

Page 1
Portable Hard Disk Unit
ポータブルハードディスクユニット
Operating Instructions
取扱説明書
Before operating this product, please read the instructions carefully and save this manual for future use.
お買い上げいただき、まことにありがとうございました。
この取扱説明書をよくお読みのうえ、正しくお使いください。
特に「安全上のご注意」は、ご使用前に必ずお読みいただき、安全にお使いください。お読みになったあ
とは、保証書と一緒に大切に保管し、必要なときにお読みください。
Model No. AJ- G
S0705K3046 -M
Printed in Japan
VQT0T80-1W
日
本
語
ENGLISH
中
文
Page 2
E-1
IMPORTANT
“Unauthorized recording of copyrighted television
programmes, video tapes and other materials may
infringe the rights of copyright holders and
contravene copyright laws.”
CAUTION:
Danger of explosion or fire if battery is
mistreated.
• Replace only with same or specified type.
• Do not disassemble or dispose of in fire.
• Do not store in temperatures over 60 °C.
• Use specified charger for rechargeable
batteries.
• Do not recharge the battery if it is not a
rechargeable type.
For memory back up battery
• Danger of explosion if battery is incorrectly
replaced.
Replace only with the same or equivalent
type.
• Refer replacement back-up battery to
qualified service personnel.
indicates safety information.
WARNING:
• TO REDUCE THE RISK OF FIRE OR SHOCK
HAZARD, DO NOT EXPOSE THIS EQUIPMENT
TO RAIN OR MOISTURE.
• TO REDUCE THE RISK OF FIRE OR SHOCK
HAZARD, KEEP THIS EQUIPMENT AWAY
FROM ALL LIQUIDS. USE AND STORE ONLY
IN LOCATIONS WHICH ARE NOT EXPOSED
TO THE RISK OF DRIPPING OR SPLASHING
LIQUIDS, AND DO NOT PLACE ANY LIQUID
CONTAINERS ON TOP OF THE EQUIPMENT.
CAUTION:
In order to maintain adequate ventilation, do not
install or place this unit in a bookcase, built-in
cabinet or any other confined space. To prevent
risk of electric shock or fire hazard due to
overheating, ensure that curtains and any other
materials do not obstruct the ventilation.
CAUTION:
TO REDUCE THE RISK OF FIRE OR SHOCK
HAZARD AND ANNOYING INTERFERENCE,
USE THE RECOMMENDED ACCESSORIES
ONLY.
For U.S.A. and Canada
Operating precaution
Operation near any appliance which generates strong
magnetic fields may give rise to noise in the video and
audio signals. If this should be the case, deal with the
situation by, for instance, moving the source of the
magnetic fields away from the unit before operation.
Page 3

For U.S.A. and Canada
FCC NOTICE (USA)
E-2
ENGLISH
Declaration of Conformity
Model Number: AJ-PCS060G
Trade Name: PANASONIC
Responsible Party: Panasonic Corporation of North America
One Panasonic Way, Secaucus, NJ 07094
Support contact: Panasonic Broadcast & Television Systems Company
1-800-524-1448
This device complies with Part 15 of FCC Rules.
Operation is subject to the following two conditions:
(1) This device may not cause harmful interference, and (2) this device must accept any interference received,
including interference that may cause undesired operation.
To assure continued compliance, follow the attached installation instructions and do not make any unauthorized
modifications.
CAUTION:
This equipment has been tested and found to comply with the limits for a Class B digital device, pursuant to Part 15 of
the FCC Rules. These limits are designed to provide reasonable protection against harmful interference in a residential
installation. This equipment generates, uses and can radiate radio frequency energy and, if not installed and used in
accordance with the instructions, may cause harmful interference to radio communications. However, there is no
guarantee that interference will not occur in a particular installation. If this equipment does cause harmful interference
to radio or television reception, which can be determined by turning the equipment off and on, the user is encouraged
to try to correct the interference by one of the following measures:
• Reorient or relocate the receiving antenna.
• Increase the separation between the equipment and receiver.
• Connect the equipment into an outlet on a circuit different from that to which the receiver is connected.
• Consult the dealer or an experienced radio/TV technician for help.
The user may find the booklet “Something About Interference” available from FCC local regional offices helpful.
FCC Warning:
To assure continued FCC emission limit compliance, the user must use only shielded interface cables when
connecting to host computer or peripheral devices. Also, any unauthorized changes or modifications to this equipment
could void the user’s authority to operate this device.
Important Safeguards
1. Read Instructions — All the safety and operating
instructions should be read before the unit is operated.
2. Retain Instructions — The safety and operating
instructions should be retained for future reference.
3. Heed Warnings — All warnings on the unit and in the
operating instructions should be adhered to.
4. Follow Instructions — All operating and maintenance
instructions should be followed.
5. Cleaning — Unplug this video unit from the wall outlet
before cleaning. Do not use liquid or aerosol cleaners.
Use a dry cloth for cleaning.
6. Attachments — Do not use attachments not
recommended by the video product manufacturer as
they may be hazardous.
7. Water and Moisture — Do not use this video unit near
water — for example near a bath tub, wash bowl,
kitchen sink, or laundry tub, in a wet basement, or near
a swimming pool, and the like.
8. Accessories — Do not place this video unit on an
unstable cart, stand, tripod, bracket, or table. The video
unit may fall, causing serious injury to a child or adult,
and serious damage to the unit. Use only with a cart,
stand, tripod, bracket, or table recommended by the
manufacturer, or sold with the video unit. Any mounting
of the unit should follow the manufacturer’s instructions
and should use a mounting accessory recommended
by the manufacturer.
An appliance and cart combination should be moved
with care. Quick stops, excessive force, and uneven
surfaces may cause the appliance and cart combination
to overturn.
9. Ventilation — Slots and openings in the cabinet are
provided for ventilation and to ensure reliable operation
of the video unit and to protect it from overheating.
These openings must not be blocked or covered.
Never place the video unit on a bed, sofa, rug, or other
similar surface, or near or over a radiator or heat
register. This video unit should not be placed in a builtin installation such as a bookcase or rack unless proper
ventilation is provided or the manufacturer's instructions
have been adhered to.
10. Power Sources — This video unit should be operated
only from the type of power source indicated on the
marking label. If you are not sure of the type of power
supply to your home, consult your appliance dealer or
local power company. For video units intended to be
operated from battery power, or other sources, refer to
the operating instructions.
Page 4
Important Safeguards (continued)
E-3
FCC Warning: Any unauthorized changes or modifications to this equipment would void the user’s
authority to operate.
11. Grounding or Polarization — This video unit may be
equipped with either a polarized 2- wire AC
(Alternating Current) line plug (a plug having one
blade wider than the other) or 3-wire grounding type
plug, a plug having a third (grounding) pin.
The 2-wire polarized plug will fit into the power outlet
only one way. This is a safety feature. If you are unable
to insert the plug fully into the outlet, try reversing the
plug. If the plug still fails to fit, contact your electrician to
replace your obsolete outlet. Do not defeat the safety
purpose of the polarized plug.
The 3-wire grounding type plug will fit into a grounding
type power outlet. This is a safety feature. If you are
unable to insert the plug into the outlet, contact your
electrician to replace your obsolete outlet. Do not defeat
the safety purpose of the grounding type plug.
12. Power-Cord Protection — Power-supply cords should
be routed so that they are not likely to be walked on or
pinched by items placed upon or against them, paying
particular attention to cords of plugs, convenience
receptacles, and the point where they exit from the
unit.
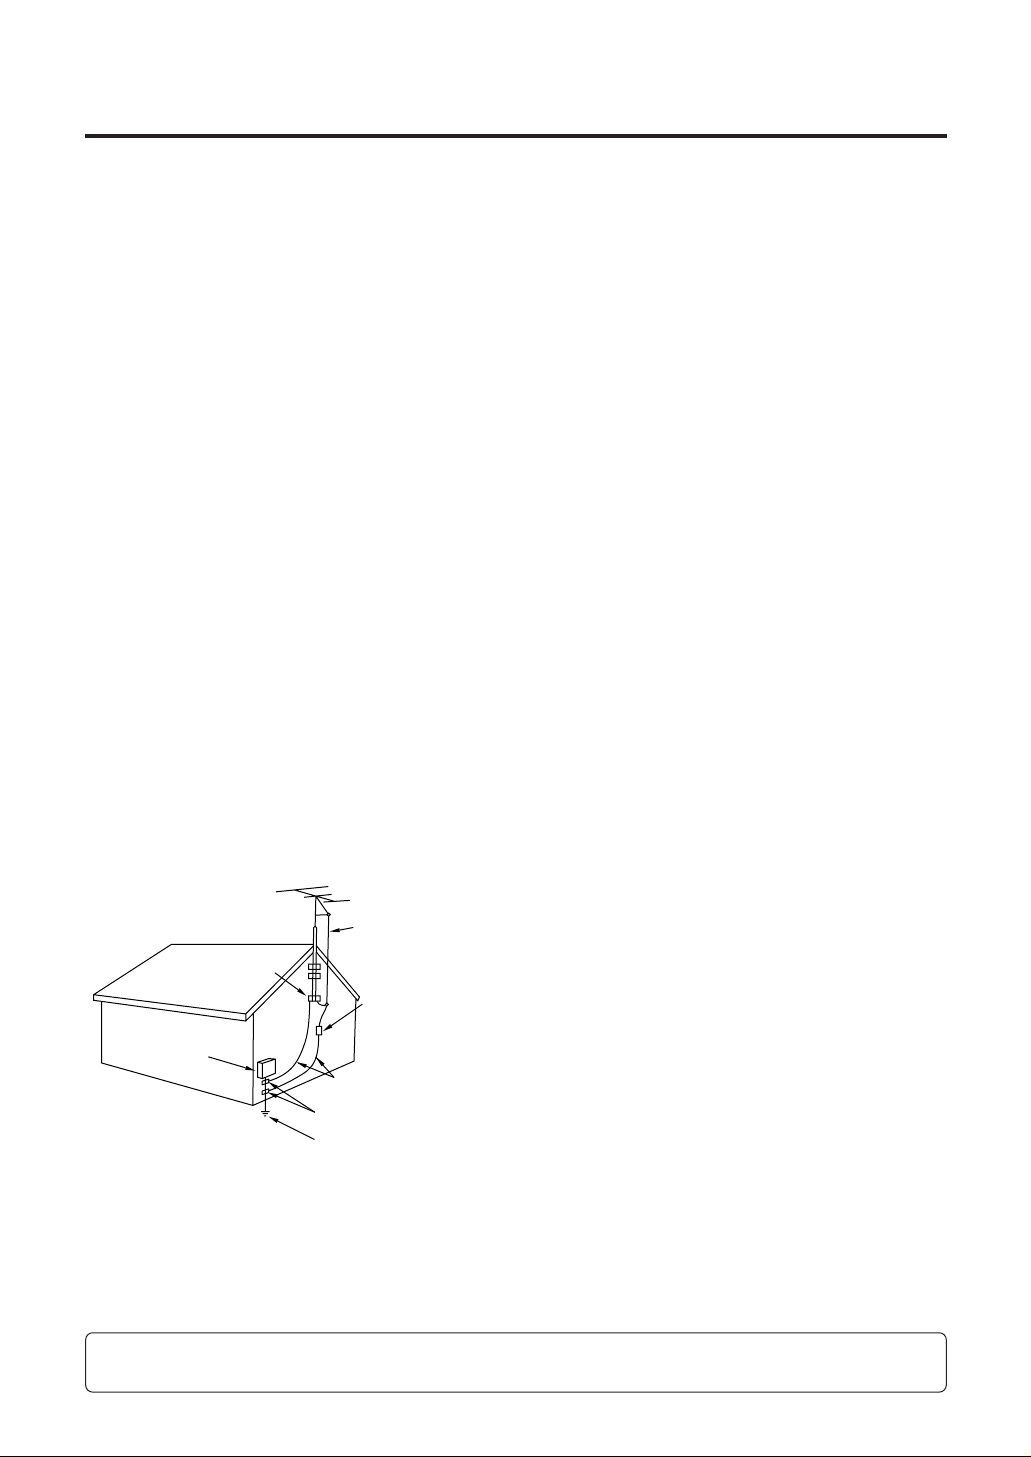
13. Outdoor Antenna Grounding — If an outside antenna
or cable system is connected to the video unit, be sure
the antenna or cable system is grounded so as to
provide some protection against voltage surges and
built-up static charges. Part 1 of the Canadian
Electrical Code, in USA Section 810 of the National
Electrical Code, provides information with respect to
proper grounding of the mast and supporting structure,
grounding of the lead-in wire to an antenna discharge
unit, size of grounding conductors, location of antenna
discharge unit, connection to grounding electrodes,
and requirements for the grounding electrode.
14. Lightning — For added protection of this video unit
receiver during a lightning storm, or when it is left
unattended and unused for long periods of time,
unplug it from the wall outlet and disconnect the
antenna or cable system. This will prevent damage to
the video unit due to lightning and power-line surges.
15. Power Lines — An outside antenna system should not
be located in the vicinity of overhead power lines or
other electric light or power circuits, or where it can fall
into such power lines or circuits. When installing an
outside antenna system, extreme care should be
taken to keep from touching such power lines or
circuits as contact with them might be fatal.
16. Overloading — Do not overload wall outlets and
extension cords as this can result in a risk of fire or
electric shock.
17. Objects and Liquids — Never push objects of any kind
into this video unit through openings as they may
touch dangerous voltage points or short out parts that
could result in a fire or electric shock. Never spill liquid
of any kind onto the video unit.
18. Servicing — Do not attempt to service this video unit
yourself as opening or removing covers may expose
you to dangerous voltage or other hazards. Refer all
servicing to qualified service personnel.
19. Damage Requiring Service — Unplug this video unit
from the wall outlet and refer servicing to qualified
service personnel under the following conditions:
a. When the power-supply cord or plug is damaged.
b. If any liquid has been spilled onto, or objects have
fallen into the video unit.
c. If the video unit has been exposed to rain or water.
d. If the video unit does not operate normally by
following the operating instructions.
Adjust only those controls that are covered by the
operating instructions, as an improper adjustment of
other controls may result in damage and will often
require extensive work by a qualified technician to
restore the video unit to its normal operation.
e. If the video unit has been dropped or the cabinet has
been damaged.
f. When the video unit exhibits a distinct change in
performance – this indicates a need for service.
20. Replacement Parts — When replacement parts are
required, be sure the service technician has used
replacement parts specified by the manufacturer or
have the same characteristics as the original part.
Unauthorized substitutions may result in fire, electric
shock or other hazards.
21. Safety Check — Upon completion of any service or
repairs to this video unit, ask the service technician to
perform safety checks to determine that the video unit
is in safe operating order.
For U.S.A. and Canada
ANTENNA LEAD IN WIRE
GROUND CLAMP
ANTENNA
DISCHARGE UNIT
ELECTRIC
SERVICE
EQUIPMENT
NEC – NATIONAL
ELECTRICAL CODE
(NEC SECTION 810-20)
GROUNDING CONDUCTORS
(NEC SECTION 810-21)
GROUND CLAMPS
POWER SERVICE GROUNDING
ELECTRODE SYSTEM
(NEC ART 250, PART H)
Page 5
E-4
ENGLISH
For Europe
Operating precaution
Operation near any appliance which generates strong
magnetic fields may give rise to noise in the video and
audio signals. If this should be the case, deal with the
situation by, for instance, moving the source of the
magnetic fields away from the unit before operation.
CAUTION:
Danger of explosion or fire if battery is mistreated.
• Replace only with same or specified type.
• Do not disassemble or dispose of in fire.
• Do not store in temperatures over 60 °C.
• Use specified charger for rechargeable batteries.
• Do not recharge the battery if it is not a
rechargeable type.
For memory back up battery
•
Danger of explosion if battery is incorrectly replaced.
Replace only with the same or equivalent type.
• Refer replacement back-up battery to qualified
service personnel.
WARNING:
• TO REDUCE THE RISK OF FIRE OR SHOCK
HAZARD, DO NOT EXPOSE THIS EQUIPMENT
TO RAIN OR MOISTURE.
• TO REDUCE THE RISK OF FIRE OR SHOCK
HAZARD, KEEP THIS EQUIPMENT AWAY
FROM ALL LIQUIDS. USE AND STORE ONLY
IN LOCATIONS WHICH ARE NOT EXPOSED
TO THE RISK OF DRIPPING OR SPLASHING
LIQUIDS, AND DO NOT PLACE ANY LIQUID
CONTAINERS ON TOP OF THE EQUIPMENT.
CAUTION:
In order to maintain adequate ventilation, do not
install or place this unit in a bookcase, built-in
cabinet or any other confined space. To prevent
risk of electric shock or fire hazard due to
overheating, ensure that curtains and any other
materials do not obstruct the ventilation.
CAUTION:
TO REDUCE THE RISK OF FIRE OR SHOCK
HAZARD AND ANNOYING INTERFERENCE,
USE THE RECOMMENDED ACCESSORIES
ONLY.
IMPORTANT
“Unauthorized recording of copyrighted television
programmes, video tapes and other materials may
infringe the rights of copyright holders and
contravene copyright laws.”
indicates safety information.
DO NOT REMOVE PANEL COVERS BY UNSCREWING THEM.
To reduce the risk of electric shock, do not remove the covers. No user serviceable parts inside.
Refer servicing to qualified service personnel.
Attention/Attentie
• Batteries are used for the main power source and memory back-up in the product.
At the end of their useful life, you should not throw them away.
Instead, hand them in as small chemical waste.
• Voor de primaire voeding en het reservegeheugen van het apparaat wordt gebruikgemaakt van een
batterij.
Wanneer de batterij is uitgeput, mag u deze niet gewoon weggooien, maar dient u deze als klein
chemisch afval weg te doen.
Page 6
E-5
For Europe
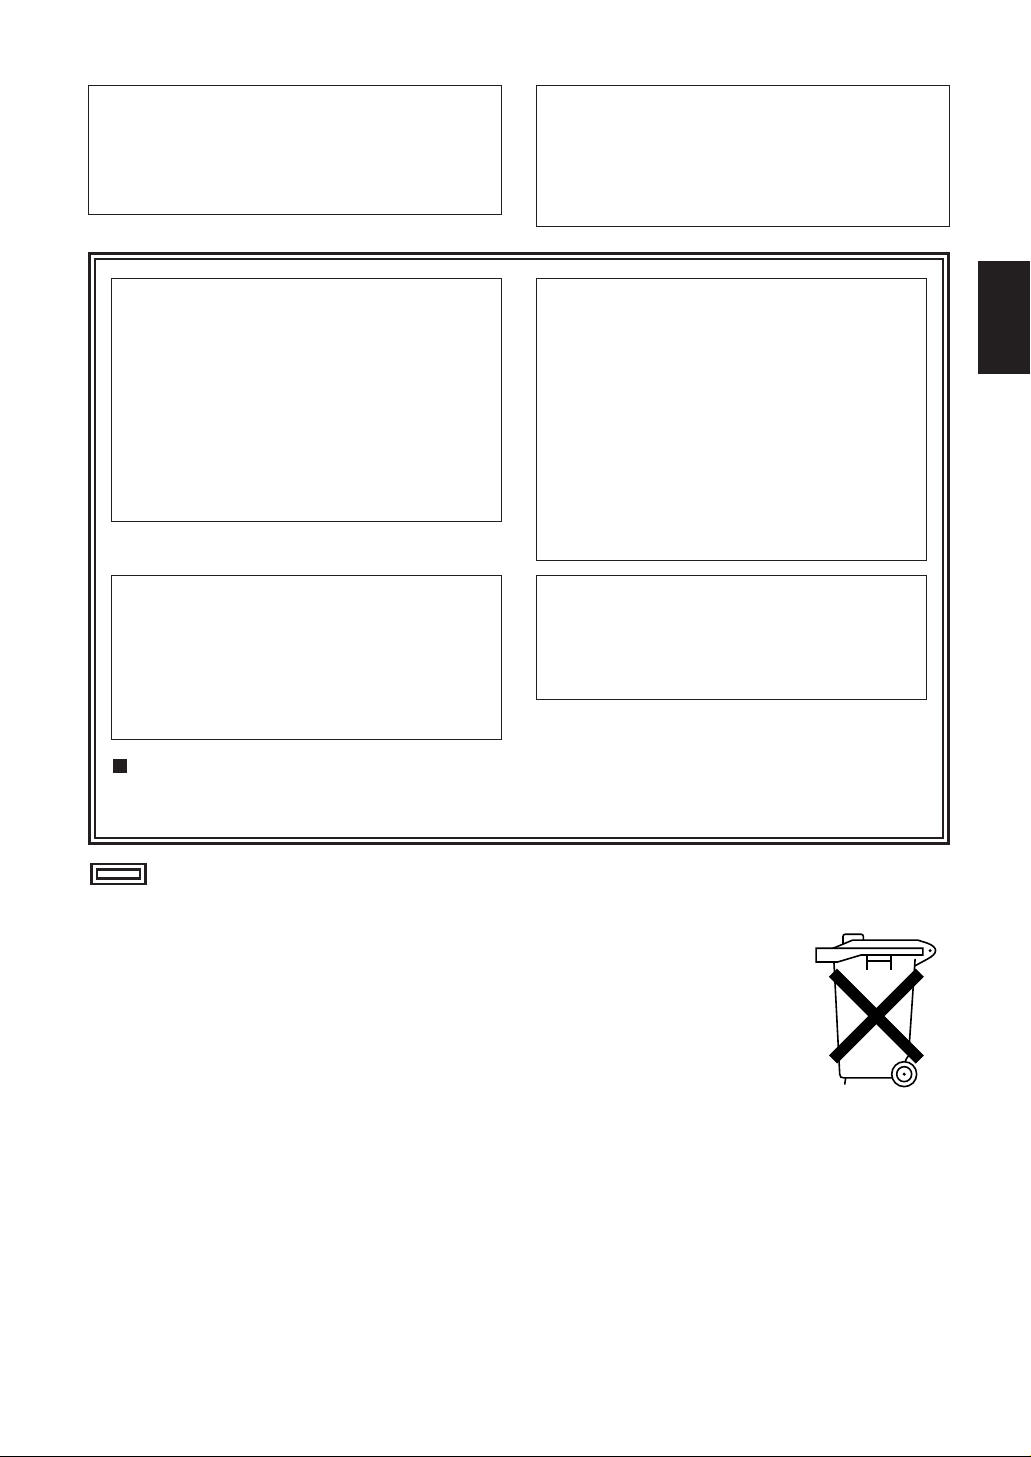
Information on Disposal for Users of Waste Electrical & Electronic Equipment (private
households)
This symbol on the products and/or accompanying documents means that used electrical and
electronic products should not be mixed with general household waste.
For proper treatment, recovery and recycling, please take these products to designated collection
points, where they will be accepted on a free of charge basis. Alternatively, in some countries
you may be able to return your products to your local retailer upon the purchase of an equivalent
new product.
Disposing of this product correctly will help to save valuable resources and prevent any potential
negative effects on human health and the environment which could otherwise arise from
inappropriate waste handling. Please contact your local authority for further details of your
nearest designated collection point.
Penalties may be applicable for incorrect disposal of this waste, in accordance with national legislation.
For business users in the European Union
If you wish to discard electrical and electronic equipment, please contact your dealer or supplier for further
information.
Information on Disposal in other Countries outside the European Union
This symbol is only valid in the European Union.
If you wish to discard this product, please contact your local authorities or dealer and ask for the correct method of
disposal.
Page 7

E-6
ENGLISH
Contents
Important Safeguards
‥‥‥‥‥‥‥‥ ‥‥
E-2
Overview
‥‥‥‥‥‥‥‥‥‥‥‥‥‥‥‥‥‥‥‥‥‥
E-7
Features
‥‥‥‥‥‥‥‥‥‥‥‥‥‥‥‥‥‥‥‥‥‥
E-7
Included accessories
‥‥‥‥‥‥‥‥ ‥‥
E-7
Options
‥‥‥‥‥‥‥‥‥‥‥‥‥‥‥‥‥‥‥‥‥‥
E-7
For better performance
‥‥‥‥‥‥‥‥ ‥‥
E-8
AJ-PCS060G ‥‥‥‥‥‥‥‥‥‥‥ E-8
Hard disk‥‥‥‥‥‥‥‥‥‥‥‥‥ E-8
Cleaning ‥‥‥‥‥‥‥‥‥‥‥‥‥ E-9
Maintenance ‥‥‥‥‥‥‥‥‥‥‥ E-9
AC adapter ‥‥‥‥‥‥‥‥‥‥‥‥ E-9
Battery pack ‥‥‥‥‥‥‥‥‥‥‥ E-9
Getting Started
Control reference guide
‥‥‥‥‥‥ ‥‥
E-10
Front ‥‥‥‥‥‥‥‥‥‥‥‥‥‥ E-10
Top‥‥‥‥‥‥‥‥‥‥‥‥‥‥‥ E-11
Right side ‥‥‥‥‥‥‥‥‥‥‥‥ E-11
Left side ‥‥‥‥‥‥‥‥‥‥‥‥ E-12
Back ‥‥‥‥‥‥‥‥‥‥‥‥‥‥ E-12
Copying
‥‥‥‥‥‥‥‥‥‥‥‥‥‥‥‥‥‥‥‥
E-13
Turning the unit ON and OFF ‥‥‥ E-13
Inserting P2 cards ‥‥‥‥‥‥‥‥ E-13
Ejecting P2 cards ‥‥‥‥‥‥‥‥ E-13
Write-protection on P2 cards‥‥‥‥ E-14
HDD capacity indicator ‥‥‥‥‥‥ E-14
Battery level indicator ‥‥‥‥‥‥‥ E-15
Copying from P2 cards to the HDD
‥‥ E-15
Canceling copy operations ‥‥‥‥ E-17
Formatting
‥‥‥‥‥‥‥‥‥‥‥‥‥‥‥‥‥‥
E-17
Formatting P2 cards ‥‥‥‥‥‥‥ E-17
Formatting the HDD ‥‥‥‥‥‥‥ E-18
Auto power OFF during use
‥‥ ‥‥
E-18
Using the AJ-PCS060G
Connecting to a computer
‥‥‥‥ ‥‥
E-19
P2 Store Manager
‥‥‥‥‥‥‥‥‥‥‥‥
E-20
Features ‥‥‥‥‥‥‥‥‥‥‥‥ E-20
System requirements ‥‥‥‥‥‥‥ E-20
Installation/uninstallation ‥‥‥‥‥ E-20
Starting and closing P2 Store Manager
‥‥
E-20
P2 Store Manager screens
‥‥‥‥ ‥‥
E-21
HDD page‥‥‥‥‥‥‥‥‥‥‥‥ E-21
S.M.A.R.T page ‥‥‥‥‥‥‥‥‥ E-22
Setup page ‥‥‥‥‥‥‥‥‥‥‥ E-23
Upgrade page ‥‥‥‥‥‥‥‥‥‥ E-24
Updating procedure ‥‥‥‥‥‥‥ E-25
Connecting to a Computer
ERROR LED display
‥‥‥‥‥‥‥‥ ‥‥
E-26
Troubleshooting
‥‥‥‥‥‥‥‥‥‥‥‥‥‥
E-28
Specifications
‥‥‥‥‥‥‥‥‥‥‥‥‥‥‥‥
E-29
Troubleshooting and Reference
• Microsoft and the Microsoft logo, Windows are registered trademarks or trademarks of Microsoft
Corporation in the United States and other countries.
• Intel and Pentium are registered trademarks or trademarks of Intel Corporation in the United States and
other countries.
• Other product names or corporate names in this manual are either trademarks or registered trademarks
of their respective owners. In this manual, the trademark symbol ™ and registered symbol
®
are
omitted.
Page 8

E-7
Overview
※1: Shock Resistance
• If a disk operation (such as copying) is in progress when the sensor detects that the unit
is hit or dropped, the hard drive head is automatically parked to protect the disk and
data.
• The hard disk is also protected by impact-absorbing materials. However, no guarantee
against damage or data loss is implied.
The AJ-PCS060G is a dedicated portable hard disk unit for AJ-P2C series P2 memory cards. It
features a USB 2.0 (Type B) interface for data transfer with a computer.
Data from P2 camera-recorders can easily be copied to the 60 GB internal hard disk.
Options
• Battery pack CGR-D16 (1,600 mAh)
CGA-D54 (5,400 mAh)
• AC adapter AG-B15
Features
• P2 card slot
• Internal 2.5" 60 GB hard disk
• Improved shock resistance from an acceleration sensor and protective materials around the
hard disk
※1
• High-speed copying of P2 card data directly to the hard disk
• Fast data transfer to a computer via the USB 2.0 cable
Included accessories
• Install Manual..............................................................................................................................1
• Ferrite core..................................................................................................................................1
• CD-ROM
[Includes P2 Driver, P2 Card Manager,
Install Manual and Operating Instructions (this manual)]......................................................1
Page 9
E-8
ENGLISH
For better performance
The unit’s internal hard disk is protected by materials to withstand impact or drops better.
However, please understand that no guarantee against damage or data loss is implied.
AJ-PCS060G
The unit houses a hard disk drive (“HDD”).
Take the following precautions during setup and use to protect the HDD and data stored on it
from data loss or interrupted operation.
The HDD is a high-precision device. Operating conditions may pose a risk of partial damage,
and in a worst-case scenario, there is a serious risk that data cannot be read or recorded.
Thus, please do not consider the internal HDD a permanent storage place for data. Use it as a
temporary storage device until you can back up data on other storage media.
• Do not subject the unit to vibration or impact during use. (Otherwise, the HDD may be
damaged.)
• Do not use the unit where vibration occurs or put it on unstable surfaces.
• Do not use it in enclosed areas without air circulation, where operating heat cannot be
dissipated.
• Do not subject it to extreme changes in temperature.
→
Using the unit where the temperature changes suddenly poses a risk of condensation. Using
the unit with internal condensation may damage the HDD. Ensure a fairly constant room
temperature, where any temperature changes occur at less than 20 °C (68 °F) per hour.
• Do not use the unit in extremely humid places.
• Do not remove the battery pack or unplug the AC adapter when the power is on.
• Before transferring the unit elsewhere, always turn the unit OFF by holding the [POWER] button
for at least 2 seconds and waiting for it to finish shutting down.
Wait until it has stopped moving completely (about 2 minutes), and protect it from vibration and
impact in transit. (After turned OFF, the HDD will continue spinning from inertia for a while.)
• Do not use the unit at altitudes lower than –90 m (–300 feet or lower), or higher than 3,000 m
(10,000 feet or higher) above sea level.
As optional accessories, use a recommended battery pack and AC adapter.
Hard disk
Recorded data
If the HDD is damaged, data recorded on it will be lost. Always keep an extra copy of important
data on separate storage media. See page E-19 for instructions on backing up data.
Erasure of HDD data before disposal or transference of the unit
When you dispose of the unit or transfer it, we urge you to take responsibility for erasing any
important data on the HDD. This will avoid any problems from leaked information.
Dispose of the HDD after bringing it near a strong magnetic field and breaking it with a
hammer or other means to make it unreadable.
Note that Panasonic cannot be liable for data lost from HDD failure or other problems, or
for other direct or indirect loss.
Page 10
E-9
For better performance (continued)
Never clean the unit with solvents such as benzene, thinner, or alcohol
• Before cleaning, remove the battery pack or unplug the AC adapter.
• Cleaning the unit with solvents may damage the outer case or cause the paint to peel.
• Use a clean, soft dry cloth to wipe away dust or dirt. If the unit becomes quite dirty, wipe it with
a cloth dampened in diluted neutral detergent after wringing the cloth well. Use a dry cloth to
wipe it dry.
• If you use a chemically treated dust cloth, follow the precautions for use.
Use the optional AC adapter (AG-B15).
Read the user’s manuals of all accessories carefully
before use.
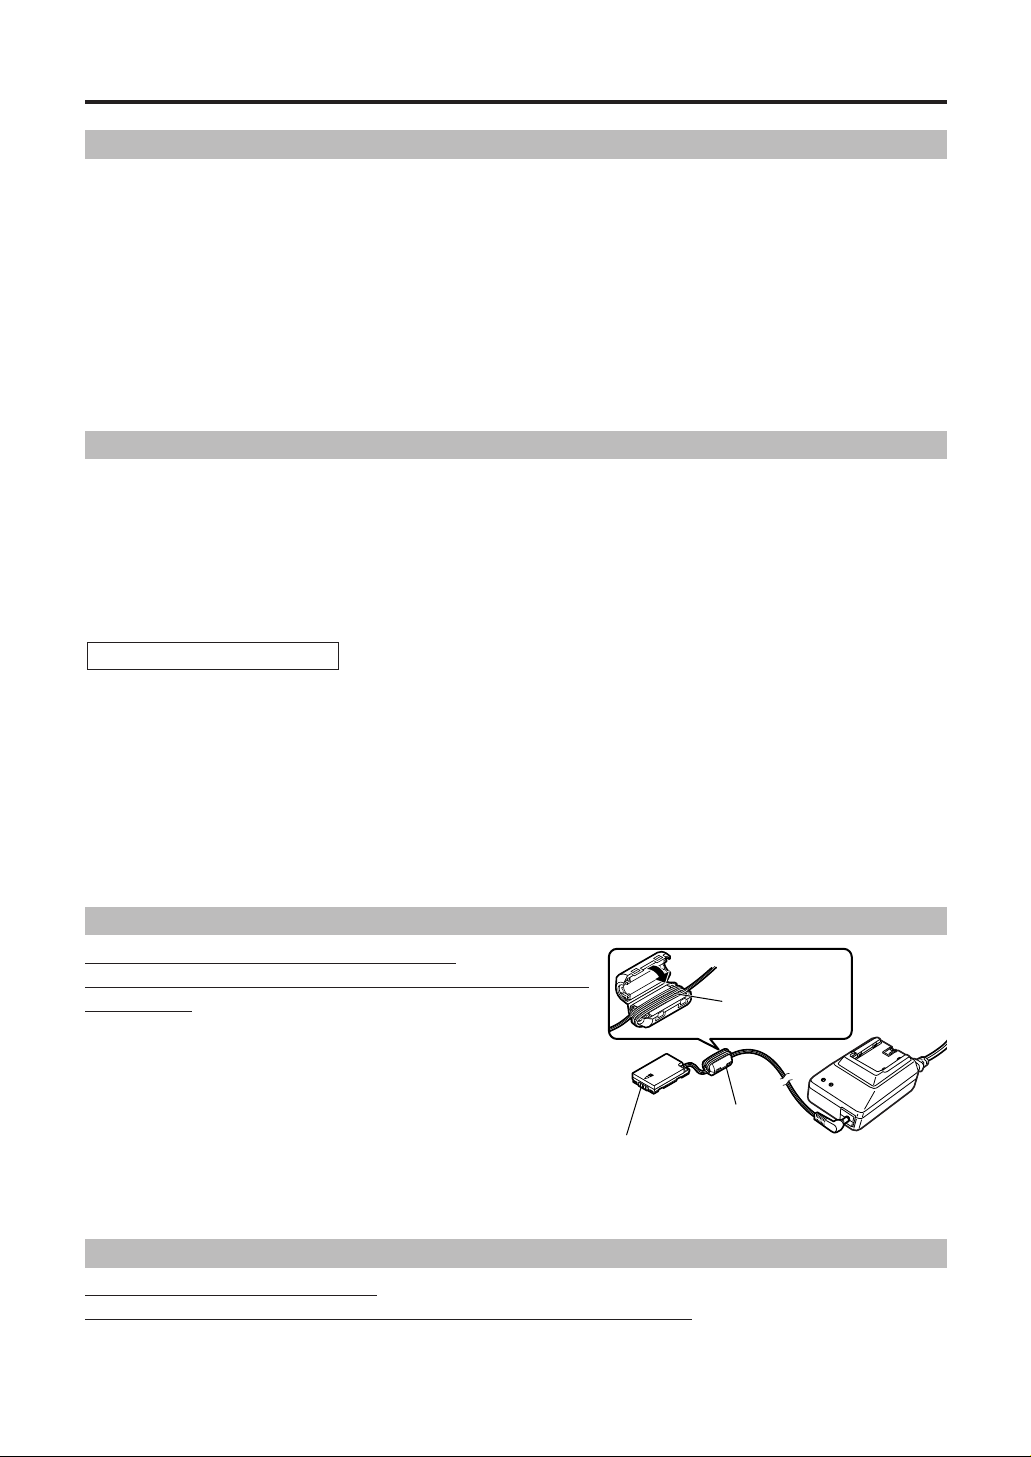
Note:
When using an AC adapter, attach the included ferrite core
near the base of the battery-type connector on the DC cable
connected to the unit. Be sure to wind the cable around the
ferrite core twice, as shown, at time of attachment.
If you do not use the ferrite core, other devices may be
affected by the unit.
AC adapter
Cleaning
The unit’s internal hard disk drive (HDD) is a high-performance part that is subject to
maintenance.
To keep the unit in optimal condition, we recommend that you inspect it regularly and bring it to
the place of purchase for periodic maintenance.
Ask your dealer for further details about periodic maintenance.
Request periodic maintenance under this guideline. See page E-22 for instructions on checking
the operating time.
Tips:
• In some cases, the content of the HDD is cleared during maintenance, so any data will be lost.
Before maintenance, always back up needed data on separate storage media.
Please understand that you will not be compensated for lost data.
• You will not be compensated for data stored on the HDD in the case of HDD failure. Lost data cannot be
recovered.
The HDD is for temporary storage of data, and we recommend backing up needed data promptly.
Every 2,000 hours of use
Maintenance
Use the optional Battery pack.
Read the user's manuals of all accessories carefully before use.
Battery pack
Battery-type connector
on the DC cable
Ferrite core
Wind twice
around and
close it
Page 11
E-10
ENGLISH
Control reference guide
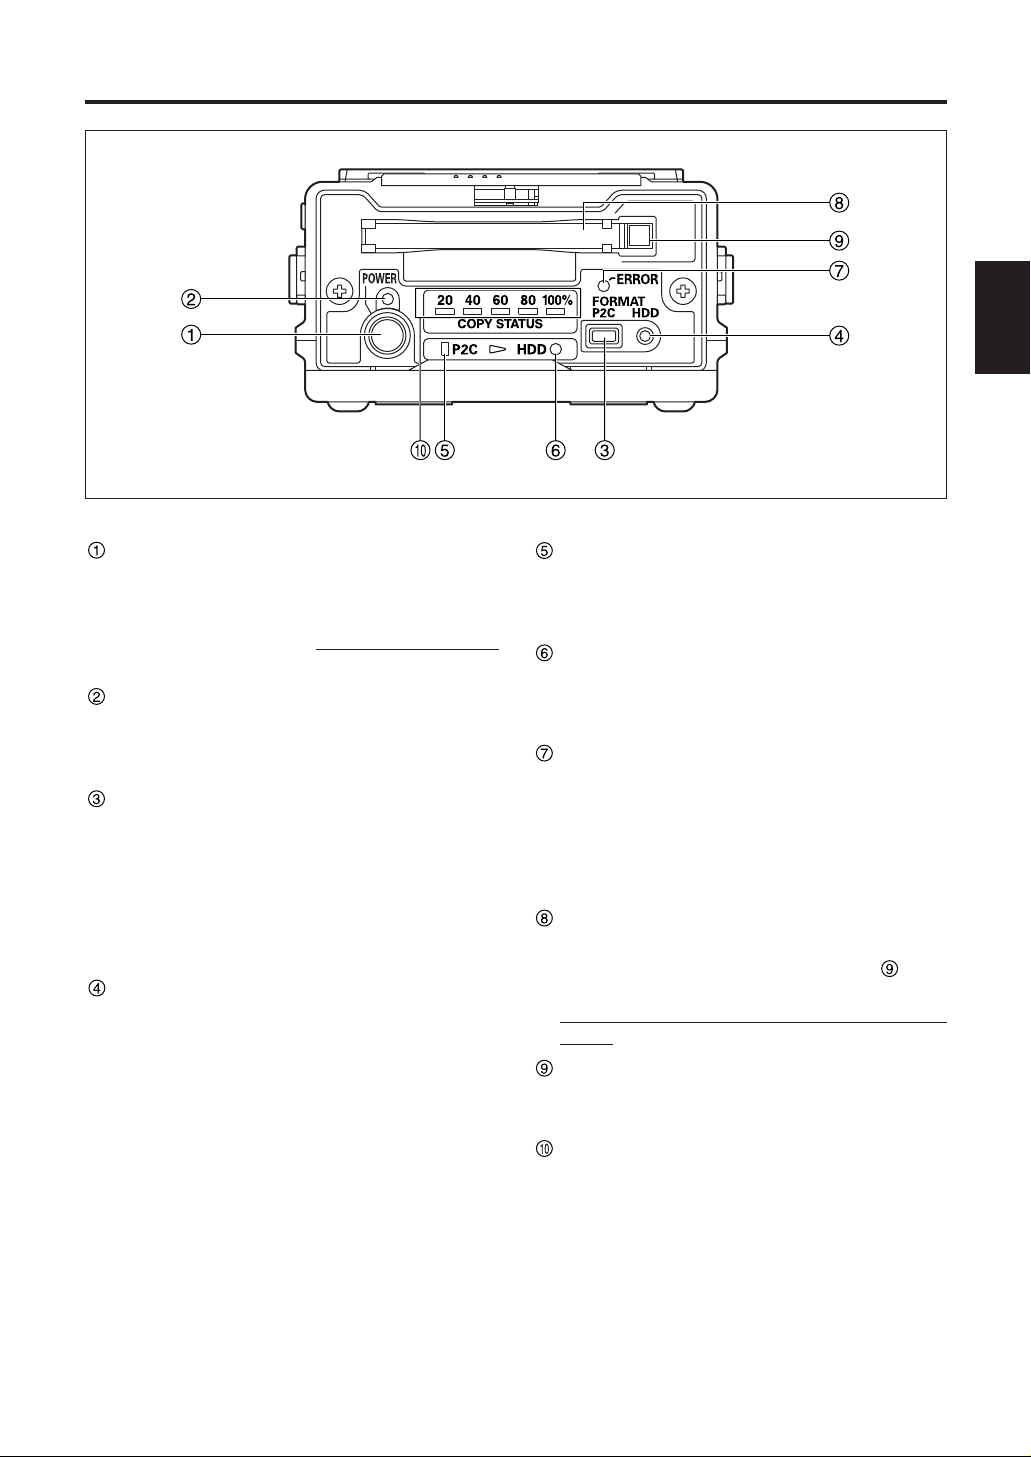
Front
POWER button
Use this button to turn the unit ON and OFF.
When the unit is OFF, simply press the
[POWER] button to turn it ON. When ON, hold
the [POWER] button for at least two seconds
to turn it OFF.
POWER LED
Lights when the unit is ON.
The POWER LED flashes during startup or
shutdown.
P2C button
Press to format P2 cards. After copying data to
the HDD, you can format the P2 card as
needed. (See page E-17)
Note:
Data cannot be recovered after formatting.
Before formatting cards, make sure all the
data may safely be deleted.
HDD button
Press to format the internal HDD. All unneeded
data on the HDD can be deleted at once.
(See page E-18)
Note:
Data cannot be recovered after formatting.
Before formatting the HDD, make sure all the
data may safely be deleted.
P2C LED
Lights or flashes when the unit is accessing a
P2 card.
(See pages E-16 and E-17)
HDD LED
Lights or flashes when the unit is accessing the
internal HDD.
(See pages E-16 and E-18)
ERROR LED
Lights or flashes if errors occur.
Errors are identified by the combination of
[COPY STATUS] LEDs on the front and [E1 to
E4], [P2C], and [HDD] LEDs on the top.
(See pages E-15 and E-26 to E-28)
P2 card slot
A dedicated slot for P2 cards. Before inserting a
P2 card, make sure the EJECT button is in.
Hold the card level as you insert it.
Never insert anything in the slot except P2
cards.
EJECT button
Press to eject P2 cards from the slot.
(See page E-13)
COPY STATUS LEDs
Indicates the progress of copying or formatting.
(See pages E-16 to E-18 and E-28)
Page 12
E-11
Control reference guide (continued)
Top
Right side
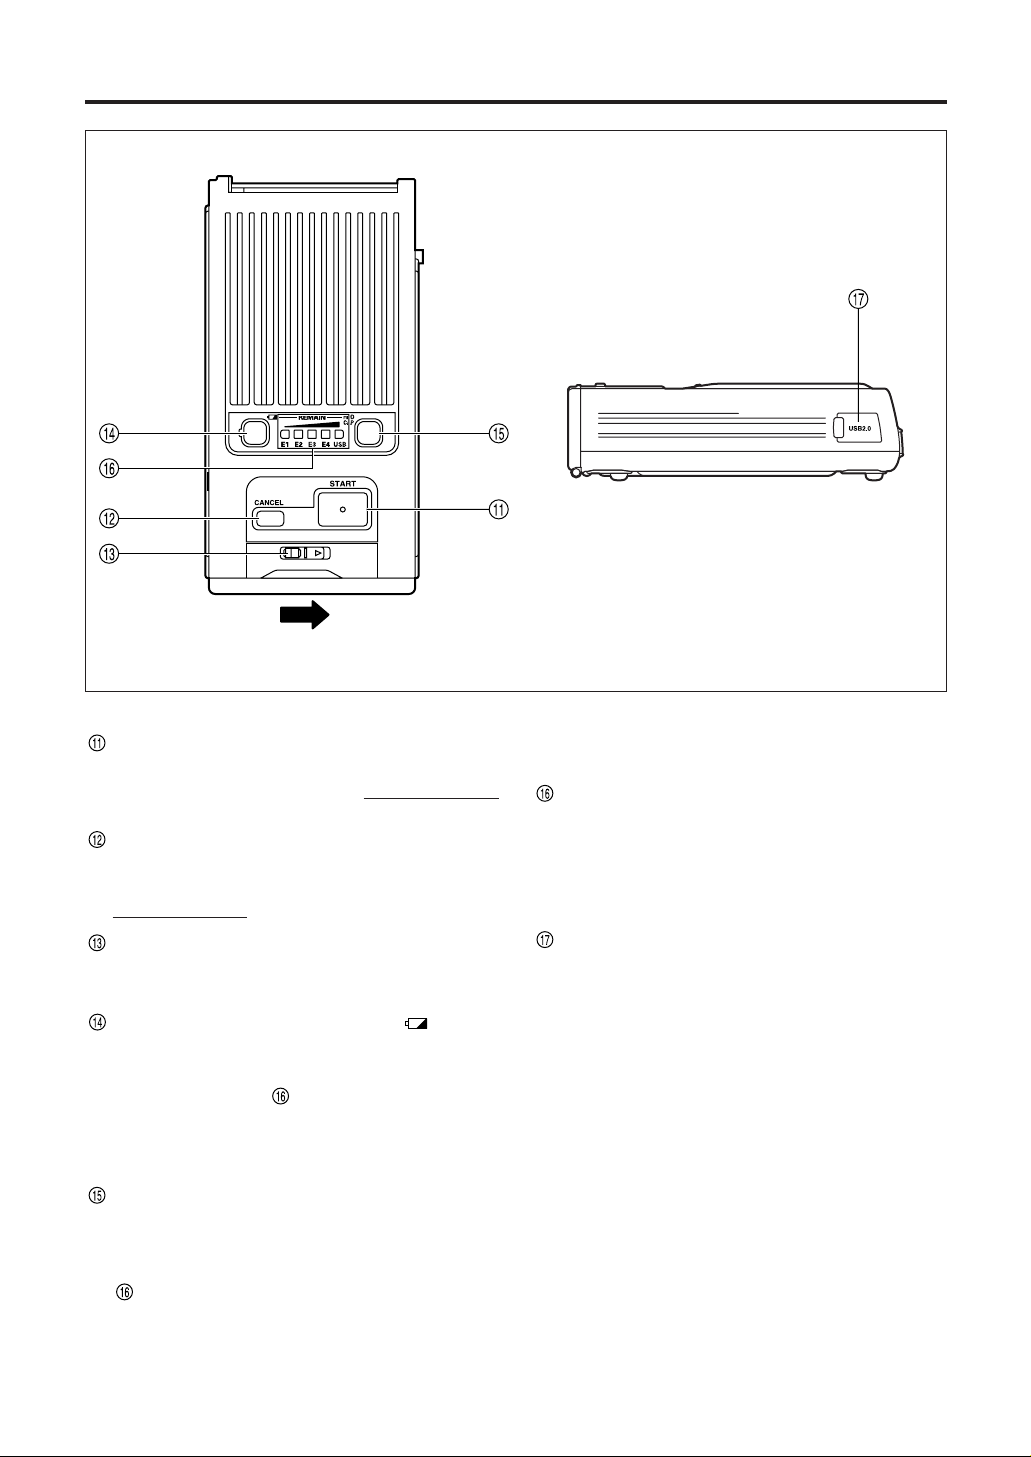
START button
Press to start copying or formatting.
Hold the [START] button for at least 2 seconds
to start either process.
CANCEL button
Press to cancel copying.
During copying, hold the [CANCEL] button for at
least 2 seconds
to cancel copying.
Sliding knob
To open the front panel cover, slide the knob in
the direction of the arrow.
Battery level indicator button
After this button is pressed, the remaining power
level of the battery pack will be displayed for
about 2 seconds in , the [REMAIN] indicator.
(See page E-15)
The [USB] indicator remains lit (green) as long
as a USB 2.0 cable is connected.
[]
HDD capacity indicator button [HDD
CAP]
After this button is pressed, the available HDD
capacity will be displayed for about 2 seconds in
, the [REMAIN] indicator.
The number in [REMAIN] represents how many
cards can be copied to the HDD.
(See page E-14)
The [USB] indicator remains lit (green) as long
as a USB 2.0 cable is connected.
Battery/HDD indicator and error LEDs
[REMAIN]
Indicates the remaining battery level, available
HDD capacity, and, if errors occur, error
identification.
(See pages E-14, E-15, E-26 to E-28)
USB 2.0 connector (Type B)
When connecting the unit to a computer, plug
the USB 2.0 cable into this connector.
Note:
Computers used with the unit must support
USB 2.0.
Page 13

E-12
ENGLISH
Control reference guide (continued)
Left side
Back
Sliding switch cover
Sliding switch
Slide toward the front to enable software
updates.
Normally, keep the switch toward the back.
(See page E-25)
Power inlet
Insert an optional battery pack or AC adapter
here.
DC IN socket (7.9 V)
Battery lock release button
When removing optional battery packs or AC
adapters, hold down the button as you slide it
toward the button side.
VERIFY switch
Use this switch to verify data after it has been
copied from P2 cards onto the internal HDD.
(See page E-16)
ON : Verify
OFF: Do not verify
Note:
To ensure accurate copying, slide the
VERIFY switch to ON. If it is set to OFF, the
unit may not be able to copy correctly in some
cases. However, note that copying will take
twice as long with verification (when ON) than
without (when OFF).
Rear panel
side
Front panel
side
Page 14
E-13
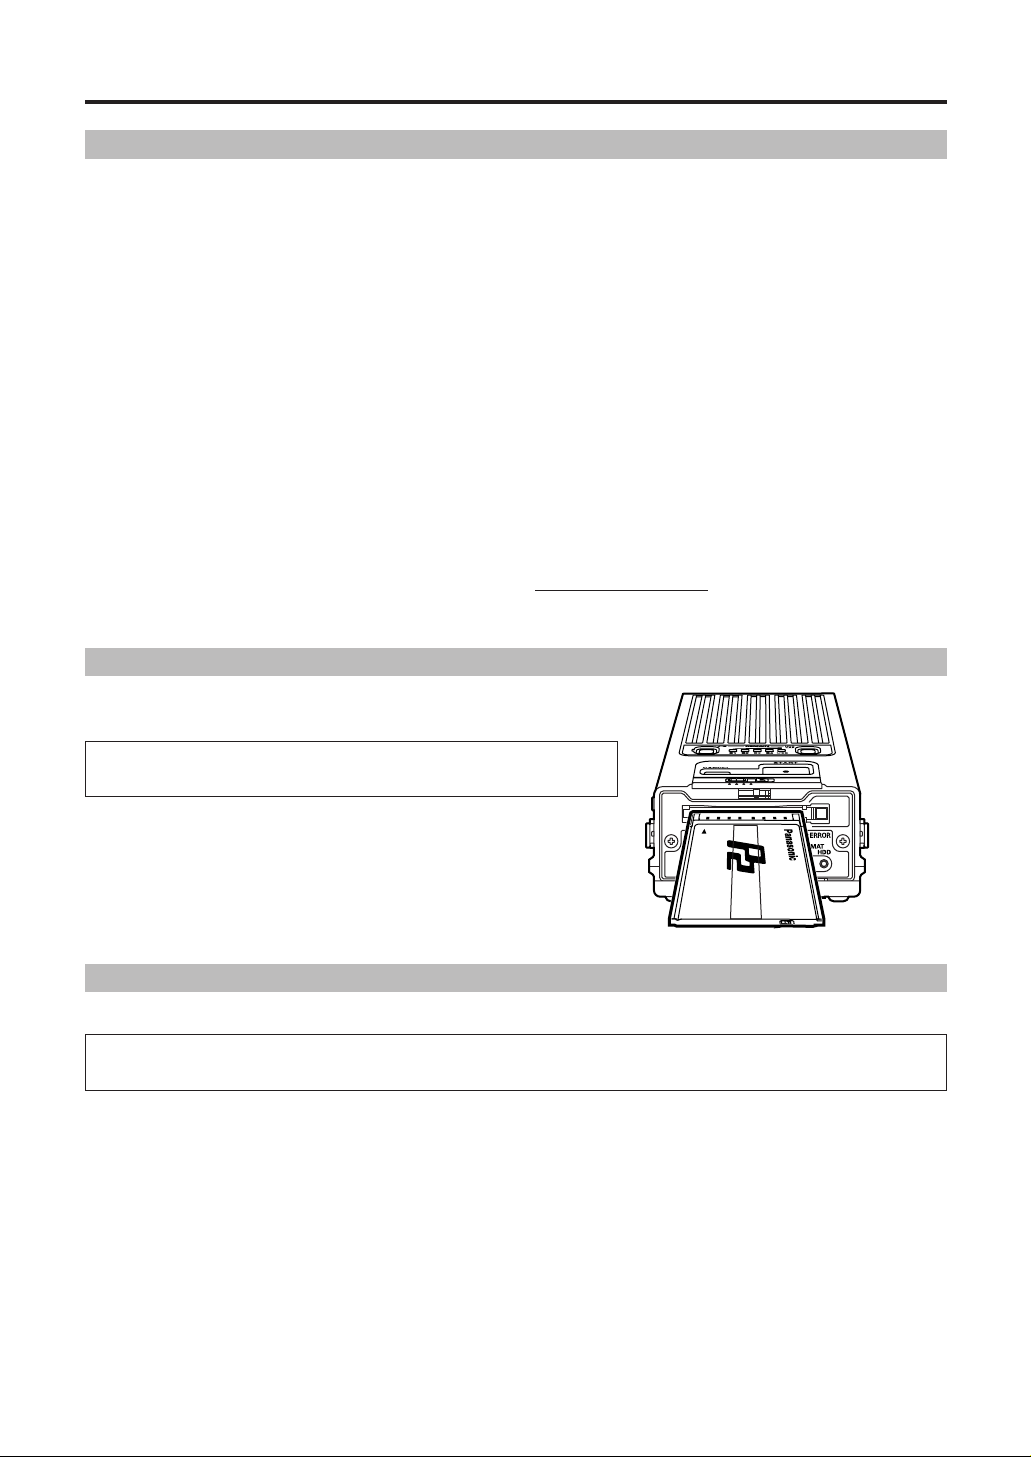
Copying
When inserting a P2 card in the card slot, always hold the
card level and insert it carefully.
Forcing cards in the slot at an angle may damage them
or the unit.
Do not eject P2 cards during access by the unit (when the [P2C] LED is lit). This may cause
data corruption.
Use an optional battery pack or AC adapter as the power source. (See page E-7)
In either case, make sure the power source is firmly connected to the unit.
For connection instructions, refer to the user's manual of the accessory. Turn the unit ON before
all operations. When finished (and when the unit is not in use), turn the unit OFF.
Power ON
To turn the unit ON, press the [POWER] button. The POWER LED flashes during startup. When
the unit is ready for use, it remains lit (green).
Note:
•
When a low voltage error occurs (when [ERROR] LED lights in red and [E2] in [REMAIN] flashes in red),
either replace the battery pack with a recharged one or switch to the AC adapter and restart the unit.
• When the temperature of the built-in HDD falls below the specified temperature (when [ERROR] LED
lights in red, and [E1] lights and [E2] flashes in red in [REMAIN]), the unit warms up to the specified
temperature. During warm-up, the [START] button and other controls are temporarily disabled.
•
More power is consumed during warm-up. In some cases a low-voltage error may occur afterwards,
depending on the remaining level of the battery pack. If this occurs, turn the power OFF and then ON again.
Power OFF
To turn the unit OFF, hold the [POWER] button for at least 2 seconds.
The POWER LED goes out. Note that during shutdown, this LED flashes.
Turning the unit ON and OFF
To eject a card, press the EJECT button once, and after the button comes out, press it again.
Note:
If the unit is connected to a computer, wait until shutdown processing for the card is complete before
pressing the EJECT button.
1. Go to [Start]
→ [My Computer]
2. Right-click on the P2 card drive (displayed as a removable disk) and select “Eject”
3. Press the EJECT button and remove the P2 card
Ejecting P2 cards
Inserting P2 cards
Page 15
E-14
ENGLISH
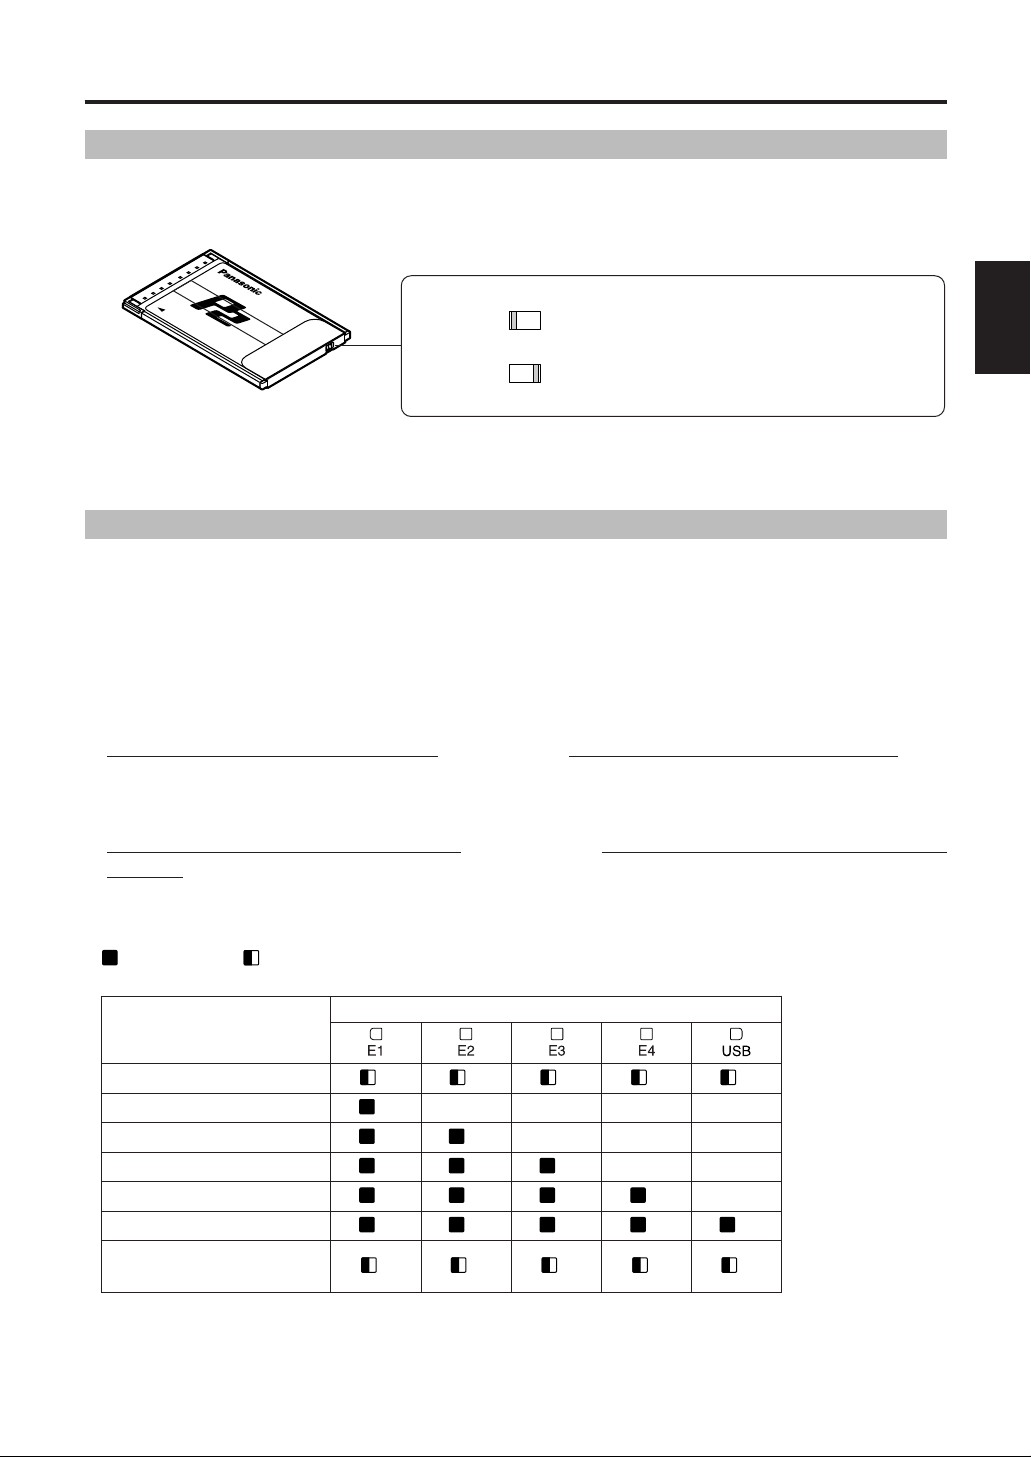
Capacity
(No. of cards that
can be copied)
Write-protect switch settings
:
Data cannot be written to or deleted from
the card.
:
Data may be written to or deleted from
the card.
PROTECT
PROTECT
Copying (continued)
Up to 15 P2 cards worth of data can be copied to the unit's internal HDD. (However, in the case
of 8 GB P2 cards, the data on only 7 P2 cards can be copied.) To see how much space is
available on the HDD (how many cards can be copied), press the [HDD CAP] button and check
the [REMAIN] indicator.
See【HDD Capacity (in Number of Cards)
】.
With the unit ON, check how many P2 cards can be copied
• When using 2 GB or 4 GB P2 cards:
Press the [HDD CAP] button once.
In [REMAIN], [E1] lights in orange for a second. After
this, the display corresponds to information given in【HDD Capacity (in Number of Cards)】,
below.
• When using 8 GB P2 cards:
Press the [HDD CAP] button twice. In [REMAIN], [E1] and [E2] light in orange for a
second. After this, the display corresponds to information given in【HDD Capacity (in Number
of Cards)】, below.
【HDD Capacity (in Number of Cards)】
The [REMAIN] indicator goes out after about 2 seconds.
When P2 cards are inserted, the following operations will be prevented to protect the data, even if
you adjust the write-protect switch. Thus, check the write-protect switch before inserting P2
cards.
Write-protection on P2 cards
HDD capacity indicator
REMAIN
R
G
G
G
G
G
0
2
1
3
4
5 or more
Full useable
(when the cards are not in use)
R
G
G
G
G
R
G
G
G
R
G
G
R
G G G G G
G
: LED lit : LED flashing
R : red G : green
Page 16
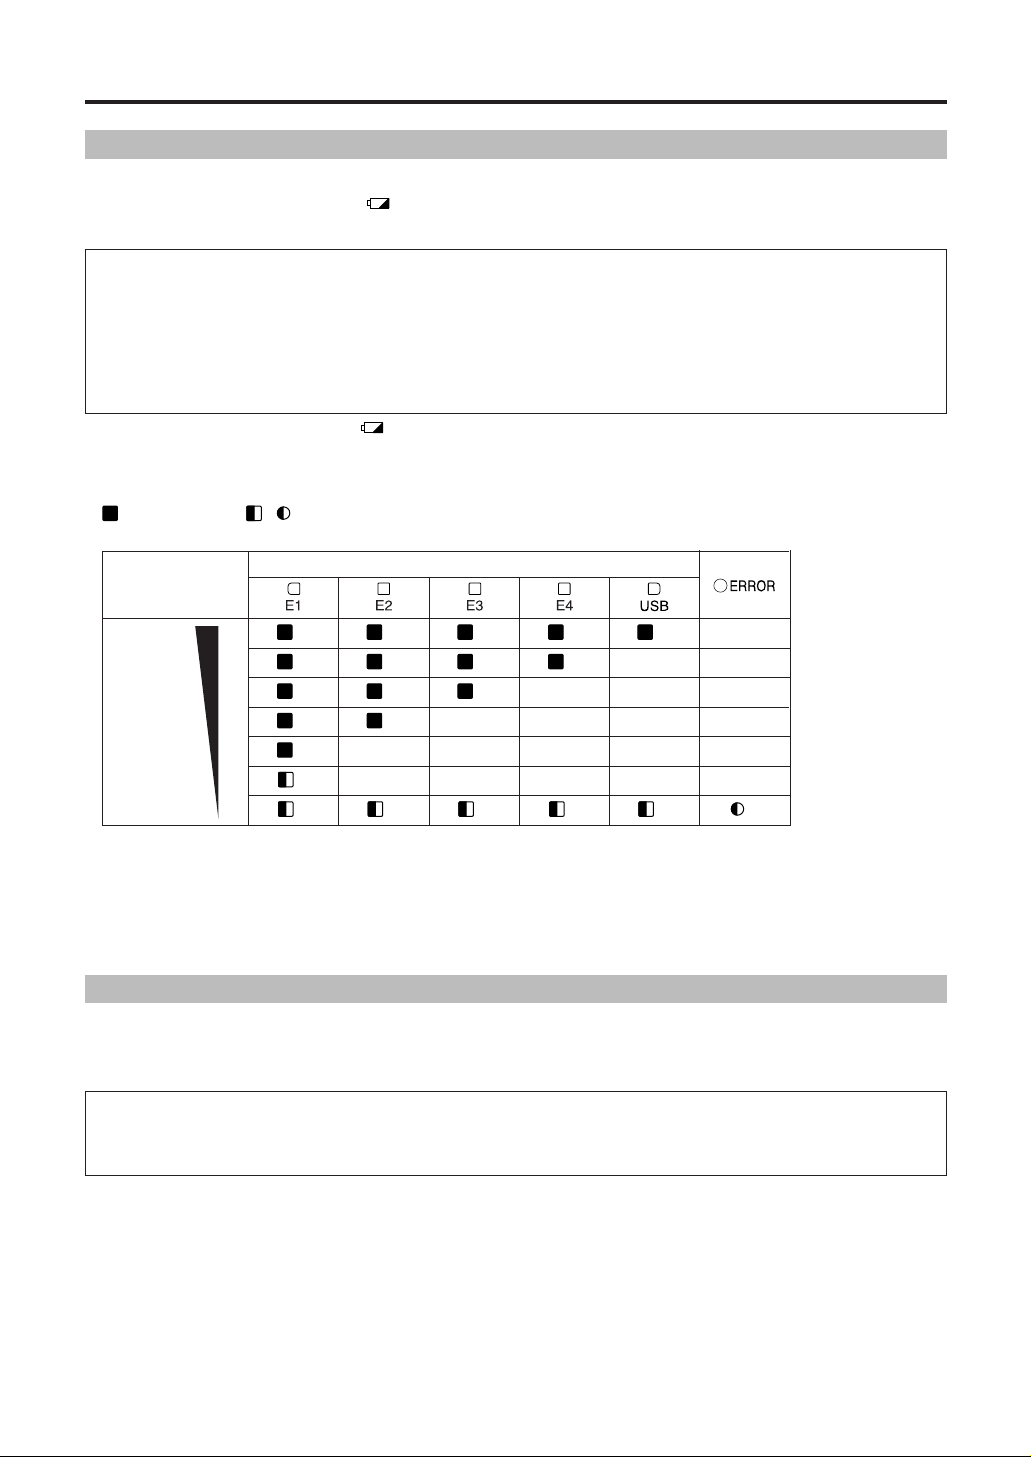
E-15
Copying (continued)
When using an optional battery pack, you can check the remaining level. You can see how much
power is left by pressing the [ ] button and checking the [REMAIN] indicator. See【Battery
level】, below.
Copy operations are not allowed when a low-voltage error occurs (when the [ERROR] LED
lights in red and [E2] in [REMAIN] flashes in red). Use the battery pack only if [E1] in [REMAIN]
is lit in green.
Once the level reaches 0 (zero), an error is displayed as described in【Battery level】and the
unit goes OFF immediately. Switch to another optional battery pack that is fully charged or use
an optional AC adapter.
With the unit ON, press the []button
The display will correspond to【Battery level】, below.
【Battery level】
The [REMAIN] indicator goes out after about 2 seconds.
Note:
With an AC adapter, in some cases the LED display may not indicate 100. This is not a problem.
High-speed copying from P2 cards to the HDD is possible because data is transferred directly to
the HDD.
Do not turn the unit OFF or eject P2 cards when the [P2C] or [HDD] LEDs are lit.
Battery level indicator
Copying from P2 cards to the HDD
1. With the unit ON, insert a P2 card in the slot
2. Press the [HDD CAP] button and make sure there is enough space to copy at least one
card
If the capacity (in number of cards) is 0, copy needed data to other storage media and format
the HDD. (See page E-14 and E-18)
: LED lit , : LED flashing
R : red G : green
When using an optional battery pack, check the remaining level before copying data.
If [E1] in [REMAIN] flashes in red, switch to a fully charged optional battery or use an optional
AC adapter.
REMAIN
Battery pack
level
G
G
G
G
R
R
100
0
G
G
G
G
R
G
G
G
R
G
G
R
G
R
G
R
Page 17
E-16
ENGLISH
Copying (continued)
:
LED lit
,, :
LED flashing
G:
green
OR :
orange
4. Make sure all the [COPY STATUS] LEDs are lit in green
5. Press the [POWER] button
Copying is complete and the [COPY STATUS] LEDs go out.
Note:
• Once the data on a P2 card has been copied to the HDD, it cannot be copied to the HDD again. If this is
the case, one of the following operations will be performed depending on the [VERIFY] switch setting.
[VERIFY] switch is OFF: Even when step 3 is taken, 100% is immediately displayed as the copying
progress status.
[VERIFY] switch is ON: When step 3 has been taken, the data is not copied, 40-59% is displayed as
the copying progress status, and the verification is conducted.
• Even after data on a P2 card has been edited, added or deleted by a computer or other device, it may be
recognized as the same data. If this is the case, one of the following operations will be performed
depending on the [VERIFY] switch setting.
[VERIFY] switch is OFF: Even when step 3 is taken, 100% is immediately displayed as the copying
progress status.
[VERIFY] switch is ON: When step 3 has been taken, the data is not copied, 40-59% is displayed as
the copying progress status, the verification is conducted, the data is
recognized as different, and operation ends with the Verify NG error
※
2
. (See
page E-27)
• If the unit heats up during copying, it will automatically copy at a slower rate. The [P2C] and [HDD] LEDs
also flash slowly at this time.
•
If copying is not completed normally (if the unit is turned OFF or the P2 card is pulled out during copying), the HDD
capacity (number of cards that can be copied) is decreased by as many P2 cards that could not be copied.
• All [COPY STATUS] LEDs flash in green if a blank P2 card is inserted and step 3 above is finished.
• In the case of P2 cards that include a Bad clip
※
3
, be sure to first restore any lost data using a P2 camerarecorder or other device before copying using this unit. When a defective clip is copied without correcting
its defects, it may not be possible to repair the copied defective clip.
※1: This function conducts the verify whether the data on P2 cards and the data recorded on the internal
HDD are the same.
※2: When the Verify NG error has occurred, “ERROR” appears in the status column of the HDD partition
information section (see page E-21). If this is the case, the data on the P2 card concerned can be
copied again, but the partition with the “ERROR” status will remain unchanged.
※3: Improperly recorded clip due to accidental removal of the P2 card or sudden power loss during
recording.
Clips with a yellow marker displayed on the thumbnail screen when using a P2 camera-recorder or
similar device.
X
3. Hold the [START] button for at least 2 seconds
Copying begins, and the verification
※
1
is conducted (when the [VERIFY] switch is set to ON).
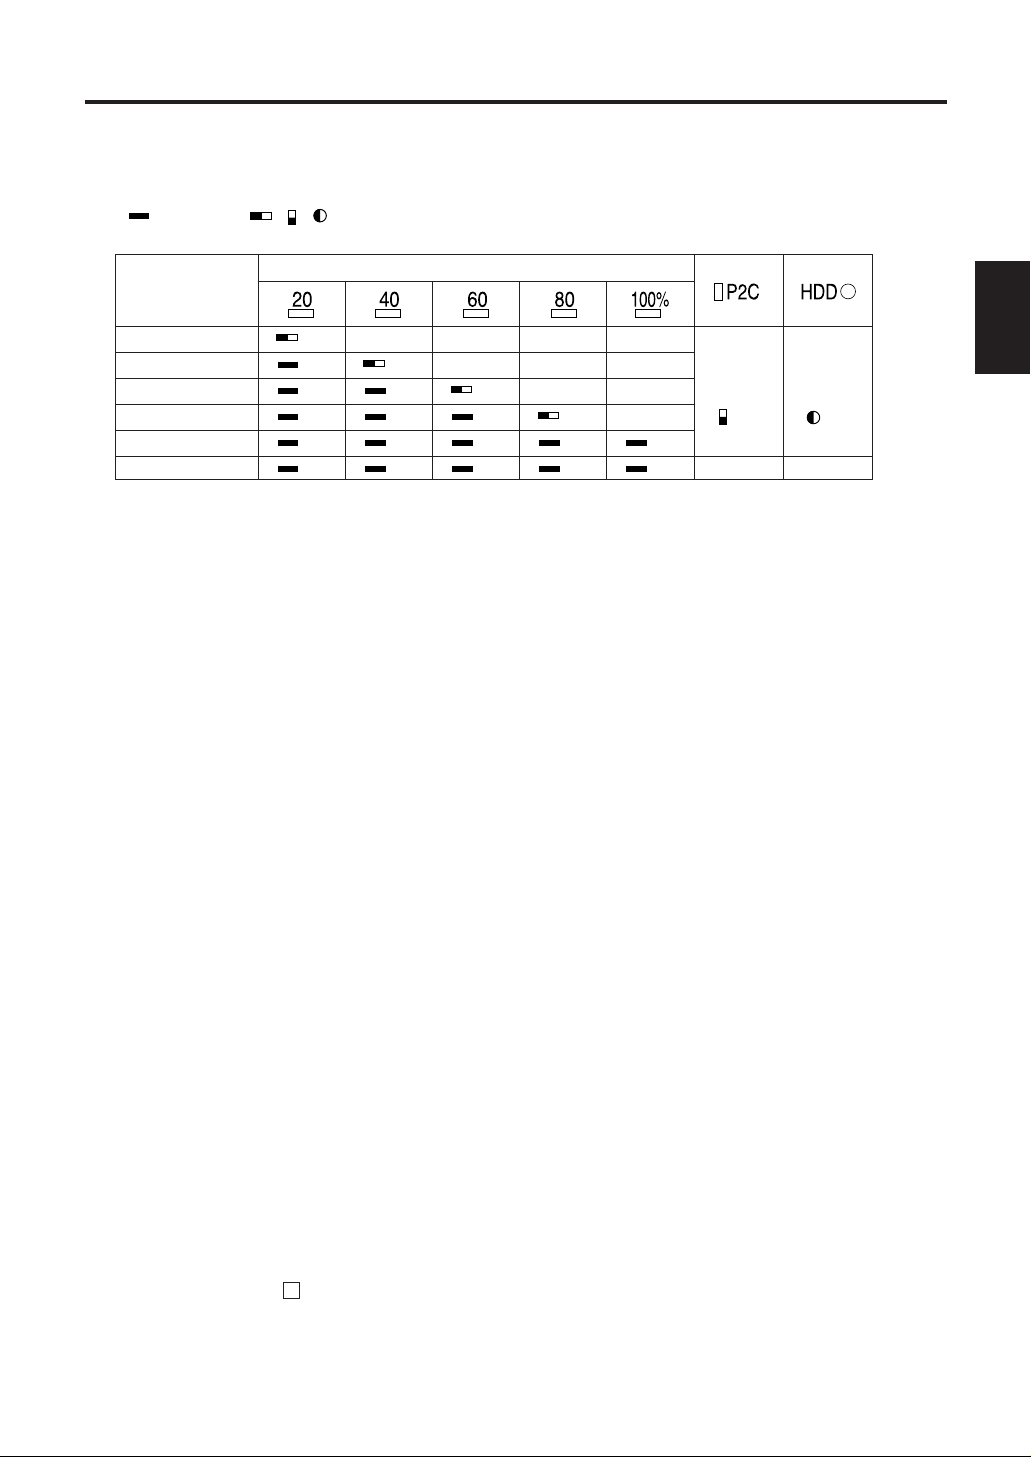
The copying progress is indicated by the LEDs, as follows.
Progress (%)
COPY STATUS
00-19
20-39
40-59
60-79
80-99
100
G
G
G
G
G
G
G
G
G
G
G
G
G
G
G
G
G
G
G
G
During
access
OR
During
access
OR
Page 18
E-17
Formatting
You can delete all data on P2 cards.
3. Within 2 seconds, press the [START] button
The [COPY STATUS], [P2C], and [HDD] LEDs go out, and P2 card formatting begins.
Formatting is complete when the [P2C] LED flashes in orange.
Note:
While the [COPY STATUS], [P2C], and [HDD] LEDs are on in step 2, if you do not press the [START]
button within 2 seconds
(step 3), the P2 card will not be formatted. To format the card, repeat the
process from step 2.
Formatting P2 cards
Data cannot be recovered after formatting. Before formatting cards, make sure all the data may
safely be deleted.
Do not turn the unit OFF or eject P2 cards when the [P2C] LED is flashing.
P2 cards cannot be formatted if the write-protect switch is set to PROTECT. Additionally, when
P2 cards are inserted in the slot, you cannot adjust the write-protect switch to prepare them for
formatting.
1. With the unit ON, insert a P2 card in the slot
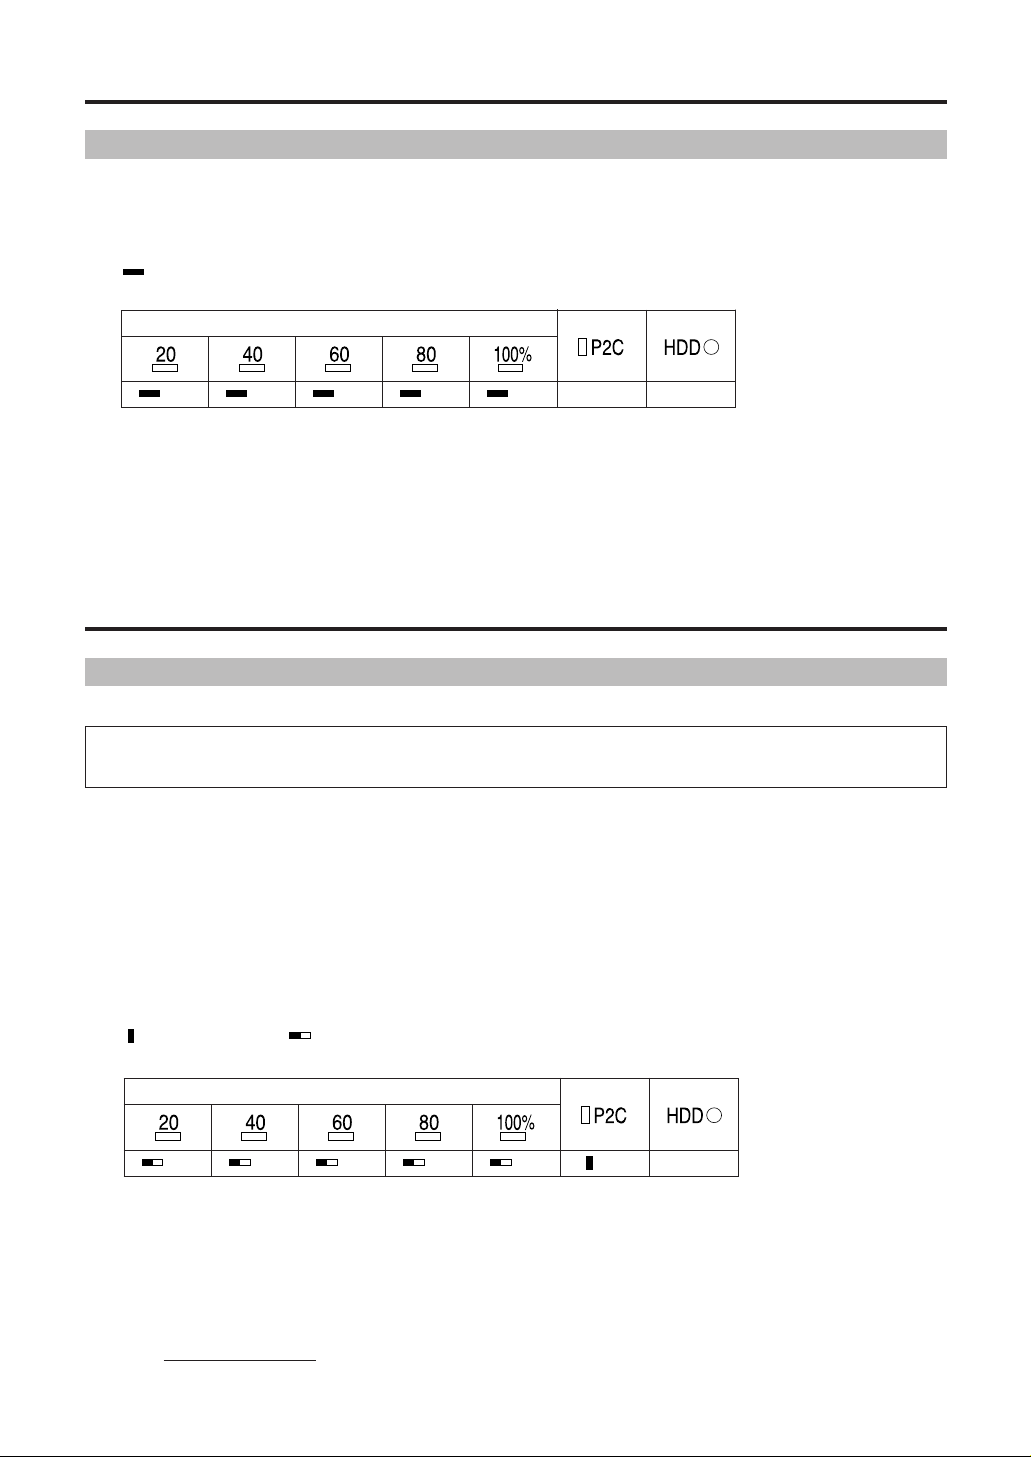
2. Hold the [P2C] button for at least 2 seconds
The [COPY STATUS], [P2C], and [HDD] LEDs change as follows.
: LED lit : LED flashing
OR : orange
COPY STATUS
OR OR OR OR OR
OR
−
: LED lit
OR : orange
You can cancel copying in progress as follows.
1. Hold the [CANCEL] button for at least 2 seconds
The [COPY STATUS], [P2C], and [HDD] LEDs change as follows.
2. Press the [POWER] button
Copying is canceled and the [COPY STATUS] LEDs go out.
Note:
Canceling copy automatically deletes copied data.
Canceling copy operations
COPY STATUS
OR OR OR OR OR
− −
Copying (continued)
Page 19
E-18
ENGLISH
Formatting (continued)
Auto power OFF during use
If left unused, the unit will automatically turn OFF after ten minutes if no copying or formatting
operations are in progress. To use the unit, turn it ON again.
If the unit is left unused while connected to a computer via the USB 2.0 cable, auto power OFF
is deactivated, even if no copying or formatting is in progress. To turn the unit OFF, hold the
[POWER] button for at least 2 seconds.
Note that auto power OFF is disabled while waiting for an error check after an error has
occurred or when copying has ended.
Note:
You can set the time until auto power OFF on the P2 Store Manager Setup page, in “Auto power off
mode.”
Options: [Never], [5 min], [10 min], [15 min], [20 min], [25 min], and [30 min]. Default: [10 min]. (See page
E-23)
2. Within 2 seconds, press the [START] button
The [COPY STATUS], [P2C], and [HDD] LEDs go out, and HDD formatting begins. Formatting
is complete when the [HDD] LED flashes in orange.
Note:
• While the [COPY STATUS], [P2C], and [HDD] LEDs are on in step 1, if you do not press the [START]
button within 2 seconds (step 2), the internal HDD will not be formatted.
To format the HDD, repeat the process from step 1.
• 15 drives are created automatically on the internal HDD.
Formatting the HDD
: LED lit : LED flashing
OR : orange
You can delete all data copied onto the internal HDD.
Put the unit on a solid surface before formatting the HDD.
Vibration or impact may damage the unit during formatting.
Data cannot be recovered after formatting. Before formatting the HDD, make sure all the data
may safely be deleted.
Do not turn the unit OFF when the [HDD] LED is lit.
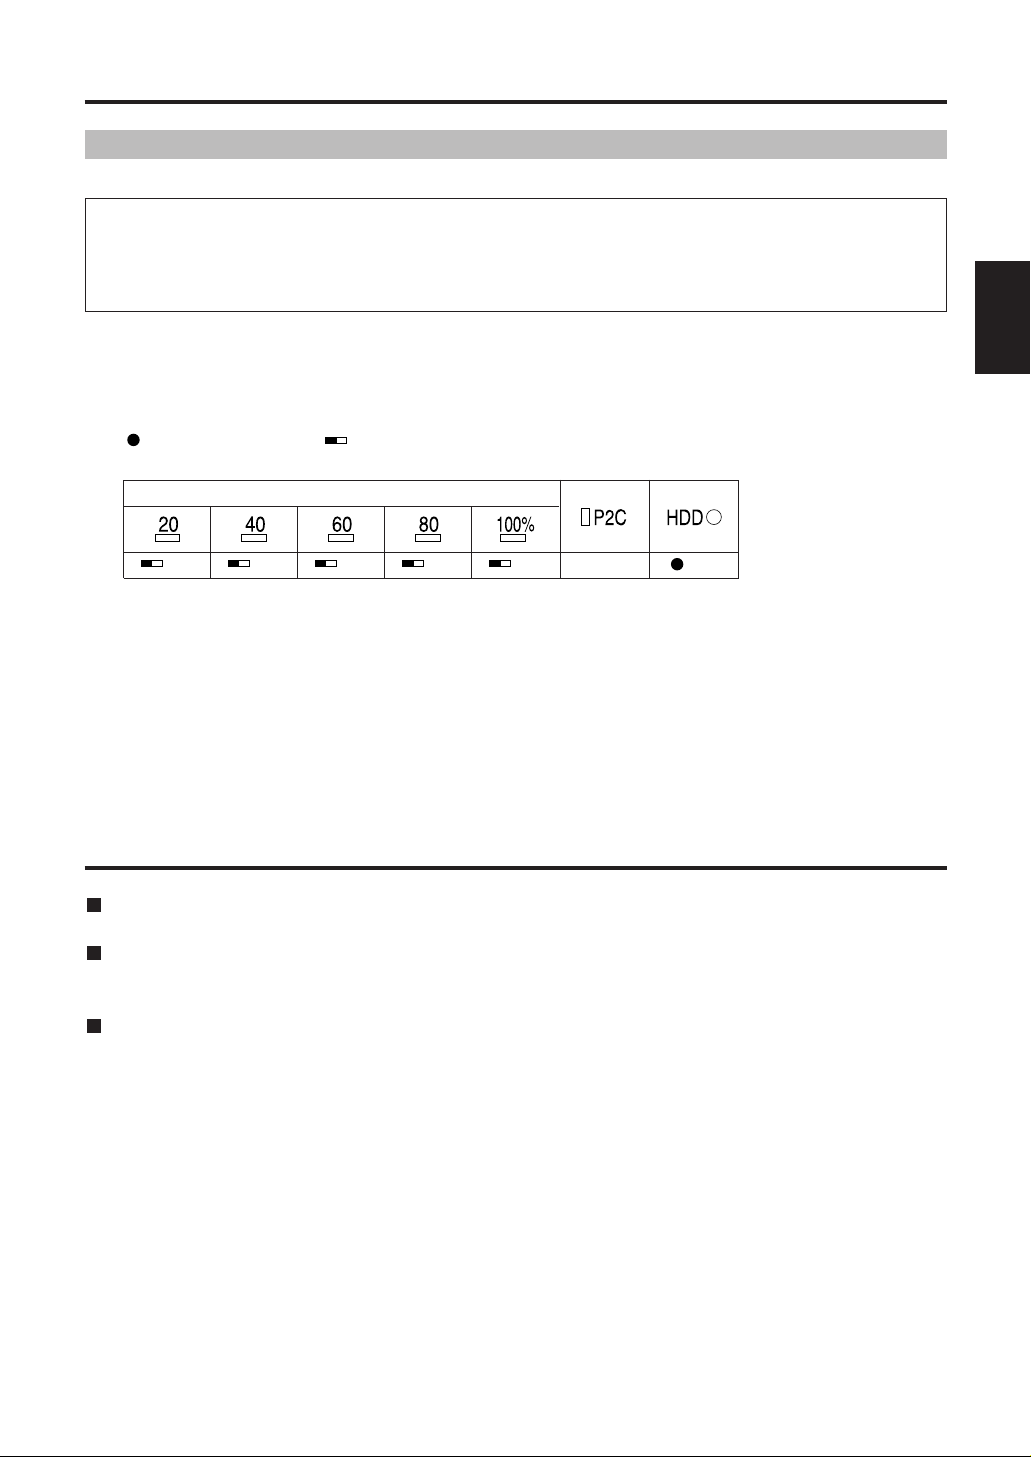
1. With the unit ON, hold the [HDD] button for at least 2 seconds
The [COPY STATUS] LED, [P2C] LED, and [HDD] LED change as follows.
COPY STATUS
OR OR OR OR OR
−
OR
Page 20

E-19
Connecting to a computer
Connect the unit to a computer with the USB 2.0 cable to back up data from P2 cards and the
internal HDD on the computer.
Before connecting the unit to a computer, install the P2 Driver on the included CD-ROM. Refer to
the Install Manual for details.
System requirements
Windows XP Professional SP2 or later
Windows 2000 SP4 or later
Connection
1. Start the computer
2. Use the USB 2.0 cable to connect the unit to the computer
3. Turn the unit ON by pressing the [POWER] button
On the unit, the POWER LED lights in green. The connection is automatically detected.
Removal
1. Disconnect the USB connection as follows
• For Windows XP Professional:
Double-click on the “Safely Remove Hardware” icon in the task tray. Follow the instructions
on screen to stop the “Panasonic P2 series USB Devices.”
• For Windows 2000:
Double-click on the “Unplug or Eject Hardware” icon in the task tray. Follow the instructions
on screen to stop the “Panasonic P2 series USB Devices.”
2. Turn the unit OFF by holding the [POWER] button for at least 2 seconds
The POWER LED goes out.
3. Unplug the USB 2.0 cable
Note:
• Use a commercially available USB 2.0 cable. Use a cable shorter than 3 m (9.8 feet). The connection
will not work correctly if the cable is longer than 3 m (9.8 feet).
• When you connect the unit to a computer with the USB 2.0 cable, up to 16 drives are added to the
computer (15 drives for the internal HDD and 1 drive for the P2 card). In some cases, these drives may
be the same as for existing drives on the network. Before connecting the unit, rename network drives on
the computer using letters apart from the computer’s hard disk drives and CD-ROM drive. Start with the
letters “Z:”, “Y:”, “W:”, and “V:” going in reverse alphabetical order.
• Drives not used in the operation described in “Copying from P2 cards to the HDD” on page E-15 cannot
be accessed from the computer. Refer to the HDD page (described on page E-21) to confirm which
drives have been assigned.
• Before ejecting P2 cards while the unit is connected to a computer, refer to the notes in “Ejecting P2
cards” on page E-13.
• Do not connect more than one unit to the computer at once.
• Data cannot be written to the unit from a computer.
Backing up data
To protect valuable data stored on the internal HDD, we recommend making a backup copy on
your computer or another storage device.
Always check the free space on your computer’s hard disk before backing up data.
• Using Windows Explorer:
Select top-level folders and files of a displayed drive on the unit. Copy the folder to your
preferred target folder on the computer. Execute the same procedure on all drives of the unit.
• Using the “P2 Viewer”:
Select needed clips and copy them to your preferred target folder on the computer, where
you have set up the virtual drive. See the software manual for further instructions.
Page 21

E-20
ENGLISH
P2 Store Manager
Using the P2 Store Manager application, you can display the status of the AJ-PCS060G and
manage the unit in several ways.
HDD status display
You can check the unit’s HDD partition information, self-diagnostic information, and more.
AJ-PCS060G setup
You can customize operating parameters for the unit, including enabling or disabling auto
power OFF.
AJ-PCS060G software updates
You can download software from the Panasonic website to keep the unit up to date.
Features
Starting and closing P2 Store Manager
1. Use the USB 2.0 cable to connect the unit to the computer
2. Turn the unit ON by pressing the [POWER] button
On the unit, the POWER LED lights in green, and the connection is automatically detected.
3. Start P2 Store Manager
Windows XP Professional:
Go to [Start] →[All Programs] →[Panasonic P2] →[P2 Store Manager].
Windows 2000:
Go to [Start] →[Programs] →[Panasonic P2] →[P2 Store Manager].
4. Make sure the indicator in the lower-left corner of the P2 Store Manager screen displays
“State: Connecting.”
You can now display the unit’s status and manage it. (See page E-21)
5. To close P2 Store Manager, click the button in the upper-right corner
The P2 Store Manager screen is closed.
Your computer must meet these requirements for P2 Store Manager.
Operating system: Windows XP Professional SP2 or later
Windows 2000 SP4 or later
RAM: 256 MB or more (512 MB or more recommended)
Processor: Pentium4 processor 1.0 GHz or higher
(Pentium4 processor 1.5 GHz or higher recommended)
Interface: Equipped with a USB 2.0 port
System requirements
P2 Store Manager is installed automatically when you install P2 Driver from the CD-ROM on your
computer. For instructions on installation and uninstallation, refer to the included Install Manual.
Installation/uninstallation
Page 22
E-21
P2 Store Manager screens
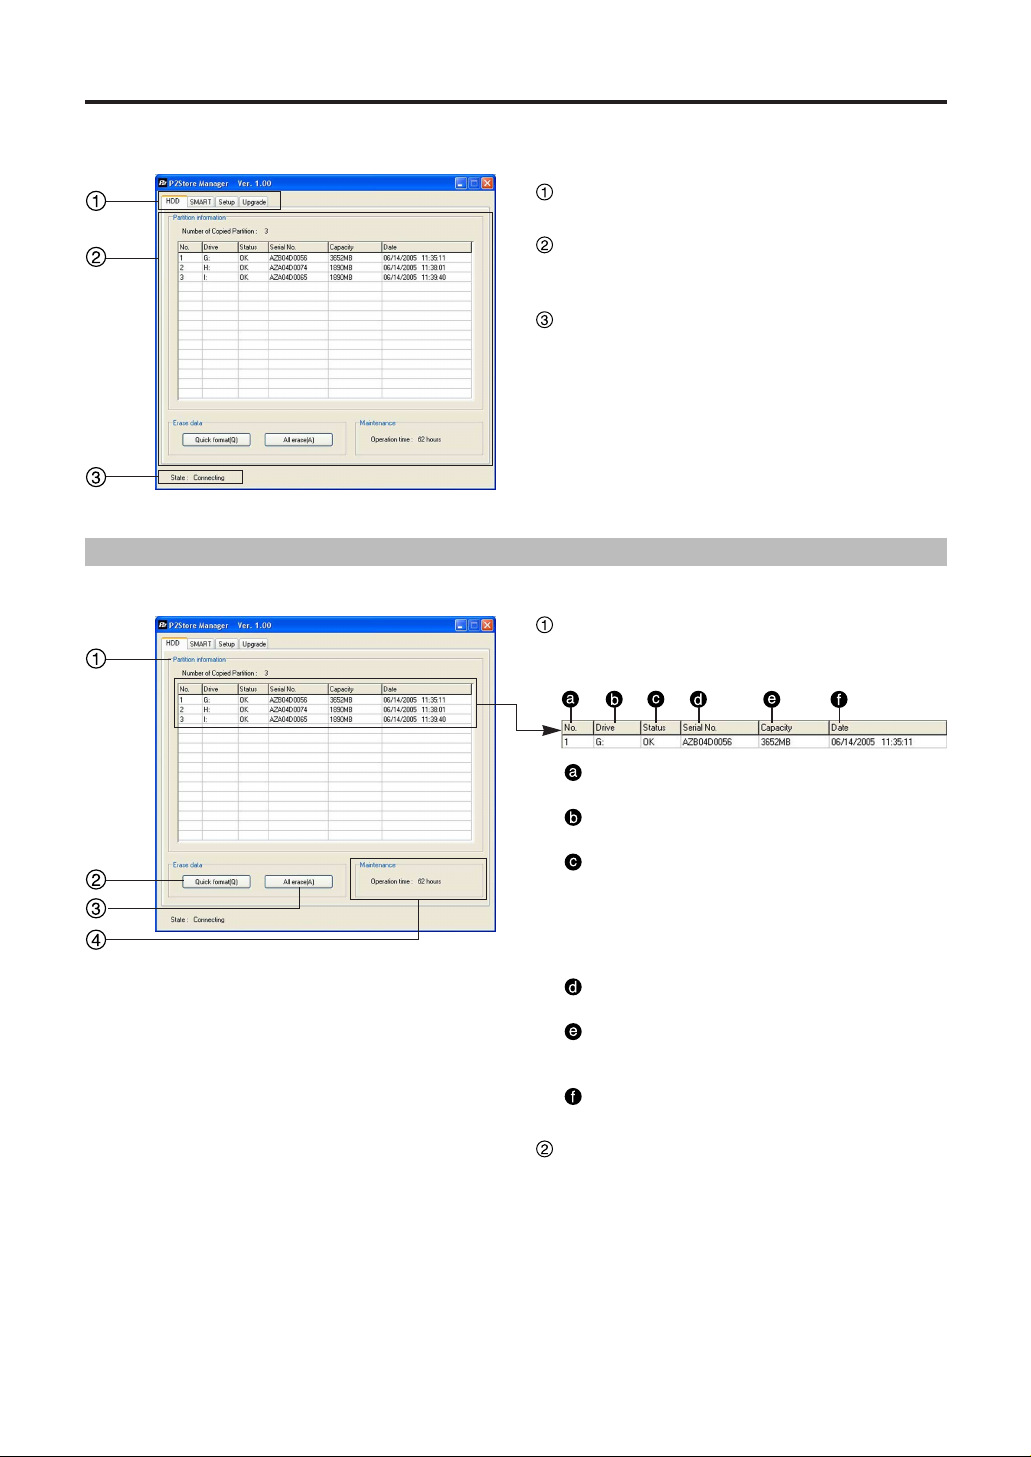
Overview of screens
Page tabs
Click the tabs to access different pages.
Page display area
Displays sections with various information about
the unit and buttons for operations.
State display area
Displays “State: Connecting” when the unit is
connected to the computer, otherwise, “State:
Disconnected.”
For checking and formatting the unit's internal HDD.
HDD page
Partition information section
Displays partition information for data copied
from P2 cards.
No.
Displays the partition number.
Drive
Displays the assigned drive letter.
Status
Displays the partition status.
“OK”: Normal
“ERROR”: Trouble occurred at some point
during the copying or verification
process.
Serial No.
Displays the source P2 card serial number.
Capacity
Displays the source P2 card capacity (in
MB).
Date
Displays the date of copying.
Quick format button
For quick formatting of the internal HDD, do the
following.
1. Click the [Quick format] button
A confirmation dialog is displayed, prompting
you for approval for formatting.
2. Click [Yes] to execute quick formatting.
※
1
Page 23
E-22
ENGLISH
P2 Store Manager screens (continued)
All erase button
For writing zeros to all sectors of the internal
HDD.
If you are using a battery to power the unit,
switch to an AC adapter before this procedure.
1. Click the [All erase] button
A confirmation dialog is displayed, prompting
you for approval for erasing, after which
another dialog confirms the AC adapter
connection.
2. Click [Yes]
Zeros are written to all sectors.
※
1, ※2
Maintenance section
Displays the total time that the internal HDD has
been in use.
Note:
※1: Before using [Quick format] and [All
erase], put the unit on a stable surface.
Vibration or impact may damage the unit
during formatting.
Using [Quick format] or [All erase] will
delete all data on the internal HDD.
If data you need is stored on it, back up
the data to separate storage media before
formatting.
※2: It takes about 45 minutes to write zeros to
all sectors. Always do this with an AC
adapter connected.
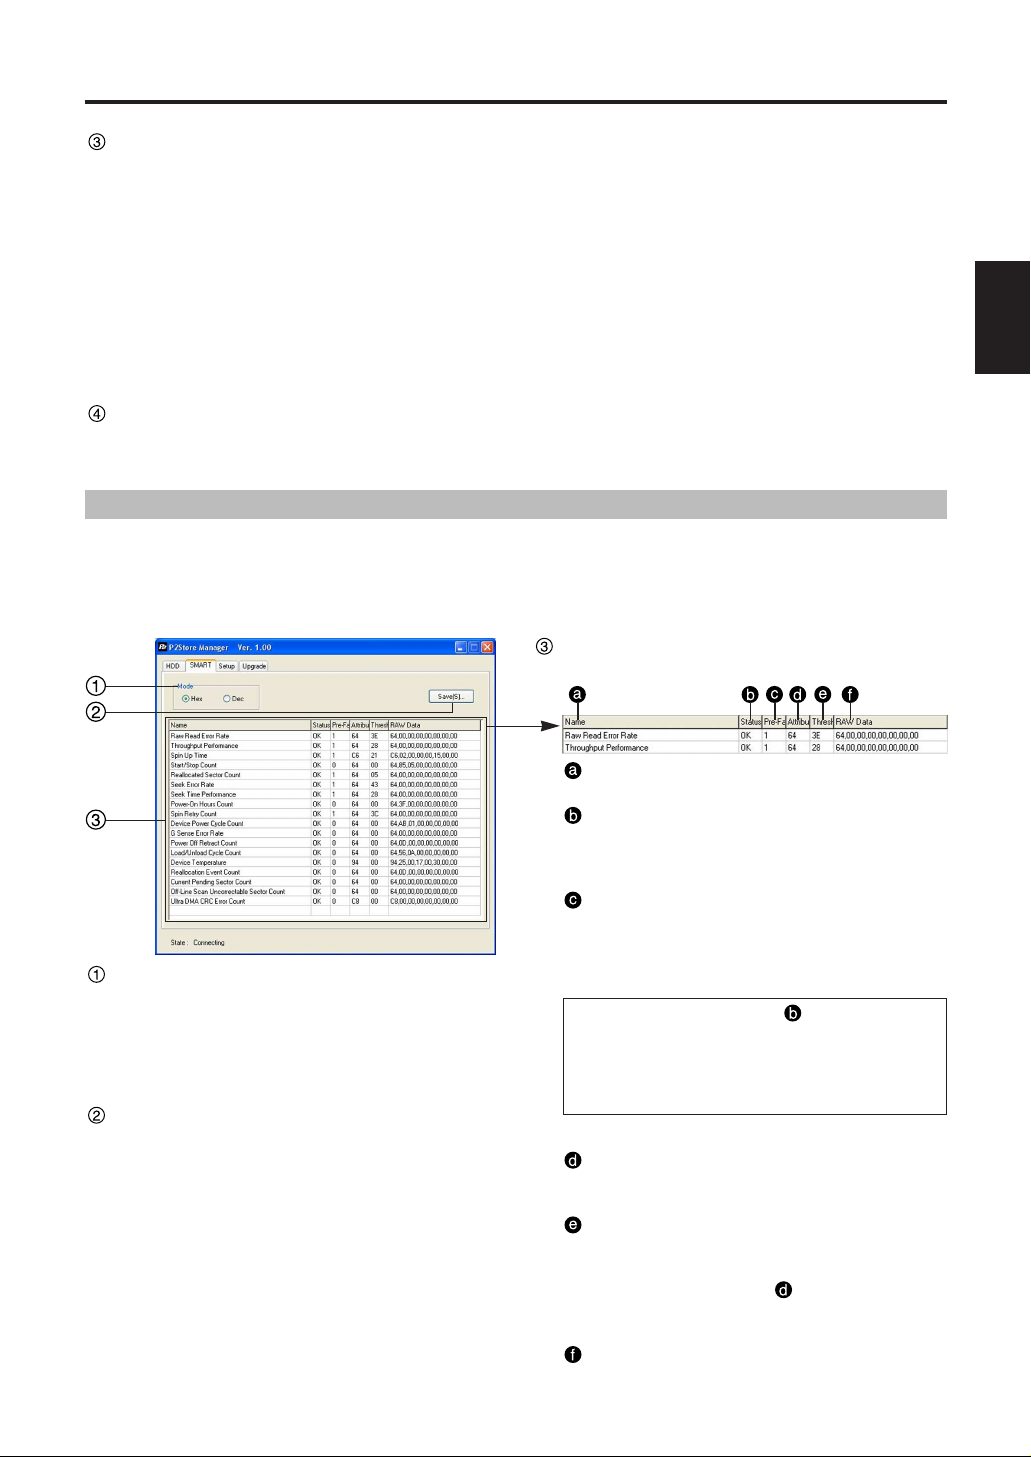
Name
Identifies the displayed item.
Status
Gives diagnostic results.
OK: No errors
NG: Errors
Pre-Failure / Advisory
Rates the severity of internal HDD errors as
“1” or “0.”
“1”: Serious
“0”: Not serious
If the diagnostic results are “NG” for a
serious error (“1” in [Pre-Failure / Advisory]),
a critical error has occurred on the internal
HDD. Contact the place of purchase as soon
as possible.
Attribute
Displays a value representing the item
status.
Threshold
Displays a reference value used in
determining if the item is “OK” or “NG.”
If the status value of is lower than the
value in this section, an “NG” judgment is
made.
RAW Data
Displays status details for the item.
Self-diagnostic information section
Displays self-diagnostic information as follows.
Mode section
Self-diagnostic information includes a list of
numbers. Choose the format from these
options.
For hexadecimal display: Choose [Hex]
For decimal display: Choose [Dec]
Save button
Self-diagnostic information can be saved as
follows.
1. Click the [Save] button
The [Save As] dialog is displayed.
2. Enter a file name and click the [Save] button
The self-diagnostic information is saved as a
text file.
Hard disks are relatively fragile devices. Before using the unit's HDD, check the S.M.A.R.T
information. (S.M.A.R.T: Self-Monitoring, Analysis and Reporting Technology) If an error is
displayed, contact the place of purchase.
Check self-diagnostic information for the unit's internal HDD on this page.
S.M.A.R.T page
Page 24
E-23
P2 Store Manager screens (continued)
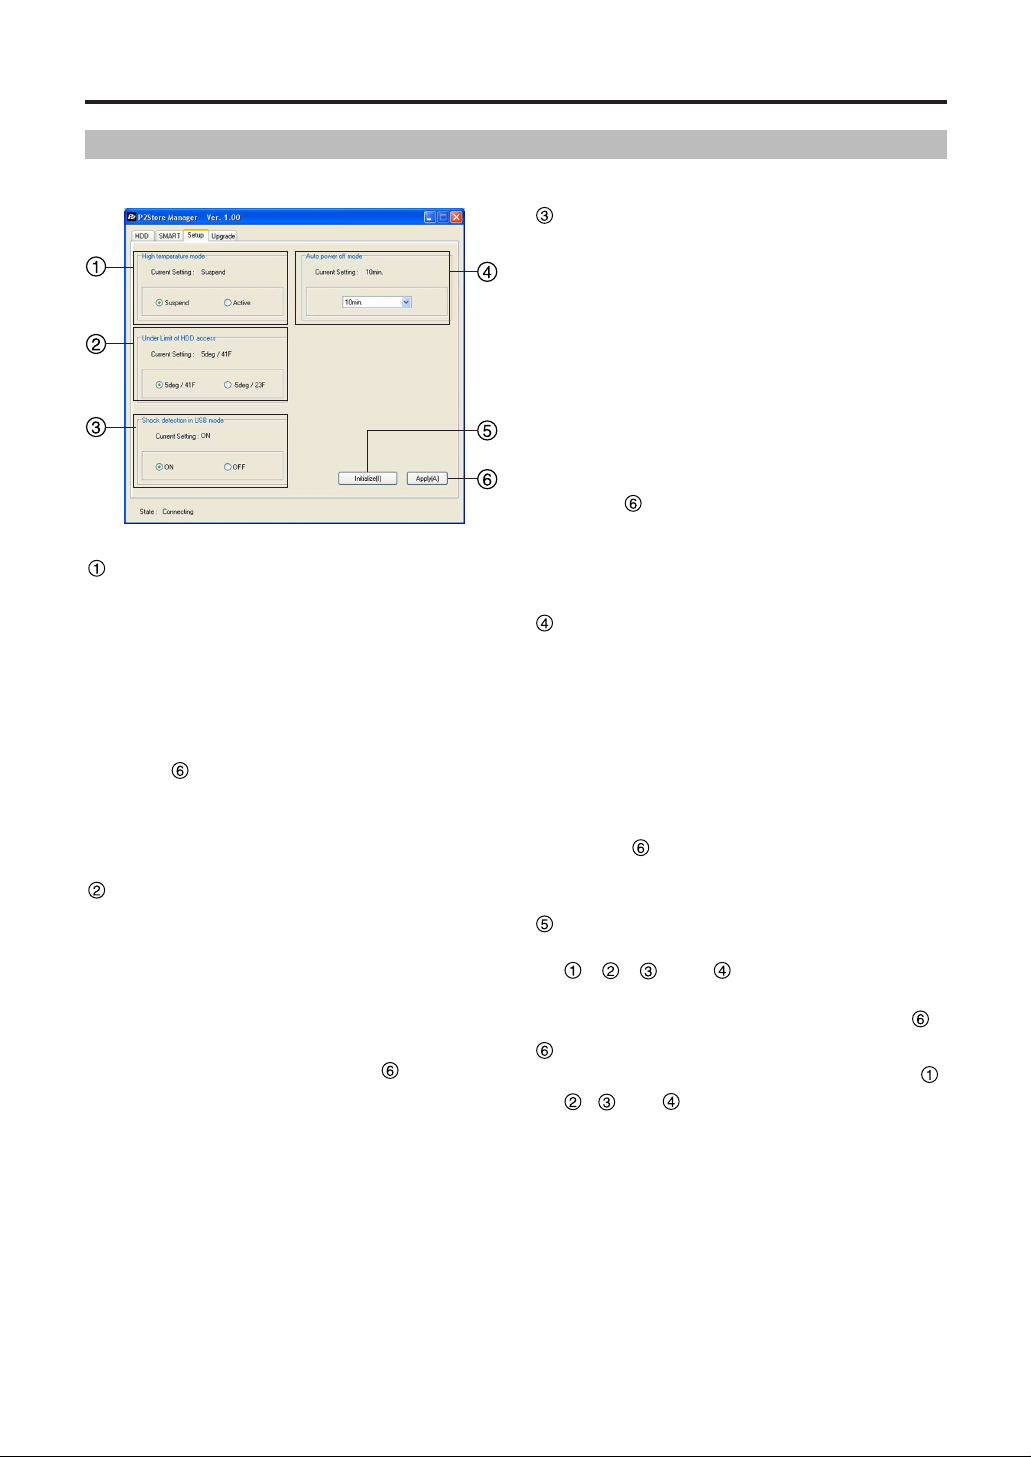
For checking and changing the unit's operating parameters.
Setup page
High temperature mode section
You can specify whether HDD operation is
suspended or remains active if the internal HDD
temperature exceeds a prescribed level.
Options: [Suspend] and [Active]. Default:
[Suspend].
The unit’s current setting is displayed in the
“Current Setting” section.
If you change it, afterward click the [Apply]
button .
Note:
Setting to [Active] may result in failure of the
HDD.
Use this setting at your own risk.
Under Limit of HDD access section
You can specify the minimum ambient
temperature at which HDD operation is
permitted.
Options: [5 deg / 41 F] and [-5 deg / 23 F].
Default: [5 deg / 41 F].
The unit’s current setting is displayed in the
“Current Setting” section. If you change it,
afterward click the [Apply] button .
Note:
Setting to [-5 deg / 23 F] may result in failure
of the HDD.
Use this setting at your own risk.
Shock detection in USB mode section
Use [ON] and [OFF] to enable or disable impact
detection when the unit is connected to a
computer via the USB 2.0 cable.
[ON] (default):
Data transfer with the computer is suspended
if the unit is hit.
[OFF]:
Data transfer is maintained even if the unit is
hit.
The unit’s current setting is displayed in the
“Current Setting” section.
If you change it, afterward click the [Apply]
button .
Note:
The possibility of HDD failure is higher with
the [OFF] setting than with the [ON] setting.
Use this setting at your own risk.
Auto power off mode section
You can specify the time until the unit switches
OFF automatically if left unused (when no
copying or formatting is in progress).
Options: [Never], [5 min], [10 min], [15 min], [20
min], [25 min], and [30 min].
Default: [10 min].
The unit’s current setting is displayed in the
“Current Setting” section.
If you change it, afterward click the [Apply]
button . Note that auto power OFF is
disabled when the unit is connected to a
computer.
Initialize button
You can restore the default settings in sections
, , and . However, note that the
setup details are not applied automatically.
If you change them, click the [Apply] button
.
Apply button
You can save the setup details in sections ,
, and on the unit as follows.
1. Click the [Apply] button
A confirmation dialog is displayed.
2. Click [Yes]
The setup details are saved on the unit.
3. Restart the unit.
Note:
The new setup takes effect after the unit is
restarted.
Page 25
E-24
ENGLISH
P2 Store Manager screens (continued)
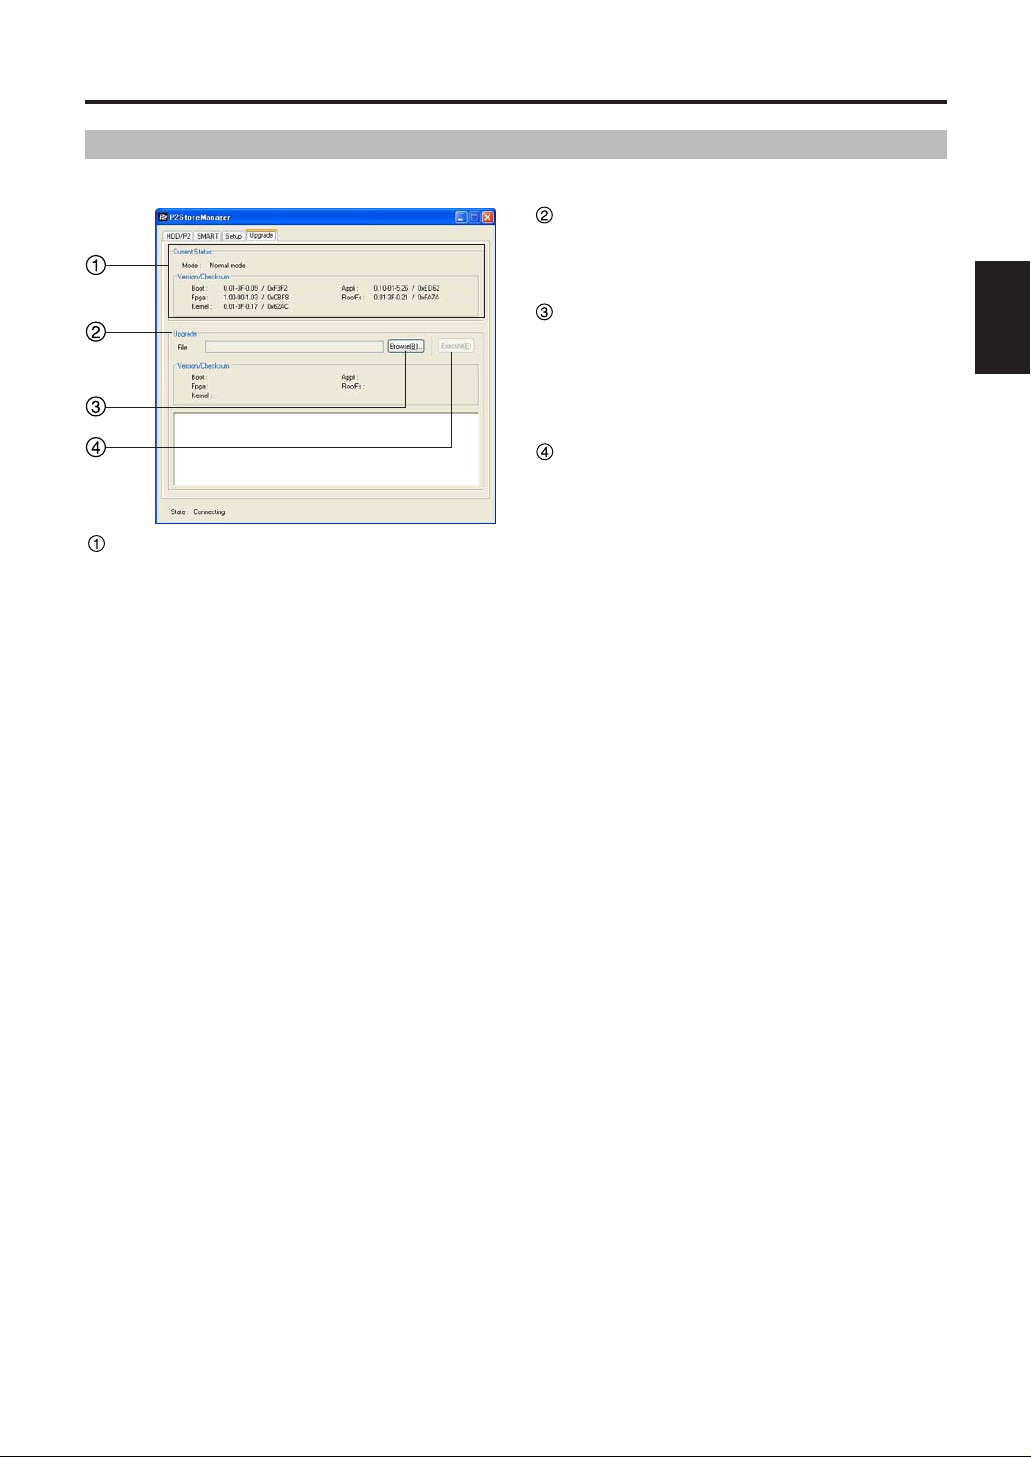
For keeping the unit's software updated.
Upgrade page
Current Status section
Displays the current mode (Normal mode or
Software upgrade mode) and the version and
checksum of the software used.
Upgrade section
You can keep the unit up to date by
downloading and installing the latest software
for it.
Browse button
Click the [Browse] button to select the
downloaded software for the unit.
The “Version/Checksum” section displays the
version and checksum of the software after
updating.
Execute button
For executing the command to update the
software.
Note that it takes several minutes to complete
this process.
Note:
During this process, never turn the unit OFF
or unplug the USB 2.0 cable.
This may damage the unit.
Additionally, put the unit on a stable surface
beforehand.
Page 26
E-25
P2 Store Manager screens (continued)
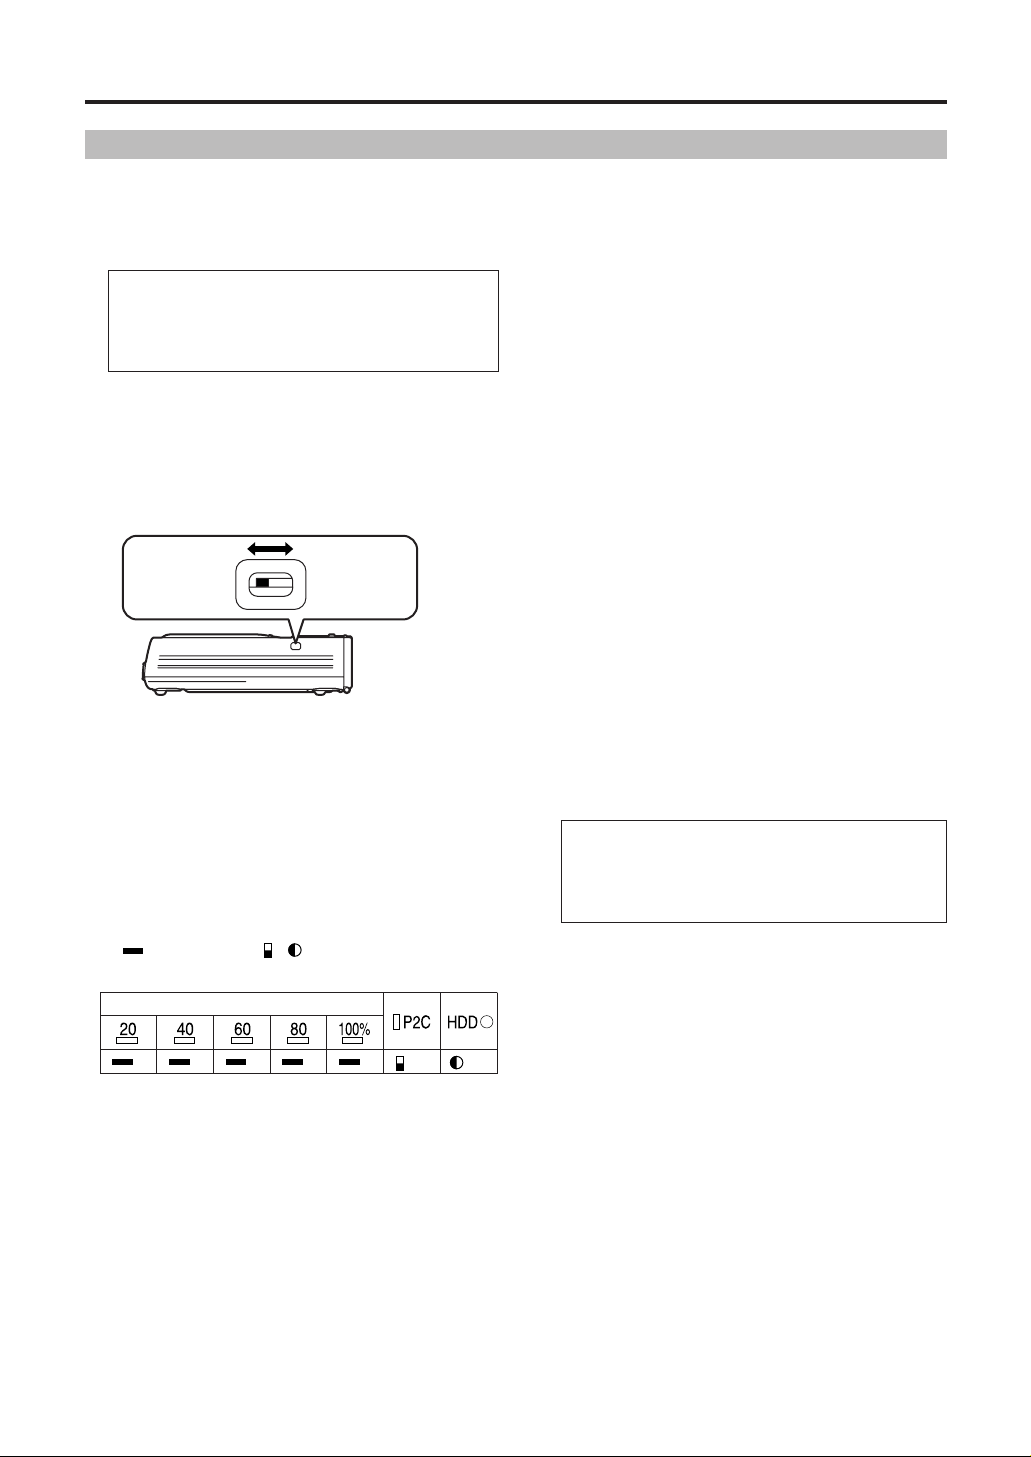
Updating procedure
1. Follow the on-screen instructions on the
support site given below to download
the unit's software data and expand the
file data to a folder of your choice.
2. Turn the unit OFF
In the State display area, “State: Disconnected”
is displayed.
3. Remove the sliding switch cover on the
side of the unit and slide the switch
toward the front, as shown below.
4. Turn the unit ON
In the State display area, “State: Connecting” is
displayed.
5. In the “Current Status” section, make
sure “Mode: Software upgrade mode” is
displayed
If “Mode: Normal Mode” is displayed, reconfirm
that the sliding switch is toward the front, as
directed in step 3.
During updating, the LED display is as follows.
: LED lit , :LED flashing
G : Green OR :Orange
Rear panel
side
Front panel
side
6. Click the [Browse] button
The [Open] dialog is displayed.
7. Select the software data for the unit as
downloaded in step 1
The “Version/Checksum” section displays the
version and checksum of the software after
updating.
If the information in both “Version/Checksum”
sections matches, there is no need to update.
Go to step 11.
COPY STATUS
G G G G G
OR
OR
8. Click the [Execute] button
A confirmation dialog is displayed.
9. Click the [Yes] button
The latest software will be installed, which takes
several minutes.
During this process, never unplug the USB 2.0
cable or turn the unit or computer OFF.
10. After checking the update message,
click the [OK] button.
The unit will be automatically deactivated. In
Windows 2000, a warning is displayed
regarding ejection, but there is no problem.
Click the [OK] button.
11. On the side of the unit, set the sliding
switch toward the back and attaching
the sliding switch cover.
12. Turn the unit ON
In the State display area, “State: Connecting” is
displayed.
13. Confirm that the “Current Status”
section displays “Mode: Normal Mode”
14. Confirm that the information in both
“Version/Checksum” sections matches
If they do not, repeat this process from step 2.
Note:
For the latest information on P2 cards, go to
the following support site.
For Japanese
http://panasonic.biz/sav/
For English
https://eww.pavc.panasonic.co.jp/pro-av/
For Japanese
http://panasonic.biz/sav/
For English
https://eww.pavc.panasonic.co.jp/pro-av/
Page 27
After clearing the error display※,
try formatting the card again. If
the error persists even after this,
contact the place of purchase.
The data format isn't standard.
After clearing the error display
※
,
you can resume use.
For further details about P2
cards, contact the place of
purchase.
12
13
An unusable P2 card has
been inserted.
After clearing the error display※,
restore a clip using a P2 camerarecorder or other device before use.
There is a clip that needs to
be restored on the P2 card.
11
E-26
ENGLISH
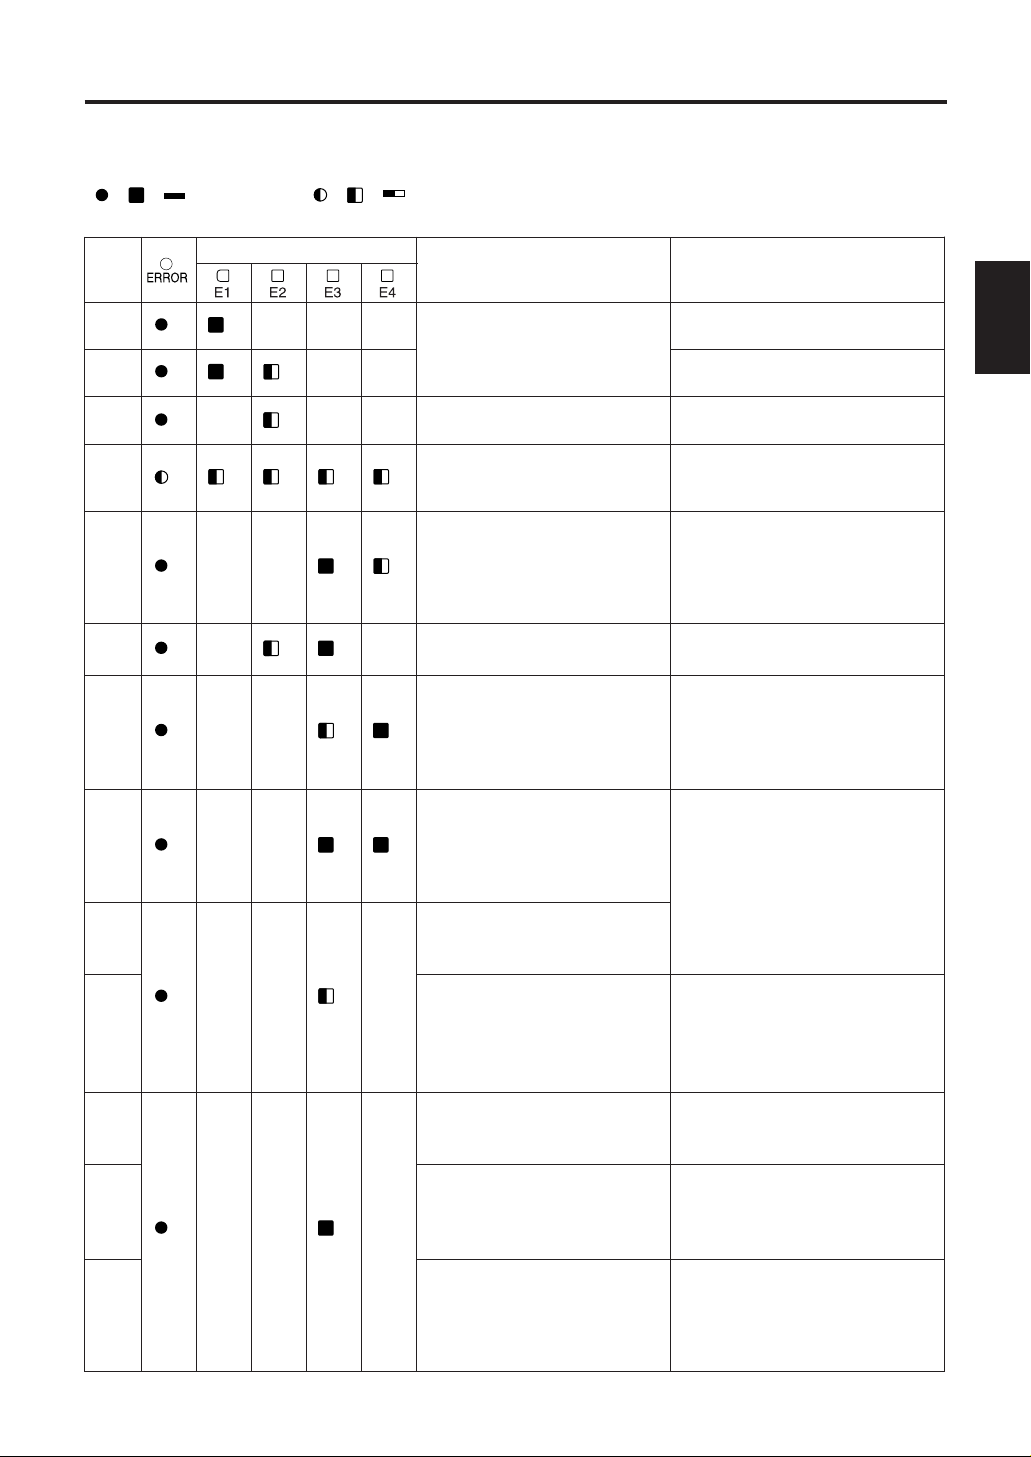
ERROR LED display
Errors that may affect the unit are indicated as follows. Investigate the status and take these
corrective actions.
, , : LED lit , , : LED flashing
R : red OR : orange
REMAIN
R
R
Status
The internal HDD temperature
is out of operating range.
Corrective Action
Turn the unit OFF and allow it to
cool down before use.
R
R R
The unit is warming up when [E2]
flashes. Go to a warmer area.
R
R
The battery is low. Recharge the battery pack.
R
R R R R
The voltage is abnormally low.
Recharge the battery pack.
(Under these conditions, the unit
immediately shuts off.)
R
R R
At the start of copying, there is
not enough HDD space.
After clearing the error display
※
,
format the internal HDD. If it
contains data you need, back up
the data on a different storage
media before formatting.
R
R R
At the start of copying, a P2
card is not inserted.
After clearing the error display
※
,
insert the P2 card, and copy.
R
R R
At the start of copying, a
vibration occurred.
After clearing the error display
※
,
place the unit on a stable
surface.
After the vibration has stopped,
you can resume use.
R
R R
At the start of copying, an
error other than insufficient
HDD space, a missing P2
card, vibration, and the like
has occurred.
R
R
During copying, an error has
occurred. (Other than if the P2
card has been pulled out)
After clearing the error display
※
,
try copying the data again. If the
error recurs, switch P2 cards and
try copying again. If the error
persists even after this, contact
the place of purchase.
A formatting error has
occurred with the P2 card.
(Write-protected)
After clearing the error display
※
,
set the write-protect switch to the
opposite side from the
PROTECT position.
(See page E-14)
R
R
1
2
3
4
5
6
7
8
9
10
No.
※To clear the error display, press the [POWER] button and [CANCEL] button together.
Page 28

ERROR LED display (continued)
E-27
REMAIN
No.
R
R R
Status
A S.M.A.R.T error has
occurred on the internal HDD.
Corrective Action
There may be a problem with the
internal HDD. If it contains data
you need, first clear the error
display
※
, and then back up the
data on a different storage
media, and contact the place of
purchase.
R
R R R R
After an internal error
occurred, copying and
formatting is not possible.
R
R R R R
An error occurred during
updating.
R
R
Copying failed, after which the
unit was turned ON and the
error occurred.
After clearing the error display
※
,
try copying the data again.
Execute [Quick Format] again.
Execute [All erase] again.
R
R
[Quick format] failed, after
which the unit was turned ON
and the error occurred.
R
OR
[All erase] failed, after which
the unit was turned ON and
the error occurred.
R
R
R
Corrections are not applied.
The unit’s internal settings
cannot be adjusted, so an
error occurs.
There may be a problem with the
unit. Contact the place of
purchase.
R
OR
The internal lithium battery is
drained.
Contact the place of purchase
and replace the lithium battery.
Once this error is displayed, it
will continue to be displayed
when the unit is turned ON until
you replace the lithium battery.
R
R R R
R
The sensor has detected impact
to the HDD while writing
administrative data or an HDD
access error has occurred.
Turn the unit OFF and ON.
After placing the unit on a stable
surface, copy the data.
R
R R
R
An error has occurred in the
control information of the
internal HDD.
If the data is important, back it up
on a different recording media,
and proceed with [Quick format].
R
R R
A [Quick format] error has
occurred on the internal HDD.
R
17
21
22
18
19
20
23
24
25
26
15
16
R
R
An [All Erase] error has
occurred on the internal HDD.
There may be a problem with the
internal HDD. Contact the place
of purchase.
After clearing the error display※,
try formatting the card again. If
the error recurs, switch P2 cards
and try formatting again. If the
error persists even after this,
contact the place of purchase.
R
R
A formatting error has
occurred with the P2 card.
(Other than write-protection or
pulling out a P2 card)
14
※To clear the error display, press the [POWER] button and [CANCEL] button together.
Page 29

ERROR LED display (continued)
E-28
ENGLISH
Troubleshooting
If the unit seems to be malfunctioning, try checking the following points. If the problem persists,
contact the place of purchase.
Symptom What to Check
The POWER LED does not light after the
[POWER] button is pressed.
• Is the battery pack drained?
• Is the AC adapter connected correctly?
Copying does not start after a P2 card is inserted
and the [START] button is pressed.
•
Is there enough space for copying on the internal HDD?
•
Is an error displayed indicating that internal HDD
temperature is over or under the prescribed level?
The [REMAIN] LEDs do not light after the [ ]
button is pressed.
• Is the POWER LED lit (green)?
The [REMAIN] LEDs do not light after the [HDD
CAP] button is pressed.
• Is the POWER LED lit (green)?
The unit's internal drive letters are not displayed in
Windows Explorer when the unit is connected to a
computer with the USB 2.0 cable.
• Is the unit processing copy or format operations?
• Does the computer support USB 2.0 connections?
• Is the operating system Windows XP SP2 or later, or
Windows 2000 SP4 or later?
• Is the unit correctly connected to the computer?
• Is the network drive assigned a letter immediately
after the letters of the computer's hard drive or CDROM drive?
P2 cards cannot be formatted.
• Is the write-protect switch set to PROTECT?
• Is the P2 card inserted correctly?
The POWER LED merely flashes after the
[POWER] button is pushed.
• Are you attempting to turn the unit ON in
temperatures below 5 °C (41 °F)?
COPY STATUS
R
OR OR OR OR OR
Status
During P2 card
access, the P2 card
was pulled out and an
error occurred.
Corrective Action
Turn the unit OFF and ON.
R
OR
A Verify NG error has occurred
when the Verify function was
executed independently.
After clearing the error display※,
try copying the data again.
R
OR
An error occurs when the Verify
NG error occurred the time
before, operation was terminated
without checking it, and then the
power is turned on.
After clearing the error display※,
try copying the data again.
27
28
29
OR
The sensor has detected
impact to the HDD, and an
error has occurred.
After ensuring the unit is away
from the source of impact keep it
off for a while.
REMAIN
Status Corrective Action
No.
30
No.
※To clear the error display, press the [POWER] button and [CANCEL] button together.
Page 30

E-29
Supply voltage:
Battery pack DC 7.2 V
(Option: CGR-D16, CGA-D54)
AC adapter DC 7.9 V
(Option: AG-B15)
Operating environment:
In use Temperature
0 °C to +40 °C
※
1
(32 °F to 104 °F)
Humidity
5 % RH to 85 % RH
(Non-condensing)
When stored
Temperature
-20 °C to +60 °C
(-
4 °F to 140 °F
)
Humidity
0 % RH to 90 % RH
(Non-condensing)
※
1: In order to protect the HDD, if the internal
temperature of the HDD is outside the
specified temperature range of the unit, an
error is displayed and copy operations will
not be allowed.
System requirements:
Verified operating systems
Windows XP Professional SP2 or later, or
Windows 2000 SP4 or later
Main memory
256 MB or more (512 MB or more
recommended)
USB interface
USB 2.0
Hard disk capacity:
60 GB
PC card slot:
PCMCIA Type II(CardBus) × 1
Dimensions (W x H x D):
90 mm × 45 mm × 180.5 mm
(3
17
/32inches × 125/32inches × 73/32inches)
(Excluding protrusions)
Weight:
650 g (1.43 lb)
Specifications
Power supply : DC 7.9 V
Current consumption : Max. 1.3 A Normal operation, 0.8 A
indicates safety information.
Weight and dimensions when shown are
approximately.
Specifications are subject to change without notice.
Page 31

重要:
对拥有版权的电视节目、录像带和其他素材进
行未授权的翻录可能会侵犯版权所有者的权
利并违反版权法。
操作前的警告:
在任何产生强磁场的设备附近进行操作都可
能引起视频和音频信号中的噪声。如果是这种
情况,要有所处理,例如在操作前将磁场源移
开,使其远离本机。
警告:
• 为了减少火灾或触电的危险,不要让本机
受到雨淋或放置在潮湿的地方。
• 为减少火患或电击的危险,本设备应避开
一切使用液体的场合,并只能存放在没有
滴液或溅液危险的地方,也不要在本设备
顶端放置任何液体容器。
注意事项:
为了保持良好的通风条件,请不要将本机安
装或置放于书橱、壁柜或其他密封空间中。
确保窗帘或其他织物不会阻碍通风条件,防
止因过热而发生电击或起火。
n 不要开启面板盖。
为了减少电击的危险,不要打开面板盖。里面没有用户能维修的部件。
有关维修问题,请与合格的维修人员联系。
注意事项:
如果电池处理不当,就会有爆炸或起火的
危险。
• 只能换上相同或指定类型的电池。
• 请勿拆卸电池或将其丢入火中。
• 请勿储存于
• 对可充电电池,请使用指定的充电器。
• 如果电池不是可充电类型的,请勿对其
充电。
有关备份电池的注意事项
• 如果更换电池操作不正确,就有发生爆炸
的危险。更换电池时请使用相同或相等的
类型。
•
更换备份电池时,请咨询合格的维修人员。
60
注意事项:
为了减少起火或电击的危险以及烦人的干
扰,请只使用推荐的附件。
℃以上的高温下。
中
文
显示安全信息。
在欧盟以外其它国家的废物处置信息
此符号仅在欧盟有效。
如果要废弃此产品,请与当地机构或经销商联系,获取正确的废弃方法。
C-1
Page 32

目录
开始
概述
............................................... C-3
特色功能
随机的附件
选购件
使用
控制参考指南
前面
顶部
右侧
左侧
后面
复制
打开和关闭本机
插入P2卡
弹出P2卡
......................................... C-3
..................................... C-3
............................................ C-3
AJ-PCS060G
.................................. C-6
...................................................... C-6
....................................................... C-7
....................................................... C-7
....................................................... C-8
....................................................... C-8
............................................... C-9
.................................... C-9
............................................... C-9
............................................... C-9
连接到计算机上
获得更佳的性能
AJ-PCS060G........................................ C-4
硬盘
...................................................... C-4
清洁
...................................................... C-5
维护
...................................................... C-5
交流电源适配器
电池组
P2
硬盘驱动器容量指示条
电池电量指示条
从P2卡复制到硬盘驱动器
取消复制操作
格式化
格式化P2卡
格式化硬盘驱动器
在使用过程中自动关闭电源
.................................................. C-5
卡上的写保护功能
.......................................... C-13
............................... C-4
.................................... C-5
.......................... C-10
....................... C-10
.................................. C-11
................... C-11
..................................... C-13
......................................... C-13
.............................. C-14
............. C-14
连接到计算机上
存储器管理程序
P2
特色
..................................................... C-16
系统要求
安装/卸载
启动和关闭
............................................. C-16
............................................ C-16
P2
............................. C-15
......................... C-16
存储器管理程序
........ C-16
存储器管理程序屏幕
P2
硬盘信息页面
S.M.A.R.T
设定页面
升级页面
升级步骤
..................................... C-17
信息页面
............................................. C-19
............................................. C-20
............................................. C-21
.................. C-17
........................... C-18
故障排除和参考资料
ERROR
故障排除
•
•
• 本说明书中的其他产品名称和公司名称是其各自所有人的商标或注册商标。在本说明书中,商
指示灯显示
...................... C-22
....................................... C-24
Microsoft和Microsoft
商标或商标。
Intel和Pentium是Intel Corporation
标符号™和注册商标符号®被省略。
标志,以及
Windows是Microsoft Corporation
在美国和其他国家的注册商标或商标。
C-2
规格
.............................................. C-25
在美国和其他国家的注册
Page 33

概述
AJ-PCS060G
型
)接口与计算机进行数据传输。
B
数据可以很容易地从
是为
AJ-P2C系列P2
P2
摄像机复制到
存储卡设计的、专用可移动式硬盘装置。其特色是使用
内置硬盘。
60 GB
USB 2.0
特色功能
•
卡槽
P2
•
英寸
2.5
• 通过使用加速传感器和环绕硬盘的保护材料,增强其抗震性
• 将P2卡数据直接高速复制到硬盘
• 通过
USB 2.0
※1抗震性
• 如果某项磁盘操作 (例如复制)正在进行中,此时传感器检测到本装置被撞击或者坠落,
则硬驱磁头会自动停住以保护磁盘和数据。
• 硬盘还处于减震材料的保护之下。但是,对于可能遭受的损坏或数据丢失不能进行担保。
内置硬盘
60 GB
电缆快速传输数据到计算机
※
1
随机的附件
(类
中
文
• 安装手册
• 铁氧体磁心
• 只读光盘
包含P2驱动程序、P2卡管理器、安装手册以及操作手册 (本说明书)
[
........................................................................................................................ 1
.................................................................................................................... 1
选购件
• 电池组
• 交流电源适配器
CGR-D16S (1600 mAh)
CGP-D28S (2800 mAh)
CGA-D54S (5400 mAh)
AG-B15
] ........................... 1
C-3
Page 34

获得更佳的性能
AJ-PCS060G
本机的内置硬盘处于减震材料的保护之下,在面临撞击或坠落时能够更好的保护硬盘和数据。
但是,请您理解的是,对于可能遭受的损坏或数据丢失不能进行担保。
作为选购件,请使用推荐的电池组和交流电源适配器。
硬盘
本机内含硬盘驱动器 (“
在设置和使用的过程中,请遵照下面的注意事项,以便保护硬盘驱动器和存储在上面的数据,防
止造成数据丢失或操作中断。
• 在使用过程中,不要让本机受到震动或撞击。(否则,硬盘驱动器可能会损坏。)
• 不要在能够受到震动的地方使用本机,也不要将其放在不稳定的地方上。
• 不要在没有空气流通的封闭区域内使用本机,在这种地方操作产生的热量不能散热。
• 不要将本机放置在温度变化极大的地方。
→在温度突然变化的地方使用本机的话,可能会产生结露。在本机内部产生结露时使用可能会损
坏硬盘驱动器。请在温度稳定的房间里使用,每小时温度的改变应该小于
• 不要在极为潮湿的地方使用本机。
• 在电源打开时,不要卸下电池组或拔除交流电源适配器。
• 在将本机转移到别的地方之前,请总是先按住
完成关机过程。
请等待直到其完全停止移动 (大约两分钟),在运输过程中使其避免受到震动和撞击。
(在电源关闭后,由于惯性,硬盘驱动器还会转一会儿。)
• 不要在海拔低于–
硬盘驱动器是高度精密的装置。某些操作条件可能会引起部分损坏的风险,在最坏的情况下,会
有数据不能读写的严重风险。因此,请不要认为内置硬盘驱动器是数据的永久存储媒体。请将其
作为暂时性存储装置使用,直到您能够使用其它存储媒体备份数据。
n 记录的数据
如果硬盘驱动器损坏,在上面记录的数据将会丢失。请一直使用另一个存储媒体对重要的数据进
行备份。有关备份数据的说明,请参阅第
米或者高于
90
HDD
”)。
米的地方使用本机。
3000
C-15
[POWER]
页。
℃。
20
键至少两秒钟以关闭电源,然后等待其
请注意对于硬盘驱动器故障或其它问题造成的数据丢失,或者其他直接或间接的损失,松下不
负任何责任。
n 在丢弃或转移本机之前删除硬盘驱动器上的数据
在您丢弃或转移本机之前,我们强烈建议您负责任地删除硬盘驱动器上的任何重要数据。这样做
可以避免泄密导致的问题。
在丢弃硬盘驱动器之前,将其带到强磁体的旁边来清除硬盘驱动器上的数据,使用锤子或其他方
法将其击碎使其无法读取。
C-4
Page 35

获得更佳的性能 (续)
清洁
绝对禁止使用诸如挥发油、稀释剂或酒精的溶剂来清洁本机。
• 在进行清洁之前,请卸下电池组或者拔除交流电源适配器。
• 使用溶剂清洁本机可能会损伤外壳或者导致外漆脱落。
• 使用一块干净的软干布来擦拭灰尘。如果本机变得很脏,就使用软布在稀释的中性清洁剂中弄
湿,充分拧干后进行擦拭。之后请使用干布进行擦干。
• 如果您使用化学处理过的除尘布,使用时请遵照使用注意事项。
维护
本机的内置硬盘驱动器 (
为了使本机保持在最佳状态,我们建议您对其要经常检查,并且将其带至经销商处进行定期维护。
有关本机定期维护的进一步详细信息,请询问经销商。
需要按照这个标准进行定期维护。有关查看操作时间的说明,请参阅第
每使用
提示:
• 在有些情况下,硬盘驱动器上的内容在维护过程中被清除,这样会丢失所有数据。
在进行维护之前,请一定使用另一个存储媒体备份需要的数据。
请理解这一点,您不会因为丢失数据而受到赔偿。
• 在硬盘驱动器出现故障时,您不会因为硬盘驱动器上的数据损失而受到赔偿。丢失的数据不能够恢复。
硬盘驱动器是暂时性的数据存储媒体,并且我们建议您迅速备份需要的数据。
2000
小时
)是需要保养的高性能部件。
HDD
C-18
页。
交流电源适配器
使用选购的交流电源适配器 (
在使用之前,请仔细阅读所有附件的使用说明书。
注意:
当使用交流电源适配器时,在靠近连接到本机上直流
导线上的电池型的连接器底部的地方,安装附赠的铁
氧体磁心。在安装时,请一定将直流导线缠绕铁氧体
磁心两圈儿,如图所示。
如果您不使用铁氧体磁心,其他设备可能会受到本机
的影响。
AG-B15
)。
缠绕两圈儿,
然后将其关闭
铁氧体磁心
在直流电缆上的电池型的连接器
中
文
电池组
使用选购的电池组。
在使用之前,请仔细阅读所有附件的使用说明书。
C-5
Page 36

控制参考指南
前面
[POWER]
使用本开关来打开和关闭本机电源。
当本机电源处于关闭状态时,只需简单按下
[POWER]
状态时,请按住
电源。
键
键就可以打开电源。当电源处于开启
[POWER]
键两秒钟以上来关闭
电源指示灯
当本机电源打开时亮起。
在启动或关闭的过程中,电源指示灯闪烁。
键
P2C
按下来格式化P2卡。在将数据复制到硬盘驱动器
之后,您可以根据需要格式化
(参阅第
注意:
在格式化之后,数据不能够被恢复。
在格式化卡之前,请确保所有数据都可以删
除。
HDD
按下来格式化内置硬盘驱动器。硬盘驱动器上所
有不需要的数据一次都可以删除。
(参阅第
注意:
在格式化之后,数据不能够被恢复。
在格式化硬盘驱动器之前,请确保所有数据都
可以删除。
键
C-13
C-14
页)
页)
P2
卡。
指示灯
P2C
当本机存取P2卡时亮起或闪烁。
(参阅第
HDD
当本机存取内置硬盘驱动器时亮起或闪烁。
(参阅第
ERROR
发生错误时亮起或闪烁。
通过前面的
[E1]到[E4]
的混合亮起状态,可以识别错误类型。
(参阅第
P2
P2
在插入
除了
槽内。
C-12和C-13
指示灯
C-12和C-14
指示灯
[COPY STATUS]
指示灯、
C-11、C-22至C-24
卡槽
卡专用卡槽。在插入P2卡之前,请确保弹出键
没有处于凸出状态。
卡时,请水平拿住卡。
P2
卡之外,绝对禁止将任何其他的东西插入
P2
页)
页)
[P2C]
指示灯、顶部的
指示灯和
页)
[HDD]
弹出键
按下将P2卡从卡槽内弹出。
(参阅第
COPY STATUS
显示复制或格式化的进展状态。
(参阅第
页)
C-9
指示灯
C-12至C-14和C-24
页)
指示灯
C-6
Page 37

控制参考指南 (续)
顶部 右侧
中
文
START
按下来开始复制或格式化。
按住
化。
CANCEL
按下来取消复制。
在复制的过程中,按住
来取消复制。
键
[START]
键
键两秒钟以上来开始复制或格式
[CANCEL]
键两秒钟以上
滑钮
如果要打开前面板盖,就按照箭头方向滑动此滑
钮。
电池电量指示键
在按下此键后,在
示电池组的剩余电量大约两秒钟。
(参阅第
只要
会保持亮起 (绿色)。
C-11
USB 2.0
硬盘驱动器容量指示键
在按下此键后,在
示硬盘驱动器的剩余使用空间大约两秒钟。
[REMAIN]
卡可以被复制到硬盘驱动器上。
(参阅第
只要
会保持亮起 (绿色)。
C-10
USB 2.0
[ ]
[REMAIN]
页)
电缆处于连通状态,
指示条 中将会显
指示灯就
[USB]
[HDD CAP]
[REMAIN]
中的数字(E1、E2等)代表有多少张
页)
电缆处于连通状态,
指示条 中将会显
指示灯就
[USB]
电池/硬盘驱动器状态指示条和错误指示灯
[REMAIN]
显示剩余电池电量、硬盘驱动器的剩余使用空
间,以及在发生错误时的错误识别指示。
(参阅第
USB 2.0
当将本机连接到计算机上时,将
入此连接器。
注意:
C-10、C-11、C-22至C-24
连接器 (类型B)
与本机一起使用的计算机必须支持
页)
USB 2.0
USB 2.0
电缆插
。
C-7
Page 38

控制参考指南 (续)
左侧
后面
后面板侧 前面板侧
滑动开关盖
滑动开关
滑向前方可以启用软件更新功能。
正常来讲,将此开关保持在后方。
(参阅第
C-21
页)
电源入口
在此插入选购的电池组或交流电源适配器。
DC IN
插座 (
7.9 V
)
电池锁定解锁键
当移除选购的电池组或交流电源适配器时,在您
将其滑向此键一侧的同时,按住此键。
VERIFY
当将数据从P2卡复制到内置硬盘驱动器上时,用
此开关来验证数据。(参阅
ON
OFF
注意:
为了保证准确的复制,将
ON
机可能不能正确复制。但是,请注意复制时进
行验证的话 (当开关处于
时间相当于不要验证 (当开关处于
时)进行复制所花费时间的双倍。
开关
: 验证是否一致
: 不要验证
。如果将其设定到
页)
C-12
VERIFY
,在有些情况下,本
OFF
ON
开关滑动到
状态时),花费的
OFF
状态
C-8
Page 39

复制
打开和关闭本机
使用选购的电池组或交流电源适配器作为电源。(参阅第
不论是使用电池组还是交流电源适配器,请确保电源牢固地连接到本装置上。
有关连接说明的信息,请参阅附件的使用说明书。在进行所有操作之前,打开本机的电源。当操作
结束后 (以及不使用本机时),关闭本机的电源。
打开电源
如果要打开电源,就按下
示灯保持亮起 (绿色)。
注意:
• 当发生低电压错误时 (
用重新充电的电池组更换电池组,或者切换使用交流电源适配器,然后重新启动本机。
• 当内置硬盘驱动器的温度降到指定温度以下时 (
中
红色亮起和
[E1]
[START]
• 在加热过程中,会消耗更多的电能。在有些情况下,其后会出现低电压错误,这取决于电池组的剩余
电量。如果是这样,请先关闭本机电源,然后重新启动本机。
关闭电源
如果要关闭本机电源,请按住
电源指示灯熄灭。请注意,在关闭电源的过程中,此电源指示灯闪烁。
键和其他控制器。
[POWER]
[E2]
键。在启动的过程中,电源指示灯闪烁。当本机准备就绪后,指
[ERROR]
红色闪烁) ,本机会加热到指定的温度。在加热过程中,暂时不能使用
[POWER]
指示灯红色亮起,并且
[ERROR]
键两秒钟以上。
页)
C-3
[REMAIN]
指示灯红色亮起,并且
指示条中
红色闪烁),请使
[E2]
[REMAIN]
指示条
插入P2卡
在将
卡插入卡槽中时,请一直水平拿住卡,并且小心插入。
P2
中
文
如果带有角度用力插入的话,可能会损坏卡或卡槽,或者损
坏本机。
弹出P2卡
如果要将卡弹出,就按下弹出键一次,然后在此键凸出之后,再次按下此键。
在本机正在存取卡的过程中(此时
注意:
如果本机连接到计算机上,请等待直到卡的关闭程序完成之后,然后再按下弹出键。
转到[开始]→[我的电脑
1.
在P2卡驱动器 (显示为可移动磁盘)上用鼠标右键单击,然后选择 “弹出”
2.
按下弹出键,然后移除P2卡。
3.
]
指示灯亮起),不要弹出P2卡。这可能会导致数据损坏。
[P2C]
C-9
Page 40

复制 (续)
卡上的写保护功能
P2
当P2卡被插入后,下面的操作将会被禁止以保护数据,即使您调节写保护开关也是一样。因此,在
插入
P2
卡之前,请检查写保护开关的设置。
写保护开关的设置
PROTECT PROTECT
PROTECT PROTECT
:不能向卡上写入数据,也不能从
卡上删除数据。
:可以向卡上写入数据,也可以从
卡上删除数据。
硬盘驱动器容量指示条
总量相当于最多
时,仅能复制
按下
[HDD CAP]
参阅 【硬盘驱动器容量 (以卡的数量计算)】。
在本机电源打开时,查看可以复制多少张
• 当使用
按下
会对应于下面的 【硬盘驱动器容量 (以卡的数量计算)】中给出的信息。
• 当使用
按下
后,显示会对应于下面的 【硬盘驱动器容量 (以卡的数量计算)】中给出的信息。
【硬盘驱动器容量 (以卡的数量计算)】
:指示灯亮起 :指示灯闪烁
R :红 色 G :绿 色
容量 (可以被
复制的卡数)
全部可使用
(当未使用卡时)
在大约两秒钟之后,
15张P2
7 P2
2 GB或4 GB P2
[HDD CAP]
8 GB P2
[HDD CAP]
0
1
2
3
4
张以上
5
卡上的数据可以被复制到本机的内置硬盘驱动器上。(但当使用
卡上的数据。)如果要查看硬盘驱动器上的剩余空间 (可以复制多少张卡),请
键并查看
键一次。在
卡时:
键两次。在
[REMAIN]
[REMAIN]
卡时:
E1 E2 E3 E4 USB
R
G
G
G
G
G
G
指示条。
卡
P2
[REMAIN]
[REMAIN]
R
G
G
G
G
G
指示条熄灭。
指示条中,
指示条中,
REMAIN
R
G
G
G
G
指示灯橙色亮起一秒钟。此后,显示
[E1]
[E1]和[E2]
R
G
G
G
指示灯橙色亮起一秒钟。此
R
G
G
8 GB P2
卡
C-10
Page 41

复制 (续)
电池电量指示条
当使用选购的电池组时,您可以查看剩余电量。通过按下
以知道剩余的电量。参阅下面的 【电池电量】。
当发生低压错误时(
许进行复制操作。只在
一旦电量下降到
关闭。请切换到另一个充满电的选购的电池组,或者使用选购的交流电源适配器。
在本机电源处于打开时,按下
显示会对应于下面的 【电池电量】。
【电池电量】
:指示灯亮起
R
:红 色 G :绿 色
电池组电量
100
0
在大约两秒钟之后,
注意:
当使用交流电源适配器时,在有些情况下指示灯显示可能不是
[ERROR]
[REMAIN]
(零),会显示错误,正如 【电池电量】中描述的那样,并且本机电源立即被
0
[REMAIN]
指示灯红色亮起,并且
指示条中
按钮
[]
, :指示灯闪烁
E1 E2 E3 E4 USB
G
G
G
G
G
R
R
指示条熄灭。
[E1]
REMAIN
G
G
G
G
R
[REMAIN]
绿色亮起时,使用电池组。
G
G
G
R
键并查看
[]
G
G
R
。这不是问题。
100
[REMAIN]
指示条中
G
R
[E2]
指示条,您就可
红色闪烁),不允
ERROR
R
中
文
从P2卡复制到硬盘驱动器
从P2卡高速复制到硬盘驱动器是可能的,因为数据被直接传送到硬盘驱动器。
当
[P2C]或[HDD]
当使用选购的电池组时,请在复制数据前检查剩余电量。
如果在
[REMAIN]
购的交流电源适配器。
在本机处于电源打开时,在卡槽中插入P2卡
1.
按下
2.
[HDD CAP]
如果容量 (以卡的数量计算)是零,请将需要的数据复制到其它存储媒体,并格式化硬盘驱动器。(参阅
第
C-10和C-14
指示灯亮起时,不要关闭本机电源或弹出P2卡。
指示条中
键,确认硬盘剩余空间足够复制至少一张卡
页)
红色闪烁,请切换到另一个充满电的选购的电池组,或者使用选
[E1]
C-11
Page 42

复制 (续)
按住
3.
[START]
复制开始,进行验证
复制操作的进展状态会由指示灯显示,如下所示。
:指示灯亮起 :指示灯闪烁
G :绿色
进展状态
(
%
00–19
20–39
40–59
60–79
80–99
100
请确保所有
4.
按下
5.
注意:
[POWER]
复制完成,
• 一旦
P2
[VERIFY]
[VERIFY]
[VERIFY]
• 即使已经由计算机或其他设备对
此时,将根据
[VERIFY]
[VERIFY]
• 如果在复制过程中本机变热,它会自动以较慢的速率进行复制。
• 如果复制未能正常完成 (如果在复制过程中本机电源关闭,或者
以被复制的卡的数目)就会下降,下降后的容量等于原来的容量减去不能被复制的卡的数目。
• 如果插入了空白的
• 如果
P2
何丢失的数据。当一个有缺陷的场景片段未经纠正缺陷就被复制时,复制后得到的场景片段拷贝可能是
无法修复的。
键至少两秒钟以上
※
1
(当将
[VERIFY]
开关设为ON时)。
, ,
OR :橙色
COPY STATUS
)
20 40 60 80 100%
P2C HDD
G
GG
GGG
GGGG
在存取
过程中
OR
在存取
过程中
OR
GGGGG
GGGGG
[COPY STATUS]
指示灯都绿色亮起
键
[COPY STATUS]
卡上的数据被复制到硬盘驱动器上之后,就不能再次复制到硬盘驱动器上。此时,将根据
开关的设定进行下列动作:
开关为
开关为ON时: 进行步骤3的操作时,将不能复制数据,当复制处于进行状态时将显示
[VERIFY]
开关为
开关为ON时: 进行步骤3的操作时,将不能复制数据,当复制处于进行状态时将显示
P2
卡上含有损坏的视频剪辑
指示灯熄灭。
时:即使进行步骤3的操作时,当复制处于进行状态时将立即
OFF
40-59%
开关的设定进行下列动作:
时:即使进行步骤3的操作时,当复制处于进行状态时将立即
OFF
40-59%
NG
,并进行验证。
卡上的数据进行了编辑、添加或删除,仍会将其视为是相同的数据。
P2
,并进行验证。此时该数据将被识别为不同的数据,因出现
※
2
错误
,动作将终止。(参阅
C-24
页)
[P2C]和[HDD]
卡被拔出),硬盘驱动器的容量 (可
P2
卡,并且完成了上述步骤3的操作,则所有的
※
3
,在使用本机复制之前,请一定首先使用P2摄像机或其他设备恢复任
[COPY ST ATUS]
100%
100%
指示灯此时也慢速闪烁。
指示灯都会绿色闪烁。
地显示。
地显示。
Verify
C-12
:不管P2卡上的数据和内置硬盘驱动器上的数据相同与否,此功能将进行验证。
※
1
:当发生
※
2
※3:由于在录制过程中意外拔出P2卡或者突然停电造成的录制不正确的视频剪辑。
Verify NG
页)。此时,P2卡上的有关数据将被再次复制,但呈现“
C-17
摄像机或类似设备时,带有黄色 号的视频剪辑将显示在缩微图像画面上。
使用
P2
错误时,在硬盘驱动器分区信息部分的状态栏内将显示出 “
ERROR”
状态的分区显示将保持不变。
X
ERROR
”字样 (参阅
Page 43

复制 (续)
取消复制操作
您可以取消正在进行的复制操作,如下所示。
按住
1.
2.
注意:
[CANCEL]
[COPY STATUS]、[P2C]和[HDD]
:指示灯亮起
OR :橙色
20 40 60 80 100%
OR OR OR OR OR ––
按下
[POWER]
复制被取消,
取消复制会自动删除已复制的数据。
键两秒钟以上
COPY STATUS
键
[COPY STATUS]
指示灯将变化如下。
指示灯熄灭。
P2C HDD
格式化
格式化P2卡
您可以删除P2卡上的所有数据。
在格式化之后,数据不能够被恢复。在格式化P2卡之前,请确保所有数据都可以删除。
中
文
当
如果写保护开关被设定为
调节写保护开关来为格式化做准备。
1.
2.
3.
注意:
指示灯闪烁时,不要关闭本机电源或弹出P2卡。
[P2C]
PROTECT,P2
在本机电源处于打开时,在卡槽中插入P2卡
按住
[COPY STATUS]、[P2C]和[HDD]
:指示灯亮起 :指示灯闪烁
OR:橙色
20 40 60 80 100%
在两秒钟内,按下
[COPY STATUS]、[P2C]和[HDD]
成。
在步骤
骤
3),P2
键两秒钟以上
[P2C]
指示灯将变化如下。
COPY STATUS
OR OR OR OR OR OR –
[START]
2中当[COPY STATUS]、[P2C]和[HDD]
卡将不会被格式化。如果要格式化P2卡,从步骤2重复操作步骤。
键
指示灯熄灭,P2卡格式化开始。当
卡就不能被格式化。此外,当P2卡被插入卡槽后,您不能
P2C HDD
指示灯橙色闪烁时,格式化完
[P2C]
指示灯亮起时,如果您不在两秒钟内按下
[START]
键(步
C-13
Page 44

格式化 (续)
格式化硬盘驱动器
您可以删除已复制到内置硬盘驱动器上的所有数据。
在格式化硬盘驱动器之前,将本机放在坚实平坦的地方。
在格式化过程中,振动或撞击可能会损坏本机。
在格式化之后,数据不能够被恢复。在格式化硬盘驱动器之前,请确保所有数据都可以删除。
当
[HDD]
1.
2.
注意:
指示灯亮起时,不要关闭本机的电源。
在本机电源处于打开时,按住
[COPY STATUS]、[P2C]和[HDD]
:指示灯亮起 :指示灯闪烁
OR :橙色
COPY STATUS
20 40 60 80 100%
OR OR OR OR OR – OR
在两秒钟内,按下
[COPY STATUS]、[P2C]和[HDD]
式化完成。
• 在步骤
• 在内置硬盘驱动器上会自动创建
1中当[COPY STATUS]
[START]
如果要格式化硬盘驱动器,从步骤
键 (步骤2),内置硬盘驱动器将不会被格式化。
[START]
[HDD]
键
指示灯、
15
键两秒钟以上
指示灯将变化如下。
P2C HDD
指示灯熄灭,硬盘驱动器格式化开始。当
指示灯和
[P2C]
重复操作步骤。
1
个驱动器。
指示灯亮起时,如果您不在两秒钟内按下
[HDD]
指示灯橙色闪烁时,格
[HDD]
在使用过程中自动关闭电源
n 如果让本机处于不使用的状态,当没有进行任何复制或格式化操作时,十分钟过后,本机就会自
动关闭电源。如果要使用本机,请再次打开本机电源。
n 当通过
能就不会被启用,即使没有进行任何复制或格式化操作。如果要关闭本机电源,请按住
USB 2.0
[POWER]
n 请注意,当发生错误后本机处于等待错误检查时或者当复制结束后,自动关闭电源功能被禁用。
注意:
存储器管理程序的设定页面上 “自动电源关闭模式”中,您可以设定自动关闭电源之前的等待时间。
在
P2
选项:
从不关闭]、[5分钟]、
[
C-19
页)
阅第
C-14
电缆将本机连接到计算机上时,如果让本机处于不使用的状态,自动关闭电源功
键两秒钟以上。
[10 分钟]、[15分钟]、[20分钟]、[25分钟]和[30分钟]
。默认:
[10 分钟]
。(参
Page 45

连接到计算机上
使用
USB 2.0
上。
在将本机连接到计算机上之前,请安装附赠的只读光盘上的
装手册。
n 系统要求
Windows XP
Windows 2000 SP4
n 连接
启动计算机
1.
使用
2.
通过按下
3.
在本机上,电源指示灯绿色亮起。连接被自动检测。
n 移除
按照下面的步骤断开
1.
•
• 对于
电缆将本机连接到计算机上,从而将P2卡和内置硬盘驱动器上的数据备份到计算机
专业版
USB 2.0
电缆将本机连接到计算机上
[POWER]
对于
Windows XP
双击任务栏中 “安全删除硬件”图标。按照屏幕上的指示操作来停止 “
Devices
双击任务栏中 “拔下或弹出硬件”图标。按照屏幕上的指示操作来停止 “
Devices
”。
Windows 2000
”。
或更新
SP2
或更新
键,打开本机电源
连接
USB
专业版:
:
驱动程序。有关详细信息,请参考安
P2
Panasonic P2 series USB
Panasonic P2 series USB
中
文
通过按住
2.
电源指示灯熄灭。
拔出
3.
注意:
• 请使用市场上出售的
正常工作。
• 当您使用
于内置硬盘驱动器,
相同。在连接本机之前,请重新命名计算机上网络驱动器名称,请使用在计算机硬盘驱动器和光驱之外
的名称命名。命名从“
• 对于在第
进行存取。请参阅硬盘驱动器说明页 (在第
• 在本机连接到计算机上的情况下,弹出
• 不要一次将多个装置连接到计算机上。
• 数据不能从计算机写入到本机。
n 备份数据
为了保护内置硬盘驱动器上的宝贵数据,我们建议您在您的计算机上或其他存储设备上制作备
份。
在备份数据之前,请总是检查计算机硬盘上的剩余空间。
• 使用
选择本机上被显示出来的驱动器上的最上一级文件夹和文件。将此文件夹复制到计算机上您
想要的目标文件夹。在本机的所有驱动器上执行相同程序。
• 使用 “
选择需要的视频剪辑,然后将其复制到计算机上您想要的目标文件夹 (设定了虚拟驱动器的
地方)。请参考软件说明书以获取进一步的说明。
[POWER]
USB 2.0
USB 2.0
页上 “从P2卡复制到硬盘驱动器”中说明的操作,操作中不使用的驱动器不能通过计算机
C-11
Windows
播放软件”:
P2
键两秒钟以上,关闭本机电源
电缆
USB 2.0
电缆将本机连接到计算机上时,最多16个驱动器被添加到计算机上 (15个驱动器对应
1
资源管理器:
电缆。请使用短于
个驱动器对应于P2卡)。在某些情况下,这些驱动器可能会与网络上的现存驱动器
:”,“Y:”,“W:”,“V:”开始,按照英文字母顺序的相反顺序依次命名。
Z
卡时,首先请参考第
P2
的电缆。如果电缆长度超过
3 m
页上说明),以确认哪些驱动器已经被分配。
C-17
页上 “弹出P2卡”中的说明。
C-9
3 m
,建立的连接就不会
C-15
Page 46

存储器管理程序
P2
通过使用P2存储器管理程序应用程序,您就可以显示
机。
AJ-PCS060G
特色
n 硬盘驱动器状态显示
您可以查看本机硬盘驱动器的分区信息、自我诊断信息以及其他信息。
n
AJ-PCS060G
您可以自定义本机的操作参数,包括启用或禁用自动关闭电源功能。
n
AJ-PCS060G
您可以从松下网站下载软件,来保证本机支持最新的状态。
设置
软件更新
系统要求
您的计算机必须满足适用于
操作系统:
Windows XP
Windows 2000 SP4
内存:
处理器: 奔腾
接口: 具有
256 MB
以上 (推荐使用
处理器
4
USB 2.0
存储器管理程序的下面系统要求。
P2
专业版
1.0 GHz
端口
或更新
SP2
或更新
512 MB
以上 (推荐使用奔腾4 处理器
以上内存)
安装/卸载
当您从只读光盘中将
载的说明信息,请参阅附赠的安装手册。
驱动程序安装到计算机上时,会自动安装P2存储器管理程序。有关安装和卸
P2
的状态,并且用几种方法管理本
1.5 GHz
以上处理器)
启动和关闭
使用
1.
按下
2.
在本机上,电源指示灯绿色亮起。连接被自动检测。
启动P2存储器管理程序
3.
Windows XP
Windows 2000
请确保在P2存储器管理程序屏幕的左下角指示显示出 “状态:正在连接”
4.
现在您可以显示本机的状态并进行管理。(参阅第
如果要关闭P2存储器管理程序,单击右上角的 按钮
5.
P2
C-16
存储器管理程序
P2
USB 2.0
[POWER]
转到
转到
存储器管理程序屏幕被关闭。
电缆将本机连接到计算机上
键来打开本机电源
专业版:
开始]→[所有程序]→
[
:
开始]→[程序]→
[
[Panasonic P2] →[P2
[Panasonic P2] →[P2
存储器管理程序]。
C-17
存储器管理程序]。
页)
Page 47

存储器管理程序屏幕
P2
屏幕概述
硬盘信息页面
用于查看和格式化本机的内置硬盘驱动器。
页面选项卡
单击选项卡进入不同页面。
页面显示区
显示有关本机的多种信息和操作按钮的区域部
分。
状态显示区
当本机连接到计算机上时,显示 “状态:正在连
接”,未连接的话,显示 “状态:断开”。
中
文
分区信息部分
为从P2卡复制过来的数据显示分区信息。
号码
显示分区编号。
驱动器号
显示被分配的驱动器盘符。
状态
显示分区状态。
”:正常
“
OK
“
ERROR
原卡序列号
显示复制源的
原卡容量
显示复制源的
复制日期
显示复制的日期。
”: 在复制或验证过程中某个时点
出现了问题。
卡的序列号。
P2
卡的容量 (以MB计算)。
P2
快速格式化按钮
如果要快速格式化内置硬盘驱动器,按下面的步
骤操作。
单击[快速格式化]按钮
1.
会显示一个确认对话框,提示您批准格式化。
单击[是]执行快速格式化。
2.
※
1
C-17
Page 48

存储器管理程序屏幕 (续)
P2
全部删除按钮
用于对内置硬盘驱动器的所有扇区都写入“零”。
如果使用电池作为本机的电源,在进行此步骤之
前,请切换成使用交流电源适配器供电。
单击[全部删除]按钮
1.
会显示一个确认对话框,提示您批准数据删
除,之后还会显示一个对话框,以确认交流电
源适配器的连接。
单击[是
2.
对所有扇区都写入 “零”。
]
※
※
1
2
、
维护部分
显示内置硬盘驱动器已被使用的总时间。
S.M.A.R.T
信息页面
注意:
※1:在使用[快速格式化]和[全部删除]功能之前,
请将本机放在一个稳定的地方。
在格式化过程中,振动或撞击可能会损坏本
机。
快速格式化]和[全部删除]功能将会删除
使用
[
内置硬盘驱动器上的所有数据。
如果硬盘上有您需要的数据,请在格式化之前
将数据用另一个存储媒体进行备份。
:将零写入所有扇区需要花费大约45分钟。进行
※
2
此项操作时,请总是使用交流电源适配器给本
机供电。
硬盘是相对来说易碎的设备。在使用本机的硬盘驱动器之前,请查看
Self-Monitoring, Analysis and Reporting Technology
(自我监测、分析和报告技术))。如果显示
错误,请联络经销商。
在此页面上查看本机的内置硬盘驱动器的自我诊断信息。
自我诊断信息部分
显示自我诊断信息,如下所示。
S.M.A.R.T
信息(
S.M.A.R.T
:
模式部分
自我诊断信息包括一个数字的列表。从这些选项
中选择格式。
对于十六进制显示:选择
对于十进制显示:选择[十进制
十六进制
[
]
]
保存按钮
自我诊断信息可以被保存,如下所述。
单击[保存]按钮
1.
显示[另存为]对话框。
输入文件名,然后单击[保存]按钮
2.
自我诊断信息被保存为文本文件。
Name
通过名称识别被显示的项目。
Status
给出诊断结果。
:没有错误
OK
:出误
NG
Pre-Failure / Advisory
用“1”或 “0”来标注内置硬盘驱动器错误的
严重程度。
”:严重
“
1
“
”:不严重
0
如果对于一个程度严重的错误 (
Advisory]
说明内置硬盘驱动器发生了致命错误。请尽快
联络经销商。
中是“1”),诊断结果 是“NG”,
[Pre-Failure /
Attribute
显示一个代表项目状态的值。
Threshold
显示一个参考值,用于确定此项目的状态是
“
”或 “NG”。
OK
如果 的状态值比此部分中的值要低,判断结
果就是 “
NG
”。
RAW Data
显示项目的详细状态信息。
C-18
Page 49

存储器管理程序屏幕 (续)
P2
设定页面
用于查看和更改本机的操作参数。
高温模式部分
您可以指定如果内置硬盘驱动器温度超过了预定
的水平,此时硬盘驱动器的操作是被暂停还是继
续有效。
选项:
[挂起]和[激活]
[挂起]
[激活]
。
默认:
本机的当前设置在 “当前设置”部分中显示。
如果您对其进行更改,之后请单击
。
注意:
设定为
使用此设置时您要自己承担可能出现的风险。
低于工作温度部分
您可以指定允许硬盘驱动器进行操作的最低环境
温度。
选项:
[5度 / 41F]和[–5度 / 23F]
默认:
[5度 / 41F]
本机的当前设置在 “当前设置”部分中显示。
如果您对其进行更改,之后请单击
。
注意:
设定为
[–5度 / 23F]
障。
使用此设置时您要自己承担可能出现的风险。
。
应用]按钮
[
可能会造成硬盘驱动器故障。
。
。
应用]按钮
[
可能会造成硬盘驱动器故
在
当本机通过
用
[打开]
[关闭]
注意:
方式上的冲击检测部分
USB
USB 2.0
[打开]和[关闭]
(默认):
如果本机受到撞击,与计算机的数据传输会被
暂停。
:
即使本机受到撞击,与计算机的数据传输也会
进行。
本机的当前设置显示在 “当前设置”部分中。
如果您对其进行更改,之后请单击
。
设置比[打开]设置更有可能造成硬盘驱动
[关闭]
器故障。
使用此设置时您要自己承担可能出现的风险。
电缆连接到计算机上时,使
来启用或取消撞击检测。
[应用]
按钮
自动电源关闭模式部分
您可以指定本机处于不使用的状态 (当没有进行
任何复制或格式化操作)时,自动关闭电源之前
的等待时间。
选项:[从不关闭]、[5分钟]、
[20分钟]、[25分钟]和[30分钟]
:
默认
[10 分钟]
本机的当前设置在 “当前设置”部分中显示。
如果您对其进行更改,之后请单击
。请注意,当本机连接到计算机上时,自动关
闭电源功能被禁用。
[10 分钟]、[15分钟]
。
应用]按钮
[
、
初始化按钮
您可以恢复 、 、 和 部分中的默认设置。
但是,请注意设置的详细信息不会自动被应用。
如果您对其进行更改,之后请单击
。
应用]按钮
[
应用按钮
按照下面步骤,将 、 、 和 部分中的设置
详细信息保存在本机上。
单击[应用]按钮
1.
会显示一个确认对话框。
单击[是
2.
详细信息被保存在本机上。
重新启动本机
3.
注意:
在本机被重新启动之后,新的设置生效。
]
中
文
C-19
Page 50

存储器管理程序屏幕 (续)
P2
升级页面
用于保持本机的软件支持最新的状态。
本机状态部分
显示所使用软件的当前模式 (标准模式或软件升
级模式),以及版本与校验码。
升级部分
通过下载和安装最新软件,您就可以保持本机的
软件最新。
浏览按钮
单击[浏览]按钮来选择下载的软件以便安装到本
装置上。
“文件版本
与校验码。
校验码”部分显示升级后软件的版本
/
执行按钮
用于执行升级软件的命令。
请注意,需要花费几分钟来完成这一过程。
注意:
在此过程中,绝对禁止关闭本机的电源或者拔
除
USB 2.0
这样做可能会损坏本机。
此外,预先将本机放在稳定的地方上。
电缆。
C-20
Page 51

存储器管理程序屏幕 (续)
P2
升级步骤
请按下述的技术支持网页的屏上指示下载本
1.
机的软件数据,将文件数据保存到您所选择
的文件夹内。
日语版
http://panasonic.biz/sav/
英语版
https://eww.pavc.panasonic.co.jp/pro-av/
关闭本机电源。
2.
在状态显示区中,“状态:断开”显示出来。
打开本机侧面上的滑动开关盖,将开关滑动
3.
到前面板侧,如下所示。
后面板侧 前面板侧
打开本机电源。
4.
在状态显示区中,“状态:正在连接”显示出来。
在 “当前设置”部分中,请确保 “模式:软
5.
件升级模式”显示出来
如果显示 “模式:标准模式” ,请重新确认滑动
开关滑动到前面板侧,如步骤
在更新过程中,指示灯的显示如下所示。
:指示灯亮起
G :绿色 OR :橙色
COPY STATUS
20 40 60 80
。
中说明那样。
3
,
100%
:指示灯闪烁
P2C
HDD
单击[执行]按钮。
8.
会显示一个确认对话框。
单击[是]按钮。
9.
最新的软件将会被安装,时间要花费几分钟。
在此过程中,绝对禁止拔出
闭本机或计算机的电源。
在检查更新信息之后,单击[确定]按钮。
10.
本机会自动被取消启用。在
会显示有关弹出的警告,但这不是问题。单击
按钮。
定
]
在本机的侧面上,将滑动开关设定滑向后
11.
USB 2.0
电缆,或者关
Windows 2000
面板侧,然后关闭滑动开关盖。
打开本机的电源。
12.
在状态显示区中,“状态:正在连接”显示出来。
确认在 “当前设置”部分中显示 “模式:
13.
标准模式”。
确认 “文件版本/校验码”中的信息和 “本
14.
机版本
如果不相符合,从步骤2重复操作步骤。
注意:
校验码”中的信息相符合。
/
卡的最新信息请查阅下列技术支持网
有关
P2
页:
日语版
http://panasonic.biz/sav/
英语版
https://eww.pavc.panasonic.co.jp/pro-av/
中,
确
[
中
文
GGGGG
单击[浏览]按钮。
6.
[打开]
11
对话框。
校验码”中的信息和“本机版本
/
。
会显示
选择在步骤1中下载的本机用软件数据。
7.
“文件版本/校验码”部分显示升级后软件的版本
与校验码。
如果“文件版本
校验码”中的信息相符合,就没有必要升级。
/
转到步骤
OR OR
C-21
Page 52

ERROR
可能影响本机的错误如下所示。请查清状态并采取下列纠正措施。
指示灯显示
, ,
R :红色 OR :橙色
编号
1
2
3
4
5
6
7
8
:指示灯亮起
ERROR
E1 E2 E3 E4
R
R
R
R
R
R
R
R
R
R
R
, ,
REMAIN
R
R
R
R
R
R
R
R
R
:指示灯闪烁
R
R
R
R
9
R
R
10
11
12
R
R
13
※如果要清除错误显示,请同时按下
[POWER] 键和 [CANCEL]
状态 纠正措施
关闭本机的电源,使其充分冷
内置硬盘驱动器的温度
超出可操作范围之外。
电池量低。 给电池组重新充电。
电压异常低。
在开始复制时,硬盘驱
动器上没有足够的剩余
空间。
在开始复制时,
插入。
在开始复制时,发生震
动。
在开始复制时发生错
误,并且该错误并不是
硬盘驱动器上没有足够
的剩余空间,
入,振动故障等类似错
误。
在复制过程中,发生错
误。(不是
来发生的错误)
发生P2卡格式化错
误。(写保护)
卡上有一个视频
在
P2
剪辑需要进行恢复。
数据不是标准格式。
插入了不能使用P2卡。
P2
P2
卡被拔出
P2
卡未插
却,然后再使用。
当
闪烁时,本机正在预热。
[E2]
请转到较暖和的地方。
给电池组重新充电。(在这些情
况下,本机会立即关闭电源。)
在清除错误显示之后
内置硬盘驱动器。如果硬盘上
有您需要的数据,在格式化之
前使用另一个存储媒体备份数
据。
卡未
在清除错误显示之后※,插 入
卡,然后继续复制。
在清除错误显示之后
放置在平稳的地方上。在振动
停止后,您可以恢复使用。
在清除错误显示之后
试复制数据。如果该错误再次
发生,更换
制。如果即使这样也不能避免
该错误再次发生,请联络经销
商。
在清除错误显示之后
护开关设定到
的另一侧。(参阅第
在清除错误显示之后
之前,请使用
设备恢复视频剪辑。
在清除错误显示之后
试格式化卡。如果即使这样也
不能避免该错误再次发生,请
联络经销商。
在清除错误显示之后
恢复使用。有关
详细信息,请联络经销商。
键。
卡,再次尝试复
P2
PROTECT
摄像机或其它
P2
P2
※
,格式化
P2
※
,将本机
※
,再次尝
※
,将写保
位置
页)
C-10
※
,在使用
※
,再次尝
※
,您可以
卡进一步的
C-22
Page 53

ERROR
编号
14
15
16
17
18
19
20
21
22
23
24
25
26
27
※如果要清除错误显示,请同时按下
指示灯显示 (续)
REMAIN
ERROR
E1 E2 E3 E4
R
R
R
R
R
R
R
R
R
R
R
R
R
R
R
R
R
R
OR
R
R
R
R
R
R
R
R
R
R
R
R
R
R
OR
状态 纠正措施
卡格式化发生错误。
P2
(不是写保护或者
被拔出来)
内置硬盘驱动器上发生
快速格式化]错误。
[
内置硬盘驱动器上发生
R
全部删除]错误。
[
内置硬盘驱动器上发生
S.M.A.R.T
复制失败,然后本机电
R
源被开启,发生错误。
快速格式化]操作失
[
R
败,然后本机电源被开
启,发生错误。
全部删除]操作失败,
[
然后本机电源被开启,
OR
发生错误。
在发生内部错误之后,不
R
能进行复制或格式化操
作。
在更新过程中发生错
R
误。
没有应用纠正措施。本
R
机的内部设置不能被调
节,所以发生错误。
内部锂电池漏电。
当写入管理性数据时,
感应器检测到对硬盘驱
R
动器的撞击或发生硬盘
驱动器存取错误。
内置硬盘驱动器的控制
R
信息出现某个错误。
当验证功能已经独立进
行时,将发生
错误。
NG
P2
错误。
Verify
[POWER] 键和 [CANCEL]
在清除错误显示之后
试格式化卡。如果该错误再次
发生,更换
卡
式化。如果即使这样也不能避
免该错误再次发生,请联络经
销商。
内置硬盘驱动器可能出现故
障。请联络经销商。
内置硬盘驱动器可能出现故
障。如果硬盘上有您需要的数
据,首先请清除错误显示,然后
在不同的存储媒体上备份数
据,接着请联络经销商。
在清除错误显示之后
试复制数据。
再次执行
再次执行
本机可能发生故障。请联络经
销商。
请联络经销商更换锂电池。
一旦显示此错误,当本机电源开启
时,就会持续显示此错误,直到您
更换锂电池。
先关闭本机电源,然后再打开。
将本机放置在平稳的地方上之
后,复制数据。
如果是重要的数据,请将其记
在独立媒体上制作备份,然后
用
快速格式化]进行处理。
[
在清除错误显示之后
试复制数据。
键。
P2
快速格式化]操作。
[
全部删除]操作。
[
※
卡,再次尝试格
※
※
,再次尝
中
文
,再次尝
,再次尝
C-23
Page 54

ERROR
编号
28
指示灯显示 (续)
REMAIN
ERROR
E1 E2 E3 E4
R
OR
29
※如果要清除错误显示,请同时按下
COPY STATUS
编号
ERROR
20 40 60 80
状态 纠正措施
当在
Verify NG
生之前出现某个错误
时,将终止动作而不进
行确认,然后启动电
源。
感应器检测到对硬盘驱
动器的撞击,发生错
OR
误。
错误发
[POWER] 键和 [CANCEL]
100
%
状态 纠正措施
在清除错误显示之后
试复制数据。
在确保本机远离能够受到撞击的
地方后,暂时关闭本机的电源,等
待一会儿。
键。
※
,再次尝
30
R
OR OR OR OR OR
在存取
卡被拔出,错误发生。
卡过程中,
P2
先关闭本机电源,然后
P2
再打开。
故障排除
如果本机看起来出现故障,请核对下列要点。如果故障持续存在,请联络经销商。
症状 要检查的项目
电池组漏电吗?
键
按下
[POWER]
在插入P2卡并按下
始。
按下
按下
当通过
在
Windows
部驱动器盘符。
不能格式化P2卡。
按下
键后,
[]
[HDD CAP]
USB 2.0
[POWER]
后,电源指示灯不亮。
[REMAIN]
键后,
电缆将本机连接到计算机上时,
资源管理器中没有显示出本机的内
键
后,电源指示灯几乎不闪。
[START]
[REMAIN]
键后,复制没有开
指示灯不亮。
指示灯不亮。
•
• 交流电源适配器连接正确吗?
•
在内置硬盘驱动器上是否有足够的剩余空间可供
复制?
• 是否显示一个错误指出内置硬盘驱动器温度超出
或低于预定水平?
电源指示灯是否亮起 (绿色)?
•
• 电源指示灯是否亮起 (绿色)?
•
本机是否正在处理复制或格式化操作?
• 计算机支持
• 操作系统是
Windows 2000 SP4
• 本机是否被正确地连接到计算机上?
• 分配给网络驱动器盘符是否紧跟着计算机的硬盘
或光驱的盘符?
写保护开关是否设定为
•
•
卡被正确插入吗?
P2
您是否在低于5℃的温度环境下试图打开本机的
•
电源?
USB 2.0
Windows XP SP2
连接吗?
或更新,或者
或更新吗?
PROTECT
?
C-24
Page 55

规格
电源 :
耗电量 :最大
电源电压:
电池组
DC 7.9 V
1.3 A
显示安全信息。
DC 7.2 V
(选购件:
CGR-D16S,CGP-D28S
,正常操作时
CGA-D54S
交流电源适配器
(选购件:
操作环境:
在使用中 温度
存放时 温度
为了保护硬盘驱动器,如果硬盘驱动器的内
※
1
部温度超出本机的指定范围之外,会显示错
误,并且不允许进行复制操作。
DC 7.9 V
AG-B15
湿度
(无结露)
湿度
(无结露)
)
)
0 ℃到 +40 ℃
5 %到 85 %
–20 ℃到 +60
0 %到 90 %
0.8 A
,
相对湿度
相对湿度
℃
系统要求:
经验证的操作系统
Windows XP
专业版
Windows 2000 SP4
主内存
256 MB
USB
※
1
USB 2.0
硬盘容量:
以上 (推荐使用
接口
60 GB
卡槽:
PC
或更新,或者
SP2
或更新
512 MB
以上内存)
中
文
PCMCIA类型 II (CardBus) ×1
尺寸 (宽×高×深):
90 mm×45 mm×180.5 mm
(不包括伸出部分)
重量:
650 g
所示的重量和尺寸为近似值。
规格如有修改,恕不另行通知。
C-25
Page 56

J-1
もくじ
安全上のご注意 ‥‥‥‥‥‥‥‥‥J-2
概要 ‥‥‥‥‥‥‥‥‥‥‥‥‥‥J-6
特長 ‥‥‥‥‥‥‥‥‥‥‥‥‥‥J-6
付属品 ‥‥‥‥‥‥‥‥‥‥‥‥‥J-6
別売品 ‥‥‥‥‥‥‥‥‥‥‥‥‥J-6
使用上のお願い ‥‥‥‥‥‥‥‥‥J-7
本機について ‥‥‥‥‥‥‥‥‥‥‥J-7
ハードディスクについて ‥‥‥‥‥‥J-7
お手入れについて ‥‥‥‥‥‥‥‥‥J-8
メンテナンスについて ‥‥‥‥‥‥‥J-8
ACアダプターについて ‥‥‥‥‥‥J-8
バッテリーパックについて ‥‥‥‥‥J-8
準 備
各部の名称と機能 ‥‥‥‥‥‥‥‥J-9
前面 ‥‥‥‥‥‥‥‥‥‥‥‥‥‥‥J-9
上面 ‥‥‥‥‥‥‥‥‥‥‥‥‥‥J-10
右側面 ‥‥‥‥‥‥‥‥‥‥‥‥‥J-10
左側面 ‥‥‥‥‥‥‥‥‥‥‥‥‥J-11
後面 ‥‥‥‥‥‥‥‥‥‥‥‥‥‥J-11
コピー操作 ‥‥‥‥‥‥‥‥‥‥J-12
電源ON・OFF操作 ‥‥‥‥‥‥‥J-12
P2カードを入れる ‥‥‥‥‥‥‥‥J-12
P2カードを取り出す ‥‥‥‥‥‥‥J-12
P2カードの書き込み保護 ‥‥‥‥‥J-13
HDD残量表示 ‥‥‥‥‥‥‥‥‥‥J-13
バッテリーパック残量表示 ‥‥‥‥J-14
P2カードからHDDへのコピー ‥‥J-14
コピーキャンセル ‥‥‥‥‥‥‥‥J-16
フォーマット ‥‥‥‥‥‥‥‥‥J-16
P2カードフォーマット ‥‥‥‥‥‥J-16
HDDフォーマット ‥‥‥‥‥‥‥‥J-17
動作中の自動電源OFF対応 ‥‥‥J-17
使いかた
パソコンに接続する ‥‥‥‥‥‥J-18
P2ストアマネージャーについて ‥J-19
主な機能 ‥‥‥‥‥‥‥‥‥‥‥‥J-19
動作環境 ‥‥‥‥‥‥‥‥‥‥‥‥J-19
インストール・アンインストール
について ‥‥‥‥‥‥‥‥‥‥‥J-19
P2ストアマネージャーの
起動と終了 ‥‥‥‥‥‥‥‥‥J-19
P2ストアマネージャーの
画面について ‥‥‥‥‥‥‥‥J-20
HDD情報ページ ‥‥‥‥‥‥‥‥‥J-20
S.M.A.R.T情報ページ ‥‥‥‥‥‥J-21
動作設定ページ ‥‥‥‥‥‥‥‥‥J-22
バージョンアップページ ‥‥‥‥‥J-23
バージョンアップ手順 ‥‥‥‥‥‥J-24
パソコンと接続して
ERRORLED表示 ‥‥‥‥‥‥‥J-25
修理を依頼される前に ‥‥‥‥‥J-27
保証とアフターサービス ‥‥‥‥J-28
定格 ‥‥‥‥‥‥‥‥‥‥‥‥‥J-29
必要なときに
・Microsoftとそのロゴ、Windowsは米国MicrosoftCorporationの米国およびその他の
国における登録商標または商標です。
・Intel、 PentiumはIntelCorporationの米国およびその他の国における登録商標または商
標です。
・その他、本文で記載されている各種名称、会社名、商品名などは各社の商標または登録商
標です。なお、本文中では™、
®
マークは明記していません。
Page 57

J-2
日
本
語
安全上のご注意
必ずお守りください
お使いになる人や他の人への危害、財産への損害を未然に防止するため、必ずお守りいただく
ことを、次 のように説明しています。
この表示の欄は、「傷害を負
う可能性または物的損害の
みが発生する可能性が想定
される」内容です。
この表示の欄は、「死亡ま
たは重傷などを負う可能性
が想定される」内容です。
このような絵表示は、してはいけない
「禁止」内容です。
この絵表示は、必ず実行していただく
「強制」内容です。
■表示内容を無視して誤った使い方をしたと
きに生じる危害や損害の程度を、次の表示
で区分し、説明しています。
注意
警告
この表示の欄は、「死亡ま
たは重傷などを負う危険が
切迫して生じることが想定
される」内容です。
危険
■お守りいただく内容の種類を、次の絵表示
で区分し、説明しています。
(下記は絵表示の一例です)
危険
バッテリーパックは、専用のACア
ダプターで充電する
指定以外の充電器で充電すると、
液もれ・発熱・発火・破裂など
を起こし、けがをする原因にな
ります。
指定以外のバッテリーパックを使わない
バッテリーパックの端子部( ・ )に金属物(ネックレスやヘアピン
など)を接触させない
バッテリーパックを分解、加工(はんだ付けなど)、加圧、加熱、火中
投入などをしない
・ビニール袋などに入れ、金属物と接触させないようにしてください。
・万一、液もれが起こったら、販売店にご相談ください。
液が身体や衣服に付いたときは、水でよく洗い流してください。
液が目に入ったときは、失明の恐れがあります。目をこすらずに、すぐにきれいな水で洗
ったあと、医師にご相談ください。
液もれ・発熱・発火・破裂の原因になります。
AC アダプターは、専用のバッテ
リーパック以外の充電には使わな
い
液もれ・発熱・発火・破裂など
を起こし、けがをする原因にな
ります。
Page 58

J-3
安全上のご注意(つづき)
分解や改造をしない
分解禁止
内部には電圧の高い部分があり、
感電や火災の原因になります。
また、使用機器を損傷すること
があります。
・内部の点検や修理などは、お買い上げの
販売店にご相談ください。
警告
異常があったときは、ACアダプ
ターの電源プラグを抜く
・内部に金属や水などの液体、異
物が入ったとき
・落下などで外装ケースが破損し
たとき
・煙や異臭、異音などが出たとき
電源コード・電源プラグが破損す
るようなことはしない
傷つけたり、加工したり、高温部
に近づけたり、無理に曲げたり、
ねじったり、引っ張ったり、重い
ものを載せたり、束ねたりしない
そのまま使うと、火災・感電の
原因になります。
・ACアダプターは電源コンセントの近く
に設置し、電源プラグに簡単に手が届く
ようにしてください。
・バッテリーで使っている場合は、バッテ
リーを外してください。
・販売店に相談してください。
電源プラグのほこりなどは、定期
的にとる
プラグにほこりなどがたまると、
湿気などで絶縁不良となり、火
災や感電の原因になります。
・電源プラグを抜き、乾いた布で拭いてく
ださい。
コンセントや配線機器の定格を超
える使い方や、交流100V〜
240V以外での使用はしない
たこ足配線等で、定格を超えると、
発熱による火災の原因になります。
傷んだまま使用すると、感電・シ
ョート・火災の原因になります。
・コードやプラグの修理は、お買い上げの
販売店にご相談ください。
雷が鳴り出したら、本機の金属部
やACアダプターなどの電源プラ
グに触れない
落雷すると、感電につながりま
す。
接触禁止
内部に金属物を入れたり、水などの
液体をかけたりぬらしたりしない
ショートや発熱により、火災・
感電・故障の原因になります。
・機器の近くに水などの液体の入った容器
や金属物を置かないでください。
火災や感電の原因になります。
傷んだプラグやゆるんだコンセン
トのまま使用しないでください。
電源プラグは、根元まで確実に
差し込む
指定以外の電源電圧を使用しない
火災や感電の原因になります。
電源プラグ
を抜く
Page 59

安全上のご注意(つづき)
J-4
日
本
語
ぬれた手で電源プラグやコネクタ
ーに触れない
感電の原因になります。
ぬれ手禁止
乗り物を運転しながら使わない
事故の誘発につながります。
・歩行中でも周囲の状況、路面の状態など
に十分ご注意ください。
本体に誤って指定外の製品を使
用すると、火災や事故を起こす
原因になります。
別売品は、指定の製品を使用する
火災や感電の原因になります。
本機の開口部から異物を差し込ん
だり、落とし込んだりしない
警告
Page 60

安全上のご注意(つづき)
J-5
注意
不安定な場所に置かない
落ちたり、倒れたりして、けが
の原因になります。
長期間使用しないときや、お手入
れのときは、バッテリーを外し、
ACアダプターの電源プラグをコ
ンセントから抜く
火災や感電の原因になります。
湿気やほこりの多い場所や加湿器
のある場所に置かない
火災や感電の原因になります。
プラグやコネクターを抜くとき
は、コードを引っ張らない
コードが傷つき、火災や感電の
原因になる恐れがあります。
・必ずプラグやコネクターを持って抜いて
ください。
電源プラグ
を抜く
本機やバッテリーパック、ACア
ダプターを直射日光の当たる場所
や異常に温度が高くなる場所に置
かない
特に真夏の車内、車のトランクの
中は、想像以上に高温(約60℃以
上)になります。絶対に放置しな
いでください。外装ケースや内部
部品が劣化するほか、火災の原因
になることがあります。
バックアップ用リチウム電池は指
定の品番のものと交換する
指定外のリチウム電池と交換する
と、爆発・発火・発熱の恐れがあ
ります。
・
電池の交換は、販売店またはサービス店に
ご依頼ください。
飛行機内で使うときは、航空会社
の指示に従う
本機が出す電磁波などにより、飛
行機の計器に影響を及ぼす恐れが
あります。
・
病院などで使うときも、病院の指示に従っ
てください。
本機の上に重い物を載せたり、乗
ったりしない
重量で外装ケースが変形し、内
部部品が破損すると、火災・故
障の原因になることがあります。
Page 61

J-6
日
本
語
概要
※1:耐衝撃性能について
●
コピー中などの動作中に衝撃や落下を検知した場合、自動的に内蔵HDDのヘッド退
避を行う。
●
内蔵HDDを緩衝材で保護するHDDパック構造導入。ただし、無破損、無故障を保証
するものではありません。
本機(AJ-PCS060G)は、USB2.0端子(Type B)を搭載するAJ-P2CシリーズのP2カー
ド(メモリーカード)専用のポータブルハードディスクユニットです。
本機は、P2カードカメラレコーダーで記録したデータを、本機に内蔵するHDD(60 GBのハ
ードディスク)にコピーできます。
別売品
●
バッテリーパック VW-VBD33(1,500mAh)
VW-VBD35(2,700mAh)
VW-VBD55(5,400mAh)
●
ACアダプター AG-B15
特長
●
P2カードを1枚装着可能。
●
60GBの2.5インチHDDを内蔵。
●
加速度センサーおよびHDDパック構造により耐衝撃性能※1を向上。
●
P2カードから内蔵HDDに、直接データ転送をすることにより高速コピーを実現。
●
本機とパソコンをUSB2.0対応ケーブルで接続することにより高速データ転送が可能。
付属品
●
インストールマニュアル・・・・・・・・・・・・・・・・・・・・・・・・・・1
●
フェライトコア・・・・・・・・・・・・・・・・・・・・・・・・・・・・・・1
●
CD-ROM
[
P2ドライバー
,
P2カードマネージャー,インストールマニュアル
,取扱説明書(本書)
] ・・・1
この装置は、情報処理装置等電波障害自主規制協議会(VCCI)の基準に基づくクラスB 情報
技術装置です。この装置は、家庭環境で使用することを目的としていますが、この装置がラ
ジオやテレビジョン受信機に近接して使用されると、受信障害を引き起こすことがあります。
取扱説明書に従って正しい取り扱いをしてください。
ヨーロッパ連合以外の国の廃棄処分に関する情報
このシンボルマークはEU域内でのみ有効です。
製品を廃棄する場合には、最寄りの市町村窓口、または販売店で、正しい廃棄方法
をお問い合わせください。
Page 62

J-7
使用上のお願い
本機には、ハードディスクが内蔵されており、パック構造により、落下/衝撃性能を向上さ
せる機構はもっていますが、無破損、無故障を保証するものではありません。
あらかじめ、ご了承ください。
別売のバッテリーパックおよびACアダプターをご用意ください。
本機について
本機には、ハードディスク(以下HDD)が内蔵されています。
HDDや、HDDに記録したデータが損なわれたり、動作が中断したりする場合がありますの
で、設置時や使用時は以下のことに気をつけてください。
HDDは非常に精密な機器で、使用状況によっては部分的な破損や最悪の場合データの読み書
きができなくなるおそれも十分にあります。このため内蔵HDDは、コピーしたデータの恒久
的な保管場所ではなく、あくまでも別の記録媒体にバックアップするまでの、一時的な保管
場所として使用してください。
●
動作中に振動や衝撃を与えない。(HDDが破損することがあります。)
●
振動する場所や不安定な場所で使用しない。
●
密閉された場所、放熱ができない場所、風通しの悪い場所では使用しない。
●
温度差の激しい場所では使用しない。
→温度差の激しい場所で使用すると、露付きが起こる場合があります。本機内部に露付
きが起こったまま使用すると、HDDに傷が付き、故障の原因になります。また、室温の
温度変化は、毎時20℃以下(1時間あたりの温度変化が20℃以内)に保つようにしてく
ださい。
●
湿度の高い場所で使用しない。
●
電源ONのときは、バッテリーパックおよびACアダプターを抜かない。
●
移動させるときには、必ず[POWER]ボタンを2秒以上押して終了処理をし電源をOFFする。
完全に回転が止まってから(2分程度待ってから)、振動や衝撃を与えないように動かす。
(電源を切っても、HDDはしばらくの間は惰性で回転しています。)
●
海抜−90m以下および海抜3000m以上の場所では使用しない。
ハードディスクについて
■ 記録データについて
HDDが故障すると、HDDに記録された内容が失われます。重要なデータは必ず別の記録媒
体にバックアップをとるようにしてください。バックアップ方法はJ-18ページを参照してく
ださい。
■ 本機の廃棄・譲渡時におけるHDD内のデータ消去について
お客様が本機を廃棄・譲渡を行う際に、HDD内の重要なデータが流出するというトラブルを
回避するためには、HDD内にコピーしたすべてのデータを、お客様の責任において消去する
ことが非常に重要です。
廃棄するためには、金槌や強い磁気によって物理的・磁気的に破壊して、読めなくすること
を推奨します。
HDDの故障あるいは何らかの不具合によるデータの損失、ならびにこれらに関するその
他の直接・間接の損害につきましては、当社は責任を負いかねます。あらかじめご了承く
ださい。
Page 63

J-8
日
本
語
使用上のお願い(つづき)
お手入れの際は、ベンジン、シンナー、アルコールなどの溶剤を使わない
●
お手入れの際は、バッテリーパックを取り外すか、またはACアダプターのコンセントを抜
いてください。
●
溶剤を使うと外装ケースが変質したり、塗装がはげるおそれがあります。
●
本機は、柔らかい、乾いた布でほこりをふいてください。汚れがひどいときは、中性洗剤
を水でうすめ、その液にひたした布をよく絞ってから汚れをふき取ってください。そのあ
と、乾いた布でからぶきしてください。
●
化学ぞうきんをご使用の際は、その注意書に従ってください。
別売の
ACアダプター(AG-B15)を使用してください。
ご使用の際には、別売品の取扱説明書をよく読んでご使
用ください。
ノート:
ACアダプターでご使用になるときは、本機に接続されるDC
ケーブルのバッテリー型コネクタの根元に同梱のフェライト
コアを取り付けてください。取り付けの際には、ケーブルを
フェライトコアに2回巻きつけてください。このフェライトコ
アを使用しないと、他の機器に影響を与えることがあります。
ACアダプターについて
内蔵ハードディスクドライブ(HDD)は補修用性能部品です。
本機を最良の状態でお使い頂くために、ユーザーによる定期的な状態確認と販売店による定期保
守をして頂く事をお勧めします。
定期保守の内容につきましては販売店にお問合せください。
定期保守は、下記を目安に依頼してください。確認のしかたについては、J-21ページを参照し
てください。
お願い:
●
保守サービスの際には、HDDの記録内容が失われることがあります。
保守サービスをご依頼の際には、必ず記録内容をバックアップしていただきますようお願いいたします。
なお、失われたデータに対しての補償は致しかねますの で、あらかじめご了承ください。
●
HDD故障時には、保存されているデータの補償、修復は出来ません。
HDDは一時保存用ですので、早めのデータのバックアップをお勧めいたします。
稼働時間 2000時間毎
メンテナンスについて
別売のバッテリーパックを使用してください。
ご使用の際には、別売品の取扱説明書をよく読んでご使用ください。
不要になった電池(バッテリーパック)は、貴重な資源を守るために、廃棄しないで充電式電池
リサイクル協力店へお持ちください。
使用済み充電式電池(バッテリーパック)の届け先
最寄りのリサイクル協力店へ。詳細は、有限責任中間法人JBRCのホームページ
http://www.jbrc.net/hpをご参照ください。
使用済み充電式電池の取り扱いについて
●
端子部をセロハンテープなどで絶縁してください。
●
分解しないでください。
バッテリーパックについて
お手入れについて
DCケーブルのバッテリー型コネクタ
フェライトコア
2回
巻き付ける
リチウムイオン
電池使用
充電式
Page 64

J-9
各部の名称と機能
前面
POWERボタン
電源をON/OFFするボタンです。
OFF時、[POWER]ボタンを押すと、電源が
ONします。ON時、2
秒以上
[POWER]ボタ
ン を押すと、電源がOFFします。
POWERLED
電源ON時に点灯します。
ただし、電源ON後の起動処理中や電源OFF時
の終了処理中は、点滅します。
P2Cボタン
P2カードをフォーマットするボタンです。
HDDにコピー完了後、必要に応じてP2カード
をフォーマットしてください。
( J-16ページ参照)
ノート:
一度フォーマットしたデータは、復元でき
ません。すべて消去してよいか確認してか
らフォーマットを行ってください。
HDDボタン
内蔵HDDをフォーマットするボタンです。内
蔵HDDにコピーしたデータが、不必要になっ
た時に一括で消すことができます。(J-17
ページ参照)
ノート:
一度フォーマットしたデータは、復元でき
ません。すべて消去してよいか確認してか
らフォーマットを行ってください。
P2CLED
P2カードアクセス時に点灯・点滅します。
( J-15、J-16ページ参照)
HDDLED
内蔵HDDアクセス時に点灯・点滅します。
( J-15、J-17ページ参照)
ERRORLED
エラー発生時に点灯・点滅します。
前面の[COPYSTATUS]LEDと上面の
[E1〜E4]LED、[P2C]LEDおよび[HDD]
LEDとの組み合わせでエラー内容を表示しま
す。( J-14、J-25〜J-27ページ参照)
P2カードスロット
P2カード専用スロットです。 のEJECTボタ
ンが押し込まれていることを確認し、P2カー
ドを水平にして挿入してください。
P2
カード以外の物は、絶対に挿入しないでく
ださい。
EJECTボタン
P2カードスロットに挿入したP2カードを、取
り出すときに使用します。
( J-12ページ参照)
COPYSTATUSLED
データコピーやフォーマット時の進行状態を表
示します。
( J-15〜J-17、J-27ページ参照)
Page 65

J-10
日
本
語
各部の名称と機能(つづき)
上面
STARTボタン
データコピーやフォーマットを開始するボタン
です。
[START] ボタンを2
秒以上押すと、各処理が
開始します。
CANCELボタン
コピーを中止するボタンです。
コピー処理中に、[CANCEL] ボタンを2
秒以上
押すと、コピーを中止します。
スライドノブ
ノブを矢印方向にスライドすると、フロントパ
ネルカバーが開きます。
バッテリーパック残量表示[ ]ボタン
ボタンを押すと の[REMAIN]にバッテリ
ーパック残量を約2秒間表示します。
( J-14ページ参照)
ただし、[USB]はUSB2.0対応ケーブル接続
時、緑色点灯します。
HDD残量表示[HDDCAP]ボタン
ボタンを押すと の[REMAIN]に内蔵HDD
残量を約2秒間表示します。
[REMAIN]は、コピー可能な枚数を示します。
( J-13ページ参照)
ただし、[USB]はUSB2.0対応ケーブル接続
時、緑色点灯します。
バッテリーパック/HDD残量表示 兼 エ
ラー表示LED[REMAIN]
バッテリーパックや内蔵HDDの残量とエラー
発生時の内容を表示します。
( J-13、J-14、J-25〜J-27ページ参照)
USB2.0端子(TypeB)
本機とパソコンを接続するときは、この端子に
USB2.0対応ケーブルをつないでください。
ノート:
本機を使用するには、USB2.0対応のパソ
コンが必要です。
右側面
Page 66

J-11
各部の名称と機能(つづき)
左側面
後面
スライドスイッチカバー
スライドスイッチ
フロントパネル側になっているとき本機用ソフ
トウェアをバージョンアップできます。
通常時はリアパネル側です。
( J-24ページ参照)
電源装着部
別売のバッテリーパックまたはACアダプター
を装着してご使用ください。
DCIN端子(7.9V)
バッテリーロック解除ボタン
別売のバッテリーパックおよびACアダプター
を取り外すときは、ボタンを押しながらボタン
側にスライドさせてください。
VERIFYスイッチ
P2カードから内蔵HDDにコピー後、Verifyチ
ェックすることができます。
( J-15ページ参照)
ON: チェックする
OFF:チェックしない
ノート:
コピー精度維持のため、VERIFYスイッチ
ONで使用してください。OFFで使用の場合、
正しくコピーできない可能性があります。
ただし、ONで使用の場合、OFFと比べて2
倍以上の時間がかかります。
リアパネル側 フロント
パネル側
Page 67

J-12
日
本
語
本機のP2カードスロットにP2カードを挿入するときには、
必ずP2カードを水平にして確実に挿入してください。
斜めのまま、無理に挿入すると故障の原因になります。
P2カードアクセス([P2C]LED点灯)中にP2カードを取り出さないでください。データが
壊れます。
コピー操作
本機の電源には、別売のバッテリーパックか、ACアダプターをご使用ください。
( J-6ページ参照)
バッテリーパックおよびACアダプターが、本機に確実に接続できているか、確認してください。
接続については、別売品の取扱説明書を参照してください。
各操作前には、電源ONしてください。また、操作後、使用しない場合には電源OFFしてくださ
い。
電源ON
[POWER]ボタン を押すと、電源がONします。起動処理中はPOWERLEDが点滅し、使用可
能になると緑色に点灯します。
ノート:
●
低電圧エラーが発生している状態([ERROR]LEDが赤色点灯、[REMAIN]の[E2]が赤色点滅)
のときは、充電したバッテリーパックに変換するか、ACアダプターに切り換えて電源を再起動して
ください。
●
内蔵HDDの温度が所定温度以下([ERROR]LEDが赤色点灯、
[REMAIN]の[E1]が赤色点灯、
[E2]が赤色点滅)のときは、所定温度まで暖機運転を行います。暖機運転中は[START]ボタン
などは、受けつけません。
●
暖機運転は消費電力が大きいため、使用するバッテリーパックの残量によっては暖機運転完了後、
低電圧エラーになることがあります。発生時は一度電源をOFFし、再度電源をONにしてください。
電源OFF
[POWER]ボタン を2
秒以上押すと、電源がOFFします。
POWERLEDが消灯します。ただし、終了処理中は点滅します。
電源ON・OFF操作
EJECTボタンを押し、ボタンが飛び出したあと、もう一度押すと、P2カードが取り出せます。
ノート:
パソコンに接続して使用している場合は、カードの停止処理後に、EJECTボタンを押してください。
1.[スタート]→[マイコンピュータ]をクリックする
2.P2カードのドライブ(リムーバブルディスク)を右クリックして、取り出しを選択する
3.EJECTボタンを押して、P2カードを取り出す
P2カードを取り出す
P2カードを入れる
Page 68

J-13
コピー操作(つづき)
本機内蔵HDDには、最大15枚分のP2カードをコピーすることができます。(ただし、8GBの
P2カードのみ使用してコピーすると最大7枚分です。)内蔵HDDにコピーできる枚数は、[HDD
CAP]ボタンを押し、[REMAIN]の表示で確認できます。
【HDD残量(コピー可能カード枚数)表】参照。
電源ONの状態でコピー可能なP2カードの枚数を確認する
●
2,4GBのP2カード使用時:
[HDDCAP]
ボタンを1回
押してください。[REMAIN]の[
E1]が、1秒間橙色点灯
し、そのあ
と以下の【HDD残量(コピー可能カード枚数)表】のように表示します。
●
8GBのP2カード使用時:
[HDDCAP]
ボタンを2回押してください。[REMAIN]の[E1]と[E2]が、1秒間橙色点灯し、
そのあと以下の【HDD残量(コピー可能カード枚数)表】のように表示します。
[REMAIN]の表示が約2秒間表示した後に消灯します。
P2カードを挿入している状態で、書き込み禁止スイッチを切り換えても、以下の設定は機能し
ません。P2カードの挿入前に、書き込み禁止スイッチを確認してください。
書き込み禁止スイッチ設定
:データの書き込みや消去を禁止します。
:データの書き込みや消去ができます。
PROTECT
PROTECT
P2カードの書き込み保護
HDD残量表示
【HDD残量(コピー可能カード枚数)表】
残量
(コピー可能 カード枚数)
REMAIN
R
G
G
G
G
G
0
2
1
3
4
5枚以上
R
G
G
G
G
R
G
G
G
R
G
G
R
G
G
フル(未使用時)
G G G G
:
点灯
:
点滅
R
:
赤色
G
:
緑色
Page 69

J-14
日
本
語
コピー操作(つづき)
別売のバッテリーパックの残量を確認することができます。バッテリーパック残量は、[]ボ
タンを押し、[REMAIN]の表示で確認できます。【バッテリーパック残量表】参照。
低電圧エラーが発生している状態([ERROR]LEDが赤色点灯、[REMAIN]の[E2]が赤
色点滅)のときは、コピー操作できません。[REMAIN]の[E1]が緑色点灯している状態で
ご使用ください。
また、残量が0(ゼロ)になると、【バッテリーパック残量表】のようにエラー表示をし、すぐ
に電源をOFFします。充電した別売のバッテリーパックか別売のACアダプターに切り替えて
ください。
電源ONの状態で[ ]ボタンを押す
以下の【バッテリーパック残量表】のように表示します。
[REMAIN]の表示が約2秒間表示した後に消灯します。
ノート:
ACアダプター使用時に、100以外のLED表示の状態になる場合がありますが、問題ありません。
REMAIN
P2カードから内蔵HDDに、直接データ転送されるので、高速コピーができます。
本機の[P2C]LED、[HDD]LEDが点灯中は、本機の電源をOFFしたり、P2カードを取り出
さないでください。
別売のバッテリーパックを使用しているときには、コピー操作をする前に、バッテリーパック
の残量を確認してください。[REMAIN]の[E1]が赤色点滅のときには充電した別売のバッ
テリーパックか別売のACアダプターに切り替えてください。
バッテリーパック残量表示
P2カードからHDDへのコピー
【バッテリーパック残量表】
1.電源ONの状態でP2カードスロットに、P2カードを挿入する
2.[HDDCAP]ボタンを押し、残量(コピー可能カード枚数)が1枚以上であることを確認する
残量(コピー可能カード枚数)が0枚の場合は、必要なデータを別の記録媒体にバックアップしたあと
HDDフォーマットをしてください。( J-13、J-17ページ参照)
バッテリーパック
残量
G
G
G
G
R
R
100
0
G
G
G
G
R
G
G
G
R
G
G
R
G
R
G
R
:
点灯
,:点滅
R:
赤色
G:
緑色
Page 70

J-15
コピー操作(つづき)
4.[COPYSTATUS]LEDすべて緑色点灯していることを確認する
5.[POWER]ボタン を押す
コピーが完了し、[COPYSTATUS]LEDが消えます。
ノート:
●
すでにコピー済みのP2カード内のデータは、再度コピーをすることはできません。
この場合、[VERIFY]スイッチの設定により、以下の動作を行います。
[VERIFY]スイ
ッチOFF :上記手順3.を実行しても、すぐにコピー進行状態100%の表示になり
ます。
[VERIFY]スイッチON :上記手順3.を実行した場合、コピーは行わずにコピー進行状態40-
59%の表示になり、Verifyチェックが実行されます。
●
パソコンなどで、P2カード内のデータを編集したり、追加/削除した場合でも、同一データと認識
することがあります。この場合、[VERIFY]スイッチの設定により、以下の動作を行います。
[VERIFY]スイッチOFF : 上記手順3.を実行しても、すぐにコピー進行状態100%の表示になり
ます。
[VERIFY]スイッチON : 上記手順3.を実行した場合、コピーは行わずにコピー進行状態40-
59%の表示になり、Verifyチェックが実行され、違うデータとして認識
し、VerifyNGエラー
※2
で終了します。( J-27ページ参照)
●
本機内部温度が高くなると自動的に、コピー速度が遅くなります。 この場合[P2C]LED、[HDD]
LEDの点滅も遅くなります。
●
コピー中に電源をOFFしたり、P2カードを抜くなどコピーが正常に完了できなかった場合、HDD残
量(コピー可能カード枚数)がコピーに失敗したP2カード枚数分減ります。
●
[COPY STATUS]LEDがすべて緑色点滅したときは、何も記録されていないP2カードを挿入し
て、上記手順3.を実行したときです。
●
不良クリップ※3が含まれるP2カードは事前に、P2カメラレコーダー等で修復してから本機にてコピ
ーしてください。不良クリップのままコピーすると、コピーされた不良クリップは修復できなくなる
ことがあります。
※1:P2カードと内蔵HDDに記録されたデータが同一であるかのチェックを行います。
※2:VerifyNGエラーになった場合、HDDパーティション情報欄( J-20ページ参照)が
ERRORになります。この場合、該当のP2カードは再度コピー可能となりますが、ERROR
となったパーティションはそのまま残ります。
※3:記録中にP2カードを抜いたり、電源が切れた場合にできる、記録不具合のクリップです。
P2カメラレコーダー等で、サムネール画面を表示したときに黄色い マークがついているクリ
ップです。
X
3.[START]ボタンを2秒以上押す
コピーが開始し、Verifyチェック※1を行います。([VERIFY]スイッチON時)
コピーの進行状態が、以下のようにLED表示されます。
:
点灯
,, :
点滅
G:
緑色
OR :
橙色
進行状態
(%)
COPYSTATUS
00-19
20-39
40-59
60-79
80-99
100
G
G
G
G
G
G
G
G
G
G
G
G
G
G
G
G
G
G
G
G
アクセス
中は
OR
アクセス
中は
OR
Page 71

J-16
日
本
語
フォーマット
P2カードに記録しているデータをすべて消去できます。
3.2秒以内に [START]ボタンを押す
[COPY STATUS]LED、[P2C]LED、[HDD]LEDの表示が消えて、P2カードフォーマットが
開始すると、[P2C]LEDが橙点滅になり、完了します。
ノート:
手順2.の[COPY STATUS]LED、[P2C]LED、[HDD]LEDが表示されたのち、2秒以内に手
順3.の[START]ボタンを押さなければ、P2カードのフォーマットが開始されません。
再度、手順2.から操作してください。
P2カードフォーマット
一度フォーマットしたデータは、復元できません。すべて消去してよいか、確認してからフォ
ーマットを行ってください。
本機の[P2C]LEDが点滅中は、本機の電源をOFFしたり、P2カードを取り出さないでくださ
い。
P2カードの書き込み禁止スイッチが、PROTECT側になっている場合にはフォーマットできま
せん。また、P2カードスロットにP2カードを挿入した状態で、書き込み禁止スイッチを切り換
えてもフォーマットできません。
1.電源ONの状態でP2カードスロットに、P2カードを挿入する
2.[P2C]ボタンを2秒以上押す
[COPYSTATUS]LED、[P2C]LED、[HDD]LEDが以下の表示になります。
:点灯 :点滅
OR :橙色
COPYSTATUS
OR OR OR OR OR OR
−
コピーが完了していないときに、コピーを中止することができます。
1.[CANCEL]ボタンを2秒以上押す
[COPYSTATUS]LED、[P2C]LED、[HDD]LEDが以下の表示になります。
2.[POWER]ボタン を押す
コピーキャンセルが完了し、[COPYSTATUS]LEDが消えます。
ノート:
コピーされたデータは、コピーキャンセルで自動的に削除されます。
コピーキャンセル
:点灯
OR: 橙色
COPYSTATUS
OR OR OR OR OR
− −
コピー操作(つづき)
Page 72

J-17
フォーマット(つづき)
本機内蔵HDDにコピーしたデータをすべて消去できます。
本機を安定した場所に置いてフォーマットを行ってください。
衝撃や振動を与えると故障の原因になります。
一度フォーマットしたデータは、復元できません。すべて消去してよいか、確認してからフォ
ーマットを行ってください。
本機の[HDD]LEDが点灯中は、本機の電源をOFFしないでください。
1.電源ONの状態で[HDD]ボタンを2秒以上押す
[COPYSTATUS]LED、[P2C]LED、[HDD]LEDが以下の表示になります。
動作中の自動電源OFF対応
■ 本機は、コピーおよびフォーマットなどの動作をしていない状態が、10分経過すると自動的
に電源がOFFします。ご使用になるときには、再度電源をONしてください。
■ 本機とパソコンをUSB2.0対応ケーブルで接続しているときは、コピーおよびフォーマット
などの動作をしていない状態で放置されても、自動的に電源はOFFしません。使用しないと
きは、[POWER]ボタンを2秒以上押して、電源をOFFしてください。
■ コピー完了状態やエラー発生後のエラー確認待ちのときは、自動的に電源はOFFしません。
ノート:
P2ストアマネージャー動作設定ページの自動電源OFFまでの時間欄で、電源を自動的にOFFする
までの時間を設定できます。
設定欄の[OFFしない]/[5分]/[10分]/[15分]/[20分]/[25分]/[30分]から選択できます。初
期設定は「10分」です。( J-22ページ参照)
2.2秒以内に [START]ボタンを押す
[COPY STATUS]LED、[P2C]LED、[HDD]LEDの表示が消えて、内蔵HDDフォーマットが
開始すると、[HDD]LEDが橙点滅になり、完了します。
ノート:
●
手順1.の[COPY STATUS]LED、[P2C]LED、[HDD]LEDが表示されたのち、2秒以内に
手順2.の[START]ボタンを押さなければ、内蔵HDDのフォーマットが開始されません。
再度、手順1.から操作してください。
●
内蔵HDDに自動的に15ドライブ作成されます。
HDDフォーマット
:点灯 :点滅
OR:橙色
COPYSTATUS
OR OR OR OR OR
−
OR
Page 73

J-18
日
本
語
パソコンに接続する
本機とパソコンをUSB2.0対応ケーブルで接続すると、P2カードおよび内蔵HDDのデータを、
パソコンにバックアップできます。
本機をパソコンに接続するまえに、付属CD-ROM内のP2ドライバーを、インストールしてくだ
さい。付属インストールマニュアルを参照してください。
■ OS動作環境
WindowsXPProfessionalSP2以降
Windows2000SP4以降
■ 接続
1. パソコンを起動する
2. 本機とパソコンをUSB2.0対応ケーブルで接続する
3. 本機の[POWER]ボタン を押し、電源をONする
本機のPOWERLEDが緑色に点灯し、本機が接続されたことを自動的に認識します。
■ 取り外し
1. USB接続の切断処理を行う
●
WindowsXPProfessionalの場合:
タスクトレイにあるハードウェアの安全な取り外しアイコンをダブルクリックし、画面の指
示に従ってPanasonicP2seriesUSBDevicesを停止してください。
●
Windows2000の場合:
タスクトレイにあるハードウェアの取り外しまたは取り出しアイコンをダブルクリックし、
画面の指示に従ってPanasonicP2seriesUSBDevicesを停止してください。
2. 本機の[POWER]ボタン を2秒以上押して、電源をOFFする
本機のPOWERLEDが消灯します。
3. USB2.0対応ケーブルを抜く
ノート:
●
ケーブルは市販品のUSB2.0対応ケーブルをご使用ください。必ず、3 m未満のケーブルをご使用くだ
さい。ケーブルの長さが3mを超える場合は正しく動作しません。
●
本機とパソコンをUSB2.0対応ケーブルで接続すると、最大16ドライブ(内蔵HDD:15ドライブ,
P2カード:1ドライブ)が、パソコンに追加されます。追加されたドライブは、既に割り当てられて
いるネットワークのドライブと重なる場合があります。接続まえに、ご使用になるパソコンのネット
ワークドライブをパソコンのHDD/CD-ROMドライブから離れたドライブ文字Z:、Y:、
W:、V:、の順番に割り当てなおしてください。
●
J-14ページのP2カードからHDDへのコピー操作で使用しないドライブは、パソコンからアク
セスできません。J-20ページのHDD情報ページで割り当てられたドライブを確認してください。
●
本機とパソコンを接続している状態でP2カードを取り出す場合は、J-12ページのP2カードを取
り出すのノートを参照してください。
●
本機を2台以上パソコンに接続しないでください。
●
パソコンから本機への書き込みはできません。
■ バックアップ方法について
内蔵HDDに蓄えられた重要なデータを保護するために、パソコンなどにデータの複製を作成すること
をお勧めいたします。
必ずパソコンの空き容量を確認してからバックアップを行ってください。
●
エクスプローラを使用する場合:
本機各ドライブの最上位フォルダーおよびファイルを選択し、パソコン上の任意のフォルダにコピー
してください。本機の全ドライブで同じ操作をくり返してください。
●
P2ビューアーソフトウェアを使用する場合:
必要なクリップを選択して、仮想ドライブ設定されたパソコン上の任意のフォルダーにコピーしてく
ださい。操作方法については、ソフトウェアの取扱説明書を参照してください。
Page 74

J-19
P2ストアマネージャーについて
P2ストアマネージャーは、本機(AJ-PCS060G)の状態表示や操作を行うアプリケーション
ソフトです。
■ HDD情報表示
本機内蔵HDDのパーティション情報、自己診断情報などを確認することができます。
■ 本機(AJ-PCS060G)の動作設定
本機の自動電源OFFの有効/無効などの動作設定を行うことができます。
■ 本機(AJ-PCS060G)のソフトウェアバージョンアップ
弊社ホームページから、本機のソフトウェアをダウンロードして、バージョンアップを行う
ことができます。
主な機能
P2ストアマネージャーの起動と終了
1.本機とパソコンをUSB2.0対応ケーブルで接続する
2.本機の[POWER]ボタンを押し、電源をONする
本機POWERLEDが緑色に点灯し、本機と接続されたことを自動的に認識します。
3.P2ストアマネージャーを起動する
WindowsXPProfessionalの場合:
[スタート]→[すべてのプログラム]→[PanasonicP2]→[P2ストアマネージャー]を選択
します
。
Windows2000の場合:
[スタート]→[プログラム]→[PanasonicP2]→[P2ストアマネージャー]を選択します。
4.P2ストアマネージャーの画面左下接続状態: 接続中表示になっていることを確認する
本機の状態表示や操作などを行うことができます。( J-20ページ参照)
5.P2ストアマネージャーを終了するには、ウィンドウ右上の ボタンをクリックする
P2ストアマネージャーの画面が消えます。
P2ストアマネージャーは、以下の条件を満たすパソコンでご使用ください。
OS: WindowsXPProfessionalSP2以降
Windows2000SP4以降
RAM:256MB以上(推奨 512MB以上)
CPU: Pentium4プロセッサ 1.0GHz以上(推奨 Pentium4プロセッサ 1.5GHz以上)
USB: USB2.0ポートを装備
動作環境
P2ストアマネージャーは、付属CD-ROM内のP2ドライバーを、パソコンにインストールする
ときに、自動的にインストールされます。インストール・アンインストールについては、付属イ
ンストールマニュアルを参照してください。
インストール・アンインストールについて
Page 75

J-20
日
本
語
P2ストアマネージャーの画面について
基本の画面説明
ページ切り替えタブ
タブをクリックすると、それぞれのページに切
り替わります。
ページ表示領域
本機の情報を表示するための欄や、操作を行う
ためのボタンなどが表示されます。
接続状態表示領域
本機がパソコンに接続されている場合は、接
続状態: 接続中、接続されていない場合は、
接続状態: 切断と表示されます。
本機内蔵HDDの情報確認とフォーマットができます。
HDD情報ページ
HDDパーティション情報欄
P2カードからコピーしたデータのパーティシ
ョン情報を表示します。
番号
パーティション番号を表示します。
ドライブ
割り当てられたドライブ文字を表示します。
状態
パーティション状態を表示します。
OK: 正常
ERROR: コピーもしくはVerify中
に異常が発生した
元カードシリアル
コピー元のP2カードのシリアルナンバーを
表示します。
元カード容量
コピー元のP2カードの容量(メガバイト単
位)を表示します。
コピー日時
コピーした日時を表示します。
クイックフォーマットボタン
内蔵HDDのクイックフォーマットを実行でき
ます。
1.[クイックフォーマット] ボタンをクリックす
る
実行してよいかどうかの確認ダイアログが表
示されます。
2.[はい]をクリックする
クイックフォーマットが実行します。
※1
Page 76

J-21
Name
表示されている項目の名称を表示します。
Status
診断結果を表示します。
OK:異常なし
NG:異常あり
Pre-Failure/Advisory
内蔵HDDの異常を、重要度1か0で
表示します。
1:重要度が高い
0:重要度が低い
重要度が1で の診断結果がNGの
場合、内蔵HDDに重大な異常が発生してい
ますので、できるだけ早めに販売店にご相
談ください。
Attribute
項目の状態を表す値を表示します。
Threshold
項目が、OKかNGかを判断する基準値を表
示します。
の状態値が、この欄の値以下になってい
る場合は、NGと判断されます。
RAWData
項目の状態の詳細データを表示します。
P2ストアマネージャーの画面について(つづき)
自己診断情報表示欄
自己診断情報を表示します。
フォーマット欄
自己診断情報の数値表示を、以下のように選択
できます。
16進表示にしたいとき:[Hex]を選択する
10進表示にしたいとき:[Dec]を選択する
保存ボタン
自己診断情報を保存できます。
1.[保存]ボタンをクリックする
[名前をつけて保存] ダイアログが表示されま
す。
2.ファイル名を入力して [保存] ボタンをクリ
ックする
自己診断情報がテキストファイルで保存され
ます。
ハードディスクは故障しやすいので、使用するまえに参考としてS.M.A.R.T(Self-Monitoring,
AnalysisandReportingTechnology)情報を確認してください。
異常表示がある場合には、ご購入の販売店にご相談ください。
本機内蔵HDDの自己診断情報を確認できます。
S.M.A.R.T情報ページ
全消去ボタン
内蔵HDDの全領域に0を書き込む処理を実行で
きます。
バッテリーをお使いの場合には、ACアダプ
タ−に切り換えてください。
1.[全消去]ボタンをクリックする
実行してよいかどうかの確認と、ACアダプ
タ−接続の確認ダイアログが表示されます。
2.[はい]をクリックする
全領域に0を書き込む処理が実行します
。
※1,※2
メンテナンス欄
内蔵HDDの稼動積算時間が表示されます。
ノート:
※1:[クイックフォーマット]や[全消去]
を実行するときは、本機を安定した場
所に置いてください。
衝撃や振動を与えると、故障の原因に
なります。
[クイックフォーマット]や[全消去]
を実行すると、内蔵HDD内全てのデ
ータが消去されます。
必要なデータがある場合には、フォー
マットを行うまえに別の記録媒体にバ
ックアップしてください。
※2:全領域に0を書き込む処理は、実行処
理時間が45分ほどかかります。必ず
ACアダプタ−を接続して実行してく
ださい。
Page 77

J-22
日
本
語
P2ストアマネージャーの画面について(つづき)
本機の動作設定を確認/変更できます。
動作設定ページ
温度上昇時のHDD動作欄
本機内蔵HDDの温度が、所定温度の上限を超
えた場合に、HDD動作を停止させるか、ある
いは常に動作させるかを設定できます。
[停止させる]/[常に動作]から選択できま
す。
初期設定は[停止させる]です。
本機の現在の設定内容が、現在の設定:
欄に表示されます。
設定を変更する場合は、選択後、 の[適用]
ボタンをクリックしてください。
ノート:
[常に動作]に設定するとHDDの故障要因
になる可能性があります。お客様の責任に
おいてご使用ください。
HDD動作温度の下限欄
本機内蔵HDDの動作が可能な下限温度値を設
定できます。
[5℃/41F]/[−5℃/23F]から選択でき
ます。
初期設定は[5℃/41F]です。
本機の現在の設定内容が、現在の設定: 欄
に表示されます。設定を変更する場合は、選択
後、 の[適用]ボタンをクリックしてくださ
い。
ノート:
[
−5 ℃/23 F
]に設定するとHDDの故障
要因になる可能性があります。お客様の責
任においてご使用ください。
USBモードでの衝撃検知欄
本機とパソコンをUSB2.0対応ケーブルで接続
しているとき、本機の衝撃検知を有効にするか
どうかを[ON]/[OFF]で設定できます。
[ON](初期設定) :
本機に衝撃が加わると、パソコンとのデー
タ転送を停止します。
[OFF]:
本機に衝撃が加わっても常にデータ転送を
行います。
本機の現在の設定内容が、現在の設定:
欄に表示されます。設定を変更する場合は、
選択後、 の[適用]ボタンをクリックし
てください。
ノート:
[OFF]設定は[ON]設定と比べてHDDが
故障する可能性が高くなります。
お客様の責任においてご使用ください。
自動電源OFFまでの時間欄
本機がコピーおよびフォーマットなどの動作を
していない状態で放置された場合に、電源を自
動的にOFFするまでの時間を設定できます。
[OFFしない]/[5分]/[10分]/[15分]/[20
分]/[25分]/[30分]から選択できます。
初期設定は [10分]です。
本機の現在の設定内容が、現在の設定:
欄に表示されます。
設定を変更する場合は、選択後、 の[適用]
ボタンをクリックしてください。ただし、本機
とパソコンを接続しているときは、自動的に電
源はOFFしません。
初期状態に戻すボタン
、 、 、 の選択状態を初期状態に戻すこ
とができます。ただし、設定内容は変更されて
いません。
設定を変更する場合は、 の[適用]ボタンを
クリックしてください。
適用ボタン
、 、 、 の動作設定内容を、本機に保存
できます。
1.[適用]ボタンをクリックする
確認のダイアログが表示されます。
2.[はい]をクリックする
動作設定内容を本機に保存します。
3.本機を再起動する
ノート:
適用した設定は、本機を再起動した後に有
効になります。
Page 78

J-23
P2ストアマネージャーの画面について(つづき)
本機のソフトウェアのバージョンアップを実行できます。
バージョンアップページ
本体の状態欄
本機の現在の動作状態を示すモード(通常モー
ド、バージョンアップモード)と実行中のソフ
トウェアのバージョンとチェックサムが表示さ
れます。
バージョンアップ欄
本機のソフトウェアのバージョンアップ処理が
実行できます。
参照ボタン
[参照]ボタンをクリックし、ダウンロードし
た本機用のソフトウェアデータを選択できま
す。
ファイルのバージョン/チェックサム欄に、
バージョンアップ後のソフトウェアのバージョ
ンチェックサムが表示されます。
実行ボタン
本機のソフトウェアのバージョンアップが実行
できます。
バージョンアップ終了まで数分程度かかりま
す。
ノート:
バージョンアップ実行中は、本機の電源を
OFFしたり、USB2.0対応ケーブルを抜か
ないでください。
故障の原因になります。また、バージョン
アップを実行するときは、本機を安定した
場所に置いて実行してください。
Page 79

J-24
日
本
語
バージョンアップ手順
1. 下記のサポートサイトから画面の指示に従
って本機用のソフトウェアデータをダウン
ロードして、任意のフォルダに解凍する
2. 本機の電源をOFFする
接続状態表示領域に接続状態: 切断が表
示されます。
3. 本機側面のスライドスイッチカバーを外
し、下図のようにスライドスイッチをフロ
ントパネル側に設定する
4. 本機の電源をONする
接続状態表示領域に接続状態: 接続中が
表示されます。
5.
本体の状態欄にモード: バージョン
アップモードが表示されたことを確認する
モード: 通常モードになっている場合には、
手順3.のスライドスイッチがフロントパネル側
になっているか、再度確認してください。
バージョンアップモードの時には、以下のよう
にLED表示されます。
:点灯 , :点滅
G :緑色 OR :橙色
P2ストアマネージャーの画面について(つづき)
リアパネル側
フロント
パネル側
6.[参照]ボタンをクリックする
[ファイルを開く]ダイアログが表示されます。
7. 手順1. でダウンロードした本機用のソフ
トウェアデータを選択する
ファイルのバージョン/チェックサム欄に、
バージョンアップ後のソフトウェアのバージョ
ンとチェックサムが表示されます。
ファイルのバージョン/チェックサム欄の内
容と、本体のバージョン/チェックサム欄の
内容が、同一の場合には、バージョンアップは
必要ありません。手順 へ進んでください。
COPYSTATUS
G G G G G
OR
OR
8.[実行]ボタンをクリックする
確認のダイアログが表示されます。
9.[はい]ボタンをクリックする
バージョンアップが実行され、終了まで数分程
度かかります。
バージョンアップ実行中は、USB2.0対応ケー
ブルを抜いたり、本機とパソコンの電源をOFF
しないでください。
10. バージョンアップ完了のメッセージを確
認し[OK]ボタンをクリックする
本機の電源が自動的にOFFします。
Windows2000の場合[デバイス取り外しの
警告]が表示されますが問題ありませんので、
[OK]ボタンをクリックしてください。
11. 本機側面のスライドスイッチをリアパネ
ル側に設定し、スライドスイッチカバー
を付ける
12. 本機の電源をONする
接続状態表示領域に接続状態: 接続中
が表示されます。
13. 本体の状態欄が、モード: 通常モ
ード表示になっていることを確認する
14. ファイルのバージョン/チェックサム
欄の内容と、本体のバージョン/チェッ
クサム欄の内容が、同一であることを
確認する
同一でない場合は、手順2. から再度実行して
ください。
ノート:
P2カードについての最新情報は、下記のサポ
ートサイトをご確認ください。
日本語
http://panasonic.biz/sav/
英語
https://eww.pavc.panasonic.co.jp/pro-av/
日本語
http://panasonic.biz/sav/
英語
https://eww.pavc.panasonic.co.jp/pro-av/
Page 80

J-25
エラー表示解除後※、P2カメラ
レコーダー等で修復してから、
ご使用ください。
ERRORLED表示
本機で発生するエラーは、以下のように表示されます。
状況を確認して、対応内容に従ってください。
, , :点灯 , , :点滅
R :赤色 OR :橙色
REMAIN
R
R
状 況
内蔵HDDの温度が動作範囲外
である。
対 応
電源をOFFし、放熱させてから
ご使用ください。
R
R R
[E2]が点滅している場合はヒ
ーターで暖機運転中です。
暖かい場所に移動してください。
R
R
電圧が低下している。
バッテリーパックを充電してく
ださい。
R
R R R R
電圧が異常に低下している。
バッテリーパックを充電してく
ださい。
(この状態ではすぐに電源がOFF
します。)
R
R R
コピー開始時に、内蔵HDDの
残量が不足している。
エラー表示解除後
※
、内蔵HDD
をフォーマットしてください。
必要なデータがある場合には、フォ
ーマットを行うまえに別の記録媒体
にバックアップをしてください。
R
R R
コピー開始時に、P2カードが
挿入されていない。
エラー表示解除後※、P2カードを
挿入してコピーをしてください。
R
R R
コピー開始時に、振動が発生
している。
エラー表示解除後
※
、安定した場
所に置いてください。
振動停止後、使用できます。
R
R R
コピー開始時に内蔵HDD残量
不足、P2カード未挿入、振動
などのエラー以外のエラーが
発生している。
R
R
コピー時にエラーが発生して
いる。
(P2カードを抜いた場合以外)
エラー表示解除後
※
、再度コピー
を行ってください。
再度エラーになる場合は、P2カ
ードを交換してコピーを行って
ください。
それでもエラーが発生する場合は、
ご購入の販売店にご相談ください。
P2カードのフォーマットエラ
ーが発生している。
(書き込み保護)
エラー表示解除後
※
、書き込み禁
止スイッチをPROTECTの反対
側に切り換えてください。
( J-13ページ参照)
修復が必要なクリップがP2カ
ード内にある。
エラー表示解除後
※
、再度フォー
マットを行ってください。
それでもエラーが発生する場合は、
ご購入の販売店にご相談ください。
R
R
データのフォーマットが規格
外です。
エラー表示解除後
※
、使用できま
す。P2カードについては、ご購
入の販売店にご相談ください。
11
12
13
使用できないP2カードが挿入
されている。
1
2
3
4
5
6
7
8
9
10
番号
※エラー表示解除は、[POWER]ボタンと[CANCEL]ボタンを同時に押してください。
Page 81

J-26
日
本
語
ERRORLED表示(つづき)
REMAIN
番号
R
R R
状 況
内蔵HDDのS.M.A.R.Tエラー
が発生している。
対 応
内蔵HDDの異常が考えられま
す。必要なデータがある場合は、
エラー表示解除後
※
、別の記録媒
体にバックアップをして、ご購
入の販売店にご相談ください。
R
R R R R
本機内部エラーが発生し、コ
ピーやフォーマットなどの操
作ができない。
R
R R R R
バージョンアップ時に、エラ
ーが発生している。
R
R
前回コピー失敗で終了してい
て、そのあとに電源をONす
ると、エラーが発生する。
エラー表示解除後
※
、 再度コピ
ーを行ってください。
再度[クイックフォーマット]を実
行してください。
再度[全消去]を実行してくださ
い。
R
R
前回内蔵HDDの[クイックフ
ォーマット]失敗で終了して
いて、そのあとに電源をON
すると、エラーが発生する。
R
OR
前回内蔵HDDの[全消去]失
敗で終了していて、そのあと
に電源をONすると、エラー
が発生する。
R
R
R
補正がされていません。
本機内部の調整ができていな
いため、エラーが発生する。
本機の異常が考えられます。ご
購入の販売店にご相談ください。
R
OR
内蔵リチウム電池が消耗して
いる。
ご購入の販売店に連絡してリチ
ウム電池を交換してください。
一旦表示されると、リチウム電
池を交換しないかぎり、電源ON
時に表示されます。
R
R R R
R
内蔵HDDに管理情報を書き込
み中に衝撃検知エラーが発生、
もしくはHDDアクセスエラー
が発生している。
電源をOFFし、再度電源をONし
てください。安定した場所に置
いてコピーを行ってください。
R
R R
R
内蔵HDDの管理情報に異常が
発生している。
必要なデータがある場合は、別
の記録媒体にバックアップをし
て、[クィックフォーマット]を実
行してください。
R
R R
内蔵HDDの[クイックフォー
マット]エラーが発生している。
R
17
21
22
18
19
20
23
24
25
26
15
16
R
R
内蔵HDDの[全消去]エラー
が発生している。
内蔵HDDの異常が考えられま
す。ご購入の販売店にご相談く
ださい。
エラー表示解除後※、再度フォー
マットを行ってください。
再度エラーになるときは、P2カ
ードを交換してフォーマットを
行ってください。それでもエラ
ーが発生する場合は、ご購入の
販売店にご相談ください。
R
R
P2カードのフォーマットエラ
ーが発生している。(書き込み
保護,P2カードを抜いた場合
以外)
14
※エラー表示解除は、[POWER]ボタンと[CANCEL]ボタンを同時に押してください。
Page 82

J-27
ERRORLED表示(つづき)
COPYSTATUS
R
OR OR OR OR OR
状 況
P2カードアクセス中
に、P2カードを抜い
てエラーが発生して
いる。
対 応
電源をOFFし、再度電源をONし
てください。
修理を依頼される前に
本機の動作がおかしいなと感じたら、一度以下の確認を行ってください。
それでも、異常状態が回復しない場合はご購入の販売店にご相談ください。
症 状 確認内容
[POWER]ボタン を押しても、POWERLEDが
点灯しない。
・ バッテリーパックが消耗していませんか?
・ ACアダプターが正常に接続されていますか?
P2カード挿入後、[START]ボタンを押してもコ
ピーが開始されない。
・ 内蔵HDDにコピーできる残量は残っていますか?
・ 内蔵HDDの所定温度以上あるいは以下のエラーが
表示されていませんか?
[ ]ボタンを押しても[REMAIN]が表示され
ない。
・ POWERLEDが緑色に点灯していますか?
[HDDCAP]ボタンを押しても[REMAIN]が
表示されない。
・ POWERLEDが緑色に点灯していますか?
本機とパソコンをUSB2.0対応ケーブルで接続し
ても、パソコンから本機内部のドライブ名がエク
スプローラーで見えない。
・ 本機がコピーおよびフォーマットの動作をしていま
せんか?
・ パソコンはUSB2.0をサポートしていますか?
・ パソコンのOSがWindowsXPProfessional
SP2以降あるいはWindows2000SP4以降です
か?
・ 本機とパソコンを正しく接続していますか?
・ パソコンのHDD/CD-ROMドライブの直後にネッ
トワークドライブを割り当てていませんか?
P2カードのフォーマットができない。
・ 書き込み禁止スイッチがPROTECT側になっていま
せんか?
・ P2カードが正常に挿入されていますか?
[POWER]ボタン を押しても、POWERLEDが
点滅状態のまま。
・ 5℃以下で電源をONしていませんか?
R
OR
単独Verify機能を実行したと
き、VerifyNGエラーが発生
している。
エラー表示解除後
※
、再度コピー
を行ってください。
R
OR
前回VerifyNGエラーが発生
し、確認をしないで終了して
いて、そのあとに電源をON
すると、エラーが発生する。
エラー表示解除後
※
、再度コピー
を行ってください。
27
28
29
OR
内蔵HDDの衝撃検知エラーが
発生している。
衝撃が停止後、一定時間で消灯
します。
REMAIN
状 況 対 応
番号
30
番号
※エラー表示解除は、[POWER]ボタンと[CANCEL]ボタンを同時に押してください。
Page 83

J-28
日
本
語
保証とアフターサービス(よくお読みください)
◆ 保証期間中の修理は...
保証書の記載内容に従って、修理させていただきます。詳しくは保証書をご覧ください。
◆ 保証期間経過後の修理は...
修理により、機能、性能の回復が可能な場合は、ご希望により有料で修理させて頂きます。
この取扱説明書を再度ご確認の上、お買い上げの販売店までご連絡ください。
修理を依頼されるとき
保証期間:お買い上げ日から本体1年間
■ 保証書 (別添付)
お買い上げ日・販売店名などの記入を必ずお
確かめの上、お買い上げの販売店からお受け
取りください。
内容をよくお読み頂いた上、大切に保存してく
ださい。
万一、保証期間内に故障を生じた場合には、
保証書記載内容に基づき、「無料修理」さ
せていただきます。
■ 保守・点検
保守・点検は機器の機能を常に良好な状態
に維持し、お客様が安心してご使用してい
ただくためのものです。
部品の劣化、ごみ、ホコリの付着などにより
突発的な故障、トラブルを未然に防ぐととも
に、安定した機能、性能の維持のために、定
期的な保守・点検を推奨いたします。
保守・点検 (有料) についての詳しい内容
は、お買い上げの販売店にご相談ください。
■ 補修用性能部品
当社では、ポータブルハードディスクユニッ
トの補修用性能部品を、製造打ち切り後、6
年間保有しています。
※ 補修用性能部品とは、その製品の機能
を維持するために必要な部品です。
品 名 ポータブルハードディスクユニット
品 番 AJ-PCS060G
製造番号
お買い上げ日
故障の状況
ご連絡いただきたい内容
故障・修理・お取扱い
などのご相談は、まず、
お買い上げの販売店
へ、お申し付けください。
お買い上げの販売店がご不明の場合は、当社 (裏表紙)までご連絡ください。
※ 内容により、お近くの窓口をご紹介させていただく場合がございますのでご了承ください。
Page 84

J-29
動作電源電圧:
バッテリーパック DC7.2V
(別売品 VW-VBD33、VW-VBD35、
VW-VBD55)
ACアダプター DC7.9V
(別売品 AG-B15)
環境条件:
使用時 温度 0℃〜+40℃
※1
湿度 5%RH〜85%RH
(結露なきこと)
保存時 温度 -20℃〜+60℃
湿度 0%RH〜90%RH
(結露なきこと)
※1:HDD保護のため、内部温度が所定温
度以下もしくは以上になったときに
は、エラー表示をして、コピー操作が
できない状態になります。
PC動作条件:
動作保証OS
WindowsXPProfessionalSP2以降,
Windows2000SP4以降
メインメモリ
256MB以上(推奨512MB以上)
USBインターフェース
USBVer2.0準拠
HDD容量:
60GB
PCカードスロット:
PCMCIATypeⅡ(CardBus準拠)×1
外形寸法(幅)×(高さ) ×(奥行):
90mm×45mm×180.5mm
(突起部は含まず)
質量:
約650g
定格
電源 :DC7.9V
消費電流:最大時 1.3A 通常動作 0.8A
は安全項目です。
この仕様は、性能向上のため変更することがあります。
Page 85

MEMO
J-30
日
本
語
Page 86

MEMO
J-31
Page 87

MEMO
J-32
日
本
語
Page 88

松下電器産業株式会社システム事業グループ
〒571-8503大阪府門真市松葉町2番15号
(06)6901−1161
Panasonic Broadcast Europe
Panasonic Marketing Europe GmbH
Hagenauer Str. 43, 65203 Wiesbaden-Biebrich Deutschland Tel: 49-611-235-481
© 2005 Matsushita Electric Industrial Co., Ltd. All Rights Reserved.
Web Site: http://panasonic.net
PANASONIC BROADCAST & TELEVISION SYSTEMS COMPANY
UNIT COMPANY OF PANASONIC CORPORATION OF NORTH AMERICA
Executive Office:
One Panasonic Way 4E-7, Secaucus, NJ 07094 (201) 348-7000
EASTERN ZONE:
One Panasonic Way 4E-7, Secaucus, NJ 07094 (201) 348-7196
Southeast Region: (201) 348-7162
WESTERN ZONE:
3330 Cahuenga Blvd W., Los Angeles, CA 90068 (323) 436-3500
Government Marketing Department:
One Panasonic Way 2E-10, Secaucus, NJ 07094 (201) 348-7587
Broadcast PARTS INFORMATION & ORDERING:
9:00 a.m. — 5:00 p.m. (EST) (800) 334-4881/24 Hr. Fax (800) 334-4880
Emergency after hour parts orders (800) 334-4881
TECHNICAL SUPPORT:
Emergency 24 Hour Service (800) 222-0741
Panasonic Canada Inc.
5770 Ambler Drive, Mississauga, Ontario L4W 2T3 (905) 624-5010
Panasonic de Mexico S.A. de C.V.
Av angel Urraza Num. 1209 Col. de Valle 03100 Mexico, D.F. (52) 1 951 2127
Panasonic Puerto Rico Inc.
San Gabriel Industrial Park, 65th Infantry Ave., Km. 9.5, Carolina, Puerto Rico 00630 (787) 750-4300
G
 Loading...