

Panasonic AG-JJLBE20P Operating Instructions

Operating Instructions
Front-End Application
Model No.
AG
-JJLFE20P
Exporting from the Front-End Application and Streaming are not available at present. Upgrading is scheduled for the future.
In this manual, each explanation for Exporting from the Front-End Application and Streaming is
enclosed in a colored frame, like .
This manual includes the information for the AG-CPD10CRUP/AG-CPD15P, but this application
does not support that at present.
• Microsoft and the Microsoft logo, Windows are registered trademarks or trademarks of
Microsoft Corporation in the United States and other countries.
ENGLISH
1009K0 -M
VQT2C61

Contents
Overview ............................................. 4
Operating Environment ........................................... 6
Installing/Uninstalling ........................ 7
Installing .................................................................. 7
Preparations ........................................................ 7
Installing the Front-End application ..................... 7
Remote updating ................................................. 8
Uninstalling .............................................................. 9
Procedures for Windows XP ............................... 9
Procedures for Windows Vista ............................ 9
Description of the Screen Displays ...10
Main Screen .......................................................... 10
Toolbar ....................................................................11
Video Display Section ............................................ 14
Live Operation Section .......................................... 15
Playback Section ................................................... 18
Property Section .................................................... 20
Info tab .............................................................. 20
Ofcers tab ........................................................ 21
Status tab .......................................................... 21
Snapshot tab ..................................................... 22
Bookmark tab (only in Archive mode) ................ 22
Classify/Case tab (only in Archive mode) .......... 23
Upload Screen ....................................................... 24
Export Screen ........................................................ 25
DVD Burn Screen .................................................. 26
Restore Screen (Provided Only with the
AG-CPD15P and AG-CPD10CRUP) ..................... 27
Cong Screen ........................................................ 28
Admin Password screen .................................... 28
Allocation (Video/Audio) screen ........................ 29
Camera1 screen ................................................ 31
Date/Time screen .............................................. 33
File Transfer screen ........................................... 34
Network screen ................................................. 35
Operation screen ............................................... 38
Embedded OSD screen .................................... 39
Radar/GPS screen ............................................ 40
Rec/Play screen ................................................ 42
Registration screen ........................................... 45
Service screen ................................................... 47
Triggers screen .................................................. 48
Starting up ......................................................... 49
Restarting .......................................................... 50
Terminating ........................................................ 50
Switching and Adjusting Display Mode .................. 51
Switching Full/Simple Operation mode ............. 51
Switching the QVGA and VGA sizes ................. 52
Switching the Main video and Sub video ........... 53
Switching Day and Night modes ....................... 54
Adjusting image brightness ............................... 55
Viewing a Live Video ............................................. 56
Zooming in live mode ........................................ 56
Making a backlit image easier to view ............... 56
Making a dark image easier to view .................. 57
Checking audio .................................................. 57
Compensating image brightness ....................... 58
Recording .............................................................. 59
Starting and stopping recording ........................ 59
Zooming in record mode ................................... 60
Focusing ............................................................ 60
Adjusting image brightness in record mode ...... 61
Turning off the [REC] lamp of the color camera
during recording ................................................ 61
Turning audio recording On or Off ..................... 62
LPR setting ........................................................ 62
Adding bookmarks in record mode .................... 63
Creating a snapshot picture in record mode ..... 64
Playback in Archive Mode ..................................... 65
Playback ............................................................ 65
Skip playback .................................................... 66
Fast rewind, fast forward, and slow playback .... 67
Quick replay ...................................................... 68
Turning playback sound On or Off ..................... 68
Creating classify information ............................. 69
Adding bookmarks in archive mode .................. 69
Creating a snapshot picture in archive mode .... 70
Displaying Information ........................................... 71
Meta Information (Info) ...................................... 71
Ofcer information (
Status information (Status) ................................ 72
Snapshot information ........................................ 72
Bookmark information ....................................... 73
Classify information (Classify/Case) .................. 73
Uploading Files ...................................................... 74
Automatic uploading .......................................... 74
Exporting Files ....................................................... 75
Creating a DVD ..................................................... 76
Restoring a File ..................................................... 78
Ofcers
) ....................................71
Operations ........................................ 49
Startup and Termination ........................................ 49
Exporting from the Front-End Application is not
available at present. Upgrading is scheduled for
the future.

Contents
(continued)
Administrator Setup ........................ 79
Basic Operations for the Administrator Setup
Screen ................................................................... 79
Opening the Administrator Setup screen ........... 79
Setting of items .................................................. 79
Allocation (Video/Audio) ........................................ 80
Resolution/RecordRate ..................................... 80
Connection Camera .......................................... 80
Preset Settings .................................................. 81
Audio In Select .................................................. 82
Init Audio Rec after power ON (Allocation) ........ 82
Camera1 ................................................................ 83
Camera1 ............................................................ 83
Init Camera1 Settings after power ON ............. 84
Date/Time .............................................................. 86
File Transfer .......................................................... 87
Upload ............................................................... 87
Export/DVD Burn ............................................... 87
Certication ....................................................... 88
Folder ................................................................ 88
Network ................................................................. 89
Streaming .......................................................... 89
Recorder (PC LAN) ........................................... 89
Recorder (USB WIRELESS LAN) ..................... 90
Recorder (UPLOAD LAN) ................................. 91
Operation ............................................................... 92
Synchronize Time .............................................. 92
Version Up ......................................................... 92
Format ............................................................... 93
Delete All Files ................................................... 94
Clear Ofcer Information ................................... 94
Factory Default .................................................. 95
Setting Copy ...................................................... 95
Setting Retrieval ................................................ 96
Service Log ....................................................... 96
Embedded OSD .................................................... 97
Embedded OSD ................................................ 97
Embedded OSD Item ........................................ 97
Radar/GPS ............................................................ 98
Radar ................................................................. 98
GPS ................................................................... 99
Rec Start Information ...................................... 100
Rec/Play .............................................................. 101
Rec .................................................................. 101
GPO ................................................................ 102
Auto Power OFF .............................................. 103
Init Settings after power ON (Rec/Play) .......... 103
Classify ............................................................ 104
Storage Capacity Warning............................... 104
Registration ......................................................... 105
Meta Denition ................................................ 105
User Settings ................................................... 108
Limited Operation ............................................ 108
Service ................................................................ 109
Triggers ................................................................110
Trigger ..............................................................110
Trigger1-Trigger16 ............................................110
Indicator Lamps and Recorder
Status ...............................................112
Setup ................................................113
Admin Password ..............................................113
Allocation (Video/Audio) setup .........................113
Camera1 setup .................................................117
Date/Time setup ...............................................119
File Transfer setup ........................................... 120
Network setup ................................................. 121
Embedded OSD setup .................................... 122
Radar/GPS setup ............................................ 123
Rec/Play setup ................................................ 124
Registration setup ........................................... 126
Triggers setup .................................................. 127
Error Messages .............................. 128
Messages Common to the Memory Card Video
Recorder .............................................................. 128
Messages Unique to the Front-End Application ...134
Camera Connection and Combination
of Cameras
Service Logs
Contents .............................................................. 142
Format of Service Log ......................................... 145
..................................... 141
................................... 142
Software License Agreement ........ 146
Display in this manual
■
Display on the screen may differ from the actual
product.
Exporting from the Front-End Application and
Streaming are not available at present. Upgrading
is scheduled for the future.
Overview
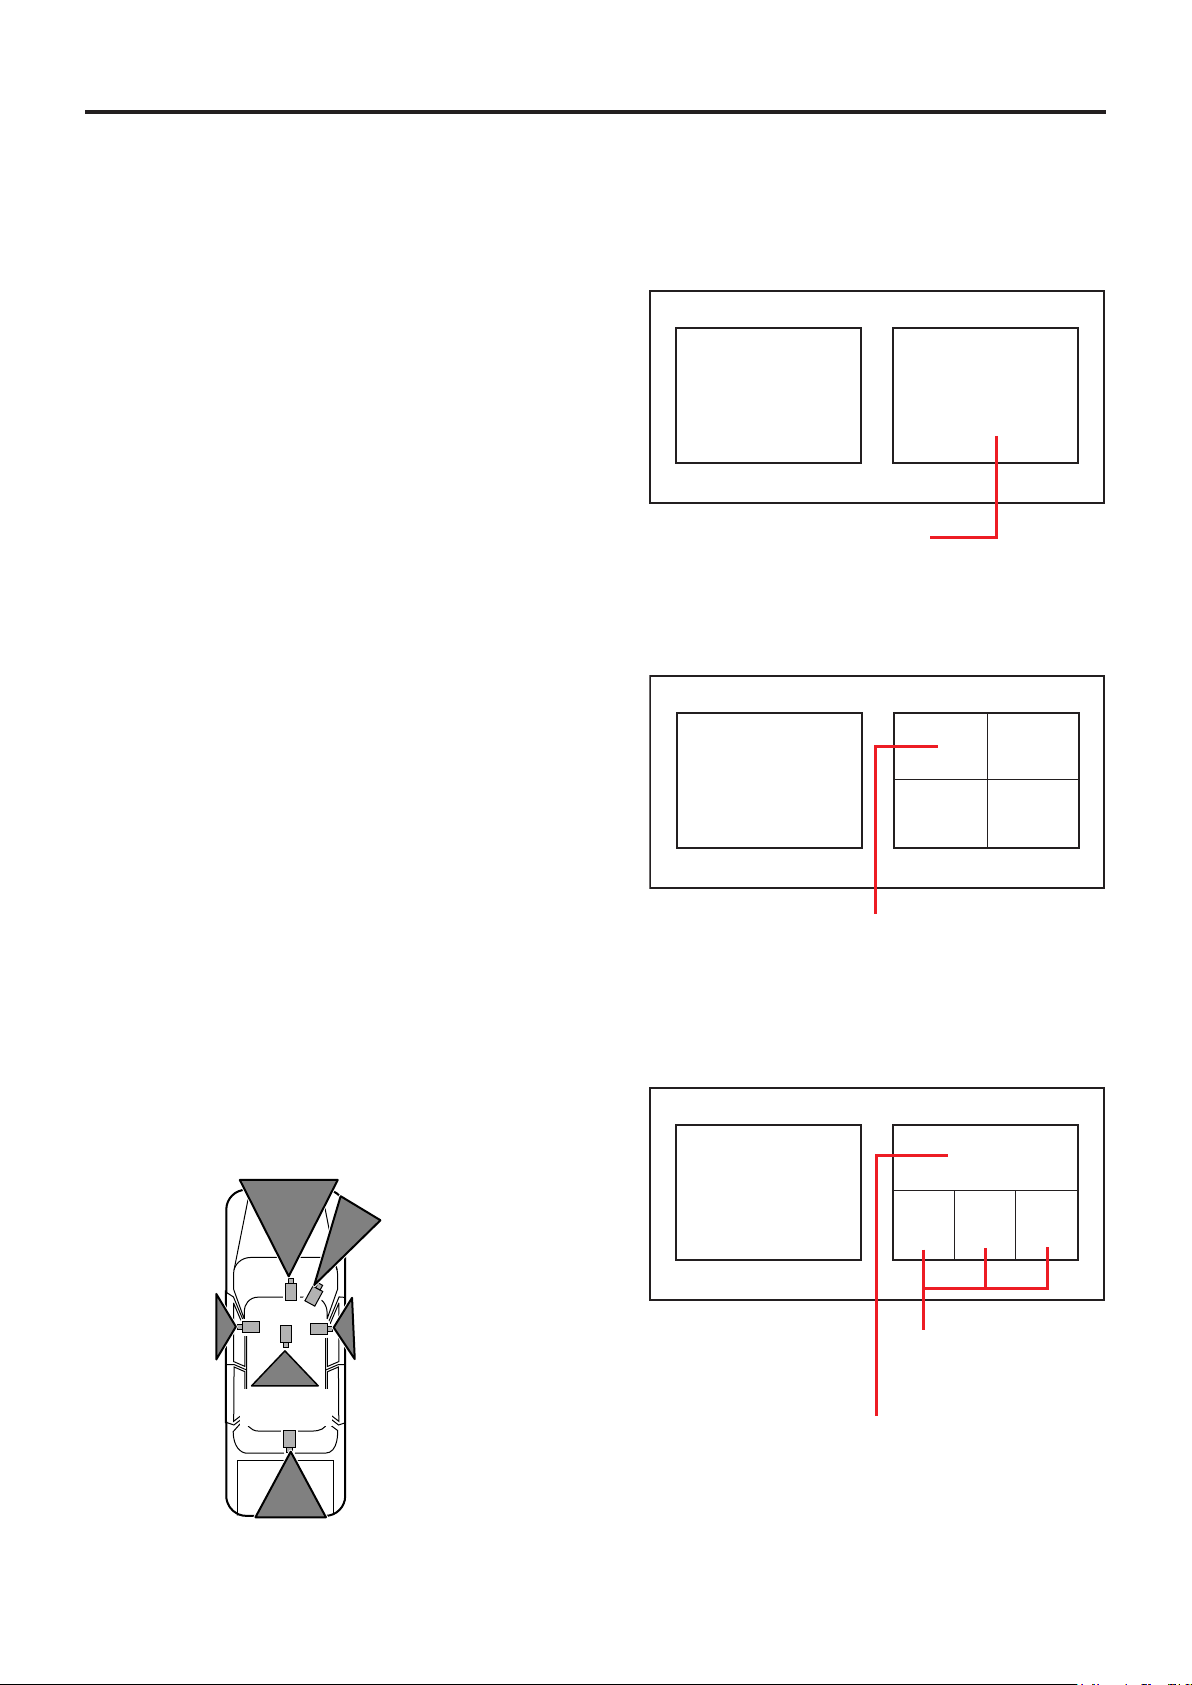
Front
(CAMERA 1)
LPR
(CAMERA 3)
R
(CAMERA 5)
L
(CAMERA 4)
Back
(CAMERA 6)
R-Seat
(CAMERA 2)
Main window Sub window (one picture)
Selected from among
CAMERA 2, and 3
Main window
Sub window
(four pictures, QUAD)
Selected from among
CAMERA 1, 2, and 3
CAMERA
6
CAMERA4CAMERA
5
Selected from among
CAMERA 2, and 3
(Upper and lower parts of a
picture is cut by 1/6)
Pictures from three
cameras are reduced
to 1/9.
Main window
Sub window
(four pictures, PANORAMA)
CAMERA4CAMERA
6
CAMERA
5
AG-JJLFE20P Front-End Application for the Memory
Card Video Recorder (hereinafter called "this
application") is a Windows application for controlling the
AG-CPD20P/AG-CPD15P/AG-CPD10CRUP Memory
Card Video Recorder.
This application enables the following operations, which
are also operable with the remote control panel (sold
separately).
Viewing a Live Video
Video signals from a camera connected to the Memory
Card Video Recorder can be viewed on the screen. A
color camera connected to the [CAMERA 1] connector
of the Memory Card Video Recorder can be controlled
with this application.
Recording video and audio
Video from the cameras and sound from the
microphones connected to the Memory Card Video
Recorder can be recorded in the SDHC Memory Cards
loaded in the recorder.
Simultaneous display and recording of
video signals from the cameras
Pictures captured by the cameras connected to the
Memory Card Video Recorder are displayed on a Main
and/or Sub windows and are recorded. A maximum of
6 cameras can be connected to the Memory Card
Video Recorder.
• Main window
among CAMERA 1, 2, and 3.
: A picture of a camera selected from
When the mirror (reversed image) function is provided
with CAMERAs 4, 5, and 6, enable this function. If this
function is not provided, connect the R-side camera to
CAMERA 4 and the L-side camera to CAMERA 5.
• Sub window
: A picture or combined pictures from
a camera or cameras as follows:
-A picture from a camera selected from among
CAMERA 2, and 3
-Combined four pictures (one selected from among
CAMERA 1, 2, and 3, and three from CAMERA 4, 5,
and 6 in QUAD or PANORAMA size)
Example: When 6 cameras are connected

Overview
(continued)
Playing back recorded video and audio
It is possible to play back video and audio recorded
in the SDHC Memory Cards that are loaded in the
Memory Card Video Recorder.
Uploading data for the Memory Card Video
Recorder
It is possible to upload data recorded in the SDHC
Memory Cards that are loaded in the Memory
Card Video Recorder to the Back-End server. Meta
information and bookmark information are also
uploaded. Uploaded data are deleted from the SDHC
Memory Cards.
Exporting data
Data recorded in the SDHC Memory Cards that are
loaded in the Memory Card Video Recorder can be
Exporting from the Front-End Application is not
exported for external media, such as the hard disk of
available at present. Upgrading is scheduled for
a PC or a USB memory device. Exported data can be
the future.
deleted from the SDHC Memory Cards.
Creating a DVD
It is possible to export data recorded in the SDHC
Memory Cards that are loaded in the Memory Card
Video Recorder in DVD-Video format. Meta information
can be embedded in the data to be exported. Exported
data can be deleted from the SDHC Memory Cards.
Conguration for the administrator
Settings for operation of the Memory Card Video
Recorder can be performed.

Overview
(continued)
Operating Environment
A PC that meets the following operating environment
is required for user of this application.
CPU: Intel Core Duo 1.66 GHz or more
(recommended)
RAM: 512 MB or more (for Windows Vista
Business, 1 GB or more) (recommended)
Display: 1024×768 dot or more
LAN: 1000BASE-T/100BASE-TX
OS: Windows XP Professional Service Pack 3 or
later, Windows Vista Business Service Pack 2 or
later
Add on:
.Net Framework 3.5 Service Pack 1
Windows Installer3.1
Adobe Reader 8 or 9
Notes
When live videos from the recorder is being displayed
•
(streaming) or a stored video le is being played using
this application, frames may be dropped or sound may
be broken up, depending on the PC status.
If security software is running together with this
•
application, the operation of this application may
slow down or the connection with the recorder may
be released. Such phenomena may be improved
by changing the settings of Firewall of the security
software.
While copying data to a DVD using this application,
•
never do the following operations:
- Turning off the power of the PC and peripheral
devices.
- Running another application.
- Starting the utility for system maintenance.
- Connecting or disconnecting peripheral devices.
- Moving the PC
- Imparting vibration or shock to the PC
- For a notebook PC, avoid supplying power with a
battery (For supplying power with a battery, be sure to
fully charge the battery.)
- Changing the power setting of PC
Streaming is not available at present. Upgrading
is scheduled for the future.
Installing/Uninstalling
Installing
The Front-End application is installed with the
following procedures. For installing the application,
WindowsInstaller V3.1 and .Net Framework 3.5 Service
Pack 1 must be installed on the computer.
Preparations
1. Download "WindowsInstaller V3.1" from
the Microsoft download site.
If the WindowsInstaller has been installed, update
it.
2. Install the "WindowsInstaller V3.1" by
following the instructions.
3. Download "Microsoft .NET Framework
3.5 Service Pack 1" from the Microsoft
download site.
If .Net3.5 has been installed, update it.
Installing the Front-End application
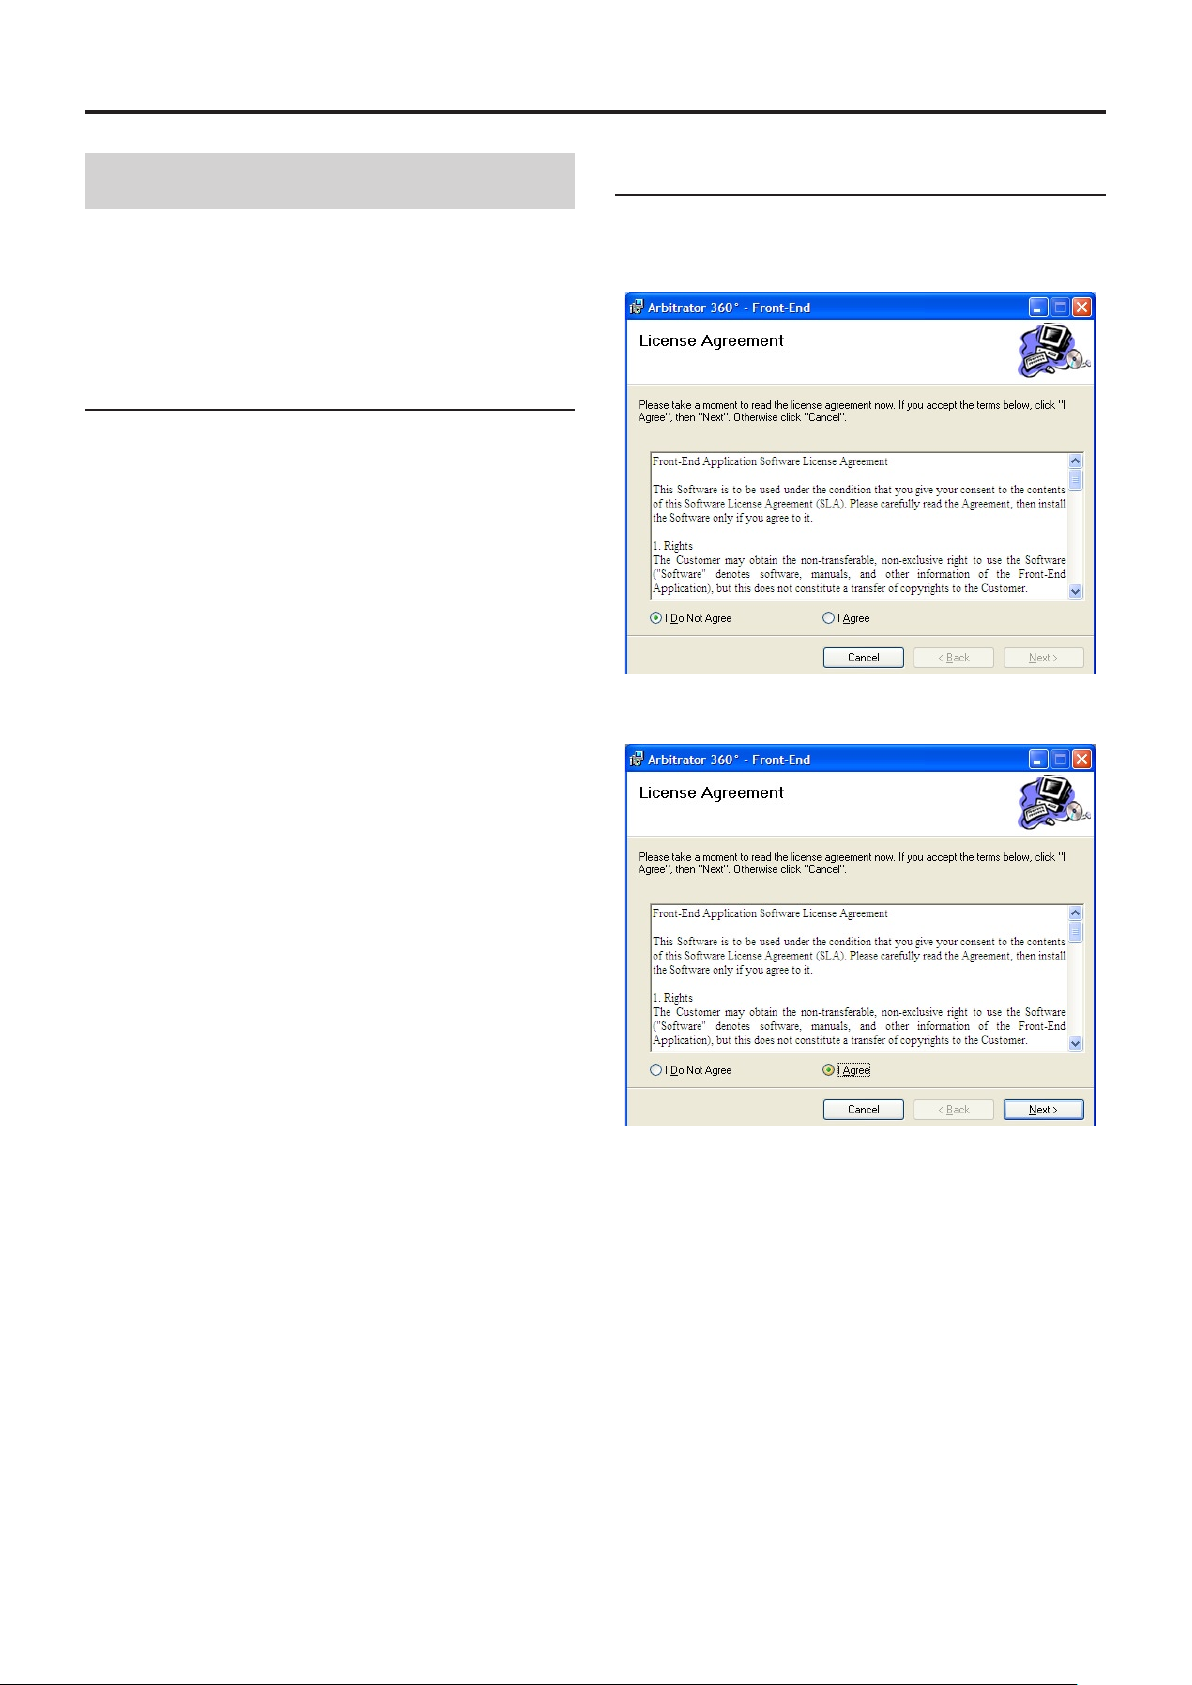
1. Click on FESetup.msi.
The License Agreement screen appears
2. Click on "I Agree".
4. Install the "Microsoft .NET Framework
3.5 Service Pack 1" by following the
instructions.
Installing/Uninstalling
(continued)
3. Click on [Next].
4. Click on [Next].
The conrmation screen appears.
When the le transfer is completed, the screen
shown below appears.
6. Click on [Close].
Installation is completed, and the shortcut icon for
the Front-End application will be placed on the
desktop.
5. Click on [Next].
The le will be transferred to the following folder:
/Program Files/Panasonic/ICV/FE
Remote updating
The Front-End application can be remotely updated
when the following conditions are satised:
A PC with the Front-End application installed is
•
connected to the Back-End Server.
The latest version of the Front-End application is
•
registered with the Back-End server.
Remote updating is set on the Back-End
•
Administrator application.
When the Front-End application receives an update
module from the Back-End Server, it is automatically
updated upon being restarted.
Notes
If the Interactive services dialog detection dialog box is
•
displayed, select "Show me the message."
If a dialog box prompting you to select Try Again,
•
Continue, or Exit Installation is displayed, select
Continue.
If a message "You must restart your system for the
•
conguration changes made to Arbitrator 360˚ – Back-
End Client to take effect. Click Yes to restart now or No
if you plan to manually restart later." is displayed, click
on [Yes]. Your PC will restart. If the PC does not restart,
recording on a DVD cannot be executed correctly.

Installing/Uninstalling
(continued)
Uninstalling
Uninstall the Front-End application following the
procedures below.
Procedures for Windows XP
1. Click on the [Start] button.
2. Select Control Panel
3. Double-click on Add or Remove Programs.
The Currently installed programs window opens.
4. Select the program to be uninstalled.
5. Click on the [Remove] button.
A conrmation message appears.
6. Click on the [Yes] button.
Uninstalling of the selected program starts.
Procedures for Windows Vista
1
Click on the [Start] button.
.
2. Select Control Panel
3. Double-click on Programs and Features.
The Uninstall or change a program window opens.
4. Select the program to be uninstalled.
5. Click on Uninstall.
The User Account Control window opens.
6. Click on the [Allow] button.
The Uninstall window opens.
7. Click on the [Uninstall] button.
Uninstalling of the selected program starts.
11
Toolbar
(See page 11.)
Video display
section
(See page 14.)
Property section
(See page 20.)
Live operation
section
(See page 15.)
Toolbar
(See page 11.)
Video display
section
(See page 14.)
Property section
(See page 20.)
Playback
section
(See page 18.)
Description of the Screen Displays
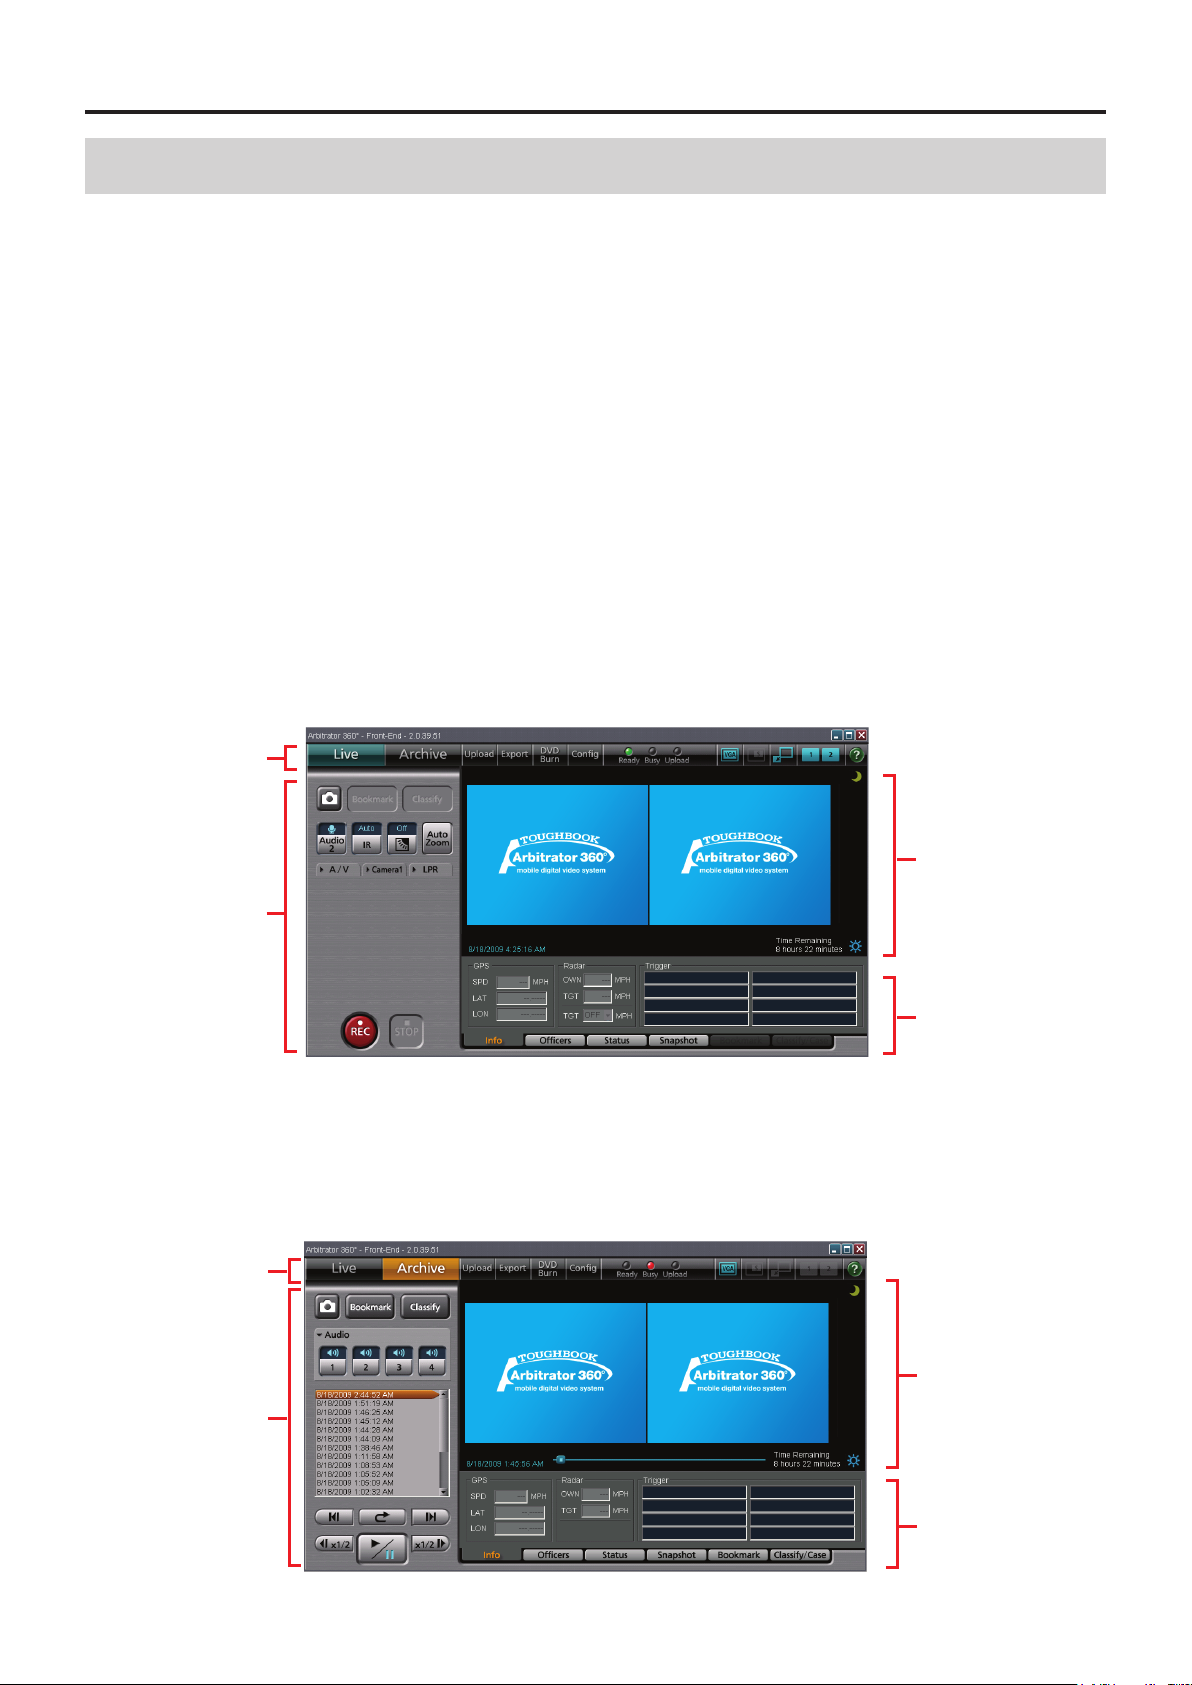
Main Screen
When you login the Front-End application, the Livemode screen will appear. On this screen, you can
monitor pictures captured by the cameras connected
to the Memory Card Video Recorder and record the
pictures. On the Archive-mode screen, you can play
back the recorded pictures.
Note on rst login
If the Live-mode screen does not appear upon rst
login of the Front-End application, check the following:
If the Windows Security Alert dialog box is
displayed
1. Select "Unblock."
2. Click on [OK].
If the Live-mode screen does not appear
Check the Firewall setting and change the setting as
described below.
● Live mode
Method 1:
1. Click on [Start].
2. Select [Control Panel].
3. Select "Windows Firewall."
4. For Windows Vista, select "Change Setting."
5. Check the Firewall setting.
If it is set to ON, check that the "Don’t allow exceptions"
check box is unchecked.
If checked, uncheck it.
Method 2:
1. Click on [Start].
2. Select [Control Panel].
3. Select "Windows Firewall."
4. Select the Exceptions tab.
5. Check the Front-End check box.
6. Click on [OK].
● Archive mode
10

Description of the Screen Displays
① ② ③ ④ ⑤ ⑥ ⑦ ⑧ ⑨
Toolbar
The buttons on the toolbar of the Main screen can
select the operation mode of the Front-End application
and switch the display mode of the screen. The lamps
indicate the status of the Memory Card Video Recorder.
When the AG-CPD20P is connected
(continued)
Live button
For shifting to Live mode. The Main screen is
displayed.
(See "Viewing a Live Video," page 56.)
Archive button
For shifting to Archive mode. The Main screen is
displayed.
(See "Playback in Archive Mode," page 65.)
Upload button
For shifting to Upload mode.
(See "Upload Screen," page 24, and "Uploading
Files," page 74.)
Export button
For shifting to Export mode.
(See "Export Screen," page 25, and "Exporting
Files," page 75.)
DVD Burn button
For shifting to DVD Video Burn mode.
(See "DVD Burn Screen," page 26, and "Creating a
DVD," page 76.)
Cong button
For shifting to Conguration mode.
(See "Cong Screen," page 28, and "Administrator
Setup," page 79.)
Upload/Streaming lamp
The Upload lamp lights while data are being
uploaded or exported.
The Steaming lamp lights during streaming.
(See "Indicator Lamps and Recorder Status," page
112.)
Ready lamp
Lights when the SDHC Memory Cards loaded in the
SDHC Memory Card slots are recordable.
(See "Indicator Lamps and Recorder Status," page
112.)
Busy lamp
Lights or ashes while an SDHC Memory Card
is being accessed, such as during recording or
playback.
(See "Indicator Lamps and Recorder Status," page
112.)
Exporting from the Front-End Application and
Streaming are not available at present. Upgrading
is scheduled for the future.
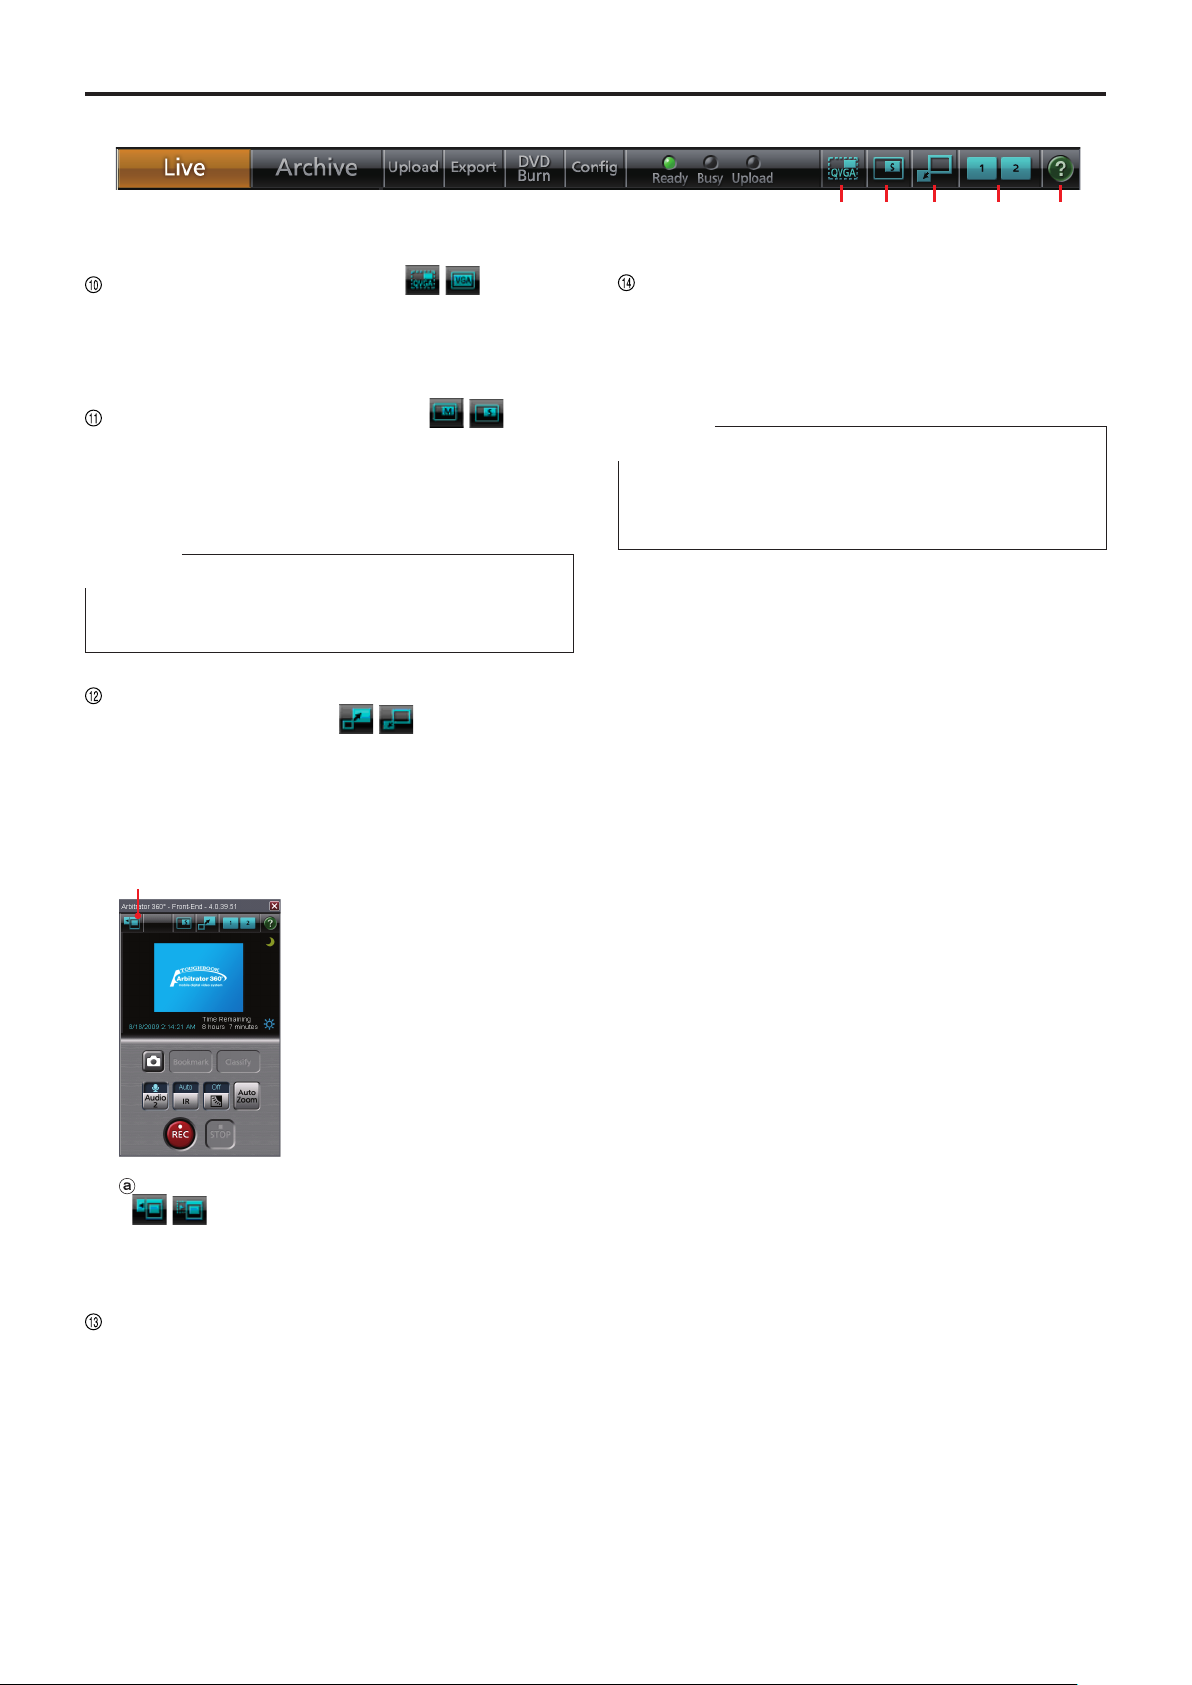
Description of the Screen Displays
1
ⓐ
⑩ ⑪ ⑫ ⑬ ⑭
QVGA/VGA switch button ( )
Select to display the video at the size of either
QVGA or VGA.
(See "Switching the QVGA and VGA sizes," page
52.)
Main/Sub video switch button (
During 1-screen mode, select to display either main
video or sub video.
(See "Switching the Main video and Sub video,"
page 53.)
Note
This button is enabled in simple operation mode or VGA
mode when main and sub videos are available.
)
(continued)
Help button
When this button is clicked, the mouse pointer will
be turned to "→+?". Clicking on a button or input
eld with this pointer will display the description of
the clicked button/input eld.
Note
If you use Acrobat 9 or 8, the description may not be
displayed correctly when you click on a button or input
eld.
Full/Simple Operation mode switch button
(only in Live mode) (
Switches the display mode between Full Operation
mode and Simple Operation mode.
(See "Switching Full/Simple Operation mode,"
page 51.)
)
● Simple Operation mode
Camera1 control panel display button
(
)
The same operation buttons as those on the
Camera1 tab are displayed.
(See "Camera1 tab," page 16.)
Preset switch button
Select a display pattern from among Presets 1, 2,
and 3.
(See "Switching the Main video and Sub video,"
page 53, and "Preset Settings," page 81.)
1
Description of the Screen Displays
① ② ③ ④ ⑤ ⑥ ⑦ ⑧ ⑨ ⑩ ⑪
ⓐ
(continued)
When the AG-CPD15P or AG-CPD10CRUP is connected
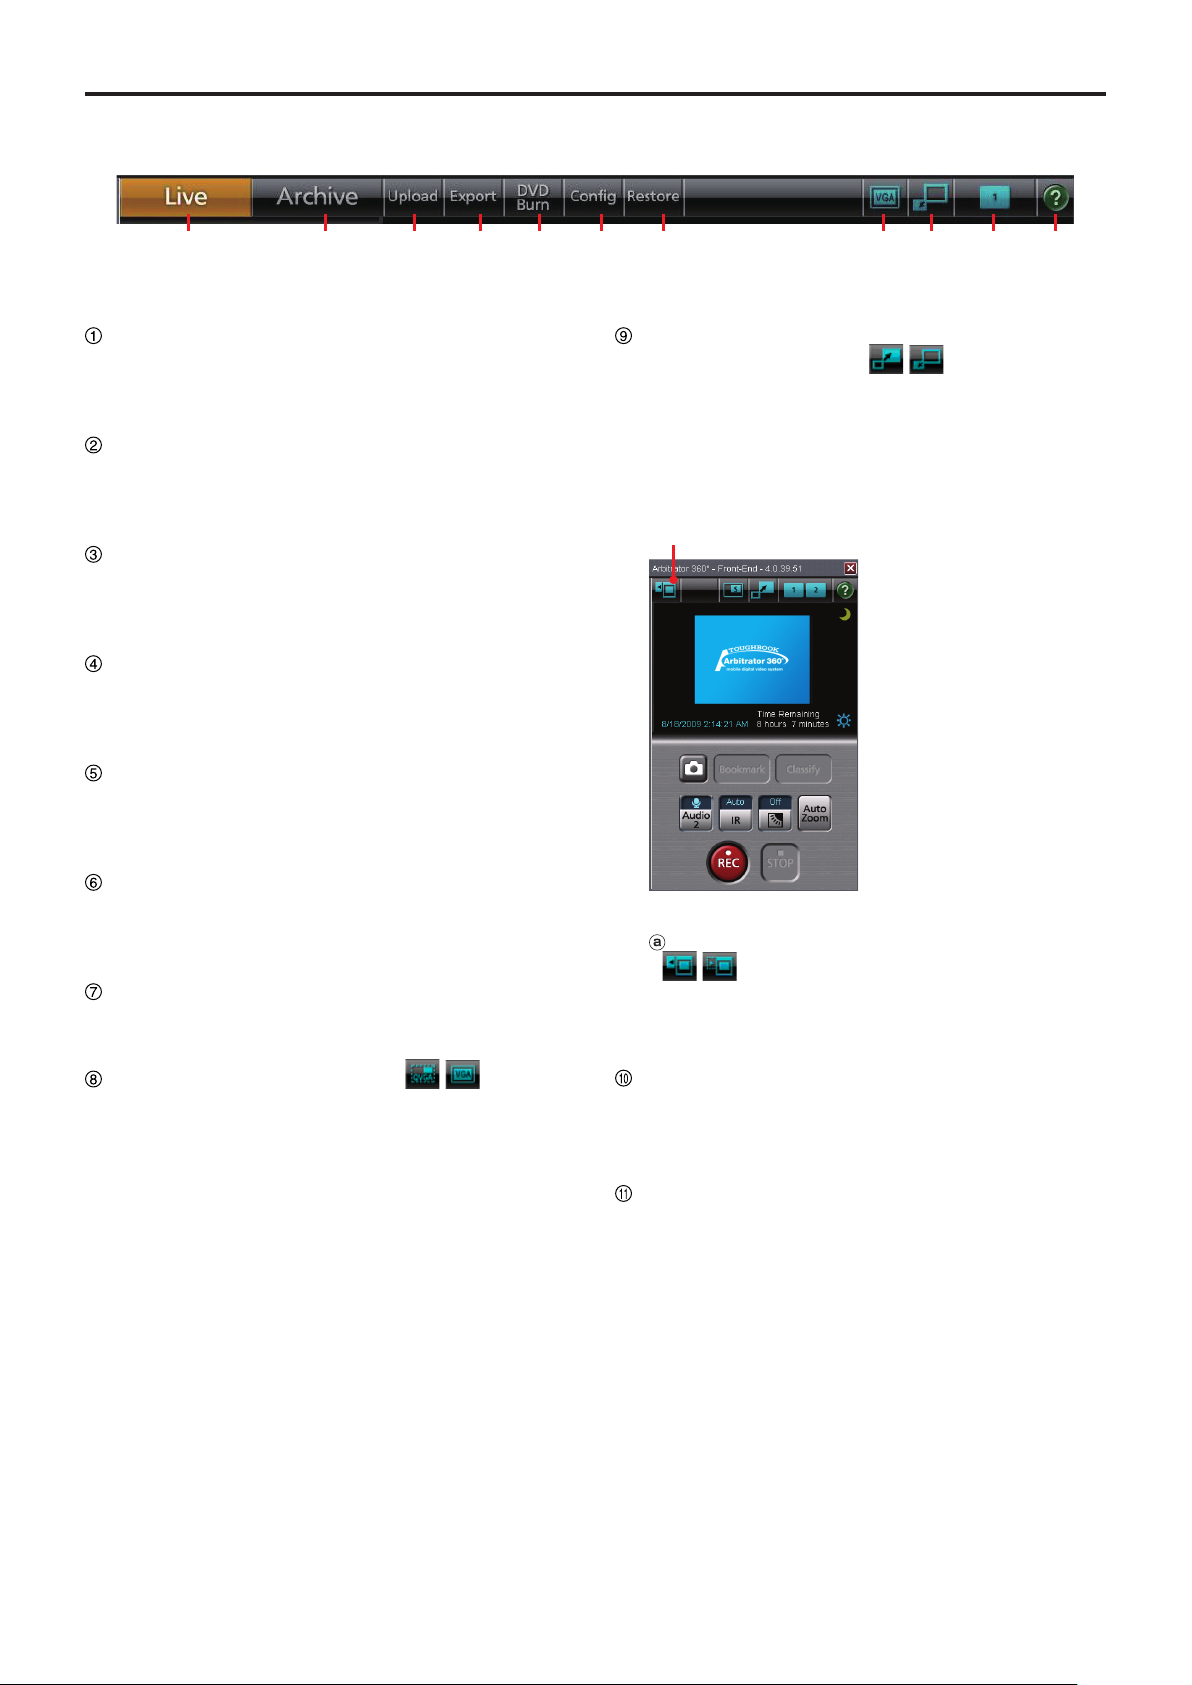
Live button
For shifting to Live mode. The Main screen is
displayed.
(See "Viewing a Live Video," page 56.)
Archive button
For shifting to Archive mode. The Main screen is
displayed.
(See "Playback in Archive Mode," page 65.)
Upload button
For shifting to Upload mode.
(See "Upload Screen," page 24, and "Uploading
Files," page 74.)
Export button
For shifting to Export mode.
(See "Export Screen," page 25, and "Exporting
Files," page 75.)
DVD Burn button
For shifting to DVD Video Burn mode.
(See "DVD Burn Screen," page 26, and "Creating a
DVD," page 76.)
Cong button
For shifting to Conguration mode.
(See "Cong Screen," page 28, and "Administrator
Setup," page 79.)
Restore button
For restoring a le.
(See "Restoring a File," page 78.)
Full/Simple Operation mode switch button
(only in Live mode) (
Switches the display mode between Full Operation
mode and Simple Operation mode.
(See "Switching Full/Simple Operation mode," page
51.)
)
● Simple Operation mode
Camera1 control panel display button
(
)
The same operation buttons as those on the
Camera1 tab are displayed.
(See "Camera1 tab," page 16.)
QVGA/VGA switch button ( )
Select to display the video at the size of either
QVGA or VGA.
(See "Switching the QVGA and VGA sizes," page
52.)
1
Camera switching button
When the QVGA-size video display is selected,
select a camera to be displayed. Each click on this
button will toggle CAM1 and CAM2.
Help button
When this button is clicked, the mouse pointer will
be turned to "→+?". Clicking on a button or input
eld with this pointer will display the description of
the clicked button/input eld.
Description of the Screen Displays
1
⑤
⑥
①
② ③ ④
⑤
⑥
② ④
①
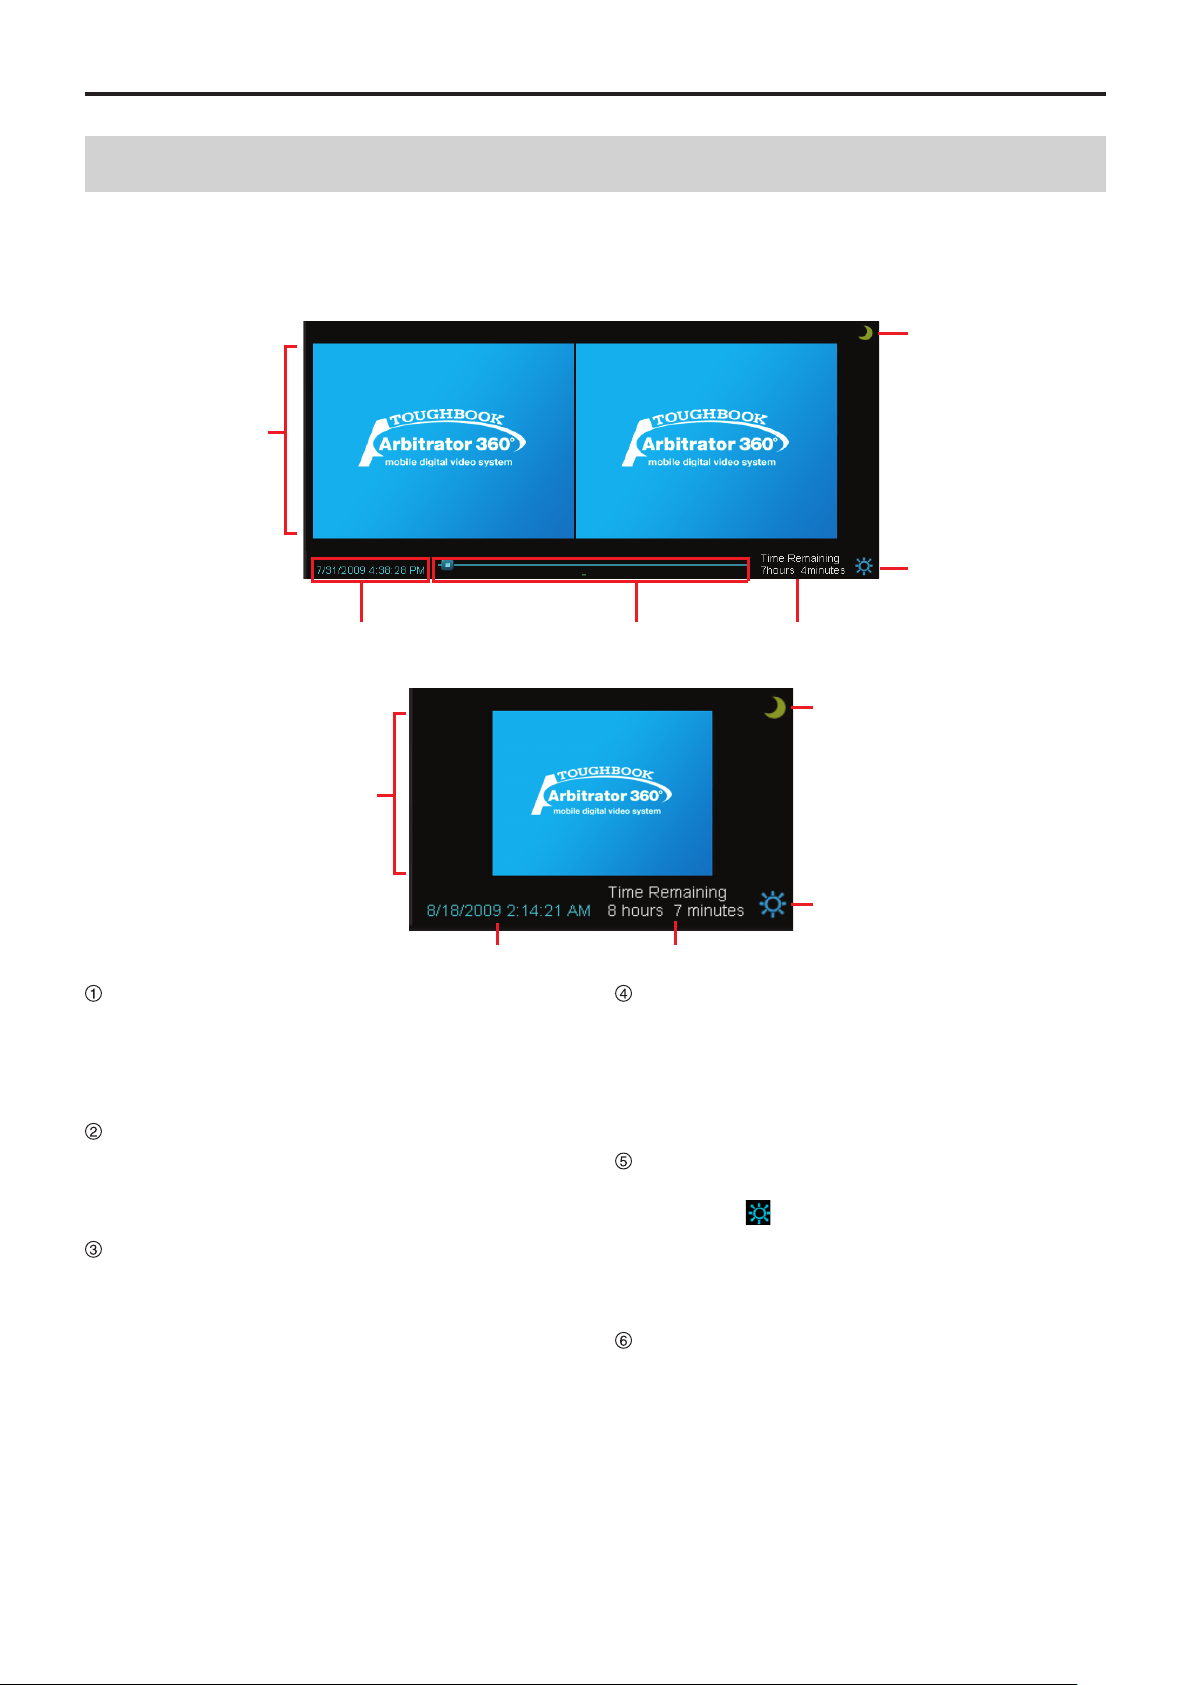
Video Display Section
In this section, you can monitor pictures captured by
the cameras connected to the Memory Card Video
Recorder and play back the recorded pictures.
Full operation mode
(continued)
Simple operation mode
Video display section
When 1 VGA-size video is displayed, the video
is displayed at the center. When 2 videos are
displayed, the Main video is displayed on the left
and the Sub video is displayed on the right.
(See "Switching and Adjusting Display Mode," page 51.)
Date and time indication
During Live mode: The current date and time are
displayed.
During Archive mode: The date and time of the
current playback location is displayed.
Seek bar (only in Archive mode)
It is displayed only in Archive mode. The current
playback location is displayed.
Sliding the switch will change a playback location.
Clicking on the left side of the switch will move the
playback location backward by 1/20 of the content
length, and clicking on the right side will move the
playback location forward by 1/20 of the content
length.
The locations of the classify information and
bookmark are displayed on the bar.
Time Remaining indication
The remaining video recordable duration on the
SDHC Memory Cards loaded in the Memory
Card Video Recorder is displayed. If the current
recordable duration becomes shorter than the
preset value, the indication turns red, and a beep
sounds every 30 seconds.
Brightness adjustment button/indication
The brightness of the video display is adjusted.
When the [ ] button is clicked, the current
brightness level is displayed. Clicking on the [▲]
button makes the video display brighter, and
clicking on the [▼] button makes it darker.
(See "Adjusting image brightness," page 55.)
Day/Night switch button
The screen image is switched between Day mode
and Night mode. The entire screen will become
darker in Night mode.
(See "Switching Day and Night modes," page 54,
and "Day/Night View," page 86.)
1
Description of the Screen Displays
① ②
③
④
⑤
⑥
⑦
⑧
A/V tab
Camera1 tab
LPR tab
Live Operation Section
In this section, you can control the pictures in the live
mode.
(continued)
IR button/indication
Switches IR mode of the camera. Each time this
button is clicked, On, Off, and Auto is cyclically
selected. The current setting is indicated on the
button.
On: Sets IR mode to ON.
Off: Sets IR mode to Off.
Auto: Automatically changes IR mode depending
on ambient brightness.
(See "Making a dark image easier to view," page
57.)
Auto Zoom button
Controls the automatic zooming function of the
camera. Zoom-in, pause, and zoom-out operation
will be automatically performed. The zoom ratio and
pause time can be set.
If other camera operation is performed during an
auto zoom operation, auto zoom will be canceled.
(See "Zooming in live mode," page 56, and
"Camera1," page 83.)
Snapshot button
A snapshot picture of a current-time live video will
be stored as a .BMP le.
Meta information will also be recorded with the
snapshot picture if this button is clicked during
recording.
(See "Creating a snapshot picture in record mode,"
page 64.)
Bookmark button
Click on this button during recording to create a
current-time bookmark.
(See "Adding bookmarks in record mode," page
63.)
Backlight compensation button/
indication
Turns the backlight compensation On or Off. The
current setting is indicated on the button.
(See "Making a backlit image easier to view," page
56.)
Audio 2 button/indication
Select whether the audio channel 2 input signal
is to be recorded or not. The current setting is
indicated on the button.
: The selected audio channel signal is recorded.
: The audio channel 2 signal is not recorded.
(See "Turning audio recording On or Off," page 62.)
REC button
Click to start recording live video and audio. "REC"
is indicated on the display during recording and a
red frame appears around the video. A signal tone
sounds every 30 seconds.
(See "Starting and stopping recording," page 59.)
STOP button
Click to stop recording live video and audio.
(See "Starting and stopping recording," page 59.)
When the setting of Force Classify on the Rec/
Play screen in Administrator Setup is FORCE or
ENABLE, the Classify Input screen is displayed.
(See "Setting the classify information," page 59,
and "Classify," page 104.)
1
Description of the Screen Displays
1
①
②
③
①
②
③ ④
(continued)
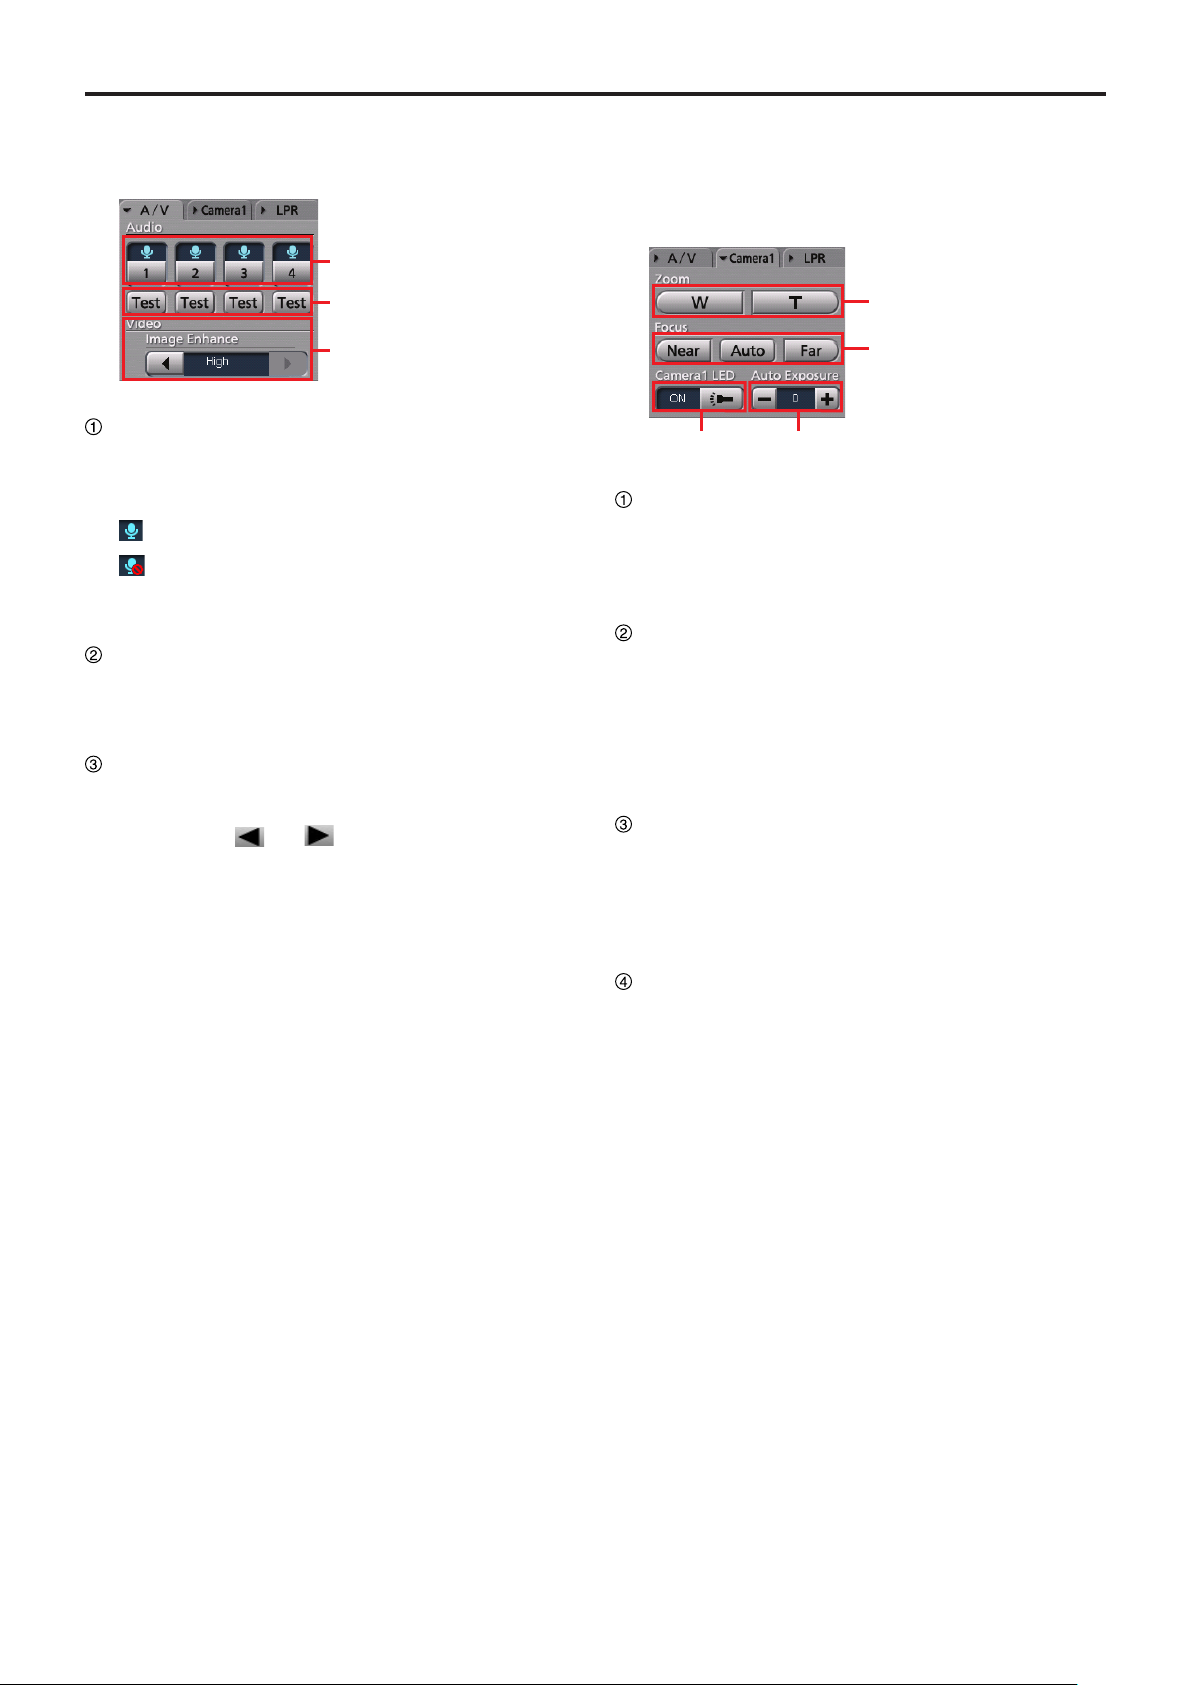
A/V tab
This is a panel for audio and video control.
Recording audio switch buttons/indications
Switch whether the selected audio channel is to be
recorded or not. The current setting is indicated on
the button.
: The selected audio channel signal is recorded.
: The selected audio channel signal is not
recorded.
(See "Turning audio recording On or Off," page 62.)
Test buttons
While a button is held pressed, the corresponding
audio channel signal will be output from the PC.
(See "Checking audio," page 57.)
Video Image Enhance button
For adjusting the brightness of a dark video image
on the Main screen.
Click on the
setting. The current setting is indicated at the
center.
Off: No video image enhancing
Low: Low video image enhancing
High: High video image enhancing
(See "Compensating image brightness," page 58)
or [] button to change the
[ ]
Camera1 tab
This is a panel for operating the color camera. The
Camera1 tab cannot be selected if no color camera is
connected to the Memory Card Video Recorder.
Zoom buttons
For adjusting zooming.
W: For zooming out
T: For zooming in
(See "Zooming in record mode," page 60.)
Focus buttons
For adjusting focus.
Near: For focusing on a object nearby
Auto: For automatic focusing
Far: For focusing on a distant object
(See "Focusing," page 60.)
Camera1 LED button/indication
Turns the [REC] lamp of the color camera On or
Off. The current setting is indicated on the left of
the button.
(See "Turning Off the [REC] lamp of the color
camera during recording," page 61.)
Auto Exposure button/indication
For adjusting the exposure. The current setting
value is indicated at the center.
-: Each click on this button decreases the exposure
value by 1. The value can be decreased to -2.
1
+: Each click on this button increases the exposure
value by 1. The value can be increased up to 2.
(See "Adjusting image brightness in record mode,"
page 61.)

Description of the Screen Displays
①
②
③
④
(continued)
LPR tab
The LPR tab is displayed when Init LPR Mode is set
to ENABLE on the Camera1 screen in Administrator
Setup.
(See "Init LPR Mode," page 85.)
(See "LPR setting," page 62.)
Patrol button
For setting the Memory Card Video Recorder to
Patrol mode. The values for Shutter Speed and
Zoom are set for Patrol mode.
LPR button
For setting the Memory Card Video Recorder to
LPR mode. The values for Shutter Speed and
Zoom are set for LPR mode.
Zoom buttons/indications
Set the zoom. The current setting value is indicated
at the center.
Clicking on the [-] or [+] button increases/decreases
the zoom value. The adjustable range is from 1.0 to
22.0. The magnitude of changes varies depending
on the zoom magnication, as shown below:
The zoom range x1.0 to x3.0:
decrease by x0.1
The zoom range x3.0 to x5.0:
decrease by x0.2
The zoom range x5.0 to x10.0:
decrease by x0.5
The zoom range x10.0 to x22.0:
decrease by x1.0
(See "Setting the zoom" page 63.)
increase and
increase and
increase and
increase and
Shutter Speed buttons/indication
Set the shutter speed. The current setting value is
indicated at the center.
or [] button increases/decreases the
[ ]
shutter speed. Each click on one of these buttons
changes the setting value, as shown below:
In Patrol mode:
In LPR mode:
(See "Setting the shutter speed," page 62.)
Auto, 1/100, 1/500, 1/1000
Auto, 1/500, 1/1000
1
Description of the Screen Displays
1
① ② ③
Audio tab
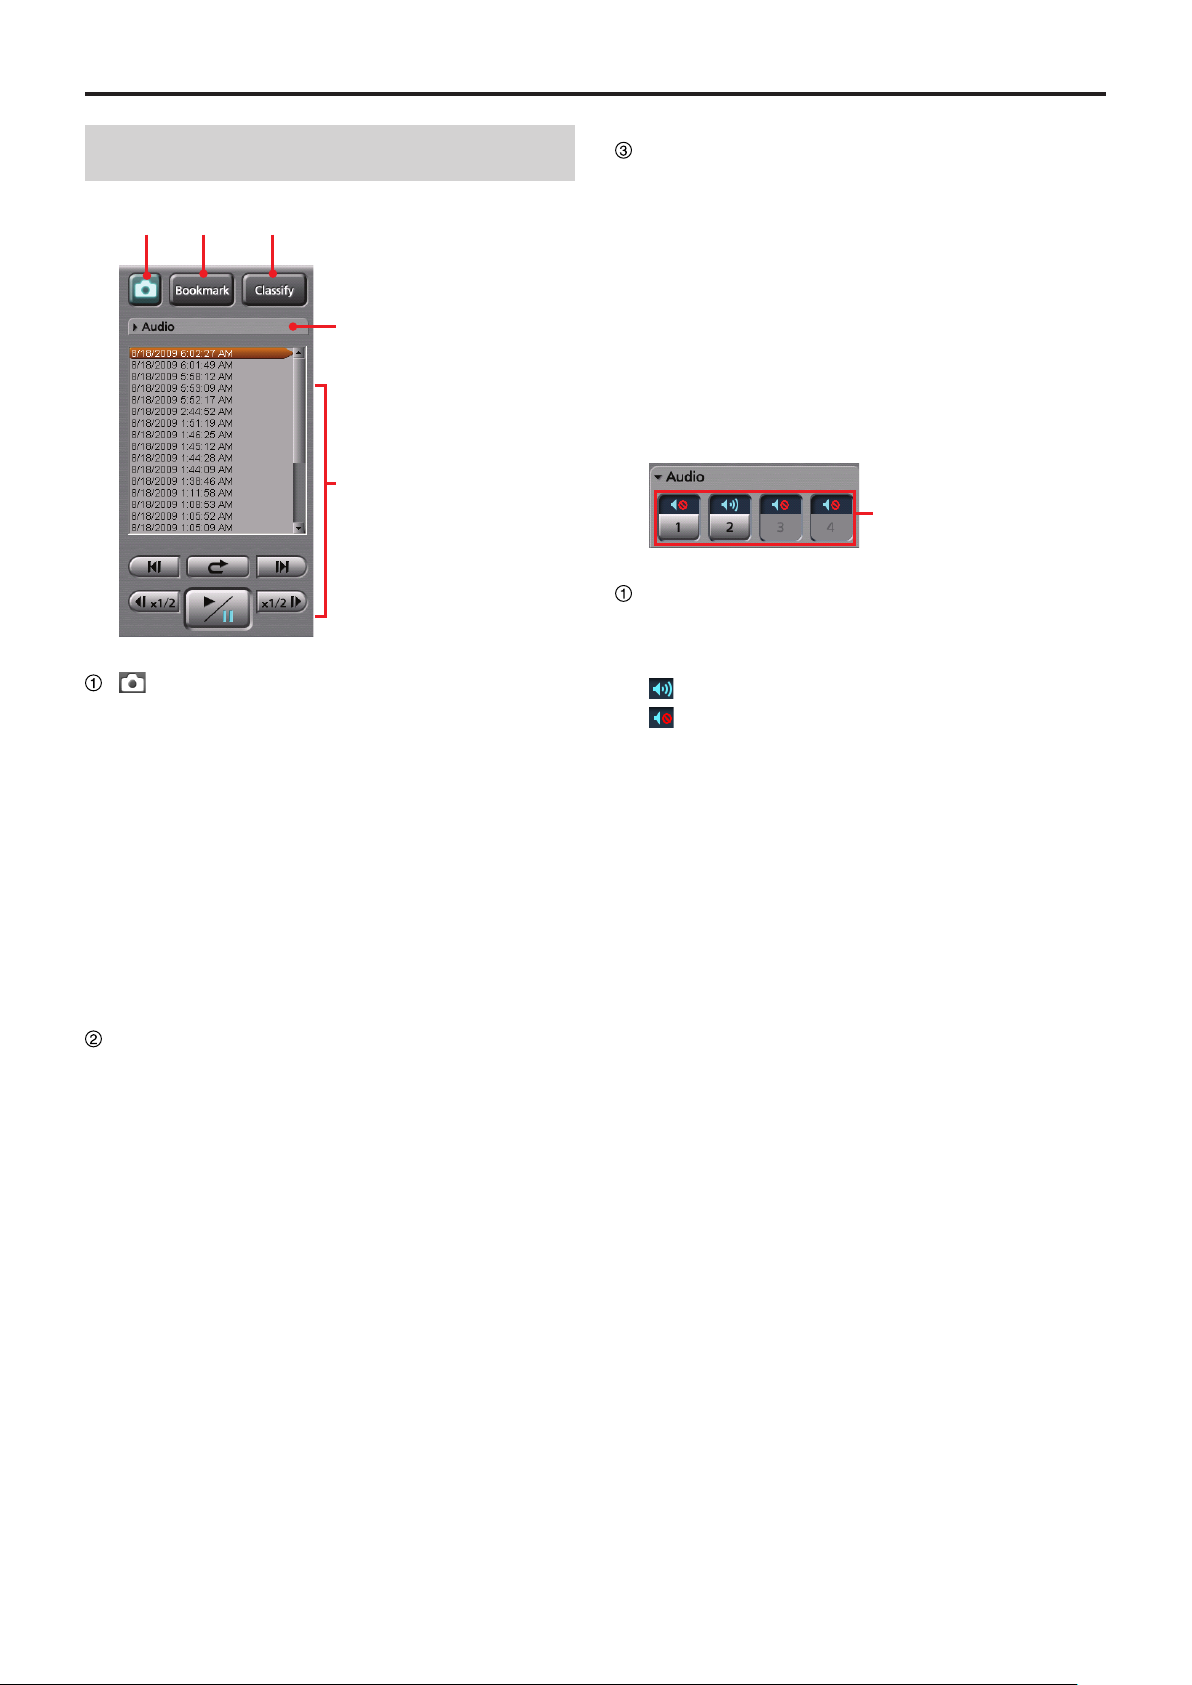
Playback section
①
Playback Section
(Snapshot) button
A snapshot picture will be created and stored as
a BMP le in the folder that is set in Administrator
Setup.
If this button is clicked during playback, the
playback pauses and a snapshot picture is created.
The playback location for a snapshot picture is
recorded as meta information. The Snapshot tab
is displayed in the Property section. This button
is disabled during Fast Forward or Fast Rewind
mode.
(continued)
Classify button
For creating a new classify information item.
If this button is clicked during playback, the
playback pauses and a classify information item
is created. The Classify tab is displayed in the
Property section. This button is disabled during Fast
Forward or Fast Rewind mode, or if any classify tag
is registered.
(See "Classify/case tab," page 23, and "Creating
classify information," page 69.)
Audio tab
This is a panel for audio control.
Audio mute buttons/indications
Select whether the playback sound of the selected
audio channel is On or OFF. The current setting is
indicated on the button.
: Audio mute Off (Playback sound On)
: Audio mute On (Playback sound Off)
If no sound is recorded on a channel, the button
corresponding to the channel is disabled.
Mute status is memorized in the Front-End
Application, and will be restored when the FrontEnd Application restarts.
(See "Turning playback sound On or Off," page 68.)
(See "Snapshot tab," page 22, and "Creating a
snapshot picture in archive mode," page 70.)
Bookmark button
For creating a new bookmark.
If this button is clicked during playback, the
playback pauses and a bookmark is created The
Bookmark tab is displayed in the Property section.
This button is disabled during Fast Forward or Fast
Rewind mode.
(See "Adding bookmarks in archive mode,"
page 69.)
1
Description of the Screen Displays
①
②
③
④
⑤
⑥
⑦
(continued)
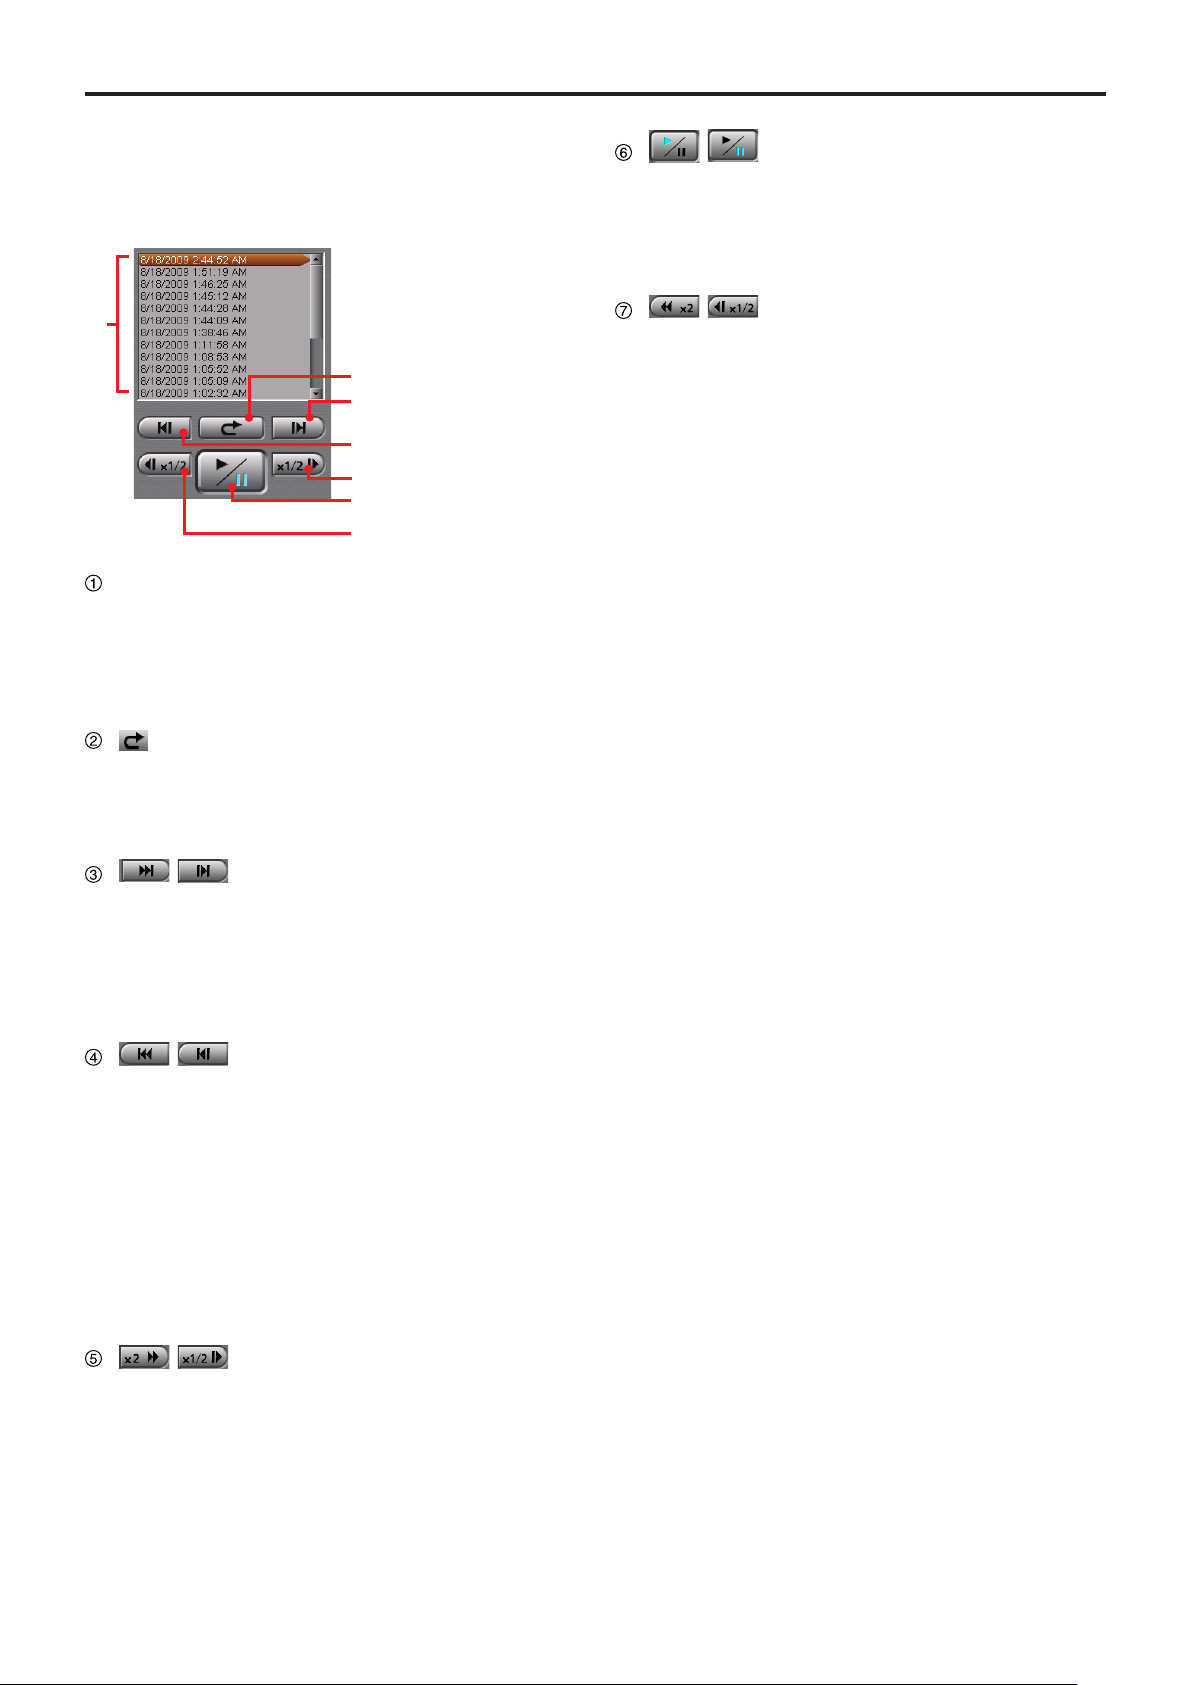
Playback Section
This panel controls playback of video signals recorded
on the SDHC Memory Cards.
(See "Playback," page 65.)
File list
For displaying a list of video les recorded on
the SDHC Memory Cards that are loaded in the
Memory Card Video Recorder.
Double-clicking on a lename will start playback of
the le from the beginning.
/
(Playback/Pause) button/
indication
Each click on this button will toggle playback and
pause modes. The current status is indicated on
the button.
At the end of the le, playback pauses.
/
(Fast rewind/Slow reverse
playback) button
If this button is clicked during playback, fast rewind
playback will start.
If this button is clicked during pause, slow reverse
playback will start.
Each time this button is clicked, fast rewind or slow
reverse playback speed changes.
At the beginning of the le, playback pauses.
(Quick replay) button
Playback from a location 7 seconds before the
button is clicked starts. If this button is clicked
within 7 seconds from the beginning of a le,
playback starts from the beginning of the le.
/
(Skip forward/Frame forward)
button
If you click on this button during playback, fast
forward, or fast rewind mode, playback from the
beginning of the next le on the le list will start.
If this button is clicked during pause, an image one
frame after the current frame will be displayed.
/
If this button is clicked within 5 seconds from the
beginning of a le, playback will start from the
beginning of the previous le on the le list. If this
button is clicked after 5 seconds from the beginning
of a le, playback will start from the beginning of
that le.
If this button is clicked during fast forward or fast
rewind mode, playback from the beginning of the
previous le on the le list will start.
If this button is clicked during pause, an image one
frame before the current frame will be displayed.
(Skip back/Frame rewind) button
/
(Fast forward/Slow playback)
button
If this button is clicked during playback, fast forward
playback will start.
If this button is clicked during pause, slow playback
will start.
Each time this button is clicked, fast forward or slow
playback speed changes.
At the end of the le, playback pauses.
1
Description of the Screen Displays
1
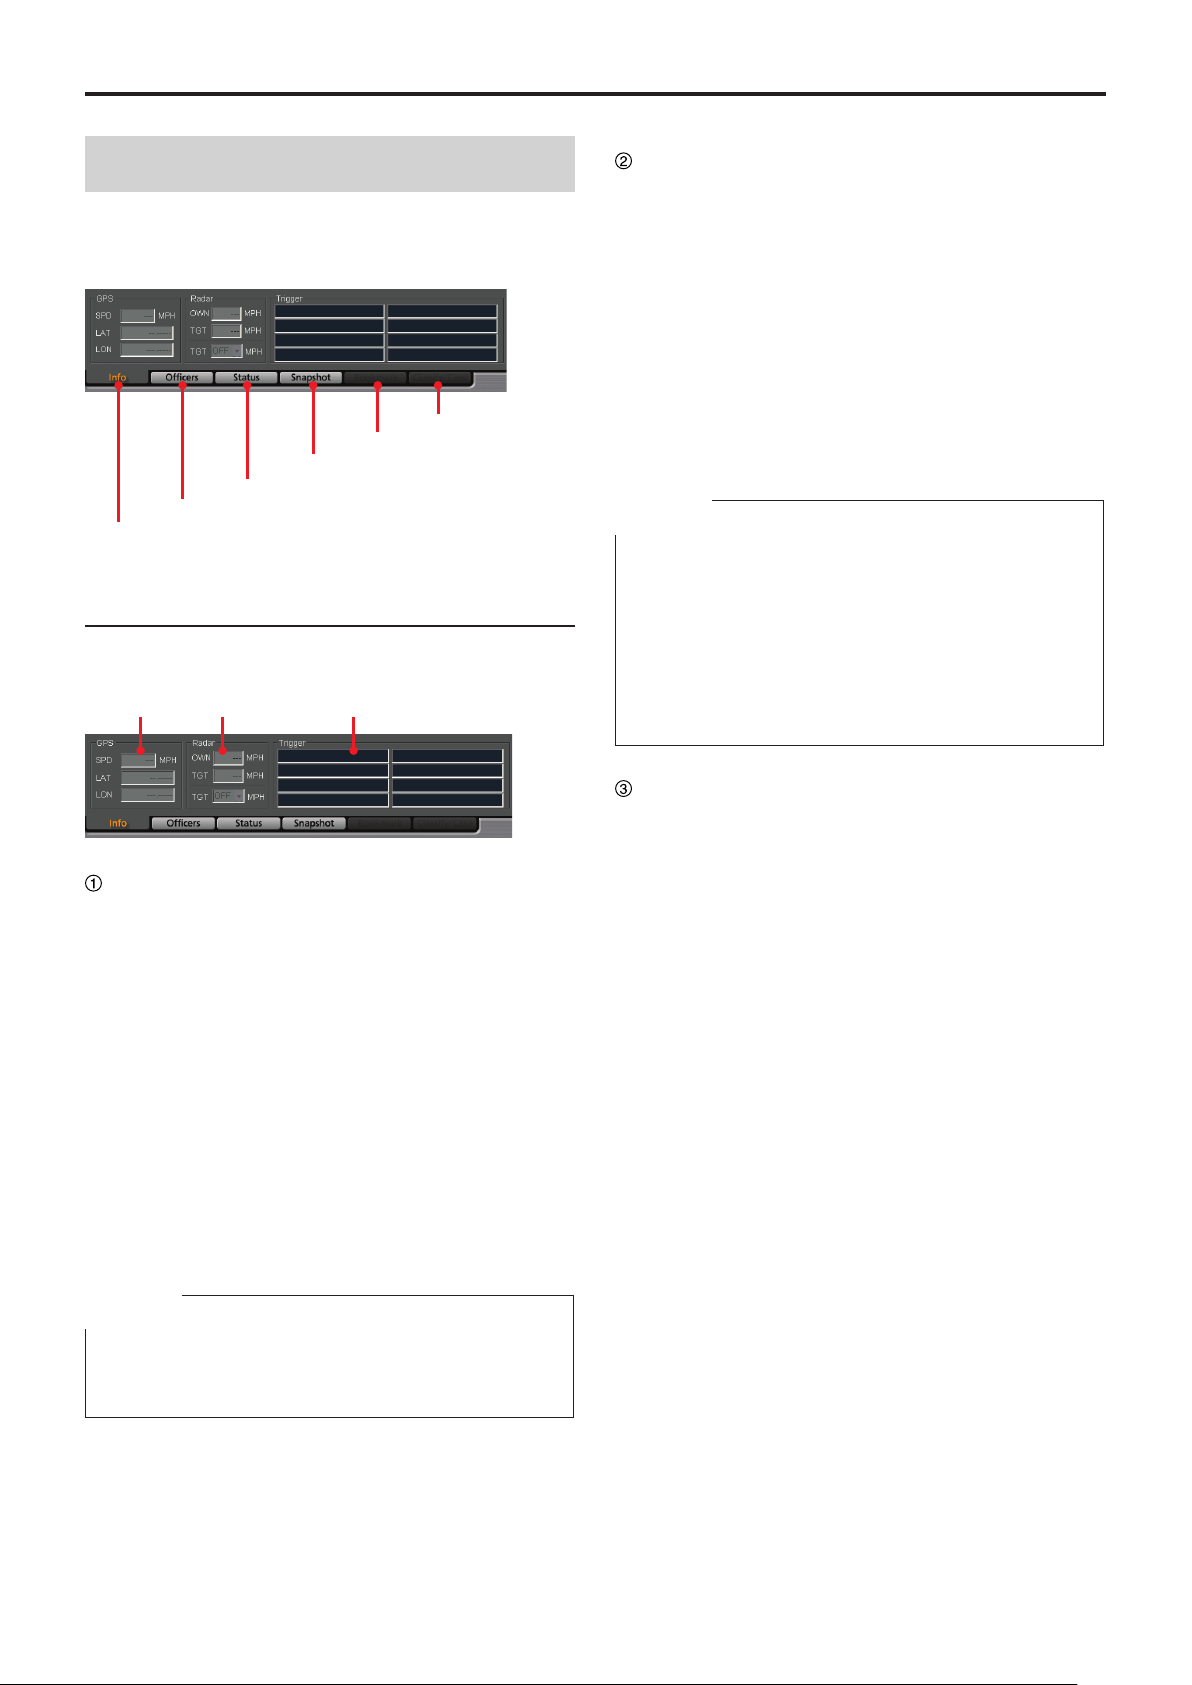
Info tab
Officers tab
Status tab
Snapshot tab
Bookmark tab
Classify/Case tab
① ② ③
Property Section
You can check the information for the pictures in the
live mode, or for the recorded pictures. Click on a tab,
and the corresponding page will be displayed.
(continued)
Radar information
The following information obtained from the radar
gun will be displayed.
In Archive mode, the displayed data are updated,
according to data sent from the Memory Card Video
Recorder.
OWN: Speed of your vehicle
TGT: Speed of the target vehicle
Info tab
Meta information is displayed.
(See "Meta information," page 71.)
GPS information
The following information obtained from the GPS
will be displayed.
In Live mode, the displayed data are updated at
intervals that are set on the Radar/GPS screen in
Administrator Setup.
In Archive mode, the displayed data are updated
according to data sent from the Memory Card Video
Recorder.
SPD: Vehicle speed
TGT (setting):
been set in the Memory Card Video Recorder.
If the TGT value exceeds this setting value, a
trigger event will be generated.
Speed of a target vehicle that has
Notes
TGT (setting) is displayed only when Trigger 15
•
or Trigger 16 is set to TGT(REC), TGT(P1REC),
TGT(P2REC), or TGT(P3REC) are set to TGT on the
Triggers screen in Administrator Setup.
(See "Triggers," page 110.)
TGT (setting) is not displayed if Connection of Radar is
•
set to OFF on the Radar/GPS screen.
(See "
Trigger information
The GPI input status is displayed when Trigger is
set to ON and the trigger name is specied on the
Trigger screen in Administrator Setup.
If the number of connected GPI is up to 8, the
status is displayed in 4 lines and 2 rows. If the
number of connected GPI is more than 8, the status
is displayed in 4 lines and 4 rows. The GPI channel
number and trigger name are displayed like "GPI
channel number : trigger name" in each cell.
GPS,
" page 99.)
LAT: Latitude. 00.000000N denotes north latitude,
and 00.000000S denotes south latitude.
LON: Longitude. 000.000000W denotes west
longitude, and 000.000000E denotes east
longitude.
Note
If the AG-CPD15P Memory Card Video Recorder is used,
the GPS information in Live mode may not be displayed
until the vehicle moves.
0
Description of the Screen Displays
②
①
① ③② ④
(continued)
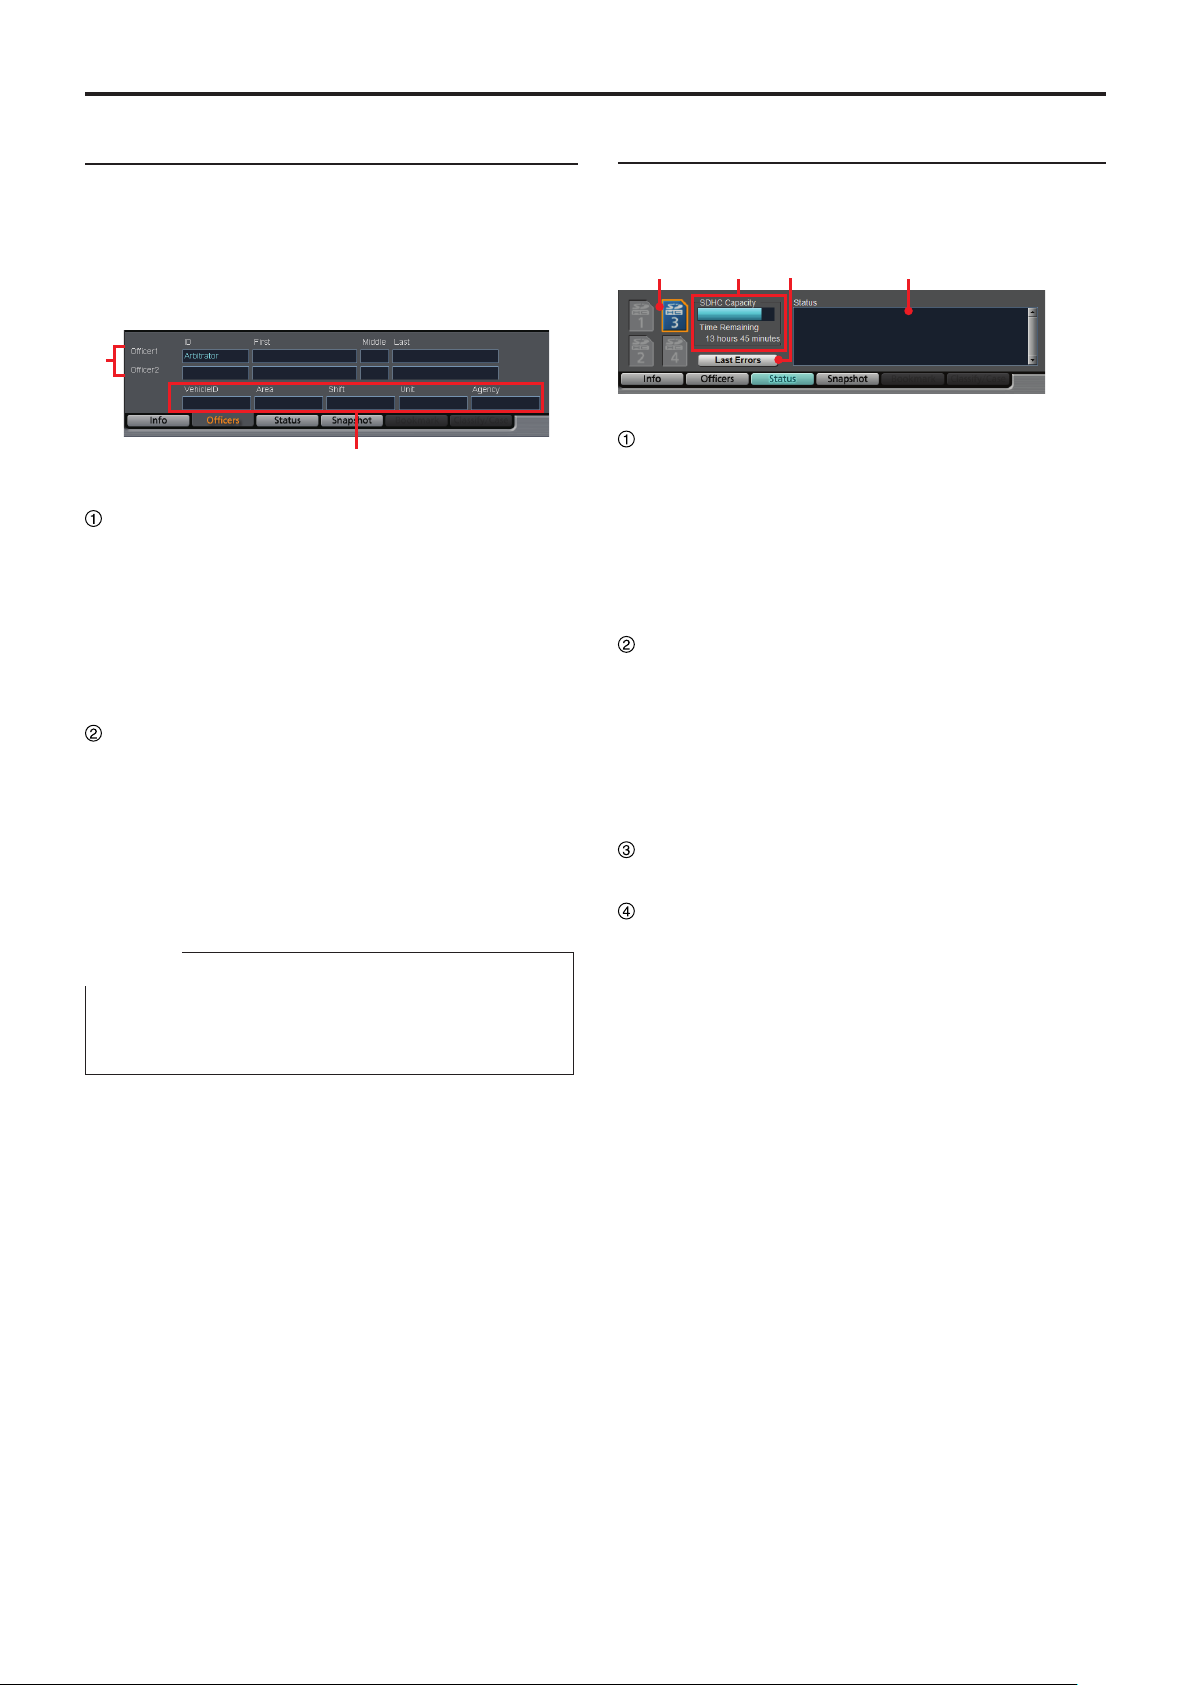
Ofcers tab
Ofcer information is displayed.
In Live mode, the setting data of the Memory Card
Video Recorder are displayed.
In Archive mode, the meta le data embedded in the
currently selected video signal are displayed.
(See "Ofcer information," page 71.)
Ofcer1, Ofcer2 information
Data for Ofcers 1 and 2 are displayed.
ID: Ofcer ID
First: First name
Middle: Middle name
Last: Last name
Shift information
Vehicle ID: Vehicle ID
Area: Area
Shift: Shiftwork pattern
Unit: Unit
Agency: Police agency
Note
The name of each eld is the default setting for Field1 to
Field5. The eld name can be changed upon installation
of the Back-End server.
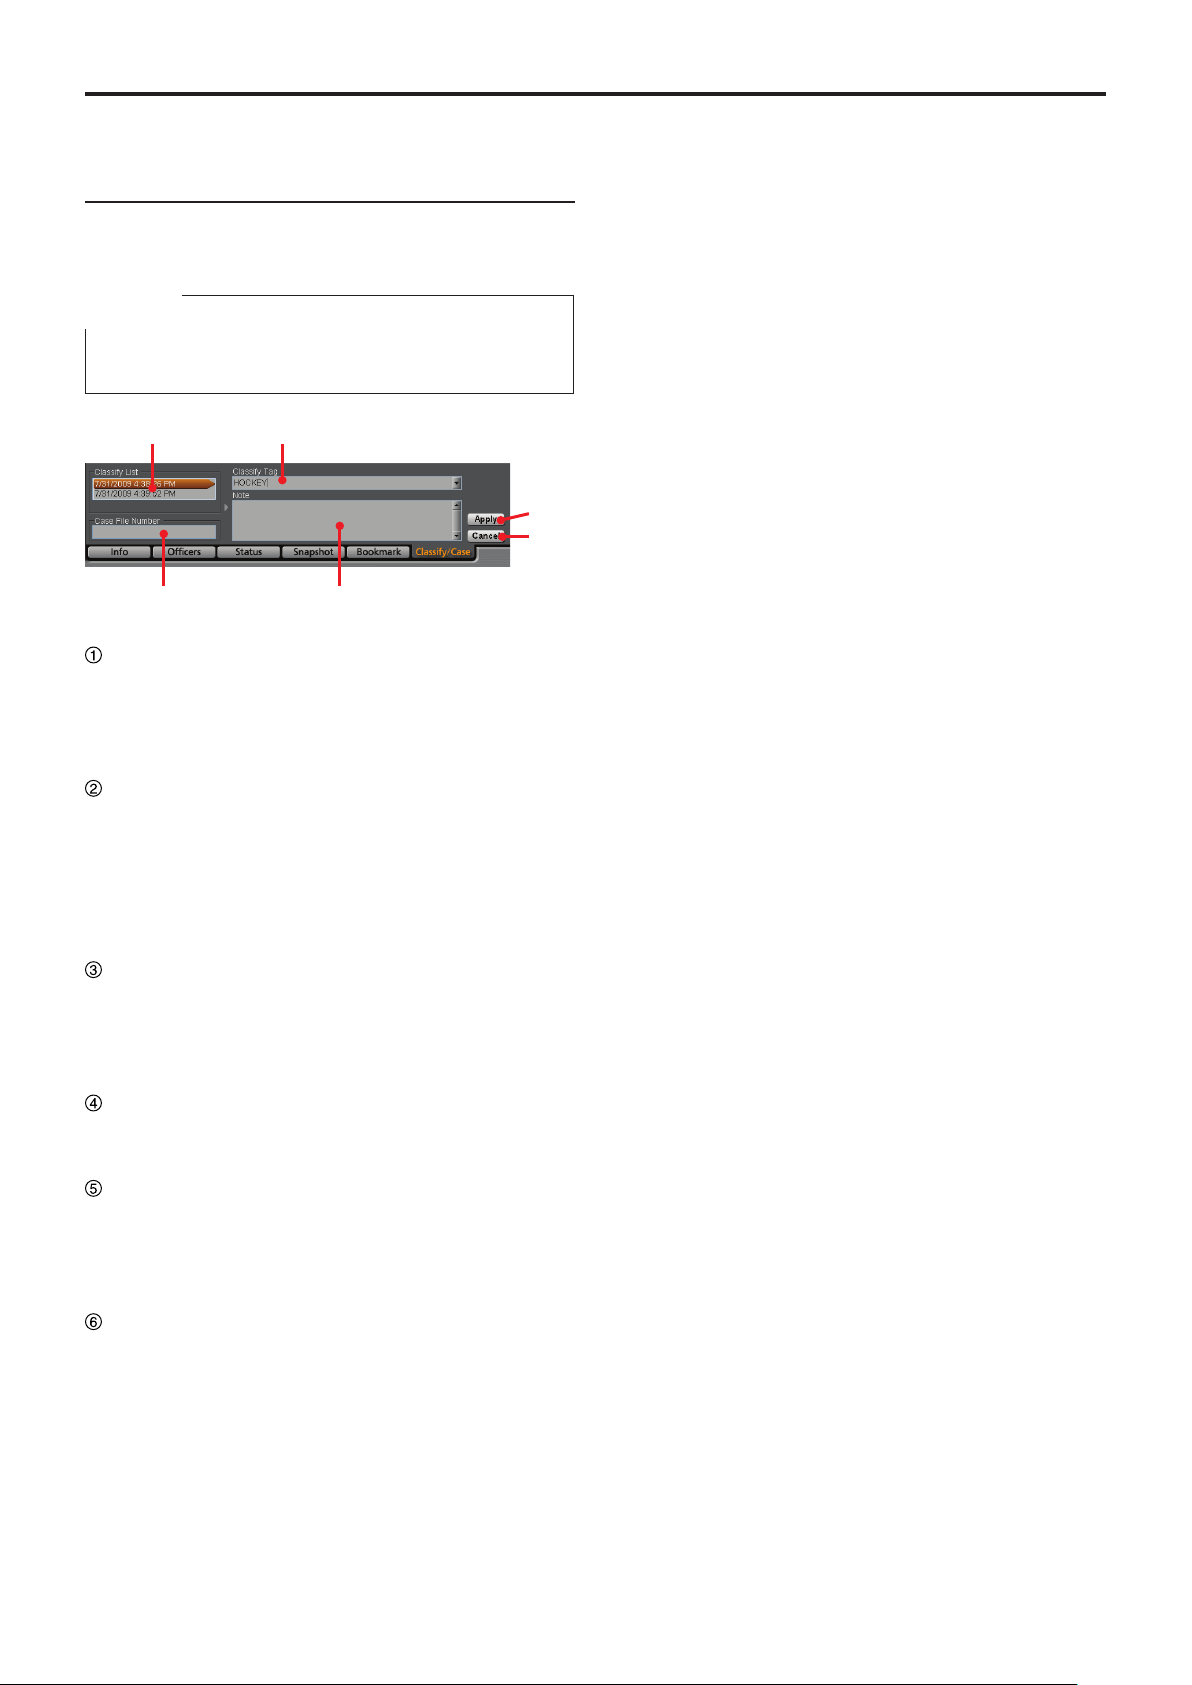
Status tab
The status of the SDHC Memory Cards loaded in the
Memory Card Video Recorder is displayed.
(See "Status information," page 72.)
SDHC indication
The status of the SDHC Memory Cards loaded in
the Memory Card Video Recorder is displayed.
In Live mode, the status of the memory card to be
used for recording is displayed.
In Archive mode, the status of the memory card in
which the video signal being played back is stored
is displayed.
SDHC Capacity indication
The remaining duration of the SDHC Memory
Cards loaded in the Memory Card Video Recorder
is displayed with a bar indication. The remaining
recordable time with the current setting will be
displayed in Time Remaining.
Just after an SDHC memory card is inserted, the
bar indicates full capacity for about 1 minute.
Last Errors button
For displaying the most recent error data.
Status indication
In Live mode, an error code and a message for
registering Snapshot, Bookmark, and Classify are
displayed.
In Archive mode, the recording date and time of
the video le selected in the le list, the playback
duration, and a message for registering Snapshot,
Bookmark, and Classify are displayed.
1

Description of the Screen Displays
① ③②
④
⑤
⑥
① ②
③
④
Snapshot tab
The snapshots and their notes are displayed.
(See "Snapshot information," page 72.)
Snapshot List
A list of snapshots in the selected video le is
displayed. If a snapshot is selected, playback
pauses at the location of the snapshot.
(continued)
Cancel button
If you click on this button before clicking on the
Apply button while editing a note, that editing
is canceled, and the note before editing will be
displayed. This button is disabled while no note is
being edited.
Note
When the AG-CPD15P is used, Snapshot List and
Note are displayed in gray and cannot be operated.
Only the E-mail button is enabled.
Bookmark tab (only in Archive mode)
Snapshot folder path
The directory of snapshot data storage location
that has been set on the File Transfer screen in
Administrator Setup is displayed.
Note
The note for the snapshot selected in the Snapshot
List is displayed. The note can be edited if playback
is paused at the snapshot location.
Note
The note of a snapshot cannot be edited in Live mode.
E-mail button
For attaching the snapshot selected in the
Snapshot List to e-mail.
This button is disabled if no snapshot is selected.
The latest snapshot will be attached to e-mail
during Live mode.
Note
This button functions correctly only when the
internet e-mail program for Windows is registered.
For registering the internet e-mail program, refer to
Windows Help.
Apply button
For updating snapshot data when the note of a
snapshot is edited. This button is disabled when no
note is edited.
The bookmarks and their notes are displayed.
(See "Bookmark information," page 73.)
Bookmark List
A list of bookmarks in the selected video le is
displayed. If a bookmark is selected, the bookmark
position is located and the unit enters playback
pause mode.
When the playback position reaches a bookmark
position during playback, the bookmark will be
selected.
Note
The note for the bookmark selected in the
Bookmark List is displayed. The note can be edited
if playback is paused at the bookmark location.
Apply button
For updating bookmark data when the note of a
bookmark is edited. This button is disabled when
no note is edited.
Cancel button
If you click on this button before clicking on the
Apply button while editing a note, that editing
is canceled, and the note before editing will be
displayed. This button is disabled while no note is
being edited.
Description of the Screen Displays
①
④ ③
②
⑤
⑥
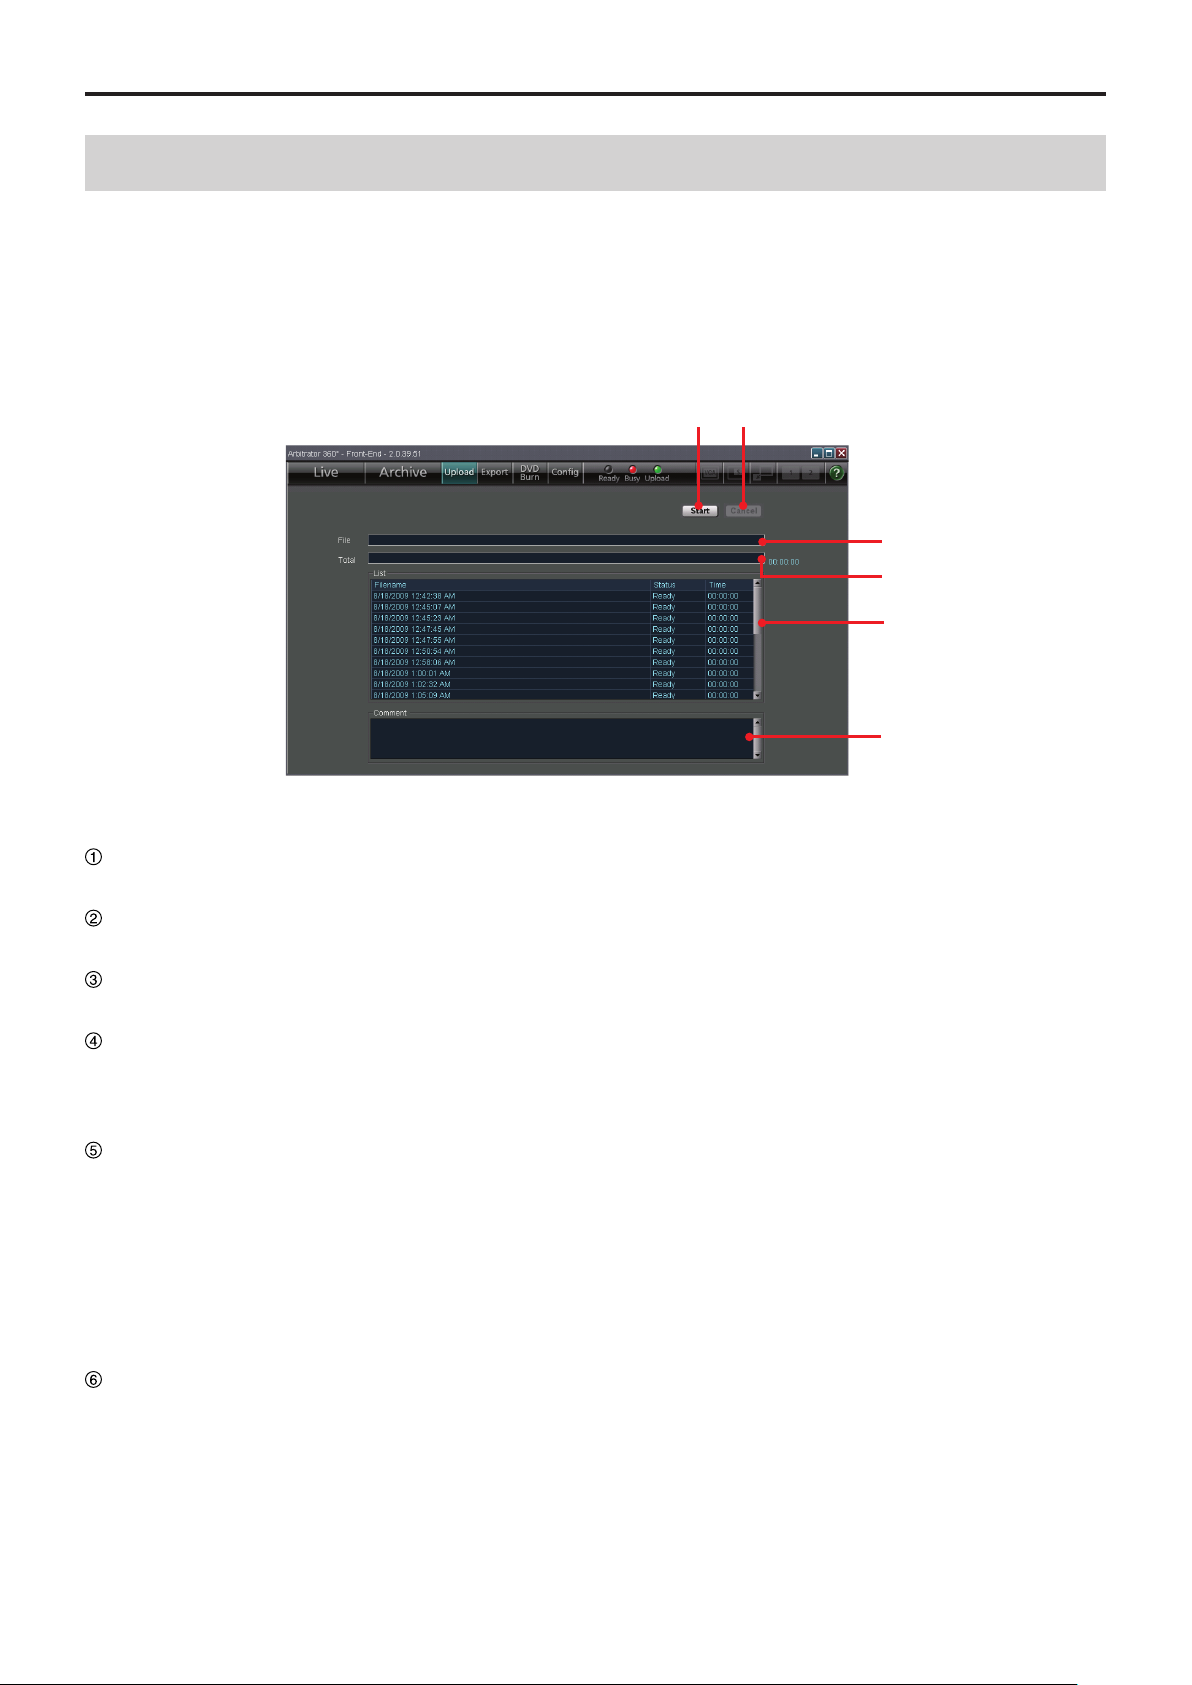
Classify/Case tab (only in Archive mode)
The classify information is displayed.
(See "Classify information," page 73.)
Note
If the AG-CPD15P Memory Card Video Recorder is used,
the Event type of the AG-CPD15P is displayed as Classify.
(continued)
Classify List
A list of classify information in the selected video
le is displayed. If a classify information item is
selected, that position is located and the unit enters
playback pause mode.
Classify Tag
The classify tag selected in the Classify List is
displayed.
A classify tag can be edited if playback is paused at
the classify information position. Select a tag from
the classify tags registered on the Rec/Play screen
in Administrator Setup.
Note
The classify information note selected in the
Classify List is displayed.
A classify information note can be edited if playback
is paused at the classify information position.
Case File Number
Enter a case le number. The input case le
number will be recorded in the bookmark le.
Apply button
For updating a classify information item when its
classify tag, note or Case File Number are edited.
This button is disabled when neither Classify Tag
nor Case File Number, nor note is edited.
Cancel button
If you click on this button before clicking on the
Apply button while editing a classify tag, note, or
the Case File Number, that editing is canceled
and the status before editing will be restored. This
button is disabled if no classify tag or note, or Case
File Number has been edited.
Description of the Screen Displays
③
⑤
⑥
④
①
②
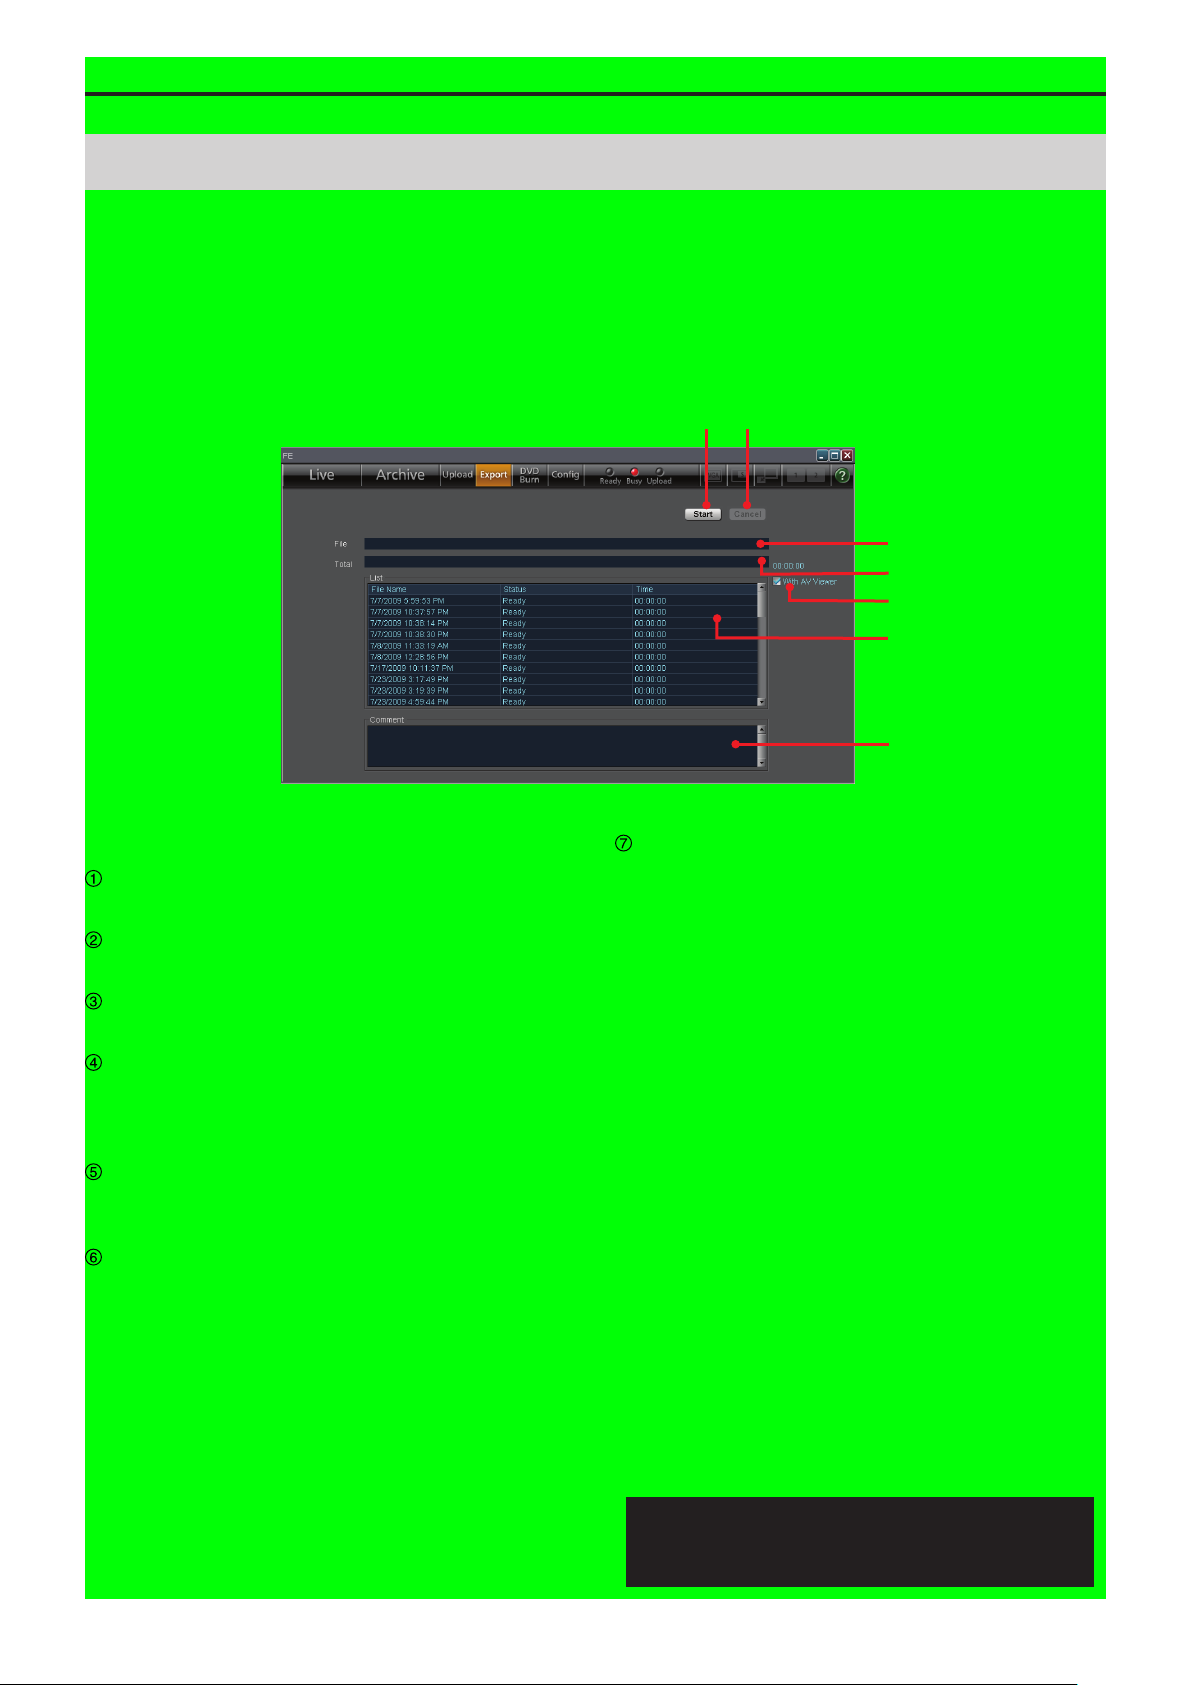
Upload Screen
When the [Upload] button of the Toolbar is clicked, the
Upload screen appears.
Video data recorded in the Memory Card Video
Recorder can be uploaded to the Back-End server.
(See "Uploading Files," page 74.)
(continued)
Start button
For starting uploading.
Cancel button
For canceling uploading.
File bar
Indicates the progress of current le uploading.
Total bar
Indicates the progress of all les to be uploaded.
An estimate time required for completion of
uploading is displayed at the right of the bar.
List
A list of les to be uploaded is displayed.
FileName: Filenames of les to be uploaded
Status: Statuses of les (Ready, Transferring,
Done, Error, Abort)
Time: For a le being uploaded, the time passed
from the beginning of uploading is displayed.
(For a le already uploaded, the time required for
uploading is displayed.)
Comment
While connecting or uploading, the current status is
displayed.
If an error is generated during uploading, the
lename for which the error was generated and the
error content are displayed.
Description of the Screen Displays
③
④
⑤
⑥
⑦
①
②
Export Screen
When the [Export] button of the Toolbar is clicked, the
Export screen appears.
Video data recorded in the Memory Card Video
Recorder can be exported to the hard disk of a PC or
removable media.
(See "Exporting Files," page 75.)
(continued)
Start button
For starting exporting.
Cancel button
For canceling exporting.
File bar
Indicates the progress of current le exporting.
Total bar
Indicates the progress of all les to be exported. An
estimate time required for completion of export is
displayed at the right of the bar.
With AV Viewer
Place a check mark when exporting the dedicated
player application together.
List
A list of les to be exported is displayed.
FileName: Filenames of les to be exported
Status: Statuses of les (Ready, Transferring,
Done, Error)
Time: For a le being exported, the time passed
from the beginning of exporting is displayed. For a
le already exported, the time required for exporting
is displayed.
Comment
If an error is generated during export, the lename
for which the error was generated and the error
content are displayed.
Exporting from the Front-End Application is not
available at present. Upgrading is scheduled for
the future.
Description of the Screen Displays
③
④
①
②
⑤
⑥
⑦
⑧
DVD Burn Screen
When the [DVD Burn] button of the Toolbar is clicked,
the DVD Burn screen appears.
Video data recorded in the Memory Card Video
Recorder can be output in DVD-Video format for
recording onto a DVD.
(See "Creating a DVD," page 76.)
(continued)
Start button
For starting outputting data for burning a DVD.
Cancel button
For canceling output.
File bar
Indicates the progress of current le output.
Total bar
Indicates the progress of all les to be output. An
estimate time required for completion of output is
displayed at the right of the bar.
List
A list of les to be output is displayed. The les with
a check mark in the check box will be output.
File Name: Filenames of les to be output
Status: Statuses of les (Ready, Transferring,
Done, Error, Abort, Transferred, Burning,
Converting, Verifying)
Total Duration
Total playback period of a selected le is displayed
for Main video and Sub video separately.
Comment
The current status is displayed.
If an error is generated during output, the lename
for which the error was generated and the error
content are displayed.
Selected Files
Total number of les checked on the List is
displayed. A maximum of 49 les can be selected.

Description of the Screen Displays
①
②
③
④
(continued)
Restore Screen (Provided Only with the AG-CPD15P and AGCPD10CRUP)
Start button
For starting restoring.
Cancel button
For canceling restoring.
Progress bar
Indicates the progress of current le restoring.
Status indication
Indicates the current status of restoring.
(Ready Restoring)
•
Completed Restoring
•
Aborted Restoring the le
•
Description of the Screen Displays
①
②
③
④
⑤
Cong Screen
(continued)
When the [Cong] button of the Toolbar is clicked,
the Cong screen appears. An administrator can
make settings for the conguration of the Front-End
application.
(See "Administrator Setup," page 79.)
Admin Password screen
On default settings
The default settings for various items are shown on the
Setup list on pages 113 to 127.
Password
For inputting an administrator password.
Retype Password
Re-enter the same string of password input in the
Password eld for reconrmation.
Item list
A list of the setting screens is displayed. Clicking
on a screen name will display the corresponding
setting screen.
Apply button
For changing the settings of the Memory Card
Video Recorder to those set in the Cong screen.
Cancel button
For canceling changes.
Description of the Screen Displays
⑤
① ③ ④
②
ⓐ
ⓑ
ⓐ
ⓑ
Allocation (Video/Audio) screen
(continued)
(See "Allocation (Video/Audio)," page 80.)
Resolution/RecordRate
Main
The resolution and bit rate of the main video can be
set.
Setting values:
mode), D1 STD (720x480, standard quality
mode), D1 10 (720x480, 10 frames/second), CIF
(352x240, low quality mode)
Sub
The resolution and bit rate of the sub video can be
set.
Setting values:
mode), D1 STD (720x480, standard quality
mode), D1 10 (720x480, 10 frames/second), CIF
(352x240, low quality mode)
D1 HI (720x480, high quality
D1 HI (720x480, high quality
Connection Camera
Camera1, Camera2, Camera3, Camera4,
Camera5, Camera6
Set if a camera is connected to each of
[CAMERA 1], [2], [3], [4], [5], and [6] connectors on
the Memory Card Video Recorder. If the camera is
connected, set to ON, and if it is not connected, set
to OFF.
Detect button
Click to automatically detect cameras connected to
the Memory Card Video Recorder.
Notes
If either of the Main or Sub Resolution/RecordRec is set
•
to "D1 10", the other is also set to "D1 10".
If you change the displayed conguration setting screen
•
without clicking on [Apply] after changing settings, "Save
and Apply Changes?" appears. Click on [Yes] then
change the screen.
Description of the Screen Displays
1
ⓑ
ⓐ
(continued)
Preset Settings
For setting the channel mode and camera
connection pattern for Preset 1, Preset 2, and
Preset 3.
(See "Preset Settings," page 81.)
Form
Set the channel mode.
Pattern
Set the camera connection pattern.
Setting values for Form and Pattern:
Form Pattern
1Channel Main 1, Sub -
Main 2, Sub -
Main 3, Sub -
2Channels Main 1, Sub 2
Main 1, Sub 3
Main 2, Sub 3
4Channels QUAD Main -, Sub 1456
Main -, Sub 2456
Main -, Sub 3456
4Channels PANORAMA Main -, Sub 1456
Main -, Sub 2456
Main -, Sub 3456
5Channels QUAD Main 1, Sub 2456
Main 1, Sub 3456
Main 2, Sub 3456
Main 3, Sub 2456*
5Channels PANORAMA Main 1, Sub 2456
Main 1, Sub 3456
Main 2, Sub 3456
Main 3, Sub 2456*
2
None*
*1 This setting is enabled when the camera connected
to the [CAMERA 1] connector is set to OFF.
*2 "None" is not selected for Preset1 unless all camera
connections are set to OFF.
1
1
Audio In Select
Select the type of microphones connected to
each of [AUDIO IN 1], [2], [3], and [4] connectors
on the Memory Card Video Recorder or turn the
microphone off.
Setting values:
Mic, Wireless Mic, Off
Init Audio Rec after power ON
Set the audio recording status upon startup of the
Memory Card Video Recorder. The setting will be
applied to all four audio channels.
Setting values:
ON, OFF, LAST
0
 Loading...