

Page 1

Palm
™
Tungsten™ W Handheld
Getting Started
Page 2

Copyright
© 2002 Palm, Inc. All rights reserved. HotSync, MultiMail, and the Palm logo
are registered trademarks of Palm, Inc. The HotSync logo, Palm, Palm
Powered, the T logo, Tungsten, the Tungsten logo, and VersaMail are
trademarks of Palm, Inc. All other brand names are trademarks or registered
trademarks of their respective owners.
Disclaimer and Limitation of Liability
Palm, Inc. assumes no responsibility for any damage or loss resulting from the
use of this guide. Palm, Inc. assumes no responsibility for any loss or claims
by third parties which may arise through the use of this software. Palm, Inc.
assumes no responsibility for any damage or loss caused by deletion of data
as a result of malfunction, dead battery, or repairs. Be sure to make backup
copies of all important data on other media to protect against data loss.
Software Download Available
Palm™ Desktop software is supplied on a CD-ROM disc. Check
www.palm.com/support/tungstenw
software.
for updates and new versions of the
Exposure to radio frequency energy (SAR)
In order to comply with FCC radio frequency (RF) exposure guidelines, users
must use a Palm™ brand body-worn accessory during body-worn operation.
Use of accessories that are not provided by Palm or that were not tested for RF
exposure compliance with this product may not comply with the FCC RF
exposure safety guidelines and should not be used.
Maximum Specific Absorption Rate (SAR) value
This device has a maximum 0.41 W/kg per 10 grams based on EN50360 and
EN50361 standards.
Electrical safety
This apparatus is intended for use when supplied with power from Motorola,
p/n 163-1149 or Phihong, p/n PSA05R-050. Other usage will invalidate any
approval given to this apparatus and may be dangerous.
Aircraft safety
Switch off your cellular telephone when in an aircraft. The use of cellular
telephones in an aircraft may be dangerous to the operation of the aircraft,
disrupt the cellular network and is illegal. Failure to observe this instruction
may lead to suspension or denial of cellular telephone services to the offender,
or legal action or both.
Page 3

Explosive Atmosphere
• Users are advised not to use the equipment when at a refueling station.
• Users are reminded of the need to observe restrictions on the use of radio
equipment in fuel depots, chemical plants or where blasting operations are
in progress.
Road Safety
It is advised that a hand-held microphone or telephone handset should not be
used by the driver while the vehicle is moving, except in an emergency. Speak
only into a fixed, neck slug or clipped-on microphone when it would not
distract your attention from the road.
Non-Ionizing radiation
As with other mobile radio transmitting equipment, users are advised that for
satisfactory operation of the equipment and for the safety of personnel, it is
recommended that no part of the human body b e allowed to c ome too close to
the antenna during the operation of the equipment.
Agency Compliance Information
Product regulatory and compliance information can be found in the
Handbook file located on the product CD-ROM.
PN: 406-4934A-IE
Page 4

Page 5

Contents
Start here . . . . . . . . . . . . . . . . . . . . . . . . . . . . . . . . . . . . . . . . . . . . . . . . 1
Follow guidelines for upgrading from another Palm™
handheld . . . . . . . . . . . . . . . . . . . . . . . . . . . . . . . . . . . . . . . . . . . . . 1
Understand how your wireless service works. . . . . . . . . . . . . . 2
Review the contents of your handheld package . . . . . . . . . . . . 2
Get to know your handheld . . . . . . . . . . . . . . . . . . . . . . . . . . . . . 3
Charge and set up your handheld. . . . . . . . . . . . . . . . . . . . . . . . . . . 4
Step 1: Connect the adapter and charge your handheld . . . . . 4
Step 2: Set up your handheld . . . . . . . . . . . . . . . . . . . . . . . . . . . . 5
Connect to the wireless network . . . . . . . . . . . . . . . . . . . . . . . . . . . . 6
Step 3: Insert the SIM card . . . . . . . . . . . . . . . . . . . . . . . . . . . . . . 6
Step 4: Turn on the Mobile application . . . . . . . . . . . . . . . . . . . . 7
Step 5: Make a phone call from your handheld. . . . . . . . . . . . . 9
Install software . . . . . . . . . . . . . . . . . . . . . . . . . . . . . . . . . . . . . . . . . . 11
Step 6: Install software from the expansion card. . . . . . . . . . . 11
Step 7: Install Palm™ Desktop software. . . . . . . . . . . . . . . . . . 12
Step 8: Set up your handheld to access your e-mail . . . . . . . . 13
Learn more about your handheld . . . . . . . . . . . . . . . . . . . . . . . . . . 15
Learn how to use the keyboard . . . . . . . . . . . . . . . . . . . . . . . . . 15
Learn how to use the navigator . . . . . . . . . . . . . . . . . . . . . . . . . 16
Enter and synchronize your information . . . . . . . . . . . . . . . . . 19
Read the Handbook . . . . . . . . . . . . . . . . . . . . . . . . . . . . . . . . . . . 20
Take the Quick Tour . . . . . . . . . . . . . . . . . . . . . . . . . . . . . . . . . . . 21
Use your handheld safely . . . . . . . . . . . . . . . . . . . . . . . . . . . . . . 22
Troubleshooting . . . . . . . . . . . . . . . . . . . . . . . . . . . . . . . . . . . . . . . . . 23
Upgrading from another Palm™ handheld . . . . . . . . . . . . . . . 23
Charging the handheld . . . . . . . . . . . . . . . . . . . . . . . . . . . . . . . . 24
Turning on the handheld. . . . . . . . . . . . . . . . . . . . . . . . . . . . . . . 25
Establishing a wireless connection . . . . . . . . . . . . . . . . . . . . . . 25
Installing Palm™ Desktop software . . . . . . . . . . . . . . . . . . . . . 26
v
Page 6

Contents
Performing HotSync operations . . . . . . . . . . . . . . . . . . . . . . . . 28
Using e-mail on your handheld. . . . . . . . . . . . . . . . . . . . . . . . . 30
Identifying incompatible third-party applications . . . . . . . . . 32
vi
Page 7

Start here
Palm™ Tungsten™ W Handheld Getting Started explains how to do the
following:
Charge and set up your Tungsten™ W handheld
■
Turn on the Mobile application, connect to your wireless service,
■
and confirm the connection
Install software on your handheld and your desktop computer
■
Learn more about using your handheld
■
Solve problems that may arise during setup, installation, and
■
subsequent use of your handheld
For the latest troubleshooting information, updates, downloads, and
other important information, go to
Follow guidelines for upgrading from another Palm™ handheld
If you are upgrading from another Palm™ handheld, please follow
these important guidelines:
Read the important upgrade information on
■
support/tungstenw
from another Palm™ handheld” in “Troubleshooting,” at the end
of this guide.
. Information is also available in “Upgrading
www.palm.com/support/tungstenw
www.palm.com/
.
Synchronize your old handheld with your computer so that the
■
information is up-to-date. We recommend that you then create a
renamed backup copy of the Palm folder on your computer.
You must install the version of Palm™ Desktop software included
■
in this package. This version contains important applications that
must be present for your handheld to operate correctly.
Do not use a Palm™ SD Backup Card to restore your backup data
■
from your previous handheld. You must follow the procedure in
“Step 7: Install Palm™ Desktop software.”
Windows:
■
During the upgrade process, some applications and
settings that are incompatible with your Tungsten W handheld are
not transferred. For application information, see “Identifying
incompatible third-party applications” in “Tro u b le s h ootin g. ” As
1
Page 8

Start here
for the settings that are not transferred, you need to find them on
your old handheld.
If you used either MultiMail® SE or MultiMail Deluxe on your old
■
Palm handheld, and if you plan to use your old handheld’s
username on your Tungsten W handheld, the saved e-mail and
account settings are upgraded automatically when you perform
your first HotSync
®
operation in “Step 7: Install Palm™ Desktop
software.”
Mac:
■
You cannot use the same username on your new Tungsten W
handheld as you used on your old handheld. When you install
Palm Desktop software in Step 7, you must create a new username.
IMPORTANT
Tungsten W handheld before your first HotSync operation and (2) you
upgraded using your username from your old Palm handheld, you must
perform a hard reset on your Tungsten W handheld. Then, before you do
anything else, perform a HotSync operation. See “Upgrading from
another Palm™ handheld” in “Troubleshooting.”
If (1) you used the VersaMail™ application on your new
Understand how your wireless service works
Some of the steps that follow depend on choices you made in your
contract with your wireless service provider. Read the wireless service
provider’s documentation to understand your service contract.
You need answers to the following questions:
Is your contract with your wireless service provider for voice only,
■
data only (GSM and/or GPRS), or for both voice and data? To take
full advantage of your Tungsten W handheld, you need both voice
and data capability.
What are your usernames and passwords for your e-mail and
■
voicemail accounts?
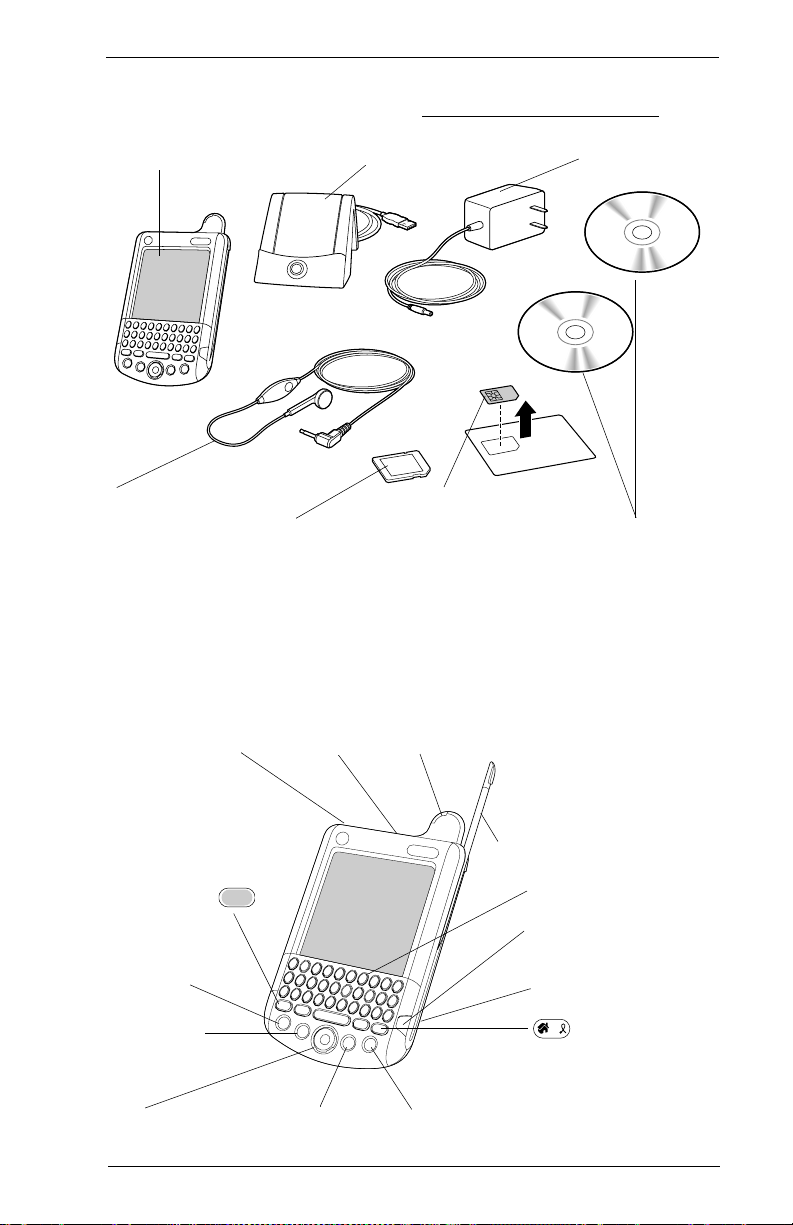
Review the contents of your handheld package
Your power adapter may be different from the one pictured below.
■
If your handheld package does not contain a subscriber identity
■
module (SIM) card, read the opening paragraphs of “Step 3: Insert
the SIM card.”
2
Page 9
Start here
For additional accessories, go to
■
Tungsten W handheld Power adapterHotSync cradle
Expansion card (optional)*
*Whether an expansion card and SIM card are included in the Tungsten W
handheld package depends on your wireless service provider.
www.palm.com/support/intl
SIM card (optional)*Hands-free headset
Tw o CD - R O M s:
Palm Desktop software
Software Essentials
.
Get to know your handheld
Voice j ack
Function
key
Date
Book
Address
Book
5-way navigator
IR port
E-mail
Indicator light
Stylus
Keyboard
Powe r button/
backlight on & off
Expansion card slot
Home key
Wireless/Mobile on & off
3
Page 10
Charge and set up your handheld
Charge and set up your handheld
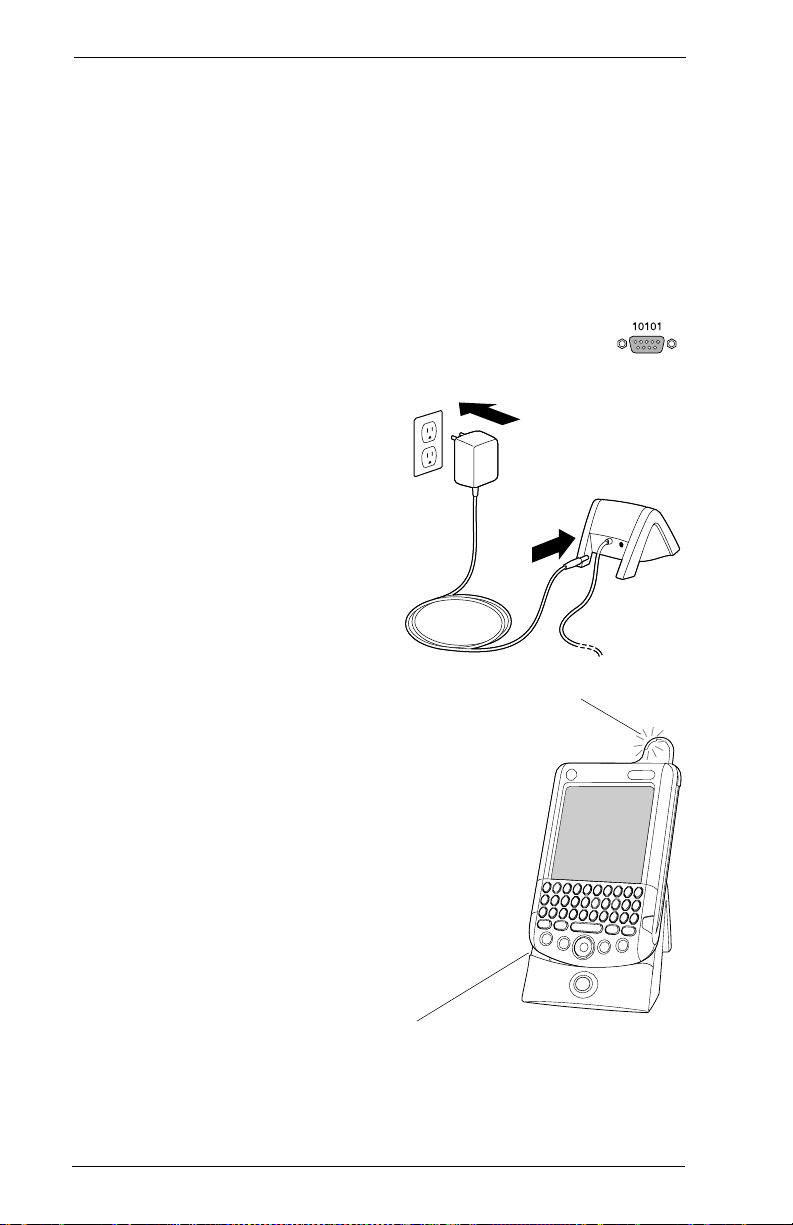
Step 1: Connect the adapter and charge your handheld
If you are upgrading from another Palm™ handheld and have a Palm
cradle already connected, be aware that not all cradles are compatible
with your new handheld. We recommend that you use the cradle
included in the package with your handheld.
NOTE
Windows NT and 95, and systems without USB ports,
require the Palm HotSync
separately. A serial port is shown at right.
Plug the power adapter into an
1.
outlet and the HotSync cradle.
NOTE
Your power adapter may
connect to the cable of the
cradle, not to the cradle itself.
2.
Place your Tungsten™ W
handheld into the cradle.
®
Cradle-Serial, SKU 10828U, sold
3.
Check that the charging
indicator light is solid green.
This means your handheld is
properly seated in the cradle
and is being charged.
NOTE
If the indicator light did
not go on, see “Charging the
handheld,” in “Troubleshooting.”
Charge for a full two hours.
4.
A minimum charge of one hour
is enough to set up the
handheld, but two hours is
recommended.
5.
Remove the plastic sheet
protecting the screen.
4
Charging indicator light
When properly seated, there is a
small gap between the front of the
handheld and the cradle
Page 11
Charge and set up your handheld
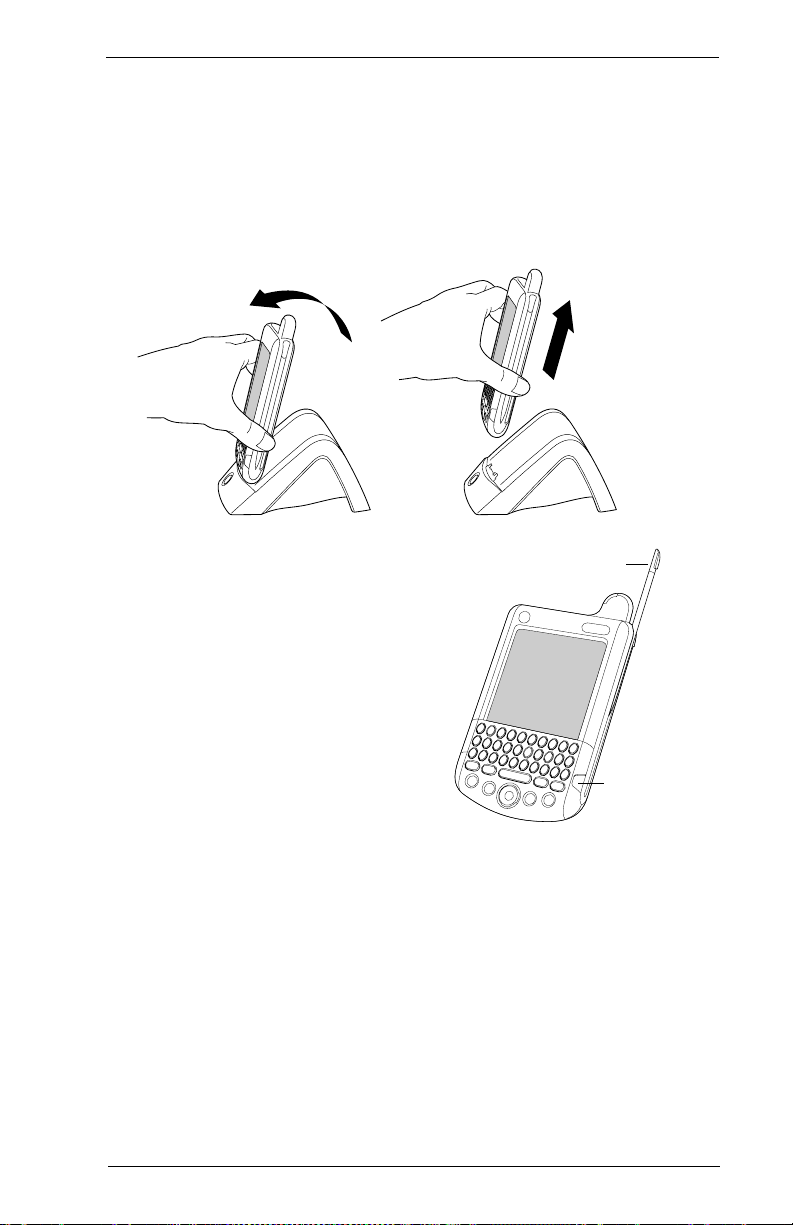
Step 2: Set up your handheld
After you charge your handheld, carefully remove it from the cradle.
To remove the handheld from the cradle:
Tilt the handheld forward, and then lift it up.
■
To set up your handheld:
1.
Press the power button to turn on
Stylus
the handheld, and remove the
stylus.
NOTE
If your handheld did not turn
on, see “Turning on the handheld,”
in “Troubleshooting.”
2.
Complete the setup screens to
calibrate the screen, select a
Powe r button
language, set the date and time,
and so on. Use the stylus to
complete the steps.
NOTE
Your handheld turns off automatically after one minute of
inactivity. To return to the screen that was displayed when the handheld
shut down, press the power button.
The setup screens are followed by the Quick Tour, which introduces
important features of your handheld, and the Keyboard tutorial,
which explains how to use the handheld keyboard.
5
Page 12

Connect to the wireless network
Connect to the wireless network
Step 3: Insert the SIM card
With the subscriber identity module (SIM) card inserted, you can use
your handheld’s wireless features, such as the mobile phone, SMS,
web browser, and wireless e-mail. Without the SIM card, you can
operate your handheld, but you cannot use the wireless features.
IMPORTANT
provided by a specific wireless service provider. Any other carrier
network requires a different device configuration and is not supported
by Palm.
This handheld is preconfigured to work with the SIM card
Most likely, the SIM card either is in your package or was handed to
you by a representative of your wireless service provider. In some
cases, however, the SIM card is already installed in your handheld.
Open the access door and either verify the presence of the SIM card or
insert it.
To insert the SIM card or verify its presence:
1.
Turn off your handheld.
IMPORTANT
could damage the connector.
2.
If you have the SIM card attached to its plastic holder, carefully
detach the SIM card from the holder. (See “Review the contents of
your handheld package” for an illustration of the SIM card
detached from its plastic holder.)
Turning off the handheld prevents static discharge that
6
Page 13

Connect to the wireless network
3.
On the back panel of your handheld, slide a thin, flat edge (similar
to your thumbnail) into the indent and under the access door until
the access door opens.
4.
Do one of the following:
If a sample SIM card is present
–
(look for the Sample SIM label),
remove it. Then slide the SIM
card into place on the access
door. Close the access door.
–
If the real SIM card is present
(look for the gold contact area),
close the access door.
Gold
contact
area
After removing the sample SIM
card, slide the real SIM card
into place on the access door
Step 4: Turn on the Mobile application
Turning on the Mobile application connects you to the wireless
network, so before doing so, be sure to complete all registration and
activation processes required by your wireless service provider.
Information about these processes may be included in the
documentation provided by your wireless service provider.
IMPORTANT
your first HotSync
username from your old handheld on your Tungsten™ W handheld.
Do not use the VersaMail™ application before performing
®
operation, if you are upgrading and plan to use your
7
Page 14

Connect to the wireless network
Blinking green indicator light
To turn on the Mobile application:
1.
Hold down the Wireless button until the Mobile dialog box
appears.
Wireless button
2.
If prompted, enter the personal identification number (PIN) given
to you by your wireless service provider.
3.
Tap On in the Mobile dialog box.
The application searches for a connection to the wireless service in
your area. This may take up to 30 seconds.
4.
Confirm that the connection is established.
Slow-blinking green light:
–
connection to the wireless service
is established.
–
Slow-blinking red light
on, but you are in an area where
there is no coverage. Move to an
area where the signal is stronger,
such as near a window or outside.
If after you move, the indicator light is still slow-blinking red, do
the following:
– See “Establishing a wireless connection,” in “Troubleshooting”
for additional ways to improve signal strength.
– Verify with your wireless service provider that service has been
activated for your handheld.
8
A
: Mobile is
Page 15

Connect to the wireless network
5.
Confirm that your handheld is connected to the wireless service.
a.
Press Home to open the Applications Launcher.
b.
Tap the Mobile icon .
The name of your wireless service provider appears above the
keypad in the Mobile application.
Look here for the name of your
wireless service provider
Step 5: Make a phone call from your handheld
1.
When Mobile is on and within coverage (indicator light is blinking
green), insert the headset connector into the voice jack.
Button: Short
press to answer
call, long press to
hang up
Earpiece
Voi ce jack
Indicator light
9
Page 16

Connect to the wireless network
GPRS
Navigator
Press all four
application buttons
at once to make an
emergency call
Mobile opens and displays the onscreen keypad used for dialing.
coverage
indicator
2.
Place the earpiece comfortably in your ear.
3.
Tap the number you want to dial.
Signal strength indicator
You can also enter a phone number using the handheld keyboard.
Just press the numbers; there is no need to press Function.
4.
Tap Dial.
Tips on making phone calls
During a call, adjust the volume by pressing
■
Up or Down on the navigator.
You can open another application while you
■
are on a call so long as the other application
does not use the wireless network. To return to
Mobile from another application, press the
button on the headset.
■ You can make an emergency call even
without the SIM card inserted, so long as
Mobile is on and you are in an area that has
coverage. The call is free. Just press all four
application buttons at once.
10
Page 17

Install software
Install software
Step 6: Install software from the expansion card
If your package does not include an expansion card or if the software
on the expansion card was already installed by your wireless service
provider, skip this step.
1.
Remove the placeholder card: Push lightly against the card with
your thumb. When the card is released, you hear the system sound.
Push
2.
Insert the expansion card in the direction shown by the icon.
Icon
Push
Notched
corner
3.
Push the card in with your thumb. You feel the card lock and hear
the system sound.
4.
To install the software, follow the instructions that appear on your
handheld screen.
NOTE
Your handheld turns off automatically after one minute of
inactivity. To return to the screen that was displayed when the
handheld shut down, press the power button.
11
Page 18

Install software
5.
When the Date/Time screen appears, confirm that the date and
time are correct, and then press Home to go to the
Applications Launcher.
6.
Remove the expansion card (see first step of this procedure) and
replace the placeholder card.
7.
Store the expansion card in a safe place.
Step 7: Install Palm™ Desktop software
IMPORTANT
begin this procedure until you read “Follow guidelines for upgrading
from another Palm™ handheld” in “Start here,” at the beginning of this
guide.
IMPORTANT
Tungsten™ W handheld before your first HotSync
upgraded using your username from your old Palm handheld, you must
perform a hard reset on your Tungsten W handheld. Then, before you do
anything else, perform a HotSync operation. See “Upgrading from
another Palm™ handheld” in “Troubleshooting.”
1.
Connect the USB HotSync cradle to your computer.
If you are upgrading from another Palm™ handheld, do not
If (1) you used the VersaMail™ application on your new
®
operation and (2) you
12
Page 19

2.
Put the Palm™ Desktop software
CD-ROM into the CD-ROM
drive.
Install software
Windows:
Follow the instructions
that appear on your computer
screen.
Mac
: Double-click the
Palm Desktop Installer icon. Mac
users, keep these points in mind:
– If you are upgrading from another Palm handheld that has a
username, you cannot use that old username on your new
Tungsten W handheld. So when the Installer asks you to select
your old username or create a new one, you must create a new
username.
– Install adds files to the Add-on folder on your computer. To
take full advantage of applications on your handheld, you need
to transfer these files to your handheld. For detailed
instructions on installing files on your handheld, read the
relevant section in “Installing Palm™ Desktop software,” in
“Troubleshooting.”
If installation does not begin as described or stalls, see “Installing
Palm™ Desktop software,” in “Tr o u bl e s ho o t in g . ” If the HotSync
operation does not execute during installation, see “Performing
HotSync operations,” in “Tr o ub l e sh o o ting .”
After you install Palm Desktop software, you can open the electronic
Handbook for Palm™ Tungsten™ W Handhelds. See “Read the
Handbook” later in this guide for details.
Step 8: Set up your handheld to access your e-mail
If you have an existing e-mail account, you can set up the VersaMail
e-mail application to access your e-mail.
If you are using a well-known ISP such as Yahoo! or CompuServe,
many of the settings required for account setup are automatically
configured. For information about other ISPs, go to
support/tungstenw
.
www.palm.com/
13
Page 20

Install software
To set up an e-mail account:
1.
Press the E-mail button.
E-mail
The VersaMail e-mail application opens.
2.
From the VersaMail main screen, press Command Stroke
+ W.
Alternately, press Function + Menu , and then select
Account Setup on the Accounts menu.
3.
From the Account Setup screen, tap New.
4.
Enter the following:
Account Name:
Enter a descriptive name for the account, such as
“My Yahoo.”
Mail Service:
Tap the Mail Service pick list and select the provider
to which you are connecting. Select Other if your ISP is not listed.
If you select Other, you must enter all settings yourself.
Protocol:
Tap the Protocol pick list and select POP or IMAP. (Most
e-mail providers use the POP protocol.) If the VersaMail
application knows the protocol for the mail service you selected, it
displays the correct protocol.
5.
Tap Next.
6.
Enter your username.
This is generally the part of your e-mail address before the @
symbol; it is usually not your entire e-mail address.
7.
Tap the Password box, and then enter your password. The
Password box displays the word “Assigned” to indicate that a
password has been entered.
8.
Press Function + Enter , or tap OK.
9.
Tap Next.
14
Page 21

Learn more about your handheld
IMPORTANT
the Handbook for Palm™ Tungsten™ W Handhelds. The handbook
includes information on filtering, sorting, deleting, and synchronizing;
and also on signatures, icons, folders, and attachments. For information
on how to locate your handbook, see “Read the Handbook,” in “Learn
more about your handheld.” For additional information, see “Using e-
mail on your handheld,” in “Troubleshooting.”
For more information on setting up your e-mail account, see
Learn more about your handheld
Learn how to use the keyboard
Take some time to learn how to use the keyboard.
Brightness Backspace/
Function
CAPS/Find
Delete
Return/
Enter
Home
Command
stroke /
Menu
Navigator
Space bar/SYMBOL
To practice using the keyboard:
Open Memo Pad: Press Home to open the
■
Applications Launcher. Press “M” to highlight the Memo
Pad icon. Press Enter to open Memo Pad. Tap New. You
can practice typing in the memo.
Tips on using the keyboard
■ Use your thumbs to press the keys.
To capitalize a letter, press CAPS and then press the key of the
■
letter. Press CAPS twice to lock it. Press CAPS again to unlock it.
To enter one of the blue characters (for example, numbers), press
■
the blue Function key and then press the key you want. Press
15
Page 22

Learn more about your handheld
Function twice to lock it. Function lock makes it easy to enter long
strings of numbers like credit card numbers and phone numbers.
Press Function again to unlock it.
To review the Keyboard tutorial, press Home to open
■
the Applications Launcher. Press “K” to highlight the
Keyboard icon. Press Enter to open the tutorial.
For information about the navigator, see the next section, “Learn
■
how to use the navigator.”
Onscreen keyboards
Besides the characters visible on the keyboard, many international
characters and symbols are available in the onscreen keyboards. To
access the onscreen keyboards, press Function and then press
SYMBOL . To enter a character from the onscreen keyboard,
tap it with your stylus.
Learn how to use the navigator
Use the keyboard to create data. Use the navigator to retrieve data and
move around your handheld. You can also use the navigator to open
Address Book and then automatically dial phone numbers or enter
recipients’ e-mail addresses.
Navigator
The following tables explain navigation basics and special features of
the navigator. Additional tips are provided in Memo Pad, in memos
such as Navigator Button Tips and Navigator Power Tips.
16
Page 23

Navigator: navigation basics
To go to the Applications
Launcher anytime
To insert a highlight
Learn more about your handheld
Hold down Select until the Applications
Launcher appears.
Press Select. (Remove the highlight by
pressing Left.)
Highlight
To view a highlighted item
To move in the direction of an
onscreen arrow
To close a dialog box
Press Select.
Press the corresponding edge of the
button. For example, in Date Book Day
view, press Right/Left to go
forward/back one day.
Do one of the following:
If only one button, press Select.
■
If more than one button, press
■
Select = OK, Done, or Yes.
IMPORTANT
Selecting OK or Yes sometimes deletes
data.
Read dialog boxes carefully.
17
Page 24

Learn more about your handheld
Navigator: special features
To see the note attached to
the highlighted Date Book
event
To check off a completed To
Do List item
To use Quick Look Up in
Address Book
Press Select.
Press Select to mark the selected item as
complete.
In Address List view, press Right to
display letter boxes. To spell a name, press
Up/Down to scroll through letters. Press
Right to move to the next box.
To use Quick Connect to dial
numbers and initiate SMS or
e-mail messages
In an Address record, press Right or tap
the Quick Connect icon to see available
numbers. In the Quick Connect dialog
box, press Up/Down to highlight the
number you want. Press Select to connect.
Quick
Connect icon
Highlight the
number, and
then press
Select on the
navigator to
connect
18
Page 25

Learn more about your handheld
Enter and synchronize your information
This section explains how to enter information into both
Palm™ Desktop software and your handheld, and then how to
synchronize the two with a HotSync
entered in one place shows up in both places.
NOTE
Users of Microsoft Outlook: If you chose to synchronize with
Outlook during installation (Step 7), create a new appointment in Outlook
rather than in Palm Desktop software.
Enter an appointment in Palm Desktop software
Windows
■
computer desktop. Then in Palm Desktop software, click
the Date icon on the left. Click New Event in the lower-left
corner and enter data.
Mac
■
icon. From the Create menu, select Event and enter data.
: Double-click the Palm Desktop icon on your
: In the Palm folder, double-click the Palm Desktop
Enter an appointment on your handheld
1.
Press the Date Book button on the front of your handheld.
®
operation, so that information
2.
Tap New, set the time for the appointment, and tap OK.
3.
Begin entering data when you see the blinking cursor onscreen.
Use the keyboard to enter data.
Blinking cursor
You d o n ’t have to save data you create on the handheld. Your data is
saved automatically.
19
Page 26

Learn more about your handheld
Perform a HotSync operation
Place your handheld in the cradle.
Press the HotSync button on the
cradle to begin the HotSync
operation.
HotSync operations synchronize
information on your handheld and
in Palm Desktop software or other
PIM (personal information
management) software, such as
Outlook. The information you enter
in one appears in both places.
NOTE
If the HotSync operation did not work, see “Performing HotSync
operations,” in “Troubleshooting.”
Read the Handbook
The electronic Handbook contains comprehensive information about
all aspects of your handheld.
The Handbook opens in Adobe Acrobat Reader. If you do not have
Acrobat Reader, you can install it from the Palm Desktop software
CD-ROM.
To open the Handbook:
Windows
■
Then select the menu item for the Handbook.
20
: In Palm Desktop software, click Help in the menu bar.
Page 27

Mac
■
: Open the Palm folder, and then open the Documentation
folder. Double-click Handbook.pdf.
Learn more about your handheld
The Bookmarks tab displays the
table of contents. Click a topic, and
it appears in the right window pane
Click Index to search an alphabetical listing of information
In the Index, click a page number, and
the related information appears in the
window pane
Take the Quick Tour
For an overview of the main features of your handheld, spend a few
minutes reviewing the Quick Tour.
To open the Quick Tour:
Press Home to open the Applications Launcher. Then
■
press “Q” to highlight the Quick Tour icon. Press Enter
to open the tour.
21
Page 28

Learn more about your handheld
Use your handheld safely
IMPORTANT
page of this guide.
For more safety information, see the reverse of the title
When you are using your handheld while driving, be sure to obey the
rules of the road: Keep your hands on the wheel and your eyes on the
road.
Whenever you use the wireless features of your handheld, please
observe the guidelines or prohibitions on the use of wireless devices
in your current location. For example, when you are on an airplane, do
not turn on the Mobile application at times when government or
airline regulations prohibit the use of cellular phones. Use the nonwireless applications of your handheld in accordance with airline
regulations for electronic devices.
To turn off Mobile:
1.
Hold down the Wireless button until the Mobile dialog box
appears.
2.
In the Mobile dialog box, tap Off.
22
Page 29

Troubleshooting
Troubleshooting
The following troubleshooting information gives you solutions to
some problems that you may encounter when you set up and
subsequently use your handheld.
Upgrading from another Palm™ handheld
These problems may occur if your are upgrading from another Palm™
handheld.
Problem: You upgraded using your username from your old Palm handheld and you used the VersaMail™ e-mail application on your Tungsten™ W handheld before your first HotSync® operation.
You must perform a hard reset on the handheld and then perform a
HotSync
1.
2.
®
operation.
Hold down the power button on the front panel of the handheld.
While holding down the power button, use the reset tip tool, or the
tip of an unfolded paper clip (or similar object without a sharp tip),
to gently press and release the reset button.
Unscrew stylus end
to access reset tip
tool
Reset button
Powe r button
3.
Wait fo r t h e P a lm P ow e r e d ™ logo to appear; then release the
power button.
4.
To complete the hard reset, when a message appears on the
handheld screen warning that you are about to erase all the data on
23
Page 30

Troubleshooting
your handheld, press Up on the navigator. The Digitizer screen
appears; follow instructions to recalibrate your handheld screen.
IMPORTANT
on the navigator; instead, press any application button on the front of
your handheld. This action performs a soft reset. Pressing a keyboard
key has no effect.
5.
Follow the instructions that appear on the handheld screen.
6.
Perform a HotSync operation.
If you want to back out of the hard reset, do not press Up
Problem: You are an upgrader using a Mac, and the wireless connection on your handheld attempts to use previous network settings.
When you attempt to browse or send e-mail, the wireless data may try
to connect through your previous network settings rather than the
Mobile application. This problem can occur if during the upgrade
process, some of the settings overwrote the network settings on your
handheld that were set by your wireless service provider. To find the
new settings, go to
www.palm.com/support/tungstenw
.
Problem: Upgrading from a Palm m515 handheld is incomplete.
When upgrading from a Palm m515 handheld, if the memory on the
m515 handheld is almost full, you may not be able to transfer all
applications and data to your Tungsten™ W handheld.
Charging the handheld
This problem may occur during Step 1.
Problem: The indicator light does not go on.
Try the following:
■ Make sure your handheld is properly seated in the cradle.
Make sure the power adapter is properly connected to the cradle.
■
Make sure the power adapter is plugged into a working electric
■
outlet.
24
Page 31

Troubleshooting
Turning on the handheld
This problem may occur during Step 2.
Problem: Handheld does not turn on.
If your handheld has been charged for at least two hours and it seems
not to turn on when you press the power button, try the following:
Press the Date Book application button or any other application
■
button to ensure your handheld is turned on.
Press Function and then Brightness . If the Brightness
■
dialog box appears, adjust the brightness by pressing and holding
Up on the navigator for a few seconds. If this doesn’t work, press
and hold Down on the navigator for a few seconds.
If your handheld was exposed to cold, make sure it is at room
■
temperature before you turn it on.
Perform a soft reset: Unscrew the top of your stylus to access the
■
reset tool (or use an unfolded paper clip or similar object without a
sharp tip). Gently press the reset button inside the hole on the back
panel of your handheld.
Reset button
Establishing a wireless connection
This problem may occur during Step 4.
Problem: Signal strength is weak.
Using the Signal Strength bar graph, monitor the signal strength while
you try the following solutions.
25
Page 32

Troubleshooting
To see the Signal Strength bar graph:
With the Mobile application turned
■
on, open Mobile by inserting the
headset connector into the voice jack
or by tapping the Mobile icon in the
Applications Launcher. The Signal
Strength bar graph appears in the
title area of the screen.
As you monitor the signal, try these
solutions to improve its strength:
Move away from your original
■
location, five to ten feet in any
direction.
If you’re indoors, stand near a window or move outdoors.
■
Open metal blinds on windows.
■
If you’re in an underground parking lot or other space below street
■
level, move to a location above ground.
If you’re in a crowd, move to a less crowded area.
■
Signal Strength bar graph,
showing maximum strength
If you’re in a vehicle, keep your handheld level with the
■
windshield. The metal frame of the vehicle shields wireless signals.
Mountains and buildings may also block signals.
If you’re outdoors, move away from overhead electrical wires.
■
Move from under trees.
Installing Palm™ Desktop software
These problems may occur during Step 7.
Problem: On a Windows computer, Palm Desktop Installer does not automatically appear.
Do the following:
1.
Click the Start button.
2.
Select Run from the Start menu.
3.
Click Browse.
26
Page 33

Troubleshooting
4.
Locate the drive into which you inserted the Palm Desktop
software CD-ROM (your CD-ROM or DVD drive).
5.
Double-click the file autorun.exe.
Problem: On a Mac computer, the CD-ROM folder does not automatically open to display the Palm Desktop Installer icon.
Do the following:
1.
Find the CD-ROM icon on your Mac desktop and double-click it.
2.
Double-click the Palm Desktop Installer icon to start installation.
Problem: On a Mac computer, you need to complete the installation of files to your handheld.
Do the following:
1.
Open Palm Desktop software and in the User pop-up menu on the
toolbar, select your username.
2.
From the HotSync menu, select Install Handheld Files.
3.
Click Add To List.
Make sure the contents of the Add-on folder are displayed. If not,
go to the Add-on folder.
4.
Select all the files.
5.
Click Add File.
The files are copied to the Files To Install folder.
6.
Close the Install Handheld Files dialog box.
7.
Press the HotSync button on the cradle to perform a HotSync
operation.
This installs the files to your handheld.
27
Page 34

Troubleshooting
Problem: A message on your desktop computer indicates that you don’t have the privileges needed to install Palm Desktop software.
When installing on a multi-user operating system, such as Windows
NT, 2000, or XP, the Palm Desktop Installer must be run from an
account with administrative privileges.
Problem: Dialog box appears prompting for permission to install a driver that has not been digitally signed.
Answer Yes to this dialog box. The Palm USB driver does not have a
digital signature.
Problem: HotSync operation does not execute during installation.
If you are unable to perform a HotSync operation during installation,
see the next section, “Performing HotSync operations.”
Problem: The installation stalls and there is no hard disk activity for at least one minute.
Check to see if there is another window hidden in the background.
Drag the current window from the center of the screen. If you see
another dialog box related to Palm Desktop software, click that dialog
box to make it active and follow its instructions.
Performing HotSync operations
This problem may occur during Step 7 or other times when you
perform a HotSync operation.
Problem: HotSync operation does not begin.
Check for the following:
Make sure your handheld is properly seated in the cradle.
■
Make sure the cradle is connected to a working USB port of your
■
desktop computer.
28
Page 35

Troubleshooting
If the USB connection is all right, press the HotSync button on the
cradle. If the HotSync operation fails, try the following:
Windows:
Complete the installation of Palm Desktop software and
then try the following:
Check the Windows system tray, in the lower-right corner of your
■
computer screen, and make sure the HotSync icon appears there. If
it is there, then HotSync Manager is running.
HotSync icon
a.
If the HotSync icon is in the system tray, click it to display the
menu. Make sure there is a checkmark next to Local USB. (If
you are using a serial-port connection, make sure Local Serial
has a checkmark.) To insert a checkmark, click the menu item.
Then press the HotSync button on the cradle.
Make sure your way(s) of
connecting to HotSync
Manager is selected
b.
If the HotSync icon is not in the system tray, click the Start
button and select Programs. Select Palm Desktop, and then
select HotSync Manager. HotSync Manager starts and the icon
appears in the system tray. Follow the instructions in Step a.
c.
If you are using a serial-port connection, make sure you
selected the correct serial port on the Local tab in the Setup
dialog box. Set it to the port to which you connected the
HotSync cradle/cable.
29
Page 36

Troubleshooting
Mac:
After you install Palm Desktop software, try the following:
Make sure the Transport Monitor of the HotSync Manager is
■
enabled: Open the Palm folder and double-click the HotSync
Manager icon. The HotSync Software Setup dialog box appears. In
the HotSync Controls tab, click Enabled.
If you are using a USB cradle, disconnect the cradle from your
■
computer, and then reconnect the cradle and restart your
computer.
If you are using a serial-port connection, double-click the HotSync
■
Manager icon in the Palm folder, and then click the Connection
Settings tab. Make sure that PalmConnect is selected and that the
port selection matches the port to which you connected the
HotSync cradle/cable.
Using e-mail on your handheld
These problems may occur during Step 8 and during subsequent use
of the VersaMail e-mail application.
Problem: Microsoft Outlook information does not synchronize.
If information from Outlook does not synchronize, review the
HotSync log. The log may contain information that explains the
problem.
To view the HotSync log:
1.
Click the HotSync logo in the system tray.
HotSync icon
2.
From the HotSync menu, select View Log.
Problem: E-mail settings are inaccurate.
Settings for ISPs and mail servers may change over time. The settings
for the default list of preconfigured accounts in the VersaMail e-mail
application are accurate at release, but these settings may change. For
the latest information on settings, consult your ISP or e-mail service
provider.
30
Page 37

Troubleshooting
Check with your ISP or e-mail service provider for e-mail account
settings and policies before calling Palm Customer Support. Palm
Customer Support representatives do not know the settings or
policies, so you must supply that information before the support
representatives can help you.
Problem: E-mail service is not working properly.
Short periods of time when e-mail is unavailable are common due to
server problems or poor wireless coverage. If you have problems
sending or receiving mail for an extended period of time, check with
your ISP or e-mail service provider to verify that the service is
working properly.
Problem: E-mail is not being sent.
Several ISPs and e-mail service providers allow you to send e-mail
through their servers (for example, Yahoo! and CompuServe). If you
can't send e-mail though your handheld, first make sure your ISP or
e-mail service provider supports this. For example, even though basic
e-mail access is free on the Yahoo! web site, Yahoo! requires an
upgrade to access e-mail on a wireless handheld. Several providers,
like Hotmail, do not offer this option at all; you must access your
e-mail through their web site. If you can't send e-mail using the
VersaMail e-mail application, make sure your ISP or e-mail provider
allows you to do this.
Many services require authenticated access to use their SMTP servers,
or ESMTP. If you have an e-mail account that allows you to use the
VersaMail e-mail application, try configuring ESMTP.
To configure ESMTP:
1.
In the VersaMail application, press Function + Menu ,
and then select Mail Servers on the Options menu.
2.
Tap D e t ai l s .
3.
Next to Options, tap the pick-list triangle and choose Advanced
Outgoing.
4.
Tap the check box next to “My server requires authentication.”
Make sure your username and password are filled in below this.
5.
Tap O K t wi c e .
31
Page 38

Troubleshooting
Many ISPs, such as cable companies, require that you have an Internet
connection to their network to send e-mail through their servers. In
this case, you can almost always receive e-mail from these accounts,
but if you want to send e-mail, you must send it through another
server.
To send e-mail through an available server:
1.
Press Function + Menu , and then select Account Setup
on the Accounts menu.
2.
Tap to highlight the problem account.
3.
Tap the Edit button.
4.
Tap Next.
5.
Make sure your username and password are correct, and tap Next.
6.
For Outgoing Mail Server, enter the address of a server through
which you can send mail.
7.
Tap Next.
8.
Tap Done.
You can then receive e-mail through this account. When you reply to
e-mail from this account, or compose a new message from within this
account, the VersaMail application uses the other SMTP server you
identified in the procedure above, when sending mail.
Identifying incompatible third-party applications
Palm works with developers of third-party add-on applications to
ensure the compatibility of these applications with your new Palm
handheld. Some third-party applications, however, may not have
been upgraded to be compatible with your new Palm handheld, or
they may not have been designed to incorporate all the features
available in your handheld.
32
Page 39

Troubleshooting
If you suspect that a third-party application is adversely affecting the
operation of your handheld, contact the developer of the application.
In addition, Palm has information about some applications’
compatibility with your handheld. To find this information, do one of
the following:
Open your web browser and go to
■
tungstenw
. On that page, click the link leading to information on
www.palm.com/support/
the compatibility of third-party applications.
■ Read the readme file for your handheld. After you install
Palm Desktop software on your computer, open the Palm folder.
The readme file is located in the Helpnote folder.
33
Page 40

Troubleshooting
34
 Loading...