

For product questions contact:
Sunbeam Consumer Service
USA : 1.800.334.0759
Canada : 1.800.667.8623
www.oster.com
©2010 Sunbeam Products, Inc. doing business as
Jarden Consumer Solutions. All rights reserved.
Distributed by Sunbeam Products, Inc. doing business as
Jarden Consumer Solutions, Boca Raton, Florida 33431.
Para preguntas sobre los productos llame:
Sunbeam Consumer Service
EE.UU.: 1.800.334.0759
Canada: 1.800.667.8623
www.oster.com
©2010 Sunbeam Products, Inc. operando bajo el nombre de Jarden
Consumer Solutions. Todos los derechos reservados. Distribuido
por Sunbeam Products, Inc. operando bajo el nombre de Jarden
Consumer Solutions, Boca Raton, Florida 33431.
SPR-101609
3CUP CHOPPER WITH
ACCESSORIES
PICADORA DE 3 TAZAS DE CAPACIDAD
CON ACCESORIOS
User Guide/ Guía del Usuario:
FPSTMC3321
Safety
Seguridad
How to use
Cómo usar
Cleaning
Cuidado y Limpieza
Recipes
Recipes
Printed in China
P.N. 137303
Impreso en China
Warranty
Garantía
www.oster.com

www.oster.com
2
www.oster.com
3
IMPORTANT SAFEGUARDS
When using electrical appliances, basic safety precautions should always be
followed, including the following:
Read all instructions before using. 1.
To protect against electrical shock, DO NOT immerse base, cord or plug in water 2.
or other liquids.
Close supervision is necessary when any appliance is used by or near children. 3.
Unplug from outlet when not in use, before putting on or taking o parts, and 4.
before cleaning.
Avoid contact with moving parts. 5.
DO NOT operate any appliance with a damaged cord or plug or after the 6.
appliance malfunctions, or has been damaged in any manner. Return appliance
to an Authorized Oster® Service Center for repair, examination or adjustment.
Do not operate this or any appliance with a frayed or damaged cord, or plug, 7.
or after the appliance malfunctions or is dropped or has been damaged in any
manner. Take appliance to the nearest authorized service facility for examination,
repair, or electrical or mechanical adjustment.
The use of accessory attachments not recommended by the manufacturer may 8.
cause injuries.
DO NOT use outdoors. 9.
DO NOT let cord hang over the edge of table or counter, or touch heated surfaces.10.
The blade is sharp. Handle carefully. Store out of reach of children.11.
This appliance is intended for processing small quantities of food for immediate 12.
consumption. This appliance is not intended to prepare large quantities of food
at one time.
To reduce the risk of injury, be certain bowl, blade and lid are securely locked in 13.
place before operating appliance.
To disconnect, remove plug from wall outlet.14.
DO NOT use this appliance for anything other than intended use.15.
To avoid injury, never place chopping blade on base without rst putting bowl 16.
properly in place. Make sure motor and chopping blade have stopped completely
before removing the lid.
Be certain the lid is locked securely in place before operating. DO NOT attempt to 17.
defeat the lid safety lock mechanism.
Keep hands and utensils away from the cutting blade while chopping food to reduce 18.
the risk of injury to persons or damage to the 3-Cup Chopper.
DO NOT operate the appliance when empty.19.
Check bowl for presence of foreign objects before operating. 20.
THIS UNIT IS INTENDED FOR HOUSEHOLD USE ONLY.
SAVE THESE INSTRUCTIONS
(For 120 & 127 Volts Only)
To reduce the risk of electrical shock, this appliance has a polarized plug (one blade
is wider than the other). This plug ts a polarized outlet only one way. This is a
safety feature intended to help reduce the risk of electrical shock. If the plug does
not t fully into the outlet, reverse the plug. If it still does not t, contact a qualied
electrician. Do not attempt to defeat this safety feature.
SHORT POWER SUPPLY CORD INSTRUCTIONS
A short power-supply cord is provided to reduce the risk resulting from becoming
entangled in or tripping over a longer cord. An extension cord may be used if care is
exercised in its use. If an extension cord is used, the electrical rating of the cord must
be at least as great as the electrical rating of the appliance. The extension cord should
be arranged so that it will not drape over the countertop or tabletop where it can be
pulled on by children or tripped over unintentionally.
Thank you for purchasing the OSTER® 3-Cup
Chopper. Before you use this product for the rst time,
please take a few moments to read these instructions and
keep it for reference. Pay particular attention to the Safety
Instructions provided. Please review the product service
and warranty statements. To learn more about Oster®
products, please visit us at www.oster.com or call us at
1-800-334-0759.
www.oster.com
4
www.oster.com
5
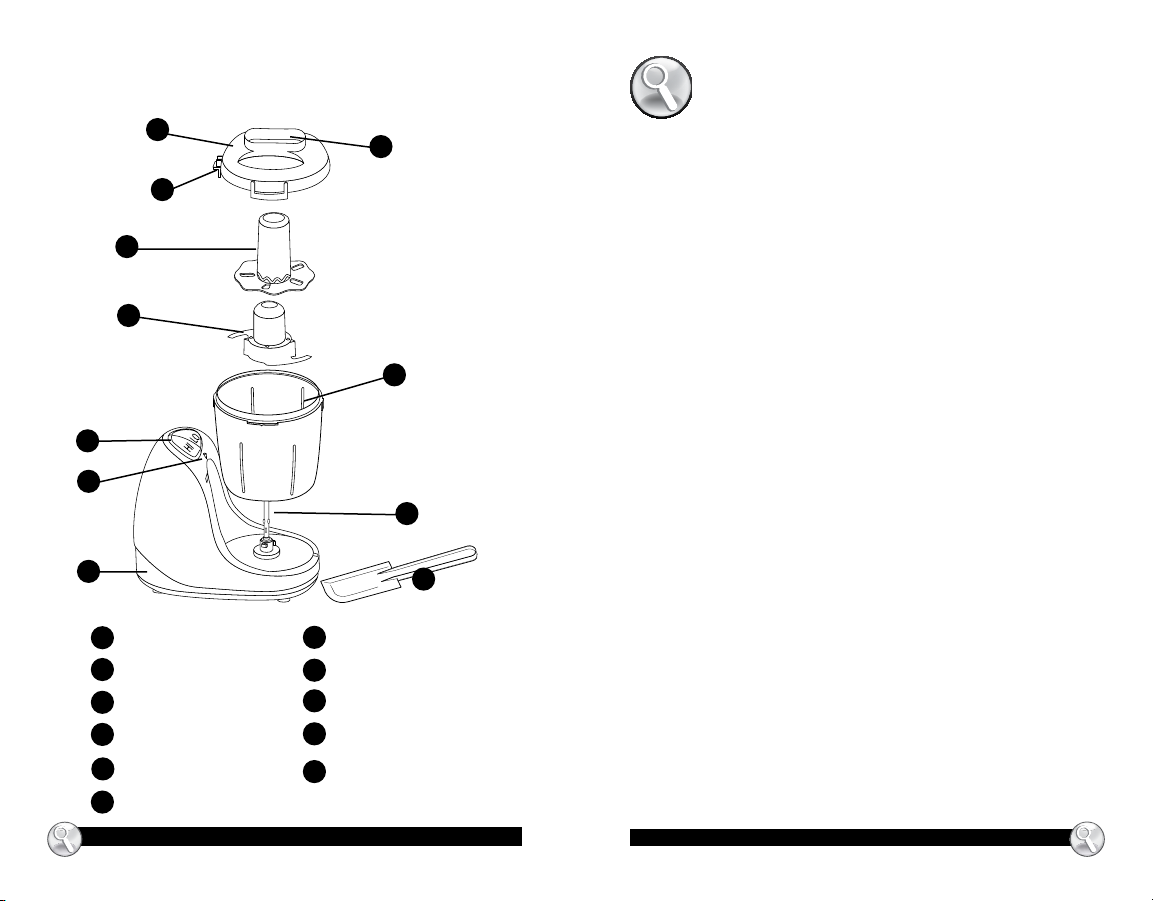
LEARNING ABOUT YOUR
3CUP CHOPPER
a
c
d
e
g
i
j
Lid
a
Drizzle Hole
b
c
Lid Locking Tabs
d
Whisk Attachment
e
Chopping Blade
f
Bowl
g
Hi/Lo Pulse Buttons
Drive Shaft
h
i
Lid Locking Slot
j
Cord Storage
k
Spatula
HOW TO:
b
f
h
k
Assembling the Unit
1 Remove all packaging materials before using.
Before using, wash lid, blade, whisk, bowl and spatula in warm
2
soapy water; rinse and dry thoroughly, see CARE AND CLEANING.
3 On a at surface place the bowl, without lid and chopping
blade, on the base and turn clockwise to lock into position.
NOTE: Rotate the bowl until it snaps into place.
4 Slide the chopping blade or whisk attachment down over the
shaft, rotating if necessary to drop into place.
Place the lid on the bowl, then turn clockwise into lid locking slot.
5
Continue turning the lid into the lid locking slot as far as it will go
so that the dot on the lid lines up with the dot on the base.
NOTE: For your protection, this unit has a safety lock lid. The unit
will not operate unless the lid and base dots align. Do not
attempt to operate the unit without locking the lid in place.
Chopping
1 Cut food into approximately 1.5 cm (1/2 inch) pieces and place
up to 3 cups of dry food in the bowl at a time.
2 Place the lid on the bowl and turn to lock into place.
3 Plug the cord into an outlet. Press and hold either the HI or LO
Pulse button for 5–10 seconds and then release; the motor will
stop. Repeat for a ner consistency.
NOTE: Add ingredients such as oil, dressings and sauces to the
bowl without removing the lid. To add ingredients, pour through
the drizzle hole found on the lid.
4 When nished chopping, allow chopping blade to stop
rotating before removing contents.
5 Remove the lid and grasp the stem of the chopping blade.
Carefully remove it from the bowl. Remove the bowl from the
base and empty the processed food.
NOTE: The mini chopper comes with a spatula to easily empty
contents from the inside of the bowl.
NOTE: Do not use bowl for storing food.

www.oster.com
6
www.oster.com
7
FOOD SETTING QTY TIME
Nuts, coarse chop
Fresh herbs, coarse chop
Nuts, ne chop
Hard cheeses
Garlic Cloves
Chocolate
Onion
Sun-dried tomatoes in oil
LO
LO
HI
HI
HI
HI
HI
HI
1 1/3 cup
1 loosely packed cup
1 1/3 cup
110–170 grams (4-6 oz.)
1 cup cloves, peeled
1 cup,1/2 inch pieces
1 cup, coarsely chopped
1 cup
10 seconds
1 minute
15 seconds
1 minute
20 seconds
30 seconds
20 seconds
30 seconds
Whisking
1 For whisking certain food products such as whipped cream,
egg whites, sauces, etc., carefully remove the chopping blade
from the bowl by grasping from the stem. Insert the whisk
attachment into the unit by turning clockwise until completely
secured. Place food product to be whisked into the bowl.
NOTE: When whisking certain foods like egg whites, please allow
room in the bowl for ung and aeration. Example: for egg whites
the maximum number of eggs that can be whisked at a time is 4–5
depending on the size of the eggs. Please experiment for best results.
2 Place the lid on the bowl and turn to lock into place.
3 Plug the cord into an outlet. Press and hold either the HI
or LO Pulse button for 5–10 seconds and then release; the
motor will stop. Repeat until desired stage of consistency
is achieved. Check frequently to prevent over-mixing.
NOTE: Add ingredients such as oil, dressings and sauces to the
bowl without removing the lid. To add ingredients, pour through
the drizzle hole found on the lid.
4 When nished whisking, allow whisk attachment to stop
completely before removing contents.
5 Remove the lid and carefully remove the whisk attachment
from the bowl. Remove the bowl from the base and empty the
processed food.
NOTE: The mini chopper comes with a spatula to easily empty
contents from the inside of the bowl.
NOTE: Do not use bowl for storing food.
CARE & CLEANING
This appliance should be cleaned after every use.
1 Unplug the 3-cup chopper when not in use and before
cleaning. Never immerse the base, plug or cord in water or
other liquids. Allow the chopping blade to stop rotating
before disassembling.
2 Wash the bowl, lid, whisk, spatula and chopping blade in
warm soapy water. Rinse and dry thoroughly.
NOTE: Lid, bowl, blade, whisk and spatula can be placed in
the dishwasher.
CAUTION: Blades are sharp! Handle with care.
3 To clean the base, wipe the exterior with a damp
cloth or sponge. Dry thoroughly with a soft cloth.

www.oster.com
8
www.oster.com
9
RECIPES
Chipotle Mayonnaise
This avored mayonnaise adds zing to hamburgers, veggie burgers
and grilled sh. It’s also great as a dipping sauce with crab cakes or
as a sandwich spread for turkey wraps.
1 tablespoon fresh lime juice
1 cup mayonnaise
Salt to taste
Process pepper and lime juice in 3-Cup Chopper until well chopped.
Add mayonnaise and process until combined. Add salt to taste
and process again to mix. Keep covered in refrigerator for up to
one week.
Makes about 1 cup
Grilled Herb Crusted Salmon
1/3 cup fresh cilantro
1/3 cup fresh oregano
1 garlic clove, peeled
1/4 cup green onion, sliced
2 (170–gram/6–ounce) salmon llets
Combine the rst 8 ingredients (excluding olive oil) in 3-Cup
Chopper bowl and process until well mixed and nely chopped.
Brush salmon llets on both sides with the herb mixture. Grill
salmon over medium-hot coals for 10 minutes or until sh akes
easily when tested with a fork.
Serves 2
1 Chipotle pepper from
can of Chipotle peppers
in Adobo sauce
1 tablespoon
fresh lemon juice
1/4 teaspoon salt
1/8 teaspoon pepper
2 teaspoons olive oil
Tapenade
Serve this pungent and salty spread on crusty baguette slices or
with vegetable crudités. Make extra to use on sandwiches.
1 cup Kalamata olives, pitted
3 garlic cloves, peeled
30 grams (1 ounce)
anchovies
2 tablespoons capers
1 teaspoon lemon rind,
grated
Place all the ingredients in the 3-Cup Chopper bowl and process until
the mixture forms a coarse paste. Refrigerate for up to one week.
1 tablespoon
fresh lemon juice
1 teaspoon fresh thyme
1 teaspoon fresh rosemary
1 teaspoon fresh oregano
2 tablespoons extra virgin
olive oil
Avocado-Edamame Dip
Frozen shelled green soybeans, edamame, can be found in most
supermarkets, usually in the natural food section.
1 medium ripe avocado, peeled
1 cup cooked,
shelled green soybeans
1/4 cup sliced scallions
1/4 cup mayonnaise
Process the avocado and soybeans in the 3-Cup Chopper on HI for
about 7 seconds or until nely chopped. Add remaining ingredients
and process until smooth.
Makes about 2 cups.
2 tablespoons
lemon juice
Hot sauce, to taste
Salt and pepper to taste

www.oster.com
10
www.oster.com
11
Chicken with Herb Crust
1/2–1 cup Dijon mustard
2 tablespoons fresh parsley,
stemmed
1 tablespoons fresh rosemary,
stemmed
3 shallots
2 teaspoons freshly cracked
black pepper
1/2 cup balsamic vinegar,
may substitute red wine
or red wine vinegar
Cover chicken generously with mustard. Place parsley, sage,
rosemary, thyme, shallots, salt and pepper in the 3-Cup Chopper.
Process until herbs are chopped and fragrant and shallots are
minced. Press herb mixture into the mustard slathered chicken.
Preheat large heavy skillet on medium heat. Heat 2 tablespoons oil
and sauté chicken, skin side down and cook meat on both sides,
turning once, until chicken is cooked through. Adjust heat
if necessary to avoid burning.
Remove chicken and deglaze pan with vinegar. Scrape up bits on
bottom of pan and cook until liquid is reduced by half. Pour over
chicken.
Serves 4.
1 large chicken, cut up in
parts (skin may be removed
if desired)
2 tablespoons fresh sage,
stemmed
3 tablespoons fresh thyme,
stemmed
2 teaspoons kosher salt
2 tablespoons extra virgin
olive oil
Persillade
This is a great topping for chicken, lamb, pork or sh.
1 bunch at leaf parsley, stemmed
1 lemon, peel removed
with vegetable peeler and reserved
Place all ingredients in 3-Cup Chopper. Press on High until
ingredients are nely minced and incorporated.
4 garlic cloves or
shallots, peeled
NOTES

www.oster.com
12
www.oster.com
13
1 Year Limited Warranty
Sunbeam Products, Inc. doing business as Jarden Consumer Solutions
or if in Canada, Sunbeam Corporation (Canada) Limited doing business
as Jarden Consumer Solutions (collectively “JCS”) warrants that for
a period of one year from the date of purchase, this product will be
free from defects in material and workmanship. JCS, at its option, will
repair or replace this product or any component of the product found
to be defective during the warranty period. Replacement will be made
with a new or remanufactured product or component. If the product
is no longer available, replacement may be made with a similar
product of equal or greater value. This is your exclusive warranty. Do
NOT attempt to repair or adjust any electrical or mechanical functions
on this product. Doing so will void this warranty.
This warranty is valid for the original retail purchaser from the date of
initial retail purchase and is not transferable. Keep the original sales
receipt. Proof of purchase is required to obtain warranty performance.
JCS dealers, service centers, or retail stores selling JCS products do
not have the right to alter, modify or any way change the terms and
conditions of this warranty.
This warranty does not cover normal wear of parts or damage resulting
from any of the following: negligent use or misuse of the product,
use on improper voltage or current, use contrary to the operating
instructions, disassembly, repair or alteration by anyone other than
JCS or an authorized JCS service center. Further, the warranty does not
cover: Acts of God, such as re, ood, hurricanes and tornadoes.
What are the limits on JCS’s Liability?
JCS shall not be liable for any incidental or consequential damages
caused by the breach of any express, implied or statutory warranty
or condition.
Except to the extent prohibited by applicable law, any implied warranty
or condition of merchantability or tness for a particular purpose is
limited in duration to the duration of the above warranty.
JCS disclaims all other warranties, conditions or representations, express,
implied, statutory or otherwise.
JCS shall not be liable for any damages of any kind resulting from the
purchase, use or misuse of, or inability to use the product including
incidental, special, consequential or similar damages or loss of prots, or
for any breach of contract, fundamental or otherwise, or for any claim
brought against purchaser by any other party.
Some provinces, states or jurisdictions do not allow the exclusion or
limitation of incidental or consequential damages or limitations on how
long an implied warranty lasts, so the above limitations or exclusion may
not apply to you.
This warranty gives you specic legal rights, and you may also have other
rights that vary from province to province, state to state or jurisdiction
to jurisdiction.
How to Obtain Warranty Service
In the U.S.A.
If you have any question regarding this warranty or would like to obtain
warranty service, please call 1-800-334-0759 and a convenient service
center address will be provided to you.
In Canada
If you have any question regarding this warranty or would like to obtain
warranty service, please call 1-800-667-8623 and a convenient service
center address will be provided to you.
In the U.S.A., this warranty is oered by Sunbeam Products, Inc. doing
business Jarden Consumer Solutions located in Boca Raton, Florida
33431. In Canada, this warranty is oered by Sunbeam Corporation
(Canada) Limited doing business as Jarden Consumer Solutions, located
at 20 B Hereford Street, Brampton, Ontario L6Y 0M1. If you have any
other problem or claim in connection with this product, please write our
Consumer Service Department.
PLEASE DO NOT RETURN THIS PRODUCT TO ANY OF
THESE ADDRESSES OR TO THE PLACE OF PURCHASE.

www.oster.com
14
www.oster.com
15
PRECAUCIONES IMPORTANTES
Cuando se utiliza cualquier artefacto eléctrico siempre se deben seguir precauciones
básicas de seguridad, incluyendo las siguientes:
1. Lea todas las instrucciones antes de usar.
2. Para protegerse contra el riesgo de una descarga eléctrica, sumerja la base, el
cable o el tomacorriente en agua u otros líquidos.
3. Se requiere supervisión cercana cuando este artefacto esté siendo utilizado cerca
de niños.
4. Desenchufe su Mini-Picadora cuando no la esté utilizando, antes de retirarle o
colocarle piezas y antes de limpiarla.
5. Evite el contacto con piezas en movimiento.
6. Opere ningún artefacto con un cable o enchufe dañado, después de que el arte
facto haya fallado o si se cae al suelo o se daña de cualquier otra manera. Regrese
el artefacto al Centro de Servicio Oster® Autorizado más cercano para examinarlo,
repararlo o para ajustarlo mecánica o eléctricamente.
7. No opere este u otro aparato con un cordón deshilachado o enchufe dañado, o
después de que el aparato sufra una falla o se deje caer o haya sido dañado de
cualquier manera. Lleve su aparato al servicio autorizado más cercano para que
sea examinado, reparado o se le haga un ajuste eléctrico o mecánico.
8. El uso de accesorios no recomendados o vendidos por el fabricante del artefacto
puede causar daños.
9. Lo utilice al aire libre.
10. Permita que el cable cuelgue sobre el borde de una mesa o mostrador o toque
supercies calientes.
11. La cuchilla es losa. Manipúlela con cuidado. Guárdela lejos del alcance de los
niños.
12. Este artefacto ha sido diseñado para procesar pequeñas cantidades de alimentos
para el consumo inmediato. lo utilice para cortar grandes cantidades de
alimentos a la vez.
13. Lo coloque sobre o cerca de quemadores de estufas de gas o eléctricas, tampoco
dentro de un horno caliente.
14. Para reducir el riesgo de daños corporales, asegúrese de que el recipiente, la cuchilla
y la tapa se encuentran rmemente cerrados antes de operar el artefacto.
15. Antes de desconectar, remueva el enchufe del tomacorriente.
16. Use este electrodoméstico para un propósito distinto de aquel para el cual fue
diseñado.
17. Para evitar cualquier daño, nunca coloque la cuchilla en la base sin antes colocar
el recipiente apropiadamente en su lugar. Cerciórese de que el motor y la cuchilla
se han detenido por completo antes de retirar la tapa.
18. Asegúrese de que la tapa está rmemente cerrada en su lugar antes de operar el
artefacto. intente frustrar el mecanismo de seguridad de la tapa.
19. Para reducir el riesgo de daños corporales o de su Mini Picadora, mantenga las
manos y los utensilios lejos de la cuchilla mientras esté cortando los alimentos.
20. No opere el artefacto mientras se encuentre vacío.
21. Asegúrese de que no se encuentra ningún objeto extraño dentro del recipiente
antes de colocar la Mini Picadora en funcionamiento.
ESTA UNIDAD DEBE SER USADA PARA
USO DOMĖSTICO SOLAMENTE
CONSERVE ESTAS INSTRUCCIONES
(Para 120 y 127 Voltios solamente)
Para reducir el riesgo de una descarga eléctrica, este artefacto cuenta con un
enchufe polarizado (una clavija es más ancha que la otra). Este enchufe entra
sólo de una manera en un tomacorriente polarizado. Si el enchufe no entra
correctamente en el tomacorriente, simplemente colóquelo al revés. Si todavía no
entra, comuníquese con un electricista competente. De ninguna manera intente
modicar o forzar la conexión diseñada como medida de seguridad.
INSTRUCCIONES DE CABLE DE CORRIENTE CORTO
Se incluye un cable eléctrico corto para evitar que se enrede o que cause
tropiezos. Un cable de extensión puede utilizarse con cuidado. Si se usa un cable
de extensión, la capacidad nominal marcada en el cable de extensión debe
ser por lo menos igual o mayor a la del artefacto. El cable de extensión debe
colocarse de manera que no cuelgue del mostrador o de la mesa, donde pueda
causar tropiezos accidentalmente.

www.oster.com
16
www.oster.com
17
Gracias por comprar la
Picador Para 3 Tazas OSTER®.
Antes de usar este producto por primera vez, tómese un
momento para leer estas instrucciones y consérvelas para
referencia. Preste particular atención a las instrucciones
de seguridad que se ofrecen. Revise la declaración de
servicio y garantía del producto. Para conocer más acerca
de los productos de Oster®, visítenos en www.oster.com o
llámenos al 1-800-334-0759.
DESCRIPCION DEL ARTEFACTO
a
b
c
d
e
f
g
i
h
j
a
Tapa
Agujero para rociar
b
Lengüetas asegurado-
c
ras de la tapa
Accesorio Batidor
d
e
Cuchilla para picar
Recipiente
f
k
g
Botones de impulso
alto/bajo (HI/LO
Eje
h
Ranura Aseguradora
i
de la tapa
j
Almacenaje del cordón
Espátula
k

www.oster.com
18
www.oster.com
19
INSTRUCCIONES:
Como utilizar su Mini Picadora
1 Retire todos los materiales del empaque antes de utilizar el
artefacto.
2
Antes de usar, lave la tapa, la cuchilla, el accesorio batidor, el
recipiente y la espátula en agua tibia jabonosa; enjuague y seque
completamente. Vea CUIDADO Y LIMPIEZA.
3 Coloque el recipiente en su base en una supercie plana, sin la
tapa y sin la cuchilla, gírelo hacia la derecha para cerrarlo
correctamente.
NOTA: Gire el recipiente hasta que chasquee y se encuentre bien
ajustado en su lugar.
4 Deslice la cuchilla hacia abajo del eje, girándola si es necesario
hasta posicionarla en su lugar.
5 Coloque la tapa en el recipiente, luego gírela hacia
la derecha hasta colocarla en la ranura aseguradora
de la tapa. Continúe girando la tapa en la ranura aseguradora
de la tapa hasta que, tanto la ranura superior como la ranura
de la base, se encuentren conjuntamente alineadas.
NOTA: Para su protección, esta unidad cuenta con una tapa con
un mecanismo de cierre de seguridad. La unidad no operará a
menos que la tapa y las ranuras estén ambas alineadas. No intente
operar la unidad sin cerrar la tapa correctamente en su lugar.
Picando sus alimentos
1 Corte los alimentos en pedazos de 1,5 cm (1/2 pulgada)
aproximadamente y coloque a la vez hasta 3 tazas de alimento
seco en el recipiente.
2 Coloque la tapa en el recipiente y gírela para cerrarla en su
lugar.
3 Enchufe el cable en un tomacorriente eléctrico. Presione y
sostenga el botón de pulso en “HI” o “LO” por 5-10 segundos
y libere; el motor se detendrá. Repita para una consistencia
más na.
NOTA: Añada ingredientes tales como aceite, aderezos y salsas al
recipiente sin remover la tapa. Para añadir ingredientes, viértalos
a través del agujero para rociar que se encuentra en la tapa.
4 Cuando termine de picar, permita que la cuchilla deje de girar
antes de retirar el contenido del recipiente.
5 Retire la tapa y tome la cuchilla por la parte del cilindro.
Quítela con cuidado del recipiente. Retire el recipiente de la
base y vacíe el alimento procesado del recipiente.
NOTA: El mini picador viene con una espátula para vaciar el
contenido dentro del recipiente con facilidad.
NOTA: No utilice el recipiente para almacenar alimentos.
ALIMENTO AJUSTE CANTIDAD TIEMPO
Nueces, cortadas gruesas
Hierbas frescas, cortadas
gruesas
Nueces, cortadas nas
Quesos duros
Dientes de Ajo
Chocolate
Cebolla
Tomates-deshidratados
en aceite
BAJA “LO”
BAJA “LO”
ALTA “HI”
ALTA “HI”
ALTA “HI”
ALTA “HI”
ALTA “HI”
ALTA “HI”
1 1/3 taza
1 taza suavemente
empacada
1 1/3 taza
110–170 gramos
(4–6 onzas)
1 taza de dientes
de ajo pelados
1 taza, trozos de ½
pulgada
1 taza, cortada gruesa
1 taza
10 segundos
1 minuto
15 segundos
1 minuto
20 segundos
30 segundos
20 segundos
30 segundos

www.oster.com
20
www.oster.com
21
Batiendo
1 Para batir ciertos alimentos como crema batida, clara de
huevo, salsas, etc. remueva cuidadosamente la cuchilla para
picar del recipiente sosteniéndola del tubo. Inserte el
accesorio batidor en la unidad girando en dirección de las
manecillas del reloj hasta que quede completamente
asegurada. Coloque el alimento a ser batido en el recipiente.
NOTA: cuando bata ciertos alimentos como clara de huevo, por
favor deje suciente espacio en el recipiente para el inado y el
aireado. Por ejemplo, para clara de huevo, el máximo número de
huevos que pueden ser batidos a la vez es de 4 a 5 dependiendo
del tamaño de los huevos. Por favor experimente para obtener
mejores resultados.
2 Coloque la tapa en el recipiente y gire para asegurar en
su lugar.
3 Enchufe el cordón en un tomacorriente. Presione y sostenga
ya sea el botón de impulso Alto (HI) o Bajo (LO) por unos 5 a
10 segundos y luego suéltelo; el motor parará. Repita hasta
que se consiga el nivel deseado de espesor. Supervise
frecuentemente para prevenir un batido en exceso.
NOTA: Añada ingredientes tales como aceite, aderezos y salsas al
recipiente sin remover la tapa. Para añadir ingredientes, viértalos
a través del agujero para rociar que se encuentra en la tapa.
4 cuando termine de batir, deje que el accesorio batidor pare
completamente antes de remover el contenido.
5 Remueva la tapa y remueva el accesorio batidor
cuidadosamente del recipiente. Remueva el recipiente
de la base y vacíe la comida procesada.
NOTA: El mini picador viene con una espátula para vaciar el
contenido dentro del recipiente con facilidad.
NOTA: No use el recipiente para almacenar la comida.
CUIDADO Y LIMPIEZA
Este artefacto debe ser limpiado después de
cada uso.
1 Desenchufe su Mini-Picadora cuando no la esté utilizando
y antes de limpiarla. Nunca sumerja la base, el enchufe
o el cable en agua ni otros líquidos. Permita que la cuchilla
pare de girar antes de desmontarla.
2 Lave el recipiente, la tapa, el accesorio batidor, la espátula
y la cuchilla en agua tibia jabonosa. Enjuague y seque
completamente.
NOTE: la tapa, el recipiente, la cuchilla, el accesorio batidor y
la espátula pueden colocarse en el lavaplatos.
PRECAUCION: ¡La cuchilla es losa! Manipúlela con cuidado.
3 Para limpiar la base, limpie el exterior con un paño o
esponja húmedos. Seque generosamente con un paño
suave.

www.oster.com
22
www.oster.com
23
RECETAS
Mayonesa de Chipotle
Esta mayonesa, deliciosamente condimentada, les da un exquisito
toque a sus hamburguesas, hamburguesas vegetarianas y pescado
a la parrilla. También es excelente como salsa para acompañar con
galletas de cangrejo o para untar el pan de los emparedados de pavo.
1 cucharada de jugo de limón fresco 1 pimentón Chipotle de
1 taza de mayonesa una lata de pimentones
Sal al gusto Chipotle en salsa
adobada
Procese el pimentón junto con el jugo de limón en su Mini-Picadora
hasta que el pimentón esté bien cortado. Agregue la mayonesa y
procese hasta que todo esté mezclado. Añada sal al gusto y procese
de nuevo la mezcla. Manténgala cubierta en el refrigerador hasta
por una semana.
Rinde hasta 1 taza.
Salmon a la Parrilla Con Capa de Hierbas
1/3 de taza de cilantro fresco
1/3 de taza de orégano fresco
1 diente de ajo, pelado
1/4 de taza de cebollín, rebanado
2 (170 gramos/6–onzas)
letes de salmón
Combine los primeros 8 ingredientes (excluyendo el aceite de oliva)
en su Mini-Picadora y procese hasta que estén bien mezclados y
namente cortados. Cubra los letes de salmón por ambos lados con
la mezcla de las hierbas. Ase a la parrilla el salmón sobre carbones
medio-calientes durante 10 minutos o hasta que la carne del pescado
se abra fácilmente con un tenedor. 2 Porciones.
1 cucharada de jugo
de limón fresco
1/4 de cucharadita de sal
1/8 de cucharadita
de pimienta
2 cucharadas
de aceite de oliva
Tapenade
Sirva esta salsa picante y condimentada para untar en rebanadas de
pan crujiente o con verduras crudas. Haga un poco más para utilizarla
en sándwiches.
1 taza de aceitunas
Kalamata sin semilla
3 dientes de ajo, pelados
30 gramas (1 onza)
de anchoas
2 cucharadas de alcaparras
1 cucharadita de corteza
de limón, rallada
Coloque todos los ingredientes en el recipiente de su Mini-Picadora y
procese la mezcla hasta que se forme una pasta gruesa. Refrigérela por
un máximo de una semana.
1 cucharada de jugo
de limón fresco
1 cucharadita de tomillo fresco
1cucharadita de romero fresco
1 cucharadita
de orégano fresco
2 cucharadas de aceite
de oliva extra virgen
Salsa de Aguacate-Edamame
Las semillas de soya verdes, congeladas y sin cáscara (edamame), se
pueden encontrar en la mayoría de los supermercados, por lo general
en la sección de alimentos naturales.
1 aguacate maduro mediano, pelado
1 taza de semillas de soya verdes
cocinadas y peladas
1/4 de taza de cebollín cortado
1/4 de taza de mayonesa
Procese el aguacate y las semillas de soya en su Mini-Picadora a
velocidad alta “HI” por 7 segundos aproximadamente o hasta que
estén namente picados. Añada el resto de los ingredientes y
procéselos hasta que se suavicen.
Rinde aproximadamente 2 tazas.
2 cucharadas de jugo
de limón
Salsa picante al gusto
Sal y pimienta al gusto

www.oster.com
24
www.oster.com
25
Pollo Cubierto Con Hierbas
1/2–1 taza de mostaza Dijón
2 cucharadas de perejil fresco,
sin tallo
1 cucharada de romero fresco,
sin tallo
3 cebollines
2 cucharaditas de pimienta negra
con vino tinto o vinagre rojo
1/2 taza de vinagre balsámico,
puede sustituir
frescamente molida
Cubra el pollo generosamente con mostaza. Coloque el perejil, la salvia,
el romero, el tomillo, el cebollín, la sal y la pimienta en su Mini-Picadora.
Procese hasta que las hierbas estén cortadas y fragantes y los
cebollines picados. Coloque la mezcla de hierbas apretándola sobre
la mostaza con que untó en el pollo. Precaliente un sartén pesado y
grande a fuego medio. Caliente 2 cucharadas de aceite y salteé el pollo,
con la piel hacia abajo y cocine la carne ambos lados, dándole vuelta
una vez, hasta que el pollo esté sucientemente cocinado. Ajuste el
calor si es necesario para evitar que se queme. Retire el pollo y prepare
un “desglase” con lo que queda en el fondo de la cacerola, utilizando el
vinagre. Raspe lo que queda pegado del fondo de la cacerola y
cocínelo hasta que el líquido se reduzca a la mitad. Vierta sobre el pollo.
Rinde para 4 Porciones.
1 pollo grande, cortado en
pedazos en partes (retire la
piel si así lo desea)
2 cucharadas de salvia fresca,
sin tallo
3 cucharadas de tomillo fresco,
sin tallo
2 cucharaditas de sal kosher
4 cucharadas de aceite de
oliva extra virgen
NOTAS
Persillade
Esta exquisita receta es una excelente cobertura para el pollo, el
cordero, el puerco o el pescado.
1 ramo de perejil de hoja plana,
sin tallo
1 limón, (remuévale la piel con
un pelador de papas y guárdela)
Coloque todos los ingredientes en su Mini-Picadora. Presione el botón
de pulso en velocidad alta “HI” hasta que todos los ingredientes estén
bien picados y mezclados.
4 dientes de ajo
o cebollines, pelados

www.oster.com
26
www.oster.com
27
Garantía Limitada de 1 Año
Sunbeam Products, Inc. operando bajo el nombre de Jarden Consumer
Solutions, o en Canadá, Sunbeam Corporation (Canada) Limited operando
bajo el nombre de Jarden Consumer Solutions, (en forma conjunta,
“JCS”), garantiza que por un período de un año a partir de la fecha de
compra, este producto estará libre de defectos de materiales y mano de
obra. JCS, a su elección, reparará o reemplazará este producto o cualquier
componente del mismo que presente defectos durante el período de
garantía. El reemplazo se realizará por un producto o componente nuevo
o reparado. Si el producto ya no estuviera disponible, se lo reemplazará
por un producto similar de valor igual o superior. Ésta es su garantía
exclusiva. No intente reparar o ajustar ninguna función eléctrica o
mecánica de este producto. Al hacerlo elimínará ésta garantía.
La garantía es válida para el comprador minorista original a partir de
la fecha de compra inicial y la misma no es transferible. Conserve el
recibo de compra original. Para solicitar servicio en garantía se requiere
presentar un recibo de compra. Los agentes y centros de servicio de JCS
o las tiendas minoristas que venden productos de JCS no tienen derecho
a alterar, modicar ni cambiar de ningún otro modo los términos y las
condiciones de esta garantía.
Esta garantía no cubre el desgaste normal de las piezas ni los daños que
se produzcan como resultado de uso negligente o mal uso del producto,
uso de voltaje incorrecto o corriente inapropiada, uso contrario a las
instrucciones operativas, y desarme, reparación o alteración por parte
de un tercero ajeno a JCS o a un Centro de Servicio autorizado por JCS.
Asimismo, la garantía no cubre actos fortuitos tales como incendios,
inundaciones, huracanes y tornados.
¿Cuál es el límite de responsabilidad de JCS?
JCS no será responsable de daños incidentales o emergentes causados
por el incumplimiento de alguna garantía o condición expresa, implícita
o legal.
Excepto en la medida en que lo prohíba la ley aplicable, cualquier
garantía o condición implícita de comerciabilidad o aptitud para un n
determinado se limita, en cuanto a su duración, al plazo de la garantía
antes mencionada.
JCS queda exenta de toda otra garantías, condiciones o manifestaciones,
expresa, implícita, legal o de cualquier otra naturaleza.
JCS no será responsable de ningún tipo de daño que resulte de la compra,
uso o mal uso del producto, o por la imposibilidad de usar el producto,
incluidos los daños incidentales, especiales, emergentes o similares, o
la pérdida de ganancias, ni de ningún incumplimiento contractual, sea
de una obligación esencial o de otra naturaleza, ni de ningún reclamo
iniciado contra el comprador por un tercero.
Algunas provincias, estados o jurisdicciones no permiten la exclusión o
limitación de los daños incidentales o emergentes ni las limitaciones a
la duración de las garantías implícitas, de modo que es posible que la
exclusión o las limitaciones antes mencionadas no se apliquen en su
caso.
Esta garantía le otorga derechos legales especícos y es posible que usted
tenga otros derechos que varían de un estado, provincia o jurisdicción a
otro.
Cómo solicitar el servicio en garantía
En los Estados Unidos
Si tiene alguna pregunta sobre esta garantía o desea recibir servicio de
garantía, llame al 1.800.334.0759 y podrá obtener la dirección del centro
de servicio que le resulte más conveniente.
En Canadá
Si tiene alguna pregunta sobre esta garantía o desea recibir servicio de
garantía, llame al 1.800.667.8623 y podrá obtener la dirección del centro
de servicio que le resulte más conveniente.
En los Estados Unidos, esta garantía es ofrecida por Sunbeam Products,
Inc. operando bajo el nombre de Jarden Consumer Solutions, Boca
Ratón, Florida 33431. En Canadá, esta garantía es ofrecida por Sunbeam
Corporation (Canada) Limited operando bajo el nombre de Jarden
Consumer Solutions, 20 B Hereford Street, Brampton, Ontario L6Y 0M1. Si
usted tiene otro problema o reclamo en conexión con este producto, por
favor escriba al Departamento de Servicio al Consumidor.
POR FAVOR NO DEVUELVA ESTE PRODUCTO A NINGUNA DE ESTAS
DIRECCIONES NI AL LUGAR DE COMPRA.
 Loading...