

For product questions contact:
ROASTER OVENS
User Guide
Safety
USA : 1-888-233-3214
www.oster.com
© 2017 Sunbeam Products, Inc. doing business as Jarden Consumer
Solutions. All rights reserved. Distributed by Sunbeam Products,
Inc. doing business as Jarden Consumer Solutions, Boca Raton,
Florida 33431. Sunbeam Products, Inc. is a subsidiary of Newell
Brands, Inc. (NYSE: NWL).
CKSTRS20-SBHVW_17EM3 P.N. 192732 Rev B
Printed in China CSH-SL0617-OST51955
How to use
Cleaning
Recipes
Warranty
www.oster.com

www.oster.com
www.oster.com
IMPORTANT SAFEGUARDS
When using electrical appliances, basic safety precautions should
always be followed to reduce the risk of re, electric shock, and/or
injury to persons including the following:
1. Read all instructions before using this product.
2. This appliance generates heat during use. Do not touch hot
surfaces. Use handles or knobs.
3. To protect against electric shock, do not place or immerse cord,
plugs, or appliance in water or other liquid.
4. This appliance is not to be used by children or by persons with
reduced physical, sensory or mental capabilities.
5. Close supervision is necessary when any appliance is used near
children. Children should not play with the appliance.
6. Unplug from outlet when not in use, before putting on or taking
o parts and before cleaning. Allow to cool before putting on
or taking o parts, and before cleaning. To disconnect, turn any
control to OFF, then unplug power cord from outlet. Do not
disconnect by pulling on cord.
7. Do not operate any appliance with a damaged cord or plug
or after the appliance malfunctions, or has been damaged in
any manner. Do not attempt to replace or splice a damaged
cord. Return appliance to the manufacturer (see warranty) for
examination, repair or adjustment.
8. The use of accessory attachments not recommended by the
appliance manufacturer may cause injuries.
9. Do not use outdoors or for commercial purposes.
10. Do not let cord hang over edge of table or counter, or touch hot
surfaces.
11. Do not place on or near wet surfaces, or heat sources such as a
hot gas or electric burner, or in a heated oven.
12. Extreme caution must be used when moving an appliance
containing hot oil or other hot liquids.
13. The roasting oven body is subject to residual heat from cooking
cycle. Do not touch roasting oven body immediately after
removing roasting pan. Allow to cool before handling.
14. Use caution when opening the lid during or after a cooking
cycle. Escaping steam can cause burns. Always lift the lid away
from your body.
15. Use caution when removing the roasting pan or roasting rack.
They will be hot from the cooking cycle and may cause burns.
16. Do not use appliance for other than intended use. Misuse can
cause injuries.
17. Intended for household countertop use only. Keep 6 inches
(152 mm) clear from the wall and on all sides. Always use
appliance on a dry, stable, level surface.
18. Avoid sudden temperature changes, such as adding refrigerated
foods or cold liquids into a heated roasting pan.
19. Models with glass window lids: The window is made of tempered
glass. Always inspect the glass for chips, cracks or any other damage.
Do not use the lid if it is damaged, as it may shatter during use.
20. CAUTION: To protect again electrical shock and product
damage, do not cook directly in the roasting oven body. Cook
only in the roasting pan provided.
21. WARNING: Spilled food can cause serious burns. Keep
appliance and cord away from children. Never drape cord over
edge of counter and never use outlet below counter.
SAVE THESE INSTRUCTIONS
HOUSEHOLD USE ONLY
POLARIZED PLUGS
This appliance has a polarized plug (one blade is
wider than the other). As a safety feature to reduce
the risk of electrical shock, this plug is intended
to t in a polarized outlet, reverse the plug. If it still does not t,
contact a qualied eletrician. Do not attempt to defeat this safety
feature or modify the plug in any way. If the plug ts loosely into
the AC outlet or if the AC outlet feels warm do not use that outlet.
POWER CORD INSTRUCTIONS:
A short power-supply cord or detachable power-supply cord is
provided to reduce risks resulting from becoming entangled in
or tripping over a longer cord. Longer detachable power-supply
cords or extension cords are available and may be used if care is
exercised in their use. If a long detachable power-supply cord or
extension cord is used on short-cord models:
2
3
www.oster.com
www.oster.com
a. The marked electrical rating of the detachable power-supply
cord or extension cord should be at least as great as the
electrical rating of the appliance;
b. When the product is of the grounded type, the extension cord
shall be a grounding type 3-wire cord; and
c. The longer cord should be arranged so that it will not drape
over the countertop or tabletop where it can be pulled on by
children or tripped over unintentionally.
Do not pull, twist or otherwise abuse the power cord.
NOTICES
1. Some countertop and table surfaces are not designed to
withstand the prolonged heat generated by certain appliances.
Do not set the heated unit on a nished wood table. We
recommend placing a hot pad or trivet under your roaster to
prevent possible damage to the surface.
2. During initial use of this appliance, some slight smoke and/
or odor may be detected. This is normal with many heating
appliances and will not recur after a few uses.
3. Please use caution when placing your roasting pan on a ceramic
or smooth glass cook top stove, countertop, table or other
surface. Due to the nature of the roasting pan, its rough bottom
may scratch some surfaces if caution is not used. Always place
heat resistant protective padding under the roasting pan before
setting on a table, countertop or other surface.
Thank you for purchasing the Oster® Roaster Oven. Before
you use this product for the rst time, please take a few moments
to read these instructions and keep it for reference. Pay particular
attention to the Safety Instructions provided. Please review the
product service and warranty statements. To learn more about Oster®
products, please visit us at
www.oster.com or call us at 1-888-233-3214.
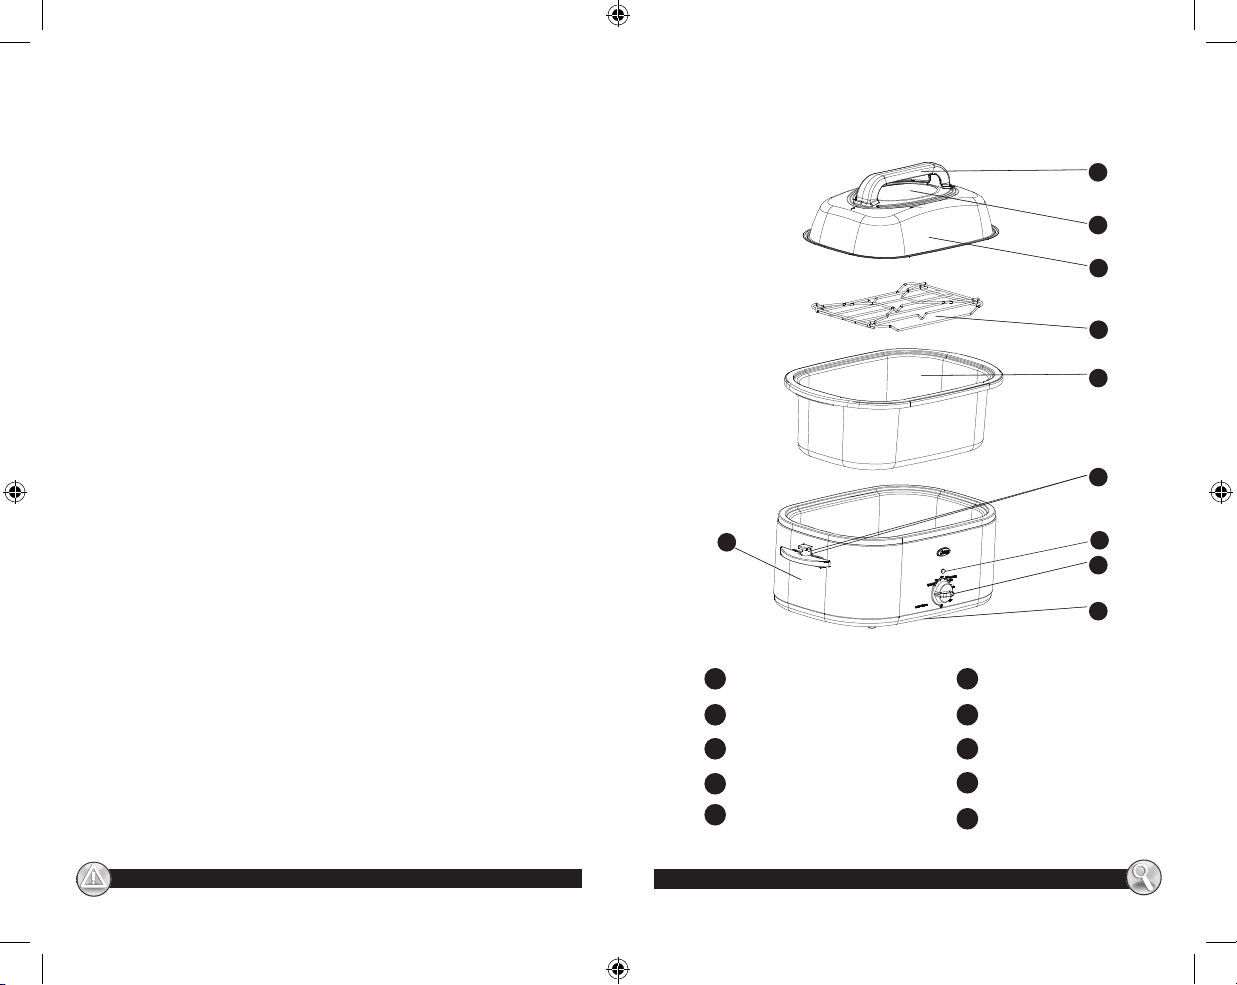
LEARNING ABOUT YOUR
ROASTER OVEN
h
a
Lid Handle
Viewing Window
b
c
Lid
Roasting Rack
d
e
Removable Roasting Pan
f
Indicator light
g
Handle
Roaster Oven Body
h
Temperature Control
i
Bottom Cover
j
a
b
c
d
e
g
f
i
j
4
5

www.oster.com
www.oster.com
PREPARING YOUR ROASTER OVEN
FOR USE
HOW TO
1. Remove all packaging materials.
2. Wash the REMOVABLE ROASTING PAN, ROASTING RACK and
LID in hot, soapy water using a sponge or wash cloth. Rinse
and dry thoroughly.
NOTE: Do not use abrasive cleaners.
3. The outside of the ROASTER OVEN BODY may be cleaned with a
soft cloth and warm soapy water.
CAUTION: Do not immerse the ROASTER OVEN BODY in water.
IMPORTANT HELPFUL TIPS
• Always use pot holders or oven mitts when placing or
removing food, a baking pan or casserole in the preheated
roaster.
CAUTION: Always lift the lid away from your body to avoid
any escaping steam from the roaster.
• Signicant amounts of heat escape whenever the LID is removed;
therefore the cooking time must be extended. Avoid frequent
removal of the LID for checking cooking progress or stirring.
• To use the LID REST feature, hold the LID upright by the
HANDLE and place the edge of the LID under the metal tabs
just above either side HANDLE.
• The LID is designed with a glass viewing window that allows
you to monitor cooking progress with ease. High-moisture
foods such as turkey and roasts may cause condensation to
form on the glass as the cooking cycle starts. This is
temporary and the condensation will dissipate during the
cooking process, providing a clear view of your food.
• Convenience foods can be baked in the roaster oven. Place
container on ROASTING RACK. Follow package directions.
• Meats roasted in your Roaster Oven will be moist and tender.
For additional browning, brush oil or butter over the meat
before cooking.
• To create a darker roasted, crispier skin poultry,
remove your poultry from the roaster oven at
the last 30 minutes of roasting time and place
in your oven at 425⁰ F for the last 30 minutes to
complete the roasting process.
6 7
USING YOUR ROASTER OVEN
1. Place the REMOVABLE ROASTING PAN into the ROASTER
OVEN BODY.
CAUTION: Do not cook food in the roaster without using the
removable roasting pan.
2. Place the lid on the roaster.
3. Make sure that the TEMPERATURE CONTROL is in the OFF
position, then plug cord into a 120 volt AC outlet.
4. Turn the roaster on by turning the TEMPERATURE CONTROL
to the desired temperature.
5. Preheat for 15 to 20 minutes. Light will turn OFF once the set
temperature is reached.
6. Place ROASTING RACK into the REMOVABLE ROASTING PAN,
put food on the RACK, and place the LID on the roaster oven.
NOTE: Some foods or recipes do not require the ROASTING
RACK to be used.
7. When nished, turn the TEMPERATURE CONTROL to the OFF
position and unplug roaster oven from outlet.
8. Remove LID and using oven mitts, remove the ROASTING
RACK with food and serve.
USING THE DEFROST SETTING
Your Oster® Roaster features a unique Defrost setting. The
Defrost setting is convenient for when you have forgotten to
defrost your frozen turkey ahead of time or did not allow
yourself enough time to fully defrost it in time to roast it. With
this unique and innovative Defrost setting, you can to take your
turkey from frozen to roasted in hours – not days!
NOTE: In order to plan your day accordingly, when roasting a
turkey from frozen you can estimate it will take around twice
the time it would normally take to roast an already defrosted
turkey in your roaster.
It’s easy to use; just follow these few simple steps:
1. Turn temperature knob to “DEFROST.” Preheat roaster for
about 15-20 minutes.

www.oster.com
www.oster.com
2. Unwrap your frozen turkey and place it on the roasting rack inside
of roaster and place lid on top. Defrosting process begins.
• Make sure to have a good meat thermometer to check
defrosting temperatures from time to time; however, try not
to open the lid too many times as it is important to keep as
much heat as possible in the roaster while defrosting.
3. Check that legs and thighs have reached between 90°F and
100°F before basting. Once they do, brush the outside of the
turkey with butter or oil and season with salt and pepper (see
chart below for estimated times).
4. Continue cooking in the Defrost Setting until the thighs and
legs reach at least 130°F to 150°F and the breast reaches at least
50°F to 60°F. (see chart below for estimated times). Once
desired temperatures have been met, use a baster to remove
any excess liquid or ice chunks remaining in the cavity. Then,
using tongs, remove the bag of giblets and neck. Once
removed, brush the outside with additional butter or oil.
NOTE: If the giblets and neck are hard to remove at this time,
let the turkey defrost slightly longer checking about every 10
– 15 minutes until they can be removed relatively easily.
5. Now you are ready to start roasting. Turn the temperature
knob to 325°F and roast your turkey (see chart below for
estimated times). The turkey will be done roasting when the
temperature of the breast reaches at least 165°F and the legs
and thighs reach at least 175°F. The other important
temperature to take is inside the cavity - it also needs to
reach at least 165°F or you risk contaminating the rest of the
bird when you carve it.
NOTE: To check doneness of the turkey it is important to
take temperature readings in dierent areas of the turkey to
make sure it is all completely done. If any of the areas have
not reached the temperatures noted above, let it roast for a
little longer until they are reached, checking about every
10 - 15 minutes.
ESTIMATED TIMES WHEN
USING DEFROST
Smaller Turkey
About 17Lbs.
Larger Turkey
about 23lbs.
Steps Hours Minutes Hours Minutes
Roaster Preheat (steps 1 & 2) 20 20
First Check of Temperatures (step 3) 1 30 4 30
Finish Defrosting (step 4) 2 1
Total DEFROST Time 3 50 5 50
Roasting Turkey (step 5) 2 1
Total DEFROST + ROAST Time 5 50 6 50
Above times are estimates and should be used as a guide to planning
your total time using the defrost setting. Your best indicators at each
stage are the temperatures the turkey reaches at each step using a
good meat thermometer.
NOTE: You might be wondering why it would take a smaller turkey
longer than a larger turkey to roast once it is thawed and you have
removed the neck and giblets. Your roaster defrost and roasting
process is based on temperature and turkey size.
• Larger turkeys – As the roaster is defrosting, it is also heating the
turkey; since it takes longer to defrost a larger sized turkey; it
also heats it longer therefore shortening the time to roast to
completion.
• Smaller turkeys – Since defrosting time for a smaller sized turkey
is shorter, so is the heating time of the turkey; therefore, it takes
longer to roast to completion.
USING THE KEEP WARM SETTING
Your Oster® Roaster features a Keep Warm setting. The keep
warm setting is convenient for entertaining until you’re ready to
serve. When your food is done cooking, simply switch the
temperature dial to the keep warm setting and the roaster will
maintain a low heat to keep your food warm until you are ready serve.
8
9

www.oster.com
www.oster.com
CARE & CLEANING
COOKING GUIDE
This appliance should be cleaned after every use.
CAUTION: Do not immerse the ROASTER OVEN BODY in water
or other liquid. Do not put REMOVABLE ROASTING PAN in
dishwasher.
1. Turn temperature control to the “OFF” position.
2. Unplug the roaster oven from outlet and allow unit to cool.
3. Allow the roaster oven to cool completely before cleaning.
4. Wash the REMOVABLE ROASTING PAN, LID and ROASTING
RACK in hot soapy water – using a sponge or cloth. Rinse
thoroughly in hot water, then towel dry.
NOTE: Do not use abrasive cleaners.
5. Wipe the inside and outside of the ROASTER OVEN BODY
with a damp cloth.
USER MAINTENANCE:
This appliance has no user serviceable parts. Any servicing
beyond that described in the Cleaning Section should be
performed by an Authorized Service Representative only. See
Warranty Section.
Determining Meat Doneness
Following the guide below, insert an instant reading thermometer
into the center of the meat or poultry making sure not to touch bone.
Remember once meat is removed from the roaster the
temperature will rise about 5 degrees.
Allow meats to stand about 10 minutes before carving and serving
MEAT MEDIUM
RARE
Beef
Roast 145⁰ F 155⁰ F 170⁰ F
Meatloaf 160⁰ F
Veal
Roast 155⁰ F
Lamb
Roast 140⁰F 155⁰ F 170⁰ F
Pork
Roast 155⁰ F 160⁰ F
Poultry
Roast Chicken Or
Turkey
Chicken or Turkey
Breast or Parts
MEDIUM
WELL DONE
180⁰ F
180⁰ F
10
* Rare pork, ham or poultry is not recommended.
11

www.oster.com
www.oster.com
Roasting Meats And Poultry
Meats will cook more rapidly in the Roaster Oven than
a conventional oven. Reducing temperature and increasing
time will result in a browner, crispier crust. Times indicated
below are approximate and should be used as a guideline only.
MEAT
BEEF :
Standing Rib
Sirloin Tip 3 to 5 lbs 325⁰ F
Tenderloin 2 to 4 lbs 450⁰ F
Corned Beef 3 lbs 350⁰ F 25 to 28 minutes 1 ¼ hours 160⁰ F
Meatloaf 2 lbs 350⁰ F 45 to50 minutes 1 ½ hours 160⁰ F
Meatballs
LAMB:
WEIGHT
(LBS.)
6 to 8 lbs
2 lbs/ 36
meatballs 350⁰ F 12 to 15 minutes 25 minutes 160⁰ F
Leg
ROASTING
TEMPERATURE
350⁰ F
6 lbs 350⁰ F
MINUTES
PER LB
10 to 12 minutes Rare: 1 hour 124⁰ F
12 to 15 minutes
15 to 17 minutes Medium: 1 ½ hours 160⁰ F
17 to 19 minutes Well: 1 ¾ hours 170⁰ F
11 to 13 minutes Rare:1 hour 124⁰ F
13 to 15 minutes
15 to 17 minutes Medium:1 ½ hours 160⁰ F
17 to 19 minutes Well:1 ¾ hours 170⁰ F
10 to 12 minutes Rare:25 minutes 124⁰ F
12 to 14 minutes
15 to 16 minutes Medium:50 minutes 160⁰ F
16 to 18 minutes Well: 1 hour 170⁰ F
12 to 15 minutes
15 to 17 minutes
17 to 19 minutes Well: 1 ¾ hours 170⁰ F
APPROXIMATE
COOKING TIME
TEMPERATURE
Medium Rare:
1 ¼ hours 145⁰ F
Medium Rare:
1 ¼ hours 145⁰ F
Medium Rare:
40 minutes 145⁰ F
Medium Rare:
1 ¼ hour 145⁰ F
Medium:
1 ½ hours 160⁰ F
INTERNAL
MEAT
Crown Rack 3 lbs 350⁰ F
PORK:
Loin Roast 5 lbs 350⁰ F 22 to 25 minutes 2 hours 160⁰ F
Pork Chops
Rolled Pork
Shoulder 4 lbs 350⁰ F 24 to 28 minutes 2 hours 160⁰ F
SPARERIBS
Country ribs 4 to 5 lbs 325⁰ F 22 to 25 minutes 1 ½ hours 160⁰ F
Baby Back Ribs 4 to 5 lbs 325⁰ F 18 to 20 minutes 1 ¼ hours 160⁰ F
SMOKED HAM:
Bone in Ham 10 to 12 lbs 325⁰ F 8 to 12 minutes 1 ¾ hours 160⁰ F
Boneless Ham 6 to 8 lbs 325⁰ F 12 to 14 minutes 1 ¼ hours 160⁰ F
Fully Cooked
Ham 6 to 8 lbs 325⁰ F 10 to 12 minutes 1 hour 160⁰ F
VEAL:
Loin 5lbs 325⁰ F 24 to 28 minutes 2 hours 155⁰ F
POULTRY:
Fresh Chicken 4 to 5 lbs 350⁰ F 12 to 15 minutes 1 ¼ hours 180⁰ F
Roasting
Chicken 6 to 8 lbs 350⁰ F 10 to 12 minutes 1 ¾ hours 180⁰ F
Fresh turkey 12 to 14 lbs 325⁰ F 6 to 8 minutes 1 ¾ hours 180⁰ F
Frozen turkey
(defrosted) 14 to 16 lbs 325⁰ F 6 to 8 minutes 2 hours 180⁰ F
Fresh Turkey
breast
(bone in) 5 to 6 lbs 325⁰ F 10 to 15 minutes 1 ½ hours 180⁰ F
WEIGHT
(LBS.)
6 chops 325⁰ F 11 to 15 minutes 45 minutes 160⁰ F
4 lbs
ROASTING
TEMPERATURE
MINUTES
PER LB
12 to 15 minutes
15 to 17 minutes
17 to 19 minutes Well: 1 hour 170⁰ F
APPROXIMATE
COOKING TIME
Medium Rare:
35 minutes 145⁰ F
Medium:
45 minutes 160⁰ F
INTERNAL
TEMPERATURE
12
13

www.oster.com
www.oster.com
Baking*
• Baking pans should always be placed on the ROASTING RACK.
Do not place pans on bottom of REMOVABLE ROASTING PAN.
• Metal pans are recommended for use in the roaster as they
provide better heat transfer and browning.
FOOD
Muns 2 ½ -inch 12 mun pan 400⁰ F 14 to18 minutes
Quick Bread 1 loaf 9 x 5x3 inch 350⁰ F 25 to 30 minutes
Yeast Bread 1 ½ lb loaf Baking sheet 375⁰ F 25 to 30 minutes
Yeast Rolls 12 rolls
Coeecake 9 squares
Brownies 9 squares
Cupcake 2 ½ -inch 12 mun pan 400⁰ F 14 to18 minutes
Sheet Cake 12 servings 13 x9x3-inches 350⁰ F 20 to 25 minutes
Pound Cake 10 servings 10-inch tube pan
Bundt Cake
Cheesecake
Fruit Pie
Quiche 8 servings
Pizza 4 servings 9-inch pizza pan 425⁰ F 20 to 25 minutes
AMOUNT OR SIZE BAKING PAN TEMPERATURE ESTIMATED TIME
10 to 12
servings
10 to 12
servings
8 to 10
servings
9-inch square
baking pan
9-inch square
baking pan
9-inch square
baking pan
10-inch Bundt
pan
10-inch spring
form pan
9-inch glass pie
plate
9-inch glass pie
plate
0r 10-inch metal
tart pan
400⁰ F 15 to 20 minutes
350⁰ F 40 to 45 minutes
350⁰ F 25 to 30 minutes
325⁰ F for dark pan
350⁰ F for light pan
325⁰ F for dark pan
350⁰ F for light pan
Crust 400⁰ F
Then With lling
350⁰ F
400⁰ F 40 to 45 minutes
400⁰ F
Then
300⁰ F
50 to 55 minutes
50 to 55 minutes
50 to 55 minutes
10 minutes
for 10 minutes
for 35 to 40
minutes
FOOD
Mini Pizzas 6 servings Baking sheet 425⁰ F 15 to 20 minutes
Baked
Potatoes
Sweet
Potatoes
Scalloped
Potatoes
Casserole
Winter
Squash/
halved
Baked
apples
AMOUNT OR SIZE BAKING PAN TEMPERATURE ESTIMATED TIME
6/ 1 lb each On rack 400⁰ F 55 to 60 minutes
10/ 8 oz each On rack 400⁰ F 45 to 50 minutes
8/10 oz each On rack 400⁰ F 45 to 50 minutes
9-inch square
baking dish
9-inch square
baking dish
In shallow
baking pan
In shallow
baking pan
On rack 350⁰ F 60 to 70 minutes
On rack 350⁰ F 50 to 60 minutes
On rack 375⁰ F 25 to 30 minutes
On rack 350⁰ F 35 to 40 minutes
* Always preheat roaster prior to baking
14
15

www.oster.com
www.oster.com
RECIPES
ROASTING
LEMON GARLIC ROAST CHICKEN
¼ cup butter or margarine, softened 2 large cloves garlic, minced
1 tbsp grated lemon peel 1 tsp salt
¼ tsp pepper 2 tbsp fresh lemon juice
4 to 5 lb chicken
Preheat roaster at 350⁰ F for 15 minutes. In small bowl, combine
all ingredients, except chicken; blend well. Spread mixture
evenly between skin and meat and on skin of chicken. Place
rack in roaster oven with handles up and curved bars down.
Place chicken on rack and place lid on roaster.
Roast for 1 ¼ hours or until chicken registers 170⁰ F in breast
and 180⁰ F in thigh when tested with meat thermometer.
Let rest 10 minutes before serving.
Makes 4 to 5 servings.
SPICY BEEF ROAST
¼ cup low sodium soy sauce 2 tbsp balsamic vinegar
2 tbsp Worcestershire sauce 2 tsp Dijon mustard
3 lb sirloin tip roast 4 large cloves garlic, minced
2 tbsp cracked black peppercorns ½ tsp salt
Preheat roaster at 350⁰ F for 15 minutes. In small bowl, combine
soy sauce, Worcestershire sauce and mustard. Brush over roast.
In clean small bowl, combine garlic, peppercorns and salt.
Sprinkle evenly over roast. Place rack in roaster oven with
handles up and curved bars down. Place beef on rack and place
lid on roaster.
Roast to desired doneness following guide in roasting chart on
page 10-11.
Let rest 10 minutes before serving.
Makes about 8 servings.
PORK ROAST
4 - 5 lb. pork loin roast ½ teaspoon pepper
4 cloves garlic, minced ½ cup Italian dressing
1 teaspoon salt ¼ cup Worcestershire sauce
Preheat roaster to 350° F. Place roast on rack. Press minced garlic
into surface of the roast. Place rack in roaster. Combine dressing
and Worcestershire sauce. Brush roast with marinade. Cover;
cook for 2 to 2 ½ hours or until done.
ORANGE AND CHILI BRAISED SHORT RIBS
9 lbs beef short ribs 1 tbsp salt
1 tsp pepper 3 large onions, halved and sliced
10 large cloves garlic, minced 3 cups beef stock or broth
2 jars (12 oz., ea) chili sauce 1 cup orange juice
1 tsp crushed red pepper akes Fresh cilantro sprigs
Hot cooked rice
Peel of 1 navel orange, cut in wide strips
Preheat roaster to 375⁰ F for 15 minutes. Season short ribs with
salt and pepper; add half the ribs to removable pan and cover.
Let short ribs brown on both sides, turning once (about 15
minutes). Remove to bowl. Repeat with remaining short ribs.
Pour o drippings. Reduce heat to 250⁰ F.
Add onions, garlic, beef stock, chili sauce place in removable
roaster pan. Add remaining ingredients, except cilantro and rice.
Stir to blend. Return short ribs to roaster. Cover and cook for 3 ½
hours or until short ribs are tender.
Garnish with cilantro and serve over rice.
Makes about 10 servings
16
17

www.oster.com
www.oster.com
RECIPES
ROAST PORK ITALIANO
2 large cloves garlic, minced 2 tsp salt
¼ tsp pepper 1/3 cup Italian dressing
2 tbsp Worcestershire sauce 4 to 5 lb pork rib roast
2 tbsp chopped fresh basil 2 tbsp chopped fresh Italian parsley
Preheat roaster at 350⁰ F for 15 minutes. In small bowl, combine
garlic, salt, pepper, Italian dressing and Worcestershire sauce.
Spread evenly over pork roast. Place rack in roaster oven with
handles up and curved bars down. Place pork on rack and place
lid on roaster.
Roast for 1 ¾ hours. Sprinkle with basil and parsley and roast
about 15 minutes longer or until pork registers 160⁰ F when
tested with meat thermometer.
Let rest 10 minutes before serving.
Makes about 8 servings.
BAKING
BAKED POTATOES
8 to 12 baking potatoes
Wash potatoes and pierce with a fork. Place rack in the pan. Stack
potatoes on roasting rack, making sure that they don’t touch the
sides of cooking pan. Cover and bake at 400°F for 1 to 1 ½ hours.
MEATBALLS
5 pounds ground beef 1 ½ teaspoons salt
1 cup Italian seasoned ne, ½ teaspoon pepper
dry bread crumbs 5 eggs
Preheat roaster with pan in place to 425° F. Combine all
ingredients. Form into 1- inch balls. Place meatballs in pan.
Cover; Bake 30 to 45 minutes or until done. Stir occasionally
to brown on all sides. Makes approximately 75 meatballs.
SEASONED MEATBALLS
2 lbs ground round ½ cup panko bread crumbs
½ cup minced onion ¼ cup chopped Italian parsley
3 tbsp tomato paste 4 large cloves garlic, minced
2 large eggs 2 tbsp dried basil
3 tsp dried oregano 2 tsp salt
¼ tsp pepper 1/3 cup Italian dressing
Preheat roaster at 350⁰ F for 15 minutes. In large bowl, combine
all ingredients; blend well. Shape into 36 meatballs. Place in
shallow roasting pan.
Place rack in roaster oven with handles up and curved bars
down. Place baking pan on rack and place lid on roaster.
Bake for 25 minutes. Remove from roaster and keep warm.
Use in Spaghetti Sauce Recipe.
18
19

www.oster.com
www.oster.com
SPAGHETTI SAUCE
1 can (28 oz) petit diced tomatoes 1 can (28 oz) tomato sauce
2 tbsp tomato paste 1 large onion, nely chopped
½ cup chopped Italian parsley 4 large cloves garlic, minced
2 tbsp dried basil 3 tsp dried oregano
1 ½ tsp salt ¼ tsp pepper
2 lbs hot cooked pasta Shredded Parmesan cheese
Add all ingredients to removable roaster pan. Cook at 350⁰ F for
1hour. Add meatballs and cook 1 hour longer.
Serve over hot cooked pasta. Add shredded Parmesan cheese, if
desired.
Makes about 18 servings
BAKED BEANS
2 cans (7-lbs. each) pork and beans 1⁄2 cup Worcestershire sauce
1 ½ cup molasses 2 tablespoons dry mustard
1 ¼ cup ketchup powder
1 pound bacon, cooked ¾ cup prepared barbecue sauce
until just crisp and cut up
Combine all ingredients in an oven safe dish and place in
roaster pan. Cover and cook at 300° F for 2 hours or until
heated through. Stir occasionally.
BARBECUE BEANS
8 cans (16 oz, ea) baked beans 1 large green pepper, chopped
1 large onion, chopped 2 cups ketchup
2 cups barbecue sauce ½ cup molasses
¼ cup mustard ¼ cup Worcestershire sauce
½ lb bacon, cooked and cut into 1-inch pieces
Add all ingredients to removable roaster pan. Cover and cook at
300⁰ F for 1 ½ hours or until heated through.
Makes about 24 servings
LEMON CHESECAKE
Crust: 2 cups nely ground animal crackers (about 8 oz)
2 tbsp granulated sugar ¼ cup unsalted butter, melted
Filling: 4 pkgs (8 oz, ea.) cream cheese, softened
4 large eggs, at room temperature
1 cup sour cream ½ cup heavy whipping cream
1 ¼ cups granulated sugar 2 tbsp fresh lemon juice
1 ½ tbsp grated lemon peel
Place rack in roaster oven with handles up and curved bars down.
Preheat roaster at 400⁰ F for 15 minutes. Generously butter 10-inch
spring form pan.
In medium bowl, combine all crust ingredients. Using a fork, toss to
thoroughly blend. Press against bottom and about ¾-inch up sides
of pan. {Place on rack in roaster oven pan; cover and bake for 10
minutes until crust is set. Remove to wire rack. Reduce roaster oven
temperature to 350⁰ F.
In large bowl of electric mixer beat cream cheese until light and
uy. Beat in sugar, scraping down sides of bowl occasionally. Add
eggs, one at a time, beating well after each addition. Gradually beat
in remaining ingredients until fully blended. Spoon lling into
prepared crust.
Place pan on to rack in roasting pan. Bake until lling is set and
golden brown on top, about 50 to 55 minutes. (Cooking
thermometer should register 155⁰F when inserted into center of
cheesecake. Remove pan from oven and cool on wire rack.
Cheesecake will rise slightly above the top of the pan and will fall
slightly as it cools.
When fully cooled, cover and refrigerate overnight before serving.
Cheesecake may be refrigerated up to 4 days or frozen up to 1
month. If frozen, refrigerate overnight to thaw.
To serve, garnish with lemon slices.
Makes 10 to 12 servings
20
21

www.oster.com
www.oster.com
RECIPES
SLOW COOKING
CLASSIC BEEF STEW
8 lbs beef stew meat, cut in 2” pieces 1 tbsp salt
½ tsp pepper 4 large onions, cut in 1/8 ths
1 tbsp dried thyme 2 quarts beef stock or broth
1 can (28 oz) tomato sauce 2 lbs baby carrots
10 celery stalks, cut in 2-inch pieces 1 lb frozen peas
5 lbs potatoes, peeled and cut in large chunks
Season beef with salt and pepper; place in removable roaster
pan. Add onions, thyme, beef stock and tomato sauce; stir to
blend. Cover and cook at 250⁰ F for 2 hours.
Add potatoes, carrots and mushrooms. Cook 1 hour longer. Add
celery and peas and cook 30 minutes or until meat is tender and
vegetables are fully cooked.
Makes about 20 servings
POT LUCK BEEF STEW
8 -lbs. beef stew meat 15 potatoes, peeled and cubed
2 cups dry bread crumbs 2 tablespoons basil
2 teaspoons salt 2 cups quick-cooking tapioca
½ teaspoon pepper 8 cans (4 ounces) sliced
4 large onions, cut into eighths mushrooms, undrained
15 cans (10 ½ -oz. each) 8 cups beef broth
condensed tomato soup 7 stalks celery
4 pounds baby carrots
Toss stew meat with bread crumbs, salt and pepper. Place beef in
pan and add remaining ingredients; stir well. Cover and roast at
250° F. for 4 to 5 hours or until meat and vegetables are tender.
CROWD PLEASING CHILI
Beans: 3 lbs dry pinto beans 14 cups cold water
Chili: 10 lbs lean ground beef, browned and drained
12 cups water
1 can (28 oz) diced tomatoes, undrained
1 can (28 oz) diced tomatoes with green chilies
2 tbsp ground cumin 3 cups tomato juice
2 tbsp salt 2 tsp coarse black pepper
3 large onions, chopped 2 large green peppers, chopped
8 large cloves garlic, minced 1/3 cup chili powder
Hot cooked rice Shredded Cheddar cheese
In large bowl, combine beans and water. Let stand overnight.
Drain well.
Preheat roaster at 350⁰ F for 15 minutes. In removable roaster
pan, combine drained beans and beef. Add water, tomatoes, salt
and pepper. Cover and cook for 2 hours.
Add remaining ingredients; cover and cook 1 hour longer, .until
beans and peppers are tender.
To serve, spoon chili over hot cooked rice and garnish with
shredded Cheddar cheese.
Makes about 60 servings
22
23

www.oster.com
www.oster.com
1 Year Limited Warranty
Sunbeam Products, Inc. doing business as Jarden Consumer Solutions or if
in Canada, Sunbeam Corporation (Canada) Limited doing business as Jarden
Consumer Solutions (collectively “JCS”) warrants that for a period of one year
from the date of purchase, this product will be free from defects in material
and workmanship. JCS, at its option, will repair or replace this product or
any component of the product found to be defective during the warranty
period. Replacement will be made with a new or remanufactured product or
component. If the product is no longer available, replacement may be made
with a similar product of equal or greater value. This is your exclusive warranty.
Do NOT attempt to repair or adjust any electrical or mechanical functions on
this product. Doing so will void this warranty.
This warranty is valid for the original retail purchaser from the date of initial
retail purchase and is not transferable. Keep the original sales receipt. Proof
of purchase is required to obtain warranty performance. JCS dealers, service
centers, or retail stores selling JCS products do not have the right to alter,
modify or any way change the terms and conditions of this warranty.
This warranty does not cover normal wear of parts or damage resulting from
any of the following: negligent use or misuse of the product, use on improper
voltage or current, use contrary to the operating instructions, disassembly,
repair or alteration by anyone other than JCS or an authorized JCS service
center. Further, the warranty does not cover: Acts of God, such as re, ood,
hurricanes and tornadoes.
What are the limits on JCS’s Liability?
JCS shall not be liable for any incidental or consequential damages caused by
the breach of any express, implied or statutory warranty or condition.
Except to the extent prohibited by applicable law, any implied warranty or
condition of merchantability or tness for a particular purpose is limited in
duration to the duration of the above warranty.
JCS disclaims all other warranties, conditions or representations, express,
implied, statutory or otherwise.
JCS shall not be liable for any damages of any kind resulting from the purchase,
use or misuse of, or inability to use the product including incidental, special,
consequential or similar damages or loss of prots, or for any breach of contract,
fundamental or otherwise, or for any claim brought against purchaser by any
other party.
Some provinces, states or jurisdictions do not allow the exclusion or limitation
of incidental or consequential damages or limitations on how long an implied
warranty lasts, so the above limitations or exclusion may not apply to you.
This warranty gives you specic legal rights, and you may also have other
rights that vary from province to province, state to state or jurisdiction to
jurisdiction.
How to Obtain Warranty Service
In the U.S.A.
If you have any question regarding this warranty or would like to obtain
warranty service, please call 1-888-233-3214 and a convenient service center
address will be provided to you.
In Canada
If you have any question regarding this warranty or would like to obtain
warranty service, please call 1-800-667-8623 and a convenient service center
address will be provided to you.
In the U.S.A., this warranty is oered by Sunbeam Products, Inc. doing business as
Jarden Consumer Solutions located in Boca Raton, Florida 33431. In Canada, this
warranty is oered by Sunbeam Corporation (Canada) Limited doing business as
Jarden Consumer Solutions, located at 20 B Hereford Street, Brampton, Ontario
L6Y 0M1. If you have any other problem or claim in connection with this product,
please write our Consumer Service Department.
PLEASE DO NOT RETURN THIS PRODUCT TO ANY OF THESE ADDRESSES
OR TO THE PLACE OF PURCHASE.
24
25

www.oster.com
www.oster.com
Notes Notes
 Loading...