

For product questions contact:
Jarden Customer Service
USA : 1.800.334.0759
Canada : 1.800.667.8623
www.oster.com
©2012 Sunbeam Products, Inc. doing business as
Jarden Consumer Solutions. All rights reserved.
Distributed by Sunbeam Products, Inc. doing business as
Jarden Consumer Solutions, Boca Raton, Florida 33431.
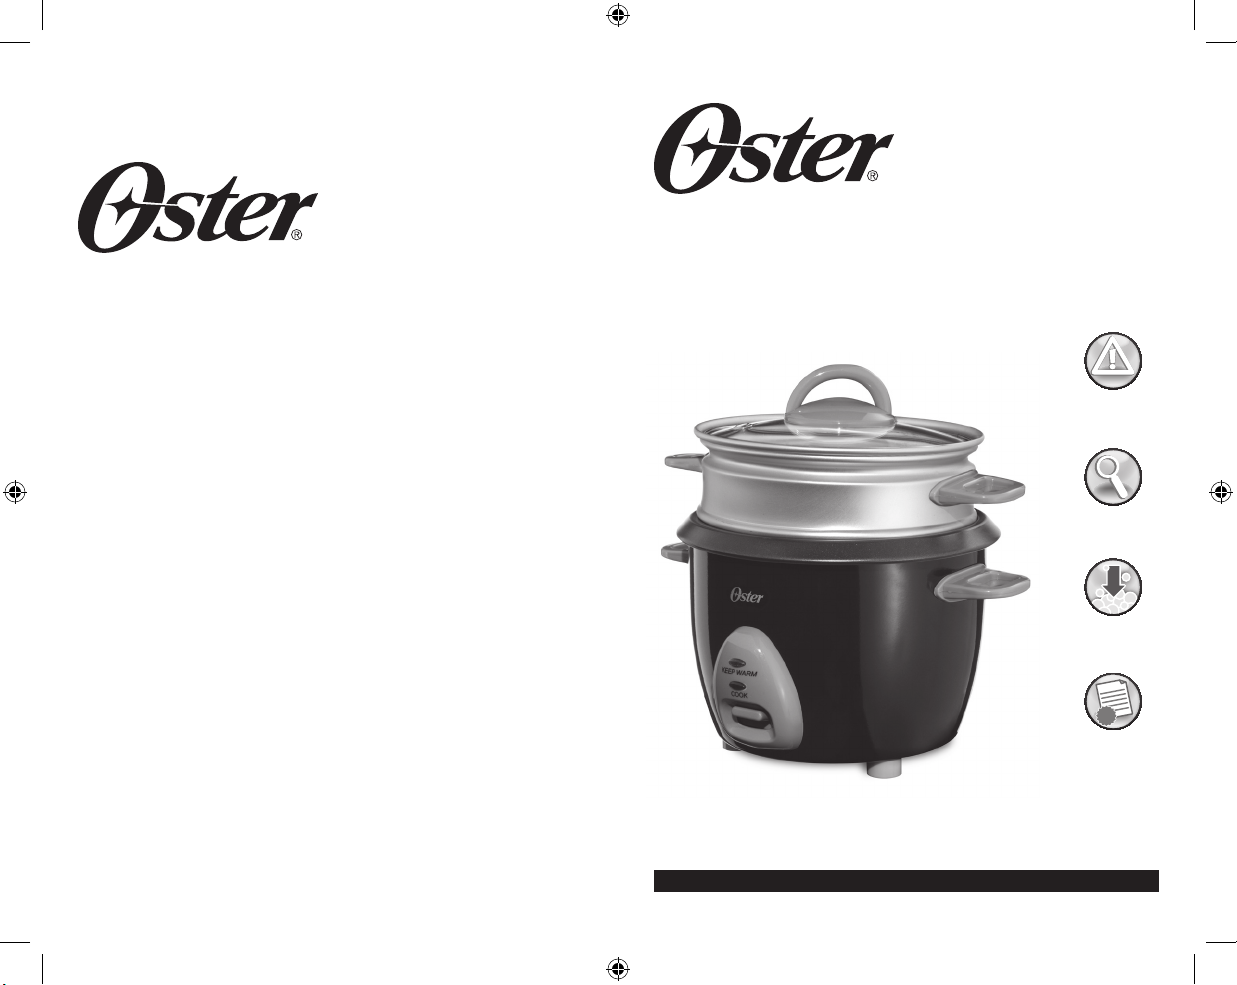
RICE COOKER
OLLA ARROCERA
Model/Modelo CKSTRCMS65
User Guide/ Guía del Usuario:
Safety
Seguridad
Para preguntas sobre los productos llame:
Jarden Customer Service
EE.UU.: 1.800.334.0759
www.oster.com
©2012 Sunbeam Products, Inc. operando bajo el nombre de Jarden
Consumer Solutions. Todos los derechos reservados. Distribuido
por Sunbeam Products, Inc. operando bajo el nombre de Jarden
Consumer Solutions, Boca Raton, Florida 33431.
How to use
Cómo usar
Cleaning
Cuidado y Limpieza
Warranty
Garantía
Printed in China/Impreso en China P.N. 156737
GCDS-OST23669-VW CKSTRCMS65_12ESM1
www.oster.com
CKSTRCMS65_12ESM1.indd 24-1 1/5/12 2:07 PM

IMPORTANT SAFEGUARDS
When using electrical appliances, basic safety precautions should always be followed,
including the following:
1. Read all instructions before using.
2. Do not touch hot surfaces. Use pot holders when removing cover or handling hot
containers. Use handles or knobs.
3. To protect against electrical shock, do not immerse cord, plug or heating unit in
water or other liquid.
4. Close supervision is necessary when any appliance is used by or near children.
5. Unplug from outlet when not in use and before cleaning. Allow to cool before
putting on or taking o parts, and before cleaning.
6. Do not operate any appliance with a damaged cord or plug or after the appliance
malfunctions, or has been damaged in any manner. Return appliance to Jarden
Customer Service (see warranty) for examination, repair or adjustment.
7. The use of accessory attachments is not recommended and may cause injuries.
8. Do not use outdoors.
9. Do not let cord hang over the edge of the table or counter, or touch heated
surfaces.
10. Do not place on or near a hot gas or electric burner, or in a heated oven.
11. Extreme caution must be used when moving any appliance containing hot
liquids.
12. To disconnect, remove plug from wall outlet.
13. Do not use this appliance for anything other than intended use.
14. To reduce the risk of electrical shock, cook only in removable pot.
15. Do not pour liquid into Heating Unit.
This appliance is for HOUSEHOLD USE ONLY. No user-serviceable parts inside. Power
Unit never needs lubrication. Do not attempt to service this product. A short power
supply cord is provided to reduce the risk resulting from becoming entangled in or
tripping over a longer cord.
DO NOT ATTEMPT TO DEFEAT THIS SAFETY FEATURE.
EXTENSION CORD USE
A short power supply cord is provided to reduce the risk resulting from becoming
entangled in or tripping over a longer cord. An extension cord may be used if care
is exercised in its use. If an extension cord is used the marked electrical rating of
the extension cord should be at least as great as the electrical rating of the Rice
Cooker. The cord should be arranged so that it will not drape over the countertop
or table top where it can be pulled on by children or tripped over unintentionally.
Do not immerse base in water or other liquids.
POLARIZED PLUG
This appliance has a polarized plug (one blade is wider than the other). To reduce
the risk of electric shock, this plug is intended to t into a polarized outlet only one
way. If the plug does not t fully into the outlet, reverse the plug. If it still does not
t, contact a qualied electrician. Do not attempt to modify the plug in any way. If
the plug ts loosely into the AC outlet or if the AC outlet feels warm do not use that
outlet.
SAVE THESE INSTRUCTIONS
THIS UNIT IS INTENDED FOR
NO LIABILITY CAN BE ACCEPTED FOR ANY DAMAGE CAUSED BY NON-COMPLIANCE WITH
THESE INSTRUCTIONS OR ANY OTHER IMPROPER USE OR MISHANDLING.
HOUSEHOLD USE ONLY
2
CKSTRCMS65_12ESM1.indd 2-3 1/5/12 2:07 PM
www.oster.com
www.oster.com
3
ADDITIONAL
IMPORTANT SAFEGUARDS
• CAUTION: this appliance generates heat and escaping steam during use. Proper
precautions must be taken to prevent risk of burns, res or other damage to
persons or property.
• All users of this appliance must read and understand this owner’s manual before
operating or cleaning this appliance.
• The cord of this appliance should be plugged into a 120 volt AC electrical outlet
only.
• When using this appliance, provide adequate air space above and on all sides
for air circulation. Do not allow this appliance to touch curtains, wall coverings,
clothing, dishtowels or other ammable materials during use.
• Do not leave appliance unattended during use.
• This appliance generates steam. Do not operate uncovered.
• If this appliance begins to malfunction during use, immediately unplug the
cord. Do not use or attempt to repair the malfunctioning appliance. Do not use
the inner pot or lid if cracked or chipped.
• This appliance is for household use only.
• Unplug the rice cooker when not in use.
• Use the rice cooker on a hard, at surface. Do not place near heat, an open ame
or on a soft surface (such as carpeting). Avoid placing it where it may tip over
during use. Dropping the rice cooker may cause it to malfunction.
• Avoid electrical shock by unplugging appliance before washing or adding water.
• To avoid burns, stay clear of the steam vent during cooking. Also, allow the rice
cooker to cool completely before touching or cleaning the lid, inner pot or
heating unit.
• Never use the inner pot on a gas or electric cooktop or an open ame.
• Do not leave the rice ladle or measuring cup in the inner pot while unit is on and
in use.
• Please use measuring cup that was provided in the rice cooker. A standard
measuring cup should not be used.
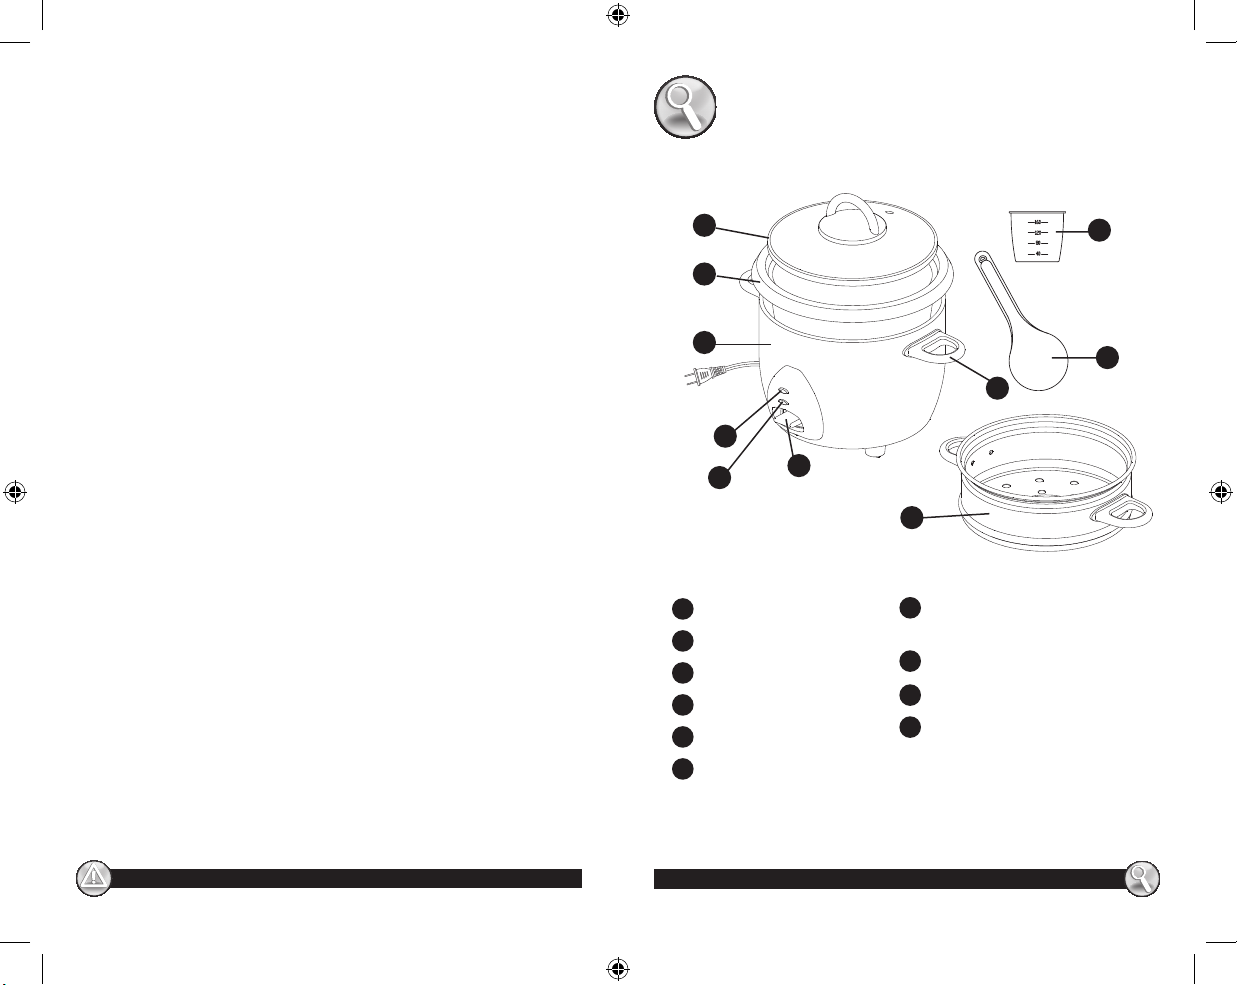
LEARNING ABOUT YOUR
RICE COOKER
a
b
c
d
e
a
Glass Lid
Inner Pot
b
c
Heating Unit
Keep Warm Light
d
Cook Light
e
Cook Switch
f
f
g
g
h
i
j
i
j
h
Steaming Tray
(Select Models only)
Handles
OsterTM Measuring Cup (5.33 oz.)
Rice Ladle
4
CKSTRCMS65_12ESM1.indd 4-5 1/5/12 2:07 PM
www.oster.com
www.oster.com
5

HOW TO:
BEFORE THE FIRST USE
1 Remove all packaging materials before using.
2
Wash LID, INNER POT, RICE LADLE and MEASURING CUP in warm,
soapy water. Rinse and dry thoroughly. See Care and Cleaning.
DO NOT IMMERSE THE HEATING UNIT OF YOUR RICE COOKER IN
WATER OR OTHER LIQUID.
USING YOUR RICE COOKER
NOTE: Measuring your rice is of extreme importance. Please do not
discard the OsterTM MEASURING CUP included with this unit. This is a “rice
cooker” MEASURING CUP, not a standard U.S. MEASURING CUP. One rice
cup of the OsterTM MEASURING CUP included with this unit is equal to 5.33
ounces of uncooked rice. The rice cooker is capable of cooking up to 3 full
“rice cooker” OsterTM measuring cups of uncooked rice, or 6 (5.33oz) OsterTM
cups of cooked rice. Do not use instant rice with this unit.
1 Measure the amount of rice you would like to cook.
2 Wash the measured rice in a separate bowl until water is clear.
3 Place rice in the INNER POT and add the corresponding amount of
water. For example, if you are making 3 OsterTM cups of uncooked
rice, add water after adding rice to the “3” mark on the INNER BOWL.
NOTE: Brown rice will take longer to cook than white rice.
4 Set the INNER POT into the rice cooker. Make sure that the INNER
POT is in direct contact with the HEATING UNIT by turning it slightly
from left to right until it properly ts onto the HEATING UNIT. NOTE:
Make sure the outside of the INNER POT is completely dry before
placing into the heating unit.
5 Cover with the LID. WARNING: Do not operate this appliance
uncovered—steam is generated during use that could cause burns
or other serious injury.
6 Plug the cord into a 120-volt AC electrical outlet. Switch the rice
cooker ON by pushing the button down. Make sure the COOK
indicator light is illuminated. Steaming will begin shortly.
7 The switch will pop up and the KEEP WARM indicator light will come
on when all the water in the RICE COOKER has evaporated. NOTE: You
may need to add more water and set the rice cooker to COOK more
than once depending on your own personal tastes.
8 After cooking, the KEEP WARM indicator light will illuminate. It is
important to let the rice stand for 10-15 minutes of steaming
without removing the LID. Carefully open the LID, taking care to
avoid escaping steam. Use the RICE LADLE, or other long handled
utensil, to mix the rice well to allow steam to escape.
Do Not Use Metal Utensils.
CAUTION: Steam will escape. Do not touch the INNER POT or
heating unit until they have cooled.
9 Allow the appliance to cool completely and unplug before cleaning.
10 Disconnect the plug from the wall outlet when not in use.
COOKING HINTS
• Rinse rice - Bran gives an unpleasant smell to cooked rice. Be sure to
rinse rice thoroughly. Rinsing with water eectively removes bran
quickly and thoroughly.
NOTE: Some rice suppliers suggest not rinsing rice because vitamins
may be lost.
• After use, wash the INNER POT and LID in warm, soapy water.
• Rinse thoroughly and dry.
• Do not keep the rice cooker in operation:
- When there is only a small amount of rice left in the POT.
- When rice ladle is inside the rice cooker.
- To warm up cold rice.
* DO NOT let water in the INNER POT boil dry.
How To Use Your Steaming Basket (included with select models only)
1 Clean and prepare your food or vegetables.
2 Place the INNER POT in the HEATING UNIT. The length of steaming
time is subject to your own personal tastes: depending if you prefer
al denté (crunchy) or more well done steamed vegetables.
3
Measure appropriate amount of water and add to INNER POT. NOTE:
You are able to steam rice and vegetables/food at the same time with
the STEAMING BASKET resting on the INNER POT.
4 Place the STEAMING BASKET on the rim of the INNER POT.
5 Add vegetables or food and put the LID onto the appliance. Switch
to COOK position for the appropriate time as shown in the chart on
page 8.
6 Disconnect the plug from the wall outlet.
6
CKSTRCMS65_12ESM1.indd 6-7 1/5/12 2:08 PM
www.oster.com
www.oster.com
7

VEGETABLE COOKING TIME
ASPARAGUS 8 10 MIN
BEAN SPROUTS 3 4 MI
BEANS: GREEN, WAX, FRENCH CUT 8 10 MIN
BROCCOLI 11 13 MIN
BRUSSELS SPROUTS 11 13 MIN
CABBAGE, SHREDDED 6 8 MIN
CABBAGE, WEDGES 14 16 MIN
CARROTS 8 10 MIN
CAULIFLOWER 11 13 MIN
CELERY 8 12 MIN
COLLARD GREENS, SPINACH 6 11 MIN
MUSHROOMS FRESH, SLICED 3 4 MIN
PEA PODS 4 6 MIN
SQUASH ACORN, BUTTERNUT 13 16 MIN
ZUCCHINI 10 12 MIN
* Altitude aects the temperature at which water boils and thus the
cooking time. It’s especially true at high altitudes where longer cooking
times are necessary. We have outlined a general guide to follow. Test for
desired consistency when cooking times indicated have been reached.
As you cook with this appliance, adapt times and measurements to your
own personal tastes.
How To Use Your Steaming Basket While Cooking Rice
1 Follow steps 1-4 under the HOW TO USE YOUR RICE COOKER.
2 Place the STEAMING BASKET on the rim of the INNER POT.
3 Add food to the STEAMING BASKET and put the LID on the
appliance. Switch to COOK position for the appropriate time as
shown in the chart. NOTE: Use the STEAMING TIME Guide to
determine when to add food to the STEAMING BASKET. Cooking 6
OsterTM MEASURING CUPS of nished rice takes approximately 30
minutes. Most vegetables can be added about 10 minutes before
rice has nished cooking. Rice cooking times can vary depending
on the type of rice being cooked and preferred rice texture. Adjust
steaming time as desired.
4 Disconnect the plug from the wall outlet.
CARE & CLEANING
This appliance should be cleaned after every use.
1 Unplug the rice cooker when not in use and before cleaning.
Never immerse HEATING UNIT, cord or plug in water or any
other liquids. Allow the RICE COOKER to cool completely
before cleaning.
NOTE: Use the RICE LADLE or wooden utensil to stir and
remove food from the INNER POT. DO NOT use metal utensils.
2 To clean the HEATING UNIT, lightly wipe the exterior with a
damp cloth or sponge. Dry thoroughly with a soft cloth.
3 The INNER POT is coated with a non-stick coating to make
clean up easier. To clean, remove the INNER POT from the rice
cooker and ll with hot water from the tap. Let it sit for a
while and then wash with hot soapy water. Rinse thoroughly
and dry.
4 The INNER POT, LID, RICE LADLE and MEASURING CUP are
dishwasher safe.
5 Make sure that the grains of rice do not stick to the HEATING
PLATE in the bottom of the HEATING UNIT. If this occurs,
remove immediately. If grains of rice are stuck onto the
heating plate, a non-abrasive pad can be used to remove it.
Polish the area for good contact between the HEATING
PLATE and the bottom of the INNER POT.
NOTE: Do not use abrasive cleaners, scouring pads or steel
wool to clean the RICE COOKER.
6 Do not use bleach, vinegar or other harsh chemicals to clean
the RICE COOKER.
Questions or comments? Please visit us at www.oster.com
or call 800-334-0759.
8
CKSTRCMS65_12ESM1.indd 8-9 1/5/12 2:08 PM
www.oster.com
www.oster.com
9

1 Year Limited Warranty
Sunbeam Products, Inc. doing business as Jarden Consumer Solutions or if
in Canada, Sunbeam Corporation (Canada) Limited doing business as Jarden
Consumer Solutions (collectively “JCS”) warrants that for a period of one year
from the date of purchase, this product will be free from defects in material
and workmanship. JCS, at its option, will repair or replace this product or
any component of the product found to be defective during the warranty
period. Replacement will be made with a new or remanufactured product or
component. If the product is no longer available, replacement may be made
with a similar product of equal or greater value. This is your exclusive warranty.
Do NOT attempt to repair or adjust any electrical or mechanical functions on
this product. Doing so will void this warranty.
This warranty is valid for the original retail purchaser from the date of initial
retail purchase and is not transferable. Keep the original sales receipt. Proof
of purchase is required to obtain warranty performance. JCS dealers, service
centers, or retail stores selling JCS products do not have the right to alter,
modify or any way change the terms and conditions of this warranty.
This warranty does not cover normal wear of parts or damage resulting from
any of the following: negligent use or misuse of the product, use on improper
voltage or current, use contrary to the operating instructions, disassembly,
repair or alteration by anyone other than JCS or an authorized JCS service
center. Further, the warranty does not cover: Acts of God, such as re, ood,
hurricanes and tornadoes.
What are the limits on JCS Liability?
JCS shall not be liable for any incidental or consequential damages caused by
the breach of any express, implied or statutory warranty or condition.
Except to the extent prohibited by applicable law, any implied warranty or
condition of merchantability or tness for a particular purpose is limited in
duration to the duration of the above warranty.
JCS disclaims all other warranties, conditions or representations, express,
implied, statutory or otherwise.
JCS shall not be liable for any damages of any kind resulting from the purchase,
use or misuse of, or inability to use the product including incidental, special,
consequential or similar damages or loss of prots, or for any breach of contract,
fundamental or otherwise, or for any claim brought against purchaser by any
other party.
Some provinces, states or jurisdictions do not allow the exclusion or limitation
of incidental or consequential damages or limitations on how long an implied
warranty lasts, so the above limitations or exclusion may not apply to you.
This warranty gives you specic legal rights, and you may also have other
rights that vary from province to province, state to state or jurisdiction to
jurisdiction.
How to Obtain Warranty Service
In the U.S.A.
If you have any question regarding this warranty or would like to obtain
warranty service, please call 1-800-334-0759 and a convenient service center
address will be provided to you.
In Canada
If you have any question regarding this warranty or would like to obtain
warranty service, please call 1-800-667-8623 and a convenient service center
address will be provided to you.
In the U.S.A., this warranty is oered by Sunbeam Products, Inc. doing business as
Jarden Consumer Solutions located in Boca Raton, Florida 33431. In Canada, this
warranty is oered by Sunbeam Corporation (Canada) Limited doing business as
Jarden Consumer Solutions, located at 20 B Hereford Street, Brampton, Ontario
L6Y 0M1. If you have any other problem or claim in connection with this product,
please write our Customer Service Department.
PLEASE DO NOT RETURN THIS PRODUCT TO ANY OF THESE ADDRESSES
OR TO THE PLACE OF PURCHASE.
10
CKSTRCMS65_12ESM1.indd 10-11 1/5/12 2:08 PM
www.oster.com
www.oster.com
11

PRECAUCIONES IMPORTANTES
Cuando use aparatos eléctricos, siempre debe seguir precauciones básicas de
seguridad, incluyendo las siguientes:
1. Lea Todas Las Instrucciones Antes De Usar.
2. No toque las supercies calientes. Use agarradores de ollas cuando remueva la
tapa o cuando manipule recipientes calientes. Use las asideras o perillas.
3. Para protegerse del riesgo de un choque eléctrico, no sumerja el cordón, el
enchufe o la unidad de calentamiento en agua u otro líquido.
4. Supervisón estricta es necesaria cuando este aparato sea usado por o cerca de
niños.
5. Desenchufe del tomacorriente cuando no esté en uso y antes de limpiar el
aparato. Deje enfriar antes de poner o remover partes, y antes de limpiar.
6. No opere ningún aparato eléctrico con el cordón o enchufe dañado, o después
de que el aparato haya tenido una falla o haya sido dañado de alguna manera.
Devuelva el aparato al Servicio al Cliente de Jarden (vea Garantía) para
evaluación, reparación o ajuste mecánico.
7. El uso de accesorios no recomendados puede causar lesiones.
8. No use al aire libre.
9. No deje que el cordón cuelgue del borde de la mesa o tablero de cocina, o que
toque supercies calientes.
10. No coloque sobre o cerca de una hornilla de gas o eléctrica, o dentro de un horno
caliente.
11. Use precaución extrema cuando mueva cualquier aparato que contenga líquidos
calientes.
12. Para desconectar, remueva el enchufe del tomacorriente de pared.
13. No use este aparato para otro uso que no sea el recomendado.
14. Para reducir el riesgo de shock eléctrico, cocine solamente en la olla removible.
15. No vierta líquidos en la unidad de calentamiento.
Este aparato es para uso DOMÉSTICO SOLAMENTE. No contiene partes que puedan
ser reparadas por el usuario. La unidad de energía nunca necesita lubricación. No
intente reparar este producto. Se provee un cable eléctrico corto para reducir el
riesgo que puede ser causado por el enredo o tropiezo con un cable largo.
USO DE UNA EXTENSIÓN DEL CORDÓN
Puede usar una extensión de cable si se usa con la debida precaución. Si usa una
extensión de cable la clasicación eléctrica marcada en la extensión de cable
debe ser por lo menos la misma que la clasicación eléctrica de la Olla Arrocera.
El cable debe estar arreglado de forma tal que no cuelgue del borde de la mesa
o tablero de cocina donde pueda ser jalado por niños o pueda causar tropiezos
accidentalmente. No sumerja la base en agua u otros líquidos. No se aceptará
responsabilidad legal por cualquier lesión que sea el resultado de no acatarse a
estas instrucciones o cualquier otro uso inadecuado o mal manejo del aparato.
ENCHUFE POLARIZADO
Este aparato tiene un enchufe polarizado (una hoja es mas ancha que la otra).
Para reducir el riesgo de choque eléctrico, este enchufe debe entrar en un
tomacorriente polarizado de una sola manera. Si el enchufe no entra por completo
en el tomacorriente, déle la vuelta. Si aun así no entra, contacte a un electricista
calicado. No intente modicar el enchufe de ninguna manera. Si el enchufe entra
holgadamente en el tomacorriente AC o si el tomacorriente AC se siente caliente no
use ese tomacorriente.
GUARDE ESTAS INSTRUCCIONES
ESTA UNIDAD ES PARA USO
DOMESTICO SOLAMENTE.
12
CKSTRCMS65_12ESM1.indd 12-13 1/5/12 2:08 PM
www.oster.com
www.oster.com
13

PRECAUCIONES IMPORTANTES
ADICIONALES
• PRECAUCIÓN: Este aparato genera calor y emite vapor durante su uso. Debe tomar las
precauciones adecuadas para prevenir riesgos de quemaduras, fuego u otro daño a su
persona o propiedad.
• Todos los usuarios de este aparato deben leer y comprender este Manual del Usuario
antes de operar o limpiar este aparato.
• El cordón de este aparato debe se enchufado en un tomacorriente eléctrico de 120 Voltios
AC solamente.
• Cuando use este aparato, mantenga suciente espacio de aire por encima y por todos los
lados para que al aire circule. No permita que este aparato toque cortinas, coberturas de
pared, ropa, toallas de platos o cualquier otro material inamable durante su uso.
• No deje el aparato desatendido durante su uso.
• Este aparato genera vapor. No lo opere sin la cubierta.
• Si este aparato empieza a tener una falla durante su uso, desenchufe el cordón
inmediatamente. No use o intente reparar el aparato fallado. No use la Olla Interna o la
Tapa si están rajadas o quebradas.
• Este aparato es para uso doméstico solamente.
• Desenchufe la Olla Arrocera cuando no esté en uso.
• Use la Olla Arrocera en una supercie plana y dura. No coloque cerca de algo caliente, una
llama de fuego o sobre una supercie suave (como alfombra). Evite colocar donde pueda
voltearse durante su uso. Dejar caer la Olla Arrocera puede causar que no funcione.
• Evite un choque eléctrico desenchufando antes de lavar o añadir agua.
• Para evitar quemaduras, manténgase alejado del escape de vapor durante la cocción.
Espere que la Olla Arrocera se enfríe completamente antes de tocar o limpiar la Tapa, Olla
Interna o Unidad de Calentamiento.
• Nunca use la Olla Interna sobre una cocina de gas o eléctrica o sobre una llama de fuego.
• No deje la Cuchara Arrocera o la Taza Medidora en la Olla Interna cuando la unidad esta
prendida o en uso.
• Por favor use la Taza Medidora que se provee con la Olla Arrocera. NO SE DEBE USAR una
taza medidora estándar.
APRENDER ACERCA DE SU
OLLA ARROCERA
a
b
c
d
e
a
Tapa de vidrio
Olla interna
b
c
Unidad de Calentamiento
Luz de mantener caliente
d
Luz de cocción
e
Interruptor de cocción
f
f
g
g
Bandeja para cocinar al Vapor
(algunos modelos solamente)
Mangos
h
Taza Medidora Oster
i
(5.33 onzas)
j
Cuchara arrocera
i
j
h
14
CKSTRCMS65_12ESM1.indd 14-15 1/5/12 2:08 PM
www.oster.com
www.oster.com
15

COMO:
ANTES DEL PRIMER USO
1 Remueva todos los materiales de empaque antes de usar.
2 Lave LA TAPA, OLLA INTERNA, CUCHARA ARROCERA y la TAZA
MEDIDORA en agua tibia jabonosa; enjuague y seque
completamente. Vea la sección Cuidado y Limpieza.
NO SUMERJA LA UNIDAD DE CALENTAMIENTO DE SU OLLA
ARROCERA EN AGUA U OTRO LÍQUIDO.
CÓMO USAR SU OLLA ARROCERA
NOTA: La medida de su arroz es extremamente importante. Por favor no
deseche la TAZA MEDIDORA incluida con esta unidad. Esta es una TAZA
MEDIDORA para “olla arrocera”, no es una TAZA MEDIDORA estándar de
los Estados Unidos. 1 Taza de arroz equivale a 5.33 onzas. La olla arrocera
es capaz de cocinar hasta 3 tazas medidoras para “olla arrocera” llenas de
arroz crudo, o 6 tazas* de arroz cocido. No use arroz instantáneo con esta
unidad.
1 Mida la cantidad de arroz que quiera cocer.
2 Lave la cantidad de arroz medida en un tazón aparte hasta que el
agua se vea clara.
3 Coloque el arroz en la OLLA INTERNA y añada la cantidad
correspondiente de agua. Por ejemplo si está haciendo 3 tazas de
arroz crudo, añada agua hasta la marca “3” en la OLLA INTERNA.
NOTA: El arroz integral tomará mas tiempo en cocinar que el arroz
blanco.
4 Coloque la OLLA INTERNA dentro de la olla arrocera. Asegúrese de
que la OLLA INTERNA este en contacto directo con la unidad de
calentamiento girándola ligeramente de izquierda a derecha hasta
que encaje adecuadamente sobre la unidad de calentamiento.
NOTA: Asegúrese de que la parte exterior de la olla interna este
completamente seca antes de colocar sobre la unidad de
calentamiento.
5 Cubra con la tapa. CUIDADO: No opere este aparato descubierto
– el vapor se genera durante el uso y podría causar quemaduras u
otras lesiones severas.
*Basado en una taza de 5.33 onzas.
6 Enchufe el cordón en un tomacorriente eléctrico de 120 voltios AC.
Prenda el interruptor de la olla arrocera a Encendido (ON)
empujando el botón hacia abajo. Asegúrese de que la luz indicadora
de COCCIÓN esté iluminada. La cocción iniciará en pocos
momentos.
7 Cuando el agua en la Olla Arrocera se haya evaporado, el interruptor
volverá a su lugar y la luz indicadora de Mantenimiento de Calor se
encenderá. NOTA: puede ser necesario añadir mas agua y jar la olla
arrocera a Cocción (COOK) más de una vez dependiendo de su gusto
personal
8 Después de cocinar, la luz indicadora de Mantenimiento de Calor se
iluminará. Es importante dejar el arroz reposar por 10-15 minutos
con el vapor sin remover la TAPA. Abra la TAPA cuidadosamente,
teniendo cuidado de no dejar escapar el vapor. Use la Cuchara
Arrocera, u otro utensilio de mango largo para mezclar bien el arroz
y permitir que el vapor escape. PRECAUCIÓN: El vapor se escapará.
No toque la Olla Interna o la unidad de calentamiento hasta que se
hayan enfriado.
9 Deje que el aparato se enfríe completamente antes de limpiar.
10 Desconecte el enchufe del tomacorriente de pared cuando no esté
en uso.
CONSEJOS DE COCINA
• Enjuague el arroz – la bra despide un olor desagradable en el arroz
cocido. Asegúrese de enjuagar el arroz completamente. El lavar con
agua remueve efectivamente la bra rápida y completamente.
NOTA: Algunos fabricantes de arroz sugieren no enjuagar el arroz
debido a que las vitaminas pueden perderse.
• Después de usar, lave la OLLA INTERNA y la TAPA en agua tibia
jabonosa.
• Enjuague completamente y seque.
• no mantenga la olla arrocera en operación:
- Cuando sólo quede una cantidad pequeña de arroz en la OLLA.
- Cuando la cuchara arrocera este dentro de la olla arrocera.
- Para calentar arroz frío
* NO deje hervir el agua en la OLLA INTERNA hasta secarse.
16
CKSTRCMS65_12ESM1.indd 16-17 1/5/12 2:08 PM
www.oster.com
www.oster.com
17

Como usar su Bandeja para cocinar al Vapor
(algunos modelos solamente)
1 Limpie y prepare sus alimentos o vegetales.
2 Coloque la OLLA INTERNA en la UNIDAD DE CALENTAMIENTO. El
tiempo de cocción a vapor está sujeto a su gusto personal:
dependiendo de si preere sus vegetales a vapor al dente (crujiente)
o más cocido.
3
Mida la cantidad correcta de agua y añádala a la OLLA INTERNA.
NOTA: YPuede cocinar al vapor arroz y vegetales/alimentos al mismo
tiempo con la BANDEJA PARA COCINAR AL VAPOR colocada sobre la
OLLA INTERNA.
4 Coloque la BANDEJA PARA COCINAR AL VAPOR en el borde de la
OLLA INTERNA.
5 Añada los vegetales o alimentos y coloque la TAPA sobre el artefacto.
Encienda el interruptor a la posición de COCCIÓN por el tiempo
recomendado como se muestra en la cartilla en la página 18.
6 Desconecte el enchufe del tomacorriente de pared.
VEGETAL TIEMPO DE COCCIÓN
ESPÁRRAGOS 8 a 10 MINUTOS
BROTES DE SOYA 3 a 4 MINUTOS
FRIJOLES: VERDES, DE CERA WAX O
CORTADOS A LA FRANCESA
BRÓCOLI 11 a13 MINUTOS
COLES DE BRUSELAS 11 a13 MINUTOS
COL, CORTADA EN TIRAS 6 a 8 MINUTOS
COL , CORTADA EN CUÑAS 14 a 16 MINUTOS
ZANAHORIA 8 a 10 MINUTOS
COLIFLOR 11 a13 MINUTOS
APIO 8 a 12 MINUTOS
HOJAS VERDES, ESPINACA 6 a 11 MINUTOS
CHAMPIÑONES FRESCOS EN TAJADAS 3 a 4 MINUTOS
ALVERJITAS 4 a 6 MINUTOS
CALABAZA ACORN O BUTTERNUT 13 a 16 MINUTOS
CALABACÍN ZUCCHINI 10 a 12 MINUTOS
*La altura afecta la temperatura a la cual hierve el agua y por lo tanto el
tiempo de cocción. Esto es especialmente válido en altas elevaciones
donde se requieren largos tiempos de cocción. Le hemos indicado
8 a 10 MINUTOS
una guía general a seguir. Verique que la consistencia es la deseada
cuando los tiempos de cocción indicados se hayan alcanzado. A medida
que cocina con este aparato, adapte los tiempos y medidas a su gusto
personal.
Cómo usar Su Bandeja para cocinar al Vapor mientras cocina arroz
1 Siga los pasos 1 a 4 en CÓMO USAR SU OLLA ARROCERA.
2 Coloque la BANDEJA PARA COCINAR AL VAPOR en el borde de la
OLLA INTERNA
3 Añada la comida en la BANDEJA PARA COCINAR AL VAPOR y
coloque la TAPA sobre el artefacto. Encienda el interruptor a
la posición de COCCIÓN por el tiempo recomendado como se
muestra en la cartilla. NOTA: Use la Guía de Tiempos de Cocción
a Vapor para determinar cuando añadir la comida a la BANDEJA
PARA COCINAR AL VAPOR. Si cocina 6 tazas de arroz le tomará
aproximadamente 30 minutos. La mayoría de vegetales pueden
añadirse como unos 10 minutos antes de que el arroz se termine
de cocinar. Los tiempos de cocción del arroz pueden variar
dependiendo del tipo de arroz que va a cocinar y del tipo de
textura preferido. Ajuste el tiempo de cocción a vapor a su gusto.
4 Desconecte el enchufe del tomacorriente de pared.
¿Preguntas o comentarios? Por favor visítenos en
www.oster.com o llame al 800-334-0759.
18
CKSTRCMS65_12ESM1.indd 18-19 1/5/12 2:08 PM
www.oster.com
www.oster.com
19

CUIDADO Y LIMPIEZA
Este aparato se debe limpiar después de cada uso.
1 Desenchufe la olla arrocera cuando no esté en uso y antes de
limpiar. Nunca sumerja la UNIDAD DE CALENTAMIENTO, el
cordón o el enchufe en agua o cualquier otro líquido. Deje
que la OLLA ARROCERA se enfríe completamente antes de
limpiar.
NOTA: Use la CUCHARA ARROCERA o un utensilio de madera
para mover y remover comida de la OLLA INTERNA. NO use
ningún utensilio de metal.
2 Para limpiar la UNIDAD DE CALENTAMIENTO, limpie
delicadamente la parte exterior con una tela o esponja
húmeda. Seque completamente con una tela suave.
3 La OLLA INTERNA esta barnizada con una capa antiadherente
para hacer la limpieza más fácil. Para limpiar, remueva la
OLLA INTERNA de la olla arrocera y llénela con agua caliente
de la llave. Déjela remojar por un rato, y luego lave con agua
tibia jabonosa. Enjuague por completo y seque.
4 La OLLA INTERNA, LA TAPA, LA CUCHARA ARROCERA y la
TAZA MEDIDORA pueden lavarse en el lavaplatos.
5 Asegúrese que los granos de arroz no se adhieran a la
PLACA DE CALENTAMIENTO en el fondo de la UNIDAD DE
CALENTAMIENTO. Si esto ocurre, remuévalos
inmediatamente. Si los granos de arroz se quedaron pegados
en la PLACA DE CALENTAMIENTO, use una esponja no
abrasiva para removerlos. Pula el área para que exista un
buen contacto entre la PLACA DE CALENTAMIENTO, y el
fondo de la OLLA INTERNA.
NOTA: No use limpiadores abrasivos, esponjas abrasivas
o esponjas de metal para limpiar la OLLA ARROCERA.
6 No use lejía, vinagre u otro químico fuerte para limpiar la
OLLA RROCERA.
NOTES / NOTAS
20
CKSTRCMS65_12ESM1.indd 20-21 1/5/12 2:08 PM
www.oster.com
www.oster.com
21

Garantía Limitada de 1 Año
Sunbeam Products, Inc. operando bajo el nombre de Jarden Consumer
Solutions, o en Canadá, Sunbeam Corporation (Canada) Limited operando
bajo el nombre de Jarden Consumer Solutions, (en forma conjunta, “JCS”),
garantiza que por un período de un año a partir de la fecha de compra, este
producto estará libre de defectos de materiales y mano de obra. JCS, a su
elección, reparará o reemplazará este producto o cualquier componente del
mismo que presente defectos durante el período de garantía. El reemplazo
se realizará por un producto o componente nuevo o reparado. Si el producto
ya no estuviera disponible, se lo reemplazará por un producto similar de valor
igual o superior. Ésta es su garantía exclusiva. No intente reparar o ajustar
ninguna función eléctrica o mecánica de este producto. Al hacerlo elimínará
ésta garantía.
La garantía es válida para el comprador minorista original a partir de la fecha
de compra inicial y la misma no es transferible. Conserve el recibo de compra
original. Para solicitar servicio en garantía se requiere presentar un recibo de
compra. Los agentes y centros de servicio de JCS o las tiendas minoristas que
venden productos de JCS no tienen derecho a alterar, modicar ni cambiar de
ningún otro modo los términos y las condiciones de esta garantía.
Esta garantía no cubre el desgaste normal de las piezas ni los daños que se
produzcan como resultado de uso negligente o mal uso del producto, uso de
voltaje incorrecto o corriente inapropiada, uso contrario a las instrucciones
operativas, y desarme, reparación o alteración por parte de un tercero ajeno a
JCS o a un Centro de Servicio autorizado por JCS. Asimismo, la garantía no cubre
actos fortuitos tales como incendios, inundaciones, huracanes y tornados.
¿Cuál es el límite de responsabilidad de JCS?
JCS no será responsable de daños incidentales o emergentes causados por el
incumplimiento de alguna garantía o condición expresa, implícita o legal.
Excepto en la medida en que lo prohíba la ley aplicable, cualquier garantía o
condición implícita de comerciabilidad o aptitud para un n determinado se
limita, en cuanto a su duración, al plazo de la garantía antes mencionada.
JCS queda exenta de toda otra garantías, condiciones o manifestaciones,
expresa, implícita, legal o de cualquier otra naturaleza.
JCS no será responsable de ningún tipo de daño que resulte de la compra,
uso o mal uso del producto, o por la imposibilidad de usar el producto,
incluidos los daños incidentales, especiales, emergentes o similares, o la
pérdida de ganancias, ni de ningún incumplimiento contractual, sea de una
obligación esencial o de otra naturaleza, ni de ningún reclamo iniciado contra
el comprador por un tercero.
Algunas provincias, estados o jurisdicciones no permiten la exclusión o
limitación de los daños incidentales o emergentes ni las limitaciones a la
duración de las garantías implícitas, de modo que es posible que la exclusión o
las limitaciones antes mencionadas no se apliquen en su caso.
Esta garantía le otorga derechos legales especícos y es posible que usted
tenga otros derechos que varían de un estado, provincia o jurisdicción a otro.
Cómo solicitar el servicio en garantía
En los Estados Unidos
Si tiene alguna pregunta sobre esta garantía o desea recibir servicio de
garantía, llame al 1-800-334-0759 y podrá obtener la dirección del centro de
servicio que le resulte más conveniente.
En Canadá
Si tiene alguna pregunta sobre esta garantía o desea recibir servicio de
garantía, llame al 1-800-667-8623 y podrá obtener la dirección del centro de
servicio que le resulte más conveniente.
En los Estados Unidos, esta garantía es ofrecida por Sunbeam Products,
Inc. operando bajo el nombre de Jarden Consumer Solutions, Boca Ratón,
Florida 33431. En Canadá, esta garantía es ofrecida por Sunbeam Corporation
(Canada) Limited operando bajo el nombre de Jarden Consumer Solutions, 20
B Hereford Street, Brampton, Ontario L6Y 0M1. Si usted tiene otro problema o
reclamo en conexión con este producto, por favor escriba al Departamento de
Servicio al Consumidor.
POR FAVOR NO DEVUELVA ESTE PRODUCTO A NINGUNA DE ESTAS
DIRECCIONES NI AL LUGAR DE COMPRA.
22
CKSTRCMS65_12ESM1.indd 22-23 1/5/12 2:08 PM
www.oster.com
www.oster.com
23
 Loading...