


|
Edge™ Handheld Vac |
User’s |
® |
|
® |
Guide |
|
Important!
Read this manual carefully, and keep for future reference.

Enjoy
Call
Click
Visit
Thank You for purchasing an Oreck Edge™ Handheld Vac! This state-of-the art vacuum cleaner will help give you a healthier clean home.
At Oreck we understand that our customers are unique and expect superior service. To meet your needs, we offer different customer service options to work with your lifestyle and preferences.
Welcome to our Call. Click. Visit. customer service program.
To speak with an Oreck representative call:
USA: 1•800•989•3535
Canada: 1•888•676•7325
On the web, point and click at: www.oreck.com
or visit www.oreck.com and click locate a store on the top right.
Visit any of our nearly 450 Oreck Clean Home Centers. To find the nearest store, please call
888•oreck (1•888•673•2578).
Contents |
|
General Warnings |
. . . . . . . . . . . |
. . . . . |
.4 |
|||||
|
||||||||||
|
|
Environment . . . |
. . . . . . . |
. . . . . . . . . . . . . . |
. . . . . . . . . . |
. |
4 |
|||
|
|
Operation . |
. . . . . . . . . . . . . |
. . . . . |
|
4 |
||||
|
|
Parts. . |
. . . . . . . . . . . . . . . . . . . . . .6 |
|||||||
|
|
Product Components . . |
. . . . . . . |
. . . . . |
. |
6 |
||||
|
|
Assembly . . |
. . . . . . . . . . . . . . |
. . . . . |
|
7 |
||||
|
|
Use . . |
. . . . . . . . . . . . . . . . . . . . . . 7 |
|||||||
|
|
Using the Accessories. . . |
. . . . . . . . . . . . . . |
. . . . . . . . . . |
. |
7 |
||||
|
|
Accessory Tools |
. . . . . . . . . . . . . |
. . . . . |
. |
7 |
||||
|
|
Maintenance. |
. |
. . . . . . . . . . . . . |
. . . . . |
|
8 |
|||
|
|
Removing and Replacing the Disposable |
|
|
|
|||||
|
|
Filter Dust Bag. |
. . . . . . . . . . . |
. . . . . |
|
8 |
||||
|
|
Removing and Replacing HEPA Filter. . |
. . . . . . 9 |
|||||||
|
|
Cord Management for Storing Unit . . . . . . |
. . . . . . . . . . |
. |
10 |
|||||
|
|
Troubleshooting . |
. . |
. . . |
. . . . . . . . . . . . .10 |
|||||
|
|
Accessories . |
. |
. . . . . . . . . . . . . . . . . . 10 |
||||||
|
|
Warranty. . |
. . . . . . . . . . . . . . |
. . . . . |
.11 |
|||||
|
|
|
|
|
|
|
|
|
|
|

Safety General Warnings
! IMPORTANT SAFETY
INSTRUCTIONS
When using an electrical appliance, basic precautions should always be followed, including the following:
Read all instructions before using this vacuum cleaner
WARNING! To reduce the risk of fire, electric shock, or injury:
•The vacuum is intended for household use only.
•Use the vacuum only as described in this manual.
•Use only manufacturer’s recommended attachments.
Environment
Use of the vacuum outdoors or on wet surfaces may result in damage to the appliance and void the warranty. Do not use outdoors or on wet surfaces.
Use of the vacuum on stairs may cause imbalance, slippage or tumbling. Always check your balance and ensure your footing when cleaning on stairs.
Use of the vacuum in an enclosed space containing flammable, explosive materials or toxic vapors may result in an unexpected spark or fire. Do not use the vacuum in such an enclosed space. Always check exposed wiring and wire connections before use.
Operation
This appliance has powerful suction capability. Do not allow it to be used as a toy and always maintain close attention when used by or near children.
Loose clothing, jewelry and long hair may become entangled in the suction of the vacuum and cause personal injury. Always keep loose clothing, jewelry, fingers and all parts of body away from openings.
Use of the vacuum with an opening blocked may reduce airflow. Keep all openings free of dust, lint, hair etc. Ensure the filter bag assembly is in place before use.
Improper handling of the power cord may result in wiring, connection damage and potential sparking or shock. Always follow these instructions when handling the power cord:

•Do not pull or carry the vacuum by the cord
•Do not use the cord as a handle
•Do not unplug the vacuum by pulling on the cord
•Do not close a door on the cord
•Do not pull the cord around sharp edges or corners
•Keep the cord away from heated surfaces
•Do not run the vacuum or other appliance over the cord
•Always grasp the plug, not the cord, when unplugging the vacuum
A damaged cord or plug may cause a spark, shock and fire. Always check the cord and plug before use. If appliance is not working as it should, has been dropped, damaged, left outdoors, or dropped into water, return it to a service center or call customer service at: U.S.: 1-800-989-3535 Canada: 1-888-676-7325.
Using the vacuum with wet hands and on wet surfaces may result in unexpected shock, slippage and personal injury. Do not handle the plug or appliance with wet hands or on wet surfaces.
Vacuuming burning or smoking objects, flammable or combustible liquids and toxic material may result in a fire and personal injury. Do not vacuum burning or smoking objects, flammable or combustible liquids.
Unplugging the vacuum while the controls are ON may cause sparking and fire. Turn OFF all controls before unplugging. Do not leave appliance unattended when plugged in. Unplug from outlet when not in use and before servicing.
Polarized Plug Notice
This product is equipped with a polarized alternating current line plug (a plug having one blade wider than the other). This plug will fit into the power outlet only one way. This is a safety feature. If you are unable to insert the plug fully into the outlet, try reversing the plug. If the plug should still fail to fit, contact an electrician to replace the obsolete outlet. Do not defeat the purpose of the polarized plug.
SAVE THESE
INSTRUCTIONS
Residential Use Only
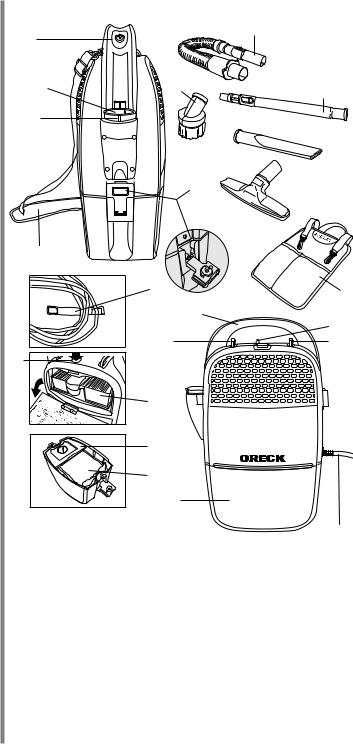
Parts Product Components |
|
1 |
6 |
|
|
2 |
11 |
3 |
|
|
|
19 |
|
10 |
|
|
|
|
|
21 |
|
|
4 |
12 |
|
8 |
13 |
|
|
|
9 |
|
7 |
20 |
20 |
18 |
|
14 |
|
|
17 |
|
16 |
|
5 |
Side and Front View |
15 |
|
1. |
Suction hose for vacuum |
12. |
Shoulder strap |
|
|
attachments |
13. |
Tool caddy |
|
2. |
Hose intake |
|||
14. |
HEPA filter |
|||
3. |
Extension wand |
|||
15. |
Power Cord |
|||
4. |
Dust container release clamps |
|||
16. |
Disposable inner dust bag |
|||
5. |
Dust container and bag |
|||
17. |
Bag dock (black) |
|||
|
location |
|||
|
18. |
HEPA door release |
||
6. |
On/off switch |
|||
19. |
Lock collar |
|||
7. |
Variable speed switch |
|||
20. |
Shoulder strap & tool |
|||
8. |
Cord strap |
|||
|
caddy attachment loops |
|||
9. |
Carry handle |
|
||
21. |
Bare floor & wall tool |
|||
10. |
Crevice tool |
|||
|
|
|||
11. |
Dusting brush |
|
|

Assembly
Use
The only assembly necessary before using the vacuum is to firmly insert the end of the non-powered suction hose into the canister intake until it locks into place.
To disconnect hose, rotate locking collar on side of canister. Then pull hose to remove. Rotate lock collar to lock hose in place–align tabs on collar and hose.
Using the Accessories
1.In the table below, you will find examples of the uses of the accessory tools.
2.A shoulder strap is included for carrying portability and ease of use. To install: attach clips on shoulder strap to attachment loops on the unit.
3.An accessory tool caddy is included for easy access during cleaning. To install: attach clips on shoulder strap to attachment loops on the unit.
Accessory Tools
Uses |
Crevice Tool |
Grooming Brush |
Extension Wand |
Dusting Brush |
|
|
|
|
|
Upholstery |
|
T |
T |
|
|
|
|
|
|
Baseboards |
T |
|
T |
T |
|
|
|
|
|
Floors |
|
T |
|
|
|
|
|
|
|
Drapes |
|
|
T |
T |
|
|
|
|
|
Cobwebs |
|
|
T |
|
|
|
|
|
|
Stairs |
|
T |
T |
|
|
|
|
|
|
Ceiling Fans |
|
|
T |
T |
Bookshelves |
|
|
T |
T |
Recessed Lighting |
|
|
T |
T |
|
|
|
|
|
Mantels |
|
|
T |
T |
|
|
|
|
|
Blinds |
|
|
T |
T |
Crevices/Corners |
T |
|
T |
|

Maintenance
! WARNING!
Performing maintenance on the vacuum while it is plugged into a wall outlet may result in unexpected vacuum operation, shock and personal injury. Always turn the vacuum OFF and unplug before performing inspection and maintenance.
Removing and Replacing the Disposable Filter
Dust Bag
To remove disposable filter dust bag:
1.Unlatch clamps and remove top half of unit.
2.Rotate bag dock (black frame) up.
3.Gently pull the filter dust bag by sliding the cardboard bag stiffener out of the bag dock.
4.The Saniseal® dust seal will close automatically. Dispose of bag.
1. |
2. |
3. |
4. |

To replace disposable filter dust bag:
1.Guide cardboard collar into the two channels in bag dock.
2.Slide cardboard collar fully into bag dock and rotate bag dock (black frame) down.
3.Align round tube in upper body with hole in inner bag and re-latch side clamps to close.
1. |
2. |
3. |
Tube |
Removing and Replacing HEPA Filter
1.Press HEPA door release button and gently pull access panel down.
2.Rotate HEPA filter clamp up.
3.Slide HEPA filter out.
4.Reverse order to replace filter.
1. |
3. |
2. |
4. |
Troubleshooting
Accessories
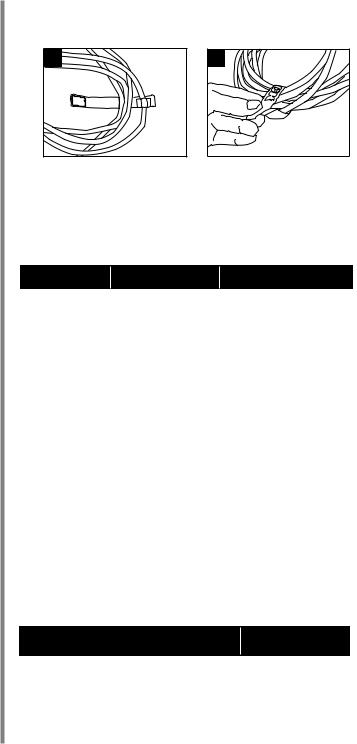
Cord Management for Storing Unit
1.Bundle cord and slide strap around cord and secure.
1. |
2. |
If the following troubleshooting tips do not resolve the problem please contact Oreck Customer Service.
U.S.: 1-800-989-3535 Canada: 1-888-676-7325
Important! Always unplug and allow the vacuum to cool down before conducting any troubleshooting. See safety warnings.
Problems |
Possible Source |
Areas to Check |
|
|
|
|
|
Cleaner will |
Not plugged in |
Be sure cleaner is |
|
not run |
properly. |
firmly plugged into |
|
|
|
wall outlet. |
|
|
No electricity in |
Check electrical |
|
|
wall outlet. |
source - fuse or circuit |
|
|
|
breaker. |
|
|
Needs service. |
Take to service center |
|
|
|
or call for nearest |
|
|
|
service center. |
|
|
|
|
|
Vacuum will |
Hose/wand tool is |
Remove obstructions. |
|
not pick up |
clogged. |
|
|
or has low |
Bag is full. |
Replace Bag. |
|
suction |
|||
|
|
||
|
|
|
|
Tools/Wands |
Proper friction |
Push and turn. |
|
will not stay |
fit not being |
|
|
together |
obtained. |
|
|
|
|
|
Part |
Number |
|
|
|
|
Replacement Disposable Filter Bags, |
PKCC12DW |
|
12 pack |
||
|
||
|
|
|
Replacement HEPA Filter |
49003-01 |
|
|
|
10
Warranty ORECK MANUFACTURING COMPANY:
(Oreck Manufacturing Company gives you the following limited warranty for this product only if it was originally purchased for residential use, not resale, from Oreck, an Oreck franchise or an Oreck Authorized Retail Dealer, it has not been used for commercial use, and it has been used and maintained in accordance with the product’s owner’s manual.)
Oreck will repair or replace, free of charge, to the original purchaser, any part that is found to be defective in material or workmanship within three (3) years of the date of purchase. This limited warranty applies to normal domestic use. Any commercial use of this product will void this limited warranty.
This limited warranty does not cover the replacement of expendable or consumable parts such as carbon motor brushes, edge brushes, drive belts, brushes, disposable bags, wheels, lights, light bulbs and other parts subject to normal wear unless they are defective in material or workmanship.
This limited warranty does not apply to any part subjected to accident, abuse, commercial use, alteration, misuse, damage caused by act of God, the use of voltages other than indicated on the serial number displayed on this product
or service of this product by other than Oreck or an Oreck Authorized Service Center. Oreck does not authorize any person or representative to assume or grant any other warranty obligation with the sale of this product.
Oreck’s limited warranty is valid only if you retain proof of purchase from Oreck, an Oreck Franchise or an Oreck Authorized Retail Dealer for this product. If you purchase
this product from any other source, your purchase is “AS IS,” which means Oreck grants you no warranty, and that you, not Oreck, assume the entire risk of the quality and performance of this product, including the entire cost of any necessary servicing or repairs of any defects.
Oreck’s liability for damages to you for any costs whatsoever arising out of this statement of limited warranty shall be limited to the amount paid for this product at the time of original purchase, and Oreck shall not be liable for any direct, indirect, consequential or incidental damages arising out of the use or inability to use this product.
Some states do not allow the exclusion or limitation of incidental or consequential damages, so the above limitation or exclusion may not apply to you.
11
 Loading...