


User’s Air Purifier
Guide
Important!
Read this manual carefully, and keep for future reference.
Oreck ProShield® Plus Air Purifier

Enjoy |
|
Congratulations on your purchase of the Oreck ProShield |
|
||
|
series air purifier. This user’s guide describes the features of |
|
|
|
the Oreck ProShield® Plus Air Purifier. |
|
|
Welcome to our Call. Click. customer service program. To |
Call |
|
speak with an Oreck representative call: |
|
Canada: 1•888•676•7325 |
|
|
|
USA: 1•800•989•3535 |
Click |
|
On the web, point and click at: www.oreck.com |
|
or visit www.oreck.com and click locate a store on |
|
|
|
the top right. |
|
|
Canada: www.oreckcanada.com |
|
|
|
Contents |
General Warnings . . . . . . . . . . . |
|
. 1 |
|
. . . . . . . . . . . . . . . . . . . . . . . . . . . . . . . . .Safety |
. |
. 1 |
|
Placement Warnings . . . . . . . . . . . . . . . . . . . . |
. |
. 2 |
|
Features . . . . . . . . . . . . . . . . . . . . . . . . . . . . . . . |
. |
. 3 |
|
Operation . . . . . . . . . . . . . . . . 5 |
||
|
Cleaning . . . . . . . . . . . . . . . . . . . . . . . . . . . . . . . |
. |
. 6 |
|
Cleaning Intervals . . . . . . . . . . . . 6 |
||
|
Cleaning the Pre-Filter . . . . . . . . . |
. |
7 |
|
Cleaning the Truman Cell® . . . . . . . . . . . . . . . |
. |
. 7 |
|
Drying the Truman Cell® . . . . . . . . |
. |
9 |
|
Cleaning the Catalytic Oxygenator . . . . . |
|
10 |
|
Cleaning the Exhaust Grille . . . . . . . |
. |
10 |
|
Troubleshooting . . . . . . . . . . . . . |
|
11 |
|
Warranty . . . . . . . . . . . . . . . . . . . . . . . . . . . . . . . |
. |
12 |
|
Spanish . . . . . . . . . . . . . . . . |
|
13 |
|
French . . . . . . . . . . . . . . . . |
. |
30 |
|
|
|
|
Safety General Warnings
! IMPORTANT SAFETY INSTRUCTIONS
•Only use the air purifier as described in this user’s guide. Failure to do so may result in serious injury or death.
•Do not use the air purifier with a damaged cord or plug. Doing so may result in electric shock, serious injury or death. Have a qualified service technician replace any damaged cords or plugs.
•Do not handle the unit with wet hands. Doing so may result in electrical shock, serious injury or death. Thoroughly dry your hands before handling any part of the air purifier.
CAUTION!
•Hair, loose clothing and body parts may get caught in the machine resulting in injury. Keep hair, loose clothing and body parts away from openings and moving parts.
•Do not unplug by pulling on the cord. Doing so may result in electrical sparks and fire. Unplug the unit by grasping, and pulling the plug.
•The Oreck ProShield Series is equipped with an ALCI (Appliance Leakage Current Interrupter). The ALCI shuts off the unit in potentially hazardous situations.
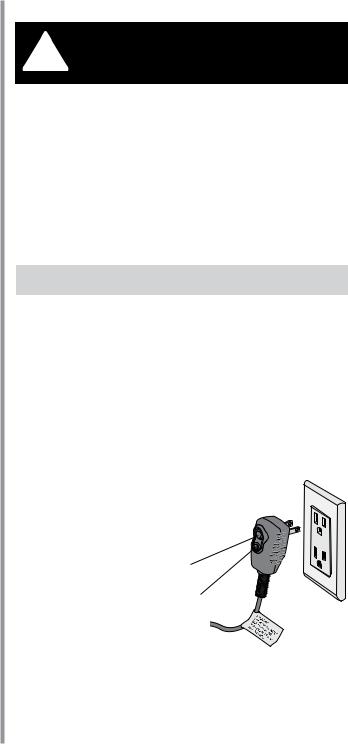
Note: A polarized plug has one rounded prong and one straight prong. The rounded end goes into the longest socket slot.
RESET
(Red)
TEST
(Gray)
Note: The ALCI has a Test and Reset button which should be tested each time the unit is plugged in.
Do not remove the tag which provides test instructions from around the cord at the ALCI.
1

DANGER: Improper installation of ALCI can result in electric shock.
Do not modify or bypass the ALCI. Do not replace any electrical component in this product with anything other than an authorized ORECK replacement part. The risk of electric shock can result if used in the vicinity of improperly grounded stationary appliances (stove, refrigerator, washer, etc.).
•Do not use an extension cord.
•Do not place the air purifier near sources of heat, such as stove tops, ovens, radiators or computers.
Placement Warnings
!WARNING!
•Do not use the air purifier outdoors or on wet surfaces. Doing so may result in electric shock, serious injury or death. Use only indoors and under dry conditions.
•Do not use the air purifier in an enclosed space where flammable, combustible or explosive gases are present.
•Do not use in an area where toxic vapors, flammable dust or oxygen tanks are present. Doing so may result in serious injury or death. Check the location and make sure these elements are not present.
CAUTION!
•Do not place open flames, including candles, directly in front of the air purifier.
•Keep objects away from the air intake grille.
It is important to consider the following when deciding on where to locate the air purifier:
•Position the air purifier on a flat, solid, stable surface. Never place the unit on soft surfaces such as a bed or sofa.
•Position the air purifier where the dirty air is not drawn across your head or body while sitting or sleeping.
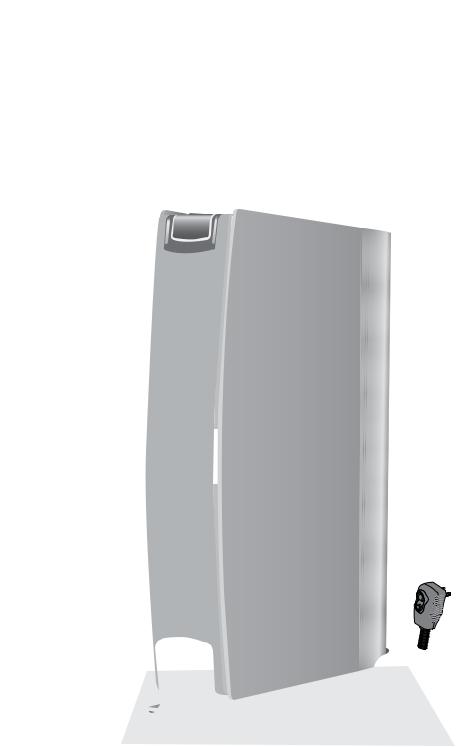
•Position the air purifier so the plug on the power cord easily reaches a standard electrical outlet for a polarized plug.
SAVE THESE
INSTRUCTIONS
2
Features |
2. |
Cleaning brush: Use to clean the front and back grilles. |
|
1. |
Pre-Filter: Filter large particles such as dust, hair and lint. |
|
|
Stores snuggly in the compartment under the cover. |
|
3. |
Helios Shield® & Catalytic Oxygenator: This component |
|
|
combines technologies to reduce ozone and odors from the |
|
|
air that passes through its filter. It cannot be removed. |
|
4. |
Truman Cell®: Electrostatically charges and collects |
|
|
small particles such as dust, smoke, pollen, molds, and |
|
|
other allergens from the air that passes through the fiter. |
|
5. |
Exhaust Grille: Directs the flow of air as it exits the unit. |
|
6. |
Power Cord: Plug into the outlet to begin use. |
|
7. |
Removable Base: Allows the air purifier to stand vertically. |
|
|
Simply stand the unit on its base with the Oreck logo facing |
|
|
front and the control panel buttons at the top. |
|
8. |
Night Light: The right end will softly glow when the night |
|
|
light is activated. The logo will illuminate when the unit |
|
|
is sitting on its base, or serve as a night light on the front of |
|
|
the unit. |
|
9. |
Cover Release Button: Press in to release the cover for |
|
|
maintenance access. |
|
10. |
Truman Cell® Light: A solid red light is included as a |
|
|
handy reminder to clean the Truman Cell® after 30 days. A |
|
|
blinking light indicates a malfunction that has caused the |
|
|
Truman Cell® to shut down and requires attention. |
|
11. |
Speed Indicator Light: Lighting starts from the center |
|
|
for the lowest motor speed to all five lights for full motor |
|
|
speed. |
|
12. |
Odor Control: This button turns the Helios Shield® on or |
|
|
off as desired. If turned off, the unit will continue to filter |
|
|
particles from the air that passes through the filter, though |
|
|
the odor-reducing capability will be turned off. |
|
13. Motor Speed/Power Button: Press the power button |
|
|
|
repeatedly for the desired speed. |
|
|
• Low for Silence Technology®. It’s the quietest |
|
|
operation. |
|
|
• Medium for normal use |
|
|
• High for maximum cleaning |
|
14. |
Night Light Button: Repeatedly press this button to change |
|
|
the lighting scheme to best suit your preference. |
|
|
|
3

2
4
6 16
1 |
3 |
|
5 |
7 |
|
|
15 |
|
9 |
|
|
|
|
8 |
|
|
|
14 10 |
|
|
12 |
13 |
|
|
15. Front Grille: Air enters here for the first stage of cleaning.
16. Remote Control: Remotely turns the Power ON/OFF, adjusts the Odor Control feature, Motor Speed and Night Light. Use these buttons in the same procedure as the unit.
11
4
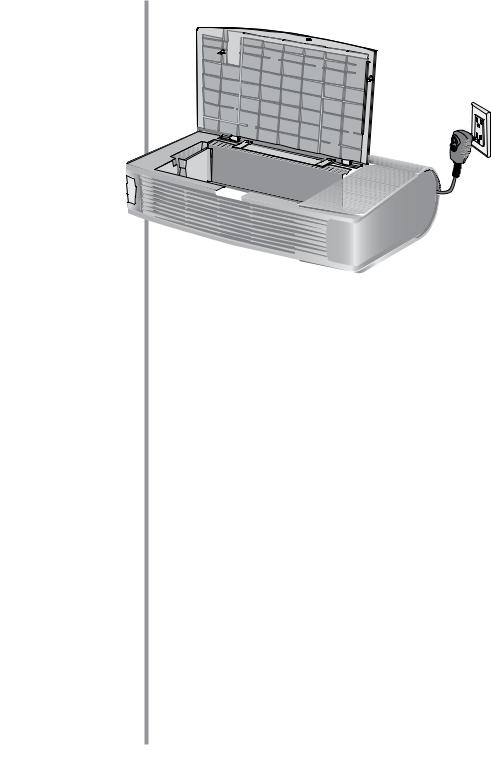
Operation
3
1.Place. Locate the air purifier on a hard surface such as a table or desk. The unit can be placed horizontally or
vertically depending on your space. Be sure the grille is not blocked by other objects and there are no candles or flames near the unit.
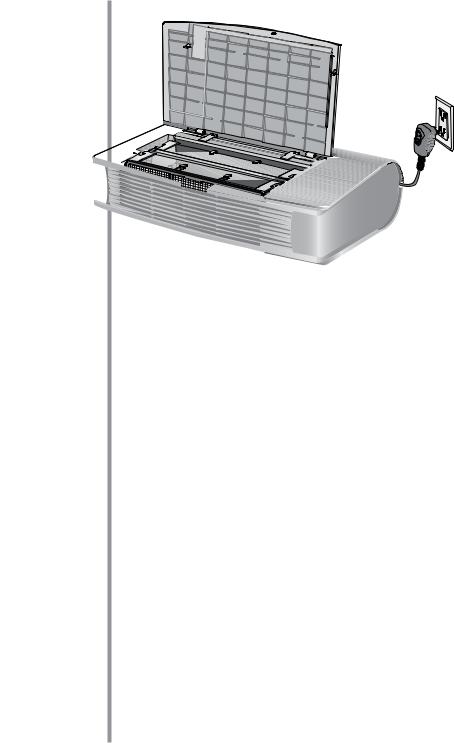
2.Plug In. Plug into nearest standard electrical outlet that accepts a polarized plug.
3.Select the air cleaning speed. Press the motor speed/power button until you reach the desired speed.
Position
so that the air is not drawn across the head or body.
2


 1
1
5

Cleaning |
Proper care and cleaning of the air purifier is critical to |
||
|
Cleaning Intervals |
|
|
|
performance. The following chart shows the cleaning intervals |
||
|
and method. |
|
|
|
|
|
|
|
Part |
Cleaning |
Method |
|
|
Time |
|
|
Cabinet |
As needed |
Wipe with damp cloth first. |
|
|
|
If required, follow with mild, |
|
|
|
non-abrasive cleaner. |
|
Truman Cell® |
2 to 4 |
Spray Oreck Assail-A-Cell® |
|
|
weeks |
cleaner or soak in warm water |
|
|
|
or warm water with mild liquid |
|
|
|
detergent. Rinse. |
|
|
|
|
|
Pre-Filter |
2 to 4 |
Rinse thoroughly in warm |
|
|
weeks |
water or as needed. |
|
Air Direction |
As needed |
Use the brush provided with the |
|
Grille |
|
air purifier to brush away debris |
|
|
|
in between the slots. |
|
Catalytic |
As needed |
Vacuum the front surface gently |
|
Ozone |
|
with a soft brush attachment. |
|
Converter |
|
Do not use any liquids for |
|
|
|
cleaning. |
! WARNING!
Cleaning the unit while it is plugged in may result in electric shock, electric spark and serious injury. Unplug the unit before cleaning or maintenance.
6
|
Cleaning the Pre-Filter |
|
The |
|
|
air purifier |
|
1 |
will not run if the |
|
|
Top Cover is not |
|
|
closed securely. |
|
|
|
5 |
3 |
|
|
2


1.Unplug the air purifier and lay it on its side with the hinged cover on top.
2.Open the Top Cover by pressing the Cover Release button.
3.Pull the Pre-Filter straight up and out of the Cabinet.
4.Thoroughly rinse the Pre-Filter and let it air dry before placing it back in the Cabinet. Do not use heated or compressed air as part of the drying process.
5.Slide the Pre-Filter back into the unit.
6.Close the Top Cover securely.
Cleaning the Truman Cell®
Note: The Truman Cell may require more frequent cleaning if “arcing” occurs. Arcing is a sharp snapping sound that occurs when large particles are collected in the Truman Cell®. If prolonged or continuous arcing occurs the Truman Cell® should be cleaned.
1.Unplug the air purifier and lay it on its side with the hinged cover on top.
2.Open the Top Cover by pressing the Cover Release button.
3.Remove the Truman Cell® by pulling up on the handle (located across the top), lifting it straight up and out.
4.Place in sink, bathtub or other location where cleaner can cover every surface.
7
|
3 |
5 |
|
|
1 |
Oreck’s |
|
Assail-a-Cell® |
|
cleaner is an |
|
excellent way to |
7 |
clean the |
|
Truman Cell®. |
|
2


5.Spray Oreck Assail-a-Cell® cleaner between each Cell Plate and cover each surface. Allow the cleaner to soak for a few minutes but do not let it dry. Thoroughly rinse the Truman Cell® with clean water.
An alternative method to clean the Truman Cell® is to rinse or soak it in warm water for loose debris. Mild liquid dish detergent in water may also be used to help break down tough dirt and residue. Thoroughly rinse the Truman Cell® with clean water.
Note: To prevent damage to the components of the Truman Cell®, do not put in dishwasher or use a cotton swab.
Tough residue such as tar from tobacco smoke may need additional cleaning or longer soaking.
6.Shake excess water from the Truman Cell® to speed up drying time. Do not use heated or compressed air to dry.
7.Place the Truman Cell® back into the unit by sliding it straight down into the slots. The Truman Cell® is specially designed so that it can only be inserted in one direction.
8.Close the Top Cover securely.
8

Drying the Truman Cell®
Note: The Truman Cell® must be completely dry after cleaning in order to operate properly. A drying mode is available to help remove any residual moisture. While in this mode, the fan will be running on Medium speed, and no power will be supplied to the Truman Cell®. Once the unit detects that the Truman Cell® is completely dry, it will return to its original operating settings and function as normal.
“Dry Mode” Operation
If the power supply detects that the Truman Cell® is wet, it shuts down power to the cell and causes the Collector Cell light to blink rapidly.
1.While the collector cell light is blinking, press and hold the power button to initiate “Dry Mode”.
2.Next, the following will all happen simultaneously:
•The lights directly above and below the power button will flash 3 times.
•The unit will switch to medium speed.
•The Collector Cell light will start to blink in a slow pattern.
3.Once in “Dry Mode”
•The unit will run for 60 minutes and then attempt to reset the power supply to the Truman Cell®.
•If the power supply successfully restarts, the unit will return to its original speed and run as normal.
•If not successful, it will go through the same process up to two more times.
•If still not successful after the third try, the cell is likely damaged or is shorting out due to the presence of a foreign object; it will return to the original speed and the Collector Cell light will blink with a rapid blink pattern indefinitely until the unit is reset.
9
Cleaning the Catalytic Oxygenator
1
4
3
2


1.Unplug the air purifie and lay it on its side with the hinged cover on top.
2.Open the Top Cover by pressing the Cover Release button.
3.Remove the Pre-Filter and Truman Cell®.
4.Vacuum the front face of the filter with a soft-brush attachment only. Do not use liquids to clean.
5.Replace the Truman Cell® and Pre-Filter.
6.Close the Top Cover securely.
Cleaning the Exhaust Grille


 2 1
2 1


1.Remove the Cleaning Brush from the storage slot located under the Top Cover.
2.Brush away debris that has collected between the Grille Slots.
3.Return the Cleaning Brush to the storage slot.
10

Troubleshooting
Service problems that appear to be major can often be solved easily. You can be your own troubleshooter by reviewing this guide.
All other servicing should be done by an Oreck authorized service center.
Problem |
|
Check |
Solution |
|
|
|
|
|
|
Unit does not |
• Power Cord |
• Plug in Power Cord |
||
turn ON. |
• |
Selector Switch |
• Set Selector Switch for desired blower |
|
|
|
|
speed. |
|
|
• |
Top Cover |
• Make sure the top cover is securely closed |
|
|
• |
ALCI Plug |
• Press the red reset button each time you |
|
|
|
|
plug in the ALCI safety device. |
|
Truman Cell® |
Truman Cell® |
• A solid red light is a 30 day cleaning |
|
|
light has turned |
|
|
reminder. Wash Truman Cell®. Make sure |
|
solid red. |
|
|
it is thoroughly clean before reinstalling. |
|
|
|
|
|
|
Truman Cell® |
Truman Cell® |
• A fast blinking light indicates the power |
||
light is |
|
|
supply has shut down due to arcing or |
|
blinking red. |
|
|
short circuit. The cell should be inspected |
|
|
|
|
and cleaned, repaired, or replaced. |
|
|
|
|
• A slow blinking light indicates the unit is |
|
|
|
|
in Dry Mode. |
|
Unit does |
Truman Cell® |
• Clean the Truman Cell®. |
|
|
not reduce |
|
|
• Truman Cell® may be damaged. Contact |
|
particles. |
|
|
Oreck for service. |
|
|
|
|
||
|
|
|
|
|
Unit sparks, |
Truman Cell® |
• Sparking or popping noise (arcing) can |
||
crackles and |
|
|
occur when a large particle is captured |
|
pops. |
|
|
in the Truman Cell®. If the unit is arcing |
|
|
|
|
excessively, the cell may be dirty. Try |
|
|
|
|
cleaning the Truman Cell®. |
|
|
|
|
• If excessive arcing continues after proper |
|
|
|
|
cleaning, the Truman Cell® may be |
|
|
|
|
damaged. If damaged, contact Oreck for |
|
|
|
|
service. |
|
Unit still does |
Review all the |
Contact Oreck for service. |
||
not operate |
above. |
|
|
|
properly. |
|
|
|
|
|
|
|
|
|
11

Warranty
12
ORECK MANUFACTURING COMPANY: (Oreck Manufacturing Company gives you the following limited warranty for this product only if it was originally purchased for residential use, not for resale, from Oreck or an Oreck Authorized Retail Dealer.)
Oreck will repair or replace, free of charge, to the original purchaser, any part that is found to be defective in material or workmanship within three (3) years following the date of purchase for all residential models. NOTE: If the unit is used commercially, a one (1) year overall warranty applies.
This limited warranty does not cover the replacement of expendable or consumable parts such as filters, cartridges, and other parts subject to normal wear unless they are defective in material or workmanship.
This limited warranty does not apply to any part subjected to accident, abuse, commercial use, alteration, misuse, damage caused by act of God, the use of voltages other than on the data plate of this product or service of this product by other than Oreck or a participating Factory Authorized Service Center.
Oreck does not authorize any person or representative to assume or grant any other warranty obligation with the sale of this product.
Oreck’s limited warranty is valid only if you retain proof of purchase from Oreck or an Oreck Authorized Retail Dealer for this product. If you purchase this product from any other source, your purchase is “AS IS,” which means Oreck grants you no warranty, and that you, not Oreck, assume the entire risk of the quality and performance of this product, including the entire cost of any necessary servicing or repairs of any defects.
Oreck’s liability for damages to you for any costs whatsoever arising out of this statement of limited warranty shall be limited to the amount paid for this product at the time of original purchase, and Oreck shall not be liable for any direct, indirect, consequential or incidental damages arising out of the use or inability to use this product. Some states do not allow the exclusion or limitation of incidental or consequential damages, so the above limitation or exclusion may not apply to you.
ALL EXPRESS AND IMPLIED WARRANTIES OTHER THAN THE LIMITED WARRANTY SET FORTH ABOVE, FOR THIS PRODUCT, INCLUDING IMPLIED WARRANTIES OF MERCHANTABILITY AND FITNESS FOR A PARTICULAR PURPOSE ARE EXPRESSLY DENIED.
This warranty gives you specific legal rights, and you may also have other rights which vary from state to state.
 Loading...