

Opel Automobile, Insignia, Insignia Saloon 5-door, Insignia Saloon 4-door Owner's Manual

Introduction..................................... 2
In brief ............................................ 6
Keys, doors and windows ............ 19
Seats, restraints ........................... 35
Storage ........................................ 55
Instruments and controls ............. 62
Lighting ........................................ 89
Infotainment system .................... 98
Climate control ........................... 101
Driving and operating ................ 110
Vehicle care ............................... 133
Service and maintenance .......... 169
Technical data............................ 181
Index........................................... 206
Contents
2 Introduction
Introduction

Introduction 3
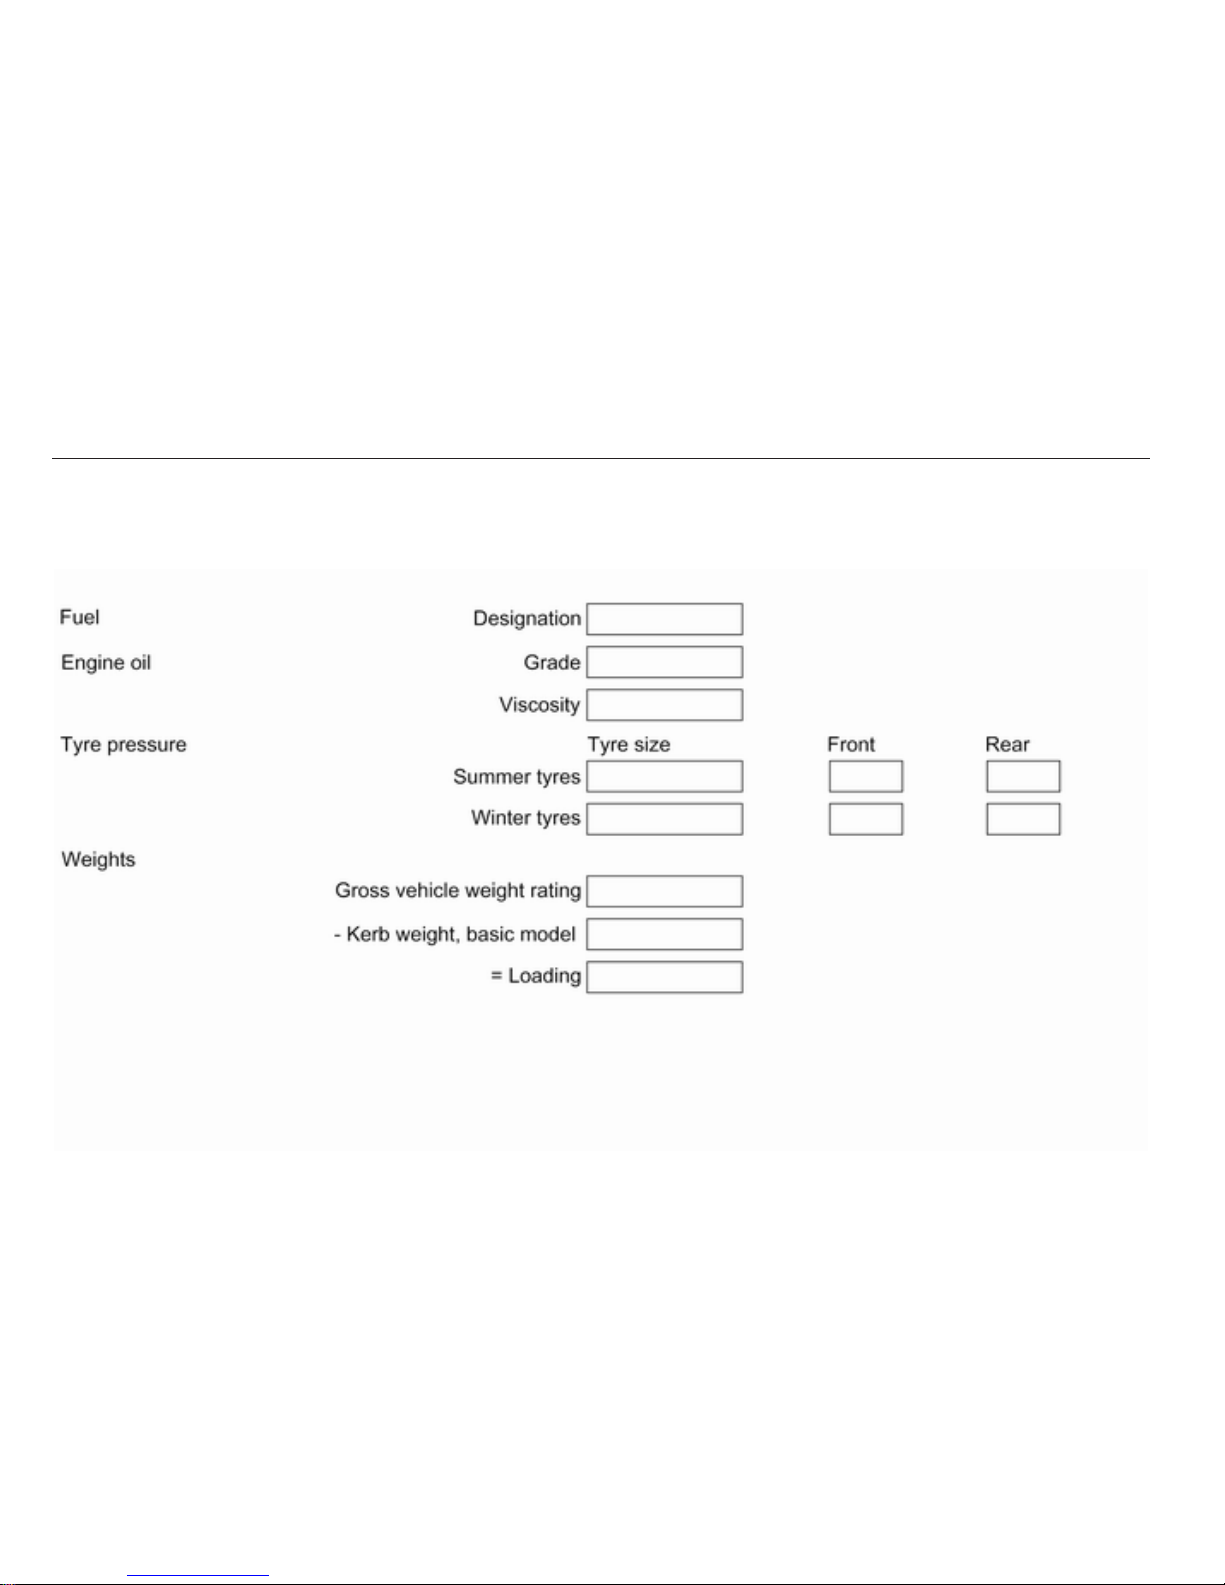
Vehicle specific data
Please enter your vehicle’s data on
the previous page to keep it easily
accessible. This information is
available under the sections "Service
and Maintenance" and "Technical
data" as well as on the identification
plate.
Introduction
Your vehicle is a designed
combination
of advanced technology,
safety, environmental friendliness
and economy.
This Owner’s Manual provides you
with all the necessary information to
enable you to drive your vehicle
safely and efficiently.
Make sure your passengers are
aware of the possible risk of accident
and injury which may result from
improper use of the vehicle.
You must always comply with the
specific laws and regulations of the
country that you are in. These laws
may differ from the information in this
Owner’s Manual.
When this Owner’s Manual refers to
a workshop visit, we recommend your
Opel Service Partner.
All Opel Service Partners provide
first-class service at reasonable
prices. Experienced mechanics
trained by Opel work according to
specific Opel instructions.
The customer literature pack should
always be kept ready to hand in the
vehicle.
Using this manual
■ The "In brief" section will give you
an initial overview.
■ The table of contents at the
beginning of this manual and within
each chapter shows where the
information is located.
■ The index will enable you to search
for specific information.
■ This Owner’s Manual depicts lefthand drive vehicles. Operation is
similar for right-hand drive vehicles.
■ The Owner’s Manual uses the
factory engine designations. The
corresponding sales designations
can be found in the chapter
"Technical data".
■ Directional data, e.g. left or right, or
front or back, always relate to the
direction of travel.
■ Depending on the model variant,
country variant, integrated special
equipment and accessories, the
scope of equipment of your vehicle
can differ from the descriptions in
this Owner’s Manual.
Danger, Warnings and
Cautions
9 Danger
Text marked 9 Danger provides
information on risk of fatal injury.
Disregarding this information may
endanger life.

4 Introduction
9 Warning
Text marked 9 Warning provides
information on risk of accident or
injury. Disregarding this
information may lead to injury.
Caution
Text marked Caution provides
information
on possible damage to
the vehicle. Disregarding this
information may lead to vehicle
damage.
Symbols
Page references are indicated with
3. 3 means "see page".
We wish you many hours of
pleasurable driving
Adam Opel GmbH

Introduction 5
6 In brief
In brief
Initial drive information
Vehicle unlocking
Press button c to unlock the doors
and luggage compartment. Open the
doors by pulling the handles, to open
the tailgate, press the button under
the moulding.
Pressing the button x, only the load
compartment is unlocked and opens.
Remote control 3 20, Central
locking system 3 21, Load
compartment 3 24.
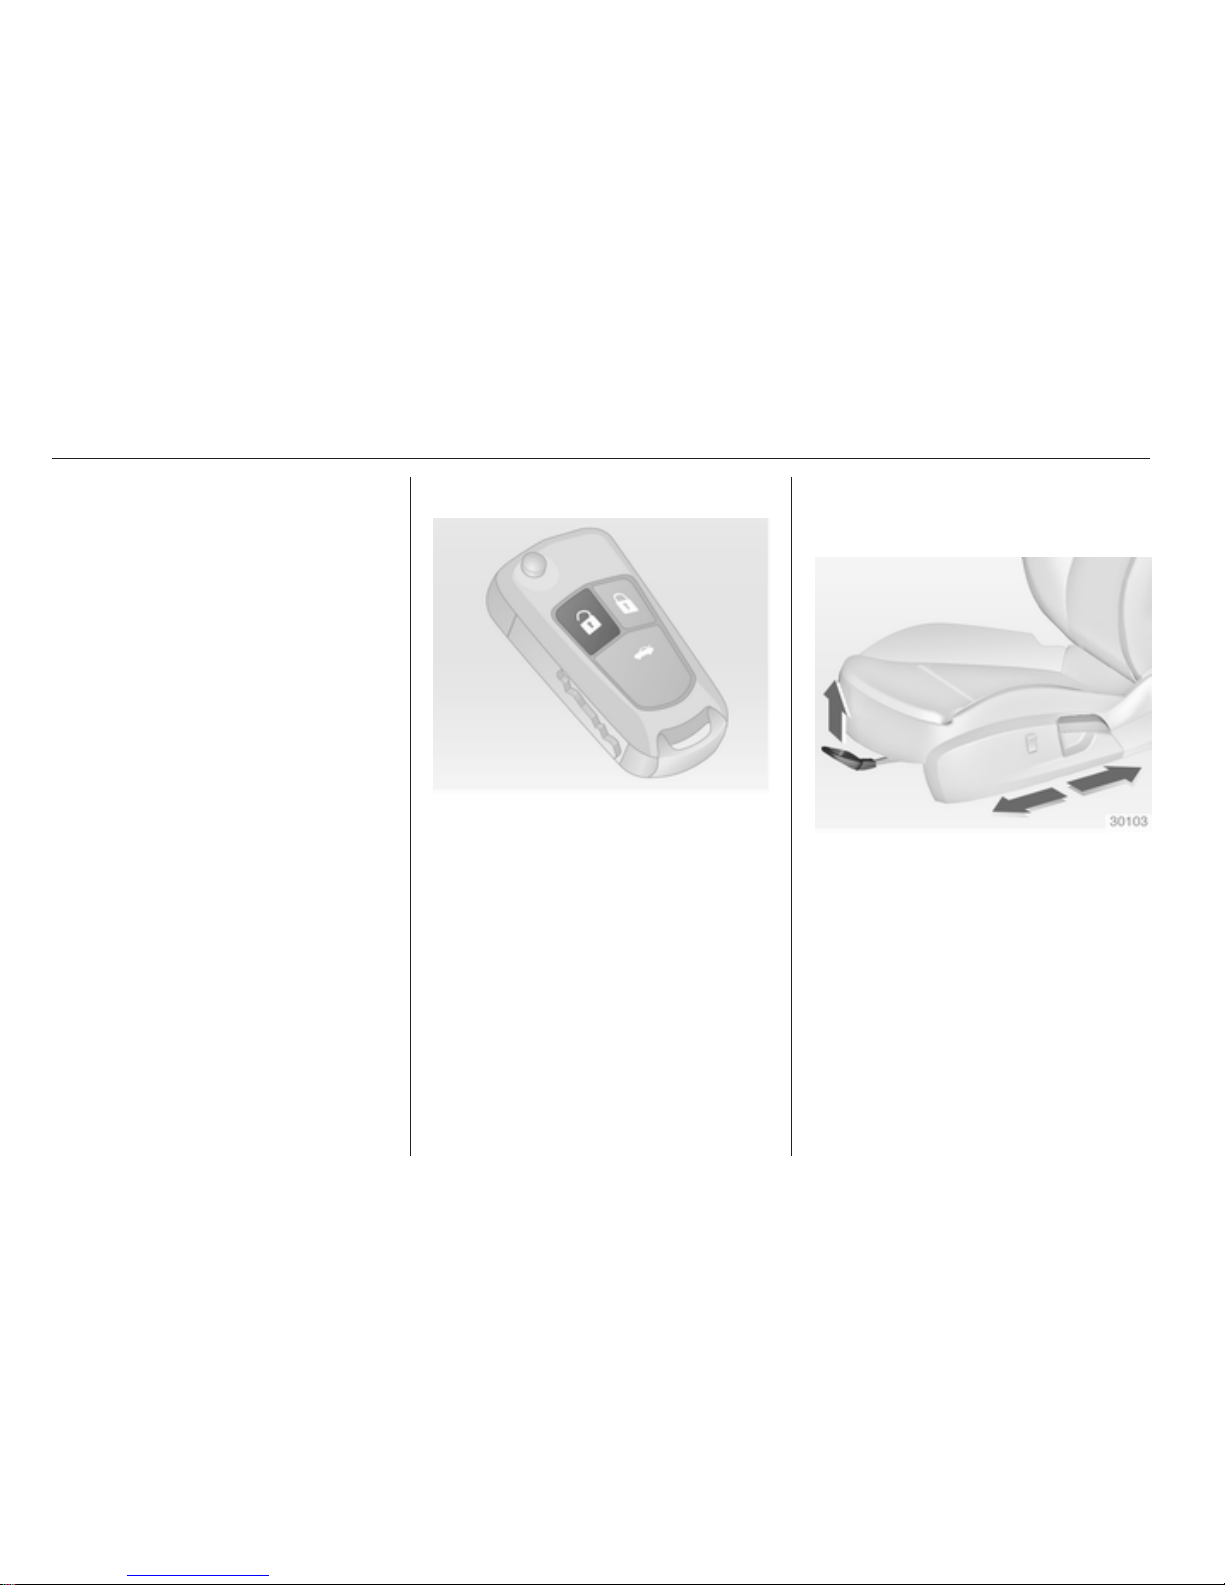
Seat adjustment
Seat positioning
Pull handle, slide seat, release
handle.
Seat adjustment 3 37, Seat position
3 36.
In brief 7
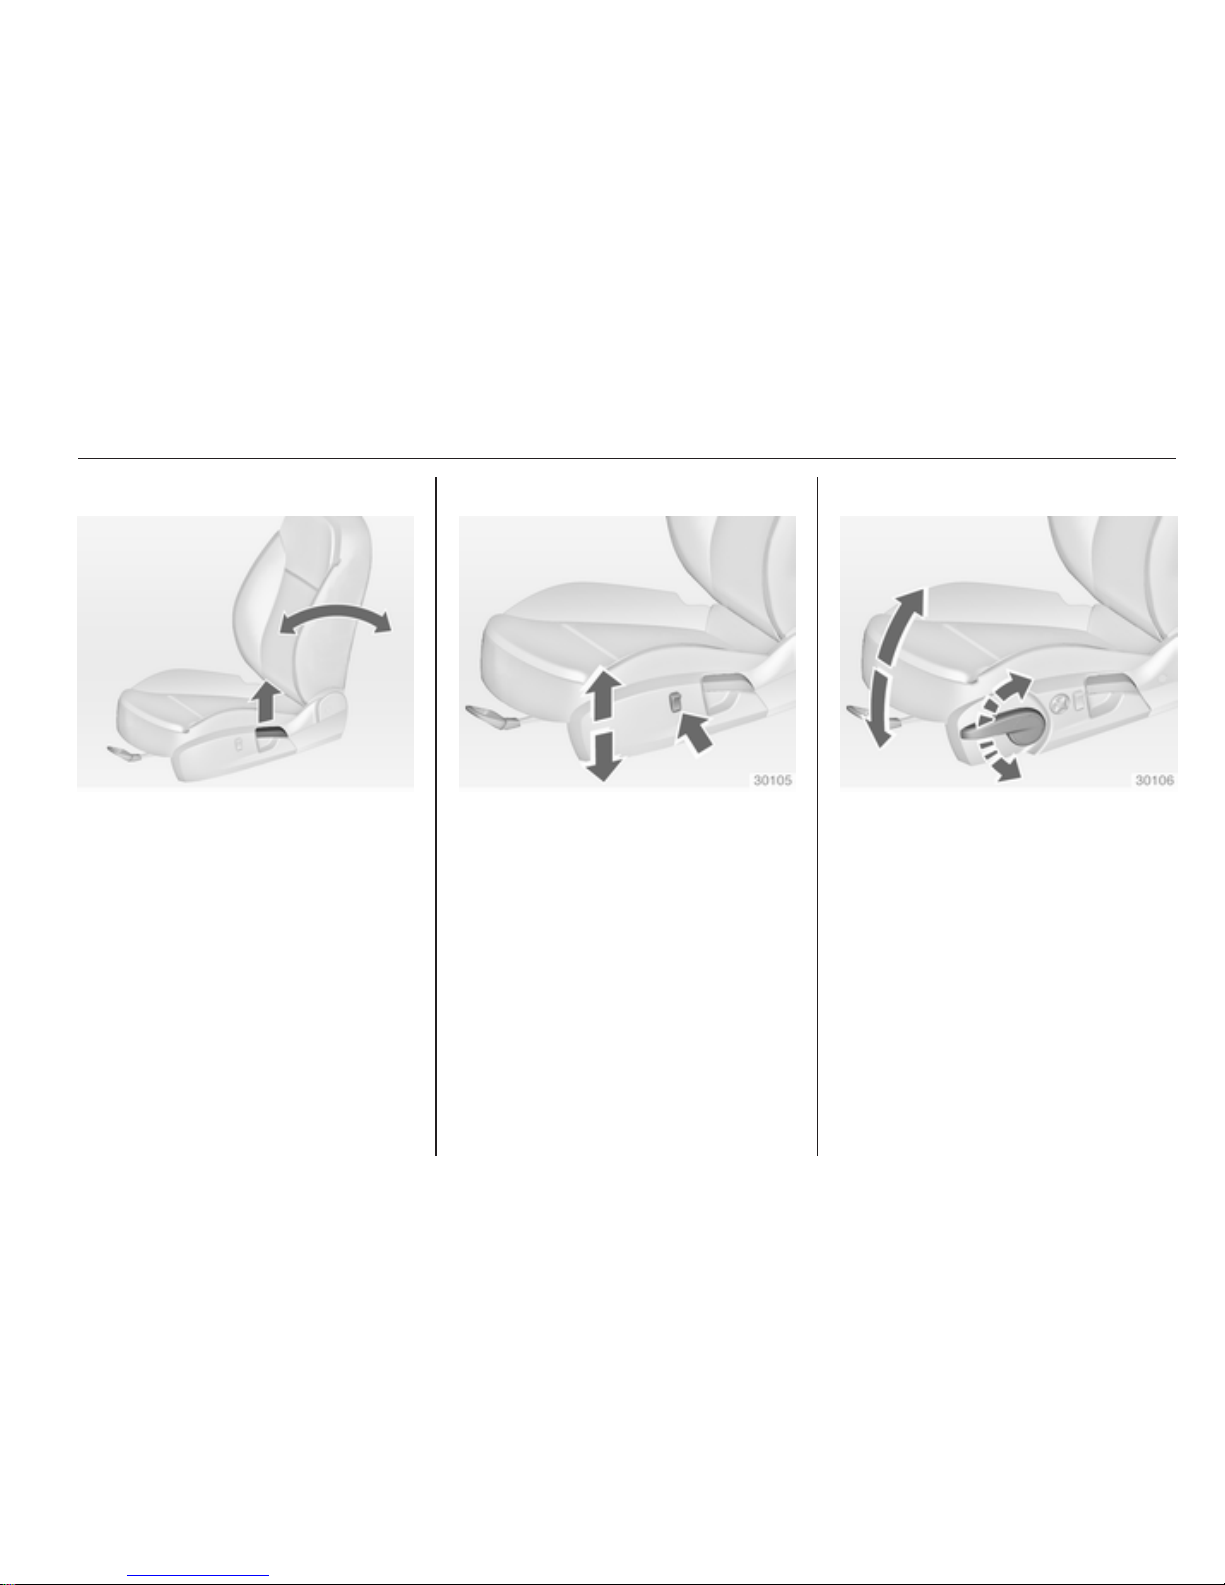
Seat backrests
Pull lever, adjust inclination and
release lever. Allow the seat to
engage audibly. Do not lean on
backrest when adjusting.
Seat adjustment 3 37, Seat position
3 36.
Seat height
Press switch
top = seat higher
bottom = seat lower
Seats 3 37, Seat position 3 36.
Seat inclination
Lever pumping motion
up = front end higher
down = front end lower
Seats 3 37, Seat position 3 36.
8 In brief
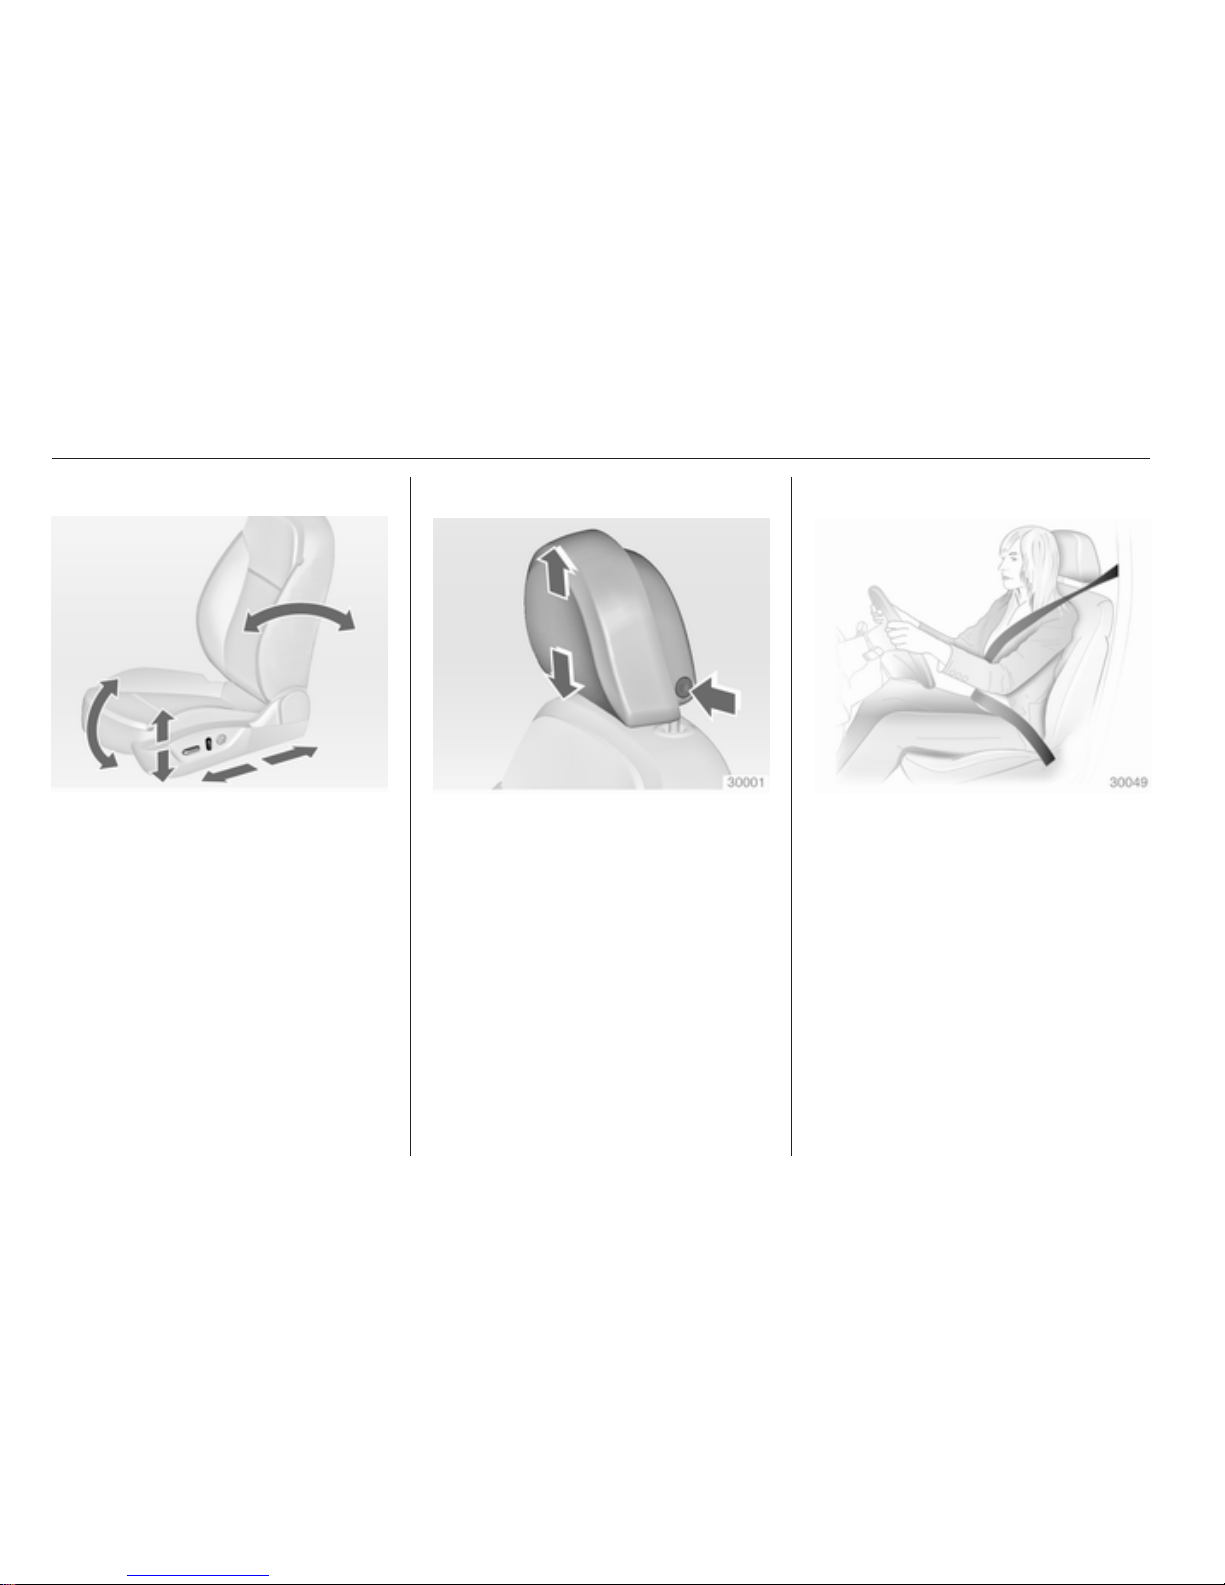
Power seat adjustment
Operate switches.
positioning = move switch
forwards/backwards
height = move switch upwards/
downwards
inclination = move switch upwards/
downwards at front
backrest = turn switch forwards/
backwards
Head restraint adjustment
Press release button, adjust height,
engage.
Head restraints 3 35.
Seat belt
Pull out the seat belt and engage in
belt
buckle. The seat belt must not be
twisted and must fit close against the
body. The backrest must not be tilted
back too far (maximum approx. 25 °).
To release belt, press red button on
belt buckle.
Seat belts 3 42, Airbag system
3 45, Seat position 3 36.
In brief 9
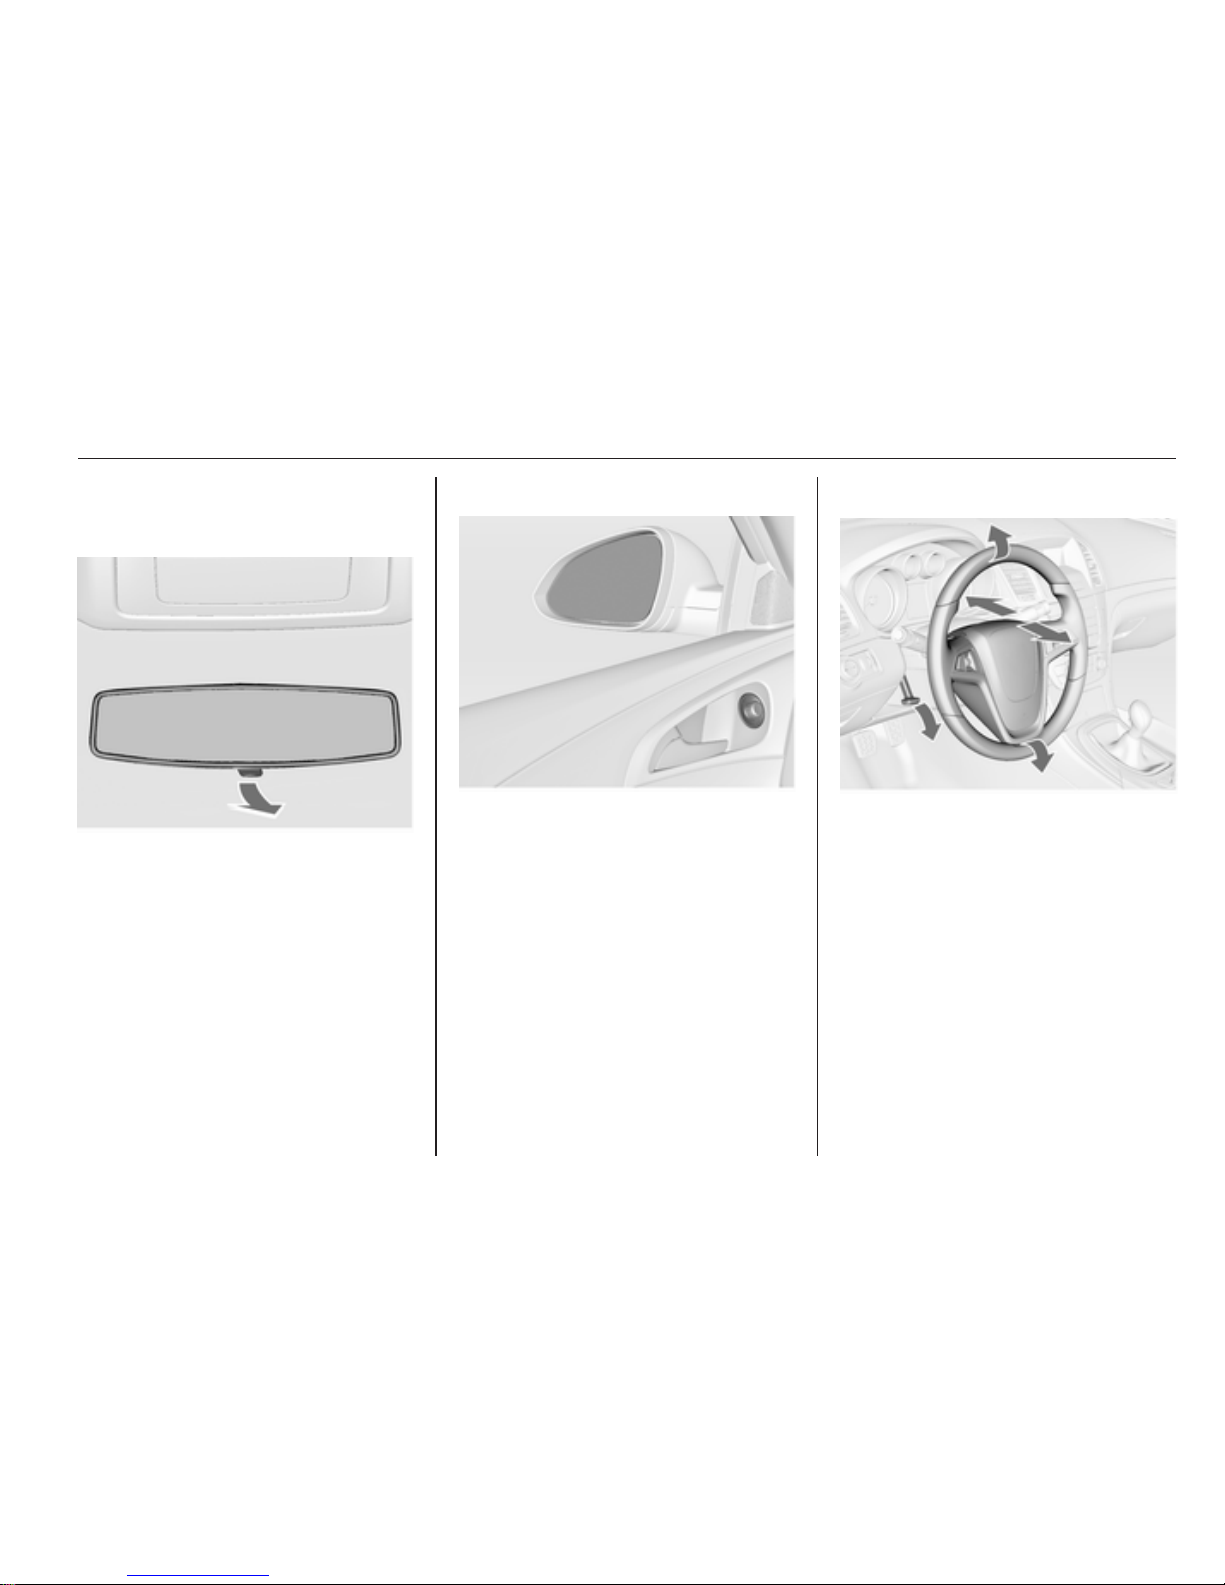
Mirror adjustment
Interior mirror
Turn the lever on the underside to
reduce dazzle.
Interior mirror 3 29, Automatic antidazzle interior mirror 3 30.
Exterior mirrors
Select the relevant exterior mirror and
adjust.
Electric adjustment 3 27, Convex
exterior mirrors 3 27, Folding
exterior mirrors 3 28, Heated
exterior mirrors 3 29.
Steering wheel adjustment
Unlock lever, adjust steering wheel,
then engage lever and ensure it is
fully locked. Do not adjust steering
wheel
unless vehicle is stationary and
steering wheel lock has been
released.
Airbag system 3 45, Ignition
positions 3 111.

10 In brief
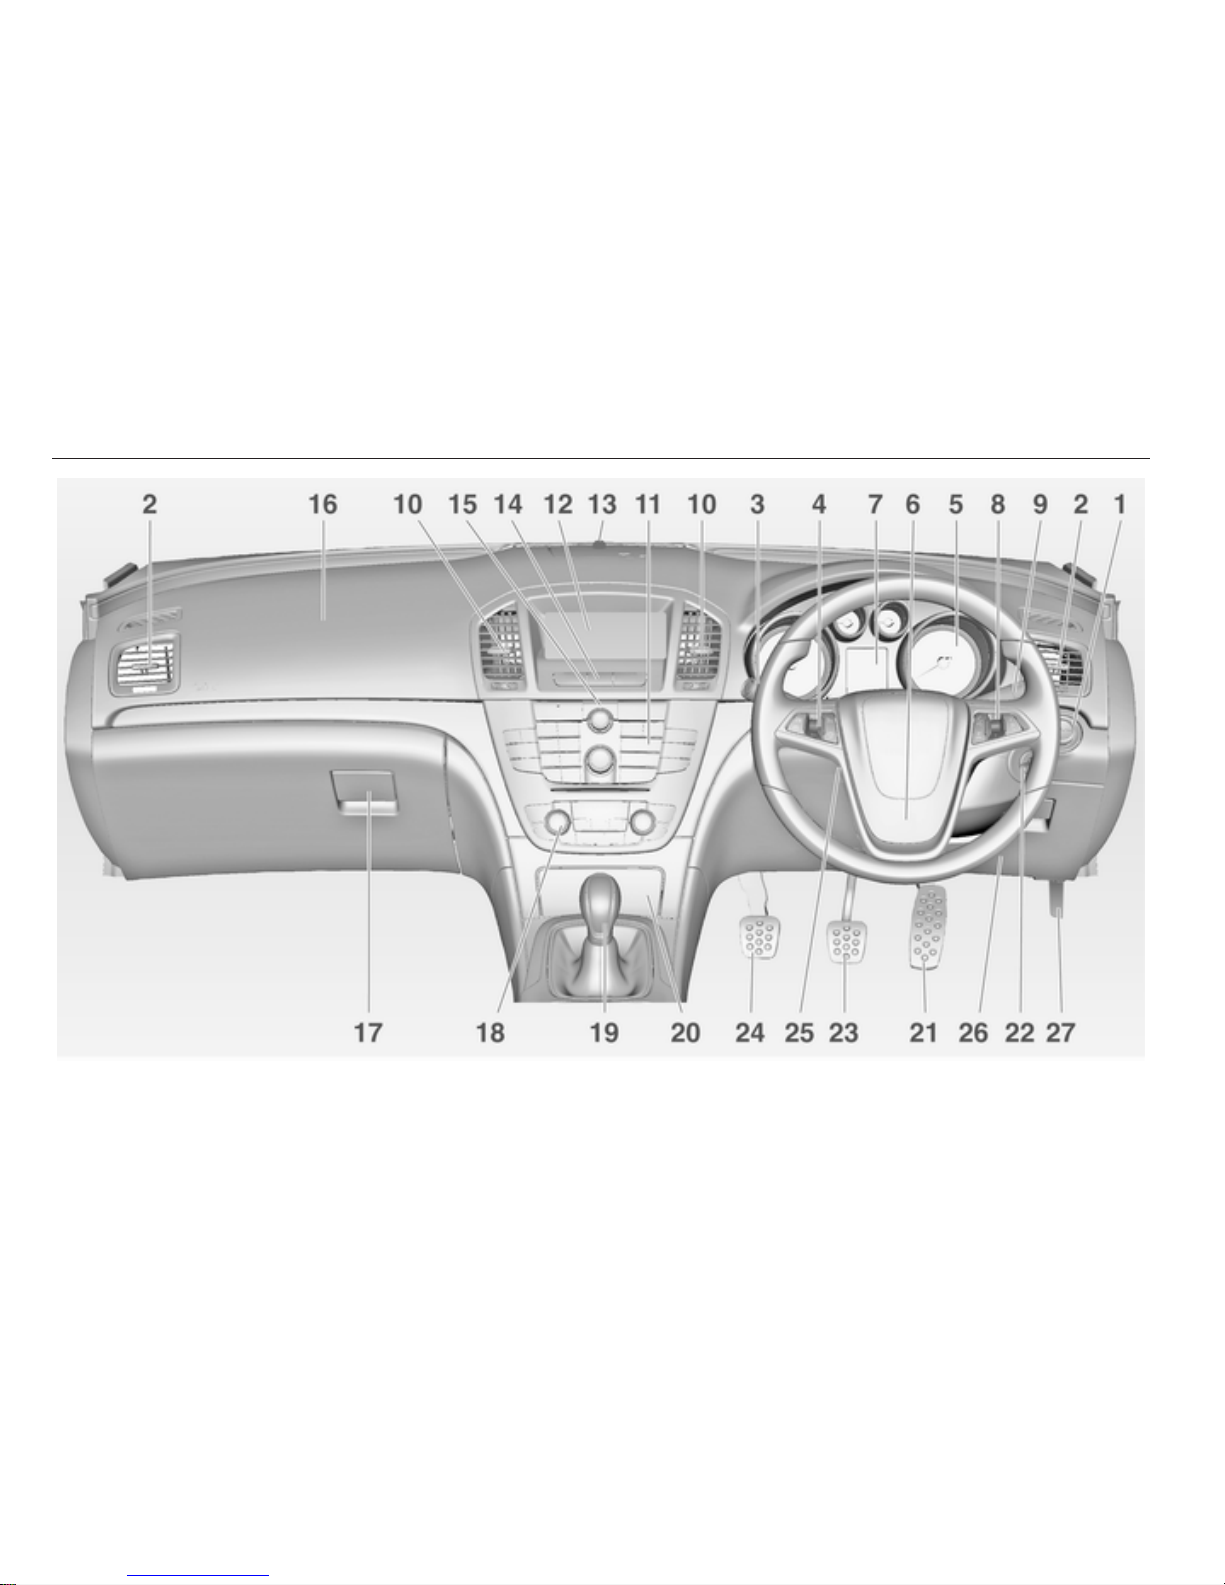
Instrument panel overview

In brief 11
1 Light switch ........................ 3 89
Headlight range
adjustment ......................... 3 92
Front fog lights ................... 3 93
Rear fog light ..................... 3 94
Instrument illumination ...... 3 95
2 Side air vents.................... 3 108
3 Turn signals, headlight
flash, low beam and high
beam ................................. 3 93
Exit lighting ........................ 3 96
Parking light ....................... 3 94
Driver Information Center... 3 78
4 Cruise control .................. 3 124
5 Instruments ........................ 3 69
6 Horn ................................... 3 63
Driver's airbag ................... 3 46
7 Driver Information Center... 3 78
8 Remote control for
infotainment system .......... 3 62
9 Windscreen wipers,
windscreen washer
system, headlight washer
system, rear wiper ............. 3 63
10 Centre air vents ............... 3 108
11 Infotainment system .......... 3 98
12 Info-Display ....................... 3 78
13 Anti-theft alarm system
status LED ......................... 3 25
14 Central locking system....... 3 21
Hazard warning flashers .... 3 93
Control
indicator for Airbag
deactivation ....................... 3 73
Control indicator for
passenger seat belt ........... 3 73
15 Sport mode ...................... 3 122
Tour mode ....................... 3 122
Traction control system ... 3 121
Electronic Stability
Control ............................. 3 121
Ultrasonic parking
sensors .............................. 3 75
16 Front passenger airbag ..... 3 46
17 Glovebox ........................... 3 55
18 Climate control system..... 3 101
19 Selector lever, manual
transmission .................... 3 117
Automatic transmission ... 3 114
20 Ashtray .............................. 3 68
21 Accelerator pedal ............ 3 110
22 Ignition switch with
steering wheel lock .......... 3 111
23 Brake pedal ..................... 3 118
24 Clutch pedal .................... 3 110
25 Steering wheel
adjustment ......................... 3 62
26 Storage compartment,
fuse box ........................... 3 149
27 Bonnet release lever ....... 3 134
12 In brief
In brief 13
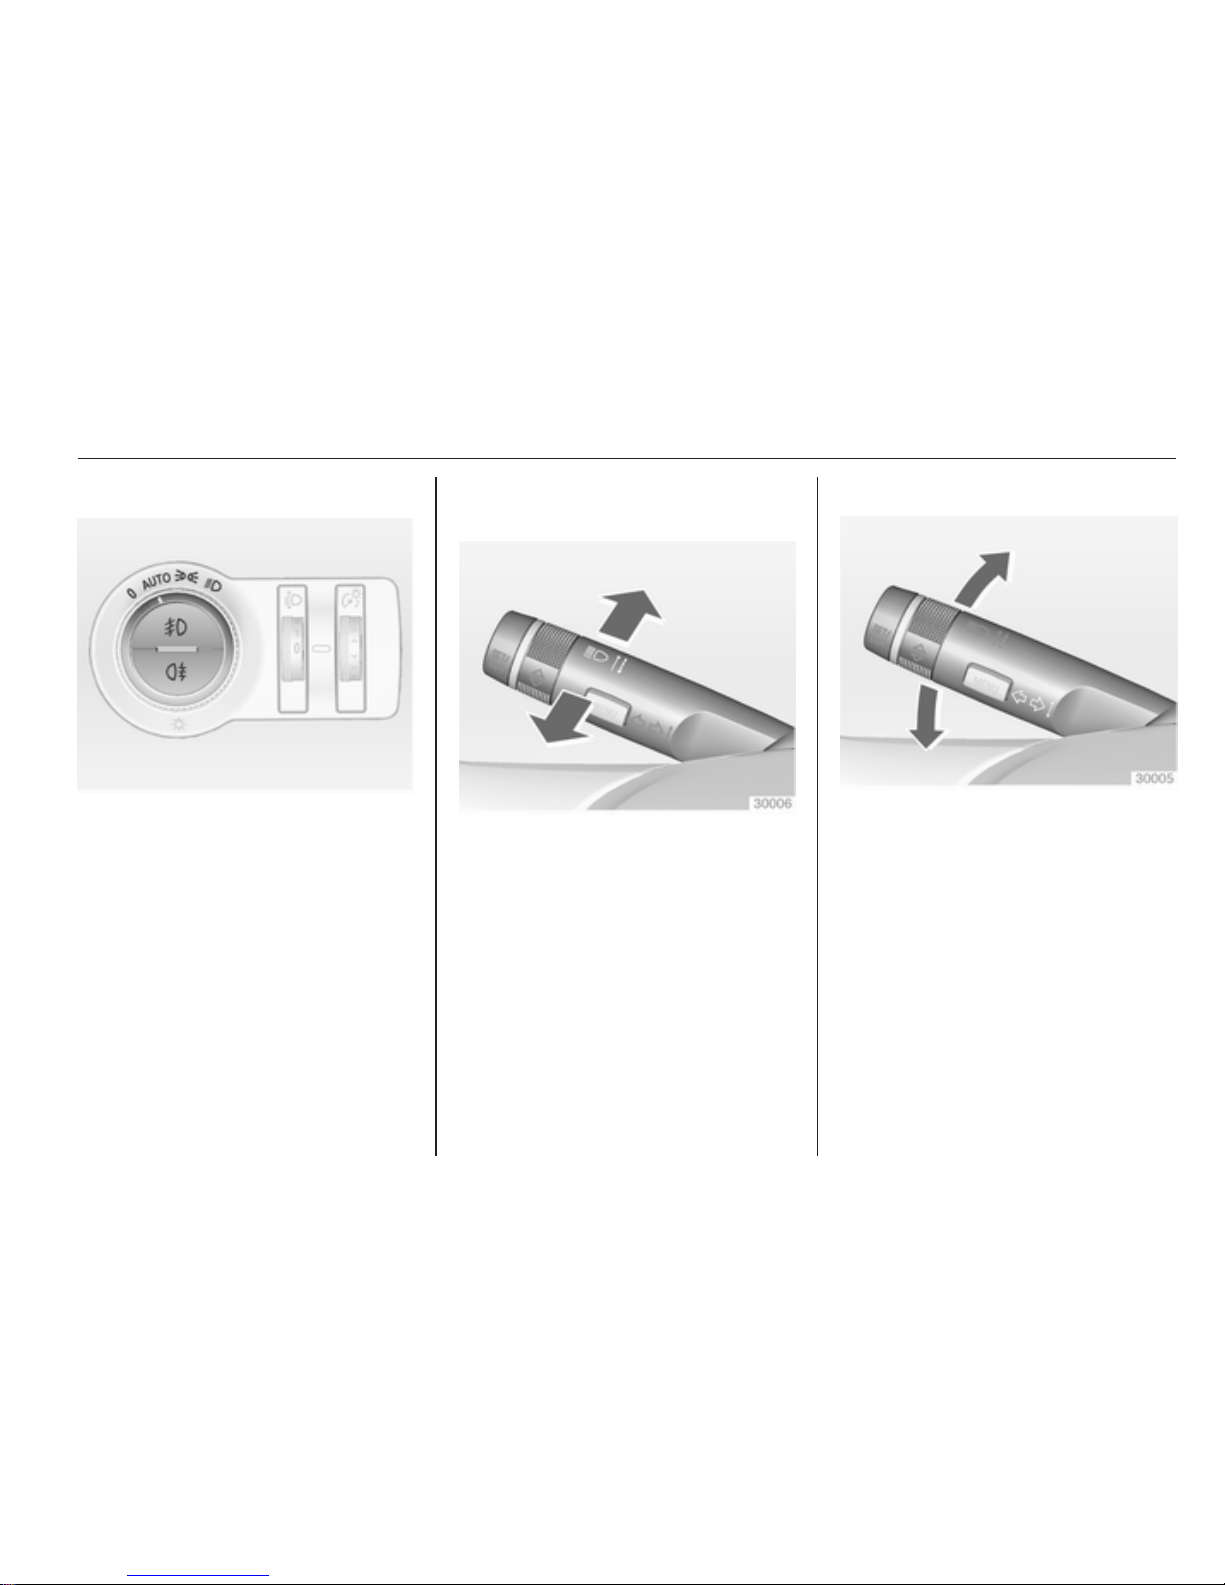
Exterior lighting
Turn
Auto = automatic light system:
Headlights are switched on
and off automatically.
7
= activation or deactivation of
the automatic light system
8
= parking lights
9
= headlights
Press
>
= front fog lights
r
= rear fog light
Lighting 3 89.
Headlight flash, high beam and
low beam
headlight flash = pull lever
high beam = push lever
low beam = push or pull lever
High beam 3 91, Headlight flash
3 92, Automatic light control
3 89.
Turn and lane-change signals
right = lever up
left = lever down
Turn and lane change signals
3 93, Parking lights 3 94.

14 In brief
Hazard warning flashers
Operated with the ¨ button.
Hazard warning flashers 3 93.
Horn
Press j.
Washer and wiper systems
Windscreen wipers
2 = fast
1 = slow
P
= adjustable timed interval wipe
§
= off
For a single swipe when the
windscreen wipers are off, press the
lever down.
Windscreen wipers 3 63, Wiper
replacement 3 138.
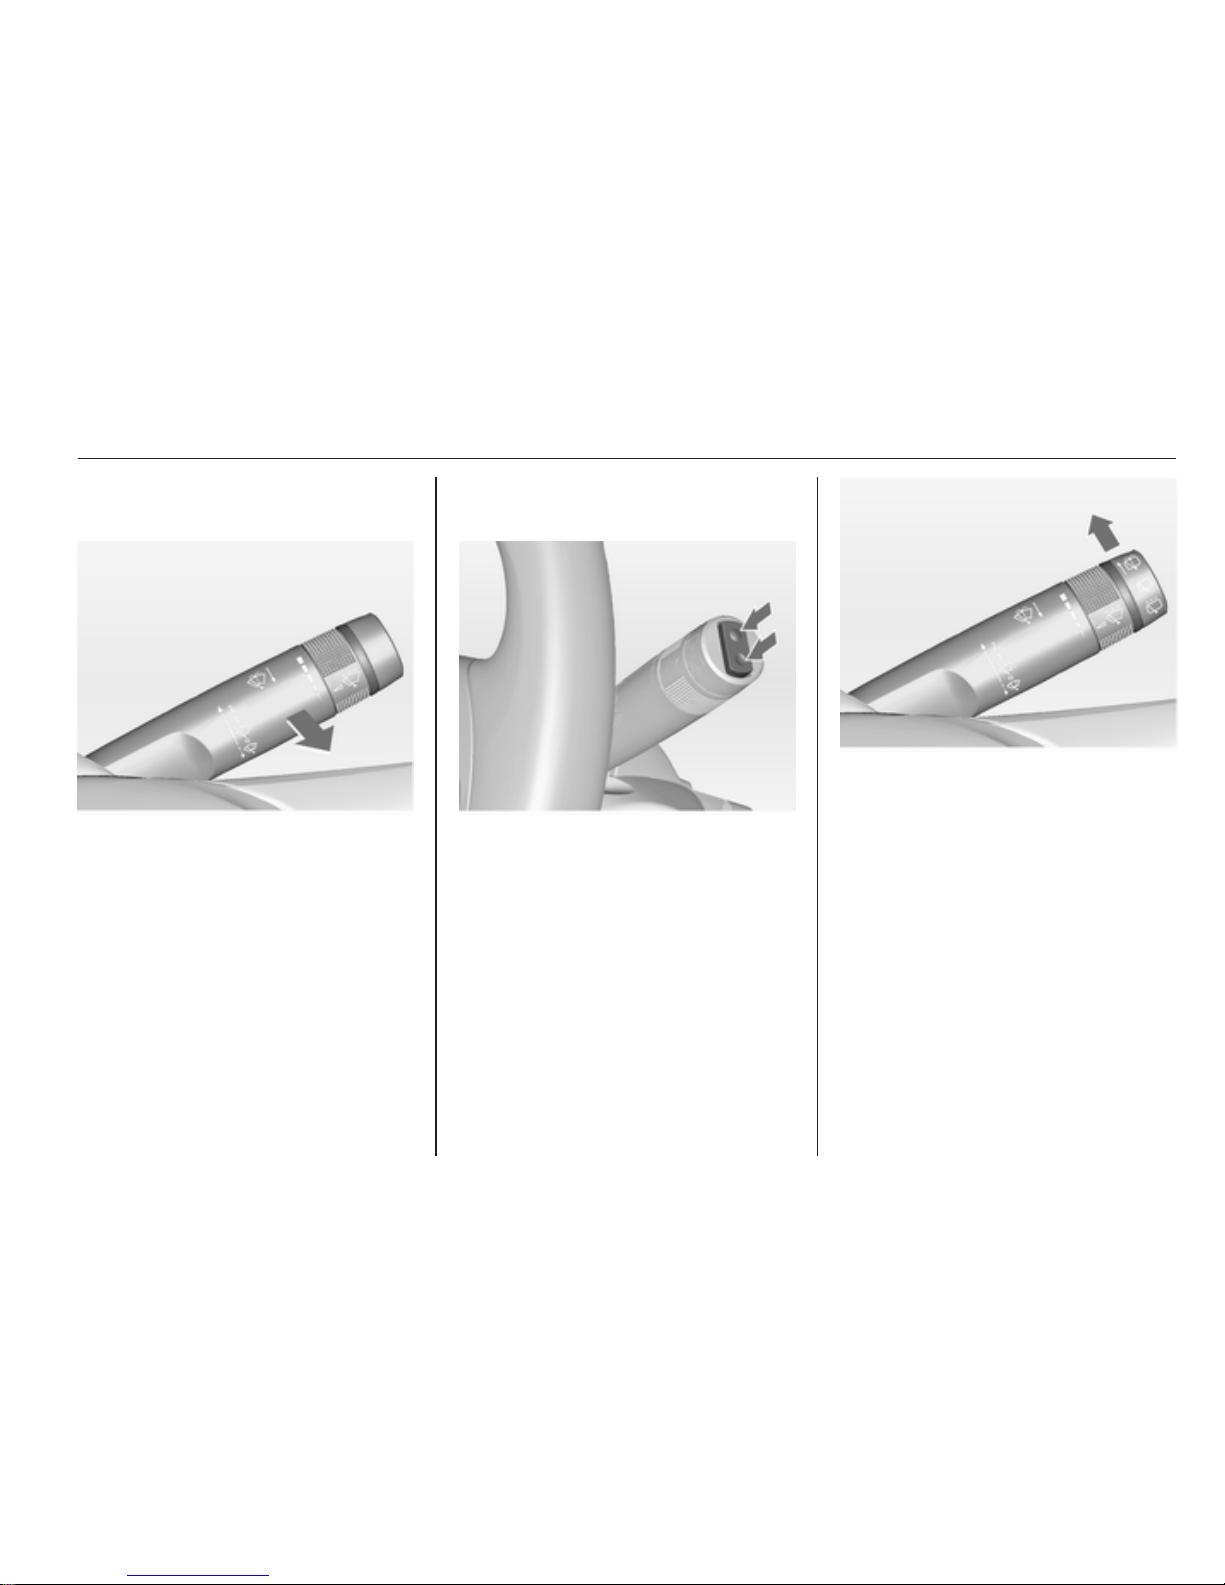
In brief 15
Windscreen and headlamp
washer systems
Pull lever.
Windscreen and headlamp washer
system 3 63, Washer fluid 3 137.
Rear window wiper and washer
system
Push the rocker switch to activate the
rear window wiper:
top = continuous operation
bottom = intermittent operation
Push lever.
Wiper fluid is sprayed on the rear
window and the wiper swipes for
a few strokes.
16 In brief
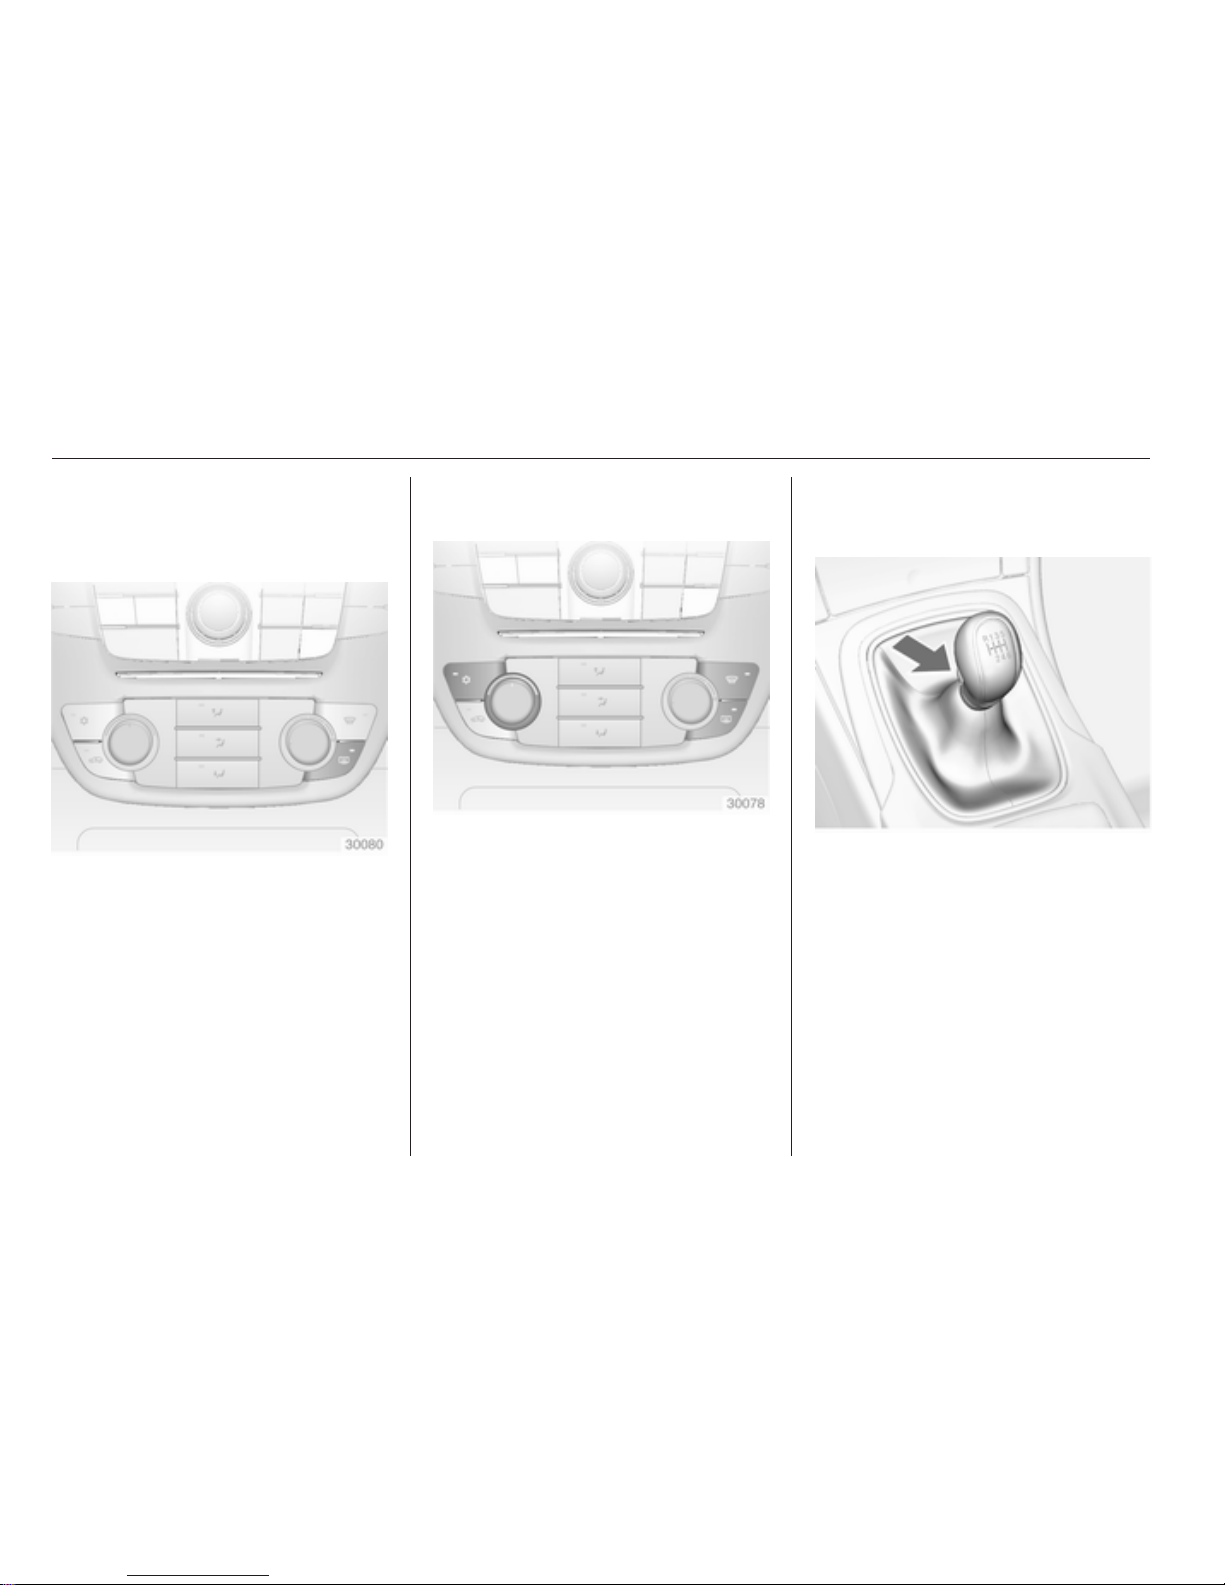
Climate control
Heated rear window, heated
exterior mirrors
Heating is operated by pressing the
Ü button.
Heated rear window 3 32.
Demisting and defrosting the
windows
Press button V.
Set temperature control to warmest
level.
Cooling n on.
Heated rear window Ü on.
Climate control system 3 101.
Transmission
Manual transmission
Reverse: with the vehicle stationary,
wait 3 seconds after declutching and
then
pull up the button on the selector
lever and engage the gear.
If the gear does not engage, set the
lever in neutral, release the clutch
pedal and depress again; then repeat
gear selection.
Manual transmission 3 117.
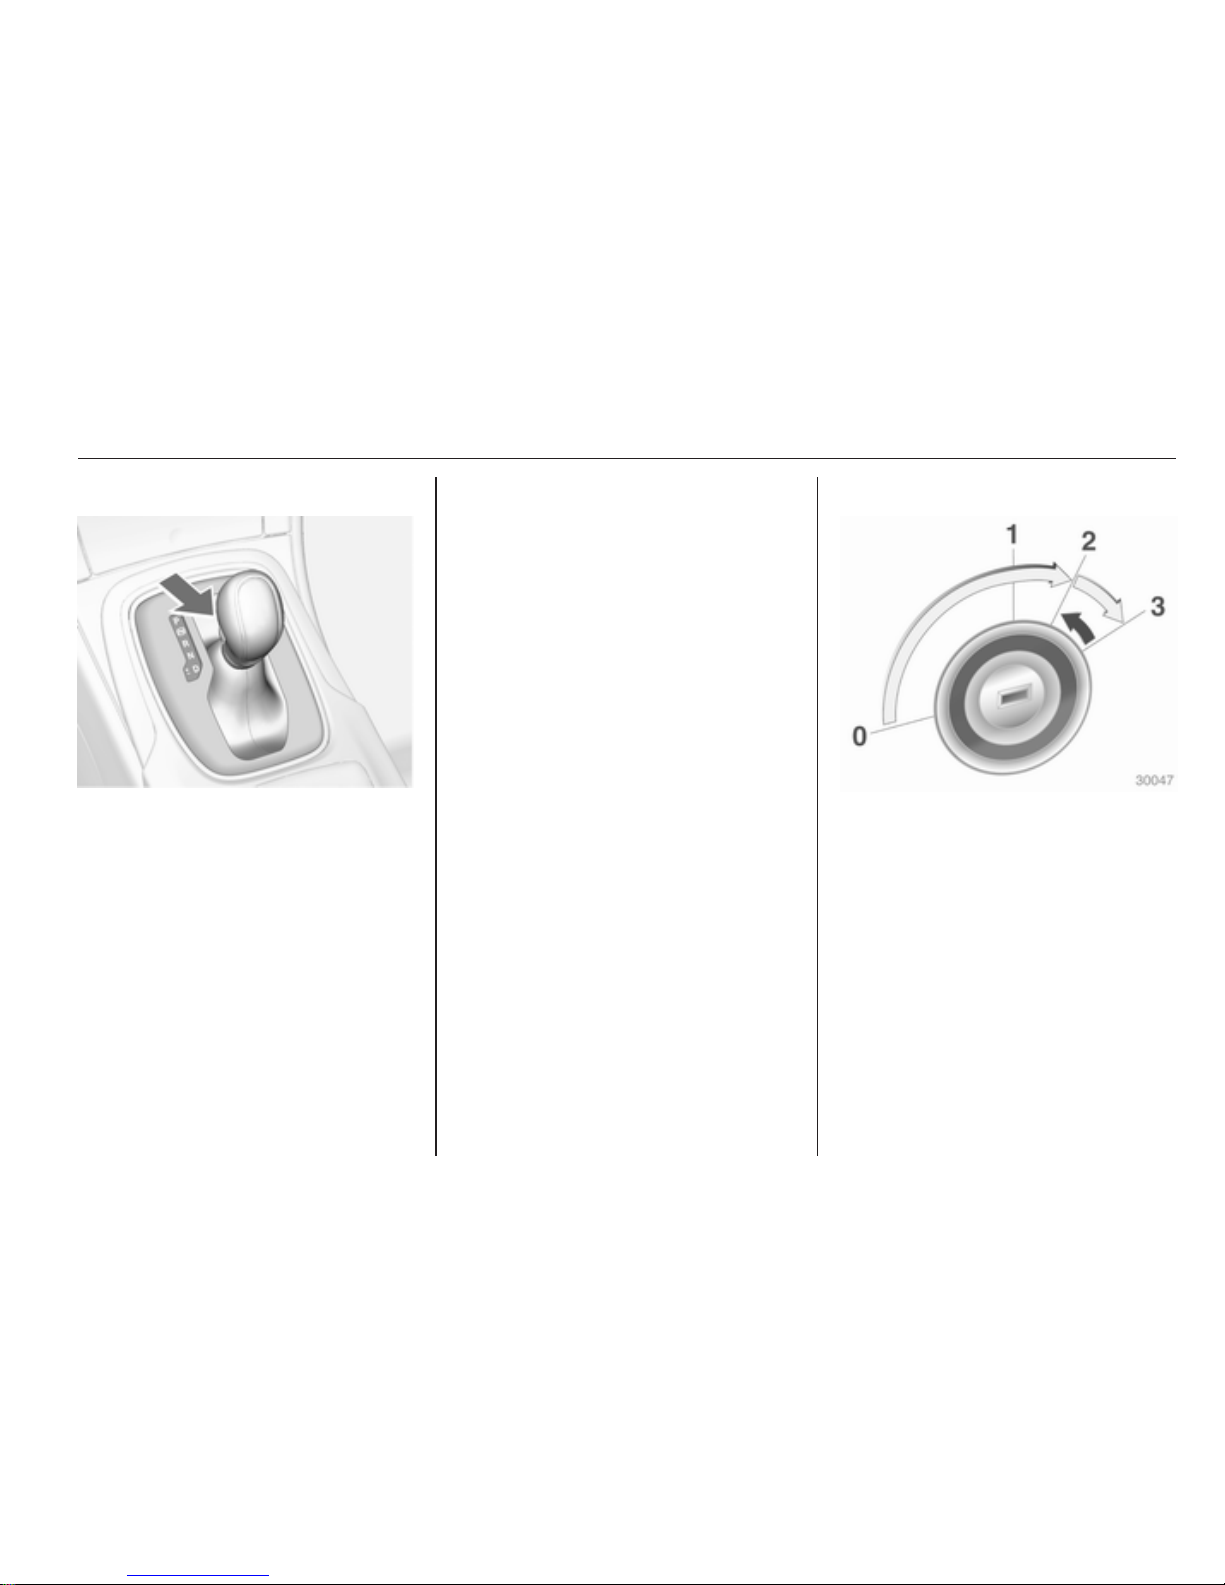
In brief 17
Automatic transmission
P = park
R = reverse
N = neutral
D = drive
Manual mode: move selector lever in
D to the left.
<
= higher gear
]
= lower gear
The selector lever can only be moved
out of P when the ignition is on and
the
brake pedal is applied. To engage
P or R, push the release button.
Automatic transmission 3 114.
Starting off
Check before starting off
■
Tyre pressure and condition
3 152, 3 191.
■ Engine oil level and fluid levels
3 135.
■ All windows, mirrors, exterior
lighting and number plates are free
from dirt, snow and ice and
operational.
■ Proper position of seats, seat belts
and mirrors 3 36, 3 44, 3 27.
■ Check brake function at low speed,
particularly if the brakes are wet.
Starting the engine
Turn key to position 1. Move the
steering wheel slightly to release the
steering wheel lock. Operate clutch
and brake, automatic transmission in
P or N, do not accelerate; for diesel
engine, turn the key to position 2 for
preheating until control indicator !
goes out; turn key to 3 and release
key.
Starting the engine 3 111.
Parking
■
Always apply parking brake.
Manual parking brake without

18 In brief
pressing release button. Apply as
firmly as possible on a downhill
slope or uphill slope. Operate foot
brake at same time to reduce
operating force.
For vehicles with electronic parking
brake system pull switch m.
■ Switch off the engine and ignition.
Turn the ignition key to 0 and
remove. Turn the steering wheel
until the steering wheel lock is felt
to engage.
For vehicles with automatic
transmission, the key can only be
removed when the selector lever is
in the P position.
■ If the vehicle is on a level surface or
uphill slope, engage first gear or set
the selector lever to P before
switching off the ignition. On an
uphill slope, turn the front wheels
away from the kerb.
If the vehicle is on a downhill slope,
engage reverse gear or set the
selector lever to P before switching
off the ignition. Turn the front
wheels towards the kerb.
■
Lock the vehicle with button e on
the remote control.
Activate the anti-theft alarm system
3 25.
■ Do not park the vehicle on an easy
flammable surface. The high
temperature of the exhaust system
could ignite the surface.
■ Close windows and sunroof.
■ The engine cooling fans may run
after the engine has been switched
off 3 134.
■ After running at high engine speeds
or with high engine loads, operate
the engine briefly at a low load or
run in neutral for approx. 30
seconds before switching off in
order to protect the turbocharger.
Keys, locks 3 19, Laying the vehicle
up for a long period of time 3 71.
Keys, doors and windows 19
Keys, doors and
windows
Keys, locks ............................... 19
Doors ........................................ 24
Vehicle security ........................ 25
Exterior mirrors ......................... 27
Interior mirrors .......................... 29
Windows ................................... 30
Roof .......................................... 32
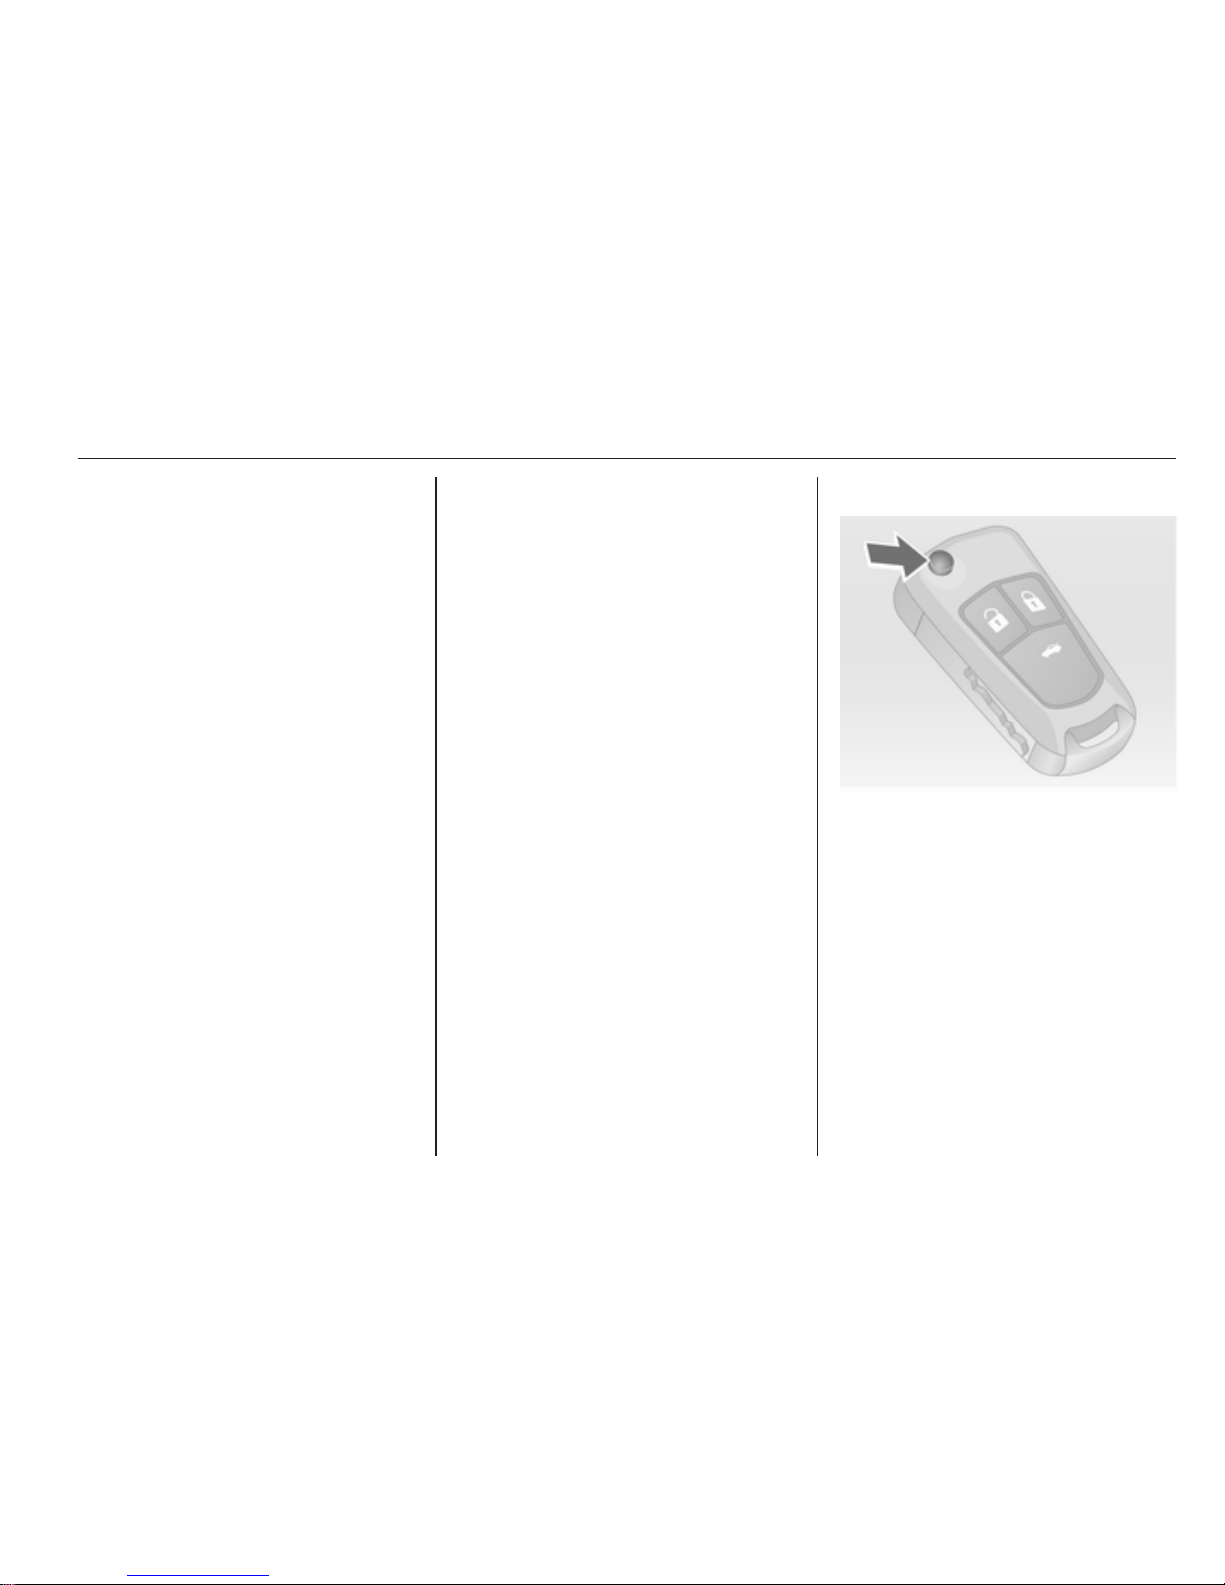
Keys, locks
Keys
Replacement keys
The key number is specified in the
Car Pass or on a detachable tag.
The key number must be quoted
when
ordering replacement keys as it
is a component of the immobiliser
system.
Locks 3 166.
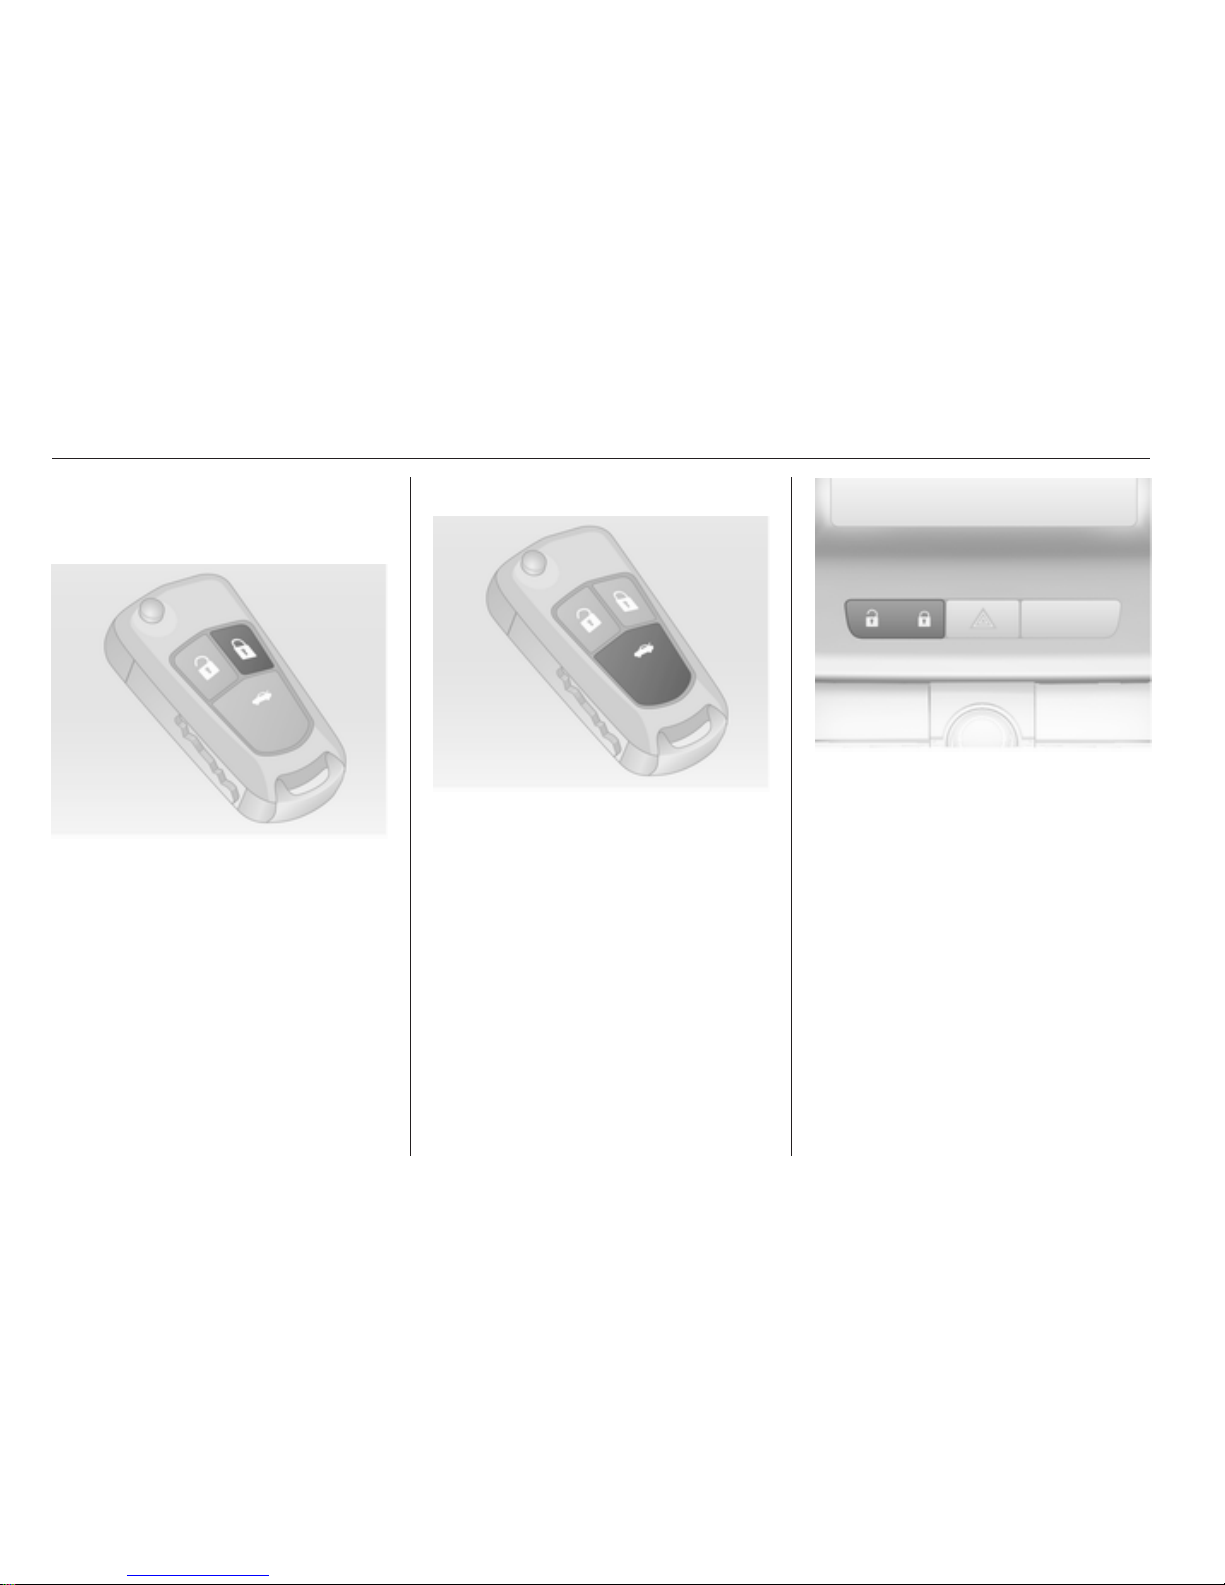
Key with foldaway key section
Press button to extend. To fold the
key, first press the button.
Car Pass
The Car Pass contains security
related vehicle data and should
therefore be kept in a safe place.
When the vehicle is taken to
a workshop, this vehicle data is
needed in order to perform certain
operations.

20 Keys, doors and windows
Radio remote control
Used to operate:
■
Central locking system
■ Anti-theft locking system
■ Anti-theft alarm system
■ Luggage compartment
■ Power windows
■ Sun roof
■ Foldable power mirrors
The radio remote control has a range
of approx. 5 metres (200 inches). This
range can be affected by outside
influences. The hazard warning
flashers confirm operation.
Handle with care, protect from
moisture and high temperatures and
avoid unnecessary operation.
Fault
If the central locking system cannot
be operated with the radio remote
control, it may be due to the following:
■ Range exceeded
■ Battery voltage too low
■ Frequent, repeated operation of the
remote control while not in range,
which will require resynchronisation
■ Overloading the central locking by
operating at frequent intervals, the
power supply is interrupted for
a short time
■ Interference from higher-power
radio waves from other sources
Opening the vehicle 3 21.
Basic settings
Some
settings can be changed in the
menu Settings in the Info-Display.
Vehicle personalisation 3 84.
Radio remote control battery
replacement
Replace the battery as soon as the
range reduces.
Batteries do not belong in household
waste. They must be disposed of at
an appropriate recycling collection
point.
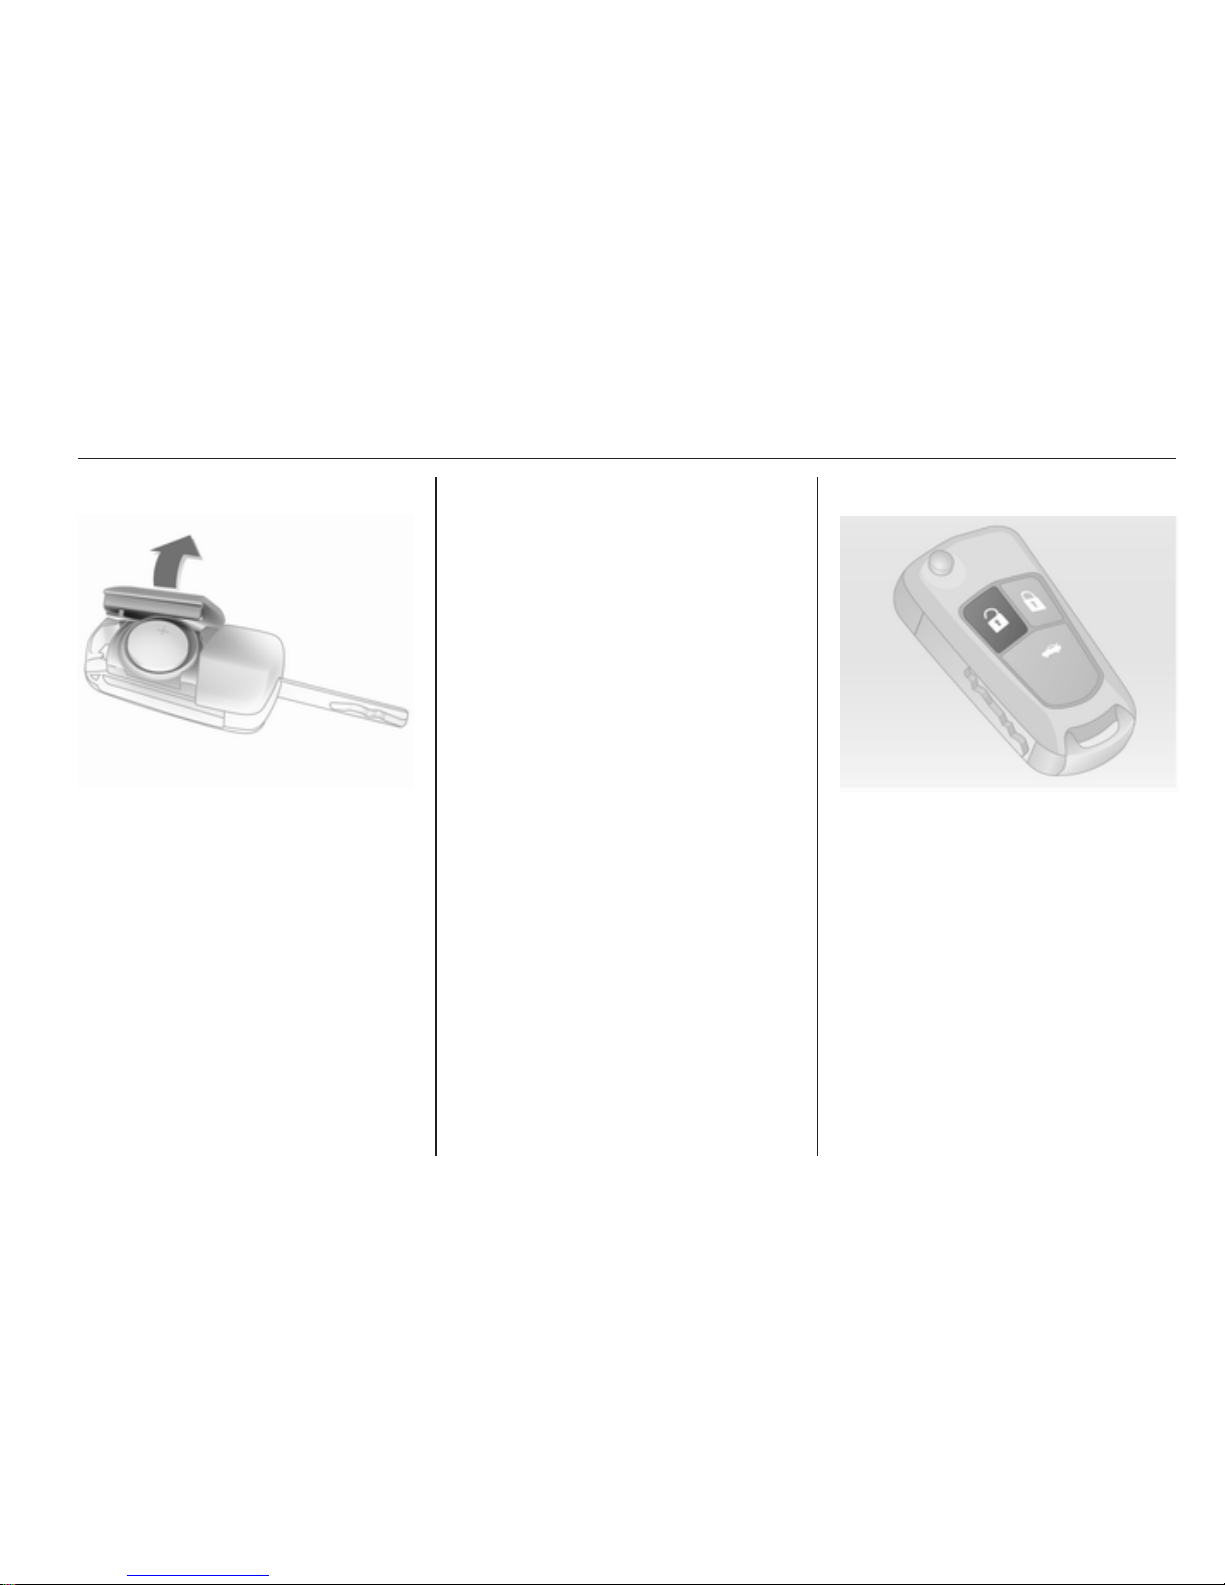
Keys, doors and windows 21
Key with foldaway key section
Extend the key and open the unit.
Replace the battery (battery type
CR 20 32), paying attention to the
installation position. Close the unit
and synchronise.
Radio remote control
synchronisation
After
replacing the battery, unlock the
door with the key in the lock. The radio
remote control will be synchronised
when you switch on the ignition.
Memorised settings
By
removing the key out of the ignition
lock the settings are automatically
saved for the used key:
■ Electronic climate control
■ Lighting
■ Infotainment system
■ Power seats
■ Power mirrors
■ Power door locks
The saved settings are automatically
used when the key is inserted into the
ignition lock.
Vehicle personalisation 3 84.
Central locking system
Unlocks and locks doors, load
compartment and fuel filler flap.
A pull on an interior door handle
unlocks the entire vehicle and opens
the door.
Note
In the event of an accident of
a certain severity, the vehicle
unlocks automatically.
Unlocking
Press button c.
It is configurable to unlock only the
driver`s door by pressing button c
once and to unlock all doors, load
compartment and fuel filler flap by
pressing button c twice.
Settings
can be changed in the menu
Settings in the Info-Display. Vehicle
personalisation 3 84.
The settings can be stored by the key
being used, memorised settings
3 21.
22 Keys, doors and windows
Locking
Close doors, load compartment and
fuel filler flap.
Press button e.
If the driver's door is not closed
properly, the central locking system
will not work. Activation or
deactivation of this function in the
menu Settings in the Info-Display.
Vehicle personalisation 3 84.
Unlocking the tailgate
Press button x
when the ignition is
off. The tailgate will unlock and open,
whilst all other doors remain locked.
Central locking buttons
Locks or unlocks all doors, the load
compartment and fuel filler flap.
Press the e button to lock.
Press the c button to unlock.
When the key is in the ignition lock,
locking
is only possible if all doors are
closed.
Keys, doors and windows 23
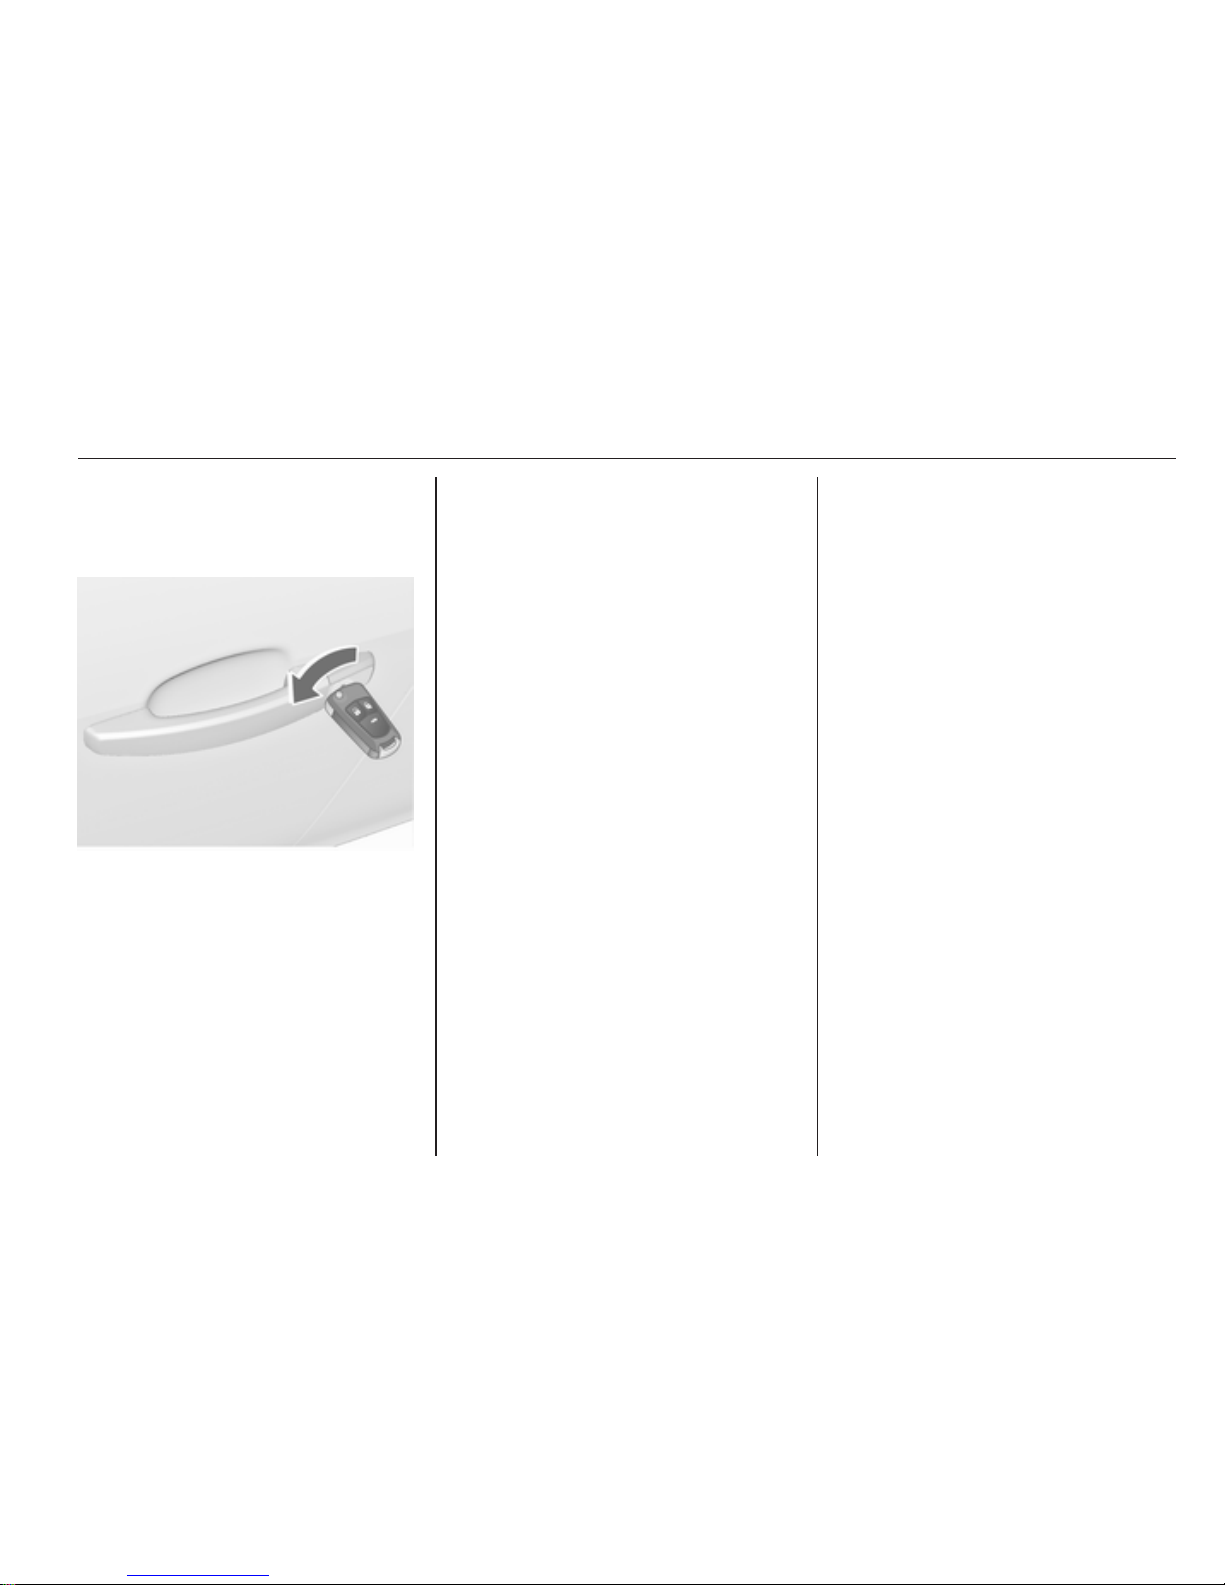
Fault in radio remote control
system
Unlocking
Manually unlock the driver's door by
turning the key in the lock. Switch on
the ignition and press the central
locking button c to open all doors,
load compartment and fuel filler flap.
To deactivate the anti-theft locking
system, switch on the ignition.
Locking
Manually lock the driver's door by
turning the key in the lock.
Fault in central locking system
Unlocking
Manually unlock the driver's door by
turning the key in the lock. The other
doors can be opened by using the
interior handle twice. The load
compartment and fuel filler flap can`t
be opened. To deactivate the antitheft locking system, switch on the
ignition 3 25.
Locking
Push inside locking knob of all doors
except driver's door. Then close the
driver's door and lock it from the
outside
with the key. The fuel filler flap
and tailgate cannot be locked.
Automatic locking
Automatic locking after driving off
This security feature can be
configured to automatically lock all
doors, load compartment and fuel
filler flap as soon as the vehicle starts
to drive.
Settings can be changed in the menu
Settings in the Info-Display. Vehicle
personalisation 3 84.
The settings can be stored by the key
being used 3 21.
Automatic locking when leaving
the vehicle
This comfort feature can be
configured to automatically lock all
doors, load compartment and fuel
filler flap a short time after the doors
are closed when leaving the vehicle.
Settings can be changed in the menu
Settings in the Info-Display. Vehicle
personalisation 3 84.
The settings can be stored by the key
being used 3 21.
24 Keys, doors and windows
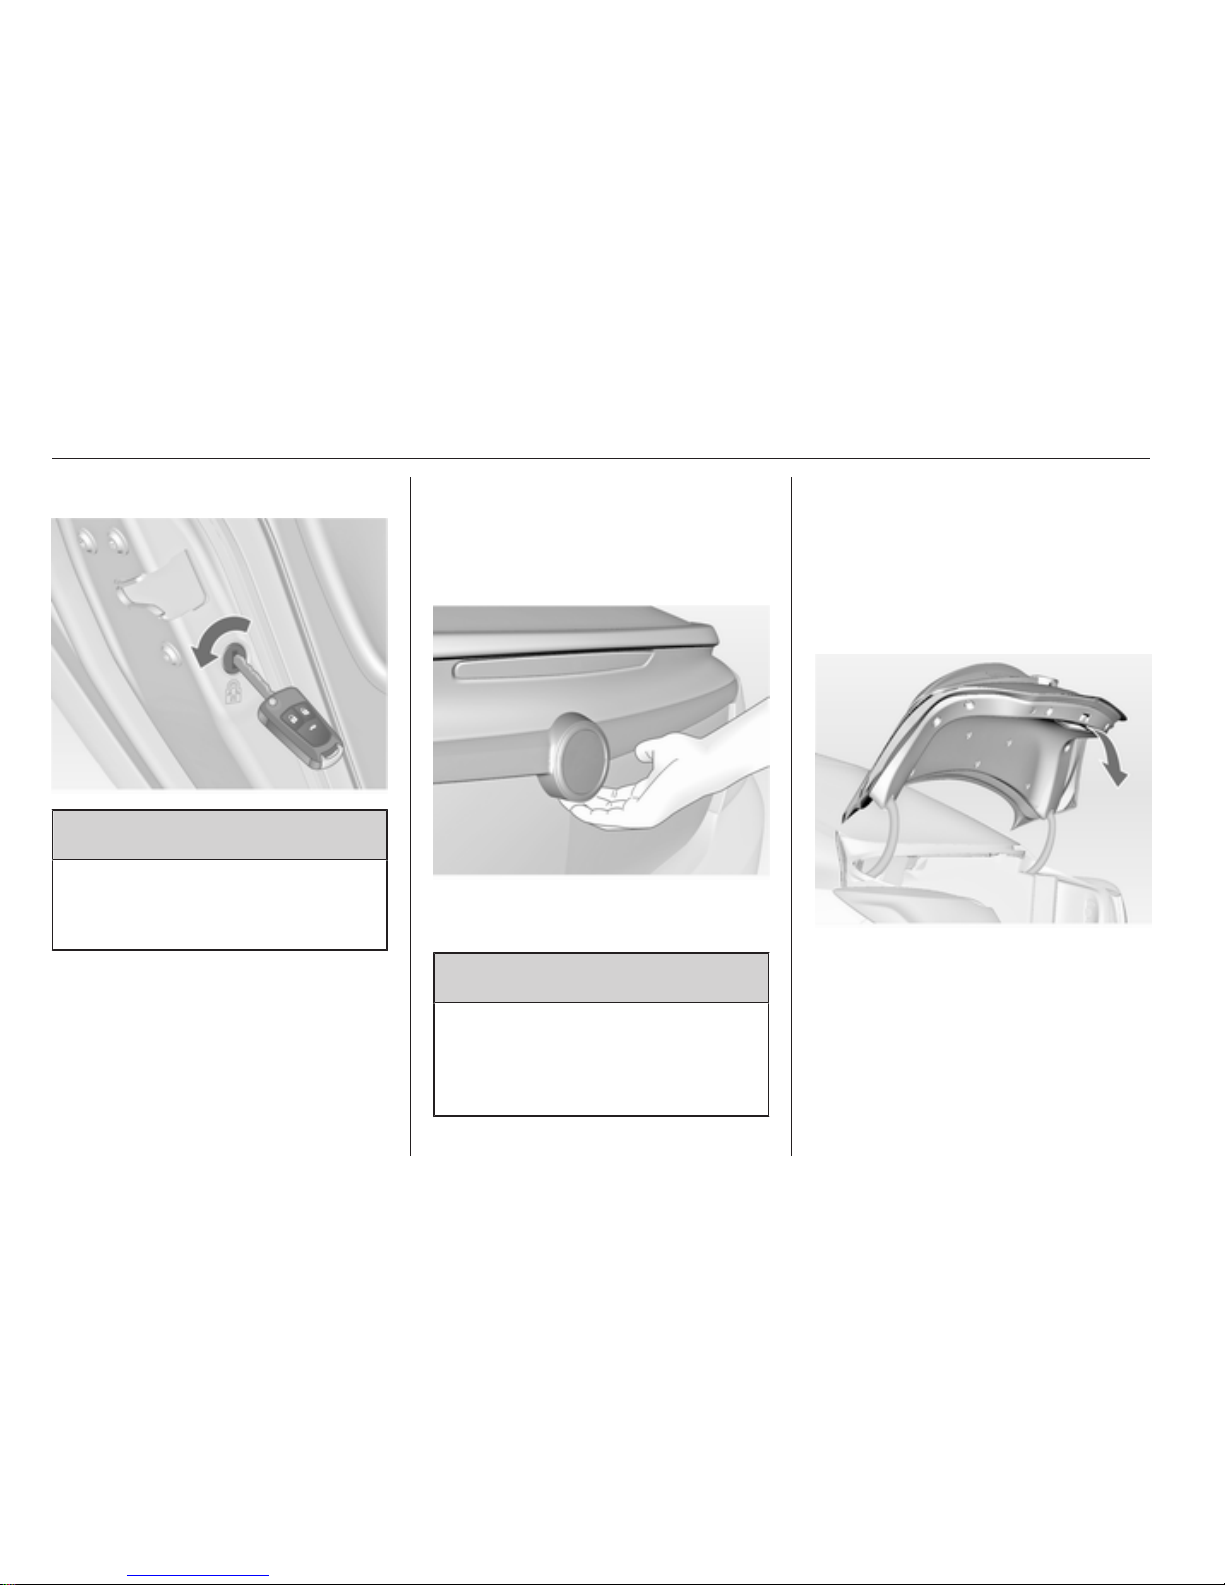
Child locks
9 Warning
Use the child locks whenever
children are occupying the rear
seats.
Using a key or suitable screwdriver,
turn
the child lock in the rear door into
horizontal position. Door cannot be
opened from inside. For deactivation
turn the child lock into vertical
position.
Doors
Load compartment
Opening
Push the button or press button x
on the remote control.
9 Warning
Do not drive with the tailgate open
or ajar, e.g. when transporting
bulky objects, since toxic exhaust
gas could enter the vehicle.
Note
The installation of certain heavy
accessories onto the tailgate may
affect its ability to remain open.
Central locking system 3 21.
Closing
Use the interior handle.
Do not pull the button under the
moulding while closing as this will
unlock tailgate again.

Keys, doors and windows 25
Vehicle security
Anti-theft locking system
9 Warning
Do not use the system if there are
people in the vehicle! The doors
cannot be unlocked from the
inside.
The system deadlocks all the doors.
All doors must be closed or the
system cannot be activated.
If
the ignition was on, the driver's door
must be opened and closed once so
that the vehicle can be secured.
Unlocking the vehicle disables the
mechanical anti-theft locking system.
This is not possible with the central
locking button.
Activating
Press e on the radio remote control
twice within 15 seconds.
Anti-theft alarm system
The anti-theft alarm system is
combined with the anti-theft locking
system.
It monitors:
■ Doors, tailgate, bonnet
■ Passenger compartment including
associated load compartment
■ Vehicle inclination, e.g. if it is raised
■ Ignition
Activation
■
Self-activated 30 seconds after
locking the vehicle (initialisation of
the system)
■
Directly by pressing e on the radio
remote control once more after
locking
■ 30 seconds after locking if the
function "automatic locking when
leaving the vehicle" is activated
Note
Changes to the vehicle interior, such
as the use of seat covers and open
windows
or sunroof, could impair the
function of passenger compartment
monitoring.
26 Keys, doors and windows
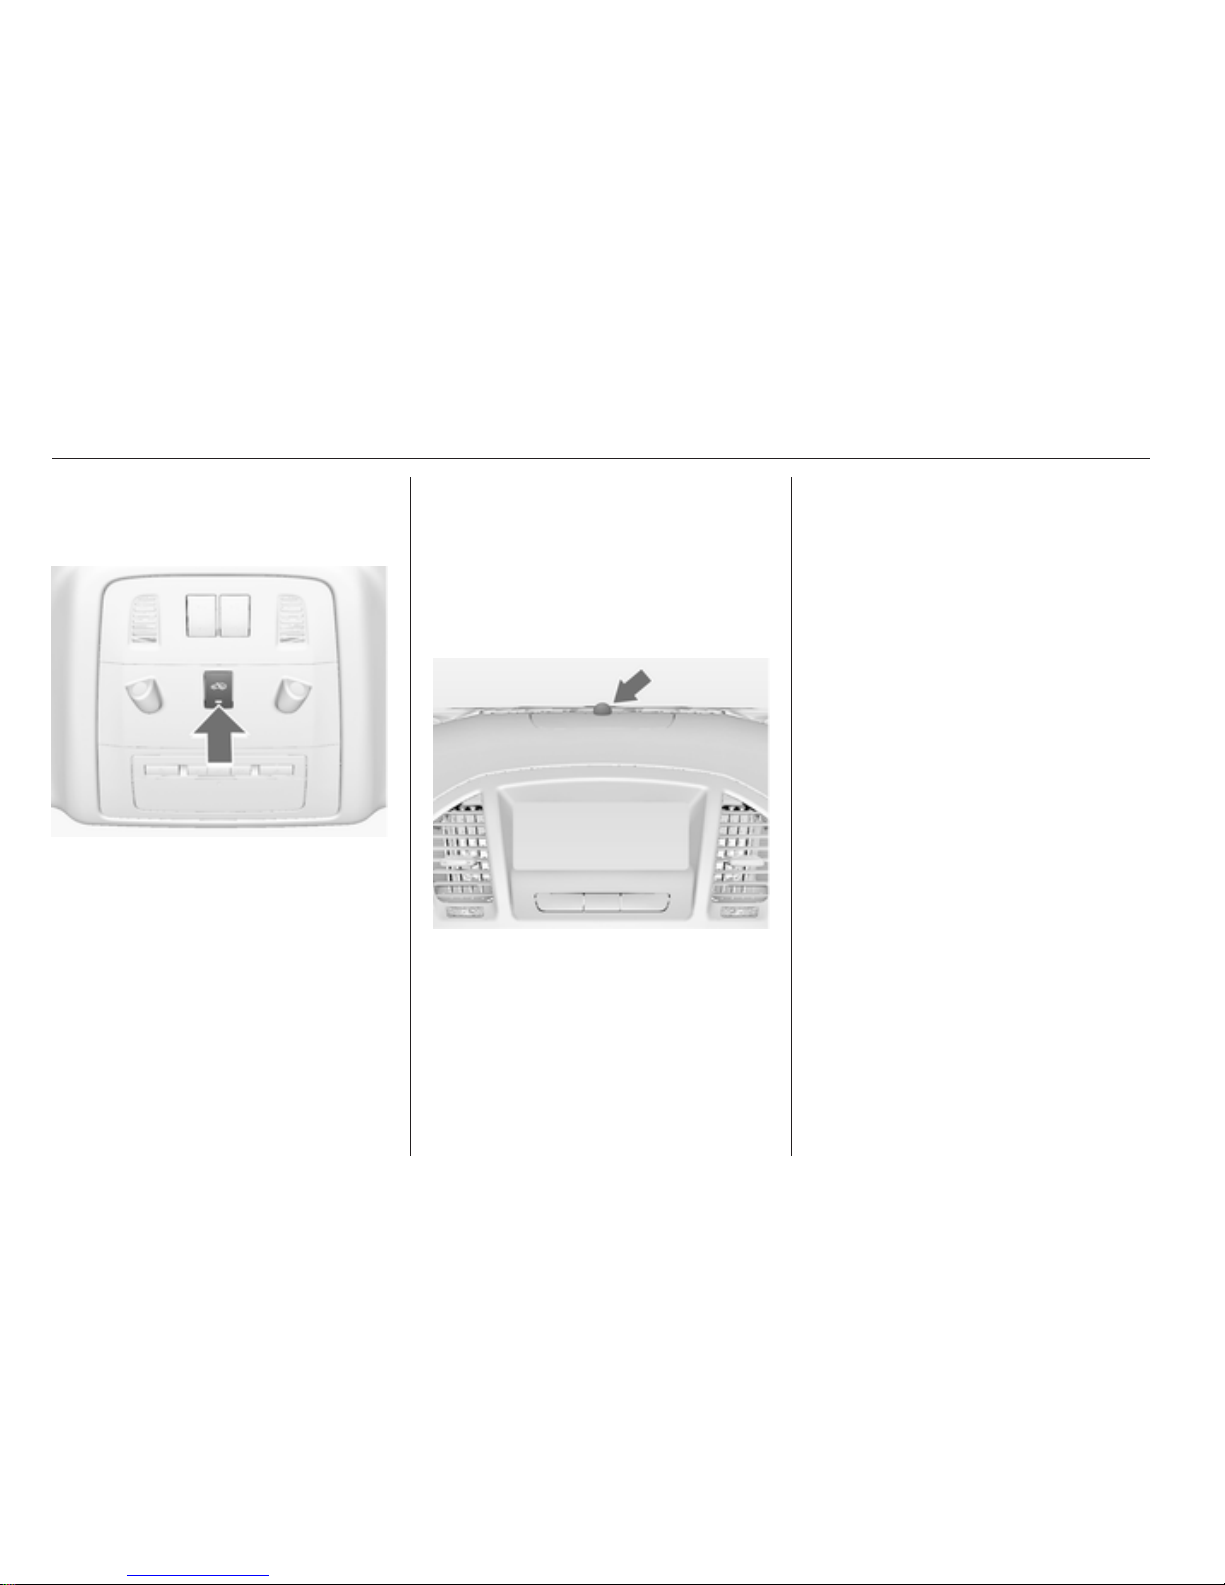
Activation without monitoring of
passenger compartment and
vehicle inclination
Switch off the monitoring of
passenger compartment and vehicle
inclination, when people or animals
are being left in the vehicle, because
of movement and high volume
ultrasonic signals, and when the
vehicle is on a ferry or train.
1.
Close tailgate, bonnet, windows
and sun roof.
2. Press button o. The LED in the
button o illuminates for
maximum 10 minutes.
3. Close doors.
4. Activate the anti-theft alarm
system.
Status message is displayed in the
Driver Information Center.
Status LED
Status LED is integrated in the sensor
on top of the instrument panel.
Status during the first 30 seconds of
anti-theft alarm system activation:
LED
illuminates
= test, arming delay.
LED flashes
quickly
= doors, tailgate or
bonnet not
completely closed,
or system fault.
Status after system is armed:
LED flashes
slowly
= system is armed.
LED flashes
quickly
3 times after
unlocking
= system is disarmed.
Seek the assistance of a workshop in
the event of faults.
Deactivation
Unlocking the vehicle deactivates
anti-theft alarm system.
Alarm
When triggered, alarm sounds by
a separate battery-backed power
sounder, simultaneously hazard
warning lights flash. The number and
duration of alarm release are
stipulated by legislation.
The alarm can be silenced by
pressing any button of the radio
remote control or by switching on the
ignition.
Keys, doors and windows 27
The anti-theft alarm system can be
deactivated only by pressing the
button c or by switching on the
ignition.
Immobiliser
The system is integrated into the
ignition switch and checks whether
the vehicle is allowed to start with the
key being used. If the transponder in
the key is recognised, the vehicle can
be started.
The electronic immobiliser activates
itself automatically after the key has
been removed from the ignition
switch.
If the control indicator d flashes
when the ignition is on, there is a fault
in the system; the engine cannot be
started. Switch off the ignition and
then repeat the start attempt.
If the control indicator continues
flashing, attempt to start the engine
using the spare key and seek the
assistance of a workshop.
Note
The immobiliser does not lock the
doors. You should always lock the
vehicle after leaving it and switch on
the anti-theft alarm system 3 21,
3 25.
Control indicator d 3 27.
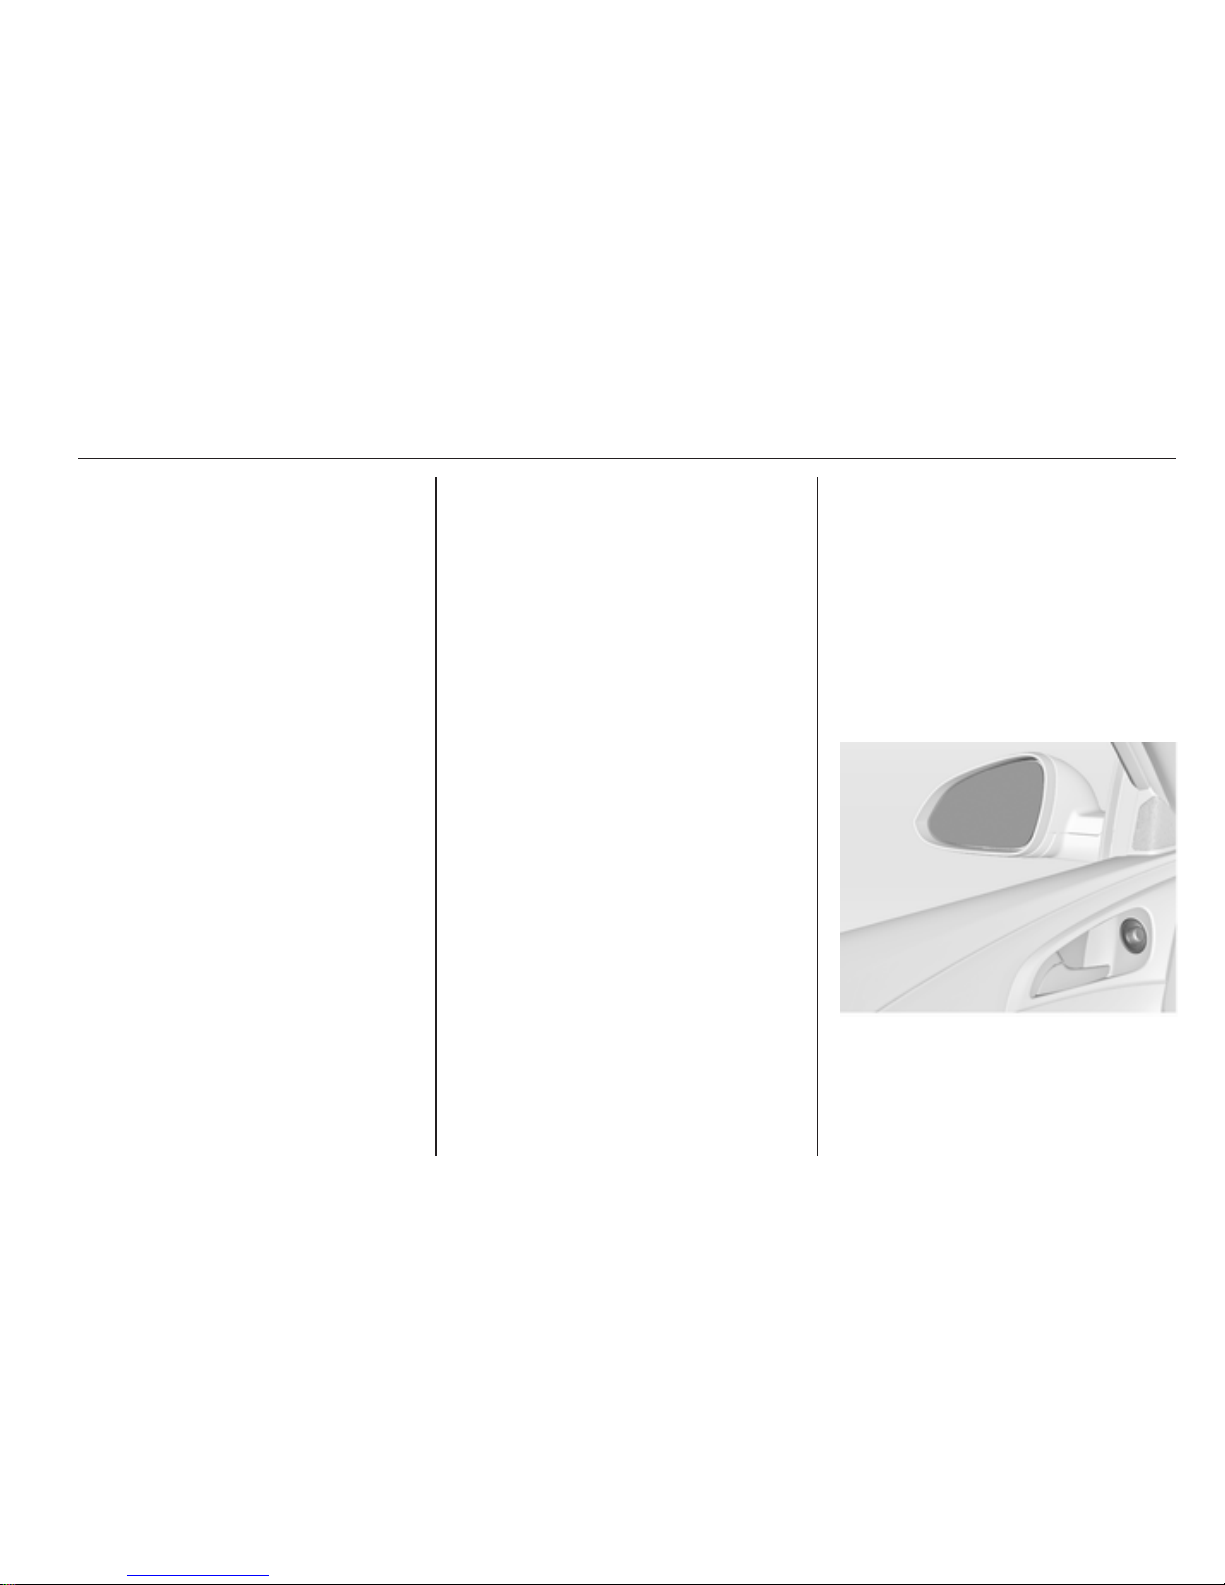
Exterior mirrors
Convex shape
The convex exterior mirror reduces
blind spots. The shape of the mirror
makes
objects appear smaller, which
will affect the abilty to estimate
distances.
Electric adjustment
Select the relevant exterior mirror by
turning the control to left (L) or right
(R).
In position 0 no mirror is selected.
Then swivel the control to adjust the
mirror.
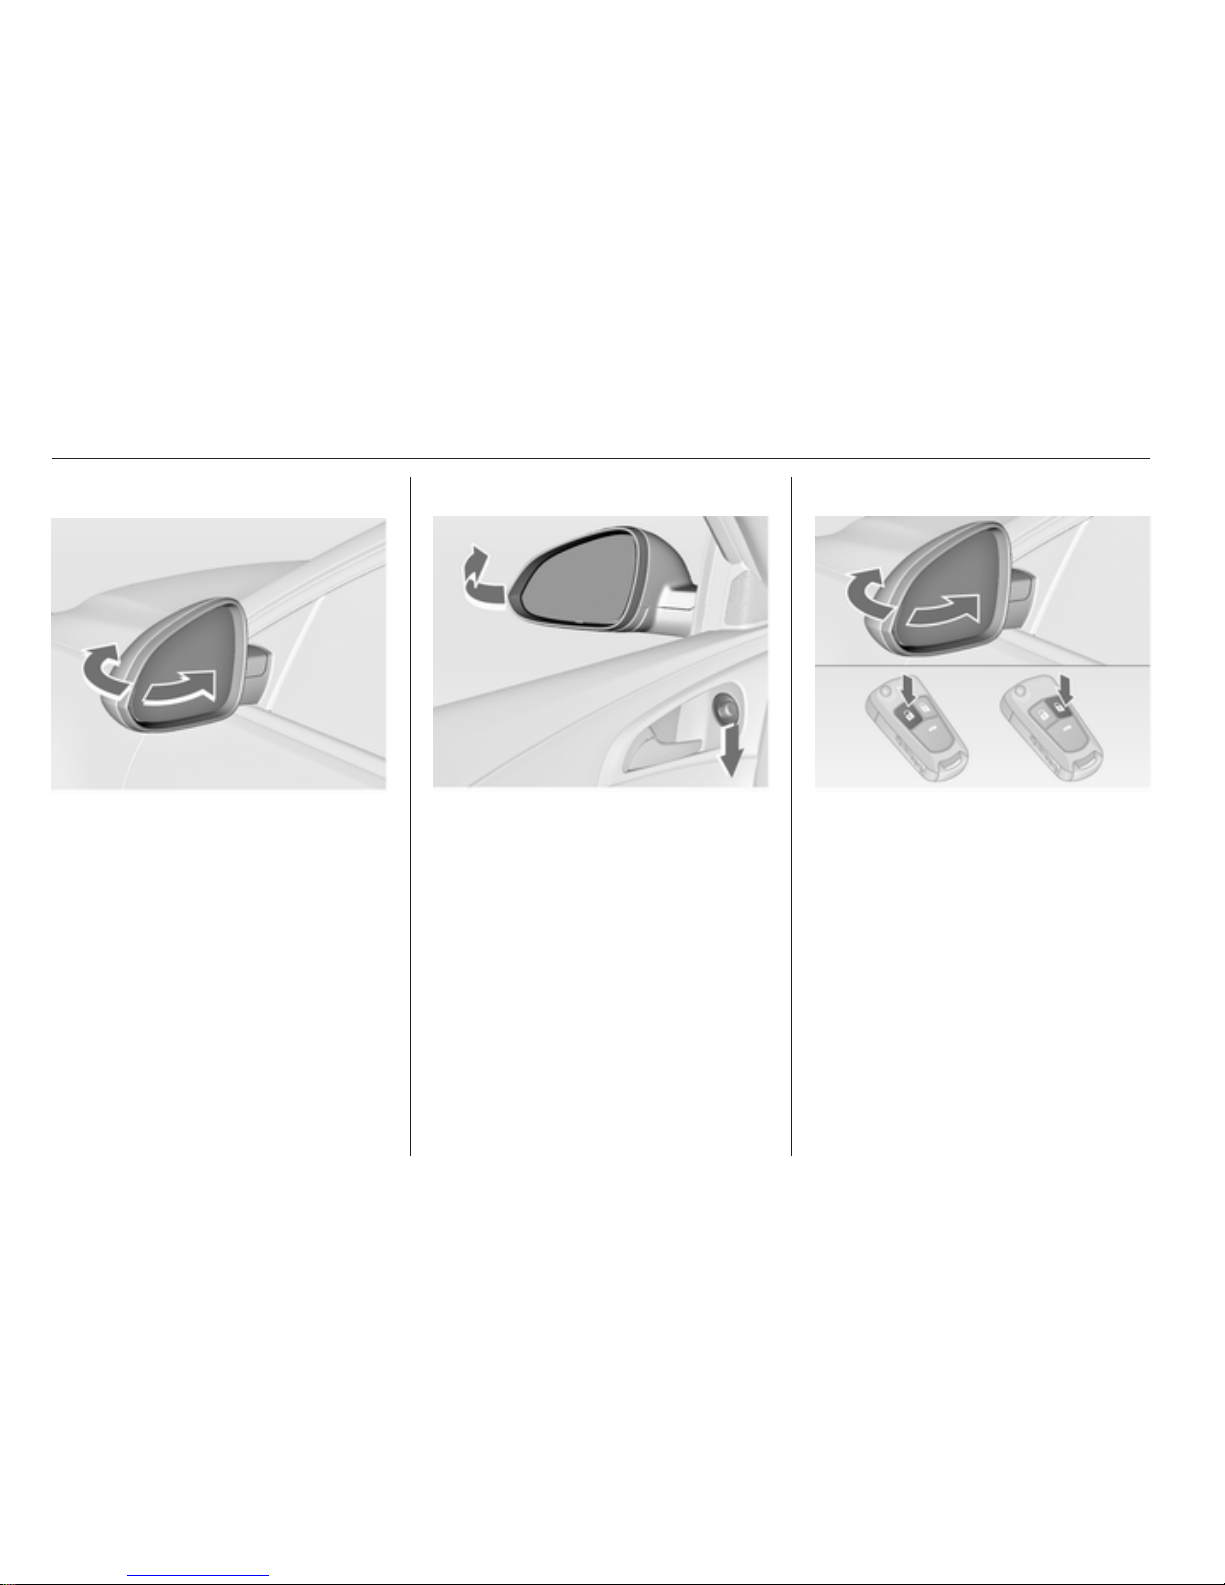
28 Keys, doors and windows
Folding
For pedestrian safety, the exterior
mirrors will swing out of their normal
mounting position if they are struck
with sufficient force. Reposition the
mirror by applying slight pressure to
the mirror housing.
Electric folding
Turn control to 7, then push the
control down. Both exterior mirrors
will fold.
Push the control down again - both
exterior mirrors return to their original
position.
If an electrically retracted mirror is
manually extended, pressing down
the adjuster will only electrically
extend the other mirror.
Folding mirrors from outside
Press e short to fold in mirrors.
Press c short to fold out mirrors.
If the mirrors were folded in by the
control in the driver`s door, they are
not folded out by pessing c.
Activation or deactivation of this
function
can be changed in the menu
Settings in the Info-Display. Vehicle
personalisation 3 84.
The settings can be stored by the key
being used 3 21.
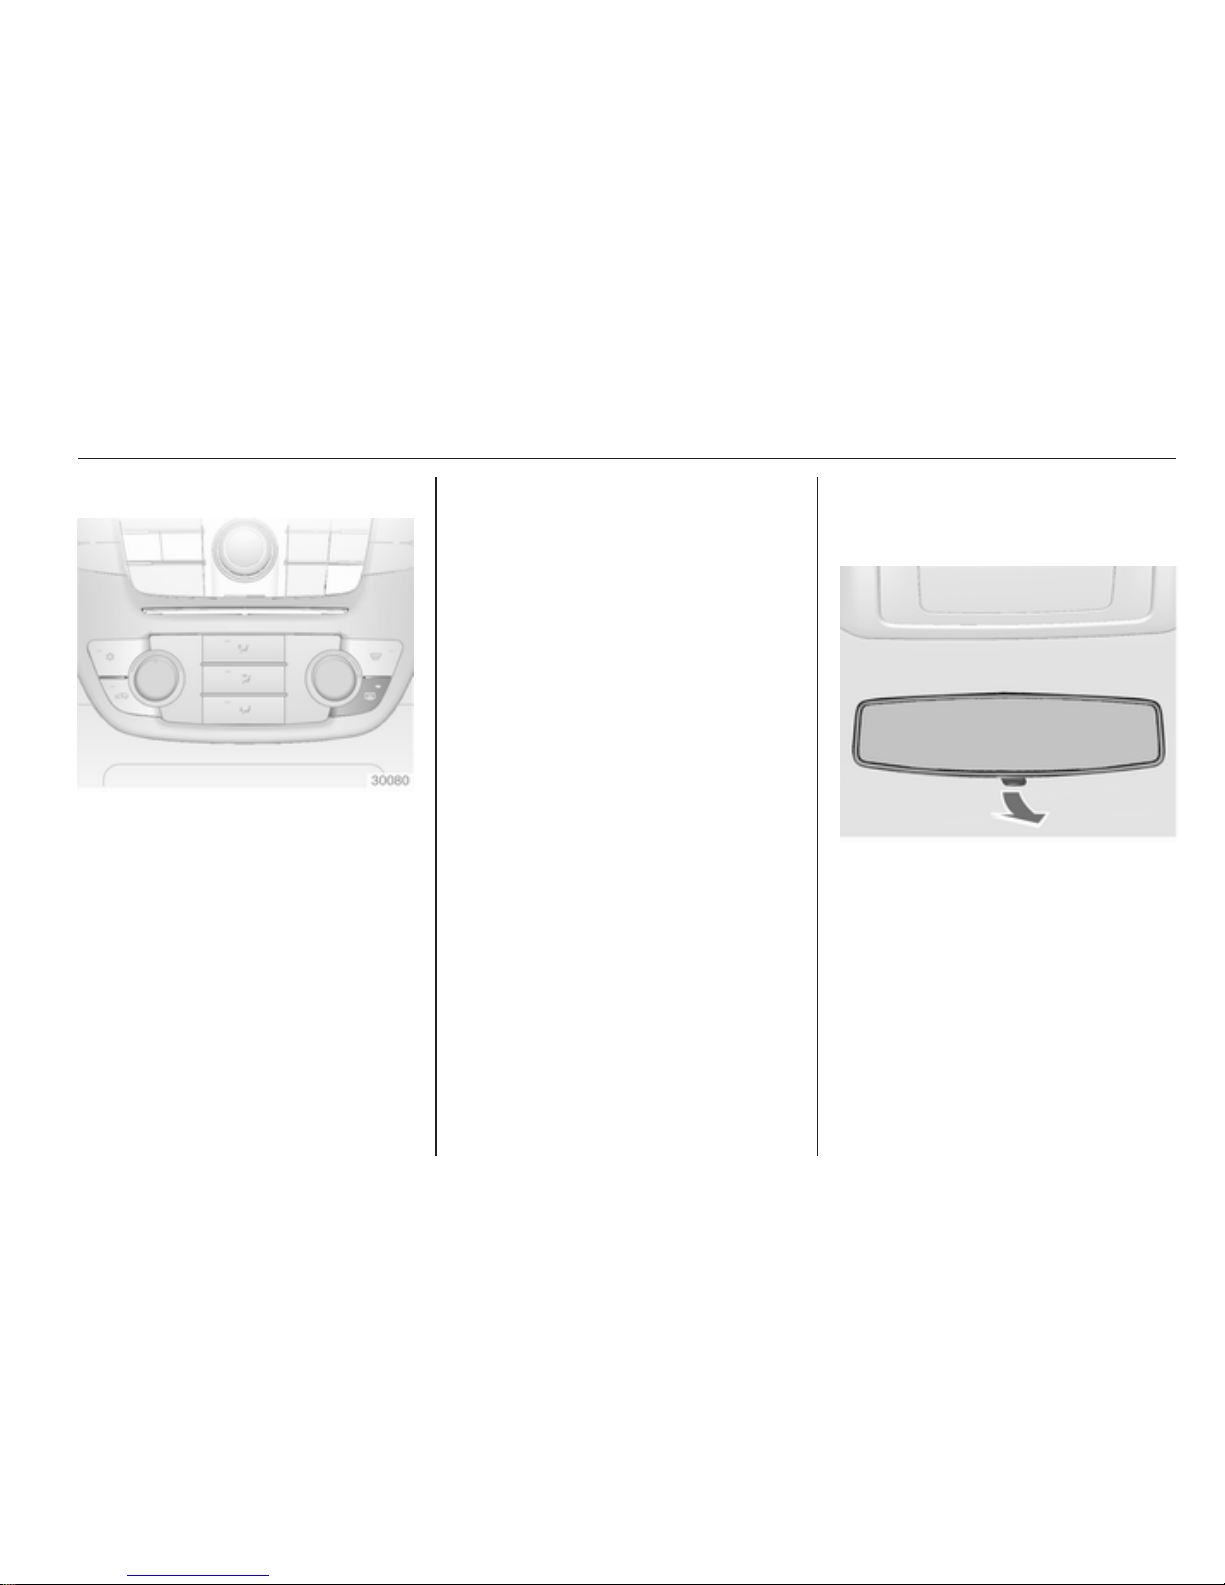
Keys, doors and windows 29
Heated
Operated by pressing the Ü button.
Heating works with the engine
running and is switched off
automatically after a short time.
Parking assist
Both exterior mirrors are
automatically aimed at the rear tyres
as
a parking aid when reverse gear is
selected, except operation with trailer
attached.
Activation or deactivation of this
function can be changed in the menu
Settings in the Info-Display. Vehicle
personalisation 3 84.
Interior mirrors
Manual anti-dazzle
To reduce dazzle, turn the lever on
the underside of the mirror housing.
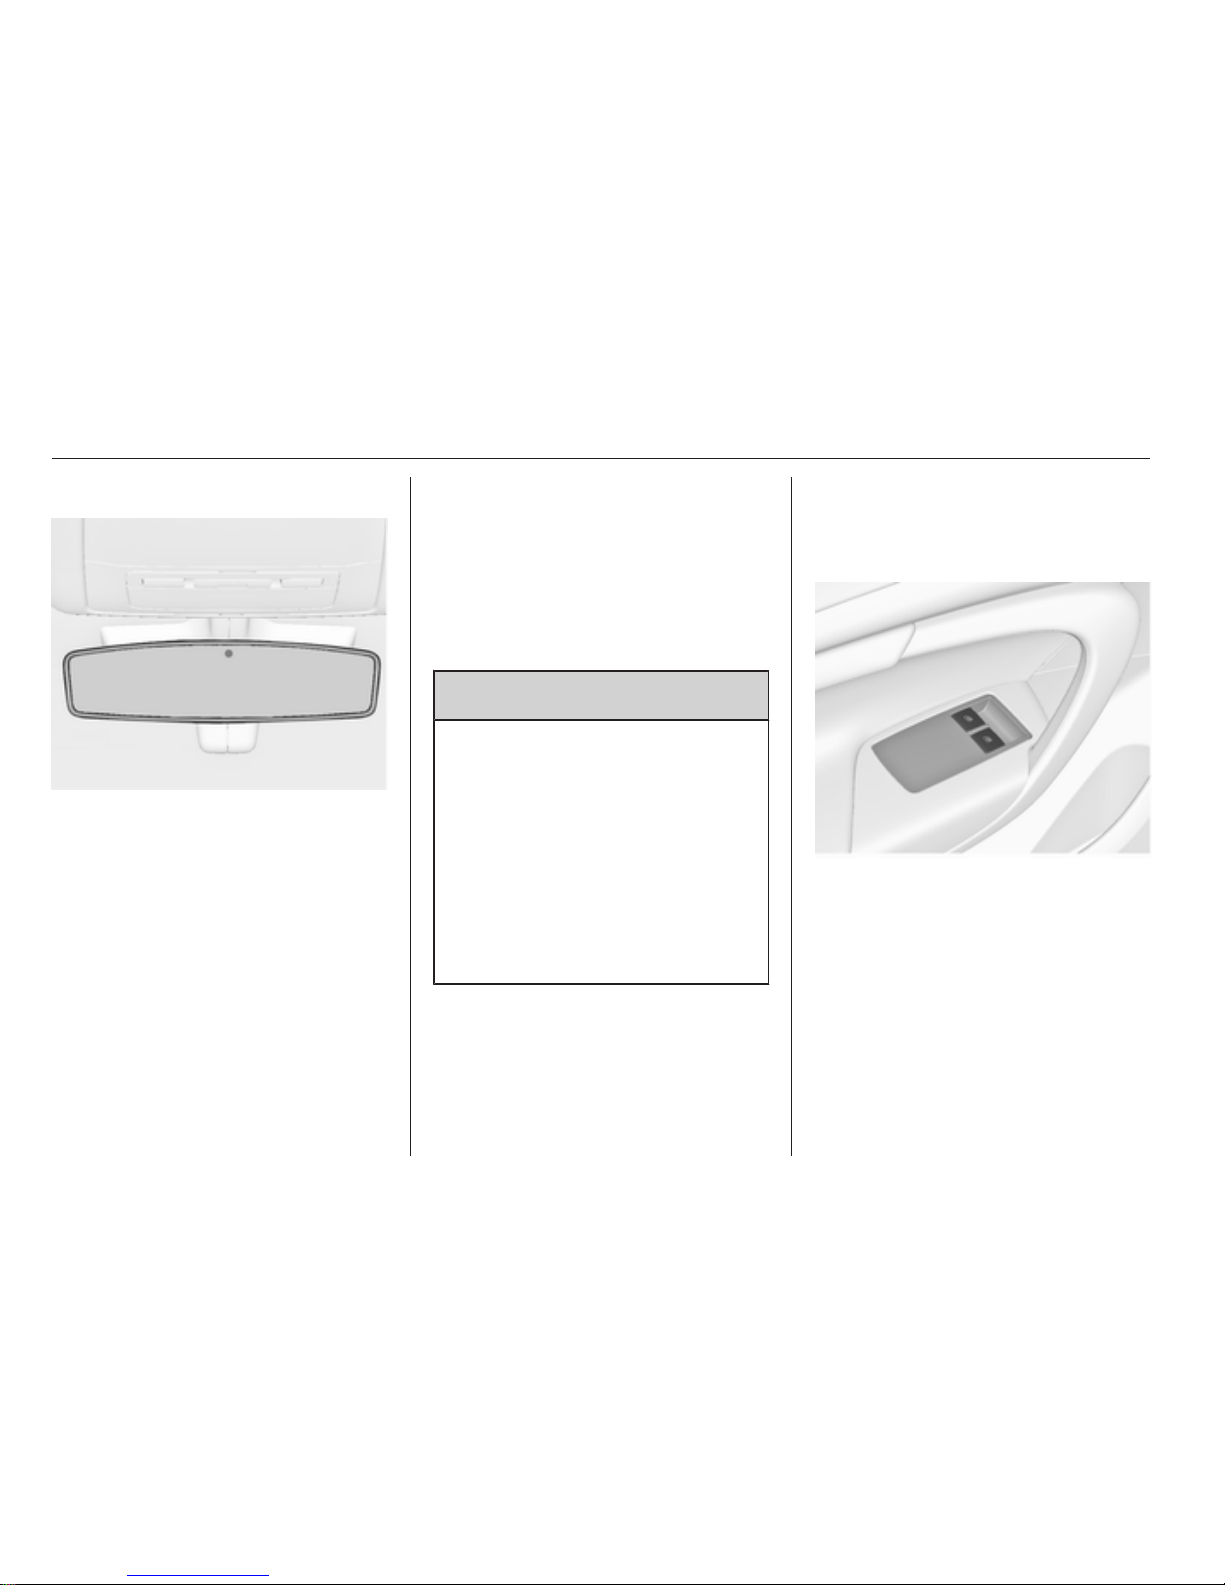
30 Keys, doors and windows
Automatic anti-dazzle
Dazzle from following vehicles at
night is automatically reduced.
Windows
Manual windows
The door windows can be opened or
closed with the window winders.
Power windows
9 Warning
Take care when operating the
power windows. Risk of injury,
particularly to children.
If there are children on the rear
seat, switch on the child safety
system for the power windows.
Keep a close watch on the
windows when closing them.
Ensure that nothing becomes
trapped in them as they move.
Power windows can be operated
■
with ignition on,
■ within 10 minutes after switching
ignition off,
■ within 5 minutes after opening
a door.
After switching off the ignition,
window operation is disabled when
the driver`s door is opened, then
closed and locked.
Operate the switch for the respective
window
by pushing to open or pulling
to close.
Pushing or pulling lightly to the first
detent: window moves up or down as
long as switch is operated.
Pushing or pulling stronger to the
second detent and then releasing:
window moves up or down
automatically with safety function. To
 Loading...