

Opel GT 2011 Owner's Manual

OPEL GT
Operation, Safety, Maintenance

2
Data specific to your vehicle
Pleas e en t er your vehicle ’s d ata he re to ke ep it ea sily access ible.
This information is available under the section "Technical da ta" as well as on the identification plate .
Fuel
Designation
Engine oil
Grade
Viscosity
Tyre pressure
Ty re si ze wi th full load
Summe r tyres Front Rear
Winter tyres F ront Rear
Weights
Permissible Gross Vehicle Weight
– EC kerb weight
=Loading

3
Your Opel GT
is an intelligen t combination of forwardlooking technology, impressive safety,
environmental friendliness and e conomy .
It now lies with you to drive your vehicle
safely and ensure that it performs
perfectly. This Owner's Manual provides
you with all the necessary information to
that end.
Ma ke sure your passengers are aware of
th e poss i ble risk of a ccid en t a nd inju ry
which ma y result from improper use of the
vehicle.
You must always comply with the specific
laws of the country that you are travelling
th r o u gh. Thes e la ws ma y d iffe r fr om the
information in this Owner’s Manual.
When ins tructed to consult a workshop,
we recommend that you consult an Opel
Service Partner.
All Ope l Service Partners offer first-class
serv ice at reasona ble prices.
You will receive quick, re liable and
individual service.
Expe rienced me chanics, trained by Opel,
work according to specific Opel
instructions.
The Owner's Manual should always be kep t
in the vehicle: Ready to hand in the glove
com partment.
Make use of the Owner's Manual:
z Its "In brief" section will give you an initial
overview.
z The table of contents at the beginning of
the Owner’s Manual and within the
individ ual chapters will show you where
everything is.
z Its index will he lp you find what y ou
want.
z It will familiarise y ou w ith the
sophisticated technology.
z It will increase your pleasure in your
vehicle.
z It will help you to handle your v ehicle
expertly.
The Owner’s Ma nual is de signed to be
clearly laid-out and easily understood.
This symbol signifies:
6 Continue reading on next page .
3 The asterisk signifies equipment not
fitted to all vehicles (model variants,
engine options, models specific to one
co u n try , opti o n al eq uipm ent , O pel
genuine parts and accessories).
9 Warning
Text marked 9 Wa rning provides
inform ation on risk of accident or injury.
Disregard of the instructions may lead to
injuries or endanger life.
Inform your passengers acc ordingly.
Yellow arrows in the illustrations serve as
points of reference or indicate some action
to be performed.
Bla ck arrows in the illustrations indicate a
reaction or a second a ction to b e
performed.
Directional data, e.g. left or right, or front
or back, in the descriptions always relates
to the di rec ti o n o f tr av e l .
We wish you many hours of pleasurable
driving
You r O pel T ea m

4

5
Contents
In b rie f ........ .... ......... ......... ......... ......... ........ . 6
Locks , do ors, window s .... .... ..... ......... ...... 21
S eats, in terio r. ..... ........ ......... ......... ......... .. 37
Instruments, co n trols.. ..... ......... ......... ...... 55
Ligh ting . ..... .... ......... .... ..... .... ..... .... ..... ...... 7 3
Infotain ment system .. ..... .... ......... ......... .. 7 8
C lim ate c ontro l ....... .... ......... ......... ......... 10 2
Driving an d op eration .... .... ......... ......... 11 0
S elf-h elp, veh icle care ..... .... ......... ......... 130
S ervice , mainte na nce . ......... ......... ......... 165
Te chnical data ....... ......... .... ..... .... ..... .... 172
Inde x.. ......... ......... ........ ......... ......... ......... 184
6In brief
In brief
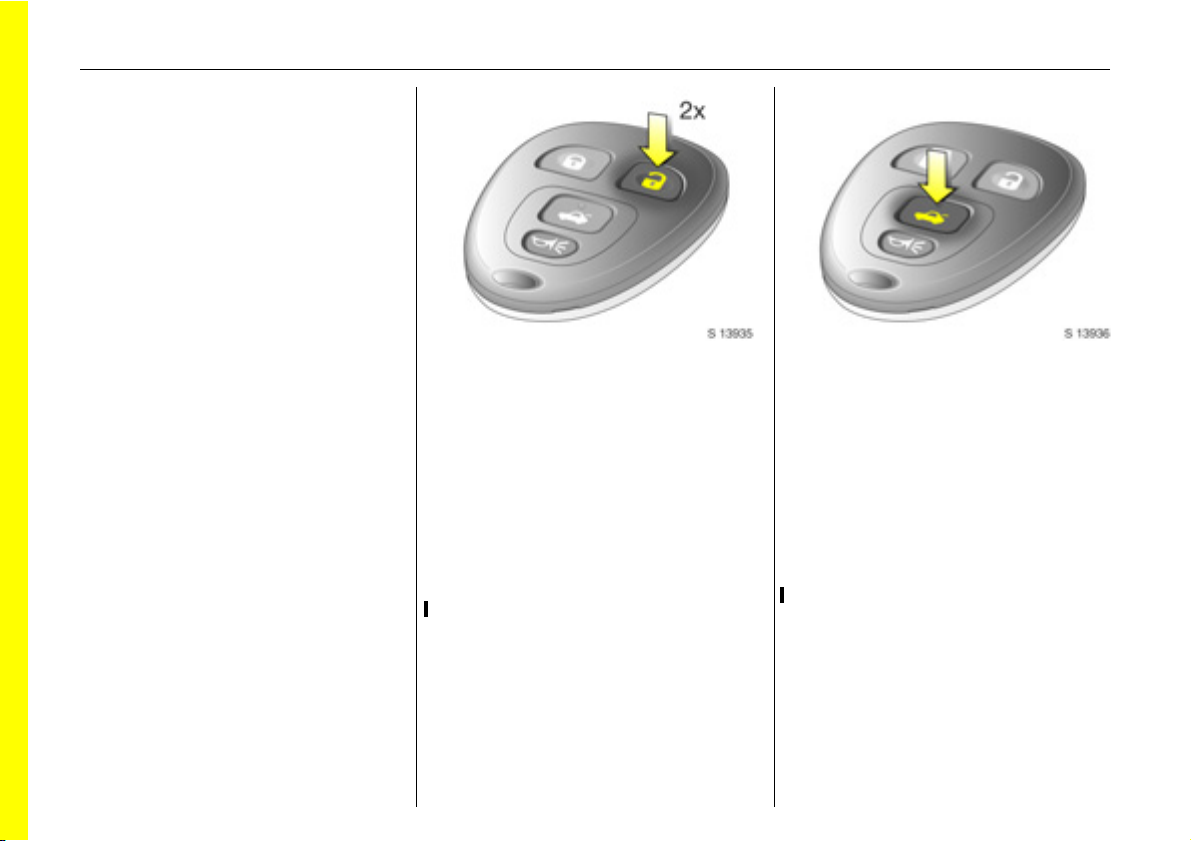
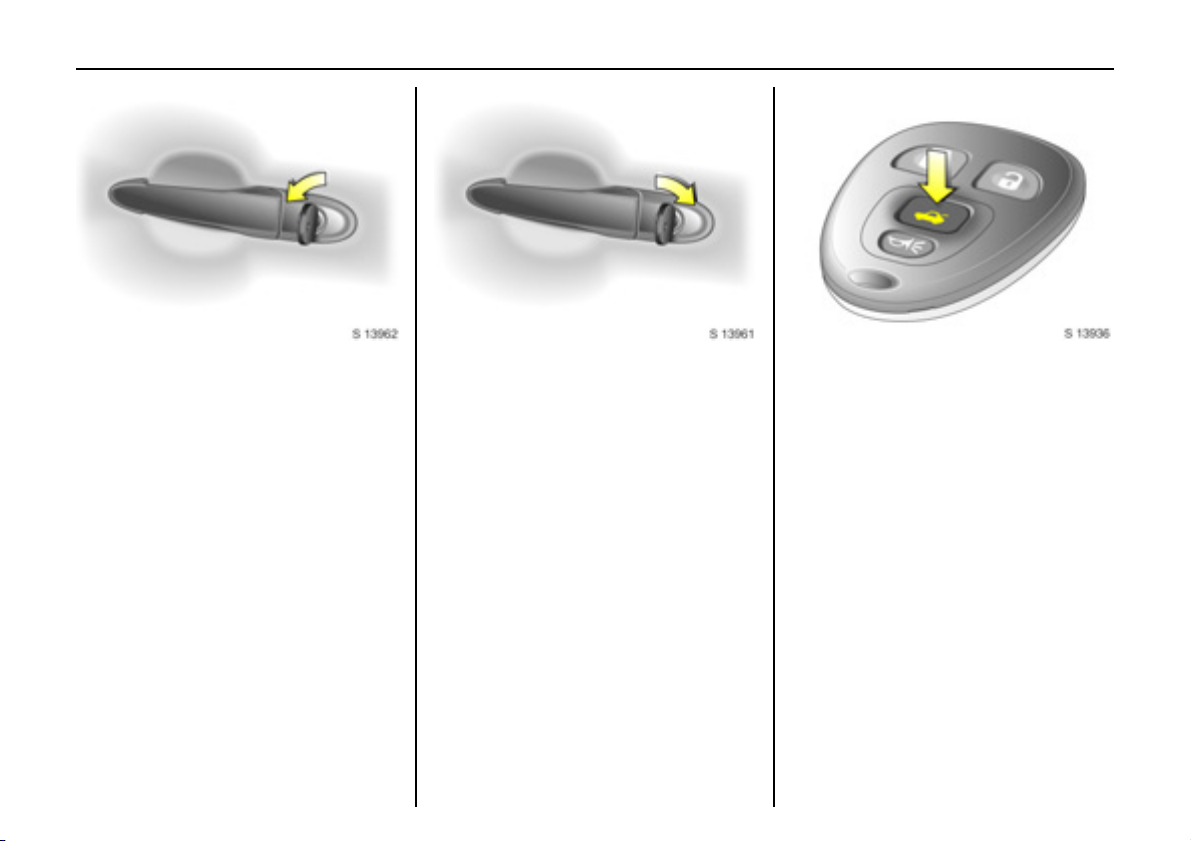
To unlock and open the doors:
Press button c on remote control
to unlock driver’s door,
pull door handle
Press button c ag ain within 5 seconds to
unlock passenger’s door.
The luggage compartment rema ins closed.
6 Door locks - see page 21,
Keys - see page 21,
Elec tronic imm obiliser - see page 21,
Remote control - see page 22,
Central locking system - see page 2 4.
To op en luggage compartment:
Press and hold button s
on remote control,
lift luggage compartment lid
towards rear of vehicle
6 Remote control - see page 22,
Central locking s ystem - see page 24,
Luggage compartme nt - see page 2 6,
Luggage compartme nt release button -
see page 2 7,
Emergency luggag e comp artment re lease
handle - see page 27,
Soft top - see page 31.
In brief 7
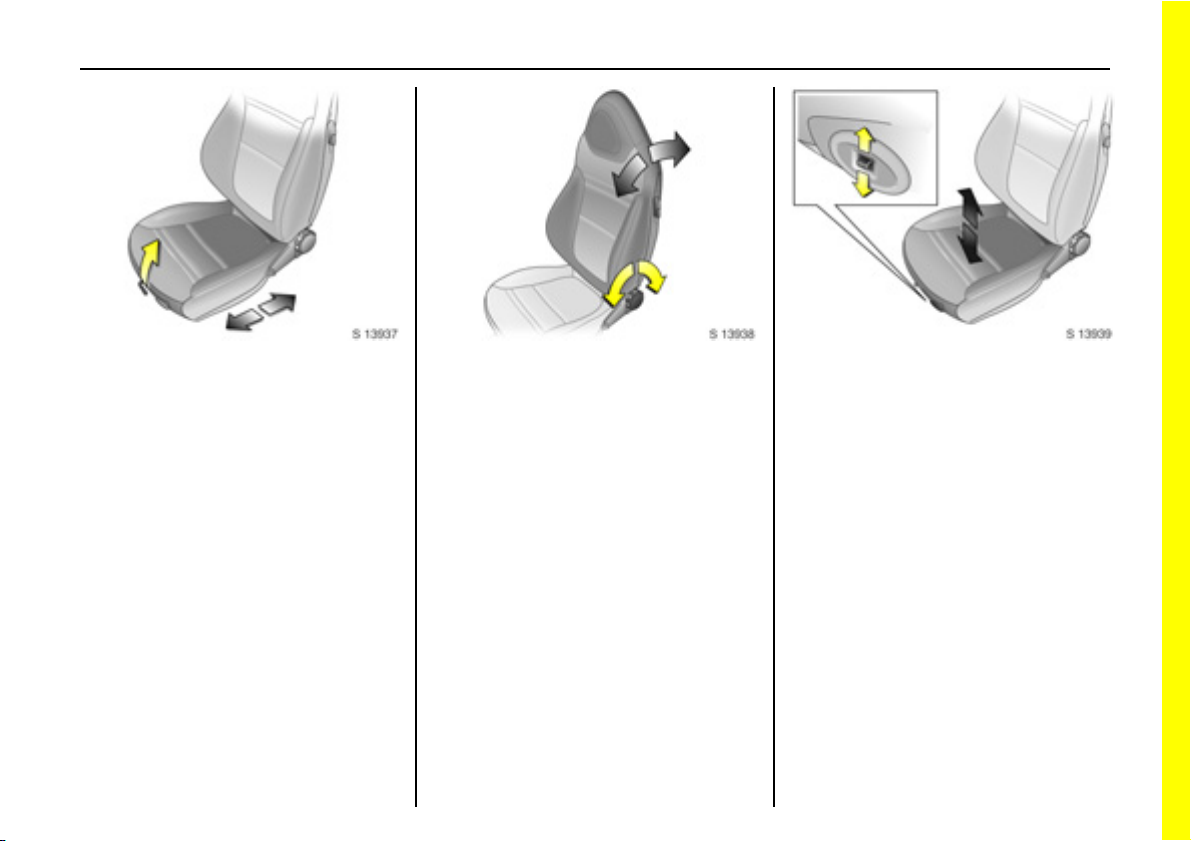
To ad jus t se ats:
Pull handle, slide seat,
release handle
6 Seats - see pa ge 37 ,
Seat pos ition - see page 38.
Adjusting seat backrests:
Turn handwheel
Move seat backrest to suit seating position.
Do not lean on seat when adjusting the
se a t back res t.
6 Seats - see page 37,
Seat position - see page 3 8.
A dju st in g d riv er’ s s eat he ig ht:
Press and hold switch up or down
until desired position is reached
6 Seats - see p age 37,
Seat position - see page 38.

8In brief
Fitting seat belt:
Draw seat b elt smoothly from
inertia reel, guide over shoulder,
enga ge in buc kle
The belt must not be twisted at any point.
The lap be lt must lie snugly against the
body.
The backrests must not be tilted back too
far (recom mende d max imum tilting angle
approx. 25o).
To release belt, press re d button on belt
buckle.
6 Seat position - see page 38,
Three-point seat belts - see pag e 40 ,
Opel Full Size airbag system - see page 45.
Adjusting electrical exterior
mirrors:
Four way switch in driver’s door
Move switch below four way switch to left
or right from centre position: four way
switch operates corresponding mirror.
6 Further information - see pag e 29.
Adjusting interior mirror:
Swivel mirror housing
Swivel lever on underside of mirror housing
to re duce dazzle at night.
Take care when driving with interior mirror
adjusted for night vision. Rear view may be
slightly distorted in this position.
6 Further information - see page 29.
In brief 9
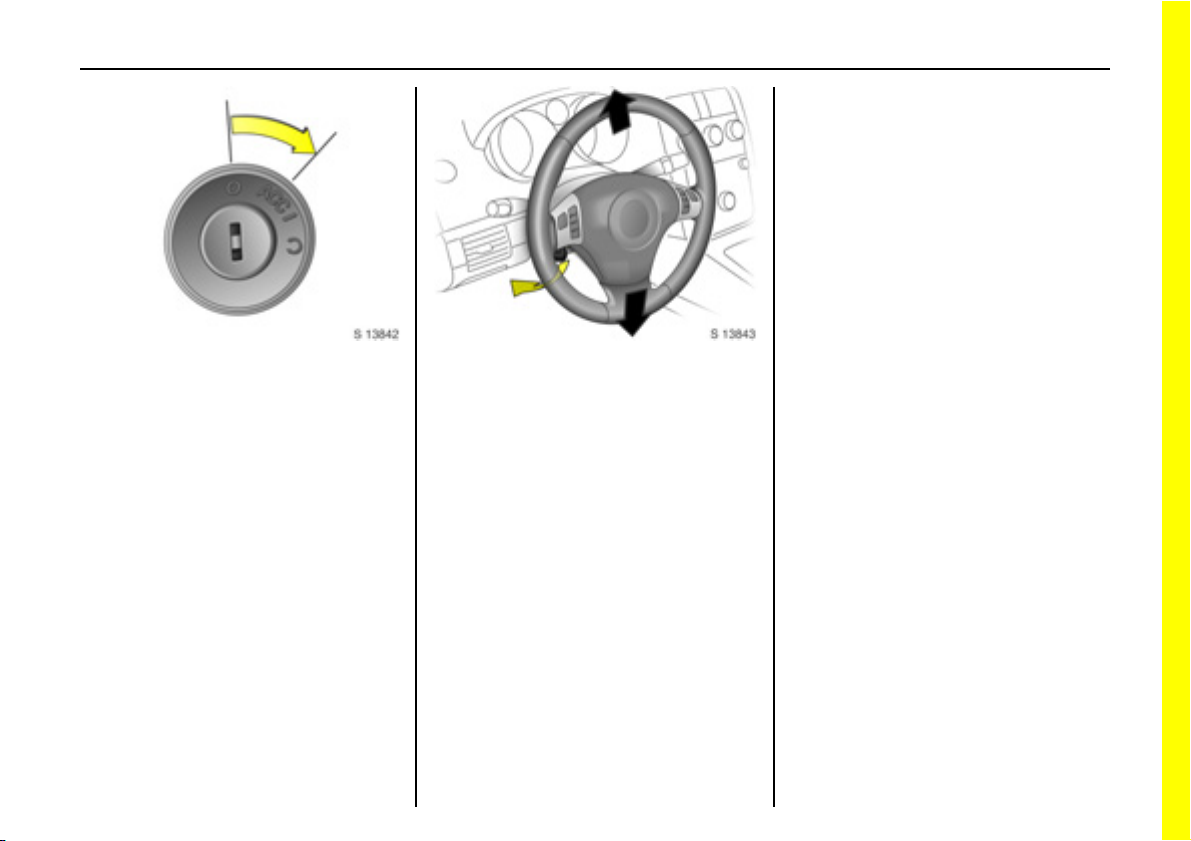
St e er ing col u m n lock and ig niti on:
Rotate steering wheel slightly,
turn key to position ACC
Po sition s:
JJJJ = Ignition off
ACC = Steering unlocked, ignition off
I = Ignition on
Y =Start
To lock the steering wheel, switch ignition
off, remove key and turn steering wheel
slightly until lock is engage d.
6 Starting - see page 1 7,
Parking the vehicle - see page 17,
Electronic immobiliser - see pag e 21.
Steering wheel adjustment:
Sw iv el le v e r dow n , ad jus t h eig ht,
swivel lever up, engage
Do not adjust steering wheel unless vehicle
is stationary and steering column lock has
been released.
Push the lever firmly upwards to ensure
that the steering wheel is locked in position.
6 Opel Full Size airbag system see p age 45.
10 In brief
s0013844.tif

In brief 11
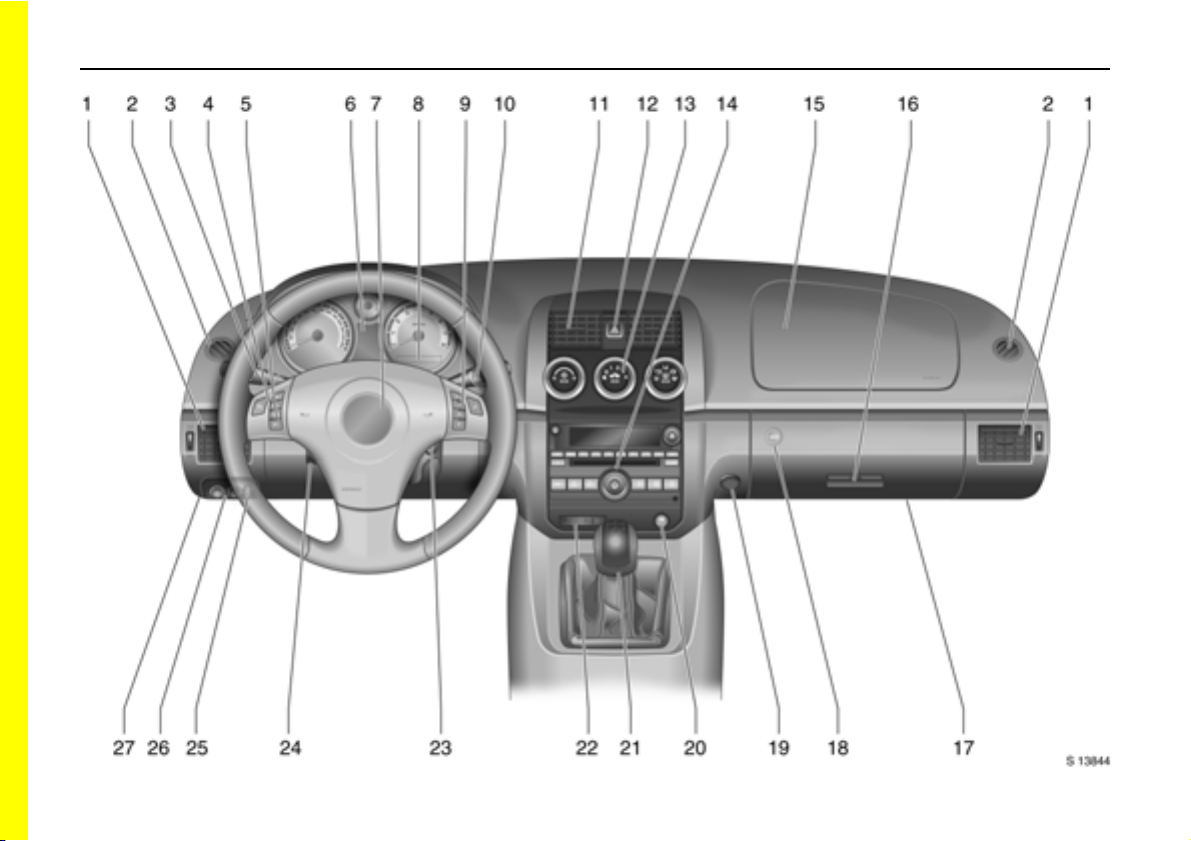
Page
1 Side air v ents ... ..... ......... ........ ......... 103
2 Doo r window de frost er v ents .... .... 10 3
3 Tur n signals . .... ......... ..... .... .... ..... 14, 74
high or low be am .. ......... ........ ..... 13, 74
head lamp flash ......... ......... ......... 13 , 7 4
parkin g la mps .. ..... .... ......... ......... 13 , 7 3
auto ligh t control .. ......... ........ ......... ..7 3
4 Cruise control
remote control on steering wheel.. 121
5 Drive r information centre
remote control on steering wheel....60
6 Instrume nts ... ......... ......... ........ ......... ..5 5
7 Drive r’s airbag.. ..... ......... .... ......... .... .. 4 5
Horn . ........ ......... ..... ......... ........ ......... ..14
8 Drive r information centre .. .... ..... .... .. 5 9
Pa ge
9 In fot a in m e nt sy ste m 3
remote control on steering wheel.... 79
10 Windscreen wipers,
windscreen washer system...15, 71, 72
11 Centre air ve n ts ......... ........ ......... ..... 10 2
12 Hazard w arning ........ ........ ......... .1 4, 7 5
13 Climate co ntrol .... ......... ......... ......... 1 0 2
14 In fo t ain me nt sy ste m 3 . .... ..... ......... ..7 8
15 Passen ge r’s airbag .. ........ ..... ......... .. 45
16 Glove com partment.. .... ......... ......... .. 51
17 Fus e bo x
(unde r in strument p anel) ...... ......... 1 4 3
18 Luggage comp artment re lease
(in g lov e com partment) ... ..... ......... .. 27
19 Accessory socket.. ..... .... ......... .... ....... 54
Page
20 ESP/Tractio n Cont rol .. ..... ......... ..... 118
21 Ge ar s hift le ver ......... .... ......... ......... ... 1 6
22 Passenger’s seat belt warning
de vice . ......... ........ ......... ......... ......... ... 43
S eat occu pancy recognition ......... ... 48
23 Ignitio n switch. .... ..... ......... ......... ........ ..9
24 S teerin g w heel a djustment .. ..... ........ ..9
25 Instrument panel, informa tion
dis play illumination ..... ..... ......... .... ... 7 6
26 Front fog lamps,
fo g tail lam p ....... ..... ......... ......... . 13, 75
27 Bonnet release
(u nder in s trum ent pan el) . ......... ..... 130

12 In brief
Control indicators
Anti-lock Brake System (ABS):
u
see pages 55, 124.
Luggage comp artment op en:
s
see pages 28, 55.
Fog t ail la mp:
r
see pages 55, 75.
Turn signals:
O
see pages 14, 56, 74.
Headlamp high be am :
P
see pages 13, 56, 74.
Exhaust emissions:
Z
see pages 56, 116.
Brake system, clutch system:
R
see pages 56, 70, 124, 156 .
Engin e oil pressure:
I
see page 5 7.
Cool ant temp era ture:
W
see page 5 7.
Airbag systems, belt tensioners:
v
see page s 41, 45, 57.
Driver’s seat belt:
X
see page s 39, 43, 57.
Alternator:
p
see page 5 8.
Electr oni c Sta bility P rogram (ESP),
v
Electr oni c Sta bility Contr ol (ESC ):
see pages 5 8, 118.
Fro n t f o g lam ps :
>
see pages 5 8, 75.
Electr oni c imm obiliser:
o
see pages 2 1, 58.
Seat occup ancy recognition:
W
passenger’s airbag deactivated see page 48.
Seat occup ancy recognition:
V
passenger’s airbag activated see page 49.
Passenger’s sea t belt:
k
see pages 3 9, 43.
In brief 13
Exterior lamps: Turn light switch
9 =High or low beam
8 =Parking lamps
AUTO = Auto light control
X = Auto light control
off/on
6 Headla mp warning de vice - see page 71,
Lighting - see page 73,
Headlamps when driving abroad see page 7 7.
Front fog lamps, fog tail lamp:
Press button
> =Front fog lamps
r =Fog tail lamp
6 Front fog la mps - see page 75,
Fog tail lamp - se e pa ge 75.
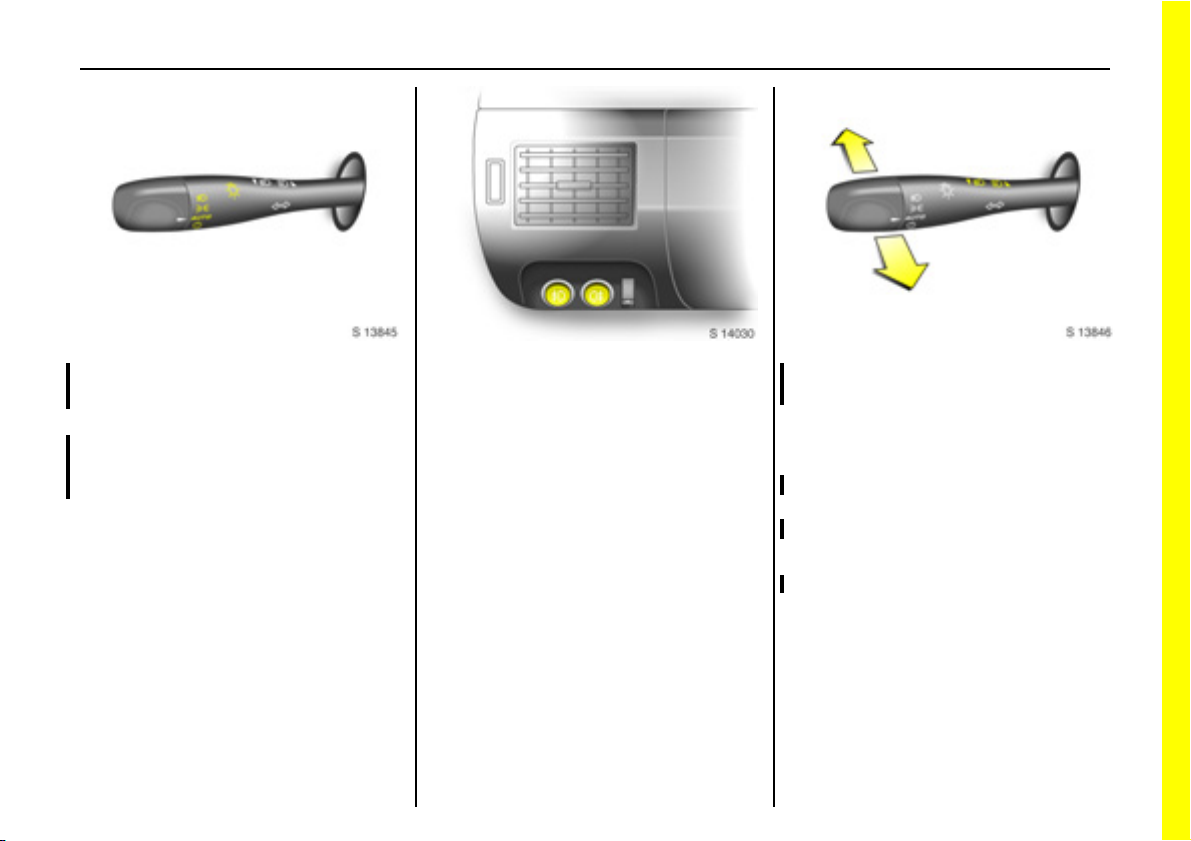
Headlamp flas h, h igh and low
beam:
Headlamp
flash
= Pull lever towards
steering wheel
and release
High beam = Push lever
forwards
Low beam = Pull lever towards
steering wheel
6 High beam, headlamp flash see page 7 4.
14 In brief
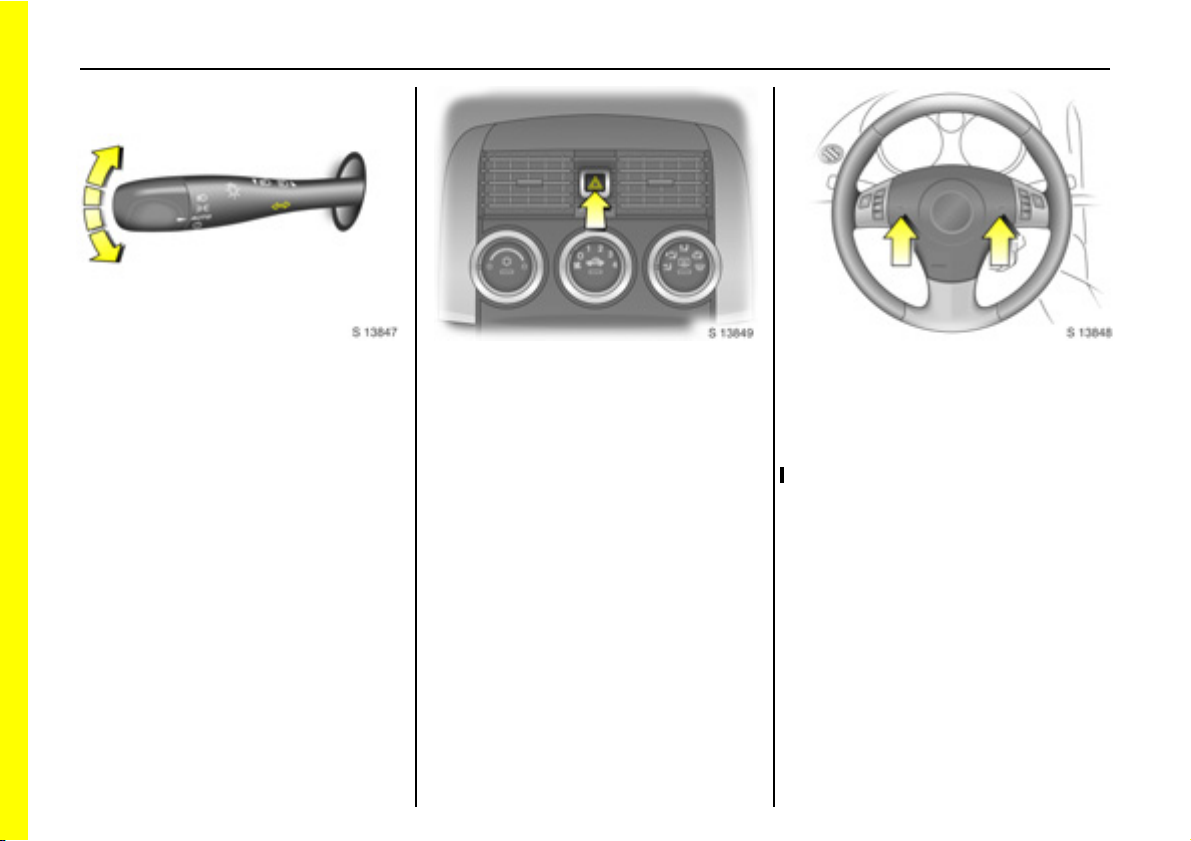
Activate turn signals:
Righ t = Move leve r up
Left = Move lever down
6 Turn signals - see page 74.
Hazard warning lamps:
On = Press ¨
Off = Press ¨ again
6 Haz ard warning lamps - see pa ge 75 .
Activate horn:
Press j on steering wheel
6 Opel Full Size airbag system see page 4 5,
Remote control on steering wheel see page 7 9.
In brief 15
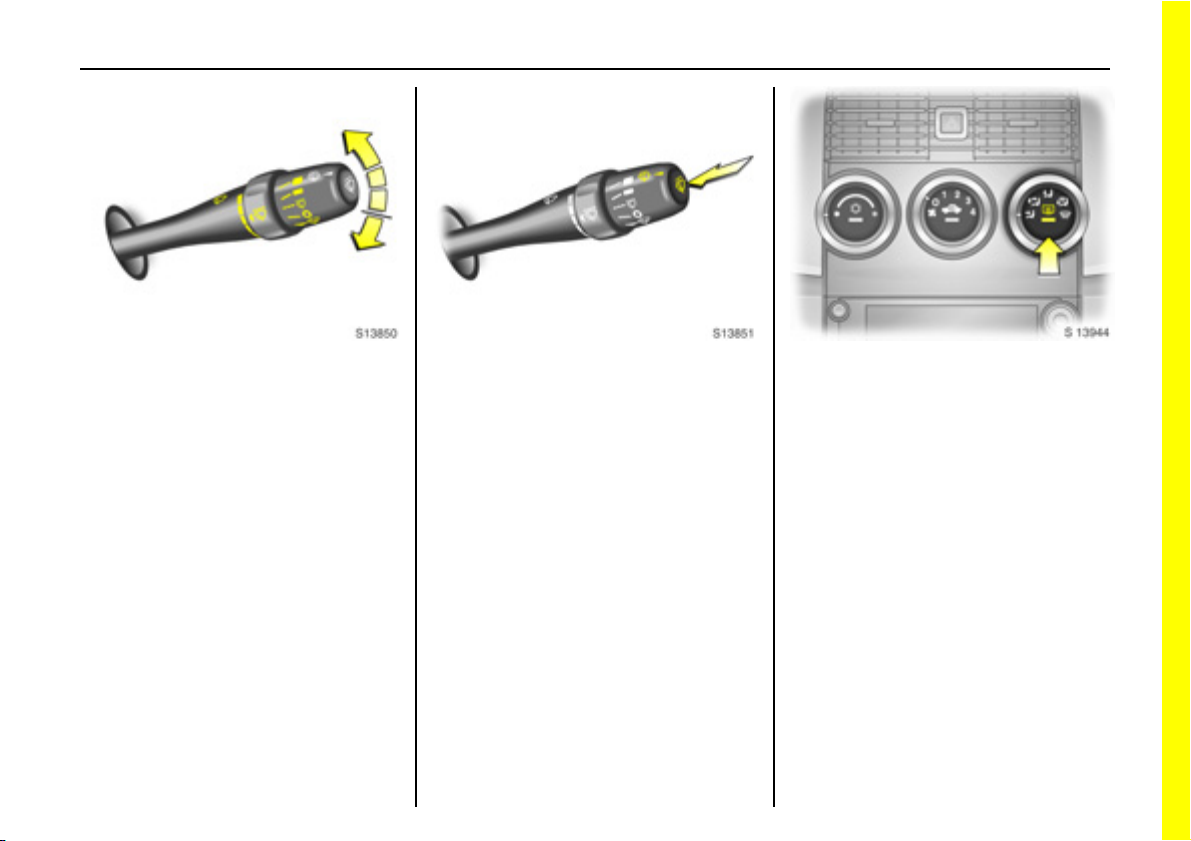
Windscreen wipers:
Move le ver f ro m r est po sit i on
z =Fast
] =Slow
P =Timed interval wipe
O=Off
Q = Misting function
6 Windscreen wipers - see pag e 71,
Adjustable wiper interval - see page 71,
Further information - see pages 163, 157.
Windscreen washer system:
Press button on end of lever
Washer fluid is sprayed onto the
wind screen and at the same time the
wipers are operated for four cycles.
6 W i n dscr e en wa sh er syste m -
see p age 72,
Further inform ation - see pages 163, 158.
Heated rear window:
Press Ü =On
Press Ü a gain = Of f
The control indicator in the button
illuminates whe n rear window he ating is
on.
Do not turn on rear window heating when
th e soft top h a s be en s tow ed in the
luggage compa rtm ent.
6 Climate control - see page 102,
Heated rear w indow - see page 103.
16 In brief
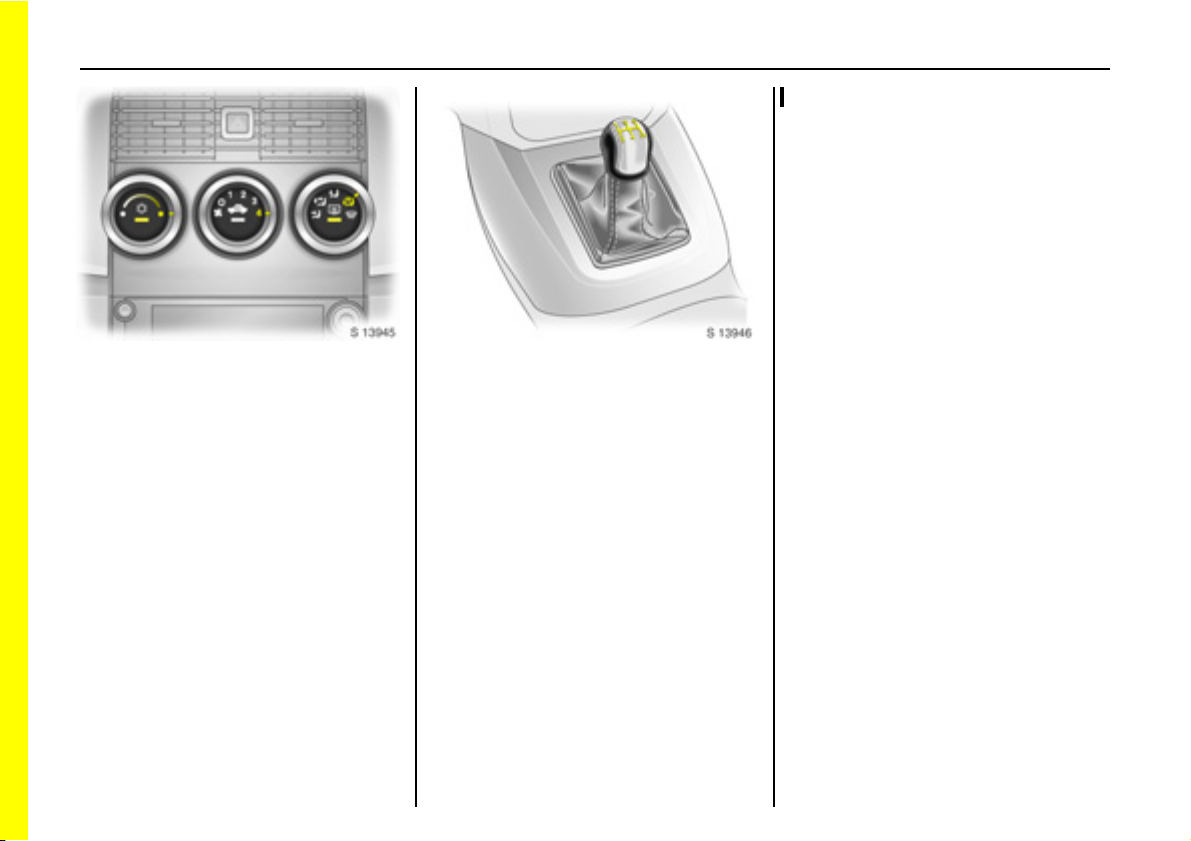
Drying misted-up windows:
Air distribution to J,
rotary switches for temperature
and fan to the right;
pres s bu ttons n and Ü
Open side air vents and direct them
towards the d oor windows.
6 Climate control - see page 102.
Manual transmission:
Reverse: with the vehicle stationary,
engage the gear.
If the gear d oes not e ngage , se t the lever in
neutral, releas e the clutc h pedal and
depress aga in; then repeat gear s election.
Before starting-off, check:
z Tyre pressures and tyre condition -
see pages 1 25, 180.
z Engine oil level and fluid le vels in engine
compartme nt - see pages 152 to 157.
z All windows, mirrors, exterior lig hting
and license plates are free from dirt,
snow and ice and are ope rational.
z Objects are securely located and will not
be thrown forward in the event of
sudden braking.
z No obj ects are p laced o n t h e ins trum en t
panel or in the area in which the airbags
inflate .
z Seats, seat belts and mirrors are
correctly a djusted .
z Br ake operatio n .

In brief 17
Starting the engine:
Transmissionin neutral, depress
clutch pedal fully, do not
accelerate, turn key to Y
and release
The engine crankin g is comp uter co ntrolled
and will continue until the engine starts or
up to a maximum of 15 seconds. To s top
the engine cranking, turn the ignition k ey
back to the ACC or JJJJ position.
When the fuel level is low, the controlled
cranking feature is disa bled to prevent
engine dama ge. Hold the key in the Y
position to start the engine.
Start attempts should not last longer than
1 5 se co nd s. If en g i n e do es no t s ta rt, wai t
10 seconds before re peating procedure.
To switch on ignition, only turn the key to I.
6 Electronic imm obilis er - see page 21,
Further information - see pages 110 to 1 14.
Releasing the hand brake:
Raise lever slightly,
press release button,
lower lever fully
6 Hand brake - see page 124.
Parking the vehicle:
Apply hand brake firmly,
switch ignition off,
engage steerin g columnlock,
lock the vehicle
To lock vehicle, press button e.
6 Further information - see page 21,
Remote control - see pag e 22,
Central locking s ystem - see page 24,
Vehicle decom missioning - see page 160.

18 In brief
Advice when parking:
z Do not the park vehicle on easily
ig nitable surfaces. The high temperature
of the exhaust system could ignite the
surface.
z Alwa ys apply the hand brak e firmly.
Ap ply the hand brake as firmly as
possible on uphill or downhill slopes. To
reduce operating forces, d epress brake
pedal at the same time.
z Close windows.
z Before switchin g off ign ition, e ngage first
or reverse gear.
z If the vehicle is parked on a level surface
or an uphill incline, engag e first gear
before switchin g off ig nition. O n an up hill
incline, also turn the front wheels away
fro m th e ke r b .
z If the vehicle is on a d ownhill incline,
engage reverse gear before switching off
the ignition. Also turn the front wheels
to w a rd s t h e k e rb .
z Turn steering whe el until lock is felt to
engage (anti-theft protection), removing
ign i t i o n k ey be fo r e ha nd .
z Switch off exterior lamps, otherwise the
headlamp wa rning device will sound
when the driver’s door is opened.
z The engine cooling fans may run after
th e engi n e h as be en s w itched off see page 1 52.
6 Further information - see pag es 159 to
160.
That was the most important
information for your first drive in
your v ehicle in brief.
The other pages of this chapter
contain a summary of the
interesting functions in your
vehicle.
The rem a in ing ch apte r s o f t he
Owner’s Manual contain
important information
on operation, safety and
maintenance as well as a
complete index.

In brief 19
TRIP A 33 k m
Opel Full Size airbag system
The airbag system is triggered in the even t
of a serious accident involving a frontal
impact and forms safety cushions for the
driver an d passenge r. The forward
movement of the driver an d passenger is
ch eck ed and the ris k of i nju r ies to the up p er
body and h ead are thereby substantially
reduced.
6 Opel Full Size airbag system see page 4 5.
Remote contro l on steering wheel
The functions of the Infotainm ent system 3
and the driver information centre can be
op erated with the b uttons on the steering
wheel.
6 Driver information centre - see pag e 59,
Remote control on steering wheel -
see p age 79,
In fo t ain me nt sy ste m 3 - see page 78.
Driver information centre
Inform ation d is play
The information display p rov id es
inform ation on d riving data, which is
continually recorde d and evaluated
electronically.
Functions:
z Outside air temperature and odom eter,
z Trip odometer A,
z Trip odometer B,
z Fue l ra n g e,
z Average fuel cons umption,
z Average s peed,
z Engine oil life monitor,
z Coolant temperature,
z Turbo boost.
6 Informa tion display - s ee page 60.
20 In brief
DOOR AJAR
COMPETITIVE MO DE
Che ck control
The check control software monitors:
z Flu i d le vels
z Engine
z Fuel fille r cap
z Remote control battery
z Air b ag sy st e ms
z Vehicle features including cruise control,
trac tion control and Electronic Stability
Program (ESP).
6 Ch eck co n trol - se e p age 68 .
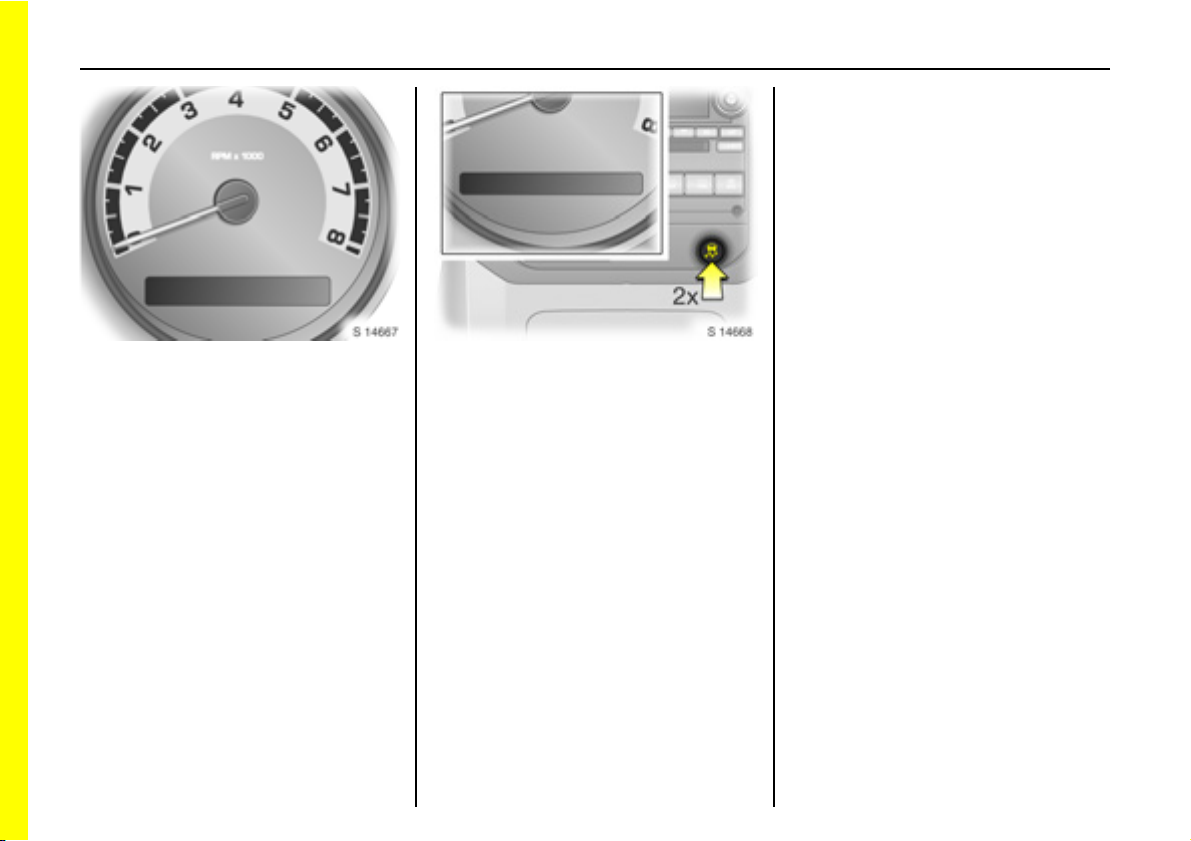
Competitive mode
To activate:
Press button R twice w ithin 5 seconds;
"COMPETITIVE MODE" appears in the
driver information centre and control
indica tor v illuminates in the instrument
panel.
Competitive m ode allows the driver full
control of the rear whe els. The traction
control aspe ct of the E lectronic Stability
Program (ESP) is deactivated for high
performance driving, while ESP continues
to assist in maintaining driving stability.
6 Driver information centre - see pag e 59,
Check control warning message -
see page 69,
Elec tronic Stability Programme (ESP) -
see page 118,
Competitive m ode - see p age 120.

21Locks, doors, windows
Locks, doors, windows
Re placem ent ke ys ... ..... ......... ........ ..... 21
Ca r Pass 3... .... ..... ......... .... ..... .... .... ..... 2 1
Electronic immobiliser....... ......... .... ..... 2 1
Re mot e control .... .... ......... ......... ......... 22
Central locking s ys tem . .... ......... ......... 24
Manu al lo ckin g o r unlocking .... .... ..... 26
Luggage compartment.... ..... .... .... ..... 2 6
Vehicle loca tor and panic alarm ....... 2 8
Exterio r mirro rs..... .... ......... ......... ......... 29
Interior mirr or ....... ......... ......... ........ ..... 29
Ele ctric win do ws... .... ......... ......... ......... 30
Sof t t op ........ ......... ......... ......... ........ ..... 31
Sun visors . ........ ......... ......... ......... ......... 36
Replacement keys
The key number is specified in the vehicle
documents and in the Car Pass 3.
The key is a c onstituent of the electronic
immobiliser. Ordering k eys from an Opel
Service Partner guarantees problem-free
op eration of the e lectronic immobiliser.
Ke ep th e sp are k ey ac cess ible in a safe
place.
Locks - see page 164.
Car Pass 3
The Car Pass contains all of the vehicle’s
data and s h ould theref o re n ot be k ept in
the vehicle.
Have your Car Pass ready to hand when
co nsu l t i ng you r Ope l Se rv i c e Pa r tne r.
E le ct ronic im m obi lis e r
The system checks whether the vehicle is
allowed to be sta rted us ing the key that
has b e en inse r ted. If t h e key is reco gnise d
as "authorised", the vehicle can be started.
The checking takes place via a
transponder in the key.
The electronic im mobiliser activates itself
automatically after the key has been
removed from the ignition sw itch.
Th e code n u mbe r of t h e e lectro n i c
imm obiliser is shown in the C ar Pass 3.

22 Locks, doors, wind ows
Cont rol indica tor for im mobili ser o
Illuminates briefly when the ignition is
switched on.
If the control indicator stays illuminated
after the ignition is switched on, there is a
fault in the system; the engine cannot be
started. Switch off the ig nition, remove the
key and re pe at the start attem pt.
If the control indicator fails to extinguish,
try to start the engine using the spare key
and consult a workshop.
Note
The im mobiliser does not lock the doors.
Therefore , after leaving the vehicle always
lock it. See page 24.
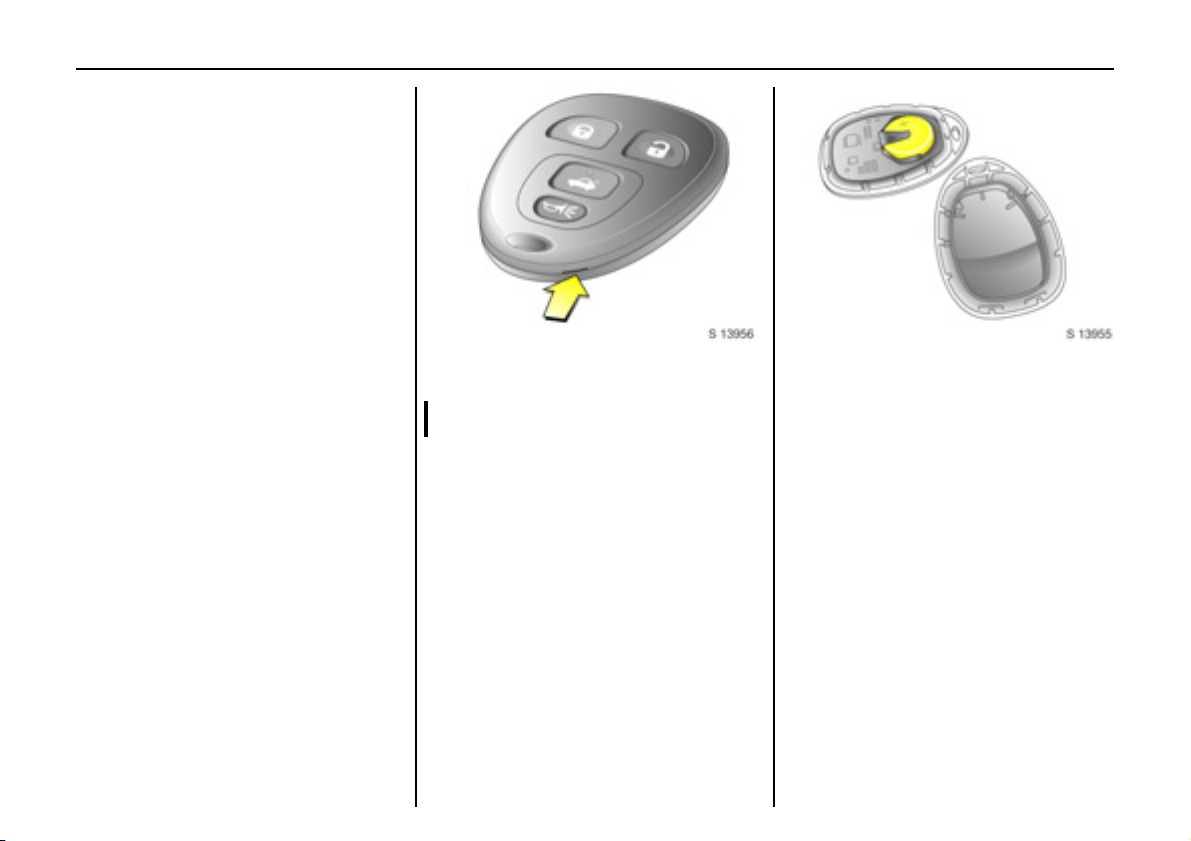
Remote co ntrol
Used to operate:
z C entral locking system,
z L uggage compartment relea se,
z V ehicle loc ator and panic alarm.
The remote control has a range of
approx. 3 metres. This range can be
af fect ed by o u tside influ en ce s.
Handle the remote control with care,
protect it from m oisture and high
temperatures and avoid unne cessary
op er at io n .
When enabled through d river information
centre personalisation mode, illumination
of hazard warning lam ps indicate s remote
control operation.
Driv er information centre - see page 59.
C entra l locking s ystem,
see page 2 4.
De lay ed lo cki ng ,
see page 2 4.
Autom atic locking ,
see page 2 5.
Autom atic unlocking,
see page 2 5.
Luggag e compart me nt release,
see page 2 6.
Ve hicle locat or and pa nic alar m,
see page 2 8.
Welcome lig ht function ,
see page 6 7.
Fault
If the remote control d oes not op erate
correctly, it may be due to the following:
z The range of the remote control has
been exceeded.
z Remote control battery volta ge is too
low. See " R em ote co n trol batter y
replace ment".
z Frequent, repeated opera tion of the
remote control outside the reception
range of the vehicle (e.g. too far from the
vehicle, remote control is then no longer
recognised). See "Radio remote control
synchronisation".
z Overloading the central locking system
by operating at frequent intervals. The
power supply may be interrupted for a
short time. The system is p rotected by a
fuse in the fuse box – see page 141.
z Inte rfer en ce from h igh er-powe r radi o
waves from other sources.
To eliminate the cause of the fault, consult
a w orkshop.
Open driver’s door with key - s ee page 26.
Remote control b attery replace ment
Replace the battery in accordance with the
chapter "Service, Maintenance" on
page 165 or when the range of the remote
control begins to decrease.
Open r em ote c ontr ol by inserting a suitable
screwdriver into the notch below
button U and prise apart the two halves
of the remote control.
23Locks, doors, windows
Remove used battery, taking care to avoid
touching any of the circuitry.
Replace battery - battery type, see
page 181 - ensuring the new battery is
installed correctly with positive (+) side
facing up.
Close remote control.
Make sure that you dispose of old batteries
in accordance with env ironmental
protection regulations.
Radio remote control synchronisation
After changing the battery, unlock the
door with the key in the lock. Inserting the
key in the ignition switch synchronises the
remote control.
24 Locks, doors, wind ows
De lay ed lo cki ng :
W h en e na bled thro u gh th e d riv er
inform ation centre personalis ation mode,
locking of the doors is delayed until
5 seconds after the last door is closed,
when button e is pressed on the remote
control.
If a door is open w he n bu tton e is pressed,
the hazard warning lamp s w ill flash when
the doors are locked after the de lay.
To override the delay, press button e
a g a in. D o or s lo c k im me d ia tel y .
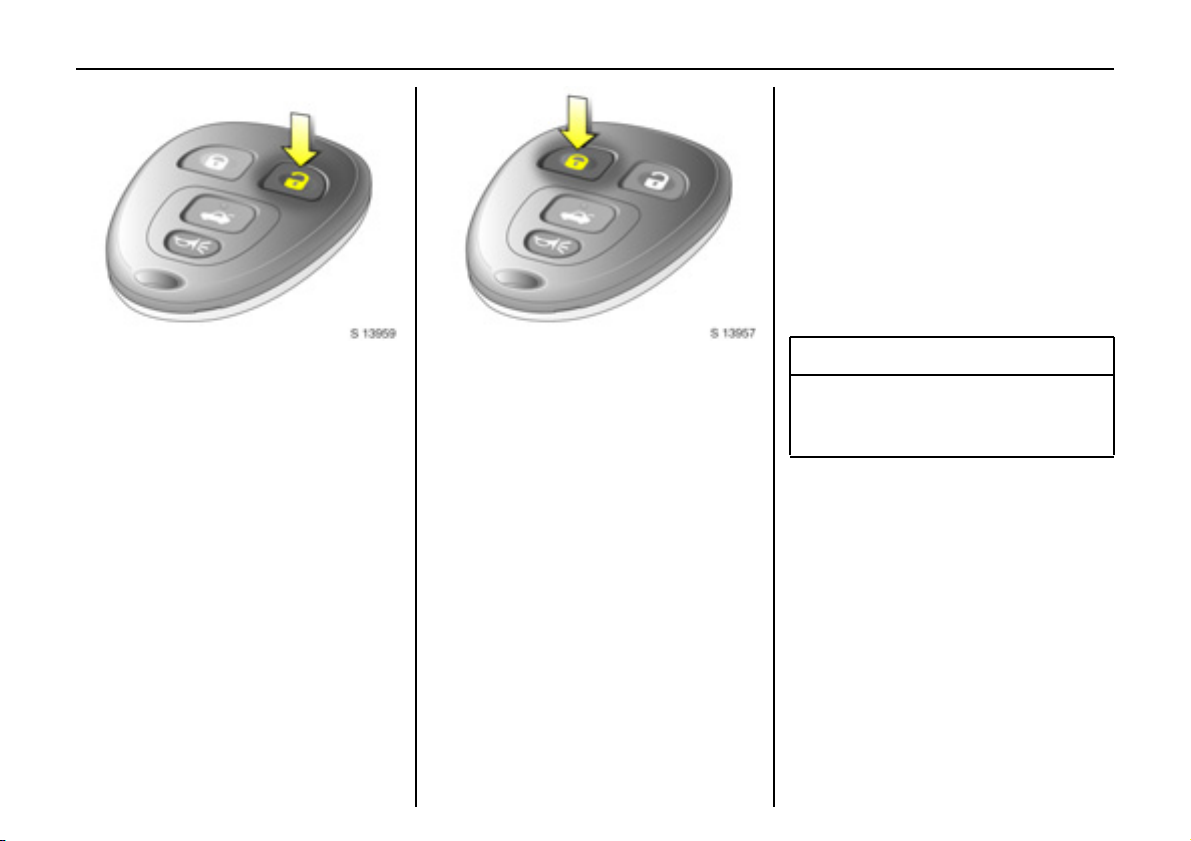
Central locking system
For doors only.
To unlock:
Press button c on remote control.
z Driv er’s door is unlocked.
Press button c on remote control twice
wi t h i n 5 se co nd s:
z Passenger’ s door is unlocked.
When enabled through the driver
information centre personalisation mode:
z Hazard warning lamps flash twice.
z Horn a ctivates twice.
If button c is pressed again after the doors
are unlocked, the hazard warning lamps
may flash tw ic e to indicate the d oors are
already unlocked.
To lo c k:
Close doors and windows before locking.
Press button e on remote control.
z Both doors are locked.
When enabled through the driver
information centre personalisation mode :
z Haz ard warning lamps flash onc e.
z Horn activates once.
If b utton e is presse d again after the doors
are loc ked, the horn activates once and the
ha zard warning lamps m ay flash once to
indica te the doors are already locked.
9 Warning
For safety reasons, remove the key from
the ignition switch before locking the
vehicle.
Driver information ce ntre - see pag e 59 .
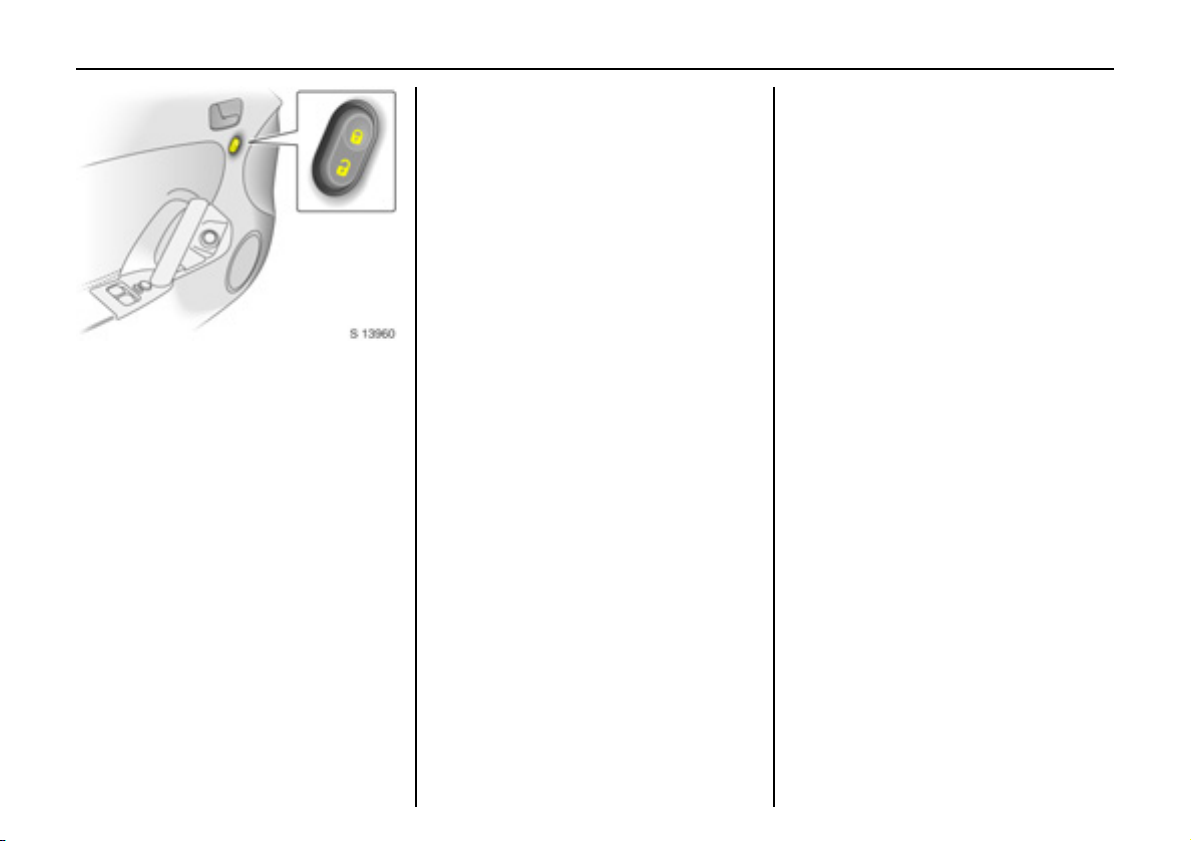
25Locks, doors, windows
Cen tra l locking switc h for locki ng and
unlocking the doors from inside the
vehicl e
Move switch in driver’s door or passeng er’s
door to position e: doors are locked.
Move switch in driver’s door or passeng er’s
door to position c: doors are unlocked.
Note
z If the ce ntral lo cking sys tem is locked, th e
doors c annot be unlocked by p ulling the
interior handle.
z L ocked doo rs unlo ck t h em sel ves
automatically when an acc ident of
a certain severity occurs (for outs id e
assistance), and the haz ard warning
lamp s com e on. The ke y must also be
in the ig nition.
Autom atic locking
The central locking system autom atically
locks th e doors as soon as a speed of
app rox. 8 km/ h (5 mph) is reached.
Fault
In the event of a fault, e.g. automatic
locking d oe sn’t take place, ensure all the
doors have been properly closed.
If the automatic locking function still fails to
ope rate, we re commend that you cons ult a
workshop.
Autom atic unlocking
W h en e na bled thro u gh th e d riv er
inform ation centre personalis ation mode,
the central locking system automatically
unlocks either the driver’s door or both
doors when the key is turned to ignition
switch position J.
This feature c an also be disabled via the
driver information centre personalisation
mode.
Driver information ce ntre - see pag e 59 .
26 Locks, doors, wind ows
Manual locking or unlocking
To unlock:
Turn key in driver’s door lock towards front
of vehicle as far as it will go. Turn ke y back
to a v ertical position and remov e.
Both doors will be unlocked.
To lo c k:
Turn key in d river’s door lock toward s rear
of vehicle as far as it will go. Turn key back
to a ve rtical position and re move.
Both doors will be locke d.
Lugg ag e com partment
To ope n wi th re mote control:
Press and hold button s on the remote
control.
27Locks, doors, windows
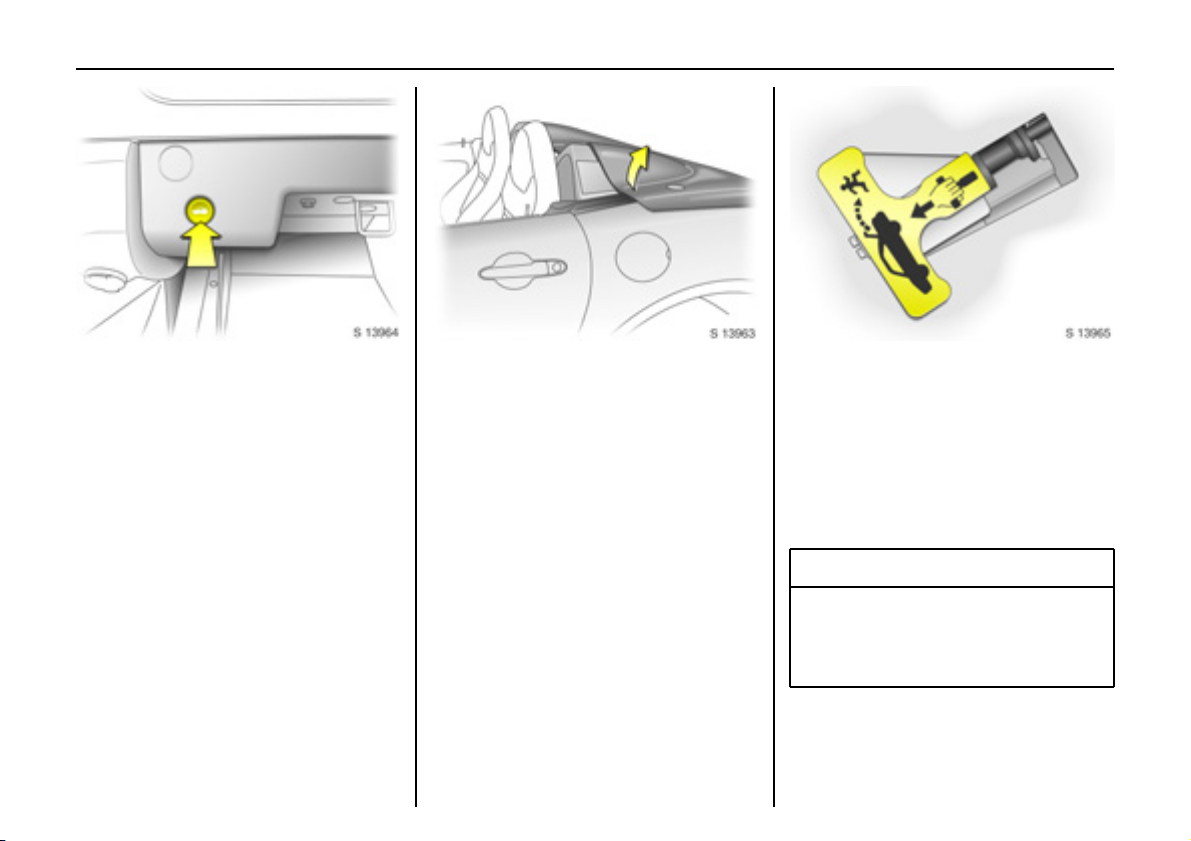
To open with release button in glove
com partm ent:
Key in ignition switch position O or ACC, or
with hand brake app lied:
Press the luggage compa rtm ent releas e
button located in the glove compartment.
With soft top in raised position, the
buttresses are unlatched a utomatically
before the luggage compartment is
op en ed . Soft top - se e p age 31.
Lift lug gage comp artment lid towa rds rear
of v eh i c l e to o pen fu ll y.
To open from w ithin lug gage
com partm ent:
Pull em ergency luggage compartm ent
release handle . Push lugga ge
compartm ent lid from the inside to open.
The emergency luggage compartmen t
release ha nd le g lows in the d ark for greater
visibility in the event of people becoming
trapped in the luggage compartment.
9 Warning
Do not use the emergency luggag e
compartment release handle to secure
items in the lugga ge c ompartment, to
avoid causing dama ge to the ve hicle.
28 Locks, doors, wind ows
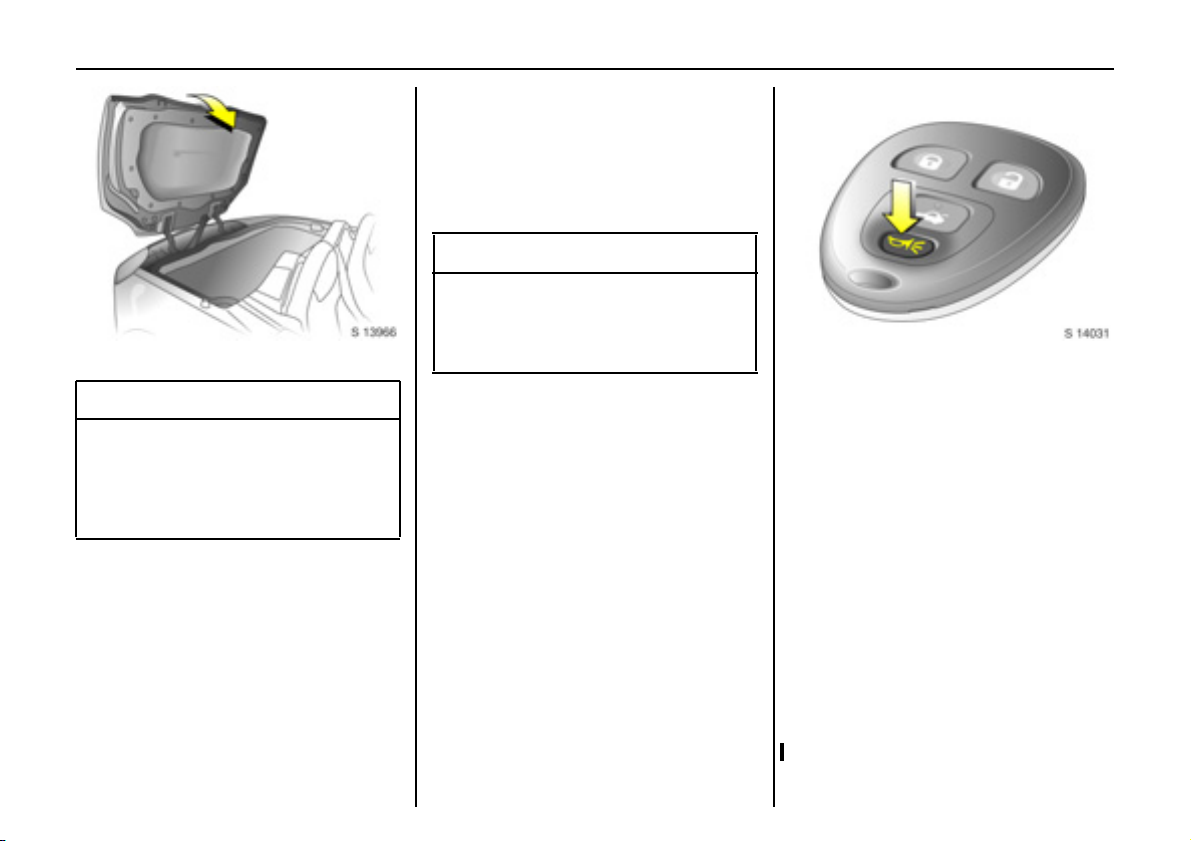
To close
9 Wa rning
Ensure the soft top is properly stowed
(see pag e 31) and e nsure no obje cts a re
placed in the area within the luggage
compartment in which the soft top is
sto red .
To close the lug gage compartme nt lid,
stand behind the vehicle and, with two
hands laid flat on the surface of the lid,
close the lid with a swift, firm motion.
If the luggage comp artm ent lid is ope n or
is n ot clos ed prop erly, "TRUNK AJAR" will
appear in the driver information centre
when the ignition is on. Control indicator
s also illuminate s in the instrument
panel. Close luggage compartm ent lid.
Driv er information centre - see page 59.
9 Warning
Do not drive with the luggag e
compa rtment ope n or ajar, e.g. when
transporting bulky objects, to avoid
causing damage to the vehicle.
Vehicle locator and panic alarm
The remote control has both a v ehicle
locator and a pan ic alarm fe ature,
activated via button U.
To aid location of the vehicle, e.g. when the
vehicle is park ed in a car park, press and
release button U ; the horn will sound
three times and the hazard warning lamps
and c ourtesy lamps will flash three tim es.
To activa te the panic alarm, press and
hold the button for 3 seconds; the horn will
sound and the hazard w arning lam ps and
courtesy lamps will flash for 3 0 seconds.
Press button U a gain to switc h off the
panic alarm, or turn key in ignition switch to
position ACC or I.
The vehicle locator and panic a larm
features are operational only with the
ignition off.
29Locks, doors, windows
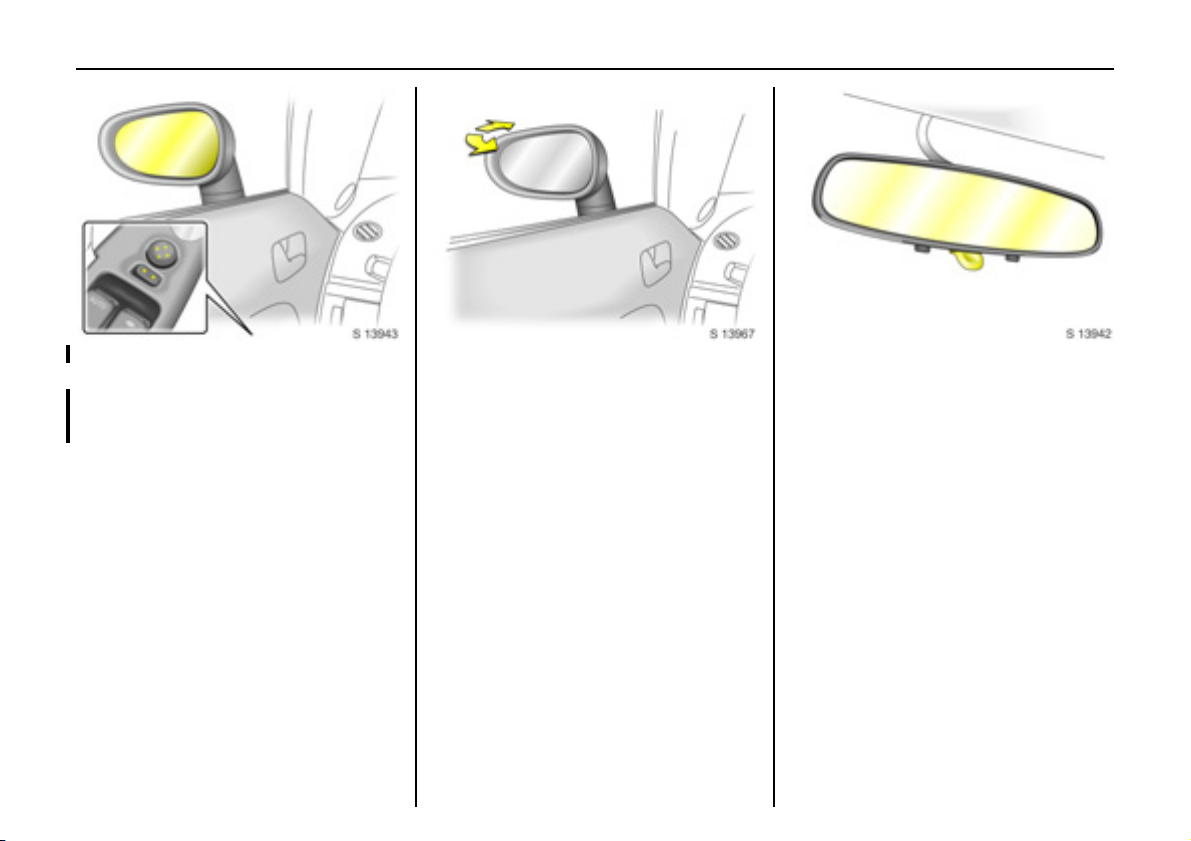
Exterio r mirrors
Adjust using th e switches in the driver’s
door. Select relevant exterior mirror and
adjust.
For the safety of pedestrians, the exterior
mirrors will swing out of their normal
mounting position if they are bumped with
sufficient force. Reposition the mirror by
applying slight pressure to the mirror
hou sing.
Interior mirror
To adjust, swivel the mirror housing.
Swivel lever on underside of mirror housing
to re duce dazzle at night.
Take care when driving with interior mirror
adjusted for night vision. Rear view may be
slightly distorted in this position.

30 Locks, doors, wind ows
Electric windows
9 Wa rning
Ta ke c are whe n o pera tin g the ele ctr ic
wind ows. Risk of injury, especially for
childre n.
Vehicle passengers should be informed
accordingly.
Keep a close watch on the windows when
closing them. Ensure that nothing
becomes trapped in them a s they move.
Th e e l ectr i c w i nd ow s ca n be us ed :
z with the ke y in ignition switch p ositions
ACC, I or Y.
z within a pprox. 5 minutes of swit ching ke y
to p o sit i o n JJJJ.
The fun ction standby after switching off
the ig nition is cancelled when the drive r’s
door is opened.
The driver’s and passenger’s window are
operated via the switches located in the
driver’s door handle.
For incremental ope ration, briefly pull or
press the switch. To open or close fully, pull
or press the switch for longer.
For automatic opening, press the switch
down fully. Pull the s witch to stop the
movement.
In the e vent of difficulty due to frost or
the like, press the relevant window switch
several times until the window is closed.
The passenger’s window is operated via a
switch in the door handle.
For incremental operation, briefly pull or
press the switch. To open or close fully, pull
or pre ss the switch for longer.
9 Warning
Before leaving the vehicle, remove the
ignition key in order to prevent
unauthorized operation of the windows risk of injury.
 Loading...