


Onkyo SKB-940, SKM-940S, SKC-940C, SKW-940, HT-R940 Instruction Manual
...Using XM Satellite Radio
Listening to XM Satellite Radio® (North American Models Only)
Important XM Radio Information
To receive XM Radio on this receiver you need to purchase an optional XM Passport System and subscribe to XM’s paid programming. Please note that XM is currently only licensed to provide service to the contiguous 48 United States (not available in Alaska and Hawaii) and portions of Canada. XM Radio service is not currently available in Mexico or any other region outside the continental U.S. and portions of Canada. For updates on service availability please visit XM's website at http://www.xmradio.com or http://www.xmradio.ca
Note:
Hardware and required basic monthly subscription sold separately. Premium Channels available at additional monthly cost. Installation costs and other fees and taxes, including a one-time activation fee may apply. Subscription fee is consumer only. All fees and programming subject to change.
About XM Radio:
There is a world beyond AM and FM. It is XM Satellite Radio. XM offers more than 160 digital channels of audio entertainment, including 100% commercial-free music channels, in the top markets in the U.S. Channels with frequent explicit language are indicated with an XL. Channel blocking is available for XM radio receivers by calling 1-800-XMRADIO.
About XM Canada:
XM Canada offers the most commercial-free music – and engaging talk show programs. XM Canada creates original content that reflects our unique Canadian culture and broadcasts it throughout North America.
Canadian Satellite Radio Inc. offers its satellite radio service and operates under the XM Canada™ brand. XM Canada has an exclusive Canadian licence from XM Satellite Radio Inc.
For more information about XM Canada, visit www.xmradio.ca or call 1-877-GET-XMSR
A warning against reverse engineering:
It is prohibited to copy, decompile, disassemble, reverse engineer, or manipulate any technology incorporated in receivers compatible with the XM Satellite Radio system. Furthermore, the AMBE® voice compression software included in this product is protected by intellectual property rights including patent rights, copyrights, and trade secrets of Digital Voice Systems, Inc. The user of this or any other software contained in an XM Radio is explicitly prohibited from attempting to copy, decompile, reverse engineer, or disassemble the object code, or in any other way convert the object code into humanreadable form. The software is licensed solely for use within this product.
XM Ready®, XM Public Radio™ are trademarks of XM Satellite Radio Inc. ©2005 XM Satellite
Radio Inc. All rights reserved. All other trademarks are the property of their respective owners.
Connecting the XM Passport System
The XM Passport System is sold separately. You can purchase the XM Passport System from the XM Web site at: http://www.xmradio.com (U.S.A.) http://www.xmradio.ca (Canada)
Connect the Passport System to the XM antenna jack on the rear panel.
XM antenna jack
|
XM |
|
|
|
|
|
|
|
|
|
|
|
|
|
|
|
ANTENNA |
|
SURROUND BACK |
SURROUND |
FRONT |
CENTER |
|
|
COMPONENT VIDEO |
|
AM |
FM 75 |
|
L |
|
L |
|
|
|
DIGITAL IN |
|
|
|
|
|
|
|
||||
COA |
|
|
Y |
|
|
|
|
|
|
|
|
XIAL |
|
|
|
|
|
MONITOR |
|
|
|
|
|
|
|
|
|
VIDEO 2 |
VIDEO 1 |
DVD |
|
|
|
|
|
OPTICAL |
|
|
|
|
|
|
OUT |
|
|
|
|
1 |
|
|
P |
V |
|
|
R |
|
R |
AC OUTLET |
|
|
|
|
|
|
|
|
120V |
60Hz |
|||
|
|
|
|
|
|
|
|
|
|
AC SWITCHED |
|
|
|
|
|
|
|
|
|
|
|
120W 1A MAX. |
|
2 |
|
|
P |
S |
|
|
|
|
|
|
|
|
|
|
|
|
|
|
|
|
FRONT |
|
|
|
|
|
|
|
|
|
|
|
SPEAKERS B |
|
|
3 |
|
|
|
|
|
|
|
|
PRE OUT |
|
|
|
L |
|
L |
L |
|
|
|
|
L |
|
|
|
|
|
|
|
|
|
AV RECEIVER |
|
|||
|
|
|
|
|
|
|
|
|
R |
|
|
|
R |
|
R |
R |
|
|
|
|
|
|
|
|
CD |
TAPE |
|
VIDEO 2 |
VIDEO 1 |
|
DVD |
|
|
|
|
Put the XM Passport System by a southerly facing window, with nothing obstructing its path to the sky.
En
TUNING  , PRESET
 , ENTER
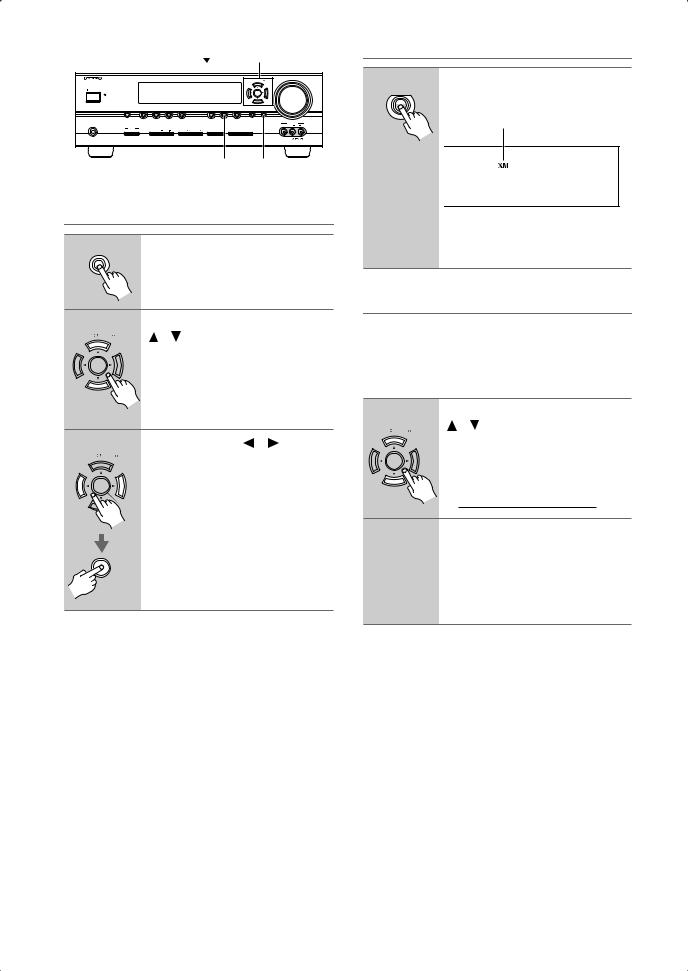
Selecting XM Satellite Radio
|
|
|
|
|
|
|
|
|
|
MASTER VOLUME |
1 |
Press the [TUNER] input selector |
|
|
|
|
|
|
|
|
|
|
TUNING PRESET |
|
|
||
|
|
|
|
|
|
|
|
|
|
|
|
TUNER |
|
STANDBY/ON |
|
|
|
|
|
|
|
|
|
|
|
button repeatedly to select XM. |
|
STANDBY |
|
|
|
|
|
|
|
|
|
ENTER |
|
|
|
MULTI CH |
|
DVD |
VIDEO 1 |
VIDEO 2 |
VIDEO 3 |
|
TAPE TUNER |
C D |
RETURN |
SETUP |
|
|
|
|
|
|
VCR |
|
|
|
|
|
|
|
VIDEO 3 INPUT |
|
Lights up when XM radio is selected. |
PHONES |
|
|
|
|
|
|
|
|
|
VIDEO |
L AUDIO |
R |
|
SPEAKERS |
|
|
|
|
|
DIGITAL |
|
TUNING |
|
|
|
|
|
A |
B |
|
TONE |
|
THX |
LISTENING MODE |
DISPLAY INPUT |
DIMMER MEMORY MODE |
|
|
|
|
|
|
|
|
|
|
|
TUNER |
SETUP |
|
|
|
|||
Setting the Satellite Radio Mode
1 SETUP |
On the AV receiver, press the |
|
[SETUP] button. |
2 |
|
Use the TUNING Up and Down |
|
|
|
|
TUNING PRESET |
[ ]/[ ] buttons to select “6. SAT |
|
|
RadioMode,” and then press |
|
|
[ENTER]. |
3 |
|
Use the PRESET [ ]/[ ] buttons |
|
TUNING PRESET |
to select “XM,” and then press |
[ENTER].
Pressing the PRESET [ ]/[
]/[ ] but-
ENTER tons cycles through the following SAT
options: None ↔ XM.
None: Select if you’re not using satellite radio.
XM: Select to use XM satellite radio.
ENTER
If “CHECK ANTENNA” appears on the display, make sure the XM Passport System is connected properly.
Signing Up for XM Satellite Radio
Before you can use XM Satellite Radio, you must first sign up for an account. You’ll need a major credit card and your XM Satellite Radio ID, which you can get from the AV receiver, as explained below, or from the Passport System package and itself.
1 |
Use the TUNING Up and Down |
|
|
||
TUNING PRESET |
[ ]/[ ] buttons to select |
|
channel 0. |
||
|
||
|
Your XM Satellite Radio ID number is |
|
|
displayed. Write it below. |
|
|
ID |
|
2 |
To sign up, go to: |
|
|
||
|
http://activate.xmradio.com |
|
|
Or call: 1-800-967-2346 |
|
|
For XM Canada, go to: |
|
|
http://xmradio.ca |
|
|
Or call: 1-877-GET-XMSR |
Notes:
•Channel 0 cannot be selected in Category Search mode. You must select Channel Search mode (see page 3).
•The following letters are not used in XM Satellite Radio IDs: I, O, S, F.
2

Selecting XM Radio Channels
There are three ways to select XM radio channels:
•Channel Search mode: select any channel.
•Category Search mode: select channels by category.
•Direct tuning: enter channel number.
Note:
You can’t select Channel Search or Category Search mode, while the Tuning Arrow
 indicators are flashing, as tuning is in progress.
ON/STANDBY
REMOTE MODE
|
|
|
RECEIVER |
DVD |
RECEIVER |
|
|
|
TAPE |
|
|
Number |
INPUT SELECTOR |
M D/CDR |
|
||
1 |
2 |
3 |
CD |
|
|
buttons |
|
|
|
HDD |
|
V1 |
V2 |
V3 |
|
|
|
|
4 |
5 |
6 |
TV |
|
|
MULTI CH |
DVD |
|
|
|
|
7 |
8 |
9 |
VCR |
|
|
TAPE |
TUNER |
CD |
CABLE |
|
D TUN |
10 |
11 |
12 |
|
|
D TUN |
ENT |
CLR |
SAT |
|
|
|
+10 |
0 |
ENT |
||
|
--/--- |
DIMMER |
SLEEP |
|
|
|
TV |
VOL |
CH |
VOL |
|
|
DISC |
|
|||
|
|
|
ALBUM |
|
|
|
INPUT |
|
|
|
|
|
GUIDE |
|
|
PREVIOUS |
|
|
TOP MENU |
|
|
MENU |
|
|
SP A / B |
|
|
MUTING |
ENTER |
|
|
|
|
|
|
|
|
ENTER |
|
|
|
|
PLAYLIST/CAT |
|
PLAYLIST/CAT |
|
|
RETURN |
RETURN |
|
|
SETUP |
|
|
|
|
|
||
|
|
LISTENING MODE |
|
|
|
|
STEREO |
SURROUND |
|
|
|
■Channel Search Mode
1Press the [RECEIVER] button, followed by the [ENTER] button
|
to select “Channel Search” |
|
mode. |
2 |
Use the Up and Down [ ]/[ ] |
|
buttons to select a channel. |
Channel number Channel name
You can also use the Left and Right
[ ]/[
]/[ ] buttons to select a category.
■ Category Search Mode
1 |
Press the [RECEIVER] button, |
||
|
|||
|
followed by the [ENTER] button |
||
|
to select “Category Search” |
|
|
|
mode. |
|
|
2 |
Use the Left and Right [ |
]/[ |
] |
|
buttons to select a category, and |
||
|
use the Up and Down [ |
]/[ |
] |
|
buttons to select a channel in |
||
|
that category. |
|
|
■ Direct Tuning
You can select an XM radio channel directly by entering its number.
1 |
Press the [RECEIVER] button, |
|
|
|
followed by the [D TUN] button. |
D TUN |
The [RECEIVER] button flashes. |
2
1 |
2 |
3 |
V1 |
V2 |
V3 |
4 |
5 |
6 |
|
MULTI CH |
DVD |
7 |
8 |
9 |
TAPE |
TUNER |
CD |
|
11 |
12 |
|
0 |
CLR |
|
ENT |
|
|
DIMMER |
SLEEP |
Within 8 seconds, use the number buttons to enter the channel number.
The channel is selected.
For example, to select channel #20, press 0, 2, 0, or 2, 0, [ENT].
Note: While the [RECEIVER] button is flashing, the input source cannot be changed by using the remote controller.
3
 Loading...