

Page 1

TABLE OF CONTENTS
Introduction . . . . . . . . . . . . . . . . . . . . . . . . . . . . . . . . . . . . . . . . . . . . . . . . . . . . . . . 3
Features And Functions. . . . . . . . . . . . . . . . . . . . . . . . . . . . . . . . . . . . . . . . . . . . . . 4
Key Charts. . . . .. . . . . . . . . . . . . . . . . . . . . . . . . . . . . . . . . . . . . . .. . . . . . . . . . . . . . . . . . . . . . 5
Device Table . . . . . . . . . .. . . . . . . . . . . . . . . . . . . . . . . . . . . . . . . . . . . . . . .. . . . . . . . . . . . . . . 6
Installing Batteries . . . . . . . . . . . . . . . . . . . . . . . . . . . . . . . . . . . . . . . . . . . . . . . . . 7
Programming Device Control. . . . . . . . . . . . . . . . . . . . . . . . . . . . . . . . . . . . . . . . . . 8
Searching For Your Code . . . . . . . . . . . . . . . . . . . . . . . . . . . . . . . . . . . . . . . . . . . . . 9
Checking The Codes . . . . . . . . . . . . . . . . . . . . . . . . . . . . . . . . . . . . . . . . . . . . . . . . 9
Programming A Master Power Macro . . . . . . . . . . . . . . . . . . . . . . . . . . . . . . . . . . 10
Programming The Power Key For The Master Power Macro . . . . . . . . . . . . . .. . . . .. . . . . . . . 10
Operating The Master Power Macro . . . . . . . . . .. . . . . . . . . . . . . . . . . . . . . . . . . . . . . . . . . . . 10
Clearing The Master Power Macro . . . .. . . . . . . . . . . . . . . . . . . . . . . . . . . . . . . . . . . . . . .. . . 11
Re-Assigning Device Keys . . . . . . . . . . . . . . . . . . . . . . . . . . . . . . . . . . . . . . . . . . . 11
Using Channel Scan . . . . . . . . . . . . . . . . . . . . . . . . . . . . . . . . . . . . . . . . . . . . . . . 11
Programming Favorite Channel Scan . . . . . . . . . . . . . . . . . . . . . . . . . . . . . . . . . . 12
Changing Volume Lock . . . . . . . . . . . . . . . . . . . . . . . . . . . . . . . . . . . . . . . . . . . . . 13
Locking Volume Control To One Mode
(Global Volume Lock). . . . . . . . . . . . . . . . . . . . . . . . . . . .. . . . .. . . . . . . . . . . . . . . . . . . . . . . . 13
Unlocking Volume Control For A Single Device
(Individual Volume Unlock). . . . . . . . . . . . . . . . . . . . . . . . . . . . . . . .. . . . .. . . . . . . . . . . . . . . 13
Unlocking All Volume Control
(Restoring Default Setting ) . . . . . . . . . .. . . . . . . . . . . . . . . . . . . . . . . . . . . . . . . . . . . . . . .. . 13
Clearing Custom Programming . . . . . . . . . . . . . . . . . . . . . . . . . . . . . . . . . . . . . . . 14
Restoring Factory Default Settings . . . . . . . . . . . . . . . . . . . . . . . . . . . . . . . . . . . . 14
Troubleshooting . . . . . . . . . . . . . . . . . . . . . . . . . . . . . . . . . . . . . . . . . . . . . . . . . . . 15
Instructions To The User . . . . . . . . . . . . . . . . . . . . . . . . . . . . . . . . . . . . . . . . . . . . 16
Limited Lifetime Warranty . . . . . . . . . . . . . . . . . . . . . . . . . . . . . . . . . . . . . . . . . . . 16
Additional Information. . . . . . . . . . . . . . . . . . . . . . . . . . . . . . . . . . . . . . . . . . . . . . 17
Manufacturer’s Codes . . . . . . . . . . . . . . . . . . . . . . . . . . . . . . . . . . . . . . . . . . . . . . 36
Setup Codes For Cable Boxes . . . . . . .. . . . . . . . . . . . . . . . . . . . . . . . . . . . . . . . . . . . . . .. . . . 36
Setup Codes For Cable Box/PVR (or DVR) Combos. . . . . . . . . . . . . . . .. . . . . . . . . . . . . . . . . . 36
Setup Codes For DVD Players . . . . . . . . . . . . . . . . . . . . . . . . .. . . . .. . . . . . . . . . . . . . . . . . . . 36
Setup Codes For DVD Player/VCR Combos . . . . . . . . . . . . .. . . . . . . . . . . . . . . . . . . . . . . . . . . 37
Setup Codes For PVRs (or DVRs). . . .. . . . . . . . . . . . . . . . . . . . . . . . . . . . . . . . . . . . . . .. . . . . 37
Setup Codes For Satellite Receivers . . . . . . . . . . . . . . . . . . . . . . . . . . . . . . . .. . . . . . . . . . . . . 37
Setup Codes For Satellite Receiver/PVR (or DVR) Combos. . . . . . . . . . .. . . . . . . . . . . . . . . . . 38
Setup Codes For TVs . . . . . . . . . . . . . . . . . . . . . . . . . . . . . . .. . . . . . . . . . . . . . . . . . . . . . . . . . 38
Setup Codes For TV/DVD Player Combos . . . . . . . . . . . . . . . . . . . . . . . . . . . . . .. . . . . . . . . . . 39
Setup Codes For TV/VCR Combos . . . . . . . . . . . . . .. . . . .. . . . . . . . . . . . . . . . . . . . . . . . . . . . 40
Setup Codes For TV/VCR/DVD Player Combos . . . . . . . . . . . . . . . . . . .. . . . . . . . . . . . . . . . . . 40
Setup Codes For VCRs. . . . . . . . . . . . . . . . . . . . . . . . . . . . . . . .. . . . . . . . . . . . . . . . . . . . . . . . 40
2
Page 2

INTRODUCTION
The One ForAll 4 Device Universal RemoteControl(URC-4220)is
designed to remotelyoperate up to four homeentertainment devices.It
also features intuitiveand easy-to-usekeys for instantcontrolof DVD and
PVR (or DVR) components.Moreover,its sophisticatedtechnology will
allowyou to consolidate your original home entertainment remote
controls into one easy-to-use product. Advancedfeatures include:
• Intuitive buttonstoalloweasyaccess to functionsandmenus on your DVD
player,PVR(or DVR),and Cable/Satellitedevices
• Direct code setup for easy device programming
• Step-and-SetcodesearchandCodeVerificationforanalternate waytopro-
gramdevices
• Power Macroformaster on/off controlof all of your equipment with a single
keystroke
• Volume Lock/Unlock feature to lock or unlock the volumecontrol to one mode
or individual modes
• DeviceKeyRe-Assignmentto remotely controla second(duplicate) device
• Channel Scan
• Color-coded keys to quicklylocate popular functions
• Extensivecodelibrary for popular video devices including DVD playersand
PVRs (or DVRs)
and FavoriteChannelScanforeasychannel surfing
The URC-4220 remote control requires two (2) newAAA alkaline batteries (not included) and some easy programming to control your devices.
For best results,please read and perform all instructions listed here.Also,
keep this guidefor future reference.
3
Page 3
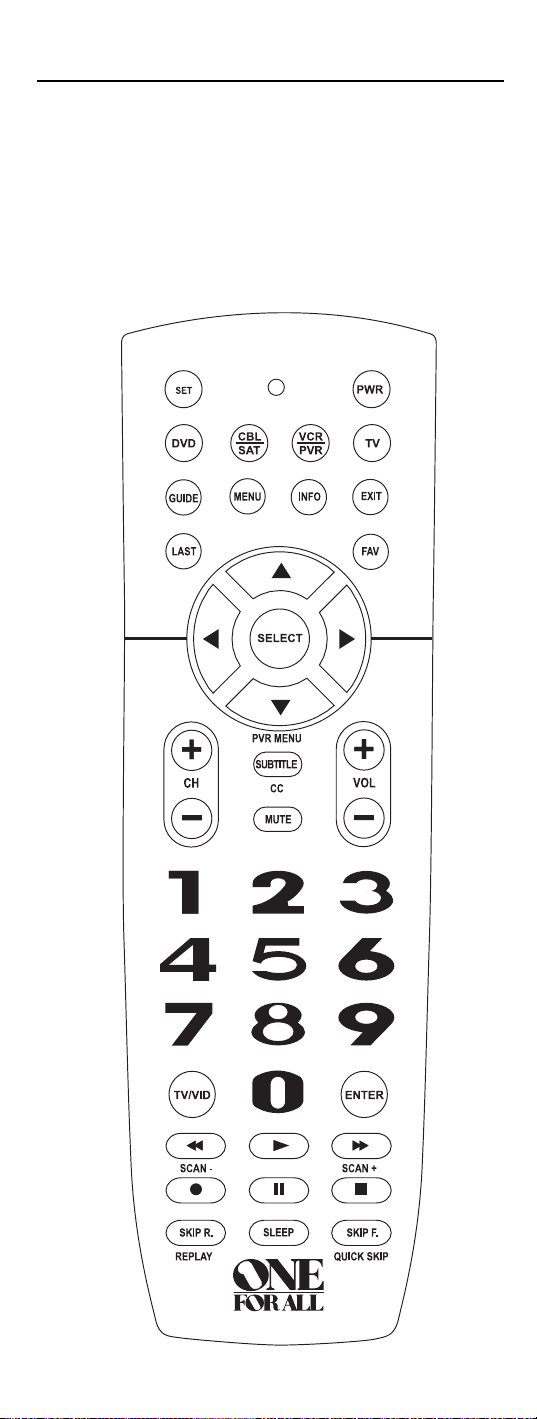
FEATURES AND FUNCTIONS
Use the illustrationbelowto locate features on the One ForAll 4 Device
Universal Remote Control (URC-4220) and then studythe Key Charts (on
the next two pages) to learn how they function.
To find out what type of devicescan be controlledbyeach devicekeyafter
programming, see the
DeviceTable on page 6.
4
Page 4
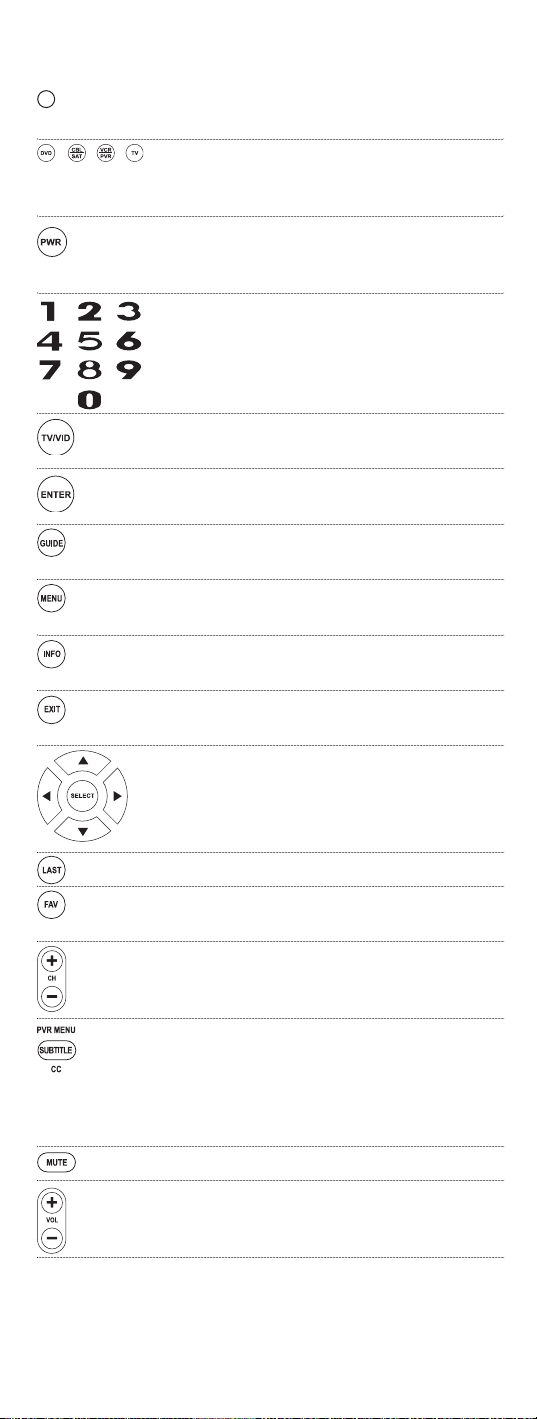
Key Charts
When the LED (red light)blinks,theremote control is
workingand(after programming) is sending signals.
Press VCR/PVR,DVD, CBL/SAT,or TV once to select a
desired home entertainment device to control.
Also see the Device Table on page 6.
Press POWER once to turn on or off the selecteddevice.
Formaster powercontrol, see Programming
A Master Power Macroon page 10.
Use the keypad (1 ~ 9 and 0) todirectly select channels
(e.g.,009 or 031).
Use TV/VID to switch the TV’s input to view TV or video
programs.
Press ENTER once after entering the channel numbers on
someTVs.
Use GUIDE to display your selecteddevice’sprogram
guideor setup menu.
Press MENU once to displayyour selected device’s main
menu.
Use INFO to display the current channel and programor
on-screendirectory.
Use EXIT to exit from your selecteddevice’sguideor
menu.
Use the Cursor Keys to move the cursor in the program
guideand menu screens.
Use SELECT(OK) to chooseoptionsfrom your selected
device’smenuorguide.
Press LAST once to recall the last channel.
Use FAV to scan all channels,orafter programming,
toscanupto10favoritechannels.
Use CH + (or CH -) to select the next higher (or lower)
channel.
PressSUBTITLE/CConcetodisplay(or turnoff) subtitlesor
closedcaptions,if availableon your DVD playeror
cable/satelliteservice.
Fora PVR (or DVR),press PVR MENU once to displaya
list of your recorded shows.
Press MUTE once to turn thesound off oron.
Use VOL+(or VOL -)to raise (or lower) the sound vol-
ume.
5
Page 5
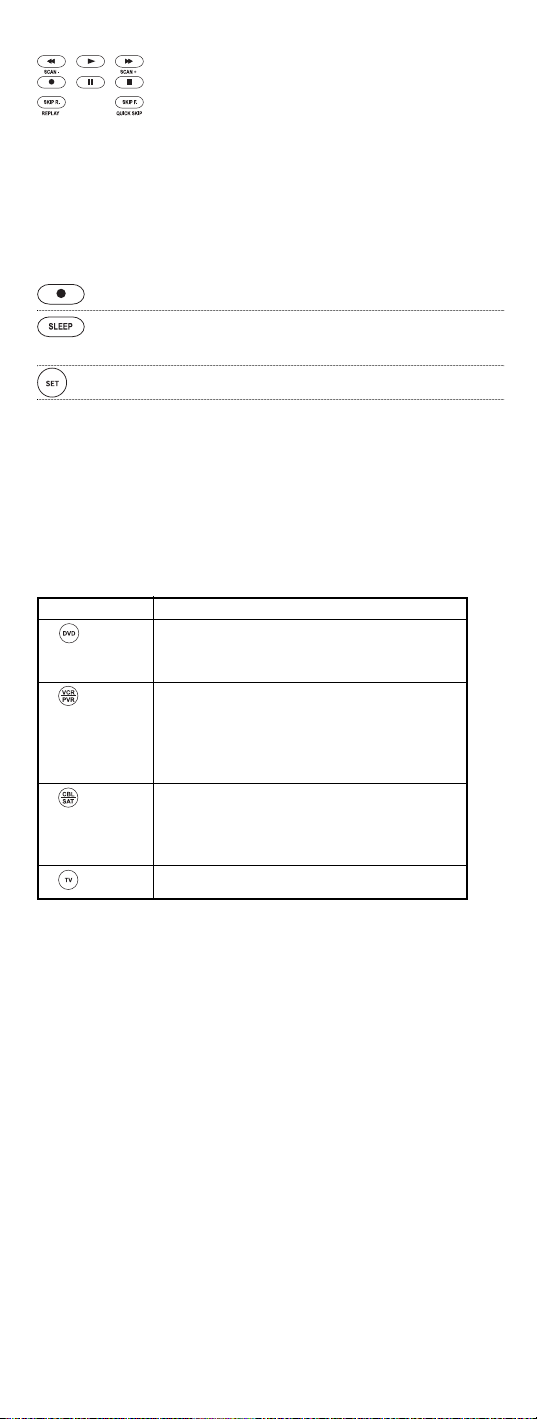
Use REW, PLAY,FWD,PAUSE,or STOP to controlyourVCR,
PVR (or DVR),orDVD player.
For a DVD player,use SKIP F. or SKIP R. to view the next
or previouschapter.
For a VCR,PVR(or DVR),orVOD(if available),useSCAN-
orSCAN+ to quickly scanforward or backthrougha video
program.Use REPLAYfor an instantreplay.UseQUICK
SKIPtoadvance thevideoprogram a preset amount (as
setonyour device).
Press REC twice to recordaVCR or PVR (or DVR)program.
Use SLEEP to setthe sleeptimeron a selecteddevice if
equipped with this feature.
UseSETforall programmingsequences.
Device Table
NOTE: Pleaserefer to the table below when performingtheinstructions in “Programming
DeviceControl”on page 8.
Afterprogramming,the One For All 4 Device UniversalRemote Control will
be able to control the following types of devices:
DEVICE KEY CONTROLS THESE TYPES OF DEVICES
• DVD Player
• TV/DVD Player Combo
• VCR/DVD Player Combo
• VCR
• TV/VCRCombo
• TV/VCR/DVD Player Combo
• VCR/DVD Player Combo
• PVR (or DVR)
• Cable Box (or Converter)
• Cable Box/PVR (or DVR) Combo
• Satellite Receiver
• Satellite Reciver/PVR (orDVR)Combo
• Television
6
Page 6
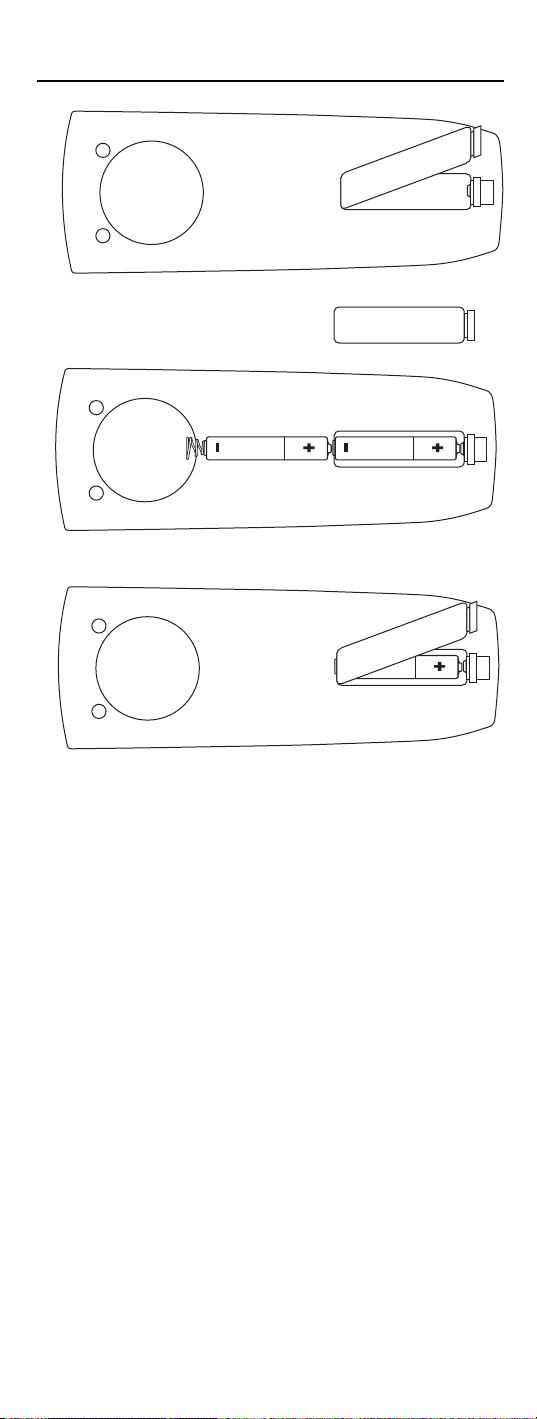
INSTALLING BATTERIES
1. On the remotecontrol’s back,push the tab and lift off the
battery cover.
2. Obtaintwo(2) new AAA alkaline batteries.Matchthe +
and – marks on the batteries to the +and – marks in the
battery case, then insert the new batteries.
3. Press the battery cover back intoplace.The tab should
clickwhenthe cover is locked.
4. Test the remote control by pressing any mode key (e.g.,
TV).If the batteriesareinserted correctly,the LED (red
light) will blink.
NOTE: When batteries needreplacement,theremotecontrolwill stopoperating.Remove
the old batteries and insertnew oneswithin 10 minutes to ensureallof yourprogramming
informationisrestored.
Battery Precautions: Do not mix old and new batteries.• Do not mix alkaline,standard
(carbon-zinc) or rechargeable (nickelcadmium)batteries.• Always remove old,weak or
worn-out batteries promptlyandrecycleordisposeofthemin accordance with Localand
NationalRegulations.
7
Page 7

PROGRAMMING DEVICE CONTROL
TheOne ForAll4 Device UniversalRemote Control is preprogrammedat
thefactoryto operate an RCA TV, aToshiba DVDplayer,a Motorolacable
box,andanRCAVCR.To control devices otherthan the defaultbrands,perform the following steps; otherwiseskip this section:
1. Turnon a desired device (e.g.,VCR or DVD player) and,if
applicable, insert media (e.g.,cassetteor disc).
NOTE: Pleaseread steps2 through 4 completelybeforeproceeding.
Highlightorwritedownthecodes and deviceyouwishtoprogram
before starting step 2.
2. Ontheremotecontrol,press a devicekeyonce (i.e.,VCR/PVR,
DVD,CBL/SAT,orTV).
NOTE: To program control of a VCR,PVR(orDVR), TV/VCRCombo,
orTV/VCR/DVD Player Combo press VCR/PVR once.After programmingaVCR Combodevice, you will be able to control channel selection,volume,andVCRfunctions.
NOTE: To program control of a DVDPlayer,DVD Player/VCR
Combo,orTV/DVDPlayer Combo,press DVD once.Afterprogramming a DVDCombodevice,you willbeable to control channelselection, volume,and DVDfunctions.
NOTE: To program control of a Cable Box,Cable Box/PVR(orDVR)
Combo,Satellite Receiver, or a Satellite Receiver/PVR (or DVR)
Combo,press CBL/SAT once.
3. Press and hold SET until the LED (red light) blinkstwice,
then release
SET.
4. Use the
Manufacturer’s Codes (startingon page 36) to
locate the typeof device and brand name and then enter
the first four-digitcodeforyour device.If performed correctly, the
NOTE:IftheLED did notblinktwice,repeat steps 2 through4andenter
thesame codeagain.
LED will blink twice.
5. Aim the remotecontrol at the device and press POWER
once.The deviceshould turn off.If itdoesnot,repeat
steps 2 through 5,trying each code for your brand until
youfindone that works.If it still doesn’twork,try
Searching For Your Code on next page.
NOTE: If the device does nothave a POWER key,press PLAY.
6. Repeat steps 1 through5 foreachdeviceyouwanttocon-
trol.For futurereference,writedown eachworkingdevice
code in thefollowingboxes:
VCR/PVRCode:
DeviceType:______________
DVD Code:
DeviceType:______________
CBL/SAT Code:
DeviceType:______________
TV Code:
DeviceType:______________
8
Page 8

SEARCHING FOR YOUR CODE
If yourdevice does not respondto the remote control after trying all codes
listed for your brand,or if yourbrand is not listedatall,trysearching for
your code.
NOTE: Beforeperformingacode search fora DVD playeror a VCR,turnonthe deviceand
insertthe requiredmedia.
Forexample,to searchfora code for your TV:
1. On the remotecontrol, press
2. Press and hold
SET until the LED (red light) blinkstwice,
TV once.
then release SET.
3. Enter
9 - 9 - 1.The LED willblinktwice.
4. Aim the remotecontrol at the TV andslowly alternate
between pressing
POWER and TV. Stopwhenthe TV turns
off (after pressing POWER).If thedevice does not havea
Powerkey,you can substitute anotherfunction,such as
0 ~ 9 , CH +,or PLAY).
digits
NOTE: Inthesearchmode,the remote control willsendIRcodes from
itslibrarytotheselected device,startingwith the mostpopular code
first.
5. Tolockin the code,pressandreleaseSET.The LED will blink
twice.
6. To search for the codes of your other devices,repeatsteps
1 through5,butsubstitute the appropriate devicekeyfor
the device youaresearchingfor.
CHECKING THE CODES
If you haveset up the remote control using the Searching ForYour Code pro-
cedure (as above), youmayneed to find out which four-digit code is operating yourequipment.For example,to find outwhichcodeisoperatingyour
TV:
1. On the remotecontrol, press
2. Press and hold
SET until the LED (red light) blinkstwice,
then release SET.
3. Enter
9 - 9 - 0.The LED willblinktwice.
4. To view the code for the first digit,press
seconds,countthe
write down the numberin the leftmost box in theTV
codeboxes on page 8.
NOTE: If a code digit is “0”,theLEDwillnotblink.
TV once.
1 once.Wait 3
LED blinks (e.g.,three blinks = 3) and
9
Page 9

5. Repeat step 4 (on the previouspage) three more times for
remainingdigits.Use 2 for the second digit,3 for the third
digit,and
4 for the fourth digit.Write down the code dig-
its in the remaining TV code boxeson page 8.
6. To checkforcodesof other devices, repeat steps 1
through 5 (startingon the previous page),butsubstitute
the appropriate devicekeyforeach deviceyouarechecking.Write down the device’s code digits in the appropriatecodeboxes on page 8.
PROGRAMMING A MASTER POWER MACRO
In its defaultstate,thePOWER key on the One ForAll 4 Device Universal
Remote Control will individually poweryour home entertainmentdevices
on or off.However,youcan also programa
POWER key that will sequentially turn on or off allthe deviceswith a single
keypress.
Programming The Power Key For The Master Power Macro
1. Press and hold SET until the LED (red light) blinkstwice,
then release SET.
Master PowerMacro ontothe
2. Enter
9 - 9 - 5.The LED willblinktwice.Then press POWER
once.
3. Forthe firstdeviceyou want in the power-on sequence,
press its device key (e.g.,
CBL/SAT) once.
4. Repeat step 3 up to three moretimesto add desired
devices to the power-on sequence (e.g.,
TV).
VCR/PVR,DVD,and
5. To save the settingsand exit the program,press and hold
SET until the LED blinks twice,then releaseSET.
Operating The Master Power Macro
1. Afterprogramming,point the remote control at the
devices and press
tiallyturn on (or off) your devices.
NOTE:When POWER is pressedfor less than2seconds,a power commandwillonly be senttothecurrently-selected device. Thisallows
youtostill individually powerdevicesonoroff.
2. Devices will turnon (or off) according to your
programmedsequence.
NOTE: Thecurrently-selected devicewillalwaysturn on or off first,
followedbytheremainingprogrammedsequence.Afterthemaster
power sequence has beencompleted,the remote control will be setto
controlthefirstpowered-on device.
NOTE:If one ormoredevicesdoesnot have a POWERkey,thepower
off/onsequencemaybeslightlydelayedwhentheremote control signals
thedevice(s).Thisactionis normal.
POWER for at least 2 seconds to sequen-
continuedonnextpage...
10
Page 10

PROGRAMMING A MASTER POWER MACRO
(continued)
Clearing The Master Power Macro
1. Press and hold SET until the LED (red light) blinkstwice,
then release
SET.
2. Enter
9 - 9 - 5.The LED willblinktwice.Then press POWER
once.
3. Press and hold
SET.TheMaster Power Macro is now cleared.
SET until the LED blinks twice,then release
RE-ASSIGNING DEVICE KEYS
TheOneForAll4 Device UniversalRemote Controlcanbesettocontrol a
secondPVR,VCR,or DVD player.For example,to controlaTV,a cable box,
twoDVD players,re-assign the unused VCR/PVRkey to operate the second
and
DVD player as follows:
1. On the remotecontrol, press and hold
(redlight) blinks twice,thenrelease SET.
2. Enter
3. Press
9 - 9 - 2.The LED willblinktwice.
DVD once.
SET until the LED
4. Press
VCR/PVRonce.The LED will blink twice.The VCR/PVR
keyisnow ready to be set up to control your second DVD
player.See
To re-assigna secondVCRor PVR (or DVR)tothe unused
Programming DeviceControl on page8.
DVD key, repeat
steps 1 through 4 .However, in step 3 substituteVCR/PVR for DVD,andinstep
4 substitute
your second VCR or PVR (or DVR).See
DVD forVCR/PVR.Now the DVD key will be ready to be set up as
Programming DeviceControl on page
8.
NOTE: Only one devicecanbeassigned to an unuseddevice key at a time.
USING CHANNEL SCAN
In the CBL/SAT or TV mode,usethe FAV key to start a 3-secondscanof all
channels.Or,if programmed,usethe
channels to view adesired channel (see Programming Favorite Channel Scan
on next page.)
1. Press
CBL/SAT or TV once.
FAV key to scan only your favorite
11
Page 11

2. Press FAV once.
• If FavoriteChannelScanhas beensetup,scanningof
favoritechannelswill start withupto100 channelchanges
oruntilstoppedbypressing anykey.
• If Favorite Channel Scan has not been set up,scanning
will start withthe currentchannel,and continue up to
100channel changes or until stopped bypressingany key.
3. To stop scanning channelsat any time,press any key
once.
PROGRAMMING FAVORITE CHANNEL SCAN
In the CBL/SAT or TV mode,you can store a listof up to 10favoritechannels,
in any order, that will beimmediately scanned when FAV is pressed (see
Using Channel Scan on the previous page).
NOTE:Favoritechannelscanonly be programmedfor one mode.Afterprogramming,if FAV
is pressed whileinanother mode,the remotecontrol willstart scanning all channels instead
(if applicabletothe selecteddevice).
1. On the remotecontrol, press CBL/SAT or TV once.
2. Press and hold
SET until the LED (red light) blinks twice,
then release SET.
3. Enter
9 - 9 - 6.The LED willblinktwice.
4. Use the keypad to enter a favorite channel number (e.g.,
031).Then press SET once.
NOTE: If the original remote control required pressing an Enterkey
to change the channel, alsopress the ENTER key afterthechannel
number (e.g.,0 - 3 - 1 - ENTER).On somesatellite receivers and cable
boxes, youmayneed to presstheSELECT (OK) key insteadof ENTER.
5. If desired,repeat step 4 for each channelto be stored,up
to a total of 10 channels.
NOTE: If you try entering morethan 10 channels, the remote control
will automatically exitprogramming.Tochange yourfavorite channel listat thispoint,youwillfirst need to deletetheexistinglistby
performing the stepsin“Clearing Custom Programming”onpage 14.
Then,perform the instructionsinthissection onceagain.
6. To exit programming with less than 10 favorite channels
stored, pressand hold
SET until the LED blinks twice.
Otherwise,the remote control will automatically exit the
program after 10 channels havebeen stored.
12
Page 12

CHANGING VOLUME LOCK
The One ForAll 4 Device Universal RemoteControlis set at the factory for
independent volumecontrol of eachselected device.However,you may
change the Volume Lock setting to GlobalVolumeLockso that a device’s vol-
ume will be locked toone mode (e.g.,tocontrol TV volume inall other
modes).After that,if desired,youcan perform
selected device to set its volumecontrolforindependent operation.
Locking Volume Control To One Mode
(Global Volume Lock)
1. Press and hold SET until theLED (red light)blinkstwice,
then release SET.
Individual Volume Unlock on a
2. Enter
3. Now,when you press
9 - 9 - 3 and then pressanymodekeyonce(e.g.,TV).
LED will blink twice.
The
VOL+,VOL -, or MUTE, the volume of
the selecteddevice (e.g.,TV) will be controlled,regardless
of the mode you haveselected.
Unlocking Volume Control For A Single Device (Individual Volume
Unlock)
1. AfterperformingGlobalVolumeLock (above),press adesired
mode key whereyou want volume to be unlocked (e.g.,
DVD) and controlledwithinits own mode.
2. Pressand and hold
then releaseSET.
3. Enter
9 - 9 - 3 and then pressVOL - once.The LED will blink
fourtimes.
SETuntiltheLED (redlight) blinks twice,
4. If desired,repeat steps 1 through 3 (of thissection) for
eachdevicethatyou want volumeto be unlocked.
5. Now,after you select a device that has volumeunlocked
DVD),pressing VOL+, VOL -, or MUTE will control the
(e.g.,
device’svolume only in its own mode.
Unlocking All Volume Control (Restoring Default Setting)
NOTE: Performing theseinstructionswillrestore independent volume control for all programmed devices(e.g., TV volume control in TV mode,VCR volumeinVCR/PVRmode,
etc.).
1. On the remotecontrol, pressand holdSET untilthe LED (red
light) blinkstwice,then release SET.
2. Enter
9 - 9 - 3 and then pressVOL+once.TheLED will
blinkfourtimes.
13
Page 13

3. Volume will again be independently controlled according
to its defaultstates for all programmed devices.
CLEARING CUSTOM PROGRAMMING
The One ForAll 4 Device Universal RemoteControlcontainsan Operational
FeatureReset
If desired,youcan use it to clear custom programming,exceptyour setup
codesand reassigneddevicekeys,and resetthemto originalfactory settings.Also see
IMPORTANT: Executing this programwill eraseall yourcustom settings for
Power Macro,Favorite Channels, andVolume Lock.
1. Press and hold SET until theLED (red light)blinkstwice,
program.
RestoringFactory Default Settings as below.
then release
SET.
2. Enter
9 - 8 - 0.The LED willblinktwice.The remote control
will return to normal operation.
RESTORING FACTORY DEFAULT SETTINGS
The One ForAll 4 Device Universal RemoteControlalso containsa Factory
program that you can use to reset all custom settings and setup codes
Reset
to originalfactory settings.Also see ClearingCustom Programming as above.
IMPORTANT: Executing this programwill eraseall yourcustom settings for
Power Macro,Favorite Channels,Volume Lock,ReassignedDevices, and all
device settings.
1. Press and hold SET until theLED (red light)blinkstwice,
then release SET.
2. Enter
9 - 8 - 1.The LED willblinktwice.The remote control
will return to normal operation.
14
Page 14

TROUBLESHOOTING
PROBLEM: LED (red light)does not blink when you press a key.
SOLUTION: Replace batteries with two new AAA alkaline batteries.
PROBLEM: LED blinks when you press a key, but homeentertain-
mentdevice does not respond.
SOLUTION: Make surethe remote control is aimed at your home
entertainment deviceand is not farther than 15 feet
away.
PROBLEM: The unit does not control home entertainment devices
or commands are not workingproperly.
SOLUTION: Try all listedcodes for the devicebrandsbeingsetup.
Make suretheycanbe operatedwithan infrared remote
control.
PROBLEM: Changing channels does not work.
SOLUTION: If original remote required pressingENTER orSELECTto
change channels,pressENTERorSELECTonthisremote
afterentering thechannel number.
PROBLEM: Tried SearchingForYour Code method and still could
not find a working code.
SOLUTION: Clear the device key as follows:Press and hold SET until
the LED (red light) blinks twice,then release.Next enter
9 - 9 - 2. Then press the device key to be clearedtwice.
Now repeat the SearchingForYourCodemethodon
page9.
PROBLEM: CH + and CH - do not work for your RCA TV.
SOLUTION: Due to RCA design (1983-1987),onlythe original
remote control willoperate these functions.
PROBLEM: No remote control of volume.
SOLUTION: SeeChangingVolume Lock on page 13 to lock/unlock
volume.
Foradditionalinformation:
• Internet:http://www.oneforall.com
15
Page 15

INSTRUCTIONS TO THE USER
This equipmenthasbeen tested and found to complywiththe limitsfora class
B digital device,pursuant to part 15of the FCC Rules.These limits are designed
to provide a reasonable protection against harmful interference in a residential
installation.Thisequipment generates,uses, and can radiateradio frequency
energyand if not installed and used in accordance with the instructions,may
causeharmful interference to
radiocommunications.However, there is no guaranteethat interference will not
occurin a particular installation.If this equipment does causeharmful interferenceto radioor television reception,which can be determined by turning the
equipmentoff and on,theuseris encouraged to try to correct the interference by
one or moreof the following measures:
• Reorientor relocate the receiving antenna.
• Increase separationbetween equipment and receiver.
• Connect equipment into an outletor a circuitdifferent from that to which the
receiveris connected.
• Consult dealeror experiencedradio/TV technician for help.
LIMITED LIFETIME WARRANTY
Audiovox ElectronicsCorporation (the“Company”) warrants to youtheoriginal
retail purchaser of this product thatshould it,under normal useandconditions,be
provendefectivein material or workmanship duringitslifetime while you own it,
suchdefect(s)will be repaired or replaced (at theCompany’s option) without charge
forpartsand repair labor. Toobtain repairor replacement within the terms of this
Warranty, the product is to be deliveredwith proof of warrantycoverage (e.g.dated
bill of sale),specification ofdefect(s), transportation prepaid,totheCompanyat the
address shownbelow.ThisWarranty does notcover product purchased,serviced or
used outside theUnitedStates or Canada.This Warranty is not transferableanddoes
not extendto costs incurredforinstallation,removalorreinstallationof the product.This Warrantydoesnotapply if in the Company’s opinion, the product hasbeen
damaged throughalteration,improper installation,mishandling,misuse,neglect,
accident,or the simultaneoususeof differentbattery types (e.g.alkaline,standard or
rechargeable).
THE EXTENTOF THE COMPANY’S LIABILITYUNDER THIS WARRANTY IS
LIMITEDTOTHEREPAIR OR REPLACEMENT PROVIDEDABOVE AND, IN NO
EVENT, SHALLTHE COMPANY’S LIABILITYEXCEED THE PURCHASE PRICE
PAID BY PURCHASERFORTHEPRODUCT.
ThisWarranty is in lieu of allother express warranties or liabilities.ANY IMPLIED
WARRANTIES,INCLUDINGANY IMPLIEDWARRANTY OF MERCHANTABILITY
OR FITNESSFORA PARTICULAR PURPOSE SHALLBE LIMITEDTODURATION
OF THISWARRANTY. IN NO CASE SHALL THE COMPANY BELIABLE FOR ANYCONSEQUENTIAL OR INCIDENTAL DAMAGES WHATSOEVER.No person or representative is authorized to assumefortheCompanyany liabilityotherthan
expressedherein in connection with the sale of this product.Some states/provinces
do not allowlimitationsonhowlong an impliedwarranty lasts or the exclusion or
limitationof incidental or consequentialdamage so the abovelimitations or exclusions may not applyto you. ThisWarrantygives you specific legal rights and youmay
also have other rights,whichvary fromstate/province to state/province.U.S.A.:
Audiovox ElectronicsCorporation,150Marcus Blvd.,Hauppauge,NewYork
11788CANADA: Audiovox Return Center,c/o Genco,6685 KennedyRoad,Unit 3,
Door 16,Mississauga,Ontario L5T 3A5
URC-4220 07/08
16
Page 16

ADDITIONAL INFORMATION
ONE FORALL®is the registered trademarkof Universal Electronics Inc.
AudiovoxAccessoriesCorporation is the Licensee of the ONE FOR ALL® brand
forNorth America.
Copyright 2006 by UniversalElectronics Inc.Nopart of this publication may be
reproduced,transmitted,transcribed, stored inanyretrieval system,ortranslated
to any language,in any formor by any means,electronic,mechanical,magnetic,
optical,manual,orotherwise,without the prior writtenpermissionof Universal
ElectronicsInc.
The One ForAll®4 Device Universal RemoteControlis compatiblefor use in
North America,excluding Mexico.
This One ForAll®4 Device Universal RemoteControlis coveredbyoneor more
of the followingUS Patents:
6,587,067 6,496,135 5,515,052 5,959,751
6,587,067 5,481,256
17
Page 17

TABLA DE CONTENIDOS
Introducción . . . . . . . . . . . .. . . . .. . . . . . . . . . . . . . . . . . . . . . . . . . . . . . . . . .. . . . .. . . . . . . . . 19
Características y Funciones . . . . . . . . . . . .. . . . . . . . . . . . . . . . . . . . . . . . . . . . . . . . . . . . . . 20
Gráfica y descripción de teclas. . . . . . . . . . . . . . . . . . . . . . . . . . . . . . . . . . . . . . . . . . . 21
Tabla del dispositivo. . . . . . . . . . . . . . . . . . . . . . . . . . . . . . . . . . . . . . . . . . . . . . . . . . . 23
Instalación de baterías. .. . . . . . . . . . . . . . . . . . . . . . . . . . . . . . . . . . . . . . .. . . . . . . . . . . . . . 24
Programación del control de dispositivos (aparatos) . . . . . . . . . . . . . . . . . . . . . .. . . . 25
Búsqueda de su código . . . . . . . . . . . . . . . . . . . . . . . . . . . .. . . . .. . . . . . . . . . . . . . . . . . . . . 26
Verificación de los códigos . . . . . . . . . . . . . . . . . . . . . . . . . . . . . . . .. . . . . . . . . . . . . . . . . . . 26
Programación de función de encedido maestro . . .. . . . . . . . . . . . . . . . . . . . . . . . . . . . . 27
Programación del botón Power para la función de encendido maestro. . . . . . . . . . . . 27
Funcionamiento del macro de encendido maestro. . . . . . . . . . . . . . . . . . . . . . . . . . . . 28
Eliminación del macro de encendido maestro . . . . . . . . . . . . . . . . . . . . . . . . . . . . . . . 28
Reasignación de teclas de dispositivos . . . . .. . . . .. . . . . . . . . . . . . . . . . . . . . . . . . . . . . 28
Uso de la exploración de canales . . . . . . . . . . . . . . . . . . . . . . . . . . . . . .. . . . . . . . . . . . . . . 29
Programación de exploración de canales favoritos . . . . . . . . . . . . . . . . . . . . . . . . . . . . . 29
Cambiar el bloqueo del volumen. . . . . . . . . . . .. . . . . . . . . . . . . . . . . . . . . . . . . . . . . . . . . . 30
Bloqueo de control de volumen en un modo
(Control global de volumen) . . . . . . . . . . . . . . . . . . . . . . . . . . . . . . . . . . . . . . . . . . . . . 30
Desbloqueo del control de volumen para un sólo dispositivo
(Desbloqueo de volumen individual) . . . . . . . . . . . . . . . . . . . . . . . . . . . . . . . . . . . . . . 30
Desbloqueo de todos los controles de volumen
(Restablecimiento de la configuración de fabrica) . . . . . . . . . . . . . . . . . . . . . . . . . . . 31
Borrar programación personalizada. . . . . . . . . . . . . . . . . . . . . . . . . . . . .. . . . . . . . . . . . . . 31
Restableciendo la configuración de fábrica . . . . . . . . . . . . . . . . . . . . . . . . . . . . . . . . . . . 32
Resolución de problemas. . . . . . . . . . . . . . .. . . . . . . . . . . . . . . . . . . . . . . . . . . . . . . . . . . . . . 33
Instrucciones para el usuario . . . .. . . . . . . . . . . . . . . . . . . . . . . . . . . . . . . . . . . . . . .. . . . . . 34
Garantia De Por Vida. . . . . . . . . . .. . . . .. . . . . . . . . . . . . . . . . . . . . . . . . . . . . . . . . .. . . . .. . 34
Información adiciona. . . . . . . . . . . . . . . . . . . . . . . . . . . . . . . . . . . . . .. . . . .. . . . . . . . . . . . . . 35
Códigos del fabricante . . . . . . . . . . . . . . . . . . . . . . . . . . . . . . . . . . .. . . . . . . . . . . . . . . . . . . . 36
Códigos de configuración para cajas (convertidores) de cable . . . . . . . . . . . . . . . . . . 36
Códigos de configuración para equipo combinado de cable/PVR (o DVR) . . . . . . . . . 36
Códigos de configuración para reproductores de DVD. . . . . . . . . . . . . . . . . . . . . . . . . 36
Códigos de configuración para equipo combinado de DVD/VCRs . . . . . . . . . . . . . . . . 37
Códigos de configuración para PVR (o DVR)
(Videograbadoras Personales Digitales en Disco Duro) . . . . . . . . . . . . . . . . . . . . . . . . 37
Códigos de configuración para receptores de satélite. . . . . . . . . . . . . . . . . . . . . . . . . 37
Códigos de configuración para equipo combinado
de receptores de satélite/PVR (o DVR) . . . . . . . . . . . . . . . . . . . . . . . . . . . . . . . . . . . . . 38
Códigos de configuración para TVs . . . . . . . . . . . . . . . . . . . . . . . . . . . . . . . . . . . . . . . 38
Códigos de configuración para equipo combinado de TV/DVDs . . . . . . . . . . . . . . . . . 39
Códigos de configuración para equipo combinado de TV/VCRs . . . . . . . . . . . . . . . . . 40
Códigos de configuración para equipo combinado de TV/VCR/DVD . . . . . . . . . . . . . . 40
Códigos de configuración para VCRs. . . . . . . . . . . . . . . . . . . . . . . . . . . . . . . . . . . . . . 40
18
Page 18

INTRODUCCIÓN
El Control Remoto Universalpara4 dispositivos(aparatos) One For All (URC-
4220)estádiseñado para controlar de manera remota hasta cuatrodispositivos
de entretenimientodoméstico. Tambiénofrece teclasintuitivasy fácil de usar
para el control instantáneode componentes DVD y PVR (o DVR).Además,su
sofisticadatecnologíale permitirá controlar sus dispositivos de entretenimiento
en un control remotequees fácil de usar.Entre las características avanzadasse
incluyen:
• Botones intuitivosquele permitiránun fácil acceso a las funcionesy menús
de su reproductor DVD,PVR (o DVR) y dispositivos de cable o satélite.
• Configuración directa de códigosparauna programaciónde dispositivos
más sencilla.
• Labúsqueda de códigos Step-and-Set y la verificaciónde código sonunaman-
eraalternativa de programar dispositivos.
• Macro de encendidomaestro para encender y apagar todos sus dispositivos
conun solo botón.
• La función de Bloqueo/Desbloqueo de volumen bloquea y desbloquea el con-
trolde volumen en un sólo modo o en modos individuales.
• Reasignación de teclas de dispositivos para el controlremotodeun segundo
dispositivo(duplicado).
• Exploraciónde todosloscanales y deCanales favoritosparaunafácilvisual-
ización de canales.
• Teclas de colores para ubicar rápidamentelasfuncionesmás utilizadas.
• Completa bibliotecade códigos para dispositivosde video populares, inclui-
dos reproductores DVD y PVRs (oDVRs) (Videograbadoras Personales
Digitales en Disco Duro).
El control Remoto UniversalURC-4220 funciona con dos (2) bateríasalcalinas
AAA nuevas(noincluidas)y necesita ser programado para controlarsus dispositivos. Lea y siga las instruccionesdetalladas en el presente documento para
obtener resultadosóptimos Conserve asimismoestaguíaparafuturas referencias.
19
Page 19

CARACTERÍSTICAS Y FUNCIONES
Consultela ilustración que aparece a continuación para ubicarlasfunciones del
ControlRemoto Universal One-for-All para 4 dispositivos(URC-4220)y estudiea
continuación las gráficas y descripciónes de las teclas (en las dos páginas siguientes) para aprender a usar cada una de ellas.
Paraconocerqué tipo de dispositivospueden ser controlados con cada tecla del
dispositivo una vez programado,consulte la Tabladeldispositivo en la página 23.
20
Page 20

Gráfica y descripción de teclas
Cuando el LED (luz roja) parpadea,el control
remoto está en funcionamiento y (unavezprogramado) está enviando
señales.
Presione VCR/PVR,DVD,CBL/SAT,o TV para seleccionar el dispositivoquedeseacontrolar.
Consulteasimismo la
página23.
Presione POWER para encender o apagar el dispositivo seleccionado.Para el control del encendidomaestro,consulte
de encedido maestro en la página 27.
Utilice el teclado numérico (1 ~9 y 0) para seleccionar directamentelos canales (p.ej.
Utilice TV/VID para alternarla señal
de TV entre video o programas de
televisión.
Presione ENTER (seleccionar) después de introducir los números del canal en algunas marcas
de TV.
Utilice GUIDE para mostrar la guía de programao
menú de configuración de
eleccionado.
Presione MENU una vez para mostrar el menú
principal de su dispositivoseleccionado.
Tabla del dispositivo en la
Programación de función
009 ó 031).
su dispositivo s
Utilice INFO para mostrar el canal y información
del programa actual o el
directorioen pantalla.
Utilice EXIT para salir de la guía o menúde su
dispositivo seleccionado.
Utilice las Teclas del cursor para moverlo a través
de las pantallasde la guía del programay del
menú.
Presione SELECT (OK) para seleccionar las opciones
desdeel menú o guía de su aparatoseleccionado.
Presione LAST una vez para volveral canal
anterior.
FAV para la exploraciónde todos los
Utilice
canales o, después de programar, para la
exploraciónde hasta10 canalesfavoritos.
21
Page 21

Utilice CH + (oCH -) para seleccionarel
canalsiguiente(o anterior).
Presione SUBTITLE/CC una vez para mostrar
(u ocultar)subtítuloso closed captions,
siempreque los ofrezcan su reproductor
DVDo TV.
Con un PVR (o DVR), presione PVR MENU una
vezparamostrar la lista de sus
programas grabados.
Presione MUTE una vez para mudar o
restablecer el sonido.
Utilice VOL+(o VOL -)para subir(o bajar)
el volumen del dispositivo.
Utilice REW,PLAY,FWD,PAUSE,o STOP para
controlar su VCR, PVR (o DVR), o reproductor DVD.
En reproductores DVD,utilice
para ver el capítulosiguienteo anterior.
R.
SKIP F. o SKIP
EnVCR,PVR (o DVR),oVOD (en caso de
estardisponible),utilice
SCAN- o SCAN+ para
buscar adelante o atrás en unprograma de
video.Utilice
tánea.Utilice
REPLAY pararepeticióninstan-
QUICK SKIP para avanzarel
programa de video un tiempo predeterminado(dependiendo on como esta configuradoen su dispositivo).
Presione REC dos vecesparagrabarun
programa porVCR o PVR (o DVR).
Utilice SLEEP (dormir)para configurarel
tiempo para apagarun dispositivo
cuente con esta función.
que
Utilice SET para todas las secuencias de
programación.
22
Page 22

Tabla del dispositivo
NOTA: Consulte la tabla que aparece a continuacióncuando sigalasinstrucciones de
“Programación del control de dispositivos (aparatos)”en la página 25.
Una vez programado,con el Control Remoto UniversalOne ForAllpara4 dispositivospodrácontrolar los siguientes tipos de dispositivos:
LA TECLA DE CONTROLA LOS SIGUIENTES TIPOS
DISPOSITIVO DE DISPOSITIVOS
• Reproductor de DVD
• ComboTV/DVD
• ComboreproductorVCR/DVD
• VCR
• ComboTV/VCR
• ComboreproductorTV/VCR/DVD
• ComboreproductorVCR/DVD
• PVR (o DVR)
• Cajade cable(oConvertidor)
• ComboCaja de cable/PVR(o DVR)
• Receptorde satélite
• ComboReceptor de satélite/PVR (o DVR)
• Televisor
23
Page 23

INSTALACIÓN DE BATERÍAS
1. En el reverso del control remoto,jale la pestaña y levante
la tapa de las baterías.
2. Adquierados (2) baterías alcalinasAAA nuevas.Haga
coincidirlas marcas+ y – de las baterías con las marcas
+ y – indicadas en elcompartimientoy a continuación
introduzca las baterías.
3. Coloque de nuevo la tapa y presione.La pestaña hará un
cliccuandola tapa esté ajustada.
4. Pruebe el control remoto presionandocualquier teclade
modo (p.ej.
rectamente, el
NOTA: El controlremoto dejará de funcionar cuandolas baterías tenganque
ser sustituidas.Retirelas baterías usadas e introduzca baterías nuevas en un
plazode 10 minutos para garantizar la conservaciónde la información qué
esta programada.
TV).Silas baterías han sido introducidascor-
LED (luz roja)se encederá.
24
Page 24

PROGRAMACIÓN DE CONTROL DE DISPOSITIVOS (APARATOS)
El Control Remoto UniversalOne ForAllpara4 dispositivosestá programado en
la fábricaparafuncionar conTVs RCA,reproductoresDVDToshiba,equiposde
cableMotorola y VCRs RCA.Para controlardispositivos de marcasdiferentes a
las predeterminadas,siga los siguientes pasos; en caso contrario,ignore estasección:
1. Encienda el dispositivo deseado (p.ej., el VCR o reproductor de DVD) y, si es necesario,inserte el medio adecuado (p.ej., un casete o undisco).
NOTA: Lea completamente los pasosdel2 al 4 antesde empezar.
Subrayeo anote los códigos y dispositivo que deseaprogramar antes
de seguirconelpasonúmero 2.
2. En el control remoto,presione una de lasteclas de dispositivo una vez (ej.,
NOTA: Paraprogramar el control de un VCR,PVR (o DVR),Combo
TV/VCR o Combo TV(VCR/reproductorDVD), presione VCR/PVR
una vez.Después de programarun dispositivo ComboVCR,podrá
controlar la seleccióndecanales,elvolumen y las funciones del VCR.
NOTA: Paraprogramar el control de un reproductor DVD, Combo
reproductorDVD/VCR, o ComboTV/reproductor DVD, presioneDVD
una vez.Después de programarun dispositivo Combo DVD,podrá
controlar la seleccióndecanales,elvolumen y las funciones del DVD.
NOTA: Paraprogramar el control de un Dispositivo de cable,undispositivo Combinadode cable/PVR (o DVR), Receptordesatéliteo
Combo receptor de satélite/PVR(oDVR),presione CBL/SAT unavez.
3. Presione y mantenga presionada la tecla SET hasta que el
LED (luz roja)parpadee dos veces.Suelete la tecla.
4. Utilice los códigos del fabricante(a partir de la página
36) para determinar el tipo de dispositivo y marca,y a
continuaciónintroduzca el primer código de cuatro dígitos de su dispositivo.El
indicarle que todo es correcto.
NOTA: Si el LED no parpadea dos veces,repitalospasos 2 y 4e introduzcaelmismo códigode nuevo.
5. Apunteel control remoto hacia el dispositivoy presione
POWER una vez.El dispositivo debería apagarse.Sino es
así,repitalospasosdel 2 al5,inténtelo con cada código
enumeradoparasu marcahastaencontrarunoque funcione. Si aún así no funciona,consulte la sección
Búsqueda de su código.
NOTA: Si el dispositivo no tiene botónPOWER, presioneel botón
PLAY.
6. Repita los pasos 1 a 5 para cada dispositivoquedesee
controlar.Anote los códigos correctos de cada dispositivo
en los siguientes espacios para referenciasfuturas:
VCR/PVR,DVD,CBL/SAT,o TV).
LED parpadeará dos veces para
Código
VCR/PVR:
Tipo de dispositivo:__________________
DVD:
Código
Tipo de dispositivo:__________________
25
Page 25

Código CBL/SAT:
Tipo de dispositivo:__________________
TV:
Código
Tipo de dispositivo:__________________
BÚSQUEDA DE SU CÓDIGO
Si su dispositivono responde a la orden del control remoto despuésde haber
probado con todosloscódigos enumeradospara su marcao si su marca no
aparece,intentela búsqueda de su código.
NOTA:Antes de realizarunabúsquedadecódigo para unreproductor DVD o unVCR,enciendaeldispositivo e introduzcalos medios necesarios.
Por ejemplo, para buscar un código para su TV:
1. En el control remoto,presione TV una vez.
2. Presione y mantenga presionada
SET hasta que el LED (luz
roja) parpadee dos veces.Suelte la tecla.
3. Presione
4.
9 - 9 - 1. El LED parpadearádosveces.
Apunte elcontrol a laTV y lentamente alterneentre lasteclas
POWER y TV. Deténgase cuando la TV se apague (después
de
de presionar
pudesustituirlo por otra función,como los dígitos
PLAY).
o
NOTA: En el modo de búsqueda,el controlremotoenviará los códigos
al dispositivoseleccionado, comenzandoconelcódigo más popular.
POWER).Si el dispositivono tiene el botón Power,
0 - 9,CH +,
5. Para seleccionar el código que funcioneen el paso No.4,
presione y sueltela tecla
SET.El LED (luz roja) parpadeará
dos veces.
6. Para buscar los códigos del restode sus dispositivos,repita los pasos del 1al 5, pero presionela tecla del dispositivo
pertinente a el dispositivoque quierabuscar.
VERIFICACIÓN DE LOS CÓDIGOS
Si ustedha programado el control remoto siguiendoel procedimiento Búsqueda
de su código (páginaanterior),es probable que quieraaveriguarquécódigo de
cuatro dígitos funciona con su dispositivo.Por ejemplo,paraaveriguarquécódigo funciona con su TV:
1. En el control remoto,presione TV una vez.
2. Presione y mantenga presionada
roja) parpadee dos veces.Suelte la tecla.
continúa en la página siguiente...
26
SET hasta que el LED (luz
Page 26

VERIFICACIÓN DE LOS CÓDIGOS
(continuación)
3. Presione 9 - 9 -0.El LED parpadearádos veces.
4. Para ver el primer dígito del código, presionela tecla
1
una vez.Espere3 segundos,cuente los parpadeos del LED
(porejemplo,tres parpadeos= 3) y escribael númeroen
el cuadrosituado más a la izquierda en los cuadros de
códigos de TVde la página 26.
NOTA: Si el dígito del códigoes“0”, el LED no parpadeará.
5. Repita el paso 4(en la página anterior) por tres veces
más para los dígitos restantes.Utilice la tecla
2 para el
segundo dígito,3 para el tercerdígitoy 4 para el cuarto.
Anote los dígitosdel códigoen los cuadrosde códigode
TV de lapágina26.
6. Para comprobar los códigosde otrosdispositivos,repita
los pasos 1 a 5 (comienza en la página anterior),pero
presione la tecla pertinente para cada dispositivo cuyos
códigos desee comprobar.Anotelos dígitos del código en
los cuadros de códigopertinentes enlas paginas25 y 26.
PROGRAMACIÓN DE FUNCIÓN DE ENCEDIDO MAESTRO
En modo predeterminado,el botón POWER del Control Remoto UniversalOne
ForAllpara4 dispositivos encenderá y apagaráindividualmentesusdispositivos
de entretenimientodoméstico. No obstante,ustedpuede tambiénprogramarun
Macro de encendido maestroen el botón
los dispositivos con solo presionarla tecla
POWER que apagará o encenderá todos
POWER por dos segundos.
Programación del botón Power para la función de encendido
maestro
1. Presione y mantenga presionadaSET hasta que El LED(luz
roja) parpadee dos veces.Suelte la tecla.
2. Presione
3. Para el primer dispositivoquequiera que se enciendeen
4. Repita el paso 3hastatresveces más para añadir disposi-
5. Para guardar la configuración y salir del programa, pre-
9 - 9 - 5.El LEDparpadearádos veces.A contin-
uación, presione
POWER una vez.
la secuencia de encendido,presione su tecla de dispositivo correspondiente (p.ej.,
tivos deseadosa la secuencia de encendido (p.ej.
DVD,y TV).
sione y mantenga presionada
CBL/SAT) unavez.
VCR/PVR,
SET hasta que el LED
parpadee dos veces.A continuación, suelte SET.
27
Page 27

Funcionamiento del macro de encendido maestro
1. Una vez programado,apunte el control remoto hacia los
dispositivos y presione
POWER durante al menos 2 segun-
dos para encender o apagar sus dispositivos de manera
secuencial.
NOTA: Cuando se presionaPOWER durante menosde2 segundos,se
enviará una señal de encendido únicamenteal dispositivo seleccionado en ese momento.Esto le permite aún así encender o apagarsus
dispositivos de maneraindividual.
2. Los dispositivos se encenderán o apagarán de acuerdo
consu secuencia programada.
NOTA: El dispositivo seleccionado en ese momentoserásiempreel
primero en apagarse o encenderse;le seguiránlos restantesdispositivossegún la secuenciaprogramada.Una vez completadala secuencia de encendido general,elcontrolremoto quedará configurado para
controlar el primer dispositivoencendido.
NOTA: Si uno o más dispositivos no cuentanconbotón POWER,la
secuencia de encendido podráverseligeramenteretrasada cuando el
control remoto envíe la señal a dicho dispositivo.Esta acción es normal.
Eliminación del macro de encendido maestro
1. Presione y mantenga presionadaSET hasta que El LED(luz
roja) parpadee dos veces.Suelte la tecla.
2. Presione
9 - 9 - 5.El LEDparpadearádos veces.A contin-
uación, presione
POWER una vez.
3. Presione y mantenga presionada
que el
LED parpadeedosveces.Suelte la tecla.El macrode
SET hasta
encendidomaestro habrá sidoeliminado.
REASIGNACIÓN DE TECLAS DE DISPOSITIVOS
El Control Remoto UniversalOne ForAllpara4 dispositivospuede ser configurado para controlarun segundoPVR,VCR,o reproductor de DVD.Por ejemplo,
para controlar una TV,un equipode cable,y dos reproductoresDVD, deberá
reasignar la tecla no utilizada
iente manera:
1. Presione y mantenga presionadaSET hasta que el LED (luz
roja) parpadee dos veces.A continuación,suelte la tecla.
2. Presione
3. PresioneDVD una vez.
4. Presione VCR/PVR una vez.El LED parpadeará dos veces.La
tecla
reproductorDVD. Consulte
positivos
VCR/PVRal control de la segunda DVD de la sigu-
9 - 9 - 2.El LEDparpadearádos veces.
VCR/PVRpodrá ser programada para su segundo
Programación de Controlde dis-
en la página 25.
continúa en la página siguiente...
28
Page 28

REASIGNACIÓN DE TECLAS DE DISPOSITIVOS
(continuación)
Parareasignarun segundoVCR o PVR (oDVR) a la tecla DVD no utilizada,repita
los pasos1 a 4.No obstante,reemplace en el paso 3
DVD por VCR/PVR.Ahora la tecla DVD estará listaparaser configuradaparasu
4,
segundo VCRo PVR (o DVR).Consulte Programaciónde Control de dispositivos
en la página 25.
NOTA: Únicamentepuede asignarseundispositivo a la vez a cada tecladedispositivo.
VCR/PVRporDVD y en el paso
USO DE LA EXPLORACIÓN DE CANALES
En los modosCBL/SATo TV, utilice la teclaFAV para comenzar una exploración de
todos los canalescada 3 segundos.En caso de estar programado,utilice la tecla
FAV para exploración de sus canalesfavoritosy elegirelcanal deseado (ver
Programacióndeexploraciónde canalesfavoritos en la página siguiente).
1. Para comenzarla exploraciónde todos los canales o de
los canalesfavoritos,presione
CBL/SAT o TV una vez.
2. Presione
FAV una vez.
• Si se ha configuradolaexploración de canales favoritos,
éstacomenzará con hasta100cambiosdecanal o hasta
quese detenga presionandocualquier tecla.
• Si no se ha configurado la búsqueda de canalesfavoritos,
ésta comenzaráen el canal actual y continuará hastaque
efectúe 100 cambios de canal o hasta que se detengapresionando cualquier tecla.
3. Para detener la búsquedade canales en cualquier
momento,presione cualquier teclauna vez.
PROGRAMACIÓN DE EXPLORACIÓN DE CANALES FAVORITOS
En los modos CBL/SAT o TVpuede programar una lista de hasta 10 canales
favoritos en cualquier orden,que serán objeto de búsquedade manerainmediata cuando se presione la tecla
NOTA: Los canales favoritos únicamente puedenser programados paraunmodo. Una vez
programada, si se presionala tecla FAV estando en otro modo, el control remoto comenzará
a explorar todosloscanales(sies aplicableal dispositivo seleccionado).
1. En el control remoto,presione CBL/SAT o TV
una vez.
FAV .
2. Presione y mantenga presionada
roja) parpadee dos veces.Suelte la tecla.
3. Presione
9 - 9 - 6.El LEDparpadearádos veces.
29
SET hasta que el LED (luz
Page 29

4. Utilice el teclado para introducir el número de uno de sus
canales favoritos (p.ej.,
031).A continuación,presione SET
una vez.
NOTA: En casodequeen el control remoto original fuera necesario
presionar lateclaENTER paracambiarelcanal,deberátambiénpre-
sionar estatecla traspresionarelnúmerodecanal (p.ej., 0 - 3 - 1 ENTER).
En algunosreceptores de satélitey equiposde cable,esposiblequedeba
presionar SELECT (OK) en lugar de ENTER.
5. Repita el paso 4para cada canal que desee programar,
hastaun total de 10 canales.
NOTA: Si intentaintroducir más de 10 canales, el control remoto saldrá automáticamente de la programación.
6. Para abandonar la programación con menosde 10
canales favoritos,presione y mantenga presionada
SET
hastaqueel LED parpadee dos veces. De otro modo,elcontrolremoto saldráautomáticamente de la programación
una vez que hayanprogramadodiezcanales.
NOTA: Si programo 10 canalesfavoritos,y quiere cambiar los canales
que programo, primero tendraqueborrar la lista queexiste.Vea
“Borrar programación personalizada” en la página 31. Luegosigua
las instruccionesdeesta sección.
CAMBIAR EL BLOQUEO DEL VOLUMEN
El Control Remoto UniversalOne ForAllpara4 dispositivosestá configurado en
la fábricaparael control independiente de volumen de cada dispositivo seleccionado.Noobstante, ustedpodrácambiar la configuración de bloqueode volumen a bloqueo de volumen global,de modo que el volumen de un dispositivo
estará bloqueado en unsolomodo(p.ej.,para controlar el volumen de TVen el
resto de modos).
Bloqueo del control de volumen a un modo (Control global de volumen)
1. Presione y mantenga presionadaSET hasta que el LED (luz
roja) parpadee dos veces.Suelte la tecla.
2. Presione
3. Ahora,cuando presione
9 - 9 - 3 y a continuaciónpresione una tecla de
modo (ej.
TV).ElLED parpadeará dos veces.
VOL+, VOL -, o MUTE, podrá contro-
lar el volumendeldispositivo seleccionado (p.ej.,
TV),
independientementedelmodo que hayaseleccionado en
el contro remoto.
Desbloqueo del control de volumen para un sólo dispositivo
(Desbloqueo de volumen individual)
Si lo desea,usted podrá realizarun desbloqueo individual de volumen en un dispositivo específicopara configurarel control de volumen para una operación
diferente.
1. Una vez realizadoel bloqueo de volumen total (arriba),
presione la tecla del modo pertinentedónde desee desbloqueary controlarel volumen en dicho modo (p.ej.
2. Presione y mantenga presionada
roja) parpadee dos veces.Suelte la tecla.
continúa en la página siguiente...
30
SET hasta que el LED (luz
DVD).
Page 30

CAMBIAR EL BLOQUEO DEL VOLUMEN
Desbloqueo del control de volumen para un sólo dispositivo
(Desbloqueo de volumen individual)
(continuación)
3. Presione 9 - 9 -3.Presione VOL - una vez.El LED
parpadeará cuatro veces.
4. Repita los pasos 1 a 3 (de esta sección)para cada dispositivocuyo volumendeseedesbloquear.
5. Ahora,después de haber seleccionado desbloquearel volumen de un dispositivo(p.ej.,
o
MUTE controlarán el volumen del dispositivosólo en el
modo de éste.
Desbloqueo de todos los controles de volumen (Restablecimiento
de la configuración
de fabrica)
NOTA: Estas instruccioneslepermitiránrestablecer un control de volumen independiente
paracada uno de los dispositivosprogramados(p.ej, control de volumendeTV en el
modoTV, control de volumen de VCR en el modoVCR/PVR,etc.).
1. Presione y mantenga presionadaSET hasta que el LED (luz
roja) parpadee dos veces.A continuación,suelte la tecla.
2. Presione
9 - 9 - 3.Presione VOL + una vez.ElLED
parpadeará cuatro veces.
DVD),las teclas VOL+, VOL -,
3. El volumen pasará a controlarse de nuevosegúnlo predeterminado en todos los dispositivosprogramados.
BORRAR PROGRAMACIÓN PERSONALIZADA
El Control Remoto UniversalOne ForAllpara4 dispositivoscontieneun programa de Restablecimiento defuncionesoperativas.Podrá usarlo para borrarla
programación personalizada y restablecerlas a laconfiguración originalde
fábrica,conexcepciónde sus códigos de configuración y las teclasreasignadas
de dispositivo. Consulte tambiénRestableciendola configuraciónde fábrica en
la página siguiente.
IMPORTANTE: La ejecución de este programa borrarátodasu configuración personalizada paramacros de encendidomaestro,canales favoritosy
bloqueo de volumen.
1. Presione y mantenga presionadaSET hasta que el LED (luz
roja) parpadee dos veces.Suelte la tecla.
31
Page 31

2. Presione 9 - 8- 0.ElLED parpadeará dosveces.El control
remoto regresaráasufuncionamiento convencional.
RESTABLECIENDO LA CONFIGURACIÓN
DE FÁBRICA
El Control Remoto UniversalOne ForAllpara4 dispositivoscontiene asimismo
un programa de Restablecimientode la configuraciónde fábricaqueborratoda
la configuraciónpersonalizada y códigosde configuración a laconfiguración
original de fábrica.
IMPORTANTE:Laejecuciónde esteprograma anulará toda su configuración
personalizadapara códigos de configuración,macro de encendido maestro,
canales favoritos,y bloqueo de volumen.
1. Presione y mantenga presionadaSET hasta que el LED (luz
roja) parpadee dos veces.Suelte la tecla.
2. Presione
9 - 8 -1.El LED parpadeará dosveces.
Elcontrolremotoregresará a su funcionamiento convencional.
32
Page 32

RESOLUCIÓN DE PROBLEMAS
PROBLEMA: El LED (luz roja) no parpadea cuandopresiona una
tecla.
SOLUCIÓN: Sustituya las bateríascondos baterías alcalinasAAA
nuevas.
PROBLEMA: El
LED parpadeacuando presiona una tecla,pero el dis-
positivo de entretenimientodomésticono responde.
SOLUCIÓN: Asegúrese de que el control remoto está dirigido a su
dispositivo de entretenimiento doméstico y lo está uti
lizando a unadistancia inferior a 5metros.
PROBLEMA: El control remoto no funcionaconlosdispositivos de
entretenimiento doméstico o las órdenesno se ejecutan
correctamente.
SOLUCIÓN: Pruebe todoslos códigos enumerados para la marca del
dispositivo queestásiendo configurado.Asegúrese de
que todoslos dispositivos puedenrecibir señal de un
controlremoto.
PROBLEMA: El cambio de canales no funcionacorrectamente.
SOLUCIÓN: Encaso de que en elcontrolremoto originalfuera
necesario pulsa
ENTER o SELECT para cambiar canales,
hágalotambién en éste control remototras introducirel
número de canal.
PROBLEMA: Probó la Búsqueda de su códigopero aúnasíno pudo
encontrar un códigoquefuncionara.
SOLUCIÓN: Anulela tecladedispositivo de la siguientemanera:
Presione y mantenga presionada
SET hastaqueelLED
(luzroja)parpadee dos veces.Suelte la tecla.Acontinuación introduzca
9 - 9 - 2 ypresione dos veces la tecla
de dispositivo que deseaanular. Repita el método
Búsquedade su código de la página26.
PROBLEMA:
CH + y CH - no funcionan en suTV RCA.
SOLUCIÓN: Debidoa los diseñosRCA(1983-1987),con estas TVs
sólo funcionará el control remoto original.
PROBLEMA: El volumen no puede ser controladodesde el control
remoto.
SOLUCIÓN: Consulte
Cambiar el bloqueodelvolumen en la página 30
para bloquear/desbloquear el volumen.
Paraobtener asistencia,póngase en contacto con nosotros:
• Correo electrónico: ofasupport@ueic.com
• Internet:http://www.oneforall.com
• LíneadeAtenciónal Consumidor:(330)405-8612
33
Page 33

INSTRUCCIONES PARA EL USUARIO
Esteequipo ha sido puesto a prueba y cumple con todaslas condiciones especificadasparadispositivos digitalesde claseB,deacuerdo con lo dispuesto en el
apartado 15 de las reglas de la FCC. Estas condiciones están dispuestas para proporcionar un nivelde protecciónrazonable contrainterferenciasperjudiciales en
instalaciones domésticas.Este equipo genera,usa y puede radiar energía de
radiofrecuencia.De no instalarse y utilizarse de acuerdo con las instrucciones,
puedecrear interferencias con otras comunicacionesde radio.Noobstante,no
existen garantías de que no seproduzcan interferencias en una instalación determinada. Si este equipo causarainterferencias perjudiciales en la recepciónde
radioo televisión,lo cual puededeterminarse encendiendo y apagandoel
equipo,elusuario podrá intentar subsanar dicha interferencia tomando una o
más de las siguientes medidas.
• Reorientelaantena o colóquelaen otra ubicación.
• Aumenteel espacio entreel equipoy el receptor.
• Conecte el equipo a una toma o un circuito distintoa aquél en el que está
conectado el receptor.
• Consultea un técnico experimentado en Radio/TV.
GARANTIA DE POR VIDA
One ForAll ("OFA") garantiza,únicamente al compradororiginal,queeste
producto estarálibre de defectos de material y fabricación,bajocondiciones
normales de uso,durante el periodo de posesiónde el comprador original.
La garantía no cubre daños o fallas derivados de productos o servicios no
proporcionados por OFA,o que resulten de accidentes,uso indebido,abuso,
negligencia,manipulación indebida,aplicaciónindebida,instalación defectuosa, ajustede configuración,mantenimiento irregular, alteraciones, ajuste
defectuosode los controlesdel consumidor,modificaciones, uso comercial
o casos de fuerza mayor.
No existen garantías explícitas excepto las enumeradas más arriba.OFA NO
SERÁRESPONSABLEDE DAÑOS ACCIDENTALES O QUESE PRODUZCAN POR EL USO DE ESTE PRODUCTOO SE DERIVENDE CUALQUIER
INCUMPLIMIENTO DE OBLIGACIÓN DE GARANTÍA.TODAS
LASGARANTÍASEXPLÍCITAS O IMPLÍCITAS,INCLUIDAS LAS
GARANTÍAS E COMERCIABILIDADAE IDONEIDAD PARAUN
PROPÓSITO CONCRETO ESTÁN LIMITADASAL PERIODODE
GARANTÍA ESPECIFICADO EL LOS PÁRRAFOS DE ARRIBA.
Algunos estadosno permitenla exclusióno limitaciónde daños accidentaleso resultantes de unmal uso ni limitaciones sobre la duraciónde una
garantía implícita,de modo que en ellos las exclusiones o limitaciones
expresadas más arriba no serán de aplicación.Estagarantía le otorgaderechosespecíficos pero puede tener también otros que puedenvariarde un
estado a otro. Paraobtener un servicio de garantíaparaun producto defectuosoduranteel periodo de garantía,
sírvasedevolver el producto al establecimiento decompra,preferiblemente
en el empaque original y juntoconsu recibode compra.Sería también
apropiado incluiruna nota en que quede reflejada la queja.El establecimiento reemplazará o repararáa su discreción el producto si efectivamente
se determina que es defectuoso.
Si la unidad fue comprada hace mas de 90 días, favor the regresarla a la
direcciónsiguiente,junto con el recibo originaly $3.95 para cubrir el envio
y manejo;
40299USA
una unidadnueva y actualconfuncionamiento igual osuperior, a la discreción de el fabricante.
CT Global Inc.2305 HurstbourneVillageDr. Suite 1000 Louisville,KY
. La unidad sera reparada o deser necesario,reemplazadacon
One ForAll:(330) 405-8655
URC-4220 01/06
34
Page 34

INFORMACIÓN ADICIONAL
Actualice su sistema de entretenimiento doméstico,One ForAll®le ofrece un
controlremoto universalque se ajustaa sus necesidades.Busque estos interesantes productos en su establecimiento más cercano:
One ForAllAccess 3.. . . . .. . . . ... . . ... . . . .. . . . .. . . . ... . . ... . . . .. URC-3605
One ForAllBigEasypara 3 dispositivos. . . . .. . . . ... . . ... . . . .. . . . .URC-3300
One ForAllDVDExpertpara4 dispositivos. . ... . . ... . . . .. . . . ... . . URC-4041
One ForAllBigEasypara 4 dispositivos. . . . .. . . . ... . . ... . . . .. . . . .URC-4330
One ForAllAccess 4.. . . . .. . . . ... . . ... . . . .. . . . .. . . . ... . . ... . . . .. URC-4605
One ForAllAccess 5.. . . . .. . . . ... . . ... . . . .. . . . .. . . . ... . . ... . . . .. URC-5705
One ForAllpara4 dispositivos . . ... . . ... . . . .. . . . .. . . . ... . . . .. . . . URC-4021
One ForAllpara3 dispositivos . . ... . . ... . . . .. . . . .. . . . ... . . . .. . . . URC-3021
One ForAllPVR para 6 dispositivos . . . .. . . . .. . . . ... . . ... . . . .. . . . URC-6131
One ForAllpara6 dispositivosHome Theater. .. . . . ... . . ... . . . .. . . URC-6011
One ForAllpara8 dispositivosHome Theater. .. . . . ... . . ... . . . .. . . URC-8011
One ForAllpara8L dispositivos Home Theater
conaprendizaje. . ... . . . .. . . . ... . . ... . . . .. . . . .. . . . ... . . . .. . . . .. . URC-8811
One ForAllA/VLCDpara8 dispositivos
conaprendizaje. . ... . . . .. . . . ... . . ... . . . .. . . . .. . . . ... . . . .. . . . .. . URC-8910
One ForAllIR/RFLCDpara8 dispositivos
conaprendizaje. . ... . . . .. . . . ... . . ... . . . .. . . . .. . . . ... . . . .. . . . .. . URC-9910
One ForAllpara8 dispositivosHome Theater
Remoto potenciado por Kameleon.. . . . ... . . ... . . . .. . . . .. . . . ... . . URC-9960
ONE FORALL®es la marca comercial registrada de UniversalElectronics Inc.
ComputimeInternationalLtd.es laconcesionariade la marca ONE FORALL®
para EE.UU. y Canadá.
Copyright 2006 por Universal Electronics Inc.Ninguna parte de esta publicación
puedeserreproducida,transmitida,
transcrita,almacenada en ningún sistema de recuperación,o traducida a
cualquier idioma,en ninguna forma o medio,yasea electrónico,mecánico,magnético, óptico,manual o de otro tipo,sinel consentimientoprevio por escritode
Universal Electronics Inc.
El Control Remoto UniversalOne ForAll®para4 dispositivos es compatiblepara
su uso en América del Norte, excepto México.
EsteControlRemoto Universal One For All® para 4 dispositivos está cubierto
por una o más de las siguientes patentes estadounidenses:
6,587,067 6,496,135 5,515,052 5,959,751
6,587,067 5,481,256
35
Page 35

MANUFACTURER’S CODES
[CÓDIGOS DEL FABRICANTE]
Setup Codes for Cable Boxes
[Códigos de configuración para cajas (convertidores) de cable]
ABC 0003,0008
Americast 0899
Bell South 0899
Digeo 1187
GeneralInstrument 0003,0276
Jerrold 0003,0276
Memorex 0000
Motorola 0276,1187, 1376
Pace 0008,1877
Panasonic 0000
Paragon 0000
Pioneer 0533,1877
Setup Codes for Cable Box/PVR (or DVR) Combos
[Códigos de configuración para equipo combinado de cable/PVR
(o DVR)]
Americast 0899
Digeo 1187
Motorola 1376,1187
Pace 1877
Setup Codes for DVD Players
[Códigos de configuración para reproductores de DVD]
Akai 0695,0899
Alco 0790
ApexDigital 0672,0717, 0755,0794, 0796,
0830,1020, 1056,1061
Audiovox 0790
Blaupunkt 0717
BlueParade 0571
Broksonic 0695
California AudioLabs 0490
Denon 0490
Diamond Vision 1316,1609, 1610
Disney 0675
Durabrand 1127
DVD2000 0521
Emerson 0675,0821, 1268
Funai 0675,1268
Gateway 073
GE 0522,0717
GoVideo 0741,0744, 1044,1075
GoldStar 0741
Gradiente 0490
Greenhill 0717
Grundig 0539
Hitachi 0573
Hiteker 0672
iLo 1348,1472
Initial 0717,1472
Insignia 1830
Integra 0571,0627
JVC 0558,0623, 0867,1164
Kawasaki 0790
Kenwood 0490
Pulsar 0000
Quasar 0000
Runco 0000
ScientificAtlanta 0008,1877
Starcom 0003
Supercable 0276
Torx 0003
Toshiba 0000
Zenith 0000,0899
Pioneer 1877
ScientificAtlanta 1877
Supercable 0276
Zenith 0899
KLH 0717,0790, 1020
Lenoxx 1127,1938
LG 0741
Magnavox 0503,0539, 0646,0675, 0821,
1268
Marantz 0539
Memorex 0695
Microsoft 0522
Mintek 0717, 1472
Mitsubishi 0521, 1521
NAD 0741
Nesa 0717
NexxTech 1830
Norcent 1830
Onkyo 0503,0627
Panasonic 0490, 0503,0703, 1362,1462,
1490,1762
Philips 0503,0539,0646,0675
Pioneer 0525,0571
Polaroid 1020,1061, 1316
PolkAudio 0539
Presidian 0675
Proceed 0672
Proscan 0522
RCA 0522,0571,0717,0790,0822,
1022,1132
Regent 1938
Rotel 0623
Samsung 0490,0573, 0744,0820,0899,
1044,1075
Sansui 0695
continuedonnextpage...
continúa en la página siguiente...
36
Page 36

MANUFACTURER’S CODES
[CÓDIGOS DEL FABRICANTE]
Setup Codes for DVD Players
[Códigos de configuración para reproductores de DVD]
Sanyo 0695
Sharp 0630,0675
Shinsonic 0533
Sony 0533,0864, 1033,1431
Superscan 0821
Sylvania 0675,0821, 1268
Symphonic 0675,1268
Teac 0790
Setup Codes For DVD Player/VCR Combos
[Códigos de configuración para equipo combinado de DVD/VCRs]
ApexDigital 1061
Broksonic 0695
Emerson 0675
Funai 0675
GoVideo 0741,0744, 1044,1075
GoldStar 0741
JVC 0867,1164
LG 0741
Memorex 0695
Panasonic 1762
Philips 0675
Technics 0490, 0703
ThetaDigital 0571
Toshiba 0503,0695,1045,1154
Urban Concepts 0503
Venturer 0790
Xbox 0522
Yamaha 0490,0539
Zenith 0503,0741
Polaroid 1061
Presidian 0675
RCA 0522,0822
Samsung 0820,1044, 1075
Sansui 0695
Sharp 0630
Sony 0864,1033, 1431
Sylvania 0675
Symphonic 0675
Toshiba 0503
Zenith 0741
Setup Codes for PVRs (or DVRs)
[Códigos de configuración para PVR (o DVR) (Videograbadoras
Personales Digitales en Disco Duro)]
ABS 1972
Alienware 1972
CyberPower 1972
Dell 1972
DirecTV 0739
Gateway 1972
Hewlett Packard 1972
HowardComputers 1972
HP 1972
Hughes Network
Systems 0739
Humax 0739
Hush 1972
iBUYPOWER 1972
Linksys 1972
MediaCenter PC 1972
Microsoft 1972
Mind 1972
Niveus Media 1972
Northgate 1972
Panasonic 0616
Philips 0618,0739
RCA 0880
ReplayTV 0614,0616
Samsung 0739
SonicBlue 0614,0616
Sony 0636,1972
Stack9 1972
Systemax 1972
TagarSystems 1972
Tivo 0618, 0636,0739
Toshiba 1008,1972
Touch 1972
Viewsonic 1972
Voodoo 1972
ZT Group 1972
Setup Codes for Satellite Receivers
[Códigos de configuración para receptores de satélite]
DirecTV 1377, 0099,0247, 0392,0566,
0639,0724, 0749,0819,1076,
1108,1142, 1392,1442,1609,
1639,1640,1749,1856
DishNetwork 0775
DishNetwork
System 0775, 1005,1505,1775
Dishpro 0775,1005,1505,1775
Echostar 0775, 1005,1505,1775
Expressvu 0775, 1775
GE 0392,0566
GeneralInstrument 0869
GOI 0775,1775
Hisense 1535
Hitachi 0819
37
Page 37

HTS 0775,1775
Hughes 0749,1442, 1749
Hughes Network
Systems 0749,1142, 1442,1749
iLo 1535
Jerrold 0869
JVC 0775,1775
Magnavox 0724
Memorex 0724
Mitsubishi 0749
Motorola 0856,0869
NextLevel 0869
Panasonic 0247, 0701
Paysat 0724
Philips 0099,0724,0749,0819, 1076,
1142,1442, 1749
Pioneer 1442
Proscan 0392,0566
Proton 1535
RadioShack 0869
RCA 0392,0566,0855,1392
Samsung 1108,1142, 1276,1377,1442,
1609
Sony 0639,1639, 1640
StarChoice 0869
Tivo 1142, 1442
Toshiba 0749,0790,0819,1285,1749
UltimateTV 1392,1640
Uniden 0724
US Digital 1535
USDTV 1535
Voom 0869
Zenith 1856
Setup Codes for Satellite Receiver/PVR (or DVR) Combos
[Códigos de configuración para equipo combinado de receptores
de satélite/PVR (o DVR)]
DirecTV 1377, 0099,0392, 0639,1076,
1142,1392, 1442,1640
DishNetworkSystem0775,1505
Dishpro 0775,1505
Echostar 0775, 1505
Expressvu 0775
Hughes Network
Systems 1142,1442
Motorola 0869
Philips 1142,1442
Proscan 0392
RCA 1392
Samsung 1442
Sony 0639,1640
StarChoice 0869
Setup Codes for TVs
[Códigos de configuración para TVs]
Admiral 0093, 0463
Advent 0761,0783,0815,0817, 0842
Aiko 0092
Akai 0030,0060,0672,0702, 0812
AmericaAction 0180
Anam 0180
AOC 0030
ApexDigital 0156,0748, 0765,0767, 0879
Audiovox 0092, 0180,0451
Aventura 0171
Bell & Howell 0154
Bradford 0180
Broksonic 0180,0236,0463
Candle 0030
Carnivale 0030
Carver 0054
Celebrity 0000
Celera 0765
Changhong 0765
Citizen 0030,0060, 0092
Clarion 0180
CommercialSolutions 0047
Contec 0180
Craig 0180
Crosley 0054
Crown 0180
CurtisMathes 0030,0047,0054,0060,0093,
0145,0154, 0166,0451,0702
CXC 0180
Daewoo 0092,0451,0672,1661
Denon 0145
Diamond Vision 1996,1997
Dumont 0017
Durabrand 0171, 0178,0180, 0463,1034
Dwin 0093
Electroband 0000
Electrograph 1755
Emerson 0154,0171, 0178,0180,0236,
0451,0463, 1944,1963
Envision 0030
ESA 0171,0812
Fisher 0154
Funai 0171,0180
Futuretech 0180
Gateway 1755,1756
GE 0047,0051, 0178,0451
Gibralter 0017,0030
GoldStar 0030, 0178
Grunpy 0180
Haier 1034
Hallmark 0178
Harman/Kardon 0054
Harvard 0180
Havermy 0093
HelloKitty 0451
Hisense 0748
Hitachi 0145
iLo 1286
continuedonnextpage...
continúa en la página siguiente...
38
Page 38

MANUFACTURER’S CODES
[CÓDIGOS DEL FABRICANTE]
Setup Codes for TVs
[Códigos de configuración para TVs]
Infinity 0054
Insignia 1204
Inteq 0017
JBL 0054
JCB 0000
Jensen 0761,0815, 0817
JVC 0053
KEC 0180
Kenwood 0030
KLH 0765, 0767
KTV 0030, 0180
LG 0178,1265
LXI 0047,0054,0154,0156, 0178
Magnavox 0030,0054, 1944,1963
Marantz 0030,0054
Matsushita 0250
Maxent 1755
Megatron 0145,0178
Memorex 0150,0154, 0178,0463
MGA 0030, 0150,0178
Midland 0017, 0047,0051
Mitsubishi 0093, 0150,0178, 1250
Motorola 0093
MTC 0030,0060
Multitech 0180
NAD 0156,0178
NEC 0030
NetTV 1755
Nikko 0030,0092, 0178
Norcent 0748
Norwood Micro 1286
NTC 0092
Onwa 0180
Optimus 0154,0166, 0250
Optonica 0093
Orion 0236,0463
Panasonic 0051, 0250
Penney 0030,0047, 0051,0060, 0156,
0178
Philco 0030,0054
Philips 0054
Pilot 0030
Pioneer 0166,0679
Polaroid 0765
Portland 0092
Prima 0761, 0783,0815, 0817
Prism 0051
Proscan 0047
Proton 0178
Pulsar 0017
Quasar 0051,0250
RadioShack 0030,0047,0154,0178, 0180
RCA 0047,0090,0679
Realistic 0030,0154, 0178,0180
Runco 0017, 0030
Sampo 0030, 1755
Samsung 0030,0060, 0178,0702,0812
Sansui 0463
Sanyo 0154
Scotch 0178
Scott 0178,0180,0236
Sears 0047,0054,0154,0156,0171,
0178
Sharp 0093
ShengChia 0093
Sony 0000
Soundesign 0178,0180
Squareview 0171
SSS 0180
Starlite 0180
Superscan 0093
Supreme 0000
SVA 0748
Sylvania 0030,0054, 0171,1944,1963
Symphonic 0171,0180
Tandy 0093
Tatung 1286, 1756
Technics 0051, 0250
Techwood 0051
Teknika 0054, 0060,0092,0150,0180
Telefunken 0702
TMK 0178
TNCi 0017
Toshiba 0060,0154,0156,1265
TVS 0463
US Logic 1286
Vector Research 0030
Victor 0053
Vidikron 0054
Vidtech 0178
Viewsonic 1755
Vizio 1756
Wards 0030,0054, 0178
Waycon 0156
Westinghouse 0000,0451
WhiteWestinghouse 0463
Yamaha 0030
Zenith 0017,0092, 0178,0463,1265
Setup Codes For TV/DVD Player Combos
[Códigos de configuración para equipo combinado de TV/DVDs]
Akai 0695
ApexDigital 0830
Broksonic 0695
Diamond Vision 1610
Emerson 0675,1268
iLo 1472
39
Page 39

Initial 1472
Magnavox 1268
Mintek 1472
Panasonic 1490
RCA 1022
Samsung 0899
Sansui 0695
Sylvania 0675,1268
Toshiba 0695
Setup Codes For TV/VCR Combos
[Códigos de configuración para equipo combinado de TV/VCRs]
Broksonic 1479
Citizen 1278
Colt 0072
Daewoo 1278
Emerson 0593,1278, 1479
Funai 0000
GE 0240,0807
GoldStar 1237
Harley Davidson 0000
Hitachi 0000
Lloyd's 0000
Magnasonic 0593,1278
Magnavox 0000,0593
Magnin 0240
Memorex 0162,1237
MGA 0240
Mitsubishi 0807
Optimus 0162,0593
Orion 1479
Panasonic 0162
Penney 0240,1237
Quasar 0162
RadioShack 0000
RCA 0240,0807
Samsung 1014
Sansui 0000,1479
Sanyo 0240
Sears 0000,1237
Sony 0000,1232
Symphonic 0000,0593
Thomas 0000
Toshiba 0845,1145
Zenith 0000,1479 0000, 1479,0479
Setup Codes For TV/VCR/DVD Player Combos
[Códigos de configuración para equipo combinado de
TV/VCR/DVD]
Akai 0899
Diamond Vision 1609
Emerson 0821
Magnavox 0821
Panasonic 1362, 1462
RCA 1132
Sharp 0630
Superscan 0821
Sylvania 0821
Toshiba 1045
Setup Codes For VCRs
[Códigos de configuración para VCRs]
ABS 1972
Admiral 0048, 0209
Adventura 0000
Aiwa 0000, 0037
Alienware 1972
AmericanHigh 0035
Asha 0240
Audiovox 0037
Beaumark 0240
Bell & Howell 0104
Broksonic 0121,0184,0209,1479
Calix 0037
Canon 0035
Carver 0081
CCE 0072
Citizen 0037,1278
Colt 0072
Craig 0037,0047,0072,0240
CurtisMathes 0035,0060,0162
Cybernex 0240
CyberPower 1972
Daewoo 0045,1278
Dell 1972
Denon 0042
DirecTV 0739
Durabrand 0039
Dynatech 0000
Electrohome 0037,0043
Electrophonic 0037
Emerex 0032
Emerson 0000,0037, 0043,0121,0184,
Fisher 0047,0104
Fuji 0035
Funai 0000,0593, 1593
Garrard 0000
Gateway 1972
GE 0035,0060, 0240,0807
GoVideo 0240
GoldStar 0037, 1237
Gradiente 0000
Harley Davidson 0000
Harman/Kardon 0081
Harwood 0072
Hewlett Packard 1972
HI-Q 0047
40
0209,0593, 1278,1479,1593
continuedonnextpage...
continúa en la página siguiente...
Page 40

MANUFACTURER’S CODES
[CÓDIGOS DEL FABRICANTE]
Setup Codes For VCRs, continued
[Códigos de configuración para VCRs, continuación]
Hitachi 0000,0042
HowardComputers 1972
HP 1972
Hughes Network
Systems 0042,0739
Humax 0739
Hush 1972
iBUYPOWER 1972
JVC 0067
KEC 0037
Kenwood 0067
KLH 0072
Kodak 0035,0037
Linksys 1972
Lloyd's 0000
Logik 0072
LXI 0037
Magnasonic 0593,1278
Magnavox 0000,0035, 0039,0081, 0593
Magnin 0240
Marantz 0035,0081
Marta 0037
Matsushita 0035,0162
MediaCenter PC 1972
MEI 0035
Memorex 0000,0035, 0037,0039,0047,
0048,0104, 0162,0209,0240,
1237
MGA 0043, 0240
MGN Technology 0240
Microsoft 1972
Mind 1972
Minolta 0042
Mitsubishi 0043, 0067,0807
Motorola 0035,0048
MTC 0000,0240
Multitech 0000, 0072
NEC 0067,0104
Nikko 0037
Niveus Media 1972
Noblex 0240
Northgate 1972
Olympus 0035
Optimus 0037,0048, 0104,0162,0593,
1062
Orion 0184,0209, 1479
Panasonic 0035, 0162,0616, 1062
Penney 0035,0037, 0042,0240, 1237
Pentax 0042
Philco 0035
Philips 0035,0081,0618,0739
Pilot 0037
Pioneer 0067
PolkAudio 0081
Presidian 1593
Profitronic 0240
Proscan 0060
Protec 0072
Pulsar 0039
Quasar 0035,0162
RadioShack 0000
Radix 0037
Randex 0037
RCA 0042,0060,0240,0807,0880
Realistic 0000,0035, 0037,0047,0048,
0104
ReplayTV 0614,0616
Ricavision 1972
Runco 0039
Samsung 0045,0240, 0739,1014
Sanky 0039,0048
Sansui 0000,0067, 0209,1479
Sanyo 0047,0104, 0240
Scott 0043,0045,0121,0184
Sears 0000,0035,0037,0042,0047,
0104,1237
Sharp 0048, 0807
Shintom 0072
Shogun 0240
Singer 0072
SonicBlue 0614,0616
Sony 0000,0032, 0035,0636, 1232,
1972
Stack9 1972
STS 0042
Sylvania 0000,0035, 0043,0081,0593,
1593
Symphonic 0000,0593, 1593
Systemax 1972
TagarSystems 1972
Teac 0000
Technics 0035, 0162
Teknika 0000, 0035,0037
Thomas 0000
Tivo 0618, 0636,0739
TMK 0240
Toshiba 0043,0045,0209,0845,1008,
1145,1972, 1503
Totevision 0037, 0240
Touch 1972
Unitech 0240
Vector 0045
Video Concepts 0045
Videomagic 0037
Videosonic 0240
Viewsonic 1972
Villain 0000
Voodoo 1972
Wards 0000,0035, 0042,0047, 0048,
0060,0072, 0081,0240
WhiteWestinghouse 0072,0209
XR-1000 0000, 0035,0072
Zenith 0000,0039, 0209,1479
ZT Group 1972
41
 Loading...