

Page 1

TABLE OF CONTENTS
Introduction. . . . . . . . . . . . . . . . . . . . . . . . . . . . . . . . . . . . . . . . . . . . . . . . . . . . . . . . . . . . . . . . . . . 3
Features And Functions . . . . . . . . . . . . . . . . . . . . . . . . . . . . . . . . . . . . . . . . . . . . . . . . . . . . . . . 4
Key Charts . . . . . . . . . . . . . . . . . . . . . . . . . . . . . . . . . . . . . . . . . . . . . . . . . . . . . . . . . . . . . . . . . . 5
Device Table . . . . . . . . . . . . . . . . . . . . . . . . . . . . . . . . . . . . . . . . . . . . . . . . . . . . . . . . . . . . . . . . 6
Installing Batteries. . . . . . . . . . . . . . . . . . . . . . . . . . . . . . . . . . . . . . . . . . . . . . . . . . . . . . . . . . . . 7
Programming Device Control . . . . . . . . . . . . . . . . . . . . . . . . . . . . . . . . . . . . . . . . . . . . . . . . . . 8
Searching For Your Code. . . . . . . . . . . . . . . . . . . . . . . . . . . . . . . . . . . . . . . . . . . . . . . . . . . . . . . 9
Checking The Codes . . . . . . . . . . . . . . . . . . . . . . . . . . . . . . . . . . . . . . . . . . . . . . . . . . . . . . . . . . 9
Programming A Master Power Macro . . . . . . . . . . . . . . . . . . . . . . . . . . . . . . . . . . . . . . . . . . 10
Programming The Power Key For The Master Power Macro . . . . . . . . . . . . . . . . . . . . . . . . . . . 10
Operating The Master Power Macro . . . . . . . . . . . . . . . . . . . . . . . . . . . . . . . . . . . . . . . . . . . . . 10
Clearing The Master Power Macro . . . . . . . . . . . . . . . . . . . . . . . . . . . . . . . . . . . . . . . . . . . . . . 11
Re-Assigning Device Keys . . . . . . . . . . . . . . . . . . . . . . . . . . . . . . . . . . . . . . . . . . . . . . . . . . . . 11
Using Channel Scan
Programming Favorite Channel Scan . . . . . . . . . . . . . . . . . . . . . . . . . . . . . . . . . . . . . . . . . 12
Changing Volume Lock . . . . . . . . . . . . . . . . . . . . . . . . . . . . . . . . . . . . . . . . . . . . . . . . . . . . . . 12
Locking Volume Control To One Mode
(Global Volume Lock). . . . . . . . . . . . . . . . . . . . . . . . . . . . . . . . . . . . . . . . . . . . . . . . . . . . . . . . . 12
Unlocking Volume Control For A Single Device
(Individual Volume Unlock) . . . . . . . . . . . . . . . . . . . . . . . . . . . . . . . . . . . . . . . . . . . . . . . . . . . . 13
Unlocking All Volume Control
(Restoring Default Setting ) . . . . . . . . . . . . . . . . . . . . . . . . . . . . . . . . . . . . . . . . . . . . . . . . . . . 13
Clearing Custom Programming . . . . . . . . . . . . . . . . . . . . . . . . . . . . . . . . . . . . . . . . . . . . . . . 14
Restoring Factory Default Settings . . . . . . . . . . . . . . . . . . . . . . . . . . . . . . . . . . . . . . . . . . . . 14
Troubleshooting . . . . . . . . . . . . . . . . . . . . . . . . . . . . . . . . . . . . . . . . . . . . . . . . . . . . . . . . . . . . . 15
Instructions To The User . . . . . . . . . . . . . . . . . . . . . . . . . . . . . . . . . . . . . . . . . . . . . . . . . . . . . 15
Lifetime Warranty . . . . . . . . . . . . . . . . . . . . . . . . . . . . . . . . . . . . . . . . . . . . . . . . . . . . . . . . . . . . 16
Additional Information . . . . . . . . . . . . . . . . . . . . . . . . . . . . . . . . . . . . . . . . . . . . . . . . . . . . . . . 17
Manufacturer’s Codes . . . . . . . . . . . . . . . . . . . . . . . . . . . . . . . . . . . . . . . . . . . . . . . . . . . . . . . . 18
Setup Codes For Cable Boxes . . . . . . . . . . . . . . . . . . . . . . . . . . . . . . . . . . . . . . . . . . . . . . . . . . 18
Setup Codes For Cable Box/PVR (or DVR) Combos. . . . . . . . . . . . . . . . . . . . . . . . . . . . . . . . . . 18
Setup Codes For DVD Players . . . . . . . . . . . . . . . . . . . . . . . . . . . . . . . . . . . . . . . . . . . . . . . . . . 18
Setup Codes For DVD Player/VCR Combos . . . . . . . . . . . . . . . . . . . . . . . . . . . . . . . . . . . . . . . . 18
Setup Codes For PVRs (or DVRs). . . . . . . . . . . . . . . . . . . . . . . . . . . . . . . . . . . . . . . . . . . . . . . . 19
Setup Codes For Satellite Receivers . . . . . . . . . . . . . . . . . . . . . . . . . . . . . . . . . . . . . . . . . . . . . 19
Setup Codes For Satellite Receiver/PVR (or DVR) Combos. . . . . . . . . . . . . . . . . . . . . . . . . . . . 19
Setup Codes For TVs . . . . . . . . . . . . . . . . . . . . . . . . . . . . . . . . . . . . . . . . . . . . . . . . . . . . . . . . . 19
Setup Codes For TV/DVD Player Combos . . . . . . . . . . . . . . . . . . . . . . . . . . . . . . . . . . . . . . . . . 20
Setup Codes For TV/VCR Combos . . . . . . . . . . . . . . . . . . . . . . . . . . . . . . . . . . . . . . . . . . . . . . . 20
Setup Codes For TV/VCR/DVD Player Combos . . . . . . . . . . . . . . . . . . . . . . . . . . . . . . . . . . . . . 21
Setup Codes For VCRs. . . . . . . . . . . . . . . . . . . . . . . . . . . . . . . . . . . . . . . . . . . . . . . . . . . . . . . . 21
. . . . . . . . . . . . . . . . . . . . . . . . . . . . . . . . . . . . . . . . . . . . . . . . . . . . . . . . . 11
2
Page 2

INTRODUCTION
The One For All 3 Device Universal Remote Control (URC-3021) is designed
to remotely operate up to three home entertainment devices. It also
features intuitive and easy-to-use keys for instant control of DVD and PVR
(or DVR) components.Moreover,its sophisticated technology will allow you
to consolidate your original home entertainment remote controls into one
easy-to-use product. Advanced features include:
• Intuitive buttons to allow easy access to functions and menus on your DVD
player,PVR (or DVR), and Cable/Satellite devices
• Direct code setup for easy device programming
• Step-and-Set code search and Code Verification for an alternate way to program devices
• Power Macro for master on/off control of all of your equipment with a single
keyst roke
• Volume Lock/Unlock feature to lock or unlock the volume control to one mode
or individual modes
• Device Key Re-Assignment to remotely control a second (duplicate) device
• Channel Scan
• Color-coded keys to quickly locate popular functions
• Extensive code library for popular video devices including DVD players and
PVRs (or DVRs)
and Favorite Channel Scan for easy channel surfing
The URC-3021 remote control requires two (2) new AAA alkaline batteries (not included) and some easy programming to control your devices.
For best results,please read and perform all instructions listed here.Also,
keep this guide for future reference.
3
Page 3
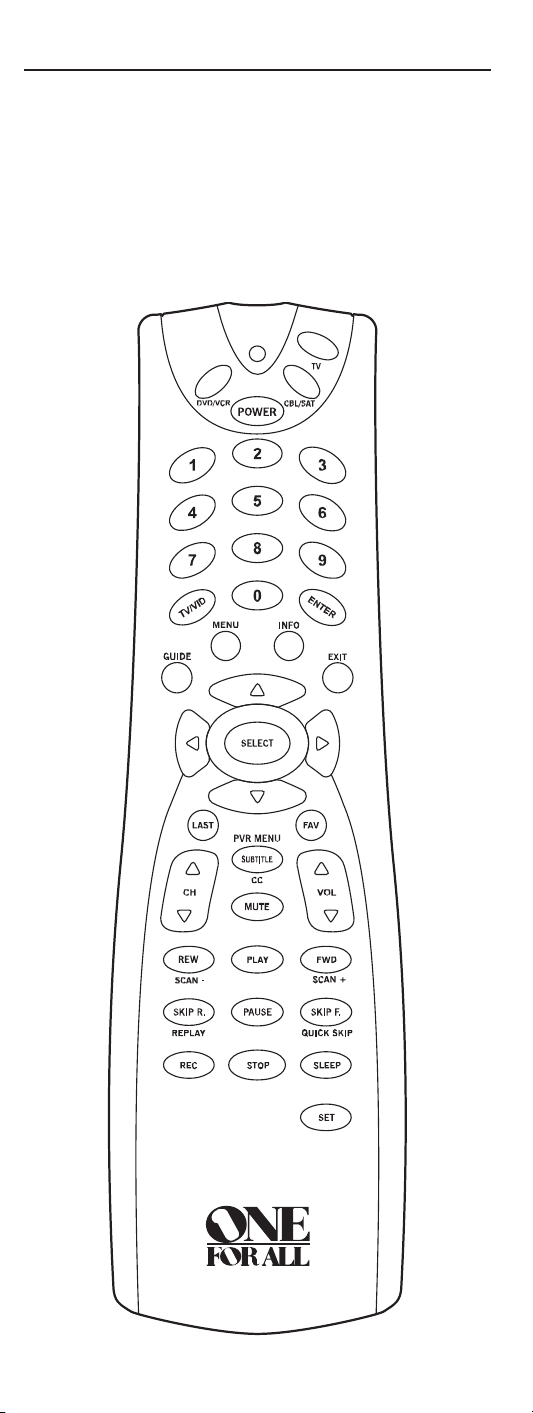
FEATURES AND FUNCTIONS
Use the illustration below to locate features on the One For All 3 Device
Universal Remote Control (URC-3021) and then study the
the next two pages) to learn how they function.
To find out what type of devices can be controlled by each device key after
programming,see the
Device Table on page 6.
Key Charts (on
4
Page 4
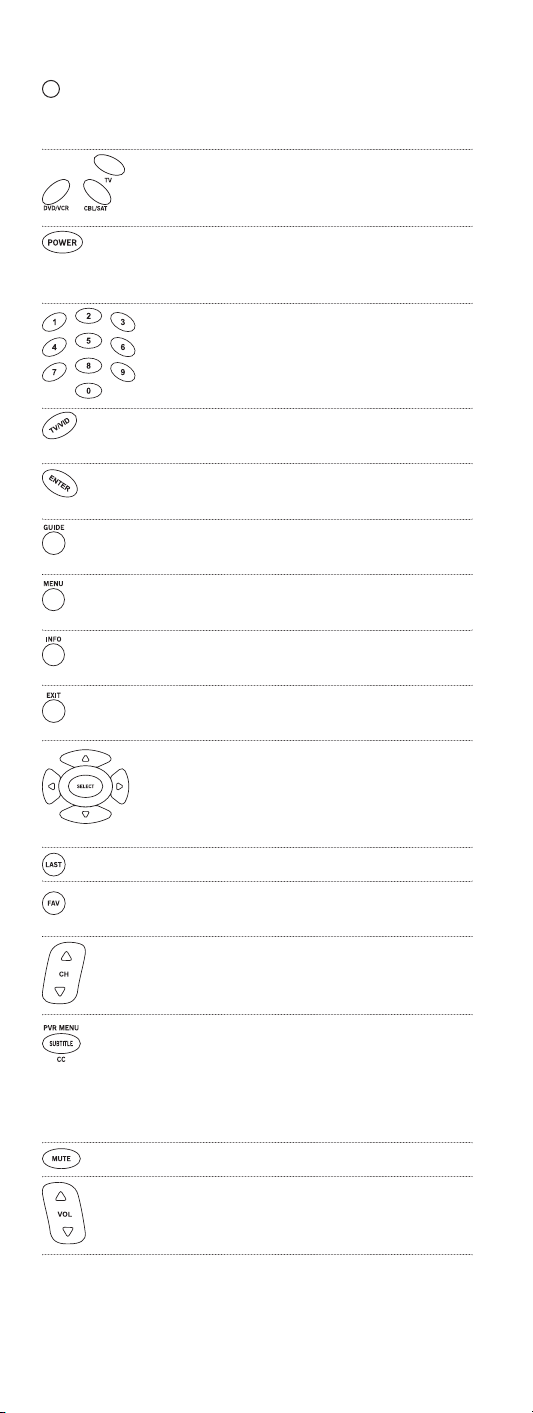
Key Charts
When the LED (red light) blinks, the remote control
is working and (after programming) is sending
signals.
Press DVD/VCR,CBL/SAT,or TV once to select a
desired home entertainment device to control.
Also see the Device Table on page 6.
Press POWER once to turn on or off the selected
device. For master power control, see Programming
A Master Power Macro on page 10.
Use the keypad (1 ~ 9 and 0) to directly select
channels (e.g., 009 or 031).
Use TV/VID to switch the TV’s input to view TV or
video programs.
Press ENTER once after entering the channel
numbers on some TVs.
Use GUIDE to display your selected device’s
program guide or setup menu.
Press MENU once to display your selected device’s
main menu.
Use INFO to display the current channel and
program or on-screen directory.
Use EXIT to exit from your selected device’s guide
or menu.
Use the Cursor Keys to move the cursor in the program guide and menu screens.
Use SELECT (OK) to choose options from your
selected device’s menu or guide.
Press LAST once to recall the last channel.
Use FAV to scan all channels, or after programming,
to scan up to10 favorite channels.
Use CH▲ (or CH ▼) to select the next higher (or
lower) channel.
Press SUBTITLE/CC once to display (or turn off) sub-
titles or closed captions, if available on your DVD
player or cable/satellite service.
For a PVR (or DVR), press PVR MENU once to display a list of your recorded shows.
Press MUTE once to turn the sound off or on.
Use VOL▲ (or VOL▼) to raise (or lower) the sound
volume.
5
Page 5
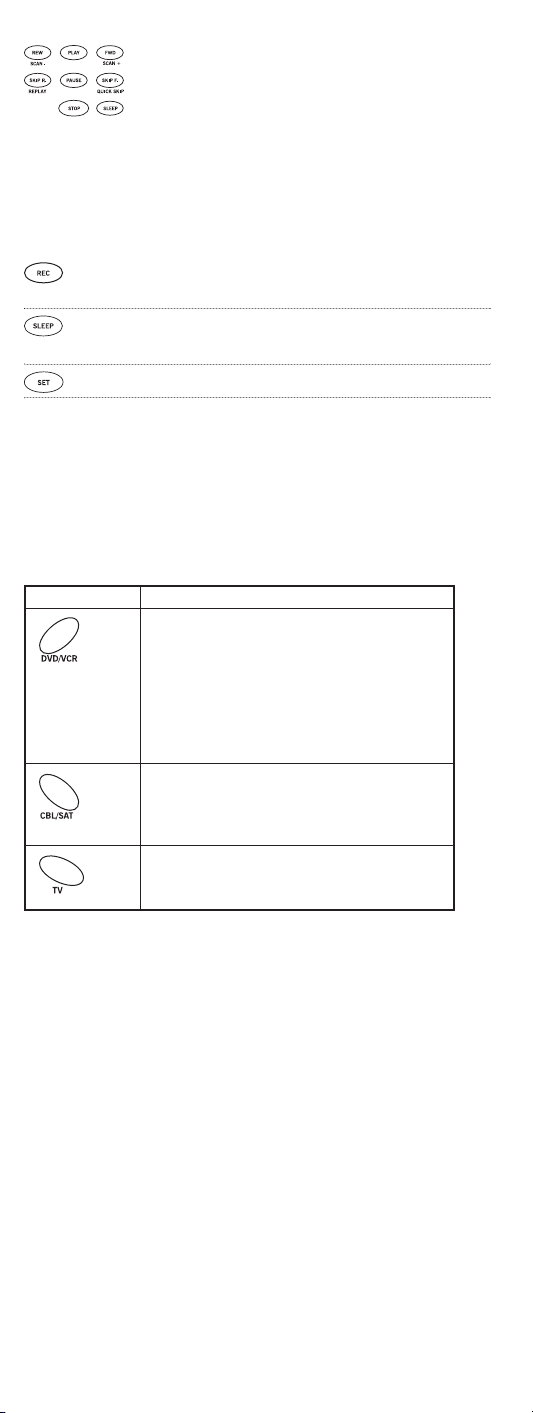
Use REW,PLAY,FWD,PAUSE,or STOP to control your VCR,
PVR (or DVR),or DVD player.
For a DVD player, use SKIP F. or SKIP R. to view the next
or previous chapter.
For a VCR,PVR (or DVR), or VOD (if available), use SCAN-
or SCAN+ to quickly scan forward or back through a video
program. Use REPLAY for an instant replay.Use QUICK
SKIP to advance the video program a preset amount (as
set on your device).
Press REC twice to record a VCR or PVR (or DVR)
program.
Use SLEEP to set the sleep timer on a selected device if
equipped with this feature.
Use SET for all programming sequences.
Device Table
NOTE: Please refer to the table below when performing the instructions in “Programming
Device Control”on page 8.
After programming,the One For All 3 Device Universal Remote Control will
be able to control the following types of devices:
DEVICE KEY CONTROLS THESE TYPES OF DEVICES
• DVD Player
•VCR
• PVR (or DVR)
• TV/DVD Player Combo
• VCR/DVD Player Combo
• TV/VCR Combo
• TV/VCR/DVD Player Combo
• VCR/DVD Player Combo
• Cable Box (or Converter)
• Cable Box/PVR (or DVR) Combo
• Satellite Receiver
• Satellite Receiver/PVR (or DVR) Combo
• Telev ision
6
Page 6

INSTALLING BATTERIES
❶
❸
❷
❷
1. On the remote control’s back, push the tab and lift off the
battery cover.
2. Obtain two (2) new AAA alkaline batteries. Match the +
and – marks on the batteries to the + and – marks in the
battery case, then insert the new batteries.
3. Press the battery cover back into place.The tab should
click when the cover is locked.
4. Test the remote control by pressing any mode key (e.g.,
TV). If the batteries are inserted correctly, the LED (red
light) will blink.
NOTE: When batteries need replacement, the remote control will stop operating. Remove the old batteries and insert new ones within 10 minutes to
ensure all of your programming information is restored.
7
Page 7

PROGRAMMING DEVICE CONTROL
The One For All 3 Device Universal Remote Controlis preprogrammed at
the factory to operate an RCA TV, a Toshiba DVD player,and a Motorola
cable box.To control devices other than the default brands, perform the following steps; otherwise skip this section:
1. Turn on a desired device (e.g.,VCR or DVD player) and,if
applicable, insert media (e.g.,cassette or disc).
NOTE: Please read steps 2 through 4 completely before proceeding.
Highlight or write down the codes and device you wish to program
before starting step 2.
2. On the remote control,press a device key once (i.e.,DVD/VCR,
CBL/SAT,or TV).
NOTE: To program control of a VCR,PVR (or DVR), TV/VCR Combo,
or TV/VCR/DVD Player Combo press DVD/VCRonce. After programming a VCR Combo device, you will be able to control channel selection, volume,and VCR functions.
NOTE: To program control of a DVD Player,DVD Player/VCR
Combo, or TV/DVD Player Combo, press DVD/VCRonce. After programming a DVD Combo device, you will be able to control channel
selection, volume,and DVD functions.
NOTE: To program control of a Cable Box, Cable Box/PVR (or DVR)
Combo,Satellite Receiver, or a Satellite Receiver/PVR (or DVR)
Combo, press CBL/SATonce.
3. Press and hold SET until the LED (red light) blinks twice,
then release SET.
4. Use the
Manufacturer’s Codes (starting on page 18) to
locate the type of device and brand name and then enter
the first four-digit code for your device.If performed correct ly, the
NOTE: If the LED did not blink twice, repeat steps 2 through 4 and enter
the same code again.
LED will blink twice.
5. Aim the remote control at the device and press POWER
once. The device should turn off. If it does not, repeat
steps 2 through 5,trying each code for your brand until
you find one that works.If it still doesn’t work, try
Searching For Your Code on next page.
NOTE: If the device does not have a POWERkey, press PLAY.
6. Repeat steps 1 through 5 for each device you want to con-
trol.For future reference,write down each working device
code in the following boxes:
DVD/VCR Code:
Device Type:__________________
CBL/SAT Code:
Device Type:__________________
TV Code:
Device Type:__________________
8
Page 8

SEARCHING FOR YOUR CODE
If your device does not respond to the remote control after trying all codes
listed for your brand,or if your brand is not listed at all, try searching for
your code.
NOTE: Before performing a code search for a DVD player or a VCR, turn on the device and
insert the required media.
For example, to search for a code for your TV:
1. On the remote control,press
2. Press and hold
then release
3. Enter
4. Aim the remote control at the TV and slowly alternate
between pressing
(after pressing POWER).If the device does not have a Power
key, you can substitute another function, such as digits 0 ~ 9 ,
CH▲,or PLAY).
NOTE: In the search mode,the remote control will send IR codes from
its library to the selected device, starting with the most popular code
first.
SET until the LED (red light) blinks twice,
SET.
9 - 9 - 1.The LED will blink twice.
POWER and TV. Stop when the TV turns off
TV once.
5. To lock in the code, press and release SET.The LED will
blink twice.
6. To search for the codes of your other devices,repeat steps
1 through 5,but substitute the appropriate device key for
the device you are searching for.
CHECKING THE CODES
If you have set up the remote control using the Searching For Your Code pro-
cedure as above,you may need to find out which four-digit code is operating your equipment. For example,to find out which code is operating your
TV:
1. On the remote control,press TV once.
2. Press and hold SET until the LED (red light) blinks twice,
then release SET.
3. Enter
4. To view the code for the first digit, press
9 - 9 - 0.The LED will blink twice.
1 once. Wait 3
seconds, count the LED blinks (e.g., three blinks = 3) and
write down the number in the leftmost box in the TV
code boxes on page 8.
NOTE: If a code digit is “0”,the LEDwill not blink.
9
Page 9

5. Repeat step 4 (on the previous page) three more times for
remaining digits.Use
digit, and
4 for the fourth digit. Write down the code dig-
2 for the second digit,3 for the third
its in the remaining TV code boxes on page 8.
6. To check for codes of other devices,repeat steps 1
through 5 (starting on the previous page), but substitute
the appropriate device key for each device you are checking.Write down the device’s code digits in the appropriate
code boxes on page 8.
PROGRAMMING A MASTER POWER MACRO
In its default state,the POWER key on the One For All 3 Device Universal
Remote Control will individually power your home entertainment devices
on or off.However, you can also program a
POWER key that will sequentially turn on or off all the devices with a single
key press.
Programming The Power Key For The Master Power Macro
1. Press and hold SET until the LED (red light) blinks twice,
then release SET.
Master Power Macro onto the
2. Enter
9 - 9 - 5.The LED will blink twice. Then press POWER
once.
3. For the first device you want in the power-on sequence,
press its device key (e.g.,
CBL/SAT) once.
4. Repeat step 3 up to two more times to add desired
devices to the power-on sequence (e.g.,
DVD/VCR and TV).
5. To save the settings and exit the program,press and hold
SET until the LED blinks twice, then release SET.
Operating The Master Power Macro
1. After programming,point the remote control at the
devices and press POWER for at least 2 seconds to sequentially turn on (or off) your devices.
NOTE: When POWER is pressed for less than 2 seconds,a power command will only be sent to the currently-selected device. This allows
you to still individually power dev ices on or off.
2. Devices will turn on (or off) according to your programmed sequence.
NOTE: The currently-selected device will always turn on or off first,
followed by the remaining programmed sequence.After the master
power sequence has been completed, the remote control will be set to
control the first powered-on device.
NOTE: If one or more devices does not have a POWERkey, the power
off/on sequence may be slightly delayed when the remote control signals
the device(s). This action is normal.
continued on next page...
10
Page 10

PROGRAMMING A MASTER POWER MACRO
(cont’d)
Clearing The Master Power Macro
1. Press and hold SET until the LED (red light) blinks twice,
then release
2. Enter 9 - 9 - 5.The LED will blink twice. Then press POWER
once.
SET.
3. Press and hold
SET.The Master Power Macro is now cleared.
SET until the LED blinks twice, then release
RE-ASSIGNING DEVICE KEYS
The One For All 3 Device Universal Remote Control can be set to control a
DVD player and a VCR (or a PVR) or a second DVD player by re-assigning
the unused
1. On the remote control,press and hold
CBL/SAT key as follows:
SET until the LED
(red light) blinks twice,then release SET.
2. Enter 9 - 9 - 2.The LED will blink twice.
3. Press
4. Press
DVD/VCR once.
CBL/SAT once. The LED will blink twice. The CBL/SAT key
is now ready to be set up to control your VCR (or PVR) or
second DVD player. See
Programming Device Control on page
8.
NOTE: Only one device can be assigned to an unused device key at a time.
USING CHANNEL SCAN
In the CBL/SAT or TV mode, use the FAV key to start a 3-second scan of all
channels. Or, if programmed, use the FAV key to scan only your favorite
channels to view a desired channel (see
Programming Favorite Channel Scan
on next page.)
1. Press
2. Press
CBL/SAT or TV once.
FAV once.
•IfFavorite Channel Scan has been set up,scanning of favorite
channels will start with up to 100 channel changes or until
stopped by pressing any key.
•IfFavorite Channel Scan has not been set up,scanning
will start with the current channel, and continue up to
100 channel changes or until stopped by pressing any key.
3. To stop scanning channels at any time,press any key once.
11
Page 11

PROGRAMMING FAVORITE CHANNEL SCAN
In the CBL/SAT or TV mode, you can store a list of up to 10 favorite channels,
in any order,that will be immediately scanned when
Using Channel Scan on the previous page).
NOTE: Favorite channels can only be programmed for one mode.After programming, if FAV
is pressed while in another mode, the remote control will start scanning all channels instead
(if applicable to the selected device).
1. On the remote control,press CBL/SAT or TV once.
FAV is pressed (see
2. Press and hold
then release
3. Enter
SET until the LED (red light) blinks twice,
SET.
9 - 9 - 6.The LED will blink twice.
4. Use the keypad to enter a favorite channel number (e.g.,
031). Then press SET once.
NOTE: If the original remote control required pressing an Enter key
to change the channel, also press the ENTER key after the channel
number (e.g.,0 - 3 - 1 - ENTER). On some satellite receivers and cable
boxes, you may need to press the SELECT(OK) key instead of ENTER.
5. If desired,repeat step 4 for each channel to be stored,up
to a total of 10 channels.
NOTE: If you try entering more than 10 channels,the remote control
will automatically exit programming. To change your favorite channel list at this point,you will first need to delete the existing list by
performing the steps in “Clearing Custom Programming” on page 14.
Then, perform the instructions in this section once again.
6. To exit programming with less than 10 favorite channels
stored, press and hold SET until the LED blinks twice.
Otherwise, the remote control will automatically exit the
program after 10 channels have been stored.
CHANGING VOLUME LOCK
The One For All 3 Device Universal Remote Control is set at the factory for
independent volume control of each selected device. However, you may
change the Volume Lock setting to
ume will be locked to one mode (e.g., to control TV volume in all other
modes).After that,if desired,you can perform
a selected device to set its volume control for independent operation.
Locking Volume Control To One Mode
(Global Volume Lock)
1. Press and hold SET until the LED (red light) blinks twice,
then release SET.
Global Volume Lock so that a device’s vol-
Indiv idual Volume Unl ock on
continued on next page...
12
Page 12

CHANGING VOLUME LOCK (cont’d)
Locking Volume Control To One Mode
(Global Volume Lock)
2. Enter 9 - 9 - 3 and then press any mode key once (e.g.,TV).
The LED will blink twice.
3. Now, when you press
the selected device (e.g.,
VOL▲, VOL▼,or MUTE, the volume of
TV) will be controlled,regardless
of the mode you have selected.
Unlocking Volume Control For A Single Device (Individual Volume
Unlock)
1. After performing Global Volume Lock (above),press a desired
mode key where you want volume to be unlocked (e.g.,
DVD/VCR) and controlled within its own mode.
2. Press and and hold
then release SET.
3. Enter
9 - 9 - 3 and then press VOL▼ once. The LED will
blink four times.
4. If desired,repeat steps 1 through 3 (of this section) for
each device that you want volume to be unlocked.
5. After selecting a device that has volume unlocked (e.g.,
DVD/VCR), pressing VOL▲,VOL▼,or MUTE will control the
device’s volume only in its own mode.
SET until the LED (red light) blinks twice,
Unlocking All Volume Control (Restoring Default Setting)
NOTE: Performing these instructions will restore independent volume control for all programmed devices (e.g., TV volume control in TV mode,VCR volume in DVD/VCR mode,
etc.).
1. On the remote control,press and hold SET until the LED (red
light) blinks twice, then release SET.
2. Enter
3. Volume will again be independently controlled according
9 - 9 - 3 and then press VOL▲ once. The LED will
blink four times.
to its default states for all programmed devices.
13
Page 13

CLEARING CUSTOM PROGRAMMING
The One For All 3 Device Universal Remote Control contains an Operational
Feature Reset
ming, except your setup codes and reassigned device keys, and reset them
to original factory settings.Also see
IMPORTANT: Executing this program will erase all your custom settings for
Power Macro,Favorite Channels, and Volume Lock.
1. Press and hold SET until the LED (red light) blinks twice,
program.If desired,you can use it to clear custom program-
Restoring Factory Default Settings below.
then release SET.
2. Enter
9 - 8 - 0.The LED will blink twice. The remote con-
trol will return to normal operation.
RESTORING FACTORY DEFAULT SETTINGS
The One For All 3 Device Universal Remote Control also contains a Factory
Reset
program that you can use to reset all custom settings and setup codes
to original factory settings.Also see Clearing Custom Programming above.
IMPORTANT: Executing this program will erase all your custom settings for
Power Macro,Favorite Channels, Volume Lock, Reassigned Devices, and all
device settings.
1. Press and hold SET until the LED (red light) blinks twice,
then release SET.
2. Enter
9 - 8 - 1.The LED will blink twice. The remote con-
trol will return to normal operation.
14
Page 14

TROUBLESHOOTING
PROBLEM: LED (red light) does not blink when you press a key.
SOLUTION: Replace batteries with two new AAA alkaline batteries.
PROBLEM:
SOLUTION: Make sure the remote control is aimed at your home
PROBLEM: The unit does not control home entertainment devices
SOLUTION: Try all listed codes for the device brands being set up.
PROBLEM: Changing channels does not work.
SOLUTION: If original remote required pressing ENTER or SELECT to
PROBLEM: Tried
SOLUTION: Clear the device key as follows: Press and hold
PROBLEM:
SOLUTION: Due to RCA design (1983-1987), only the original
PROBLEM: No remote control of volume.
LED blinks when you press a key, but home entertain-
ment device does not respond.
entertainment device and is not farther than 15 feet
away.
or commands are not working properly.
Make sure they can be operated with an infrared remote
control.
change channels, press
ENTER or SELECT on this remote after
entering the channel number.
Searching For Your Code method and still could not
find a working code.
the
LED (red light) blinks twice,then release.Next enter
9 - 9 - 2. Then press the device key to be cleared twice.
Now repeat the
Searching For Your Code method on page
SET until
9.
CH▲ and CH▼ do not work for your RCA TV.
remote control will operate these functions.
SOLUTION: See Changing Volume Lock on page 12 to lock/unlock
volume.
For assistance,please contact us in any of the following ways:
• E-mail: ofasupport@ueic.com
• Internet: http://www.oneforall.com
• Consumer Help Line: (330) 405-8612
INSTRUCTIONS TO THE USER
This equipment has been tested and found to comply with the limits for a class B
digital device, pursuant to part 15 of the FCC Rules.These limits are designed to
provide a reasonable protection against harmful interference in a residential
installation.This equipment generates,uses,and can radiate radio frequency
energy and if not installed and used in accordance with the instructions,may
cause harmful interference to radio communications. However,there is no guarantee that interference will not occur in a particular installation.If this equipment does cause harmful interference to radio or television reception,which can
be determined by turning the equipment off and on, the user is encouraged to
try to correct the interference by one or more of the following measures:
• Reorient or relocate the receiving antenna.
• Increase separation between equipment and receiver.
• Connect equipment into an outlet or a circuit different from that to which the
receiver is connected.
• Consult dealer or experienced radio/TV technician for help.
15
Page 15

LIFETIME WARRANTY
One For ALL ("OFA") warrants this product to be free from defects in materials
and workmanship,under normal use, throughout the period of the product’s
ownership by the original purchaser. This warranty does not cover damages or
failures caused by products or services not supplied by OFA, or which result from
accident,misuses,abuse, neglect, mishandling,misapplication, faulty installation,
set-up adjustment,improper maintenance,alteration, maladjustment of consumer controls, modifications,commercial use, or that is attributable to acts of
God.
There are no express warranties except as listed above.OFA SHALL NOT BE
LIABLE FOR INCIDENTAL OR CONSEQUENTIAL DAMAGES RESULTING
FROM THE USE OF THIS PRODUCT OR ARISING OUT OF ANY BREACH OF
WARRANTY,ALL EXPRESS AND IMPLIED WARRANTIES, INCLUDING THE
WARRANTIES OF MERCHANTABILITY AND FITNESS FOR A PARTICULAR
PURPOSE,ARE LIMITED TO THE WARRANTY PERIOD SET FORTH ABOVE.
Some states do not allow the exclusion or limitation of incidental or consequential damagers, or limitations on how long an implied warranty lasts,so the above
exclusions or limitations may not apply to you. This warranty gives you specific
legal rights and you may also have other rights which vary from state to state.
To obtain warranty service for a defective product, please return the product,
preferably in the original carton, along with your purchase receipt,to the store of
original purchase for the first 90 days.A note detailing the complaint would be
helpful.The store, at its option,will replace or repair this product if found to be
defective.
If the unit has been purchased more than 90 days ago,please return it to CT
Global Inc. 8918 Stone Green Way,Louisville,KY 40220 together with the original
receipt and $3.95 to cover postage and handling.It will be repaired or replaced at
the manufacturer’s option. The manufacturer reserves the right to substitute a
currently manufactured model with equal or superior features.
One For All:(330) 405-8655
URC-3021 March 2004
16
Page 16

ADDITIONAL INFORMATION
As you update your home entertainment system,One For All® has a universal
remote control that will fit your needs.Look for these exciting products at a
retailer near you:
One For All Access 3. . . . . . . . . . . . . . . . . . . . . . . . . . . . . . . . . . . . . . . . . . . . URC-3605
One For All Big Easy 3-Device . . . . . . . . . . . . . . . . . . . . . . . . . . . . . . . . . . . URC-3300
One For All DVD Expert 4-Device. . . . . . . . . . . . . . . . . . . . . . . . . . . . . . . . URC-4041
One For All Big Easy 4-Device . . . . . . . . . . . . . . . . . . . . . . . . . . . . . . . . . . . URC-4330
One For All Access 4. . . . . . . . . . . . . . . . . . . . . . . . . . . . . . . . . . . . . . . . . . . . URC-4605
One For All Access 5. . . . . . . . . . . . . . . . . . . . . . . . . . . . . . . . . . . . . . . . . . . . URC-5705
One For All 4 Device . . . . . . . . . . . . . . . . . . . . . . . . . . . . . . . . . . . . . . . . . . . URC-4021
One For All 3 Device . . . . . . . . . . . . . . . . . . . . . . . . . . . . . . . . . . . . . . . . . . . URC-3021
One For All PVR 6-Device . . . . . . . . . . . . . . . . . . . . . . . . . . . . . . . . . . . . . . URC-6131
One For All 6-Device Home Theater. . . . . . . . . . . . . . . . . . . . . . . . . . . . . . URC-6011
One For All 8-Device Home Theater. . . . . . . . . . . . . . . . . . . . . . . . . . . . . . URC-8011
One For All 8L-Device Home Theater
With Learning. . . . . . . . . . . . . . . . . . . . . . . . . . . . . . . . . . . . . . . . . . . . . . . . . URC-8811
One For All A/V LCD 8 Device
With Learning. . . . . . . . . . . . . . . . . . . . . . . . . . . . . . . . . . . . . . . . . . . . . . . . . URC-8910
One For All IR/RF LCD 8 Device
With Learning. . . . . . . . . . . . . . . . . . . . . . . . . . . . . . . . . . . . . . . . . . . . . . . . . URC-9910
One For All 8 Device Home Theater Remote
Powered By Kameleon. . . . . . . . . . . . . . . . . . . . . . . . . . . . . . . . . . . . . . . . . . URC-9960
ONE FOR ALL® is the registered trademark of Universal Electronics Inc.
Computime International Ltd.is the Licensee of the ONE FOR ALL® brand for
USA and Canada.
Copyright 2004 by Universal Electronics Inc.No part of this publication may be
reproduced, transmitted,transcribed, stored in any retrieval system,or translat-
ed to any language,in any form or by any means,electronic, mechanical,mag-
netic, optical,manual, or otherwise, without the prior written permission of
Univers al Elec tronics Inc.
The One For All® 3 Device Universal Remote Control is compatible for use in
North America, excluding Mexico.
This One For All® 3 Device Universal Remote Control is covered by one or more
of the following US Patents:
6,587,067 6,496,135 5,515,052 5,959,751
6,587,067 5,481,256
17
Page 17

MANUFACTURER’S CODES
Setup Codes for Cable Boxes
Americast 0899
Bell South 0899
Director 0476
General Instrument 0476, 0810,0276
GoldStar 0144
Hamlin 0009
Jerrold 0476, 0810, 0276
Memorex 0000
Motorola 0476,0810, 0276
Pace 0237
Panasonic 0000, 0107
Paragon 0000
Setup Codes for Cable Box/PVR (or DVR) Combos
Motorola 1376
Pioneer 1877
Setup Codes for DVD Players
Apex Digital 0672, 0717,0794, 1056, 0755,
0797, 1100, 0796,1061
Axion 1072
Blaupunkt 0717
Blue Parade 0571
CineVision 0876
Curtis Mathes 1087
CyberHome 1024,1023, 0816
Daewoo 0784
Denon 0490
Dual 1068
DVD2000 0521
Emerson 0591, 0675
Enterprise 0591
Fisher 0670
Funai 0675
GE 0522, 0815,0717
Go Video 0744, 0715, 0783
GPX 0699
Greenhill 0717
Hitachi 0573
Hiteker 0672
JVC 0558, 0623
Kenwood 0490, 0534
KLH 0717, 1020
Koss 0651
Lasonic 0798
Magnavox 0503, 0675
Marantz 0539
Microsoft 0522
Philips 0305, 0317
Pioneer 0877, 1877,0144, 0533
Pulsar 0000
Quasar 0000
Runco 0000
Samsung 0144
Scientific Atlanta 0877, 1877, 0477
Sony 1006
Supercable 0276
Toshiba 0000
Zenith 0000,0525, 0899
Scientific Atlanta 1877
Mintek 0839, 0717
Mitsubishi 0521, 1521
Nesa 0717
Norcent 1003
Onkyo 0503
Oritron 0651
Panasonic 0490, 1762
Philips 0503, 0539,0646
Pioneer 0525, 0571
Polk Audio 0539
Proscan 0522
Qwestar 0651
RCA 0522, 0571, 0717
Rotel 0623
Rowa 0823
Samsung 0573, 1075, 0820
Sanyo 0670
Shinsonic 0533,0839
Sony 0533, 1533, 0864,1033
Sylvania 0675
Symphonic 0675
Technics 0490
Theta Digital 0571
Toshiba 0503
Tredex 0799
Urban Concepts 0503
Xbox 0522
Yamaha 0490, 0539, 0545
Zenith 0503,0591
Setup Codes For DVD Player/VCR Combos
Apex Digital 1061
Go Video 0744, 0715
Hitachi 0000
Panasonic 1762
RCA 0060
Samsung 1075, 0820
Sanyo 0104
Sony 0864
Sylvania 0675, 0000
Symphonic 0675, 0000
Toshiba 0503
18
continued on next page...
Page 18

MANUFACTURER’S CODES
Setup Codes for PVRs (or DVRs)
Panasonic 0616
Philips 0618
ReplayTV 0614, 0616
Setup Codes for Satellite Receivers
AlphaStar 0772
DirecTV 0392,0566, 0639, 0247, 0749,
1749, 0724, 0819,1856
Dish Network System 1005,0775
Dishpro 1005, 0775
Echostar 1005, 0775
Expressvu 0775
GE 0566
General Instrument 0869
GOI 0775
Hitachi 0819
HTS 0775
Hug hes Ne twork
Systems 0749, 1749
JVC 0775
Magnavox 0724, 0722
Memorex 0724
Setup Codes for Satellite Receiver/PVR (or DVR) Combos
Echostar 1005
Expressvu 0775
Proscan 0392
Sonic Blue 0616, 0614
Sony 0636
Tivo 0636, 0618
Mitsubishi 0749
Motorola 0869
Next Level 0869
Panasonic 0247, 0701
Paysat 0724
Philips 0749, 1749, 0724,0722
Proscan 0392, 0566
RadioShack 0869
RCA 0392, 0566, 0855,0143
Samsung 1276
SKY 0856
Sony 0639, 1639
Star Choice 0869
Toshiba 0749,1749, 0790, 1285
UltimateTV 0392, 0639
Uniden 0724, 0722
Zenith 0856,1856
RCA 0392
Sony 0639
Setup Codes for TVs
AOC 0030
Admiral 0093, 0463
Advent 0761, 0842
Aiko 0092
Akai 0702, 0030, 0672,0812
Alfide 0672
America Action 0180
Anam 0180
Apex Digital 0748, 0765,0767
Audiovox 0451, 0180, 0092, 0623
Baysonic 0180
Bell & Howell 0154
Bradford 0180
Broksonic 0236, 0463
CXC 0180
Candle 0030
Carnivale 0030
Carver 0054
Celebrity 0000
Celera 0765
Changhong 0765
Cineral 0451, 0092
Citizen 0060, 0030, 0092
Clarion 0180
Contec 0180
Craig 0180
Crosley 0054
Crown 0180, 0672
Crown Mustang 0672
Curtis Mathes 0047, 0054,0154, 0451, 0093,
0060, 0702, 0030,0145, 0166,
1147, 1347
Daewoo 0451, 1661, 0092,0672, 0623
Denon 0145
Dumont 0017
Durabrand 0178, 0180
Electroband 0000
Emerson 0154, 0236, 0463, 0180, 0178,
0171, 0623
Envision 0030
Fisher 0154
Fujitsu 0683, 0809
Funai 0180, 0171
Futuretech 0180
GE 0047, 0051, 0451,0178, 1147,
1347
Gateway 1755, 1756
Gibralter 0017,0030
GoldStar 0030, 0178
Gradiente 0053
Grundig 0672
Grunpy 0180
Hallmark 0178
Harman/Kardon 0054
Harvard 0180
Havermy 0093
Hello Kitty 0451
19
Page 19

Hitachi 0145, 1145
Infinity 0054
Inteq 0017
JBL 0054
JCB 0000
JVC 0463, 0053
Jensen 0761
KEC 0180
KLH 0765, 0767
KTV 0180, 0030
Kenwood 0030
Kioto 0706
LXI 0047, 0054, 0154, 0156,0178
MGA 0150, 0030,0178
MTC 0060, 0030
Magnavox 0054, 0706, 0030,1454, 1254
Marantz 0054, 0030
Matsushita 0250, 0650
Megatron 0178, 0145
Memorex 0154, 0250, 0463,0150, 0178
Midland 0047,0017, 0051
Mitsubishi 0093, 0150, 1250, 0178, 0836
Motorola 0093
Multitech 0180
NAD 0156, 0178,0866
NEC 0030, 1704, 0704
NTC 0092
Nikko 0030, 0178, 0092
Norcent 0748, 0824
Onwa 0180
Optimus 0154, 0250, 0166,0650
Optonica 0093
Orion 0236, 0463
Panasonic 0051, 0250,0650
Penney 0047, 0156,0051, 0060, 0030,
0178, 1347
Philco 0054, 1661, 0463, 0030,0145
Philips 0054, 1454, 0690
Pilot 0030
Pioneer 0166, 0866
Portland 0092
Prima 0761
Prism 0051
Proscan 0047
Proton 0178
Pulsar 0017
Quasar 0051, 0250, 0650
RCA 0047, 1047, 1147,1247, 1347,
1447, 1547
RadioShack 0047, 0154, 0180,0030, 0178
Realistic 0154,0180, 0030, 0178
Runco 0017,0030
SSS 0180
Sampo 0030, 1755
Samsung 0060, 0702, 0030,0178, 0812
Sansei 0451
Sansui 0463
Sanyo 0154
Scotch 0178
Scott 0236, 0180, 0178
Sears 0047, 0054,0154, 0156, 0178,
0171
Semivox 0180
Semp 0156
Sharp 0093
Sheng Chia 0093
Sony 0000, 1100, 0810
Soundesign 0180, 0178
Squareview 0171
Starlite 0180
Supreme 0000
Sylvania 0054, 0030,0171
Symphonic 0180, 0171
TMK 0178
TNCi 0017
TVS 0463
Tandy 0093
Technics 0051, 0250
Techwood 0051
Teknika 0054, 0180, 0150, 0060,0092
Telefunken 0702
Toshiba 0154,0156, 0060, 1356, 1656,
1704, 0650
Toshiba 1256
Vector Research 0030
Victor 0053
Vidikron 0054
Vidtech 0178
ViewSonic 1755
Wards 0054, 0030, 0178,0866
Waycon 0156
White Westinghouse 0463, 0623
Yamaha 0030
Zenith 0017,0463, 0178, 0092
Setup Codes For TV/DVD Player Combos
Sylvania 0675
Setup Codes For TV/VCR Combos
America Action 0278
Audiovox 0278
Broksonic 0479, 1479
Citizen 1278
Colt 0072
Curtis Mathes 1035
Daewoo 1278
Emerson 0479, 1479, 1278
Funai 0000
GE 0240, 1035, 0807,1060
GoldStar 1237
Harley Davidson 0000
Hitachi 0000
Lloyd’s 0000
Magnasonic 1278
Magnavox 0000, 1781
Magnin 0240
Memorex 0162, 1237
20
continued on next page...
Page 20

MANUFACTURER’S CODES
Setup Codes For TV/VCR Combos, continued
MGA 0240
Mitsubishi 0807
Optimus 0162
Orion 1479, 0479
Panasonic 0162, 1035
Penney 0240, 1035,1237
Quasar 0162, 1035
RadioShack 0000
RCA 0240, 0807, 1060,1035
Samsung 1014
Setup Codes For TV/VCR/DVD Player Combos
Sharp 0807
Setup Codes For VCRs
ABS 1972
Admiral 0048, 0209
Adventura 0000
Aiko 0278
Aiwa 0037, 0000
Akai 0041
Alienware 1972
America Action 0278
American High 0035
Asha 0240
Audiovox 0037,0278
Beaumark 0240
Bell & Howell 0104
Broksonic 0184, 0121, 0209,1479, 0479
Calix 0037
Canon 0035
Carver 0081
CCE 0072, 0278
Citizen 0037, 0278, 1278
Colt 0072
Craig 0037, 0047, 0240,0072
Curtis Mathes 0060, 0035,0162, 0041, 1035
Cybernex 0240
CyberPower 1972
Daewoo 0045, 0278, 1278
Denon 0042
Durabrand 0038, 0039
Dynatech 0000
Electrohome 0037
Electrophonic 0037
Emerex 0032
Emerson 0037, 0184, 0000, 0121, 0043,
0209, 0278, 0479,1479, 1278
Fisher 0047, 0104
Fuji 0035, 0033
Funai 0000
Garrard 0000
Gateway 1972
GE 0060, 0035, 0240,0807, 1060,
1035
Go Video 0432
GoldStar 0037, 0038, 1237
Gradiente 0000
Sansui 0000,1479, 0479
Sanyo 0240
Sears 0000, 1237
Sony 0000, 1232
Sylvania 1781
Symphonic 0000
Thomas 0000
Toshiba 1145, 0845
Zenith 0000,1479, 0479
Harley Davidson 0000
Harman/Kardon 0081, 0038
Harwood 0072
Hewlett Packard 1972
HI-Q 0047
Hitachi 0000, 0042, 0041
Hug hes Ne twork
Systems 0042
iBUYPOWER 1972
Jensen 0041
JVC 0067, 0041
KEC 0037, 0278
Kenwood 0067, 0041, 0038
KLH 0072
Kodak 0035,0037
Lloyd’s 0000
Logik 0072
LXI 0037
Magnasonic 1278
Magnavox 0035, 0039, 0081,0000, 1781
Magnin 0240
Marantz 0035, 0081
Marta 0037
Matsushita 0035, 0162
Media Center PC 1972
MEI 0035
Memorex 0035, 0162, 0037,0048, 0039,
MGA 0240, 0043
MGN Te chnology 0240
Microsoft 1972
Mind 1972
Minolta 0042
Mitsubishi 0067, 0043, 0807
Motorola 0035, 0048
MTC 0240,0000
Multitech 0000, 0072
NEC 0104, 0067, 0041, 0038
Nikko 0037
Noblex 0240
Northgate 1972
Olympus 0035
0047, 0240, 0000,0104, 0209,
0479, 1237
21
Page 21

Optimus 1062, 0162, 0037,0048, 0104,
0432
Orion 0184, 0209,1479, 0479
Panasonic 1062, 0035,0162, 1035, 0616
Penney 0035, 0037,0240, 0042, 0038,
1035, 1237
Pentax 0042
Philco 0035
Philips 0035, 0081, 0618
Pilot 0037
Pioneer 0067
Polk Audio 0081
Profitronic 0240
Proscan 0060, 1060
Protec 0072
Pulsar 0039
Quasar 0035, 0162, 1035
RadioShack 0000
Radix 0037
Randex 0037
RCA 0060, 0240, 0042,1035, 0880,
0807, 1060
Realistic 0035,0037, 0048, 0047, 0000,
0104
ReplayTV 0616,0614
Runco 0039
Samsung 0240, 0045, 1014
Sanky 0048, 0039
Sansui 0000,0067, 0209, 0041, 1479,
0479
Sanyo 0047, 0240,0104
Scott 0184, 0045, 0121, 0043
Sears 0035, 0037,0047, 0000, 0042,
0104, 1237
Sharp 0048, 0807
Shintom 0072
Shogun 0240
Singer 0072
Sonic Blue 0614, 0616
Sony 0035, 0032, 0033,0000, 1232,
0636
STS 0042
Sylvania 0035, 0081,0000, 0043, 1781
Symphonic 0000
Tagar Systems 1972
Tatung 0041
Teac 0000, 0041
Technics 0035, 0162
Teknika 0035, 0037, 0000
Thomas 0000
Tivo 0636, 0618
TMK 0240
Toshiba 0045,0043, 1145, 0845
Totevision 0037, 0240
Touch 1972
Unitech 0240
Vector 0045
Vector Research 0038
Video Concepts 0045
Videomagic 0037
Videosonic 0240
Viewsonic 1972
Villain 0000
Wards 0060, 0035, 0048,0047, 0081,
0240, 0000, 0042,0072
White Westinghouse 0209, 0072
XR-1000 0035, 0000, 0072
Yamaha 0038
Zenith 0039,0033, 0000, 0209, 1479,
0479
ZT Group 1972
22
 Loading...