


USER MANUAL
MODEL
T W N 3 0 S E R I E S
T W I N G E A R J U I C E R
www.OmegaJuicers.com
022415

Congratulations!
CONGRATULATIONS and THANK YOU on the purchase of your new Omega.
At Omega, we strive to develop technologically advanced machines that help deliver nutrition and flavor of the highest kind and closest to nature’s purest form.
We are driven by you, our brand supporters. Your enthusiasm helps us continue to reinvent and renew our line of juicers, high speed blenders and beverage equipment.
Our team at Omega thanks you for supporting us for over 50 years!
Join us on Twitter @OmegaAppliances &/or on Facebook @OmegaJuicers
Product Registration, visit:
www.omegajuicers.com/omega-warranty-registration
Recipes, visit: www.omegajuicers.com/recipes
Customer service: Call 1-800-633-3401 or visit: www.omegajuicers.com/contact-omega-juicers
After using your Omega,we kindly ask you to review the machine on www.OmegaJuicers.com

TABLE OF CONTENTS
02 - 03 Safety First, Important Safeguards
04 - 05 Know Your Omega
06 - 08 Quick Start Assembly
09 Sterilization & Easy Cleaning
10 - 11 If the Auger Stops Working
12 - 15 Precautions for Safe Use
16 - 17 Troubleshooting
18 - 19 Product Specifications
20 - 25 Recipes

SAFETY FIRST

SAFETY FIRST
When using electrical appliances, basic safety precautions should always be followed including the following.
1.READ ALL INSTRUCTIONS BEFORE USING.
2.To protect against electrical shock, do not immerse cord, plug, or main body (motor) in water or other liquid.
3.Close supervision is necessary when any appliance is used by or near children.
4.Unplug from outlet before assembling, before taking off parts, before cleaning and when not in use.
5.Avoid contact with moving parts.
6.Do not operate any appliance with a damaged cord or plug or after the appliance malfunctions or has been damaged in any manner. Return appliance to the manufacturer (see warranty) for examination, repair, or electrical or mechanical adjustment.
7.The use of attachments not recommended or sold by manufacturer may cause fire, electric shock or injury.
8.Do not let cord hang over edge of table or counter or touch heated surfaces.
9.Always make sure juicer locking clip is locked when juicer is in operation.
10.To disconnect, press/switch OFF then remove plug from wall outlet. Make sure the motor stops completely before disassembling.
11.Do not put your fingers or other objects into the juicer while it is in operation. If food becomes lodges in opening, use food plunger or another piece of fruit or vegetable to push down the lodged food. When this method is not possible, turn off the machine, remove the plug from wall outlet and disassemble juicer to remove the remaining food.
12.Do not use outdoors.
13.Do not place on or near a hot gas or electric burner or in a heated oven.
14.Do not use appliance for anything other than its intended use.
15.Keep the appliance clean. Refer to the Care & Cleaning instructions in this manual.
Warning: This appliance has a polarized plug (one blade is wider than the other).
To reduce the risk of electrical shock, this plug will fit in a polarized outlet only one way. If plug does not fit fully into the outlet, reverse the plug. If it still does not fit, contact a qualified electrician. DO NOT attempt to modify the plug in any way.
SAVE THESE INSTRUCTIONS
3

KNOW YOUR OMEGA
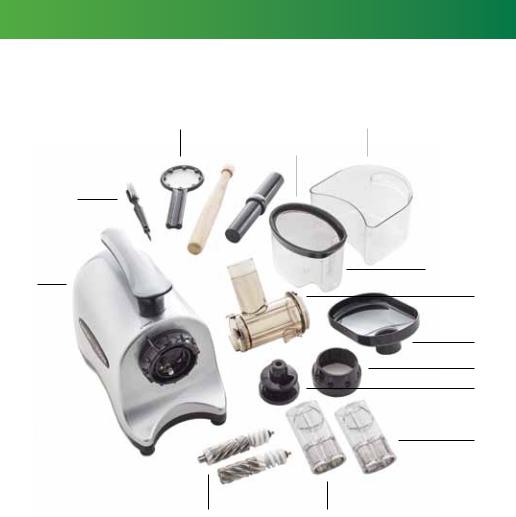
know your omega
C F
E
D
B
G
A
H
I
J
K
L
N M
A |
Main Body |
F |
Pulp Container |
K |
Drum Cap |
B |
Cleaning Brush |
G |
Juice Cup |
L |
Coarse Juice Strainer |
C |
Locking Handle |
H |
Drum |
M |
Fine Juice Strainer |
D |
2 Pushers (Wood & Plastic) |
I |
Hopper |
N |
Twin Gear Augers |
E |
Sieve |
J |
Locking Ring |
|
|
5

QUICK START ASSEMBLY
AND
Sterilization & Cleaning

QUICK START ASSEMBLY
1.Connect drum with main body by turning locking clip clockwise (about 60°). Place hopper onto guide.
Locking Clip |
Drum |
Hopper
1.For juicing function :
(A)Place the auger into the drum. Insert the juicing strainer into the drum.
(B)Place the drum cap onto the drum end.
(C)Place the locking ring onto the drum and turn it counter clockwise until it clicks firmly into place.
(D)Attach adjustable pressure cap to the drum cap end.
(A) Auger & Juicing Strainer |
(B) Drum Cap |
(C) Locking Ring |
(D) Adjustable Pressure Cap |
Turn to right on the adjustable pressure cap for maximum pressure. This is best for carrot, beetroot and the leafygreens.
Turn to Left for soft fruits like orange, strawberry etc.
7
 Loading...