


L I M I T E D L I F E T I M E W A R R A N T Y
Products manufactured and sold by OMEGA RESEARCH & DEVELOPMENT, INC. (the Company), are warranted to be free from defects in materials and workmanship under normal use. If a product sold by the Company proves to be defective, the Company will repair or replace it free of charge within the first year and thereafter all parts to be repaired will be free with only a nominal charge for Omega Research and Development, Inc.'s labor and return shipping, to the original owner during the lifetime of the car in which it was originally installed.
All products for warranty repair must be sent postage prepaid to Omega Research & Development, Inc., P.O. Box 508, Douglasville, Georgia 30133, with bill of sale or other dated proof of purchase. This warranty is nontransferable and does not apply to any product damaged by accident, physical or electrical misuse or abuse, improper installation, alteration, any use contrary to its intended function, unauthorized service, fire, flood, lightning, or other acts of God.
This warranty limits the Company's liability to the repair or replacement of the product. The Company shall not be responsible for removal and/or reinstallation charges, damage to or theft of the vehicle or its contents, or any incidental or consequential damages caused by any failure or alleged failure of the product to function properly. Under No Circumstances Should This Warranty, Or The Product Covered By It, Be Construed As A Guarantee Or Insurance Policy Against Loss. The Company neither assumes nor authorizes any person or organization to make any Warranties or assume any liability in connection with the sale, installation, or use of this product.
This device complies with FCC Rules part 15. Operation is subject to the following two conditions, (1) This device may not cause harmful interference and, (2) This device must accept any interference that may be received, including interference that may cause undesired operation.
The manufacturer is not responsible for any radio or TV interference caused by unauthorized modifications to this equipment. Such modifications could void the user's authority to operate the equipment.
6/02 MO_REC-11/433
REC-11
REMOTE RECEIVER UNIT
OWNER'S MANUAL
This product is designed for professional installation only!
COPYRIGHT: OMEGA RESEARCH & DEVELOPMENT 2000

REC-11 Operating Instructions
Introduction
The REC-11 is a fully-featured Remote Keyless Entry System with Starter Disable designed by Omega Research and Development, a leader in vehicle security and convenience systems since 1970. Please note that this advanced personal convenience system has Programmable Features which can be configured by the installer. These instructions describe operations of the system with the factory default settings of the Programmable Features. Please see your installing dealer for more details on Programmable Features.
To learn how to operate your system, this Owner's Operation Manual will begin with Transmitter Functions, then explain the system's other operations as enhanced by the factory-set Programmable Features. As you become more familiar with the basic operations that this model performs, this Manual will further discuss the User Programmable Features, and then explain how change them to configure the system to suit your personal needs.
Automatic Transmitter VerificationTM
You received two remote control transmitters to operate your Remote Keyless Entry System. The system LED will flash two times every time the ignition key is turned “on”. This alert will last 90 seconds for the first 48 hours after a new installation. The alert will shorten to 10 seconds after the first 48 hours. If a new remote is coded into the system the alert will again be 90 seconds for 48 hours. This Patented feature alerts you if someone has covertly added an unauthorized transmitter to your system, and is found only in Omega Research and Development products.
17) One or Two Button Operation: Default Two
This feature allows the unit to be locked and unlocked from two separate buttons or have the unit “toggle” the lock and unlock operations from one button.
List of Programmable Features:
1)Secret Override Code: Default 1&0 Programming Switch Press
2)Doors Automatically Lock 90 Seconds After The Ignition Is Turned “Off” : Default OFF
3)Doors Automatically Relock 90 Seconds After Remotely Unlocking : Default OFF
4)Doors Lock With Ignition “On” : Default ON
5)Ignition “Off” Unlock #1 : Default ON
6)Ignition “Off” Unlock #2 : Default ON
7)Operating Trunk Release Also Unlocks Doors: Default ON
8)Doorlock Pulse Time .8/3 Seconds :Default .8 Second
9)Double Unlock Pulse : Default OFF
10)Audible Confirmation Of Received Transmitter Signal : Default ON
11)The Starter Disable Will Automatically Engage 90 Seconds After The Ignition Switch Is Turned “Off” : Default OFF
12)The Starter Disable Will Automatically Engage 90 Seconds After The Transmitter Is Used To Unlock The Doors : Default OFF
13)Ignition Activated Anti-Carjacking : Default OFF
14)Transmitter Activated Anti-Carjacking : Default OFF
15)30 Second Parking Lights Upon Unlock : Default ON
16)“Panic” / 3rd Channel From Button III : Default 3rd Channel
Page 2 |
Page 19 |
14) Transmitter Activated Anti-Carjacking: Default OFF.
This Feature adds Anti-Carjacking protection, and the ignition must be "on" for the AntiCarjacking to operate. Press and hold the transmitter's II button for 3 seconds. The piezo will start beeping 53 seconds later, and for the next seven seconds pressing the Valet Switch once will cancel the Anti-Carjacking Feature. At 60 seconds the piezo starts making a siren sound, and the parking and dome lights will also flash. At 90 seconds the starter interrupt output will activate. Once the siren sound occurs and lights flash, Anti-Carjacking cannot be canceled unless the ignition is turned "off", then back "on"; the Valet Switch must be pressed once within 10 seconds of turning the ignition back "on". This is the only way to cancel or turn off the Anti-Carjacking Feature - once activated, the transmitter cannot be used to cancel or turn off the Feature.
15) 30 Second Parking Lights Upon Unlock: Default 30 Seconds.
This feature gives the option of having the parking light output flash twice then illuminate for 30 seconds upon Unlock or have the parking lights only flash twice upon Unlock. To change this feature press the Lock button for the 2 flashes only setting.
16) “Panic” or 3rd Channel From Button III: Default 3rd Channel.
This feature allows button III to operate either “Panic” or 3rd channel. In the default setting holding button III depressed for 4 seconds will activate the 3rd channel output. Panic can be activated from either the lock or the unlock button. Press and hold either button for 5 seconds to activate panic. With this feature off press and hold button III for 5 seconds to activate “panic”. Press the lock and unlock buttons together for 5 seconds to activate the 3rd channel output.
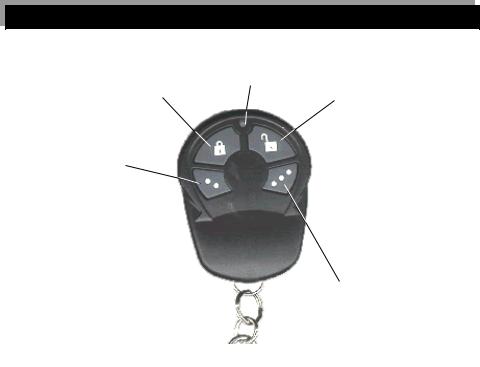
Transmitter Functions
“LOCK” BUTTON
Pressing the LOCK button will lock all of the doors and engage the optional starter interrupt; when held operates “Panic”.
“II” BUTTON
Pressing the II button for 2 seconds will activate remote trunk release (vehicle must be equipped with power trunk release). This operation also unlocks the doors.
Your system may be configured to lock your doors upon turning the ignition "On", and unlock them when the ignition is turned "Off". Your system is capable of being operated by up to four transmitters, which are available from where you purchased your system.
GREEN LIGHT
Illuminates whenever any transmitter button is pressed.
“UNLOCK” BUTTON
Pressing the UNLOCK button will unlock all of the doors and disengage the starter interrupt circuit. Or, if the system is thusly configured, pressing the UNLOCK button once unlocks only the driver's door and pressing a second time will unlock all of the doors. Press and hold to activate “Panic”.
“III” BUTTON
Pressing the III button for two seconds can be used to activate the 3rd Channel Output. This Button may also be configured to activate the “Panic” feature.
Page 18 |
Page 3 |
 Loading...