

Page 1

DIGITAL VOICE
RECORDER
Getting started
Recording
1
2
WS-823
WS-822
WS-821
Other information
USER MANUAL
Thank you for purchasing an Olympus digital voice recorder.
Please read these instructions for information about using the product
correctly and safely.
Keep the instructions handy for future reference.
To ensure successful recording, we recommend that you test the record
function and volume before use.
Register your product on
www.olympus-consumer.com/
register and get additional
benefits from Olympus!
Playback
FM radio
Menu
Use with a PC
EN
3
4
5
6
7
Page 2

Table of contents
Names of parts ............................................................................ 4
Recorder ................................................................................................4
Display ..................................................................................................5
1 Getting started
Setup .......................................................................................... 8
Inserting the battery............................................................................. 9
Turn the power ON ................................................................................ 9
Setting the inserted battery ............................................................... 10
Setting the date/time .........................................................................10
Charging the battery ..................................................................11
Charging the battery by connecting to a PC’s USB connector ............11
Charging the battery by connecting to an AC adapter with a USB
connection (model A514; optional) .................................................... 13
Batteries....................................................................................15
Inserting/removing a microSD card .............................................17
Inserting a microSD card ..................................................................... 17
Removing a microSD card ................................................................... 18
Preventing accidental operation ................................................19
Setting HOLD mode ............................................................................19
Releasing HOLD mode ........................................................................19
Turning the power OFF ...............................................................20
Turning the power OFF .......................................................................20
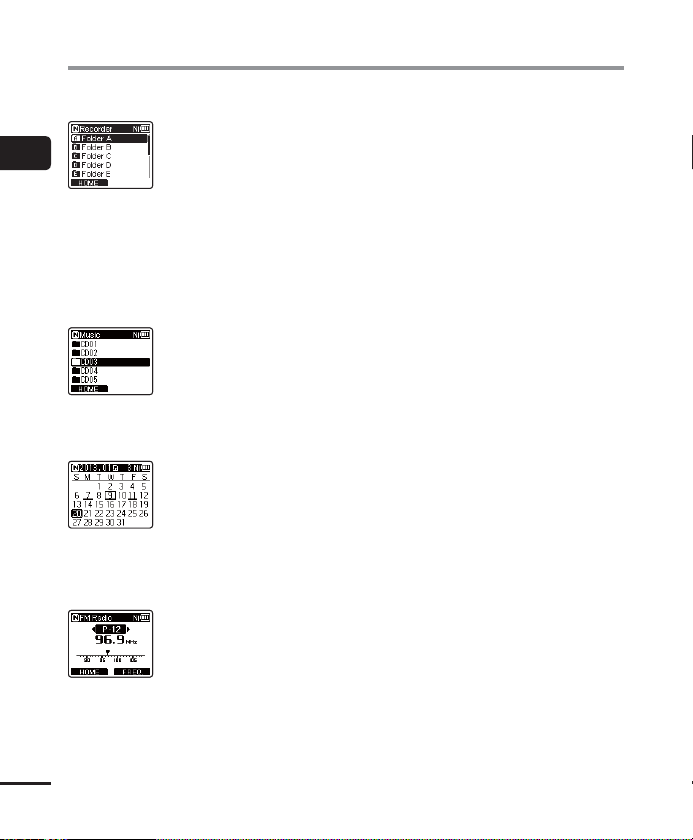
[Home] screen operations ...........................................................21
Selecting the mode............................................................................. 21
Folders ......................................................................................23
Folders for voice recordings ................................................................23
Folders for music playback .................................................................. 23
Selecting folders and files ..........................................................24
2 Recording
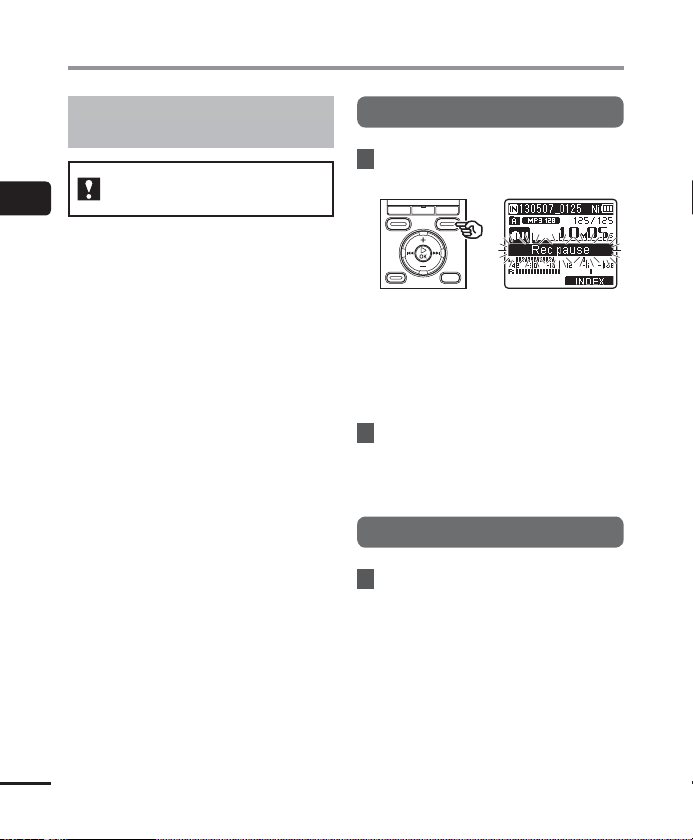
Recording ..................................................................................26
Basic recording procedure ...................................................................26
Pausing/resuming recording ..............................................................28
Quickly checking a recording ..............................................................28
Monitoring while recording ................................................................ 29
Recording with an external microphone .....................................30
Recording with an external microphone ............................................30
Recording from another connected device ..................................31
Recording audio from another device with this recorder....................31
Recording audio from this recorder with another device....................31
Changing the recording scene [Rec Scene] ...................................32
EN
Changing the recording scene ............................................................32
2
3 Playback
Playback ....................................................................................34
Basic playback procedure .................................................................... 34
Playback through the earphones ........................................................ 35
Fast-forwarding ..................................................................................36
Rewinding ..........................................................................................36
Skipping to the beginning of a file ..................................................... 37
Changing the playback speed/tone (voice changer*) ........................38
ABC repeat playback ...........................................................................40
Index marks/temp marks ...........................................................43
Writing an index mark/temp mark ..................................................... 43
Erasing an index mark/temp mark .....................................................43
Calendar Search function ...........................................................44
Using the Calendar Search function to search for a file ....................... 44
Selecting preset playback settings template [Play Scene] ............45
Selecting a preset playback settings template ...................................45
Erasing files/folders ...................................................................46
Erasing files ......................................................................................... 46
Erasing a folder ...................................................................................47
4 FM radio
(WS-823 model only)
Before using the FM radio function .............................................48
Presetting radio stations automatically ......................................49
Presetting a local radio station [By scanning] ....................................49
Listening to FM radio ..................................................................51
Listening to FM radio ..........................................................................51
Selecting the reception mode.............................................................52
Adding preset radio stations .......................................................53
Adding a radio station received manually as a preset station
[Set manually] ....................................................................................53
Deleting preset radio stations ....................................................55
Deleting an unneeded preset radio station ........................................55
Recording FM radio ....................................................................56
Recording FM radio ............................................................................. 56
5 Menu
Setting menu items ...................................................................58
Basic operation ...................................................................................58
File menu [File Menu] .................................................................61
Extracting the speaking portions of files of spoken-word content
[Voice Detect] .....................................................................................61
Page 3

Table of contents
Preventing accidental file erasure [File Lock]......................................61
Sorting files [Sort by] ..........................................................................61
Moving/copying files [Move/Copy].....................................................62
Dividing files [File Divide] ...................................................................62
Displaying file or folder information [Property] .................................62
Recording menu [Rec Menu] .......................................................63
Selecting the recording sensitivity [Rec Level] ...................................63
Setting the recording mode [Rec Mode].............................................64
Selecting microphone directivity [Zoom Mic].....................................64
Reducing noise during recording [Low Cut Filter]...............................65
Voice-activated recording function [VCVA].........................................65
Voice sync recording function [V-Sync. Rec] ....................................... 67
Playback menu [Play Menu]........................................................69
Skipping non-voice portions during playback [Voice Playback] ......... 69
Alternating repeatedly between normal and muted playback
[Shadowing] .......................................................................................69
Reducing noise during playback [Noise Cancel] .................................70
Adjusting low volume portions during playback [Voice Balancer] ....70
Emphasizing voice more clearly [Voice Filter] .....................................71
Selecting playback modes [Play Mode] ..............................................71
Changing music sound quality [Equalizer] .........................................73
Setting a skip space [Skip Space] ........................................................73
Setting a preset playback settings template [Play Scene] .................. 74
LCD/Sound menu [LCD/Sound Menu] ...........................................75
Setting the backlight [Backlight] .......................................................75
Adjusting the contrast [Contrast] ........................................................75
Setting the LED indicator light [LED] ..................................................75
Turning beeping sound ON/OFF [Beep] .............................................. 75
Changing the display language [Language] ...................................... 76
Selecting the speaker output [Speaker] .............................................76
Device menu [Device Menu] .......................................................77
Selecting the recording media [Memory Select] ................................77
Setting power save mode [Power Save] ............................................. 77
Setting the battery in use [Battery] ....................................................77
Setting the date/time [Time & Date] .................................................78
Setting the USB connection [USB Settings] ........................................79
Restoring the default settings [Reset Settings] ..................................79
Formatting a recording media [Format] ............................................. 80
Checking recording media information [Memory Info.] ..................... 80
Checking voice recorder information [System Info.] .......................... 80
FM menu [FM Menu] ...................................................................81
Selecting the recording sound quality [Rec Mode] ............................. 81
Presetting a radio station [Set stations] .............................................81
Setting scanning sensitivity [Scan Level]............................................81
Selecting the FM radio output [Output] .............................................81
Extracting the speaking portions of files of spoken-word content
[Voice Detect] ............................................................................82
Extracting the speaking portions of files of spoken-word content
[Voice Detect] .....................................................................................82
Moving/copying files [Move/Copy] ..............................................84
Moving/copying files [Move/Copy].....................................................84
Dividing files [File Divide] ...........................................................87
Dividing a file [File Divide] ..................................................................87
Setting the USB connection [USB Settings]..................................89
Setting the USB connection [USB Settings] ........................................89
Formatting recording media [Format] .........................................91
Formatting a recording media [Format] ............................................. 91
6 Use with a PC
PC operating environment .........................................................93
PC connection/disconnection ......................................................95
Connecting the voice recorder to a PC.................................................95
Disconnecting the voice recorder from a PC ........................................96
Loading a file to a PC ..................................................................97
Usage as external memory of the PC ...........................................98
7 Other information
Alarm message list .....................................................................99
Troubleshooting ......................................................................101
Recorder care ...........................................................................104
Accessories (optional) ...............................................................105
Copyright and trademark information ......................................106
Safety precautions ...................................................................107
Specifications ..........................................................................111
EN
3
Page 4
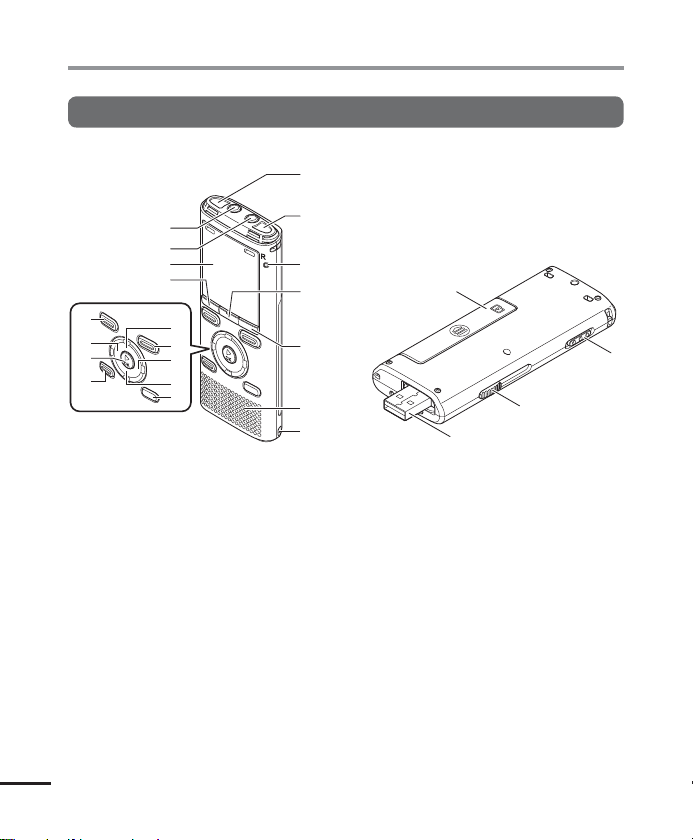
Names of parts
Recorder
Names of parts
8
9
0
!
)
(
*
&
@
#
$
%
^
1 Built-in stereo microphone (L)
2 Built-in stereo microphone (R)
3 LED indicator light (LED)
4
MENU/SCENE
F2
button
5
button
6 Built-in speaker
7 Strap hole
8
EAR (earphone)
9
MIC (microphone)
jack
0 Display
!
F1
button
@
+
button
#
EN
REC (record)
( s) button
4
jack
1
2
3
4
5
6
7
-
w
$ 9 button
%
–
button
^
LIST
button
&
ERASE
button
OK
button
* `
( 0 button
)
STOP
( 4) button
- Battery/card cover
=
POWER/HOLD
q USB connector slide lever
w USB connector/USB connector
cover (retractable)
=
q
switch
Page 5
Names of parts
12 3
Display
4 [
Recorder
Folder list display File list display File display
4
5
] mode
12 3
6
5
16 3
7
8
9
5
Names of parts
0
!
@
#
$
1 Recording media indicator
[l]: Internal memory
[m]: microSD card
2 Current folder name
3 Battery indicator
4 Folder name
5 Function button guide display
6 File name
[ ]: Playback indicator
]: Voice Detect
[
*
7 Folder indicator, recording format
indicator and file lock indicator
8
Voice recorder status indicator
[ ]: Recording indicator
]: Recording pause indicator
[
]: Stop indicator
[
]: Playback indicator
[
]: Fast forward indicator
[
]: Fast rewind indicator
[
]: Fast playback indicator
[
]: Slow playback indicator
[
]: Modified tone playback indicator
[
(High)
]: Modified tone playback indicator
[
(Low)
9 Speaker muting indicator ( ) and
voice playback indicator* ( )
0 Current file number in folder/Total
number of recorded files in folder
! Elapsed recording time or
playback time
@ Remaining memory bar indicator
or playback position bar indicator
# Possible recording time remaining
or file length
$ Level meter or recording date/
time
* WS-823 and WS-822 models only
*
*
EN
5
Page 6
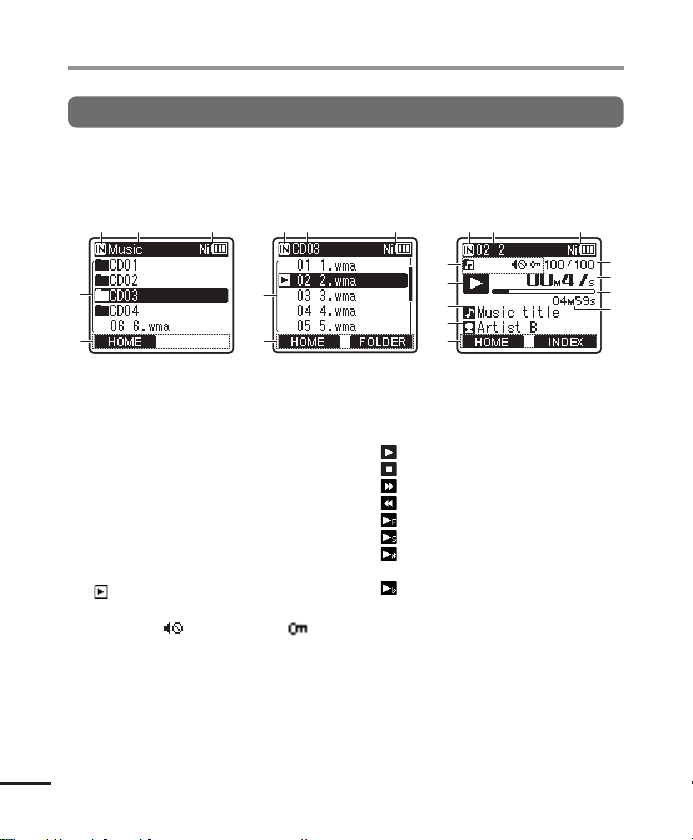
Names of parts
Display
4 [
Music
] mode
Names of parts
List display 1 List display 2
12 3
4
5
When folder contains files
and folders
12 3
6
5
When folder contains only
files
File display
16 3
7
8
9
0
5
!
@
#
$
1 Recording media indicator
[l]: Internal memory
[m]: microSD card
2 Current folder name
3 Battery indicator
4 Folder name or file name
5 Function button guide display
6 File name
[ ] Playback indicator
7 Folder indicator, speaker muting
indicator ( ) and file lock ( )
EN
6
8 Voice recorder status indicator
[ ]: Playback indicator
]: Stop indicator
[
]: Fast forward indicator
[
]: Fast rewind indicator
[
]: Fast playback indicator
[
]: Slow playback indicator
[
]: Modified tone playback indicator
[
(High)
]: Modified tone playback indicator
[
(Low)
*
*
9 Music title
0 Artist name
! Current file number in folder/Total
number of recorded files in folder
@ Elapsed playback time
# Playback position bar indicator
$ File length
* WS-823 and WS-822 models only
Page 7
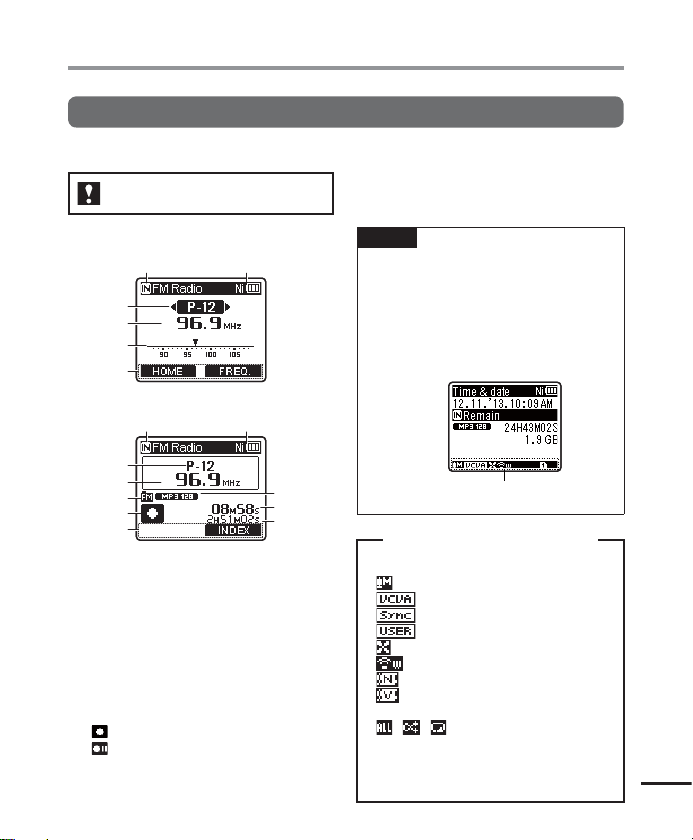
Names of parts
1 2
1 2
Display
4 [
FM Radio
] mode
WS-823 model only
Radio reception display
3
4
5
6
Radio recording display
3
4
7
8
6
1 Recording media indicator
2 Battery indicator
3 Preset number being received
4 Radio frequency being received
5 Radio frequency bar indicator
6 Function button guide display
7 Folder indicator
8 Voice recorder status indicator
[ ]: Recording indicator
]: Recording pause indicator
[
9 Recording format indicator
0 Elapsed recording time
! Possible recording time
TIP
• Pressing and holding the STOP ( 4)
button while the voice recorder is in
stop mode displays the [Time & date]
and [Remain] (amount of possible
recording time remaining) settings. If
the current date/time is set incorrectly,
see “Setting the date/time [Time &
Date]” (☞P.78).
9
0
!
Meanings of indicators shown in indicator
[ ]: Rec Level
[
[
[
]: Low Cut Filter
[
[
[ ]: Noise Cancel
[
[ ] [ ] [ ]: Play Mode
*1 WS-823 model only
*2 WS-823 and WS-822 models only
*3 WS-821 model only
Indicator display area
display area (same for all modes)
]: VCVA
]: V-Sync. Rec
]: Equalizer
]: Zoom Mic
]: Voice Balancer
Voice Filter
*1
*2
*3
Names of parts
EN
7
Page 8
Getting started
Setup
After unpacking the voice recorder, follow the steps below to have it ready for use.
1
Getting
Setup
started
3
Getting
started
3
Getting
started
3
Getting
started
Insert the battery
1
Turn the power ON
2
Select the battery setting
3
Select the battery setting to match the inserted battery. Select the setting
for a nickel-metal hydride rechargeable battery or the setting for an alkaline
battery.
Setting the date/time
4
Set the voice recorder’s clock for use with file management.
EN
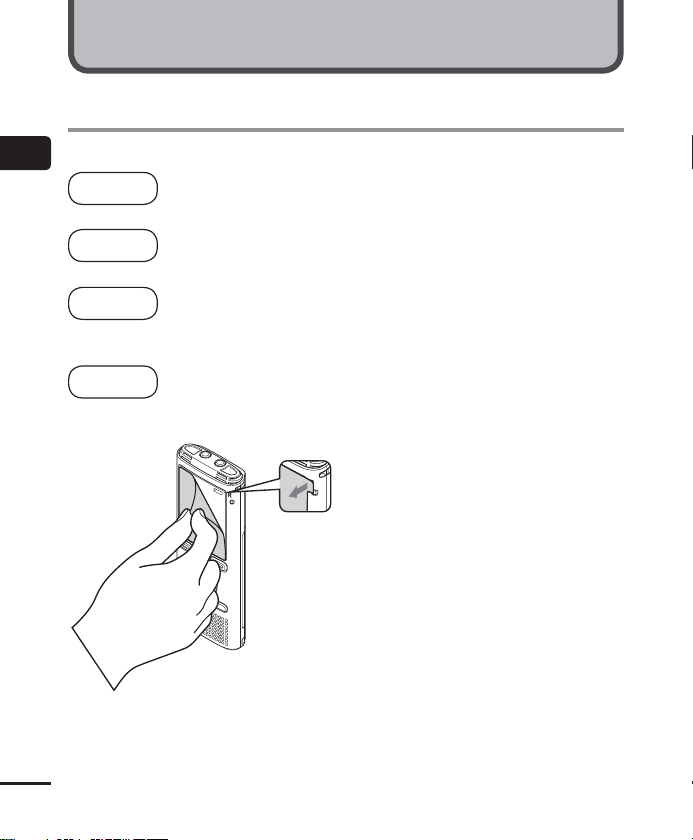
Remove the screen protector
on the display.
8
Page 9
Setup
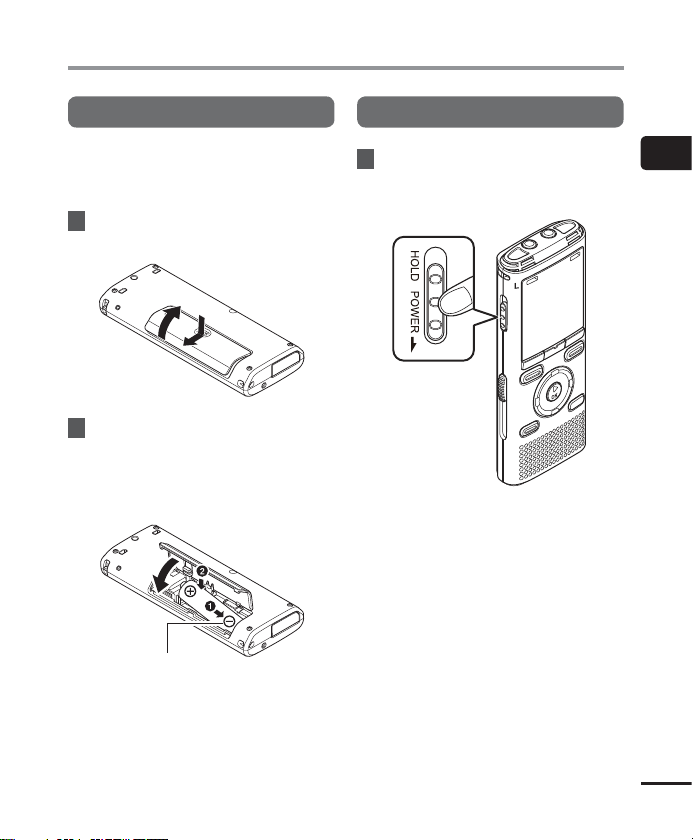
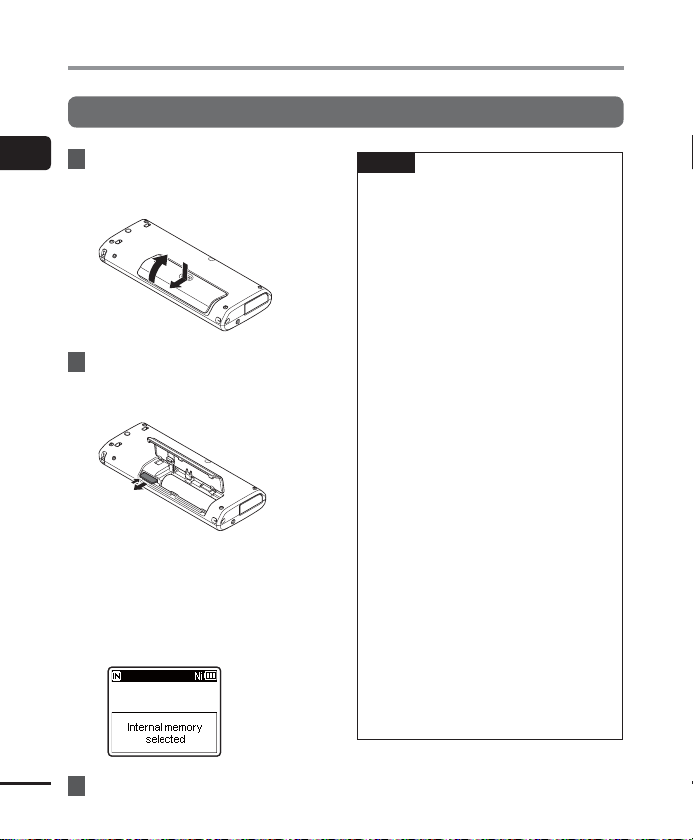
Inserting the battery
Before using the voice recorder, insert the
battery in the battery compartment of the
voice recorder.
1 Slide open the battery/card cover
while lightly pressing down on it.
2 Insert a AAA battery, making
sure its positive and negative
terminals are placed correctly.
Slide the battery/card cover
completely closed.
Insert the battery’s
negative terminal first
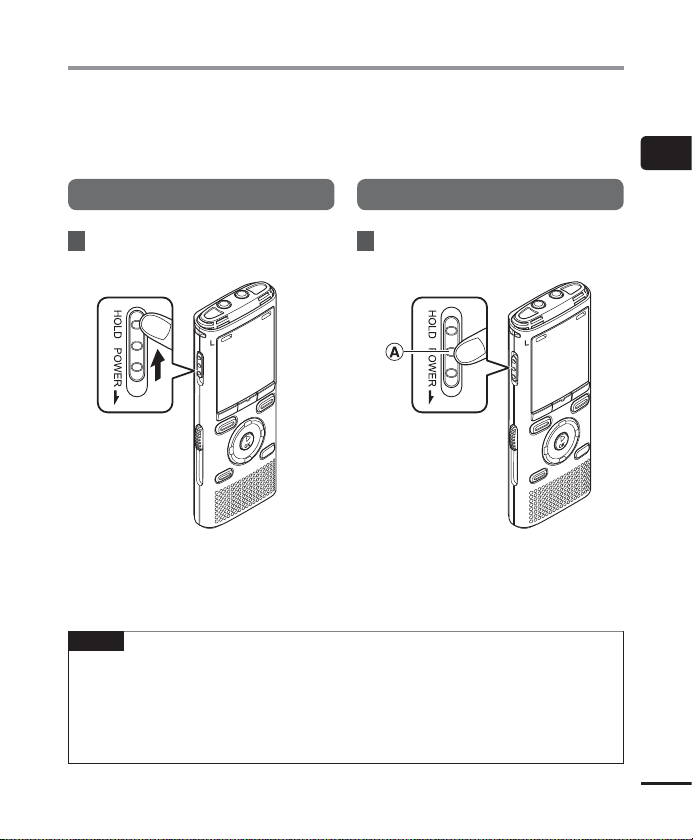
Turn the power ON
1 While the voice recorder is turned
off, slide the
in the direction of the arrow.
POWER/HOLD
switch
POWER/HOLD
switch
1
Setup
EN
9
Page 10
Setup
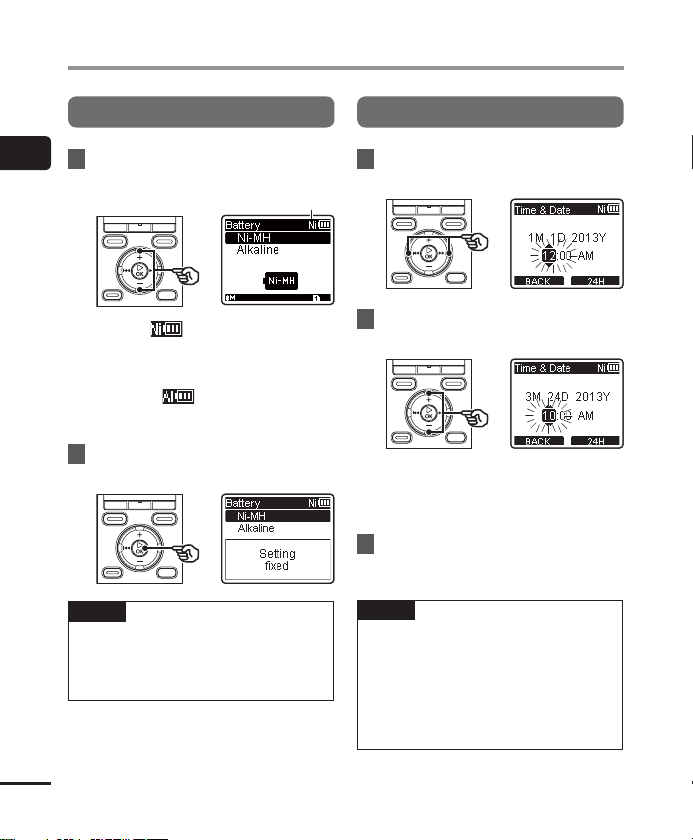
Setting the inserted battery
1
1 Press the +/– button to select the
Setup
type of battery you inserted.
[Ni-MH] ( )
Select if you inserted an Olympus
nickel-metal hydride rechargeable
battery (model BR404).
[Alkaline] (
Select if you inserted an alkaline
battery.
)
2 Press the `OK button to finalize
the setting.
NOTE
• See “Setting the date/time” if a time
display with a blinking cursor on
the hour appears in the display after
setting the battery.
Setting the date/time
1 Press the 9 or 0 button to
select the item to set.
Battery type
2 Press the +/– button to change
the number.
• To change the setting of another item,
press the 9 or 0 button to move
the blinking cursor, then press the + or
– button to change the number.
3 Press the `OK button to finalize
the setting.
TIP
• You can press the `OK button during
the setting procedure to set the items
entered so far and start the clock.
• You can change the clock display
format. See “Setting the date/time
[Time & Date]” (☞ P.78) for the
procedure.
EN
10
Page 11

Charging the battery
Charging the battery by connecting to a PC’s USB connector
WS-823 and WS-822 models
only
NOTE
• Before connecting the USB connector,
release HOLD mode (☞P.19).
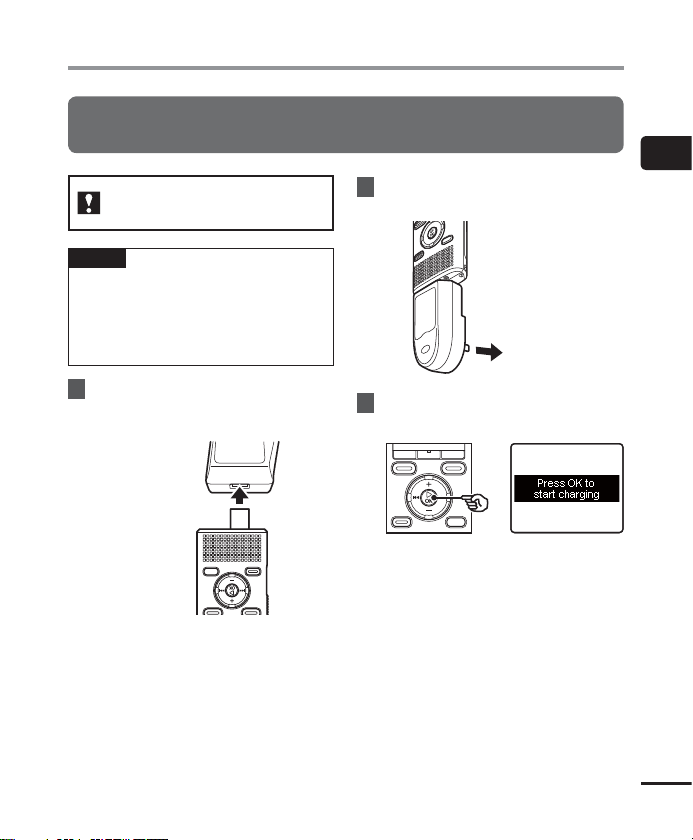
1 Start the PC.
2
Slide the USB connector slide
lever in the direction of the
arrow.
• The USB connector extends out. The
USB connector cover is stored inside
the voice recorder.
3 After making sure the voice
recorder is stopped, connect the
USB connector to a USB port on a
PC.
4 Press the `OK button to start
charging the battery.
• When [Battery] (☞P.77) is set to
[Ni-MH], [Press OK to start charging]
appears on the display. Press the `OK
button while this message is blinking.
1
Charging the battery
EN
11
Page 12
Charging the battery
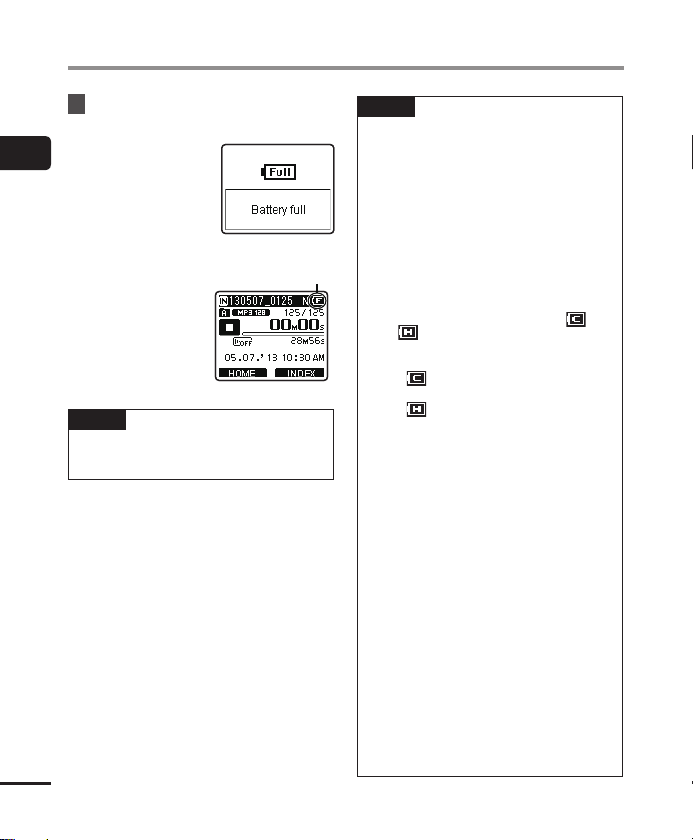
5 Charging has finished when the
battery indicator changes to [ ].
1
Charging the battery
Chargingtime: About 3 hours*
* Approximate time needed to fully
charge a completely flat battery at
room temperature.
Battery charging time will depend on
the amount of remaining power and
the state of the battery.
NOTE
• Never attempt to charge an alkaline
battery, lithium battery or other
primary cell battery. Fluid leakage or
overheating may cause the recorder to
malfunction.
EN
12
Page 13
Charging the battery
Charging the battery by connecting to an AC adapter with a USB connection
(model A514; optional)
WS-823 and WS-822 models
only
NOTE
• Before connecting the AC adapter,
select [AC Adapter] for the USB
connection setting (☞ P.89).
• Before connecting the AC adapter,
release HOLD mode (☞ P.19).
2 Connect the AC adapter to an AC
power outlet.
To an AC power
outlet
1
Charging the battery
1 Connect the voice recorder to
the USB connector on the AC
adapter.
To USB connector
of AC adapter
(model A514)
3 Press the `OK button to start
charging.
• When [Battery] (☞P.77) is set to
[Ni-MH], [Press OK to start charging]
appears on the display. Press the `OK
button while this message is blinking.
EN
13
Page 14
Charging the battery
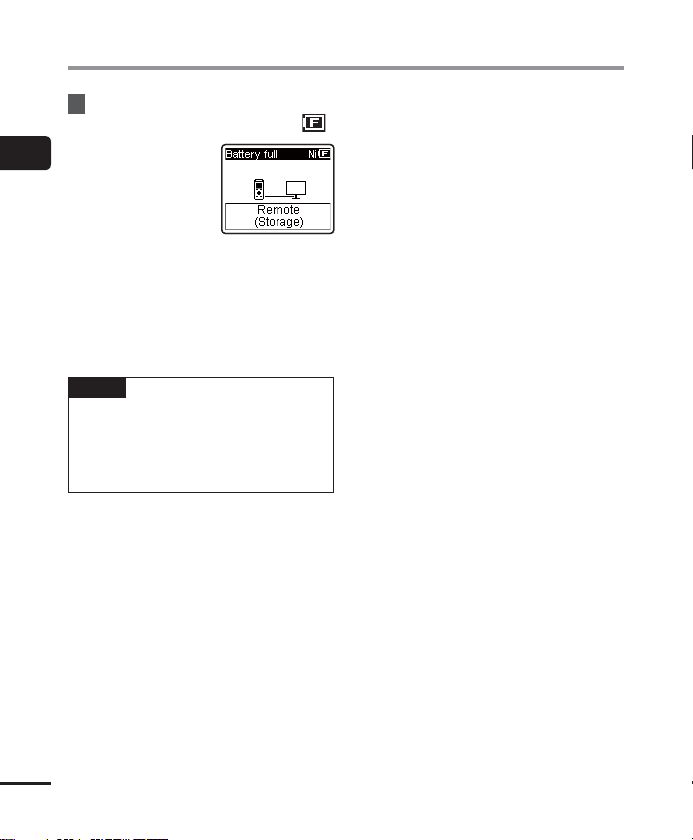
4 Charging is finished when
[
Battery full
1
When charged with
the power turned off
] appears.
Charging the battery
When charged with
the power turned on
NOTE
• Use only the Olympus USB connecting
AC adapter model provided (A514).
EN
14
Displayed when the
battery is fully charged
NOTE
• The power of the PC must be ON to
charge the battery using the USB
connector.
You cannot charge the battery when
the power of the PC is OFF, or the PC
is in standby, sleep or auto power OFF
mode.
• Do not use a USB hub when charging
the battery by connecting to the PC.
• Before charging the battery, insert the
rechargeable battery provided and set
[Battery] to [Ni-MH].
• You cannot charge the battery if [
or [
]*2 is blinking. Charge the battery
in an ambient temperature of between 5
and 35°C (41 and 95°F).
*1 [
] Ambient temperature is too
low.
*2 [
] Ambient temperature is too
high
• If battery life has become noticeably
short on a full charge, replace the
battery with a new one.
• Insert the USB connector securely all
the way. Operation will not be normal if
the connection is not made properly.
• Use the USB extension cable provided if
needed (only for WS-823 model).
• Use only a compatible Olympus USB
extension cable. Operation is not
guaranteed if another manufacturer’s
cable is used. Only use the Olympus
USB extension cable with the voice
recorder and never use if a product
from another manufacturer is used.
• To charge the battery with [USB
Settings] set to [Composite], set [USB
Connection] to [Optional] before
connecting the USB cable.
When you select [AC Adapter] for the
[USB Connection] you can charge the
battery (☞ P.89).
]*1
Page 15
Batteries
Rechargeable batteries
Read the information below carefully when
using a nickel-metal hydride rechargeable
battery (model BR404).
4 Discharging
Rechargeable batteries discharge naturally
when not in use. Be sure to charge the
battery before use.
4 Operating temperature
Rechargeable batteries are chemical-based
products. Their performance can vary
even when used within the recommended
operating temperature range. This variation
is normal.
4 Recommended temperature
ranges
When powering voice recorder: 0 to 42°C
(32 to 107.6°F)
When being charged: 5 to 35°C (41 to 95°F)
During long-term storage: -20 to 30°C (-4
to 86°F)
Use of a rechargeable battery outside the
temperature ranges above may result in
drops in battery performance or life. When
not using the voice recorder for an extended
period, remove the rechargeable battery
before storage to prevent fluid leakage or
rust.
NOTE
• Due to the nature of nickel-metal
hydride rechargeable batteries, new
batteries and batteries not used for an
extended period (one month or more)
may not charge completely. The battery
should become fully charged after
charging and discharging the battery
up to three times.
• Always dispose rechargeable batteries
in the legally prescribed manner. Before
disposing rechargeable batteries that
are not fully discharged, take steps to
prevent shorting such as insulating
their terminals with tape.
Battery indicator
As the battery loses its remaining charge, the
battery indicator on the display changes as
follows:
• [ ] indicates there is little remaining
battery charge. Charge the battery or
replace it with a fresh one. When the
battery has run out, [
low] appear, and operation stops.
] and [Battery
1
Batteries
EN
15
Page 16

Batteries
Battery precautions
• The voice recorder does not support
manganese batteries.
1
• Always turn power off before replacing
Batteries
the battery. Files may be damaged if the
battery is removed while the voice recorder
is recording or performing an operation
such as erasing a file.
• You may need to reset the date/time if
the battery is removed from the voice
recorder for over one minute, or if the
battery is quickly removed and replaced.
See “Setting the date/time [Time & Date]”
(☞P.78) for the procedure.
• When not using the voice recorder for
an extended period, always remove the
battery before storage.
• When replacing the battery, use an AAA
alkaline dry cell battery or an Olympus
nickel-metal hydride rechargeable battery
(model BR404).
• When buying rechargeable batteries,
always select model BR404 nickel-metal
hydride rechargeable batteries. Operation
is not guaranteed. If a battery from another
manufacturer is used.
• Even if the battery indicator is [
playback with the built-in speaker at some
volumes may result in a drop in battery
output voltage, causing the voice recorder
to reset. Lower the volume in this case.
• The continuous battery usage time is
reduced when using a microSD card
(☞P.113).
• The continuous battery usage time will
vary depending on the performance of the
battery in use (☞P.113).
• The continuous battery usage time of
a nickel-metal hydride rechargeable
battery that has been used repeatedly will
be reduced due to battery degradation
(☞P.113).
• The [Battery] screen appears automatically
after you have replaced the battery. You can
also use a menu operation to display this
screen and set the battery (☞P.77).
],
EN
16
Page 17
Inserting/removing a microSD card
The voice recorder has its own internal memory, and also supports standard microSD cards
(microSD, microSDHC) sold separately.
Inserting a microSD card
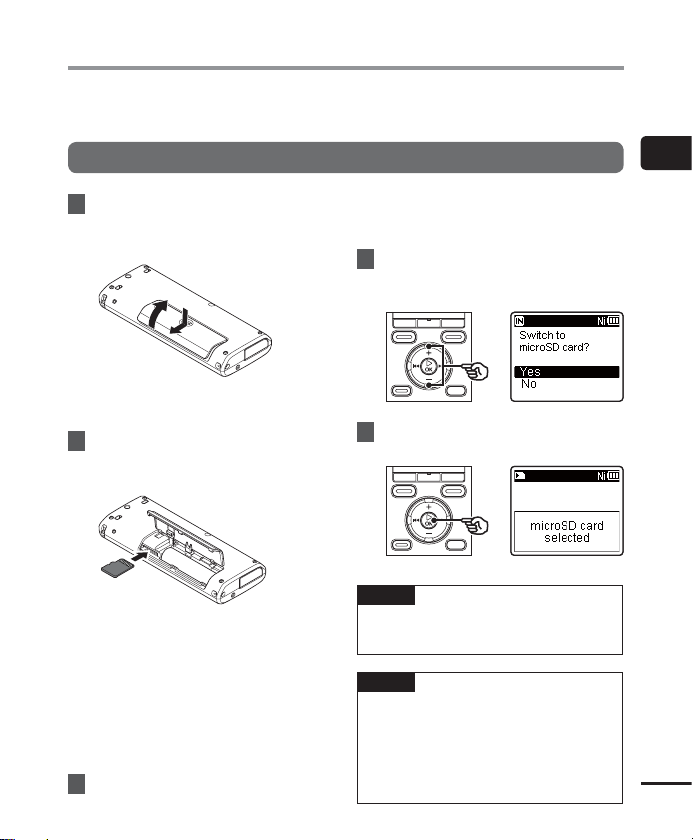
1 While the voice recorder is in
stop mode, open the battery/
card cover.
• The microSD card slot is inside the
battery/card cover.
2
Insert a microSD card, making
sure it is placed correctly as
shown.
• Insert the microSD card straight,
avoiding crooked insertion.
• Inserting a microSD card the wrong
way or crookedly could damage its
contact surface or cause it to jam in
the slot.
• A microSD card not inserted fully (until
it clicks into place) might not record
data.
3 Close the battery/card cover.
• The recording media selection screen
appears after a microSD card has been
inserted.
4 To record onto the microSD card,
press the
[
Yes
+/–
button and select
].
5 Press the `OK button to finalize
the setting.
TIP
• You can also select the internal memory
as the recording media (☞P.77).
NOTE
• The voice recorder may not be able to
recognize a microSD card formatted
(initialized) for a PC or other device.
Before using a microSD card, always
initialize it on the voice recorder
(☞P.91).
1
Inserting/removing a microSD card
EN
17
Page 18
Inserting/removing a microSD card
Removing a microSD card
1
1 While the voice recorder is in
Inserting/removing a microSD card
stop mode, open the battery/
card cover.
2 Release the microSD card by
pressing it inward, then letting it
slowly return.
• The microSD card moves outward and
stops. Pull the microSD card out with
your fingertips.
• [Internal memory selected] is
displayed after removing a microSD
card if [Memory Select] was set to
[microSD card].
NOTE
• MicroSD cards may pop out forcefully
• Depending on the card’s manufacturer
• For microSD card compatibility under
Note that our customer support will
Also note that some cards may
• Read the operating instructions
• If a microSD card is not recognized by
• Processing speed may be low for
on removal if you flick or release your
finger too quickly after pressing the
card in.
and type, some microSD cards and
microSDHC cards may not be fully
compatible with the voice recorder and
not be recognized properly.
Olympus verification, please contact
our customer support at:
http://www.olympusamerica.com
provide information on microSD card
manufacturers and card types for which
Olympus has verified operation, but
will not guarantee it's performance.
no longer be recognized correctly
by the voice recorder in case
card manufacturer changes card
specifications.
provided with the card when using a
microSD card.
the voice recorder, try removing and
reinserting the card to have the voice
recorder attempt recognition again.
some microSD card types. Processing
performance may also be reduced by
writing or deleting data repeatedly
from a microSD card. In this case,
reinitialize the card (☞ P.91).
EN
3 Close the battery/card cover.
18
Page 19
Preventing accidental operation
Setting the voice recorder to HOLD mode maintains the current operation and disables button
operations. HOLD mode is a handy feature for preventing unintentional operation from
accidental button presses when the voice recorder is carried in a bag or pocket. It is also useful
for preventing the voice recorder being accidentally stopped during recording.
Setting HOLD mode
Releasing HOLD mode
1
Preventing accidental operation
1 Slide the
the [
• [Hold] appears in the display, and the
recorder enters HOLD mode.
NOTE
• When any button is pressed during HOLD mode, [Hold] appears in the display for 2
seconds. No other operation is performed.
• Setting HOLD mode during voice recorder playback (or recording) continues the playback
(or recording) operation and prevents any other operation from being performed (the
voice recorder stops when playback ends, or recording stops when there is no more
available memory).
POWER/HOLD
HOLD
] position.
switch to
1 Slide the
position A shown below.
POWER/HOLD
switch to
EN
19
Page 20
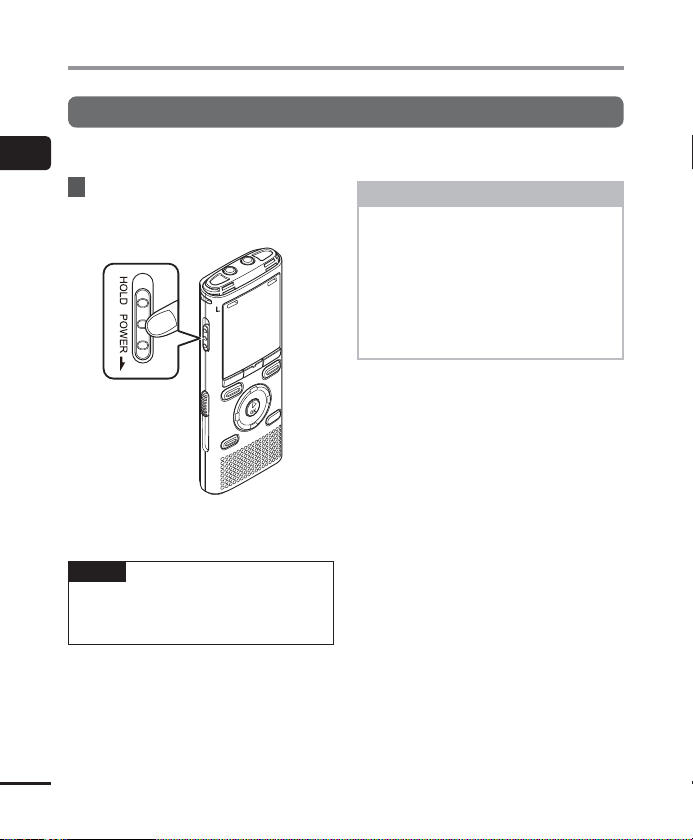
Turning the power OFF
Turning the power OFF
Existing data, mode settings and the clock setting are saved when the power is turned OFF.
1
Turning the power OFF
1 Slide the
the direction of the arrow for at
least half a second.
• The playback stop position at power
TIP
• Turning the power OFF whenever the
voice recorder is not in use minimizes
battery consumption.
POWER/HOLD
OFF is stored in memory.
switch in
Power Save mode
When the voice recorder has been
stopped for at least 10 minutes (default
setting) after power ON, the display
disappears and the voice recorder
automatically enters the Power Save
mode (☞ P.77).
• Pressing any button releases the
Power Save mode.
EN
20
Page 21
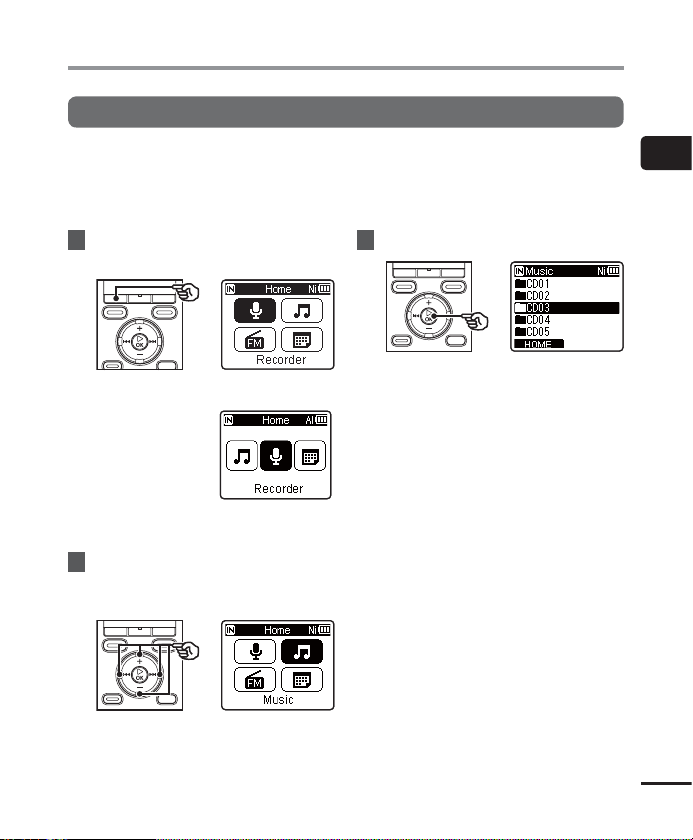
[Home] screen operations
Selecting the mode
In addition to its recording function, the voice recorder also provides music player and FM
radio* functions. Choose the application you want by selecting one of the voice recorder’s
modes.
* WS-823 model only
1 Press the
display the [
F1 (HOME)
Home
button to
] screen.
For WS-823 model
For WS-822 and
WS-821models
3 Press the `OK button.
2 Press the +/–, 9 or 0,
button to select the desired
mode.
1
[Home] screen operations
• In WS-822 and WS-821 models, you
can only use the 9 or 0 button
to select modes.
EN
21
Page 22
[Home] screen operations
When [
Recorder
] is selected
The voice recorder enters
1
[Home] screen operations
When [
Music
[Recorder] mode. Audio
can be recorded with the
built-in microphone.
Files recorded with the
microphone or from the
FM radio* can also be
played back (☞P.26,
P.34).
] is selected
The voice recorder enters
[Music] mode. In this
mode you can play music
files transferred to the
voice recorder (☞P.34).
When [
When [
* WS-823 model only
EN
22
Calendar Search
The voice recorder enters
[Calendar Search]
mode. In this mode you
can search for files by
specifying the recording
date (☞P.44).
FM Radio
]* is selected
The voice recorder enters
[FM Radio] mode. In this
mode you can listen to FM
radio (☞P.48, P.51).
] is selected
Page 23
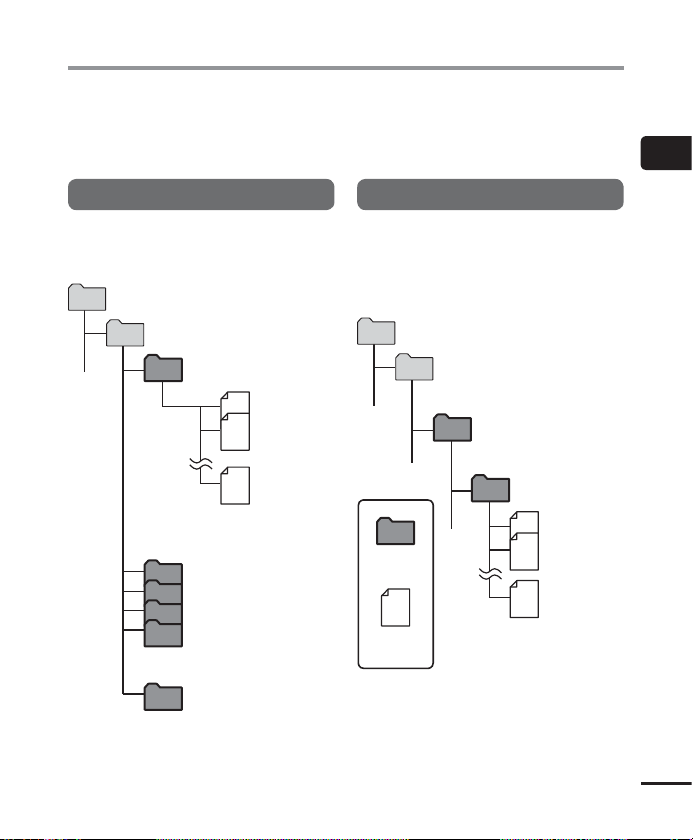
Folders
In addition to its own internal memory, the voice recorder can also use microSD cards as a data
recording media. Sound files, music files and content files stored on either media are saved in
folders arranged in a tree structure. You can specify any playback sequence for the music files in
the [Recorder] and [Music] folder (☞P.61).
Folders for voice recordings
Folders for music playback
1
Folders
Sound files recorded by the voice recorder
are saved in the folders labeled [Folder A] to
[Folder E] in the [Recorder] folder.
Select the mode in the [Home]
Home
screen.
Recorder
Folder A
001
002
200
Each folder can store up to 200 files.
Folder B
Folder C
Folder D
Folder E
Recordings made with the
microphone are saved here.
FM Radio
Recordings from the radio are saved
here (WS-823 model only).
Files and folders placed directly within the
[Recorder] folder (not within one of the sub-folders)
are not displayed by the voice recorder.
When music files created using Windows
Media Player are transferred to the voice
recorder, folders are created automatically for
them within the folder for music playback,
using the hierarchical structure shown below.
Home
Music
First level
Artist 01
Second level
Album 01
001
Folder
File
Up to 300* folders can be created within the [Music]
folder (including a [Music] folder itself).
* Up to 130 folders for WS-821 model.
The voice recorder can only recognize two folder
sublevels.
002
200
Each folder can store
up to 200 files.
EN
23
Page 24
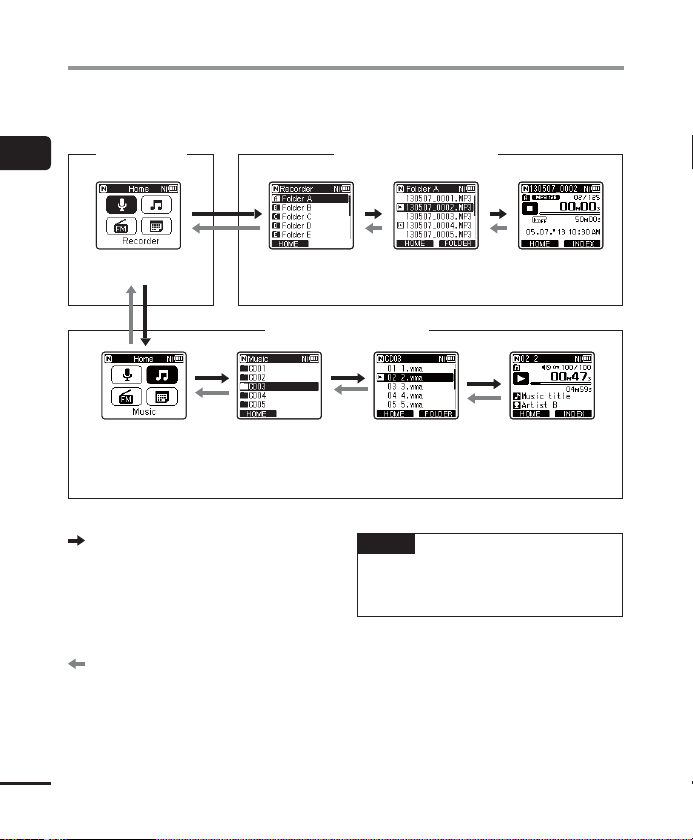
Selecting folders and files
You can select a different folder while the voice recorder is in stopped or playing a file. See
“Folders” (☞P.23) for a description of the voice recorder’s hierarchical folder structure.
[
Home
1
Selecting folders and les
] screen
Folders for voice recordings
EN
Example: WS-823
model
When [Music] mode is selected
Forward: `OK button
Each press of the `OK button opens the
currently selected folder or file in the
list, moving forward to the next (lower)
level in the folder hierarchy. When a list
is displayed, you can perform the same
function by pressing the 9 button.
Back: LIST button
Each press of the LIST button moves back
to the previous (higher) level in the folder
hierarchy. When a list is displayed, you can
perform the same function by pressing
the 0 button.
Folder list
display
Folders for music playback
Folder list
display
File list display File display
File list display File display
TIP
• When navigating through a folder
hierarchy, you can press and hold the
LIST button to return to the file display.
24
Page 25

Selecting folders and files
+/– button
Used to select a folder or file.
[
Home
] screen
Used to select the voice recorder mode
(☞P.21).
List display
Displays the folders and files recorded in
the voice recorder.
Pressing the F2 (FOLDER) button changes
the display to the list display of the next
folder.
File display
Displays the information of the selected file.
1
Selecting folders and les
EN
25
Page 26
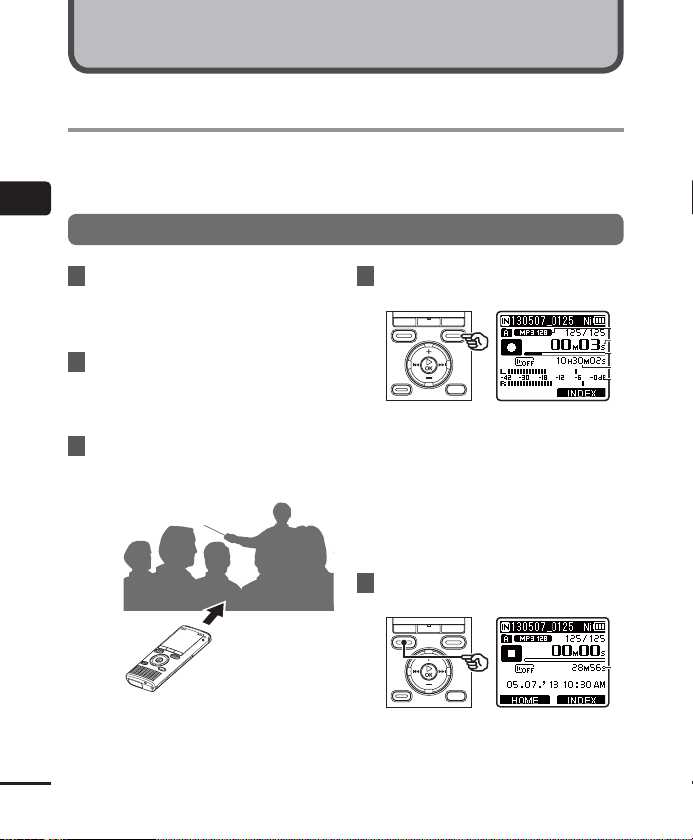
Recording
Recording
The voice recorder has five folders ([&] to [*]) in which recorded files can be saved. These
folders provide a handy way to sort recordings into separate categories (such as business and
leisure).
2
Recording
Basic recording procedure
1 Press the +/–, 0 or 9
button in the [
select [
Home
Recorder
`OK button (☞ P.21).
2
Select the folder to save the
recording in (☞ P.24).
• Each new voice recording file is saved
in the selected folder.
3 Point the built-in microphone
in the direction of the sound to
record.
EN
26
] screen and
], then press the
4 Press the
REC
( s) button to start
recording.
a Rec Mode
b Elapsed recording time
c Remaining memory bar indicator
d Remaining possible recording time
e Level meter (changes according to
recording volume and recording
function setting)
• The LED indicator light lights, and [K]
appears in the display.
5 Press the
STOP
( 4) button when
you want to stop recording.
f File length
• [L] appears in the display.
a
b
c
d
e
f
Page 27
Recording
Sound files recorded with the voice
recorder are automatically given a file
name in the format below.
131001_0001.WMA
123
1 Date recorded
Indicates the year, month and day the
recording was made.
2 File number
Appended file numbers are
consecutive regardless of whether the
recording media has been switched.
3 Extension
A file extension indicating the
recording format the file was recorded
in by the voice recorder.
• Linear PCM format: “.WAV”*
• MP3 format: “.MP3”
• WMA format: “.WMA”
* WS-823 and WS-822 models only
TIP
• [Rec Mode] must be set with the voice
recorder stopped (☞P.81).
• Pressing the REC ( s) button while
[Recorder] is selected on the [Home]
screen will allow you to start recording.
The recorded file will be saved to
[Folder A].
WS-823 model only
• You can record radio broadcasts by
selecting [FM Radio] mode (☞P.56).
• You can adjust the recording level
manually to match your application
(☞P.63).
NOTE
• To prevent the beginning of the
recording being cut off, start recording
after the LED indicator light has lit or
mode indicator has appeared in the
display.
• When the remaining possible recording
time is 60 seconds, the LED indicator
light starts flashing. It flashes more
rapidly as the remaining time decreases
(at the 30- and 10-second points).
• When [Folder full] appears, no more
recording can be done. To record more,
you will need to select a different folder
or delete unneeded files (☞P.46).
• If [Memory full] appears, the voice
recorder has no more available
memory space. You will need to
delete unneeded files to record more
(☞P.46).
• When using a microSD card in the voice
recorder, be sure the desired recording
media setting ([Internal memory]
or [microSD card]) has been selected
(☞P.77).
• If a folder other than folders & to * is
selected when the REC ( s) button is
pressed, the blinking message [Cannot
record in this folder] appears. Redo
the recording operation after selecting
one of folders & to *.
• It’s recommended to initialize the
recording media before making an
important recording.
• Processing performance may
be reduced when data has been
repeatedly written to or deleted from
the recording media. Please initialize
the recording media in this case
(☞P.91).
2
Recording
EN
27
Page 28
Recording
Recording linear PCM format files of over
2 GB
WS-823 and WS-822 models
2
only
Recording
When recording a linear PCM format file,
recording will continue even after the file size
exceeds 2 GB.
• The data is divided and saved in separate
files of up to 2 GB. The files are processed
as multiple files during playback.
• After recording 200 files which exceed 2GB
recording stops.
EN
28
Pausing/resuming recording
1 Press the
recording.
• Recording pauses, and the [≠]
• Recording is stopped automatically
2 Press the
while recording is paused.
• Recording resumes from the position it
REC
( s) button during
indicator appears in the display along
with the blinking message [Rec
pause].
after being paused for at least 60
minutes.
REC
( s) button again
was paused at.
Quickly checking a recording
1 Press the `OK button during
recording.
• [•] appears in the display.
• Recording ends, and the file just
recorded is played.
WS-823 model only
• When this operation is done while
recording in [FM Radio] mode, [Recorder]
mode is automatically selected and the file
just recorded will be played.
Page 29
Recording
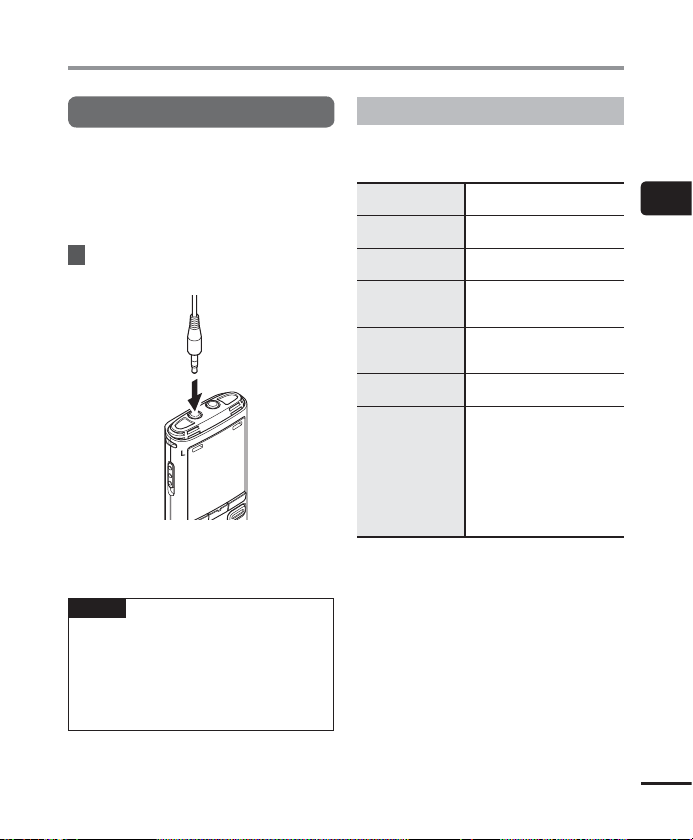
Monitoring while recording
You can monitor the recording as you are
making it by listening on the earphone
plugged into the voice recorder’s EAR jack.
+/– button to adjust the recording
Use the
monitor volume.
1 Connect the earphones to the
voice recorder’s
To EAR
jack
• Changing the volume will not affect
the recording level.
NOTE
• To avoid unpleasantly loud sound, set
the volume to [00] before plugging in
the earphone.
• To prevent feedback, do not place the
earphone near the microphone while
recording.
EAR
jack.
Recording settings
Various recording settings are available,
letting you tailor recording to different
recording conditions.
[
Rec Level
]
(☞P.63)
Rec Mode
[
(☞ P.64)
Zoom Mic
[
(☞ P.64)
[
Low Cut Filter
(☞ P.65)
VCVA
]
[
(☞ P.65)
V-Sync. Rec
[
(☞ P.67)
Rec Scene
[
(☞ P.32)
*1 When [FM Radio] mode is set, [RecMode]
is fixed at one of the settings below
(WS-823 model only).
• [MP3 256 kbps]
• [MP3 128 kbps]
*2 WS-823 model only
Sets the recording sensitivity.
*1
Sets the recording sound
]
quality.
*2
Sets the built-in stereo
]
microphone’s directivity.
Reduces humming sounds
]
from equipment such as
air-conditioners or projectors.
Sets the trigger level for
voice-activated recording
(VCVA).
]
Sets the trigger level for
voice-synchronized recording.
Used to select one of multiple
preregistered templates of
recording settings. When
selected, each template
]
enters several settings
tailored to a particular
recording location or
condition all in a single
operation.
2
Recording
EN
29
Page 30

Recording with an external microphone
Recording with an external microphone
You can record audio input using an external microphone or other device connected to the
voice recorder’s microphone jack. Do not plug or unplug devices into voice recorder jacks while
recording.
2
1 Connect an external microphone
Recording with an external microphone
to the voice recorder’s
To MIC jack
2 Start recording.
• See “Recording” ( ☞P.26) for
descriptions of recording operations.
TIP
• See “Accessories (optional)”
(☞P.105) for the compatible external
microphones.
MIC
jack.
NOTE
• Connecting an external microphone to
the voice recorder’s MIC jack disables
the built-in microphone.
• Microphones with plug-in power
supplies can be used.
• When [Rec Mode] is set to stereo,
recording with an external mono
microphone records on the left channel
only (☞P.64).
• When [Rec Mode] is set to mono,
only the input from the left channel
microphone is recorded when using an
external stereo microphone (☞P.64).
EN
30
Page 31

Recording from another connected device
Recording audio from another
device with this recorder
Audio can be recorded when you have
connected the audio output terminal
(earphone jack) of another device and
the MIC jack of the recorder using the
connecting cord KA333 (optional) for
dubbing.
To MIC
jack
NOTE
• When recording from a connected
external device, perform a test
recording and adjust the output level
of the connected device as needed.
To audio output terminal
of other device
Recording audio from this recorder
with another device
Audio from this recorder can be recorded
to another device by connecting the audio
input terminal (microphone jack) of the other
device and the EAR jack of this recorder using
the connecting cord KA333 (optional).
To audio input terminal
of other device
To EAR
jack
NOTE
• Adjusting playback sound quality
settings on the voice recorder affects
the audio output signals output from
the EAR jack (☞P.69 to P.73).
2
Recording from another connected device
EN
31
Page 32

Changing the recording scene [Rec Scene]
Changing the recording scene
The voice recorder has preregistered templates of optimum settings tailored to various
recording applications such as lectures and dictation. When selecting one of these templates
you can enter several settings recommended for your recording application all in a single
2
operation.
Changing the recording scene [Rec Scene]
1 While the voice recorder is in stop
mode, press and hold the
SCENE
button.
MENU
/
2 Press the `OK button.
TIP
• You can press the 9 button to
display the settings of the selected
template. Press the 0 button to
return to the [Rec Scene] screen.
4 Press the `OK button to finalize
the setting.
5
Press the
STOP
( 4) button to exit
the selection screen.
3 Press the +/– button to select the
desired recording application.
EN
32
Rec Scene
• Press and hold the STOP ( 4) button
when the recorder is stopped to check
setting indicators meanings.
NOTE
• Recording menu settings cannot be
changed when a [Rec Scene] selection
has been made. To use these functions,
you must select [Off] for the [Rec
Scene] setting.
Page 33

Changing the recording scene [Rec Scene]
Preregistered [Rec Scene] settings
[
Lecture
]
[
Rec Level
][
Rec Mode
][
[
[
Zoom Mic
]* [+6]
Low Cut Filter
[
VCVA
[
V-Sync. Rec
[
[
Conference
[
Rec Level
Rec Mode
[
Zoom Mic
[
[
Low Cut Filter
[
VCVA
[
V-Sync. Rec
[
Meeting
[
Rec Level
Rec Mode
[
Zoom Mic
[
Low Cut Filter
[
VCVA
[
V-Sync. Rec
[
][
][
][
]
][
][
]* [
][
][
][
]
][
][
]* [
][
][
][
High
MP3 128 kbps
On
Off
Off
Middle
MP3 128 kbps
Off
On
Off
Off
Middle
MP3 128 kbps
Off
Off
Off
Off
]
]
]
]
]
]
]
]
]
]
]
]
]
]
]
]
]
[
Dictation
]
[
Rec Level
][
Rec Mode
][
[
[
Zoom Mic
]* [
Low Cut Filter
[
VCVA
[
V-Sync. Rec
[
[
DNS
[
Rec Level
Rec Mode
[
Zoom Mic
[
Low Cut Filter
[
VCVA
[
V-Sync. Rec
[
][
][
][
]
][
][
]* [
][
][
][
Low
MP3 128 kbps
Off
On
Off
Off
Low
MP3 128 kbps
Off
Off
Off
Off
* WS-823 model only
]
]
]
]
]
]
]
]
]
]
]
2
Changing the recording scene [Rec Scene]
]
EN
33
Page 34

Playback
Playback
In addition to files recorded by the voice recorder, you can also play files in WAV*, MP3 and
WMA format transferred from a PC.
* WS-823 and WS-822 models only
Basic playback procedure
3
Playback
1 Select the file to play from the
folder containing it (☞P.24).
TIP
• Files are saved in the locations
below.
Files recorded with the built-in
microphone:
[Recorder] folders (folders & to
*)
Files recorded from the radio:
[Recorder] folder ([FM Radio]*
folder)
Music files transferred from a PC:
[Music] folder
* WS-823 model only
2 Press the `OK button to start
playback.
EN
34
a
b
c
d
e
a Recording media indicator, file name
and folder indicator
b Elapsed playback time
c Playback position bar indicator
d File length
e Recording date/time
• [•] appears in the display.
3 Press the +/– button to adjust
the volume to the desired level.
• The volume can be adjusted to a
setting between [00] to [30]. The
higher the number, the louder the
volume.
4 Press the
STOP
( 4) button to stop
playback.
• [L] appears in the display.
• The file being played stops right away.
The resume function automatically
stores the playback stop position in
memory. The position is retained even
if the power is turned OFF. The next
time the power is turned ON, playback
can be resumed from the stop position
stored in the memory.
Page 35

Playback
Playback settings
You can select various file playback methods
tailored to different applications and tastes.
*1 *3
[
Voice Playback
(☞P.69)
Shadowing
[
(☞P.69)
Noise Cancel
[
(☞P.70)
Voice Balancer
[
(☞P.70)
Voice Filter
[
(☞P.71)
Play Mode
]
[
(☞P.71)
*4
Equalizer
]
[
(☞P.73)
[
Skip Space
]
(☞P.73)
Play Scene
[
(☞P.74)
*1 WS-823 and WS-822 models only
*2 WS-821 model only
*3 Function active only in [Recorder] mode.
*4 Function active only in [Music] mode.
Only plays voice portions of
]
a recorded audio file.
Plays segments of files,
]
alternating repeatedly
between playback and
silence.
A setting that makes
recorded voices more
*3
]
discernable when muffled
by projector noise or similar
sounds.
Compensates low-volume
*1 *3
]
portions of recorded audio
files during playback.
Cuts low- and high-
*2 *3
]
frequency components,
emphasizing voices for
greater clarity.
Selecting from among three
playback modes.
Adjusts the quality of sound
as desired.
A handy function for quickly
moving the playback
position, and playing short
segments repeatedly.
Selecting a package of
settings recommended for
]
your recording application
in a single operation.
Improves operability.
Playback through the earphones
You can connect the earphones to the voice
recorder’s EAR jack and listen to playback
through them.
1 Connect the earphones to the
voice recorder’s
To EAR
jack
2 Press the `OK button to start
playback.
TIP
• There will be no sound from the
speaker when the earphones are
connected.
NOTE
• To avoid unpleasantly loud sound, set
the volume to [00] before plugging in
the earphone.
• Avoid excessive volume when listening
to playback through the earphones.
It may cause hearing damage or loss.
EAR
jack.
3
Playback
EN
35
Page 36

Playback
Fast-forwarding
3
Playback
Fast-forwarding while the voice
recorder is in stop mode
1 With the voice recorder stopped,
press and hold the 9 button.
• [ß] appears in the display.
• Fast-forwarding stops when you
release the 9 button. Press the
`OK button to start playback from the
current position.
Fast-forwarding during playback
1 Press and hold the 9 button
during playback.
• Playback starts from the current
position when you release the 9
button.
• If an index mark or temp mark in the
file is reached, fast-forwarding stops at
the mark (☞P.43).
• Fast-forwarding stops when the end
of the file is reached. Press and hold
the 9 button again to fast-forward
from the beginning of the next file.
EN
36
Rewinding
Rewinding while the voice recorder is
in stop mode
1 With the voice recorder stopped,
press and hold the 0 button.
• [™] appears in the display.
• Rewinding stops when you release the
0 button. Press the `OK button
to start playback from the current
position.
Rewinding during playback
1 Press and hold the 0 button
during playback.
• Playback starts from the current
position when you release the 0
button.
• If an index mark or temp mark in the
file is reached, rewinding stops at the
mark (☞P.43).
• Rewinding stops when the beginning
of the file is reached. Press and hold
the 0 button again to rewind from
the end of the previous file.
Page 37

Playback
Skipping to the beginning of a file
Skipping to the beginning of the
next file
1 Press the 9 button while the
voice recorder is in stop mode, or
during playback.
Skipping to the beginning of the
current file
1 Press the 0 button while the
voice recorder is in stop mode, or
during playback.
Skipping to the beginning of the
previous file
1 Press the 0 button when
the playback position is the
beginning of the file.
• To skip to the beginning of the
previous file during playback, press the
0 button twice consecutively.
NOTE
• If an index mark or temp mark
is reached when skipping to the
beginning of a file during playback,
playback starts from the position of the
mark. When skipping to the beginning
of a file while the voice recorder is
in stop mode, the mark is ignored
(☞P.43).
• If a setting other than [File Skip]
is set for [Skip Space], playback
starts after the set amount of time
has been skipped backwards or
forwards. Playback does not skip to the
beginning of the file.
3
Playback
EN
37
Page 38

Playback
Music files
If a music file transferred to the voice recorder
is unplayable, check that its sampling rate,
bit count and bit rate values are within the
supported ranges. The sampling rate, bit
count and bit rate combinations supported
for music file playback by the voice recorder
are shown below.
3
Playback
File format Sampling rate
WAV format* 44.1 kHz 16 bits
MPEG 1 Layer 3:
32 kHz,
44.1 kHz,
MP3 format
WMA format
* WS-823 and WS-822 models only
• MP3 files with variable bit rates (bit rates
converted variably in a single file) may not
play normally.
• Linear PCM-format WAV files are the
only WAV files the voice recorder can
play. Playback of other WAV files is not
supported.
• Even if the file formats is compatible for
playback on this recorder, the recorder does
not support every encoder.
48 kHz
MPEG 2 Layer 3:
16 kHz,
22.05 kHz,
24 kHz
8 kHz,
11 kHz,
16 kHz,
22 kHz,
32 kHz,
44.1 kHz,
48 kHz
EN
38
Bit count/
bit rate
8 to 320 kbps
5 to 320 kbps
Changing the playback speed/tone
(voice changer*)
You can change the playback speed and
audio tone*. Changing the playback speed
is handy for speeding up conference
presentations, or for slowing down parts
difficult to discern when learning a language.
* WS-823 and WS-822 models only
1 Press the `OK button during
playback.
2 Press the +/–, 9 or 0
button.
9 or 0 button:
Adjust the playback speed.
+/– button:
Adjust the audio tone* (voice
changer).
* WS-823 and WS-822 models only
Page 39

Playback
3 Press the `OK button.
Playback speed/
tone indicator
TIP
• When speech is still difficult to discern
after changing the playback speed,
changing the tone may help.
• When the speed/tone changing
function and [Play Scene] function
have both been selected, the [Play
Scene] setting takes precedence.
The [Play Scene] settings cannot be
changed (☞P.74).
• When changing the playback speed/
tone, playback operations such as
stopping playback, skipping to the
beginning of a file, and writing index
marks/temp marks are the same as
during standard playback.
NOTE
• Altered playback speed/tone settings
are retained even after power OFF.
• Changing the playback speed and tone
will make the battery deplete more
quickly.
• The function below cannot be used
when changing the playback speed/
tone.
• [Noise Cancel] (☞P.70)
Fast playback restrictions
Depending on their sampling frequency and
bit rate, some files may not play normally.
In this case, you will need to reduce the
playback speed.
3
Playback
EN
39
Page 40

Playback
ABC repeat playback
The voice recorder has a function that lets you repeat the playback of a portion (segment) of
the file being played. In addition to the A-B repeat function available from previous models, the
segment to repeat can be changed during repeat playback. There is also a shadowing playback
function handy for language learning that can be used during ABC repeat playback. The
[Shadowing] setting must be set to [On] before you can use the shadowing playback function
(☞P.69).
3
Playback
ABC repeat playback
1 Select the starting point for repeat
playback (A) during playback.
2 When the ending point (B) is selected,
repeat playback starts.
3 When the starting point for repeat
playback (A) is canceled during repeat
playback, the ending point of the segment
(B) becomes the new starting point and
playback continues.
4 When the ending point (C) is selected,
EN
repeat playback starts again.
40
5 These steps can be repeated to re-specify
a new segment to be played back
repeatedly up to the end of the file.
1 Select a file for ABC repeat
playback, and start playback.
2
Press the
F1 (ABC)
button when
playback reaches the desired
start position for ABC repeat
playback.
• If [Shadowing] has been set, the [ ]
] indicator appears.
or [
Page 41

Playback
ABC repeat playback
TIP
• You can change the playback
speed (☞P.38), and fast-forward/
rewind (☞P.36) when the [B]
indicator is blinking.
• If playback reaches the end of
the file when the [B] indicator
is blinking, the end of the file
is treated as the segment end
position, and repeat playback
starts.
3 Press the
F1 (SET B)
button again
when playback reaches the
desired end position for ABC
repeat playback.
• Segment A-B is set, and ABC repeat
playback starts.
• If [Shadowing] has been set, the
repeat segment is played with the
volume muted or lowered after it
has been played at the usual volume.
These operations are repeated until
canceled.
Stopping ABC repeat playback:
☞Go to Step
Specifying new starting/ending
points:
☞Go to Step [
]
Specifying new starting/ending
points
4 Press the
F1 (CANCEL A)
during ABC repeat playback.
• Segment A-B is canceled. [ ]
becomes the new start position, and
playback continues.
• You can change the playback speed
(☞P.38), and fast-forward/rewind
(☞P.36).
• The shadowing playback function is
disabled.
button
3
Playback
EN
41
Page 42

Playback
ABC repeat playback
5 Press the
F1 (SET C)
desired end position for ABC
repeat playback.
3
Playback
• Segment B-C is set, and ABC repeat
playback starts.
• The shadowing playback function is
enabled.
TIP
• You can repeat Steps 4 and 5 as
needed to change the repeat
segment as desired.
6 Press the
• Playback stops. The playback segment
specified for this function is retained.
NOTE
• You cannot change the end position
of a repeat playback segment to a
position before the start position.
• You cannot write index marks or temp
EN
marks during ABC repeat playback
(☞P.43).
42
STOP
( 4) button.
button at the
Canceling ABC repeat playback
1
Press the
• If pressed when ABC repeat playback is
• If pressed during ABC repeat playback,
NOTE
• If you change the file or switch to
different display screen, ABC repeat
playback is canceled.
F2 (CNCL ABC)
stopped, cancels ABC repeat playback.
cancels the playback segment setting
for the function, and continues
standard playback.
button.
Page 43

Index marks/temp marks
Writing an index mark or temp mark in a file enables you to quickly access desired position in
the file with the same operations used for fast-forwarding, rewinding or skipping to the start
of a file. Index marks can only be written in files created with Olympus voice recorders. For files
created with other devices, you can temporarily store desired positions in the memory using
temp marks.
Writing an index mark/temp mark
1
When the desired position has
been reached press the F2(
button to write an index mark or
temp mark.
NOTE
• Temp marks are temporary
markings. They are automatically
erased when you select a different
file, transfer the file to a PC, or
move the file on a PC.
• You can write up to 99 index
marks/temp marks in a single
file. The message [No more can
be set] appears if you attempt to
write more than 99 marks.
• You cannot write or erase index
marks/temp marks in files that
have been locked by the file lock
function (☞P.61).
INDEX
Erasing an index mark/temp mark
1
Select a file that contains index
)
mark/temp mark you want to
erase and start playback.
2
Use the 9 or 0 button to
select the index mark/temp mark
you want to erase.
3 When the number of the index
mark/temp mark to erase is being
shown (for about 2 seconds)
in the display, press the
button.
• Any subsequent index marks/temp
marks in the file are automatically
renumbered.
ERASE
3
Index marks/temp marks
EN
43
Page 44

Calendar Search function
Using the Calendar Search function to search for a file
You can search for voice files by specifying a recording date. If you have forgotten in which
folder a file has been saved, this feature lets you access it quickly by entering its recording date.
1 Press the
display the [
3
2
Calendar Search function
Press the +/–, 9 or 0
button to select [
Search
].
• On WS-822 or WS-821 model, use
the 9 or 0 button to select
[Calendar Search].
3 Press the `OK button.
4
Press the +/–, 9 or 0
button to select the desired date.
a Number of files saved (recorded) on
selected date
b Today’s date
c Date file was recorded
d Selected date
EN
44
F1 (HOME)
Home
button to
] screen.
Calendar
a
b
c
d
• Dates on which files were saved are
underlined.
9 or 0 button:
Move to the previous/next date. Press
and hold to skip to the next date on
which a file was recorded.
+/– button:
Move to the previous/next week.
F1, F2 button:
Move to the previous/next month.
• Press the STOP ( 4) button to cancel
the setting and return to the [Home]
screen.
5 Press the `OK button.
6 Press the +/– button to select the
desired file.
7
Press the `OK button to start
playback.
NOTE
• You can only search for files saved in
the folders for voice recording ([&] to
[*] and [FM Radio]* folders).
* WS-823 model only
Page 45

Selecting preset playback settings template [Play Scene]
Selecting a preset playback settings template
This voice recorder has 2 preregistered template [Transcription] and [Language study], with
optimum settings tailored to such playback scenes. Selecting one of these templates lets you
enter several settings recommended for your recording application all in a single operation.
See “ Setting a preset playback settings template” for how to set playback settings packages
(☞P.74).
1 While the voice recorder is in stop
mode or playing a file, press and
hold the
MENU/SCENE
button.
4 Press the +/– button to select the
desired preset playback settings
package.
3
Selecting preset playback settings template [Play Scene]
• If you pressed the MENU/SCENE
button during playback, go to Step
2 Press the +/– button to select
[
Play Scene
].
3 Press the `OK button.
5 Press the `OK button to finalize
[.
the setting.
TIP
• If you selected a preset playback
settings template while the voice
recorder is in stop mode, press the
STOP ( 4) button to exit the menu
screen.
EN
45
Page 46

Erasing files/folders
This section describes how to erase a single unneeded file from a folder, erase all the files in the
current folder at once, or erase a selected folder.
Erasing files
1 Select the file you want to erase
(☞P.24).
3
2
When the file display screen
Erasing les/folders
appears, press the
while the voice recorder is in stop
mode.
• The voice recorder returns to the
stopped mode if no operation is
performed for 8 seconds.
3 Press the +/– button to select [
in folder
[All in folder]:
[One file]:
] or [
One file
Erases all the files saved in the same
folder as the selected file.
Erases only the selected file.
EN
46
ERASE
].
button
4 Press the `OK button.
5 Press the + button to select
[
Start
].
All
6 Press the `OK button.
• [Erasing!] appears in the display, and
the erasing process starts. [Erased]
appears when the process has
finished.
Page 47

Erasing files/folders
Erasing a folder
1 Select the folder you want to
erase (☞P.24).
2
In the folder display screen, press
the
ERASE
button while the voice
recorder is in stop mode.
• The voice recorder returns to the
stopped mode if no operation is
performed for 8 seconds.
3 Press the + button to select
[
Start
].
4 Press the `OK button.
• [Erasing!] appears in the display, and
the erasing process starts. [Erased]
appears when the process has
finished.
NOTE
• Files cannot be restored after being
erased, so please check carefully before
erasing a file.
• When there is a microSD in the voice
recorder, be sure to check whether
the recording media being erased is
[Internal memory] or [microSD card]
(☞P.77).
• Locked files and read-only files cannot
be erased (☞P.61).
• The voice recorder’s default [Recorder]
folders ([FolderA] to [FolderE], and
[FM Radio]* folder) and [Music] folder
cannot be erased.
* WS-823 model only
• [Music] folder subfolders other than
the [Music] can be erased.
• Files unrecognizable to the voice
recorder will not be erased, nor will
folders containing these files. The voice
recorder must be connected to a PC to
erase these files and folders.
• Before erasing a file or folder, charge or
replace the battery to ensure it will not
run out before the process has finished.
Erasing processes can take over 10
seconds to complete. To prevent the
risk of damage to data, never attempt
to perform any of the following
processes before an erasing process
has finished :
1 Disconnecting the AC adapter
2 Removing the battery
3 Removing the microSD card (if the
recording media has been set to
[microSD card]).
3
Erasing les/folders
EN
47
Page 48

FM radio
(WS-823 model only)
Before using the FM radio function
Radio signal reception quality varies substantially depending on where you are using the radio.
Poor reception can often be improved by adjusting the antenna position or orientation, or
moving to a more accessible location for the signal such as a near window.
NOTE
4
• The supplied earphones function as
Before using the FM radio function
EN
an FM antenna. If the earphones are
not connected, the message [Insert
earphone] appears, and FM radio can
not be received.
To EAR
jack
TIP
• You may not be able to receive FM
radio when indoors or in the shadow of
a building. Reception may be improved
by moving near a window when
indoors, or by moving out of building
shadows.
48
NOTE
• FM radio cannot be received when
you are beyond a radio station’s
broadcasting range or when the signal
is blocked by mountains or other
topographical obstructions.
• Even when within broadcasting range,
you may not be able to receive radio
broadcasts in locations prone to signal
reception difficulty (such as within
tunnels, underpasses, office buildings,
apartment buildings and building
shadows).
• Do not use a mobile phone, PC, TV
or other electrical appliance near the
voice recorder when using it to listen
to the radio. Such product may cause
noise.
• Using the voice recorder with a
connected AC adapter (such as model
A514) will generate noise. Always use
batteries for the FM radio function.
Page 49

Presetting radio stations automatically
Presetting a local radio station [By scanning]
Follow the steps below to preset the frequency of an FM radio station you can receive in your
area.
1 Connect the earphones to the
voice recorder’s
2
Press the F1
display the [
3
Press the +/–, 9 or 0
button to select [
4 Press the `OK button.
5
Press the
6 Press the `OK button to move
the cursor to the desired setting
item.
EAR
(HOME)
Home
] screen.
FM Radio
MENU/SCENE
jack.
button to
].
button.
7 Press the +/– button to select
[
Set stations
8 Press the `OK button.
9 Press the +/– button to select [
scanning
10 Press the `OK button.
].
].
4
Presetting radio stations automatically
By
EN
49
Page 50

Presetting radio stations automatically
Presetting a local radio station [By scanning]
11
Press the +/– button to select
[
Start
].
4
Presetting radio stations automatically
12 Press the `OK button.
• When [Set by scanning completed]
appears, the operation is finished.
TIP
• Preset numbers are sorted
automatically by frequency.
• Up to 30 radio stations can be preset.
The message [Preset Full] appears if
you attempt to preset more than 30
stations.
EN
50
Page 51

Listening to FM radio
Listening to FM radio
Follow the steps below to listen to stereo FM radio on the voice recorder.
1 Set FM radio mode by
performing Steps 1 to 4 of the
procedure given in “
Presetting
radio stations automatically
(☞P.49).
2
Press the 9 or 0 button to
select a radio station.
TIP
• By selecting the frequency mode
and manually adjusting the
frequency, you may sometimes be
able to receive a radio station that
was not detected by the automatic
preset operation
• You can add a received radio station
to the preset stations
• To stop listening to FM radio, press
the F1 (HOME) button to return to
the [Home] screen.
• You can listen to the radio through
the voice recorder’s built-in
speaker with the earphones still
connected (☞P.81).
(☞P.52).
(☞P.53).
3 Press the +/– button to adjust
the volume to the desired level.
”
4
Listening to FM radio
• The volume can be adjusted to a
setting between
higher the number, the louder the
volume.
FM radio settings
The FM radio function includes features for
automatically presetting radio stations, and
for setting the scan sensitivity used during
auto reception.
[
Set stations
(☞ P.49)
Scan Level
[
(☞ P.81)
Output
[
(☞ P.81)
]
]
]
[00] and [30]. The
Used to search for local
radio stations and preset
received stations in a list.
Sets the scan sensitivity
during auto reception.
Used to select whether to
listen to FM radio through
the earphones or speaker.
EN
51
Page 52

Listening to FM radio
Selecting the reception mode
Different reception modes can be selected to match different reception conditions. If the radio
station you want to listen to has a signal too weak to be detected by the automatic preset
process, you can select manual reception to adjust the radio frequency manually.
1 Set FM radio mode by
performing Steps 1 to 4 of the
procedure given in “
Presetting
radio stations automatically
4
Listening to FM radio
(☞P.49).
2 Press the F2 button to select the
desired reception mode.
TIP
• When a radio station has been
preset (☞P.49), the voice
recorder switches between preset
mode and frequency mode each
time you press the F2 button.
• You cannot select preset mode if
no radio stations have been preset.
3 Press the 9 or 0 button to
change the reception mode.
Frequency mode (auto reception/manual reception)
• Press the 9 or 0 button to adjust
the FM radio frequency being received
(manual reception).
• Press and hold the 9 or 0 button
to scan to the next radio station found
(auto reception).
b Frequency being received
EN
52
Preset mode
• Pressing the 9 or 0 button lets
”
you select preset radio stations (by
preset number).
a Preset number
• When the frequency of a non-preset
radio station is being received, pressing
the F2 button switches to the preset
station nearest in frequency to the
current frequency.
• Reducing the sensitivity used for
scanning can sometimes enable
reception of stations difficult to receive
due to interference or other problems
(☞P.81).
a
b
Page 53

Adding preset radio stations
Adding a radio station received manually as a preset station [Set manually]
Follow the steps below to add a radio station received in frequency mode as a preset radio
station.
1 Set FM radio mode by
performing Steps 1 to 4 of the
procedure given in “
radio stations automatically
(☞P.49).
2
Press the F2 button to set
frequency mode.
3
Press the 9 or 0 button to
select the radio station you want
to preset.
4
Press the
5 Press the `OK button to move
the cursor to the desired setting
item.
MENU/SCENE
Presetting
”
button.
6 Press the +/– button to select
[
Set stations
7 Press the `OK button.
8 Press the +/– button to select
[
Set manually
9 Press the `OK button.
].
].
4
Adding preset radio stations
EN
53
Page 54

Adding preset radio stations
Adding a radio station received manually as a preset station [Set manually]
10 Press the +/– button to select
[
Save preset
4
Adding preset radio stations
11 Press the `OK button.
• When the message [Preset (number)
saved] appears, the procedure is
finished.
TIP
• Up to 30 radio stations can be preset.
The message [Preset Full] appears if
you attempt to preset more than 30
stations.
• Preset numbers are sorted
automatically by frequency.
].
EN
54
Page 55

Deleting preset radio stations
Deleting an unneeded preset radio station
1 Set FM radio mode by
performing Steps 1 to 4 of the
procedure given in “
radio stations automatically
(☞P.49).
2
Press the F2 button to set preset
mode.
3
Press the 9 or 0 button to
select the preset number of the
radio station you want to delete.
4
Press the
ERASE
Presetting
button.
5 Press the +/– button to select
[
Erase preset
”
].
4
6 Press the `OK button.
• When the message [Preset (number)
erased] appears, the procedure is
finished.
TIP
• Preset numbers are sorted
automatically by frequency.
Deleting preset radio stations
EN
55
Page 56

Recording FM radio
Recording FM radio
Even when FM radio reception is clear, noise may enter after starting to record in certain
reception environments. To avoid such a problem, perform a test recording beforehand. Try to
record in a location with good radio reception.
NOTE
• Recording is disabled when [Output]
in the [FM Menu] menu is set to
4
[Speaker]. Set this item to [Earphone]
before starting recording (☞P.81).
Recording FM radio
1 Set FM radio mode by
performing Steps 1 to 4 of the
procedure given in “
radio stations automatically
(☞P.49).
2
Press the 9 or 0 button to
select the radio station you want
to record from.
EN
56
Presetting
3 Press the
REC
( s) button to start
recording.
a
b
c
d
a
Preset number being received
”
b Radio frequency being received
c Indicator of folder where file will
be saved and Recording format
indicator
d Elapsed recording time and Possible
recording time remaining
• The LED indicator light lights, and [K]
appears in the display.
4 Press the
STOP
( 4) button when
you want to stop recording.
• The recorded file is saved
automatically in the [FM Radio]
subfolder in the [Recorder] folder.
Page 57

Recording FM radio
Recording FM radio
TIP
• Files recorded from FM radio have “FM”
appended to the beginning of the file
name assigned at the time of recording
(☞P.27).
FM130715_0007.MP3
Date: 130715 (July 15, 2013)
NOTE
• When recording FM radio, always
connect the earphones to the EAR jack.
4
Recording FM radio
EN
57
Page 58

Menu
Setting menu items
Basic operation
Menu items are arranged by tabs, letting you quickly set desired items by selecting a tab and
then moving to the desired item within the tab. Follow the steps below to set a menu item.
1 During recording/playback or
while the voice recorder is in stop
mode, press the
button.
MENU/SCENE
5
Setting menu items
TIP
• Some menus contain items that
can be set during recording/
playback (☞P.60).
2 Press the +/– button to select the
tab containing the item you want
to set.
• Moving the cursor from one tab to
another switches the displayed menu
EN
58
screen.
3 Press the `OK button to move
the cursor to the desired setting
item.
• You can also use the 9 button to
perform this operation.
4 Press the +/– button to select the
desired setting item.
Page 59

Setting menu items
Basic operation
5 Press the `OK button.
• The setting of the selected item is
displayed.
• You can also use the 9 button to
perform this operation.
6 Press the +/– button to change
the setting.
7 Press the `OK button to finalize
the setting.
• A message indicating the setting has
been entered appears.
• You can cancel the setting and return
to the previous screen by pressing
the 0 button instead of the `OK
button.
8
Press the
STOP
( 4) button to exit
the menu screen.
• When the menu screen is displayed
during recording or playback, press
the MENU/SCENE button to return to
the previous screen without ending
recording/playback.
NOTE
• For menu settings done while the voice
recorder is in stop mode, the voice
recorder exits the menu and returns to
the stopped mode if no operation is
performed for 3 minutes. The selected
setting item is not changed in this case.
• For menu settings done during
recording/playback, the voice recorder
exits the menu if no operation is
performed for 8 seconds.
5
Setting menu items
EN
59
Page 60

Setting menu items
Basic operation
4 Menu items that can be set
during recording
• Rec Level
• Zoom Mic
• Low Cut Filter
• VCVA
• Backlight
• LED
4 Menu items that can be set
5
Setting menu items
during Playback
• Property
• Noise Cancel
• Voice Balancer
• Voice Filter
• Play Mode
• Equalizer
• Skip Space
• Backlight
• LED
4 Menu items that can be set while
listening to the radio (WS-823
model only)
• Rec Mode
• Set stations
• Scan Level
• Backlight
• LED
• Output
*1 WS-823 model only
*2 Function active only in [Recorder] mode.
*3 WS-823 and WS-822 models only
*4 WS-821 model only
*5 Function active only in [Music] mode.
*6 Cannot be selected while recording from
EN
the radio.
60
*1
*2
*2*3
*2*4
*5
*6
*6
*6
*6
Page 61

File menu [File Menu]
Extracting the speaking portions of
files of spoken-word content [Voice
Detect]
The [Voice Detect] function extracts the
speaking portions of a file of spoken-word
content recorded by the voice recorder.
See “Extracting speaking portions of files
of spoken-word content [Voice Detect]”
(☞P.82) for more information.
WS-823 and WS-822 models
only
Preventing accidental file erasure
[ File Lock]
The file lock feature lets you lock important
files to prevent them being accidentally
erased. Once locked, a file is not erased even
if the operation for erasing all the files in its
folder is performed (☞P.46).
1 Select the file you want to lock
(☞ P.24).
[Lock]:
File is locked.
[Unlock]:
File lock is canceled.
Sorting files [Sort by]
You can change the playback order of the
files in a folder.
1 Press the +/– button to select
[
File name
[
Date descending
[File name]:
Automatically sorts the files by file
name.
[Date ascending]:
Automatically sorts the files by date
(recording date/time) from oldest to
newest files.
[Date descending]:
Automatically sorts the files by date
(recording date/time) from newest to
oldest files.
2 Press the +/– button to select
[
Recorder
[Recorder]:
Sorts all the files in the [Recorder]
folder (including the files in the [FM
Radio]* folder).
[Music]:
Sorts all the files in the [Music] folder.
* WS-823 model only
NOTE
• When [File name] is selected, files
], [
Date ascending
] or
].
] or [
Music
].
are listed in order of file name
based on the first 20 characters of
each name.
5
File menu [File Menu]
EN
61
Page 62

File menu [File Menu]
Moving/copying files [Move/Copy]
Files saved in the internal memory or on a
microSD card can be moved or copied within
memory.
See “Moving/copying files [Move/Copy]”
(☞P.84) for the procedure.
WS-823 and WS-822 models
only
5
File menu [File Menu]
Dividing files [File Divide]
Large files or files with long recording times
can be divided for easier management and
editing.
See “Dividing a file [File Divide]” (☞P.87)
for the procedure.
Displaying file or folder
information [Property]
You can display the information of a file or
folder from a menu screen.
File information
1 Press the +/– button to switch
the screen.
• Information is displayed for the items
[Name], [Date], [Size], [Bit Rate]*1,
*2
and [Album]*2.
[Artist]
*1 If you selected a linear PCM-format
file, the [Bit Rate] item displays the
sampling frequency and bit count.
*2 If the file has no tag information,
[UNKNOWN_ARTIST] and
[UNKNOWN_ALBUM] are displayed.
Folder information
1 Press the +/– button to switch
the screen.
• Information is displayed for the items
[Name], [File] (the number of files) and
[Folder] (the number of folders).
• The [Folder] item is not displayed in
[Recorder] mode.
• Displayed numbers of files do not
include files in formats that are
unrecognizable to the voice recorder.
EN
62
Page 63

Recording menu [Rec Menu]
Selecting the recording sensitivity
[ Rec Level]
You can change the recording level
(sensitivity) as needed for your recording
application.
[High]:
The highest recording sensitivity. Suited
to recording lectures, large conferences
and other applications with distant or
quiet sound sources.
[Middle]:
Suited to recording discussions and
small-group meetings.
[Low]:
The lowest recording sensitivity. Suited
to recording dictation.
[Manual]*:
Lets you set the recording sensitivity
manually, to any of 30 levels.
* WS-823 model only
TIP
• To record the speaker’s voice clearly,
set [Rec Level] to [Low], and place the
voice recorder’s built-in microphone
near the speaker’s mouth (5 to10 cm
away).
NOTE
• When [Rec Level] is set to [High],
[Middle] or [Low], the recording level is
adjusted automatically.
Excessively loud sound input may
generate noise regardless of whether
[Rec Level] is set to [High], [Middle]
or [Low].
Adjusting the recording level
WS-823 model only
1
Adjust the recording level by
pressing the 9 or 0 button
during recording or when
recording is paused.
• Increasing the [Rec Level] number
increases the recording level and
extends the level meter indicator
position.
NOTE
• Setting the voice recorder to [Manual]
disables the limiter function. If [OV] is
displayed, the recorded audio will be
distorted. Adjust the recording level so
that [OV] is not displayed.
5
Recording menu [Rec Menu]
EN
63
Page 64

Recording menu [Rec Menu]
Setting the recording mode
[ Rec Mode]
You can prioritize sound quality or recording
time. Select the recording mode that best
matches your recording application.
[ PCM 44.1 kHz]
[ MP3 256 kbps]
[MP3 192 kbps]
[MP3 128 kbps]
[ WMA 32 kbps mono]
[WMA 8 kbps mono]
5
*1 WS-823 and WS-822 models only
*2 WS-821 model only
Recording menu [Rec Menu]
*3 Mono recording
TIP
• Sound quality increases as the
recording rate value increases.
• Setting a higher recording rate
increases file size. Check that you have
enough remaining memory before
recording.
• To record conferences and
presentations clearly, it is
recommended to set [Rec Mode]
setting to [MP3 128kbps] or above.
NOTE
• When [Rec Mode] is set to stereo,
recording with a connected mono
microphone records on the left channel
only.
*1
*1
*2
*3
*3
Selecting microphone directivity
[ Zoom Mic]
The voice recorder’s built-in stereo
microphone provides directivity ranging from
broad-coverage stereo recording to highly
directional recording.
WS-823 model only
1 Press the +/– button to adjust
the built-in stereo microphone’s
directivity.
• The + button increases directivity.
• The – button enables recordings with
broader-coverage stereo.
• Reducing directivity and broadening
the sound pickup range gives
recordings more of a stereo effect.
• The setting can be adjusted to
between [–3] and [+6].
EN
64
Page 65

Recording menu [Rec Menu]
Selecting microphone directivity
[Zoom Mic]
Zoom mic function
High
directivity
Low
directivity
Narrow sound
pickup range
NOTE
• The [Zoom Mic] function has been set
so as to optimize its performance when
it is used with the voice recorder’s builtin stereo microphone. Note that normal
recording may no longer be possible
when using a separately purchased
microphone or when recording from
another device using a connecting
cord.
• Using the [Zoom Mic] function will
make the battery deplete more quickly.
Broad sound
pickup range
Reducing noise during recording
[Low Cut Filter]
The voice recorder’s low cut filter function
lets you make recordings that reduce
humming sounds from air-conditioners or
low-frequency sounds from equipment such
as projectors.
[On]:
Turns the low cut filter ON.
[Off]:
Turns the low cut filter OFF.
5
Recording menu [Rec Menu]
Voice-activated recording function
[ VCVA]
The voice-activated recording function
(VCVA) automatically starts recording when
a sound louder than a preset voice activation
level is detected, and automatically pauses
recording when the sound volume level
falls. Use this function to automatically omit
unneeded quiet segments when recording
(such as long silences during conferences),
saving memory.
[On]:
Turns VCVA ON. You can adjust the
voice activation level used for VCVA
(☞ P.66).
[Off]:
Turns VCVA OFF. Restores standard
recording.
EN
65
Page 66

Recording menu [Rec Menu]
b
Adjusting the voice activation level for
voice-activated recording
1 Press the
REC
( s) button to start
recording.
• Recording pauses automatically
about 1 second after the input
sound becomes quieter than the set
activation sensitivity.
The blinking message [Standby]
appears in the display. The LED
indicator light becomes lit when
5
Recording menu [Rec Menu]
recording is activated and flashes
when recording is paused.
2 Press the 9 or 0 button to
adjust the voice activation level.
a Voice activation level (moves left/
right to match set level)
b Level meter (changes in proportion
to recording sound volume)
• The setting can be adjusted to
between [01] and [23].
TIP
• Increasing the setting number
increases the VCVA activation
sensitivity, enabling quieter sounds to
activate the start of recording.
• Adjust the VCVA voice activation level
to suit the recording conditions (to
cope with high levels of surrounding
noise or the like).
• To avoid recording mistake, it’s
recommended to perform a test
recording beforehand to adjust the
voice activation level.
WS-823 model only:
• To change the recording level
(☞ P.63) during VCVA recording in
[Manual], press the F1 button. The
voice recorder changes to recording
level adjustment mode. Press the
F1 button again to return to voice
activation level adjustment mode.
a
NOTE
• The following function is disabled
when using the [VCVA] function:
• [V-Sync. Rec] (☞ P.67)
EN
66
Page 67

Recording menu [Rec Menu]
Voice sync recording function
[ V-Sync. Rec]
Adjusting the voice sync level for voice sync
recording
The voice sync recording function
automatically starts recording when a sound
louder than a preset voice sync recording
level (detection level) is detected, and
automatically stops recording when the
sound volume level decreases. When copying
music from another device connected to the
voice recorder, use the voice sync recording
function to detect the silent intervals
between music tracks and save each track as
a separate file.
[1 sec.], [2 sec.], [3 sec.], [5 sec.]:
Set the detection time. The voice
recorder enters standby mode when
the input (recording level) is below the
preset level for at least the set detection
time.
[Off]:
Recording is done normally.
1 Press the
REC
( s) button to
prepare for recording.
2 Press the 9 or 0
button to
adjust the voice sync level.
Voice sync level (moves
left/right to match set
level)
• The voice sync level can be adjusted to
a setting between [01] and [23].
• Increasing the setting number increases
the activation sensitivity, enabling
quieter sounds to activate the start of
recording.
TIP
WS-823 model only
• To change the recording level
(☞P.63) during voice sync level
adjustment in [Manual], press the F1
button. The voice recorder changes to
recording level adjustment mode. Press
the F1 button again to return to voice
sync level adjustment mode.
5
Recording menu [Rec Menu]
EN
67
Page 68

Recording menu [Rec Menu]
3 Press the
• The blinking message [Standby]
• Recording starts automatically if the
TIP
• The voice recorder automatically ends
recording and returns to recording
standby mode when the input sound
5
Recording menu [Rec Menu]
has been below the voice sync level
for at least the set detection time.
Each time the voice recorder enters
standby mode, the current file is closed.
Recording continues in a new file the
next time sound is detected.
• Press the STOP ( 4) button to end a
voice sync recording session.
NOTE
• The following function is disabled
when using the [V-Sync. Rec] function:
• [VCVA] (☞ P.65)
REC
( s) button again.
appears in the display, and the LED
indicator light flashes.
input is louder than the voice sync
level.
EN
68
Page 69

Playback menu [Play Menu]
Skipping non-voice portions during
playback [Voice Playback]
The [Voice Playback] function lets you only
play the speaking portions of a recorded file
of spoken-word content.
WS-823 and WS-822 models
only
NOTE
• The speaking portions of the file must
be extracted beforehand (☞ P.82).
[On]:
Automatically skips the non-voice
portions of the file and plays only the
speaking portions.
[Off]:
The voice playback function is disabled.
NOTE
• The [Voice Playback] function is only
enabled in [Recorder] mode.
Alternating repeatedly between
normal and muted playback
[Shadowing]
The voice recorder’s shadowing playback
function plays a repeat segment set for the
ABC repeat playback function (☞ P.40)
first at normal volume (for listening practice
when learning a foreign language), and then
a second time at muted or low volume (for
speaking practice).
These two operations are repeated in
alternation. This function is handy for use in
language learning.
[Silent]:
Plays the repeat segment with the
volume muted (silent) after playing it
once at normal volume.
[Small volume]:
Plays the repeat segment at low volume
after playing it once at normal volume.
[Off]:
Disables the shadowing playback
function.
NOTE
• Shadowing playback only works with
ABC repeat playback (☞ P.40).
5
Playback menu [Play Menu]
EN
69
Page 70

Playback menu [Play Menu]
Reducing noise during playback
[Noise Cancel]
Use the [Noise Cancel] function to reduce
noise when a recorded voice is difficult to
discern.
[High][Low]:
Reduces surrounding noise, producing
higher sound-quality playback.
[Off]:
The noise cancel function is disabled.
5
NOTE
Playback menu [Play Menu]
• [Noise Cancel] is only enabled in
[Recorder] mode.
• Using the [Noise Cancel] function will
make the battery deplete more quickly.
• The following function is disabled
when using the [Noise Cancel]
function:
• Modified speed/tone* during
playback (☞ P.38)
* WS-823 and WS-822 models only
Adjusting low volume portions
during playback [Voice Balancer]
The [Voice Balancer] function adjusts lowvolume portions of recorded audio files to
make them louder.
Use it to make quiet parts of conversations
or other recorded audio louder and clearer.
The function can be used on files saved in the
audio recording folders ([&] to [*]).
WS-823 and WS-822 models
only
[On]:
Adjusts low-volume portions of audio
files during playback, making them
louder.
[Off]:
The voice balancer function is disabled.
NOTE
• [Voice Balancer] is only enabled in
[Recorder] mode.
• Using the [Voice Balancer] function
will make the battery deplete more
quickly.
• When the [Voice Balancer] function
and [Play Scene] function have both
been selected, the [Play Scene] setting
takes precedence. The [Play Scene]
settings cannot be changed (☞P.74).
EN
70
Page 71

Playback menu [Play Menu]
Emphasizing voice more clearly
[Voice Filter]
During normal playback or fast/slow
playback, the voice filter function cuts
low- and high-frequency range tone and
emphasizes voices, making them more clearly
audible.
WS-821 model only
[On]:
Turns on the voice filter function.
[Off]:
Turns the voice filter function OFF.
NOTE
• [Voice Filter] is only enabled in
[Recorder] mode.
• Using the [Voice Filter] function will
make the battery deplete more quickly.
• When the [Voice Filter] function and
[Play Scene] function have both been
selected, the [Play Scene] setting takes
precedence. The [Play Scene] settings
cannot be changed (☞ P.74).
Selecting playback modes
[Play Mode]
Several playback modes are available for
different listening styles.
1 Press the +/– button to select
[
Recorder
When [
2 Press the +/– button to select
[
File
[File]:
[Folder]:
When [
2 Press the +/– button to select
[
Playback range
[
Random
[Playback range]:
[Repeat]:
[Random]:
] or [
Music
].
Recorder
] was selected
] or [
Folder
].
Stops playback after the current file
has been played.
Plays all the files in the current folder
consecutively, stopping playback after
the last file in the folder is played.
Music
] was selected
], [
Repeat
] or
].
Lets you specify a range of files for
playback.
Repeatedly plays the files in the set
range.
Plays the files in the set range at
random.
5
Playback menu [Play Menu]
EN
71
Page 72

Playback menu [Play Menu]
3 Press the +/– button to select a
setting.
When [
Playback range
[File], [Folder], [All]:
Specify the range of files for playback.
Repeat
] or [
When [
selected:
[On]:
The files in the specified playback
range are played repeatedly or at
random.
[Off]:
Cancels repeat playback and random
5
playback.
Random
Playback menu [Play Menu]
] was selected:
] was
NOTE
• When [Playback range] is set to [File],
[End] blinks in the display for 2 seconds
after the last file in the folder has been
played, then playback stops at the start
position of the last file.
• When [Playback range] is set to
[Folder], [End] blinks in the display for
2 seconds after the last file in the folder
has been played, then playback stops
at the start position of the first file in
the folder.
• When [Playback range] is set to [All],
after the last file in the current folder
has been played, the first file in the
next folder is being played. When
playback reaches the end of the last file
in the voice recorder, [End] blinks in the
display for 2 seconds, then playback
stops at the start position of the first file
in the voice recorder.
EN
72
Page 73

Playback menu [Play Menu]
Changing music sound quality
[Equalizer]
The voice recorder’s equalizer settings can
be changed to change music sound quality
as desired.
When [
User
] was selected
1 Press the 9 button.
2
Press the 9 or 0 button to
select a frequency band.
• You can set different levels for the
[60Hz], [250 Hz], [1 kHz], [4 kHz] and
[12kHz] frequency bands.
3 Press the +/– button to set a
level.
• Levels can be set to values between
[–6] and [+6], in 1 dB increments.
• Increasing a level setting emphasizes
the corresponding frequency band.
• To change another frequency band,
repeat Steps
NOTE
• [Equalizer] is only enabled in [Music]
mode.
2
and 3.
Setting a skip space
[Skip Space]
The [Skip Space] function lets you skip
a preset amount forward (forward skip)
or backward (reverse skip) in a file during
playback. It is handy for quickly moving the
playback position, or for repeated playback of
a short segment.
1 Press the +/– button to select
[
Forward Skip
[Forward Skip]:
Starts playback after moving the
playback position forward by the set
amount.
[Reverse Skip]:
Starts playback after moving the
playback position backward by the set
amount.
2 Press the +/– button to select a
setting.
When [
[File Skip], [10 sec. Skip], [30 sec. Skip],
[1 min. Skip], [5 min. Skip], [10 min.
Skip]
When [
[File Skip], [1 sec. Skip] to
[5sec. Skip], [10 sec. Skip], [30 sec.
Skip], [1 min. Skip], [5 min. Skip]
Forward Skip
Reverse Skip
] or [
Reverse Skip
] was selected:
] was selected:
].
[3 sec. Skip],
5
Playback menu [Play Menu]
EN
73
Page 74

Playback menu [Play Menu]
NOTE
• Forward/reverse skip operations over a
skip space that contains an index mark/
temp mark or the starting position of a
file will stop at that mark or at the start
position.
Forward/reverse skip playback
1
Press the `OK button to start
playback.
5
2
Press the 9 or 0 button
Playback menu [Play Menu]
during playback.
• Playback starts after skipping forward
or backward by the set amount.
Setting a preset playback settings
template [Play Scene]
The voice recorder has 2 preregistered
templates, [Transcription] and [Language
study], with optimum settings tailored to
such playback scenes. With one single step
you can select one of these templates to
enter several settings recommended for your
recording application.
[Transcription]:
Is a handy setting when creating a
written record by transcribing an audio
file of spoken-word content such as
a conference or interview recording.
EN
74
Changes the operations assigned to the
voice recorder’s buttons to operations
tailored to transcription.
[Transcription]
[
STOP ( 4)
][
[
9 (CUE)
]
[
0 (REV)
9 (SKIP)
[
0 (SKIP)
[
Voice Balancer
[
([
Voice Filter
][
][
][
]*2)
*1
]
Auto Back (3 sec)
x3.5 Play Back
[
[
x2.0 Play Back
Reviewing
10 sec. Skip
3 sec. Skip
On
]
[
[Language study]:
Changes the operations assigned to the
voice recorder’s buttons to operations
tailored to language learning.
[Language study]
[
STOP ( 4)
][
[
9 (CUE)
]
[
0 (REV)
9 (SKIP)
[
0 (SKIP)
[
Voice Balancer
[
([
*1 WS-823 and WS-822 models only
*2 WS-821 model only
Voice Filter
][
][
][
]*2)
Stop
]
x2.5 Play Back
[
[
x2.0 Play Back
Reviewing
10 sec. Skip
3 sec. Skip
*1
]
Off
]
[
TIP
• You can press the 9 button to
display the selected template setting.
Press the 0 button to return to the
[Play Scene] screen.
]
*1
]
*2
]
]
]
]
*1
]
*2
]
]
]
]
Page 75

LCD/Sound menu [LCD/Sound Menu]
Setting the backlight [Backlight]
The display backlights are switched on for
a preset amount of time when a button
operation is performed.
[5 sec.], [10 sec.], [30 sec.], [1 min.]:
Set the amount of time that the
backlight stays lit.
[Off]:
Disables the backlight.
Adjusting the contrast [Contrast]
You can adjust the contrast of the display to
12 different levels.
• The setting can be adjusted to between
[01] to [12].
Setting the LED indicator light [LED]
You can set the LED indicator light to not
become lit.
[On]:
LED indicator light is switched on.
[Off]:
LED indicator light stays off.
5
LCD/Sound menu [LCD/Sound Menu]
Turning beeping sound ON/OFF
[Beep]
The voice recorder makes beeping sounds
when buttons are pressed, or to warn in case
of operation errors. You can select whether
the voice recorder makes these beeping
sounds.
[On]:
Enables beeping sounds.
[Off]:
Disables beeping sounds.
EN
75
Page 76

LCD/Sound menu [LCD/Sound Menu]
Changing the display language
[Language]
You can select the language used in the voice
recorder’s displays.
• [English], [Español], [Français].
TIP
• The language selections vary
depending on where the voice recorder
5
LCD/Sound menu [LCD/Sound Menu]
was purchased.
Selecting the speaker output
[Speaker]
You can set the built-in speaker to be ON or
OFF when the earphones are not connected.
When set to [Off], sound will not be output
from the speaker even if the earphones are
accidentally disconnected. Use this setting to
prevent possible embarrassment on public
transport.
[On]:
The voice recorder’s playback sound is
output from the earphones when the
earphones are connected, or from the
built-in speaker when the earphones
are not connected.
[Off]:
The voice recorder’s playback sound is
not output from the built-in speaker
even if the earphones are disconnected.
NOTE
WS-823 model only
• The setting for this function only
applies to file playback. To set
how speaker output is handled
when listening to FM radio, see the
description of the [Output] item in the
[FM Menu] menu (☞ P.81).
EN
76
Page 77

Device menu [Device Menu]
Selecting the recording media
[Memory Select]
When there is a microSD card in the voice
recorder, you can select whether to record on
the internal memory or on the microSD card
(☞P.17).
[Internal memory]:
Records on the internal memory on the
voice recorder.
[microSD card]:
Records on the microSD card.
Setting power save mode
[Power Save]
The voice recorder turns OFF automatically
when a preset amount of time has elapsed
with the voice recorder stopped after power
ON.
[5 min.], [10 min.], [30 min.], [1 hr.]:
Select the desired amount of time.
[Off]:
Disables power save mode. Note that
leaving the voice recorder ON will
quickly deplete the battery.
Setting the battery in use
[Battery]
Set the battery type to match the battery you
are using.
[Ni-MH] ( ):
Select this setting when using an
Olympus Ni-MH rechargeable battery
(model BR404).
[Alkaline] (
Select this setting when using an
alkaline dry cell battery.
):
5
Device menu [Device Menu]
EN
77
Page 78

Device menu [Device Menu]
Setting the date/time
[Time & Date]
Set the date and time beforehand to enable
easier management of recorded files.
If the current date and time are not correct,
set them using the procedure below.
1 Press the 9 or 0 button to
select the desired setting item.
5
Device menu [Device Menu]
2 Press the +/– button to change
the number.
• To change the setting of another item,
press the 9 or 0 button to move
the blinking cursor, then press the + or
– button to change the number.
3 Press the `OK button to finalize
the setting.
TIP
• When setting the hour or minute,
each time you press the F2 button the
display changes between the AM/PM
and 24-hour clock formats.
Example: 10:38 PM
10:38 PM
(default format)
• When setting the year, month or date,
each time you press the F2 button
the display order used for the date
changes.
Example: March 24, 2013
3M 24D 2013Y
(default format)
24D 3M 2013Y
2013Y 3M 24D
NOTE
• Even if the voice recorder is not used
for a long period of time, when the
battery is used up, the date and time
must be re-entered.
22:38
EN
78
Page 79

Device menu [Device Menu]
Setting the USB connection
[USB Settings]
The [PC] setting lets you connect the voice
recorder to a PC to transfer files. The [AC
Adapter] setting lets you connect the voice
recorder to a USB-connection AC adapter
(model A514; optional) to charge the
rechargeable battery. You can change the
USB class setting as required by different USB
applications.
See “Setting the USB connection [USB
Settings]” (☞P.89) for the procedure.
Restoring the default settings
[Reset Settings]
The [Reset Settings] function restores all
the voice recorder’s functions to their initial
(factory default) settings. Time setting and file
number will remain the same.
1 Press the + button to select
[
Start
].
Rec Menu:
Rec Level: Middle
Rec Mode: MP3 128 kbps
Zoom Mic*1: Off
Low Cut Filter: Off
VCVA: Off
V-Sync Rec: Off
Rec Scene: Off
Play Menu:
Voice Playback
Shadowing: Off
Noise Cancel
Voice Balancer
Voice Filter
Play Mode:
Recorder:
Playback range / File
Music:
Playback range / Folder
Repeat / Off
Random / Off
Equalizer
Skip Space:
Forward Skip: File Skip
Reverse Skip: File Skip
Play Scene: Off
*5
*3 *4
: Off
*2*3
: Off
*3
: Off
*2*3
: Off
: Off
5
Device menu [Device Menu]
EN
79
Page 80

Device menu [Device Menu]
LCD/Sound Menu:
Backlight: 10 sec.
Contrast: Level 06
LED: On
Beep: On
Language: English
Speaker: On
Device Menu:
Memory Select: Internal memory
Power Save: 10 min.
Battery: Ni-MH
Alkaline
USB Settings:
USB Connection: PC
5
USB Class: Storage Class
Device menu [Device Menu]
FM Menu
Rec Mode: MP3 128 kbps
Scan level: High
Output: Earphone
*1 WS-823 model only
*2
WS-823 and WS-822 models only
*3 Function active only in [Recorder]
mode.
*4 WS-821 model only
*5 Function active only in [Music] mode.
*2
*4
*1
:
Formatting a recording media
[Format]
Formatting a recording media erases all
existing files saved on it. Be sure to transfer all
important files to a PC before formatting.
See “Formatting recording media [Format]”
(☞P.91) for the procedure.
Checking recording media
information [Memory Info.]
You can display the capacity and remaining
memory space of the recording media from a
menu screen.
NOTE
• Some recording media memory
capacity is used as a management
area, so the actual usable capacity
will always be slightly less than the
displayed capacity.
Checking voice recorder
information [System Info.]
You can display voice recorder information
from a menu screen.
• The voice recorder’s [Model], [Version]
(system version) and [Serial No.]
information is displayed.
EN
80
Page 81

FM menu [ FM Menu]
WS-823 model only
Selecting the recording sound
quality [Rec Mode]
This setting cannot be changed while
recording from FM radio.
[MP3 256 kbps]
[MP3 128 kbps]
Presetting a radio station
[Set stations]
You can preset radio stations to make them
easier to select (☞ P.49, P.53).
Setting scanning sensitivity
[Scan Level]
You can select the scan sensitivity used
during auto reception. This setting cannot be
changed while recording from the radio.
[High]:
Scans for radio stations with high
sensitivity. Use this setting under
normal circumstances.
[Low]:
Scans for radio stations with low
sensitivity. Try using this setting when
there are problems such as interference
between radio stations.
Selecting the FM radio output
[Output]
You can select whether the sound of the FM
radio is output from the earphones or built-in
speaker. This setting cannot be changed
while recording from the radio.
[Earphone]: Always outputs the radio
sound from the earphones. The
radio sound is not output from the
built-in speaker if the earphones are
disconnected.
[Speaker]: Always outputs the radio
sound from the built-in speaker. The
radio sound is not output from the
earphones even if they are connected.
NOTE
• The setting for this function only
applies to the radio sound. To set how
speaker output is handled for file
playback, see the description of the
[Speaker] item in the [LCD/Sound
Menu] (☞P.76).
5
FM menu [FM Menu]
EN
81
Page 82

Extracting the speaking portions of files of spoken-word content [Voice Detect]
Extracting the speaking portions of files of spoken-word content
[Voice Detect]
The [Voice Detect] function extracts the speaking portions of a file of spoken-word content
recorded by the voice recorder.
WS-823 and WS-822 models
only
NOTE
• The [Voice Detect] function can only
5
Extracting the speaking portions of les of spoken-word content [Voice Detect]
EN
82
be used in [Recorder] mode.
1 Select the folder containing the
desired file (☞P.24).
2
Press the
while the voice recorder is in stop
mode.
3
Press the `OK button to move
the cursor into the list of setting
items.
4
Press the `OK button.
5
Press the +/– button to select the
desired file in which you want to
detect voice.
MENU/SCENE
button
6 Press the `OK button.
• The progress of the operation is shown
as a percentage in the display.
• [Voice Detection completed] appears
when the process has finished.
TIP
• When the voice detection process
has finished, the [Voice Playback]
item in the [Play Menu] is set to [On]
(☞ P.69).
Page 83

Extracting the speaking portions of files of spoken-word content [Voice Detect]
Extracting the speaking portions of files of spoken-word content
[Voice Detect]
NOTE
• The message [No file] appears if you
select a folder that doesn’t contain
a saved file. You must select a folder
containing a file before you can
perform the process.
• The voice recorder may not be able to
properly extract non-silent portions
from files of non-spoken word
content such as recorded musical
performances.
• The voice recorder may not be able
to properly extract speaking portions
when they were low in volume when
recorded (level meter readout of -12 dB
or less), or due to surrounding noise.
• The time needed for the extraction
process will increase in proportion to
the size of the recorded file. Before
starting extraction, it’s recommended
to charge or replace the battery to
ensure it will not run out before the
process has finished.
5
Extracting the speaking portions of les of spoken-word content [Voice Detect]
EN
83
Page 84

Moving/copying files [Move/Copy]
Moving/copying files [Move/Copy]
Files saved in the internal memory or on a
microSD card can be moved or copied within
memory.
WS-823 and WS-822 models
only
1
Before performing the move/
5
Moving/copying les [Move/Copy]
copy operation, first select the
folder containing the file you
want to move or copy (☞ P.24).
2
Press the
MENU/SCENE
while the voice recorder is in stop
mode.
3
Press the `OK button to move
the cursor into the list of setting
items.
4
Press the +/– button to select
[
Move/Copy
5
Press the `OK button.
].
button
6 Press the +/– button to select the
desired file movement/copying
method.
[Move to memory]:
Moves one or more files saved in the
internal memory or inserted microSD
card to a different folder in the internal
memory.
[Copy to memory]:
Copies one or more files saved in the
internal memory or inserted microSD
card to a different folder in the internal
memory.
[Move to microSD]:
Moves one or more files saved in the
internal memory or inserted microSD
card to a different folder in the
microSD card.
[Copy to microSD]:
Copies one or more files saved in the
internal memory or inserted microSD
card to a different folder in the
microSD card.
7 Press the `OK button.
EN
84
Page 85

Moving/copying files [Move/Copy]
Moving/copying files [Move/Copy]
8 Press the +/– button to select the
number of files to move or copy.
[One file]: Selects only the specified file
[Selected files]: Lets you select multiple
files.
[All files]: Selects all the files in the
folder.
9 Press the `OK button to continue
to the next setting.
When [
One file
] was selected
1 Press the +/– button to select the
file to move or copy, then press the
`OK button.
When [
Selected files
1 Press the +/– button to select a file
to move or copy, then press the
`OK button.
TIP
• You can deselect a previously
selected file by selecting it and
pressing the `OK button again.
2 Repeat Step 1 to select all the files
you want to move or copy, then
press the F2 button.
] was selected
5
Moving/copying les [Move/Copy]
EN
85
Page 86

Moving/copying files [Move/Copy]
Moving/copying files [Move/Copy]
When [
All files
All the files in the current folder are
selected automatically, and the display
switches to the [Destination] screen.
10
Press the +/–, 9 or 0
button to select the folder to
move or copy the files to.
5
Moving/copying les [Move/Copy]
11 Press the F2 button.
• The progress of the operation is shown
as a percentage in the display.
• [File move completed] or [File copy
completed] appears when the process
has finished.
] was selected
TIP
• Locked files (☞P.61) remain locked
after being moved or copied.
NOTE
• Files cannot be copied if there is
insufficient remaining memory.
• Files cannot be moved or copied if
there are over 200 files.
• To prevent the risk of data damage,
never remove the battery while moving
or copying a file.
• Files cannot be moved or copied within
the same folder.
• When a file moving or copying process
is canceled before completion, the files
that completed the process will have
been moved or copied, and process is
canceled for the other files.
• Files with DRM cannot be moved or
copied.
• Files cannot be moved or copied
directly within the [Recorder] folder.
Instead, select one of the subfolders
within the [Recorder] folder: Folders &
to *, or the [FM Radio]* folder.
* WS-823 model only
EN
86
Page 87

Dividing files [File Divide]
Dividing a file [File Divide]
Large files or files with long recording times
can be divided for easier management and
editing.
NOTE
Only MP3-format and PCM-format* files
recorded on the voice recorder can be
divided.
* WS-823 and WS-822 models only
1 Play the file to divide, and stop
playback at the desired division
point.
• Press and hold the 9 or 0
button to fast-forward/rewind.
• Writing an index mark/temp mark at
the division point beforehand is handy.
2 Press the
MENU/SCENE
button
while the voice recorder is in stop
mode.
3
Press the `OK button to move
the cursor into the list of setting
items.
4
Press the +/– button to select
[
File Divide
5
Press the `OK button.
].
6 Press the + button to select
[
Start
].
7 Press the `OK button.
• [Dividing!] appears in the display, and
the file dividing process starts.
[File divide completed] appears when
the process has finished.
8 Press the
STOP
( 4) button to exit
the menu screen.
5
Dividing les [File Divide]
EN
87
Page 88

Dividing files [File Divide]
Dividing a file [File Divide]
TIP
• After dividing a file, the first half of the
file is given the name “File name_1”
and the second half “File name_2”.
NOTE
• [File Divide] can be performed only
when the file list is displayed.
• Files cannot be divided if there are 200
5
Dividing les [File Divide]
files in the folder.
• Locked files (☞P.61) cannot be
divided.
• It may not be possible to divide some
MP3 or PCM files with extremely short
recording times.
• To prevent the risk of data damage,
never remove the battery while
dividing a file.
EN
88
Page 89

Setting the USB connection [USB Settings]
Setting the USB connection [USB Settings]
The [PC] setting lets you connect the voice recorder to a PC to transfer files. The [AC Adapter]
setting lets you connect the voice recorder to a USB-connection AC adapter (model A514;
optional) to charge the rechargeable battery. You can change the USB class setting as required
by different USB applications.
1 While the voice recorder is in stop
mode, press and hold the
SCENE
button.
2
Press the +/– button to select the
[
Device Menu
3
Press the `OK button to move
] tab.
MENU
/
the cursor into the list of setting
items.
4
Press the +/– button to select
[
USB Settings
5
Press the `OK button.
].
6 Press the +/– button to select
[
USB Connection
[USB Connection]:
Used to set connection to a PC.
[USB Class]:
Used to set the USB class.
] or [
USB Class
7 Press the `OK button.
When [USB Connection] was selected
☞Go to Step
When [USB Class] was selected
☞ Go to Step
TIP
• If the voice recorder is not
recognized by the PC as an
external memory device, select
[Storage Class] for [USB Class].
• If [AC Adapter] is selected for
[USB Connection], the voice
recorder will not be recognized if
connected to a PC.
\
Å
].
5
Setting the USB connection [USB Settings]
EN
89
Page 90

Setting the USB connection [USB Settings]
Setting the USB connection [USB Settings]
When [
USB Connection
8 Press the +/– button to select a
setting.
] was selected
When [
USB Class
] was selected
10
Press the +/– button to select a
setting.
5
Setting the USB connection [USB Settings]
[PC]:
Select to connect the voice recorder
to a PC. The voice recorder will be
connected as a storage or composite
device.
[AC Adapter]:
Select to charge the rechargeable
battery from a PC, or to connect
the voice recorder to an AC adapter
(model A514; optional).
[Optional]:
Select to confirm the connection
method whenever making a USB
connection.
9 Press the `OK button, and go to
Step Î.
EN
90
[Storage Class]:
Select to have the voice recorder
recognized as an external memory
device by a connected PC.
[Composite]:
Select to have the voice recorder
recognized as an external memory
device by a connected PC, and to use
the voice recorder as a USB speaker/
microphone.
11 Press the `OK button, and go to
Step Î.
12
Press the
STOP
( 4) button to exit
the menu screen.
Page 91

Formatting recording media [Format]
Formatting a recording media [Format]
Formatting a recording media erases all existing files saved on it. Be sure to transfer all
important files to a PC before formatting.
1 While the voice recorder is in stop
mode, press and hold the
SCENE
button.
2
Press the +/– button to select the
[
Device Menu
3
Press the `OK button to move
the cursor into the list of setting
items.
4
Press the +/– button to select
[
Format
5
Press the `OK button.
6
Press the +/– button to select the
recording media to be formatted.
7
Press the `OK button.
8
Press the + button to select
[
Start
] tab.
].
].
MENU
/
9 Press the `OK button.
10
Press the + button to select
[
Start
] again.
11
Press the `OK button.
• [Formatting!] appears, and formatting
starts.
• [Format done] appears when the
process has finished.
TIP
• To reset all the voice recorder’s settings
to their default values, use the [Reset
Settings] operation (☞P.79).
5
Formatting recording media [Format]
EN
91
Page 92

Formatting recording media [Format]
Formatting a recording media [Format]
NOTE
• Never format the voice recorder from
a PC.
• Formatting erases all the existing data,
including locked files and read-only
files.
• If there is a microSD card in the voice
recorder, make sure [Internal memory]
or [microSD card] has been correctly
selected as the recording media to
5
Formatting recording media [Format]
EN
92
erase (☞P.77).
• Before formatting, charge or replace
the battery to ensure it will not run
out before the process has finished.
The formatting process can sometimes
take over 10 seconds to complete. To
prevent the risk of damage to data,
never attempt to perform any of the
following processes before a formatting
process has finished:
1 Disconnecting the USB-connection
AC adapter
2 Removing the battery
3 Removing the microSD card (if the
recording media has been set to
[microSD card])
• Even when formatting or erasing
(☞ P.46) is performed, only the
file management information of the
internal memory and/or microSD card
is updated and the recorded data is not
completely erased.
When disposing of a microSD card,
be sure to destroy the card, format
the card and record silence until the
recording time runs out, or perform a
similar operation in order to prevent
the leakage of personal information.
Page 93

Use with a PC
Connecting the voice recorder to a PC lets you:
• Play WMA-, MP3- and WAV*-format
language-learning content and music
files loaded on a PC using Windows Media
Player or iTunes.
* WS-823 and WS-822 models only
• As well as a voice recorder and music
player, you can use this device as a PC’s
external memory device to save or read
data from the PC (☞ P.98).
PC operating environment
Windows
Operating system
Microsoft Windows XP/Vista/7/8
standard installation
PC
Windows PC with at least one available USB
port
NOTE
• The requirements shown are the operating environments needed for using a USB
connection to save files recorded by the voice recorder on a PC.
• Even when the requirements for the operating environment are satisfied, updated
versions, multiboot environments, self-modified PCs and other compatible machines will
not be covered under the operational warranty.
Macintosh
Operating system
Mac OS X 10.5 to 10.8
standard installation
PC
Apple Macintosh series PC with at least one
available USB port
6
PC operating environment
EN
93
Page 94

PC operating environment
PC connection precautions
• When uploading or downloading a file to or from the voice recorder, data transfer will
continue as long as the voice recorder’s LED indicator light is flashing, even if the PC
data communication screen disappears. Never disconnect the USB connector before
data communication has finished. Always use the procedure on ☞P.96 to disconnect
the USB connector. Data may not be transferred correctly if you disconnect the
connector before the drive has stopped.
• Do not format (initialize) the voice recorder’s drive from a PC. Formatting done from a
PC will not be done correctly. Use the voice recorder’s [Format] menu for formatting
(☞P.91).
• Voice recorder folders or files that are moved or renamed in a Windows or Macintosh file
management screen may be reordered or become unrecognizable.
• Note that it will still be possible to read and write data on the voice recorder after
setting the attribute of the voice recorder’s drive to ’Read only’ on a PC.
• To prevent nearby electronic devices being affected by noise, disconnect the external
6
PC operating environment
microphone and earphones when connecting the voice recorder to a PC.
EN
94
Page 95

PC connection/disconnection
Connecting the voice recorder to a PC
1 Start the PC.
2
Slide the USB connector slide
lever in the direction of the
arrow.
• The USB connector extends out. The
USB connector cover is stored inside
the voice recorder.
3 After making sure the voice
recorder is in stop mode, connect
its USB connector to a USB port
on the PC.
• [Remote (Storage)] appears in the
voice recorder’s display when the USB
connector is connected.
• The voice recorder will not connect to
the PC if [AC Adapter] was selected for
the voice recorder’s [USB Connection]
setting. Select [PC] for the [USB
Connection] setting (☞P.89).
TIP
• Windows: The voice recorder is
recognized and displayed in the [My
Computer] folder with the model
name as the drive name. If there is a
microSD card in the voice recorder, it
can be used as the [Removable Disk ].
• Macintosh: The voice recorder is
recognized and displayed on the
desktop with the model name as the
drive name. If there is a microSD card
in the voice recorder, [Untitled] is
displayed.
• For information on the PC’s USB port,
see the PC’s user manual.
• Use the USB extension cable provided if
needed (only for WS-823 model).
NOTE
• The voice recorder must not be in
HOLD mode.
• Insert the USB connector securely all
the way. Operation will not be normal if
the connection is not made properly.
• Connecting the voice recorder through
a USB hub may result in unstable
operation. Do not use a USB hub if
operation is unstable.
• Use only a compatible Olympus USB
extension cable. Operation is not
guaranteed if another manufacturer’s
cable is used. Only use the Olympus
USB extension cable with the voice
recorder and never use it with another
manufacture’s products.
6
PC connection/disconnection
EN
95
Page 96

PC connection/disconnection
Disconnecting the voice recorder from a PC
Windows
1 On the task bar at the bottom-
right of the screen, click [
select [
Safely remove USB Mass
Storage Device
• The letter used to identify the drive
will vary according to your PC.
• When the window indicating it is safe
6
PC connection/disconnection
to remove hardware appears, close the
window.
2 Check that the voice recorder’s
LED indicator light is off before
disconnecting the voice recorder
from the PC.
NOTE
• To prevent the risk of data damage, never disconnect the voice recorder from the USB
port while the LED indicator light is flashing.
].
Macintosh
1 Drag-and-drop the removable
] and
disk icon for the voice recorder
shown on the desktop to the
trash can icon.
2 Check that the voice recorder’s
LED indicator light is off before
disconnecting the voice recorder
from the PC.
EN
96
Page 97

Loading a file to a PC
The voice recorder’s five audio recording folders are displayed on the PC as [FOLDER_A],
[FOLDER_B], [FOLDER_C], [FOLDER_D] and [FOLDER_E]. Recorded audio files are displayed
within these folders (for WS-823 model only, recordings from FM radio are saved in a folder
labeled [FLD_FM]). You can copy voice recorder files to any folder on the PC.
4 Voice recorder drive name and folder names on the PC
Internal memory
Drive name
*1
WS-823
*1 Recognized/displayed by voice recorder drive name
*2 WS-823 model only
RECORDER
MUSIC
Folder names
FOLDER_A
FOLDER_B
FOLDER_C
FOLDER_D
FOLDER_E
FLD_FM
*2
microSD card
Drive name
Removable
disk
Windows
Untitled
Macintosh
RECORDER
MUSIC
Folder names
FOLDER_A
FOLDER_B
FOLDER_C
FOLDER_D
FOLDER_E
FLD_FM
*2
6
Loading a le to a PC
NOTE
• To prevent the risk of data damage, never disconnect the voice recorder from the USB
port while the LED indicator light is flashing.
• WMA-format files cannot be played in the standard Macintosh operating system.
EN
97
Page 98

Usage as external memory of the PC
Connecting the voice recorder to a PC lets you transfer voice recorder data to save in the PC,
and vice-versa.
Windows
1 Connect the voice recorder to the
PC (☞P.95).
2
Open Windows Explorer.
• When you open [My Computer],
the voice recorder is recognized and
displayed with the model name as the
drive name.
3 Click on the folder labeled with
your voice recorder’s model
6
Usage as external memory of the PC
name.
4
Copy the desired data to the PC.
5
Disconnect the voice recorder
from the PC (☞P.96).
Macintosh
1 Connect the voice recorder to the
PC (☞P.95).
• When the voice recorder is connected
to the Macintosh operating system,
it is recognized and displayed on the
desktop with the model name as the
drive name.
2 Double-click the removable disk
icon labeled with your voice
recorder’s model name.
3
Copy the desired data to the PC.
4
Disconnect the voice recorder
from the PC (☞P.96).
NOTE
• During data communication, [Busy] appears in the voice recorder’s display and the LED
EN
indicator light flashes. To prevent the risk of data damage, never disconnect the voice
recorder from the USB port while the LED indicator light is flashing.
98
Page 99

Other information
Alarm message list
Message Meaning Action required
Battery low
File locked
Cannot record in this folder
No more can be set
Folder full
Memory error
Card error
Illegally copied file The music file was copied illegally.
Memory full There is no remaining memory.
The remaining battery power
is low.
An attempt was made to erase a
locked file.
An attempt was made to record
when not in [Recorder] mode.
WS-823 model only
An attempt was made to record in
the [FM Radio] folder.
The maximum number of index
marks (99) have been written in
the file.
The maximum number of temp
marks (99) have been written in
the file.
The maximum number of files
(200) have been saved in the
folder.
An internal memory error
occurred.
The microSD card was not
recognized correctly.
Replace or charge the battery
(☞P.9, P.11).
You must unlock the file before you
can erase it (☞P.61).
Before recording, select [Recorder]
mode and one of the folders from
[Folder A] to [Folder E] (☞P.21,
P.24).
Before recording, select one of the
folders from [Folder A] to [Folder E]
(☞P.23, P.24).
Erase unneeded index marks
(☞P.43).
Erase unneeded temp marks
(☞P.43).
Erase unneeded files (☞P.46).
Contact the Olympus Customer
Support Center (☞back cover).
Remove and reinsert the microSD
card (☞P.17, P.18).
Erase the music file (☞P.46).
Erase unneeded files (☞P.46).
7
Alarm message list
EN
99
Page 100

Alarm message list
Message Meaning Action required
No file There are no files in the folder.
Format error A formatting problem occurred.
Can’t create the system file.
Connect to PC and erase
unnecessary file
Cannot play this file The file’s format is not supported.
Select a file No file has been selected.
Same folder can’t be moved
(copied)
7
Alarm message list
Some files can’t be moved
(copied)
This file can’t be divided.
Insert earphone
The voice recorder is unable to
create a management file due to
low remaining memory.
An attempt was made to move
(copy) a file to the same folder.
A file with the same name as a file
being moved (copied) exists in
the destination folder.
An attempt was made to divide
a file that is not an MP3- or WAVformat file recorded by the voice
recorder.
WS-823 model only
Earphones that function as an
antenna for listening to FM radio
are not inserted.
Select another folder (☞P.23,
P.24).
Format the memory again
(☞P.91).
Connect the voice recorder to a PC
and erase unneeded files.
Select a file that can be played by
the voice recorder (☞P.38).
You must select a file before you can
perform the operation (☞P.23,
P.24).
Select another folder.
Select another file.
Select another file.
Select FM radio mode after inserting
the earphone.
EN
100
 Loading...