

Olympus WS-11 01, WS-21 OS, WS-110, WS-210S Instructions Manual
OLYMPUS®
DIGITAL VOICE RECORDER
WS-11
01WS-21
u INSTRUCTIONS
Thank
you
for
purchasinganOlympus
Digital
Voice Recorder.
these
Please read
about
using
the
Keep
ensure
To
you
Shiniuku Monolith.
3500 Corporate Parkway, P.O,Box 610, Center Valley,PA18034-0610, U.S.A.
(Premises/Goods delivery) Wendenstrasse
Vision House 19 Colonial Way Watford Herts WD24 4JL. Tel. +44(0)
instructions
successful
test
the
record
3·'
OLYMPUS
Nlshi·Shinjuku 2·chome, Shinjuku·ku, Tokyo 163-0914, Japan. Tel. 03-3340-2111
OLYMPUS
OLYMPUS
(Letters) Postfach
instructions
the
product
handy
recordings,werecommend
function
IMAGING
IMAGING
IMAGING
14-18,20097
104908.
OLYMPUSUKLTD.
h»p://www.olympus.com/
for
correctly
and
AMERICA
EUROPA
20034 Hamburg. Germany,
information
and
for
future
volume
CORP.
INC.
GMBH
Hamburg, Germany.
reference.
OS
safely.
before
that
use.
Tel.
'-888-553-4448
Tel.
040-237730
1923831000
For
customersinNorth
DeclarationofConformity
Model Number:
Trade Name:
Responsible Party:
Address:
Telephone Number: 1-888-553-4448
This device Complies with Part 15 of the FCC Rules. Operationissubject to the
following two conditions: (1) This device may not cause harmful interference, and
(2) this device must accept any interference received, including interference that
may cause undesired operation,
and
South
America
WS-110IWS-210S
DIGITAL VOICE RECORDER
OLYMPUS IMAGING AMERICA INC.
3500 Corporate Parkway,
Valley,PA18034-0510,U,S.A.
~
~
TestedToComply
With FCC Standards
P,O.
Box 510, Center
FOR HOME OR OFFICE USE
Canadian
This digital apparatus does not exceed the Class B limits for radio noise emissions
from digital apparatus as set outinthe Radio Interference Regulations of the Canadian
Department of Communications.
Cet appareil numerique ne depasse pas les limites de la Categorie B pour les emissions
de bruit radio emanant d'appareils numeriques, tel que prevu dans les Reglements sur
l'lnterference Radio du Departement Canadien des Communications.
For
-
RFI
customersinEurope
"CE" mark indicates that this product complies with the European
requirements for safety, health,environment and customer protection.
This symbol [crossed-out wheeled bin WEEE Annex IV) indicates separate
collection of waste electrical and electronic equipment in the EU countries.
Please do not throw the equipment into the domestic refuse. Please use the
return and collection systems availableinyour country for the disposal of this
product.
Applicable
Product:
WS-110/WS-210S
-1-
Ul-BS0001-03
AP0804
Introduction
The
contentsofthis
notice.
Contact
ingtoproduct
" The
utmost
document.Inthe
found,
please
..
Any
liability
loss
incurredbya
other
than
reasonsisexcluded
Olympusoran
names
care
contact
for
document
our
Customer
and
has
been takentoensure
unlikely
passive
defectofthe
from
maybechangedinthe
Support
model
event
our
thataquestionable
Customer
damagesordamageofany
product,
Olympus
the
Olympus's
Center
numbers.
Support
authorized
for
the
integrityofthe
Center.
repair
liability.
future
the
performedbythe
service
without
latest
information
item,
kind
contentsofthis
error,oromission
occurred
station,orany
Trademarks
IBM
and
PC/AT are
of
International
Microsoft,
trademarksofMicrosoft
Macintoshisa
Safe
Before
using
know
howtooperateitsafely
sible
location
• The
warning
yourself
that
you
the
trademarksorregistered
Business
Windows
and
and
always
and
Windows
Corporation.
trademarkofApple
ProperUsage
your
new
recorder, read
for
future
reference.
symbols
others
read
indicate
from
the
Machines
and
important
personal
warnings
Corporation.
Media are
computer
this
correctly.
injuryordamagetoproperty,itis
and
trademarks
registered
Inc.
manual
Keep
this
safety
related
information
carefullytoensure
manualinan
information.Toprotect
provided.
GeneralPrecautions
if}
Do
not
leave
the
under
direct
Do
not
store
lil
Do
not
use
'"Donot
place
tors.
I>
Avoid
recordingorplaying
they
may
move
the
..
Avoid
sandordirt.
..
Avoid
strong
Do
not
disassemble,
Do
not
operate
cart).
lIi Keep
the
<Warning
Recorded
unit
malfunction,orduring
Itisrecommendedtobackupand save
computer
a
Any
liability
loss
incurredbya
than
Olympusoran
excluded
recorderinhot,
sunlightoron
the
recorderinplaces
organic
solvents
the
recorderontopofor
cause
interference
recorder
further
These
vibrationsorshocks.
repairormodify
the
unit
while
unit
outofthe
regarding
contentinmemory
hard
for
from
data
disk.
passive
defectofthe
Olympus
the
Olympus's
reachofchildren.
Battery
Lf',Warning
Undernocircumstances
tery
compartment.
plosion.
Battery
should
sembled.
not
attempttorecharge
Do
tery.
use
Never
battery
Keep
Ifyou
notice
heat, smoke,
CD
remove the battery immediately while being careful nottoburn yourself. and;
@call
your dealer or local Olympus representative for servicing.
This
neverbeexposedtoflame, heated,
any
battery
outofthe
anything
unusual when
oraburning
humid
locations
the
beachinthe
exposedtoexcessive
suchasalcohol
back
and
away
can
loss>
repair
damagesordamageofany
insert
may
withatornorcracked
reachofchildren.
near
near
cellular
noise.Ifyou
from
such
cause
irreparable
the
operatingavehicle
maybedestroyedorerasedbyoperating
authorized
liability.
alkaline,
odor:
unit
work.
product,
any
other
resultinbattery
lithiumorany
using
suchasinsideaclosed
summer.
and
lacquer
electric
appliances
phonesorother
experience
equipment
important
repair
.
damage.
yourself.
(suchasa
contenttoother
performedbythe
service
station,orany
parts
than
leakage,
outer
this
product
moistureordust.
thinnertoclean
suchasTVsorrefrigera-
noise,
movetoanother
bicycle,
kind
the
main
overheating,
short-circuitedordisas-
other
non-rechargeable
cover.
suchasabnormal
-2-
wireless
motorcycle,orgo·
occurred
third
other
unit
advanced
duetodata
third
that
easily
essential
automobile
the
unit.
equipment,
place,
mistakes,
media
such
duetodata
party
reasons
into
the
fireorex-
relat-
party
other
you
acces-
as
other
bat-
bat-
noise,
wi
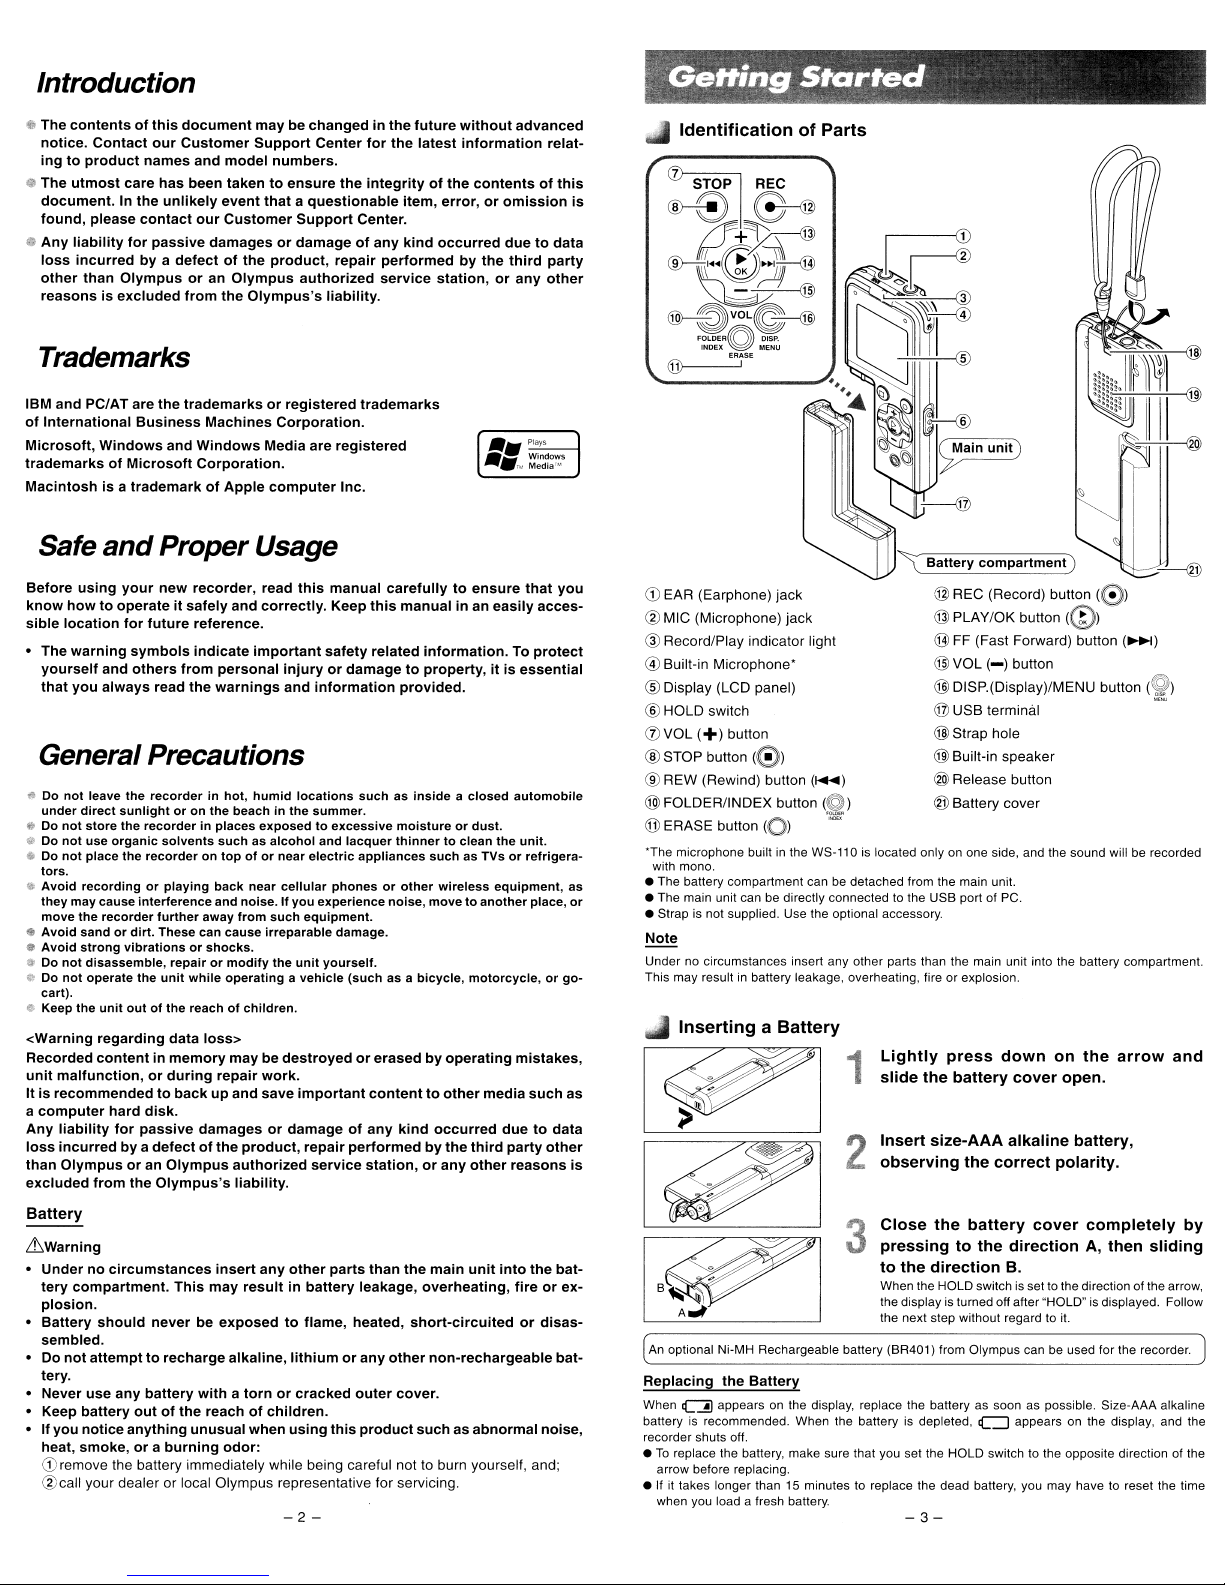
IdentificationofParts
is
STOP REC
® E) G @
?f+~
~~{~
~~~~~
~-'----'----@
@-----~VOLC-@
FOLDER~
~SE
CD
EAR (Earphone) jack
@ MIC (Microphone) jack
@ Record/Play indicator light
@ Built-in Microphone"
® Display (LCD panel)
® HOLD switch
CV
VOL
(+)
®STOP button
® REW (Rewind) button
@FOLDERIINDEX
@ ERASE button
'The
microphone built in the WS-11 0islocated only on one side, and the sound will be recorded
with mono.
as
or
• The battery compartment can be detached from the main unit.
• The main unit can be directty connected to the USB port of PC.
• Strap is nof supplied. Use the optional accessory.
Note
Under no circumstances insert any other parts than the main unit into the battery compartment.
This may result in battery leakage, overheating, fire or explosion.
..I
InsertingaBattery
I?
is
I~
I
,VI
An
optional Ni-MH Rechargeable battery (BR401) from Olympus can be used for the recorder.
Replacing
When
~
battery
is
recorder shuts off.
•
To
replace the battery, make sure that you set the HOLD switch to the opposite direction of the
arrow before replacing.
• If
it
takes longer than 15 minutes to replace the dead battery, you may have to reset the lime
when you load a fresh battery.
DISP.
INDEX~MENU
"'\
Battery
compartment)
@ REC (Record) button
@PLAY/OK
@
FF
@ VOL
@ DISP.(Display)/MENU button
button
(Fast Forward) button
(-)
button
@ USB terminal
button
(0)
(1+01)
button
(0)
(0)
'~~"
1
2
3
the
Battery
appears on the display, replace the battery as soon as possible. Size·AAA alkaline
recommended. When the battery is depleted,
@Straphole
@ Built-in speaker
® Release button
@ Battery cover
Lightly
slide
Insert
observing
Close
pressingtothe
to
When the HOLD switchisset to the direction of the arrow,
the display is turned off after "HOLD" is displayed. Follow
the next step without regard to it.
the
the
press
battery
size-AAA
the
the
battery
direction
c=J
down
cover
alkaline
correct
cover
directionA,then
B.
appears on the display, and the
(0)
(@)
on
the
open.
battery,
polarity.
completely
(~)
(0)
"'~
arrow
sliding
-3-
and
by
• Power
Supply
Recording
Slide tlleH.OLD
Power
Power
Standby Mode and DisplayShut
If the recorderisstopped for 5 minutesorlonger during recording or playing, it goes
into Standby (power-save) mode, and the display shuts off.
turn on the display, press any button.
..
Hold
Setting the HOLD switch to the direction of the
button operations are disabled. This feature is useful when the recorder is carried in a
handbag
Notes
e Setting the HOLD switch to the direction of the arrow during playback will turn off the
display at the time when playback of the current file ends.
e Setting the HOLD switch to the direction
display and finish recording at the time when the remaining recording time reaches to
zero.
..
Setting Time/Date (Time & Date)
If you have set the time and date, information as to when a sound file was recorded is
stored automatically with that file.
When using the recorder for the first time, or after the battery has been taken out for
a log period of time, the "year" indication will flash.
time and date by following steps
In~!catedl;lyth.
O.N
~
The:dlsplay
The
resume
positio~
i.runemOrv~before
SIIJift
he
arrow
OFF
~~1"he
or
pocket. Remember to release the HOLD switch to use the recorder.
Wh!Ie'tI18
dlsplay
TheT~suri1efuriqtion
tU'1:!ed
po"!'er is
a~wlt~h
;
arrow.;
WilfAlJin'
luilCtiOri'
HOLD
awltchln
nM:Qrderia
~uts
Off
oU.· .
4 through 6 described below.
In,:
'.~~'
orrand the power
will
brin$l
power was'turned off! '
the
n0tJlI
aildthejl9\yer
remembers
Off
of
the arrow during recording will turn off the
th~
~Ir.ctlon
..
.'
f
tfie
recol'd8f
will
.-,:,
be
0Jl,poalte t.!lat
MnM
on,
baG!<.l()
the stop
·t
d!.reCtion.~ndlcated
Operatlon:~'
will
betumed
the~
stop
~...~
arrow
~ition
'f
To
holds the current status, and all
In
such a case, be sure to set the
by
off.
before the
'.,
exit Standby mode and
!
.th,l~
,t;;;.}
~
HOLD switch
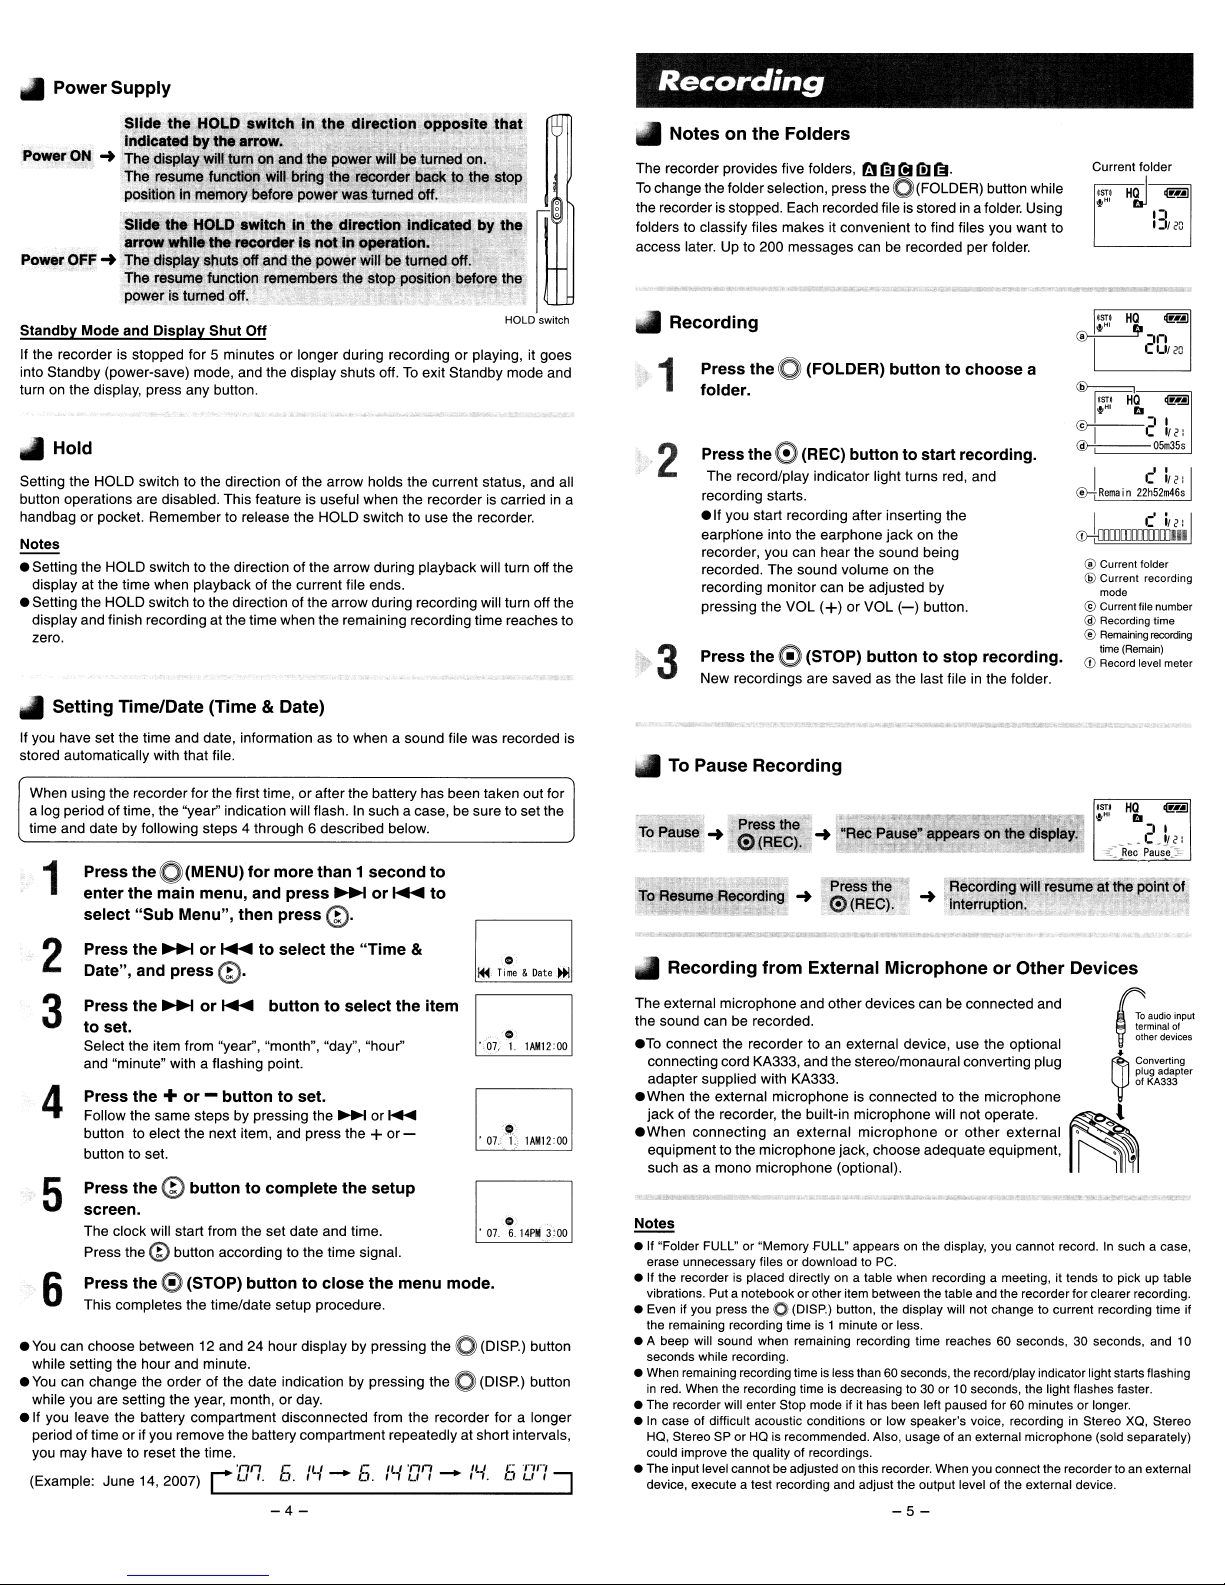
• Notesonthe Folders
The recorder provides five folders,
To
change the folder selection, press the
the recorder is stopped. Each recorded file is stored in a folder. Using
folders to classify files makes it convenient to find files you want to
access later. Up to 200 messages can be recorded per folder.
..
Recording
Press the0 (FOLDER)
1
folder.
Press the0 (REC) button
2
The record/play indicator light turns red, and
recording starts.
elf
you start recording after inserting the
earplione into the earphone
recorder, you can
recorded. The sound volume on the
recording monitor can be adjusted by
pressing the
Press the
3
New recordings are savedasthe last file in the folder.
...
To Pause Recording
VOL
G)(STOP)
fl't
hear
the sound being
(+)
or
VOL
buttontostop
fiJ
f!l1!J
lEI·
O(FOLDER)
button while
buttontochoose
to
startrecording.
jack
on the
(-)
button.
recording.
a
Current folder
1
ISTI
HQ.
i1J
HQ
£I
C'
(Remain)
olmJ
I)
I:lUG
olmJ
U/2G
i/
2
\!pHI
1ST'
HI
.--..I...
~2n
I c'lu:
®-+
Rem.in22h52m46s
I
<D-tWIDIWIID111
@ Current folder
@ Current recording
mode
@ Current file number
@ Recording time
® Remaining recording
time
Q)
Record level meter
I
:
Press
the
1
0 (MENU)
enterthe main menu, and press
select
"Sub
Menu", then press
Press the
2
Date", and
Press the
3
to
Select the item from "year", "month", "day", "hour"
and "minute" with a flashing point.
Press the +
4
Follow the same steps by pressing the~or
button to elect the next item, and press the +
button to set.
Press
5
screen.
The clock will start from the set date and time.
Press the
Press theG) (STOP)
6
This completes the time/date setup procedure.
eYou
can choose between 12 and 24 hour display by pressing the 0 (DISP.) button
while setting the hourand minute.
You
can change the order of the date indication by pressing the 0 (DISP.) button
e
while you are setting the year, month,
elf
you leave the battery compartment disconnected from the recorder for a longer
period of time orif you remove the battery compartment repeatedly at short intervals,
you may have to reset the time.
(Example: June 14, 2007) _ _
~
press@.
~
set.
or-buttontoset.
the@buttontocomplete
@ button according to the time signal.
for
or
~
or
~
buttontoclose
'O'I.
r
more
than 1 second
~
@.
to
select
the
buttontoselect
the
or
day.
5.
1'-1-5.1'-1
-4-
to
or
~
to
"Time
&
the item
~
or-
setup
the menu mode.
'0'1-
~.
. 0
',07,
,
07.
1'-1.
o
Time&Date
1.
1AM12:oo
o
6.
14P~
5 [}'']--,
3:00
TiR!SUm&R~ral.ng
!AI
.'1"?4'i't
..
~
Recording
The external microphone and other devices can be connected and
the sound can be recorded.
eTo
connect the recorder to an external device, use the optional
connecting cord KA333, and the stereo/monaural converting plug
adapter supplied with KA333.
eWhen
the external microphone is connected to the microphone
jack
of the recorder, the built-in microphone will not operate.
eWhen
connectinganexternal
equipment to the microphonejack, choose adequate eqUipment,
such as a mono microphone (optional).
Notes
• " "Folder
erase
unnecessary
•Ifthe
recorderisplaced
vibrations.
•
Evenifyou
the
remaining
• A
beep
will
seconds
•
•
•Incaseofdifficult acoustic conditionsorlow
•
while
When
remaining
in
red.
When
The
recorder
HQ,
StereoSPorHQis
could
improve
The
input
level
device, execute a
from
FULL"or"Memory
filesordownloadtoPC.
Putanotebookorother
press
theOJ(DISP.)
recording
sound
when
recording.
recording
the
recording
will
enter
the
qualityofrecordings.
cannotbeadjustedonthis
test
PresS-'a
~
o
(R!=ch.
External
FULL" appearsonthe
directlyona
timeis1minuteorless.
remaining
timeisless
timeisdecreasingto30or10
Stop
mode
recommended.
recording
MicrophoneorOther Devices
microphoneorother
table
when
item
between
bUllon,
the
display
recording
than60seconds,
if it
has
been
Also,
usageofan
recorder.
and
adjust
1he
-5-
~
•
~
external
~
display,
you
cannot
record.Insuchacase,
recordingameeting,ittendstopickuptable
the
1able
and
the
will
time
reaches60seconds,30seconds,
the
left
paused
speaker's
When
output
levelofthe
recorder for clearer
not
changetocurrent recording
record/play
seconds,
voice,
external microphone
you
indicator
light
flashes
the
recordertoan
light
the
for60minutesorlonger.
recordinginStereo
connect
external device.
(sold
starts
faster.
XQ,
separately)
o
audio
terminal of
other
deVices
Converting
plug adapter
of KA333
recording.
time
and
flashing
Stereo
external
i.npUI
if
10
 Loading...