

Page 1

DIGITAL VOICE
RECORDER
W-20
INSTRUCTIONS
EN
INSTRUCTIONS
KR
사용설명서
CN
使用說明書
T
W
使用說明書
Thank you for purchasing an Olympus
Please read these instructions for information
about using the product correctly and safely.
Keep the instructions handy for future reference.
To ensure successful audio/image recording,
we recommend that you test the audio/image
Digital Voice Recorder.
recording functions before use.
EN
1
Page 2
For Safe and
Correct Usage
Before using your new recorder, read this
manual carefully to ensure that you know
how to operate it safely and correctly.
Keep this manual in an easily accessible
location for future reference.
• The warning symbols indicate important safety
related information. To protect yourself and others
from personal injury or damage to property, it is
essential that you always heed the warnings and
information provided.
● Avoid strong vibrations or shocks.
● Do not disassemble, repair or modify the
unit yourself.
● Do not operate the unit while operating
a vehicle (such as a bicycle, motorcycle,
or go-cart).
● Keep the unit out of the reach of
children.
<Warning regarding data loss>
Recorded content in memory may be
destroyed or erased by operating mistakes,
unit malfunction, or during repair work.
It is recommended to back up and save
important content to other media such as a
computer hard disk.
General Precautions
● Do not leave the recorder in hot, humid
locations such as inside a closed
automobile under direct sunlight or on
the beach in the summer.
● Do not store the recorder in places
exposed to excessive moisture or dust.
● Do not use organic solvents such as alcohol
and lacquer thinner to clean the unit.
● Do not place the recorder on top of or
near electric appliances such as TVs or
refrigerators.
● Avoid recording or playing back near
cellular phones or other wireless
equipment, as they may cause
interference and noise. If you
experience noise, move to another
place, or move the recorder further away
from such equipment.
● Avoid sand or dirt. These can cause
irreparable damage.
2
Batteries
Warning
• Batteries should never be exposed to
flame, heated, short-circuited or
disassembled.
• Do not attempt to recharge alkaline,
lithium or any other non-rechargeable
batteries.
• Never use any battery with a torn or
cracked outer cover.
• Keep batteries out of the reach of
children.
• If you notice anything unusual when
using this product such as abnormal
noise, heat, smoke, or a burning odor:
1 remove the batteries immediately while
being careful not to burn yourself, and;
2 call your dealer or local Olympus
representative for servicing.
Page 3

Table of Contents
Getting Started
Main Features ........................................... 4
Identification of Parts ................................ 5
Inserting Batteries .................................... 7
Recording, Taking Pictures, and Playback
Recording ............................................... 10
Recording Modes (MOdE)...................... 11
Microphone Sensitivity (MIC) ................. 12
Using the Variable Control
Voice Actuator (VCVA) ........................ 13
Other functions
Moving Files Between Folders (MOVE) ... 19
Alarm Playback Function (ALARM) ....... 20
Erasing .................................................... 23
System Sounds (bEEP) .......................... 24
Resetting the Recorder (CLEAR) ........... 25
Managing Files on Your PC
Using OLYMPUS Voice Album Software .. 27
Installing Software .................................. 29
Starting Voice Album .............................. 30
Window Names ...................................... 31
Setting Time/Date (TIME) ......................... 8
Notes on the Folders ................................ 9
Taking Pictures ....................................... 14
Playing .................................................... 17
Hold ......................................................... 25
Menu List ................................................ 26
Using Online Help .................................. 32
File Format ............................................. 33
Other Information
Troubleshooting ...................................... 34
Specifications ......................................... 35
Technical Assistance and Support ......... 35
3
Page 4

Main Features
● The recorder stores highly compressed
WAVE and JPEG format in 32 MB
Main Features
intergrated flash memory.
● The recorder supports three recording
modes, HQ (High Quality) mode, SP
(Standard Playback) mode and LP (Long
Playback) mode.
• Continuous recording time is approximately 1 hour
and 31 minutes in HQ mode, approximately 2
hours and 17 minutes in SP mode and
approximately 6 hours and 4 minutes in LP mode.*
● A and B voice folders can hold a maximum
of 100 audio files each, and the (image)
folder can hold a maximum of 250 image
files.
● The recorder has a C-MOS solid-state
300,000-pixel image sensor (true pixels).
● Audio and image files are recorded to built-
in flash memory. Data isn't lost during
battery changes.
● It's easy to operate with Jogdial and a clear
display.
● You can take pictures while recording
audio. If you transfer data to your computer,
you can see linked images while listening
to recorded audio.
● You can edit audio and image files using
the special “OLYMPUS Voice Album”
software included in the package.
● Connect the included USB cable to your
compurter for faster transmission speed.
* Available recording time for one continuous file. Available
recording time may be shorter if many short recordings
are made. (The displayed available recording time and
recorded time are approximate indications.)
..........................................................................
Microsoft and Windows are registered trademarks
of Microsoft Corporation.
Intel and Pentium are registered trademarks of Intel
Corporation.
Other product and brand names mentioned herein
may be the trademarks or registered trademarks of
their respective owners.
4
Page 5
Identification of Parts
1
2
3
4
5
6
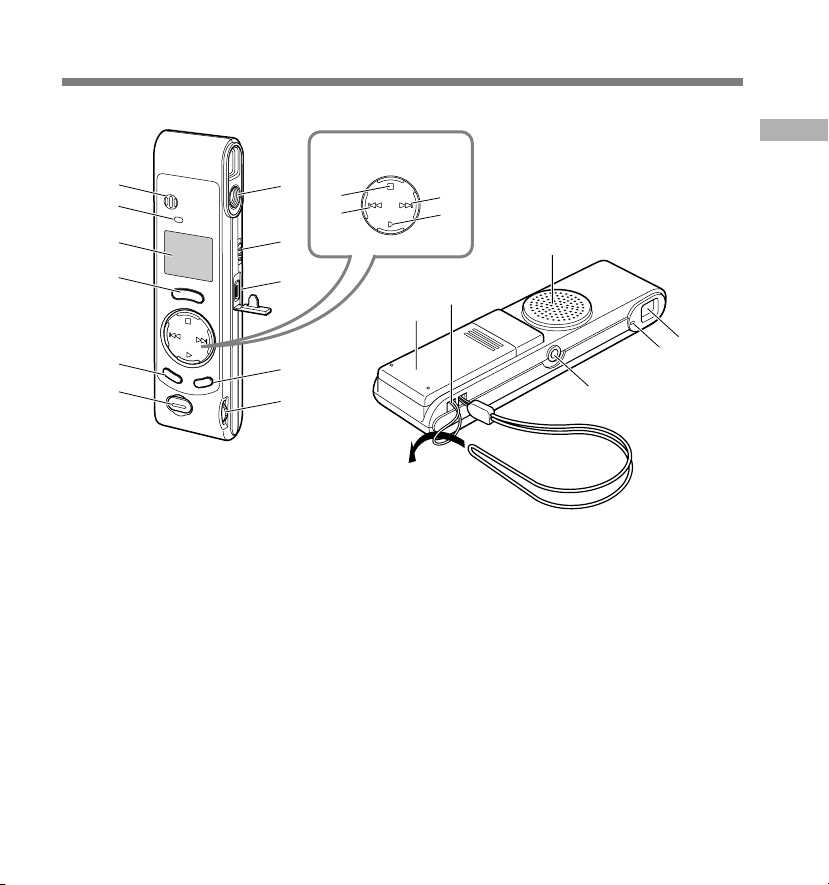
1 Built-in microphone
2 Record indicator lamp
3 Display (LCD panel)
4 REC (Record) button
5 MENU/FOLDER button
6 Shutter button
7 Lens
8 HOLD switch
9 PC (USB) terminal
0 ERASE button
! VOLUME control
@ STOP button
7
8
9
0
!
@
#
Jogdial
$
%
^
&
*
-
# –/0 (Rewind) button
$ +/9 (Fast Forward) button
% PLAY button
^ Built-in speaker
& Strap hole
* Battery cover
( Viewfinder
) Shooting lamp
- Earphone jack
)
Identification of Parts
(
5
Page 6
Identification of Parts
Display (LCD Panel)
Identification of Parts
1
2
3
4
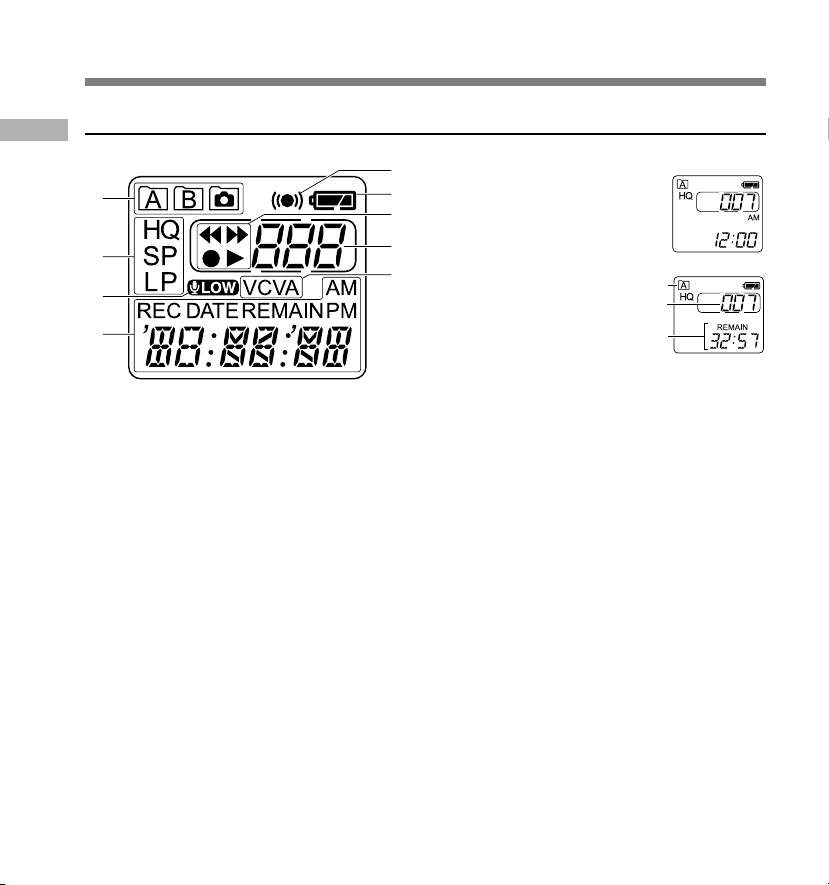
1 Folder indicator
2 Recording mode indicator
3 Microphone sensitivity display
(LOW)
4 Current time/date, Recording time/
date (REC DATE), Recording/
Playing time, Remaining recording
time (REMAIN), Menu display, etc.
5 Alarm indicator
6 Battery indicator
7 Rewind indicator(7),
Fast Forward indicator (8),
Record indicator (s), Play(`)
indicator
8 File number indicator
9 VCVA (Variable Control Voice
Actuator) indicator
6
5
When the recorder is halted
6
and is not recording or
7
playing back, it displays a
clock.
8
9
If the STOP button is pressed
and held, it displays the
available remaining recording
time and the total number of
files in a folder.
a Current folder
b Total number of files recorded in the current
folder
c Remaining recording time
Standby Mode and Display Shut Off
If the recorder is stopped or paused for 60
minutes or longer, it goes into Standby
(power-save) mode, and the display shuts off.
To exit Standby mode and turn on the display,
press any button.
a
b
c
Page 7
Inserting Batteries
1
1
2
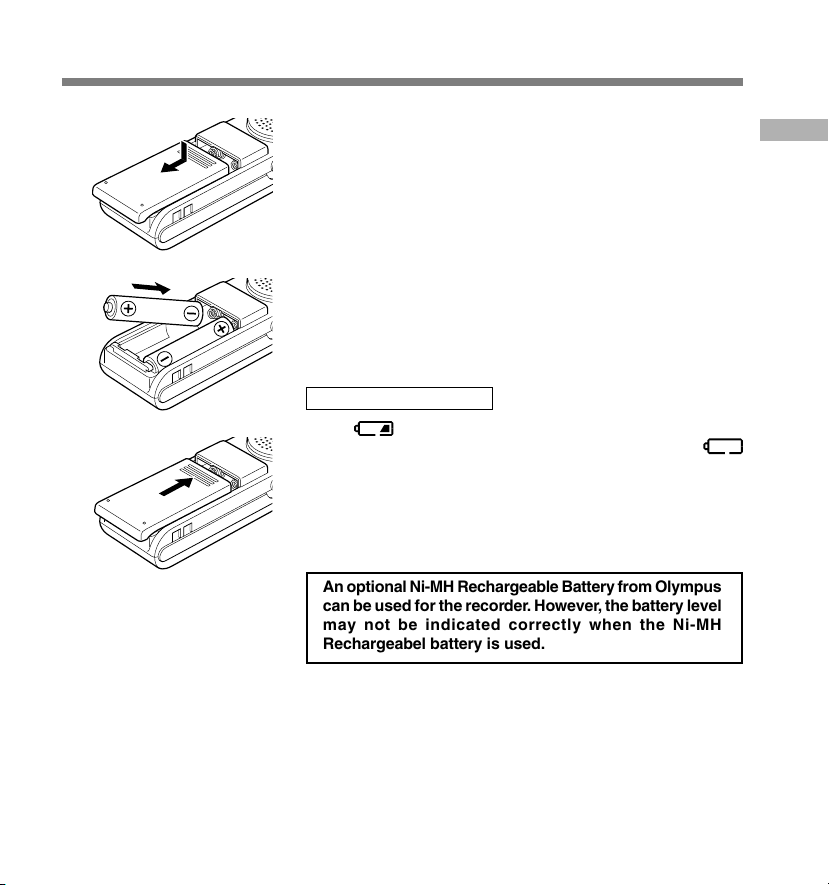
Lightly press down on the arrow and slide the
battery cover open.
Insert two AAA alkaline batteries, observing the
correct polarity.
Inserting Batteries
2
3
................................................................................................................................................................
Notes
• Be sure to stop the recorder before replacing the batteries. Unloading the batteries while the recorder
is recording, erasing or otherwise accessing a audio file may corrupt the file. If you are recording into a file
and the batteries run out, you will lose your currently recorded file because the file header will not be able
to close. So, it is crucial to change the batteries once you see only one mark in the battery icon.
• Be sure to replace both batteries at the same time.
• Never mix old and new batteries, or batteries of different types and/or brands.
• Remove the batteries if you are not going to use the recorder for an extended period of time.
Close the battery cover completely.
The hour indicator flashes, indicating the start of the Time/
3
Date setup process (☞ P.8).
Replacing batteries
When
soon as possible. When the batteries are depleted,
flashes on the display, and the recorder shuts off. AAA alkaline
batteries are recommended.
It is recommended to set the HOLD switch to the HOLD position
before you replace batteries to maintain the current settings
(time/date, etc.). For your convenience,the recorder also logs
the current settings in nonvolatile memory at hourly intervals.
An optional Ni-MH Rechargeable Battery from Olympus
can be used for the recorder. However, the battery level
may not be indicated correctly when the Ni-MH
Rechargeabel battery is used.
appears on the display, replace the batteries as
7
Page 8
Setting Time/Date (TIME)
If you have set the time and date, information as to when a file is recorded is stored automatically
with that file. The time and date should be set to ease file management tasks. The time and date
Setting Time/Date (TIME)
setting is also needed to perform the alarm playback function (☞ P.20).
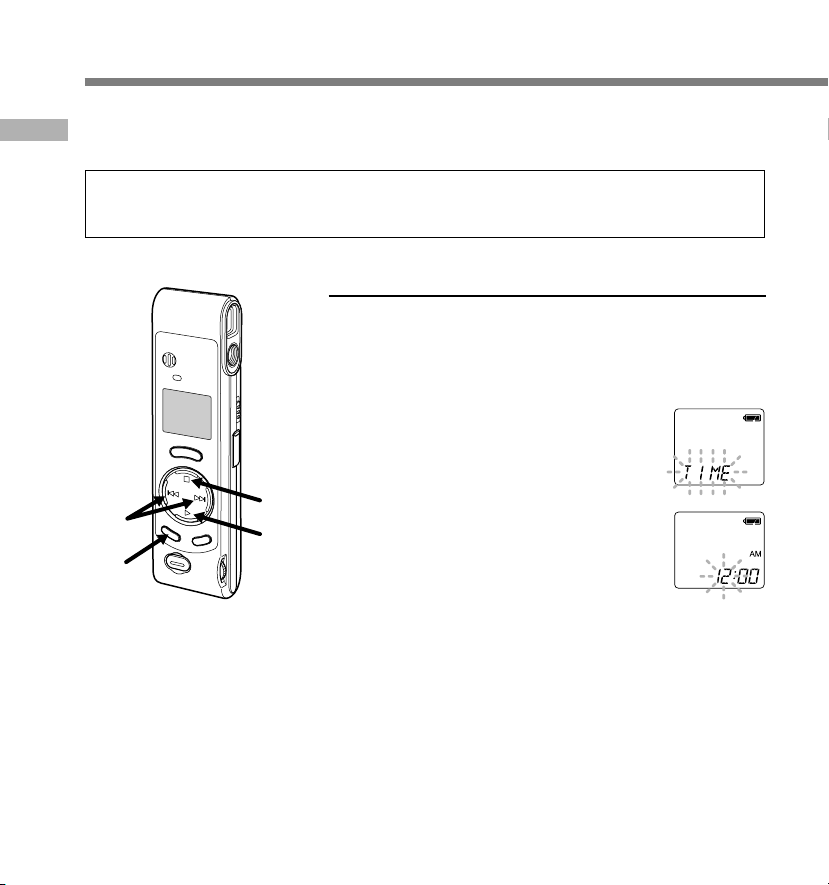
When you install batteries for the first time or each time you replace the batteries, the hour
indication will flash. In such a case, be sure to set the time and date by following steps 4
through 5 described below.
Changing the Time/Date
Press and hold the MENU/
FOLDER button for 1 second or
1
longer.
The menu opens (☞ P.26).
Press the +/9 or –/0 button
until “TIME” flashes on the display.
2
2,4
8
1
5
3,4
Press the PLAY button.
The hour indicator flashes, indicating the
3
start of the Time/Date setup process.
Repeat steps 1 and 2 to set the
time and date:
4
1 Press the +/9 or –/0 to select a
value.
2 Press the PLAY button to set the
value.
• Time and date setup proceeds in the
order of hour, minute, year, month, and
date.
Press the STOP button.
The menu screen closes and “END”
5
flashes.
Page 9

Notes on the Folders
• You can choose between 12 and 24 hour display
by pressing the MENU/FOLDER button while
setting the hour and minute.
(Example: 5:23 P.M.)
(Initial setting)
• You can choose the order of the year, month, day
by pressing the MENU/FOLDER button while
setting them.
(Example: September 15, 2002)
(Initial setting)
Notes
• If you leave the recorder untouched for 3 minutes
or longer before pressing the STOP button in step
5, Setup mode will be canceled, and any time/
date settings you made will be canceled.
• If you press the STOP button during the setup
operation, the clock will use the values that were
set to that point.
The recorder has three folders: A, B, and .
Press the MENU/FOLDER button to change
folders. Folders toggle in the order of A → B
→ → A … each time the button is pressed.
Folders A and B
Each recorded message stored in a folder is
saved as a Wave file. These folders can be
selectively used to distinguish the kind of
recording; for example, A might be used to
store private information, while B might be
dedicated to holding business information. Up
to 100 messages can be recorded per folder.
Folder
All image files, including image files recorded
during audio recording in A or B folder, will
be saved in the folder. It holds a maximum
of 250 image files.
Setting Time/Date (TIME) / Notes on the Folders
9
Page 10
Recording
Built-in microphone
Recording
2
3
1
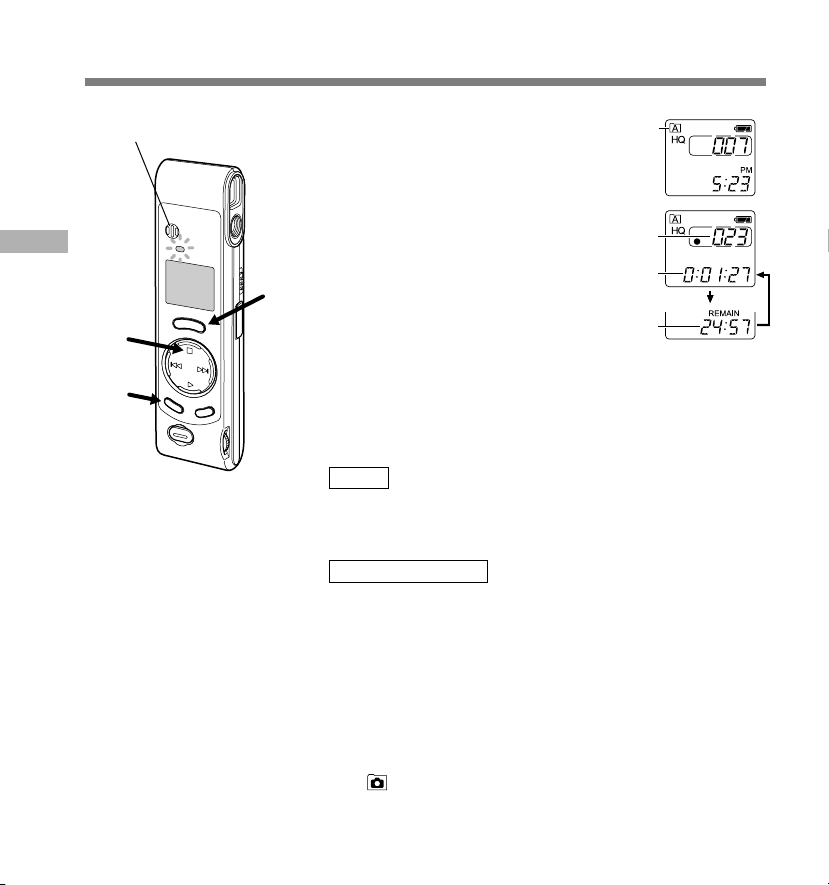
Press the MENU/FOLDER button
to choose folder A or B.
1
The folder name is displayed.
a Current folder
Press the REC button to start
recording.
2
The record indicator lamp glows red.
• If you press the MENU/FOLDER button while
recording, the screen display will change.
b Current file number
c Recording time
d Remaining recording time
Press the STOP button to stop
recording.
3
Pause Recording
Pause
Press the REC button while recording.
a
b
c
d
➥ The record indicator lamp will flash, and “PAUSE” and
the record indicator (s) will flash on the display.
Resume Recording
Press the REC button again.
➥ Recording will resume at the point of interruption.
.................................................................................................................................................................
Notes
• Even if you press the MENU/FOLDER button, the display will not change to current recording time if the
remaining recording time is 5 minutes or less.
• When the remaining recording time becomes 1 minute or less, the record indicator lamp flashes.
• If “FULL” appears on the display, you cannot record in the selected folder. In such a case, erase unnecessary
files (☞ P.23).
• If you press the REC button while in folder
there are 100 files in folder A, it switches to folder B.
• The recorder stops when it has been left paused for 10 minutes or longer.
10
, it automatically switches to folder A and starts recording. If
Page 11
Recording Modes (MOdE)
You can select from among three recording modes: HQ (High Quality) mode, SP (Standard
Playback) mode and LP (Long Playback) mode. Continuous recording time is approximately 1
hour and 31 minutes in HQ mode, approximately 2 hours and 17 minutes in SP mode and
approximately 6 hours and 4 minutes in LP mode.
The recording time shown above is for one continuous file. The available recording time may
be shorter than specified if several files are recorded. (Use the remaining time and recorded
time only as references.)
3
1
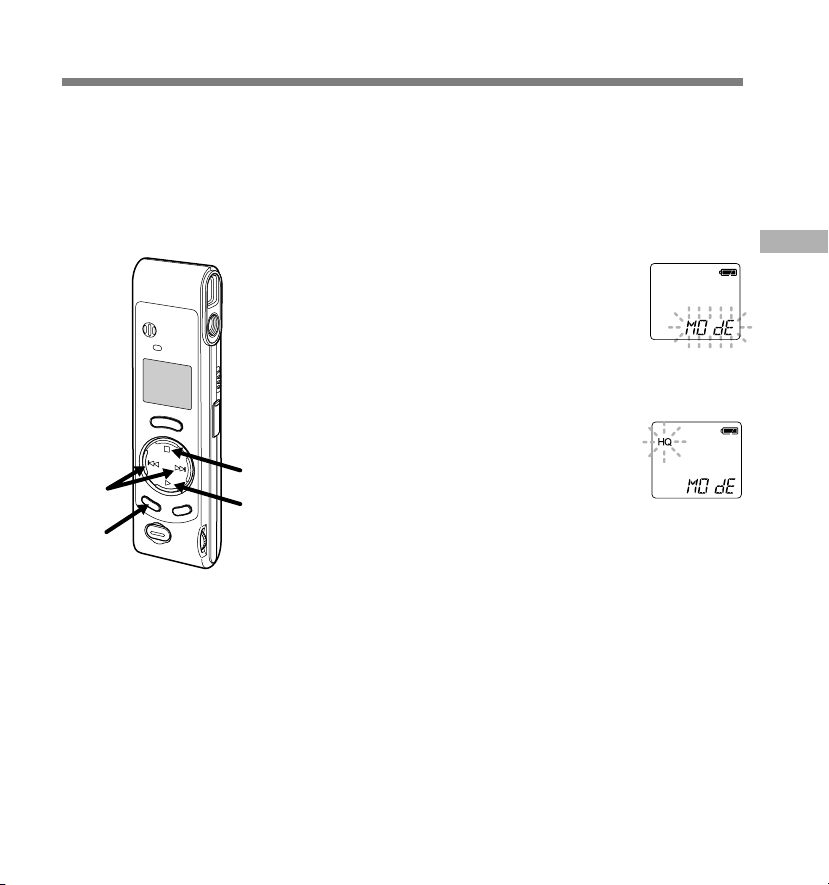
Press and hold the MENU/FOLDER
button for 1 second or longer.
1
“MOdE” will be displayed on the screen
(☞ P.26).
Press the PLAY button.
The recording mode setup process
2
begins.
Press the +/9 or –/0 button
to choose a recording mode.
3
4
2
Press the STOP button.
The menu screen closes and “END”
4
flashes.
.......................................................................................................
Note
Choose HQ or SP mode for recording meetings or lectures with crisp
clarity.
Recording Modes (MOdE)
11
Page 12
Microphone Sensitivity (MIC)
Microphone sensitivity is adjustable to meet recording needs.
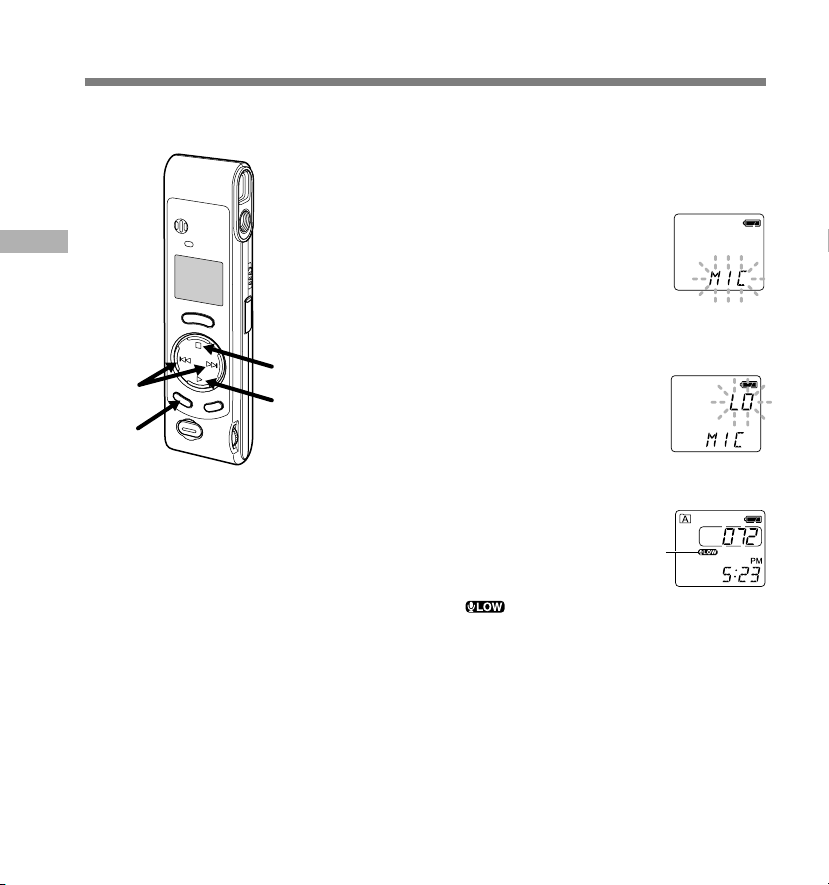
Press and hold the MENU/FOLDER
button for 1 second or longer.
1
The menu opens (☞ P.26).
Press the +/9 or –/0 button
until “MIC” flashes on the display.
Microphone Sensitivity (MIC)
2,4
1
2
Press the PLAY button.
The microphone sensitivity setup process
3
begins.
5
3
Press the +/9 or –/0 button
to choose between HI and LO.
4
HI : High-sensitivity mode that records
sounds in all directions.
LO: Low-sensitivity mode suited for
dictation.
Press the STOP button.
The menu screen closes and “END”
5
flashes.
a Microphone sensitivity display
If you choose LO,
display.
.......................................................................................................
Notes
• To ensure successful recording, make a test recording to choose
appropriate microphone sensitivity before recording.
• If you choose HI, we recommend setting the recording mode to HQ
or SP to best take advantage of the higher sensitivity.
• If you choose HI, background noise may be high depending on the
recording conditions.
will appear on the
a
12
Page 13
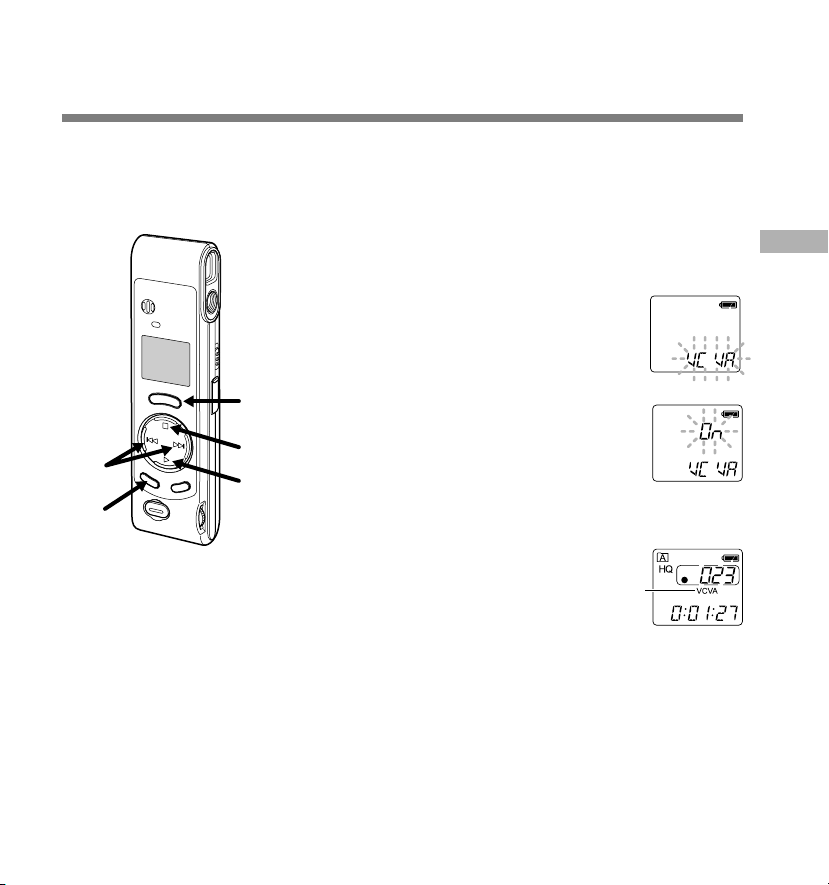
Using the Variable Control Voice Actuator (VCVA)
When the microphone senses that sounds have reached a preset volume, the built-in Variable
Control Voice Actuator (VCVA) starts recording automatically, and stops when the volume drops.
Particularly helpful for extended recording, the VCVA not only conserves memory by turning off
recording during silent periods, but also makes playback more efficient and convenient.
Press and hold the MENU/FOLDER
button for 1 second or longer.
1
The menu opens (☞ P.26).
Press the +/9 or –/0 button until
“VCVA” flashes on the display.
2
Press the PLAY button.
The VCVA setup process begins.
3
6
Press the +/9 or –/0 button to
choose between On and OFF.
4
On : Will start recording in VCVA mode.
5
2,4
1
OFF : Will resume recording in normal mode.
3
Press the STOP button.
The menu screen closes and “END” flashes.
5
Press the REC button to start recording.
When the VCVA senses sound louder than
6
the preset volume, recording starts
automatically. When it senses silence,
recording automatically pauses after
approximately 1 second, and the recorder
enters Standby mode.
a VCVA indicator
The record indicator lamp is lit during recording. When the recorder
is in standby mode, the record indicator lamp flashes, and VCVA
and the record (s) indicator flash on the display.
..............................................................................................................
Note
To ensure successful recordings, we recommend that you test the record
function and volume before use.
a
Using the Variable Control Voice Actuator (VCVA)
13
Page 14
Taking Pictures
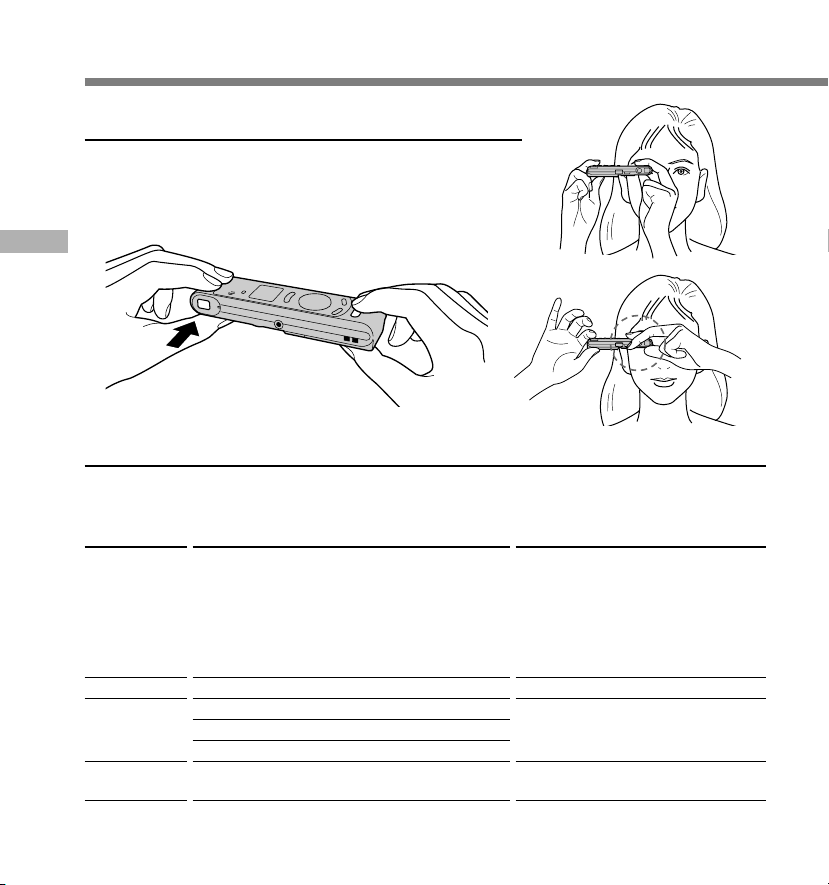
Holding the Camera (Recorder)
Hold the recorder securely with both hands and keep your
elbows close to your body.
Make sure you don’t block the lens with your finger or the
camera strap.
Taking Pictures
Good position
Bad position
Shooting Lamp System
When the shooting lamp on the side of the finder is on or flashes in orange or green, that
indicates the recorder is in one of the following states:
Lamp Status
Lit in orange
Lit in green
Flashing in
orange
Flashing in
green
Recorder Status (Shutter button)
Adjusting exposure (Half-Press)*
Appropriate exposure (Half-Press)
Wrong exposure (Full-Press)
Maximum number of files recorded (Half-Press)
Insufficient memory remaining (Half-Press)
Photography completed (Full-Press)
Can/cannot
You cannot take a picture.
Take a picture when the shooting lamp
is lit in green. If the lamp doesn't
change to green, it's too bright or too
dark to shoot. If the lamp is lit in orange
for 6 seconds or longer, change the
brightness before take a picture.
You can take a picture.
You cannot take a picture.
You can take another picture.
*Adjusting time varies according to brightness.
14
Page 15
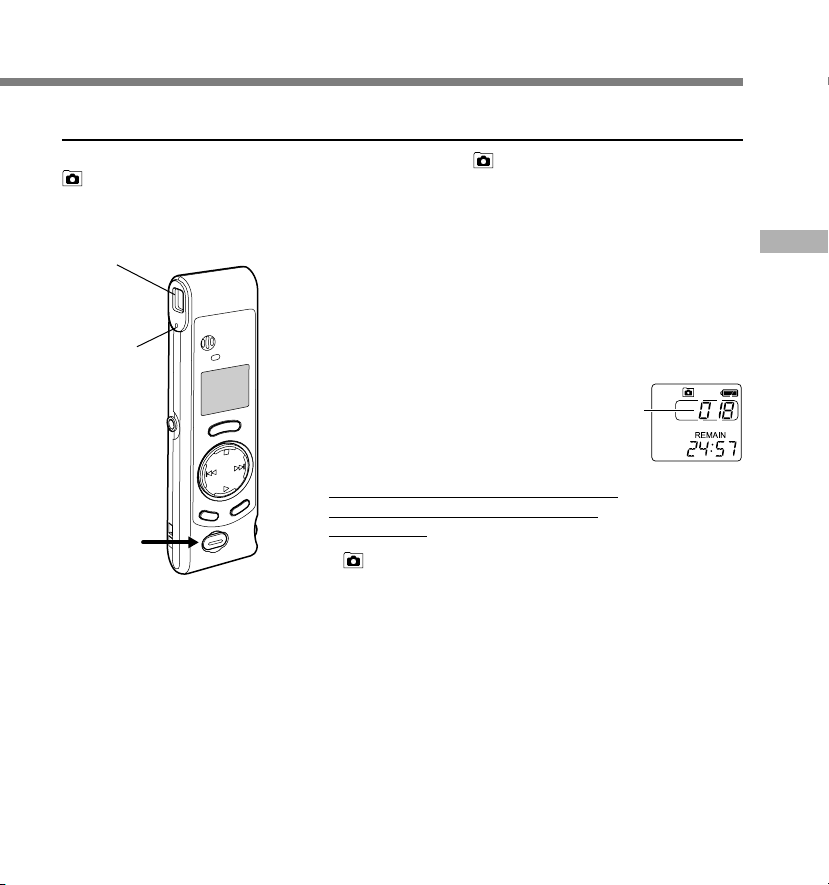
Taking Pictures
You can choose any folder when taking pictures: A, B, or . All pictures will be saved in folder
.
The shutter button has two stages. Exposure is adjusted during the first stage, and a picture is
taken in the second stage.
Viewfinder
Shooting
lamp
1,2
Press the shutter button halfway
(Half-press).
1
The shooting lamp next to the finder turns
orange. When the lamp changes from
orange to green, it's ready for you to take
a picture.
Keep the button gently pressed, and
then press it further (Full-press).
2
The recorder takes a picture. When the
shooting lamp flashes in green,
photography is completed.
If the lamp flashes in orange, that means
a picture wasn't taken, so try taking a
picture again.
• If you press the STOP button while in folder
, the total number of image files will
appear. A maximum of 250 image files can
be stored.
a Current number of recorded files
You can take pictures while you are recording
audio (recording pause).
.......................................................................................................
Notes
• Always press the shutter button gently. If you press too hard, the
recorder may move and the image will be blurred.
• You cannot see recorded images using the recorder's display.
Transfer image files to a computer and use the “OLYMPUS Voice
Album” software included in the package to view them (☞ P.30).
a
Taking Pictures
15
Page 16
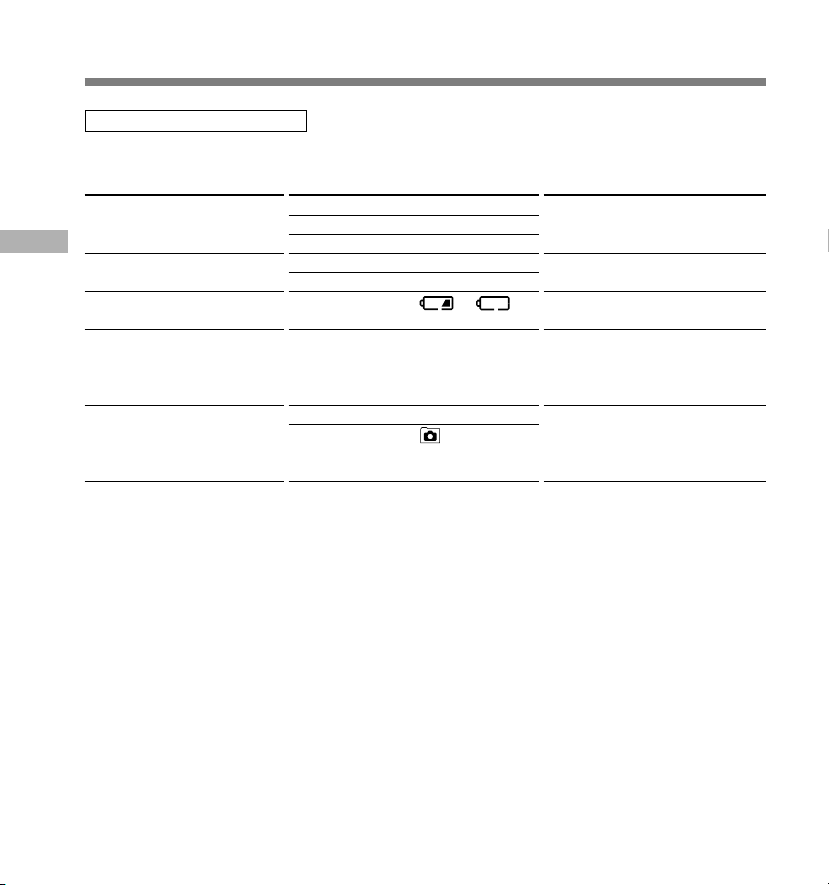
Taking Pictures
If you cannot take a picture
The following are probable causes. Eliminate the problem and resume photography.
Probable cause
Maximum number of image
files recorded (250 images)
Taking Pictures
Insufficient memory remaining
Insufficient battery power
remaining
50 image files have already
taken while recording one
audio file
The shutter button was pressed
(full-press) while the shooting
lamp was lit in orange
Message
The shooting lamp flashes in orange.
The display flashes “FULL”.
The display flashes the file number.
The shooting lamp flashes in orange.
The display flashes “FULL”.
The display flashes or .
The shooting lamp flashes in orange.
The shooting lamp flashes in orange.
The display flashes .
*The audio file will be recorded as two audio files.
Action
Erase unwanted image files.
Erase unwanted audio files or
image files.
Replace with new batteries.
Press the STOP button to stop
recording, then press the REC
button to start a new audio file
and record images.*
Take a picture when the shooting
lamp is green. If the lamp doesn't
change to green, it's too bright or
too dark to take a picture.
16
Page 17
Playing
2
1
5
3
4
Press the MENU/FOLDER button
to choose folder A or B.
1
Press the +/9 or –/0 button
to choose the file that you want to
2
play.
Press the PLAY button to start
playback.
3
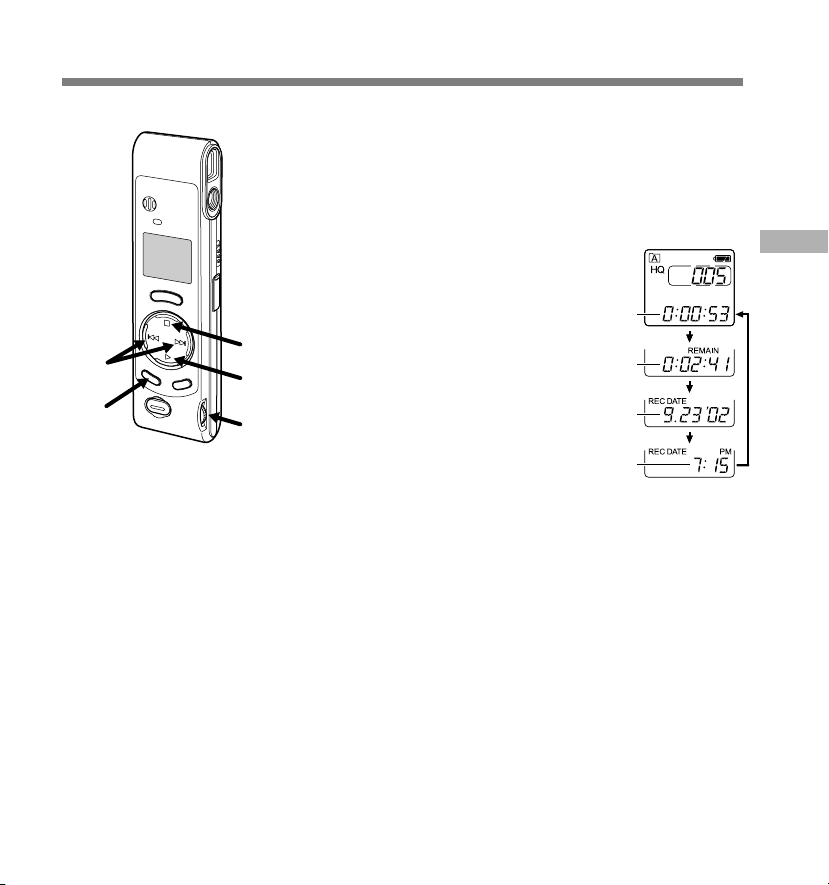
• If you press the MENU/FOLDER button
during playback, the screen display will
change.
a File elapsed time
b File remaining time
c Recording year, month, and date
d Time of recording
Adjust the VOLUME control to
your liking.
4
Press the STOP button at any point
you want to stop the playback.
5
Resume playback by pressing PLAY
button again.
Playing
a
b
c
d
17
Page 18

Playing
Playback
Operation
How to Cancel
functions
Playing
Fast
Playback
(F.PLAY)
Fast
Forward
(8)
Rewind
(7)
Skipping to
beginning
of a file*
Press the PLAY button for 1 second or longer while stopped or
playing a file.
➥ The recorder plays back at approximately 30% faster than
normal rate.
Hold the +/9 button while playing a file.
➥ The recorder stops when it reaches the end of the file.
Continue pressing the +/9 button to proceed with the cue
from the beginning of the next file.
Hold the –/0 button while playing a file.
➥ The recorder stops when it reaches the beginning of the file.
Continue pressing the –/0 button to proceed with the
review from the end of the previous file.
Press the +/9 button in stop mode, playback mode, or fast
playback mode.
➥ Stop mode ................... The recorder stops at the beginning of
the next file.
➥ Playback mode ............The recorder skips to the beginning of
the next file and starts playing it.
➥ Fast playback mode .... The recorder skips to the beginning of
the next file and starts fast playback.
Press the –/0 button in stop mode, playback mode, or fast
playback mode.
➥ Stop mode ................... The recorder stops at the beginning of
the previous file.
➥ Playback mode ............The recorder skips to the beginning of
the current file and starts playing it.
➥ Fast playback mode .... The recorder skips to the beginning of
the current file and starts fast playback.
Press the PLAY button
again.
➥ Playback returns to
normal rate.
Release the +/9
button.
➥ Playback returns to
normal rate.
Release the –/0
button.
➥ Playback returns to
normal rate.
* If you keep pressing the +/9 or –/0 button in stop mode, the recorder continuously skips
to the beginnings of files (SKIP).
18
Page 19
Moving Files Between Folders (MOVE)
You can move a file recorded in folder A or B to the other.
The moved file is added at to the end of the destination folder.
Press the MENU/FOLDER button
to choose folder A or B.
1
Choose the file you want to move
and play it.
2
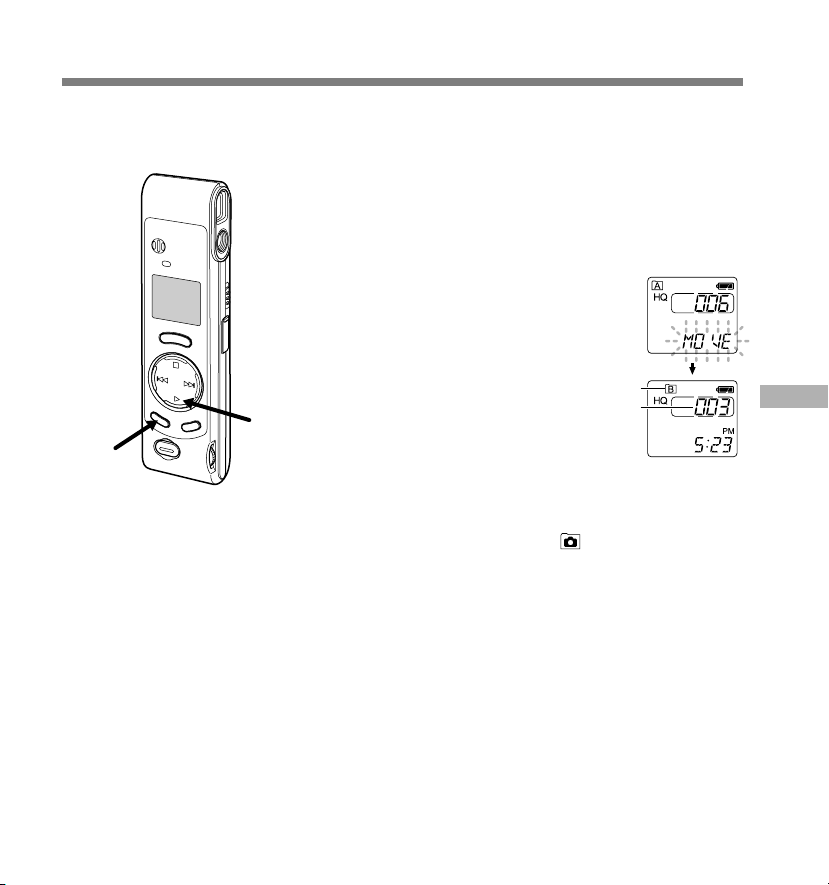
Press and hold the MENU/
FOLDER button for 1 second or
3
longer.
Playback stops, and “MOVE” flashes on
the display.
1,3
a Destination folder
b Destination number of the file
The destination folder and the number of the
2
moved file appear on the display, and moving
is completed.
.......................................................................................................
Notes
• You cannot move files between folder and the other folders.
• If the destination folder is full (a maximum of 100 files), “FULL”
appears on the display and files cannot be transferred to it.
a
b
Moving Files Between Folders (MOVE)
19
Page 20
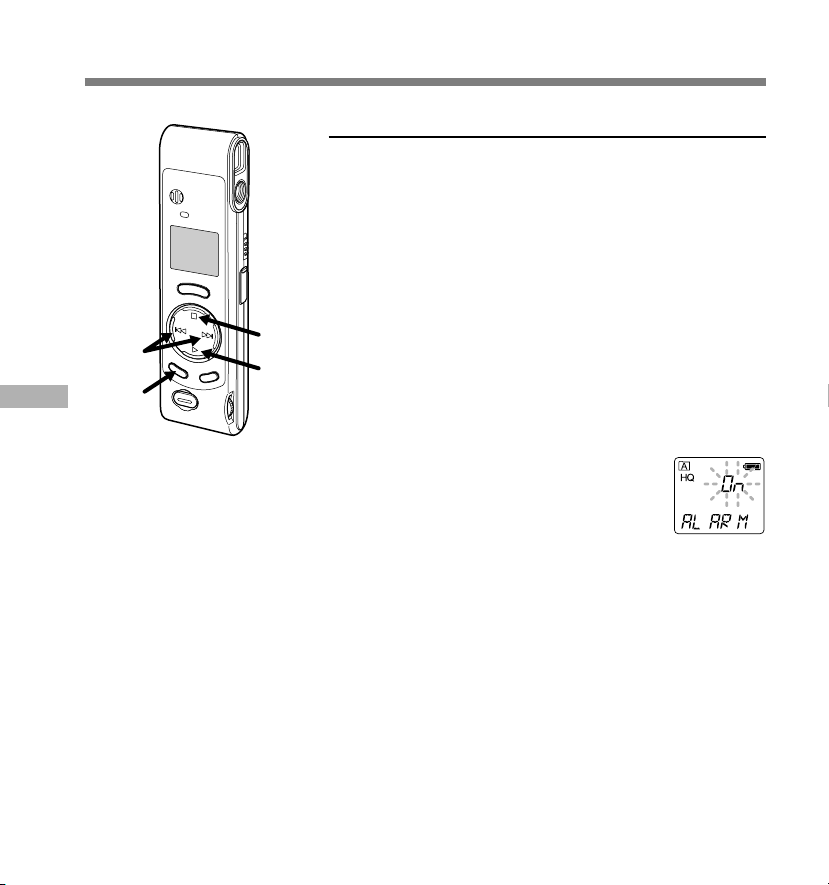
Alarm Playback Function (ALARM)
The alarm playback function can be set to play a selected file at a pre-set time. Up to 5 alarms
can be set.
Setting Alarm Playback
Press the MENU/FOLDER button
to choose folder A or B.
1
Press the +/9 or –/0 button
to choose the file to be played
2
when the alarm sounds.
Press and hold the MENU/
FOLDER button for 1 second or
3
longer.
Alarm Playback Function (ALARM)
2,4,6
5,7
1,3
The menu opens (☞ P.26).
Press the +/9 or –/0 button
until “ALARM” flashes on the
4
display.
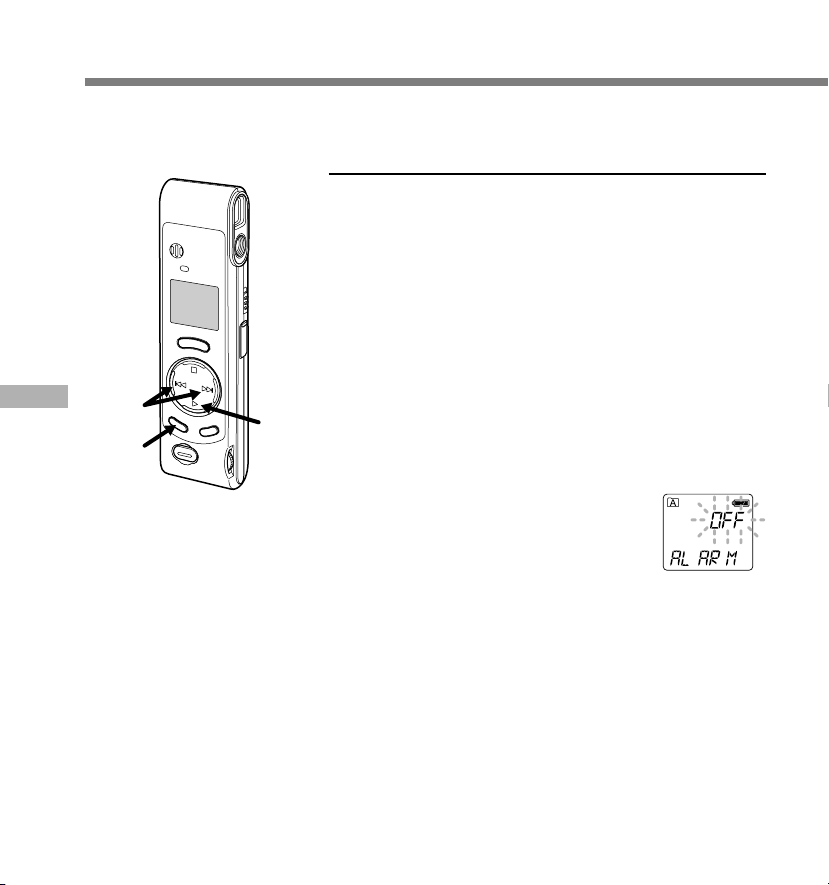
Press the PLAY button.
“ALARM” turns on and “OFF” flashes.
5
Press the +/9 or –/0 button
to select On.
6
Press the PLAY button to complete
the setup screen.
7
The month indicator flashes.
20
Page 21
8
Repeat steps 1 and 2 to set the
time and date:
8
1 Press the +/9 or –/0 to select a
value.
2 Press the PLAY button to set the
value.
• Time and date setup proceeds in the
order of month, date, hour, and minute.
Press the STOP button.
The menu screen closes and “END”
9
flashes.
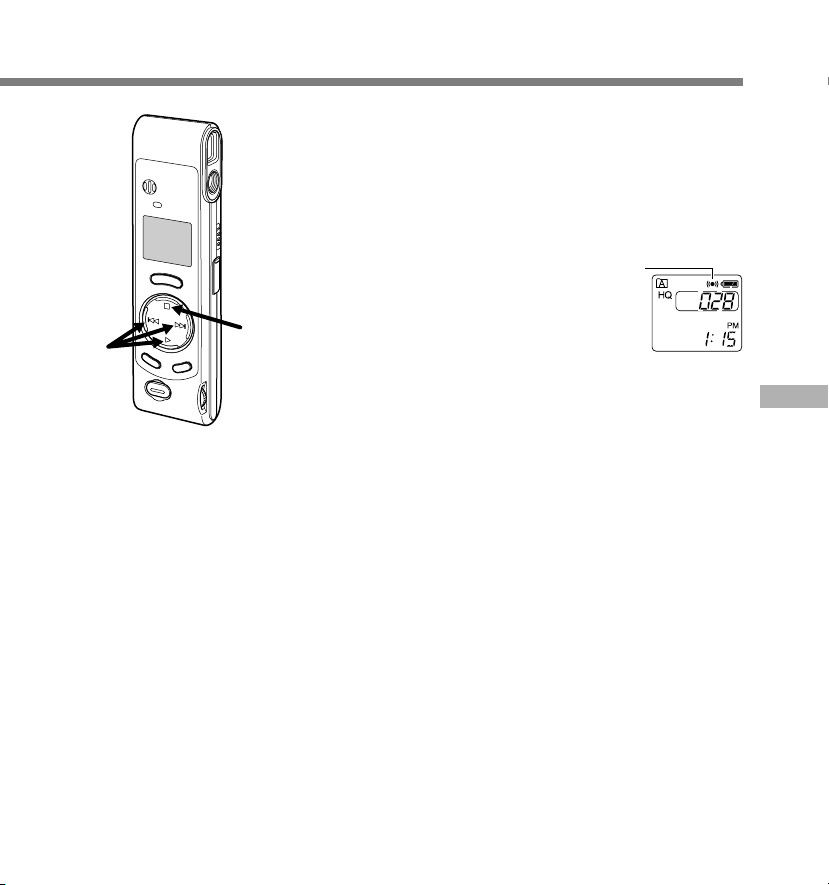
9
a Alarm indicator
An alarm will sound at the scheduled time
for 5 minutes. Press the STOP button while
the alarm is sounding to play back the file
you associate with the alarm. Press the
STOP button again to stop file alarm
playback.
.......................................................................................................
Notes
• The alarm tone stops automatically if no button is pressed within 5
minutes after the alarm starts. The file is not played back in this
case.
• After alarm playback is over, the alarm playback function is canceled
automatically.
• You cannot set the alarm playback function for more than 5 files.
Also, if no files are recorded in the selected folder, you cannot set
the alarm playback function.
• You cannot set the year of the file to be played.
a
Alarm Playback Function (ALARM)
21
Page 22
Alarm Playback Function (ALARM)
To Cancel an Alarm Playback
1
2
3
2,4,6
Alarm Playback Function (ALARM)
1,3
8
5,7
4
5
6
7
8
Press the MENU/FOLDER button
to choose folder A or B.
Press the +/9 or –/0 button
to select a file for which alarm
playback is set.
Press and hold the MENU/
FOLDER button for 1 second or
longer.
The menu opens (☞ P.26).
Press the +/9 or –/0 button
until “ALARM” flashes on the
display.
Press the PLAY button.
“ALARM” turns on and “On” flashes.
Press the +/9 or –/0 button
to select OFF.
Press the PLAY button.
Press the STOP button.
The menu screen closes and “END”
flashes.
22
Page 23
Erasing
You can easily erase unnecessary files. Sequential file numbers are reassigned automatically.
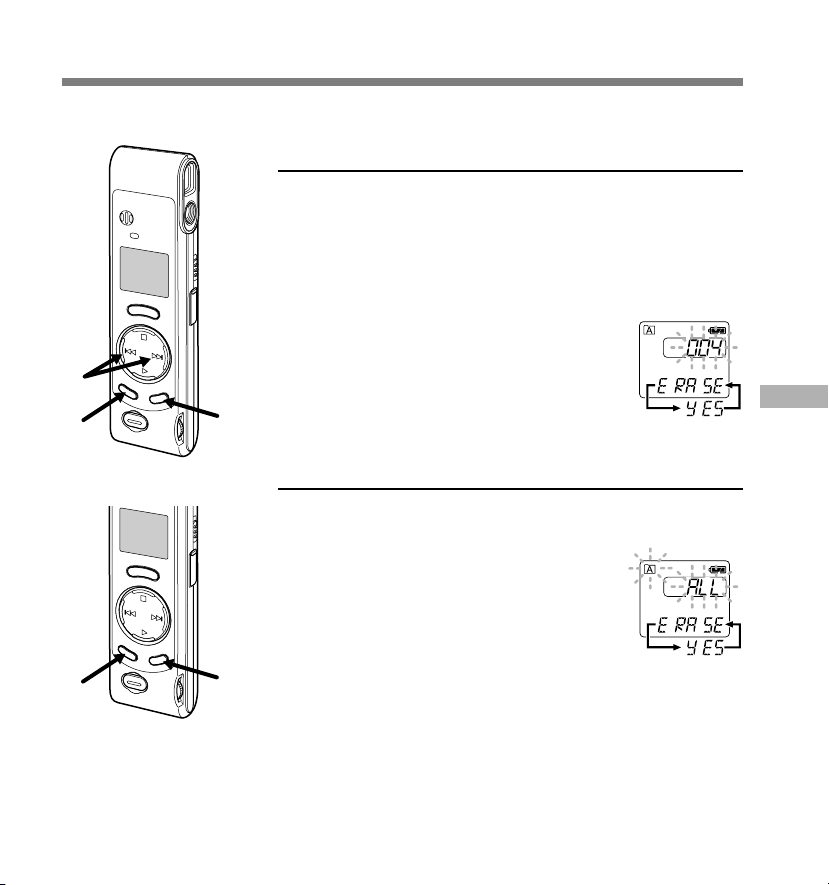
Erasing One File at a Time
Press the MENU/FOLDER button to
choose a folder.
1
Press the +/9 or –/0 button to
choose the file you want to erase.
2
You can erase a file while you are playing it back.
Press the ERASE button.
The file number flashes, then alternatively
3
“ERASE” and “YES” appear on the display for
2
1
1
.................................................................................................................................................................
Notes
• If the ERASE button is not pressed within the 8 seconds after “ERASE” starts flashing, the recorder will
revert to stop status.
• An erased file cannot be restored. We recommend you transfer important files to a computer, and check
their content before erasing them from the recorder.
3,4
2,3
8 seconds.
Press the ERASE button again.
The file is erased.
4
Erase All Files from a Folder
Press the MENU/FOLDER button to
choose a folder.
1
Press the ERASE button for 2 seconds
or longer.
2
The folder name and “ALL” flash, then
alternatively “ERASE” and “YES” appear on
the display for 8 seconds.
Press the ERASE button again.
All files in the selected folder are erased
3
simultaneously.
Erasing
23
Page 24

System Sounds (bEEP)
The recorder beeps to alert you to button operations or warn you of errors. System sounds may
be turned off.
Press and hold the MENU/
FOLDER button for 1 second or
1
longer.
The menu opens (☞ P.26).
Press the +/9 or –/0 button
until “bEEP” flashes on the
2
display.
Press the PLAY button.
The system sound setup process begins.
3
System Sounds (bEEP)
2,4
5
3
Press the +/9 or –/0 button
to choose between On and OFF.
4
On : System sounds are enabled.
OFF : System sounds are disabled.
1
Press the STOP button.
The menu screen closes and “END”
5
flashes.
If the alarm playback function has been set,
the alarm will sound at the scheduled time
even if system sounds are turned off.
24
Page 25

Resetting the Recorder (CLEAR)
This function erases all files stored in the recorder and also resets the current time and other settings
to their initial status. If you have important files that you want to save, connect the recorder to a
computer and transfer those files from the recorder to the computer before resetting the device.
While holding the STOP button, hold the
ERASE button for 2 seconds or longer.
1
“CLEAR” and “YES” appear alternately on the
display for 8 seconds.
Press the ERASE button again.
1
2
The recorder returns to the default condition at
2
the time of purchase, and shows the date and
time setting screen (☞ P.8).
....................................................................................................................
Note
If the ERASE button is not pressed within the 8 seconds after “CLEAR” starts
flashing, the recorder will revert to stop status.
Hold
Setting the HOLD switch to the HOLD position.
If you set the recorder to HOLD position by sliding the HOLD switch in the direction of the arrow,
the current conditions will be preserved, and all buttons and switches except the HOLD switch
will be disabled. This feature is useful when the recorder has to be carried a bag or a pocket
because files won't be erased if the ERASE button is pressed by accident.
Remember to reset the HOLD switch when using the recorder.
Notes
• The recorder functions as follows with the HOLD switch set to the HOLD position:
– If the recorder is stopped, the display goes dark.
– If the recorder is playing, the display goes dark when playback of the
current file has completed.
– If the recorder is recording, the display goes dark when the recorder
stops recording automatically upon running out of free memory.
• When the display is dark because the HOLD switch is set to the HOLD position,
you can make the clock flash for 2 seconds by pressing any button.
• When you set the HOLD switch to the HOLD position while playing back,
you can still adjust the volume using the VOLUME control.
• The alarm will sound at the scheduled time even if the recorder is set to
HOLD. The recorder will then begin to play the file associated with the
alarm once you press the STOP button.
Resetting the Recorder (CLEAR) / Hold
25
Page 26
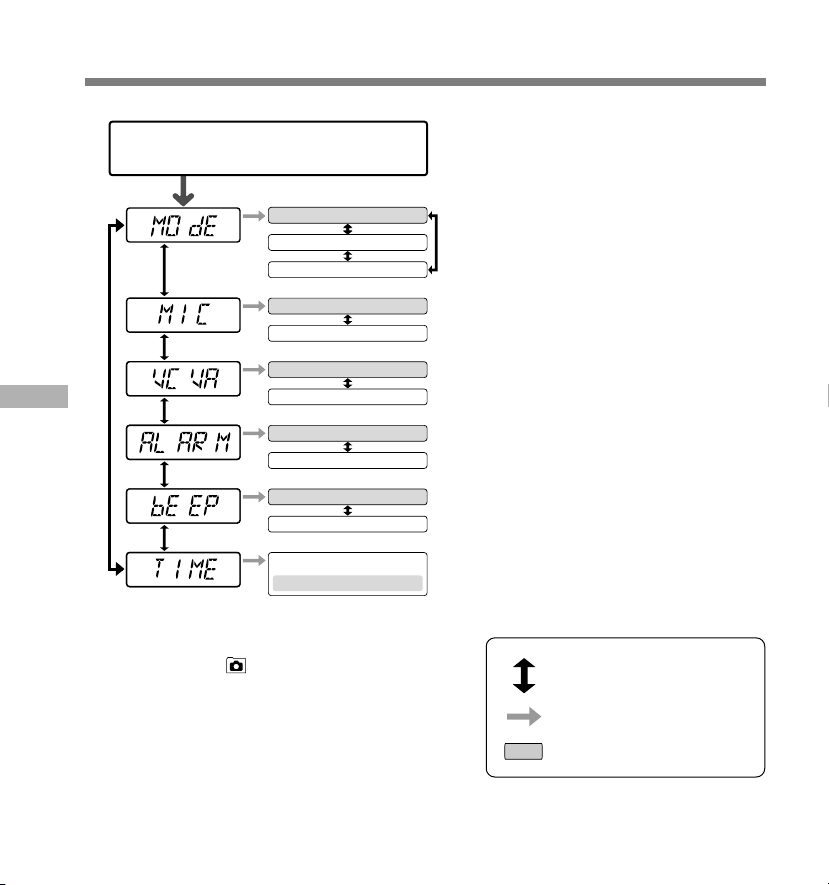
Menu List
Press and hold the MENU/FOLDER
button for 1 second or longer
HQ
SP
LP
HI
LO
OFF
On
OFF
On
On
OFF
Time/Date Screen
12 hour/year, month, day
Menu List
(☞
(
☞
(
☞
(
☞
(
☞
(
☞
P.11 )
P.12)
P.13)
P.20)
P.24)
P.8)
Notes
• If you choose folder , "ALARM" won't appear.
• The recorder will stop if you leave it idle for 3 minutes
during a menu setup operation, when a selected item is
not applied.
Recording mode setting. Switch among HQ,
SP, and LP modes.
Microphone mode setting. Switch between HI
and LO modes.
VCVA setting. Switch between On (enabled)
and OFF (disabled).
Alarm playback setting. Switch between On
(enabled) and OFF (disabled).
System sounds setting. Switch between On
(enabled) and OFF (disabled).
Time/Date setting. In order of hour, minute,
year, month and day.
Press the +/9 or –/0
button
Press the PLAY button
Initial setting
26
Page 27

Using OLYMPUS Voice Album Software
By connecting the recorder to your PC, you will be able to use Voice Album in the following ways:
Visual Index function PC Camera function
Using OLYMPUS Voice Album Software
The Visual Index function displays the images
corresponding to the index points in the audio file.
You can quickly and easily search the important
audio file or the important part of recording with the
linked images.
You can monitor the images using your PC.
Voice Album function Slide show function
You can add your comments and narration to image
files.
.................................................................................................................................................................
You can enjoy the slide show with recorded voice
comments.
Notes
• For more information on menus and operations, refer to Online Help. You will be able to use Online Help
after Voice Album is installed.
• Image files (including any Visual Index) cannot be transferred from a PC to the recorder.
27
Page 28

Using OLYMPUS Voice Album Software
Operating Environment
PC: IBM PC/AT compatible PC
Operating System: Microsoft Windows 98/ 98SE/ Me/ 2000 Professional/ XP Professional,Home
CPU: Intel Pentium II class 233 MHz processor or better
RAM: 64 MB or more
Using OLYMPUS Voice Album Software
Hard drive space: 10 MB or more
Drive: 2x or faster CD-ROM drive
Sound card: Creative Labs Sound Blaster 16 or 100% compatible sound card
Browser: Microsoft Internet Explorer 4.01 or later
Display: 800 x 600 pixels or more, 256 colors or more
USB port: One free port
Audio I/O terminals: Earphone output or speakers
.................................................................................................................................................................
Notes
• USB ports are not available on PCs running Windows 95 or that have been upgraded from Windows 95 to
any other OS.
• Certain functions, such as remote and direct recording, do not work on PCs that don't have USB ports.
• Voice Album is software specifically designed for this recorder. You cannot use it with any other recorder.
• Voice Album isn't compatible with voice recognition software.
Edition
28
Page 29

Installing Software
Before you connect the USB cable to the recorder and your PC, you must first install the
software.
Be sure to confirm the following before installation:
• Check your PC’s operating system before attempting installation.
• Exit all running applications.
• If you are running Windows 2000 /XP (Professional only) on a network, you need to log on as an administrator.
Insert OLYMPUS Voice Album into
the CD-ROM drive.
1
The installation program will start
automatically. Once the program starts,
jump to step 4. If it does not, follow the
procedures in steps 2 and 3.
Click on the [Start] button and
select [Run].
2
Enter “D:/Setup.exe” in the [Open]
field and click on [OK].
3
This is assuming the CD-ROM is in drive D.
The installation Language Selection
dialog box opens.
4
Click on the desired language to select it.
Click on [Next] when the Voice
Album opening screen appears.
5
Confirm your acceptance of the
terms of the Licensing Agreement.
6
You must accept the terms of the Licensing
Agreement to install Voice Album. If you
accept them, click on [Yes].
Select where to install Voice
Album.
7
This lets you specify the folder in which
to install Voice Album. Click on [Browse]
to find the desired installation folder. To
accept the default folder, click on [Next].
Note
If the installation folder does not exist, a
confirmation dialog box opens to get your
permission to create a folder for this purpose.
Click on [Yes].
Select a program menu folder.
You may change the program menu folder
8
to another one, such as [Startup]. To
accept the default folder, click on [Next].
Authorizing the start of file
copying.
9
Confirm all “Current Settings”. To accept
them, click on [Next].
Note
To change the program menu folder or
installation folder, click on [Back].
Copy files.
Wait until Voice Album is installed on
10
your PC, then click on [Finish].
Installing Software
29
Page 30
Starting Voice Album
1
2
Starting Voice Album
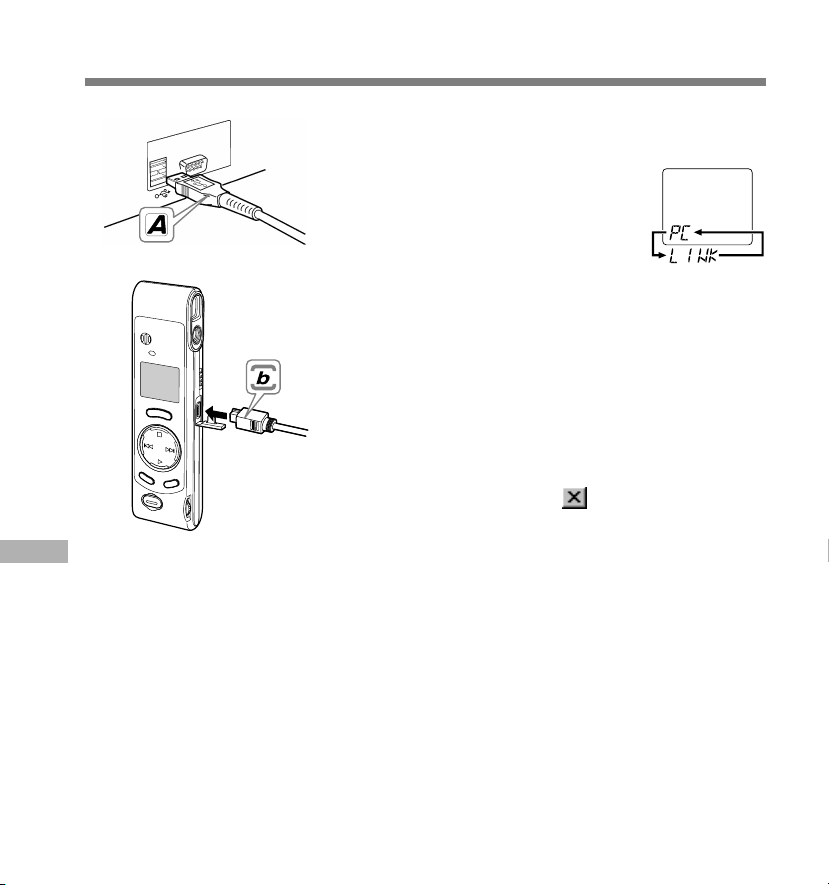
Insert end A of the USB cable to
your PC's USB port or USB hub.
1
Confirm that the recorder is not in
use before attaching end b of the
2
USB cable to the PC terminal port
of the recorder.
• Release the HOLD switch on the recorder
and make sure that the recorder is in stop
mode before plugging in the USB cable.
When the recorder and the PC are
connected with the USB cable, the
recorder display alternately flashes “PC”
and “LINK”.
To use Voice Album without connecting the recorder to the
PC, or if Voice Album does not start automatically when you
connect the recorder to the PC, click on the [Start] button,
point to [All Programs], select [OLYMPUS Voice Album] then
click on [OLYMPUS Voice Album].
To exit Voice Album, click on the button on the window, or
click on [File], and then click on [Exit Voice Album].
......................................................................................................
Notes
• When the recorder is connected to a PC, the power will be supplied
from the USB cable.
• When you start Voice Album for the first time by connecting the
recorder to the PC after installation, it may take a few minutes to
start.
• When the recorder is connected to the PC, the recorder
accommodates only Voice Album operations.
• Do NOT use any USB cable other than the one supplied.
• Do NOT disconnect the USB cable before file transfer or recording
is completed.
30
Page 31

Window Names
12453
7
6
Window Names
1 Menu bar
You can select various menu commands.
2 Tool bar
Frequently used menu commands are
assigned to buttons.
3 Playback Controller
Control buttons to play and stop audio files.
4 File List View
Will display the folders selected in 6 and
7.
5 Visual Index View
Displays Visual Indexes (which are images
linked to an audio file).
6 Recorder View
Displays folder structure of connected
recorder.
7 Folder View
Displays folder structure in which files
transferred and saved in the PC.
* All images have been inserted for display only, so
actual appearance may be different.
31
Page 32

Using Online Help
To open Online Help, do either of the following:
• Click on the [Start] button, select [All Programs], then [OLYMPUS Voice Album], then click on [Help].
• While Voice Album is running, choose [Contents] from the [Help] menu.
• While Voice Album is running, press [F1] on the keyboard.
Search by Contents
Once the Online Help screen appears,
click on the Contents tab.
1
Double-click on the icon of the
desired topic heading.
2
The title of the topic is displayed.
Double-click on the icon of the
Using Online Help
desired topic.
3
An explanation of the topic is displayed.
Search by Key word or Phrase
Once the Online Help screen appears,
click on the Index tab or Search tab.
1
Enter text.
If you select the keyword tab, searching starts
2
automatically.
If you select the search tab and input a phrase,
click [List Topics].
Choose a topic, then click on [Display].
An explanation of the topic is displayed.
3
.................................................................................................................................................................
Note
For more information on menus and operations, refer to Online Help. You will be able to use Online Help after
Voice Album is installed.
32
1
2
3
1
2
3
Page 33

File Format
Transferred audio files are recorded in WAVE format (.wav) and image files are recorded in
JPEG format (.jpg).
When you transfer files, the filenames change as follows.
In the recorder
On the PC
DW A0001.wav (jpg)A001
Folder name
File number
Prefix added to
the file in the PC
Folder name
File number
The file number of the transferred file is
renumbered automatically and will differ
from the original file on the recorder.
Measure of size of file and time for transfer
Audio file Size of file Time for transfer*
HQ mode Approx. 3.2MB Approx. 1 minute
SP mode Approx. 1.6MB Approx. 30 seconds
LP mode Approx. 1.2MB Approx. 15 seconds
(5 minutes of recording with the recorder)
Image file 30 to 50KB 2 to 3 seconds
(per image file)
* Transfer time may vary depending on the performance and configuration of your PC.
.................................................................................................................................................................
Notes
• Transfer may take several minutes depending on the recording mode of the file to be transferred and the
PC operating environment.
• If the file to be transferred already exists on the PC, it won't be transferred.
Extension
File Format
33
Page 34

Troubleshooting
Symptom
Nothing appears on
the display
Won’t start
Unable to record
No playback tone
heard
Noise heard during
playback
Recording stops
midway
Cannot find the
recorded auido
Files cannot be moved
The shooting lamp
Troubleshooting
doesn't change from
orange to green
Focus is blurry
Recorded images
appear different from
the view in the finder
Probable cause
The batteries are not loaded properly.
The recorder is in HOLD mode.
The recorder is in HOLD mode.
Low remaining internal flash memory.
The maximum number of files has been
reached.
The earphone is connected.
The VOLUME control is set to 0.
The recorder was placed near a cell phone
or fluorescent lamp while recording or
during playback.
VCVA is turned on.
Wrong folder.
The number of files in the destination folder
has reached 100 (maximum recording
number).
Objects are too bright or too dark.
The recorder moved when the shutter
button was pressed (camera shake).
Too close to subject.
Action
Verify polarity is correct (☞ P.7).
Release the recorder from HOLD
(☞ P.25).
Release the recorder from HOLD
(☞ P.25).
Erase unnecessary files (☞ P.23).
Check another folder (☞ P.9).
Unplug the earphones to use the
internal speaker.
Adjust the VOLUME control.
Move the recorder.
Turn VCVA off (☞ P.13).
Switch to the right folder (☞ P.9).
Erase unwanted files in the
destination folder (☞ P.23).
Take measures such as shifting
the direction the recorder is
pointed in.
Hold the recorder properly so it
doesn't move, and gently press
the shutter button (☞ P.14).
Take pictures at least 80cm away
from the subject.
The image appearing in the finder
is for approximate reference only.
Take a test shot beforehand to
check how the image will actually
appear.
34
Page 35

Specifications Technical
Recording medium
Power supply
Battery life: Recording ........ Approx. 24 hours
External dimensions:
Weight: 70 g (including batteries)
Recording format
Input level: –70 dBv
Sampling frequency:
Overall frequency response:
Recording time:
Speaker: Built-in ø23 mm round dynamic speaker
Maximum working output (3 V DC):
Earphone jack:
Recording format
Image pickup device:
Number of recording pixels
Number of shootable frames
White balance control
Exposure control system
Lens
: 4-element glass lens (IR coated), F2.8, f=6.5mm
(equivalent to 61 mm lens with 35 mm camera)
Shooting distance
Viewfinder
Operating environment Temperature
* Specifications and design are subject to change
without notice.
* Battery life varies greatly according to type of
batteries used and the conditions of use.
: Built-in flash memory
: Two AAA (LR03 or R03) batteries or
Two Ni-MH rechargeable batteries.
Shooting ...........5,000 images or more
(with alkaline batteries, based on our
standard testing procedure)
119.5 x 29.5 x 19.5mm
(without protrusions)
: WAVE
HQ mode ...... 15.5 kHz
SP mode ....... 10.3 kHz
LP mode ....... 3.9 kHz
HQ mode ...... 300 to 5,800 Hz
SP mode ....... 300 to 4,200 Hz
LP mode ....... 300 to 1,600 Hz
HQ mode ...... 1 hour 31 minutes
SP mode ....... 2 hours 17 minutes
LP mode ....... 6 hours 4 minutes
110 mW (8 Ω speaker)
ø3.5 mm mini-jack, impedance 8 Ω or more
: JPEG (DCF-compliant)
1/4-inch VGA C-MOS solid-state image
pickup device, 300,000-pixels (total)
: Optical, real-image viewfinder
: 640 x 480 pixels
: 250
: Full-auto TTL
: Full-auto
: 0.8m to ∞
: 0 to 40°C
Assistance and
Support
The following are contact infomation
technical for technical support for Olympus
recorders and software only.
◆ Technical Hotline Number in the U.S. and
Canada
1-888-553-4448
◆ User Support E-mail address in the U.S.
and Canada
distec@olympus.com
◆ Technical Hotline Number in Europe
Toll free number
00800 67 10 83 00
available for Austria, Belgium, Denmark,
Finland, France, Germany, Italy,
Luxemburg, Netherlands, Norway,
Portugal, Spain, Sweden, Switzerland,
United Kingdom
Charged numbers for the Rest of Europe
+49 180 567 1083
+49 40 23773 899
◆ User Support E-mail address in Europe
dss.support@olympus-europa.com
Specifications / Technica Assistance and Support
35
Page 36

Page 37

디지털
음성 레코더
W-20
사용설명서
올림푸스 디지털 음성녹음기를 구입해 주셔서 감사합니다.
본 제품을 올바르고 안전하게 사용하기 위해 이
사용설명서를 읽어 주시기 바랍니다.
이 사용설명서는 가까운 곳에 두시고 앞으로도
참고하기시 바랍니다.
음성/화상녹음을 성공적으로 마치시려면
사용 전에 음성/화상녹음기능을
시험해보시기 바랍니다.
KR
1
Page 38

안전하고 올바른 사
용을 위해
본 제품을 사용하기 전에 안전하고 올바른
사용방법의 숙지를 위해 이 매뉴얼을 정독
하십시오. 이 매뉴얼은 가까운 곳에 두셨다
가 앞으로도 참고하시기 바랍니다.
• 경고표시는 안전과 관련된 중요 정보사항을 나
타냅니다. 부상이나 재산상의 피해로부터 귀하
와 다른 사람들을 보호하려면 여기 제공된 경고
사항과 정보에 항상 주의를 기울이셔야 합니다.
일반적인 예방대책
● 본 녹음기를 직사광선이 비치는 밀폐된
자동차나 하절기 시 바닷가 같은 덥고 습
기찬 곳에 두지 마십시오.
● 과도한 습기나 먼지에 노출된 장소에 보
관하지 마십시오
● 청소 시에는 알코올이나 벤젠과 같은 유
기용제를 사용하지 마십시오.
● TV나 냉장고 등의 전자제품 위나 가까이
두지 마십시오.
● 휴대전화기나 기타 무선장비는 혼신이나
소음을 일으킬 수 있으므로 이들 기기 근
처에서는 녹음이나 재생을 피하십시오.
● 모래나 먼지를 피하십시오. 모래나 먼지
는 수리가 불가능한 파손을 유발할 수 있
습니다.
● 강한 진동이나 충격을 주지 마십시오.
● 본 제품을 분해, 수리 혹은 개조하지 마
십시오.
● 자전거, 오토바이 또는 자동차를 주행 중
인 때에는 본 제품을 작동시키지 마십시
오.
● 아이들의 손이 닿지 않는 곳에 두십시오.
<데이터 소실에 관한 주의사항>
메모리의 기록내용은 오조작, 기계의 고장,
수리도중에 파괴되거나 지워질 수 있습니다.
중요한 기록내용은 PC의 하드디스크등의 미
디어에 백업받아 보관할 것을 권장합니다.
건전지
경고
• 건전지는 열기에 노출되거나, 가열되거나,
누전되거나, 분해되어선 안됩니다.
• 알칼라인, 리튬 또는 기타 비 충전식 건전
지를 충전하려 하지 마십시오.
• 외부 덮개가 찢어지거나 부서진 건전지는
사용하지 마십시오.
• 아이들의 손이 닿지 않는 곳에 두십시오.
• 본 제품 사용 시 비정상적인 소음, 열, 연
기 혹은 타는 냄새 등 이상한 상황이 발생
하면:
1 화상을 입지 않도록 주의하면서 건전지
를 즉시 빼내고,
2 본 제품의 판매처나 올림푸스 한국(주)
지점 서비스센터로 연락하여 서비스를
받으십시오.
2
Page 39

목차
시작하기
주요 특징 .................................................. 4
부분의 확인 .............................................. 5
건전지 삽입 .............................................. 7
녹음, 사진촬영 및 재생
녹음 ......................................................... 10
녹음모드 (MOdE) ................................. 1 1
마이크 민감도 (MIC) ............................ 12
가변제어음성작동기 (VCVA) 의 사용 ..... 13
사진촬영.................................................. 14
기타 기능
폴더간 파일 이동하기 (MOVE) ............ 19
알람재생기능 (ALARM) ....................... 20
지우기 ..................................................... 23
시스템 사운드 (bEEP) ......................... 24
레코더를 초기화하기 (CLEAR) ........... 25
PC상의 파일관리
OLYMPUS
Voice Album 소프트웨어의 사용 ...... 27
소프트웨어 설치 ..................................... 29
Voice Album 실행방법 ...................... 30
시간/날짜 설정 (TIME) .......................... 8
폴더에 관한 주의사항 .............................. 9
재생 ......................................................... 17
홀드 ......................................................... 25
메뉴목록.................................................. 26
윈도우 명칭 ............................................ 31
온라인 도움말의 사용 ............................ 32
파일 포맷 ................................................ 33
기타 정보
문제해결.................................................. 34
본 녹음기의 사양 ................................... 35
기술적 도움과 지원 ............................... 35
3
Page 40

주요 특징
● 본 녹음기는 32 메가바이트 통합 플래시
메모리 내에 고도로 압축된 WAVE와
주요 특징
JPEG포맷을 저장하고 있습니다.
● 본 녹음기는 3가지의 녹음모드 즉 HQ
(고품질) 모드, SP (표준재생) 모드 그리
고 LP (장시간 재생) 모드를 지원합니다.
• 최대녹음가능시간은 HQ모드에서는 약 1시간
31분, SP모드에서는 약 2시간 17분 그리고
LP모드에서는 6시간 4분입니다.*
● A와 B음성폴더는 각각 최대 100개의 음
성파일을 저장할 수 있으며 (영상)폴
더는 최대 250개의 화상파일을 저장할
수 있습니다.
● 본 녹음기는 C-MOS 반도체를 이용한
300,000픽셀 영상센서를 장착하고 있
습니다.(유효화소)
● 음성 및 화상파일은 내장형 플래시메모리
에 녹음되어 있습니다. 데이터는 건전지
교체 중에 손실되지 않습니다.
● 조그다이얼판과 LCD화면으 로인해 작동
이 용이합니다.
● 오디오녹음 중에도 사진촬영이 가능합니
다. 데이터를 컴퓨터에 전송하면 녹음된
오디오를 듣는 동안에도 연결되어 있는
영상을 볼 수 있습니다.
● 팩키지 안에 있는 특수 “OLYMPUS Voice
Album” 소프트웨어를 이용하여 음성 및
화상파일을 편집할 수 있습니다.
● 전송속도를 높이기 위해서는 내장된 USB
케이블을 컴퓨터에 연결하십시오.
* 하나의 계속된 파일을 위한 가용 녹음시간.
가용 녹음시간은 녹음을 짧게 여러 번 하는 경우 단축
될 수 있습니다. (디스플레이된 가용 녹음시간은 근사
치를 표시한 것임)
..........................................................................
Microsoft와 Windows 는 마이크로소프트사의
상표에 등록되어 있습니다.
Intel과 Pentium 은 인텔사의 상표에 등록되어
있습니다.
기타 여기 언급된 제품과 브랜드 명은 각각 그들
소유자의 등록상표입니다.
4
Page 41

부분의 확인
조그다이얼
1
2
3
4
5
6
7
8
9
0
!
@
#
1 내장형 마이크
2 녹음 지시기 램프
3 디스플레이 (LCD패널)
4 REC (녹음) 버튼
5 MENU (메뉴)/FOLDER (폴더) 버튼
6 셔터버튼
7 렌즈
8 HOLD스위치
9 PC (USB) 터미널
0 ERASE (지우기) 버튼
! 음량조절기
@ STOP (정지) 버튼
$
%
^
&
*
# –/0 (되감기) 버튼
$ +/9 (빨리감기) 버튼
% PLAY (재생) 버튼
^ 내장형 스피커
& 스트랩 구멍
* 건전지 덮개
( 뷰파인더
) 촬영램프
- 이어폰 잭
-
)
부분의 확인
(
5
Page 42

부분의 확인
디스플레이 (LCD패널)
부분의 확인
1
2
3
4
1 폴더 표시창
2 녹음 모드 표시창
3 마이크 민감도 디스플레이 (LOW)
4 현재의 시각/날짜, 녹음 시각/날짜
(REC DATE), 녹음 경과시간, 녹음
잔량시간 (REMAIN), 메뉴 디스플
레이 등
5 알람 지시기
6 건전지 지시기
7 빨리 되감기 표시창 (7),
빨리 감기 표시창 (8),
녹음 표시창 (s), 재생 표시창 (`)
8 파일 번호 표시창
9 VCVA (가변제어음성작동기) 지시기
5
녹음기가 정지하여 녹음이
6
나 재생이 안 되는 경우, 시
7
계가 나타납니다.
8
9
STOP버튼을 누르고 있으면
남아있는 가용녹음시간과 한
폴더 내의 총 파일 수가 나
타납니다.
a 현재의 폴더
b 현재의 폴더에 녹음한 파일의 합계
c 녹음 잔량 시간
대기 상태와 디스플레이 차단
녹음기가 60분 이상 정지되면 대기 (전력
절감) 모드로 전환되며 디스플레이가 꺼집
니다. 대기상태를 종료하여 화면을 켜려면
아무 버튼이나 누르십시오.
a
b
c
6
Page 43

건전지 삽입
1
2
3
.................................................................................................................................................................
주
• 건전지 교체 전에 녹음기를 정지시켜야 합니다. 녹음 중에 건전지를 빼내고 오디오파일을 지우면 파일
이 손상될 수 있습니다. 파일에 녹음을 하는 도중 건전지가 소모되면 표제가 닫히지 못하게 되므로 현
재 녹음된 파일을 잃게 됩니다. 따라서 건전지 아이콘에 표시가 하나라도 나타나면 건전지를 교체하는
것이 중요합니다.
• 건전지 2개를 동시에 교체하십시오.
• 오래된 건전지와 새 건전지 또는 다른 종류나 다른 브랜드의 건전지를 섞어 사용하지 마십시오.
• 본 녹음기를 오래 사용하지 않을 때에는 건전지를 빼내십시오.
화살표 방향으로 가볍게 누르면서 건전지 덮개를
밀어 여십시오.
1
AAA형 알카라인 건전지 두 개를 극성표시를 보면
서 정확히 삽입하십시오.
2
건전지 덮개를 완전히 닫으십시오.
시간 표시등이 깜박거리면서 시작 시간, 날짜 설정이 시
3
작 되었음을 보여줍니다 (☞8페이지).
건전지 교체
디스플레이에
해 주십시오. 건전지 소모 시에는
점멸하며 녹음기는 꺼집니다. 건전지는 AAA형 알칼라인 건
전지를 권장합니다.
현재 설정해 놓은 것 (시각/날짜 등) 을 유지하려면 전지를
교환하기 전에 HOLD 스위치를 HOLD 위치에 설정해 놓는
것이 좋습니다. 이 레코더는 현재 설정해 놓은 것을 매시간
간격으로 기억하여 기록해 주므로 매우 편리합니다.
본 녹음기에는 선택 사양인 Olympus사의 Ni-MH
2차 건전지를 사용하실 수 있습니다. 그러나, NiMH 2차 건전지를 사용하면 건전지 잔량이 정확하게
표시되지 않습니다.
가 나타나면 가능한 빨리 전지를 교환
가 디스플레이판에
건전지 삽입
7
Page 44

시간/날짜 설정 (TIME)
시간과 날짜를 설정한 경우에는 파일녹음정보가 파일 내에 자동 저장됩니다. 시간과 날짜의
설정목적은 파일관리작업을 쉽게 하게 하기 위한 것입니다. 시간과 날짜의 설정은 알람재생
기능을 수행하는데도 필요합니다 (☞20페이지).
시간/날짜 설정 (TIME)
전지를 맨처음 넣거나 전지를 교환할 때마다 시간 표시가 깜빡입니다. 그럴 경우에는 다음의
스텝 4~5을 따라서 반드시 시각과 날짜를 설정해 주십시오.
시간/날짜 변경
MENU/FOLDER 버튼을 1초 이상
계속 누르십시오.
1
메뉴가 열립니다 (☞26페이지).
“TIME”표시가 깜빡일 때까지 +/9
또는 –/0 버튼을 누르십시오.
2
2,4
8
1
5
3,4
PLAY 버튼을 누르십시오.
시간 지시기가 깜빡이며 시간/날짜 설
3
정과정의 시작을 알립니다.
시간과 날짜 설정을 위해 1 단계
와 2 단계를 반복하십시오:
4
1 숫자의 설정을 위해 +/9 또는 –/
0 버튼을 누르십시오.
2 설정된 숫자가 맞으면 PLAY 버튼을
누르십시오.
• 시간과 날짜 설정은 시, 분, 년, 월, 그
리고 일의 순서로 진행됩니다.
STOP 버튼을 누르십시오.
메뉴화면이 닫히고 “END” 가 점멸합니
5
다.
Page 45

폴더에 관한 주의사항
• 시와 분의 설정 중에는 MENU/FOLDER 버튼
을 눌러 12시와 24시 디스플레이 사이에서 선
택할 수 있습니다.
(예; 5:23 P.M.)
(초기 설정)
• MENU/FOLDER 버튼을 눌러 월, 년, 일의 설
정 시 그 순서를 선택할 수 있습니다.
(예; 9월 15일 2002년)
(초기 설정)
주
• 스텝 5에서 STOP 버튼을 누르기 전에 3분 이
상 조작을 하지 않으면 설정모드는 취소되며 시
각/날짜 설정도 취소됩니다.
• 설정 중 STOP버튼을 누르면 시계는 그 때까지
설정된 항목을 사용하게 됩니다.
레코더에는 3개의 폴더 (A, B, ) 가 있
습니다.
MENU/FOLDER 버튼을 눌러 폴더를 변
경하십시오. 버튼을 누를 때마다 폴더가 A→
B→ → A … 순으로 바뀝니다.
폴더 A 와 B
폴더안에 저장된 각각의 녹음 메시지는 웨
이브 파일로서 보존됩니다. 녹음 종류를 구
별하기 위해서는 이 폴더들을 선택해서 사
용할 수 있습니다. 예를 들어 A는 개인정보
를 저장하는데 사용할 수 있는 반면 B는 사
업정보를 저장하는데 사용하실 수 있습니
다. 폴더 당 최대100개의 메시지를 녹음할
수 있습니다.
폴더
A혹은 B폴더 내의 오디오녹음 중 녹음된
영상파일을 포함한 전체 파일은 폴더에
저장됩니다. 이 폴더는 최대 250개의 영상
파일을 저장할 수 있습니다.
시간/날짜 설정 (TIME) / 폴더에 관한 주의사항
9
Page 46

녹음
내장형 마이크
녹음
3
1
A폴더 혹은 B폴더를 선택하려면
MENU/FOLDER 버튼을 누르십시오.
1
폴더 명이 디스플레이됩니다.
a 현재의 폴더
녹음을 시작하려면 REC 버튼을 누
르십시오.
2
녹음 지시기 램프가 빨간색이 됩니다.
• 녹음 중 MENU/FOLDER 버튼을 누르면
화면 디스플레이가 바뀝니다.
2
b 현재의 파일 번호
c 녹음 시간
d 녹음 잔량시간
녹음을 정지하려면 STOP 버튼을
누르십시오.
3
녹음 정지
일시정지
녹음 중 REC 버튼을 누르십시오.
a
b
c
d
➥ 녹음지시기 램프가 점멸하고 “PAUSE” 및 녹음지시기
(s)가 디스플레이에서 점멸합니다.
녹음재개
다시 REC 버튼을 누르십시오.
➥ 중단된 부분에서 녹음이 다시 시작됩니다.
.................................................................................................................................................................
주
• 녹음 잔량시간이 5분 이하가 되면 MENU/FOLDER 버튼을 눌러도 현재의 녹음시간이 표시되지 않습
니다.
• 녹음 잔량시간이 1분 이하가 되면 녹음 지시기 램프가 깜빡입니다.
• 디스플레이 화면에 “FULL”이 표시되면 더 이상 녹음할 수가 없습니다. 그럴 경우에는 필요없는 파일을
삭제하십시오 (☞23페이지).
•
폴더에서 REC 버튼을 누르면 A폴더로 자동 전환되며 녹음이 시작됩니다. A폴더에 100개의 파일
이 있는 경우에는 B파일로 전환됩니다.
• 일시정지된 상태가 10분 이상 지속되면 녹음기는 정지상태가 됩니다.
10
Page 47

녹음모드 (MOdE)
HQ (고품질) 모드, SP (표준재생) 모드, LP (장시간 재생) 모드 등 3가지 녹음모드 중에서
선택할 수 있습니다. 연속녹음시간은 HQ모드에서는 약 1시간 31분, SP모드에서는 2시간 17
분, 그리고 LP모드에서는 약 6시간 4분입니다.
위에 보여진 녹음시간은 하나의 화일에 연속녹음 했을 경우입니다. 여러개의 화일이 녹음되
면 가능 녹음시간이 이보다 줄어들 수 있습니다. (잔량시간은 다소 차이가 날 수 있습니다.)
3
1
MENU/FOLDER 버튼을 1초 이상
계속 누르십시오.
1
“REC MOdE” 표시가 스크린에 나타납
니다 (☞26페이지).
PLAY 버튼을 누르십시오.
녹음모드설정과정이 시작됩니다.
2
+/9 또는 –/0 를 눌러 녹음
상태를 선택할 수 있습니다.
3
4
2
STOP 버튼을 누르십시오.
메뉴화면이 닫히고 “END” 가 점멸합니다.
4
.......................................................................................................
주
회의나 강의내용을 깨끗하게 녹음하기 위해서는 HQ나 SP모드를 선
택하십시오.
녹음모드 (MOdE)
11
Page 48

마이크 민감도 (MIC)
마이크 민감도는 녹음내용에 따른 필요사항을 충족시킬 수 있도록 조정이 가능합니다.
MENU/FOLDER 버튼을 1초 이상
계속 누르십시오.
1
메뉴가 열립니다 (☞26페이지).
“MIC” 표시가 깜빡일 때까지+/9
또는 –/0 버튼을 누르십시오.
마이크 민감도 (MIC)
2
PLAY 버튼을 누르십시오.
마이크 민감도설정이 시작됩니다.
3
12
2,4
1
5
3
LO과 HI를 선택하려면 +/9 또
는 –/0 버튼을 누르십시오.
4
HI : 모든 방향에서 사운드를 녹음하는
고 민감도 모드.
LO: 구술에 적합한 저 민감도.
STOP 버튼을 누르십시오.
메뉴화면이 닫히고 “END” 가 점멸합니다.
5
a 마이크 민감도 디스플레이
LO를 선택하면
나타납니 다.
.......................................................................................................
주
• 성공적으로 녹음하려면 녹음하기 전에 적절한 마이크로폰의 감도
를 선택하기 위하여 테스 트 녹음을 해 주십시오.
• HI를 선택하면 고감도를 이용할 수 있으므로 녹음상태를 HQ또는
SP로 하기를 추천합 니다.
• HI선택시 녹음조건에 따라 배경잡음이 높을 수 있습니다.
가 디스플레이 창에
a
Page 49

가변제어음성작동기 (VCVA) 의 사용
사운드가 미리 설정된 음량에 다다랐음을 마이크가 감지하면 내장된 가변제어음성작동기가
자동적으로 녹음을 시작하며 음량이 떨어지면 녹음을 정지합니다.
VCVA기능은 특히 녹음연장 시에 유용하며 조용한 시간동안에는 녹음을 중단하여 메모리를
보존할 뿐만 아니라 재생을 더욱 효율적이고 편리하게 해 줍니다.
MENU/FOLDER 버튼을 1초 이상 계속
누르십시오.
1
메뉴가 열립니다 (☞26페이지).
“VCVA” 표시가 깜빡일 때까지+/9
또는 –/0 버튼을 누르십시오.
2
PLAY 버튼을 누르십시오.
VCVA설정과정이 시작됩니다.
3
6
On과 OFF의 선택을 위해 +/9 또
는 –/0 버튼을 누르십시오.
5
4
2,4
1
On : VCVA모드로 녹음을 시작합니다.
OFF: 정상모드로 녹음을 재개합니다.
3
STOP 버튼을 누르십시오.
메뉴화면이 닫히고 “END” 가 점멸합니다.
5
녹음을 시작하려면 REC 버튼을 누르십
시오.
6
VCVA가 사전에 설정된 음량보다 더 큰 음
을 감지하면 녹음이 자동적으로 시작됩니
다. VCVA가 아무런 음도 감지하지 못하면
약 1 초 후 녹음이 자동적으로 멈추어지고
녹음기는 대기모드로 전환됩니다.
a VCVA 지시기
a
가변제어음성작동기 (VCVA) 의 사용
녹음지시기 램프는 녹음하는 동안 켜집니다. 녹음기가 대기 모
드에 있을 때, 녹음지시기 램프가 점멸합니다. 그리고 VCVA
와 녹음 지시기(s)는 디스플레이에서 점멸합니다.
..............................................................................................................
주
녹음을 성공적으로 하려면 사용 전에 녹음기능과 음량을 점검하시기 바
랍니다.
13
Page 50

사진촬영
카메라 잡기 (녹음기)
녹음기를 양손으로 안전하게 잡고 팔꿈치를 몸에 붙이십시오.
손가락이나 카메라 줄이 렌즈를 가리는지 확인하십시오.
사진촬영
좋은 자세
나쁜 자세
촬영램프시스템
파인더 측면에 있는 촬영램프가 점등하거나 오렌지색 혹은 녹색으로 점멸하는 경우에는 녹음
기가 다음 상태 중 하나에 해당됩니다 :
램프상태
오렌지색 점등
녹색 점등
오렌지색 점멸
녹색 점멸
*시간조정은 밝기에 따라 다릅니다.
녹음기상태 (셔터버튼)
노출조정 (반셔터)*
적절한 노출 (반셔터)
노출불량 (한 번 더누름)
최대 파일 수 녹음 (반셔터)
잔존 메모리부족 (반셔터)
사진촬영 완료 (한 번 더누름)
가능/불가능
사진촬영이 불가능합니다.
촬영램프가 녹색이 점등할 때 사진을
촬영하십시오. 램프가 녹색으로 변하
지 않으면 너무 밝거나 어두워서 촬영
이 불가능합니다. 램프가 6초 이상 오
렌지색으로 점등되면 촬영 전에 밝기
를 바꾸십시오.
사진촬영이 가능합니다.
사진촬영이 불가능합니다.
다른 사진촬영이 가능합니다.
14
Page 51

사진촬영
사진촬영 시에는 A, B, 혹은 중 아무런 폴더나 선택 가능합니다. 모든 사진은 폴더
에 저장됩니다.
셔터버튼에는 두 단계가 있습니다. 노출은 첫째 단계에서 조정되며 사진은 둘째 단계에서 촬
영됩니다.
뷰파인더
촬영램프
1,2
셔터버튼을 반만 누르십시오 (반셔
터).
1
파인더 옆의 촬영램프가 오렌지색이 됩
니다. 램프색이 오렌지에서 녹색으로 변
하면 사진촬영준비를 하십시오.
버튼을 부드럽게 누르고 있다가 더
세게 누르십시오 (한 번 더누름).
2
녹음기가 사진촬영을 합니다. 촬영램프
가 녹색으로 점멸하면 사진촬영이 완료
됩니다.
오렌지색이 점멸하고 있으면 촬영이 되
지 않고 있으니 다시 촬영하여 주시기
바랍니다.
• 폴더에서 STOP버튼을 누르면 총 화상
파일 수가 나타납니다. 최대 250개의 화상
파일을 저장할 수 있습니다.
a 기록된 파일의 현재의 수
오디오 녹음 중에도 사진촬영이 가능합니
다 (녹음 멈춤).
.......................................................................................................
주
• 항상 셔터버튼을 부드럽게 누르십시오. 너무 강하게 누르면 녹음
기가 이동하여 영상이 손상됩니다.
• 녹음기 디스플레이를 이용하여 녹화 영상을 볼 수 없습니다. 화상
파일을 컴퓨터에 전송하고 “OLYMPUS Voice Album ” 소프트웨
어를 이용하여 화상파일을 보십시오 (☞30페이지).
a
사진촬영
15
Page 52

사진촬영
사진촬영이 불가능한 경우
원인은 다음과 같습니다. 문제를 해결하고 사진촬영을 다시 시작하십시오.
가능원인
최대 파일 수 녹음 (250 영상)
사진촬영
잔존 메모리부족
잔존 건전지용량 부족
한 음성파일 녹음 중 50개
화상파일 미리 녹화
촬영램프가 오렌지색으로 점등
된 동안 셔터버튼 누름 (완전
누름)
*음성파일은 두 개 파일로 녹음.
메시지
촬영램프가 오렌지색으로 점멸.
디스플레이가 “FULL” 로점멸.
디스플레이가 파일 수로 점멸.
촬영램프가 오렌지색으로 점멸.
디스플레이가 “FULL” 로점멸.
디스플레이판이 혹은 으로
점멸.
촬영램프가 오렌지색으로 점멸.
촬영램프가 오렌지색으로 점멸.
디스플레이가 점멸.
조치
불필요한 영상파일 삭제.
불필요한 오디오 혹은 영상파일
삭제.
새로운 건전지로 교체.
STOP 버튼을 눌러 녹음 중 녹음
을 중단하고 REC 버튼을 눌러 새
음성파일 시작 및 영상녹화*.
촬영램프가 녹색이 점등할 때 사
진을 촬영하십시오. 램프가 녹색
으로 변하지 않으면 너무 밝거나
어두워서 촬영이 불가능합니다.
16
Page 53

재생
2
1
5
3
4
A폴더 혹은 B폴더를 선택하려면
MENU/FOLDER 버튼을 누르십시오.
1
+/9 또는 –/0 를 눌러 재생
하고자 하는 파일을 선택하십시오.
2
재생시작을 위해 PLAY 버튼을 누
르십시오.
3
• 재생 중 MENU / FOLDER버튼을 누르면
화면 디스플레이가 바뀝니다.
a 파일경과 시간
b 파일잔존 시간
c 날짜 녹음
d 녹음시간
음량을 기호대로 조정하십시오.
4
재생을 정지시키고자 하는 때에
STOP 버튼을 누르십시오.
5
PLAY 버튼을 다시 눌러 재생을 재개할
수 있습니다.
재생
a
b
c
d
17
Page 54

재생
재생
재생기능
빠른 재생
(F.PLAY)
빨리 감기
(8)
빨리 되감기
(7)
파일시작으로
건너뛰기*
화일 재생이나 정지중에 PLAY 버튼을 1초 이상 계속 누르십시오.
➥ 정상보다 약 30% 빠르게 재생됩니다.
파일재생 중 +/9버튼을 계속 누르십시오.
➥ 파일 끝부분에 도달 시 녹음기는 정지합니다.
다음 파일의 시작부분부터 재시작을 진행하려면 +/9버튼
을 계속 누르십시오.
파일재생 중 –/0버튼을 계속 누르십시오.
➥ T파일 끝부분에 도달 시 녹음기는 정지합니다.
이전 파일의 끝부분부터 재시작을 진행하려면 –/0버튼을
계속 누르십시오.
정지상태, 재생상태 또는 빠른 재생상태에서 +/9 버튼을 누
릅 니다.
➥ 정지모드 ..................... 녹음기가 다음 파일의 시작부분에서
➥ 재생모드 ..................... 다음 파일의 시작부분으로 건너뛰어
➥ 빠른 재생모드 ............ 다음 파일의 시작부분으로 건너뛰어
정지상태, 재생상태 또는 빠른 재생상태에서 –/0 버튼을 누
릅 니다.
➥ 정지모드 ..................... 이전 파일의 시작부분에서 정지.
➥ 재생모드 ..................... 현재 파일의 시작부분으로 건너뛰어
➥ 빠른 재생모드 ............ 현재 파일의 시작부분으로 건너뛰어
작동
정지.
재생시작.
빠른 재생시작.
재생시작.
빠른 재생시작.
취소방법
PLAY 버튼을 다시 누
르십시오.
➥ 정상속도로 돌아갑
니다.
+/9 버튼을 놓으십
시오.
➥ 정상속도로 돌아갑
니다.
–/0 버튼을 놓으십
시오.
➥ 정상속도로 돌아갑
니다.
*정지모드에서 +/9 또는 –/0 을 계속 누르면 파일의 시작부분으로 계속 건너뛴다
(SKIP).
18
Page 55

폴더간 파일 이동하기 (MOVE)
폴더 A나 B에 기록된 파일을 다른 폴더로 이동시킬 수 있습니다.
이동된 파일은 목적지 폴더의 파일순서 중 맨 마지막에 추가됩니다.
A폴더 혹은 B폴더를 선택하려면
MENU/FOLDER 버튼을 누르십시오.
1
이동시켜 재생하고자 하는 파일을
선택하십시오.
2
MENU/FOLDER 버튼을 1초 이상
계속 누르십시오.
3
재생이 정지되고 디스플레이 화면에는
“MOVE”가 깜빡 입니다.
a 지정폴더
b 파일의 지정번호
목적지 폴더와 이동한 파일수가 디스플레
이 화면에 표시되면 이동완료를 뜻합니다.
2
1,3
.......................................................................................................
주
• 폴더 와 다른 폴더 사이에서는 파일을 이동시킬 수 없습니다.
• 목표폴더가 꽉 찬 경우 (최대 100개 파일) “FULL” 표시가 디스플
레 이상에 나타나고 파일을 전송할 수 없습니다.
a
b
폴더간 파일 이동하기 (MOVE)
19
Page 56

알람재생기능 (ALARM)
알람재생기능은 선택파일을 미리 설정한 시간에 재생하기 위해 사용할 수 있습니다. 알람은
5개까지 설정할 수 있습니다.
알람 재생의 설정
A폴더 혹은 B폴더를 선택하려면
MENU/FOLDER 버튼을 누르십시오.
1
알람이 울릴 때 재생될 파일의 선택
을 위해 +/9 또는 –/0버튼
2
을 누르십시오.
MENU/FOLDER 버튼을 1초 이상
계속 누르십시오.
3
메뉴가 열립니다 (☞26페이지).
알람재생기능 (ALARM)
2,4,6
5,7
1,3
“ALARM” 표시가 디스플레이상에
깜빡이면 +/9 또는 –/0 버
4
튼을 누르십시오.
PLAY 버튼을 누르십시오.
“ALARM” 이 켜지고 “OFF” 가 점멸합
5
니다.
눌러서 On을 선택하려면 +/9
또는 –/0 버튼을누르십시오.
6
20
설정스크린의 종료를 위해 PLAY 버
튼을 누르십시오.
7
월 지시기가 점멸합니다.
Page 57

시간과 날짜 설정을 위해 1 단계
와 2 단계를 반복하십시오:
8
1 숫자의 설정을 위해 +/9 또는 –/
0 버튼을 누르십시오.
2 설정된 숫자가 맞으면 PLAY 버튼을
누르십시오.
• 시간과 날짜 설정은 월, 날짜, 시간과
분의 순서로 진행됩니다.
8
STOP 버튼을 누르십시오.
메뉴화면이 닫히고 “END” 가 점멸합니
9
다.
9
a 알람 지시기
알람은 맞춰놓은 시간에 5분 동안 울립니
다. 알람과 관련되는 파일을 재생하려면 알
람이 울리는 동안 STOP버튼을 누르십시
오. 파일알람재생을 정지시키려면 STOP
버튼을 다시 누르십시오.
.......................................................................................................
주
• 알람이 울리기 시작한 후 5분 이내에 아무 버튼도 누르지 않으면
알람은 자동적으로 멈춥니다. 이 경우에 파일은 재생되지 않습니
다.
• 알람 재생이 끝난 후에 알람 재생 기능은 자동적으로 취소됩니다.
• 5개 이상의 파일에 알람 재생 기능을 설정할 수는 없습니다. 선택
된 폴더에 녹음된 파일이 없어도 알람 재생 기능을 설정할 수 없
습니다.
• 알람 재생 예약은 파일의 년도를 설정할 수 없습니다.
a
알람재생기능 (ALARM)
21
Page 58

알람재생기능 (ALARM)
2,4,6
알람재생기능 (ALARM)
1,3
8
5,7
알람 재생 설정을 취소하려면
A폴더 혹은 B폴더를 선택하려면
MENU/FOLDER 버튼을 누르십시오.
1
+/9 또는 –/0 버튼을 눌러
알람재생이 설정된 대상 파일을 선
2
택하십시오.
MENU/FOLDER 버튼을 1초 이상
계속 누르십시오.
3
메뉴가 열립니다 (☞26페이지).
“ALARM” 표시가 디스플레이상에
깜빡이면 +/9 또는 –/0 버
4
튼을 누르십시오.
PLAY 버튼을 누르십시오.
“ALARM” 이 켜지고 “On” 가 점멸합니
5
다.
OFF 를 선택하려면 +/9 또는 –
/0 버튼을 누르십시오.
6
PLAY 버튼을 누르십시오.
7
STOP 버튼을 누르십시오.
메뉴화면이 닫히고 “END” 가 점멸합니
8
다.
22
Page 59

지우기
불필요한 화일을 쉽게 삭제할 수 있습니다. 일련의 화일번호들이 자동적으로 부여됩니다.
한 개 파일을 한 번에 지우기
폴더선택을 위해 MENU/FOLDER 버튼
을 누르십시오.
1
지우고자 하는 파일의 선택을 위해 +/
9 또는 –/0 버튼을 누르십시오.
2
재생하는동안 파일을 지울수 있습니다.
ERASE 버튼을 누르십시오.
파일 수가 깜빡이고나서 “ERASE”와 “YES”
3
가 8초동안 번갈아 표시됩니다.
2
1
1
3,4
2,3
ERASE 버튼을 다시 누르십시오.
파일이 삭제됩니다.
4
한 폴더에서 모든 파일을 삭제하려면
폴더선택을 위해 MENU/FOLDER 버
튼을 누르십시오.
1
ERASE 버튼을 2초 이상 누르십시오.
폴더명과 “ALL”이 깜빡이고나서 “ERASE”
2
와 “YES”가 8 초동안 번갈아 표시됩니다.
ERASE 버튼을 다시 누르십시오.
선택된 폴더 안에 있는 모든 파일이 동시에
3
삭제됩니다.
지우기
.................................................................................................................................................................
주
•“ERASE” 표시가 깜빡이고 난 후 8초 내에 ERASE버튼을 누르지 않으면 정지상태로 돌아갑니다.
• 지워진 파일은 복구되지 않습니다. 중요한 파일은 컴퓨터에 전송하고 녹음기에서 삭제 전에 그 내용을
확인하시기를 권장합니다.
23
Page 60

시스템 사운드 (bEEP)
본 녹음기는 작동 시 버튼을 누르게 하고 실수에 대해 경고를 주기 위해 발신음을 냅니다. 시
스템 사운드는 꺼질 수도 있습니다.
MENU/FOLDER 버튼을 1초 이상
계속 누르십시오.
1
메뉴가 열립니다 (☞26페이지).
“bEEP” 표시가 디스플레이상에 깜
빡일 때까지 +/9 또는 –/0
2
버튼을 누르십시오.
PLAY 버튼을 누르십시오.
시스템 사운드 설정과정이 시작됩니다.
3
시스템 사운드 (bEEP)
2,4
1
24
5
3
On과 OFF의 선택을 위해 +/9
또는 –/0 버튼을 누르십시오.
4
On : 시스템사운드를 가능하게 합니다.
OF F : 시스템사운드를 불가능하게 합니다.
STOP 버튼을 누르십시오.
메뉴화면이 닫히고 “END” 가 점멸합니다.
5
알람재생기능이 설정된 경우에는 시스템사
운드가 꺼져있더라도 예정된 시간에 알람
이 울립니다.
Page 61

레코더를 초기화하기 (CLEAR)
이 기능은 녹음기에 저장된 전체 파일을 삭제하여 주며 현재 시간과 기타 설정사항을 최초상태
로 재설정해 줍니다. 저장하고자 하는 중요파일이 있으면 본 녹음기를 컴퓨터에 연결하여 초기
화 전에 컴퓨터로 전송하십시오.
STOP 버튼을 누른 채로, ERASE 버튼을
2초 이상 계속 누르십시오.
1
디스플레이 화면에 “CLEAR”와 “YES”가 8초
동안 번갈아 표시됩니다.
ERASE 버튼을 다시 누르십시오.
1
2
본 녹음기는 구입 시 최초값 상태로 되돌아가며
2
날짜 및 시간 설정화면을 보여줍니다 (☞8페이
지).
.............................................................................................................
주
“CLEAR” 의 점멸개시 8초 후 ERASE 버튼을 누르지 않으면 녹음기는 정
지상태로 되돌아갑니다.
홀드
HOLD위치에 HOLD 스위치 설정
HOLD스위치를 화살표 방향으로 밀어넣어 녹음기를 HOLD상태로 설정하는 경우 현재 상태
는 그대로 유지되고 HOLD스위치를 제외한 모든 버튼과 스위치는 작동불능상태가 됩니다.
이 특징은 ERASE버튼을 사고로 누르는 경우에도 파일이 삭제되지 않기 때문에 본 녹음기
를 가방이나 주머니에 넣고 다닐 때 유용합니다.
본 녹음기 사용 시에는 HOLD스위치를 재설정하는 것을 잊지 마십시오.
주
• HOLD 스위치를 HOLD 위치에 설정하면 레코더는 다음과 같은 기능을
갖습니다:
– 레코더가 정지하면 디스플레이 화면이 어두워집니다.
– 레코더가 재생중이면 현재 파일의 재생이 끝났을 때 디스플레이 화
면이 어두워집니다.
– 녹음상태에서 홀드스위치를 홀드쪽으로 밀면, 녹음가능시간이 O이
되는 시점에서 녹음이 종료되고 디스플레이는 어두워집니다.
• HOLD 스위치가 HOLD 위치에 설정되어 있어 디스플레이 화면이 어두울
때, 아무 버튼이나 누르면 시계는 2초동안 깜빡입니다.
• 재생하는 동안 HOLD 위치에 HOLD 스위치를 설정해 도 볼륨 조절
이 가능합니다.
• 알람은 레코더가 HOLD에 설정되어 있더라도 맞춰 놓은 시간에 울립니
다. STOP버튼을 누르면 알람과 관련된 파일을 재생하기 시작합니다.
레코더를 초기화하기 (CLEAR) / 홀드
25
Page 62

메뉴목록
MENU/FOLDER 버튼을 1초 이상
계속 누르십시오.
HQ
SP
LP
HI
LO
OFF
On
OFF
On
On
OFF
시간/날짜 스크린
12시간/연,월,을
메뉴목록
(☞11페이지)
(☞12페이지)
(☞13페이지)
(☞20페이지)
(☞24페이지)
(☞8페이지)
주
• 폴더를 선택하면 “ALARM” 이 나타나지 않습니다.
• 선택항목의 미적용 시 메뉴설정 중 3분간 녹음기를 작
동시키지 않으면 정지합니다.
녹음모드 설정. HQ, SP 와 LP모드를 변경
가능.
마이크 설정. HI 과 LO 중 변환.
VCVA설정. On ( 가능) 과 OFF (불가능)
중 변환.
알람재생 설정. On (가능) 과 OFF (불가능)
중 변환.
시스템사운드 설정. On (가능) 과 OFF (불
가능) 중 변환.
날짜/시간 설정. 시, 분, 년, 월 및 일의 순.
+/9 또는 –/0 버튼
을 누르십시오
PLAY 버튼을 누르십시오.
초기 설정
26
Page 63

.................................................................................................................................................................
•
•
27
Page 64

.................................................................................................................................................................
•
•
•
•
28
Page 65

•
•
•
1
2
3
4
5
6
“ ”
7
8
9
10
“ ”
29
Page 66

1
2
1
2
•
“ ” “ ”
......................................................................................................
•
•
•
•
•
30
Page 67

7
12453
6
1
2
3
4
5
6
7
6 7
31
Page 68

•
•
•
1
2
3
1
2
3
.................................................................................................................................................................
32
Page 69

A001
.................................................................................................................................................................
•
•
DW A0001.wav
(jpg)
33
Page 70

☞
☞
☞
☞
☞
☞
☞
☞
☞
34
Page 71

.................
.................
.......
........
........
.......
........
........
.......
........
........
ø
8Ω
ø Ω
◆
◆
35
Page 72

Page 73

W-20
C
N
1
Page 74

•
•
•
●
●
●
●
●
●
●
●
●
●
•
•
•
1
2
2
Page 75

4
5
7
8
9
10
11
12
13
14
19
20
23
24
25
27
29
30
34
35
17
25
26
31
32
33
35
3
Page 76

●
●
•
*
●
●
●
●
●
*
● “
●
4
”
Page 77

1
2
3
4
5
6
7
8
9
0
!
@
1
2
3
4
5
6
7
8
9
0
!
@
#
$
%
&
*
# –/0
$ +/9
%
^
&
*
(
)
-
^
-
)
(
5
Page 78

1
2
3
4
1
2
3
4
5
6
7 7
8
s `
8
9
5
6
7
8
9
a
b
c
a
b
c
6
Page 79

1
1
2
3
☞
2
3
•
•
•
•
7
Page 80

MENU/FOLDER
1
+/9 –/0
2
☞
☞
2,4
8
1
5
3,4
PLAY
3
1 +/9 –/0
4
2
•
1 2
STOP
5
Page 81

•
→ → → …
•
•
•
9
Page 82

錄音
a
b
c
d
錄音
內置麥克風
3
2
按MENU/FOLDER按鈕以選擇文件
夾A或B 。
1
顯示文件夾名。
a 現行文件夾
按REC按鈕開始錄音。
錄音指示燈會亮起變成紅色。
2
• 如在記錄期間﹐按MENU∕FOLDER按鈕﹐屏
幕顯示將會變化。
b 現行文件號
c 錄音時間
d 剩余記錄時間
按STOP按鈕停止錄音。
3
1
暫停記錄
暫停
在錄音時按 REC 按鈕
➥ 記錄指示燈將閃爍﹐且“PAUSE”(暫停) 與記錄指示燈 (s)
會在顯示器中閃爍。
恢復錄音
再次按 REC 按鈕。
➥ 會自中斷處繼續錄音。
.........................................................................................
備註
• 如剩余記錄時間僅有5分鐘或更少時間時﹐即使您按MENU/FOLDER按鈕﹐顯示也不會改變到現行
錄音時刻。
• 當剩余記錄時間僅有1分鐘或更少的時間時﹐錄音指示燈將閃爍。
• 如顯示屏中呈現“FULL”字樣時﹐便不能在所選之文件夾內進行錄音﹐在此情況下﹐可抹消不需
要的文件 (☞第23頁)。
• 如果您在文件夾 圖樣呈現期間按REC按鈕﹐將會自動地切換到文件夾A并開始記錄﹐在文件
夾A中具有100個文件﹐然后可以切換到文件夾B。
• 當暫停住10分鐘或更長的時間時錄音機將停止。
10
Page 83

錄音模式 (MOdE)
您能從三種記錄模式﹕HQ (優質) 模式﹐SP (標准播放) 模式和LP (長時播放) 模式中加以選
擇。連續記錄時間在HQ (優質) 模式約1小時31分鐘﹐在SP (標准播放) 模式約2小時17分鐘﹐以
及在LP (長時播放) 模式約6小時4分鐘。
對一個連續文件中的有效記錄時間。如果需要多次執行短片段的記錄﹐則錄音時間可能會縮短。
上述所示為一個連續文件所需的記錄時間。如記錄有若幹個文件時﹐有效的記錄時間可能比表明的
時間要短。(可供運行的剩余時間與記錄時間僅作參考。)
3
1
按住MENU/FOLDER按鈕1秒鐘或更
長的時間。
1
“MOdE”會顯示在面板上 (☞第26頁)。
按PLAY按鈕。
開始錄音模式設定。
2
按 +/9 或 –/0 按鈕以選擇某
一種記錄模式。
3
4
2
按STOP按鈕。
選單屏幕關閉結束“E N D ”字樣將會閃
4
爍。
........................................................
備註
對于會議或講演需要清楚明了的錄音宜選用HQ (優質) 或SP (標
准播放) 模式。
錄音模式 (MOdE)
11
Page 84

麥克風靈敏度可視錄音需要做調整 (MIC)
麥克風靈敏度可視錄音需要做調整。
按住MENU/FOLDER按鈕1秒鐘或更
長的時間。
1
開啟選單 (☞第26頁)。
按 +/9 或 – / 0 按鈕直到
“MIC”字樣在顯示器中閃爍為止。
麥克風靈敏度可視錄音需要做調整 (MIC)
2
按PLAY按鈕。
開始設置傳聲器 (麥克風) 靈敏度。
3
12
2,4
1
5
3
按 +/9 或 –/0 按鈕﹐以在 HI
(高) 或 LO (低) 之間加以選擇。
4
HI : 高靈敏度模式,會記錄所有方向之聲
音。
L O : 低靈敏度模式,適合口述。
按STOP按鈕。
選單屏幕關閉結束“E N D ”字樣將會閃
5
爍。
a 麥克風靈敏度顯示
如您選用LO (低) 模式﹐
屏中呈現。
........................................................
備註
• 為保証錄音效果良好﹐在記錄之前﹐應先選擇好合適的麥克風
靈敏度進行試錄。
• 如您選用HI的模式﹐建議將記錄狀態設置在HQ或SP模式﹐以
充分利用其高靈敏度的優越性能。
• 如您選用HI的模式﹐根据記錄的情況可能會有較高的背景噪
音。
字樣將在顯示
a
Page 85

使用可變式聲控錄音 (VCVA)
當麥克風感應聲音在預設的音量,內置的可變式聲控錄音 (VCVA) 開始自動地記錄。
當音量變小時即停止。特別在長時間記錄時有所幫助,VCVA不僅可以在無聲狀態下停止記錄以
節省記憶容量,更增加播放的效率及方便性。
按住MENU/FOLDER按鈕1秒鐘或更長的
時間。
1
開啟選單 (☞第26頁)。
按+/9 或–/0 按鈕直到“VCVA”字
樣在顯示器中閃爍為止。
2
按PLAY按鈕。
開始VCVA屏幕設定。
3
6
按+/9或–/0按鈕選擇On(開)或OFF
5
(關)。
4
2,4
1
On :開始以VCVA模式錄音。
OF F : 恢復正常模式錄音。
3
按STOP按鈕。
選單屏幕關閉結束“END”字樣將會閃爍。
5
按REC按鈕開始錄音。
當VCVA感覺到的音量比預置音量更大時﹐便
6
自動地開始進行錄音﹐而當感覺到靜音時則在
1秒鐘時間后會自動地暫停記錄﹐錄音機隨之
也進入到Standby(准備)狀態。
a VCVA (可變式聲控錄音) 指示
在記錄期間記錄指示燈點亮。當錄音機處在准備狀態下﹐記錄指示
燈閃爍﹐且VCVA(可變式聲控錄音)和記錄(s)指示燈將在顯示
器中閃爍
............................................................
備註
為確保能成功的錄音,我們建議您在使用前先測試錄音功能及音
量。
a
使用可變式聲控錄音 (VCVA)
13
Page 86

攝影
持拿照相機 (錄音機)
雙手牢握錄音機,雙肘緊貼身體。
不要讓手指和背帶檔住鏡頭。
攝影
正確位置
錯誤位置
指示燈系統
當打開取景器一側的指示燈以橙色或綠色光閃爍時﹐指示出錄音機正處在下列的某一狀態之中﹕
指示燈狀態
橙色燈點亮
綠色燈點亮
橙色光閃爍
綠色光閃爍
*按照亮度調節不同時間。
記錄狀態 (快門釋放鈕)
調節曝光量 (半按下)*
曝光量適當 (半按下)
曝光量不當 (全按下)
最大的被記錄文件號 (半按下)
剩余貯存量不足 (半按下)
攝影完成 (全按下)
能∕不能
您不能拍攝只有當指示燈亮綠色光時才
能拍攝﹐如指示燈未能轉為綠色光﹐表
示曝光太亮或太暗﹐如指示燈橙色光亮
6秒種或更長的時間﹐則應在拍攝以前
改變其亮度。
您能拍攝
你不能拍攝
您能拍攝另一張圖景
14
Page 87

拍攝靜止影像
當攝影時您能選擇任意文件夾﹕A、B或 。所有圖像將貯存在文件夾 中。
快門按鈕有2個檔級﹐當處在第一檔時調節曝光量﹐然后在第二檔進行拍攝。
Make sure you don掐 block the lens with your finger or the camera strap.An index number appears on the
display.
取景器
指示燈
半按下快門釋放鈕 (半按下)。
接着取景器中指示燈轉換成橙色。當指示
1
燈從橙色轉換成綠色時便為您的拍攝作好
了准備。
輕輕按住按鈕﹐然后再按下 ( 全按
下)。
2
錄音機即可拍攝一張圖景。當指示燈閃爍
綠光時﹐拍攝即完成。
當指示燈閃爍橙色時表示拍攝沒有完成,
請再重拍攝一次。
• 如果您在文件夾 狀態下﹐按STOP按鈕﹐
將會呈現全部的圖像數。最多可存貯250個圖
像文件。
a 當前記錄的文件號
a
攝影
1,2
您能在記錄聲音 (記錄暫停) 狀態下進行拍
攝。
........................................................
備註
• 始終要求輕按快門按鈕﹐如您按得過重時﹐容易使錄音機移動
而使圖像變得模糊不清。
• 您不能使用錄音機的顯示器顯示圖像。轉換圖像文件到計算機
并利用包含在包裝盒中的“OLYMPUS Voice Album ”軟件 (☞第
30頁)。
15
Page 88

攝影
如果您不能拍攝
可能是由于如下所述的原因所致。解決好這一問題﹐即可恢復攝影。
可能原因
最大的被記錄圖像文件號 (250
圖像)
攝影
剩余貯存量不足
電池剩余功率不足
在記錄某個聲音文件期間可拍
攝有50幅圖像
在指示燈以橙色光點亮時﹐按下
快門按鈕 (全按下)
*聲音文件將作為2個聲音文件來記錄。
訊息
指示燈以橙色光閃爍。
顯示器閃爍“FULL”。
顯示器閃爍文件號。
指示燈以橙色光閃爍。
顯示器閃爍“FULL”。
顯示器閃爍
指示燈以橙色光閃爍。
指示燈以橙色光閃爍。
顯示器中閃爍
或 圖樣。
圖樣。
解決方法
刪除不需要的圖像文件。
刪除不需要的聲音文件或圖像的記
錄。
更換新電池。
按STOP按鈕停止記錄。然后按REC
按鈕以開始新的聲音文件和記錄圖
像。*
當指示燈成綠色光時拍攝﹐如果指
示燈未轉換成綠色光﹐表示拍攝時
的環境光太亮或太暗。
16
Page 89

播放
2
1
5
3
4
按MENU/FOLDER按鈕以選擇文件
夾A或B 。
1
按 +/9 或 –/0 按鈕以選擇您
所需要播放的文件。
2
按PLAY按鈕開始播放。
• 如果您在播放期間按MENU/FOLDER按鈕﹐屏
3
幕顯示將發生變化。
a 文件已播時間
b 文件剩余時間
c 記錄的年份、月份與日期
d 記錄時間
調整VOLUME控制至您想要的大
小。
4
在您需要停止播放的任意位置上按
STOP按鈕。
5
再次按動 PLAY 按鈕即可恢復播放。
播放
a
b
c
d
17
Page 90

播放
播放
播放功能
快速播放
(F.PLAY)
快進 (8)
快倒 (7)
跳過某一文
件的開始端*
在停止或播放某一文件期間﹐按住PLAY按鈕達1秒鐘或更長的時間。
➥ 錄音機將以較常規速率快30%的速率播放。
在播放某一文件期間按住+/9按鈕。
➥ 當錄音機到達該文件的末端時停止。繼續按+/9按鈕將會從
下一個文件的開始端進行選聽。
在播放某一文件期間按住–/0 按鈕。
➥ 當錄音機到達該文件的始端時停止。繼續按–/0按鈕將從前
一個文件的末端進行復聽。
在停止模式﹐播放模式或快放模式下﹐按 +/9 按鈕。
➥ 停止模式 ............ 錄音機在下一個文件的開始端停止。
➥ 播放模式 ............ 錄音機跳到下一個文件的開始端并再
➥ 快速播放模式 ........錄音機跳到下一個文件的開始端并再
在停止模式﹐播放模式或快放模式下﹐按 –/0 按鈕。
➥ 停止模式 ............ 錄音機在先前文件的開始端停止。
➥ 播放模式 ............ 錄音機跳到當前文件的開始端并再開
➥ 快速播放模式 ........錄音機跳到當前文件的開始端并再開
操作
開始播放。
快速播放。
始播放。
始快速播放。
如何刪除
再次按PLAY按鈕。
➥ 回復到常規速率播放。
釋放 +/9 按鈕。
➥ 回復到常規速率播放。
釋放 –/0 按鈕。
➥ 回復到常規速率播放。
* 如果您在停止模式下按住 +/9 或 –/0 按鈕﹐錄音機將連續地跳到各文件的開始端 (SKIP (跳
越))。
18
Page 91

在文件夾之間轉移文件 (MOVE)
您能將文件夾A或B之一中所記錄的某一文件轉移到另一個文件夾中。
被轉移的文件按序加到目標文件夾的末端。
按MENU/FOLDER按鈕以選擇文件
夾A或B 。
1
選擇您所要轉移和播放的文件進行播
放。
2
按住MENU/FOLDER按鈕1秒鐘或更
長的時間。
3
停止放音﹐在顯示屏上的“MOVE”字樣
閃爍。
a 目標文件夾
b 目的文件的編號
在顯示屏上呈現目標文件夾與被轉移的文件
號﹐并完成轉移。
2
1,3
備註
• 不能在文件夾 與其他文件夾之間進行轉移。
• 如果目標文件夾已滿 (最多為100個文件)﹐“FULL”字樣將在
顯示屏中呈現﹐且不能再將文件轉移到該文件夾中。
a
b
在文件夾之間轉移文件 (MOVE)
19
Page 92

提醒播放功能 (ALARM)
提醒播放功能,可以設定在所預設的時間中播放所選擇的文件。本機最多能設置5個報時點。
設置鬧鐘播放
按MENU/FOLDER按鈕以選擇文件
夾A或B 。
1
按 +/9 或 –/0 按鈕選擇當提
醒聲響時欲播放的文件。
2
按住MENU/FOLDER按鈕1秒鐘或更
長的時間。
3
開啟選單 (☞第26頁)。
2,4,6
提醒播放功能 (ALARM)
1,3
20
5,7
按 +/9 或 –/0 按鈕直到
“ALARM”字樣在顯示器中閃爍為
4
止。
按PLAY按鈕。
“ALARM”打開與“OFF ”字樣閃爍。
5
按 +/9 或 –/0 按鈕﹐以選擇
On (開)。
6
按PLAY按鈕完成屏幕設定。
月份指示閃爍。
7
Page 93

8
重復步序1與2設定時間與日期:
1 按 +/9 或 –/0 按鈕設定某一值。
8
2 按PLAY按鈕接受該值。
• 時間與日期的屏幕設定按月份、日期、
小時和分鐘的次序進行。
按STOP按鈕。
選單屏幕關閉結束“E N D ”字樣將會閃
9
爍。
a 警報指示
鬧鐘將按預定的時間報時5分鐘。在鬧鐘鳴響
的時刻﹐按STOP按鈕即行播放文件。與鬧鐘
9
相聯系您再次按STOP按鈕﹐即可停止文件的
鬧鐘播放。
........................................................
備註
• 如在報時開始的5分鐘內未按任何一個按鈕﹐報時音將自動停
止﹐在此情況下﹐文件不再播放。
• 在鬧鐘播放完后﹐鬧鐘播放功能也自動地取消。
• 設置鬧鐘播放功能不能超過5個文件。同時﹐假如在被選之文
件夾中沒有被記錄的文件﹐便不能設置鬧鐘播放功能。
• 不能設置被播放文件的年份。
a
提醒播放功能 (ALARM)
21
Page 94

提醒播放功能 (ALARM)
2,4,6
1,3
提醒播放功能 (ALARM)
8
5,7
取消鬧鐘播放設置
按MENU/FOLDER按鈕以選擇文件
夾A或B 。
1
按 +/9 或 –/0 按鈕以選擇設
置鬧鐘播放的某一文件。
2
按住MENU/FOLDER按鈕1秒鐘或更
長的時間。
3
開啟選單 (☞第26頁)。
按+/9 或 – / 0
“ALARM”字樣在顯示器中閃爍為
4
止。
按PLAY
“ALARM”打開與“On”字樣閃爍。
5
按 +/9 或 –/0 按鈕﹐以選擇
OFF (關)。
6
按鈕。
按鈕直到
22
按PLAY
按鈕。
7
按STOP
選單屏幕關閉結束“E N D ”字樣將會閃
8
爍。
按鈕。
Page 95

刪除
您可方便地消除不需要的文件。文件的順序號會自動重新設定。
一次刪除一個文件
按MENU/FOLDER按鈕選擇文件夾。
1
按 +/9 或 –/0 按鈕選擇您要刪除的
文件。
2
您能在播放某一文件期間刪除該文件。
按ERASE按鈕。
顯示屏中的文件號閃爍﹐然后顯示屏交替地呈
3
現“ERASE”與“YES”字樣達8秒鐘時間。
2
1
3,4
再次按ERASE按鈕。
文件被刪除。
4
從一個文件夾中刪除所有文件
按MENU/FOLDER按鈕選擇文件夾。
1
按ERASE按鈕2秒鐘以上。
顯示屏中的文件夾名及“ALL”字樣閃爍﹐然
2
后顯示屏交替地呈現“ERASE”與“YES”字
樣達8秒鐘時間。
再次按ERASE按鈕。
在所選之文件夾中的全部文件同時被刪除。
3
1
2,3
刪除
.........................................................................................
備註
• 在“ERASE”開始閃爍8秒鐘后若未按下ERASE按鈕,錄音機會回到停止狀態。
• 刪除的文件無法回復。我們建議您將重要的文件轉移到計算機﹐并在刪除錄音機中目錄之前對其
內容進行檢查。
23
Page 96

系統聲 (bEEP)
錄音機的嘀嘀聲用以對您的按鈕操作進行提示﹐或對您的誤操作作出警告。系統聲可以關閉。
按住MENU/FOLDER按鈕1秒鐘或更
長的時間。
1
打開選單 (☞26頁)。
按+/9 或 –/0 按鈕直到
“bEEP”字樣在顯示器中閃爍為
2
止。
按PLAY按鈕。
系統聲設置過程開始。
3
系統聲 (bEEP)
24
2,4
1
5
3
按 +/9 或 –/0 按鈕選擇On (開)
或OFF (關)。
4
O n : 系統音效起作用。
OF F : 系統音效不起作用。
按STOP按鈕。
選單屏幕關閉結束“E N D ”字樣將會閃
5
爍。
如己設置好鬧鐘播放功能﹐則即使關斷系統
聲﹐在到達預定的時刻仍會發出鬧鐘音。
Page 97

初期化系統 (CLEAR)
該功能用以刪除在錄音機中貯存的所有文件并將當前時間與其他設置的內容預置到它們的初始狀態。
如您有重要的文件需要保存﹐可將錄音機連接到計算機上并在器件格式化之前使那些文件從錄音機
轉移到計算機中。
按住STOP按鈕﹐再按住ERASE按鈕2秒鐘或
更長的時間。
1
在顯示屏上交替地呈現“CLEAR”與“YES”字樣
8秒鐘。
再次按ERASE按鈕。
1
2
錄音機返回到購機時的默認狀態﹐且表示出日期和
2
時間的屏幕設定 (☞第8頁)。
............................................................
備註
如果在“C LEAR”字樣開始閃爍后8 秒鐘的時間內沒有按下E R A S E 按
鈕﹐錄音機將回復到停止狀態。
維持
設定HOLD開關到維持位置。
若您依箭頭方向移動HOLD開關,將錄音機放設定至 HOLD狀態,會保留當前設定,且除了HOLD
以外的所有按鈕會作動無效。當錄音機安放在包袋中時﹐由于ERASE按鈕可能會不經意的按動﹐為
使文件不被偶然性刪除﹐可利用這一有用的功能。
當使用錄音機時記得重設HOLD開關。
備註
•
HOLD開關置于HOLD位置﹐錄音機具有以下功能﹕
– 如錄音機在停止狀態﹐顯示屏熄滅。
– 如錄音機在播放狀態﹐當現行文件播放完畢時﹐顯示屏熄滅。
– 如錄音機在記錄狀態﹐當存貯內容運行完、錄音機自動停止
記錄時﹐顯示屏熄滅。
• 當顯示屏熄滅時﹐由于HOLD開關置于HOLD的位置﹐您可按任
意按鈕使時鐘閃爍2秒鐘。
• 在播放期間﹐當您將HOLD開關置于HOLD位置時﹐仍可利用
VOLUME控制來調節音量。
• 即使錄音機設置在HOLD位置﹐在鬧鐘到達預設時間上仍將會有
報時聲。一旦您按下STOP按鈕﹐錄音機將開始播放與鬧鐘相關
聯的文件。
初期化系統(CLEAR)/ 維持
25
Page 98

選單列表
按住MENU/FOLDER按鈕1秒鐘或更長
的時間。
HQ
SP
LP
HI
LO
OFF
On
OFF
On
On
OFF
時間 / 日期屏幕
12小時 / 年﹐月﹐日
選單列表
(☞第11頁)
(☞第12頁)
(☞第13頁)
(☞第20頁)
(☞第24頁)
(☞第8頁)
備註
• 如果您選擇文件夾 “ALARM”字樣不會呈現。
• 當您在選單設定操作保持3分鐘,錄音機會停止。
所選定的項目將不會執行。
記錄模式設定。在HQ (優質)﹐SP (標准模式) 與
LP (長時播放) 模式之間切換。
麥克風設定。 選擇HI (高) 或LO (低)。
VCVA設定。 選擇On (開啟) 或OFF (關閉)。
播放提醒設定。 選擇On (開啟) 或OFF (關閉)。
系統音效設定。 選擇On (開啟) 或OFF (關閉)。
時間 / 日期設定。依序為小時、分、年、月、
日。
按 +/9 或 –/0 按鈕
按PLAY按鈕
初始設置
26
Page 99

使用 OLYMPUS Voice Album (奧林巴斯語聲圖集)
連接錄音機到您的個人電腦,您將可以使用Voice Album下列功能:
可視檢索功能 個人電腦(PC )監視功能
使用 OLYMPUS Voice Album (奧林巴斯語聲圖集)
可視檢索功能能用于顯示和播放某一與聲音文件相關聯
的圖像﹐您能在播放某一聲音文件的同時迅速地移動可
視檢索的位置﹐以便將所需之圖像盡快顯示出來。
語聲圖集功能 幻燈呈現功能
您能在所記錄的圖像中迭加某些描述標記和注釋。 您可以幻燈呈現方式播放所記錄的圖像。
.........................................................................................
備註
• 有關選單與操作方面的詳情請參見在線幫助﹐在完成Voice Album裝載之后您即可使用在線幫助。
• 圖像文件 (包括任一可視檢索) 不能從個人電腦 (PC) 轉移到錄音機中。
在錄音機的取景器中的景像可在個人電腦 (PC) 的監
視器上顯示出來。
27
Page 100

使用 OLYMPUS Voice Album(奧林巴斯語聲圖集)
操作環境
PC: IBM PC/AT 相容 PC
操作系統: Microsoft Windows 98/ 98SE/ Me /2000 Professional / XP Professional,Home
使用 OLYMPUS Voice Album(奧林巴斯語聲圖集)
CPU (中央處理單元):
RAM (隨機存取內存貯器):
硬碟空間: 10MB以上
Drive: 2×或更高速率的CD-ROM (只讀存貯CD光盤) 驅動器
音效卡: Creative Labs Sound Blaster (創新實驗室聲霸卡) 16 或100% 相容音效卡
瀏覽器: Microsoft Internet Explorer (微軟網絡瀏覽器) 4.01版或更新的版本
顯示器: 800×600像素或更多像素﹐256彩色或更多彩色
USB插口: 至少一個空連接插口
聲音I/O端子: 耳機或揚聲器輸出
.........................................................................................
備註
• 使用Windows95或從Windows95升級至其他操作系統之個人電腦無USB插口。需外接PC配接卡或軟
盤供下載聲音資料至個人電腦中。
• 某些功能如移除或直接錄音無法在無USB插口之個人電腦中執行。
• Voice Album是為本錄音機設計的專用性軟件﹐您不可能用于其他任何錄音機。
• Voice Album與語音識別軟件不兼容。
Edition
Intel PentiumII (英特爾 奔騰II) 233MHz (兆赫) 或更高級別的處理器
64MB以上
28
 Loading...