

Page 1
DIGITAL CAMERA
TG-3
Instruction Manual
Thank you for purchasing an O lympus digital camera. Before you star t to
use your new camera, please r ead these instructions caref ully to enjoy
optimum p erfo rmanc e and a longer ser vice life. Keep this manual in a safe
place for future reference.
We recommend that you take test shots to get accustomed to your camera
before taking important photographs.
The screen and camera illustrat ions shown in this manual were produced
during the develop ment stages and may differ from the actual pr oduct.
Page 2
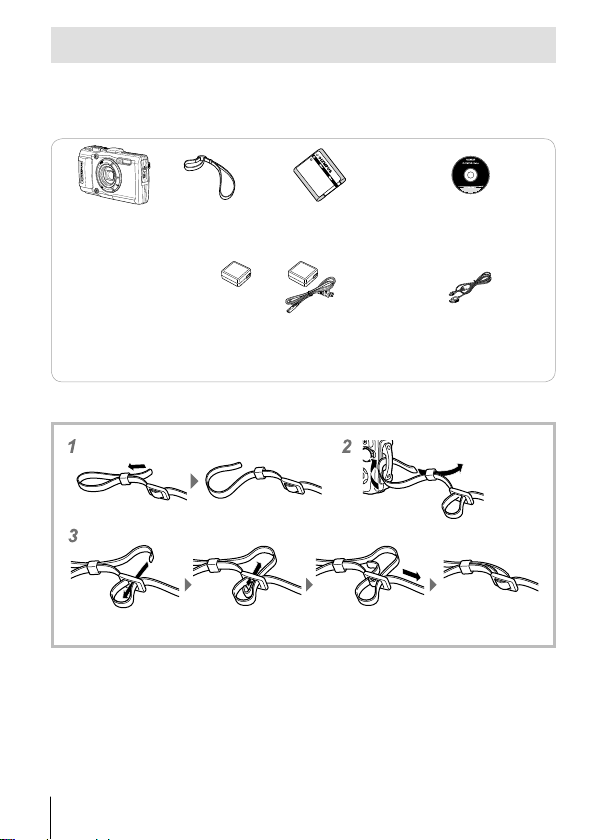
Unpack the box contents
The following items are included with the camera.
If anything is missing or damaged, contact the dealer from whom you
purchased the camera.
Digital camera Strap
USB-AC adapter (F-2AC) USB cable (CB-USB8)
Other accessories not shown: Warranty card
Contents may vary depending on purchase location.
Lithium Ion Battery
(LI-92B)
or
Attaching the camera strap
• Pull the strap tight so that it does not come loose.
OLYMPUS Setup
CD-ROM
2
EN
Page 3
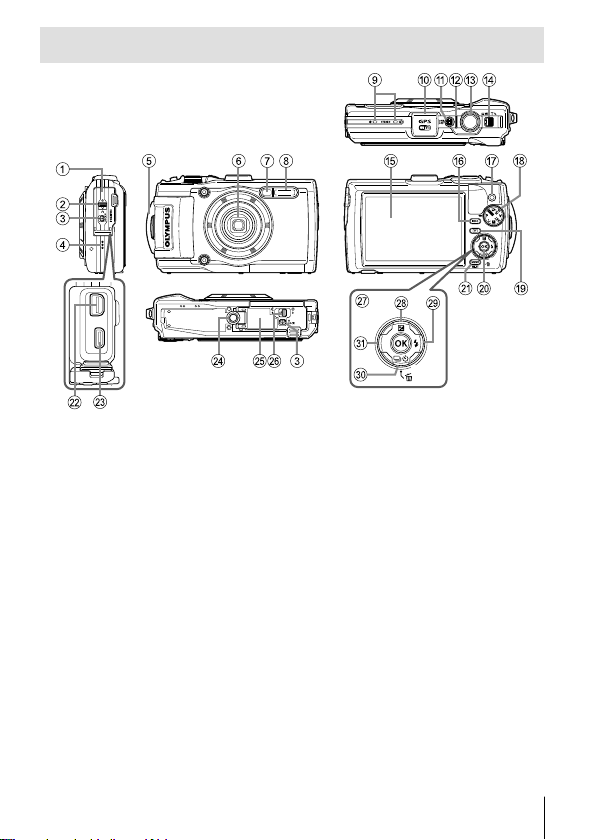
Names of parts
1 Connector cover
2 Connector cover lock
3 LOCK knob
4 Speaker
5 Strap eyelet
6 Lens
7 Self-timer lamp/LED Illuminator/
AF illuminator
8 Flash
9 Stereo microphone
0 GPS antenna
a n button
b Indicator lamp
c Shutter button
d Zoom lever
e Monitor
f INFO (Information display) button
g R (Movie) button
• FGHI instruct to press the up/down/left/right arrow pad.
h Mode dial
i q (Playback) button
j A button
k /Wi-Fi button
l Multi-connector
m HDMI micro connector
n Tripod socket
o Battery/card compartment cover
p Battery/card compartment cover
lock
q Arrow pad
r F (Up) / F (Exposure
compensation) button
s I (Right) /# (Flash) button
t G (Down) / jY (Sequential
shooting/Self-timer) / (Erase)
button
u H (Left) button
EN
3
Page 4
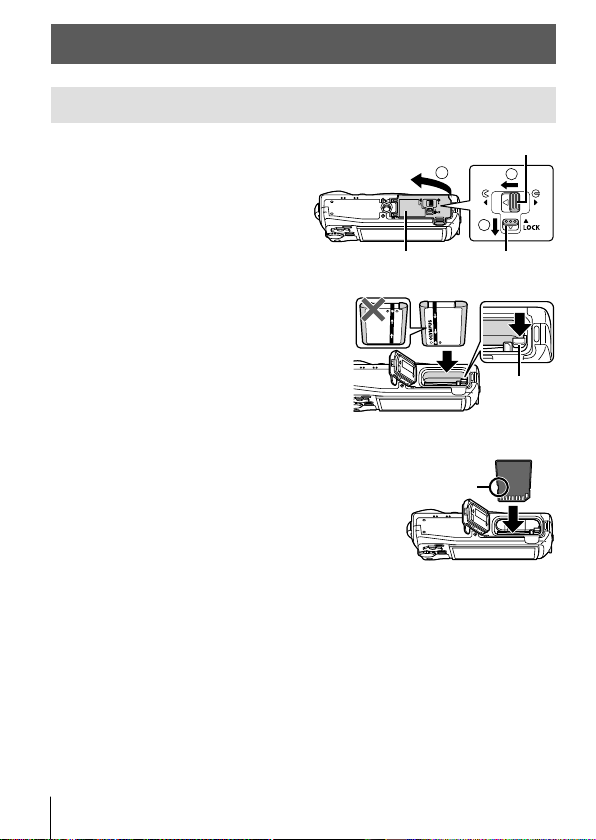
Preparations for shooting
Inserting and removing the battery and card
Follow Steps 1, 2 and
1
3 to open the battery/card
compartment cover.
• Turn off the camera before
opening the battery/card
compartment cover.
Insert the battery while sliding the
2
battery lock knob in the direction of
the arrow.
• Insert the battery as illustrated with the
C mark toward the battery lock knob.
• Slide the battery lock knob in the
direction of the arrow to unlock, and then
remove the battery.
Insert the card straight until it clicks
3
into place.
• Always use the specified cards with
this camera. Do not insert other types
of memory cards. g “Using the card”
(P. 92)
• Do not touch the metallic parts of the
card directly.
Battery/card compartment cover lock
3
Battery/card compartment
cover
Write-protect
switch
2
1
LOCK knob
Battery
lock knob
4
EN
Page 5

To remove the card
Press the card in until it clicks and
comes out slightly, then remove the
card.
21
Follow Steps 1, 2 and 3 to close
4
battery/card compartment cover.
• When using the camera, be sure to close
the battery/card compartment cover.
11
2
3
EN
5
Page 6
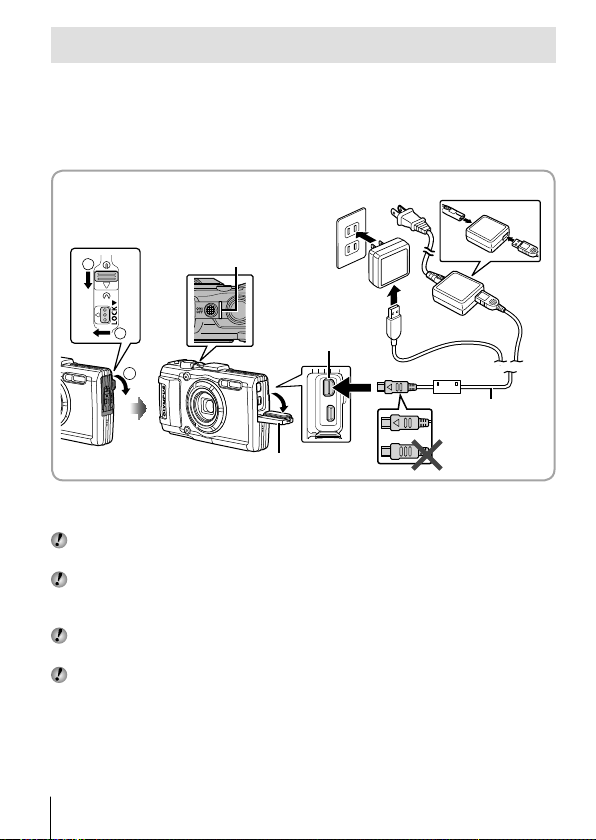
Charging the battery
Check that the battery is in the camera, and connect the USB
1
cable and USB-AC adapter.
• The battery is not fully charged at shipment. Before use, be sure to
charge the battery until the indicator lamp turns off (up to 5 hours).
Connecting the camera
AC outlet
Indicator lamp
On: Charging
2
1
3
Off: Charged
Connector cover
Multi-connector
or
USB cable
(supplied)
For charging the battery abroad, see “Using your charger and USB-AC
adapter abroad” (P. 92).
Never use any cable other than supplied or Olympus-designated USB cable.
This may cause smoking or burning.
The included F-2AC USB-AC adapter (hereafter referred to as USB-AC
adapter) differs depending on the region where you purchased the camera. If
you received a plug-in type USB-AC adapter, plug it directly into AC outlet.
Be sure to unplug the power plug of the USB-AC adapter from the wall outlet
when the charging is complete or the playback ends.
For details on the battery, see “Handling the Battery” (P. 104). For details on the
USB-AC adapter, see “USB-AC adapter” (P. 107).
• If the indicator lamp does not light, reconnect the USB cable and USB-AC
adapter to the camera.
• If “No Connection” is displayed on the back monitor, disconnect the USB
cable and set [Storage] in [USB Connection] (P. 56) before connecting the cable
again.
6
EN
Page 7

When to charge the batteries
Charge the battery when the
error message shown on the
right appears.
Flashes in red
Error message
Battery Empty
EN
7
Page 8
Turning on the camera and making the initial
settings
When you turn on the camera for the first time, a screen appears enabling
to set the language for the menus and messages displayed in the monitor,
and the date and time.
To change the selected date and time, see “Setting the date and time
d [X]” (P. 59).
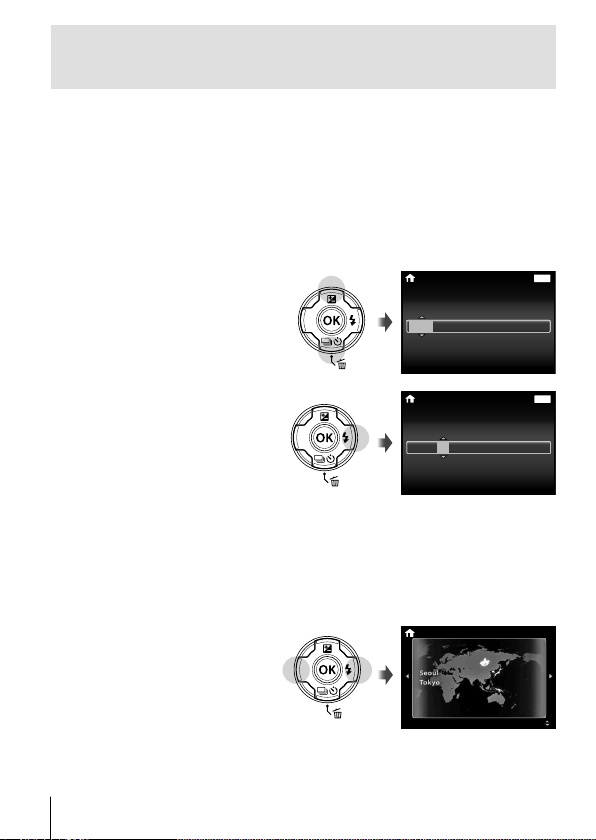
Press the n button to turn on the camera, press
1
FGHI
the A button.
Press
2
pad to select the year for
[Y].
of the arrow pad to select your language and press
FG
of the arrow
X
YMDTime
2014
-- --
--
Back
:..
Y/M/D
--
MENU
Press I of the arrow
3
pad to save the setting
for [Y].
As in Steps 2 and 3, press
4
FGHI
X
Y M D Time
2014
of the arrow pad to
set [M] (month), [D] (day), [Time] (hours and minutes), and
[Y/M/D] (date order), and then press the A button.
• For precise time setting, press the A button as the time signal strikes
00 seconds.
Use HI to select the
5
’14.02. 26 12:30
time zone and then press
the A button.
• Use FG to turn daylight
saving time ([Summer]) on
or off.
8
EN
-- --
MENU
Back
:..
Y/M/D
--
--
Summer
Page 9
Using basic functions
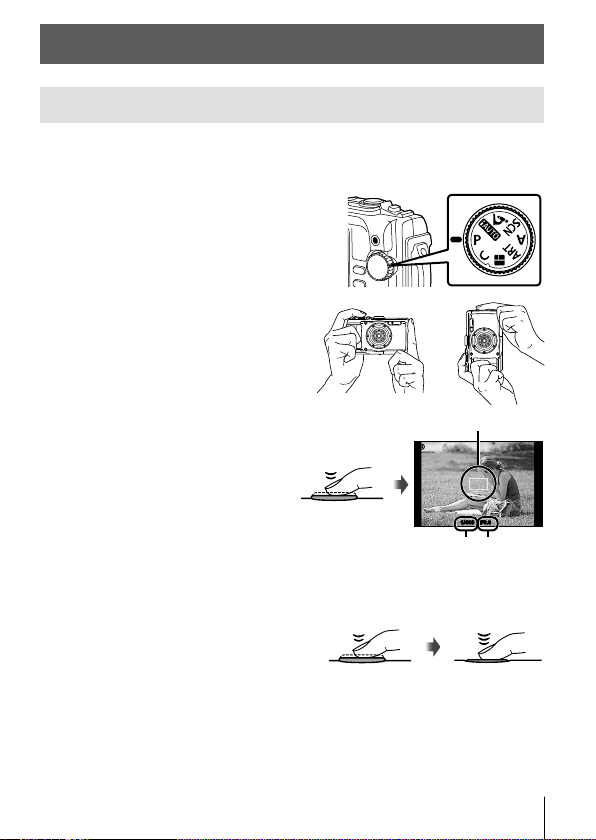
Taking photographs
Press the n button to turn on the camera.
1
When the camera is turned on, the monitor will turn on.
Set the mode dial to P.
2
In mode P, the camera automatically
adjusts shutter speed and aperture in
response to subject brightness.
Frame the shot.
3
• When holding the camera, take
care not to cover the flash,
microphone or other important
parts with your fingers, etc.
Press the shutter button
4
halfway down to focus.
The camera was unable to focus
if the AF target mark flashes red.
Try focusing again.
• The shutter speed and
aperture value are displayed
in red if the camera is unable
to achieve optimal exposure.
To take the picture, gently
5
press the shutter button all the
way down while being careful
not to shake the camera.
Press halfway
Press
halfway
AF target
PP
F6.9F6.91/4001/400
Shutter
speed
Press the rest of
the way down
Aperture
value
EN
9
Page 10
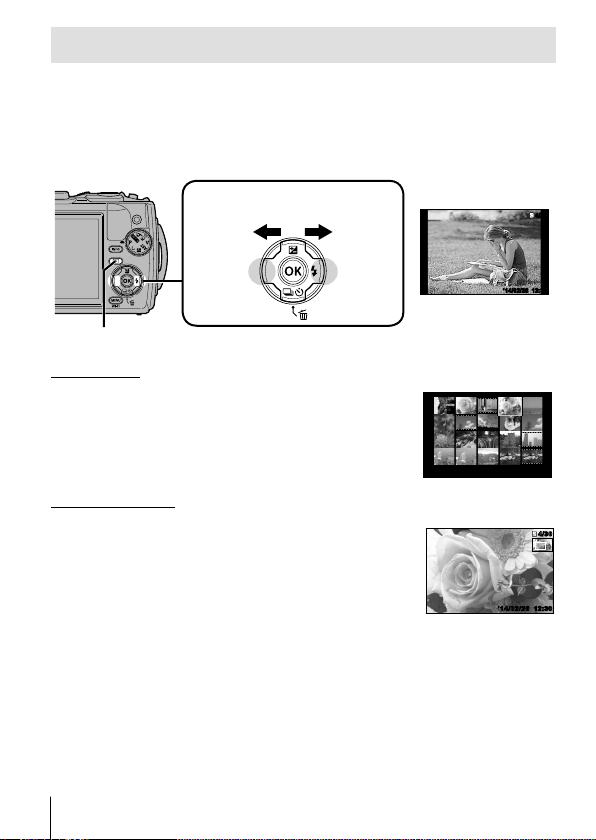
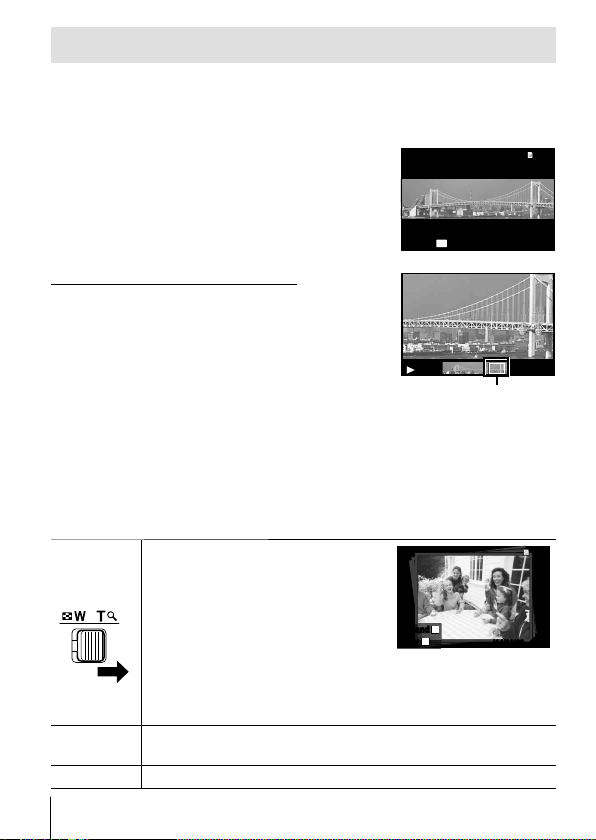
Viewing photographs (Playing back images)
Turn on the camera.
Press the q button.
• Your most recent photograph is displayed.
• Press HI to select an image.
q button
Displays the
previous frame
Displays the
next frame
Arrow pad
Index display
• In single-frame playback, press the zoom lever to the
W side for Index playback.
• Use FGHI to move the cursor.
• Press the zoom lever to the T side, or press the A
button for single-frame playback.
Close-up playback
• In single-frame playback, press the zoom lever to the
T side to zoom in up to 10×; press the W side to zoom
out. Press the A button to return to single-frame
playback.
• Press FGHI to scroll an image to the direction of
the button you pressed.
Still image
’14/02/26’14/02/26 12:30
’
14/02/26 12:30
4/30
4/30
12:30’14/02/26’14/02/26 12:30
4/30
4/30
10
EN
Page 11

Recording movies
Press the R (movie) button
1
to start recording.
• The movie is shot in the set
shooting mode. Note that the
shooting mode effects may not
be obtained for some shooting
modes.
• Sound is also recorded.
• When using a camera with a
CMOS image sensor, moving
objects may appear distorted
due to the rolling shutter
phenomenon. This is a physical
phenomenon whereby distortion
occurs in the filmed image when
shooting a fast-moving subject
or due to camera shaking. In
particular, this phenomenon
becomes more noticeable when
using a long focal length.
Press the R (movie) button again to stop recording.
2
Lights up
red when
recording
0:00
0:00 0:340:34
RECREC
RECREC
0:000:00
Recording time
Recording length
0:340:34
(P. 94)
EN
11
Page 12

Movie playback
Select a movie in the Playback
mode, and press the A button.
4/30
4/30
OK
Movie PlayMovie Play
’14/02/26
’14/02/26
12:3012:30
During playbackMovie
Pausing and restarting
playback
Fast forward
Rewind
Adjusting the volume
Press the A button to pause playback. During
pause, fast forward or reverse, press the A button
to restart playback.
Press I to fast forward. Press I again to increase
the fast forward speed.
Press H to rewind. Press H again to increase the
rewind speed.
Use FG to adjust the volume.
Operations while playback is paused
Elapsed time/Total shooting time
00:14/00:3400:14/00:34
During pause
Cueing
Advancing and
rewinding one frame at
a time
Resuming playback
Use F to display the first frame and press G to
display the last frame.
Press I or H to advance or rewind one frame at a
time. Hold I or H pressed for continuous advance
or rewind.
Press the A button to resume playback.
To stop movie playback
Press the button.
• To play back movies on the computer, the supplied PC software is
recommended. For the first use of the PC software, connect the camera to the
computer, then launch the software.
00:12/00:3400:12/00:34
12
EN
Page 13

Erasing images during playback
Display the image you want to erase and press G ().
1
• To erase a movie, select
the movie to erase and
press G ().
Press FG to select [Erase], and press the A button.
2
• Grouped images are erased as a group (P. 53).
• Multiple images or all images can be erased at a time (P. 53).
Erase
Erase
Cancel
Back
100-0004100-0004
MENU
4/304/30
EN
13
Page 14
Playing back panorama and grouped images
Playing back panorama images
Panorama images that were combined together using [Auto] or [Manual]
can be scrolled for viewing.
Select a panorama image during
1
playback.
Press the A button.
2
OK
Replay
To control panorama image playback
Stop playback: Press the button.
Pause: Press the A button.
Control while paused
Press FGHI to scroll the image in the
direction of the pressed button.
Press the zoom lever to enlarge/shrink the
image.
Press the A button to restart scrolling.
Playing back grouped images
With sequential shooting (j/c/d) (P. 33) and [p Focus BKT] (P. 21) in
k (Microscope), the taken images are displayed as a group during
playback.
Expands.
• Expand to view the frames of a
T side
group in index view.
• If you want to delete images from
the grouped images, you can
expand the group and delete the
images individually.
ExpandExpand
OK
PlayPlay
Sequential images frame
• Select the image and press the A button to display the
images respectively.
• Use HI to view the previous/next frame.
A button
button
14
EN
Plays back the grouped images in sequence automatically or
pauses playback.
Stops playback.
’14/02/26 12:30
Viewing area
T
’14/02/26’14/02/26
12:30
12:30
4/304/30
4/30
Page 15

EN
15
Page 16
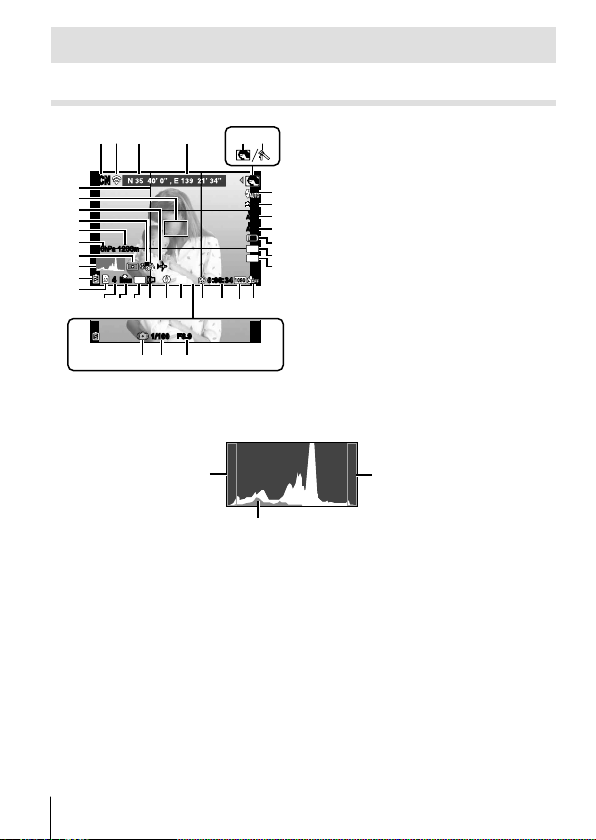
Monitor display
Shooting screen displays
33
32
31
30
29
28
27
26
25
1 2
SCNSCN
880hPa 1200m880hPa 1200m
44
ORM
N
3 4
zz
n
n
Date
G
2022232421 141819 17
F6.9F6.91/1001/100
3536
34
0:00:340:00:34
16
56
0.00.0
WB
AUTOWBAUTO
ISO
ISO
AUTO
AUTO
16
4:3
15
7
8
9
10
11
M
12
13
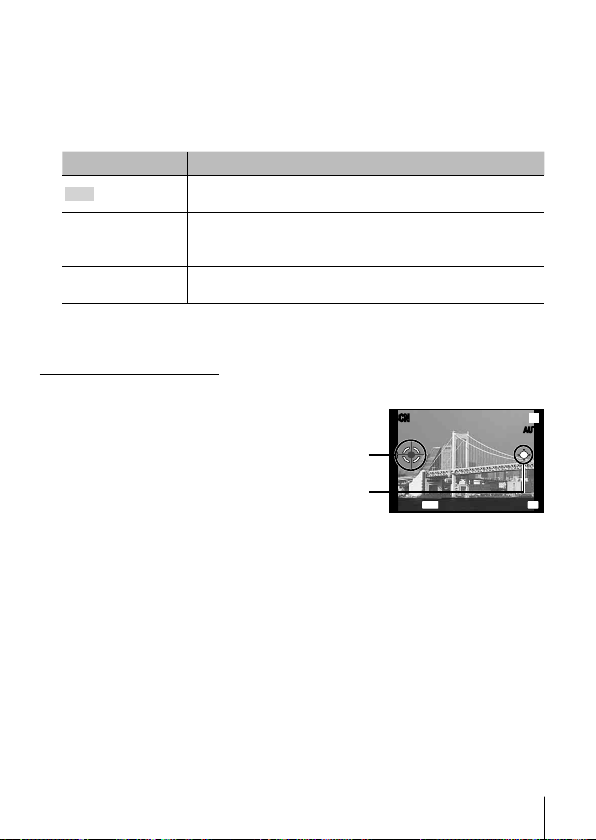
When the shutter button is pressed halfway down
Reading a histogram
If the peak fills too much
of the frame, the image
will appear mostly black.
The green section shows luminance
distribution within the screen’s center.
If the peak fills too much of
the frame, the image will
appear mostly white.
Switching the displays
The displays change in the order of Normal → Detailed → No info. →
Measurement position information each time the INFO button is pressed.
g [GPS Settings] (P. 63)
16
EN
Page 17

No. Name Normal Detailed No info.
1
Shooting mode
2
Connection to Smartphone
3
Latitude
4
Longitude
5
Sub mode
6
Picture Mode
7
Flash
8
Exposure compensation
9
White balance
10
ISO sensitivity
11
Y
o
/
12
Image size (still images)
13
Aspect
14
Recording with sound/
wind noise reduction
15
Image size (movies)
16
Movie recording length
17
Movie recording icon
18
GPS icon
19
Direction information
20
Conversion Lens
21
Date stamp
22
Compression
23
Number of storable still pictures
24
Current memory
25
Battery check
26
Histogram
27
Metering
28
Atmospheric/Hydraulic pressure
29
Altitude/Water depth
30
Image stabilization
31
World time
32
AF target mark
33
Grid Guide
34
Aperture value
35
Shutter speed
36
Camera shake warning
RR
RRR
RR
RR
RR
RR
RR
RR
RR
RR
RRR
RR
RR
RR
RR
RR
RR
RR
RR
RR
RR
RR
RR
RR
RR
RRR
RRR
RRR
RRR
R
–
R
–
R
–
R
–
R
–
R
–
R
–
–
–
–
–
–
–
–
–
–
–
–
–
–
–
–
–
–
–
–
–
–
–
–
–
–
–
–
–
–
–
EN
17
Page 18
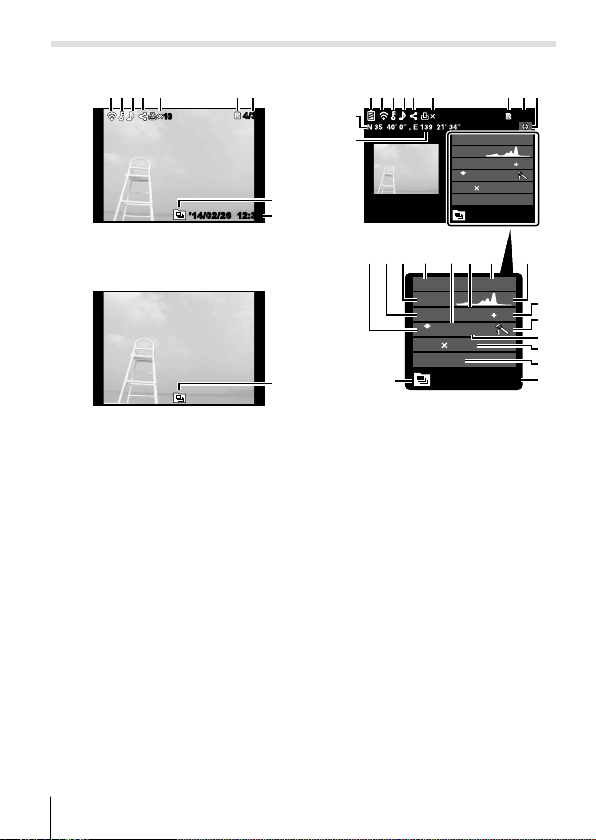
Playback mode display
5
6
6
5
• Normal
23 64
5
1010
87
4/304/30
12:30’14/02/26’14/02/26 12:30
2
2
• Detailed
11
10
1 23 54
6
1010
880hpa
P
F3.9
ISO
ORM
N
4608 3456
100-0004
’14/02/26 12:30
4/304/30
1200m
AUTOWB100
Still image
1514 161312
17 18 19
• No information
2
26
880hpa
P
1/1000
F3.9
ISO
AUTOWB100
ORM
N
4608 3456
100-0004
’14/02/26 12:30
1200m
2.0
Switching the displays
The displays change in the order of Normal → Detailed → No info. each
time the INFO button is pressed.
897
2.01/1000
20
21
22
23
24
2
18
EN
Page 19

No. Name Normal Detailed No info.
1
Battery check
2
Eye-Fi transfer data/Wi-Fi
3
Protect
4
Adding sound
5
Share order
6
Print reservation/number of prints
7
Current memory
8
Frame number/
total number of images
9
Direction information
10
Longitude
11
Latitude
12
Compression/
Image size (movies)
13
Shutter speed
14
Shooting mode
15
Atmospheric/Hydraulic pressure
16
ISO sensitivity
17
Aperture value
18
Altitude/Water depth
19
Histogram
20
Exposure compensation
21
Picture mode
22
White balance
23
Image size (still images)
24
File name
25
Recording date and time
26
Grouped images
–
RR
RR
RR
RR
RR
RR
RR
–
–
–
–
–
–
–
–
–
–
–
–
–
–
–
–
RR
RRR
R
R
R
R
R
R
R
R
R
R
R
R
R
R
R
R
R
–
–
–
–
–
–
–
–
–
–
–
–
–
–
–
–
–
–
–
–
–
–
–
–
–
EN
19
Page 20
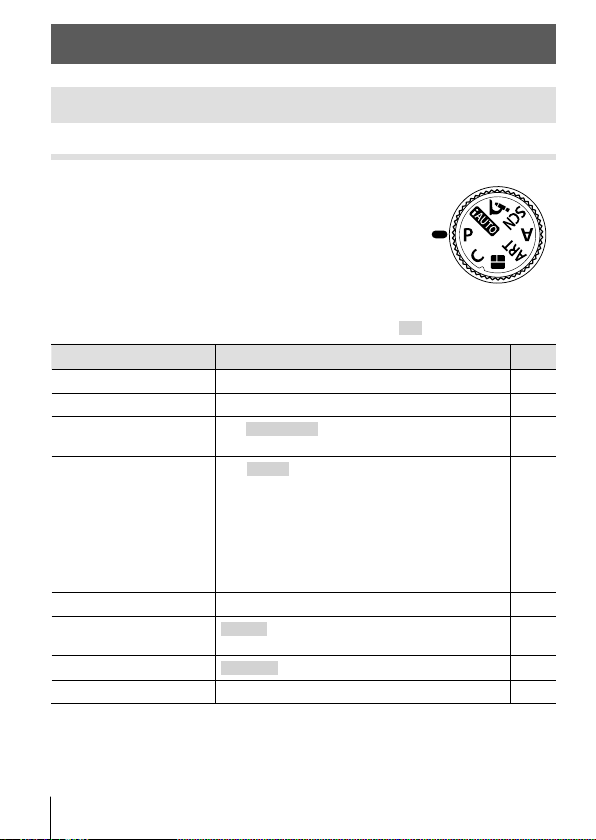
Shooting using basic functions
Using the shooting modes
Selecting shooting mode
Turn the mode dial to set the shooting mode to
the indicator.
• After selecting O,
mode.
List of shooting mode
• The default settings of the function are highlighted in .
Shooting mode Sub mode
P (Program mode)
A (iAUTO mode)
(Microscope)
k
O (Scene Mode)
A (A mode)
ART
(Art Filter)
P (PHOTO STORY)
C (Custom mode)
• “List of settings available in each shooting mode” (P. 100), “List of O
settings” (P. 102), “List of ART settings” (P. 101)
• In certain shooting modes, the camera may take a few moments for image
processing after taking a picture.
20
EN
ART
, P, or k, select the sub
–
–
m Microscope/o Focus Stacking/
p Focus BKT/n Microscope Control
B
Portrait/e e-Portrait/F Landscape/
1
Interval Shooting/H Hand-Held Starlight/
G
Night Scene/U Night+Portrait/C Sport/
2
Indoor/3 Self Portrait/` Sunset/
X
Fireworks/_ Cuisine/^ Documents/
g
Beach & Snow/] Snapshot/\ Wide1/
[
Wide2/w Macro/s Snow/s Panorama/
E
Backlight HDR
–
Pop Art/Soft Focus/Pale&Light Color/
Grainy Film/Pin Hole/Diorama/Dramatic Tone
Standard/Speed/Fun Frames
–
P. 9
P. 21
P. 21
P. 22
P. 26
P. 27
P. 28
P. 29
Page 21

A (iAUTO mode)
A full auto mode in which the camera automatically optimizes settings for
the current scene. The camera does all the work, which is convenient for
beginners.
Rotate the mode dial to A.
1
Press the shutter button halfway down to focus.
2
The camera was unable to focus if the AF target mark flashes red. Try
focusing again.
Press the shutter button all the way down to shoot.
3
k (Microscope)
Images can be taken from up to 1 cm away from the subject. In this mode
you can shoot images with a large depth of field, and perform focus bracket
shooting of a set number of images.
Rotate the mode dial to k.
1
Use HI to select a sub mode and press the A button at the
2
end.
Sub mode Application
m
Microscope Images can be taken from up to 1 cm away from the subject.
Focus
o
Stacking*
p
Focus BKT
Microscope
n
Control
*1 There may be situations in which it is not possible to create composite image
due to camera shake.
*2 Available only when Picture mode is [Vivid], [Natural] or [Muted].
Press the shutter button all the way down to shoot.
3
• You can shoot with a fixed focus position. gAFL (P. 34)
The camera shoots a number of images, automatically shifting
the focus in each image. These can then be combined into a
1
composite image with a large depth of field. Two images are
recorded, the first frame and the composite image.
In this mode, the camera shoots a number of images,
automatically shifting the focus in each image. The number
of images and shooting steps are set in [Focus BKT settings]
(P. 64).
Changes the magnification level of the subject on the monitor.
The magnification level when the shooting distance is 1 cm is
displayed on the monitor. You can change the magnification
level by pressing the I button.*
the image may be grainy.
2
At high magnification levels,
EN
21
Page 22

O (scene mode)
Only by selecting a sub mode according to the subject or the scene, you
can shoot with an proper setting.
Sub mode Application
Portrait Suitable for portrait shooting.
B
e
e-Portrait
Landscape Suitable for landscape shooting.
F
Interval Shooting
1
Hand-Held
H
Starlight
Night Scene Suitable for tripod shooting of night scenes.
G
Night+Portrait
U
Sport Suitable for fast action shooting.
C
Indoor Suitable for shooting portraits indoors like party scene.
2
Self Portrait Suitable for shooting yourself with holding the camera.
3
Sunset Suitable for shooting the sunset.
`
Fireworks Suitable for shooting fireworks at night.
X
Cuisine Suitable for shooting cuisine.
_
Documents Suitable for shooting paper documents or time tables.
^
Beach & Snow
g
]
Snapshot Suitable for shooting seaside and pool portraits.
\
Wide1 Suitable for shooting underwater.
[
Wide2
Macro Suitable for shooting close-up view underwater.
w
s
Snow
Smoothes out skin tones and texture. This mode is
suitable when viewing images on a high-definition TV.
Automatically shoot successive images according to
set [Start Waiting Time], [Frame], and [Interval Time].
The shot frames can also be recorded as into a single
movie.
Suitable for shooting night scenes without a tripod.
Reduces blur when shooting low light/ illuminated
scenes.
Suitable for portrait shooting against a background of
night view.
Suitable for shooting at snow-capped mountains,
seascapes in the sun, and other whitish scenes.
Suitable for shooting underwater.
The focus distance is fixed to approximately 5 m.
Suitable for shooting snow scenes. This mode allows
shooting using tap control (P. 61).
22
EN
Page 23

Sub mode Application
s
Panorama
You can shoot and combine multiple images to create
an image with a wide angle of view (panoramic image).
Suitable for contrasting scenes. This mode captures
Backlight HDR
E
multiple images and merges them into one, properly
exposed image.
Rotate the mode dial to O.
1
Use HI to select a sub mode and press
2
Portrait
the A button at the end.
• Press the A button once again to display the
sub mode selection screen.
• In [e-Portrait] mode, two images are recorded: an unmodified image and a
second image to which [e-Portrait] effects have been applied.
1 Interval Shooting
Adjusts interval settings in the setting menu before selecting Interval
Shooting in O (Scene Mode) to shoot.
Customizing the setting
Press the button to display the
1
menus.
Use H to move to the page tab, and
2
use FG to select Setting menu 3 and
Ta b
GPS Settings
Wi-Fi Settings
Interval Settings
Focus BKT Setting
Certification
then press A.
Use FG to select [Interval Settings] and press A. Then
3
press FG to select an item and press A.
MENU
GPS Settings
Wi-Fi Settings
Interval Settings
Focus BKT Setting
Certification
BackSettings Menu 3
Frame
Start Waiting Time
A
Interval Time
Time Lapse Movie
BackSettings Menu 3
BackInterval Settings
00:05:00
00:00:30
MENU
MENU
99
Off
16
M
4:3
MENUMENU
EN
23
Page 24

Use FG to highlight an option and press A to select.
4
Frame
Start Waiting Time
Interval Time
Time Lapse Movie
• Press the button repeatedly to exit the menu.
• The interval may be longer than the set interval such as when the camera
takes a few moments for image processing.
• If shooting a time lapse movie over a long period, use the USB-AC adapter
F-3AC (sold separately).
• For the free space on a card, you cannot shoot the set number of frames.
• During interval shooting the power may turn off, but the shooting is still
performed according to the setting.
To cancel the interval shooting
Press the button.
Sets the number of frames to be shot between 1 and
99 frames.
Sets the time from pressing the shutter button until
the picture is taken between 00:00:00 and 24:00:00.
Sets the shooting interval for the second and
subsequent frames between 00:00:01 and 24:00:00.
Select [On] to record, besides the still pictures
recorded for each frame, a movie generated from the
sequence of frames.
] \ [ w Shooting underwater
The [] Snapshot], [\ Wide1], [[ Wide2]*
1
, [w Macro] submode is
recommended for shooting underwater.
*1 When set to [[ Wide2], the focus distance is automatically fixed to approx.
5.0 m (16.4 ft.).
• You can shoot with a fixed focus position. gAFL (P. 34)
24
EN
Page 25
s Panorama
When shooting a panorama, you can select the method of combining
images using the submenu.
1 Select [s Panorama].
2 Press G to go to the submenu.
3 Use HI to select a submenu, and press the A button to set.
Submenu Application
Auto
Panorama images are automatically combined just by
swinging the camera in the shooting direction.
Three frames are taken and combined by the camera.
Manual
The user composes the shots using the guide frame and
manually releases the shutter.
PC
The frames that were taken are combined into a
panorama image using the PC software.
• Move the camera as if rotating it around a vertical axis through the center
of the lens to take better panorama images.
Taking pictures with [Auto]
1 Press the shutter button to take the first frame.
2 Move the camera slightly in the
direction of the second frame.
3 Move the camera slowly so that
the pointer and the target mark
overlap. The camera releases the
shutter automatically when the
pointer and the target overlap.
• To combine only two frames,
press the A button.
Target mark
Pointer
SCNSCN
MENU OK
Screen when combining
images from left to right
s
AUTOAUTO
SaveCancel
4 Repeat step 3 to take a third frame. The camera automatically combines the
frames into a single panorama image.
• To cancel the panorama function, press the button.
• If the shutter does not automatically release, try [Manual] or [PC].
EN
25
Page 26

Taking pictures with [Manual]
1 Use FGHI to specify at which
edge the next picture is to be
connected, and then press the A
button.
Direction for combining frames
SCNSCN
s
MANUALMANUAL
2 Press the shutter button to take
the first frame.The edge of the first
frame is displayed faintly on the
screen.
3 Compose the next shot so that the edge of the first frame displayed faintly on
the screen overlaps the subject of the second frame, and press the shutter
button.
• To combine only two frames, press the A button.
4 Repeat step 3 to take a third frame. The camera automatically combines the
frames into a single panorama image.
Taking pictures with [PC]
1 Use FGHI to specify at which edge the next picture is to be connected,
and then press the A button.
2 Press the shutter button to take the first frame. The edge of the first frame is
displayed faintly on the screen.
3 Compose the next shot so that the edge of the first frame displayed faintly on
the screen overlaps the subject of the second frame, and press the shutter
button.
4 Repeat step 3 until the desired number of frames are taken, and then press
the A button or button when finished.
• Panorama shooting is possible for up to 10 frames.
• The shot images are combined into a single panorama image by the PC
software.
• For details on installing the PC software, refer to P. 82. In addition, refer to the
PC software help guide for details on how to make panorama images.
A (A mode)
When an aperture value is set, the camera automatically sets an
appropriate shutter speed. After pressing H, you can change the aperture
value using FG.
26
EN
Page 27
ART
(art filters)
You can shoot with color and effect like posters and paintings.
Sub mode Application
Pop Art
Soft Focus
Pale&Light Color
Enhances the color and atmosphere of an image more
brightly and vividly.
Expresses an ethereal atmosphere with a soft tone and
makes an image dreamy.
Expresses a comfortable floating feeling by making an
image more pale and light.
Grainy Film Expresses the strength and roughness of black and white.
Expresses the tunnel effect like that obtained from an
Pin Hole
old fashioned camera or a toy camera by reducing the
peripheral brightness.
Expresses an image shooting a surreal miniature world with
Diorama
enhancing the saturation and contrast and blurring an outof-focus area of an image.
Enhances the local contrast of an image and provide an
Dramatic Tone
image that a difference of brightness and darkness is
emphasized.
Rotate the mode dial to
1
Use HI to select a sub mode and press
2
ART
.
the A button at the end.
• Press the A button once again to display the
sub mode selection screen.
Pop Art
1
0.00.0
WB
AUTOWBAUTO
16
M
4:3
MENUMENU
27
EN
Page 28
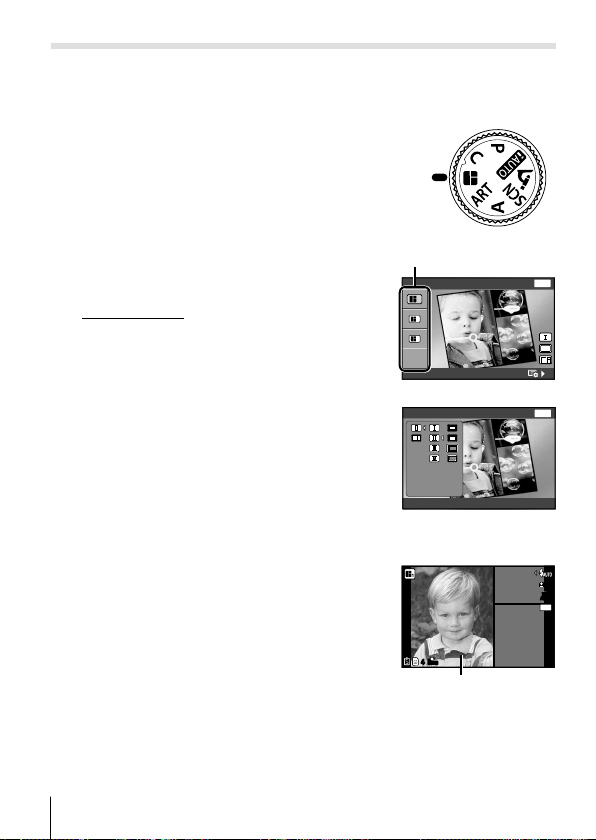
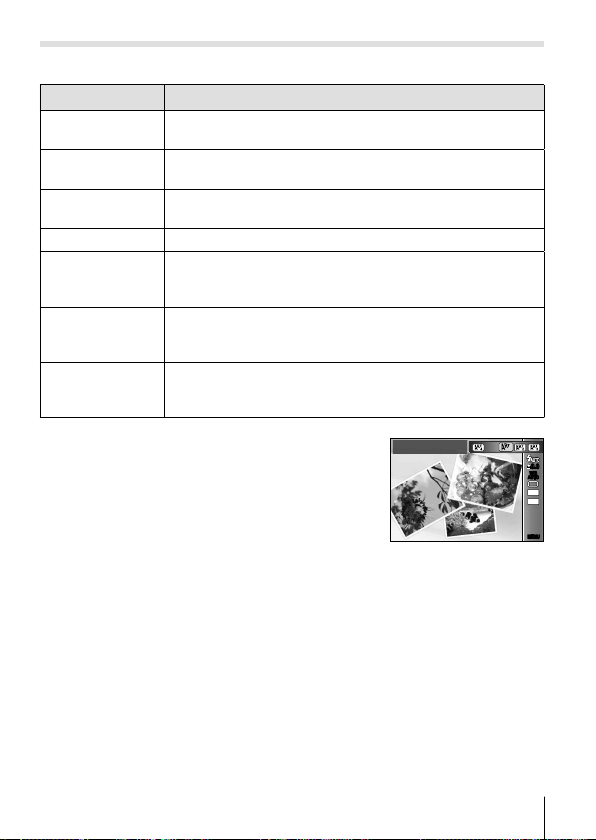
P (PHOTO STORY)
When shooting, an image is incorporated into a layout frame set to create a
desired collage. This enables wide range of photo expression with themes
or stories.
Rotate the mode dial to P.
1
Select a theme using FG and press
2
I.
Types of theme
P
Standard
1
Speed
P2
Fun Frames
P
3
Select desired items in the theme using
3
FGHI, then press A.
• Press the shutter button halfway to return to
the shooting screen.
• The monitor switches to PHOTO STORY
display.
• Press the A button once again to display
the theme selection screen.
Press the shutter button all the way
4
down in standby mode to shoot.
• Press I button to switch the current frame.
28
EN
Theme
Standard SETUP
1
2
3
Black/Pin-Hole SETUP
44
N
ORM
Current frame
MENU
MENU
0.00.0
WB
AUTOWBAUTO
16
M
Page 29

Shoot each frame in the same way.
5
• Shot images are displayed in the frames.
• Press (G) to cancel the image in the
directly preceding frame and retake the shot.
If there are multiple images, use HI to
Next frame
0.00.0
WB
AUTOWBAUTO
16
change the image to retake. Once you have
selected, press the A button.
• Press the button, and then press the
A button to cancel the shot picture and
restart shooting again.
After shooting all frames, press A and save the picture.
6
44
N
ORM
Shot image
• AF Mode is fixed to [Spot].
• The following operations are not available in the PHOTO STORY mode.
Movie recording, sequential and self-timer.
C (Custom mode)
If you store shooting settings in [Custom Mode Setup] (P. 56), you can call up
and shoot using the stored shooting settings.
M
EN
29
Page 30

Using the zoom
Pressing the zoom lever adjusts the shooting range.
Zoom bar
PP
N
ORM
W side T side
Image size Zoom bar
44
3.43.4
0.00.0
WB
AUTOWBAUTO
ISO
ISO
AUTO
AUTO
16M
4:3
00:3400:34
16M
Optical zoom
Super-resolution zoom*1
Other
*2
*1 For the super resolution zoom and the details, refer to P. 48.
*2 Due to increased processing of the pixel counts, the image quality will not
degrade. The magnification ratio changes depending on the image size
setting.
30
EN
Page 31

Using shooting options (Set by direct button)
Some items are not available in some shooting modes. g “List of settings
available in each shooting mode” (P. 100)
Flash
You can use a flash when shooting.
Press the # button (I) to display options.
1
Use HI to choose a flash mode and press A.
2
#AUTO
• In [!](Red-eye reduction flash), after the pre-flashes, it takes about
• [!](Red-eye reduction flash) may not work effectively under some
• In A mode, only #AUTO and $ can be selected.
Auto flash
!
Red-eye reduction flash
#
Fill-in flash
$
Flash off The flash does not fire.
#
Remote Control
RC
#
Slave
SLV
LED On
q
1 second before the shutter is released. Do not move the camera until
shooting is complete.
shooting conditions.
The flash fires automatically in low
light or backlight conditions.
This function allows you to reduce
the red-eye phenomenon.
The flash fires regardless of the
light conditions.
For details, see “Taking pictures
with the Olympus Wireless RC
Flash System” (P. 95).
The commercially-available slave
flash that is synchronized with the
camera flash is used for taking
pictures. The flash intensity setting
can be adjusted.
The LED turns on when a picture
is taken. This is effective for taking
close up pictures.
EN
31
Page 32

Exposure compensation
Compensates the brightness (appropriate exposure) adjusted by the
camera.
Press the +/- button (F), and then press HI for the exposure
1
compensation.
• Choose positive (“+”) values to make pictures brighter, negative (“–”)
values to make pictures darker.
Negative (–) No compensation (0) Positive (+)
32
EN
Page 33

Single/Sequential
Press the jY button (G) to display the direct menu.
1
Select an option using HI and press A.
2
o
Single-frame shooting
j
Sequential *
c
High-Speed1 *
d
High-Speed2 *
*1 Taken pictures are displayed as a group.
*2 The number of recording pixels are limited.
• During sequential shooting, focus, exposure, and white balance are locked at
the first frame.
• During sequential shooting, if the battery check blinks due to low battery, the
camera stops shooting and starts saving the pictures you have taken on the
card. The camera may not save all of the pictures depending on how much
battery power remains.
1
1, 2
1, 2
Shoots 1 frame at a time when the
shutter button is pressed (normal
shooting mode).
The images are taken sequentially for
100 frames at up to about 5 frames per
second (fps) while pressing down the
shutter button all the way down.
The images are taken sequentially for
up to 100 frames at about 15 frames
per second (fps) while pressing down
the shutter button all the way down.
The images are taken sequentially for
up to 100 frames at about 60 frames
per second (fps) while pressing down
the shutter button all the way down.
EN
33
Page 34

Self timer
Sets the time after the shutter button is pressed until the picture is taken.
Press the jY button (G) to display the direct menu.
1
Select [Y12], [Y2] or [YC] using HI and press the A
2
button.
Press the shutter button halfway to focus, the rest of
Y12
Self-timer
12 SEC
the way down to start the timer. First, the self-timer
lamp lights up for approximately 10 seconds, then it
blinks for approximately 2 seconds and the picture
is taken.
Press the shutter button halfway to focus, the rest of
the way down to start the timer. The self-timer lamp
blinks for approximately 2 seconds, and then the
Y2
Self-timer
2 SEC
picture is taken.
After selecting this mode, press the button to
set “the number of frames, the time from pressing
the shutter button until the picture is taken, and the
YC
Custom
Self-timer
interval time”. Pictures are taken by these setting.
• To cancel the activated self-timer, press the button.
• Self timer is not canceled automatically after shooting.
AFL (Focus lock)
You can lock the focus position.
This setting is available in k (Microscope) mode, and when O mode is
[] Snapshot], [\ Wide1], or [w Macro].
Press the A button.
1
• The camera focuses and locks the position.
• Make fine forward/backward adjustment to
the locked focus using the FG button.
• Press the A button again to release the
focus lock.
• Zooming operation, pressing the
button, and the other operations also release
the focus lock.
AF lock mark
ORM
N
44
AF LOCKAF LOCK
0.00.0
16
M
4:3
0:340:34
34
EN
Page 35

Using shooting options
(Set by function menu)
Some items are not available in some shooting modes. g “List of settings
available in each shooting mode” (P. 100)
Function menu
PP
Function menu
1 Picture Mode..........................P. 36
2 Flash ......................................P. 37
3 Exposure compensation ........P. 37
4 White balance ........................ P. 37
Press H to display the function menu.
1
• To hide the function menu, press A.
Use FG on the arrow pad to select settings, use HI to
2
change the selected setting, and press A.
Displays the selected function name
Selection
1
2
0.00.0
3
WB
AUTOWBAUTO
4
ISO
ISO
AUTO
AUTO
5
6
16
M
7
4:3
8
MENUMENU
Setup menu (P. 41)
5 ISO sensitivity ........................ P. 38
Y .....................................
6 o/
7 Image Size (still images)........P. 39
8 Aspect .................................... P. 39
Arrow pad
(HI)
Flash Auto
0.00.0
Arrow pad
WB
AUTOWBAUTO
ISO
ISO
(FG)
AUTO
AUTO
16
M
4:3
MENUMENU
Function
P. 38
EN
35
Page 36

• The default settings of the function are highlighted in .
Picture Mode Sets the processing options.
Vivid Produces vivid colors.
h
Natural Produces natural colors.
i
Muted Produces flat tones.
j
8
Fish Eye
7
Sparkle
6
Reflection Makes an image with the effect of reflecting in a mirror.
5
Fragmented
Pop Art
Soft Focus
Pale&Light
Color
Grainy Film
Pin Hole
Diorama
Dramatic
Tone
Produces distortion with the effect of shooting with a
fisheye lens.
Produces twinkling lights with the effect of shooting with
a cross filter.
Makes an image into a collage of tiles. This mode
produces the effect of mosaic art.
Enhances the color and atmosphere of an image more
brightly and vividly.
Expresses an ethereal atmosphere with a soft tone and
makes an image dreamy.
Expresses a comfortable floating feeling by making an
image more pale and light.
Expresses the strength and roughness of black and
white.
Expresses the tunnel effect like that obtained from an
old fashioned camera or a toy camera by reducing the
peripheral brightness.
Expresses an image shooting a surreal miniature world
with enhancing the saturation and contrast and blurring
an out-of-focus area of an image.
Enhances the local contrast of an image and provide an
image that a difference of brightness and darkness is
emphasized.
36
EN
Page 37

Flash Sets the flash firing method.
_
Flash Auto
Redeye
!
Fill In The flash fires regardless of the available light.
#
Flash Off The flash does not fire.
$
Remote
#RC
Control
SLV Slave
#SLV
LED On
q
Exposure
compensation
–2.0 to +2.0 Value
White balance
e
WB Auto The camera automatically adjusts the white balance.
f
Sunny Suitable for shooting outdoors under a clear sky.
g
Cloudy Suitable for shooting outdoors under a cloudy sky.
h
Incandescent Suitable for shooting under tungsten lighting.
Fluorescent Suitable for shooting under white fluorescent lighting.
Underwater Suitable for underwater shooting.
Z
One Touch 1
One Touch 2
The flash fires automatically in low-light or backlight
conditions.
Pre-flashes are emitted to reduce the occurrence of red
eye in your photos.
For details, see “Taking pictures with the Olympus
Wireless RC Flash System” (P. 95).
The commercially-available slave flash that is
synchronized with the camera flash is used for taking
pictures. The flash intensity setting can be adjusted.
The LED turns on when a picture is taken. This is
effective for taking close up pictures.
Compensates the brightness (appropriate exposure)
adjusted by the camera.
Set a larger negative (–) value to adjust darker, or a
larger positive (+) value to adjust brighter.
Sets an appropriate color scheme for the light of the
shooting scene.
For manually adjusting the white balance according
to the light when shooting. Set a piece of white paper
or other white object so that it fills the entire screen,
and press the button to set the white balance.
For how to register one touch white balance, see
“Registering one touch white balance” (P. 39).
EN
37
Page 38

ISO sensitivity Sets the ISO sensitivity.
l
m
Q
to # Value
o/Y
o
j
c
d
Y12
Y2
YC
ISO Auto
High ISO
Auto
Single
Sequential
High-Speed1
High-Speed2
Y
12 sec
Y
2 sec
Custom
Self-timer
The camera automatically sets the sensitivity with
priority on image quality.
The camera automatically sets the sensitivity with
priority on minimizing blur caused by a moving subject
or by camera shake.
Set a smaller value to reduce noise in the picture, or a
larger value to reduce blur.
Sets the sequential shooting function and the time
from pressing the shutter button until the picture
is taken.
One frame is shot each time the shutter button is
pressed.
The images are taken sequentially for 100 frames at up
to about 5 frames per second (fps) while pressing down
the shutter button all the way down.
The images are taken sequentially for up to 100 frames
at about 15 frames per second (fps) while pressing
down the shutter button all the way down.
The images are taken sequentially for up to 100 frames
at about 60 frames per second (fps) while pressing
down the shutter button all the way down.
The self-timer lamp turns on for approx. 10 seconds,
then blinks for approx. 2 seconds, and then the picture
is taken.
The self-timer lamp blinks for approx. 2 seconds, then
the picture is taken.
Photographs are taken at “the number of frames, the
time from pressing the shutter button until the picture is
taken, and the interval time” which you set.
38
EN
Page 39

Image size
(still images)
4608×3456 Suitable for printing pictures over A3 (11×17 in.).
4
3200×2400 Suitable for printing pictures up to A3 (11×17 in.).
3
1920×1440 Suitable for printing pictures up to A4 size (8.5×11 in.).
7
640×480 Suitable for using pictures on emails.
Aspect Sets the horizontal-to-vertical ratio of images.
4:3
u
16:9
v
3:2
w
1:1
x
• In certain shooting modes, some functions cannot be set. g “List of settings
available in each shooting mode” (P. 100).
• Examples of image size when the aspect ratio is 4:3.
Sets the number of recording pixels.
Change the horizontal-to-vertical ratio when taking
pictures.
Registering one touch white balance
Select [ One Touch 1] or [ One Touch 2], face the camera toward a
piece of white paper or other white object, and press the button.
• The camera releases the shutter and the white balance is registered. When
the white balance was previously registered, the registered data is updated.
• The registered white balance data will not be cleared by turning off the power.
• Perform this procedure under the light where the pictures will be actually
taken.
• When the camera settings are changed, the white balance must be registered
again.
• When the white balance cannot be registered, check that the white paper fills
the screen, and then perform the procedure again.
EN
39
Page 40

Using the setup menu functions
Setup menu
4 Playback Menu
Normal
Auto
Face/iESP
ESP
MENU
Slideshow
Edit
Erase
Print Order (P. 78)
q
R (Protect)
Share Order (P. 68)
Camera Menu 1 Back
1
2
3
4
5
6
7
Wi-Fi StartWi-Fi Start
ResetReset
Compression
Shadow Adjust
AF Mode
ESP/
Digital Zoom Off
P. 50
1 Camera Menu 1
Wi-Fi Start/End Wi-Fi (P. 65)
Reset
Compression
Shadow Adjust
z
AF Mode
ESP/n
Digital Zoom
2 Camera Menu 2
Image Stabilizer (Still images)
Accessory Settings
AF Illuminat.
Rec View
z
Pic Orientation
Date Stamp
Super-Res Zoom
3 Movie Menu
Image Size
IS Movie Mode
R (Movie sound recording)
Wind Noise Setting
A
Recording Volume
40
EN
P. 42
P. 45
P. 49
5 Settings Menu 1
Memory Format/Format
Backup
Eye-Fi
Custom Mode Setup
d
USB Connection
q Power On
Sound Settings
6 Settings Menu 2
Pixel Mapping
s (Monitor)
TV Out
l (Language)
d
X (Date/time)
World Time
Tough Settings
7 Settings Menu 3
GPS Settings
Wi-Fi Settings
Interval Settings
Focus BKT Setting
d
Certification
P. 55
P. 57
P. 63
Page 41

Using the setup menu
Press the button during shooting or playback to display the setup
menu.
The setup menu provides access to a variety of camera settings, such
as shooting and playback functions, time and date settings, and display
options. Some items are not available in some shooting modes. g “List of
settings available in each shooting mode” (P. 100)
Press the button.
1
• The setup menu is displayed.
Press H to select the page tabs. Use FG to select the
2
Camera Menu 1 Back
Wi-Fi StartWi-Fi Start
ResetReset
Compression
Shadow Adjust
AF Mode
ESP/
Digital Zoom Off
Normal
Face/iESP
MENU
Auto
ESP
desired page tab and press I.
Page tab
Normal
Face/iESP
MENU
Auto
ESP
Camera Menu 1 Back
Wi-Fi StartWi-Fi Start
ResetReset
Compression
Shadow Adjust
AF Mode
ESP/
Digital Zoom Off
3
Use FG to select the desired submenu 1 and then press the
Submenu 1
Camera Menu 1 Back
Wi-Fi StartWi-Fi Start
ResetReset
Compression
Shadow Adjust
AF Mode
Digital Zoom Off
Face/iESP
Normal
MENU
Auto
ESPESP/
A button.
Submenu 2
Camera Menu 1 Back
Wi-Fi StartWi-Fi Start
ResetReset
Compression
Shadow Adjust
AF Mode
Digital Zoom
Face/iESP
Normal
MENU
Camera Menu 1 Back
Wi-Fi StartWi-Fi Start
ResetReset
Auto
ESPESP/
Off
Compression
Shadow Adjust
AF Mode
ESP/
Digital Zoom
MENU
Off
On
Use FG to select the desired submenu 2
4
and then press the A button.
• Once a setting is selected, the display returns to
the Submenu 1.
• There may be additional operations.
5
Press the button to complete the setting.
Camera Menu 1 Back
Wi-Fi StartWi-Fi Start
ResetReset
Compression
Shadow Adjust
AF Mode
ESP/
Digital Zoom
Face/iESP
Normal
Auto
EN
MENU
ESP
On
41
Page 42

For the operation method, refer to (P. 41).
• The default settings of the function are highlighted in .
z
Camera Menu 1
Restoring the shooting functions to the default settings
z
[Reset]
Submenu 2 Application
Restores the following menu functions to the default settings.
• Sub mode of
• Picture Mode
• Flash
• Exposure compensation
Yes
No The settings will not be changed.
• White balance
• ISO sensitivity
• o/Y
• Image Size (still images)
• Aspect
• Camera Menu 1, Camera Menu 2 and Movie Menu Functions
• Aperture value
ART
, O,
P, and k
Selecting the image quality for still images z [Compression]
Submenu 2 Application
Fine Shooting at high quality.
Normal Shooting at normal quality.
• “Number of storable pictures (still images)/Recording length (movies) in the
internal memory and cards” (P. 94)
42EN42
EN
Page 43

For the operation method, refer to (P. 41).
Brightening the subject against backlight z [Shadow Adjust]
Submenu 2 Application
Auto Automatically On when a compatible shooting mode is selected.
Off The effect is not applied.
On
• When [ESP/n] is set to [n], [Shadow Adjust] is automatically fixed to [Off].
Shoot with automatic adjustment to brighten an area that has
become darker.
Selecting the focusing area z [AF Mode]
Submenu 2 Application
The camera focuses automatically. (If a face is detected, it is
Face/iESP
Spot
AF Tracking
*1 For some subjects, the frame may not appear or may take some time to
appear.
*2 If the frame blinks in red, the camera cannot focus. Try refocusing on the
subject.
To focus on a moving subject continuously (AF Tracking)
1 Hold the camera to align the AF target mark on the subject and press the A
button.
2 When the camera recognizes the subject, the AF target mark automatically
tracks the subject movement to focus on it continuously.
3 To cancel the tracking, press the A button.
• Depending on the subjects or the shooting conditions, the camera may be
unable to lock the focus or fail to track the subject movement.
• When the camera fails to track the subject movement, the AF target mark
changes to red.
shown by a white frame
halfway and the camera focuses, the frame turns to green
face is detected, the camera chooses a subject in the frame and
focuses automatically.)
The camera focuses on the subject located within the AF target
mark.
The camera tracks the subject movement automatically to focus
on it continuously.
*1
; when the shutter button is pressed
*2
. If no
EN
43EN43
Page 44

For the operation method, refer to (P. 41).
Selecting the method for measuring the brightness
z
[ESP/n]
Submenu 2 Application
ESP
5 (spot)
• When set to [ESP], the center may appear dark when shooting against strong
backlighting.
Shoots to obtain a balanced brightness over the entire screen
(Meters the brightness at the center and surrounding areas of
the screen separately).
Shoots the subject at the center during backlighting (Meters the
brightness at the center of the screen).
Shooting at higher magnifications than optical zoom
z
[Digital Zoom]
Submenu 2 Application
Off Disable digital zoom.
On Enable digital zoom.
• The option selected for [Digital Zoom] affects the appearance of the zoom bar
(P. 48).
• This setting is not available when drive settings are [c] and [d].
• This setting is not available when the picture mode is except [Vivid], [Natural],
and [Muted].
44EN44
EN
Page 45

For the operation method, refer to (P. 41).
z Camera Menu 2
Reducing the blur caused by the camera shake when shooting
z
[Image Stabilizer]
Submenu 2 Application
Off
On The image stabilizer is activated.
• There may be a noise coming from inside the camera when reducing camera
shake.
• Images may not be stabilized if camera shake is too severe.
• When the shutter speed is extremely slow, such as when taking pictures at
night, [Image Stabilizer] may not be as effective.
The image stabilizer is deactivated. This is recommended for
shooting when the camera is fixed in place on a tripod or other
stable surface.
Using separately sold accessories
z
[Accessory Settings]
Submenu 2 Submenu 3 Application
Off
RC
Remote Flash
Slave
Off
Conversion
Lens
• “Taking pictures with the Olympus Wireless RC Flash System” (P. 95)
• “Use the conversion lens/LED light guide” (P. 96)
PTWC-01
FCON-T01
TCON-T01
The external flash is not available.
An Olympus Wireless RC Flash System
compatible flash is used for taking pictures.
(Channel: CH1, Group: A)
The commercially-available slave flash that is
synchronized with the camera flash is used for
taking pictures. The flash intensity setting can be
adjusted.
Select when taking pictures without a conversion
lens.
Select depending on designated optional
conversion lenses.
EN
45EN45
Page 46

For the operation method, refer to (P. 41).
Using the assist lamp for shooting a dark subject
z
[AF Illuminat.]
Submenu 2 Application
Off The AF illuminator is not used.
On
When the shutter button is pressed halfway down, the AF
illuminator turns on to aid focusing.
AF illuminator
Viewing the image immediately after shooting z [Rec View]
Submenu 2 Application
Off
0.5/1/2/3 (sec)
The image being recorded is not displayed. This allows the user
to prepare for the next shot while following the subject in the
monitor after shooting.
The image being recorded is displayed for selected second(s).
This allows the user to make a brief check of the image that was
just taken.
46EN46
EN
Page 47

For the operation method, refer to (P. 41).
Automatically rotating images shot with the camera in a
vertical position during playback z [Pic Orientation]
• During shooting, the [y] (P. 53) setting on the q Playback Menu is set
automatically.
• This function may not work properly if the camera is facing up or down during
shooting.
Submenu 2 Application
Information about the vertical/horizontal orientation of the
Off
On
camera during shooting is not recorded with images. Images
shot with the camera in a vertical position are not rotated during
playback.
Information about the vertical/horizontal orientation of the
camera during shooting is recorded with images. Images are
automatically rotated during playback.
Imprinting the date of recording z [Date Stamp]
Submenu 2 Application
Off Do not imprint the date.
On Stamp new photographs with the date of recording.
• When the date and time are not set, [Date Stamp] cannot be set.
g [X] (P. 59)
• The date stamp can not be deleted.
• You cannot set [Date Stamp] when drive settings are [j], [c], and [d],
and the picture mode is except [Vivid], [Natural], and [Muted].
EN
47EN47
Page 48

For the operation method, refer to (P. 41).
Shooting larger pictures than when using optical zoom with
low degrading of image quality z [Super-Res Zoom]
Submenu 2 Application
Off Disable super-resolution zoom.
On Enable super-resolution zoom.
• [Super-Res Zoom] is available only when [Image Size] is set to [].
• This setting is not available when drive settings are [c] and [d].
• This setting is not available when the picture mode is except [Vivid], [Natural],
and [Muted].
Super-resolution
zoom
On Off 16M
Off On
On On 16M
*1 Due to increased processing of the pixel counts, the image quality will not
degrade. The magnification ratio changes depending on the image size
setting.
• Photographs taken with the zoom bar displayed in red may appear “grainy”.
48EN48
EN
Digital zoom Image size Zoom bar
Super-resolution zoom
16M
Digital zoom
Other
Super-resolution zoom
Digital zoom
*1
Page 49

For the operation method, refer to (P. 41).
A
Movie Menu
Selecting the image size for movies A [Image Size]
Submenu 2 Application
1080p
720p
VGA (640×480)
HS 120fps*
HS 240fps*
*1 HS: Film quickly moving subjects for slow-motion playback.
• “Number of storable pictures (still images)/Recording length (movies) in the
1
(640×480)
1
(320×240)
This setting is available when Picture mode is [Vivid], [Natural] or [Muted].
internal memory and cards” (P. 94)
Select the image quality based on the image size
and frame rate.
Reducing the blur caused by the camera shake when shooting
A [IS Movie Mode]
Submenu 2 Application
Off
On The image stabilizer is activated.
• Images may not be stabilized if camera shake is too severe.
The image stabilizer is deactivated. This is recommended for
shooting when the camera is fixed in place on a tripod or other
stable surface.
Recording sound when shooting movies A [R]
Submenu 2 Application
Off No sound is recorded.
On Sound is recorded.
• Sound is not recorded in the [Diorama] of picture mode or HS movie mode.
EN
49EN49
Page 50

For the operation method, refer to (P. 41).
Reduce wind noise in the recorded sound when recording
movie A [Wind Noise Setting]
Submenu 2 Application
Off Disable Wind Noise Reduction.
On Uses Wind Noise Reduction.
Adjusting the microphone volume A [Recording Volume]
Submenu 2 Application
Normal Set the microphone level to Normal for general use.
Low
q
Playback Menu
Set the microphone level to Low not to produce clipping sound
when the microphone level is high.
Playing back pictures automatically q [Slideshow]
Submenu 2 Submenu 3 Application
Off/
Cosmic/
BGM
Start ― Starts the slideshow.
• During a slideshow, press I to advance one frame, H to go back one frame.
• Press the button or the A button to stop the slideshow.
Breeze/
Mellow/
Dreamy/
Urban
Selects the background music options.
50EN50
EN
Page 51

For the operation method, refer to (P. 41).
Editing still images q [Edit]
Submenu 1 Submenu 2
P. 51
P. 51
P. 52
P. 52
P. 52
P. 53
P. 53
Edit (still images)
Q
P
R
Shadow Adj
Redeye Fix
y
e-Portrait
Changing the image size q [Q]
This saves a high-resolution image as a separate image with a smaller size
for use in email attachments and other applications.
Submenu 1 Submenu 2 Submenu 3
Edit
1 Use HI to select an image.
2 Use FG to select an image size and press the A button.
• The resized image is saved as a separate image.
Q
3
7
Cropping image q [P]
Submenu 1 Submenu 2
Edit
1 Use HI to select an image, and press the A
button.
2 Use the zoom lever to select the size of the
cropping frame, and use FGHI to move the
frame.
3 Press the A button after you have selected the
area to trim.
• The edited image is saved as a separate
image.
P
Back
MENU
Cropping frame
EN
51EN51
Page 52

For the operation method, refer to (P. 41).
Adding sound to still images q [R]
Submenu 1 Submenu 2
Edit
1 Use HI to select an image.
2 Aim the microphone toward the sound source.
3 Press the A button.
• Recording starts.
• The camera adds (records) sound for approx.
4 seconds while playing back the image.
To play sound recordings
To play sound recorded with an image, select the image and press the A button.
• Press FG to adjust volume.
R
Microphone
Brightening areas that are dark due to backlight or other
reasons q [Shadow Adj]
Submenu 1 Submenu 2
Edit Shadow Adj
1 Use HI to select an image, and press the A button.
• The edited image is saved as a separate image.
• Depending on the picture, the editing may not be effective.
• The retouching process may lower the image resolution.
Retouching red eyes in flash shooting q [Redeye Fix]
Submenu 1 Submenu 2
Edit Redeye Fix
1 Use HI to select an image, and press the A button.
• The edited image is saved as a separate image.
• Depending on the picture, the editing may not be effective.
• The retouching process may lower the image resolution.
52EN52
EN
Page 53

For the operation method, refer to (P. 41).
Rotating images q [y]
Submenu 1 Submenu 2
Edit
1 Use HI to select an image.
2 Press the A button to rotate the image.
3 If necessary, repeat Steps 1 and 2 to make settings for other images, and
press the button.
• The new picture orientations will be saved even after the power is turned
off.
y
Smoothing skin tone q [e-Portrait]
Submenu 1 Submenu 2
Edit e-Portrait
1 Use HI to select an image, and press the A button.
• Some images cannot be adjusted such as when faces are undetectable.
• The edited image is saved as a separate image.
Erasing images q [Erase]
Submenu 2 Application
All Erase All images in the internal memory or card will be erased.
Sel. Image Images are individually selected and erased.
Erase Deletes the image displayed.
Erase Group
• When erasing pictures in the internal memory, do not insert the card into the
camera.
• Protected images cannot be erased.
All images in the group are erased.
To erase each image in the group, refer to “Playing back
panorama and grouped images” (P. 14).
EN
53EN53
Page 54

For the operation method, refer to (P. 41).
To individually select and erase images [Sel. Image]
1 Use FG to select [Sel. Image], and
press the A button.
2 Use FGHI to select the image to
be erased, and press the A button to
R
mark
Sel. Image (1)
4/304/30
add a R mark to the image.
• Press the zoom lever to the T
end to return to the single frame
Erase/Cancel
MENU
display.
3 Repeat Step 2 to select the images to be erased, and then press the
button to erase the selected images.
4 Use FG to select [Yes], and press the A button.
• The images with a R mark are erased.
To erase all images [All Erase]
1 Use FG to select [All Erase], and press the A button.
2 Use FG to select [Yes], and press the A button.
Protecting images q [R]
• Protected images cannot be erased by [Erase] (P. 13, 53), [Sel. Image], [Erase
Group], or [All Erase] (P. 53), but all images are erased by [Memory Format]/
[Format] (P. 55).
1 Use HI to select an image.
2 Press the A button.
• Press the A button again to cancel the settings.
3 If necessary, repeat Steps 1 and 2 to protect other images, and press the
button.
• If you protect the grouped images, all images in the group will be
protected at once. To protect each image in the group, expand images.
g “Playing back panorama and grouped images” (P. 14)
OK
54EN54
EN
Page 55

For the operation method, refer to (P. 41).
d Settings Menu 1
Erasing data completely d [Memory Format]/ d [Format]
• Before formatting, check that no important data is left in the internal memory
or card.
• Cards must be formatted with this camera before first use or after being used
with other cameras or computers.
• Be sure to remove the card before formatting the internal memory.
Submenu 2 Application
Yes
No Cancels formatting.
Completely erases the image data in the internal memory or card
(including protected images).
Copying images in the internal memory to the card d [Backup]
Submenu 2 Application
Yes Backs up image data in the internal memory to the card.
No Cancels the backup.
Using an Eye-Fi card d [Eye-Fi]
Submenu 2 Application
All Transfers all images.
Sel. Image Transfers only selected image.
Off Disable Eye-Fi communication.
• When using an Eye-Fi card, read the Eye-Fi card instruction manual carefully,
and comply with the instructions.
• Use the Eye-Fi card in compliance with the laws and regulations of the
country where the camera is used.
• In locations such as on an airplane, where the Eye-Fi communication is
prohibited, remove the Eye-Fi card from the camera, or set [Eye-Fi] to [Off].
• This camera does not support the Eye-Fi card’s Endless mode.
EN
55EN55
Page 56

For the operation method, refer to (P. 41).
Saving custom settings d [Custom Mode Setup]
Submenu 2 Application
Set Save current settings.
Reset Return to the default setting.
Selecting a method for connecting the camera to other
devices d [USB Connection]
Submenu 2 Application
Auto
Storage Connect camera as a card reader.
MTP
Print Select when connecting to a PictBridge-compatible printer.
• When using the supplied software, select [Storage].
• Refer to “Connecting the camera to a computer” (P. 80) for the connection
method with a computer.
Set to select the connection method each time the camera is
connected to another device.
For Windows Vista/Windows 7/Windows 8/Windows 8.1, connect
camera as a portable device.
Turning on the camera with the q button d [q Power On]
Submenu 2 Application
No
Yes
The camera is not turned on. To turn on the camera, press the
button.
n
Press and hold the q button to turn the camera on in the
playback mode.
56EN56
EN
Page 57

For the operation method, refer to (P. 41).
Selecting the camera sound and its volume d [Sound Settings]
Submenu 2 Submenu 3 Application
Sound Type
Volume
q Volume
1/2/3
0/1/2/3/4/5 Selects the operation volume of camera buttons.
0/1/2/3/4/5 Selects the image playback volume.
Selects the camera sounds (operation sounds,
shutter sound, and warning sound).
d Settings Menu 2
Adjusting the image processing function d [Pixel Mapping]
• This function has already been adjusted at factory shipping, and no
adjustment is needed right after purchase. Approximately once a year is
recommended.
• For best results, wait at least one minute after taking or viewing pictures
before performing pixel mapping. If the camera is turned off during pixel
mapping, be sure to perform it again.
To adjust the image processing function
Press the A button when [Start] (Submenu 2) is displayed.
• The check and adjustment of the image processing function starts.
Adjusting the brightness of the monitor d [s]
1 Use FG to adjust the brightness while viewing
the monitor, and then press the A button.
s
Back
MENU
EN
57EN57
Page 58

For the operation method, refer to (P. 41).
Playing back images on a TV d [TV Out]
The TV video signal system varies depending on the countries and regions.
Before viewing camera images on your TV, select the video output according
to your TV’s video signal type.
Submenu 2 Submenu 3 Application
NTSC/PAL
HDMI Out
HDMI Control
• For the connection method, refer to “Viewing camera images on TV” (P. 73).
NTSC
PAL
480p/576p
720p
1080i
Off Operate with the camera.
On Operate with the TV remote control.
Connecting the camera to a TV in North America,
Taiwan, Korea, Japan, and so on.
Connecting the camera to a TV in European
countries, China, and so on.
Set the signal format to be given priority. If
the TV setting does not match, it is changed
automatically.
Changing the display language d [l]
Submenu 2 Application
Languages
The language for the menus and error messages displayed on
the monitor is selected.
58EN58
EN
Page 59

For the operation method, refer to (P. 41).
Setting the date and time d [X]
1 Press FG of the arrow pad to select the year for [Y].
2 Press I of the arrow pad to save the setting for [Y].
3 As in Steps 1 and 2, press FGHI of the arrow pad to set [M] (month),
[D] (day), [Time] (hours and minutes), and [Y/M/D] (date order), and then
press the A button.
• For precise time setting, press the A button as the time signal strikes 00
seconds.
To check the date and time
Press the INFO button while the camera is turned off. The current time is
displayed for approx. 30 seconds.
Choosing home and alternate time zones d [World Time]
• You will not be able to select a time zone using [World Time] if the camera
clock has not first been set using [X].
Submenu 2 Submenu 3 Application
Home/
Alternate
*1
x
*1, 2
z
*1 In areas where daylight saving time is in effect, use FG to turn daylight
saving time ([Summer]) on.
*2 When you select a time zone, the camera automatically calculates the time
difference between the selected zone and the home time zone (x) to display
the time in the travel destination time zone (z).
x
z
— Select the home time zone (x).
—
The time in the home time zone (the time zone
selected for x in submenu 2).
The time in the travel destination time zone (the
time zone selected for z in submenu 2).
Select the travel destination time zone (z).
EN
59EN59
Page 60

For the operation method, refer to (P. 41).
Setting functions specifically for tough conditions
d [Tough Settings]
Displaying the current altitude/water depth (atmospheric/hydraulic
pressure) (Manometer)
• The readings may have a margin of error depending on meteorological
conditions. Use the readings only for your reference.
Submenu 1 Submenu 2 Submenu 3 Application
Off Cancels the manometer display.
Displays the current altitude/water
Tough
Settings
Manometer
On
Calibrate
• When set to [On], a cautionary message appears if the water depth reaches
12 m (39.4 ft), followed by a warning if the depth exceeds 15 m (49.2 ft).
To adjust the altitude/water depth display
1 Use FG to select [Calibrate], and press the A
button.
2 Use FG to select the current altitude/water
depth, and press the A button to set.
Setting the units of elevation, depth, etc. (m/ft)
Submenu 1 Submenu 2 Submenu 3 Application
Tough
Settings
m/ft
m This displays in meters.
ft This displays in feet.
depth (atmospheric/hydraulic pressure)
in the shooting standby mode screen.
(–20 m to 5,000 m)
Proceed to the setting screen. See
below.
Calibrate
Back
1200m1200m
MENU
60EN60
EN
Page 61

For the operation method, refer to (P. 41).
Operating the camera by tapping the body (Tap Control)
Submenu 1 Submenu 2 Submenu 3 Application
Off Cancels [Tap Control].
On [Tap Control] is activated.
Tough
Settings
Tap Control
Calibrate
Adjusts the tap strength and intervals
between multiple taps on each side
of the camera body. (top, bottom, left,
right, & back)
Operating during shooting mode (Example: Picture mode)
1 Tap the right or left side of the camera body once.
• The picture mode selection screen is
Natural
jh8
displayed.
2 Tap the right or left side of the camera body to
select a function.
3 Tap the back of the camera body twice to confirm
your selection.
Take a picture: Tap the back of the camera twice (Only for the [s Snow]
mode).
• Tap the camera firmly using the pad of your finger.
• When the camera is stabilized on a tripod for example, tap control may not
work properly.
• To prevent dropping the camera when using tap control, strap the camera to
your wrist.
Operating during playback mode
When switched to playback mode by tapping the top
of the camera body twice, the operations below can be
used.
Display next image: Tap the right side of the camera
once.
Display previous image: Tap the left side of the camera
once.
Fast forward and reverse: Tilt the camera to the right
or the left.
Return to the shooting mode: Tap the top side of the
When tapping the
camera’s top
camera twice.
EN
0.00.0
WB
AUTOWBAUTO
ISO
ISO
AUTO
AUTO
16
M
4:3
MENUMENU
61EN61
Page 62

For the operation method, refer to (P. 41).
To adjust the tap control
1 Select [Calibrate] in Submenu 3 and press the
A button.
2 Select the part to adjust with FG and press the
A button.
Str
Avg
BackTop
Intvl
Norm
3 Select the [Str] setting with FG and press I.
4 Select the [Intvl] setting with FG and press the
A button.
• Check the operation of the camera by tapping on the camera after making the
settings.
Using the LED illuminator as an auxiliary light (LED Illuminator)
Submenu 1 Submenu 2 Submenu 3 Application
Tough
Settings
LED
Illuminator
Off Disables the LED illuminator.
On Enables the LED illuminator.
To use the LED illuminator
Press and hold the INFO button down until the
LED illuminator
LED illuminator lights up.
• If you perform an operation when the LED
illuminator is on, it will illuminate up to approx.
90 seconds. (Up to 30 seconds when the
camera’s power is turned off.)
To turn the LED illuminator off
Press and hold the INFO button down until the LED illuminator turns off.
MENU
62EN62
EN
Page 63

For the operation method, refer to (P. 41).
d Settings Menu 3
Recording the shooting location and time information on the
images shot d [GPS Settings]
Submenu 2 Submenu 3 Application
GPS
Auto Time
Adjust
Track
A-GPS Data –
• [Auto Time Adjust] applies only when x (home time zone) is selected for
[World Time].
• For the GPS function and Track function, refer to “Using GPS function (GPS
Settings)” (P. 70).
Off When the GPS function is not going to be used.
On When the GPS function is going to be used.
Off Do not adjust the clock.
On Adjust the clock using GPS UTC data.
Off Turn GPS tracking off.
On The camera records the log automatically.
Save Saves a track log in the card.
Allows you to check the validity period of the
data.
Setting Wi-Fi d [Wi-Fi Settings]
Submenu 2 Application
Connection Settings
Private Password Regenerate a password.
Reseth
Reset Wi-Fi Settings Reset Wi-Fi settings to the default settings.
Set the connection mode.
“Connecting the camera to a
g
smartphone” (P. 65)
Cancel all images selected for sharing.
• For the operation method, refer to “Setting up a wireless LAN connection (WiFi Settings)” (P. 67).
EN
63EN63
Page 64

For the operation method, refer to (P. 41).
Adjusting interval settings d [Interval Settings]
Submenu 2
Frame
Start Waiting
Time
Interval Time
Time Lapse
Movie
Submenu 3
1 to 99 (frames) Sets the number of frames to shoot.
00:00:00 to 24:00:00
(minutes)
00:00:01 to 24:00:00
(minutes)
Off Store each of the frames as a picture.
On
Sets the waiting time before shooting
starts.
Sets the interval time after shooting
starts.
In addition to storing the still pictures,
create a movie from the sequence of
frames and store it.
Application
Setting the focus bracket shooting d [Focus BKT Setting]
Submenu 2
Number of
pictures
Focus Range
Submenu 3
10/20/30
Narrow/Normal/Wide
Sets the number of frames in the bracket
shooting.
Sets the interval between the shifted
focus positions.
Application
Checking the certification marks d [Certification]
Part of the certification mark (for safety standards, etc.) is displayed.
64EN64
EN
Page 65

Connecting the camera to a smartphone
If you use the wireless LAN functions on the camera to connect to a
smartphone with Wi-Fi connectivity, you can then use the smartphone app
to do things like importing images to your smartphone and operating the
camera by remote control. You can also update the A-GPS data and import
and manage the GPS log and images recorded on the camera.
For further details on the smartphone app, go to the following addresses.
OLYMPUS IMAGE SHARE (OI.Share):
http://oishare.olympus-imaging.com/
OLYMPUS IMAGE TRACK (OI.Track):
http://oitrack.olympus-imaging.com/
Before using the wireless LAN function, read “Precautions when using the
wireless LAN function” (P. 107).
If using the wireless LAN function in a country outside the region where the
camera was purchased, there is a risk that the camera will not conform to the
wireless communication regulations of that country. Olympus will not be held
responsible for any failure to meet such regulations.
As with any wireless communication, there is always a risk of interception by
a third party.
The wireless LAN antenna is contained in the camera grip. Where possible,
avoid covering the antenna with your hands.
During wireless LAN connection, the battery will run down faster. If the battery
is running low, the connection may be lost during a transfer.
Connection may be diffi cult or slow in proximity to devices that generate
magnetic fi elds, static electricity or radio waves, such as near microwaves,
cordless telephone.
EN
65
Page 66

Capabilities of OI.Share
• Transfer images to a smartphone from the camera
Images on the camera can be imported to a smartphone.
You can easily post the imported images on social networking services.
• Edit the images
You can also apply filter or use the stamp function on the images.
• Smartphone remote shooting
You can operate the camera remotely using your smartphone.
• Add geotags to images in the camera
You can add GPS tags to the images by simply transferring the GPS log
recorded on your smartphone to the camera.
The position information added by the camera cannot be changed.
Capabilities of OI.Track
• A-GPS data update
The A-GPS data can be updated.g “Before using GPS function (A-GPS
data)” (P. 69)
• GPS log and image management
You can check the GPS log and images recorded on the camera and import
and manage them on your smartphone.
To view images using OI.Track, set [Track] (P. 63) to [On] when taking
photographs.
66
EN
Page 67

Setting up a wireless LAN connection (Wi-Fi Settings)
The following describes how to set up the connection settings and change
the password when using the camera’s wireless LAN function.
Setting connection method
1 Select [Wi-Fi Settings] in the d Settings Menu 3 (P. 41) and press A.
2 Select [Connection Settings] and press I.
3 Select the wireless LAN connection method and press A.
Submenu 2 Submenu 3 Application
Private
Connection
Settings
Changing private connection password
One-Time
Select Select which method to use each time.
Off Wi-Fi function is turned off.
Change the password used for [Private].
1 Select [Wi-Fi Settings] in the d Settings Menu 3 (P. 41) and press A.
2 Select [Private Password] and press I.
• Pressing F generates and displays a different password. A present
password is overwritten.
Cancelling image sharing
Deselects images selected for sharing (P. 68) when connected to a wireless
LAN network.
1 Select [Wi-Fi Settings] in the d Settings Menu 3 (P. 41) and press A.
2 Select [Reseth] and press I.
3 Select [Yes] and press A.
Initializing wireless LAN settings
Initializes content of [Wi-Fi Settings].
1 Select [Wi-Fi Settings] in the d Settings Menu 3 (P. 41) and press A.
2 Select [Reset Wi-Fi Settings] and press I.
3 Select [Yes] and press A.
• A password is randomly changed.
Connects to one smartphone (Connect using a
preset password.). All images in the camera are
available for viewing.
Connects to two or more smartphones (Connect
using a different password each time.). Only the
images selected for sharing are available for
viewing.
EN
67
Page 68

Sharing images over Wi-Fi connection (Share Order)
With [One-Time], you can select the images to share in advance.
Select [Share Order] in the q Playback Menu (P. 41) and press A.
1
Use HI to select an image for sharing and press A to
2
display h.
Repeat step 2 to select all images for sharing, and then press
3
the button to end [Share Order].
• h is displayed on the images selected for sharing.
You can set a share order on a maximum around 200 frames.
Connecting to a smartphone (Wi-Fi Start)
Connects to a smartphone. Start the OI.Share or OI.Track smartphone app
installed on your smartphone.
Select [Wi-Fi Start] in the z Camera Menu 1 (P. 41) and press
1
A.
• Pressing and holding the button also starts Wi-Fi connection.
• When [Connection Settings] is set to [Off], [Wi-Fi Start] is not available.
Select the connection method and press A.
2
• Depending on the setting of [Connection Settings], the connection
method is varied as follows.
Private connection
• Sets SSID and a password with your smartphone.
Reading a QR code with OI.Share sets SSID and a password
automatically.
From the second time, the same setting is automatically applied for the
connection.
One-time connection
• Sets SSID and a password with your smartphone every time.
Reading a QR code with OI.Share sets SSID and a password automatically.
Select
• Select which method to use each time.
To end the connection, press and hold on the camera.
3
• While selecting Remote Shutter Mode in OI.Share, press A after a QR
code is displayed.
• Selecting [End Wi-Fi] in the z Camera Menu 1 (P. 41) and pressing A
68
also end the connection.
EN
Page 69

Using GPS function
Use the camera GPS function to record the position information in the
images or record movement tracking.
• Latitude and longitude are displayed on images to which position information
has been added.
• The camera is not equipped for GPS navigation.
Before using the GPS function, read “GPS function, electronic compass” (P. 107).
In certain countries and regions it may be illegal to acquire position information
without prior application to the government. Because of this, in certain sales
regions, the camera may be set up not to display position information.
When taking the camera abroad, be aware that some regions or countries may
have laws regulating the use of this function. Be sure to abide by all local laws.
Turn GPS off when on board aircraft and in other locations in which the use of
GPS devices is prohibited. g [GPS Settings] (P. 63)
This camera also supports Quasi-Zenith Satellites System and GLONASS.
Before using GPS function (A-GPS data)
Depending on the status of the camera and communication, it may take time
to acquire the position information. When the A-GPS is used, the position
determination time can be shortened from a few seconds to a few tens of
seconds. The A-GPS data can be updated using the OI.Track smartphone
app or the PC software “OLYMPUS A-GPS Utility”.
• Make sure that the camera date is set correctly.
• Set the camera to private connection (P. 67).
• A-GPS data must be updated every 4 weeks.
The position information may have changed when time has elapsed after
updating the data. Use as new A-GPS data as possible.
• The provision of A-GPS data may be terminated without prior notice.
Updating the A-GPS data using a smartphone
Before update, install the OI.Track smartphone app on your smartphone.
Refer to the URL below for details on how to update the A-GPS data.
http://oitrack.olympus-imaging.com/
Connect the camera and the smartphone, following the procedure
described in “Connecting to a smartphone (Wi-Fi Start)” (P. 68).
Updating the A-GPS data using a PC
Download the OLYMPUS A-GPS Utility software from the URL below, and
install it on your PC.
http://sdl.olympus-imaging.com/agps/
Refer to “OLYMPUS A-GPS Utility Instruction Manual” on the website with
above URL for details on how to update the data.
EN
69
Page 70

Using GPS function (GPS Settings)
Select [GPS Settings] in the d Settings Menu 3 (P. 41) and press
1
A.
Select [GPS] and press A.
2
Select [On] and press A.
3
• G flashes during measurement. When
the position measurement ends, G will
appear and the position information will be
displayed.
• Once the position measurement has ended,
position information will be added to the
pictures at the time of shooting.
• Do not cover the GPS antenna with your hands or metal objects.
• If you are using the GPS function for the first time and the A-GPS has not
been updated, or if the function has not been used for a long time, it may take
a few minutes for the position measurement to end.
• Latitude and longitude are displayed on the shooting screen. If you do not
wish to add position information, set [GPS] to [Off].
• Position information is not added to movies.
• When the [GPS] is set to [On], the battery will run down faster.
PP
GPS
44
N
ORM
i
0.00.0
WB
AUTOWBAUTO
ISO
ISO
AUTO
AUTO
16
M
4:3
0:340:34
70
EN
Page 71

Using the electronic compass (Measurement position information screen)
1 Press and hold the INFO button while
the shooting screen is displayed.
• A measurement position information
screen appears.
1 Electronic compass
2 Update status
3 GPS tracking active
4 Latitude
1
Updated 1 min ago
2
6 Atmospheric/Hydraulic pressure
(P. 60)
7 Altitude/Water depth (P. 60)
8 Current date and time
Back
Latitude/Longitude
N123°56' 78''
E123°56' 78''
Barometer
880hpa
Altitude/Water Depth
1200m
2014/02/26
12:30
Update GPS
MENU
LOG
OK
5 Longitude
• The displays change in the order of Normal → Detailed → No info. →
Measurement position information each time the INFO button is pressed.
• Press the A button on the measurement position information screen to
update the position information.
• You can check the measurement position information by pressing the INFO
button while the camera is turned off.
3
4
5
6
7
8
EN
71
Page 72

Using an information acquisition function to display movement tracking
(Track)
1 Select [GPS Settings] in the d Settings Menu 3 (P. 41) and press A.
2 Select [Track] and press A.
• This cannot be selected if the camera card is not inserted.
3 Press A button to select the recording method of the sequence of position
information (log data).
Submenu 2
Track
• Track logs are stored in the GPSLOG folder on the memory card.
• Tracking ends automatically when:
• The battery is exhausted.
• The camera is left off for more than 24 hours.
• While [Track] is [On], the GPS receiver will continue to draw power from the
battery when the camera is off.
Displaying tracked movement of GPS logs
Submenu 3
Off Do not record.
On
Save
The camera automatically records
position information at regular intervals.
Record every time [Save] is selected
and the A button is pressed. If using
continuously, please do this once a day.
Application
After the GPS track logs are recorded, the tracked movement of the logs
can be displayed using the OLYMPUS Viewer 3 or OI.Track.
• The tracked movement cannot be displayed on the camera.
72
EN
Page 73

Connecting the camera to another device
Viewing camera images on TV
Use the AV cable (sold separately) to playback recorded images on your
TV. You can play back high-definition images on a high-definition TV by
connecting it to the camera using the HDMI cable.
Multi-connector
AV cable (sold separately: CB-AVC3)
(Connect to the TV video input jack
(yellow) and audio input jack (white).)
HDMI cable
(Connect to the HDMI
connector on the TV.)
HDMI Micro connector
Use the cable to connect the camera to the TV.
1
• Choose the camera video mode before connecting the camera via an AV
cable. g [TV Out] (P. 58)
Choose the TV input channel.
2
• The camera monitor turns off when the cable is connected.
• Press the q button when connecting via an AV cable.
• For details on changing the input source of the TV, refer to the TV’s instruction
manual.
• Depending on the TV’s settings, the displayed images and information may
become cropped.
(type D)
EN
73
Page 74

• If the camera is connected using both an A/V and HDMI cable, it will assign
priority to HDMI.
• Do not connect the USB cable and HDMI cable at the same time.
• If the camera is connected via an HDMI cable, you will be able to choose
the digital video signal type. Choose a format that matches the input format
selected with the TV.
1080i Priority is given to 1080i HDMI output.
720p Priority is given to 720p HDMI output.
480p/576p
480p/576p HDMI output. 576p is used when [PAL] is
selected for
[TV Out] (P. 58)
.
Using the TV remote control
The camera can be operated by a TV remote control when connected to a
TV that supports HDMI control.
Select [TV Out] in the d Settings Menu 2 (P. 41).
1
Select [HDMI Control] and choose [On].
2
Operate the camera by using the TV remote control.
3
• You can operate the camera by following the operation guide displayed
on the TV.
• Some televisions may not support all features.
• You cannot shoot pictures or movies when the HDMI cable is connected.
• Do not connect the camera to other HDMI output devices. Doing so may
damage the camera.
• HDMI output is not performed while connected via USB to a computer or
printer.
74
EN
Page 75

Printing Pictures
Direct printing (PictBridge)
By connecting the camera to a PictBridge-compatible printer with the USB
cable, you can print out recorded pictures directly.
Before connecting, select [Print] for [USB Connection] (P. 56) in the setting
menu.
Connecting the camera
Multi-connector
Smaller terminal
• Use a fully charged battery for printing.
• Movies cannot be printed.
Easy printing
Use HI to display the pictures you want to print on the
1
USB cable
camera.
Connect the camera to the printer
2
using the supplied USB cable.
• If the easy print start screen is not
displayed, select [Print] for [USB
Connection] (P. 56) in the setting menu
before connecting the printer again.
Easy Print Start
Custom Print
USB port
EN
75
Page 76

Press I.
3
• The picture selection screen appears when printing is completed. To print
another picture, use HI to select the image and press A.
• To exit, unplug the USB cable from the camera while the picture selection
screen is displayed.
Custom printing
Connect the camera to the printer using the supplied USB
1
cable and turn the camera on.
• When the camera is turned on, a dialog should
be displayed in the monitor prompting you
to choose a host. If it is not, select [Print] for
[USB Connection] (P. 56) in the setting menu.
Follow the operation guide to set a print
2
Print
All Print
Multi Print
All Index
Print Order
option.
Selecting the print mode
Select the type of printing (print mode). The available print modes are as
shown below.
Print Prints selected pictures.
All Print
Multi Print
All Index Prints an index of all the pictures stored in the card.
Print Order
Setting the print paper items
This setting varies with the type of printer. If only the printer’s STANDARD
setting is available, you cannot change the setting.
Size Sets the paper size that the printer supports.
Borderless
Pics/sheet
Prints all the pictures stored in the card and makes one
print for each picture.
Prints multiple copies of one image in separate frames
on a single sheet.
Prints according to the print reservation you made (P. 78).
If there is no picture with print reservation, this is not
available.
Selects whether the picture is printed on the entire
page or inside a blank frame.
Selects the number of pictures per sheet. Displayed
when you have selected [Multi Print].
MENU
BackPrint Mode Select
76
EN
Page 77

Selecting pictures you want to print
Select pictures you want to print. The selected
Print
Single Print
4/30
4/30
pictures can be printed later (single-frame
reservation) or the picture you are displaying
can be printed right away.
100-0004
100-0004
’14/02/26’14/02/26 12:3012:30
More
Prints the currently displayed picture. If there is a
Print (f)
picture that [Single Print] reservation has already been
applied to, only that reserved picture will be printed.
Applies print reservation to the currently displayed
Single Print (t)
picture. If you want to apply reservation to other
pictures after applying [Single Print], use HI to
select them.
Sets the number of prints and other items for the
More (u)
currently displayed picture, and whether or not to print
it. For operation, refer to “Setting printing data” in the
next section.
Setting printing data
Select whether to print printing data such as the date and time or file name
on the picture when printing.
<×
Sets the number of prints.
Date Prints the date and time recorded on the picture.
File Name Prints the file name recorded on the picture.
Trims the picture for printing. Set the trimming size
P
Once you have set the pictures for printing and printing data,
3
with the zoom lever (T/W), and set the trimming
position with FGHI.
select [Print], then press A.
• To stop and cancel printing, press A. To resume printing, select
[Continue].
Cancelling printing
To cancel printing, highlight [Cancel] and press A. Note that any changes to the
print order will be lost; to cancel printing and return to the previous step, where
you can make changes to the current print order, press .
ORMNORM
N
34564608 34564608
EN
77
Page 78

Print reservation (DPOF)
In print reservations, the number of prints and date imprint option are saved
in the image on the card. This enables easy printing at a printer or print
shop supporting DPOF by using only the print reservations on the card
without a computer or a camera.
• Print reservations can be set only for the images stored on the card.
• DPOF reservations set by another DPOF device cannot be changed by
this camera. Make changes using the original device. Making new DPOF
reservations with this camera will erase the reservations made by the other
device.
• DPOF print reservations can be made for up to 999 images per card.
Single-frame print reservations [<]
Display the setup menu.
1
• “Using the setup menu” (P. 41)
From the q Playback Menu, select [Print Order] and then
2
press the A button.
0
’14/02/26’14/02/26 12:3012:30
Print
100-0004
100-0004
4/30
4/30
34564608 34564608
Use FG to select [<], and press the
3
Print Order
A button.
Use HI to select the image for print reservation. Use FG to
4
select the quantity. Press the A button.
Use FG to select the [X] (date print) screen option, and
5
press the A button.
Submenu 2 Application
No This prints the image only.
Date This prints the image with the shooting date.
Time This prints the image with the shooting time.
• When printing images, the setting cannot be changed between the
images.
Use FG to select [Set], and press the A button.
6
OK
ORMNORM
N
78
EN
Page 79

Reserving one print each of all images on the card [U]
Follow Steps 1 and 2 in [<] (P. 78).
1
Use FG to select [U], and press the A button.
2
Follow Steps 5 and 6 in [<].
3
Resetting all print reservation data
Follow Steps 1 and 2 in [<] (P. 78).
1
Select either [<] or [U], and press the A button.
2
Use FG to select [Reset], and press the A button.
3
Resetting the print reservation data for selected images
Follow Steps 1 and 2 in [<] (P. 78).
1
Use FG to select [<], and press the A button.
2
Use FG to select [Keep] and press the A button.
3
Use HI to select the image with the print reservation you
4
want to cancel. Use FG to set the print quantity to “0”.
If necessary, repeat Step 4, and then press the A button when
5
finished.
Use FG to select the [X] (date print) screen option, and
6
press the A button.
• The settings are applied to the remaining images with the print
reservation data.
Use FG to select [Set], and press the A button.
7
EN
79
Page 80

Connecting the camera to a computer
Connecting the camera
Multi-connector
Smaller terminal
USB cable
If nothing is displayed on the camera screen even after connecting the
camera to the computer, the battery may be exhausted. Use a full-charged
battery.
If the camera cannot connect to PC, disconnect the USB cable and check the
setting of [USB Connection] (P. 56) before connecting to PC again.
• The battery can be charged while the camera is connected to the computer
via USB. The charging time varies depending on the performance of the
computer. (There may be cases in which it takes approx. 10 hours.)
80
EN
USB port
Page 81

Copying pictures to a computer
Your camera supports the USB Mass Storage Class. You can transfer
images to a computer by connecting the camera to the computer with the
provided USB cable. The following operating systems are compatible with
the USB connection:
Windows
Macintosh Mac OS X v10.5-v10.9
Turn the camera off and connect it to the computer.
1
• The location of the USB port varies with the computer. For details, refer to
your computer’s manual.
The computer recognizes the camera as a new device.
2
If your computer is running Windows Vista / Windows 7 / Windows 8 /
Windows 8.1, select [MTP] in [USB Connection] of the setting menu to use
Windows Photo Gallery.
Data transfer is not guaranteed in the following environments, even if your
computer is equipped with a USB port.
Computers with a USB port added by means of an extension card, etc.
Computers without a factory-installed OS and home-built computers
Camera controls can not be used while the camera is connected to a
computer.
If the dialog is not displayed when the camera is connected, set [USB
Connection] (P. 56) of the setting menu before connecting to PC again.
Windows XP SP3 /Windows Vista SP2 / Windows 7 SP1 /
Windows 8 / Windows 8.1
EN
81
Page 82

Installing Software
Windows
Insert the supplied CD in a CD-ROM drive.
1
Windows XP
• A “Setup” dialog will be displayed.
Windows Vista / Windows 7 / Windows 8 / Windows 8.1
• An Autorun dialog will be displayed. Click
“OLYMPUS Setup” to display the “Setup”
dialog.
If the “Setup” dialog is not displayed, select “My Computer” (Windows XP) or
“Computer” (Windows Vista/Windows 7) from the start menu. Double-click the
CD-ROM (OLYMPUS Setup) icon to open the “OLYMPUS Setup” window and
then double-click “LAUNCHER.EXE”.
If a “User Account Control” dialog is displayed, click “Yes” or “Continue”.
Follow the on-screen instructions on your computer.
2
Register your Olympus product.
3
• Click the “Registration” button and follow the on-screen instructions.
Install OLYMPUS Viewer 3.
4
• Check the system requirements before beginning installation.
• Click the “OLYMPUS Viewer 3” button and follow the on-screen
instructions to install the software.
Operating System
Processor
RAM 1 GB or more (2 GB or more recommended)
Free Hard Drive Space 3 GB or more
Monitor Settings
• See online help for information on using the software.
Windows XP SP3 /Windows Vista SP2 /
Windows 7 SP1 /Windows 8 / Windows 8.1
Pentium 4 1.3 GHz or better
(Core 2 Duo 2.13 GHz or better required for movies)
1024 × 768 pixels or more
Minimum 65,536 colors (16,770,000 colors
recommended)
82
EN
Page 83

Macintosh
Insert the supplied CD in a CD-ROM drive.
1
• The disk contents should automatically
be displayed in the Finder. If they are not,
double-click the CD icon on the desktop.
• Double-click the “Setup” icon to display the
“Setup” dialog.
Install OLYMPUS Viewer 3.
2
• Check the system requirements before
beginning installation.
• Click the “OLYMPUS Viewer 3” button and
follow the on-screen instructions to install
the software.
Operating System Mac OS X v10.5–v10.9
Processor
RAM 1 GB or more (2 GB or more recommended)
Free Hard Drive Space 3 GB or more
Monitor Settings
• Other languages can be selected from the language combo box. For
information on using the software, see online help.
Intel Core Solo/Duo 1.5 GHz or better
(Core 2 Duo 2 GHz or better required for movies)
1024 × 768 pixels or more
Minimum 32,000 colors (16,770,000 colors
recommended)
EN
83
Page 84

Usage Tips
If the camera does not work as intended, or if an error message is displayed on
the screen, and you are unsure of what to do, refer to the information below to fix
the problem(s).
Troubleshooting
Battery
The camera does not work even when batteries are installed.
• Insert recharged batteries in the correct direction. g “Inserting and
removing the battery and card” (P. 4)
• Battery performance may have been reduced temporarily due to low
temperature. Take the batteries out of the camera, and warm them by putting
them in your pocket for a while.
Card
An error message is displayed.
• g “Error message” (P. 86)
Shutter button
No picture is taken when the shutter button is pressed.
• Cancel sleep mode.
To save battery power, the camera automatically goes into sleep mode and
the monitor turns off if there is no operation for 3 minutes when the camera is
turned on. No picture is taken even if the shutter button is fully pressed in this
mode. Operate the zoom lever or other buttons to restore the camera from
sleep mode before taking a picture. If the camera is left for another 5 minutes,
it automatically turns off. Press the n button to turn the camera on.
• Press the q button to switch to the shooting mode.
• Wait until #(flash charge) stops blinking before taking pictures.
• With prolonged camera use, the internal temperature may increase, resulting
in automatic shutdown. If this occurs, wait until the camera has sufficiently
cooled.
The camera’s external temperature may also increase during use, however
this is normal and does not indicate malfunction.
84
EN
Page 85

Monitor
Difficult to see.
• Condensation may have occurred. Turn off the power, and wait for the camera
body to become acclimated to the surrounding temperature and dry out before
taking pictures.
The light is caught in the picture.
• Shooting with flash in dark situations results in an image with many flash
reflections on dust in the air.
Date and time function
Date and time settings return to the default setting.
• If the batteries are removed and left out of the camera for about 3 days*1, the
date and time settings return to the default setting, and must be reset.
*1 The time until the date and time settings return to the default setting varies
depending on how long the batteries have been loaded.
g “Turning on the camera and making the initial settings” (P. 8)
Lens
Lens gets fogged.
• For rapid temperature change, lens fogging (condensation) may occur.
Miscellaneous
The compass heading is not correct or the compass needle flashes.
• The compass does not function as expected in the vicinity of strong
electromagnetic fields, such as from televisions, microwaves, large electric
motors, radio transmitters, and high-voltage power lines.
Normal function can sometimes be restored by moving the camera in a figure
eight while rotating your wrist.
EN
85
Page 86

Error message
• When one of the messages below is displayed on the monitor, check the
corrective action.
Error message Corrective action
Card problem
Card Error
Write Protect
Memory Full
Card Full
Card Setup
Power Off
Format
Memory Setup
Power OffPower Off
Memory Format
No Picture
Picture Error
*1 Before erasing important images, download them to a computer.
*2 All data will be erased.
Insert a new card.
Card problem
The card write-protect switch is set to the “LOCK” side.
Release the switch.
Internal memory problem
• Insert a card.
• Erase unwanted images.
*1
Card problem
• Replace the card.
• Erase unwanted images.
*1
Card problem
Use FG to select [Format], and press the A button.
Next, use FG to select [Yes], and press the A
*2
button.
Internal memory problem
Use FG to select [Memory Format], and press the
A button. Next, use FG to select [Yes], and press the
A button.
*2
Internal memory/Card problem
Take pictures before viewing them.
Problem with selected image
Use photo retouch software, etc. to view the image on a
computer. If the image still cannot be viewed, the image
file is corrupted.
86
EN
Page 87

Error message Corrective action
Problem with selected image
The Image
Cannot Be Edited
Use photo retouch software, etc. to edit the image on a
computer.
Battery problem
Battery Empty
Charge the battery.
Connection problem
No Connection
Connect the camera and computer or printer correctly.
Printer problem
No Paper
Load paper into the printer.
Printer problem
No Ink
Refill the ink in the printer.
Printer problem
Jammed
Settings
Changed
Remove the jammed paper.
Printer problem
*3
Return to the status where the printer can be used.
Printer problem
Print Error
Turn off the camera and printer, check the printer for any
problems, and then turn the power on again.
Problem with selected image
Use a computer to print.
Cannot Print
*4
*3 This is displayed, for instance, when the printer’s paper tray has been
removed. Do not operate the printer while making the print settings on the
camera.
*4 This camera may be unable to print images taken by other cameras.
EN
87
Page 88

Shooting tips
When you are unsure of how to take a picture that you envision, refer to the
information below.
Focusing
Focusing on the subject.
• Taking a picture of a subject not in the center of the monitor.
After focusing on an object at the same distance as the subject, compose
the shot, and take the picture.
Pressing the shutter button halfway g P. 9
• Set [AF Mode] to [Face/iESP]. g P. 43
• Taking a picture in [AF Tracking] mode. g P. 43
The camera tracks the subject movement automatically to focus on it
continuously.
• Taking a picture of a shadowy subject. g P. 45
Using the AF illuminator makes focusing easier.
• Taking a picture of subjects where autofocus is difficult.
In the following cases, after focusing on an object (by pressing the shutter
button halfway down) with high contrast at the same distance as the subject,
compose the shot, and take the picture.
Subject with low contrast Excessively bright light in
Subjects at different
*1
distances
center of frame
Fast-moving subject Subject not inside AF
Subject containing no
vertical lines
area
*1 It is also effective to compose the shot by holding the camera vertically to
focus, and then returning to the horizontal position to take the picture.
88
EN
*1
Page 89

Camera shake
Taking pictures without camera shake.
• Taking pictures using [Image Stabilizer]. g P. 45
The camera detects camera movement to reduce the blur even if the ISO
sensitivity is not increased. This function is also effective when taking
pictures at a high zoom magnification.
• Shooting movies using [IS Movie Mode]. g P. 49
• Select [J Sport] in the scene mode. g P. 22
The [J Sport] mode uses a fast shutter speed and can reduce the blur
incurred by a moving subject.
• Taking pictures at a high ISO sensitivity. g P. 38
If a high ISO sensitivity is selected, pictures can be taken at a high shutter
speed even at locations where a flash cannot be used.
Exposure (brightness)
Taking pictures with the right brightness.
• Taking pictures of a subject against a backlight
Faces or backgrounds are bright even when shot against backlight.
[Shadow Adjust] g P. 52
[E Backlight HDR] g P. 22
• Taking pictures using [Face/iESP]. g P. 43
Appropriate exposure is obtained for a face against backlight, and the face
is brightened.
• Taking pictures using [Spot Metering]. g P. 44
Brightness is matched with a subject in the center of the screen and the
image is not affected by background light.
• Taking pictures using [Fill In] flash. g P. 31
A subject against backlight is brightened.
• Taking pictures of a white beach or snow scene. g P. 22
Select [g Beach & Snow], [s Snow] in the scene mode.
• Taking pictures using exposure compensation. g P. 32
Adjust the brightness while viewing the screen for taking the picture.
Normally, taking pictures of white subjects (such as snow) results in images
that are darker than the actual subject. Use the exposure compensation to
adjust in the positive (+) direction to express whites as they appear. When
taking pictures of black subjects, on the other hand, it is effective to adjust in
the negative (-) direction.
EN
89
Page 90

Color hue
Taking pictures with colors at the same shade as they appear.
• Taking pictures by selecting white balance. g P. 37
Best results in most environments can normally be obtained with the [WB
Auto] setting, but for some subjects, you should try experimenting with
different settings. (This is especially true for sunshade under a clear sky,
mixed natural and artificial light settings, and so on.)
Image quality
Taking sharper pictures.
• Taking pictures with the optical zoom or super-resolution zoom.
Avoid using digital zoom (P. 44) to take pictures.
• Taking pictures at a low ISO sensitivity. g P. 38
If the picture is taken with a high ISO sensitivity, noise (small colored spots
and color unevenness that were not in the original image) can occur, and the
image can appear grainy.
Playback/Editing tips
Playback
Playing images in the internal memory and card.
• Remove the card and display the images in internal memory. g P. 4
Viewing images with high picture quality on a highdefinition TV.
• Connect the camera to the TV using an HDMI cable. g P. 73
Editing
Erasing the sound recorded to a still image.
• Record over the sound with silence when playing back the image.
g P. 52
90
EN
Page 91

Information
Cleaning and storing the camera
Camera care
Exterior:
• Wipe gently with a soft cloth. If the camera is very dirty, soak the cloth in mild
soapy water and wring well. Wipe the camera with the damp cloth and then
dry it with a dry cloth. If you have used the camera at the beach, use a cloth
soaked in clean water and well wrung.
• Foreign materials may be attached to the camera when using the camera in
conditions with foreign materials such as dirt, dust or sand. If you continue to
use the camera in such conditions, it could cause damage to the camera.
To avoid such damage, wash the camera using the following method.
1 Close and lock the battery/card
compartment cover and connector cover
firmly. (P. 4)
2 Fill a bucket or other container with
fresh water, immerse the camera facing
downward in the bucket and shake the
camera thoroughly. And rinse the camera by
placing it directly under a strong stream of
tap water with pressing the button.
Monitor:
• Wipe gently with a soft cloth.
Lens:
• Blow dust off the lens with a commercial blower, then wipe gently with a lens
cleaner.
Do not use strong solvents such as benzene or alcohol, or a chemically
treated cloth.
Mold may form on the lens surface if the lens is left dirty.
Battery/USB-AC adapter:
• Wipe gently with a soft, dry cloth.
EN
91
Page 92

Storage
• When storing the camera for extended periods, remove the battery, adapter
and card, and keep in a cool, dry place that is well ventilated.
• Periodically insert the battery and test the camera functions.
Avoid leaving the camera in places where chemical products are handled
since this may result in corrosion.
Using a separately sold USB-AC adapter
The USB-AC adapter F-3AC (sold separately) can be used with this
camera. Do not use any USB-AC adapter other than the dedicated one.
When using F-3AC, be sure to use the USB cable included with this
camera.
Do not use any other USB-AC adapter with this camera.
Using a separately sold charger
A charger (UC-90: sold separately) can be used to charge the battery.
Using your charger and USB-AC adapter abroad
• The charger and USB-AC adapter can be used in most home electrical
sources within the range of 100 V to 240 V AC (50/60Hz) around the world.
However, depending on the country or area you are in, the AC wall outlet may
be shaped differently and the charger and USB-AC adapter may require a
plug adapter to match the wall outlet. For details, ask at your local electrical
shop or travel agent.
• Do not use travel voltage converters as they could damage your charger and
USB-AC adapter.
Using the card
Cards compatible with this camera
SD/SDHC/SDXC/Eye-Fi (with Wireless LAN function) card
(commercially available)
(for compatibility card details, visit the Olympus website.)
• This camera can be used without a card by storing images in its internal
memory.
92
EN
Page 93

Eye-Fi card
• Use the Eye-Fi card in compliance with the laws and regulations of the
country where the camera is used. Remove the Eye-Fi card from the camera
or disable the card functions in airplanes and other locations where use is
prohibited.
• The Eye-Fi card may become hot during use.
• When using an Eye-Fi card, the battery may run out faster.
• When using an Eye-Fi card, the camera may function more slowly.
SD/SDHC/SDXC card write-protect switch
The SD/SDHC/SDXC card body has a write-protect switch.
If you set the switch to the “LOCK” side, you will not be able
to write to the card, delete data or format. Return the switch
to enable writing.
Format
Cards must be formatted with this camera before first use or after being
used with other cameras or computers.
Checking the image saving location
The memory indicator shows whether the internal memory or card is being
used during shooting and playback.
Current memory indicator
v: Internal memory is being used
w: Card is being used
Even if [Memory Format]/[Format], [Erase], [Sel. Image], [All Erase], or [Erase
Group] is performed, the data in the card is not completely erased. When
disposing of the card, damage the card to prevent the disclosure of personal
data.
Switching between a card and internal memory is not available.
When using the internal memory, remove the card fi rst.
Readout/recording process of the card
During shooting, the current memory indicator lights up in red while the
camera is writing data. Never open the battery/card cover or unplug the
USB cable. This can not only damage the image data but also render the
internal memory or card unusable.
LOCK
EN
93
Page 94

Number of storable pictures (still images)/Recording
length (movies) in the internal memory and cards
The fi gures for the number of storable still pictures and recording length are
approximate. The actual capacity varies with shooting conditions and the card
used.
4608×3456
3200×2400
1920×1440
640×480
*1
Compression
L
M
L
M
L
M
L
M
Number of storable pictures
Internal memory SD/SDHC/SDXC card (4GB)
4 450
9 990
9 1,020
18 2,030
26 2,770
50 5,300
188 20,340
312 30,510
Recording length
Internal memory
With sound
*1
10 sec. 10 sec. 20 min. 20 min.
*1
20 sec. 20 sec. 38 min. 38 min.
Without sound
SD/SDHC/SDXC card (4GB)
With sound
32 sec. 32 sec. 69 min. 69 min.
*2
*2
―
―
3 sec.
7 sec.
―
―
Without sound
7 min.
13 min.
Still pictures
Image Size
4
3
7
*1 Examples of image size when the aspect ratio is 4:3.
Movies
Image Size
C 1920×1080
D 1280×720
E
640×480
y 640×480
z 320×240
*1
The recording length is up to 29 minutes in the HD quality specified.
*2
The recording length is up to 20 sec. in the HS quality specified.
• The maximum file size of a single movie is 4GB, regardless of the capacity of
the card.
Increasing the number of pictures that can be taken
Either erase unwanted images, or connect the camera to a computer or other
device to save the images, and then erase the images in the internal memory or
card.
[Erase] (P. 13, 53), [Sel. Image], [All Erase], [Erase Group] (P. 53), [Memory Format]/
[Format] (P. 55)
94
EN
Page 95

Using separately sold accessories
Taking pictures with the Olympus Wireless RC Flash
System
You can take pictures with a wireless flash when using a flash compatible
with the Olympus Wireless RC Flash System. The camera’s built-in flash is
used for communication between the camera and flash.
• For details about operation of a wireless flash, refer to the instruction manual
for the special external flash.
Set the wireless flash based on the guidelines below.
1
Wireless flash setup range guidelines
• The setup range varies depending on the ambient environment.
Point the remote
sensor toward the
camera
Turn on the wireless flash.
2
Use the MODE button on the wireless flash to set to RC mode,
3
and make the channel and group settings. (Channel: CH1,
Group: A)
Set [Remote Flash] (P. 45) on the camera to [#RC].
4
Select the flash option in the function menu, and then select
5
the remote control.
• “Flash” (P. 31)
50°
50°
Flash direction
30°
30°
50°
50°
5m
30°
30°
7m
EN
95
Page 96

Take a test shot to check the operation of the flash and the
6
resulting image.
• Be sure to check the charge level of the camera and wireless flash before
taking pictures.
• Although there is no limit on the number of wireless flash units that are
set up, usage of a maximum of three units is recommended to prevent
malfunction due to interference with each other.
• When the camera flash is set to [#RC], the camera built-in flash is
used for communication with the wireless flash. It cannot used for taking
pictures.
Use the conversion lens/LED light guide
A fish eye converter capable of shooting pictures with strongly emphasized
perspective and the unique facial expressions of pets etc. and a
teleconverter capable of shooting faraway scenes are available.
When shooting with MACROs, you can use the LED light guide to prevent
unevenness in the MACRO LED illumination.
Conversion lens/LED light guide Converter adapter
Fish Eye converter (FCON-T01)
Teleconverter (TCON-T01)
LED light guide (LG-1) ―
• To use the conversion lens (sold separately), remove the lens ring which has
been attached to the camera and then attach the converter adapter (sold
separately) to the camera.
• The LED light guide (sold separately) is attached directly to the camera body
after removing the lens ring.
To attach/remove the lens ring
CLA-T01
Remove
Lens ring
96
EN
direction
Attach direction
Marks for
attaching
Page 97

To attach/remove the LED light guide
LED light
guide
Remove
direction
Attach direction
Marks for
attaching
To attach/remove the conversion lens/filter
Converter
Filter
⌀40.5
adapter
Remove
direction
Attach
direction
Marks for
attaching
Conversion
lens
• To attach the lens ring, converter adapter or LED light guide to the camera,
align the marks and screw it in the direction of attaching until it clicks into
place.
• The LED light guide cannot be used underwater.
• When the LED light guide is installed, do not fire the flash.
• For details, please visit the Olympus website for your local area.
EN
97
Page 98

Important information about water and shock
resistant features
Water resistance: The waterproof feature is warranted*1 to operate at depths up
to 15 m (49.2 feet) for up to one hour.
The waterproof feature may be compromised if the camera is subject to
substantial or excessive impact.
Shock resistance: The anti-shock feature warrants*
camera against accidental impact incurred from everyday use of your digital
compact camera. The anti-shock feature does not unconditionally warrant all
defective operation or cosmetic damage. Cosmetic damage, such as scratches
and dents, are not covered under the warranty.
As with any electronic device, proper care and maintenance are required
to preserve the integrity and operation of your camera. To maintain camera
performance, please take your camera to the nearest Olympus Authorized
Service Center to have it inspected after any major impact. In the event the
camera is damaged as a result of negligence or misuse, the warranty will not
cover costs associated with the service or repair of your camera. For additional
information on our warranty, please visit to the Olympus website for your local
area.
Please observe the following care instructions for your camera.
*1 As determined by Olympus pressure testing equipment in accordance with
IEC Standard Publication 529 IPX8 - This means that the camera can be
used normally under water at a specified water pressure.
*2 This anti-shock performance is confirmed by Olympus’ testing conditions in
accordance with MIL-STD-810F, Method 516.5, Procedure IV (Transit Drop
Test). For more details of Olympus’ testing conditions, please refer to the
Olympus website for your local area.
Before Use:
• Check the camera for foreign material including dirt, dust or sand.
• Firmly close the battery/card compartment cover lock, connector cover lock
and LOCK knob.
• Do not open the battery/card compartment cover and connector cover with
wet hands, while under water, or in a damp or dusty environment (e.g. beach).
2
the operation of the
98
EN
Page 99

After Use:
• Be sure to wipe off any excess water or debris after using the camera under
water.
• After the camera is used under seawater, immerse
the camera in a bucket containing fresh water
for about 10 minutes (with the battery/card
compartment cover and connector cover firmly
closed, the lock in place and the lens ring removed).
After that, let the camera dry in a shaded location
with good ventilation.
• When opening the battery/card compartment cover
or connector cover, open slowly with the camera
orientated as shown in the following illustration
to prevent water drops entering the camera. If any
water drops are found on the inner side of the cover,
be sure to wipe them off before using the camera.
Battery/card
compartment
cover
Storage and Maintenance
• Do not leave the camera in an environment at high temperature (40°C (104°F)
or more) or at low temperature (–10°C (14°F) or less). Failure to do so may
break down water resistance.
• Do not use chemicals for cleaning, rust prevention, anti-fogging, repairing, etc.
Failure to do so may break down water resistance.
• Do not leave the camera in water for a long time. Prolonged exposure to
water will cause damage to the camera’s appearance and/or deteriorate
water resistance.
• In order to preserve the water resistant feature, as with any underwater
housing, it is recommended that the waterproof packing (and seals) are
replaced annually.
For the Olympus distributors or service stations where the waterproof
packing can be replaced, visit Olympus website for your local area.
The included accessories (e.g. USB-AC adapter) do not offer shock or water
resistance.
EN
99
Page 100

List of settings available in each shooting
mode
For the available settings of O and
settings” (P. 102) and “List of
Picture Mode
Flash
Exposure Comp.
White balance
ISO
o/Y
Image size (still images)
Aspect
Wi-Fi Start/End Wi-Fi
Reset
Compression
Shadow Adjust
AF Mode
n
ESP/
Digital Zoom
Image Stabilizer
Accessory Settings
AF Illuminat.
Rec View
Pic Orientation
Date Stamp
Super-Res Zoom
Image Size (movies)
IS Movie Mode
R
Wind Noise Setting
Recording Volume
ART
settings” (P. 101).
A
P
―
R
*1 *1 *1 *1 *1
R
―
R
―
R
―
R
*1
R
RRR
RRRRR
RRRRRRRR
RRRRRRRR
RRRRRRRR
―
R
―――――
R
―
R
―
R
RRRRRRRR
*1 *1 *1 *1 *1
R
―
R
RRRRRRRR
RRRRR
RRR
―
R
*1
R
RRRRRRR
RRRRRRR
RRRRRRR
RRRRRRR
ART
, refer to “List of O
mopn
R
RRRRRR
RR
R
R
RRRRR
RRRRRR
R
RRRRRR
R
R
k
――
―
*1 *1
*1
―――
――
―――
*1 *1
RR
*1
RR
RRR
RR
RRRR
―
―
RR
RR
P
A
R
R
R
R
RR
RR
R
―
*1
*1
*1
―
―
―
―
―
―
―
―
―
―
―
―
*1 Some functions cannot be set.
100
EN
 Loading...