

Page 1

DIGITAL VOICE
RECORDER
DS-5000
DS-5000iD
INSTRUCTIONS
INSTRUCTIONS
EN
MODE D’EMPLOI
FR
INSTRUCCIONES
ES
Thank you for purchasing an Olympus
Please read these instructions for information
about using the product correctly and safely.
Keep the instructions handy for future reference.
To ensure successful recordings, we recommend that you
test the record function and volume before use.
Digital Voice Recorder.
EN
Page 2
Introduction
Introduction
● The contents of this document may be changed in the future without advanced notice.
Contact our Customer Support Center for the latest information relating to product names
and model numbers.
● The utmost care has been taken to ensure the integrity of the contents of this document. In
the unlikely event that a questionable item, error, or omission is found, please contact our
Customer Support Center.
● Any liability for passive damages or damage of any kind occurred due to data loss incurred
by a defect of the product, repair performed by the third party other than Olympus or an
Olympus authorized service station, or any other reasons is excluded from the Olympus’s
liability.
Trademarks
Microsoft and Windows are registered trademarks of Microsoft Corporation.
Macintosh is a trademark of Apple Inc.
Intel and Pentium are registered trademarks of Intel Corporation.
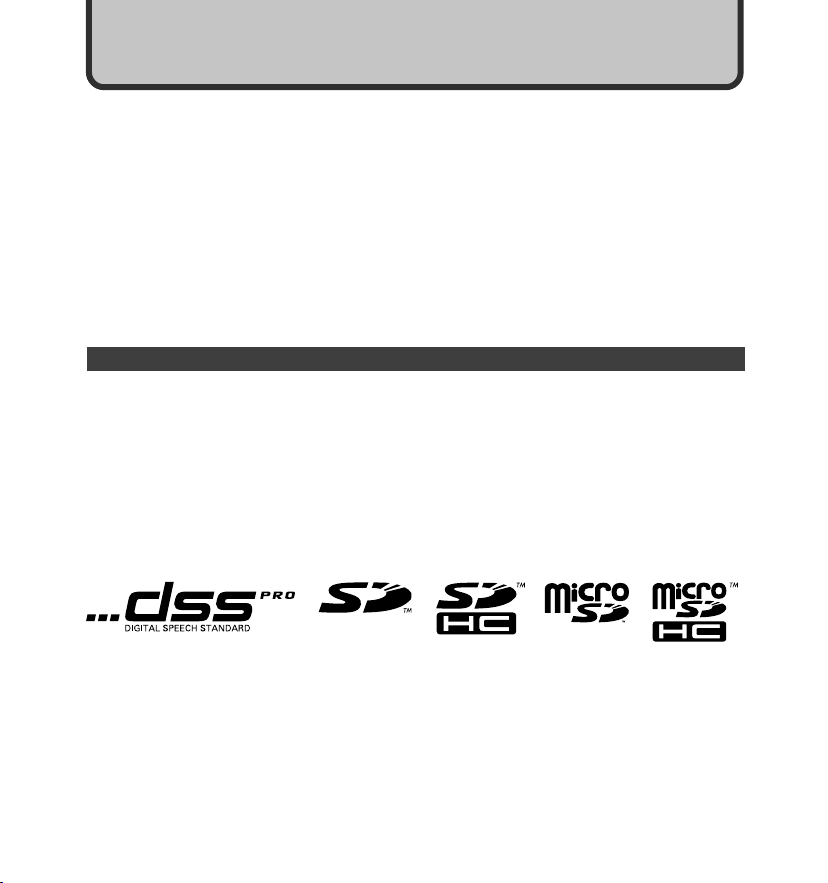
SD and microSD are a trademark of SD card Association.
SDHC and microSDHC are a trademark of SD card Association.
Other product and brand names mentioned herein may be the trademarks or registered
trademarks of their respective owners.
2
Page 3

Table of Contents
Table of Contents ...................................... 3
Safe and Proper Usage ............................ 4
General Precautions ................................. 5
1 Getting Started
Main Features .......................................... 9
Memory Card ......................................... 10
Identification of Parts ............................. 12
Installing Batteries ................................. 14
Charging Battery Pack .......................... 16
Using the Battery Pack .......................... 18
Using the AC Adapter ............................ 19
Turning ON the Recorder ...................... 20
Power Save Mode ................................. 20
Inserting and Ejecting a SD card .......... 21
Setting Time/Date (Time & Date) .......... 22
Setting Recording Destination
(Card Select) ................................... 24
2 Basic Operations
Recording .............................................. 25
Playing ................................................... 29
Erasing ................................................... 31
3 Advanced Operations
Menu List ............................................... 35
Learning to Use the Menu ..................... 39
Selecting Folders and Files ................... 40
Displaying File Information .................... 41
Device Lock Function ............................ 42
Setting Priority Levels (Priority) ............ 45
Setting the Author ID and Work Type.... 46
Verbal Comment .................................... 49
Index Marks ........................................... 50
Inserting and Ejecting a microSD card ....
Formatting the Card (Format) ............... 52
Customizing the Recorder ..................... 54
51
4 Managing Files on Your PC
DSS Player Software ............................. 55
Installing DSS Software ........................ 57
Uninstalling DSS Software .................... 58
Using Online Help ................................. 59
Connecting Recorder to PC .................. 60
Running DSS Player ............................. 62
5 Other Information
Alarm Message List ............................... 63
Troubleshooting ..................................... 64
Accessories (Optional) .......................... 65
Specifications ........................................ 66
Technical Assistance and Support ........ 67
1
2
3
4
5
7
3
Page 4

Safe and Proper Usage
Before using your new recorder, read this
manual carefully to ensure that you know
how to operate it safely and correctly. Keep
this manual in an easily accessible location
for future reference.
Important Safety Precautions
Certain symbols are used in the user’s
manual and on this product to help protect
users, their surroundings, and their
property from possible injury or damage.
Please familiarize yourself with the
following definitions and meanings for each
symbol before reading the precautions.
Signifies danger which
may result in serious
Danger
Warning
Caution
injury or death.
Indicates items or actions
which may cause serious
injury or death.
Indicates items or actions
which may result in
damage or personal injury.
Symbols prohibiting a specific action
Prohibited
Symbols requiring a specific action
Mandatory
Do not
disassemble
Unplug from
power outlet
Convention Used In this Manual
• The word “card” is used to refer to the SD
card and microSD card.
• The word “DSS Player” is used to refer to
the DSS Player Pro R5 Dictation Module
in Windows environment and DSS Player
in Apple Macintosh environment.
• The Notes at the bottom of a page are
used for additional information,
exceptions, or related events.
• Words in uppercase form such as PLAY
or REC are used to describe a function,
button, or switch position on the recorder.
4
Page 5

General Precautions
● Do not leave the recorder in hot, humid
locations such as inside a closed
automobile under direct sunlight or on the
beach in the summer.
● Do not store the recorder in places exposed
to excessive moisture or dust.
● Do not use organic solvents such as
alcohol and lacquer thinner to clean the
unit.
● Do not place the recorder on top of or near
electric appliances such as TVs or
refrigerators.
● Avoid recording or playing back near
cellular phones or other wireless
equipment, as they may cause interference
and noise. If you experience noise, move
to another place, or move the recorder
further away from such equipment.
● Avoid sand or dirt. These can cause
irreparable damage.
● Avoid strong vibrations or shocks.
● Do not disassemble, repair or modify the
unit yourself.
● Do not operate the unit while operating a
vehicle (such as a bicycle, motorcycle, or
go-cart).
● Keep the unit out of the reach of children.
<Warning regarding data loss>
Recorded content in memory may be
destroyed or erased by operating mistakes,
unit malfunction, or during repair work.
It is recommended to back up and save
important content to other media such as a
computer hard disk.
Batteries/Rechargeable Battery Pack
Danger
• Do not solder lead wires or terminals directly
onto a battery or modify it.
• Do not connect the = and - terminals
together. This may cause fire, overheating or
electric shock.
• When carrying or storing the battery, be sure
to put it in the provided case to protect its
terminals. Do not carry or store the battery
with any metal objects (such as key rings).
If this warning is not followed, fire,
overheating or electric shock may occur.
• Do not connect the batteries directly to a
power outlet or a cigarette lighter of an
automobile.
• Do not insert the batteries with their = and
- terminals reversed.
• If any liquid from a battery gets into your
eyes, promptly wash it off with clean water
and consult your doctor at once.
• There is a hole from which gas escapes on the =
terminal. Do not cover or block it.
Warning
• Batteries should never be exposed to flame,
heated, short-circuited or disassembled.
• Do not attempt to recharge alkaline, lithium
or any other non-rechargeable batteries.
• Never use any battery with a torn or cracked
outer cover.
• Keep batteries out of the reach of children.
5
Page 6
General Precautions
• If you notice anything unusual when
using this product such as abnormal
noise, heat, smoke, or a burning odour:
1 remove the batteries immediately while
being careful not to burn yourself, and;
2 call your dealer or local Olympus
representative for service.
• Do not expose the rechargeable batteries to
water. Do not allow water to contact the
terminals.
• Do not remove or damage the battery
insulating sheet.
• Do not use the batteries if you find
something wrong with them such as leakage,
color change or deformity.
• Unplug the charger if the charging is still
incomplete after the specified time it should
take.
• Should any battery liquid get on skin or
clothing, promptly wash it off with clean
water.
• Keep batteries away from fire.
Caution
• Rechargeable batteries are exclusively for
use with Olympus digital voice recorder DS5000/5000iD. Do not use them in combination
with other equipment.
•
Do not subject batteries to strong shocks.
• Do not use batteries of different types, voltages,
and/or brand names.
• When using rechargeable batteries or battery
pack, make sure they are charged at the same
time.
• When using rechargeable batteries or
battery pack that have not been used for a
while, be sure to recharge them before use.
Cradle
Danger
Warning
Do not
disassemble
• Never disconnect the AC adapter
or power cord with a wet hand. This
may cause electric shock or injury.
• Only use the included AC adapter
with the cradle. Using it in
combination with other AC
adapters may cause overheating,
fire, or malfunction.
• Never disassemble, modify, or
repair the recorder yourself. This
may cause fire, electric shock, or
injury.
• Never use it in locations where it
might come into contact with water
(such as a bathroom). Getting the
recorder wet may cause fire or
electric shock.
• Do not drop the recorder or allow
it to suffer a shock. This may cause
damage, fire, or electric shock.
• Do not insert metal wires or similar
objects. This may cause fire,
overheating or electric shock.
• Keep out of the reach of children.
Do not let children use this product
without adult supervision.
6
Page 7
General Precautions
Caution
• Do not use or store the Cradle in/
on an unstable place, such as a
television set, etc. If it falls, it may
cause injury or break.
• Unplug the AC adapter or power
cord from the cradle and AC outlet
Unplug from
power outlet
when not using for extended
periods of time. If this precaution
is not followed and the cradle is
damaged then fire may occur.
AC Adapter
Danger
• Be sure to use the AC Adapter with
the proper voltage (AC 100 - 240 V).
Using it with other voltage levels
may cause fire, explosion,
overheating, electric shock or
injury.
• For safety, be sure to unplug the
AC Adapter from the outlet before
performing maintenance or
Unplug from
power outlet
cleaning. Also, never plug in or
disconnect the power plug with a
wet hand. This may cause electric
shock or injury.
Warning
• Do not attempt to disassemble, repair or
modify the AC adapter in any way.
• Keep foreign objects including water, metal,
or flammable substances from getting inside
the product.
• Do not moisten the AC adapter or touch it
with a wet hand.
• Do not use the AC adapter in the vicinity of
flammable gas (including gasoline, benzine
and lacquer thinner).
In case
• ... the internal parts of the AC adapter are
exposed because it has been dropped or
otherwise damaged:
• ... the AC adapter is dropped in water, or if
water, metal flammable substances or other
foreign objects get inside it:
• ... you notice anything unusual when using
the AC adapter such as abnormal noise, heat,
smoke, or a burning odour:
1 do not touch any of the exposed parts;
2 immediately disconnect the power supply
plug from the power outlet, and;
call your dealer or local Olympus representative
3
for servicing. Continued use of the AC adapter
under these circumstances could result in
electric shock, fire or injury.
Caution
• Do not use the AC Adapter if the
power plug is damaged or the plug
is not completely connected to the
outlet. This may cause fire,
overheating, electric shock, short
circuit or damage.
• Unplug the AC Adapter from AC outlet
when not using. If this precaution is
Unplug from
power outlet
not followed, fire, overheating or
electric shock may occur.
• Make sure to hold the plug when
removing the power plug from the
outlet. Do not bend the cord
excessively or put a heavy object on
it. This may cause fire, overheating,
electric shock or damage.
7
Page 8

General Precautions
• If something appears to be wrong
with the AC Adapter, unplug the AC
Adapter from the outlet and consult
your nearest service center. Using
the AC Adapter may cause fire,
overheating, electric shock or
injury.
• Do not use or keep the AC Adapter
in very hot places, such as in direct
sunlight, in a closed car on a sunny
day, near a heater, on an electric
carpet, etc. Do not use the AC
Adapter if something is covering it
(such as a blanket). This may cause
fire, explosion, leakage or
overheating.
8
Page 9

1 Getting Started
1 Getting Started
Main Features
● Slide switch operation for ease of use and
fast response.
● Supports two types of memory: SD card and
microSD card (☞ P.10).
● Three Programmable smart buttons F1,F2
and F3 (☞ P.54).
● Recording and storing voice in Digital
Speech Standard Pro (DS2 format).
● Two recording modes, QP (Quality
Playback) mode or SP (Standard Playback)
mode (☞ P.37).
● Data encryption function for securing
recordings on the device.
● The recorder’s Ni-MH Rechargeable Battery
Pack can be charged in the recorder using
the USB cable or the AC adapter (☞ P.16,
17).
● Supports USB 2.0. High-Speed, which
enables high-speed data transmission from
the recorder to your computer.
● Five folders and up to 200 files/folder, for a
maximum of 1000 recordings (☞ P.25).
When using DSS Player, it is possible to create
up to a maximum of seven folders (1,400 files) (☞
P.54, 55).
● Large LCD screen with backlight.
● Device Lock function to prevent
unauthorized access to device (☞ P.42).
Authentication system via password or
fingerprint scan (☞ P.42, 43). (DS-5000iD only)
● IndexMark function which is useful to search
particular points in the dictation (☞ P.50).
●
Verbal comment function which allows
transcriptionists to instantly search and play
back instructions on their computer (☞ P.49).
● Priority Setting (☞ P.45).
● DSS Player software included (☞ P.55).
It is possible to customize the recorder in a number
of ways.
1
Main Features
9
Page 10
Memory Card
This recorder uses dual memory in the form of
SD card memory and built-in memory
(microSD card), allowing you to record to the
selected memory.
A removable microSD card is used for the builtin memory thus allowing you to remove your
recording from the recorder safely in case of
1
recorder malfunction or failure.
Memory Card
Compatible Cards
The recorder supports cards with memory
capacity between 512 MB to 8 GB.
Settings and operating environment
relating to the card
Check the latest operating information on the
Olympus homepage (http://www.olympus.com/)
when using cards other than the included card.
In addition, refer to the following pages as well
when handling the card.
• Inserting and Ejecting a SD card (☞ P.21)
•
Inserting and Ejecting a microSD card (☞ P.51)
• Setting Recording Destination (Card Select) (☞ P.24)
• Formatting the Card (Format) (☞ P.52)
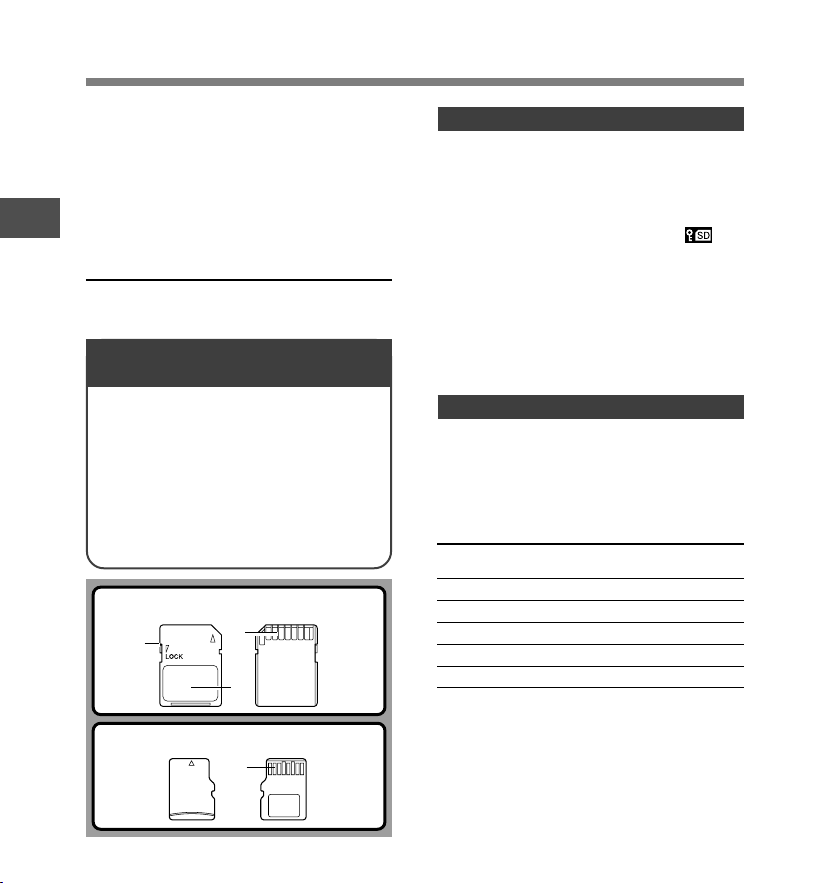
SD card
1
3
2
microSD card
1
10
SD card
1 Card Lock
SD card is equipped with a lock function.
When the lock function is used, important
data is protected by preventing it from being
accidentally overwritten or erased.
When the lock function is set will
appear on the display.
2 Index area
For writing down information identifying card
or content.
3 Contact area
Comes into contact with the recorder’s
signal read contacts.
microSD card
1 Contact area
Comes into contact with the recorder’s
signal read contacts.
Memory Sizes of Cards and
Approximate Recording Times*
Memory Size QP Mode SP Mode
512MB 38 hr. 45 min. 79 hr. 30 min.
1GB 77 hr. 40 min. 159 hr. 05 min.*
2GB 157 hr. 55 min.*2323 hr. 35 min.*
4GB 310 hr. 10 min.*2635 hr. 25 min.*
8GB 631 hr. 15 min.*21293 hr. 15 min.*
The above are the standard times, and the available
recording time will vary depending on the card.
*1: Available recording time for one continuous file.
Available recording time may be shorter if many short
recordings are made.
*2:Total recording time of several files. The maximum
recording time per file is 99 hours 59 minutes.
1
2
2
2
2
Page 11
Warning
• Do not touch the card contacts.
That may damage the card.
• Do not place the card in locations
with static electricity.
• Store the card in a location that is
out of the reach of children. In case
of accidental ingestion, consult a
physician immediately.
Check Card Information (Card Info.)
Information such as the memory capacity and
remaining memory for installed cards can be
displayed on the recorder (☞ P.36).
Card Info.
SD
Remain
Capacity
mSD
micro SD
Remain
Capacity
BACK EXIT
Notes
• When initializing (formatting) a card, confirm that
no necessary data is stored on the memory card
beforehand. Initialization completely erases the
existing data on the card.
• In some cases cards which have been formatted
(initialized) by another device, such as a computer,
cannot be recognized. Be sure to format them with this
recorder before using.
• The card has a service life. When reaching the end of
its life, writing or erasing data on the card will be
disabled. In this case, replace the card.
• If you use a PC card adapter compatible with the card
to save or delete some data on the card, the maximum
recording time on the card may be decreased. To
recover the original recording time, initialize/format the
card in the recorder.
• Olympus will not be held liable for any data corruption
or loss due to misuse of the media card.
540MB
1024MB
250MB
512MB
Memory Card
11
1
Memory Card
Page 12
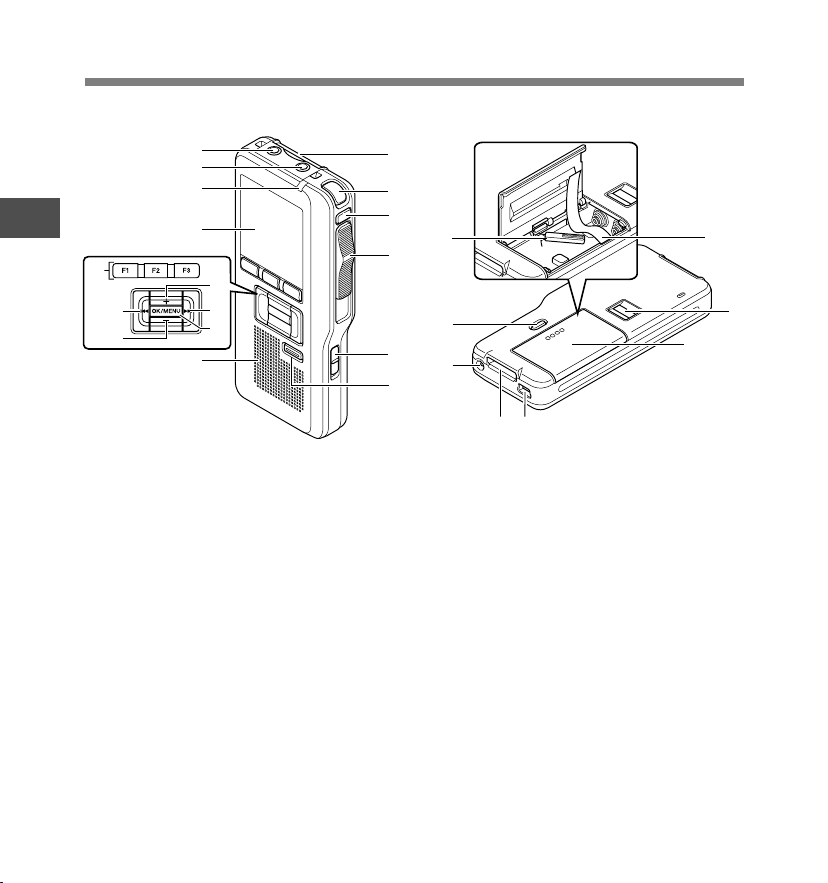
Identification of Parts
7
8
9
1
Identification of PartsIdentification of Parts
$
%
^
0
!
@
#
&
1 SD card slot
2 Built-in microphone
3 NEW button
4 Slide (REC/STOP/PLAY/REV)
switch
5 POWER (ON/OFF) switch
6 ERASE button
7 EAR (Earphone) jack
8 MIC (Microphone) jack
9 Record/Play indicator light
0 Display (LCD panel)
! VOLUME (+) button
@ Fast Forward (9) button
# OK/MENU button
12
1
2
3
e
4
w
5
q
6
=
-
$ Programmable smart button
(F1,F2,F3)
% Rewind (0) button
^ VOLUME (
-
) button
& Built-in speaker
* Battery removal tape
( Fingerprint sensor*
) Battery cover
- PC (USB) terminal
= Cradle connector
q Power jack
w Battery cover release button
e microSD card cover
*DS-5000iD only
*
(
)
Page 13
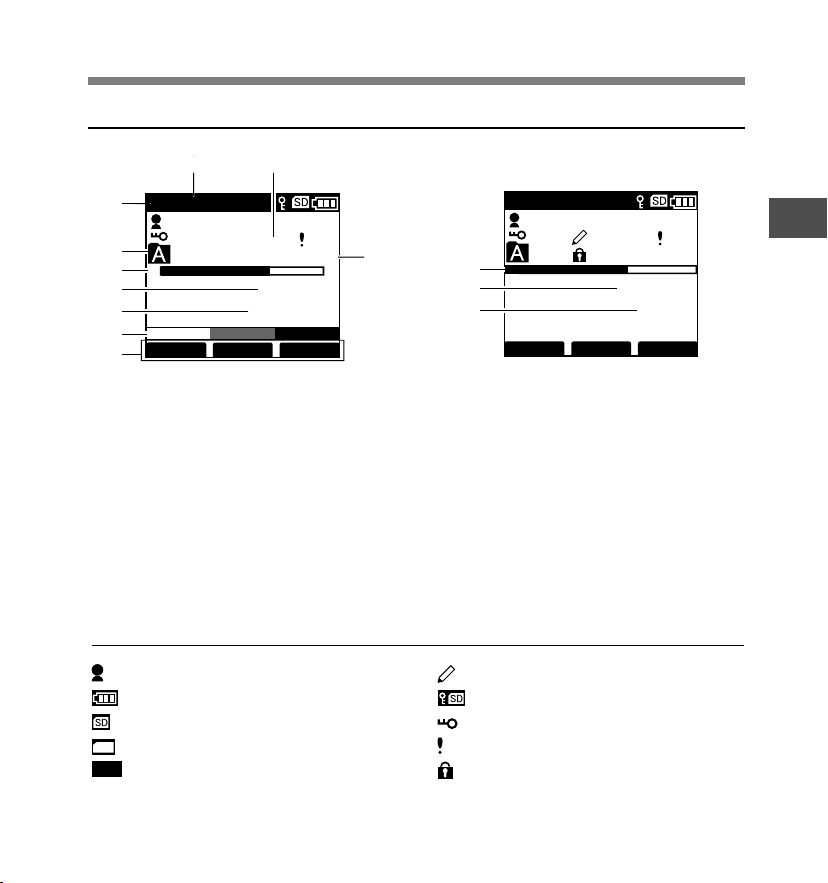
Display Status Indicators
Identification of Parts
8
QP DICT
1
2
3
4
5
6
7
MIKE
EF
VERBAL
9
025
00
/ 030
M
10
15 H 22 M 30
DISPLY INDEX
QP DICT VCVA
MIKE
0
s
s
!
@
#
INSERT
025
SPEED INDEX
02
/ 030
M
50
12M 0 5
Display in the recording mode Display in the playback mode
1 Record mode indicator
2 Current folder
3 Memory remaining indicator
(E/F bar)
4 Recording elapsed time
5 Remaining recording time
6 Level meter indicator
7 Button guide display
8 Microphone sensitivity indicator
9 Current file number
0 Total number of files in the folder
! Playback position bar indicator
@ Current Playback time
#
Total recording time of the selected
file
Author ID indicator
Battery indicator
SD card indicator
mSD
microSD card indicator
VCVA
VCVA (Variable Control Voice
Pending indicator
Card Lock indicator
Encryption indicator
Priority indicator
Erase Lock indicator
Actuator) indicator
1
Identification of PartsIdentification of Parts
s
s
13
Page 14
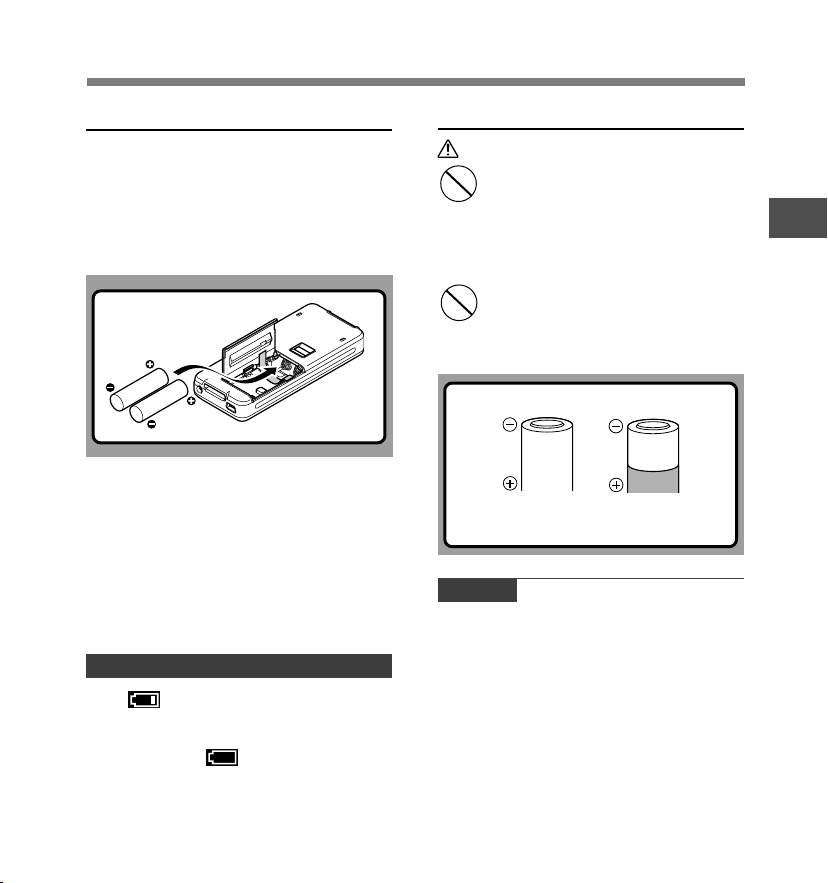
Installing Batteries
This recorder can be used with either Ni-MH
Rechargeable Battery Pack or AAA Alkaline
Batteries.
Ni-MH Rechargeable Battery Pack
(included)
1
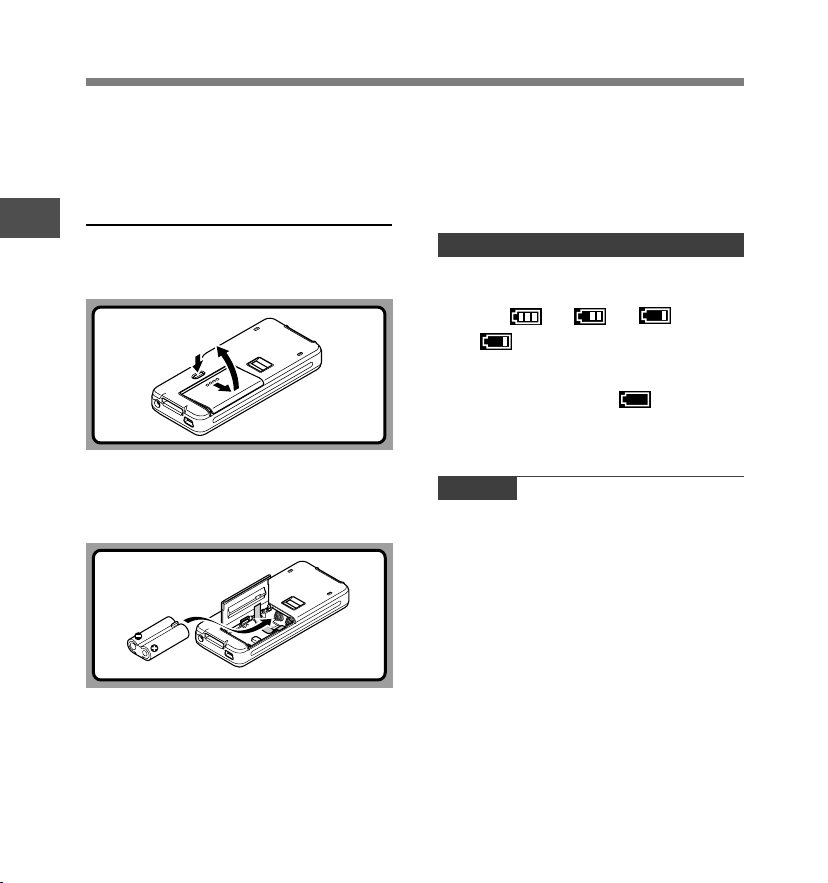
Installing Batteries
Installing Batteries
Lightly press down on the battery cover
1
release button and open the battery
cover, as shown in the illustration below.
Insert the Ni-MH Rechargeable Battery
2
Pack, observing the correct polarity as
shown in the illustration below, and then
close the battery cover.
When pulling on the tape the battery pack may
suddenly pop out, so be sure to press down
lightly the battery pack with your finger while
pulling.
The battery pack needs to be fully charged in
the recorder before initial use.
Recharging Battery Pack
The battery indicator on the display changes
as the battery pack lose power.
→ →
When appears on the display, charge the
battery pack as soon as possible.
When the battery pack charge is low, the
recorder shuts down and [ Battery Low]
appears on the display.
Notes
• Removing the battery pack while the recorder is in use
may corrupt the file.
• If power runs out during recording, current file will be
lost or corrupted!.
• It is crucial to charge the battery pack once you see
one hash mark on the LCD battery indicator.
• Remove the battery pack if you are not going to use
the recorder for an extended period of time.
14
When using the Ni-MH Rechargeable Battery
Pack, insert it so that the flat surface with the
polarities is facing down as shown in the
illustration below. Exercise caution, as the
directions inscribed inside the battery
compartment apply to AAA batteries only.
In addition, when inserting the battery pack, insert
them so that the tape is under the battery pack,
as shown in the illustration. The battery pack can
then be removed easily by pulling up the tape.
Page 15
Installing Batteries
AAA Alkaline Batteries
Lightly press down on the battery cover
1
release button and open the battery
cover (☞ P.14).
Insert two AAA batteries, observing the
2
correct polarity as shown in the illustration
below, and then close the battery cover.
Insert the batteries in the direction inscribed on
the inside of the recorder’s battery compartment.
In addition, when inserting the batteries, insert
them so that the tape is under the batteries, as
shown in the illustration. The batteries can then
be removed easily by pulling up the tape. When
pulling on the tape the batteries may suddenly
pop out, so be sure to press down lightly the
batteries with your finger while pulling.
The battery indicator on the display changes
as the batteries lose power.
Replacing Batteries
When appears on the display, replace the
batteries as soon as possible.
When the batteries are too weak, the recorder
shuts down and [ Battery Low] appears
on the display.
Cautions Concerning the Battery
Warning
• Using batteries for which part or all
of the external coating (insulating
sheath) is peeling off or batteries
which have ruptured may cause fluid
leaks, overheating, and explosions.
For this reason such batteries should
absolutely not be used.
• Commercially available batteries for
which part or all of the external
coating (insulation sheath) has been
peeled off should absolutely not be
used.
Unusable batteries
Batteries for which the entire external coating
(insulating sheath) is peeled off (naked batteries),
or those where it has partially been peeled off.
Notes
• Be sure to turn OFF the recorder before replacing
the batteries. Removing the batteries while the recorder
is in use may corrupt the card. If you are recording into
a file and the batteries run out, you will lose your
currently recorded file since the file header will not be
written. It is crucial to replace the batteries when one
hash mark in shown in the battery icon.
• Be sure to replace both batteries at the same time.
• Never mix old and new batteries, or batteries of
different types and/or brands.
• If it takes longer than 1 minute to replace dead batteries,
you may have to reset the time when you load new
batteries.
• Remove the batteries if you are not going to use the
recorder for an extended period of time.
1
Installing Batteries
Installing Batteries
15
Page 16
Charging Battery Pack
You can charge the Ni-MH Rechargeable
Battery Pack in the recorder using the cradle
in combination with the USB cable or AC
Adapter. Or by directly connecting the AC
Adapter or USB cable to the recorder.
Battery pack need to be fully charged before
first use.
1
Charging Battery Pack
Full charge time: Approximately 3 hours.
Charge the Ni-MH Rechargeable
Battery Pack using the Cradle
The Ni-MH Rechargeable Battery Pack in the
recorder can be charged by connecting the AC
adapter or USB cable to the cradle with the
recorder set in it.
Charging using Cradle and AC Adapter
Connect the AC adapter to the cradle.
For connection procedures, see P.61.
When using the AC adapter for charging, connect the
power plug to the cradle AC connector (☞ P.19).
Firmly press the recorder all the way into
the cradle as shown in the illustration.
CHARGE indicator light glows red and the charging
starts.
The light goes out when the charging is complete.
Charging using Cradle and USB Cable
Connect the USB cable to the cradle.
For connection procedures, see P.61.
Turn the recorder’s POWER switch OFF
(☞ P.20) and firmly press the recorder all
the way into the cradle as shown in the
illustration.
CHARGE indicator light glows red and the charging
starts.
The light goes out when the charging is complete.
When the recorder is connected to a USB cable while
its POWER switch is turned OFF, only charging will
be performed, and the computer will not recognize it
as a drive.
16
CHARGE indicator light
Page 17
Charging Battery Pack
Directly Charging Through the
Recorder
The Ni-MH Rechargeable Battery Pack in the
recorder can be charged by connecting an AC
adapter or USB cable to the recorder.
Charging using AC Adapter (no cradle)
Connect the AC adapter to the recorder.
For connection procedures, see P.19.
When using the adapter for charging, connect the
power plug to the cradle AC connector.
Charging using the USB cable (no cradle)
Connect a USB cable to the recorder while
its POWER switch is turned OFF.
When the recorder is connected to a USB cable while
its POWER switch is turned OFF, only charging will
be performed, and the computer will not recognize it
as a drive.
Notes
• Charge the battery pack often for first few uses. Battery
pack performs better after several full charge/discharge
cycles.
• Battery packs other than the supplied battery pack
cannot be charged.
• If you charge the battery pack right after charging is
complete, it will take only few minutes to charge the
battery pack.
• The PC must be ON when charging battery pack via
the USB cable connection.
• Charging battery pack via the USB cable connection
may not be successful depending on the power supply
capacity of your PC. Use the AC adapter instead.
• Do not set or remove the recorder from the cradle while
it is in operation.
• Do not charge the recorder with the USB hub connected.
• Do not attach or remove the rechargeable battery pack
if the AC adapter or USB cable is connected.
1
Charging Battery Pack
17
Page 18
Using the Battery Pack
The battery pack is exclusively for use with
Olympus voice recorder DS-5000/5000iD.
Never use them in combination with other
equipment.
1
Discharging
Using the Battery Pack
Battery pack self-discharge while this is not in
use. Be sure to charge them regularly before
use.
Battery life
Over time, rechargeable battery packs
gradually wear down. If you charge you battery
pack regularly and you notice a decrease in
usage time, then it is probably time to purchase
a new battery pack.
Operating temperature
Rechargeable batteries, such as the battery
pack, are chemical products. Batteries
efficiency may fluctuate even when operating
within the recommended temperature range.
This is an inherent nature of such products.
Recommended temperature range for
use
Discharging (when using appliance):
0°C - 42°C/32°F - 107.6°F
Charging:
5°C - 40°C/41°F - 104°F
Storage:
–20°C - 30°C/–4°F - 86°F
Using the battery pack outside the above
temperature range may result in declining
efficiency and shorter battery life.
In order to prevent battery leakage or rust,
remove the battery pack from the products
when you will not be using them for a long time,
and store them separately.
Notes
• This recorder is designed to fully charge battery
pack regardless of their energy level. However, for
best results when charging newly purchased battery
pack or battery pack that have not been used for a
long time (more than one month), It is recommended
to fully charge the battery pack then discharge
repeatedly for 2 to 3 times.
• When disposing battery packs, always observe the local
laws and regulations. Contact you local recycling center
for proper disposal methods.
• If Ni-MH rechargeable battery pack is not fully
discharged, protect against short-circuiting (e.g. by
taping the contacts) before disposing.
For customers in Germany
Olympus has a contract with the GRS (Joint
Battery Disposal Association) in Germany to
ensure environmentally friendly disposal.
18
Page 19
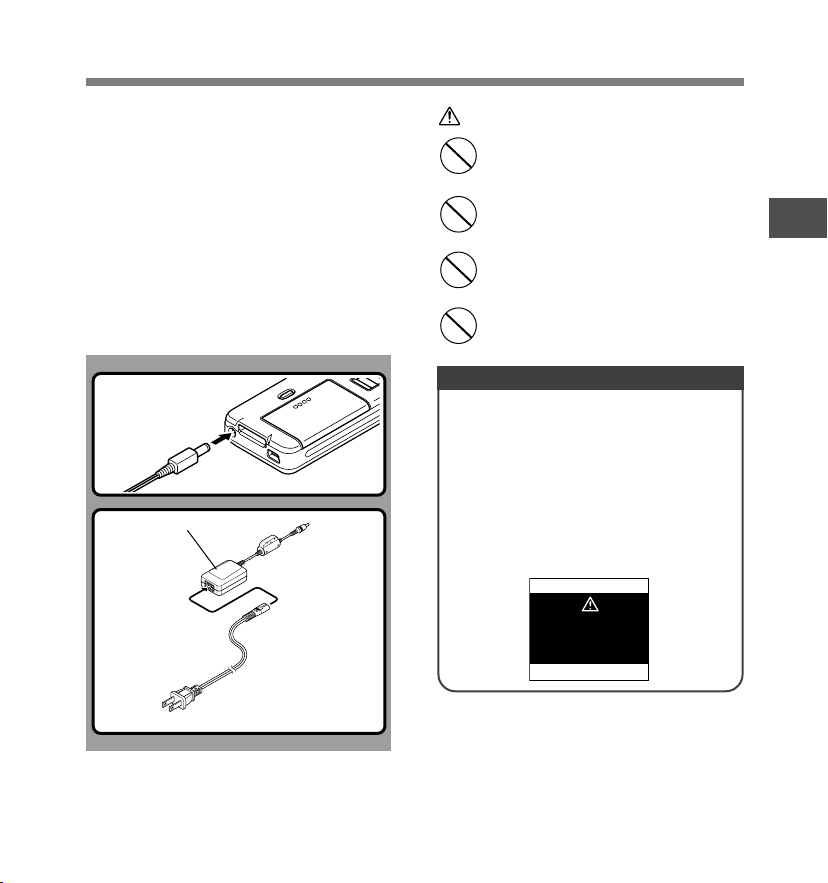
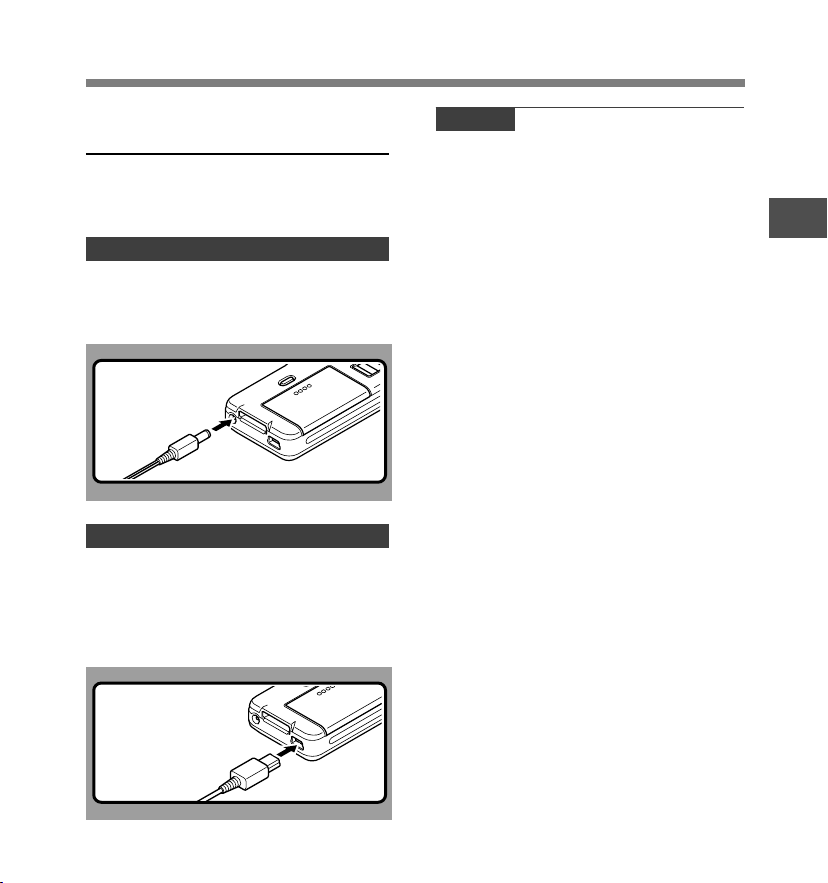
Using the AC Adapter
Use the AC adapter (Olympus Model A513,
included) in cases where battery
consumption is a concern, such as when
recording for extended periods of time.
Plug the AC adapter (Olympus Model A513
included) into a household power outlet and
connect the power plug to the recorder’s
power connector (DC 5V). Always turn off
the recorder before you connect power.
Refer to P.16-P.17 regarding supplying
power to the recorder and cradle with the
aim of charging the Ni-MH Rechargeable
Battery Pack (☞ P.14).
AC adapter
AC
connector
AC cable
The plug type varies
depending on the country
where sold.
Warning
• Always stop recording before
connecting or disconnecting
power.
• When the AC adapter is not in use,
disconnect the power supply plug
from the power outlet.
• Use only the correct power supply
voltage as indicated on the
adapter.
• Do not use the AC adapter when
connecting the recorder to the
USB port.
Detecting abnormal voltage
If the recorder detects a DC power
voltage outside of the allowable voltage
(allowable voltage: 4.6 to 5.5 V), then
[Power Supply Error Remove Power
Plug] will appear on the display and all
operations will stop. The recorder will
not be operable while abnormal voltage
is detected. Use the included AC
adapter (A513).
Power Supply
Error
Remove
Power Plug
1
Using the AC Adapter
19
Page 20
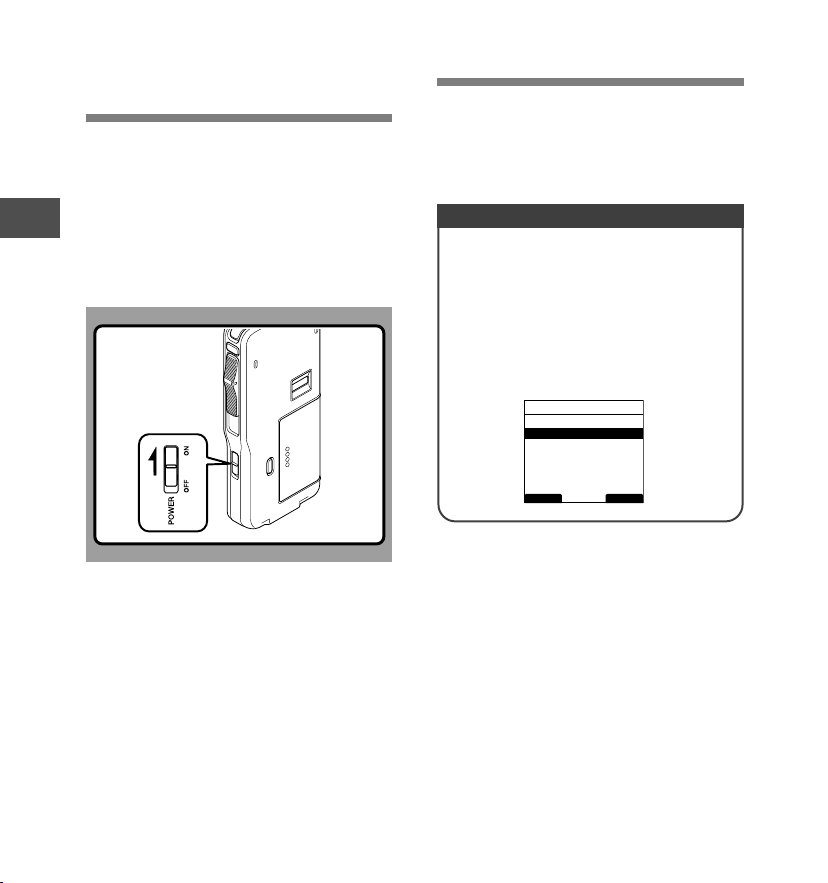
Turning ON the
Power Save Mode
Recorder
With the battery charged in the recorder and
the card inserted properly, the recorder is ready
to work.
While the POWER switch on the side of the
1
recorder is in the OFF position, none of the
Turning ON the Recorder/Power Save Mode
buttons or switch on the recorder will be active.
Slide the power switch to the ON position to
activate the recorder.
When the recorder is ON but not in use for 10
minutes, by default, it will switch to power save
mode automatically. To reactivate the recorder
again, operate any button or the slide switch.
Power Save Setting (Power Save)
You can set the time to enter Power Save
mode from among [5 min.], [10 min.], [30
min.], [1 hour], and [Off] .
To exit power save, press any button.
The [Power Save] setting can be changed
from the Menu. For more details, refer to
“Menu List” (☞ P.35) and “Learning to Use
the Menu” (☞ P.39).
Power Save
5min.
10min.
30min.
1hour
Off
BACK EXIT
20
Page 21
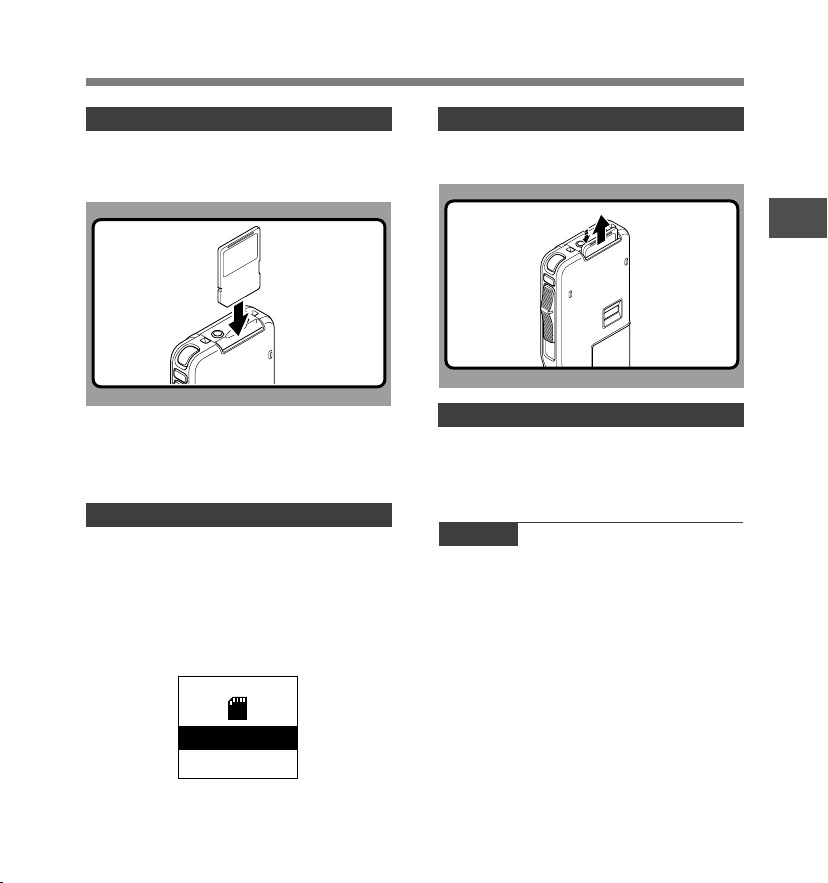
Inserting and Ejecting a SD card
Inserting a SD card
Insert the SD card into the card slot in the
direction shown in the illustration until it
clicks.
This recorder uses a microSD card as its builtin memory. The microSD card has been
preloaded. Refer to P.51 when removing or
inserting the card during emergencies.
When Inserting a Card
The recorder message [Please Wait] on the
display flashes for seconds.
Inserting an unselected card when the card
selected via [Card Select] is not loaded will
switch the recording destination to the
unselected card. Inserting the selected card
will revert the recording destination back.
SD
SD Card
Selected
Ejecting a SD card
Push the SD card inward once to unlock it,
and let it eject.
When Ejecting a Card
When a card selected through the [Card
Select] is ejected, the recording destination will
change over to the other card.
Notes
• Insert the card keeping it straight.
• The card stops with a click when it is inserted all
the way.
• Inserting the card the wrong way or at an angle
could damage the contact area or cause the card
to jam.
• If the card is not inserted all the way, data may not
be written to the card.
• Hold the card straight and pull it out.
• If a unformatted card is installed, the recorder will
automatically display the menu format option (☞ P.52).
• Never use any card in the recorder unless it has been
formatted on this unit (☞ P.52).
• Never remove the card while the recorder is in
operation. This may damage the data.
• Releasing your finger quickly after pushing the card
inward may cause it to eject forcefully out of the slot.
21
1
Inserting and Ejecting a SD card
Page 22

Setting Time/Date (Time & Date)
Setting the correct time and date on the
recorder is very important since every file
recorded on the recorder will have the date
and time information as part of the file header.
This will simplify the file management aspects
later on.
1
Setting Time/Date
The hour indicator will flash automatically
when you load batteries before using the
recorder for the first time, or after the
recorder hasn’t been used for a long time.
However, when a Password or Fingerprint
(DS-5000iD only) has been set as the
device lock function (☞ P.42), the recorder
will go to the Time/Date set screen after
verification (unlocking).
F1, F2 button
OK/MENU,+, –,
9, 0 button
Press the 9 or 0 button to select
1
the item to set.
Select the item from [hour], [minute], [year],
[month] and [day] with a flashing point.
Time & Date
1 M 14 D 2008 Y
5: 00 PM
24H
BACK EXIT
Press the 9 or 0 button to select
2
the item to set.
Follow the same steps by pressing the 9 or
0 button to select the next item, and press
+ or – button to set.
the
Time & Date
01 M 14 D 2008 Y
5 : 45 PM
24H
BACK EXIT
• You can choose between 12 and 24 hour display
by pressing the F2(24H or 12H)* button while
setting the hour and minute.
Example: 5:45 P.M.
(Initial setting)
5:45 PM ←→ 17:45
22
Page 23

Setting Time/Date (Time & Date)
• You can choose the order of the year, month,
day by pressing the F2(D/M/Y or Y/M/D or M/
D/Y)* button while setting them.
Example: January 14, 2008
(Initial setting)
*The display will vary depending on the status of the
settings.
Press the OK/MENU button to
3
complete the setup screen.
The clock will start from the set date and time.
Press the OK/MENU button according to the time
signal.
1M 14D 2008
14D 1M 2008
2008Y 1M 14D
Y
Y
Notes
• If the slide switch is moved to a position other than
STOP while setting the Time/Date, the Time/Date
currently being set (un-finalized Time/Date) will be
cancelled and it will revert to the previously set Time/
Date.
• You can set the time and date from your PC using DSS
Player software (☞ P.55).
Changing the Time/Date
When the recorder’s POWER switch is turned
ON the [Time & Date] will be displayed for two
seconds. If the [Time & Date] is not correct,
set it using the procedure below.
Press the + or
1
screen, and select the [Time & Date].
See P.36, 38 regarding the menu.
Device Menu
USB Class
Time & Date
Power Save
Reset Settings
12
Card Info.
System Info.
BACK EXIT
Press the OK/MENU or 9 button.
The Time/Date screen appears. The hour
2
indicator flashes, indicating the start of the Time/
Date setup process.The following steps are the
same as Step 1 through Step 3 of “Setting Time/
Date (Time & Date)” (☞ P.22).
Press F1(BACK) or 0 button to return
3
to the [Main Menu] screen, then press
F1(BACK) or 0 button again to exit
the setting.
button in the menu
–
1
Setting Time/Date
23
Page 24

Setting Recording Destination (Card Select)
By default, the recording destination is set to
the [SD Card] at the factory. To change the
recording destination, follow the procedure
outlined below.
1
Setting Recording Destination
F1 button
OK/MENU,
9, 0 button
Select [Card Select] at the [Device Menu]
1
screen and press OK/MENU or 9
button.
Refer to P.36 regarding each menu item settings.
Device Menu
Fingerprint
Card Select
Beep
Format
12
USB Class
Time & Date
BACK EXIT
+, –,
Press the + or
2
between [SD] and [micro SD].
Card Select
SD
mSD
micro SD
BACK EXIT
button to choose
–
Press the OK/MENU button to
3
complete the setup screen.
[SD Card Selected] or [microSD Card Selected]
will light up on the display, and it will return to the
[Device Menu] screen.
If the 0 or F1(BACK) is pressed, the setting
will be cancelled and it will return to the [Device
Menu] screen.
The recording destination (
set will appear on the display.
Card Select
SD
mSD
microSD Card
Selected
BACK EXIT
or ) that was
QP DICT
MIKE
E
025
New File
FOLDER
PRIOR
3 H 0 8 M 0 5
Press F1(BACK) or 0 button to return
4
to the [Main Menu] screen, then press
F1(BACK) or 0 button again to exit
the setting.
02
/ 030
M
INFO
10
s
s
24
Page 25

2 Basic Operations
2 Basic Operations
Recording
By default, the recorder has five folders, A,
B, C, D, E and you can select folder by
pressing the F1(FOLDER) button. These
five folders can be selectively used to
distinguish the kind of recording; for
example, Folder A might be used to store
private information, while Folder B might be
dedicated to holding business information.
Up to 200 messages can be recorded per
folder.
Also, by default, the Recording Mode is QP.
Record Function
By default, the RECORD function is configured
to record at the current position (overwrite).
However, that can be changed to any of the
following settings:
• Append: Appends the recording to the end of the
current file (☞ P.26).
• Overwrite: Overwrites the recording starting at the
current position in the file (☞ P.27).
• Insert: Inserts the recording at the current position
in the file (☞ P.28).
Recording Related Settings
Recording related settings can be
configured to provide a suitable recording
environment.
• Rec Mode (☞ P.37)
• VCVA Recording (☞ P.37)
• Mic Sense (☞ P.37)
• Verbal Comment (☞ P.49)
• Pending (☞ P.37)
2
Recording
25
Page 26

2
Recording
Recording
New Recording
Create a new file to record in.
1
Press the NEW button to create a new
1
file.
When [The Worktype List is displayed when a
new file is created] is set in DSS Player
2
2
3
(☞ P.55) you can select the Work Type from the
Work Type list.
aSelected Author ID
bNew file number
cRemaining recording time
Move the slide switch to the REC
2
position to start recording.
The record/play indicator light glows red.
Aim the microphone at the sound source.
When you press the F2 (DISPLY) button
during recording, you can change the LCD
screen displays.
Move the slide switch to the STOP
3
position to stop recording.
If you want to append additional recordings to
the same file, move the slide switch to the REC
position again.
Notes
• A beep will sound when the remaining recording time reaches 60 seconds, 30
seconds, and 10 seconds while recording.
• When remaining recording time is less than 60 seconds, the record/play indicator
light starts flashing in red. When the recording time is decreasing to 30 or 10
seconds, the light flashes faster.
• [Memory Full] or [Folder Full] will be displayed when the memory or folder capacity
is full.
- Delete any unnecessary files before recording any further (☞ P.31) or transfer
dictation files to your computer using DSS Player Software (☞ P.55).
- Change the recording destination at [Card select] setting (☞ P.24) or change to a
card with free space.
a
b
c
QP DICT
MIKE
031
New File
15
PRIOR
031
DISPLY
031
PRIOR
H
22
M
INFO
/ 031
00
M
15 H 2 2 M 3 0
INDEX
/ 031
02
M
15 H 0 2 M 2 0
INFO
/ 030
40
10
20
s
F
s
s
s
s
EF
Remain
FOLDER
QP DICT
MIKE
E
VERBAL
QP DICT
MIKE
FOLDER
26
Page 27

Overwrite Recording
You can overwrite a previously recorded file from any point within
1
the file.
Note that the overwritten recordings will be erased.
Select and play the file you want to
1
2
2
3
overwrite.
Stop playback at the starting point of overwrite.
Move the slide switch to the REC
2
position to start overwriting.
The record/play indicator light glows red.
aRecording elapsed time
bTotal recording time of the selected file
Move the slide switch to the STOP
3
position to stop overwriting.
Note
• You cannot select a different recording mode (QP, SP) than that of the original file
before overwrite recording.
a
b
Recording
QP DICT
MIKE
101
E
VERBAL
DISPLY
10
M
00H 1 4 M 0 0
INDEX
/ 133
25
2
Recording
F
s
s
27
Page 28

2
Recording
Recording
Insert Recording
Additional recording can be inserted into previously recorded file.
1
Select and play the file you want to
1
insert an additional recording into.
2
2
3
While playing the file, press the
2
F1(INSERT) button to insert an
additional recording.
[Insert Rec?] appears on the display.
Move the slide switch to the REC
3
position to start inserting an additional
recording.
The record/play indicator light glows red.
[Insert Rec] and the remaining recording time will
alternate on the display.
QP DICT VCVA
MIKE
134
00
Insert Rec?
QP DICT
MIKE
134
E
DISPLY
VERBAL
H
00
33 M 2 5
00
4 H 3 3 M 0 6
/ 134
M
10
EXIT
/ 134
M 11s
INDEX
s
s
F
S
28
Move the slide switch to the STOP
4
position to stop inserting the
4
additional recording.
Notes
• If you place the slide switch in the STOP position for more than two seconds while
moving the slide switch from the PLAY position to the REC position, the Insert
recording will be cancelled.
• The recording time and date of the file is updated to the time and date of the
inserted recording.
• You cannot select a different recording mode (QP, SP) than that of the original file
before inserting.
QP DICT
MIKE
E
VERBAL
134
Insert Rec
DISPLY
00
/ 134
M 12s
INDEX
F
Page 29

Playing
You can start playing a file at any point.
1
Select the file, then move the slide
1
switch to the PLAY position to start
playback.
The record/play indicator light glows green.
1
Press the + or – button to adjust the
2
volume.
The display shows the volume level. You can
choose between 0 to 30.
2
3
aVolume level
Move the slide switch to the STOP
3
position at any point you want to stop
the playback.
a
QP DICT
MIKE
INSERT
QP DICT
MIKE
Volume 15
INSERT
101
00
27 M 5 8
SPEED
101 / 133
00
SPEED
/ 133
M
05
INDEX
M
INDEX
07
s
s
2
Playing
s
29
Page 30

Playing
Playback
Operation
How to Cancel
functions
2
Playing
Fast
Forward
(FF)
Rewind
(REW)
Cue
(CUE)
Review
(REV)
Playback
Speed
Press the 9 button once while stopped.
Press the 0 button once while stopped.
Hold the 9 button while stopped or playing a file.
Hold the 0 button while stopped or playing a file.
Move the slide switch to the REV position.
Press the F2 (SPEED) button during playback.
➥ Every time the F2(SPEED) button is pressed, the
playback speed will switch.
Play(playback): Playback at normal speed.
Slow Play (slow playback): Playback speed
slows down (-50%), and “Slow play” will turn on.
Fast Play (fast playback): Playback speed
becomes faster (+50%), and “Fast play” will turn
on.
Move the slide switch to a position
other than the STOP position.
➥ The recorder starts the operation
of the set position.
Release the button.
Release the button.
Release the slide switch.
Notes
• If you press the 9 button once while fast-forwarding or twice while stopped, the recorder will stop at the end of the file
(F.SKIP).
• If you press the 0 button once while rewinding or twice while stopped, the recorder will stop at the beginning of the file
(B.SKIP). If the 0 button is pressed within 2 seconds, the recorder skips to the beginning of the previous file.
• If you continue to press and hold the 9 button while Fast Forwarding (FF) the recorder will F.SKIP continuously while
the button is held.
• If you continue to press and hold the 0 button while Rewinding (REW) the recorder will B.SKIP continuously while the
button is held down.
30
Page 31

Erasing
Erasing a File
Erasing or deleting a file from any of the folder on the recorder is a
2
very simple process.
Select the file you want to erase.
1
3
4
Press the ERASE button.
2
Press the + button and select [File
3
Erase], then press the OK/MENU
button.
Press the + button and select [Start],
4
then press the OK/MENU button.
The display changes to [File Erase !] and
erasing will start.
[Erase Done] is displayed when the file is
erased. File numbers will be reassigned
automatically.
QP DICT
MIKE
All Erase
File Erase
Cancel
All Erase
File Erase
Cancel
QP DICT
MIKE
File Erase
Start
Cancel
BACK
QP
DICT
MIKE
029
029
File Erase !
029
/ 031
/ 031
/ 030
2
Erasing
Erase Done
Notes
• An erased file cannot be restored.
• Files cannot be erased in the following cases.
- File being set [Lock] (☞ P.37).
- The SD card lock is turned on while the SD card is selected as the recording
destination (☞ P.10).
31
Page 32

2
Erasing
Erasing
Erasing All Files in a Folder
All files in a folder can be erased simultaneously.
2
Select the folder you want to erase.
1
Press the ERASE button.
2
3
4
Press the + button and select [All
3
Erase], then press the OK/MENU
button.
Press the + button and select [Start],
4
then press the OK/MENU button.
The display changes to [All Erase !] and erasing
will start.
[Erase Done] is displayed when the files are
erased. Any locked files in the folder will be
reassigned new file numbers in ascending
order.
QP DICT
MIKE
All Erase
File Erase
Cancel
All Erase
File Erase
Cancel
QP DICT
MIKE
E
All Erase
Start
Cancel
BACK
QP DICT
MIKE
E
029
All Erase !
000
/ 030
/ 030
/ 000
32
Erase Done
Notes
• The erasing process may take up to 10 seconds. Do not interrupt this process!
Data will be destroyed.
• Files cannot be erased in the following cases.
- File being set [Lock] (☞ P.37).
- The SD card lock is turned on while the SD card is selected as the recording
destination (☞ P.10).
Page 33

Partially Erasing a File
45
02
You can erase a selected file in part.
2
3
Start playback the file you want to
1
erase partially.
Erasing
Press the ERASE button at the point to
2
start erasing.
While playback continues, [Partial Erase] will
appear on the display.
Press the ERASE button at the point to
3
end erasing.
The erase starting point (time) set in step 2 and
the ending point (time) set in this step will
alternate on the display for 8 seconds.
If you playback to the end of file or to the start
position of the Verbal comment (☞ P.49), that
will mark the end position for the partial erase
automatically.
QP DICT
MIKE
INSERT
QP DICT
MIKE
QP DICT
MIKE
134
45
01 H 5 5M 2 5
SPEED
01H 5 5
Partial Erase
134
05
Partial Erase
Start
134
45
Partial Erase
End
/ 134
M
02
INDEX
M
M
EXIT
/ 134
M
01
EXIT
/ 134
M
32
EXIT
2
Erasing
s
s
s
2 3
s
s
s
33
Page 34

Erasing
2
Erasing
Press the ERASE button to confirm
4
erase.
4
The display changes to [Partial Erase!] and
erasing will start.
When [Erase Done] appears on the display,
partial erase is complete.
Notes
• If the ERASE button is not pressed within 8 seconds after the [Starting point] and
[Ending point] are alternately displayed, the recorder will revert to stop status.
• An erased file cannot be restored.
• Files cannot be Partial erased in the following cases.
- File being set [Lock] (☞ P.37).
- Files that Verbal comment is being played back (☞ P.49).
- The SD card lock is turned on while the SD card is selected as the recording
destination (☞ P.10).
QP DICT
MIKE
QP DICT
MIKE
134
1
H
20
M
Partial Erase !
134
1
H
20
M
Erase Done
35
35
/ 134
s
/ 134
s
34
Page 35

3 Advanced Operations
3 Advanced Operations
Menu List
● Menu Setting (while the recorder is stopped, press the OK/MENU button)
Main Menu
Second layer Setting
Ref.Page
File Menu
Record
Menu
Display
Menu
Pending
Lock
Priority
Work Type
Rec Mode
VCVA
Mic Sense
Backlight
LED
Contrast
Language
Finished, Pending
Off, On
Cancel, Set
Edit the Work Type and Option Item.
QP, SP
Off, On
Dictation, Conference
On, Off
On, Off
Program contrast level 1~12 (Default is 6).
English, Deutsch, Français, Español,
Italiano, Русском
P.37
P.37
P.45
P.46
P.37
P.37
P.37
P.38
P.38
P.38
P.38
3
Menu List
Device Menu
(To the next page)
35
Page 36

Menu List
3
Menu List
Main Menu
Device
Menu
File Menu
(To the page 35)
Second layer Setting
Fingerprint
Card Select
Enroll, Verify
SD, microSD
Beep
Format
USB Class
Time & Date
Power Save
Reset Settings
Card Info.
System Info.
Initializes the card (SD/microSD).
Composite, Storage
In order of hour, minute, year, month and
day.
In order of 5min., 10min., 30min., 1hour and
Off.
Returns the menu settings to their initial
state.
SD(Remain, Capacity), microSD(Remain,
Capacity)
Model Name, Version, Serial
On, Off
Ref.Page
P.43
P.24
P.38
P.52
P.38
P.22
P.20
P.53
P.11
P.38
Notes
• The selectable language varies depending on the countries where the product was purchased.
• [Fingerprint] is a menu item for the DS-5000iD only (it will not appear on the DS-5000).
• Items appear in bold letters in the “Setting” column to indicate that they are the initial settings.
36
Page 37

Menu List
The Menus and Their Functions
This recorder is equipped with various functions other than those introduced in detail in this
instruction. These can be set from the four menus categorized in the Main Menu.
● File Menu
DescriptionFunction Setting
=
Pending
Lock
Priority
Work Type
● Record Menu
Rec Mode
VCVA
Mic Sense
When you set [Pending] to the file, the file becomes “Pending
file” and the editing sign of
[Download file] is set to [Finished file] by DSS Player, the
[Pending] file is not transferred and only [Finished] file (edited
file) will be transferred to your PC.
When a file is set to [Lock], will appear on the display,
allowing you to prevent important files from accidental erase.
Moreover, the file will not be erased even when all files within
a folder are erased.
Please see P.45 for details.
Please see P.46 for details.
DescriptionFunction Setting
The recording mode can be selected from QP (Quality Play)
and SP (Standard Play).
You cannot select the QP mode when setting the recorder
to the Classic DSS mode.
The Variable Control Voice Actuator (VCVA) is a function
that starts recording automatically when the microphone
senses that sounds have reached a preset threshold volume
level, and automatically pauses when the volume drops
below the threshold. The VCVA feature allows you to
conserve memory by automatically stopping recording in
instances like long silent periods during meetings.
When this is enabled,
You can switch between two microphone sensitivities to meet
recording needs: [Dictation] for oral dictation and
[Conference] which is suited for situations like meetings and
conferences with a small number of people. The setting
status will appear on the display as [Conference] or
[Dictation].
will appear on the display. If
VCVA
will appear on the display.
[Pending/Finished]
=[On/Off]
=[QP/SP]
=[On/Off] Pr ess the
9 or 0button while
recording to adjust the
actuator level.
=[Dictation/
Conference]
3
Menu List
37
Page 38

Menu List
● Display Menu
Backlight
LED
DescriptionFunction Setting
When the display backlight is set to [ON], the backlight will
light up for about 10 seconds when a button is pressed.
This is useful in that it allows you to check the display even
in dark locations.
You can set it so the Record/Play indicator light does not
turn on.
=[On/Off]
=[On/Off]
3
Menu List
● Device Menu
38
Contrast
Language
Fingerprint
Card Select
Beep
Format
USB Class
Time & Date
Power Save
Reset Settings
Card info.
System info.
Display contrast can be adjusted from level 01 to 12. =Press the + or –
You can select the display language for this recorder.
The selectable language varies depending on the countries
where the product was purchased.
DescriptionFunction Setting
Please see P.43 for details.
Please see P.24 for details.
When this is set to [ON], the recorder beeps to alert you to
button operations or warn you of errors.
Please see P.52 for details.
When connected to a computer, composite devices will be
recognized as [Composite] and drives will be recognized as
[Storage].
Please see P.22 for details.
Please see P.20 for details.
Please see P.53 for details.
Please see P.11 for details.
System information about the recorder like its [Model Name],
[Version] and [Serial] can be displayed.
button to set the
contrast level (level 01
to 12).
=[English/Deutsch/
Français/ Español/
Italiano/Русском]
=[On/Off]
=[Composite/Storage]
Page 39

Learning to Use the Menu
To navigate through the different options in the
Menu, use the Menu List flow chart (☞ P.35)
and the following steps to modify or change
any settings.
F1, F3 button
OK/MENU,
9, 0 button
Press the OK/MENU button.
The [Main Menu] screen will appear on the
1
display (☞ P.35).
Main Menu
File Menu
Record Menu
Display Menu
Device Menu
EXIT
Press the + or – button to move to the
2
[Main Menu] item to be set.
Main Menu
File Menu
Record Menu
Display Menu
Device Menu
EXIT
+, –,
Press the OK/MENU or 9 button.
Move to the setting of the selected menu items.
3
Press the + or – button to move to the
4
menu item to be set.
Record Menu
Rec Mode
VCVA
Mic Sense
BACK EXIT
Press the OK/MENU or 9 button.
Move to the setting of the selected item.
5
Rec Mode
QP
SP
BACK EXIT
Press the + or – button to change the
6
setting.
Press the OK/MENU button to complete
7
the setup screen.
If press the 0 or F1(BACK), the setting will be
cancelled and it will return to the menu.
Pressing the F3(EXIT) button will cancel the
contents being set and take you out of the MENU.
Press the F1(BACK) or 0 button to
8
return to the [Main Menu] screen, and
then press F3(EXIT) or the 0 button
to complete the setting.
3
Learning to Use the Menu
39
Page 40

Selecting Folders and Files
F1 button
3
Selecting Folders and Files
Changing Folders
Press the F1(FOLDER) button while the
1
recorder is stopped.
The folder list screen will be displayed.
QP DICT
A
B
C
D
E
FOLDER
Select the folder by pressing the + or
2
button and then press the OK/MENU
–
button.
This will change the folder.
You can switch folders by pressing the
F1(FOLDER) button.
QP DICT
A
B
C
D
E
FOLDER
Folder A
Folder B
Folder C
Folder D
Folder E
Folder A
Folder B
Folder C
Folder D
Folder E
EXIT
EXIT
OK/MENU,
button
+, –
Changing File
Press the 9 or 0 button while the
1
file is being displayed.
This will change and display the file number order
for files within the folder.
QP DICT VCVA
MIKE
C
001
/ 010
00
M
00
05 M 0 0
INFO
PRIOR
FOLDER
Scroll bar
The scroll bar will appear when all of
the items cannot be displayed in the
menu or list display screen.
QP DICT
FOLDER
aCurrent file number
a
bTotal number of
recorded files in the
b
folder
s
s
A
Folder A
B
Folder B
C
Folder C
D
Folder D
E
Folder E
F
Folder F
EXIT
40
Page 41

Displaying File Information
The recorder can display a variety of
information related to the current file.
It is also possible to go to the Work Type and
Option Item edit screen.
F3 button
Select the file whose information you
1
want to display.
Refer to P.40 regarding file selection.
QP DICT
MIKE
029
/ 030
00M
00
s
22 M 4 0
s
INFO
PRIOR
FOLDER
Press the F3(INFO).
The file information is displayed.
2
029/030
File Name
DS5000006.DS2
Rec Time
12
Author ID
MIKE
M23D
2008Y 12:23
P
M
The Displayed Information
The following information will be displayed.
[File Name]...File name
[Rec Time]...Time and date the file was
[Author ID]...Display the Author ID of file.
[Work Type]...Displays the Work Type ID of file.
[Option Item]...Displays the Option Item which
recorded.
has been set.
3
Displaying File Information
41
Page 42

Device Lock Function
Recorder access can be restricted by enabling
the device lock function. Authentication via
password and/or fingerprint verification (DS5000iD only) can act as a safe guard for your
data even in case the recorder is lost or left
unattended.
Fingerprint registry (☞ P.43) is performed by
the recorder, while password registry can be
performed by using DSS Player (☞ P.55).
3
Device Lock Function
F2 button
OK/MENU,+, –,
9, 0 button
Unlocking the Recorder
When the password registry and/or fingerprint
registry is done, the recorder will prompt for
password and/or fingerprint verifications (DS5000iD only) on startup.
Unlock Device
Enter Password
Unlock Device
Enter Password
or Sweep Finger
Unlocking the Recorder with a
Password
Select the numbers you want to enter
1
by pressing the +, –, 9 or 0 button
to move the cursor.
Unlock Device
Enter Password
or Sweep Finger
Press the OK/MENU button to select a
2
number.
A * will appear in the selected first digit and the
blinking cursor will move to the next one over (to
the right). Repeat steps 1 and 2 to enter all four
digits.
Pressing the ERASE button at any time will erase
the last entry and move the cursor to the previous
entry (to the left).
Unlock Device
Enter Password
or Sweep Finger
After all four digits have been entered,
3
press the F2(ENTER) button.
If the 4 digit number entered matches the
registered password then the startup message
will appear and the recorder will start up.
Unlock Device
Enter Password
or Sweep Finger
Entry column
Cursor
DS-5000iDDS-5000
Unlock the recorder’s device lock through the
method below.
The default password when using the recorder
for the first time is “0000”.
42
ENTER
Page 43

Device Lock Function
Unlocking the Recorder Via Fingerprint
Verification (Only DS-5000iD)
Slide the finger to be scanned for
verification over the scanner window on the
back side of the recorder in one sweeping
motion from top down as shown in the
illustration.
If [NG! Sweep Finger Again] is displayed, re-scan your
finger or a different registered finger again. If there is
no fingerprint match after 10 tries [Incorrect
Fingerprint Enter Password] will be displayed and it
is not possible to authenticate via fingerprint
verification.
Press your
finger firmly at
the fingerprint
sensor, and slide
it at a constant
speed.
In case the fingerprint may not be scanned correctly,
press your finger firmly against the sensor and sweep it.
Authentication Halt Mode
If there is no password match after five
tries the recorder will enter password
input halt mode for ten minutes.
After ten minutes have passed the
mismatch history will be erased and it
will once again return to the password
input screen.
Unlock Device
Enter Password
Device is
Locked
09 : 59
Fingerprint Registration (Fingerprint)
Fingerprint registration is performed on the
recorder. By selecting an Author ID from the
Author list (☞ P.46) and then registering your
fingerprint, you can associate it to your Author ID.
You can register up to 10 fingerprint data.
Select [Fingerprint] from the [Device
1
Menu] screen and press OK/MENU or
the 9 button.
Device Menu
Fingerprint
Card Select
Beep
Format
12
USB Class
Time & Date
BACK EXIT
Press + or – to select [Enroll] and then
2
press OK/MENU or the 9 button.
Fingerprint
Enroll
Verify
BACK EXIT
Press + or – to select a registration
3
number and then press OK/MENU or
the 9 button.
When making a new registration, select a
registration number that has not already been
registered (
registering a fingerprint, select the previously
registered number (
Fingerprint
Data1
JONATHAN
Data2
DS5000ID
Data3
- - - -
BACK EXIT
does not appear). When re-
does appear).
a Connection with
Author ID
b No connection with
a
Author ID
b
3
Device Lock Function
43
Page 44

Device Lock Function
When re-registering, the re-registration
confirmation screen will appear and you can
select [Yes] to continue with registration.
Recognizing your fingerprint (☞ P.43).
When [OK!] appears, repeat the same operation
4
twice. If an error message appears, perform the
scan once more according to the instructions on
the screen.
Fingerprint
Data3 Enroll
Sweep
3
Device Lock Function
Your Finger
1 / 3
BACK
[Completed] displays when the fingerprint registration
is complete.
EXIT
Fingerprint
Data3 Enroll
BACK EXIT
Verifying the Registered Fingerprint Data
Select [Fingerprint] from the [Device
1
Menu] screen and press OK/MENU or
the 9 button.
Press + or – to select [Verify] and then
2
press the OK/MENU button.
Recognizing your fingerprint (☞ P.43).
If your fingerprint data matches, [Fingerprint
3
Accepted] will be displayed and the matching
registration number will appear. In cases where
there is a connection with an author, the Author
ID will appear. If the fingerprint does not match,
then [Incorrect Fingerprint] will appear and then
it will return to the fingerprint scanning screen.
Fingerprint
Your Finger
Data1
JONATHAN
BACK
Fingerprint
Accepted
EXIT
a Verified registration
number
b Related Author ID
a
b
44
OK!
3 / 3
Erasing Fingerprint Data
Select the registration number you want
1
to erase and press the ERASE button.
The method for Step 1 on P.43 will appear on the
registration number list screen.
Press + or – to select [Yes] and then
2
press the OK/MENU button.
Fingerprint
Data1
Jonathan
Clear Data3 ?
Yes
No
Data5
The erasing of the selected registration data
will be completed.
Fingerprint
Data1
Jonathan
Data3 Cleared
Data4
Data5
Page 45

Setting Priority Levels (Priority)
By default, F2 button is programmed with
Priority function. The setting can also be
performed from the menu.
You can set a priority level on each file
recorded. You can choose between “HIGH”
and “NORMAL” The default is Normal level.
F2 button
OK/MENU,
9 button
+, –,
To Set a Priority Level on a File
To Set the F2 (PRIOR) Button
Select the file you want to perform the
1
setting on and press the F2(PRIOR
button.
Each time the F2(PRIOR) button is pressed the
Priority level will change (HIGH/NORMAL). When
the HIGH level setting is selected,
on the display.
Perform the setting in the same manner after
creating a NEW file.
QP DICT
MIKE
FOLDER
029
0
H 00M
15 H 2 2 M 4 0
PRIOR
/ 030
00
INFO
a
s
s
will appear
a Priority indicator
Performing the Setting from the Menu
Choose the file which you would like to
1
set the Priority level for.
Select [Priority] from the [File Menu]
2
screen and press OK/MENU or the 9
button.
File Menu
Pending
Lock
Priority
Work Type
BACK EXIT
Press the + or – button to choose
3
between [Set] and [Cancel], then press
OK/MENU button.
[Set]...High Level.
[Cancel]...Normal Level.
Priority
E
029
/ 030
Set
Cancel
)
BACK EXIT
3
Setting Priority Levels
45
Page 46

Setting the Author ID and Work Type
Every file recorded on the recorder will include
the Author ID and Work Type as part of its
header information. To create multiple Author
IDs and Work Types on the recorder, use the
bundled DSS Player software to create and
upload a Data list (list of Author IDs and Work
Types) to the recorder. For more details, refer
to the online help for DSS Player (☞ P.59).
By default the Author ID is set to [DS5000].
3
Setting the Author ID and Work Type
F1,F2,F3 button
OK/MENU,+, –,
9, 0 button
Setting an Author ID
Turn ON the recorder.
When [The Author List is displayed when the
1
power is on] has been set through DSS Player
(☞P.55), the registered Author ID List will appear.
Press the + or – button to select the
2
Author ID that you want to assign to the
recorder from the ID list.
Author ID
AUTHOR A
AUTHOR B
AUTHOR C
AUTHOR D
AUTHOR E
AUTHOR F
Press the OK/MENU button to select
3
the ID.
Recordings created afterward will have the
selected Author ID in their headers.
EXIT
Note
• Up to 10 Author ID entries can be registered (up to a
maximum of 16 characters).
Author List
ID 1
ID 2
ID 3
ID10
46
Page 47

Setting the Author ID and Work Type
Setting the Work Type
Up to 10 Work Types can be registered in the
DSS Player software and uploaded to the
recorder. Each Work Type can have up to 10
Option Items fields* associated with it. The
Work Types and Option Items can be used on
the recorder to populate the recording file
header information.Refer to the online help for
DSS Player (☞ P.59) regarding registration/
set up details and Option Item through DSS
Player.
*Each Option Items field has a maximum of 20
characters limit for each of the field name and the
field value. Preset default values can also be set for
the option items to simplify data entry process.
Press the NEW button while in STOP mode.
When [The Worktype List is displayed when a new
1
file is created] has been set through DSS Player
(☞ P.55), the Work Types uploaded to the
recorder will appear in a list.
Press the + or – button to highlight a
2
Work Type from the Work Type list.
029/030
Work Type1
E
Work Type2
Work Type3
Work Type4
Work Type5
Work Type6
SCAN
EXIT
Press the OK/MENU button to select
3
the Work Type.
All recordings made with the new Work Type ID
will have the new Work Type as part of the header
information.
Work Type List
Type 1
Type 2
Type 3
Type 10
The selected Work Type and a maximum of 10
Option Items registered for that Work Type will
be recorded in the New File header information.
When [Set in the recorder] has been set for the
Option Item ID within the selected Work Type, it
will take you to the file information input screen
(☞ P.48). For more details, refer to the online help
for DSS Player (☞ P.59).
Editing the Work Type
Select the file you want to edit its Work
1
Type information (☞ P.41).
Select [Work Type] from the [File Menu]
2
screen and press OK/MENU or the 9
button.
The Work Type setting screen will appear.
File Menu
Pending
Lock
Priority
Work Type
BACK EXIT
Press the F2(EDIT) button.
The modification method confirmation screen will
3
appear.
029/030
Work Type
E
Letter
Reference No
Subject
BACK
EDIT
Press the + or – to select [Edit Work
4
Type] or [Select From Work Type List]
and then press the OK/MENU button.
Edit Work Type...This will take you to the file
information input screen and allow you to modify
the Work Type information that has been set for
the file.
Select from Work Type List...select a different
Work Type from the Work Type list.
029/030
Work Type
E
Edit Work Type
MRI
Select From
12345678901234
Work Type List
DEP
BACK
EXIT
EXIT
47
3
Setting the Author ID and Work Type
Page 48

Setting the Author ID and Work Type
Inputting File Information
Press the + or – button on the file
1
information input screen to select the
target field (Option Item) and press the
OK/MENU button.
The input screen will be displayed.
When inputting file information into a new file or
an existing file, only eligible input characters as
specified in the DSS Player can be entered.
029/030
Setting the Author ID and Work Type
Work Type
E
Letter
Reference No
Subject
FINISH
SCAN
Entering characters.
Enter characters through the following method.
2
● Character selection
+,
, 0, 9 button... Use these buttons to
–
easily navigate the cursor up, down, left, and right
among the displayed numbers, alphabet letters,
and symbols.
● Character confirmation
OK/MENU button... Use this button to confirm
your selection.
● Moving the entry column
3
... Moves the entry column one
... Moves the entry column one
Entry is performed by insert entry. When the
character in the entry column has already been
finalized, the character after the cursor will move
one column to the right.
01
_ABCDEFGHIJKLMNO
PQRSTUVWXZ
EXIT
space after (right).
space before (left).
Reference No
E
0123456789
BACK
FINISH
EXIT
● Maximum entered character count
Option Item ID... 20 characters
● Cancelling the entered contents
Press the F1(BACK) button, to select [YES],
and then press the OK/MENU button during
entry...This will erase the entered contents for
this item and return you to the file information
input screen.
Press the F3(EXIT) button to select [YES], and
then press the OK/MENU button during entry...
This will erase all of the finalized contents for the
a
b
items and take you to the NEW mode and take
you to the paused mode for New Files or the state
before entering Menu settings.
Reference No
01
E
0123456789
_ABCDEFGHIJKLMNO
PQRSTUVWXZ
BACK
FINISH
EXIT
a
b
a Entry column
b Cursor
Press the F2(FINISH) button.
3
This will return you to the file information input
screen. When inputting file information while
creating a New File, pressing the F2(FINISH)
button while inputting the bottom most Option Item
ID in the items set as eligible for input will take
you to the paused mode for the New File.
48
Page 49

Verbal Comment
The data recorded with the F1(VERBAL)
button being pressed during recording, is
recorded as a Verbal comment position (a
position within a file) in the header.
It is possible to instantly search and play back
Verbal comment sections through DSS Player,
thereby making it useful for things like giving
instructions to transcriptionists.
F1 button
OK/MENU,
9, 0 button
ERASE button
+,
Setting a Verbal Comment
While recording, press and hold the
1
F1(VERBAL) button, and release it when
you want to stop.
Audio recorded while continuing to hold the
F1(VERBAL) button will be recorded as Verbal
Comment.
QP DICT
MIKE
029
DISPLY
10
/ 030
M
2 2M 4 0
INDEX
56
F
s
s
E
Verbal Comment
VERBAL
Locating a Verbal Comment
Hold the 9 or 0 button while
2
playing a file.
The recorder stops for 1 second when it reaches
the Verbal Comment.
QP DICT
MIKE
029
/ 030
10
M
56
s
2 2M 4 0
Verbal Comment
s
Clearing an Verbal Comment
Press the ERASE button while playing
3
back a Verbal Comment.
Press the + button to select [Clear] and
4
then press the OK/MENU button.
The Verbal Comment is erased.
QP DICT
MIKE
029 / 030
Verbal Comment
Clear
Cancel
Notes
• Up to 32 Verbal Comment can be set in a file.
• When a file is locked or set to read-only, or when the
SD card lock is enabled Verbal Comment cannot be
erased. Clear the settings before erasing.
• When the recorder has been set to Classic DSS mode,
Verbal comments cannot be recorded.
3
Verbal Comment
49
Page 50

Index Marks
Index marks can be placed in a file during
recording or playback. Index marks are used
to provide a quick and easy way to identify
important or significant parts within the file.
F3 button
3
Index Marks
9, 0
button
ERASE button
Setting an Index Mark
Press the F3(INDEX) button during
1
recording or playback to set an index
mark.
An index number appears on the display.
QP DICT
MIKE
029
/ 030
3
H
10
M
56
s
22M 4 0
s
INDEX
INSERT
Index 01 Set
SPEED
Locating an Index Mark
Hold the 9 or 0 button while
2
playing a file.
The recorder stops for 1 second when it reaches
the index mark.
QP DICT
MIKE
029
/ 030
3
H
10
M
56
s
22M 4 0
Index 01
s
INDEX
Clearing an Index Mark
Locate the index mark you want to clear.
3
Press the ERASE button while the index
4
number appears for approximately 2
seconds on the display.
The index mark is erased.
QP DICT
MIKE
029
/ 030
3
H
10
M
56
s
2 2M 4 0
Index 01 Clear
Notes
• Up to 32 indexmark can be set in a file.
• When a file is locked or set to read-only, or when the
SD card lock is enabled Indexmark Comment cannot
be erased. Clear the settings before erasing.
• When the recorder has been set to Classic DSS mode,
index marks are limited to a maximum of 16 for each
file.
s
50
Page 51

Inserting and Ejecting a microSD card
When it is necessary to remove or insert the
microSD card serving as the built-in memory
in emergencies, use the method below to either
remove or insert it.
Inserting a microSD card
1 Open the battery cover (☞ P.14).
2 Open the card cover inside the battery
compartment.
3 Insert the microSD card into the card
slot in the direction shown in the
illustration until it clicks.
2
1
3
Ejecting a microSD card
1 Open the battery cover (☞ P.14).
2 Open the card cover inside the battery
compartment.
3 Push the microSD card inward once to
unlock it, and let it eject.
1
3
When it is Difficult to Eject the
microSD card
The microSD card is sometimes difficult to
take out. In this case, pick up a card with
your fingers as shown in the illustration.
Exercise caution when using things like
tweezers, as there is the risk of accidentally
damaging the card and rendering it unable
to read data out.
2
3
Inserting and Ejecting a microSD card
51
Page 52

Formatting the Card (Format)
Cards that have been used in non-Olympus
devices, or cards that are not recognized by
the recorder, must be formatted before they
can be used with the recorder.
To familiarize yourself with the formatting
process, read the steps below.
In terms of formatting, only selected cards can
be formatted, the recorder’s menu settings
cannot be initialized. The initialization of menu
items should be set up through DSS Player or
the recorder’s [Reset Settings].
3
Formatting the Card
OK/MENU,
+, –, 9 button
Select [Device Menu] from the [Format]
1
screen and press OK/MENU or the 9
button.
Refer to P.36 regarding the menu’s various setting
items.
Device Menu
Format
USB Class
Time & Date
Power Save
12
Reset Settings
Card info.
BACK
EXIT
Press the + or – button to select [SD]
2
or [microSD] and then press the OK/
MENU or 9 button.
Format
SD
mSD
micro SD
BACK EXIT
Press the + or – button to highlight the
3
[Start] option.
Format
SD
Start
Cancel
BACK
EXIT
52
Page 53

Formatting the Card (Format)
Press the OK/MENU button to confirm
4
[Start] selection.
Format
SD
Data will be
cleared
Press the + or – button again to
5
highlight the [Start] option.
Format
SD
Are You Sure?
Start
Cancel
Press the OK/MENU button again to
6
initiate the formatting process.
Format
SD
Format !
Format
SD
Format Done
[Format Done] displays when formatting ends.
Initializing the Recorder’s Menu
Settings (Reset Settings)
To return the recorder’s menu settings
to their original status from the time of
purchase (initial settings), perform the
setting from [Reset Settings] in the
[Device Menu], or perform the same
operation by using DSS Player.
Device Menu
USB Class
Time & Date
Power Save
Reset Settings
Card Info.
System Info.
BACK EXIT
Notes
• The time required to format cards differs depending on
the capacity of cards. Do not interrupt the formatting
process by the following operations. Doing so will
damage the data or card.
- Remove the card.
- Remove the batteries.
• When the card is formatted, all the stored data, including
locked files, are erased.
• If an unformatted card is inserted, the recorder
automatically displays the format option in the menu.
• SD cards for which the SD card lock is enabled cannot
be initialized.
3
Formatting the Card
53
Page 54

Customizing the Recorder
You can customize various specifications of the
recorder when using DSS Player (☞ P.55). For
more details, refer to the online help for DSS
Player (☞ P.59).
The Recorder’s Customized Settings
❏ Button settings
You can change the allocated functions for the
Programmable smart buttons (F1, F2, F3 buttons),
the NEW button, and the slide switch.
❏ Hands-Free settings
3
Customizing the Recorder
You can perform settings related to the HandsFree operation with the Foot Switch (RS27/28 sold
optional).
❏ Menu settings
You can set the default values for each of the
recorder’s Menu items.
❏ Security settings
You can perform various settings related to the
recorder’s device lock.
• Device lock function ON/OFF.
• Settings related to the timing for setting the
device lock.
• Password settings.
• Changing the number of allowable input errors
(mismatches) for the password.
❏ Author List settings
You can perform settings related to the Author,
such as Author registration.
❏ Work Type List settings
You can perform settings related to the Work Type,
such as Work Type registration.
❏ Folder settings
You can perform various settings related to the
recorder’s folders.
• Changing the number of folders and folder
name.
• Auto Lock setting which locks files recorded in
54
designated folders.
• Encryption Password setting which encrypts
files recorded in designated folders.
• Work Type settings for each folder.
❏ Dictation settings
You can perform various settings related to the
recorder’s Dictation.
• Recording format (DSS Pro/Classic DSS)
selection.
• Recording mode (Overwrite/Append/Insert)
setting.
• Settings related to eligible files when
downloading to a PC (All Files/Finished Files).
❏ Alarm settings
You can set occasions for the recorder’s alarm or
beep noise to sound.
❏ Slide Switch Guide settings
You can set the Slide Switch Guide, which
indicates the position of the Slide Switch on the
recorder’s LCD screen, to either enabled or
disabled.
❏ Permission settings
You can perform various settings related to user
authorization, such as prohibiting both file erasure
and MENU settings.
❏ Splash Message settings
You can set the contents that appear in the
message which is displayed during startup.
❏ Display settings
• You can select a default pattern for display
during recording from 5 patterns.
• On the 2nd line of LCD, you can display File
Name or Work Type instead of Author ID which
is currently displayed in the NEW, STOP, REC,
PLAY, CUE/REV, FF/REW or ERASE mode.
Page 55

4 Managing Files on Your PC
4 Managing Files on Your PC
DSS Player Software
The DSS Player is a fully featured software tool that provides a simple to use but sophisticated
method of managing your recordings. Some of the features of the DSS Player are:
• Automatic startup of the application by connecting the device.
• Automatic download of Dictation by connecting the device.
• Backs up downloaded Dictation (Windows only).
• Automatic transmission of downloaded Dictation to addresses specified through e-mail and
FTP (Windows only).
• Automatic transmission of transcribed documents through e-mail and FTP, as well as Dictation
and link management (Windows only).
• Voice recorder’s menu setting.
• Customize functions on the recorder (Windows only).
• Direct recording and editing of existing Dictation through Voice recorder’s button and slide
operation.
• Recording Instruction Comments and Verbal comments (Windows only).
• Encrypt the Dictation within the folder by encrypting the folder itself (Windows only).
Make sure that your computer meets the minimum requirements listed below. Please check
with your system administrator or your Olympus Professional Dealer.
4
DSS Player Software
55
Page 56

DSS Player Software
Minimum Requirement
Windows
Operating System:
CPU:
4
DSS Player Software
RAM:
Hard drive space:
Drive:
Display:
USB port:
Audio I/O terminals:
Macintosh
Operating System:
CPU:
RAM:
Hard drive space:
Display:
USB port:
Windows 2000 Professional Service Pack4;
Windows XP Professional/XP Home edition Service Pack2;
Windows XP 64-bit;
Windows Vista Ultimate/Enterprise/Business/Home Premium/Home Basic;
Windows Vista Ultimate 64-bit edition/Enterprise 64-bit edition/Business 64bit edition/Home Premium 64-bit edition/Home Basic 64-bit edition;
Windows Server 2003;
Windows Server 2003 x64 edition
Windows 2000/XP: 500MHz processor or more
Windows Vista: 800MHz processor or more
Windows Server 2003: 550MHz processor or more
Windows 2000/XP: 128MB or more
Windows Vista: 512MB or more
Windows Server 2003: 256MB or more
Dictation Module: 70MB or more;
Microsoft .NET Framework Version 2.0: 150MB
CD or DVD drive
800 x 600 pixels or more, 65536 colors more
One or more free ports
Windows-compatible sound device
Mac OS 10.3.9 - 10.5
PowerPC G3; Intel Core/Duo
256MB or more (512MB or more is recommended)
200MB or more
1024 x 768 pixels or more, 32,000 colors more
One or more free ports
Note
• Macintosh version does not support voice recognition software.
56
Page 57

Installing DSS Software
Be sure to confirm the following before installation:
• Exit all running applications.
• Eject the floppy disk if you are using one.
• If you are running Windows 2000/XP/Vista or Mac OS X on the network, you need to log on
as an Administrator.
Windows
For the Windows version, there is an
installation method for individuals and one for
administrators to install on multiple client PCs.
An explanation of the installation method for
individuals installing the software on a single
PC will be provided here.
Insert Olympus DSS Player CD into the
1
CD-ROM drive.
The installation program will start automatically.
If the installation program does not start
automatically, browse your CD-ROM drive and
execute “setup.exe”.
The launcher will startup.
Select the language you would like to install from
2
the upper-left pull-down menu and click
[Installation for Standalone System].
The Install Wizard will begin.
Once you have consented to the licensing
3
agreement, enter your name, company name, and
license ID number (serial number).
The license ID number is printed on the license
ID card included inside the recorder package.
Proceed with the installation according
4
to the instructions on the screen.
Macintosh
Insert Olympus DSS Player CD into the
1
CD-ROM drive.
Double-click the CD icon.
2
Double-click the setup icon.
The Install Wizard will begin.
3
Once you have consented to the licensing
agreement, follow the instructions on the screen
to complete the installation.
Proceed with the installation according
4
to the instructions on the screen.
You will be requested to restart, so
5
conduct a restart by following the
instructions.
4
Installing DSS Software
57
Page 58

Uninstalling DSS Software
Windows
Exit DSS Player program.
1
Click the [start] button on the taskbar.
2
Select [Add/Remove programs] from the
3
[Control Panel].
A list of installed applications is displayed.
4
Uninstalling DSS Software
Select [Olympus DSS Player Pro], then
4
click the [Change/Remove] button.
Proceed with the installation according
5
to the instructions on the screen.
Macintosh
Exit DSS Player.
1
Delete the Preferences file.
Delete the [DSS Preference] file in the following
2
location.
Macintosh HD : User : Library : Preferences
Delete the Executable file.
Delete the [DSS Player] file in the location where
3
you installed the file.
Note
• The dictation files you made are stored in the
[MESSAGE] folder. If you don’t need them, delete them.
You can confirm the location of the [MESSAGE] folder
by clicking on [Options] in the [Tools] menu before
uninstalling.
58
Page 59

Using Online Help
For information on the DSS Player usage and features, refer to the online Help.
To start online Help:
Windows
Click the [start] button, then select [All
1
Programs], [Olympus DSS Player], [Dictation
Help].
While DSS Player is running, select the
2
[Help] menu, [Contents].
While DSS Player is running, press F1 on
3
the keyboard.
Macintosh
While DSS Player is running, select [DSS Player
Help] from the [Help] menu.
Note
• Online Help is available after the DSS Player is installed
(☞ P.57).
4
Using Online Help
59
Page 60

Connecting Recorder to PC
Connecting to Your PC Using the USB Cable
Turn ON the recorder (☞ P.20).
1
Connect the USB connection cable to the USB port of the
2
PC.
Confirm that the recorder has stopped and connect a USB
3
cable to the connection port on the recorder.
If [Remote] is displayed on the recorder, it indicates proper connections.
Once you connect the recorder to your PC, the recorder will be
powered through the USB cable. When the AC adapter is connected
4
Connecting Recorder to PC
power will be supplied from the AC adapter.
Notes
• NEVER remove the card or disconnect the USB cable while the record/play indicator
light is flashing. If you do, the data on the card will get destroyed.
• Some PCs may not supply sufficient power and the recorder fails to connect. Refer
to your PC User’s Manual regarding the USB port on your PC.
• Do not connect the recorder to a PC by using a USB hub. Make sure to connect to
a USB port on your PC.
• Make sure to push the cable connector all the way in. Otherwise, the recorder may
not operate properly.
Supported computers
Windows
Operating System:Windows 2000/XP/Vista
Supported computers: Windows computers equipped with more than
Macintosh
Operating System:Mac OS 10.3.9 - 10.5
Supported computers: Apple Macintosh series equipped with more
one free USB port.
than one free USB port.
60
Notes
• This is an operational environment for saving the files recorded by this recorder to
your PC with USB connection.
• Even if operational environment is satisfied, we do not support upgraded OS, the
multi-boot environment and self-modified computers.
Page 61

Connecting Recorder to PC
Connecting to Your PC Using the Cradle
Place the recorder in the cradle
Connect the USB connection cable to the USB port of the
1
PC.
The USB cable is connected with cradle as shown in figure.
2
Turn ON the recorder, then set the recorder in the cradle.
If [Remote] is displayed on recorder, it indicates proper connection.
3
Disconnecting Recorder from PC
To avoid data corruption or loss, make sure that the recorder’s record/
play indicator light isn’t flashing, before removing the recorder from
the cradle or disconnect the cable from the recorder terminal.
Remove the Recorder from the Cradle
To prevent damage or loss of the data, confirm that the recording/
playback indicator light of this recorder is not on, and remove this
recorder and USB connection cable from the cradle.
Notes
• Never touch the contact points at the bottom of the cradle, as that may cause bad
connection.
• With a PC connected, the recorder cannot be operated with the foot switch (RS27/
28). When connecting the recorder to a PC via the cradle, remove the foot switch.
4
Connecting Recorder to PC
61
Page 62

Running DSS Player
By default, connecting the recorder to your PC, will start the application automatically. Connecting
to your PC Using the Cradle.
Windows
Disabling Automatic Start
Right-click the Device Detector in the
1
System Tray in the lower right-hand
corner of the screen, then select
[Settings startup application].
4
Running DSS Player
Click [DSS Player Pro].
2
The check mark on [DSS Player Pro] disappears.
Manual Start
Start Windows.
1
Click the [start] button, then select [All
2
Programs].
All program menu will be displayed.
Select [Olympus DSS Player Pro],
3
then click [Dictation Module].
Macintosh
Disabling Automatic Start
Click the Dock’s System Preferences.
1
Click Device Detector.
The check mark on [DSS Player Pro] disappears.
2
Turn the automatic startup setting Off.
3
Manual Start
Start your Macintosh.
1
Double click the DSS Player icon for the
2
folder in [Application] = [DSS Player].
All program menu will be displayed.
Register user information
3
The user’s registration screen will be displayed
at the time of initial startup. Please input the serial
number. Please see the seal attached to the CDROM package included with the DSS Player, for
the serial number. After the input has ended, click
[OK] to complete the registration.
62
Page 63

5 Other Information
5 Other Information
Alarm Message List
Message
Battery Low
Power Supply
Error
File
Protected
Index Full
Folder Full
Erase Error
Card Error
Memory Full
Format Error
System Error
Insert Card
Meaning
Low battery
power
Abnormal voltage
detected
Erase-locked
Index full
Folder full
Maximum number
Erase failure
Incompatible card
Zero remaining
memory
Formatting error
System error
No card
Explanation
Battery power is getting low.
Voltage outside of the
allowable limit has been
detected.
Attempt to delete a locked
file.
The file is full of index marks
(maximum of 32 marks).
The folder is full of files
(maximum of 200 files).
The destination folder already
has the maximum number of
files (200).
An error occurred while
erasing.
An incompatible card was
inserted.
The card has no remaining
memory.
There was an error while
formatting the card.
System error detected in the
recorder.
There is no card inserted.
Action
Charge the battery pack or
replace with new batteries. (☞
P.14, 17).
Use the included AC Adapter
(☞ P.19).
Unlock the file (☞ P.37).
Erase index marks that are no
longer required (☞ P.50).
Erase unnecessary files
(☞ P.31).
Erase unnecessary files
(☞ P.31).
Erase once again.
When an Erase Error occurs
format the card.
Insert a compatible card
(☞ P.21, 51).
Erase files that are no longer
required or insert another card.
Reformat the card (☞ P.52).
This is a malfunction. Contact
the place of purchase or
Olympus Service Center for
repair.
Insert a card (☞ P.21, 51).
5
Alarm Message List
63
Page 64

Troubleshooting
5
Troubleshooting
Symptom
Nothing appears
on the display
Won’t start
Unable to record
No playback tone
heard
Unable to erase
Noise heard
during playback
Recording level
too low
Unable to set
index marks
Cannot find the
recorded voice
Cannot connect
to a PC using a
cradle
Probable cause
The batteries are not loaded properly.
The batteries are dead.
The recorder is in power off mode.
The recorder is in power off mode.
The batteries are dead.
The card does not have enough memory.
The card is unformatted.
The maximum number of files has been
reached.
The SD card is locked.
The earphone is connected.
The VOLUME button is set to 0.
The file is locked.
The SD card is locked.
The recorder was shaken during
recording.
The recorder was placed near a cell
phone or fluorescent lamp while
recording or during playback.
The microphone sensitivity is too low.
The maximum number of index marks
(32) has been reached.
The file is locked.
The SD card is locked.
Wrong folder.
Switch the recording card.
Sometimes a connection cannot be made
with some PCs running Windows XP or
Vista.
Action
Verify polarity is correct (☞ P.14, 15).
Replace with new batteries (☞ P.15).
Turn the recorder ON (☞ P.20).
Turn the recorder ON (☞ P.20).
Replace with new batteries (☞ P.15).
Erase unnecessary files or insert
another card (☞ P.21, 31, 51).
Format the card (☞ P.52).
Check another folder.
Unlock the SD card lock (☞ P.10).
Unplug the earphones to use the
internal speaker.
Adjust the VOLUME button.
Unlock the file (☞ P.37).
Unlock the SD card lock (☞ P.10).
Move the recorder.
Set the microphone sensitivity to
Conference mode and try again
(☞ P.37).
Erase unnecessary index marks
(☞ P.50).
Unlock the file (☞ P.37).
Unlock the SD card lock (☞ P.10).
Switch to the right folder.
The recorder is recording to another
card.
You need to change the PC’s USB
settings. See DSS Player online help
for details (☞ P.59).
64
Page 65

Accessories (Optional)
Headset: E62, E102
Stereo headset for your PC. A helpful tool for PC based transcription.
Monaural binaural earphone: E20
Noise-cancellation microphone: ME12 (Dictation microphone)
Used to get crisp recordings of your own voice by reducing the effects of ambient noise.
Recommended to improve the accuracy when using voice-recognition software.
External microphone: ME15
A lavalier omnidirectional microphone that clips to clothing. Used to record your own voice or
people near you.
PC transcription kit: AS-5000
The AS-5000 transcription kit provides you with a PC-footswitch, a headset and DSS Player
Pro Transcription Module for easy transcription of DSS recordings.
Foot switch: RS27/28
Connect to the USB cradle with DS-5000/DS-5000iD for hands-free transcription.
Connecting cord: KA333
Use to connect the microphone jack of this unit to a radio or other sound source.
Telephone pickup: TP7
Earphone type microphone can be plugged into your ear while phoning. The voice or
conversation over the phone can be clearly recorded.
Ni-MH rechargeable battery: BR403
High-efficiency rechargeable long life batteries.
Highly sensitive noise-cancellation monaural microphone: ME52W
This microphone is used to record sound at a distance while minimizing surrounding noise.
5
Accessories (Optional)
65
Page 66

Specifications
Recording format
DS2 (Digital Speech Standard Pro)
Recording media
micro SD, SD-card: 512 MB to 8 GB
Input level -70 dBv
Sampling frequency
QP mode: 16 kHz
SP mode: 12 kHz
Overall frequency response
QP mode: 200 to 7,000 Hz
SP mode: 200 to 5,000 Hz
Recording time (512 MB Card)
QP mode: 38 hours 45 minutes
SP mode: 79 hours 30 minutes
Alkaline battery life
5
Specifications
Recording
QP mode: Approx. 24 hours
SP mode: Approx. 32 hours
Playback
All mode: Approx. 13 hours
Ni-MH Rechargeable Battery life
Recording
QP mode: Approx. 20 hours
SP mode: Approx. 28 hours
Playback
All mode: Approx. 10 hours
Speaker
Built-in ø23mm round dynamic speaker
MIC/EAR jack
ø3.5 mm mini-jack, impedance MIC
2 kΩ, EAR 8 Ω or more
Maximum working output (3 V DC)
250 mW or more (8 Ω speaker)
Input power requirement
Rated voltage: 5 V
Batteries:
Ni-MH Rechargeable Battery
Pack or Two AAA batteries
(LR03 or R03) or Two Ni-MH
rechargeable batteries
66
External dimensions
113.5 x 50.0 x 17 mm
(without protrusions)
Weight
110 g (Including Ni-MH Rechargeable
Battery Pack)
* Specifications and design are subject to
change without notice.
* Battery life is measured by Olympus. It
varies greatly according to the type of
batteries used and the conditions of use.
Page 67

Technical Assistance and Support
DS-5000 is part of the Olympus Professional Dictation System. Your dealer is trained to
troubleshoot and fix many common problems that you may be having with this system. If you
encounter problems using your DS-5000/5000iD, we recommend that you contact your Olympus
Professional Dealer that sold you the system. If your dealer cannot fix your problem, please call
our technical hotline number or send an E-mail.
◆ For customers in the U.S. and Canada
Phone: 1-888-553-4448
E-mail: distec@olympus.com
◆ For customers in Europe
E-mail : dss.support@olympus-europa.com
5
Technical Assistance and Support
67
Page 68

For customers in North and South America
Declaration of Conformity
Model Number: DS-5000/5000iD
Trade Name: DIGITAL VOICE RECORDER
Responsible Party: OLYMPUS IMAGING AMERICA INC.
Address: 3500 Corporate Parkway, P.O. Box 610, Center Valley, PA 18034-0610, U.S.A.
Telephone Number: 1-888-553-4448
This device Complies with Part 15 of the FCC Rules. Operation is subject to the following two
conditions: (1) This device may not cause harmful interference, and (2) this device must accept any
interference received, including interference that may cause undesired operation.
Tested To Comply
With FCC Standards
FOR HOME OR OFFICE USE
Canadian RFI
This digital apparatus does not exceed the Class B limits for radio noise emissions from digital apparatus
as set out in the Radio Interference Regulations of the Canadian Department of Communications.
Cet appareil numérique ne dépasse pas les limites de Catégorie B pour les émissions de bruit radio émanant
d’appareils numériques, tel que prévu dans les Règlements sur l’Interférence Radio du Département Canadien des
Communications.
For customers in Europe
“CE” mark indicates that this product complies with the European requirements for safety,
health, environment and customer protection.
L’indication “CE” signifie que ce produit est conforme aux exigences concernant la sécurité, la
santé, l’environnement et la protection du consommateur.
La marca “CE” indica que este producto cumple con los requisitos europeos en materia de
seguridad, salud, medio ambiente y protección al consumidor.
This symbol [crossed-out wheeled bin WEEE Annex IV] indicates separate collection of waste
electrical and electronic equipment in the EU countries.
Please do not throw the equipment into the domestic refuse.
Please use the return and collection systems available in your country for the disposal of this product.
Produit applicable : DS-5000/5000iD/, AC adapter, Cradle
Le symbole [poubelle sur roue barrée d’une croix WEEE annexe IV] indique une collecte séparée
des déchets d’équipements électriques et électroniques dans les pays de L’UE. Veuillez ne pas jeter
l’équipement dans les ordures domestiques. A utiliser pour la mise en rebut de ces types d’équipements
conformément aux systèmes de traitement et de collecte disponibles dans votre pays.
Produit applicable : DS-5000/5000iD/, Chargeur AC, Support
Este símbolo [un contenedor de basura tachado con una X en el Anexo IV de WEEE] indica que la
recogida de basura de equipos eléctricos y electrónicos deberá tratarse por separado en los países
de la Unión Europea. No tire este equipo a la basura doméstica. Para el desecho de este tipo de
equipos utilice los sistemas de devolución al vendedor y de recogida que se encuentren disponibles.
Producto aplicable: DS-5000/5000iD/, Adaptador de CA, Base
Page 69

U1-BS0038-01
AP0712
 Loading...