

Page 1
basic_e_d4226_7.fm Page 1 Thursday, February 5, 2004 11:47 AM
DIGITAL CAMERA
APPAREIL PHOTO NUM
DIGITALKAMERA
CÁMARA DIGITAL
ÉRIQUE
C-765 Ultra Zoom
BASIC MANUAL
MANUEL DE BASE
EINFACHE ANLEITUNG
MANUAL BÁSICO
ENGLISH..........2
FRANÇAIS .....42
DEUTSCH ......82
ESPAÑOL ....122
Page 2
basic_e_d4226_7.fm Page 2 Thursday, February 5, 2004 11:47 AM
CONTENTS
GETTING STARTED . . . . . . . . . . . . . . . . . . . . . . . . . . . . .4
MENU FUNCTIONS. . . . . . . . . . . . . . . . . . . . . . . . . . . . .16
SHOOTING BASICS . . . . . . . . . . . . . . . . . . . . . . . . . . . . 22
Taking still pictures . . . . . . . . . . . . . . . . . . . . . . . . . . . 24
If correct focus cannot be obtained (Focus lock) . . . . 25
Recording movies . . . . . . . . . . . . . . . . . . . . . . . . . . . . 26
Zooming in on a subject (optical zoom) . . . . . . . . . . . 26
Using the flash . . . . . . . . . . . . . . . . . . . . . . . . . . . . . . 27
Using the self-timer . . . . . . . . . . . . . . . . . . . . . . . . . . .28
ADVANCED SHOOTING. . . . . . . . . . . . . . . . . . . . . . . . .29
En
PLAYBACK . . . . . . . . . . . . . . . . . . . . . . . . . . . . . . . . . . .31
Playing back still pictures . . . . . . . . . . . . . . . . . . . . . . 31
Playing back movies . . . . . . . . . . . . . . . . . . . . . . . . . . 32
Protecting pictures . . . . . . . . . . . . . . . . . . . . . . . . . . . 33
Erasing pictures . . . . . . . . . . . . . . . . . . . . . . . . . . . . . 33
Formatting (CARD SETUP). . . . . . . . . . . . . . . . . . . . . 34
Playback on a TV . . . . . . . . . . . . . . . . . . . . . . . . . . . . 35
PRINT RESERVATION/DIRECT PRINT . . . . . . . . . . . . .36
DOWNLOADING PICTURES TO A COMPUTER . . . . . . 37
ERROR CODES. . . . . . . . . . . . . . . . . . . . . . . . . . . . . . . . 39
SPECIFICATIONS . . . . . . . . . . . . . . . . . . . . . . . . . . . . . . 40
These instructions are only for quick reference. For more details
on the functions described here, refer to the “Reference Manual”
on CD-ROM.
2 En
Page 3
basic_e_d4226_7.fm Page 3 Thursday, February 5, 2004 11:47 AM
J Before using your camera, read this manual carefully to ensure correct use.
J We recommend that you take test shots to get accustomed to your camera before
taking important photographs.
J These instructions are only a basic manual. For more details on the functions described
here, refer to the Reference Manual on the CD-ROM. For connection to the PC or
installation of provided software, refer to the Software Installation Guide included in the
CD-ROM package.
For customers in North and South America
For customers in USA
Declaration of Conformity
Model Number : C-765 Ultra Zoom
Trade Name : OLYMPUS
Responsible Party : Olympus America Inc.
Address : 2 Corporate Center Drive, Melville, New York
11747-3157 U.S.A.
Telephone Number : 1-631-844-5000
Tested To Comply With FCC Standards
FOR HOME OR OFFICE USE
This device complies with Part 15 of the FCC rules. Operation is subject to
the following two conditions:
(1) This device may not cause harmful interference.
(2) This device must accept any interference received, including interference
that may cause undesired operation.
For customers in Canada
This Class B digital apparatus meets all requirements of the Canadian
Interference-Causing Equipment Regulations.
En
For customers in Europe
“CE” mark indicates that this product complies with the European
requirements for safety, health, environment and customer
protection. “CE” mark cameras are intended for sales in Europe.
Trademarks
• IBM is a registered trademark of International Business Machines Corporation.
• Microsoft and Windows are registered trademarks of Microsoft Corporation.
• Macintosh is a trademark of Apple Computer Inc.
• All other company and product names are registered trademarks and/or
trademarks of their respective owners.
• The standards for camera file systems referred to in this manual are the “Design
Rule for Camera File System/DCF” standards stipulated by the Japan Electronics
and Information Technology Industries Association (JEITA).
En 3
Page 4
basic_e_d4226_7.fm Page 4 Thursday, February 5, 2004 11:47 AM
GETTING STARTED
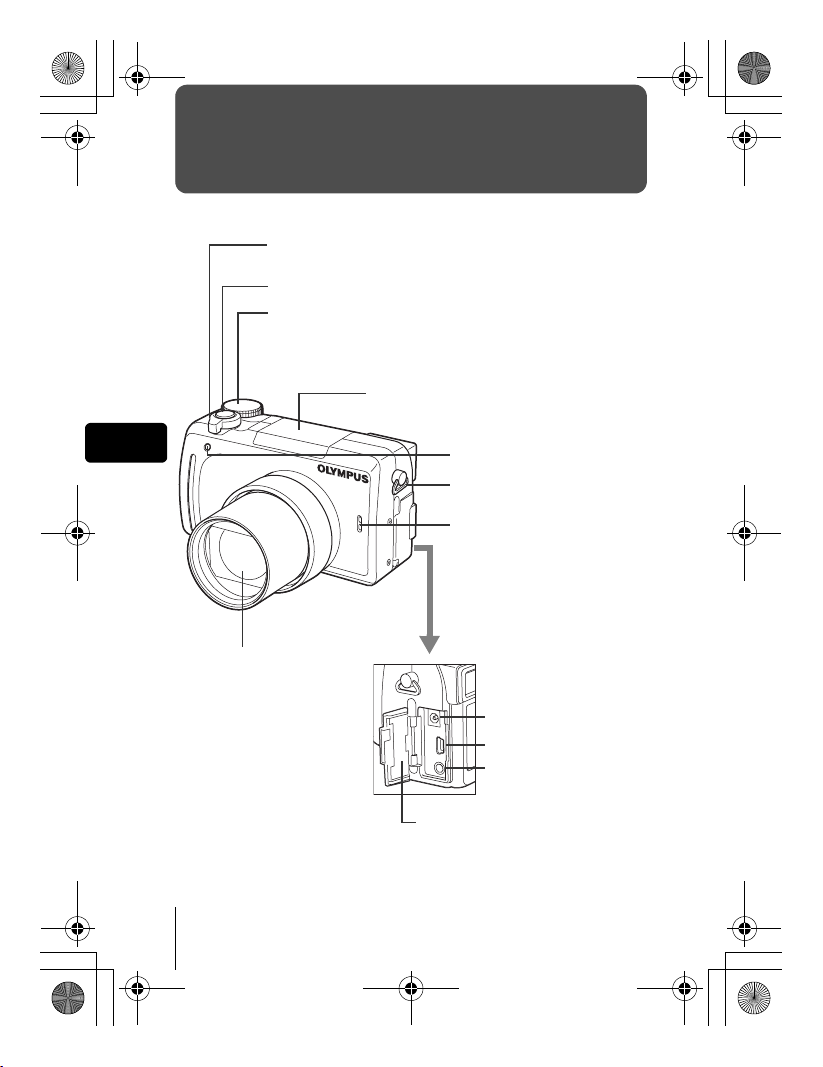
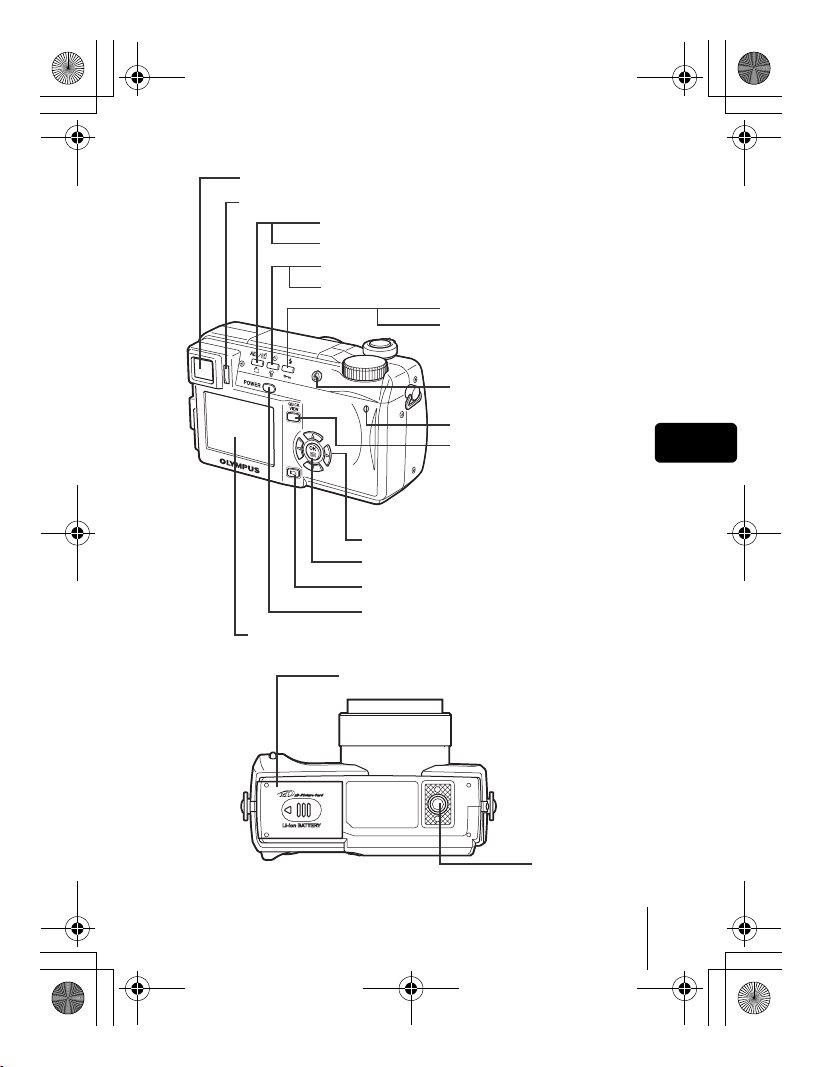
J NAMES OF PARTS
Zoom lever (W/T•GU)
Shutter button
Mode dial
Flash
En
Self-timer lamp
Strap eyelet
Microphone
Lens
DC-IN jack
USB connector
A/V OUT jack (MONO)
Connector cover
4 En
Page 5
basic_e_d4226_7.fm Page 5 Thursday, February 5, 2004 11:47 AM
Viewfinder
Diopter adjustment dial
AEL/Custom button (x)
Rotation button (y)
Self-timer button (Y)
Erase button (S)
Flash mode button (#)
Protect button (0)
Flash button
Card access lamp
QUICK VIEW button
Arrow pad (acbd)
OK/Menu button
Monitor button (f)
Power switch
Monitor
(e )
En
Battery compartment/card cover
Tripod socket
En 5
Page 6

0.0
2288 1712
HQ
00:36
ISO100
basic_e_d4226_7.fm Page 6 Thursday, February 5, 2004 11:47 AM
J
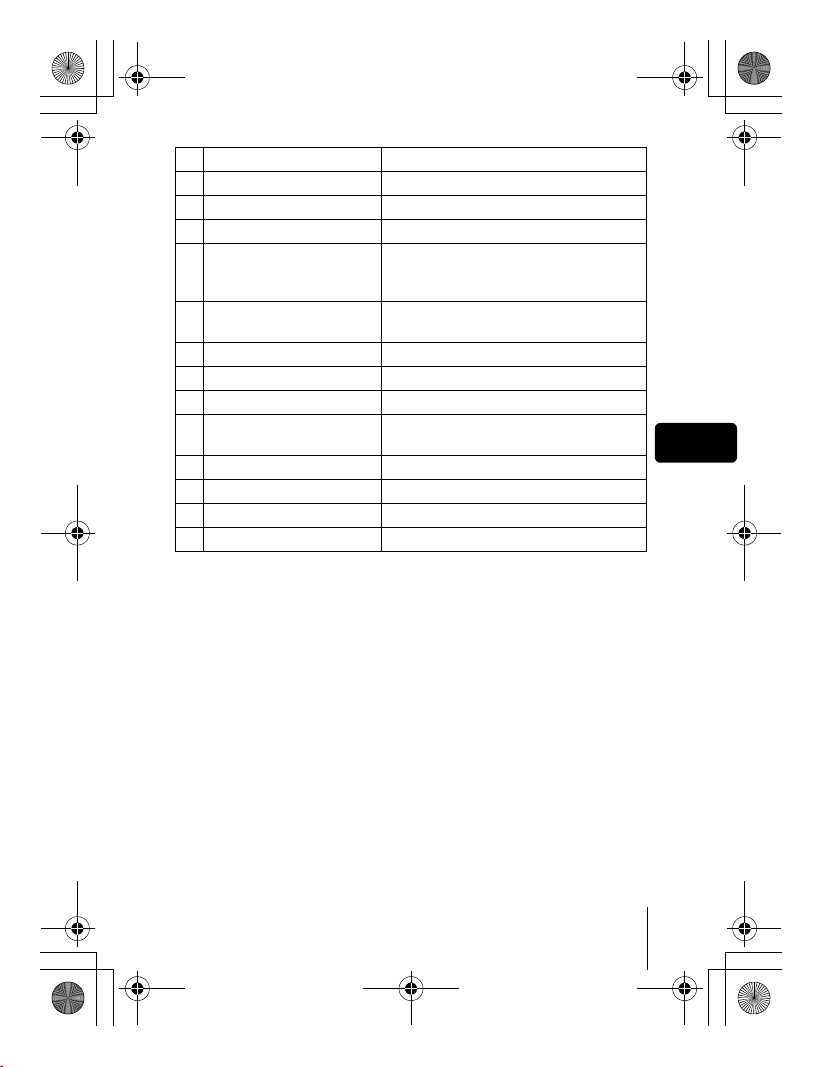
VIEWFINDER AND MONITOR INDICATIONS
Shooting modes
0.0
2288 1712
HQ
Still picture Movie
Item Indications
En
1 Shooting modes P, A, S, M, N, m, L, J, I, s, P
2 Shutter speed 15" - 1/1000
3 Aperture value F2.8 - F8.0
4 Exposure compensation
Exposure differential
–2.0 - +2.0
–3.0 - +3.0
5 Battery check e, f
6 Green lamp
7 Flash stand-by
Camera movement warning
# (Lights)
# (Blinks)
/Flash charge
8 Macro mode
Super macro mode
Manual focus
&
%
MF
9 Noise reduction O
10 Flash mode !, #, $, #SLOW1,
HSLOW1, #SLOW2
11
Flash intensity control
w –2.0 - +2.0
12 Drive o, j, i, k, 7
13 Self-timer Y
14 Sound record R
ISO100
00:36
00:36
6 En
Page 7
basic_e_d4226_7.fm Page 7 Thursday, February 5, 2004 11:47 AM
Item Indications
15 Record mode TIFF, SHQ, HQ, SQ1, SQ2
16 Resolution 2288 × 1712, 1280 × 960, 640 × 480 etc.
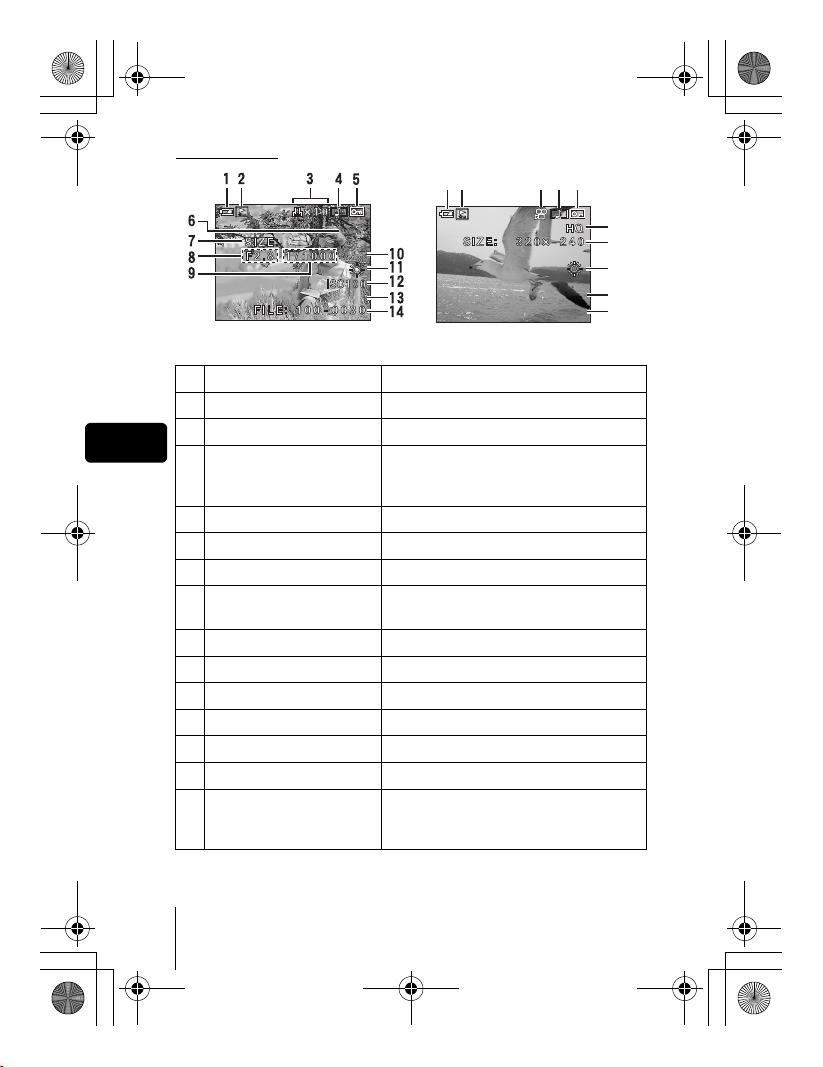
17 AF target mark [ ]
18 Number of storable still
pictures
Time remaining
19 AE lock
AE memory
20 Spot metering n
21 ISO ISO 64, ISO 100, ISO 200, ISO 400
22 White Balance 5, 3, 1, w, x, y, V
23 White balance
compensation
24 Saturation 6 –5 - +5
25 Sharpness N –5 - +5
26 Contrast J –5 - +5
27 Memory gauge a, b, c, d
30
00:36
B
C
B1 - B7, R1 - R7
En
En 7
Page 8
'04.06.17 15:30
0.0
2288*1712
HQ
'04.06.177
5:30
00:00/00:20
basic_e_d4226_7.fm Page 8 Thursday, February 5, 2004 11:47 AM
Playback mode
12 345
2288*1712
'04.06.17 15:30
HQ
0.0
'04.06.1
00:00/00:20
Still picture Movie
Item Indications
1 Battery check e, f
2 Switch frame J
En
3 Print reservation,
< ×10
Number of prints
Movie
n
4 Sound record H
5Protect 9
6 Record mode TIFF, SHQ, HQ, SQ1, SQ2
7 Resolution 2288 × 1712, 1280 × 960, 640 × 480,
320 × 240 etc.
8 Aperture value F2.8 - F8.0
9 Shutter speed 15" - 1/1000
10 Exposure compensation –2.0 - +2.0
11 White balance WB AUTO, 5, 3, 1, w, x, y, V
12 ISO ISO 64, ISO 100, ISO 200, ISO 400
13 Date and time ’04.06.17 15:30
File number, Frame number
14
FILE : 100 - 0030, 30
Playing time/
Total recording time
00:00/00:20
15:30
6
7
11
13
14
8 En
Page 9
2288 1712
HQ
basic_e_d4226_7.fm Page 9 Thursday, February 5, 2004 11:47 AM
Memory gauge
The memory gauge lights up when you take a still
Battery check
picture. While the gauge is lit, the camera is
storing the picture on the card. The memory
gauge indication changes as shown below
depending on the shooting status. The indication
is not displayed during movie recording.
2288 1712
HQ
Memory gauge
Shoot Shoot Shoot
a b c d
Before
shooting
(Gauge is off)
One picture
taken
(Lit)
Two or more
taken
(Lit)
Wait
No more pictures
can be taken
(Fully lit)
Wait until the gauge
returns to the status
on the left to take
the next shot.
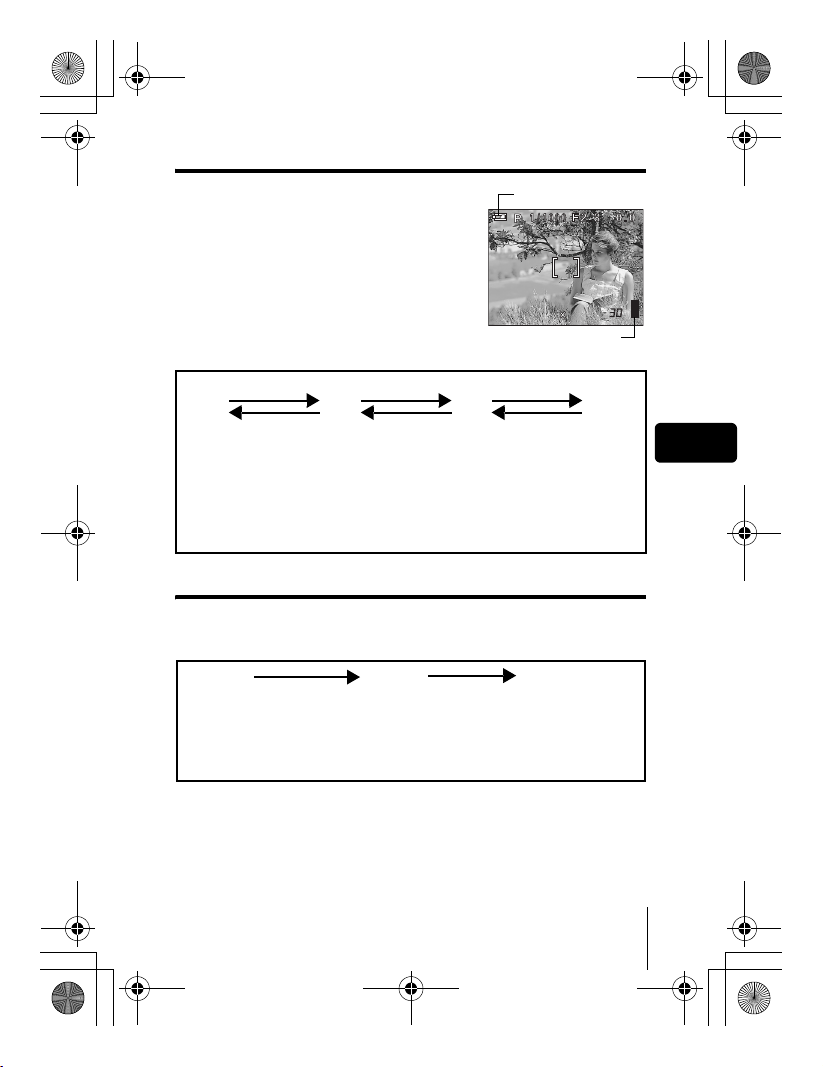
Battery check
If the remaining battery power is low, the battery check indication changes as
follows when the camera is turned on or while the camera is in use.
ef
Lights (green)
(Goes off after a while)
Remaining power level:
high
Blinks (red)
Remaining power level:
low
Charge the battery.
BATTERY EMPTY
is displayed.
Remaining power level:
exhausted
Charge the battery.
En
En 9
Page 10
basic_e_d4226_7.fm Page 10 Thursday, February 5, 2004 11:47 AM
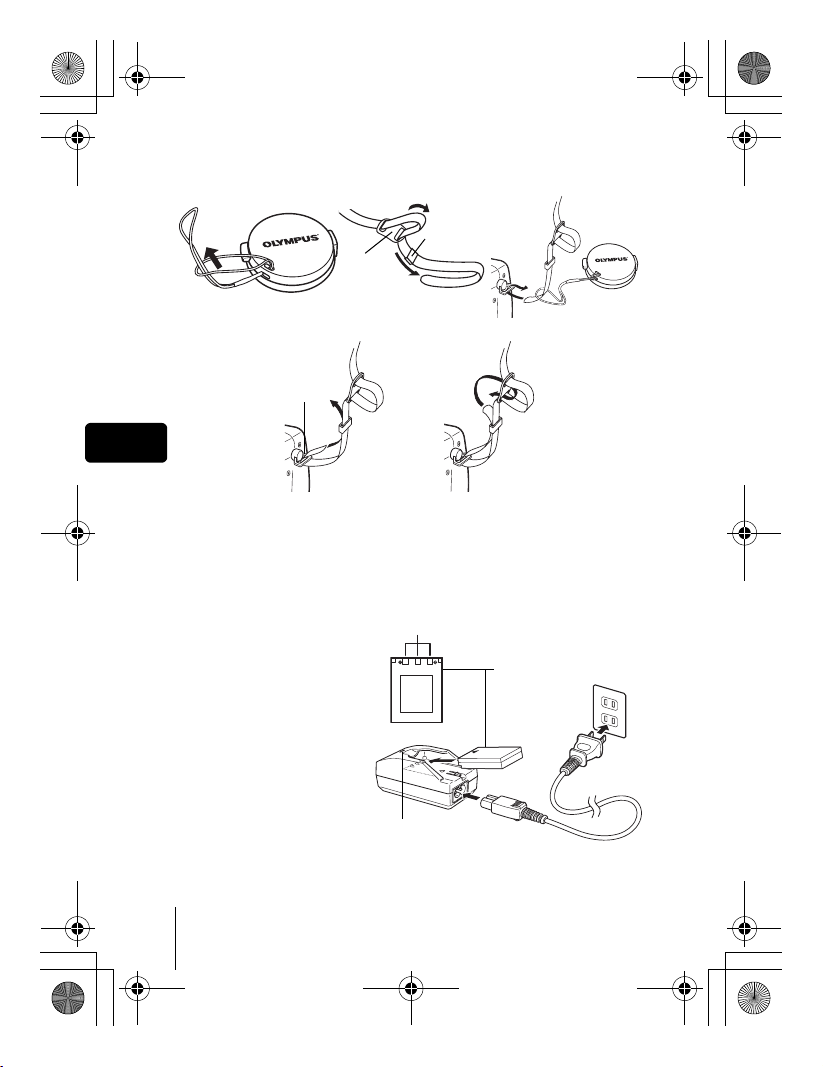
J ATTACHING THE STRAP AND LENS CAP
123
Ring
Stopper
45
Strap
eyelet
En
J CHARGING THE BATTERY
This camera uses an Olympus lithium ion battery (LI-10B). The battery is
dedicated to this camera and other batteries do not work.
The battery is not fully charged when the camera is purchased. Fully charge
the battery on the specified charger (LI-10C) before first use. For details, read
the charger’s instructions (provided).
1 Make sure that the +
and - terminals of
the battery shown in
the illustration on the
right are correctly
oriented when
loading the battery
into the charger.
•
The charge indicator will
light red during charging.
• When charging is
complete, the charger
indicator will change
from red to green.
• Charging normally takes approximately 2 hours.
10 En
Connection terminals
Charging indicator
Lithium ion battery
(LI-10B)
Page 11
basic_e_d4226_7.fm Page 11 Thursday, February 5, 2004 12:58 PM
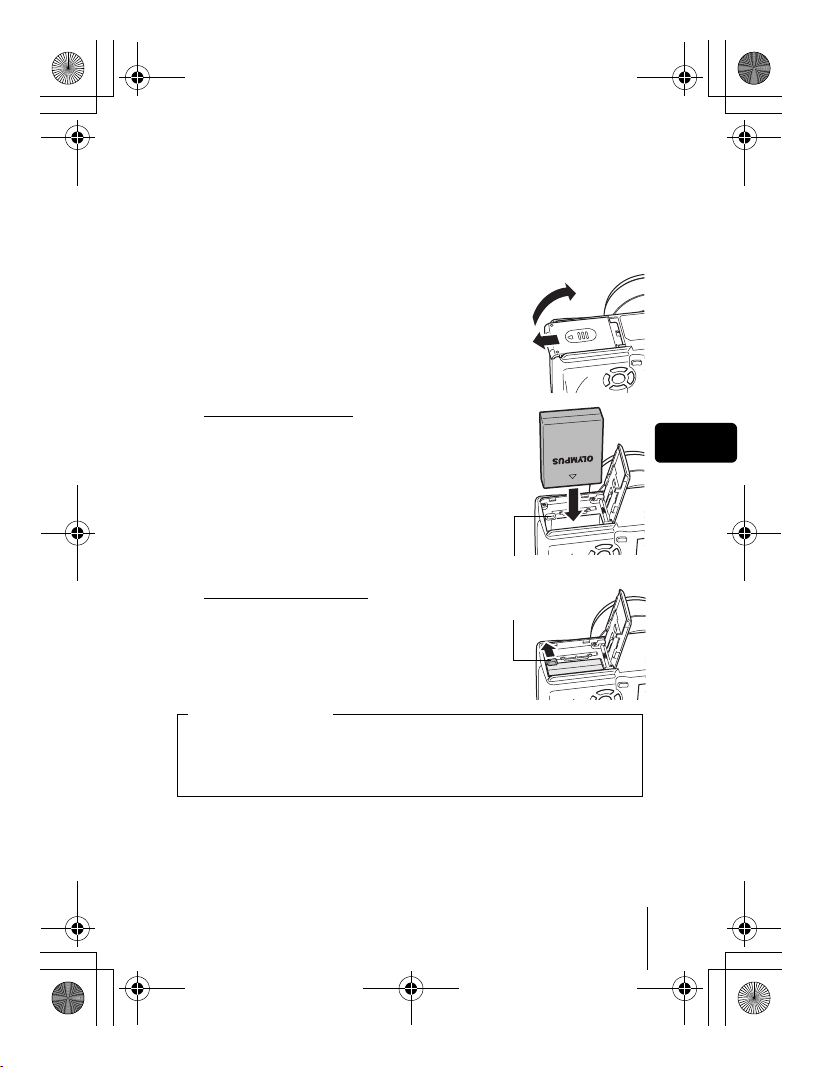
J INSERTING AND REMOVING THE
BATTERY AND CARD
1
Make sure the camera is turned off.
• The monitor is off.
• The viewfinder is off.
• The lens is not extended.
2 Slide the battery compartment/card
cover in the direction of A, then lift
B
in the direction of B.
• Use the ball of your finger to slide the cover.
Do not use your fingernail as this could
result in injury.
A
3 Loading the battery
Align the battery as shown and
insert it into the battery
compartment until the battery is
locked in position with the battery
lock knob.
Battery lock knob
Removing the battery
Slide the knob in the direction of the
arrow. When the battery is ejected,
pull it out of the battery
compartment.
Battery lock knob
En
Low battery warning
The amount of power consumed varies considerably depending on the
operations performed on the digital camera. If you use an exhausted
battery, the camera may turn off without displaying the battery level
warning.
En 11
Page 12
basic_e_d4226_7.fm Page 12 Thursday, February 5, 2004 11:47 AM
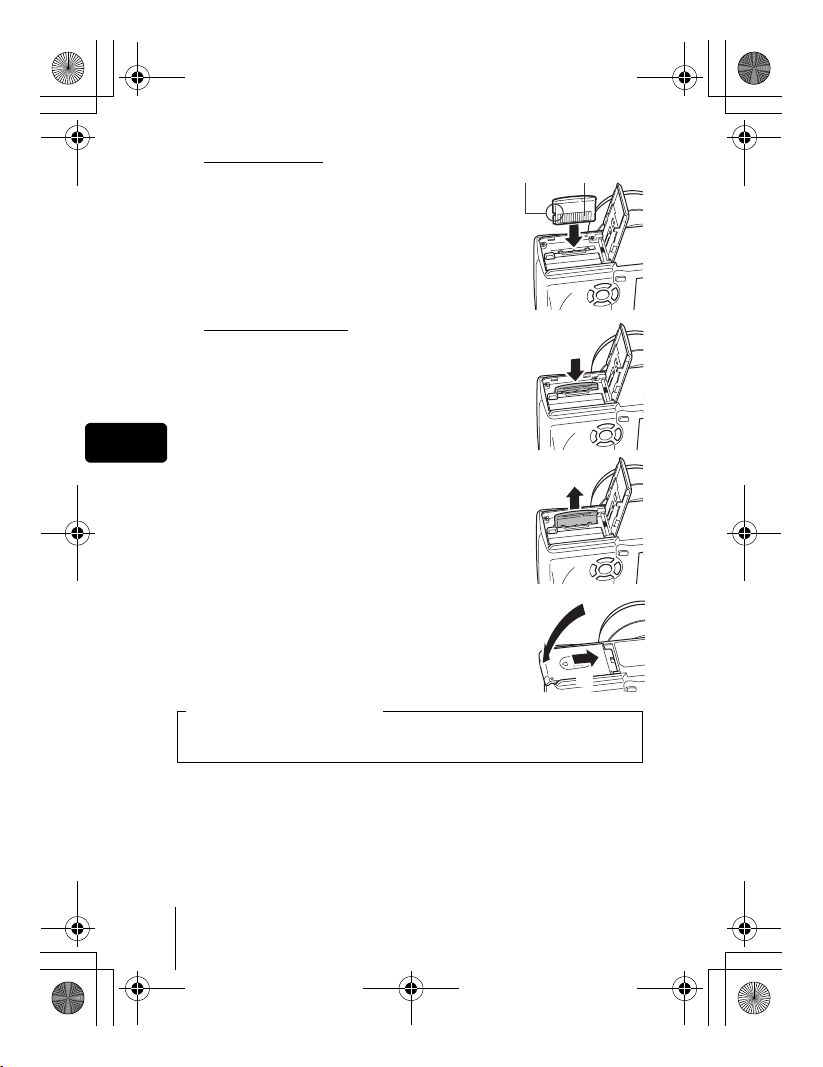
Inserting a card
Insert the card in the appropriate
Notch Contact area
direction.
• Insert the card while keeping it straight.
• Inserting the card the wrong way or at an
angle could damage the contact area or cause
the card to jam.
• If the card is not inserted all the way, data may
not be written to the card.
Removing the card
Push the card all the way in to unlock it,
then let it return slowly.
• The card is ejected a short way and then stops.
Hold the card straight and pull it out.
En
4 Close the battery compartment/card
cover in direction C and then slide it in
the direction shown D.
Notes for removing the card
Releasing your finger quickly after pushing the card all the way in may
cause it to eject forcefully out of the slot.
C
D
12 En
Page 13
basic_e_d4226_7.fm Page 13 Thursday, February 5, 2004 11:47 AM
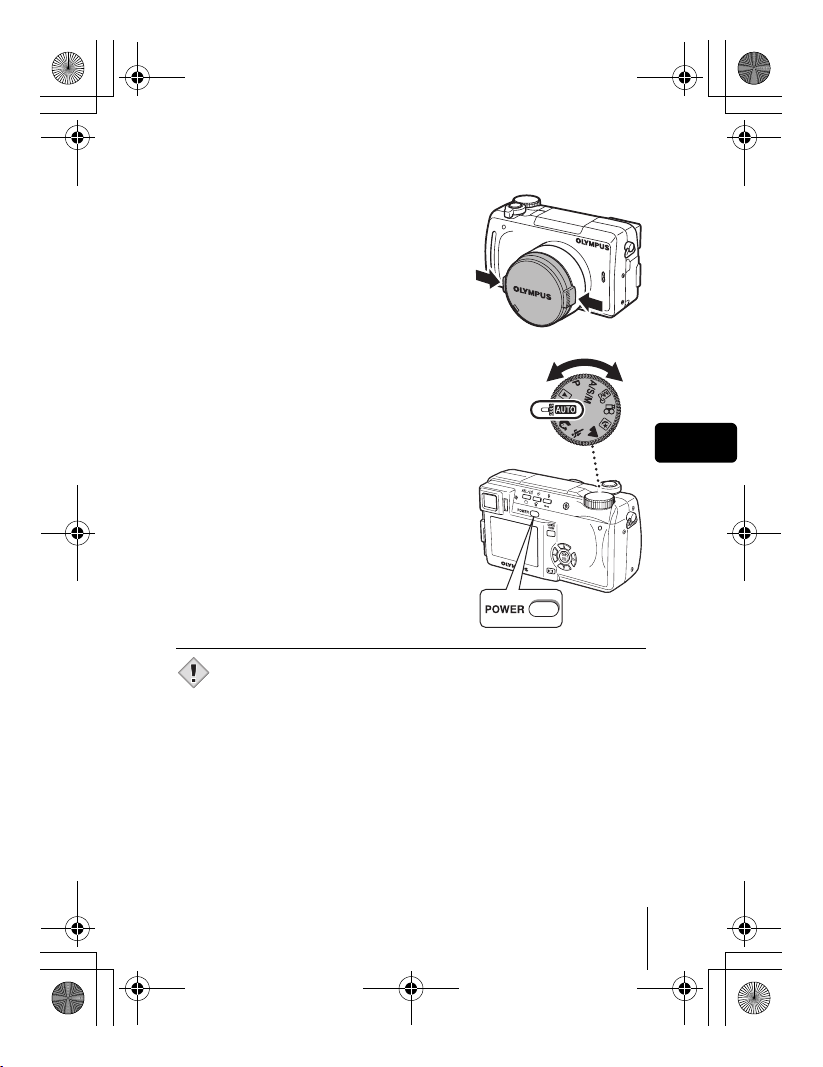
J POWER ON/OFF
Press the tabs on the lens cap as
1
indicated by the arrows and
remove the lens cap.
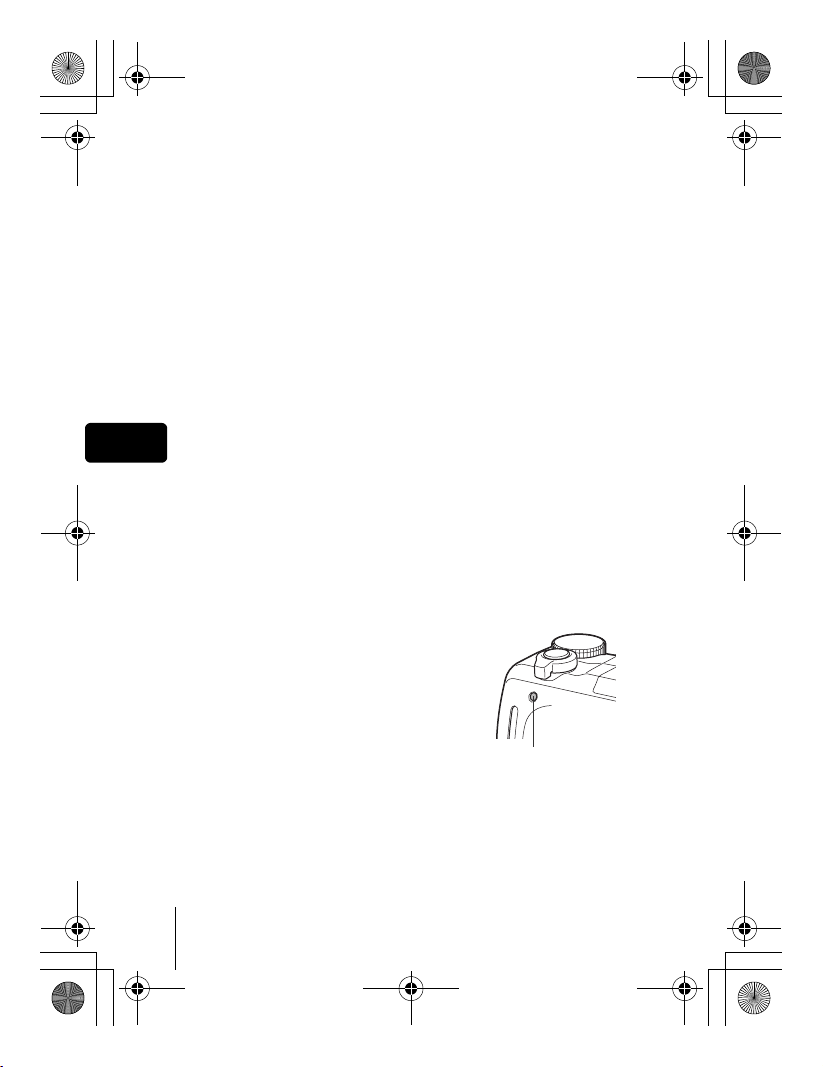
2 Press the power switch.
• The power turns on and the lens extends
when the mode dial is set to any mode
other than q. The monitor turns on.
• When the mode dial is set to q, the
camera turns on in the playback mode
and the monitor turns on.
3 To turn the camera off, press the
power switch again.
• To save battery power, the camera automatically enters the sleep
mode and stops the operation after about 3 minutes of non-
Note
operation. The camera activates again as soon as you operate the
shutter button or zoom lever.
Mode dial
En
En 13
Page 14
basic_e_d4226_7.fm Page 14 Thursday, February 5, 2004 11:47 AM
J SELECTING A LANGUAGE W
Set the mode dial to P and press the power switch to turn
1
the camera on.
2 Press e.
• The top menu is displayed.
3 Press d on the arrow pad to select MODE MENU.
4 Press ac to select the SETUP tab, then press d.
5 Press ac to select W, then press d.
• The green frame moves to the selected item.
6 Press ac to select a language, then press e.
7 Press e again to exit the menu.
En
8 To turn the camera off, press the power switch.
14 En
Page 15
basic_e_d4226_7.fm Page 15 Thursday, February 5, 2004 11:47 AM
J SETTING THE DATE AND TIME X
Set the mode dial to P and press the power switch to turn
1
the camera on.
2 Press e.
• The top menu is displayed.
3 Press d on the arrow pad to select MODE MENU.
4 Press ac to select the SETUP tab, then press d.
5 Press ac to select X, then press d.
• The green frame moves to the selected item.
6 Press ac to select one of the following date formats:
Y-M-D (Year/Month/Day), M-D-Y (Month/Day/Year), D-M-Y
(Day/Month/Year). Then press d.
• Move to the year setting.
• The following steps show the procedure used when the date and time
settings are set to Y-M-D.
7 Press ac to set the year, then press d to move to the
month setting.
• To move back to the previous setting, press b.
• The first two digits of the year are fixed.
8 Repeat this procedure until the date and time are
completely set.
• The time is displayed in the 24-hour format. Consequently, 2 p.m. is
displayed as 14:00.
9 Press e.
• For a more accurate setting, press e when the time signal hits 00
seconds. The clock starts when you press the button.
10 To turn the camera off, press the power switch.
En
• The date and time settings will be returned to the factory default
settings if the camera is left without the battery for approximately
Note
one day.
En 15
Page 16
basic_e_d4226_7.fm Page 16 Thursday, February 5, 2004 11:47 AM
MENU FUNCTIONS
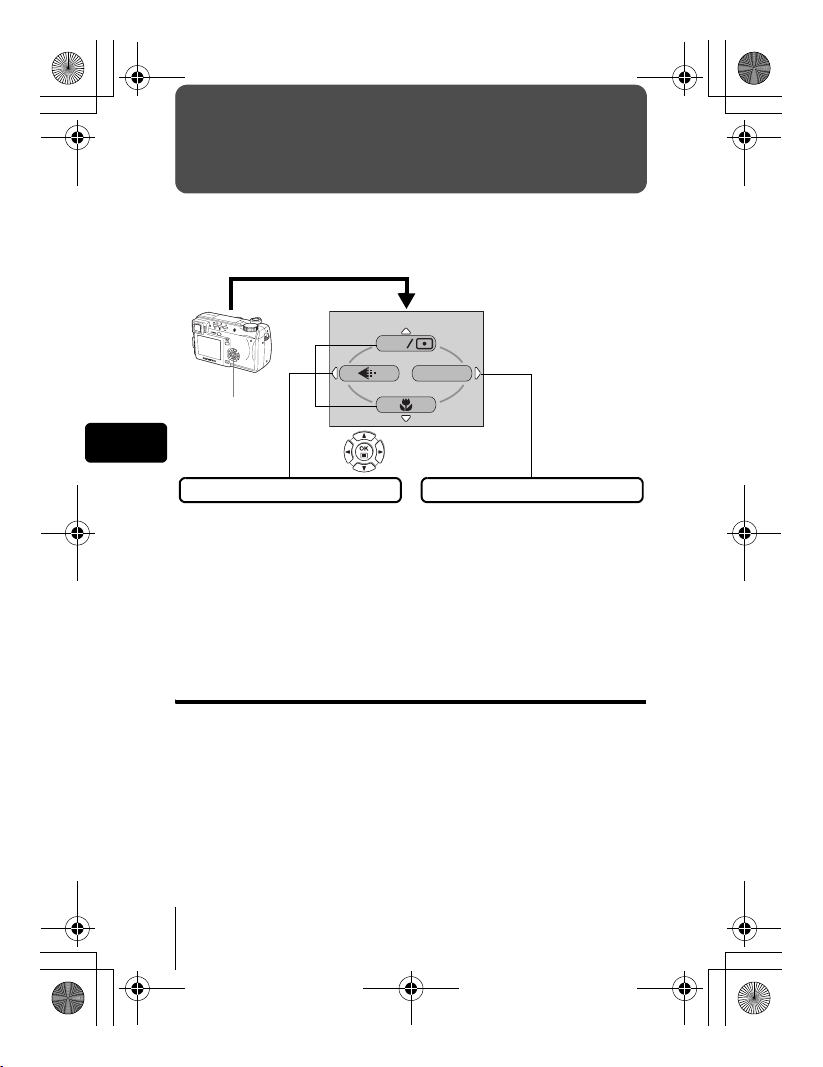
J USING THE MENUS AND TABS
When you turn on the camera and press e, the top menu is displayed on the
monitor. The functions of this camera are set from the menus.
The top menu is displayed.
ESP
MODE MENU
Press e.
En
SHORTCUT MENUS
• Take you directly to the setting
screens.
• Display operational buttons at the
bottom of the screen.
The functions registered in the
•
shortcut menus can also be
accessed from the MODE MENU.
• The shortcut menus can be
replaced in modes other than
hnq.
Use the arrow pad
to select a menu.
MODE MENU
• Lets you access the menu
selections to set the ISO,
sharpness, etc.
• Categorizes the settings into 4
tabs.
•Press ac to select a tab and
display the associated menu
items.
• There is no mode menu in h
mode.
How to use the mode menus
1 Press e to display the top menu. Press d.
2 Press ac to select a tab, then press d.
3 Press ac to select an item, then press d.
4 Press ac to select a setting. Press e to complete
setting.
Press e again to exit the menu and return to shooting
status.
16 En
Page 17
basic_e_d4226_7.fm Page 17 Thursday, February 5, 2004 11:47 AM
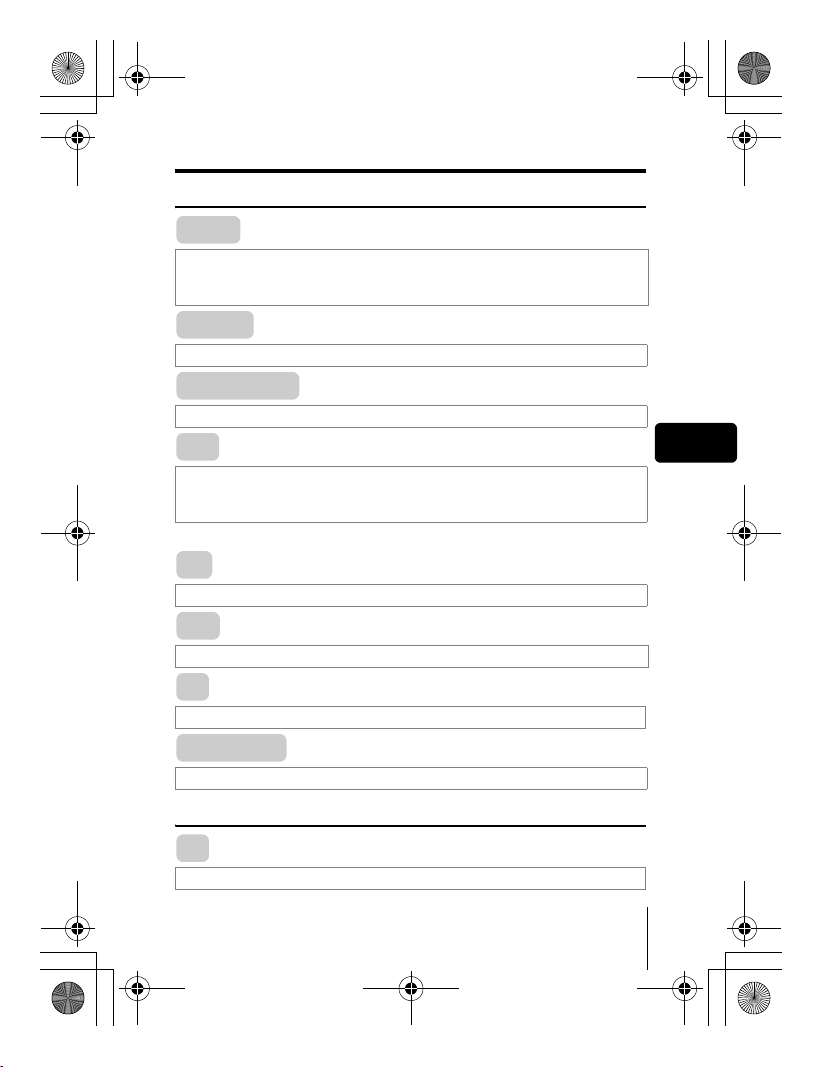
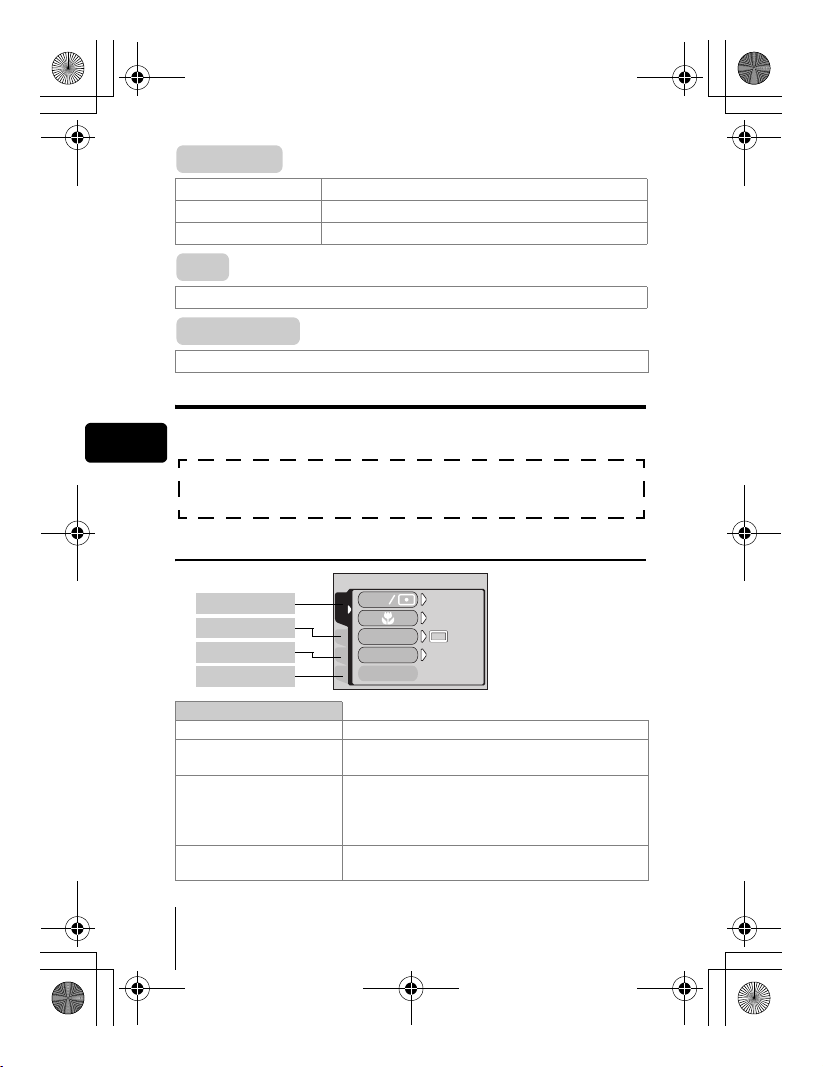
Shortcut menus
Shooting modes
DRIVE
Selects a shooting mode from o (single-frame shooting), j (sequential
shooting), i (high speed sequential shooting), k (AF sequential
shooting) and 7 (auto bracketing).
ESP/5
Selects the metering method (ESP, 5 or MULTI).
DIGITAL ZOOM
Extends the maximum optical zoom, making possible up to approx. 40× zoom.
K
Sets the image quality and resolution.
Still picture : TIFF*, SHQ, HQ, SQ1, SQ2
Movie : SHQ, HQ, SQ
*TIFF cannot be selected when the mode dial is set to h.
&
Used to take pictures of a close subject. Selects OFF, & or %.
WB
Sets the appropriate white balance according to the light source.
X
Sets the date and time.
CARD SETUP
Formats a card.
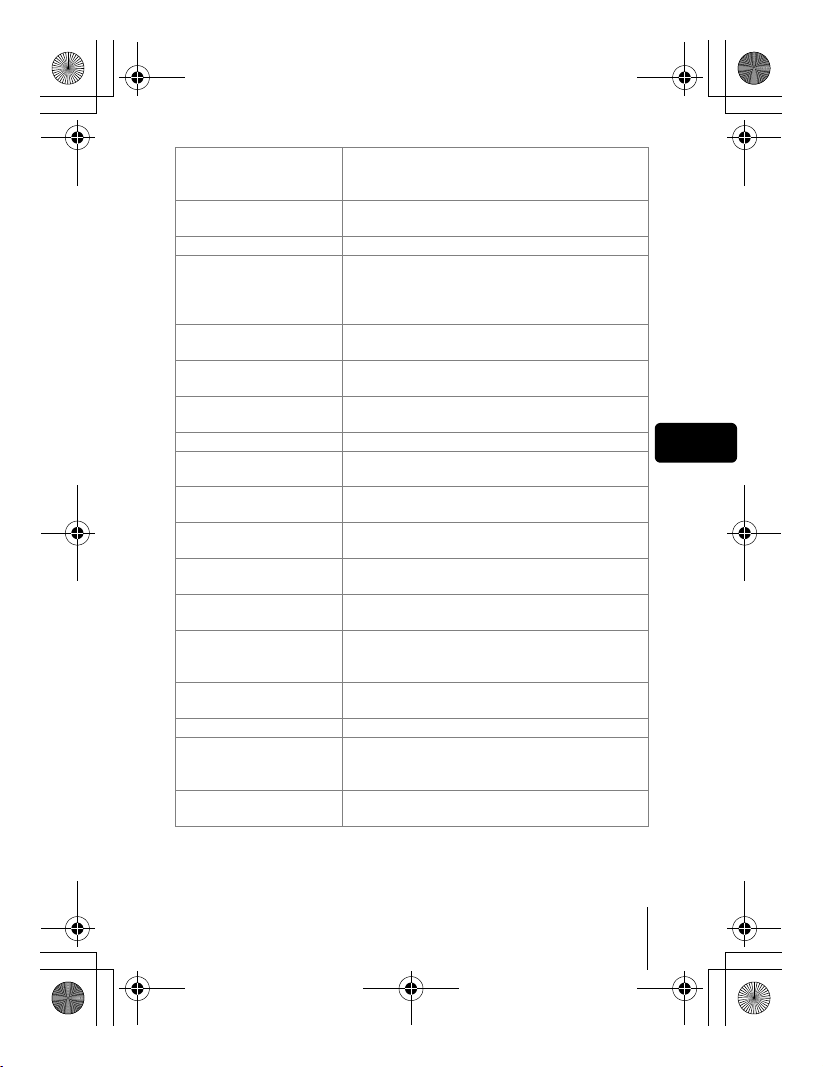
Playback mode
En
m
Runs through all saved pictures one after another.
En 17
Page 18
OFF
AUtO
ESP
basic_e_d4226_7.fm Page 18 Thursday, February 5, 2004 11:47 AM
MOVIE PLAY
MOVIE PLAYBACK Plays back movies.
INDEX Creates an index picture of a movie in 9 frames.
EDIT Edits a movie.
INFO
Displays all the shooting information on the monitor.
SWITCH FRAME
Selects ALL to display all images or 0 to display only protected images.
Mode menus
The MODE MENU has 4 tabs. Press ac to select a tab and display the
En
associated menu items.
These instructions are only for quick reference. For more details
on the functions described here, refer to the “Reference Manual”
on CD-ROM.
Shooting modes
DRIVE
ISO
A/S/M
ESP
OFF
AUtO
CAMERA tab
PICTURE tab
CARD tab
SETUP tab
ESP
CAMERA
CARDSEt PIC
CAMERA tab
ESP/5 Selects the metering method (ESP, 5, MULTI).
&
Used to take pictures of a close subject. Selects
OFF, &, %.
Selects a shooting mode from o (single-frame
j
DRIVE
ISO
shooting),
(high speed sequential shooting),
sequential shooting) and
Selects the ISO sensitivity from AUTO, 64, 100,
200 and 400.
(sequential shooting), i
k
7
(auto bracketing).
18 En
(AF
Page 19
basic_e_d4226_7.fm Page 19 Thursday, February 5, 2004 11:47 AM
A/S/M
r1/2/3/4
w Adjusts the amount of light emitted by the flash.
#SLOW
NOISE REDUCTION
DIGITAL ZOOM
FULLTIME AF
AF MODE Selects the auto focus method (iESP or SPOT).
o
PANORAMA
2 IN 1
FUNCTION
AF AREA
INFO
u
R (still pictures)
R (movies)
SUPER ZOOM
Selects the shooting mode from A (Aperture
priority shooting), S (Shutter priority shooting)
and M (Manual shooting).
Selects a mode to be activated when taking
pictures in r mode.
Selects from #SLOW1 (1st curtain),
H
SLOW1 (1st curtain with red-eye reduction)
#
SLOW2 (2nd curtain) when the flash mode
and
#
is set to
Reduces the noise that affects pictures during
long exposures.
Extends the maximum optical zoom up to
approximately 40× magnification.
Keeps the image in focus at all times without
having to press the shutter button halfway.
Enables you to take a picture of yourself while
holding the camera.
Allows panorama pictures to be taken with
Olympus CAMEDIA-brand cards.
Combines two still pictures taken in succession
and stores them as a single picture.
Adds special effects to pictures (BLACK & WHITE,
SEPIA, WHITE BOARD, BLACK BOARD).
Changes the position of the AF target mark
using the arrow pad.
Selects whether to display all the information
such as shutter speed and white balance, or
only the minimum information.
Displays a histogram showing the luminance
distribution of still pictures.
Sound can be recorded when taking still pictures.
Selects whether to record sound when shooting
a movie. You can play back sound only when
you play back through a PC, TV, etc.
Extends the optical zoom, making possible up to
14× zoom in 1600 × 1200 record mode.
SLOW (slow synchronization).
En
En 19
Page 20

basic_e_d4226_7.fm Page 20 Thursday, February 5, 2004 11:47 AM
PICTURE tab
K
WB
> Makes fine changes to the white balance.
SHARPNESS Adjusts the sharpness of the image.
CONTRAST Adjusts the contrast of the image.
SATURATION
CARD tab
CARD SETUP Formats a card.
SETUP tab
ALL RESET
En
W Selects a language for on-screen display.
PW ON/OFF SETUP
REC VIEW
SLEEP Sets the sleep timer.
MY MODE SETUP
FILE NAME Changes how file names are assigned.
PIXEL MAPPING
s
X Sets the date and time.
m/ft
VIDEO OUT
SHORT CUT
CUSTOM BUTTON
8
Sets the image quality and resolution.
Still picture: TIFF, SHQ, HQ, SQ1, SQ2
Sets the appropriate white balance according to
the light source.
Adjusts the level of color depth without changing
the tint.
Selects whether to keep the current camera
settings when you turn off the power.
Sets the picture that is displayed when the
power is turned on and off.
Selects whether to display pictures on the
monitor while saving them to a card.
Customizes settings which are activated in the
r mode.
Checks the CCD and image processing
functions for errors.
Adjusts the brightness of the viewfinder or monitor.
Sets the measurement unit (m/ft) used during
manual focus.
Selects NTSC or PAL according to your TV’s
video signal type. TV video signal types differ
depending on the region.
Assigns frequently used functions as shortcut menus.
Assigns a frequently used function to the
camera’s custom button.
Turns off the beep sound for button operations
and warnings.
20 En
Page 21
OFF
basic_e_d4226_7.fm Page 21 Thursday, February 5, 2004 11:47 AM
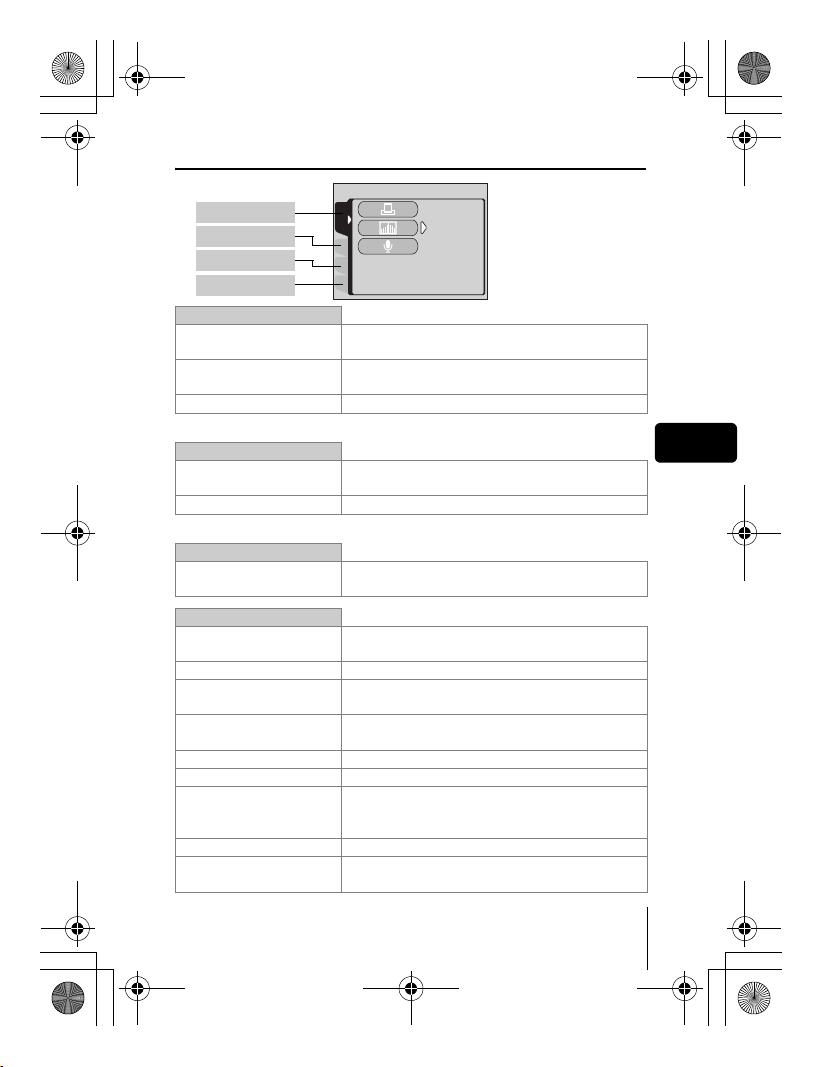
Playback mode
PLAY tab
EDIT tab
CARD tab
PLAY
CARDSEt EDIt
OFF
SETUP tab
PLAY tab
<
u
R Adds sound to a still picture already taken.
*1
EDIT tab
Q
P Crops part of a picture and saves it as a new file.
*2
*1
Stores the necessary information on the card to
allow you to print the pictures taken.
Displays a histogram showing the luminance
distribution.
The PLAY tab is not displayed during movie playback.
*2
Makes the file size smaller and saves it as a new
file.
The EDIT tab is not displayed during movie playback.
CARD tab
CARD SETUP
Erases all image data stored on the card or
format the card.
SETUP tab
ALL RESET
Selects whether to keep the current camera
settings when you turn off the power.
W Selects a language for on-screen display.
PW ON/OFF SETUP
SCREEN SETUP
s
Sets the picture that is displayed when the
power is turned on and off.
Registers a stored picture for use as the picture
displayed when the power is turned on and off.
Adjusts the brightness of the viewfinder or monitor.
X Sets the date and time.
Selects NTSC or PAL according to your TV’s
VIDEO OUT
video signal type. TV video signal types differ
depending on the region.
G
8
Selects the number of frames in the index display.
Turns off the beep sound for button operations
and warnings.
En
En 21
Page 22
basic_e_d4226_7.fm Page 22 Thursday, February 5, 2004 11:47 AM
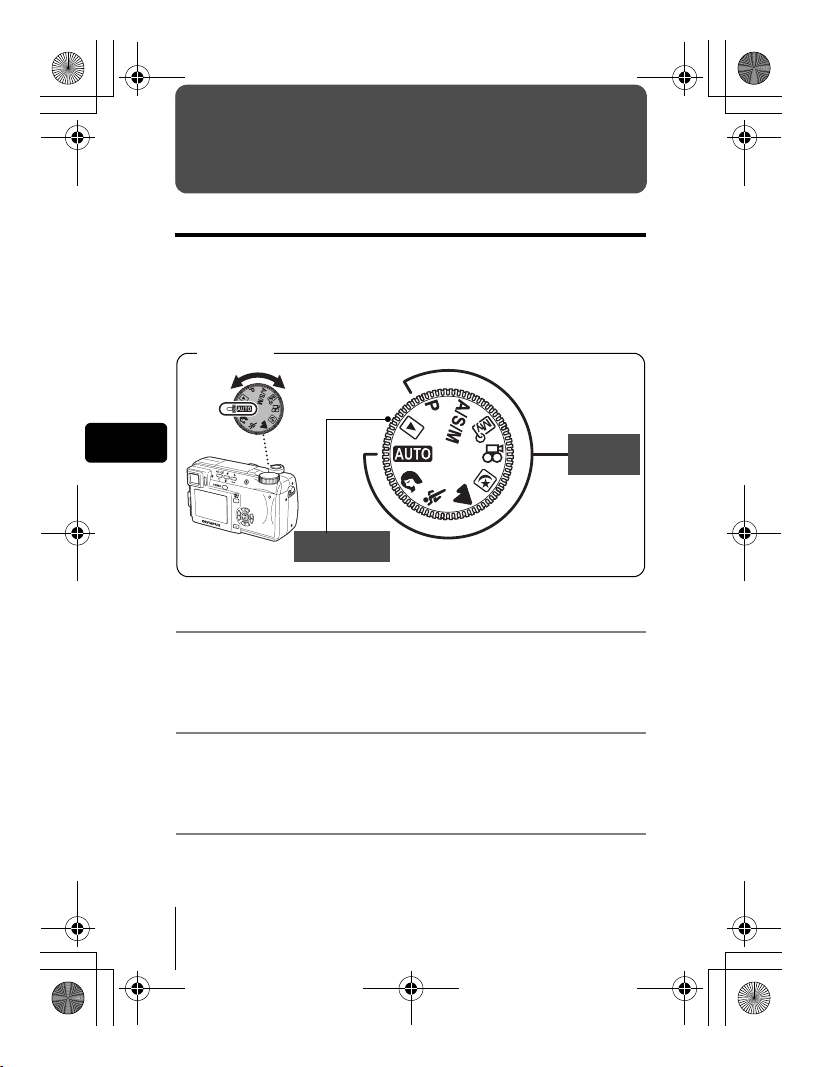
SHOOTING BASICS
Mode dial
The shooting modes include modes where the optimal settings for the
situation are automatically selected, and modes where you can select the
settings best suited to the shooting conditions and the effect you wish to
achieve.
You can change the shooting mode before and after turning the camera on.
Mode dial
En
Playback mode
h Full-auto shooting
Allows you to take still pictures using no special functions or manual
adjustments. The camera sets the optimal focusing and exposure. This is the
simplest of all shooting modes.
i Portrait shooting
Suitable for taking a portrait-style shot of a person. This mode features an infocus subject against a blurred background. The camera automatically sets
the optimal shooting conditions.
j Sports shooting
Suitable for capturing fast-moving action (such as sports) without blur. The
camera automatically sets the optimal shooting conditions.
22 En
Shooting
modes
Page 23
basic_e_d4226_7.fm Page 23 Thursday, February 5, 2004 11:47 AM
l Landscape shooting
Suitable for taking pictures of landscapes and other outdoor scenes. Both the
foreground and the background are in focus. Since blues and greens are
vividly reproduced in this mode, it is excellent for shooting natural scenery.
The camera automatically sets the optimal shooting conditions.
m Night Scene shooting
Suitable for shooting pictures in the evening or at night. The camera sets a
slower shutter speed than is used in normal shooting. For example, if you
take a picture of a street at night in h mode, the lack of brightness will
result in a dark picture with the background underexposed and without
details. In the Night Scene shooting mode, the true appearance of the street
is captured. The camera automatically selects the optimal settings for this
type of shooting condition. Since the shutter speed is slow, make sure you
stabilize the camera by using a tripod.
P Program shooting
Allows you to take still pictures. The camera sets the aperture and shutter
speed. Other functions, such as flash modes and drive modes, can be
adjusted manually.
p Aperture priority/Shutter priority/Manual shooting
When the mode dial is set to p, the following items can be set with the
menus.
A Aperture priority shooting
En
Allows you to set the aperture manually. The camera sets the shutter
speed automatically.
Press a to increase the aperture value (f number).
Press c to decrease the aperture value (f number).
S Shutter priority shooting
Allows you to set the shutter speed manually. The camera sets the
aperture automatically.
Press a to set a faster shutter speed.
Press c to set a slower shutter speed.
En 23
Page 24
basic_e_d4226_7.fm Page 24 Thursday, February 5, 2004 11:47 AM
M Manual shooting
Allows you to set the aperture and shutter speed manually.
Press b to increase the aperture value (f number).
Press d to decrease the aperture value (f number).
Press a to set a faster shutter speed.
Press c to set a slower shutter speed.
r My Mode
Allows you to save your favorite settings as your own personal mode and use
these customized settings when taking pictures. Current settings can also be
saved for retrieving by this mode.
n Movie record
Allows you to record movies. The camera sets the aperture and shutter speed
En
automatically. Even if the subject moves during recording or the distance to
the subject changes, correcct focusing and exposure are maintained
continuously. If R is set to ON, sound is recorded at the same time.
J TAKING STILL PICTURES
You can take still pictures using either the monitor or the viewfinder. Both
methods are easy as all you have to do is to press the shutter button.
1 Set the mode dial to h i j l m r p P
and press the power switch.
• The monitor turns on.
To shoot using the viewfinder, press f to turn the viewfinder on.
2 Decide the composition of the picture.
3 Press the shutter button gently (halfway) to adjust the
focus.
24 En
Page 25
F2.8
2288 1712
HQ
2288 1712
HQ
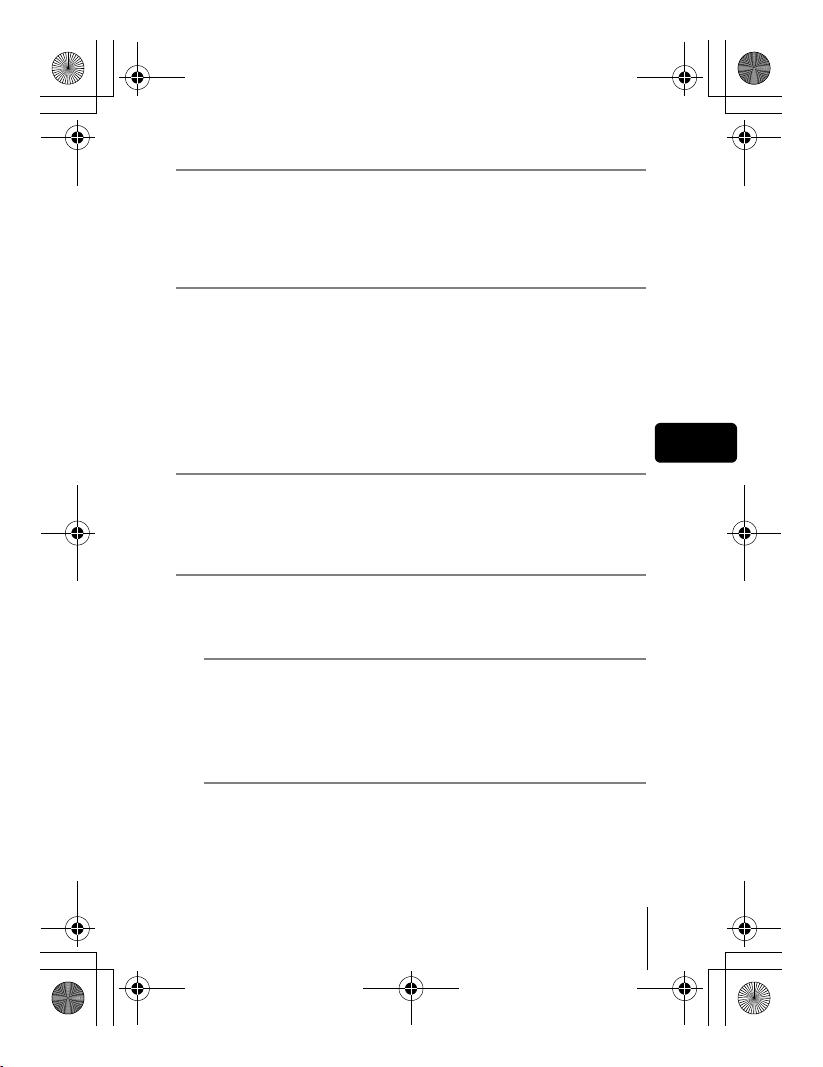
basic_e_d4226_7.fm Page 25 Thursday, February 5, 2004 11:47 AM
• When the focus and exposure are locked,
the green lamp lights (focus lock).
• The AF target mark moves to the focused
position.
• The shutter speed and aperture value
automatically set by the camera are
displayed (except in M mode).
• # blinks to warn of camera movement.
Press the flash button to open the flash.
• When # lights after the flash has popped
up, the flash is ready to fire. The flash fires
automatically when the shutter button is pressed all the way.
HQ
2288 1712
#mark
Green lamp
F2.8
AF target
mark
4 Press the shutter button all the way (fully).
• The camera takes the picture.
• The card access lamp blinks while the picture is stored on the card.
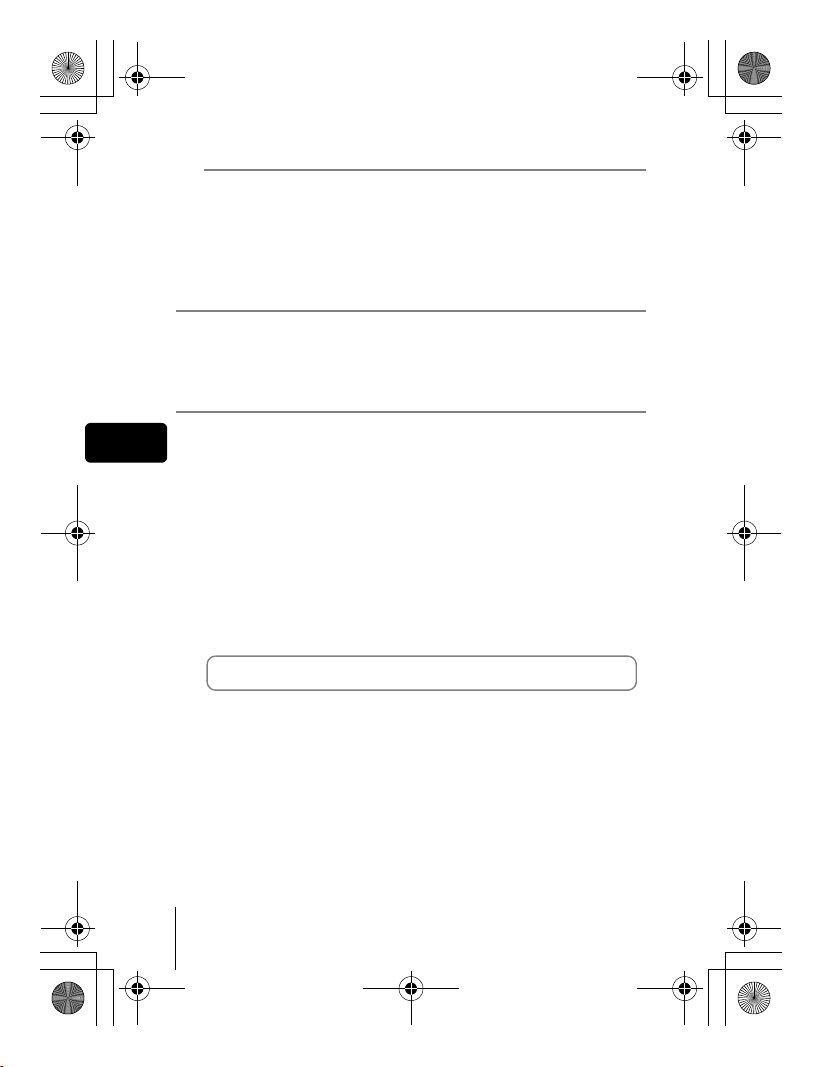
J IF CORRECT FOCUS CANNOT BE
OBTAINED (FOCUS LOCK)
When the subject cannot be focused on, you can focus the camera on
another point at roughly the same distance (focus lock) and take the picture
as explained below.
1 Position the AF target mark on the
subject you want to focus on.
• When shooting a hard-to-focus subject or
a fast-moving subject, point the camera at
an object about the same distance away
as the subject.
2 Press the shutter button halfway
until the green lamp lights.
• When the focus and exposure are locked,
the green lamp lights.
• The AF target mark moves to the focused position.
• When the green lamp blinks, the focus and exposure are not locked.
Release your finger from the shutter button, re-position your subject
and press the shutter button halfway again.
2288 1712
HQ
AF target mark
En
En 25
Page 26
2288 1712
HQ
basic_e_d4226_7.fm Page 26 Thursday, February 5, 2004 11:47 AM
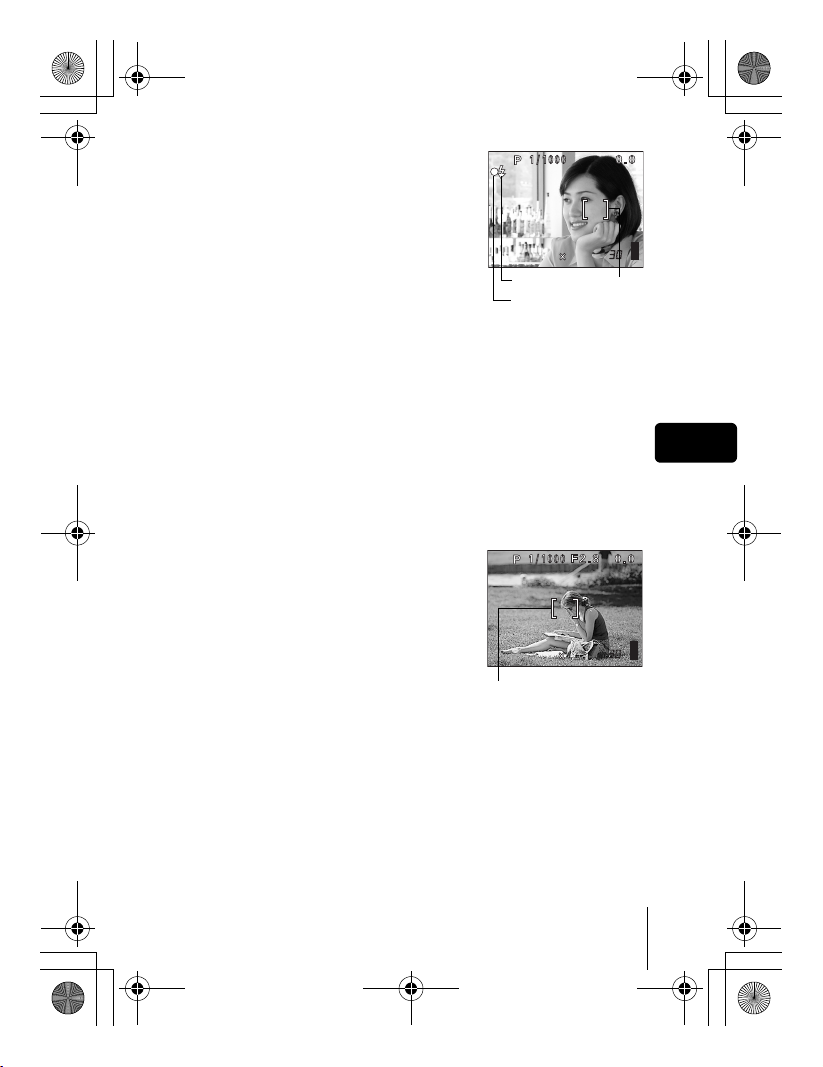
3 Keeping the shutter button
pressed halfway, recompose your
shot.
4 Press the shutter button fully.
J RECORDING MOVIES
Set the mode dial to n and press the power switch.
1
• The monitor turns on.
The available recording time on the card that you are using is displayed.
•
2 Decide the composition of the picture.
En
• You can use the zoom lever to enlarge your subject.
3 Press the shutter button fully to start recording.
• You can adjust the zoom during movie recording. Sound is recorded at
the same time.
• The card access lamp blinks while the movie is stored on the card.
• During movie recording, N lights red.
4 Press the shutter button again to stop recording.
• When the remaining recording time has been used up, recording stops
automatically.
• When there is space in the card memory, the remaining recording time
is displayed, and the camera is ready to shoot.
•
During movie recording, the flash and manual focus (MF) are disabled.
• It takes longer to store movies than still pictures.
Note
• The remaining recording time varies depending on the record mode
and the amount of space available on the card.
• This camera cannot play back sound.
2288 1712
HQ
J
ZOOMING IN ON A SUBJECT (OPTICAL ZOOM)
In addition to the optical zoom, this camera is equipped with a super zoom
and digital zoom for taking telephoto and wide-angle shots. You can increase
the zoom magnification by combining the super zoom or digital zoom with the
optical zoom. The super zoom and digital zoom cannot be used at the same
time.
Camera movement is likely to occur at higher magnifications. Stabilize the
camera with a tripod, etc. to avoid camera movement.
26 En
Page 27
!
basic_e_d4226_7.fm Page 27 Thursday, February 5, 2004 11:47 AM
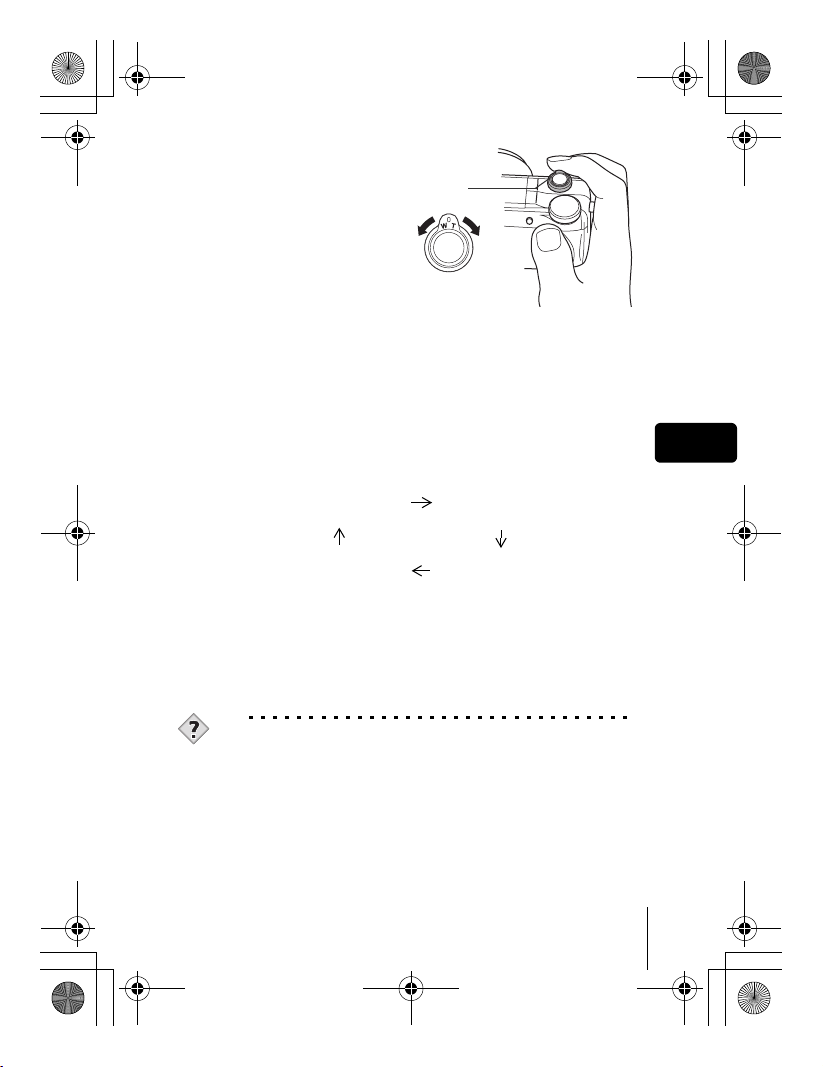
1 Push or pull the zoom
lever.
• Wide-angle: Push the zoom
lever toward W to zoom out.
• Telephoto: Pull the zoom
lever toward T to zoom in.
Zoom lever
2 Take the picture.
J USING THE FLASH
Press the flash button.
1
• The flash pops up.
2 Set the flash mode by repeatedly pressing #.
• The flash mode changes in the sequence shown below (when all
modes are available).
Auto
(Auto-flash)
(Red-eye
reduction flash)
En
#SLOW (Slow
synchronization)
• To prevent the flash from firing, press down on the top of the flash to
retract it.
#(Fill-in flash)
3 Press the shutter button halfway.
• In conditions where the flash will fire, # lights.
4 Press the shutter button fully to take the picture.
TIPS
Flash working range
W (max.): Approx. 0.3 m - 4.5 m (1.0 ft. - 14.8 ft.)
T (max.) : Approx. 1.2 m - 3.5 m (3.9 ft. - 11.5 ft.)
En 27
Page 28
basic_e_d4226_7.fm Page 28 Thursday, February 5, 2004 11:47 AM
Auto-flash (No indication)
The flash fires automatically in low light or backlight conditions.
Red-eye reduction flash (!)
The red-eye reduction flash mode significantly reduces the red-eye
phenomenon by emitting pre-flashes before firing the regular flash.
Fill-in flash (#)
The flash always fires every time the shutter button is pressed.
Flash off ($)
The flash does not fire even in low light conditions.
Slow synchronization (#SLOW1 #SLOW2 !#SLOW1)
1st curtain (front curtain) #SLOW1 (factory default setting):
Adjusts the flash for slow shutter speeds.
2nd curtain (rear curtain) #SLOW2:
The 2nd curtain fires the flash just before the shutter closes.
En
1st curtain with red-eye reduction !#SLOW1:
Adjusts the flash for slow shutter speeds, and minimizes red-eye.
J USING THE SELF-TIMER
This function lets you take pictures using the self-timer. Fix the camera
securely on a tripod for self-timer shooting. This function is useful for taking
pictures where you want to be included in the photograph.
1 Select Y by repeatedly pressing Y.
2 Press the shutter button fully to
take the picture.
• Pressing the shutter button halfway locks
the focus and exposure.
• The self-timer lamp lights for approximately
10 seconds, then starts blinking. After
blinking for approximately 2 seconds, the
picture is taken.
Self-timer lamp
28 En
Page 29

basic_e_d4226_7.fm Page 29 Thursday, February 5, 2004 11:47 AM
ADVANCED SHOOTING
J SEQUENTIAL SHOOTING
There are 4 sequential shooting modes: sequential shooting, high speed
sequential shooting, AF sequential shooting and auto bracketing. Sequential
shooting modes can be selected from the DRIVE mode menu.
Sequential shooting cannot be performed when the record mode is set to
TIFF.
Drive mode
o Shoots 1 frame at a time when the shutter button is pressed.
(Normal shooting mode, single-frame shooting)
j Focus, exposure and white balance are locked at the first frame.
Approx. 7 frames at 1.6 frames/sec. (in HQ mode)
i Pictures can be taken at a faster speed than normal sequential
shooting. The sequential shooting speed varies depending on the
record mode setting. 2 frames at 2.1 frames/sec.
k Focus is individually locked for each frame. The AF sequential
shooting speed is slower than for normal sequential shooting.
BKT When auto bracketing is set, the exposure is changed
automatically for each frame when you start shooting. The
exposure differential and number of frames can be selected in the
menus. The focus and white balance are locked at the first frame.
J METERING
There are three ways of measuring the brightness of a subject.
ESP metering : Meters the center of the subject and the surrounding
area separately.
Spot metering : Exposure is determined by metering within the AF
target area. In this mode, a subject can be shot with
optimal exposure regardless of the background light.
Multi-metering : Meters the brightness of the subject at up to 8 different
points to set the optimal exposure based on the
average brightness. This method is useful with a high
contrast subject.
En
En 29
Page 30

basic_e_d4226_7.fm Page 30 Thursday, February 5, 2004 11:47 AM
J AE LOCK
This function is suitable for situations when optimal exposure is difficult to
achieve, such as when there is excessive contrast between the subject and
the surroundings.
J MACRO MODE SHOOTING
Focusing is usually slow when you get close to a subject (W: 7 cm/2.8" to
60 cm/2.0 ft., T: 1.2 m/3.9 ft. to 2 m/6.6 ft.). However, in the & mode focusing
is performed quickly. When the optical zoom lever is at the maximum wide
position and you are as close as 7 cm/2.8" to your subject, you can fill the
entire frame with your subject.
J SUPER MACRO MODE SHOOTING
This mode lets you shoot from as close as 3 cm/1.2" to your subject.
% mode, normal shooting is also possible, but the position of the zoom
In the
is fixed automatically and cannot be changed.
En
J MANUAL FOCUS
If auto focus is unable to focus on a subject, use manual focus.
30 En
Page 31

basic_e_d4226_7.fm Page 31 Thursday, February 5, 2004 11:47 AM
PLAYBACK
J PLAYING BACK STILL PICTURES
Set the mode dial to q and press the power switch.
1
• The monitor turns on and displays the last picture taken. (Single-frame
playback)
2 Use the arrow pad to play back other pictures.
Jumps to the picture 10 frames back.
Displays the previous
picture.
Jumps to the picture 10 frames ahead.
Displays the next
picture.
QUICK VIEW
This function lets you play back pictures while the camera is in the shooting
mode. This is useful when you want to check shooting results and resume
shooting quickly.
1 Press the QUICK VIEW button in the shooting mode.
2 Press the QUICK VIEW button again to return to the
shooting mode.
Close-up playback
Pictures displayed on the monitor can be enlarged 1.5, 2, 2.5, 3, 3.5 or 4
times. This function is useful when you want to check the details of a picture.
1 Select the still picture you want to enlarge.
• You cannot enlarge pictures with n.
En 31
En
Page 32

basic_e_d4226_7.fm Page 32 Thursday, February 5, 2004 11:47 AM
2 Pull the zoom lever toward T.
• Each time you pull the zoom lever, the picture is enlarged gradually.
• To return the picture to the original size (1×), push the zoom lever
toward W.
Index display
This function lets you show several pictures at the same time on the monitor.
It is useful for quickly finding the picture you want to view. The number of
pictures shown can be 4, 9 or 16.
1 In the single-frame playback mode, push the zoom lever
toward W.
• Use the arrow pad to select the picture.
• To return to the single-frame playback, pull the zoom lever toward T.
J PLAYING BACK MOVIES
En
Use the arrow pad to display the picture with n you want
1
to play back.
2 Press e.
• The top menu is displayed.
3 Press a to select MOVIE PLAY.
4 Press ac to select MOVIE PLAYBACK, then press e.
• The movie is played back. When playback ends, the display
automatically returns to the beginning of the movie.
• Fast forward/fast rewind functions are available during playback.
d: Fast forward. Each press switches the speed between ×1, ×2 and
×20.
b: Fast rewind. Each press switches the speed between ×1, ×2 and
×20.
•Press e again after playback ends to display the menu.
PLAYBACK : Plays back the entire movie again.
FRAME BY FRAME :
EXIT : Leaves the movie playback mode.
Press ac to select the desired operation, then press e.
Plays back the movie manually one frame at a time.
32 En
Page 33

basic_e_d4226_7.fm Page 33 Thursday, February 5, 2004 11:47 AM
When FRAME BY FRAME is selected
a : Displays the first frame of the movie.
c : Displays the last frame of the movie.
d : Displays the next frame. The movie can be played continuously by
holding the button down.
b : Displays the previous frame. The movie can be played continuously in
reverse by holding the button down.
e : Displays the MOVIE PLAYBACK menu.
J PROTECTING PICTURES
You are recommended to protect important pictures to avoid accidentally
erasing them.
1 Use the arrow pad to display the picture you want to
protect.
2 Press 0.
• To cancel protection, press 0 again.
• Protected pictures cannot be erased by the single-frame/all-frame
erase function, but they are all erased by formatting.
Note
J ERASING PICTURES
This function erases recorded pictures. Pictures can be erased either one
frame at a time or all the pictures in the card.
• Once erased, pictures cannot be restored. Check each picture
before erasing to avoid accidentally erasing pictures you want to
Note
keep.
En
Single-frame erase
1 Use the arrow pad to display the picture you want to
erase.
2 Press S.
•The S ERASE screen is displayed.
3 Press ac to select YES, then press e.
• The picture is erased and the menu is closed.
En 33
Page 34

basic_e_d4226_7.fm Page 34 Thursday, February 5, 2004 11:47 AM
All-frame erase
1 In the top menu, select MODE MENU CARD CARD
SETUP, and press d.
2 Press ac to select R ALL ERASE, then press e.
3 Press a to select YES, then press e.
• All the pictures are erased.
J FORMATTING (CARD SETUP)
This function lets you format a card. Formatting prepares cards to receive
data. Before using non-Olympus cards or cards which have been formatted
on a PC, you must format them with this camera.
• All existing data, including protected pictures, are erased when the
En
card is formatted. Make sure that you save or transfer important
Note
data to a PC before formatting a card.
1 In the top menu, select MODE MENU CARD CARD
SETUP, and press d.
•The I FORMAT screen is displayed.
When h is selected:
In the top menu, press d to select CARD SETUP.
When q is selected:
In the top menu, select MODE MENU CARD CARD
SETUP, and press d. Press ac to select I FORMAT,
then press e.
2 Press a to select YES, then press e.
•The BUSY bar is displayed and the card is formatted.
34 En
Page 35

basic_e_d4226_7.fm Page 35 Thursday, February 5, 2004 11:47 AM
J PLAYBACK ON A TV
Use the AV cable provided with the camera to play back recorded images on
your TV.
1 Make sure that the TV and camera are turned off.
Connect the A/V OUT jack on the camera to the video
input terminal on the TV using the AV cable.
Connect to the TV’s video input (yellow)
and audio input (white) terminals.
Connector cover
AV cable
A/V OUT jack (MONO)
2 Turn the TV on and set it to the video input mode.
• For details of switching to video input, refer to your TV’s instruction
manual.
3 Set the mode dial to q and turn the camera on.
• The last picture taken is displayed on the TV. Use the arrow pad to
select the picture you want to display.
• The close-up playback, index display and slideshow functions can also
be used on a TV screen.
• You are recommended to use the optional AC adapter when using
the camera with a TV.
Note
• Make sure that the camera’s video output signal type is the same as
the TV’s video signal type.
En
En 35
Page 36

basic_e_d4226_7.fm Page 36 Thursday, February 5, 2004 11:47 AM
PRINT RESERVATION/DIRECT PRINT
J PRINT RESERVATION (DPOF)
DPOF is short for Digital Print Order Format. DPOF is the format used to
record automatic print information from digital cameras.
If a card containing print reservation data is taken to a print shop that supports
the DPOF format, the pictures can be printed according to the DPOF
reservations. Or pictures can be printed out at home on a personal DPOFcompatible printer.
All-frame reservation
Use this feature to print all the pictures stored on the card. Select the desired
number of prints and whether you want the date and time included.
Single-frame reservation
Use this feature to print only selected pictures. It is also used to change the
En
reserved number of prints and the date/time settings. Display the frame to be
printed and select the desired number of prints.
Resetting the print reservation data
This function allows you to reset all the print reservation data for pictures
stored on the card.
J DIRECT PRINT (PictBridge)
By connecting the camera to a PictBridge-compatible printer with the USB
cable, you can print out recorded pictures directly without the use of a
computer.
PictBridge is the standard for connecting digital cameras and printers of
different makers and printing out pictures directly.
PRINT Prints the selected picture.
ALL PRINT Prints all the pictures stored on the card.
MULTI PRINT * Prints one picture in multiple layout format.
ALL INDEX * Prints an index of all the pictures stored on the card.
PRINT ORDER * Prints the pictures according to the print reservation data
* This option may not be available depending on the type of printer.
on the card. If no print reservations have been made, this
option is not available.
For more details, refer to the “Reference Manual” on CD-ROM.
36 En
Page 37

basic_e_d4226_7.fm Page 37 Thursday, February 5, 2004 12:22 PM
DOWNLOADING PICTURES TO A COMPUTER
By connecting the camera to a computer with the provided USB cable,
images on a card can be transferred to the computer. Some OS’s (operating
systems) may need a special setup before connecting to the camera for the
first time. Follow the chart below. For details of the procedures in the chart,
refer to the “Reference Manual” on the software CD. Also refer to the
“Software Installation Guide” included in the CD-ROM package.
Identifying the OS
Windows 98/
98SE (Second
Edition)
Installing the USB
driver for Windows 98
Connecting the camera to the computer using the provided USB cable
Confirming the computer recognizes the camera
* Even if your computer has a USB connector, data transfer may not
function correctly if you are using one of the operating systems listed
below or if you have an add-on USB connector (extension card, etc.).
• Windows 95/NT 4.0
• Windows 98/98SE upgrade from Windows 95
• Mac OS 8.6 or lower (except Mac OS 8.6 equipped with USB MASS
Storage Support 1.3.5 installed at the factory)
• Data transfer is not guaranteed on a home-built PC system or PCs with no
factory installed OS.
• You can view images using: graphics applications that support the
JPEG file format (Paint Shop Pro, Photoshop, etc.); Internet
Note
browsers (Netscape Communicator, Microsoft Internet Explorer,
etc.); CAMEDIA Master software; or other software. For details on
using commercial graphics applications, refer to their instruction
manuals.
Windows Me/2000/XP
Downloading image files
Disconnecting the USB cable
Mac OS 9.0 - 9.2/
OSX
* For OS 8.6, see below.
En 37
En
Page 38

basic_e_d4226_7.fm Page 38 Thursday, February 5, 2004 11:47 AM
• QuickTime is needed for playing back movies. QuickTime is
included on the provided software CD.
• If you want to process images, make sure to download them to your
computer first. Depending on the software, image files may be
destroyed if the images are processed (rotated, etc.) while they are
on the card.
J FOR OTHER OS USERS
Users running other OS cannot use the provided USB cable to connect the
camera directly to a computer.
Windows 95 Windows NT Mac OS before OS 9
You can download images directly to your computer using a PC card adapter.
Does your computer have a USB interface?
The USB port is indicated by a mark. Check that the port has the mark.
No
En
No
Does your computer have a built-in PC card slot?
No
Yes
Is your OS one of
the following?
• Windows 98
• Windows 2000
• Windows Me
• Windows XP
• Mac OS 9/X
Yes
Connect the camera directly to
Yes
your computer using the
provided USB
cable.
Use the optional USB reader/
writer.
*Certain card readers may not
be compatible with Mac OS X.
Check the Olympus website for
the most up-to-date compatibility
information.
Use the optional PC card adapter.
*Not supported by Windows NT4.0 or lower.
Consult your nearest Olympus representative.
For more details, refer to the “Reference Manual” on CD-ROM.
For connection to the PC, refer to the “Software Installation Guide”
included in the CD-ROM package.
38 En
Page 39

basic_e_d4226_7.fm Page 39 Thursday, February 5, 2004 1:00 PM
ERROR CODES
Monitor
indication
NO CARD
CARD ERROR
WRITE-
PROTECT
CARD FULL
NO PICTURE
PICTURE
ERROR
CARD-COVER
OPEN
CARD%SEtUP
POWER%OFF
FORMAt
SELECt
GO
Possible cause Corrective action
The card is not inserted,
or it cannot be recognized.
There is a problem with the
card.
Writing to the card is
prohibited.
The card is full.
No more pictures, movies or
information such as print
reservations can be
recorded.
There are no pictures on the
card.
There is a problem with the
selected picture and it
cannot be played back on
this camera.
The card cover is open. Close the card cover.
The card is not formatted. Format the card.
Insert a card or insert a different card.
If the problem persists, format the
card. If the card cannot be formatted,
it cannot be used.
Use a different card. Insert a new
card.
The recorded image has been
protected (read-only) on a PC.
Download the image to a PC and
cancel the read-only setting.
Replace the card or erase unwanted
pictures. Before erasing, download
important images to a PC.
The card contains no pictures.
Record pictures.
Use image processing software to
view the picture on a PC. If that
cannot be done, the image file is
damaged.
All data on the card is deleted.
En
En 39
Page 40

basic_e_d4226_7.fm Page 40 Thursday, February 5, 2004 12:23 PM
SPECIFICATIONS
Product type : Digital camera (for shooting and displaying)
Recording system
Still picture : Digital recording, TIFF (non-compression), JPEG (in
Applicable standards : Exif 2.2, Digital Print Order Format (DPOF),
Sound with still pictures : Wave format
Movie : QuickTime Motion JPEG support
Memory : xD-Picture Card (16-512 MB)
Resolution : 3200 × 2400 pixels (ENLARGE SIZE: SHQ, HQ)
En
No. of storable pictures
when using a 16 MB card
(Without sound)
No. of effective pixels : 4,000,000 pixels
Image pickup device : 1/2.5" CCD solid-state image pickup,
Lens : Olympus lens 6.3 mm to 63 mm, f2.8 to f3.7,
Photometric system : ESP metering, spot metering system
Aperture : f2.8 to f8.0
Shutter speed : 15 to 1/1000 sec.
Shooting range : 0.6 m (2 ft.) to ) (w), 2 m (6.6 ft.) to ) (T) (NORMAL)
Viewfinder : 0.44" TFT color LCD display, 240,000 pixels
accordance with Design rule for Camera File system
(DCF))
PRINT Image Matching II, PictBridge
2288 × 1712 pixels (TIFF, SHQ, HQ)
2288 × 1520 pixels (3:2 TIFF, SHQ, HQ)
2048 × 1536 pixels (TIFF, SQ1)
1600 × 1200 pixels (TIFF, SQ1)
1280 × 960 pixels (TIFF, SQ1)
1024 × 768 pixels (TIFF, SQ2)
640 × 480 pixels (TIFF, SQ2)
: Approx. 1 frame (TIFF : 2288 × 1712)
Approx. 5 frames (SHQ : 2288 × 1712)
Approx. 16 frames (HQ : 2288 × 1712)
Approx. 49 frames (SQ1 : 1280 × 960 NORMAL)
Approx. 165 frames (SQ2 : 640 × 480 NORMAL)
4,110,000 pixels (gross)
11 elements in 7 groups
(equivalent to 38 mm to 380 mm lens on 35 mm camera)
0.07 m (0.2 ft.) to ) (w), 1.2 m (4 ft.) to ) (T) (macro
mode)
40 En
Page 41

basic_e_d4226_7.fm Page 41 Thursday, February 5, 2004 11:47 AM
Monitor : 1.8" TFT color LCD display, 118,000 pixels
Auto focus : TTL system autofocus
Outer connector : DC-IN jack, USB connector (mini-B), A/V OUT jack
Automatic calendar
system
Operating environment
Temperature : 0°C to 40°C (32°F to 104°F) (operation)
Humidity : 30% to 90% (operation) /10% to 90% (storage)
Power supply : Only an Olympus LI-10B lithium-ion battery
Dimensions : 104.5 mm (W) × 60 mm (H) × 68.5 mm (D)
Weight : 280 g (0.62 lb.) (without battery or card)
Contrast detection system
: 2000 up to 2099
–20°C to 60°C (–4°F to 140°F) (storage)
AC adapter specified by Olympus (optional)
(4.1" × 2.4" × 2.7") (excluding protrusions)
SPECIFICATIONS ARE SUBJECT TO CHANGE WITHOUT ANY NOTICE OR
OBLIGATION ON THE PART OF THE MANUFACTURER.
En
En 41
Page 42

basic_f_d4226_7.fm Page 42 Thursday, February 5, 2004 10:12 AM
TABLE DES MATIÈRES
GUIDE RAPIDE DE DÉMARRAGE. . . . . . . . . . . . . . . . .44
FONCTIONS DU MENU . . . . . . . . . . . . . . . . . . . . . . . . .56
INSTRUCTIONS DE BASE . . . . . . . . . . . . . . . . . . . . . . .62
Prise de vue fixe . . . . . . . . . . . . . . . . . . . . . . . . . . . . . 64
Si une mise au point satisfaisante est impossible
(mémorisation de la mise au point) . . . . . . . . . . . . 65
Enregistrement de films . . . . . . . . . . . . . . . . . . . . . . .66
Zoom avant sur un sujet (Zoom optique) . . . . . . . . . .66
Utilisation du flash . . . . . . . . . . . . . . . . . . . . . . . . . . . . 67
Utilisation du retardateur . . . . . . . . . . . . . . . . . . . . . . . 68
PRISE DE VUE ÉLABORÉE . . . . . . . . . . . . . . . . . . . . . . 69
AFFICHAGE . . . . . . . . . . . . . . . . . . . . . . . . . . . . . . . . . .71
Fr
Affichage de vues fixes . . . . . . . . . . . . . . . . . . . . . . . .71
Lecture de vidéos . . . . . . . . . . . . . . . . . . . . . . . . . . . .72
Protection des photos . . . . . . . . . . . . . . . . . . . . . . . . .73
Effacement de photos . . . . . . . . . . . . . . . . . . . . . . . . .73
Formatage (configuration de la carte) . . . . . . . . . . . . . 74
Affichage sur un téléviseur . . . . . . . . . . . . . . . . . . . . .75
RÉSERVATION D’IMPRESSION/IMPRESSION DIRECTE
TRANSFERT DES PHOTOS VERS UN ORDINATEUR
CODES D’ERREUR. . . . . . . . . . . . . . . . . . . . . . . . . . . . .79
CARACTÉRISTIQUES . . . . . . . . . . . . . . . . . . . . . . . . . .80
. . .76
. . .77
Ces instructions sont uniquement destinées à une prise en main
rapide. Vous trouverez un descriptif plus détaillé des fonctions
dans le “Manuel de référence” sur le CD-ROM.
42 Fr
Page 43

basic_f_d4226_7.fm Page 43 Thursday, February 5, 2004 10:12 AM
J Lisez soigneusement ce manuel avant d’utiliser votre appareil photo afin de garantir un
usage correct.
J Nous vous conseillons d’effectuer quelques prises de vue d’essai pour vous familiariser
avec votre appareil avant de prendre des photographies importantes.
J Ce manuel contient uniquement des instructions de base. Vous trouverez un descriptif
plus détaillé des fonctions dans le Manuel de référence sur le CD-ROM. Pour le
raccordement à un ordinateur ou l’installation du logiciel fourni, reportez-vous au Guide
d’installation du logiciel sur le CD-ROM.
Pour les utilisateurs en Amérique du Nord et du Sud
Pour les utilisateurs aux États-Unis
Déclaration de conformité
Numéro de modèle : C-765 Ultra Zoom
Marque : OLYMPUS
Organisme responsable : Olympus America Inc.
Adresse : 2 Corporate Center Drive, Melville, New York
11747-3157 U.S.A.
Numéro de téléphone : 1-631-844-5000
Testé pour être en conformité avec la réglementation FCC
POUR L’UTILISATION A LA MAISON OU AU BUREAU
Cet appareil est conforme aux normes de la Section 15 des directives FCC.
Son utilisation est soumise aux deux conditions suivantes:
(1) Cet appareil ne doit pas causer de brouillage radioélectrique.
(2) Cet appareil doit pouvoir résister à toutes les interférences, y compris
celles susceptibles d’entraver son bon fonctionnement.
Pour les utilisateurs au Canada
Cet appareil numérique de la catégorie B est conforme à la législation
canadienne sur les appareils générateurs de parasites.
Pour les utilisateurs en Europe
Le label “CE” indique que ce produit est conforme aux normes
européennes en matière de sécurité, de santé, d’environnement et
de protection du consommateur. Les appareils photo comportant le
label “CE” sont destinés à être vendus en Europe.
Fr
Marques déposées
• IBM est une marque déposée de la société International Business Machines
Corporation.
• Microsoft et Windows sont des marques déposées de la société Microsoft
Corporation.
• Macintosh est une marque de Apple Computer Inc.
• Tous les autres noms de sociétés et appellations de produits sont des marques,
déposées ou non, des propriétaires respectifs.
• Les normes pour les systèmes de fichiers d’appareil photo indiquées dans ce
manuel sont les normes “Design Rule for Camera File System/DCF” stipulées par
l’association JEITA (Japan Electronics and Information Technology Industries
Association).
Fr 43
Page 44

basic_f_d4226_7.fm Page 44 Thursday, February 5, 2004 10:12 AM
GUIDE RAPIDE DE DÉMARRAGE
J NOMENCLATURE DES PIÈCES
Levier de zoom (W/T•GU)
Déclencheur
Molette Mode
Flash
Voyant du retardateur
Fr
Objectif
Œillet de courroie
Microphone
44 Fr
Prise d’entrée CC
(DC-IN)
Connecteur USB
Prise A/V OUT (MONO)
Couvercle de connecteur
Page 45

basic_f_d4226_7.fm Page 45 Thursday, February 5, 2004 10:12 AM
Viseur
Molette de réglage dioptrique
Écran ACL
Touche Mémorisation AE/
personnalisée
Touche de rotation (y)
Touche du retardateur (Y)
Touche d’effacement (S)
Couvercle de la carte/de la batterie
(
x)
Touche Mode flash (#)
Touche de protection (0
Touche Flash
Voyant d’accès de carte
Touche QUICK VIEW
Molette de défilement (acbd)
Touche OK/Menu (e)
Touche de l’écran ACL (f)
Commutateur marche/arrêt
)
Fr
Embase filetée
de trépied
Fr 45
Page 46

0.0
2288 1712
HQ
00:36
ISO100
basic_f_d4226_7.fm Page 46 Thursday, February 5, 2004 10:12 AM
J
INDICATIONS SUR LE VISEUR ET L’ÉCRAN ACL
Mode prise de vue
0.0
2288 1712
HQ
Vue fixe Vidéo
Éléments Indications
1 Mode prise de vue P, A, S, M, N, m, L, J, I, s, P
Fr
2 Vitesse d’obturation 15" – 1/1000
3 Valeur de l’ouverture F2.8 – F8.0
4
Compensation d’exposition
Différentiel d’exposition
-2.0 – +2.0
-3.0 – +3.0
5 Contrôle de la batterie e, f
6 Voyant vert
7
Flash en attente
Avertissement de bougé/
#(Allumé)
#(Clignote)
Chargement du flash
8 Mode gros plan
Mode Super gros plan
Mise au point manuelle
&
%
MF
9 Réduction des parasites O
10 Mode de flash !, #, $, #SLOW1,
HSLOW1, #SLOW2
11 Commande d’intensité
w -2.0 – +2.0
du flash
12 Mode d’entraînement o, j, i, k, 7
ISO100
00:36
00:36
46 Fr
Page 47

basic_f_d4226_7.fm Page 47 Thursday, February 5, 2004 10:12 AM
Éléments Indications
13 Retardateur Y
14 Enregistrement du son R
15 Mode d’enregistrement TIFF, SHQ, HQ, SQ1, SQ2
16 Résolution 2288 × 1712, 1280 × 960, 640 × 480 etc.
17 Repères de mise au
point automatique
18 Nombre de vues
enregistrables
Secondes restantes3000:36
19 Mémorisation AE
Mémoire AE
20 Mesure ponctuelle n
21 ISO ISO 64, ISO 100, ISO 200, ISO 400
22 Balance des blancs 5, 3, 1, w, x, y, V
23 Réglage de la balance
des blancs
24 Saturation 6-5 – +5
25 Netteté N -5 – +5
26 Contraste J -5 – +5
27 Bloc mémoire a, b, c, d
[]
B
C
B1 – B7, R1 – R7
Fr
Fr 47
Page 48

'04.06.17 15:30
0.0
2288*1712
HQ
'04.06.177
5:30
00:00/00:20
basic_f_d4226_7.fm Page 48 Thursday, February 5, 2004 10:12 AM
Mode affichage
12 345
2288*1712
'04.06.17 15:30
HQ
0.0
'04.06.1
00:00/00:20
Vue fixe Vidéo
Éléments Indications
1 Contrôle de la batterie e, f
2 Changement d’image J
3
Réservation d’impression,
Nombre de copies Image
Fr
vidéo
< × 10
n
4 Enregistrement du son H
5Protection 9
6 Mode d’enregistrement TIFF, SHQ, HQ, SQ1, SQ2
7 Résolution 2288 × 1712, 1280 × 960, 640 × 480,
320 × 240 etc.
8 Valeur de l’ouverture F2.8 – F8.0
9 Vitesse d’obturation 15" – 1/1000
10
Compensation d’exposition
-2.0 – +2.0
11 Balance des blancs WB AUTO, 5, 3, 1, w, x, y, V
12 Sensibilit
é
ISO ISO 64, ISO 100, ISO 200, ISO 400
13 Date et heure ’04.06.17 15:30
14 Numéro de fichier,
FILE : 100 – 0030, 30
Numéro de photo
Durée de lecture/Durée
00:00/00:20
d’enregistrement totale
15:30
6
7
11
13
14
48 Fr
Page 49

2288 1712
HQ
basic_f_d4226_7.fm Page 49 Thursday, February 5, 2004 10:12 AM
Bloc mémoire
Le bloc mémoire d’image s’allume lorsque vous
effectuez une prise de vue fixe. L’appareil photo
enregistre la photo sur la carte pendant que le
bloc est allumé. L’indication du bloc mémoire
change comme indiqué ci-dessous en fonction
de la situation de prise de vue. L’indication ne
s’affiche pas pendant l’enregistrement d’une
vidéo.
Prise de vue Prise de vue Prise de vue
Contrôle de la batterie
2288 1712
HQ
Bloc mémoire
a b c d
Attente
Avant la
prise de vue
(Le bloc
mémoire
est éteint)
Une photo
est prise
(Allumé)
Plus de deux
photos sont prises
(Allumé)
Contrôle de la batterie
Si la batterie est presque déchargée, l’indicateur de contrôle de la batterie
prend l’aspect ci-dessous lorsque l’appareil est mis en marche ou pendant
son utilisation.
Aucune autre photo
ne peut être prise
(Complètement
allumé)
Attendez que le bloc
mémoire reprenne
l’aspect à gauche
pour prendre la
photo suivante.
Fr
ef
Allumé (vert)
(s’éteint après un
certain temps)
Énergie restante :
élevée
Énergie restante : faible
Charger la batterie.
Clignote (rouge)
BATTERY EMPTY
[BATTERIE VIDE]
s’affiche.
Énergie restante :
épuisée
Charger la batterie.
Fr 49
Page 50

basic_f_d4226_7.fm Page 50 Thursday, February 5, 2004 10:12 AM
J
FIXATION DE LA COURROIE ET DU BOUCHON D’OBJECTIF
123
Bague
Arrêtoir
45
Œillet de
courroie
Fr
J CHARGEMENT DE LA BATTERIE
Cet appareil photo emploie une batterie Olympus aux ions de lithium (LI-10B). Cette batterie
est exclusivement conçue pour cet appareil et les autres batteries ne fonctionnent pas.
La batterie n’est pas entièrement chargée au moment de l’achat de l’appareil. Chargez
entièrement la batterie sur le chargeur indiqué (LI-10C) avant la première utilisation.
Reportez-vous aux instructions fournies avec le chargeur pour plus d’informations.
1 Assurez-vous que
les pôles + et - de
la batterie illustrés à
droite sont
correctement
orientés lors de son
insertion dans le
chargeur.
•L
’indicateur de
chargement s’allume en
rouge au cours du
chargement.
• Une fois le chargement
terminé, l’indicateur du
chargeur passe du rouge au vert.
• Le chargement dure généralement 2 heures environ.
Bornes de connexion
Témoin de charge
Batterie lithium-ion
(LI-10B)
50 Fr
Page 51

basic_f_d4226_7.fm Page 51 Thursday, February 5, 2004 10:12 AM
J INSERTION ET RETRAIT DE LA BATTERIE
ET DE LA CARTE
1
Assurez-vous que l’appareil photo est éteint.
• L’écran ACL est éteint.
• Le viseur est éteint.
• L’objectif n’est pas sorti.
2 Faites glisser le couvercle du
compartiment de la batterie et de la
B
carte en direction de A et levez-le
ensuite vers B.
• Faites glisser le couvercle avec le bout du
doigt. N’utilisez pas votre ongle, vous
risqueriez de vous blesser.
A
3 Mise en place de la batterie
Alignez la batterie comme indiqué et
insérez-la dans le compartiment de
batterie jusqu’à ce qu’elle se
verrouille en position avec son
bouton de blocage.
Bouton de blocage de la
Retrait de la batterie
Faire glisser le bouton dans la
direction de la flèche. Une fois la
batterie éjectée, la tirer hors de son
compartiment.
batterie
Bouton de blocage
de la batterie
Fr
Indication de batterie faible
La quantité d’énergie consommée varie considérablement en fonction
des opérations effectuées sur l’appareil photo numérique. Si vous
utilisez une batterie épuiséee, l’appareil risque de s’éteindre sans
afficher l’avertissement de niveau de charge.
Fr 51
Page 52

basic_f_d4226_7.fm Page 52 Thursday, February 5, 2004 10:12 AM
Insertion d’une carte
Insérez la carte dans le bon sens.
• Tenez la carte droite pendant que vous
l’insérez.
• Si la carte est insérée à l’envers ou en biais,
vous risquez d’endommager la zone de
contact ou de coincer la carte.
• Si la carte n’est pas entièrement insérée, les
données ne pourront pas y être
enregistrées.
Encoche
Retrait de la carte
Poussez la carte à fond pour la
déverrouiller puis laissez-la sortir
lentement.
• La carte est éjectée sur une courte distance puis
s’arrête. Tenez la carte droite et sortez-la.
Fr
4 Refermez le couvercle du compartiment
de la batterie et de la carte en appuyant
dans la direction C et faites-le glisser
dans la direction D.
Remarques sur le retrait de la carte
Si vous retirez votre doigt rapidement après avoir enfoncé la carte à
fond, elle risque d’être propulsée brutalement hors de son logement.
Zone de contact
C
D
52 Fr
Page 53

basic_f_d4226_7.fm Page 53 Thursday, February 5, 2004 10:12 AM
J MISE EN MARCHE/ARRÊT
Appuyez sur les boutons du
1
bouchon d’objectif comme
indiqué par les flèches et retirez
le bouchon d’objectif.
2 Appuyez sur le commutateur
marche/arrêt.
• L’appareil s’allume et l’objectif se déploie
lorsque vous faites tourner la molette de
sélection de mode dans toute position
différente de q. Le viseur s’allume.
• Lorsque la molette Mode se trouve en
position q, l’appareil photo s’allume en
mode affichage et l’écran ACL s’allume.
3 Appuyez de nouveau sur le
commutateur marche/arrêt pour
éteindre l’appareil.
• Pour économiser l’énergie de la batterie, l’appareil passe
automatiquement en mode veille et cesse de fonctionner après 3
Remarque
minutes d’inactivité. L’appareil se réactive dès que vous appuyez
sur le déclencheur ou le levier du zoom.
Molette Mode
Fr
Fr 53
Page 54

basic_f_d4226_7.fm Page 54 Thursday, February 5, 2004 10:12 AM
J SÉLECTION DE LA LANGUE W
1
Amenez la molette Mode sur P et appuyez sur le
commutateur marche/arr
êt pour allumez l’appareil.
2 Appuyez sur e.
• Le menu principal s’affiche.
3 Appuyez sur d pour sélectionner MODE MENU.
4 Appuyer sur ac pour sélectionner l’onglet SETUP et
appuyez sur d.
5 Appuyez sur ac pour sélectionner W, puis appuyez
sur d.
• L’encadré vert passe sur l’élément sélectionné.
6 Appuyez sur ac pour sélectionner une langue, puis
appuyez sur e.
7 Appuyez de nouveau sur e pour quitter le menu.
Fr
8 Pour éteindre l’appareil, appuyez sur le commutateur
marche/arrêt.
54 Fr
Page 55

basic_f_d4226_7.fm Page 55 Thursday, February 5, 2004 10:12 AM
J
RÉGLAGE DE LA DATE ET DE L’HEURE X
1
Amenez la molette Mode sur P et appuyez sur le
commutateur marche/arr
êt pour allumez l’appareil.
2 Appuyez sur e.
• Le menu principal s’affiche.
3 Appuyez sur d pour sélectionner MODE MENU.
4 Appuyer sur ac pour sélectionner l’onglet SETUP et
appuyez sur d.
5 Appuyez sur ac pour sélectionner X, puis appuyez
sur d.
• L’encadré vert passe sur l’élément sélectionné.
6 Appuyez sur ac pour sélectionner l’un des formats de
date suivants: Y-M-D (Année/Mois/Jour), M-D-Y (Mois/
Jour/Année), D-M-Y (Jour/Mois/Année). Appuyez ensuite
sur d.
• Passez au réglage de l’année.
• Les étapes suivantes montrent la procédure utilisée lorsque le format
de date est Y-M-D.
7 Appuyez sur ac pour régler l’année, puis appuyez sur
d pour passer au réglage du mois.
• Pour revenir au réglage précédent, appuyez sur b.
• Les deux premiers chiffres de l’année sont fixes.
8 Répétez cette procédure jusqu’à ce que la date et l’heure
soient complètement réglées.
• L’heure est affichée au format 24 heures. Par conséquent, 2 heures de
l’après-midi s’affiche sous la forme 14:00.
9 Appuyez sur e.
• Pour un réglage plus précis, appuyez sur e lorsque l’horloge franchit
00 seconde. L’horloge démarre lorsque vous appuyez sur le bouton.
10 Pour éteindre l’appareil, appuyez sur le commutateur
marche/arrêt.
Fr
• Les paramètres de date et d’heure reprendront les valeurs par
défaut d’usine si l’appareil photo est laissé sans batterie durant
Remarque
environ une journée.
Fr 55
Page 56

basic_f_d4226_7.fm Page 56 Thursday, February 5, 2004 10:12 AM
FONCTIONS DU MENU
J
UTILISATION DES MENUS ET DES ONGLETS
Lorsque vous mettez l’appareil sous tension et que vous appuyez sur e, le
menu principal s’affiche sur l’écran ACL (ou viseur). C’est à partir des menus
que vous réglez chacune des fonctions de l’appareil.
Le menu principal s’affiche.
ESP
MODE MENU
Appuyez sur e.
Utilisez la molette de
défilement pour
Fr
Menus Raccourcis
• Vous amène directement aux
écrans de réglage.
• Affiche les touches à utiliser au
bas de l’écran.
• Les fonctions enregistrées dans
les menus raccourcis sont
également accessibles depuis le
MODE MENU.
• Les menus raccourcis peuvent
être remplacés dans les modes
autres que hnq.
sélectionner un menu.
MODE MENU
• Permet d’accéder aux options de
menu servant à définir la
sensibilité ISO, le netteté, etc.
• Organise les paramètres en 4
onglets.
• Appuyez sur ac pour
sélectionner un onglet et afficher
les options correspondantes.
• Le mode menu n’existe pas en
h.
Comment utiliser les mode menus
1
Appuyez sur e pour afficher le menu principal. Appuyez sur
2
Appuyez sur
3
Appuyez sur
4
Appuyez sur
pour terminer le réglage.
Appuyez de nouveau sur
prise de vue.
56 Fr
ac
pour sélectionner un onglet, puis appuyez sur
ac
pour sélectionner un élément, puis appuyez sur
ac
pour sélectionner un paramètre. Appuyez sur e
e
pour quitter le menu et retourner en mode
d
.
d
.
d
.
Page 57

basic_f_d4226_7.fm Page 57 Thursday, February 5, 2004 10:12 AM
Menus Raccourcis
Mode prise de vue
DRIVE
Sélectionne un mode de prise de vue parmi o (prise d’une seule vue), j
(prise de vue en série), i (prise de vue en série à grande vitesse),
k (prise de vue en série avec mise au point automatique) et BKT
(bracketing automatique).
ESP/5
Sélectionnez la méthode de mesure (ESP, 5 ou MULTI).
DIGITAL ZOOM [ZOOM NUM]
Amplifie le zoom optique maximum, ce qui porte le facteur de
grossissement à environ 40x.
K
Règle la qualité et résolution.
Vue fixe : TIFF*, SHQ, HQ, SQ1, SQ2
Vidéo : SHQ, HQ, SQ
*TIFF ne peut pas être sélectionné quand la molette mode est sur h.
&
Sert à prendre des photos d’un sujet proche. Sélectionne OFF, & ou %.
WB (Balance des blancs)
Règle la balance des blancs appropriée selon la source de lumière.
X
Règle la date et l’heure.
CARD SETUP [DEF CARTE]
Formate une carte.
[ ]: Lorsque le français est sélectionné.
Mode affichage
Fr
m
Affiche toutes les images enregistrées l’une après l’autre.
Fr 57
Page 58

OFF
AUtO
ESP
basic_f_d4226_7.fm Page 58 Thursday, February 5, 2004 10:12 AM
MOVIE PLAY [LECT MOVIE]
MOVIE
Lit les vidéos.
PLAYBACK
[LECT MOVIE]
INDEX Crée une image index d’une vidéo en 9 vues fixes.
EDIT
Édition d’une vidéo.
[RETOUCHER]
INFO
Affiche toutes les informations de prise de vue sur l’écran ACL.
SWITCH FRAME [CHANGEMENT D’IMAGE]
Sélectionne ALL pour afficher toutes les images ou 0 pour afficher
seulement les images protégées.
[ ]: Lorsque le français est sélectionné.
Menus Mode
Fr
Le MODE MENU comprend 4 onglets. Appuyez sur ac pour sélectionner
un onglet et afficher les options correspondantes.
Ces instructions sont uniquement destinées à une prise en main
rapide. Vous trouverez un descriptif plus détaillé des fonctions
dans le “Manuel de référence” sur le CD-ROM.
Mode prise de vue
Onglet CAMERA
Onglet PICTURE [PHOTO]
Onglet CARD [CARTE]
Onglet SETUP [CONFIG]
Onglet CAMERA
ESP/5
&
58 Fr
DRIVE
ISO
A/S/M
ESP
OFF
AUtO
ESP
CAMERA
CARDSEt PIC
Sélectionne la méthode de mesure (ESP, 5 ou MULTI).
Sert à pour prendre des photos d’un sujet proche.
Sélectionne OFF, &, %.
Page 59

basic_f_d4226_7.fm Page 59 Thursday, February 5, 2004 10:12 AM
Sélectionne un mode de prise de vue parmi o (prise
DRIVE
ISO
A/S/M
r1/2/3/4
w
#SLOW
NOISE REDUCTION
[REDUC BRUIT]
DIGITAL ZOOM
[ZOOM NUM]
FULLTIME AF
[AF CONTINU]
AF MODE
[MODE AF]
o
PANORAMA
[PANORAMIQUE]
2 IN 1 [2 EN 1]
FUNCTION
[FONCTION]
AF AREA
[ZONE AF]
INFO
u
R (vues fixes) Enregistre le son lors d’une prises de vue fixes.
R (vidéos)
SUPER ZOOM
[ ]: Lorsque le français est sélectionné.
d’une seule vue), j (prise de vue en série), i
(prise de vue en série à grande vitesse),
de vue en série avec mise au point automatique) et
(bracketing automatique).
Sélectionne la sensibilité ISO AUTO, 64, 100, 200 ou 400.
Sélectionne le mode de prise de vue parmi A (prise de
vue avec priorité à l’ouverture), S (prise de vue avec
priorité à la vitesse) et M (prise de vue manuelle).
Sélectionne le mode à activer lors des prises de vue
en mode r.
Permet de régler la quantité de lumière émise par le flash.
Sélectionne l’option de #SLOW1 (Premier rideau),
H
SLOW1 (1er rideau avec atténuation des yeux
rouges) et
choisi le mode flash #SLOW (synchronisation lente).
Réduit les parasites qui affectent les images
pendant les expositions longues.
Amplifie le zoom optique maximum, ce qui porte le
facteur de grossissement à environ 40×.
Conserve la mise au point de l’image à tout moment sans
qu’il soit nécessaire d’enfoncer le déclencheur à mi-course.
Sélectionne la méthode de mise au point
automatique (iESP ou SPOT).
Vous permet de prendre une photo de vous-même
tout en tenant l’appareil.
Permet de prendre des photos panoramiques avec
des cartes de marque Olympus CAMEDIA.
Fusionne deux photos prises à la suite et les
enregistre comme une seule image.
Ajoute des effets spéciaux aux images (BLACK &
WHITE, SEPIA, WHITE BOARD, BLACK BOARD).
Modifie la position des repères de mise au point
automatique à l’aide de la Molette de défilement.
Permet de sélectionner s’il faut afficher toutes les
informations comme la vitesse d’obturation et la balance
des blancs ou seulement les informations minimales.
Affiche un histogramme indiquant la distribution de la
lumière sur les images fixes.
Permet d’enregistrer le son en même temps qu’une vidéo.
Vous ne pouvez lire la piste sonore que lorsque vous
visionnez sur un ordinateur, une télévision, etc.
Amplifie le zoom optique, ce qui porte le facteur de
grossissement à environ 14× en mode
d'enregistrement 1600 × 1200.
SLOW2 (Second rideau) si vous avez
#
k
(prise
BKT
Fr
Fr 59
Page 60

basic_f_d4226_7.fm Page 60 Thursday, February 5, 2004 10:12 AM
Onglet PICTURE
[PHOTO]
K
WB
(Balance des blancs)
>
SHARPNESS
[NETTETE]
CONTRAST
[CONTRASTE]
SATURATION
Onglet CARD
[CARTE]
CARD SETUP
[CONFIG CARTE]
Onglet SETUP
[CONFIG]
ALL RESET
[TOUT REINIT]
Fr
W
PW ON/OFF SETUP
[CONFIG ON/OFF]
REC VIEW
[VISUAL IMAGE]
SLEEP [VEILLE] Règle la minuterie de mise en veille.
MY MODE SETUP
[MY MODE]
FILE NAME
[NOM FICHIER]
PIXEL MAPPING
s
X Règle la date et l’heure.
m/ft
VIDEO OUT
[SORTIE VIDEO]
SHORT CUT
[RACCOURCI]
CUSTOM BUTTON
[BOUT PERSO]
8
[ ]: Lorsque le français est sélectionné.
Règle la qualité et résolution.
Vue fixe: TIFF, SHQ, HQ, SQ1, SQ2
Règle la balance des blancs appropriée selon la
source de lumière.
Permet d’effectuer un réglage fin de la balance des blancs.
Règle la netteté de l’image.
Règle le contraste de l’image.
Règle le niveau de profondeur des couleurs sans modifier la teinte.
Formate une carte.
Détermine si les réglages actuels de l’appareil doivent
être conservés ou non lorsque vous coupez l’alimentation.
Sélection de la langue des messages affichés.
Définit l’image affichée lors de l’arrêt et de la mise
sous tension.
Détermine si les photos sont affichées ou non sur
l’écran ACL pendant leur enregistrement sur une carte.
Personnalise les paramètres activés en mode r.
Change la méthode d’attribution des noms de fichiers.
Vérifie si les fonctions de CCD et de traitement de l’image
ne présentent pas d’erreurs.
Règle la luminosité de l’écran ACL ou viseur.
Définit l’unité de mesure (m/ft) utilisée en mise au point manuelle.
Sélectionne NTSC ou PAL suivant le type de signal
vidéo de votre téléviseur. Le type de signal vidéo TV
varie en fonction de la région.
Affecte les fonctions fréquemment utilisées aux
menus raccourcis.
Affecte une fonction fréquemment utilisée à la touche
personnalisée de l’appareil photo.
Coupe le signal sonore pour l’utilisation des touches
et les avertissements.
60 Fr
Page 61

OFF
basic_f_d4226_7.fm Page 61 Thursday, February 5, 2004 10:12 AM
Mode affichage
Onglet PLAY [LECTURE]
Onglet EDIT
Onglet CARD [CARTE]
PLAY
CARDSEt EDIt
OFF
Onglet SETUP [CONFIG]
Onglet
*1
[LECTURE]
PLAY
<
u
R Ajoute des sons à une vue fixe déjà prise.
*1
L’onglet PLAY ne s’affiche pas pendant la lecture d’une vidéo.
Onglet EDIT
*2
Q
P
*2
L’onglet EDIT ne s’affiche pas pendant la lecture d’une vidéo.
Onglet CARD
[CARTE]
CARD SETUP
[CONFIG CARTE]
Onglet SETUP
[CONFIG]
ALL RESET
[TOUT REINIT]
W
PW ON/OFF SETUP
[CONFIG ON/OFF]
SCREEN SETUP
[DEF ECRAN]
s
Stocke dans la carte les informations nécessaires à
l’impression des photos prises.
Affiche un histogramme représentant la distribution de luminance.
Diminue la taille du fichier et l’enregistre sous un nouveau nom.
Détoure une partie de l’image et l’enregistre dans un nouveau fichier.
Supprime toutes les données d’images stockées sur
la carte ou formate la carte.
Détermine si les réglages actuels de l’appareil doivent
être conservés ou non lorsque vous coupez l’alimentation.
Sélection de la langue des messages affichés.
Définit l’image affichée lors de l’arrêt et de la mise
sous tension.
Mémorise une image enregistrée qui sera affichée
lors de la mise en marche ou de l’arrêt de l’appareil.
Règle la luminosité de l’écran ACL ou viseur.
X Règle la date et l’heure.
VIDEO OUT
[SORTIE VIDEO]
G
8
Sélectionnez NTSC ou PAL suivant le type de signal vidéo de votre
téléviseur. Le type de signal vidéo TV varie en fonction de la région.
Sélectionne le nombre de photos dans l’affichage d’index.
Coupe le signal sonore pour l’utilisation des touches
et les avertissements.
[ ]: Lorsque le français est sélectionné.
Fr
Fr 61
Page 62

basic_f_d4226_7.fm Page 62 Thursday, February 5, 2004 10:12 AM
INSTRUCTIONS DE BASE
Molette Mode
Les modes de prise de vue incluent notamment les modes dans lesquels les
réglages optimaux de l’image sont sélectionnés automatiquement et les
modes dans lesquels vous pouvez choisir les réglages les mieux adaptés
aux conditions de prise de vue et aux effets que vous souhaitez obtenir.
Vous pouvez changer de mode de prise de vue avant et après avoir allumé
l’appareil photo.
Molette Mode
Mode prise de
vue
Fr
Mode d’affichage
h Prise de vue entièrement automatique
Vous permet d’effectuer des prises de vue fixes sans utiliser aucune fonction
spéciale ni réglage manuel. L’appareil photo règle la mise au point et
l’exposition optimales. Il s’agit du mode de prises de vue le plus simple.
i Photo de portrait
Permet de prendre une photo-portrait d’une personne. Ce mode effectue la
mise au point sur le sujet, l’arrière-plan étant flou. L’appareil photo se règle
automatiquement pour des conditions de prise de vue optimales.
62 Fr
Page 63

basic_f_d4226_7.fm Page 63 Thursday, February 5, 2004 10:12 AM
j Photo de sport
Permet de capturer une action rapide (comme lors d’une épreuve sport) sans
flou de bougé. L’appareil photo se règle automatiquement pour des
conditions de prise de vue optimales.
l Photo de paysage
Permet de photographier des paysages et des scènes en extérieur. La mise
au point s’effectue à la fois sur le premier plan et sur l’arrière-plan. Ce mode
est particulièrement adapté à la photographie de paysages naturels car il
amplifie l’éclat du bleu et du vert. L’appareil photo se règle automatiquement
pour des conditions de prise de vue optimales.
m Scene nuit
Permet de faire des photos le soir ou la nuit. L’appareil photo ralentit la vitesse
d’obturation par rapport à une Scene nuit. Si vous utilisez le mode h, par
exemple, pour prendre une photo dans la rue la nuit, le manque de luminosité
produira une image sombre à l’arrière-plan sous-exposé et manquant de
détails. Le mode Prise de vue nocturne permet de restituer l’aspect réel de la
rue. L’appareil photo règle automatiquement les paramètres optimaux pour ce
type de prise de vue. Comme la vitesse d’obturation est lente, assurez-vous de
stabiliser l’appareil photo sur un trépied.
P Prise de vue programmée
Vous permet d’effectuer des prises de vue fixes. L’appareil photo règle
l’ouverture et la vitesse d’obturation. Les autres fonctions telles que le flash
et les modes d’entraînement peuvent être réglées manuellement.
p Prise de vue avec priorité à l’ouverture / priorité à la vitesse /
prise de vue manuelle
Lorsque la molette Mode se trouve sur p, vous pouvez définir les
éléments suivants avec les menus.
A Prise de vue avec priorité à l’ouverture
Vous permet de régler l’ouverture manuellement. L’appareil photo règle
automatiquement la vitesse d’obturation.
Appuyez sur a pour augmenter la valeur de l’ouverture. (indice F).
Appuyez sur c pour diminuer la valeur de l’ouverture. (indice F).
S Prise de vue avec priorité à la vitesse
Vous permet de régler manuellement la vitesse d’obturation. L’appareil
photo règle automatiquement l’ouverture.
Appuyez sur a pour augmenter la vitesse d’obturation.
Appuyez sur c pour diminuer la vitesse d’obturation.
Fr
Fr 63
Page 64

basic_f_d4226_7.fm Page 64 Thursday, February 5, 2004 10:12 AM
M Prise de vue manuelle
Vous permet de régler manuellement l’ouverture et la vitesse d’obturation.
Appuyez sur b pour augmenter la valeur de l’ouverture. (indice F).
Appuyez sur d pour diminuer la valeur de l’ouverture. (indice F).
Appuyez sur a pour augmenter la vitesse d’obturation.
Appuyez sur c pour diminuer la vitesse d’obturation.
r My Mode
Vous permet de mémoriser vos réglages préférés en tant que mode personnel
et utilise ces réglages personnalisés lors des prises de vue. Vous pouvez
également mémoriser les paramètres actuels et les rétablir à l’aide de ce mode.
n Enregistrement vidéo
Permet d’enregistrer des vidéos. L’appareil photo règle automatiquement
l’ouverture et la vitesse d’obturation. Même si le sujet se déplace pendant
l’enregistrement ou si la distance entre l’appareil et le sujet change, la mise
au point et l’exposition correctes sont maintenues en permanence. Si l’option
R est activée (ON), le son est enregistré simultanément.
Fr
J PRISE DE VUE FIXE
Vous pouvez effectuer des prises de vue fixe à l’aide de l’écran ACL ou du viseur.
1
Amenez la molette Mode sur
r p P
• L’écran ACL s’allume.
et appuyez sur le commutateur marche/arrêt.
h i j k l m o
Pour effectuer une prise de vue avec le viseur, appuyez
sur f pour l’allumer.
2 Choisissez le cadrage de la photo.
3 Appuyez doucement sur le déclencheur jusqu’à mi-course
pour effectuer la mise au point.
64 Fr
Page 65

F2.8
2288 1712
HQ
2288 1712
HQ
basic_f_d4226_7.fm Page 65 Thursday, February 5, 2004 10:12 AM
• Lorsque la mise au point et l’exposition
sont mémorisées, le voyant vert s’allume
(Mémorisation de la mise au point).
• Les repères de mise au point automatique
se déplacent sur la position ayant servi à
la mise au point.
• La vitesse d’obturation et l’ouverture sont
automatiquement réglées par l’appareil et
affichées (sauf en mode M).
• # clignote pour signaler un bougé de
l’appareil. Appuyez sur le levier du flash
pour le faire sortir.
Le flash est prêt à se déclencher lorsque #
•
s’allume après l’éjection du flash. Le flash se
déclenche automatiquement lorsque le déclencheur est enfoncé à fond.
HQ
2288 1712
Symbole#
Voyant
vert
F2.8
Repères de
mise au
point
automatique
4 Enfoncez complètement le déclencheur.
• L’appareil prend la photo.
Le voyant d’accès de carte clignote pendant l’enregistrement de l’image.
•
J SI UNE MISE AU POINT SATISFAISANTE
EST IMPOSSIBLE (MÉMORISATION DE LA
MISE AU POINT)
Lorsque la mise au point sur le sujet est impossible, vous pouvez effectuer la
mise au point sur quelque chose d’autre qui se trouve plus ou moins à la
même distance (mémorisation de la mise au point) et prendre la photo selon
la procédure décrite ci-dessous.
1
Placez les repères de mise au point
automatique autour du sujet sur lequel
vous voulez effectuer la mise au point.
• Lorsque vous prenez en photo un sujet sur
lequel il est difficile d’effectuer la mise au
point ou un sujet en mouvement, visez un
sujet placé à peu près à la même distance.
2
Enfoncez le déclencheur à mi-course
jusqu’à ce que le voyant vert s’allume.
•
Lorsque la mise au point et l’exposition sont mémorisées, le voyant vert s’allume.
• Les repères de mise au point automatique se déplacent sur la position
ayant servi à la mise au point.
• Le voyant vert clignote si la mise au point et l’exposition ne sont pas
mémorisées. Retirez votre doigt du déclencheur, recadrez le sujet puis
enfoncez à nouveau le déclencheur à mi-course.
2288 1712
HQ
Repères de mise au point automatique
Fr
Fr 65
Page 66

2288 1712
HQ
basic_f_d4226_7.fm Page 66 Thursday, February 5, 2004 10:12 AM
3 Recadrez votre photo tout en
maintenant le déclencheur enfoncé
à mi-course.
4
Enfoncez complètement le déclencheur.
2288 1712
J
ENREGISTREMENT DE FILMS
HQ
1 Amenez la molette Mode sur n et appuyez sur le
commutateur marche/arrêt.
• L’écran ACL s’allume.
•
La durée d’enregistrement disponible sur la carte que vous utilisez s’affiche.
2 Choisissez le cadrage de la photo.
• Vous pouvez utiliser le levier du zoom pour agrandir votre sujet.
3 Appuyez complètement sur le déclencheur pour
commencer l’enregistrement.
• Vous pouvez régler le zoom pendant l’enregistrement d’une vidéo. Le
son est enregistré simultanément.
• Le voyant d’accès de carte clignote pendant l’enregistrement de la
Fr
vidéo sur la carte.
• Pendant l’enregistrement d’une vidéo, N s’allume en rouge.
4 Appuyez de nouveau sur le déclencheur pour arrêter
l’enregistrement.
• Lorsque le temps d’enregistrement restant est épuisé,
l’enregistrement s’arrête automatiquement.
• S’il existe de l’espace disponible sur la carte mémoire, le temps
d’enregistrement restant s’affiche et l’appareil est prêt à effectuer une
prise de vue.
• En mode d’enregistrement de vidéo, il est impossible d’utiliser le
flash ou la mise au point manuelle (MF).
•
L’enregistrement est plus long pour les vidéos que pour les vues fixes.
Remarque
• Le temps d’enregistrement restant varie selon le mode
d’enregistrement et l’espace disponible sur la carte.
• Cet appareil photo ne peut pas lire les sons.
J
ZOOM AVANT SUR UN SUJET (ZOOM OPTIQUE)
Outre le zoom optique, cet appareil photo est doté d'un super zoom et d'un
zoom numérique permettant de prendre des photos au téléobjectif ou en grand
angle. Vous pouvez augmenter le facteur de grossissement en combinant le
super zoom ou le zoom numérique au zoom optique. Il est impossible d'utiliser
simultanément le super zoom et le zoom numérique.
Le risque de bougé est plus grand lorsque vous utilisez un facteur de
grossissement élevé. Il est donc conseillé de stabiliser l'appareil sur un
trépied, etc. pour éviter qu'il ne bouge.
66 Fr
Page 67

!
basic_f_d4226_7.fm Page 67 Thursday, February 5, 2004 10:12 AM
1 Pousser/tirer le levier
de zoom.
•
Grand angle: Pousser
tourner le levier de zoom
vers W pour un zoom arrière.
• Téléobjectif: Tirer tourner le
levier de zoom vers T pour
un zoom avant.
Levier de
zoom
2 Prenez la photo.
J UTILISATION DU FLASH
Appuyez sur la touche du flash.
1
• Le flash est éjecté.
2 Régler le mode du flash en appuyant plusieurs fois sur #.
• Le mode du flash change selon la séquence ci-dessous (si tous les
modes sont disponibles).
AUTO
(Flash automatique)
(flash atténuant
les yeux rouges)
Fr
#SLOW
(synchronisation lente)
• Pour éviter que le flash ne se déclenche, appuyez sur son haut pour le
faire rentrer.
# (flash d’appoint)
3 Enfoncez le déclencheur à mi-course.
• # s’allume dans les conditions de déclenchement du flash.
4
Enfoncez complètement le déclencheur pour prendre la photo.
CONSEILS
Plage de fonctionnement du flash
W (max.): environ 0,3 m à 4,5 m
T (max.) : environ 1,2 m à 3,5 m
Fr 67
Page 68

basic_f_d4226_7.fm Page 68 Thursday, February 5, 2004 10:12 AM
Flash automatique (Pas d’indication)
Le flash se déclenche automatiquement lorsque l’éclairage est faible ou à contre-jour.
Flash atténuant l’effet “yeux rouges” (!)
Ce mode permet d’atténuer sensiblement l’effet “yeux rouges” en émettant
une série de pré-éclairs avant de déclencher l’éclair principal.
Flash d’appoint (#)
Le flash se déclenche après chaque pression du déclencheur.
Flash débrayà ($)
Le flash ne se déclenche pas, même dans des situations de faible éclairage.
Synchronisation lente (#SLOW1 #SLOW2 !#SLOW1)
Premier rideau (rideau avant) #SLOW1 (réglage d’usine par défaut):
Ajuste le flash pour des vitesses d’obturation lentes.
Second rideau (rideau arrière) #SLOW2:
Le second rideau déclenche le flash juste avant la fermeture de l’obturateur.
Premier rideau avec atténuation de l’effet “yeux rouges” !#
SLOW1:
Ajuste le flash pour des vitesses d’obturation lentes, et minimise l’effet “yeux
Fr
rouges”.
J UTILISATION DU RETARDATEUR
Cette fonction vous permet d’effectuer des prises de vue en utilisant le
retardateur. Pour la prise de vue avec retardateur, fixez solidement l’appareil
sur un trépied. Cette fonction est utile lorsque la personne qui prend la photo
veut également y figurer.
1 Sélectionnez Y en appuyant plusieurs fois sur Y.
2 Enfoncez complètement le
déclencheur pour prendre la photo.
• Enfoncez le déclencheur à mi-course pour
mémoriser la mise au point et l’exposition.
• Le voyant du retardateur s’allume pendant
environ 10 secondes, puis commence à
clignoter. La photo est prise après environ
2 secondes de clignotement.
Voyant du retardateur
68 Fr
Page 69

basic_f_d4226_7.fm Page 69 Thursday, February 5, 2004 10:12 AM
PRISE DE VUE ÉLABORÉE
J PRISE DE VUE EN SÉRIE
Il existe 4 modes de prise de vue en série: prise de vue en série, prise de vue
en série à grande vitesse, prise de vue en série avec mise au point
automatique, et bracketing automatique. Vous pouvez sélectionner les
modes de prise de vue en série dans le menu DRIVE.
La prise de vue en série est impossible lorsque le mode d’enregistrement est
TIFF.
Mode d’entraînement (DRIVE)
o Effectue une prise de vue à la fois lorsque le déclencheur est
j La mise au point, l’exposition et la balance des blancs sont
i Les photos peuvent être prises plus rapidement que lors d’une
k La mise au point est réglée séparément pour chaque prise de vue.
BKT En mode bracketing automatique, l’exposition est modifiée
J MESURE
Il existe trois méthodes pour mesurer la luminosité d’un sujet.
Mesure ESP : mesure séparément le centre du sujet et la zone
Mesure ponctuelle : l’exposition est déterminée en effectuant la
Mesure multiple : mesure la luminosité du sujet sur 8 points
enfoncé (mode prise de vue normale, une photo à la fois).
réglées lors de la première photo.
Environ 7 photos, à 1,6 images/sec. (en mode HQ)
prise de vue en série normale. La vitesse de la prise de vue en
série varie en fonction du mode d’enregistrement sélectionné.
2 photos, à 2,1 images/sec.
La vitesse de prise de vue en série AF est plus lente que pour la
prise de vue en série normale.
automatiquement à chaque photo lorsque vous déclenchez la
prise de vue. Vous pouvez sélectionner le différentiel d’exposition
et le nombre de photos dans les menus. La mise au point et la
balance des blancs sont réglées lors de la première photo.
qui l’entoure.
mesure à l’intérieur de la zone de mise au point
automatique. Ce mode permet de photographier
un sujet avec une exposition optimale
indépendamment de la lumière en arrière-plan.
différents pour déterminer l’exposition optimale en
fonction de la luminosité moyenne. Cette méthode
est utilise en présence d’un sujet fortement
contrasté.
Fr
Fr 69
Page 70

basic_f_d4226_7.fm Page 70 Thursday, February 5, 2004 10:12 AM
J MÉMORISATION AE (AE LOCK)
Cette fonction est intéressante dans les situations où une exposition optimale
est difficile à obtenir, par exemple en présence d’un contraste excessif entre
le sujet et la scène qui l’entoure.
J PRISE DE VUE EN MODE GROS PLAN
La mise au point est généralement lente lorsque vous vous rapprochez d’un
sujet (W : 7 cm à 60 cm, T : 1,2 m à 2 m). Le mode & permet cependant une
mise au point plus rapide. Lorsque le levier du zoom optique se trouve en
position grand angle maximum et que vous vous trouvez à 7 cm du sujet,
celui-ci peut remplir la totalité de l’image.
J PRISE DE VUE EN MODE SUPER GROS
PLAN
Ce mode vous permet de prendre des photos à 3 cm du sujet.
Les prises de vue normales sont également possibles en mode
position du zoom est fixée automatiquement et ne peut pas être modifiée.
J MISE AU POINT MANUELLE
Fr
Utilisez la mise au point manuelle lorsque la mise au point automatique sur
un sujet est impossible.
%, mais la
70 Fr
Page 71

basic_f_d4226_7.fm Page 71 Thursday, February 5, 2004 10:12 AM
AFFICHAGE
J AFFICHAGE DE VUES FIXES
Amenez la molette Mode sur q et appuyez sur le
1
commutateur marche/arrêt.
• L’écran ACL s’allume et affiche la dernière photo prise. (Affichage
d’une seule photo)
2 Utilisez la molette de défilement pour afficher d’autres
photos.
Affiche la 10 ème photo en arrière.
Affiche la photo
précédente.
Affiche la 10 ème photo en avant.
Affiche la photo
suivante.
Contrôle rapide (QUICK VIEW)
Cette fonction vous permet d’afficher les images pendant que l’appareil photo
est en mode prise de vue. Elle est utile lorsque vous voulez vérifier
rapidement les résultats de la prise de vue avant de continuer.
1 Appuyez sur la touche QUICK VIEW en mode de prise de
vue.
2 Enfoncez à nouveau la touche QUICK VIEW pour revenir
au mode prise de vue.
Affichage en gros plan
Les images affichées sur l’écran ACL peuvent être agrandies 1,5, 2, 2,5, 3,
3,5 ou 4 fois. Cette fonction est utile lorsque vous voulez vérifier les détails
d’une photo.
1 Sélectionnez la photo que vous voulez agrandir.
• Vous ne pouvez pas agrandir les images qui comportent le symbole
n.
Fr 71
Fr
Page 72

basic_f_d4226_7.fm Page 72 Thursday, February 5, 2004 10:12 AM
2 Tirez le levier de zoom vers T.
• L’image est s’agrandit progressivement à chaque fois que vous tirez
sur le levier du zoom.
• Pour revenir à la taille originale de l’image (1x), poussez le levier de
zoom vers W.
Affichage d’index
Cette fonction vous permet d’afficher plusieurs images à la fois sur l’écran
ACL. Elle est utile lorsque vous voulez rechercher une photo particulière.
Vous pouvez afficher 4, 9 ou 16 images.
1 En mode affichage d’une seule image, poussez le levier de
zoom vers W.
• Utilisez la molette de défilement pour sélectionner la photo.
• Pour revenir à l’affichage d’une seule image, tirez le levier de zoom
vers T.
J LECTURE DE VIDÉOS
Fr
Utilisez la molette de défilement ou la molette de réglage
1
pour afficher l’image comportant un symbole n que vous
voulez revoir.
2 Appuyez sur e.
• Le menu principal s’affiche.
3 Appuyez sur a pour sélectionner MOVIE PLAY.
4 Appuyez sur ac pour sélectionner MOVIE PLAYBACK,
puis appuyez sur e.
• La vidéo est lue. Lorsque la fin de la vidéo est atteinte, l’affichage
revient automatiquement à son début.
•
Les fonctions d’avance/retour rapide sont disponibles pendant la lecture.
d
: Avance rapide. Chaque pression sélectionne la vitesse x1, x2 ou x20.
b
: Retour rapide. Chaque pression sélectionne la vitesse x1,x2 ou x20.
• Appuyez de nouveau sur e à la fin de la lecture pour afficher le menu.
PLAYBACK : Relit la vidéo intégralement.
FRAME BY FRAME:
EXIT : Quitte le mode lecture de vidéos.
Appuyez sur ac pour sélectionner l’opération désirée, puis appuyez
sur e.
Vous permet de faire défiler la vidéo manuellement, une
image à la fois.
72 Fr
Page 73

basic_f_d4226_7.fm Page 73 Thursday, February 5, 2004 10:12 AM
Lorsque l’option FRAME BY FRAME est sélectionnée
a : Affiche la première image de la vidéo.
c : Affiche la dernière image de la vidéo.
d : Affiche l’image suivante. La vidéo défile en continu si vous maintenez
la touche enfoncée.
b : Affiche l’image précédente. La vidéo défile en continu en marche
arrière si vous maintenez la touche enfoncée.
e : Affiche le menu MOVIE PLAYBACK.
J PROTECTION DES PHOTOS
Il est conseillé de protéger les photos importantes pour éviter de les effacer
accidentellement.
1 Utilisez la molette de défilement ou la molette de réglage
pour afficher l’image que vous voulez protéger.
2 Appuyez sur 0.
• Pour annuler la protection, appuyez de nouveau sur 0.
• Les photos protégées ne peuvent être supprimées ni avec la
fonction d’effacement de toutes les photos, ni avec la fonction
Remarque
d’effacement d’une seule photo, mais elles seront toutes effacées
par un formatage.
J EFFACEMENT DE PHOTOS
Cette fonction permet d’effacer les photos enregistrées. Vous pouvez effacer
les photos une par une ou toutes les photos de la carte à la fois.
• Une fois effacées, les photos ne peuvent pas être récupérées. Par
conséquent, vérifiez chaque photo avant de l’effacer pour éviter
Remarque
toute suppression accidentelle.
Effacement d’une seule photo
1 Utilisez la molette de défilement pour afficher l’image que
vous voulez effacer.
2 Appuyez sur S.
•L’écran S ERASE s’affiche.
3 Appuyez sur ac pour sélectionner YES, puis appuyez
sur e.
• La photo est effacée et le menu est fermé.
Fr 73
Fr
Page 74

basic_f_d4226_7.fm Page 74 Thursday, February 5, 2004 10:12 AM
Effacement de toutes les photos
1 Dans le menu principal, sélectionnez MODE MENU
CARD CARD SETUP et appuyez sur d.
2 Appuyez sur ac pour sélectionner R ALL ERASE,
puis appuyez sur e.
3 Appuyez sur a pour sélectionner YES, puis appuyez sur
e.
• Toutes les photos sont effacées.
J
FORMATAGE (CONFIGURATION DE LA CARTE)
Cette fonction vous permet de formater des cartes. Le formatage prépare les
cartes à recevoir des données. Avant d’utiliser des cartes d’une marque autre
que Olympus ou des cartes qui ont été formatées sur un ordinateur, vous
devez les formater avec cet appareil photo.
• Toutes les données existantes, y compris les images protégées,
Fr
sont effacées lorsque la carte est formatée. Veillez à sauvegarder
Remarque
ou à transférer les données importantes sur un ordinateur avant de
formater une carte déjà utilisée.
1 Dans le menu principal, sélectionnez MODE MENU
CARD CARD SETUP, puis appuyez sur d.
•L’écran I FORMAT s’affiche.
Lorsque h est sélectionné:
Dans le menu principal, appuyez sur d pour sélectionner
CARD SETUP.
Lorsque q est sélectionné:
Dans le menu principal, sélectionnez MODE MENU
CARD CARD SETUP, puis appuyez sur d. Appuyez sur
ac pour sélectionner I FORMAT, puis appuyez sur e.
2 Appuyez sur a pour sélectionner YES, puis appuyez sur
e.
• La barre BUSY s’affiche pendant le formatage de la carte.
74 Fr
Page 75

basic_f_d4226_7.fm Page 75 Thursday, February 5, 2004 10:12 AM
J AFFICHAGE SUR UN TÉLÉVISEUR
Utilisez le câble vidéo fourni avec l’appareil photo pour afficher les images
enregistrées sur votre téléviseur.
1 Assurez-vous que le téléviseur et l’appareil photo sont
éteints.
Branchez la prise A/V OUT de l’appareil photo à la prise
d’entrée vidéo du téléviseur avec le câble AV.
À brancher aux bornes d’entrée vidéo (jaune)
et d’entrée audio (blanc) du téléviseur.
Couvercle de connecteur
Câble AV
Prise A/V OUT (MONO)
2 Allumez le téléviseur et mettez-le en mode entrée vidéo.
• Reportez-vous au mode d’emploi du téléviseur pour la procédure de
sélection de l’entrée vidéo.
3 Amenez la molette Mode sur q et allumez l’appareil
photo.
• La dernière photo prise est affichée sur le téléviseur. Utilisez la molette
de défilement pour sélectionner la photo que vous voulez afficher.
• Vous pouvez également afficher des photos en gros plan, des index et
des diaporamas sur l’écran du téléviseur.
• Il est conseillé d’utiliser l’adaptateur secteur en option lorsque vous
vous servez de l’appareil photo avec un téléviseur.
Remarque
• Vérifiez si le signal de sortie de l’appareil photo est le même que le
signal vidéo de votre téléviseur.
Fr
Fr 75
Page 76

basic_f_d4226_7.fm Page 76 Thursday, February 5, 2004 10:12 AM
RÉSERVATION D’IMPRESSION/IMPRESSION DIRECTE
J RÉSERVATION D’IMPRESSION (DPOF)
DPOF est l’abréviation de l’anglais “Digital Print Order Format” (Format de
commande de tirage numérique). Il s’agit d’un format utilisé pour enregistrer
automatiquement les informations d’impression à partir des appareils photo
numériques.
Si vous apportez une carte qui contient des informations d’impression à un
boutique d’impression qui prend en charge le format DPOF, il pourra
effectuer les tirages d’après les réservations DPOF. Vous pouvez également
effectuer les tirages vous-même sur une imprimante compatible DPOF.
Réservation de toutes les images
Cette fonction vous permet d’imprimer toutes les photos enregistrées sur la
carte. Indiquez le nombre de tirages souhaités et précisez si la date et l’heure
doivent ou non être imprimées.
Réservation d’une seule image
Utilisez cette fonction pour n’imprimer que les photos sélectionnées. Utiliser
aussi pour modifier le nombre enregistré de tirages et les réglages de la date/
l’heure. Affichez les photos à imprimer et sélectionnez le nombre souhaité de
Fr
tirages.
Réinitialisation des données de réservation d’impression
Cette fonction vous permet de réinitialiser les données de réservation
d’impression pour les images enregistrées sur la carte.
J IMPRESSION DIRECTE (PictBridge)
En connectant l’appareil à une imprimante compatible PictBridge à l’aide d’un
câble USB, vous pouvez imprimer directement des photos enregistrées sans
utiliser d’ordinnateur.
PictBridge est la norme utilisée pour connecter des appareils photo
numériques et des imprimantes de différents fabricants et pour imprimer des
photos directement.
PRINT Imprime la photo sélectionnée.
ALL PRINT Imprime toutes les images sur la carte.
MULTI PRINT * Imprime une photo dans plusieurs formats.
ALL INDEX * Imprime un index de toutes les photos stockées sur la carte.
PRINT ORDER * Imprime les photos selon les données de reservation
*Il se peut que cette option ne soit pas disponible pour certains types
d’imprimante.
Reportez-vous au “Manuel de référence” sur le CD-ROM pour plus
d’informations.
d’impression. Si aucune réservation d’impression n’a été
effectuée, l’option n’est pas affichée.
76 Fr
Page 77

basic_f_d4226_7.fm Page 77 Thursday, February 5, 2004 10:12 AM
TRANSFERT DES PHOTOS VERS UN ORDINATEUR
En raccordant l’appareil photo à un ordinateur avec le câble USB fourni, vous pouvez transférer des
images d’une carte vers l’ordinateur. Certains systèmes d’exploitation peuvent nécessiter un réglage
spécial avant du premier branchement de l’appareil. Suivre le schéma ci-dessous. Pour plus de
détails sur les procédures décrites dans le tableau, se référer au “Manuel de référence” sur le logiciel
CD. Veuillez également consulter le “Guide d’installation de logiciel” livré avec le CD-ROM.
Identification du système d’exploitation
Windows 98/
98SE (Second
Edition)
Windows Me/2000/XP
Mac OS 9.0 - 9.2/
OS X
* Pour OS 8.6,
voir ci-dessous.
Installation du
pilote USB pour
Windows 98
Raccordement de l’appareil photo à un ordinateur en utilisant le câble USB
Confirmation que l’ordinateur reconnaît l’appareil photo
Téléchargement de fichiers d’image
Retrait du câble USB
* Même si votre ordinateur dispose d’un connecteur USB, le transfert de données peut ne pas
fonctionner correctement si vous utilisez l’un des systèmes d’exploitation indiqués ci-dessous ou
si vous avez un connecteur USB additionnel (carte d’extension, etc.).
•
Windows 95/NT 4.0
•
Windows 98/98SE actualisé à partir de Windows 95
•
Mac OS 8.6 ou inférieur (sauf Mac OS 8.6 avec USB MASS Storage Support 1.3.5 installés en
usine)
•
Le transfert de données n’est pas garanti sur un système d’ordinateur construit à la maison ou
sur un ordinateur sans système d’exploitation installé en usine.
•
Vous pouvez visionner des images en utilisant: des applications graphiques qui
supportent le format de fichier JPEG (Paint Shop Pro, Photoshop, etc.); des navigateurs
Internet (Netscape Communicator, Microsoft Internet Explorer, etc.); CAMEDIA Master;
Remarque
ou d’autres logiciels. Pour des détails sur l’utilisation des applications graphiques
disponibles dans le commerce, reportez-vous à leurs manuels d’utilisations.
Fr
Fr 77
Page 78

basic_f_d4226_7.fm Page 78 Thursday, February 5, 2004 10:12 AM
•
QuickTime est nécessaire pour visionner des vidéos. QuickTime figure sur le CD fourni.
•
Si vous voulez éditer des images, vous devez d’abord les télécharger sur votre
ordinateur. Avec certains types de logiciels, les fichiers d’image peuvent être détruits si
vous tentez d’éditer (faire pivoter, etc.) alors qu’ils sont toujours sur la carte.
J POUR LES UTILISATEURS D’AUTRES
SYSTÈMES D’EXPLOITATION
Les utilisateurs d’autres systèmes d’exploitation ne peuvent pas utiliser le
câble USB fourni pour connecter l’appareil photo directement à l’ordinateur.
Windows 95 Windows NT Mac OS avant OS 9
Vous pouvez télécharger des images directement vers votre ordinateur en
utilisant un adaptateur de carte PC (en option).
Votre ordinateur possède-t-il une interface USB?
Le port USB est indiqué par le symbole . Vérifiez que le port est bien
accompagné du symbole .
Non
Fr
Non
Votre ordinateur possède-t-il un logement de carte PC intégré?
Oui
Votre système
d’exploitation
figure-t-il parmi les
suivants?
•Windows 98
•Windows 2000
•Windows Me
•Windows XP
•Mac OS 9/X
Oui
Connectez l’appareil photo
directement à l’ordinateur à
l’aide du câble
USB fourni.
Utilisez le lecteur/graveur
USB en option.
*Certains lecteurs de carte ne
sont pas compatibles avec
Mac OS X.
Veuillez consulter le site web
d’Olympus pour obtenir les
informations de compatibilité les
plus récentes.
Non
Oui
Adressez-vous au représentant Olympus le plus près de chez vous.
Reportez-vous au “Manuel de référence” sur le CD-ROM pour plus d’informations.
Pour la connexion à l’ordinateur, veuillez consulter le “Guide d’installation de
logiciel” livré avec le CD-ROM.
Utilisez l’adaptateur de carte PC
en option.
* Non supporté avec Windows NT4.0
et les systèmes inférieurs.
78 Fr
Page 79

basic_f_d4226_7.fm Page 79 Thursday, February 5, 2004 10:54 AM
CODES D’ERREUR
Indication de
l’écran ACL
NO CARD
CARD ERROR
WRITE-
PROTECT
CARD FULL
NO PICTURE
PICTURE
ERROR
CARD-COVER
OPEN
CARD%SEtUP
POWER%OFF
FORMAt
SELECt
GO
Cause possible Solution
[PAS DE CARTE]
La carte n’est pas insérée,
ou elle ne peut pas être
identifiée.
[ERR CARTE]
Il y a un problème avec la
carte.
[ECRIT PROTEGE]
Il est interdit d’écrire sur la
carte.
[CARTE PLEINE]
La carte est pleine.
Vous ne pouvez plus
enregistrer de photos, de
vidéos ou des informations
telles qu’une réservation
d’impression.
[PAS IMAGE]
Il n’y a aucune photo sur la
carte.
[ERREUR D’IMAGE]
Il y a un problème avec
l’image sélectionnée qui ne
peut pas être lue sur cet
appareil photo.
[!COUVER CARTE]
Le couvercle du logement
de la carte est ouvert.
La carte n’est pas formatée. Formatez la carte.
Insérez une carte ou remplacez la
carte existante.
Si le problème persiste, formatez la carte.
Si la carte ne peut pas être formatée, vous
ne pouvez pas l’utiliser.
Utilisez un autre type de carte ou
insérez une nouvelle carte.
L’image enregistrée a été protégée
(lecture seule) sur un ordinateur.
Vous devez télécharger l’image sur
un ordinateur et annuler cet attribut.
Remplacez la carte ou effacez une
partie des photos. Avant de les
effacer, téléchargez les images
importantes sur un ordinateur.
La carte ne contient aucune image.
Enregistrez des photos.
Utilisez un logiciel de traitement
d’image pour l’afficher sur un
ordinateur. Si vous n’y parvenez pas,
cela signifie que le fichier image est
endommagé.
Fermez le couvercle du logement de
carte.
Toutes les données de la carte seront
effacées.
Fr
Fr 79
Page 80

basic_f_d4226_7.fm Page 80 Thursday, February 5, 2004 10:57 AM
CARACTÉRISTIQUES
Type d’appareil : Appareil photo numérique (prise de vue et affichage)
Système d’enregistrement
Vue fixe : Enregistrement numérique, TIFF (non compressé), JPEG
Normes applicable : Exif 2.2, Digital Print Order Format (DPOF),
Vue fixe avec son : Format Wave
Vidéo : Prise en charge du format QuickTime Motion JPEG
Mémoire : xD-Picture Card (16 - 512 Mo)
Résolution : 3.200 × 2.400 pixels (ENLARGE SIZE : SHQ, HQ)
Fr
Nombre d’images enregistrables
avec une carte de 16 Mo
(Sans son)
Nombre de pixels
effectifs
Capteur d’image : Capteur d’image CCD à semiconducteurs de 1/2,5 pouces
Objectif : Objectif Olympus 6,3 mm à 63 mm, f2,8 à f3,7,
Système de mesure : Mesure ESP, mesure ponctuelle
Ouverture : f2,8 à f8,0
Vitesse d’obturation : 15 à 1/1000 seconde
Portée de prise de vue : 0,6 m à ) (W), 2 m à ) (T) (NORMAL)
Viseur : Écran couleur à cristaux liquides TFT de 0,44",
(selon la règle de conception des systèmes de fichiers
d’appareil photo (DCF))
PRINT Image Matching II, PictBridge
2.288 × 1.712 pixels (TIFF, SHQ, HQ)
2.288 × 1.520 pixels (3:2 TIFF, SHQ, HQ)
2.048 × 1.536 pixels (TIFF, SQ1)
1.600 × 1.200 pixels (TIFF, SQ1)
1.280 × 960 pixels (TIFF, SQ1)
1.024 × 768 pixels (TIFF, SQ2)
640 × 480 pixels (TIFF, SQ2)
: Environ 1 image (TIFF : 2.288 × 1.712)
Environ 5 images (SHQ : 2.288 × 1.712)
Environ 16 images (HQ : 2.288 × 1.712)
Environ 49 images (SQ1 : 1.280 × 960 NORMAL)
Environ 165 images (SQ2 : 640 × 480 NORMAL)
: 4.000.000 de pixels
à 4.110.000 de pixels (brut)
11 éléments en 7 groupes
(équivalent à un objectif de 38 mm à 380 mm sur un
appareil photo de 35 mm)
0,07 m à ) (W), 1,2 m à ) (T) (mode gros plan)
240.000 pixels
80 Fr
Page 81

basic_f_d4226_7.fm Page 81 Thursday, February 5, 2004 10:12 AM
Écran ACL : Écran couleur à cristaux liquides TFT de 1,8",
Mise au point
automatique
Connecteurs externes : Prise d’entrée CC (DC-IN), connecteur USB (mini-B),
Calendrier automatique : de 2000 à 2099
Conditions de fonctionnement
Température : 0°C à 40°C (fonctionnement)
Humidité : 30% à 90% (utilisation)/10% à 90% (stockage)
Alimentation : Uniquement une batterie lithium-ion Olympus LI-10B
Dimensions : 104,5 mm (L) × 60 mm (H) × 68,5 mm (P)
Poids : 280 g (sans batterie ni carte)
CARACTÉRISTIQUES MODIFIABLES SANS PRÉAVIS NI OBLIGATIONS DE LA
PART DU FABRICANT.
118.000 pixels
: Mise au point à système TTL
Système de détection de contraste
prise A/V OUT
–20°C à 60°C (stockage)
Adaptateur secteur spécifié par Olympus (en option)
(hors saillies)
Fr
Fr 81
Page 82

basic_d_d4226_7.fm Page 82 Thursday, February 5, 2004 1:14 PM
INHALT
ERSTE SCHRITTE . . . . . . . . . . . . . . . . . . . . . . . . . . . . . 84
MENÜFUNKTIONEN . . . . . . . . . . . . . . . . . . . . . . . . . . . 96
GRUNDLEGENDE AUFNAHMEFUNKTIONEN . . . . . 102
Einzelbildmodus. . . . . . . . . . . . . . . . . . . . . . . . . . . . 104
Wenn die richtige Bildschärfe nicht erzielt werden kann
(Schärfespeicher)
. . . . . . . . . . . . . . . . . . . . . . . . . 105
Movie-Aufnahme . . . . . . . . . . . . . . . . . . . . . . . . . . . 106
Einzoomen eines Motivs (Optischer Zoom) . . . . . . . 106
Blitzprogrammwahl . . . . . . . . . . . . . . . . . . . . . . . . . 107
Verwendung des Selbstauslösers . . . . . . . . . . . . . . 108
WEITERE AUFNAHMEFUNKTIONEN . . . . . . . . . . . . 109
WIEDERGABE . . . . . . . . . . . . . . . . . . . . . . . . . . . . . . . 111
Einzelbildwiedergabe. . . . . . . . . . . . . . . . . . . . . . . . .111
Movie-Wiedergabe. . . . . . . . . . . . . . . . . . . . . . . . . . .112
De
Bilder vor dem Löschen schützen . . . . . . . . . . . . . . .113
Bildlöschung. . . . . . . . . . . . . . . . . . . . . . . . . . . . . . . .113
Kartenformatierung (CARD SETUP) . . . . . . . . . . . . .114
Wiedergabe auf einem Fernsehgerät . . . . . . . . . . . .115
DRUCKVORAUSWAHL/DIREKTES AUSDRUCKEN
HERUNTERLADEN VON BILDERN AUF IHREN COMPUTER
FEHLERMELDUNGEN . . . . . . . . . . . . . . . . . . . . . . . . 119
TECHNISCHE DATEN . . . . . . . . . . . . . . . . . . . . . . . . . 120
. . . 116
. . . 117
Diese Bedienhinweise sind ausschließlich als Kurzinformation
zu verstehen. Weitere Einzelheiten zu den hier beschriebenen
Funktionen finden Sie im “Referenzhandbuch” auf der CD-ROM.
82 De
Page 83

basic_d_d4226_7.fm Page 83 Thursday, February 5, 2004 1:14 PM
J Lesen Sie sich dieses Handbuch sorgfältig durch, bevor Sie die Kamera benutzen, um
eine ordnungsgemäße Bedienung zu gewährleisten.
J Wir empfehlen, vor wichtigen Aufnahmen Probeaufnahmen vorzunehmen, um sich mit
der Bedienung und den Funktionen der Kamera vertraut zu machen.
J Diese Bedienhinweise sind lediglich als einfache Anleitung zu verstehen. Weitere
Einzelheiten zu den hier beschriebenen Funktionen finden Sie im Referenzhandbuch
auf der CD-ROM. Zum Anschließen an einen Personal Computer oder zu Installation
der mitgelieferten Software lesen Sie bitte die Software-Installationsanleitung (ist dem
CD-ROM-Paket als Ausdruck beigefügt).
Für Kunden in Nord- und Südamerika
Für Kunden in den USA
Betriebserlaubnis
Modellnummer : C-765 Ultra Zoom
Markenname : OLYMPUS
Verantwortlicher Hersteller : Olympus America Inc.
Adresse : 2 Corporate Center Drive, Melville,
Telefonnummer : 1-631-844-5000
Auf Übereinstimmung mit den FCC-Bestimmungen geprüft.
FÜR DEN HEIM- UND BÜROGEBRAUCH
Dieses Gerät erfüllt die Auflagen unter Abschnitt 15 der FCC-Bestimmungen.
Das Betreiben dieses Geräts ist zulässig, wenn die nachfolgend genannten
Auflagen erfüllt werden:
(1) Von diesem Gerät dürfen keine schädlichen Störeinstreuungen ausgehen.
(2) Dieses Gerät muss die Einwirkung von Störeinstreuungen zulassen. Dies
schließt Störeinstreuungen ein, welche Beeinträchtigungen der
Funktionsweise oder Betriebsstörungen verursachen können.
Für Kunden in Kanada
Dieses digitale Gerät der Klasse B erfüllt alle Anforderungen der
Vorschriften für Geräte, die Störeinstreuungen verursachen.
New York11747-3157, USA
Für Kunden in Europa
Das (CE)-Zeichen bestätigt, dass dieses Produkt mit den europäischen
Bestimmungen für Sicherheit, Gesundheit, Umweltschutz und
Personenschutz übereinstimmt. Mit dem (CE)-Zeichen versehene
Kameras sind für den europäischen Markt bestimmt.
De
Warenzeichen
•
IBM ist ein eingetragenes Warenzeichen der International Business Machines Corporation.
•
Microsoft und Windows sind eingetragene Warenzeichen der Microsoft Corporation.
• Macintosh ist ein Warenzeichen der Apple Computer Inc.
• Alle weiteren Firmen- und Produkteigennamen sind eingetragene Warenzeichen/
Handelsmarken der jeweiligen Rechteinhaber.
• Die Bilddatenverwaltung dieser Kamera unterstützt die DCF-Norm „Design Rule
for Camera File System“ der JEITA (Japan Electronics and Information
Technology Industries Association).
De 83
Page 84

basic_d_d4226_7.fm Page 84 Thursday, February 5, 2004 1:14 PM
ERSTE SCHRITTE
J BESCHREIBUNG DER TEILE
Zoomregler (W/T•GU)
Auslöser
Programmwählscheibe
Blitz
Selbstauslöser-LED
Trageriemenöse
Mikrofon
De
Objektiv
84 De
Gleichspannungseingang
(DC-IN)
USB-Anschluss
A/V OUT-Buchse
(MONO)
Buchsenabdeckung
Page 85

Such
basic_d_d4226_7.fm Page 85 Thursday, February 5, 2004 1:14 PM
er
Dioptrienregler
Anpassbare Funktionstaste/AE-Speicher Taste (x)
Bilddrehungstaste (y)
Selbstauslöser taste (Y)
Löschtaste (S)
Blitzmodustaste (#)
Schreibschutztaste (0)
LCD-Monitor
Blitz-Taste
Schreibanzeige
QUICK VIEW-Taste
Pfeiltasten (acbd)
OK/Menü-Taste
LCD-Monitor-Taste (f)
Ein-/Ausschalter
Karten-/Akkufachdeckel
(e )
De
Stativgewinde
De 85
Page 86

0.0
2288 1712
HQ
00:36
ISO100
basic_d_d4226_7.fm Page 86 Thursday, February 5, 2004 1:14 PM
J LCD-MONITOR-UND SUCHER-ANZEIGEN
Aufnahmemodus
0.0
2288 1712
HQ
Einzelbild Movie
Funktion Anzeigen
1 Aufnahmemodus P, A, S, M, N, m, L, J, I, s, P
2 Verschlusszeit 15" – 1/1000
3 Blendenwert F2.8 – F8.0
4 Belichtungskorrektur
De
Belichtungsrichtwert
-2.0 – +2.0
-3.0 – +3.0
5 Akkuladezustand e, f
6 Grüne LED
7 Blitzbereitschaft
Verwackelungswarnanzeige/Blitzladebetrieb
8 Nahaufnahmemodus
Super-Nahaufnahmemodus
Manuelle Scharfstellung
# (Leuchtet)
# (Blinkt)
&
%
MF
9 Rauschminderung O
10 Blitzmodus
!, #, $, #SLOW1,
HSLOW1, #SLOW2
11 Blitzstärkensteuerung w -2.0 – +2.0
12 Auslösermodus o, j, i, k, BKT
13 Selbstauslöser Y
14 Tonaufzeichnung R
ISO100
00:36
00:36
86 De
Page 87

basic_d_d4226_7.fm Page 87 Thursday, February 5, 2004 1:14 PM
Funktion Anzeigen
15 Speichermodus TIFF, SHQ, HQ, SQ1, SQ2
16 Bildauflösung
17 AF-Markierung [ ]
18 Anzahl der
speicherbaren
Einzelbilder
Aufnahmerestzeit
19 AE-Speicher (AE Lock)
AE Memory
20 Spotmessung n
21 ISO ISO 64, ISO 100, ISO 200, ISO 400
22 Weißabgleich 5, 3, 1, w, x, y, V
23 Weißabgleich anpassen B1 – B7, R1 – R7
24 Farbsättigung 6-5 – +5
25 Bildschärfe N -5 – +5
26 Kontrast J -5 – +5
27 Speichersegmente a, b, c, d
2288 × 1712, 1280 × 960, 640 × 480 usw.
30
00:36
B
C
De
De 87
Page 88

'04.06.17 15:30
0.0
2288*1712
HQ
'04.06.177
5:30
00:00/00:20
basic_d_d4226_7.fm Page 88 Thursday, February 5, 2004 1:14 PM
Wiedergabemodus
12 345
2288*1712
'04.06.17 15:30
HQ
0.0
'04.06.1
00:00/00:20
Einzelbild Movie
Funktion Anzeigen
1 Akkuladezustand e, f
2 Bild Wechseln J
3 Druckvorauswahl,
Anzahl der Ausdrucke
Movie
< × 10
n
4 Tonwiedergabe H
5Schreibschutz 9
6 Speichermodus TIFF, SHQ, HQ, SQ1, SQ2
De
7 Bildauflösung 2288 × 1712, 1280 × 960, 640 × 480,
320 × 240 usw.
8 Blendenwert F2.8 – F8.0
9 Verschlusszeit 15" – 1/1000
10 Belichtungskorrektur -2.0 – +2.0
11 Weißabgleich WB AUTO, 5, 3, 1, w, x, y, V
12 ISO ISO 50, ISO 100, ISO 200, ISO 400
13 Datum und Zeit ’04.06.17 15:30
14 Dateinummer,
Bildnummer
Spielzeit/
FILE: 100 – 0030,
30
00:00/00:20
Gesamtspielzeit
15:30
6
7
11
13
14
88 De
Page 89

2288 1712
HQ
basic_d_d4226_7.fm Page 89 Thursday, February 5, 2004 1:14 PM
Speichersegmentanzeige
Die Speichersegmentanzeige leuchtet, wenn Sie
Akkuladezustand
ein Einzelbild erstellen. Während der
Akkuladezustand leuchtet, wird die Aufnahme
auf die Karte gespeichert. Die
Speichersegmentanzeige ändert sich wie
nachfolgend gezeigt je nach Aufnahmestatus.
Bei der Movie-Aufnahme erscheint diese
Anzeige nicht.
Aufnehmen Aufnehmen Aufnehmen
a b c d
Vor der
Aufnahme
(Anzeige ist
aus)
Nach einer
Aufnahme
(leuchtet)
Nach mehr als
zwei Aufnahmen
(leuchtet)
2288 1712
HQ
Speichersegmente
Warten
Es können keine
weiteren
Aufnahmen erstellt
werden.
(leuchtet
vollständig)
Warten Sie, bis die
Anzeige wieder in
den links gezeigten
Status
zurückgekehrt ist,
bevor Sie die
nächste Aufnahme
erstellen.
Akkuladezustand
Ist die verbleibende Akkuleistung gering, verändert sich die
Akkuzustandsanzeige wie folgt, während die Kamera eingeschaltet oder in
Benutzung ist.
De
ef
leuchtet (grün)
(erlischt nach wenigen
Augenblicken)
Verbleibende
Akkuleistung: hoch.
blinkt (rot)
Verbleibende
Akkuleistung: niedrig
Akku aufladen.
BATTERY EMPTY
[BATTERIE LEER]
wird angezeigt.
Verbleibende
Akkuleistung:
erschöpft
Akku aufladen
.
De 89
Page 90

basic_d_d4226_7.fm Page 90 Thursday, February 5, 2004 1:14 PM
J
ANBRINGEN DES TRAGERIEMENS UND OBJEKTIVSCHUTZ
123
Ringlasche
Stopper
45
Trageriemenöse
J AUFLADEN DES AKKUS
Dieses Kamera verwendet einen Olympus Lithium-Ionen-Akku (LI-10B). Verwenden
De
Sie für diese Kamera ausschließlich diesen Akku. Andere Akkus dürfen nicht
verwendet werden.
Wenn Sie die Kamera kaufen, ist der Akku noch nicht vollständig geladen. Laden Sie
den Akku daher erst vollständig mit dem dafür vorgesehenen Ladegerät (LI-10C)
auf, bevor Sie die Kamera zum ersten Mal benutzen. Die Einzelheiten hierzu finden
Sie in der Bedienungsanleitung des Ladegeräts (mitgeliefert).
1
Achten Sie darauf, dass
die
+
und - Pole des
Akkus beim Einlegen
ins Ladegerät wie in der
rechtsstehenden
Abbildung gezeigt
korrekt ausgerichtet
sind
.
•
Während des
Ladevorgangs leuchtet die
Ladezustandsanzeige rot.
•
Wenn der Ladevorgang
abgeschlossen ist,
wechselt die
Ladezustandsanzeige
von rot auf grün.
• Der Ladevorgang dauert normalerweise 2 Stunden.
90 De
Anschlusspole
Ladezustandsanzeige
Lithium-Ionen-Akku
(LI-10B)
Page 91

basic_d_d4226_7.fm Page 91 Thursday, February 5, 2004 1:14 PM
J EINLEGEN UND ENTNEHMEN DER KARTE
UND DES AKKUS
1 Vergewissern Sie sich, dass die Kamera ausgeschaltet ist.
• Der LCD-Monitor ist ausgeschaltet.
• Der Sucher ist ausgeschaltet.
• Das Objektiv darf nicht ausgefahren sein.
2 Schieben Sie den Karten-/
Akkufachdeckel in Richtung A, und
B
heben Sie ihn anschließend in
Richtung B.
•
Zum Bewegen des Akkufachdeckels die
Fingerkuppe verwenden. Verwenden Sie nicht
Ihren Fingernagel, da es dadurch zu Verletzungen
kommen kann
.
A
3 Einlegen des Akkus
Richten Sie den Akku wie
nachfolgend gezeigt aus. Schieben
Sie den Akku in das Akkufach und
fixieren Sie diese mit der
Akkufachentriegelung.
Akkuverriegelung
Entnehmen des Akkus
Schieben Sie die Akkuverriegelung
in die Richtung der Pfeilmarkierung.
Der Akku springt ein Stück nach
oben und lässt sich nun
herausziehen. Halten Sie den Akku
dabei gerade.
Akkuverriegelung
De
Warnhinweis für niedrige Akkuleistung
Je nach mit der Digitalkamera ausgeführten Funktion kann deren
Stromverbrauch deutlich schwanken. Wenn Sie einen erschöpften Akku
verwenden, kann es sein, dass sich die Kamera mangels ausreichender
Stromversorgung abschaltet, ohne zuvor den Warnhinweis für die niedrige
Akkuleistung anzuzeigen.
De 91
Page 92

basic_d_d4226_7.fm Page 92 Thursday, February 5, 2004 1:14 PM
Einlegen einer Karte
Halten Sie die Karte richtig herum
und legen Sie sie ins Kartenfach ein.
• Schieben Sie die Karte hinein, während Sie
diese gerade halten.
• Wenn Sie Karte falsch herum oder in einem
falschen Winkel einlegen, kann der
Kontaktbereich der Karte beschädigt
werden oder die Karte verklemmt sich.
• Wenn die Karte nicht vollständig
eingeschoben wird, können unter
Umständen keine Daten auf die Karte
geschrieben werden.
Entnehmen einer Karte
Drücken Sie die Karte zum Entriegeln
vorsichtig nach innen und lassen Sie sie
anschließend langsam herausgleiten.
• Die Karte wird dabei ein kleines Stück aus dem
Einschubfach ausgeschoben und bleibt danach
stehen. Halten Sie die Karte gerade und ziehen
Sie sie heraus.
De
4 Schließen Sie den Einlegen und
Entnehmen der Karte und des Akkus in
Richtung C und schieben Sie ihn
anschießend wie gezeigt in Richtung D.
Kerbe
Indexbereichseite
C
D
Vorsichtsmaßnahmen beim Entfernen der Karte
Wenn Sie Ihren Finger zu schnell von der Karte lösen, nachdem Sie diese
vollständig nach innen gedrückt haben, kann es passieren, dass die Karte
unvermittelt aus dem Einschub ausgeworfen wird.
92 De
Page 93

basic_d_d4226_7.fm Page 93 Thursday, February 5, 2004 1:14 PM
J EIN- UND AUSSCHALTEN DER KAMERA
Drücken Sie wie durch die Pfeile
1
angezeigt auf die beiden äußeren
Riegel des Objektivschutzes und
nehmen Sie diesen vom Objektiv
ab.
2 Drücken Sie auf den Ein-/
Programmwählscheibe
Ausschalter der Kamera.
• Die Kamera schaltet sich ein und das
Objektiv wird ausgefahren, wenn die
Programmwählscheibe auf einen
anderen Modus als q eingestellt ist.
Das Objektiv wird ausgeschoben, und
der Sucher schaltet sich ein.
• Wenn die Programmwählscheibe auf q
eingestellt ist, schaltet sich die Kamera
im Wiedergabemodus ein, worauf der
LCD-Monitor eingeschaltet wird.
3 Zum Ausschalten der Kamera
drücken Sie erneut auf den Ein-/
Ausschalter der Kamera.
• Um Akkustrom zu sparen, wechselt die Kamera automatisch in den
Sleep-Modus, wenn innerhalb von 3 Minuten kein
Hinweis
Bedienungsschritt erfolgt. Die Kamera schaltet sich wieder ein,
sobald Sie den Auslöser oder den Zoomregler leicht drücken.
De
De 93
Page 94

basic_d_d4226_7.fm Page 94 Thursday, February 5, 2004 1:14 PM
J AUSWÄHLEN EINER SPRACHE W
1
Stellen Sie die Programmwählscheibe auf P und drücken
Sie anschließend auf den Ein-/Ausschalter der Kamera,
um die Kamera einzuschalten.
2 Drücken Sie e.
• Das Hauptmenü wird angezeigt.
3 Drücken Sie auf die Pfeiltaste d und wählen Sie MODE
MENU.
4 Drücken Sie ac und wählen Sie den Menüanzeiger
SETUP. Drücken Sie anschließend d.
5 Drücken Sie ac und wählen Sie W. Drücken Sie
anschließend d.
• Der grüne Begrenzungsrahmen bewegt sich zur gewählten Funktion.
6 Drücken Sie ac und wählen Sie die gewünschte
Sprache. Drücken Sie anschließend e.
7 Drücken Sie e erneut, um das Menü zu schließen.
De
8 Zum Ausschalten der Kamera drücken Sie erneut auf den
Ein-/Ausschalter der Kamera.
94 De
Page 95

basic_d_d4226_7.fm Page 95 Thursday, February 5, 2004 1:14 PM
J EINSTELLEN VON DATUM UND ZEIT X
Stellen Sie die Programmwählscheibe auf P und drücken
1
Sie anschließend auf den Ein-/Ausschalter der Kamera,
um die Kamera einzuschalten.
2 Drücken Sie e.
• Das Hauptmenü wird angezeigt.
3
Drücken Sie auf die Pfeiltaste d und wählen Sie MODE MENU.
4 Drücken Sie ac und wählen Sie den Menüanzeiger
SETUP. Drücken Sie anschließend d.
5 Drücken Sie ac und wählen Sie X. Drücken Sie
anschließend d.
• Der grüne Begrenzungsrahmen bewegt sich zur gewählten Funktion.
6 Drücken Sie ac und wählen Sie eines der
nachfolgenden Datumsformate: Y-M-D (Jahr/Monat/Tag),
M-D-Y (Monat/Tag/Jahr), D-M-Y (Tag/Monat/Jahr). Drücken
Sie anschließend d.
• Wechseln Sie auf die Einstellung der Jahreszahl.
In diesem Anwendungsbeispiel wird das Datumsformat Y-M-D verwendet.
•
7
Drücken Sie
d
, um zur Einstellung für die Monatszahl zu gelangen.
• Drücken Sie b, um zur vorherigen Einstellung zurückzugelangen.
• Die ersten beiden Ziffern der Jahreszahl lassen sich nicht ändern.
ac
zum Einstellen des Jahres und anschließend
8 Wiederholen Sie diese Bedienungsschritte, bis Datum und
Zeit vollständig eingestellt sind.
•
Die Uhrzeit wird stets im 24-Stunden-Format angezeigt. Deshalb wird das
englische Uhrzeitformat wie z. B. „2 p.m.“ immer als „14:00“ dargestellt.
9 Drücken Sie e.
•
Zur sekundengenauen Zeitmessung e zur vollen Minute (00 Sekunden)
drücken. Die Zeitmessung wird beim Drücken dieser Taste aktiviert.
10 Zum Ausschalten der Kamera drücken Sie erneut auf den
Ein-/Ausschalter der Kamera.
De
• Die Einstellungen für Datum und Zeit werden gelöscht, wenn in der Kamera für
circa 1 Stunde keine Batterien eingelegt sind.
Hinweis
De 95
Page 96

basic_d_d4226_7.fm Page 96 Thursday, February 5, 2004 1:14 PM
MENÜFUNKTIONEN
J
VERWENDEN DER MENÜS UND MENÜANZEIGER
Wenn Sie die Kamera einschalten und e drücken, erscheint das Hauptmenü auf dem
LCD-Monitor oder Sucher. Die Funktionen der Kamera werden über Menüs eingestellt.
Das Hauptmenü wird angezeigt.
ESP
Drücken Sie auf
e.
AUSWECHSELBARE MENÜFUNKTIONEN
• Damit gelangen Sie direkt zu den
Einstellmenüs.
• Zeigt Funktionstasten am unteren
De
Bildschirmrand an.
• Die in den auswechselbaren
Menüfunktionen enthaltenen
Funktionen sind auch über das MODE
MENU erreichbar.
• Die auswechselbaren Menüfunktionen
lassen sich in jedem Modus außer
hnq auswechseln
.
MODE MENU
Verwenden Sie die
Pfeiltasten für die
Menüauswahl.
MODE MENU
• Damit können Sie auf die
Menüauswahl für das Einstellen der
ISO-Empfindlichkeit, der Schärfe, usw.
zugreifen.
• Unterteilt die Einstellungen in
4 Menüanzeiger.
• Drücken Sie ac, um einen
Menüanzeiger auszuwählen und um
sich die zugehörigen Menüfunktionen
anzeigen zu lassen.
• Im Modus h ist kein Menümodus
verfügbar
.
Verwenden der Mode-Menüs
1
Drücken Sie e, um das Hauptmenü anzuzeigen. Drücken Sie d.
2 Drücken Sie ac, um einen Menüanzeiger auszuwählen
und anschließend d.
3 Drücken Sie ac und wählen Sie die gewünschte
Funktion. Drücken Sie anschließend d.
4 Drücken Sie ac, um eine Einstellung auszuwählen.
Drücken Sie e, um die Einstellung zu übernehmen.
Drücken Sie e erneut, um das Menü zu schließen und
zum Aufnahmestatus zurückzukehren.
96 De
Page 97

basic_d_d4226_7.fm Page 97 Thursday, February 5, 2004 1:14 PM
Auswechselbare Menüfunktionen
Aufnahmemodus
DRIVE
Verändert den Aufnahmemodus zwischen o (Einzelbildaufnahme),
j (Serienaufnahme), i (Hochgeschwindigkeits-Serienaufnahme),
k (AF-Serienaufnahme) and BKT (Automatische Belichtungsreihen).
ESP/5
Dient zur Wahl der Messmethode (ESP, 5 oder MULTI).
DIGITAL ZOOM [DIGITALZOOM]DIGITAL ZOOM [DIGITALZOOM]
Erweitert den größtmöglichen optischen Zoom und ermöglicht ZoomVergrößerungen auf das ungefähr 40fache.
K
Zum Einstellen von Bildqualität und Bildauflösung.
Einzelbild : TIFF*, SHQ, HQ, SQ1, SQ2
Movie-Aufnahme : SHQ, SQ
* TIFF kann nicht ausgewählt werden, wenn die Programmwählscheibe auf
h gestellt wurde.
&
Zur Aufnahme von sehr nahen Motiven. Wählt OFF, & oder %.
De
WB (Weißabgleich)
Zur Wahl des passenden Weißabgleichs entsprechend der Lichtquelle.
X
Zur Einstellung von Datum und Zeit.
CARD SETUP [KARTE EINR.]
Formatiert eine Karte.
[ ]: Bei der Anzeige der deutschsprachigen Menüs.
De 97
Page 98

OFF
AUtO
ESP
basic_d_d4226_7.fm Page 98 Thursday, February 5, 2004 1:14 PM
Wiedergabemodus
m
Zeigt jedes gespeicherte Bild nacheinander an (Diashow).
MOVIE PLAY [FILM-WIEDERG.]
MOVIE PLAYBACK
[FILM-WIEDERG.]
INDEX Erzeugt für ein Movie einen Index mit 9 Bildern.
EDIT [BEARBEITEN] Zum Bearbeiten eines Movies.
INFO
Zeigt alle Aufnahmeinformationen auf dem LCD-Monitor an.
SWITCH FRAME [BILD WECHSELN]
Wählt ALL, um alle Bilder anzuzeigen oder 0, um nur schreibgeschützte
Bilder anzuzeigen.
[ ]: Bei der Anzeige der deutschsprachigen Menüs.
De
MODE-Menü
Das MODE MENU verfügt über 4 Menüanzeiger. Drücken Sie ac, um einen
Menüanzeiger auszuwählen und die zugehörigen Menüfunktionen anzuzeigen.
Diese Bedienhinweise sind ausschließlich als Kurzinformation zu
verstehen. Weitere Einzelheiten zu den hier beschriebenen
Funktionen finden Sie im “Referenzhandbuch” auf der CD-ROM.
Spielt ein Movie ab.
Aufnahmemodus
Menüanzeiger CAMERA [KAMERA]
Menüanzeiger PICTURE [BILD]
Menüanzeiger CARD [KARTE]
Menüanzeiger SETUP [EINR]
98 De
ESP
CAMERA
DRIVE
ISO
CARDSEt PIC
A/S/M
ESP
OFF
AUtO
Page 99

basic_d_d4226_7.fm Page 99 Thursday, February 5, 2004 1:14 PM
Menüanzeiger CAMERA
[KAMERA]
ESP/5 Wählt die Messmethode (ESP, 5 oder MULTI).
&
DRIVE
ISO
A/S/M
r1/2/3/4
w
#SLOW
NOISE REDUCTION
[RAUSCHMIND.]
DIGITAL ZOOM
[DIGITALZOOM]
FULLTIME AF
[AF PERMANENT]
AF MODE [AF-MODUS]
o
PANORAMA
2 IN 1
[2-IN-1]
FUNCTION
[AUFNAHMEFKT]
AF AREA
[AF FELD]
INFO
u
R (Einzelbilder)
R (Movies)
SUPER ZOOM
Zur Aufnahme von sehr nahen Motiven. Wählt OFF, &, %.
Verändert den Aufnahmemodus zwischen o
(Einzelbildaufnahme),
(Hochgeschwindigkeits-Serienaufnahme),
Serienaufnahme) und
Verändert die Einstellung der ISO-Empfindlichkeit zwischen AUTO, 64,
100, 200 und 400.
Verändert den Aufnahmemodus zwischen A (Aufnahme mit
vorrangigem Blendenwert), S (Aufnahme mit vorrangiger
Verschlusszeit) und M (Manuelle Aufnahme).
Zum Auswählen eines Modus bei der Aufnahmeerstellung im
r
Modus.
Zur Regulierung der Blitzlichtstärke.
Wechselt zwischen #SLOW1 (1. Verschlussvorhangseffekt:
Blitzabgabe beim Öffnen des Verschlusses),
Blitzabgabe beim Öffnen des Verschlusses mit Vorblitzabgabe) und
#
SLOW2 (2. Verschlussvorhangseffekt: Blitzabgabe beim Schließen
des Verschlusses), wenn der Blitzmodus auf
(Blitzsynchronisation mit einer langen Verschlusszeit) eingestellt wird.
Vermindert das Bildrauschen, das bei langen Verschlusszeiten
entstehen kann.
Erweitert den größtmöglichen optischen Zoom und ermöglicht
Zoom-Vergrößerungen auf das ungefähr 40fache.
Zur permanenten Scharfstellung, ohne dass hierzu der
Auslöser halb nach unten gedrückt gehalten werden muss.
Wechselt die Autofokus-Methode (iESP oder SPOT).
In diesem Modus können Sie mithilfe der Kamera ein
Selbstporträt von sich erstellen
Bei der Verwendung von Olympus CAMEDIA-Karten können
Panoramaaufnahmen angefertigt werden.
Dabei werden zwei nacheinander getätigte Aufnahmen als ein
Bild abgespeichert.
Damit können Sie Ihren Bildern Spezialeffekte hinzufügen
(Schwarz/Weiß, Sepia, weißer Hintergrund für schwarze
Buchstaben, schwarzer Hintergrund für weiße Buchstaben).
Ermöglicht die Veränderung der AF-Markierungsposition
mithilfe der Pfeiltasten.
Legt fest, ob alle Informationen wie beispielsweise die
Verschlusszeit oder die Weißabgleicheinstellung angezeigt
werden oder nur die nötigsten Informationen.
Zur Anzeige des Luminanzhistogramms der aufgenommenen Bilder.
Legt fest, ob bei Einzelbildaufnahmen gleichzeitig Ton
aufzeichnet wird.
Legt fest, ob während einer Movie-Aufnahme auch der
Ton mit aufgezeichnet wird oder nicht. Die Tonwiedergabe
kann nur
Erweitert den optischen Zoom und ermöglicht ZoomVergrößerungen auf das 14fache im 1600 × 1200 Speichermodus.
j
(Serienaufnahme), i
BKT
(automatische Belichtungsreihen).
ü
ber einen Computer, Fernseher usw. erfolgen.
k
H
#SLOW
[ ]: Bei der Anzeige der deutschsprachigen Menüs.
(AF-
SLOW1 (1.
De
De 99
Page 100

basic_d_d4226_7.fm Page 100 Thursday, February 5, 2004 1:14 PM
Menüanzeiger
PICTURE [BILD]
K
WB (Weißabgleich)
>
SHARPNESS
[SCHÄRFE]
CONTRAST
[KONTRAST]
SATURATION
[FARBSÄTTIGUNG]
Menüanzeiger CARD
[KARTE]
CARD SETUP
[KARTE EINR.]
Menüanzeiger SETUP
[EINR]
ALL RESET
[ALLESZURÜCKSETZEN]
W
PW ON/OFF SETUP
[START/SCHLUSSBILD]
De
REC VIEW
[AUFNAHME ANSICHT]
SLEEP
[
RUHE MODUS
MY MODE SETUP
[MEIN MODUS EIN]
FILE NAME [DATEINAME]
PIXEL MAPPING
[PIXEL KORREKTUR]
s
X
m/ft
VIDEO OUT
[VIDEOSIGNAL]
SHORT CUT
[TASTEN BELEGUNG]
CUSTOM BUTTON
[PERSÖNLICHE
MENÜTASTE]
8
]
Zum Einstellen von Bildqualität und Bildauflösung.
Einzelbild: TIFF, SHQ, HQ, SQ1, SQ2
Zur Wahl des passenden Weißabgleichs entsprechend der
Lichtquelle.
Ermöglicht Feinabstimmungen an der jeweiligen
Weißabgleicheinstellung.
Reguliert die Bildschärfe.
Reguliert den Bildkontrast.
Reguliert die Farbsättigung, ohne die Farben selbst zu verändern.
Formatiert eine Karte.
Legt fest, ob die jeweils aktuellen Einstellung nach dem Ausschalten
der Kamera beibehalten werden oder nicht.
Verändert die Sprache der Bildschirmmenütexte.
Wählt das Bild, das angezeigt wird, wenn die Kamera
ein- und ausgeschaltet wird
Legt fest, ob Aufnahmen beim Speichern auf dem LCD-Monitor
angezeigt werden.
Ermöglicht das Programmieren einer Zeit, zu der sich die Kamera
automatisch abschaltet.
Zum Anpassen der Einstellungen, die im
werden.
Ermöglicht eine veränderte Zuweisung von Dateinamen.
Überprüft den CCD-Chip und die Bildverarbeitungsfunktionen der
Kamera auf eventuelle Fehler.
Reguliert die Sucher- oder LCD-Monitor-Helligkeitseinstellung.
Zur Einstellung von Datum und Zeit.
Wechselt für die manuelle Scharfstellung zwischen den
Maßeinheiten m (Meter) und ft (Fuß).
Wählt je nach angeschlossenem Fernseher zwischen NTSC oder
PAL als Videosignal. Das jeweilige Videosignal hängt von der
Region ab, in der Sie Ihren Fernseher gekauft haben.
Damit können Sie häufig verwendete Fernseher als auswechselbare
Menüfunktionen einstellen.
Damit können Sie der anpassbaren Funktionstaste eine
häufig benutzte Funktion Ihrer Wahl zuweisen.
Schaltet den Piepton zur Bestätigung von
Tastenbedienungen und Warnhinweisen aus.
.
[ ]: Bei der Anzeige der deutschsprachigen Menüs.
Modus aktiviert
r
100 De
 Loading...