

Page 1

C-2500L
D.REPAIR PROCEDURE
1.Standard of dust/dirt within the viewfinder .....................................D-2
2.Damege code ...........................................................................................D-3
3. Standard for Inspection........................................................................D-5
4. C-2500L Upgrading Procedure...........................................................D-6
Rev.2
SERVER_DIS D-1 Ver.1.0
Page 2
D. REPAIR PROCEDURE
C-2500L
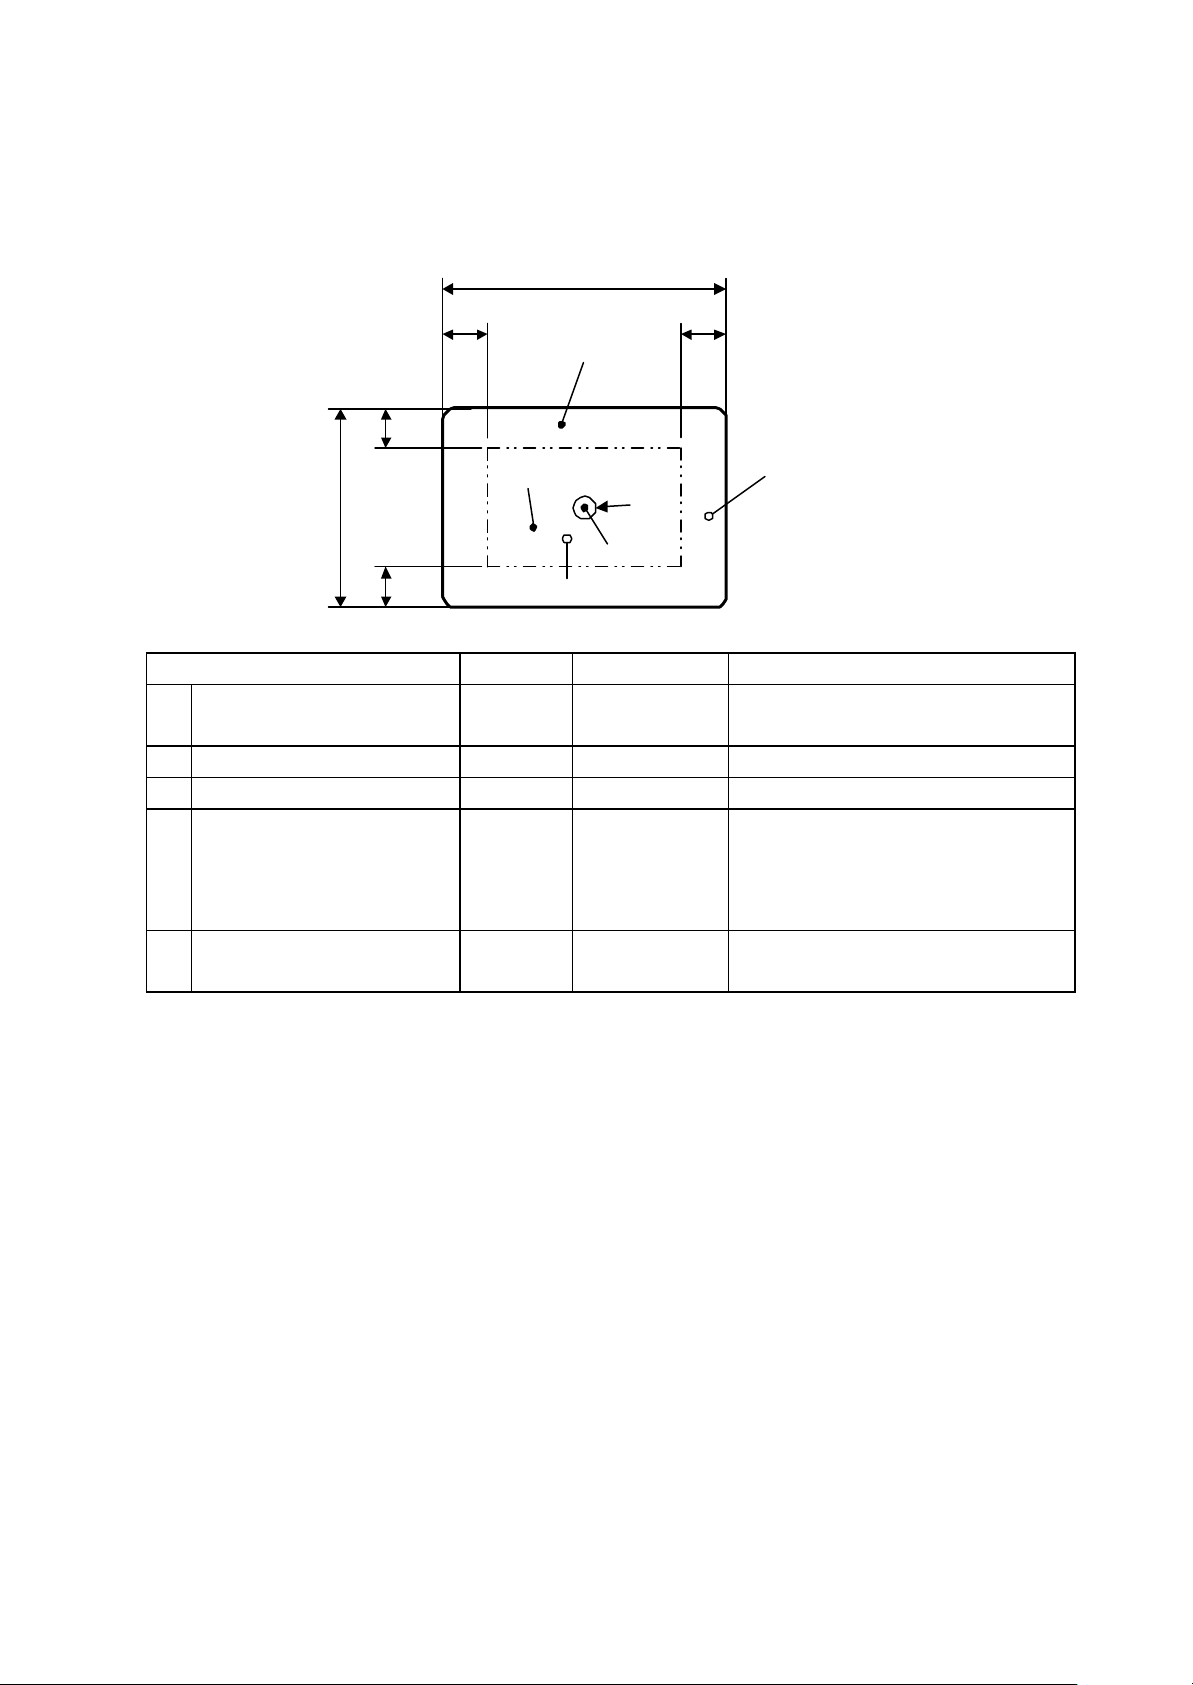
1. Standard of dust/dirt within the viewfinder
1/61/6
③
1/6
②
C
B
A
⑤
1
①
1/6
Location Type No. of speckles Size
¬ Zone A
(Within the AF target)
- Zone B (without zone A) Dirt Two or less * 1/2 or less than AF target line width
® Zone C (without zone A and B) Dirt - 2/3 or less than AF target line width
¯ Zone A and B Blur - Nominal size: 0.3mm dia or less
° Zone C (without zone A and B) Blur - Acceptable level of zone C wider than
Note 1) *For ¬ and -, the number of specks of dirt should be 2or less, all totaled.
Note 2) *For ¬, - and ®, the number of specks of dirt should be 4or less, all totaled.
Note 3) ¯ and ° should be independently evaluated and should not be totaled.
Note 4) The thickness of blur should be evaluated against the samples.
Note 5) The thickness of blur should be evaluated against the samples.
Note 6) The number of specks of dirt for each lacation should be 2or less.
Conditions
1)Background : white
2)Reflected light : BV4 to 6
3)Focus length : Tele side
Dirt One or less * 1/3 or less than AF target line width
④
(1/3 or less than AF target dia)
Acceptable if it is not so conspicuous.
Note 4)
zone A and B Note 5)
SERVER_DIS D-2 Ver.1.0
Page 3

C-2500L D. REPAIR PROCEDURE
2. Damage code
1) Damage code is displayed on the control panel.
Damage information
[X4] [X3] [X2] [X1]
2) The damage information is the following sheet.
e.g. [0][0][E][0] means there are damages among Zoom lens, Focus lens and/or System.
[0][0][F][8] means there are damages among Zoom lens, Focus lens ,System and/or Device.
[X1]
SUB CPU MDSP CAM-ASIC Device
Damage number Time out for
communication to SUB
CPU
1 # - - 2 - # - -
3 # # - 4 - - # 5 # - # 6 - # # 7 # # # 8 - - - #
9 # - - #
A - # - #
B # # - #
C - - # #
D # - # #
E - # # #
Which parts might
be damaged?
Main GNT#-2(NTSC)/
Main GPL#-2(PAL)
Damage mark
Abnormal MDSP Abnormal CAM-ASIC Abnormal device for CPU
Main GNT#-2(NTSC)/
Main GPL#-2(PAL)
Main GNT#-2(NTSC)/
Main GPL#-2(PAL)
Main GNT#-2(NTSC)/
Main GPL#-2(PAL)
[X2]
Zoom Lens Focus lens System
Damage number Damage for zoom lens Damage for focus lens Damage for system
2 # - 4 - # 6 # # 8 - - #
A # - #
C - # #
E # # #
F # # #
Which parts
might be
damaged?
Rev.2
Ver.1.0 D-3 SERVER_DIS
CCD-Lens Unit CCD-Lens Unit Main GNT#-2(NTSC)/
Main GPL#-2(PAL),
CCD-Lens Unit
Page 4

D. REPAIR PROCEDURE
C-2500L
[X3]
Damage number Ration of charge voltage for Strobe Charge time for Strobe
1 # 2 - #
3 # #
Which parts might
be damaged?
[X4]
Damage number Flash ROM DRAM EEPROM
2 # - 4 - # 6 # # 8 - - #
A # - #
C - # #
E # # #
Which parts
might be
damaged?
Main GNT#-2(NTSC)/
Main GPL#-2(PAL),
Strobe board
Main GNT#-2(NTSC)/
Main GPL#-2(PAL)
Main GNT#-2(NTSC)/
Main GPL#-2(PAL),
Strobe board
Main GNT#-2(NTSC)/
Main GPL#-2(PAL)
CCD-Lens Unit
SERVER_DIS D-4 Ver.1.0
Rev.2
Page 5

C-2500L D. REPAIR PROCEDURE
Sequence mode is selected and the mode is displayed on control panel
3. Standard for Inspection
procedure specification
1 Put on AC adapter
2 Insert smart media
3 Power on and set A mode
4 Put on Lens cap
5 Press release bottom Check AF illuminator
6 Put off Lens cap
7 Zooming with viewfinder Check dust/dirt in the viewfinder and zooming
8 Pop-up strobe Strobe off mark should be disappeared
9 Take a picture with Auto strobe mode Flash condition
10 Take a picture with red-eye mode Flash condition
11 Putdown the Strobe
12 Set Drive mode to sequence mode
13 Set resolution to SQ mode SQ mode is selected and the mode is displayed on control panel
14 Press [SPOT] bottom twice 1) SPOT mark is displayed on control panel
2) SPOT mark is disappeared from control panel
15 Press jog dial to right and left side
during pressing +/- bottom
16 Set mode dial to M mode
Press jog dial to four directions
17 Set mode dial to play mode
1) move zoom lever to Wide side
twice
2) move zoom lever to Tele side
twice from setting play mode
Be back image to standard size
18 Press [INFO] bottom Information is displayed on LCD monitor
19 Press protect bottom with displaying
information
20 Check serial communication by PC
21 Format smart media
22 Press CF bottom CF mark is displayed on control panel
23 Reset the mode
24 Power off
25 Take off AC adapter and load
batteries
Power on and off
26 Take off batteries
27 Take off smart media
28 Check body and lens
Reset: If a user doesn’t need the reset, you skip the reset item.
Check exposure compensation indicator
The aperture mark is changed
The value for shutter speed is changed
1)4-frames index to 9-frames index
2)the image is magnified 2x to 4x
Protect mark is displayed on LCD monitor
Rev.2
Ver.1.0 D-5 SERVER_DIS
Page 6

D. REPAIR PROCEDURE
C-2500L
4.C-2500L Upgrading Procedure
Preparation
AC adapter
Special Smart Media (C-2500L firm v.1.20)
How to upgrade firmware
1.Remove all batteries (AA batteries and CR2025) form the C-2500L.
2.Connect AC adapter to the C-2500L.
3.Insert Special Smart Media (C-2500L Firm v1.20) into card slot of C-2500L then close the card door.
4.Press POWER button of the C-2500L.
5.Upgrading will automatically start. (AF illuminator of C-2500L will be on while upgrading camera)
6.When upgrading is successfully finished, AF illuminator blinks in every 1second cycles.
Note: If C-2500L state follows that AF illuminator blinks rapidly (in 4Hz cycles) and camera beeps or AF illuminator
continues to be on more than 90 seconds, upgrading is failed.
In case, remove AC adapter from C-2500L to reset and redo from STEP2
7.Remove AC adapter from the C-2500L to reset.
8. Remove Special Smart Media from C-2500L.
How to confirm the upgrading Status
1.Connect AC adapter, open the card door and set C-2500L in PLAYBACK mode then press power button.
2.Then press FOCUS button and SPOT button simultaneously.
3.The following data will be displayed on LCD. Check if the VERSION is 1.20.
In the case of v1.17, “CARD-COVER OPEN” is displayed on LCD monitor.
4. Press POWER button to turn off the C-2500L.
C2500L Upgrade
1.Addition of a slow sync flash mode
2.Addition of a Medium Sharpening mode
3.AE lock for both focus and exposure in the center-weighted metering mode
Rev.2
SERVER_DIS D-6 Ver.1.0
 Loading...