

Page 1
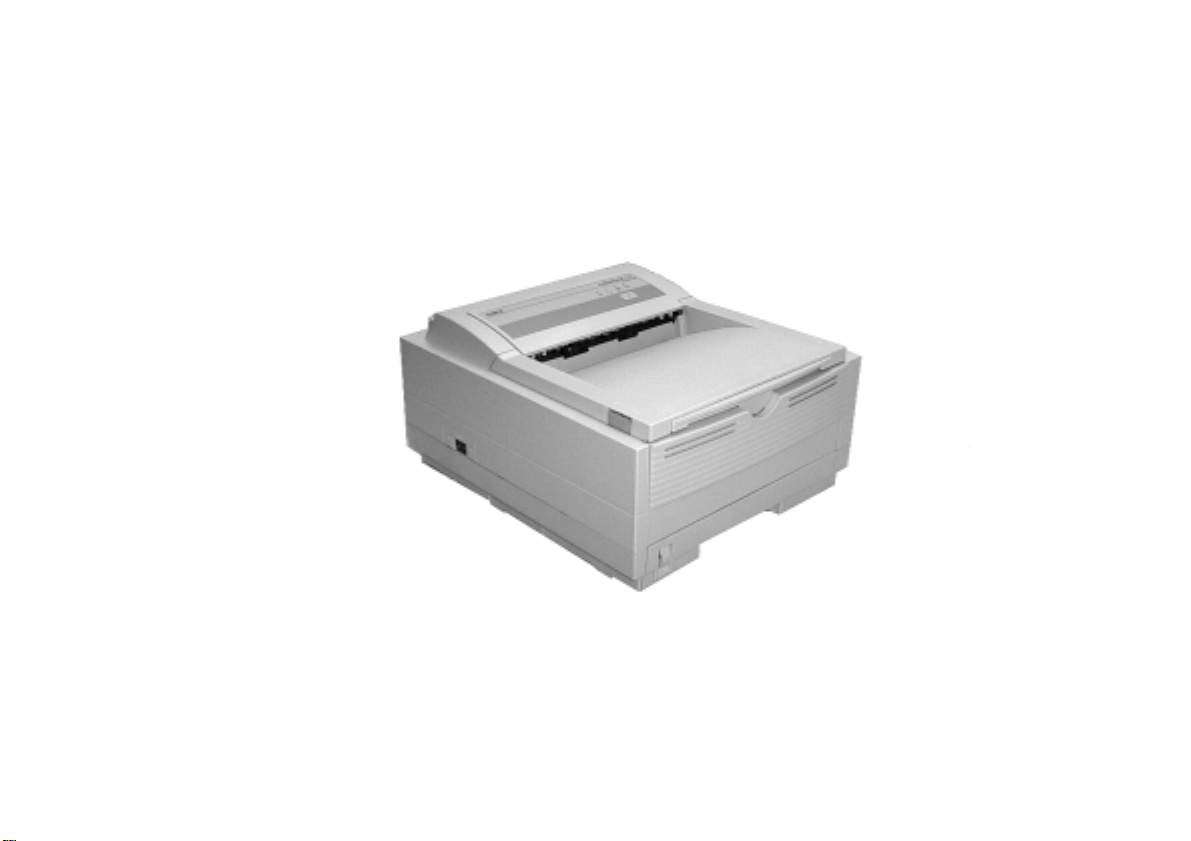
OKIPAGE 10e
User’s Guide
Page 2

Page 3

Preface
English
Every effort has been made to ensure that the information in this document is complete, accurate, and up-todate. Oki assumes no responsibility for the results of errors beyond its control. Oki also cannot guarantee that
changes in software and equipment made by other manufacturers and referred to in this guide will not affect
the applicability of the informatio n in it. Mention of
software products manufactured by other companies
does not necessarily constitute endorsement by Oki.
Copyright 1999 by Oki. All rights reserved.
Oki and Microline are registered trademarks of Oki
Electric Industry Company Ltd.
Energy Star is a trademark of the United States Environmental Protection Agency.
Epson is a registered trademark of Epson America Inc.
IBM is a registered trademark of Internation al Business
Machines Corporation.
Microsoft, MS-DOS and Windows are registered trade-
marks of Microsoft Corporation.
User’s Guide i
Page 4

EEC compatibility
Energy Star
This product complies with the requirements of the Council Directives
89/336/EEC and 73/23/EEC on the
approximation of the laws of the
member states relating to electromagnetic compatibility and low voltage.
As an Energy Star Partner, Oki
has determined that this product
meets the Energy Star guidelines
for energy efficiency.
ii Okipage 10e
Page 5

Table of contents
English
Preface . . . . . . . . . . . . . . . . . . . . . . . . . . . . . . . . . . . . . . i
EEC compatibility . . . . . . . . . . . . . . . . . . . . . . . . . . . . ii
Energy Star. . . . . . . . . . . . . . . . . . . . . . . . . . . . . . . . . . ii
Table of contents . . . . . . . . . . . . . . . . . . . . . . . . . . . . . iii
Safety instructions . . . . . . . . . . . . . . . . . . . . . . . . . . . . .1
Toner cartridge & image drum handling . . . . . . . . .2
Emergency first aid. . . . . . . . . . . . . . . . . . . . . . . . . .3
Printer control panel. . . . . . . . . . . . . . . . . . . . . . . . . . . .4
LED indicators . . . . . . . . . . . . . . . . . . . . . . . . . . . . .4
Power on LED (green) . . . . . . . . . . . . . . . . . . . .5
Ready LED (green). . . . . . . . . . . . . . . . . . . . . . .5
Manual feed LED (amber) . . . . . . . . . . . . . . . . .5
Error LED (red). . . . . . . . . . . . . . . . . . . . . . . . . .5
Control switch. . . . . . . . . . . . . . . . . . . . . . . . . . . . . .6
Printer settings . . . . . . . . . . . . . . . . . . . . . . . . . . . . . . . .7
Viewing and changing settings. . . . . . . . . . . . . . . . .7
Printing menu settings . . . . . . . . . . . . . . . . . . . . . . .7
Using printer status monitor . . . . . . . . . . . . . . . .7
Using control switch . . . . . . . . . . . . . . . . . . . . . .7
Level 1 Menu . . . . . . . . . . . . . . . . . . . . . . . . . . . . . .8
Level 2 Menu . . . . . . . . . . . . . . . . . . . . . . . . . . . . . .8
Paper . . . . . . . . . . . . . . . . . . . . . . . . . . . . . . . . . . . . . . 10
Paper and envelope types. . . . . . . . . . . . . . . . . . . . 10
Transparencies and adhesive labels. . . . . . . . . . . . 10
Installing paper. . . . . . . . . . . . . . . . . . . . . . . . . . . . 11
Printing envelopes . . . . . . . . . . . . . . . . . . . . . . . . . 11
Print quality adjustments . . . . . . . . . . . . . . . . . . . . 12
Printing transparencies. . . . . . . . . . . . . . . . . . . . . . 12
Heavyweight paper or cardstock . . . . . . . . . . . . . . 13
Toner . . . . . . . . . . . . . . . . . . . . . . . . . . . . . . . . . . . . . . 14
When to replace toner cartridge. . . . . . . . . . . . . . . 14
Toner cartridge life . . . . . . . . . . . . . . . . . . . . . . . . 14
Replacing toner cartridge. . . . . . . . . . . . . . . . . . . . 14
Image drum . . . . . . . . . . . . . . . . . . . . . . . . . . . . . . . . . 16
When to replace image drum. . . . . . . . . . . . . . . . . 16
Image drum life . . . . . . . . . . . . . . . . . . . . . . . . . . . 16
Replacing image drum. . . . . . . . . . . . . . . . . . . . . . 16
Resetting drum counter . . . . . . . . . . . . . . . . . . . . . 17
Fonts . . . . . . . . . . . . . . . . . . . . . . . . . . . . . . . . . . . . . . 18
What is a font?. . . . . . . . . . . . . . . . . . . . . . . . . . . . 18
Printing a font list. . . . . . . . . . . . . . . . . . . . . . . . . . 18
Using fonts. . . . . . . . . . . . . . . . . . . . . . . . . . . . . . . 18
Symbol sets . . . . . . . . . . . . . . . . . . . . . . . . . . . . . . 18
User’s Guide iii
Page 6

Printer maintenance. . . . . . . . . . . . . . . . . . . . . . . . . . . 19
Generating a cleaning page . . . . . . . . . . . . . . . . . . 19
Using printer status monitor. . . . . . . . . . . . . . . 19
Using control switch . . . . . . . . . . . . . . . . . . . . 19
Cleaning LED array. . . . . . . . . . . . . . . . . . . . . . . . 20
Troubleshooting. . . . . . . . . . . . . . . . . . . . . . . . . . . . . . 21
Paper Jams . . . . . . . . . . . . . . . . . . . . . . . . . . . . . . . 21
Input jam . . . . . . . . . . . . . . . . . . . . . . . . . . . . . . . . 21
Feed jam or exit jam . . . . . . . . . . . . . . . . . . . . . . . 21
Print quality problems . . . . . . . . . . . . . . . . . . . . . . 22
Software problems. . . . . . . . . . . . . . . . . . . . . . . . . 24
Hardware problems . . . . . . . . . . . . . . . . . . . . . . . . 24
Specifications . . . . . . . . . . . . . . . . . . . . . . . . . . . . . . . 25
Index . . . . . . . . . . . . . . . . . . . . . . . . . . . . . . . . . . . . . . 27
iv Okipage 10e
Page 7

Safety instructions
English
This printer has been carefully designed to give years of
safe, reliable performance. As with all electrical equipment, however, there are a few basic precautions t hat
should be taken to avoid personal injury or damaging
the printer:
• Read this user’s guide carefully and save it for
future reference.
• Read and follow all warning and instruction
labels on the printer itself.
• Disconnect the printer before cleaning. Use only
a damp cloth. Do not use liquid or aerosol cleaners to clean the printer.
• Place the printer on a firm, solid surface. If the
printer is placed on something unsteady, it may
fall and become damaged or injure someone. If
the printer is placed on a soft surface, such as a
rug, sofa, or bed, the vents may become blocked
causing the printer to overheat.
• Do not put the printer on or near a heat source,
such as a radiator or heat register. Keep it out of
direct sunlight. Allow enough room around the
printer for adequate ventilation and easy access.
• Do not use the printer near water, or spill liquid
of any kind into it.
• Make sure that the power source matches the rating listed on the back of the printer. If you are not
sure, check with your dealer or with your local
power company.
• This printer has an earthed, 3-pin plug as a safety
feature and will only connect to an earthed outlet.
If this plug cannot be connected to a po wer o utlet,
then it is possible that the power outlet is of the
older, non-earthed type. Contact an electrician to
have the power outlet replaced. Do not use an
adapter to defeat the earthing.
• To avoid damaging the power cable, do not put
anything on it or place it where it will be walked
on. If the cable becomes damaged or frayed,
replace it immediately.
• If an extension cable or power strip is being used
with the printer, make sure that the total of the
amperage rating required by all the equipment is
less than the rating of the extension cable or
power strip. The total ratings of all equipment
User’s Guide 1
Page 8

plugged into the outlet should not exceed 13
amperes.
• The printer has been dropped, or the cabinet is
damaged.
• The power outlet into which the printer is connected must remain accessible at all times.
• Opening any cover may expose hot surfaces.
These are clearly labelled. Do NOT touch them.
• Do not insert anything into the ventilation s lots
on the printer; you could get a shock or cause a
fire.
• Aside from the routine maintenance described in
this user’s guide, do not try to service the printer
yourself. Opening a cover may expose you to
shocks or other hazards.
• Do not make any adjustments other than those
outlined in this users guide as damaged m ay be
caused to the printer.
If anything happens tha t in di cates t h at the pr in te r is not
working properly or has been damaged, disconnect the
printer from the power source and contact your dealer.
These are some of the things to look for:
• The power cable or plug is frayed or damaged.
• Liquid has been spilled into the printer, or it has
been exposed to water.
• The printer does not function normally when following the operating instructions.
Toner cartridge & image drum handling
• Leave unused toner cartridges and image drum
units in their packages until needed. When
replacing a toner cartridge or image unit, reuse
the packaging to dispose of the old tone r cartridge
or image drum unit.
• Do not expose the toner cartridges and image
drum units to light for more than five minutes.
Never expose the green drum (inside the image
drum unit) to direct sunlight.
• Always hold the image drum unit by the ends never by the middle. N ever touch th e green drum
inside the image drum unit.
• To avoid damage to the image drum unit, always
use original toner cartridges.
• Exercise care when removing the toner cartridge.
Do not let it touch your clothing or porous materials. The toner powder causes permanent stains.
2 Okipage 10e
Page 9

• Small amounts of toner spilled on skin or clothing can be readily removed with soap and cold
water. Using heated water will make removing
the stain much more difficult.
Emergency first ai d
English
•
IF TONER IS SWALLOWED:
ing and seek medical attention. Never attempt to
induce vomiting or give anything by mouth to a
person who is unconscious.
•
IF TONER IS INHALED:
open area for fresh air. Seek medical attention.
•
IF TONER GETS IN THE EYES:
with large quantities of cool, NOT cold, water for
a minimum of 15 minutes keeping eyelids open
with fingers. Seek medical attention.
User’s Guide 3
Induce vomit-
Take the person to an
Flush eyes
Page 10
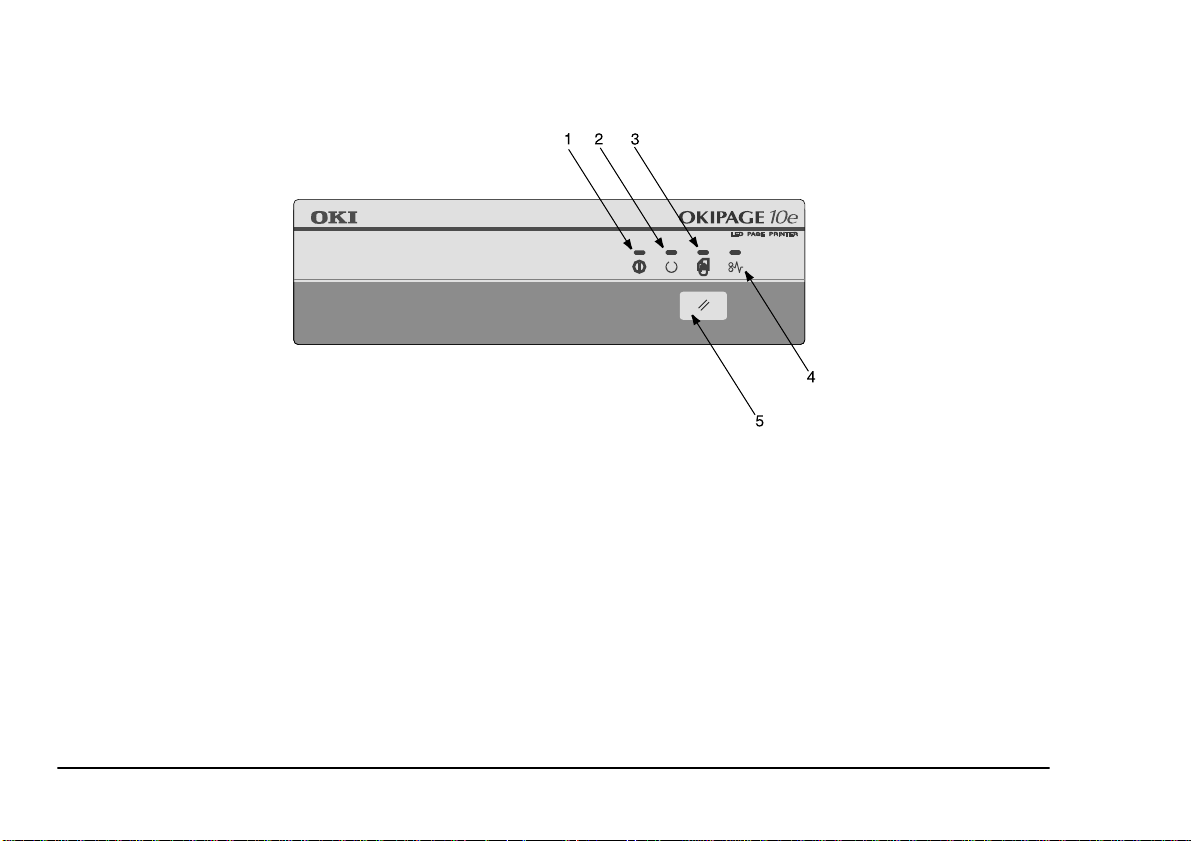
Printer control panel
1. Power On LED indicator
2. Ready LED indicator
3. Manual Feed LED indicator
4. Error LED indicator
5. Control Switch
LED indicators
The printer control panel consists of four led indcators
to show the status of the printer. the led indicators have
five operating conditions as follows:
4 Okipage 10e
• Indicator off
• Indicator on
• Flash 1 - slow blink - 2 seconds on, 2 seconds off
• Flash 2 - blink - 500 ms on, 500 ms off
• Flash 3 - fast blink - 120 ms on, 120 ms off.
All four LED indicators come on momentarily when
power is switched on using the main power switch.
Page 11

Power on LED (green )
English
Manual feed LED (amber)
This indicator comes on and stays on when the printer
is switched on using the main power switch.
Ready LED (green)
• Indicator on - the printer is on line and ready to
receive data.
• Indicator off - printer is off line and cannot
receive data.
• Flash 1 - slow blink - printer is data processing
when printing has been suspended.
• Flash 2 - blink - printer is receiving and processing data during printing or the printer is reset ting
itself.
• Flash 2 - blink with manual feed and error LED
indicators - indicates there is a minor error with
the printer.
• Flash 3 - rapid blink with manual feed and error
LED indicators - indicates there is a major error
with the printer.
• Flash 2 - blink - printer requesting that manual
feed is used for paper feed.
• Flash 2 - blink with ready and error LED indicators - indicates there is a minor error with the
printer.
• Flash 3 - rapid blink with ready and error LED
indicators - indicates there is a major error with
the printer.
Error LED (red)
• Flash 1 - slow blink - indicates that image drum
requires changing or toner is low.
• Flash 2 - blink - indicates there is a printing error,
problem with paper or a cover open.
• Flash 2 - blink with ready and manual feed LED
indicators - indicates there is a minor error with
the printer.
• Flash 3 - rapid blink with ready and manual feed
LED indicators - indicates there is a major error
with the printer.
User’s Guide 5
Page 12

Control switch
The primary functions of the control switch are activated by pressing the switch moment arily and releasing.
The primary functions are as follows:
• Turning the printer off line.
• Turning the printer on line (ready).
• Resume printing after a paper error, paper jam,
print overrun, page overflow, or receiving buffer
overflow.
• Interrupting data processing when the printer is
receiving and processing data.
• Resuming data processing.
The secondary functions of the control switch are activated after turning the printer off line, then pressing and
holding the switch for at least two seconds before releasing. The secondary functions are as follows:
• Printing the demo and menu pages.
Note:
Demo and menu pages can also be printed
using the printer status monitor.
The other functions of the control switch are activated
after turning the printer off line then pressing and holding the switch for at least five seconds befo re releasing .
The other functions are as follows:
• Printing a cleaning page.
Note:
A cleaning page can also be printed using the
printer status monitor.
• Resetting the printer and clearing the buffer after
printing has been cancelled.
Note:
To reset the printer to the default settings of the
manufacturer, the control switch is pressed and
held down while the printer i s switched on with
the main power switch. The LED indicators
blink when the printer has reset to the default
settings.
• Printing any data held in the buffer after printing
has been cancelled.
6 Okipage 10e
Page 13

Printer settings
English
Viewing and changing settings
When installing the printer driver software onto a computer, a status monitor is also installed to indicate what
is happening to the printer when it is being used. This
status monitor is used to control and change the var ious
printer settings as listed below for Level 1 and Level 2
Menus.
Changing any of the printer settings is as follows:
1. Start the status monitor.
2. Click on Printer Setup tab - Printer Menu button.
3. The Printer Menu Setup appears which has several tabs available. Click on these tabs to access
and change the various printer settings.
Printing menu settings
The menu settings can be printed using one of two
methods as follows.
Using printer status monitor
1. Start the status monitor for the printer.
2. Click on Printer Setup tab - Printer Menu button Test Print tab.
3. Click on Menu Print button and the printer prints
a lsit of the menu settings.
Using control switch
1. Press the control switch to take the printer off
line.
2. Press and hold down the control switch for at
least two seconds, but less than five seconds.
3. The printer prints a lsit of the menu settings and a
demo print page.
User’s Guide 7
Page 14

Level 1 Menu
The following table lists Level 1 Menu selections. Factory default settings are indicated in bold type.
Category Item Parameters
Personality Emulate
Tray Select Manual On;
Paper Feed
Auto Tray Switch On;
Edit Size Edt size
Paper Size Tray 1 Letter; Executive; Legal 14;
Tray 2 (if fitted) Letter; Executive; Legal 14;
Manual Letter; Executive; Legal 14;
Feeder (if fitted) Letter; Executi ve; Legal 14 ;
Auto
; HP PCL6; IBM PPR;
Epson FX
Off
Tray 1
; Tray 2; Feeder
Off
Cassett
; Letter; Exec ; Legal 14;
Legal 13; A4 Size; A5 Size; A6
Size; B5 Size; Com-9; Com-10;
Monarch; DL Env; C5 Env
Legal 13;
Size; B5 Size
Legal 13;
Size; B5 Size
Legal 13;
Size; B5 Size; Com-9; Com-10;
Monarch; DL Env; C5 Env
Legal 13;
Size; B5 Size; Com-9; Com-10;
Monarch; DL Env; C5 Env
A4 Size
A4 Size
A4 Size
A4 Size
; A5 Size; A6
; A5 Size; A6
; A5 Size; A6
; A5 Size; A6
Category Item Parameters
Media Type Tray 1 Light; M Light;
Heavy; Heavy
Tray 2 (if fitted) Light; M Light;
Manual Light; M Light;
Feeder (if fitted) Light; M Light;
Paper Size Check Size Check
Copies Copies
Euro Sign Euro Sign
Heavy; Heavy
Heavy; Heavy; Transpr
Heavy; Heavy
Enable
; Disable
1
~ 99
Disable
; Enable
Medium
Medium
Medium
Medium
Level 2 Menu
The following table lists Level 2 Menu selections. Factory default settings are indicated in bold type.
Category Item Parameters
Print Mode Reso lu tion
Smoothing
Memory Useage Raster Buffer
Font Protection
Auto Operation Auto Continue Off;
Wait Timeout Off; 5 Sec;
Manual Timeout
Print Protection
600
; 300
Medium
; Dark
Auto
; Full Letter; Full A4;
Full Legal
Auto
; Off; 400KB; 900KB;
1.6MB; 22.5MB
On
90 Sec
60 Sec
Good
; Better; Best
; M
; M
; M
; M
; 300 Sec
8 Okipage 10e
Page 15

Category Item Parameters
Darkness Control Darkness
Power Saving Power Saving
Low Toner Low Toner
Toner Sa ving Toner Saving
Clearable Warnings Clearable WarningsOn; Off
Error Report E rror Report
Parallel I/F Paralle l S pe ed High
Bi-Direction Enable
I-Prime Off;
RS232C Serial Flow Control
Baud Rate 300; 600; 1200; 2400;
Data Bits
Parity
Min. Busy Time
Language Language
Medium (0)
Dark (+1); Dark (+2); Light
(-2); Medium Light (-1)
0 Sec
; 8 Min; Disable
On
; Off
Disable
; Medium; Light
Off
; On
On
DTRHI
OFF; RBSTXON
9600
4800;
8 Bits
; 7 Bits
None
; Even; Odd
220m Sec
English
Italian; Spanish; S wedish;
Danish; Norwegian; Dutch;
Portuguese; Turkish; Polish
English
; Medium
; DTRLO; XONX-
; 19200
; 1 Sec
; French; German;
User’s Guide 9
Page 16

Paper
Paper and envelope types
The manufacturer of this prin ter recommend s the following guidelines when selecting paper and envelopes
for use in your printer:
• Paper and envelopes should be stored flat and
away from moisture, direct sunlight and heat
sources.
• Use a smooth finished paper such as copier or
laser type paper with a Sheffield (smoothness)
rating of 250 or less. If in doubt, please ask your
paper supplier.
• Use envelopes designed for use in laser type
printers.
• The use of heavily laid or textured paper will
seriously impact on the life of the image drum.
• Do not use very smooth, shiny/glossy paper.
• Do not use heavily embossed headed paper.
• Avoid printing on both sides and putting paper
through the printer twice.
• Avoid using paper with perforations, cut outs and
ragged edges.
• Do not use envelopes with windows or metal
clasps.
• Do not use envelopes with self sealing flaps.
• Avoid using damaged or curled envelopes .
Transparencies and adhesive labels
The manufacturer of thi s printer recommends the following guidelines when selecting transparencies and
adhesive labels for use in your printer:
• Always use manual feed.
• Always use rear output.
• Media must designed for use in laser printers or
photocopiers. Do not use media designed for use
in colour laser printers and photocopiers.
• Must be able to withstand 200°C for 0.1 sec.
• Labels should cover entire carrier sheet.
10 Okipage 10e
Page 17

• Carrier sheet or adhesive
any part of the printer.
must not
be exposed to
Installing paper
1. Remove the paper tray from the bottom of the
printer and place p lain pape r in the tr ay, keeping
the level of the paper in the tray below the guide
marks (1).
English
Printing envelopes
1. Pull out the rear exit extender (1) until it locks
and lift out the support bar.
2. Pull down the manual feed tray (2) and adjust the
paper guides to the width of the envelope.
2. Adjust the rear paper support (2) to the size of
paper you are using by lifting up and sliding forwards or backwards as necessary.
3. Adjust the paper guides (3).
4. Replace the tray in the printer. The paper level
indicator (4) provides a visual indication of how
much paper is left in the tray.
User’s Guide 11
3. Insert the envelope, flap down and to the left,
until the printer grips it.
4. Set envelope size and landscape orientation in
your software, then issue the print command.
Page 18

Print quality adjustments
Printing transparencies
The process used to fuse (fix) the printed image to the
paper involves a mixture of pressure and heat. Too
much heat will cause lightweight paper to crease or curl
and corrugations in transparencies. Too little heat wi ll
cause the image not to fuse fully into heavyweight paper.
The print quality for different type of paper is adjusted
by changing the media type as follows:
1. Start the status monitor.
2. Click on Printer Setup tab - Printer Menu button Paper tab.
3. Click on the button for the paper tray being used.
4. Adjust the media type to the required s etting and,
if necessary, the paper size to the s ize o f th e pap er
being used.
5. Click on Apply button - Close button - OK button
to set the printer to the new media type and printing quality.
When printing transparencies, the manual feed must be
used and the media type changed to transparencies a s
follows:
CAUTION:
Damage to the printer may occur if the i ncorrect setting is
used when printing transparencies.
1. Open the manul feed on the printer and place the
transparency face up between the paper guides.
2. Adjust the paper guides to the width of the transparency.
3. Start the status monitor.
4. Click on Printer Setup tab - Printer Menu button Paper tab - Manual Feed button.
5. Adjust the media type to Transparency and the
paper size to the size of the transparency being
used.
6. Click on Apply button - Close button - OK button
to set the printer for transparencies.
Note:
Remember to reset the printer for normal paper
after printing transparencies.
12 Okipage 10e
Page 19

Heavyweight paper or cardstock
The normal paper path from a main paper tray to the top
output stack involves two complete U-turns. This may
sometimes cause very heavyweight paper or cardstock
to jam or misfeed.
Use the manual feed tray to feed this type of paper and
the rear paper exit to collect printed output. This gives
a nearly straight paper path through the machine and
may prove more reliable in this type of application.
English
User’s Guide 13
Page 20
Toner
When to replace toner cartridge
Replace the toner cartridge after Toner Low displays in
the printer status monitor. Also, the Error LED indicator slowly blinks when toner is low. After Toner Low
displays, the printer will print about 100 more pages,
then display Toner Empty an d stop printing. Printing
will resume after a new t oner cartridge has been installed.
CAUTION:
The use of original toner or toner cartridges is highly
recommended. Using compatible or counterfeit toner or
toner cartridges can seriously damage the printer.
Toner cartridge life
How long your toner cartridge lasts depends on the
print density; the percentage of the page that prints
black. A typical letter has 3% to 5% print density;
graphics usually ha ve higher density. Higher pr int de nsity means toner is used up faster. At 5% print density,
a toner cartridge will print an average of 2500 pages.
Remember, this is only an average: actual results may
vary.
The first toner cartridge installed in a new printer has to
fill the image drum reservoir and saturate the developing roller with toner. The first toner cartridge normally
produces about 1,000 pages after installation.
Replacing toner cartridge
WARNING
Be careful when handling the toner cartridge. Do not let
toner spill on your clothing or other porous materials.
1. Open the cover and remove the used toner cartridge.
2. Shake the new toner cartridge to evenly distribute
toner.
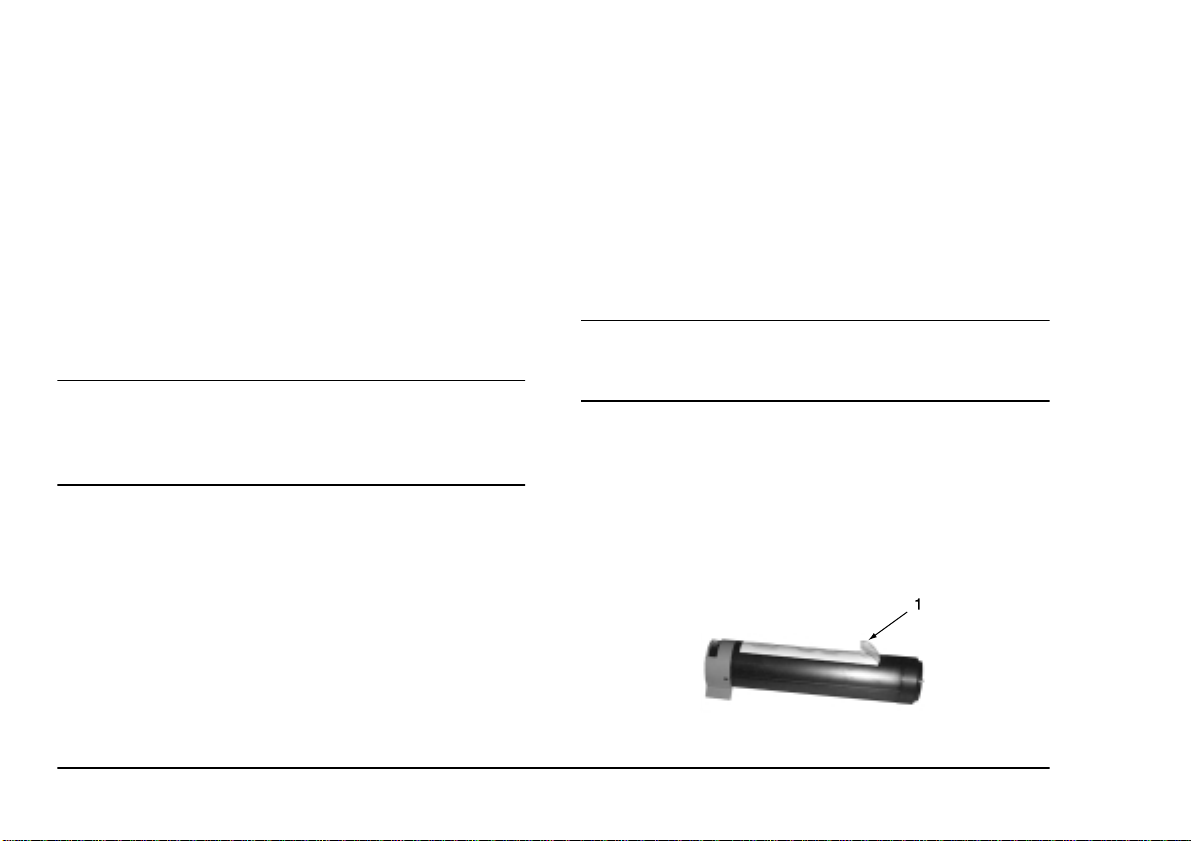
3. Unwrap the new toner cartridge and carefully
peel off the sealing tape (1).
14 Okipage 10e
Page 21
4. Insert the cartridge into the printer, left end (1)
first as illustrated.
5. Push the coloured tab forward to release the toner
into the toner hopper.
English
6. Close the top cover and press down to latch it
closed.
User’s Guide 15
Page 22

Image drum
When to replace image drum
When the drum reaches 90% of its lif e, a Change Dr um
message is displayed in the printer staus monitor. Also,
the Error LED indicator slowly blinks when the image
rquires changing. Change the image drum when the
print becomes faint or begins to deteriorate.
Image drum life
The life of an image drum dep e nds on a number of factors, including tem perature and humid ity, the type of
paper used, and the number of pages per job.
The image drum should last about 9,000 pages at one
page per job, 14,000 pages at three pages per job and
20,000 pages continuous printing. These numbers are
approximate because different number of pages are
printed each time and the environmental conditions and
the paper type used may vary.
Replacing image drum
CAUTION:
Never expose the image drum unit to light for more than 5
minutes. Never expose the image drum unit to direct
sunlight. Always hold the image drum unit by the ends.
Never touch the surface of the green drum inside the image
drum unit.
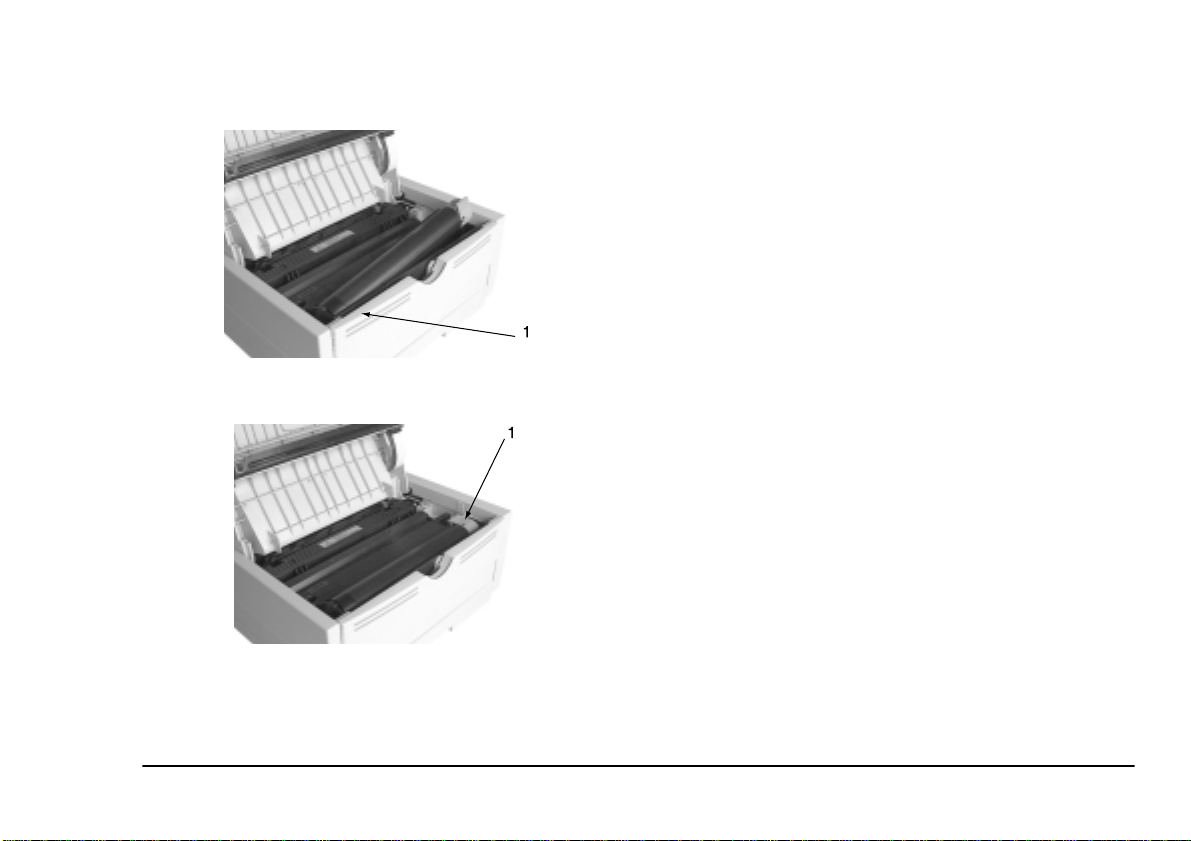
1. Open the cover and remo ve the used image drum.
2. Remove the new image drum from the package
and remove the protective sheet (1) from the
image drum (2).
16 Okipage 10e
Page 23
3. Install the new image drum (1) into the printer
placing the alignment pins on each end into the
slots in the printer.
4. Remove the sponge packaging from the image
drum and discard.
5. Install a new toner cartridge. Refer to “Replacing
toner cartridge”.
6. Close the top cover and press down to latch it
closed.
7. Reset the drum counter following the instructions
given below.
English
Resetting drum counter
After replacing the image drum, reset the dr um co un ter
to keep a correct count of the number of pages printed
on the image drum.
1. Start the status monitor for the printer.
2. Click on Printer Setup tab - Printer Menu button Maintenance 1 tab.
3. Click the Reset button next to Drum Counter, the
click on the OK button to reset the drum counter.
User’s Guide 17
Page 24

Fonts
What is a font?
A font refers to a set of printable characters in a particular typeface of a specific size (e.g. 12 point) and style
(e.g. roman, bold or bold-italic). In computer printing,
however, this term has been used in a wider context to
refer to all sizes and styles of a particular typeface. In
printers, fonts may be divided into two basic types: bitmap fonts and scalable (or outline) fonts.
Bitmap fonts are made up of a pattern of dots (at the
printer resolution) to form the image of each printable
character. These are of a fixed size and scaling makes
them look ragged.
Scalable fonts are stored as a set of mathematical
curves. At print time, the printer uses the stored curves
to make up a bitmap of each character required, at the
required size in the required style, at the fu ll printer resolution. Such fonts are therefore said to be scalable and
do not appear ragged at enlarged sizes.
Printing a font list
1. Start the status monitor for the printer.
2. Click on Printer Setup tab - Printer Menu button Test Print tab.
3. Click on Front Print button and the printer prints
a lsit of the available fonts.
Using fonts
Some MS-DOS and most Windows programs provide
an easy method of font selection within documents. In
these cases the font selection is controlled by the host
PC software application (or by Windows itself). On
other software platforms special codes (e scape sequences) must be embedded with the print data. This
topic is beyond the scope of this H elp Guid e. Howeve r,
the font list referred to in the previous topic contains a
list of the required codes. Use of these codes is best left
to a professional programmer.
Symbol sets
The printer provides special sets of characters for technical, legal and foreign language uses, as well as sets of
drawing characters and standard alphanumeric characters. Each font us es sy mbols f rom one or more of t hese
sets.
18 Okipage 10e
Page 25

Printer maintenance
English
Generating a cleaning page
If the printer shows signs of fading, streaking or errat i c
marks, the prob lem may be cleared by gen erating a
drum cleaning page using one of the two methods a s
follows.
Using printer status monitor
1. Start the status monitor for the printer.
2. Click on Printer Setup tab - Printer Menu button Test Print tab - Cleaning button.
3. Open the manual feed tray (1) and insert a sheet
of A4 plain paper between the paper guides, then
click the OK button.
4. The printer grips the paper and prints a cleaning
page.
5. If subsequent printing appears faded or uneven,
try replacing the toner cartridge.
Using control switch
1. Press the control switch to take the printer off
line.
2. Open the manual feed tray (1) and insert a sheet
of A4 plain paper betwe en the paper guides.
3. Press and hold down the control switch for at
least five seconds.
4. The printer grips the paper and prints a cleaning
page.
5. Return the printer on line by pressing the control
switch.
6. If subsequent printing appears faded or uneven,
try replacing the toner cartridge.
User’s Guide 19
Page 26

Cleaning LED array
Clean the LED array whenever a new toner cartridge is
installed; if there is faded vertical areas; light printing
down a page.
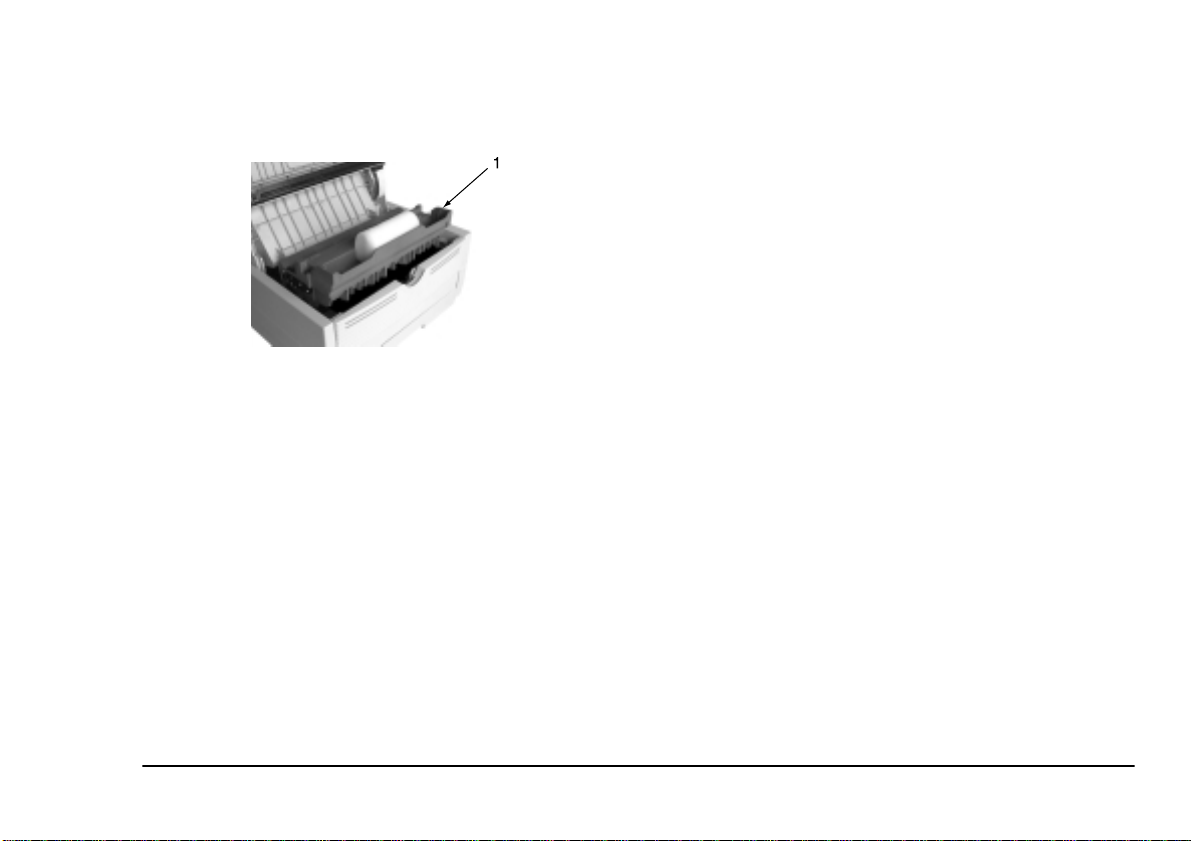
Wipe the LED array ( 1) gently with the c leaning pad
that came with the new toner cartridge or use an antistatic cleaning pad that is generally available for computer cleaning.
1
20 Okipage 10e
Page 27

Troubleshooting
Paper Jams
The printer may experience a paper jam in one of three
areas. The printer status monitor will ind icate which
area has caused the jam:
• INPUT JAM - paper has failed to leave the
selected fed tray and enter the internal paper path
of the printer.
English
• FEED JAM - paper has entered the printer but
failed to reach the exit.
• EXIT JAM - paper has reached the exit but has
failed to exit completely from the printer.
Input jam
1. Remove the paper tray (1) from the printer.
2. Remove any crumpled or folded paper.
3. Remove any paper from the underside (2) of the
printer.
4. Replace the paper tray. After successfully removing any damaged or m isfed paper the pr inter
should continue printing.
User’s Guide 21
Feed jam or exit jam
1. Remove the tray and clear any mis-fed sheets as
given a bove.
2. Open the cover.
WARNING
The fuser area will be hot. This area is clearly marked.
Do not touch it.
CAUTION:
Never expose the image drum unit to light for more than 5
minutes. Never expose the image drum unit to direct
sunlight. Always hold the image drum unit by the ends.
Never touch th e surfac e of t he green drum inside the i mag e
drum unit.
Page 28

3. Carefully lift out the image drum, compl ete with
the toner cartridge. Be careful not to touch or
scratch the green drum surface.
4. Remove any jammed sheets from the paper path.
5. Re-install the image drum, ensuring that it correctly locates into the slots on each side of the
printer.
6. Close the top cover and press down to latch it
closed.
7. The printer will warm up and commence printing
when ready. The page lost through the jam will
normally be reprinted.
Note:
If the edge of the jammed paper protrudes (or
can be seen) from the exit, reinstall the image
drum, close the top cover and switch the printer
on. Remove the jammed paper from the exit
when the exit roller begins rotating after a few
seconds from switching on. However, if the
jammed paper cannot be removed, contact a
service representative.
Print quality problems
Before consulting a service representative regarding a
print quality problem, check the table below to see if
there is a solution, or something you might have overlooked.
Symptom Problem Solution
Blank sheets
printed.
Entire page
prints faintly.
Page has grey
background.
Page prints all
black.
Page has repetitive marks.
Image drum cartridge not
properly installed.
Empty or missing toner
cartridge.
Empty toner cartridge.
Pages get fainter when
toner is used up.
LED array is dirty. Clean LED array.
Static electricity, gener-
ally from dry environments, causes toner to
stick to background.
Hardware problem. Cont ac t se rvi ce .
Damaged image drum
cartridge causes repetitive marks every 1.6
inches (4.06 cm) du e to
surface nicks and
scratches.
Reinstall image drum
cartridge.
Install new toner cartridge.
Install new toner cartridge.
Change paper to a
smoother laser bond or
use a humidifier.
Generate a cleaning
page, repetitive marks
may be temporary.
22 Okipage 10e
Page 29

Symptom Problem So lution
Oblong area of
faint print
appears on each
page.
Vertical white
streaking or
faint areas on
page.
Vertical black
lines.
Fuzzy print. LED array is dirty. Clean LE D array.
Distorted print. Paper pat h, la mp a ssem -
Faded print. Ton e r c ar t r id g e i s no t
Smeared or
blotched print.
Printed page is
light/blurred.
Bold characters
and dark lines
are smeared.
Drop out caused by using
paper exposed t o high
humidity.
Toner is low and does not
distribute p r operly, or the
drum is worn out.
LED array is dirty. Clean LED array.
Hardware problem. Contact service.
bly, or fusing unit problem.
correctly installed.
Dirty rollers; toner
dropped inside printer or
image drum problem.
Is toner low? Replace toner cartridge.
Is paper meant fo r laser
printers?
LED array is dirty. Clean LED array.
Toner i s low. Install new toner car-
Change paper stocks,
check paper sto ra ge environment or use a dehumidifier; check toner
level.
Replace toner cartridge.
Check drum and replace
the drum, if necessary.
Contact service.
Generate cleaning page.
Contact service.
Install toner cartridge
correctly.
Contact service.
Use recommended pa pe r.
tridge.
Symptom Problem Solution
Print is darker
than usual.
Pages curl
excessively.
Darkness setting is too
high.
Printing on wrong side of
paper.
Moisture in paper.
Improper storage.
High humi dity. Recommended operat-
Change darkness setting.
Turn paper over in tray.
(Note arrow on paper
package). Inst all paper
print side down in tray.
Avoid storing paper in
areas of excessive temperature and humidity.
Store paper in protective
wrapping.
ing humidity: 20-80%
English
User’s Guide 23
Page 30

Software problems
Hardware problems
Your software (operating environm ent, applicatio ns
and printer drivers) controls the printing process. Make
sure you have selected the right driver for use with yo ur
printer. See your software documentation for more information.
Symptom Problem Solution
Printing is garbled. Incorrect driver is
installed.
Printer’s output is
below rated speed.
Size of top margin
increases with each
page printed.
Much of the printing
delays will be caused
by your application.
Sometimes purely text
documents will print
slowly depending on
the selected fonts and
how they are transferred to the printer.
Creeping text.
Number of lines per
page in software is not
equal to number of
lines per page of
printer.
Install an appropriate
driver.
For maximum speed,
use text in your document and use a printer
resident font.
Many software packages assume 66 lines
per page, but your
printer’s default is 64.
Adjust software
accordingly, or set
LINES Per PAGE in
the soft control panel
to equal lines per page
in your software.
Symptom Problem Solution
Graphic image prints
partly on one page,
partly on the next.
When you try to print
nothing happens, but
printer indicates it is
ready to receive data.
Garbage prints. Incorrect cable con-
Printer freezes or displays error message
when computer is
rebooted.
Odours. Gases are given off by
Printer is on but must
warm up before a job
is printed.
Insufficient printer
memory for this ima ge
at this resolution.
Configuration error. Che ck cable connec-
figuration. Also, see
Software Problems.
Booting the computer
while the printer is on
can cause a communications error.
forms or adhesives
passing through the
hot fusing unit.
Power Save mode is
set on to conserve
energy. The fuser must
heat up before you can
begin printing the next
job.
Change the resolution,
reduce the image size,
or install more memory in your printer.
tion. If more than one
printer is available,
make sure your printer
has been selected.
Check cable configuration, continuity, and
length.
Turn printer off before
rebooting computer.
Make sure the forms
you use can withstand
heating, and provide
adequate ventilation.
To eliminate warm up
delay, change Power
Save setting in Level 2
Menu.
24 Okipage 10e
Page 31

Specifications
English
Printing Process:
LED array imaging to orga nic photoco nductive drum.
Power Supply:
Voltage: 230V±10% to 240V ±10% AC
Frequency: 50/60Hz ±2%
Power Cable: 1.8m separate cable, terminated with
country specific plug.
Physical:
Dimensions: 200 × 330 × 395 mm (H × W × D)
Weight: Approx 10 kg with legal/universal
cassette installed.
Resolution:
LED Head: 300dpi
Max. Output: 600×600dpi
Power Consumption:
Power Save: 18 W
Idle: 61 W
Normal: 215 W
Peak: 460 W
Memory:
RAM (fitted): 4MB
RAM (max.): 37MB
ROM: 6MB
Emulation:
HP PCL6, IBM Proprinter, Epson,
Paper Han dling:
1st tray (Standard): 250 sheets (75 g/m²)
2nd tray (Optional): 500 sheets (75 g/m²)
Multi Purpose
Feeder (Optional): 100 sheets/50 envelopes
(75 g/m²)
Paper weight:
1st/2nd trays: 60–105g/m²
manual feed: 60–120g/m²
(envelopes 90 to 105 g/m²)
Output: 150 sheets face down (75 g/m²)
50 sheets face-up (rear output)
(75 g/m²)
User’s Guide 25
Page 32

Product life:
Duty: 180 KP, 5 years, maximum of
15KPPM
Reliability: MTBF 24 000 sheets
Consumables: Image drum 20KP (continuous)
Toner 2.5KP @ 5% density
Environment:
Operating: 10 to 32°C at 20 to 80% humidity
Non-operating: 0 to 43°C at 10 to 90% humidity
Storage: -10 to 43°C at 10 to 90% humidity
Noise: Operating: 50 dBA
Standby: 38 dBA
Power Save: background level
Interface:
IBM Centronics (CEN 36) (standard)
RS232C (optional)
26 Okipage 10e
Page 33

Index
English
C
Cleaning page. . . . . . . . . . . . . . . . . . . . . . . . . . . . . . . .19
Control switch . . . . . . . . . . . . . . . . . . . . . . . . . . . . . . . .6
D
Drum counter . . . . . . . . . . . . . . . . . . . . . . . . . . . . . . . .17
E
Envelopes
Printing . . . . . . . . . . . . . . . . . . . . . . . . . . . . . . . . .11
Types. . . . . . . . . . . . . . . . . . . . . . . . . . . . . . . . . . .10
Error LED indicator . . . . . . . . . . . . . . . . . . . . . . . . . . . .5
Exit paper jam. . . . . . . . . . . . . . . . . . . . . . . . . . . . . . . .21
F
Feed paper jam . . . . . . . . . . . . . . . . . . . . . . . . . . . . . . .21
Fonts
Listing . . . . . . . . . . . . . . . . . . . . . . . . . . . . . . . . . .18
Symbol sets . . . . . . . . . . . . . . . . . . . . . . . . . . . . . .18
Types. . . . . . . . . . . . . . . . . . . . . . . . . . . . . . . . . . .18
Using . . . . . . . . . . . . . . . . . . . . . . . . . . . . . . . . . . .18
I
Image drum
Life . . . . . . . . . . . . . . . . . . . . . . . . . . . . . . . . . . . . 16
Replacing . . . . . . . . . . . . . . . . . . . . . . . . . . . . . . . 16
Resetting drum counter . . . . . . . . . . . . . . . . . . . . 17
Input paper jam . . . . . . . . . . . . . . . . . . . . . . . . . . . . . . 21
Installing
Paper. . . . . . . . . . . . . . . . . . . . . . . . . . . . . . . . . . . 11
L
Labels. . . . . . . . . . . . . . . . . . . . . . . . . . . . . . . . . . . . . . 10
LED array . . . . . . . . . . . . . . . . . . . . . . . . . . . . . . . . . . 20
LED indicators. . . . . . . . . . . . . . . . . . . . . . . . . . . . . . . . 4
Error . . . . . . . . . . . . . . . . . . . . . . . . . . . . . . . . . . . . 5
Manual feed . . . . . . . . . . . . . . . . . . . . . . . . . . . . . . 5
Power on. . . . . . . . . . . . . . . . . . . . . . . . . . . . . . . . . 5
Ready . . . . . . . . . . . . . . . . . . . . . . . . . . . . . . . . . . . 5
Level 1 menu. . . . . . . . . . . . . . . . . . . . . . . . . . . . . . . . . 8
Level 2 menu. . . . . . . . . . . . . . . . . . . . . . . . . . . . . . . . . 8
User’s Guide 27
Page 34

M
Maintenance
Cleaning LED array . . . . . . . . . . . . . . . . . . . . . . . 20
Cleaning page. . . . . . . . . . . . . . . . . . . . . . . . . . . . 19
Manual feed LED indicator. . . . . . . . . . . . . . . . . . . . . . 5
Menu settings. . . . . . . . . . . . . . . . . . . . . . . . . . . . . . . . . 7
P
Paper
Envelope types . . . . . . . . . . . . . . . . . . . . . . . . . . . 10
Exit jam . . . . . . . . . . . . . . . . . . . . . . . . . . . . . . . . 21
Feed jam. . . . . . . . . . . . . . . . . . . . . . . . . . . . . . . . 21
Input jam. . . . . . . . . . . . . . . . . . . . . . . . . . . . . . . . 21
Installing. . . . . . . . . . . . . . . . . . . . . . . . . . . . . . . . 11
Label types . . . . . . . . . . . . . . . . . . . . . . . . . . . . . . 10
Paper types . . . . . . . . . . . . . . . . . . . . . . . . . . . . . . 10
Transparencies . . . . . . . . . . . . . . . . . . . . . . . . . . . 10
Paper jams . . . . . . . . . . . . . . . . . . . . . . . . . . . . . . . . . . 21
Power on LED indicator . . . . . . . . . . . . . . . . . . . . . . . . 5
Printer control panel
Control switch . . . . . . . . . . . . . . . . . . . . . . . . . . . . 6
Error LED indicator . . . . . . . . . . . . . . . . . . . . . . . . 5
LED indicators . . . . . . . . . . . . . . . . . . . . . . . . . . . . 4
Manual feed LED indicator . . . . . . . . . . . . . . . . . . 5
Power on LED . . . . . . . . . . . . . . . . . . . . . . . . . . . . 5
Ready LED indicator . . . . . . . . . . . . . . . . . . . . . . . 5
Printer settings
Level 1 menu. . . . . . . . . . . . . . . . . . . . . . . . . . . . . .8
Level 2 menu. . . . . . . . . . . . . . . . . . . . . . . . . . . . . .8
Menu settings . . . . . . . . . . . . . . . . . . . . . . . . . . . . .7
Viewing & changing . . . . . . . . . . . . . . . . . . . . . . . .7
Printing
Cardstock. . . . . . . . . . . . . . . . . . . . . . . . . . . . . . . .13
Cleaning page . . . . . . . . . . . . . . . . . . . . . . . . . . . .19
Envelopes . . . . . . . . . . . . . . . . . . . . . . . . . . . . . . .11
Font list . . . . . . . . . . . . . . . . . . . . . . . . . . . . . . . . .18
Heavyweight paper . . . . . . . . . . . . . . . . . . . . . . . .13
Label types . . . . . . . . . . . . . . . . . . . . . . . . . . . . . .10
Paper & envelope types. . . . . . . . . . . . . . . . . . . . .10
Quality adjustments. . . . . . . . . . . . . . . . . . . . . . . .12
Quality problems. . . . . . . . . . . . . . . . . . . . . . . . . .22
Transparencies. . . . . . . . . . . . . . . . . . . . . . . . . . . .12
Transparency types . . . . . . . . . . . . . . . . . . . . . . . .10
R
Ready LED indicator . . . . . . . . . . . . . . . . . . . . . . . . . . .5
S
Safety . . . . . . . . . . . . . . . . . . . . . . . . . . . . . . . . . . . . . . .1
Specifications . . . . . . . . . . . . . . . . . . . . . . . . . . . . . . . .25
Symbol sets. . . . . . . . . . . . . . . . . . . . . . . . . . . . . . . . . .18
28 Okipage 10e
Page 35

T
Toner
Cartridge life . . . . . . . . . . . . . . . . . . . . . . . . . . . . .14
Replacing. . . . . . . . . . . . . . . . . . . . . . . . . . . . . . . .14
Replacing cartridge . . . . . . . . . . . . . . . . . . . . . . . .14
Transparancies . . . . . . . . . . . . . . . . . . . . . . . . . . . . . . .10
Troubleshooting
Hardware problems. . . . . . . . . . . . . . . . . . . . . . . .24
Paper jams . . . . . . . . . . . . . . . . . . . . . . . . . . . . . . .21
Print quality problems. . . . . . . . . . . . . . . . . . . . . .22
Software problems. . . . . . . . . . . . . . . . . . . . . . . . .24
English
User’s Guide 29
Page 36

OKI SYSTEMS COMPANIES
Oki Systems (UK) Limited
550 Dundee Road
Slough Trading Estate
Slough
Berks SL1 4LE
Tel: +44 (0) 1753 819 819
Fax: +44 (0) 1753 819 899
http://www.oki.co.uk
Oki Systems (Ireland) Limited
The Square Industrial Complex
Tallaght
Dublin 24
Tel: +353 (01) 459 8666
Fax: +353 (01) 459 8840
http://www.oki.ie
Hawthorn Business Centre
Adelaide Industrial Estate
Falcon Road
Belfast BT12 6HP
Tel: +44 (01232) 572 355
Fax: +44 (01232) 572 350
http://www.oki.ie
30 Okipage 10e
 Loading...