

Page 1
User’s Guide
MC363dn
Page 2
P
REFACE
Every effort has been made to ensure that the information in this document is complete,
accurate, and up-to-date. The manufacturer assumes no responsibility for the results of
errors beyond its control. The manufacturer also cannot guarantee that changes in software
and equipment made by other manufacturers and referred to in this guide will not affect
the applicability of the information in it. Mention of software products manufactured by
other companies does not necessarily constitute endorsement by the manufacturer.
While all reasonable efforts have been made to make this document as accurate and helpful
as possible, we make no warranty of any kind, expressed or implied, as to the accuracy or
completeness of the information contained herein.
The most up-to-date drivers and manuals are available from:
http://www.oki.com/printing/
Copyright © 2016. Oki Data Corporation All rights reserved.
OKI is a registered trademark of Oki Electric Industry Co., Ltd.
Energy Star is a trademark of the United States Environmental Protection Agency.
Microsoft, MS-DOS and Windows are registered trademarks of Microsoft Corporation.
Apple, Macintosh, Mac and Mac OS are trademarks of Apple Inc.
Other product names and brand names are registered trademarks or trademarks of their
proprietors.
AirPrint
AirPrint logo
iPad
iPhone
iPod
iPod touch
TM
TM
®
®
®
®
iPad, iPhone, iPod, and iPod touch are trademarks of Apple Inc., registered in
the U.S. and other countries. AirPrint and the AirPrint logo are trademarks of
Apple Inc.
As an Energy Star Program Participant, the manufacturer has determined that
this product meets the Energy Star guidelines for energy efficiency.
This product complies with the requirements of the Council Directives 2014/30/
EU (EMC), 2014/35/EU (LVD), 1999/5/EC (R&TTE), 2009/125/EC (ErP) and
2011/65/EU(RoHS), as amended where applicable, on the approximation of the
laws of the member states relating to Electromagnetic Compatibility, Low
Voltage, Radio & Telecommunications Terminal Equipment, Energy related
Products and Restriction on the use of certain Hazardous Substances in
electrical and electronic equipment.
The following cables were used to evaluate this product to achieve EMC directive
2014/30/EU compliance and configurations other than this may affect that compliance.
CABLE TYPE LENGTH
(METRE)
Power 1.8
USB 5.0
LAN 7.0
Tele p ho n e 7.0
CORE SHIELD
Preface > 2
Page 3

E
w
w
w
.
o
k
i
.
c
o
m
/
p
r
i
n
t
i
n
g
/
MERGENCY FIRST AID
Take care with toner powder:
If swallowed, give small amounts of cold water and seek medical
attention. DO NOT attempt to induce vomiting.
If inhaled, move the person to an open area for fresh air. Seek medical
attention.
If it gets into the eyes, flush with large amounts of water for at least 15
minutes keeping eyelids open. Seek medical attention.
Spillages should be treated with cold water and soap to help reduce risk
of staining skin or clothing.
M
ANUFACTURER
Oki Data Corporation,
4-11-22 Shibaura, Minato-ku,
Tokyo 108-8551,
Japan
I
MPORTER TO THE
Oki Europe Limited
Blays House
Wick Road
Egham
Surrey, TW20 0HJ
United Kingdom
EU/
AUTHORISED REPRESENTATIVE
For all sales, support and general enquiries contact your local distributor.
E
NVIRONMENTAL
INFORMATION
Emergency first aid > 3
Page 4

This product contains software developed by the Heimdal Project.
Copyright (c) 1995 - 2008 Kungliga Tekniska Högskolan
(Royal Institute of Technology, Stockholm, Sweden).
All rights reserved.
Redistribution and use in source and binary forms, with or without modification, are
permitted provided that the following conditions are met:
1. Redistributions of source code must retain the above copyright notice, this list of
conditions and the following disclaimer.
2. Redistributions in binary form must reproduce the above copyright notice, this list of
conditions and the following disclaimer in the documentation and/or other materials
provided with the distribution.
3. Neither the name of the Institute nor the names of its contributors may be used to
endorse or promote products derived from this software without specific prior written
permission.
THIS SOFTWARE IS PROVIDED BY THE INSTITUTE AND CONTRIBUTORS “AS IS” AND ANY
EXPRESS OR IMPLIED WARRANTIES, INCLUDING, BUT NOT LIMITED TO, THE IMPLIED
WARRANTIES OF MERCHANTABILITY AND FITNESS FOR A PARTICULAR PURPOSE ARE
DISCLAIMED. IN NO EVENT SHALL THE INSTITUTE OR CONTRIBUTORS BE LIABLE FOR ANY
DIRECT, INDIRECT, INCIDENTAL, SPECIAL, EXEMPLARY, OR CONSEQUENTIAL DAMAGES
(INCLUDING, BUT NOT LIMITED TO, PROCUREMENT OF SUBSTITUTE GOODS OR
SERVICES; LOSS OF USE, DATA, OR PROFITS; OR BUSINESS INTERRUPTION) HOWEVER
CAUSED AND ON ANY THEORY OF LIABILITY, WHETHER IN CONTRACT, STRICT LIABILITY,
OR TORT (INCLUDING NEGLIGENCE OR OTHERWISE) ARISING IN ANY WAY OUT OF THE
USE OF THIS SOFTWARE, EVEN IF ADVISED OF THE POSSIBILITY OF SUCH DAMAGE.
Environmental information > 4
Page 5

C
ONTENTS
Preface . . . . . . . . . . . . . . . . . . . . . . . . . . . . . . . . . . . . . . . . . . . . . . . . . . .2
Emergency first aid . . . . . . . . . . . . . . . . . . . . . . . . . . . . . . . . . . . . . . . . . .3
Manufacturer. . . . . . . . . . . . . . . . . . . . . . . . . . . . . . . . . . . . . . . . . . . . . . .3
Importer to the EU/authorised representative. . . . . . . . . . . . . . . . . . . . .3
Environmental information . . . . . . . . . . . . . . . . . . . . . . . . . . . . . . . . . . . .3
Contents . . . . . . . . . . . . . . . . . . . . . . . . . . . . . . . . . . . . . . . . . . . . . . . . . .5
Notes, cautions and warnings . . . . . . . . . . . . . . . . . . . . . . . . . . . . . . . . . .8
About this guide . . . . . . . . . . . . . . . . . . . . . . . . . . . . . . . . . . . . . . . . . . . .9
Documentation suite . . . . . . . . . . . . . . . . . . . . . . . . . . . . . . . . . . . . . . . 9
Purpose of this guide . . . . . . . . . . . . . . . . . . . . . . . . . . . . . . . . . . . . . . . 9
On-line usage . . . . . . . . . . . . . . . . . . . . . . . . . . . . . . . . . . . . . . . . . . . .10
Printing pages. . . . . . . . . . . . . . . . . . . . . . . . . . . . . . . . . . . . . . . . . . . .10
Introduction . . . . . . . . . . . . . . . . . . . . . . . . . . . . . . . . . . . . . . . . . . . . . .11
Overview . . . . . . . . . . . . . . . . . . . . . . . . . . . . . . . . . . . . . . . . . . . . . . .13
Front view . . . . . . . . . . . . . . . . . . . . . . . . . . . . . . . . . . . . . . . . . . . .13
Rear view . . . . . . . . . . . . . . . . . . . . . . . . . . . . . . . . . . . . . . . . . . . . .14
Control panel . . . . . . . . . . . . . . . . . . . . . . . . . . . . . . . . . . . . . . . . . . . .15
Keypad - character switching . . . . . . . . . . . . . . . . . . . . . . . . . . . . . . . . .16
Changing the display language . . . . . . . . . . . . . . . . . . . . . . . . . . . . . . . .17
Getting started . . . . . . . . . . . . . . . . . . . . . . . . . . . . . . . . . . . . . . . . . . . .18
Turning on your machine . . . . . . . . . . . . . . . . . . . . . . . . . . . . . . . . . . . .18
Turning off your machine . . . . . . . . . . . . . . . . . . . . . . . . . . . . . . . . . . . .19
When the machine is not used for long time . . . . . . . . . . . . . . . . . . . . .19
Power saving mode . . . . . . . . . . . . . . . . . . . . . . . . . . . . . . . . . . . . . . . .20
Sleep mode . . . . . . . . . . . . . . . . . . . . . . . . . . . . . . . . . . . . . . . . . . . . .21
Auto power off . . . . . . . . . . . . . . . . . . . . . . . . . . . . . . . . . . . . . . . . . . .22
Installing drivers and utilities . . . . . . . . . . . . . . . . . . . . . . . . . . . . . . . . .23
Windows - scanner and printer drivers. . . . . . . . . . . . . . . . . . . . . . . . .24
Mac - printer driver . . . . . . . . . . . . . . . . . . . . . . . . . . . . . . . . . . . . . .25
Fax driver. . . . . . . . . . . . . . . . . . . . . . . . . . . . . . . . . . . . . . . . . . . . .26
Configuration tool . . . . . . . . . . . . . . . . . . . . . . . . . . . . . . . . . . . . . . .27
ActKey utility . . . . . . . . . . . . . . . . . . . . . . . . . . . . . . . . . . . . . . . . . .28
Paper recommendations . . . . . . . . . . . . . . . . . . . . . . . . . . . . . . . . . . . . .30
Cassette trays. . . . . . . . . . . . . . . . . . . . . . . . . . . . . . . . . . . . . . . . . . . .31
Multi purpose tray . . . . . . . . . . . . . . . . . . . . . . . . . . . . . . . . . . . . . . . . .32
Output tray . . . . . . . . . . . . . . . . . . . . . . . . . . . . . . . . . . . . . . . . . . . . .32
Rear output tray . . . . . . . . . . . . . . . . . . . . . . . . . . . . . . . . . . . . . . . . . .32
Duplex . . . . . . . . . . . . . . . . . . . . . . . . . . . . . . . . . . . . . . . . . . . . . . . . .32
Loading paper . . . . . . . . . . . . . . . . . . . . . . . . . . . . . . . . . . . . . . . . . . . . .33
Cassette trays. . . . . . . . . . . . . . . . . . . . . . . . . . . . . . . . . . . . . . . . . . . .33
Multi purpose tray . . . . . . . . . . . . . . . . . . . . . . . . . . . . . . . . . . . . . . . . .36
Configuring the tray settings . . . . . . . . . . . . . . . . . . . . . . . . . . . . . . . . .36
Registering custom sizes . . . . . . . . . . . . . . . . . . . . . . . . . . . . . . . . . . . .37
User authentication and access control . . . . . . . . . . . . . . . . . . . . . . . . .38
PIN authentication. . . . . . . . . . . . . . . . . . . . . . . . . . . . . . . . . . . . . . . . .38
Logging into the machine . . . . . . . . . . . . . . . . . . . . . . . . . . . . . . . . . .38
Logging out of the machine . . . . . . . . . . . . . . . . . . . . . . . . . . . . . . . .38
User name and password authentication . . . . . . . . . . . . . . . . . . . . . . . . .38
Logging into the machine . . . . . . . . . . . . . . . . . . . . . . . . . . . . . . . . . .38
Logging out of the machine . . . . . . . . . . . . . . . . . . . . . . . . . . . . . . . .38
Operation from the computer . . . . . . . . . . . . . . . . . . . . . . . . . . . . . . .39
Contents > 5
Page 6

Operation . . . . . . . . . . . . . . . . . . . . . . . . . . . . . . . . . . . . . . . . . . . . . . . .41
Multi-tasking. . . . . . . . . . . . . . . . . . . . . . . . . . . . . . . . . . . . . . . . . . . . .42
Loading document(s) . . . . . . . . . . . . . . . . . . . . . . . . . . . . . . . . . . . . . . .43
Document requirements. . . . . . . . . . . . . . . . . . . . . . . . . . . . . . . . . . .43
Scannable area . . . . . . . . . . . . . . . . . . . . . . . . . . . . . . . . . . . . . . . . .43
Placing document(s) in the ADF . . . . . . . . . . . . . . . . . . . . . . . . . . . . .44
Placing document(s) on the glass . . . . . . . . . . . . . . . . . . . . . . . . . . . .45
Copying . . . . . . . . . . . . . . . . . . . . . . . . . . . . . . . . . . . . . . . . . . . . . . . . . .46
Basic operation . . . . . . . . . . . . . . . . . . . . . . . . . . . . . . . . . . . . . . . . . . .46
Increasing copy count . . . . . . . . . . . . . . . . . . . . . . . . . . . . . . . . . . . .46
Advanced operation. . . . . . . . . . . . . . . . . . . . . . . . . . . . . . . . . . . . . . . .47
Resetting copy settings . . . . . . . . . . . . . . . . . . . . . . . . . . . . . . . . . . . . .49
Auto reset . . . . . . . . . . . . . . . . . . . . . . . . . . . . . . . . . . . . . . . . . . . .49
Using the reset/logout button . . . . . . . . . . . . . . . . . . . . . . . . . . . . . . .49
Scanning . . . . . . . . . . . . . . . . . . . . . . . . . . . . . . . . . . . . . . . . . . . . . . . . .50
Installing scanner drivers (TWAIN/WIA/ICA driver) . . . . . . . . . . . . . . . . . .50
Installation procedure . . . . . . . . . . . . . . . . . . . . . . . . . . . . . . . . . . . .50
Using ActKey software . . . . . . . . . . . . . . . . . . . . . . . . . . . . . . . . . . . .55
Setup to use the WSD Scan . . . . . . . . . . . . . . . . . . . . . . . . . . . . . . . . . .56
Installation procedure . . . . . . . . . . . . . . . . . . . . . . . . . . . . . . . . . . . .56
Scanning methods. . . . . . . . . . . . . . . . . . . . . . . . . . . . . . . . . . . . . . . . .57
Scan to E-mail . . . . . . . . . . . . . . . . . . . . . . . . . . . . . . . . . . . . . . . . . . .59
Scan to Shared Folder . . . . . . . . . . . . . . . . . . . . . . . . . . . . . . . . . . . . . .63
Scan to USB memory. . . . . . . . . . . . . . . . . . . . . . . . . . . . . . . . . . . . . . .66
Scan to Computer . . . . . . . . . . . . . . . . . . . . . . . . . . . . . . . . . . . . . . . . .68
Connecting VIA USB . . . . . . . . . . . . . . . . . . . . . . . . . . . . . . . . . . . . .69
Connecting VIA Network . . . . . . . . . . . . . . . . . . . . . . . . . . . . . . . . . .69
WSD Scan connection . . . . . . . . . . . . . . . . . . . . . . . . . . . . . . . . . . . .70
Remote Scan . . . . . . . . . . . . . . . . . . . . . . . . . . . . . . . . . . . . . . . . . . . .71
Simple scan mode . . . . . . . . . . . . . . . . . . . . . . . . . . . . . . . . . . . . . . .72
Manual scan mode. . . . . . . . . . . . . . . . . . . . . . . . . . . . . . . . . . . . . . .72
Secure scan mode (for network connection) . . . . . . . . . . . . . . . . . . . . .73
Secure scan mode (for USB connection). . . . . . . . . . . . . . . . . . . . . . . .75
Managing profiles . . . . . . . . . . . . . . . . . . . . . . . . . . . . . . . . . . . . . . . . .76
Adding a new network profile . . . . . . . . . . . . . . . . . . . . . . . . . . . . . . .76
Deleting a network profile . . . . . . . . . . . . . . . . . . . . . . . . . . . . . . . . .77
Managing the address book . . . . . . . . . . . . . . . . . . . . . . . . . . . . . . . . . .78
Setting sender and reply to E-mail addresses (from/reply to) . . . . . . . . .78
Creating E-mail templates . . . . . . . . . . . . . . . . . . . . . . . . . . . . . . . . .79
Adding an E-mail address entry to the address book . . . . . . . . . . . . . . .80
Deleting an E-mail address entry from the address book . . . . . . . . . . . .80
Modifying an E-mail address entry from the address book . . . . . . . . . . .81
Adding a group entry to the address book . . . . . . . . . . . . . . . . . . . . . .81
Deleting a group address entry from the address book . . . . . . . . . . . . .82
Modifying a group address entry from the address book. . . . . . . . . . . . .82
Printing . . . . . . . . . . . . . . . . . . . . . . . . . . . . . . . . . . . . . . . . . . . . . . . . . .83
Job lists . . . . . . . . . . . . . . . . . . . . . . . . . . . . . . . . . . . . . . . . . . . . . . . .83
Print from USB memory . . . . . . . . . . . . . . . . . . . . . . . . . . . . . . . . . . . . .84
Basic operation . . . . . . . . . . . . . . . . . . . . . . . . . . . . . . . . . . . . . . . . .84
Advanced operation . . . . . . . . . . . . . . . . . . . . . . . . . . . . . . . . . . . . . .85
Switching online/offline . . . . . . . . . . . . . . . . . . . . . . . . . . . . . . . . . . . . .86
Printing with AirPrint . . . . . . . . . . . . . . . . . . . . . . . . . . . . . . . . . . . . . . .86
Products Affected . . . . . . . . . . . . . . . . . . . . . . . . . . . . . . . . . . . . . . .86
How to print . . . . . . . . . . . . . . . . . . . . . . . . . . . . . . . . . . . . . . . . . . .86
Faxing . . . . . . . . . . . . . . . . . . . . . . . . . . . . . . . . . . . . . . . . . . . . . . . . . . .87
Sending a fax from the MFP . . . . . . . . . . . . . . . . . . . . . . . . . . . . . . . . . .87
Basic operation . . . . . . . . . . . . . . . . . . . . . . . . . . . . . . . . . . . . . . . . .87
Contents > 6
Page 7

Advanced operation . . . . . . . . . . . . . . . . . . . . . . . . . . . . . . . . . . . . . .88
Fax receiving . . . . . . . . . . . . . . . . . . . . . . . . . . . . . . . . . . . . . . . . . .97
Managing the phone book . . . . . . . . . . . . . . . . . . . . . . . . . . . . . . . . . .100
Adding a speed dial entry to the phone book . . . . . . . . . . . . . . . . . . .100
Adding a group entry to the phone book . . . . . . . . . . . . . . . . . . . . . .101
Deleting a speed dial entry from the phone book. . . . . . . . . . . . . . . . .101
Deleting a group dial entry from the phone book. . . . . . . . . . . . . . . . .101
Modifying a speed dial entry . . . . . . . . . . . . . . . . . . . . . . . . . . . . . . .102
Modifying a group dial entry . . . . . . . . . . . . . . . . . . . . . . . . . . . . . . .102
Registering an entry from reception or transmission history . . . . . . . . .102
Internet fax . . . . . . . . . . . . . . . . . . . . . . . . . . . . . . . . . . . . . . . . . . . .103
Sending a fax from your PC . . . . . . . . . . . . . . . . . . . . . . . . . . . . . . .103
Receiving an internet fax . . . . . . . . . . . . . . . . . . . . . . . . . . . . . . . . .106
Adding fax numbers to the phone book . . . . . . . . . . . . . . . . . . . . . . .107
Adding new groups to the phone book . . . . . . . . . . . . . . . . . . . . . . . .107
Importing and exporting fax numbers . . . . . . . . . . . . . . . . . . . . . . . .108
Functions common to copy, fax and scan operations . . . . . . . . . . . . . .109
Continuous scan mode. . . . . . . . . . . . . . . . . . . . . . . . . . . . . . . . . . . . .109
Maintenance . . . . . . . . . . . . . . . . . . . . . . . . . . . . . . . . . . . . . . . . . . . . .110
Replacing consumable items. . . . . . . . . . . . . . . . . . . . . . . . . . . . . . . . .110
Toner cartridge replacement. . . . . . . . . . . . . . . . . . . . . . . . . . . . . . .110
Image drum replacement . . . . . . . . . . . . . . . . . . . . . . . . . . . . . . . . .115
Replacing the transfer belt unit . . . . . . . . . . . . . . . . . . . . . . . . . . . . .115
Fuser replacement. . . . . . . . . . . . . . . . . . . . . . . . . . . . . . . . . . . . . .118
Cleaning. . . . . . . . . . . . . . . . . . . . . . . . . . . . . . . . . . . . . . . . . . . . . . .120
...the unit casing . . . . . . . . . . . . . . . . . . . . . . . . . . . . . . . . . . . . . . .120
...the LED head . . . . . . . . . . . . . . . . . . . . . . . . . . . . . . . . . . . . . . . .120
...the paper path in the ADF . . . . . . . . . . . . . . . . . . . . . . . . . . . . . . .122
...the underside of the ADF. . . . . . . . . . . . . . . . . . . . . . . . . . . . . . . .122
...the document glass . . . . . . . . . . . . . . . . . . . . . . . . . . . . . . . . . . .123
Installing upgrades . . . . . . . . . . . . . . . . . . . . . . . . . . . . . . . . . . . . . . . .124
Additional paper tray . . . . . . . . . . . . . . . . . . . . . . . . . . . . . . . . . . . . . .124
Setting the driver device options. . . . . . . . . . . . . . . . . . . . . . . . . . . . . .125
Windows . . . . . . . . . . . . . . . . . . . . . . . . . . . . . . . . . . . . . . . . . . . .125
Mac OS X . . . . . . . . . . . . . . . . . . . . . . . . . . . . . . . . . . . . . . . . . . . .125
Troubleshooting . . . . . . . . . . . . . . . . . . . . . . . . . . . . . . . . . . . . . . . . . .126
Checking the machine’s status . . . . . . . . . . . . . . . . . . . . . . . . . . . . . . .126
Checking the device and job status . . . . . . . . . . . . . . . . . . . . . . . . . . . .126
Checking the LED indicator in the power switch . . . . . . . . . . . . . . . . . . .126
Clearing paper jams . . . . . . . . . . . . . . . . . . . . . . . . . . . . . . . . . . . . . .127
In the scanner ADF section... . . . . . . . . . . . . . . . . . . . . . . . . . . . . . .127
In the printer section... . . . . . . . . . . . . . . . . . . . . . . . . . . . . . . . . . .128
Dealing with unsatisfactory printing. . . . . . . . . . . . . . . . . . . . . . . . . . . .135
Dealing with unsatisfactory copying. . . . . . . . . . . . . . . . . . . . . . . . . . . .136
Fax problem checklist . . . . . . . . . . . . . . . . . . . . . . . . . . . . . . . . . . . . .137
Before Machine Disposal . . . . . . . . . . . . . . . . . . . . . . . . . . . . . . . . . . . .139
Specifications . . . . . . . . . . . . . . . . . . . . . . . . . . . . . . . . . . . . . . . . . . . .140
Index . . . . . . . . . . . . . . . . . . . . . . . . . . . . . . . . . . . . . . . . . . . . . . . . . . .143
Oki contact details. . . . . . . . . . . . . . . . . . . . . . . . . . . . . . . . . . . . . . . . .144
Contents > 7
Page 8

N
OTES, CAUTIONS AND WARNINGS
NOTE
A note provides additional information to supplement the main text.
CAUTION!
A caution provides additional information which, if ignored, may
result in equipment malfunction or damage.
WARNING!
A warning provides additional information which, if ignored, may
result in a risk of personal injury.
For the protection of your product, and in order to ensure that you benefit from its full
functionality, this model has been designed to operate only with genuine original toner
cartridges. Any other toner cartridge may not operate at all, even if it is described as
“compatible”, and if it does work, your product's performance and print quality may be
degraded.
Use of non-genuine products may invalidate your warranty.
Specifications subject to change without notice. All trademarks acknowledged.
Notes, cautions and warnings > 8
Page 9

A
BOUT THIS GUIDE
NOTE
Images used in this manual may include optional features that your product
does not have installed.
D
OCUMENTATION SUITE
This guide is part of a suite of online and printed documentation provided to help you
become familiar with your product and to make the best use of its many powerful features.
The documentation is summarised below for reference and is found on the manuals DVD
unless indicated otherwise:
> Installation Safety booklet: provides information for safe use of your product.
This is a paper document that is packaged with the product and should be read before
setting up your machine.
> Set-up guide: describes how to unpack, connect and turn on your product.
This is a paper document that is packaged with the product.
> User’s Guide: helps you become familiar with your product and make the best use
of its many features. Also included are guidelines for troubleshooting and
maintenance to ensure that it performs at its best. Additionally, information is
provided for adding optional accessories as your printing needs evolve.
> Configuration Guide: provides machine, fax and network configuration
information.
> On-line Help: on-line information accessible from the printer driver and utility
software.
P
URPOSE OF THIS GUIDE
The purpose of this guide is to provide you with in-depth information on how to use your
machine efficiently and effectively for printing, copying, scanning and faxing.
NOTE
The User Guide assumes that the machine has been set up and fully
configured. Refer to the Setup Guide and Configuration Guide for guidance.
Depending on your OS, model or version, the description on this document may be
different.
About this guide > 9
Page 10
ON-
1
2
3
LINE USAGE
This guide is intended to be read on screen using Adobe Reader. Use the navigation and
viewing tools provided in Adobe Reader.
There are many cross-references within this book, each highlighted as blue text. When you
click on a cross-reference the display will instantly jump to the part of the manual
containing the referenced material.
By using the button in Adobe Reader, you can navigate directly back to where you were
before.
You can access specific information in two ways:
> In the list of bookmarks down the left hand side of your screen, click on the topic of
interest to jump to the required topic. (If the bookmarks are not available, use the
“Contents” on page 5.)
> In the list of bookmarks, click on Index to jump to the Index. (If the bookmarks are
not available, use the “Contents” on page 5.) Find the term of interest in the
alphabetically arranged index and click on the associated page number to jump to
the page containing the term.
P
RINTING PAGES
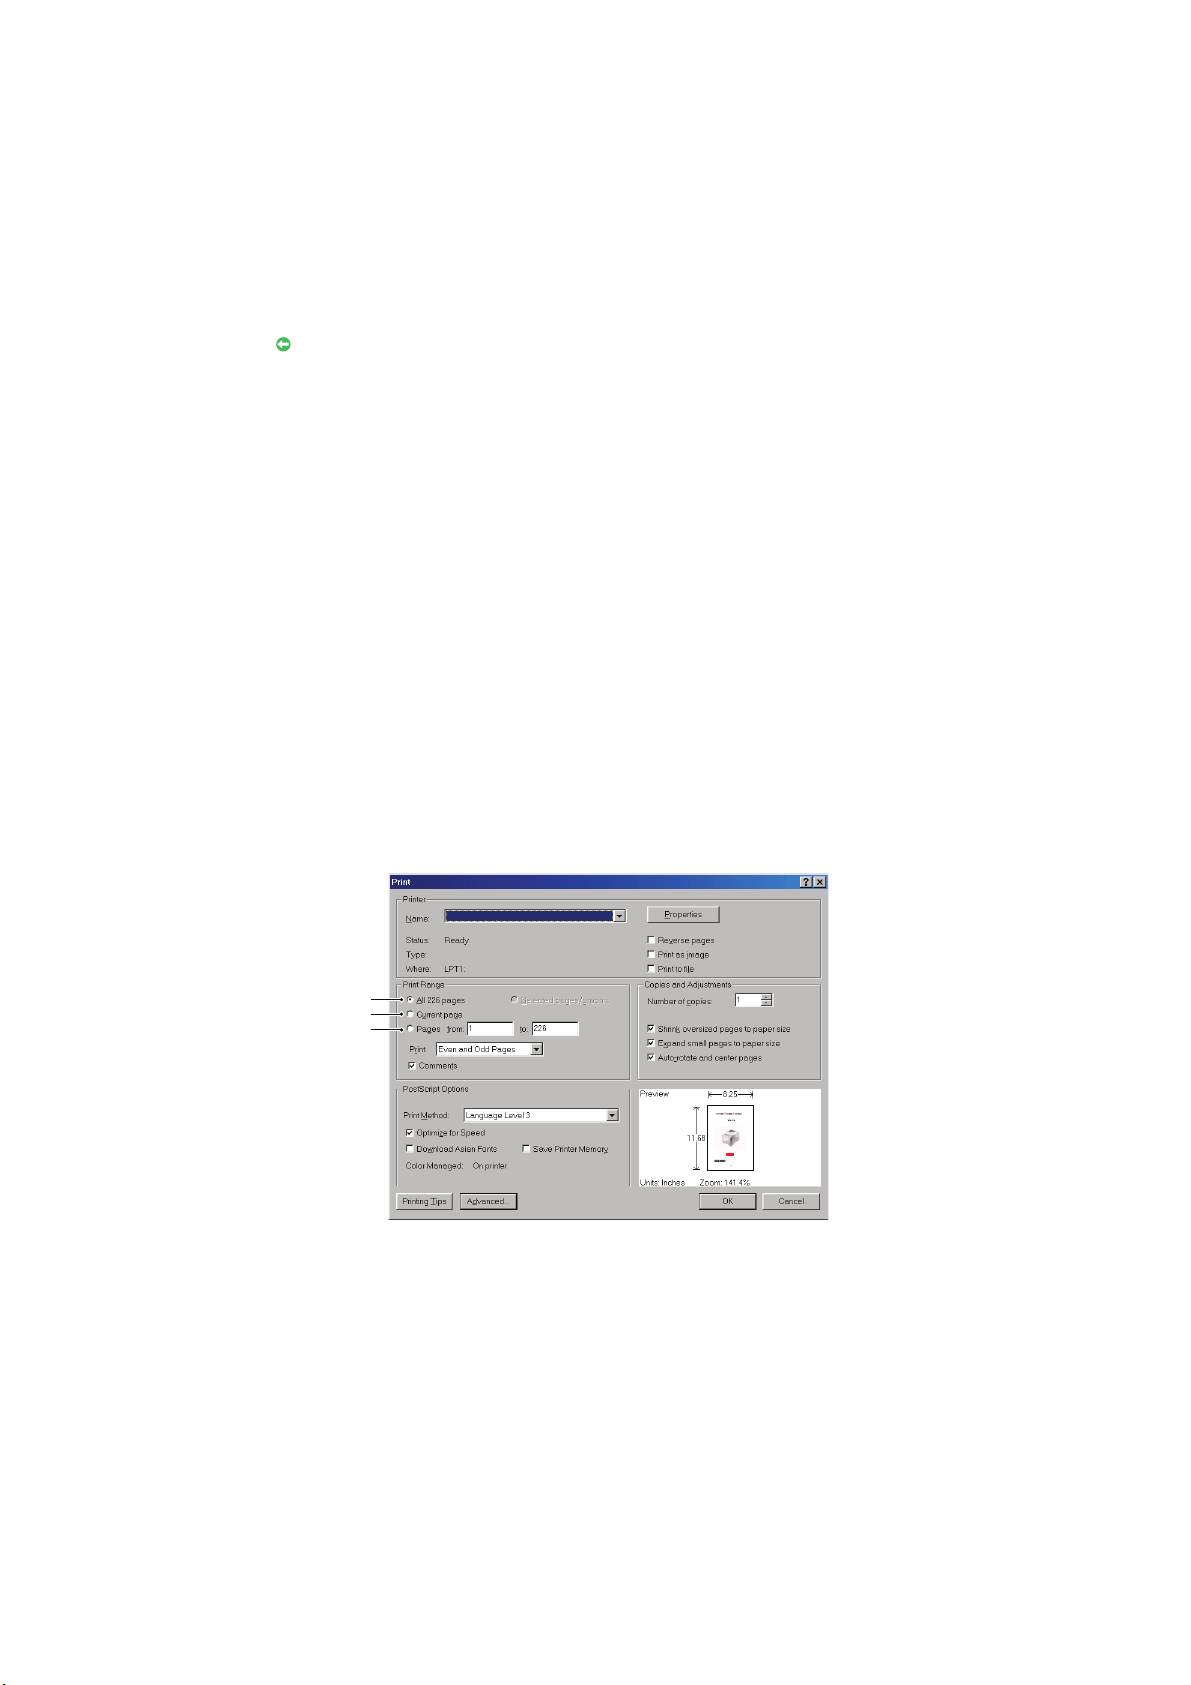
The whole manual, individual pages, or sections may be printed. The procedure is:
1. From the toolbar, select File > Print (or press the Ctrl + P keys).
2. Choose which pages you wish to print:
(a) All pages, (1), for the entire manual.
(b) Current page, (2), for the page at which you are looking.
(c) Pages from and to, (3), for the range of pages you specify by entering their
page numbers.
(d) Click OK.
About this guide > 10
Page 11

I
NTRODUCTION
Congratulations on choosing this Multi Function Product (MFP). It i s d esi gn ed w it h a d va nc e d
features, to give you clear, vibrant color prints and crisp black and white pages at high
speed on a range of office print media.
With this MFP, you can instantly scan paper-based documents and deliver the electronic
image to various destinations including E-mail addresses, printers, ftp servers or someone
else's computer on the network. This MFP also has a “walk-up” fax facility allowing you to
send your documents to a destination fax number instantly.
Your MFP includes these features:
> Multi-tasking to allow scanning one job while printing another to ensure greater
productivity.
> Digital Copying - An intuitive control panel, makes digital copying fast and easy.
> Up to 600 x 600dpi (dots per inch) copy resolution.
> Actkey utility - enables the MFP to receive one key touch commands from a locally
connected computer (“pull scan”).
> Scan to E-mail - Connected to an Ethernet network and a SMTP server, this MFP
allows you to transmit document(s) over the internet via E-mail. With a touch of the
E-mail on-screen button and the selection of your recipients' E-mail addresses, the
document(s) is/are first scanned and converted into an image file, and then
transmitted to remote recipients within minutes.
> Scan to Shared Folder - Allows you to send scanned documents to a server or a
personal computer's file folder over an intranet with FTP (File Transfer Protocol),
HTTP (Hypertext Transfer Protocol), CIFS (Common Internet File System) protocol.
The scan to filing feature removes the need for the mail server to handle large
attachments.
> Multiple Pages Sending - With the Auto Document Feeder (ADF), the MFP allows a
stack of up to 50 page document(s) to be continuously scanned.
> Faxing - An intuitive control panel, makes direct faxing fast and easy.
> Advanced fax transmission and reception, including delayed transmissions, sending
to multiple locations, confidential transmission and reception, and polling.
> Address Book/Phone Book/Profiles Managing - This provides a convenient way to
manage all the E-mail addresses, fax numbers and profiles (filing destinations).
> ProQ/High Quality, multi-level technology produces subtler tones and smoother
gradations of color to lend photographic quality to your documents.
> 600 x 600, 1200 x 600 dpi (dots per inch) and ProQ/High Quality print resolution for
high quality image production showing the finest detail.
> Internet Protocol version 6 (IPv6).
> Single Pass color Digital LED technology for high speed processing of your printed
pages.
> PostScript 3, PCL 5C, PCL 6, IBM PPR and Epson FX emulations for industry standard
operation and wide compatibility with most computer software.
> 10Base-T and 100Base-TX network connection lets you share this valuable resource
among users on your office network.
> Photo Enhance mode to improve printouts of photographic images (not available on
PS drivers).
> Automatic two-sided (duplex) printing for economical use of paper and compact
printing of larger documents.
Introduction > 11
Page 12

Additionally, the following optional features are also available:
> Additional paper tray for loading a further 530 sheets to minimise operator
intervention, or different paper stocks for letterhead stationery, alternative paper
sizes or other print media.
> Additional memory allows printing of more complex pages. For example, high
resolution banner printing.
> Four modes of toner save function (Default: Off, Low, Middle, High) are available
when using Copy/DirectPrint/Fax function.
> Can use wireless LAN.
> Can use AirPrint. Can print from iPhone, iPad, iPod touch, or other iOS device
without installing printer drivers.
Introduction > 12
Page 13

O
12
13
14
15
6
2
3
4
5
1
17
9
10
11
7
5
8
16
VERVIEW
F
RONT VIEW
1. ADF unit.
2. ADF paper tray.
3. Operator panel.
Menu driven operator controls and LCD panel
4. Output tray (face down).
Standard printed copy delivery point. Holds up to
150 sheets at 80g/m².
5. Paper tray.
Standard paper tray. Holds up to 250 sheets of
80g/m² paper.
6. Multi purpose tray.
7. Multi-purpose tray release recess.
8. Output tray release button.
9. Document glass.
a
10. ADF document glass.
.
11. Document cover.
12. LED heads.
13. Fuser release levers.
14. Toner cartridges (C,M,Y,K).
15. ID unit.
16. Power Switch.
17. USB memory port.
Used for feeding heavier paper stocks, envelopes
and other special media. Also for manual feeding
of single sheets when required.
a. The display language can be changed to show different languages. (see “Changing the display
language” on page 17).
Introduction > 13
Page 14
R
1
5
4
3
76
8
2
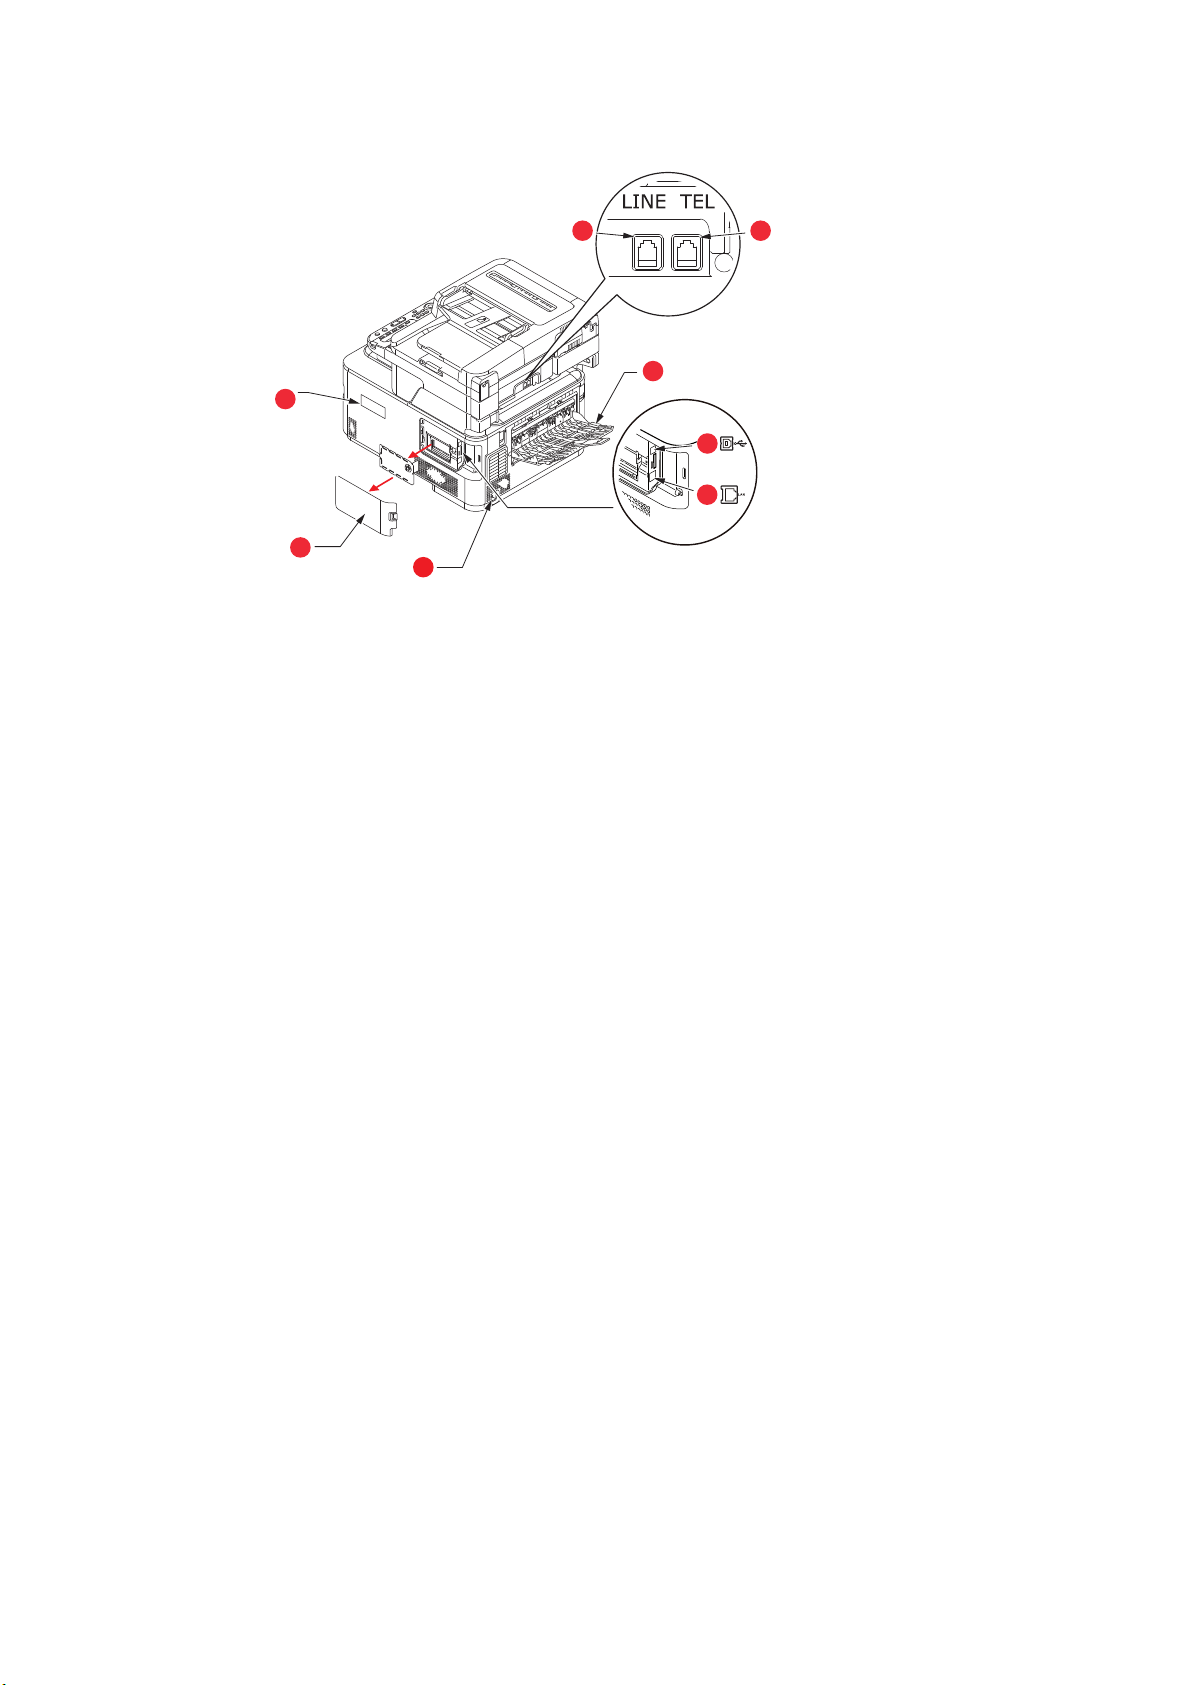
EAR VIEW
1. Access panel.
2. AC power socket.
3. USB interface.
4. Network interface.
a. The Network Interface may have a protective “plug” which must be
removed before connection can be made.
a
5. Rear output tray (face up stacker).
6. LINE connection.
7. TEL connection.
8. Wireless LAN I/F Cover.
When the rear output tray is folded down paper exits the printer through the rear of the
printer and is stacked here face up. This is mainly used for heavy print media. When used
in conjunction with the multi purpose feed tray, the paper path through the printer is
essentially straight. This avoids bending the paper around curves in the paper path and
enables feeding of up to 220g/m² media.
Introduction > 14
Page 15

C
17
3 1 2 11 512 46
13 7 8 101516914
ONTROL PANEL
REF. DESCRIPTION
1. Liquid crystal display (LCD)
Displays operating instructions and status of your machine.
2. Panel adjust recess
The LCD panel can be swivelled upwards from its base position for ease of use.
3. Main function buttons
COPY: Pressing this button selects copy mode. This allows you to control the copying process
whereby documents to be copied are scanned in the scanner unit (document glass or ADF) and the
copies are automatically printed in the printer unit.
SCAN: Pressing this button gives access to several send modes. These allow you to select and
control the process whereby a document is scanned and the scanned data is sent: by email as an
attachment, to a local PC, to a network PC, to a USB memory stick. It also allows you to arrange for
a document to be scanned from a remote PC.
PRINT: Pressing this button selects print mode. This allows you to select and print out a stored job,
an encrypted print job or a job stored on a USB memory stick. It also allows you to print out a job
list of all recent prints, or switch the machine to an “offline” state.
FAX/HOOK: Pressing this button selects fax send mode. This allows you to control the process whereby a
document is scanned and then the scanned data is sent as a fax. If the button has been pressed twice and the
external telephone handset is replaced, you can dial when you hear the dial tone.
4. RESET/LOG OUT:
Pressing this button returns all settings of a selected function to their default values, but does not stop any jobs
that are already in progress.
At the top level screen, pressing this button logs the user out (if access control is enabled and active).
5. REDIAL/?HELP:
The last dialed telephone number is displayed. Pressing this button when the green LED on the
START button is flashing, displays help information on the LCD screen.
6. Keypad
Use the numeric buttons to enter, for example, number of copies or a fax number.
The * and # buttons are also used to navigate menus in touch-tone systems such as voice mail (if
you have a telephone handset connected), or in vertical service codes.
Refer to “Keypad - character switching” on page 16.
7. START:
> MONO - Pressing this button starts the copying, faxing or scanning process in black & white.
> COLOR - Pressing this button starts the copying or scanning process in color.
Green LED illuminates when copying/scanning is possible, if the LED is unlit then that function is not
possible, e.g only the Mono button LED illuminates when faxing (color faxing is not possible).
8. STOP: Pressing this button stops the copying or scanning process.
9. BACK: Used to cancel selections and go back to the top level of the setting. The key is also used to
10. POWER SAVE: Pressing this button switches the power save mode on or off, its LED being
cancel any previous input.
illuminated when power save mode is on. If the machine has gone into power save mode as
indicated by the screen being black and the LED being illuminated, you can return to normal mode
by pressing the POWER SAVE button.
Introduction > 15
Page 16
REF. DESCRIPTION
11. STATUS: Pressing this button gives access to the status menu screen. Use to check detailed status
12. SETTING: Pressing this button gives access to several setup options on the LCD screen, including
13. CLEAR: Executes the following actions according to the entered items when pressed or held:
14. DATA IN MEMORY indicator light
15. Arrow keys
16. OK: Used to select and confirm current setting selections.
17.
K
EYPAD
information about the machine. Flashes/illuminates if there is a status item to be displayed.
the administrator menu, profile options and address books settings.
> Minimizes a setting value.
> Enters zero as a setting value.
> Clears what is entered.
> Cancels a selected item.
LED illuminates to show data is stored in the MFP memory.
Up: moves the cursor up.
Down: moves the cursor down.
Left: moves the cursor left. Can also be used to return to the previous screen.
Right: moves the cursor right. Can also be use to proceed to the next screen.
One-touch speed dial keys:
numbers or email addresses. Eight keys x two groups (press the
-
CHARACTER SWITCHING
Provides one-touch dialling of your most often used or favourite fax
SHIFT
key to switch the groups).
Numbers, upper and lower case letters and symbols can be entered using the keypad. Press
the key multiple times to switch between characters.
NOTE
When pressing multiple times, you must re-press the key within 2 seconds of
the previous press.
The example below is based on English being the display language:
KEY AVAILABLE CHARACTER
11 -> 1
2 a -> b -> c -> 2 -> A -> B -> C
3 d -> e -> f -> 3 -> D -> E -> F
4 g -> h -> i -> 4 -> G -> H -> I
5 j -> k -> l -> 5 -> J -> K -> L
6 m -> n -> o -> 6 -> M -> N -> O
7 p -> q -> r -> s -> 7 -> P -> Q -> R -> S
8 t -> u -> v -> 8 -> T -> U -> V
9 w -> x -> y -> z -> 9 -> W -> X -> Y -> Z
0 SP (space) -> 0 -> SP (space)
* @ -> * -> @
# . -> _ -> - -> P -> SP (space) -> + -> ! -> “ -> $ -> % -> & -> ‘ -> (
-> ) -> , -> / -> : -> ; -> < -> = -> > -> ? -> [ -> £ -> ] -> ^ -> #
Introduction > 16
Page 17

C
HANGING THE DISPLAY LANGUAGE
The default language used by your MFP for display messages and for report printing is
1
English
. If required, this can be changed using the Panel Language Setup utility.
1. To ensure your product contains the latest firmware updates, it is recommended that you download
the language files from this utility during setup.
Introduction > 17
Page 18
G
ETTING STARTED
T
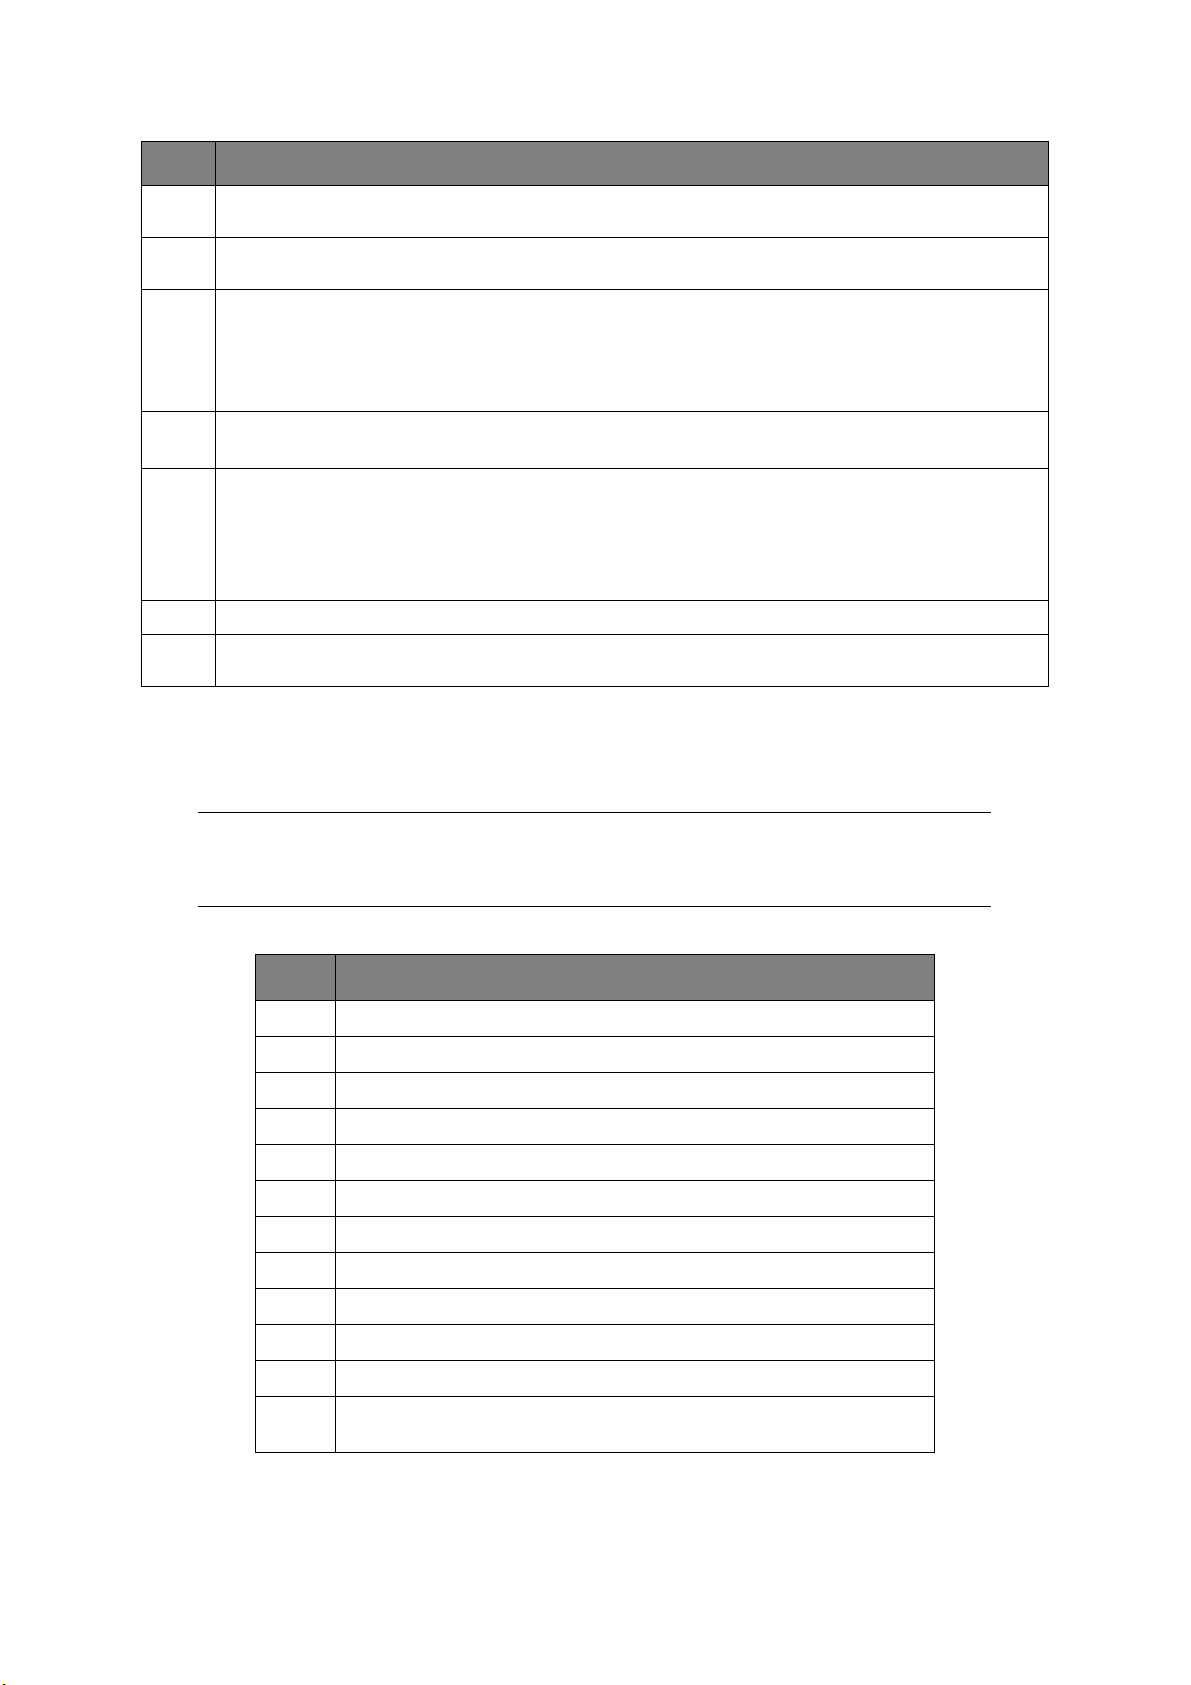
URNING ON YOUR MACHINE
1. Plug the AC cable into the AC power socket of your machine.
2. Plug the AC cable into the electric socket.
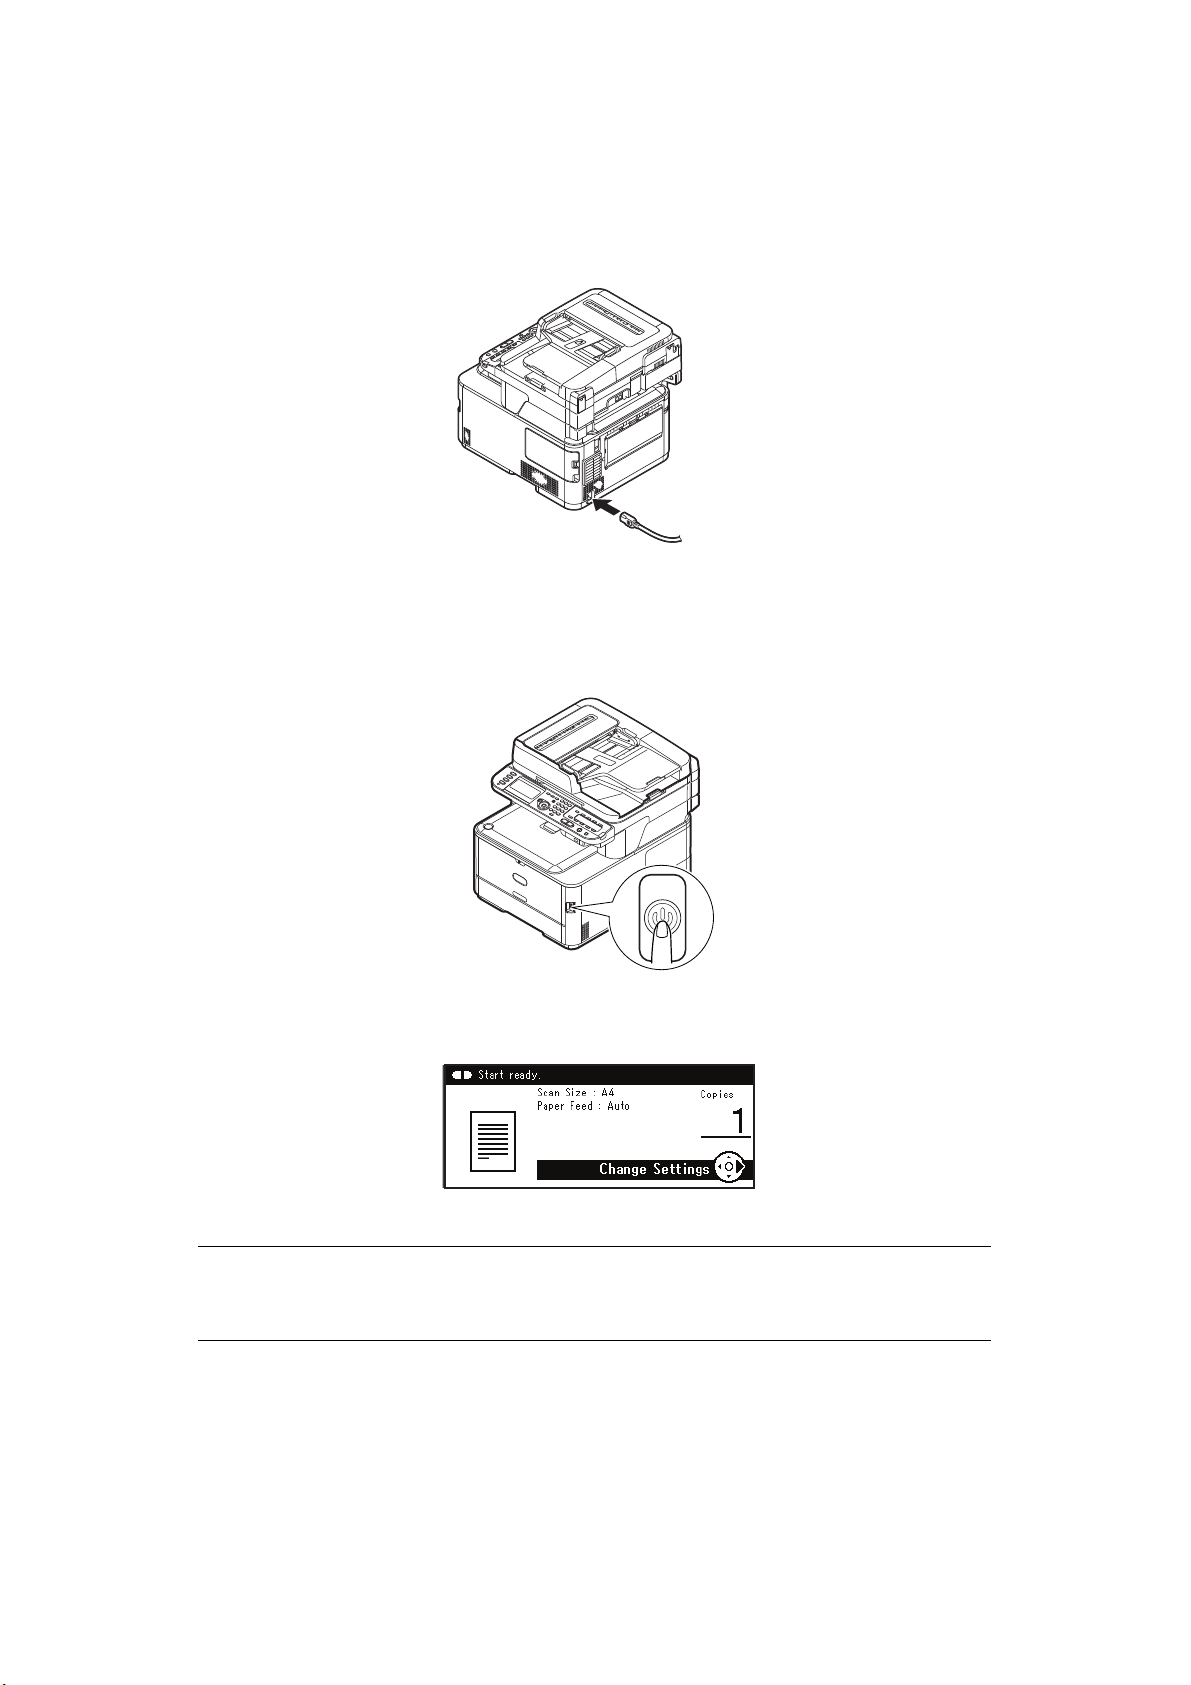
3. Check that no documents are on the document glass or ADF, and the ADF cover is
closed.
4. Hold down the power switch for about a second to turn on the power.
The copy standby screen is displayed after your machine became ready status.
NOTE
Turn the power off, and when turning the power back on again, push the
power switch after waiting for a few seconds.
Getting started > 18
Page 19
T
URNING OFF YOUR MACHINE
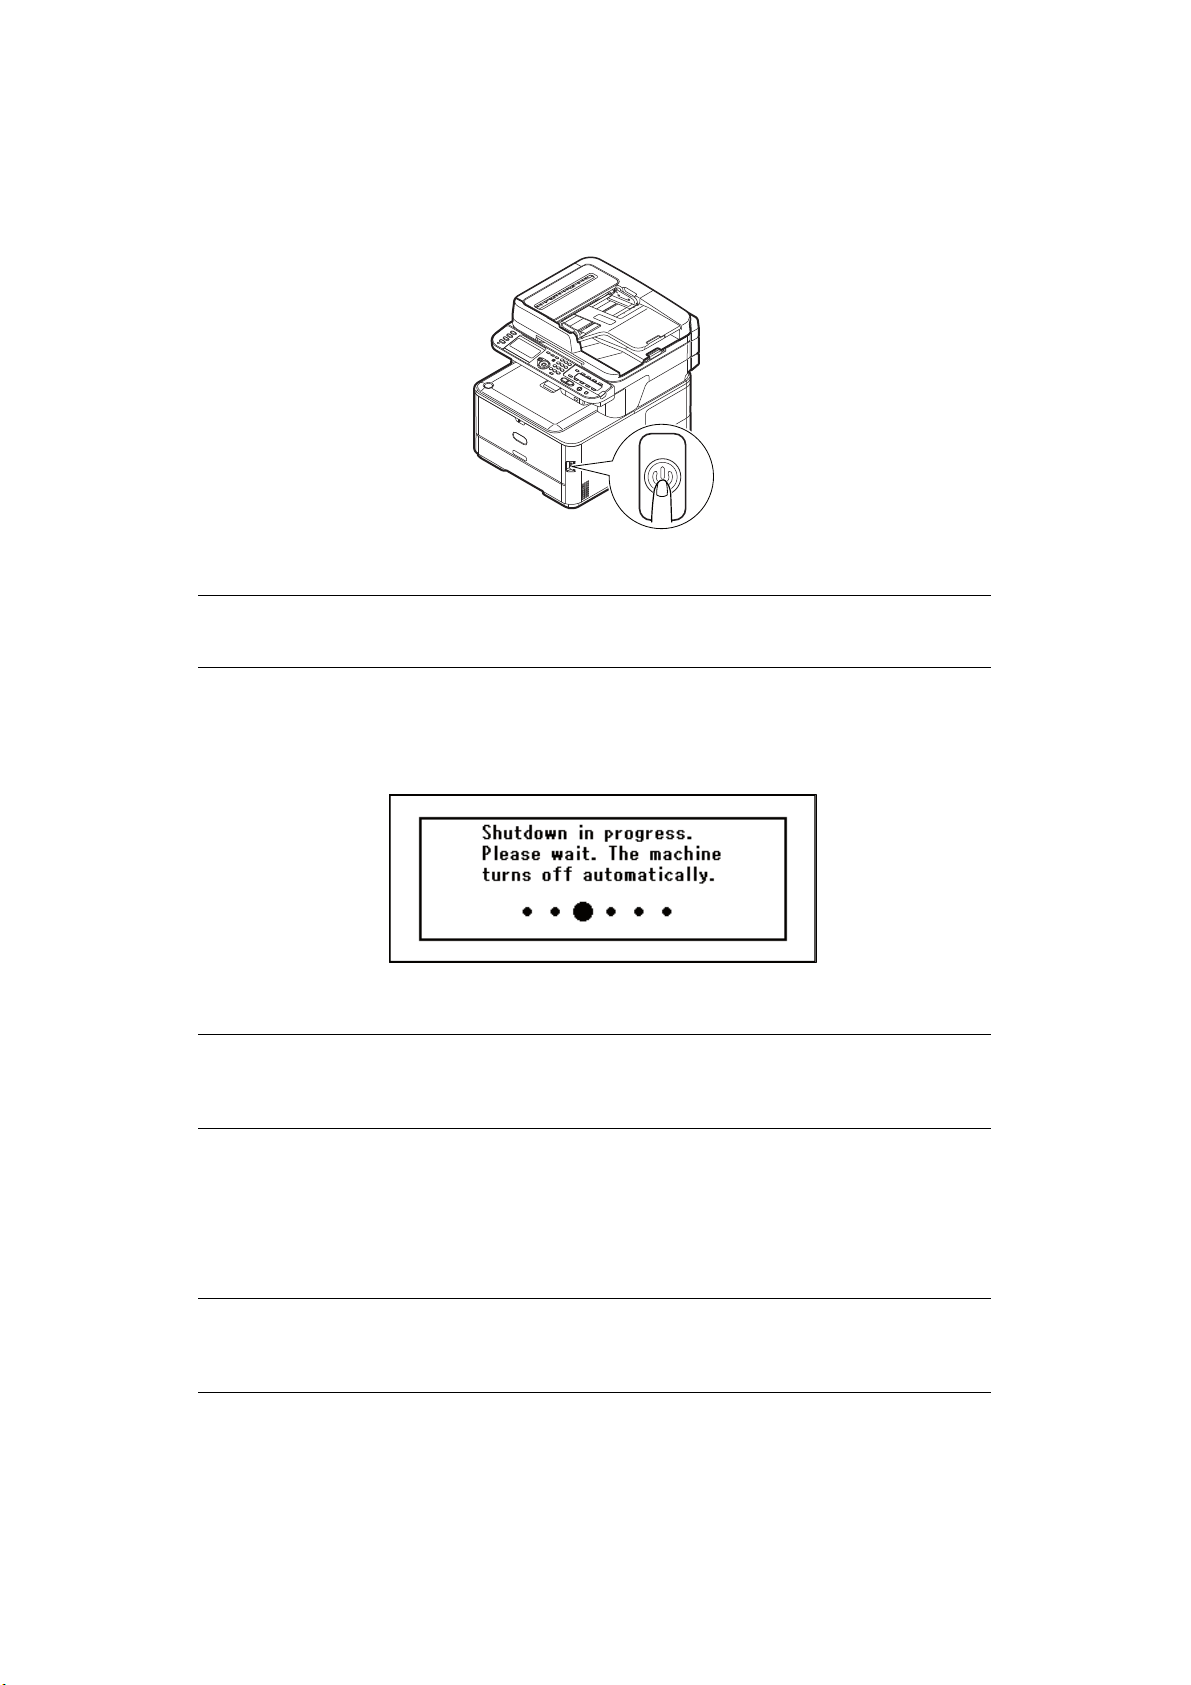
Be sure to follow the procedure below every time you turn off the machine.
1. Hold down the power switch for about a second.
NOTE
Press the power switch for less than 5 seconds.
The message Shutdown in progress. Please wait. The machine turns off
automatically. appears in the operator panel, and power switch indicator blinks
every 1 second. Then the machine turns off automatically and power switch indicator
goes out.
NOTE
Turn the power off, and when turning the power back on again, push the
power switch after waiting for a few seconds.
W
HEN THE MACHINE IS NOT USED FOR LONG TIME
When the machine is not used for long time due to holidays or trips, pull the power cord
from the socket.
NOTE
The machine does not have functional failures if removing the power plug for
long time (more than 4 weeks).
Getting started > 19
Page 20

P
OWER SAVING MODE
If you do not use the machine for a while, it will enter power saving mode to control the
power consumption of the device. To cancel or initiate power saving mode, press the
Power Save button on the control panel.
NOTE
If your machine is connected locally (via USB), when it transitions to Sleep
mode its status is viewed as off-line. To use the printer in this state, you must
press the Power Save button to exit sleep mode.
By default, the time interval to enter the power saving mode is set to 1
minute.
You can enable or disable the power saving mode.
Getting started > 20
Page 21

S
LEEP MODE
Your machine transitions from power saving mode to sleep mode after a set period of time.
In sleep mode the power consumption of the device in minimal. To cancel sleep mode,
press the Power Save button on the control panel.
NOTE
The machine will not enter sleep mode if an error occurs and the machine
requires attention.
By default, the time interval to enter sleep mode is set to 30 minutes.
You can enable or disable sleep mode.
> When the network connection is switched from wired to wireless, sleep
mode is disabled. To enable sleep mode for devices connected using
wireless LAN, enable sleep mode from the sleep mode setting menu.
> When a device using the wireless LAN connection goes into sleep mode, the
wireless LAN connection is broken. To reconnect to the wireless LAN, press
the power save button on the device to recover from sleep mode.
> After the device connected to the wireless LAN has recovered from sleep
mode, it automatically connects to the wireless access point using the same
settings as before it went into sleep mode. However, it may take up to
1 minute to connect.
> When the network connection is switched from wireless LAN to wired LAN,
sleep mode is enabled.
> Depending on your network environment, your device may wake from sleep
mode immediately. If this happens, it is recommended that you disable
sleep mode.
Getting started > 21
Page 22

A
UTO POWER OFF
When your machine is not used for a certain period of time, it turns off the power
automatically. Once the machine turns off the power, you need to turn on to use it.
The machine has three settings to select the machine's behavior on Auto Power Off.
> Enable
> Auto Config
> Disable
Enable:
When your machine is not used for a certain period of time, it turns off the power
automatically.
Auto Config:
The machine will not turn off the power automatically under the conditions listed below.
> An Ethernet cable is plugged to network interface connection
> A telephone cable is plugged to LINE connection
Disable:
The Auto Power Off function is disabled. The machine will not turn off the power
automatically.
NOTE
In the following cases, the Auto Power Off function is also disabled.
> When an error occurs
> When time-set transmission is scheduled
> When the fax transmission is waiting for a redial
By factory default, the time interval to turn off the power is set to 4 hours. You can change
the time interval by pressing the SETTING key on the operator panel and then selecting
Admin Setup > Manage Unit > Power Save > Auto Power Off Time.
By factory default, Auto Power Off is set to Auto Config or Disable. You can change the setting by pressing the SETTING key on the operator panel and then selecting Admin Setup > User Install > Power Setup > Auto Power Off.
Getting started > 22
Page 23

I
NSTALLING DRIVERS AND UTILITIES
NOTE
Example screenshots have been used throughout and may not represent your
machine, however the procedure is the same.
NOTE
You must be logged on as an administrator or a member of the Administrators
group in order to complete this procedure. If your computer is connected to a
network, network policy settings may also prevent you from completing this
procedure.
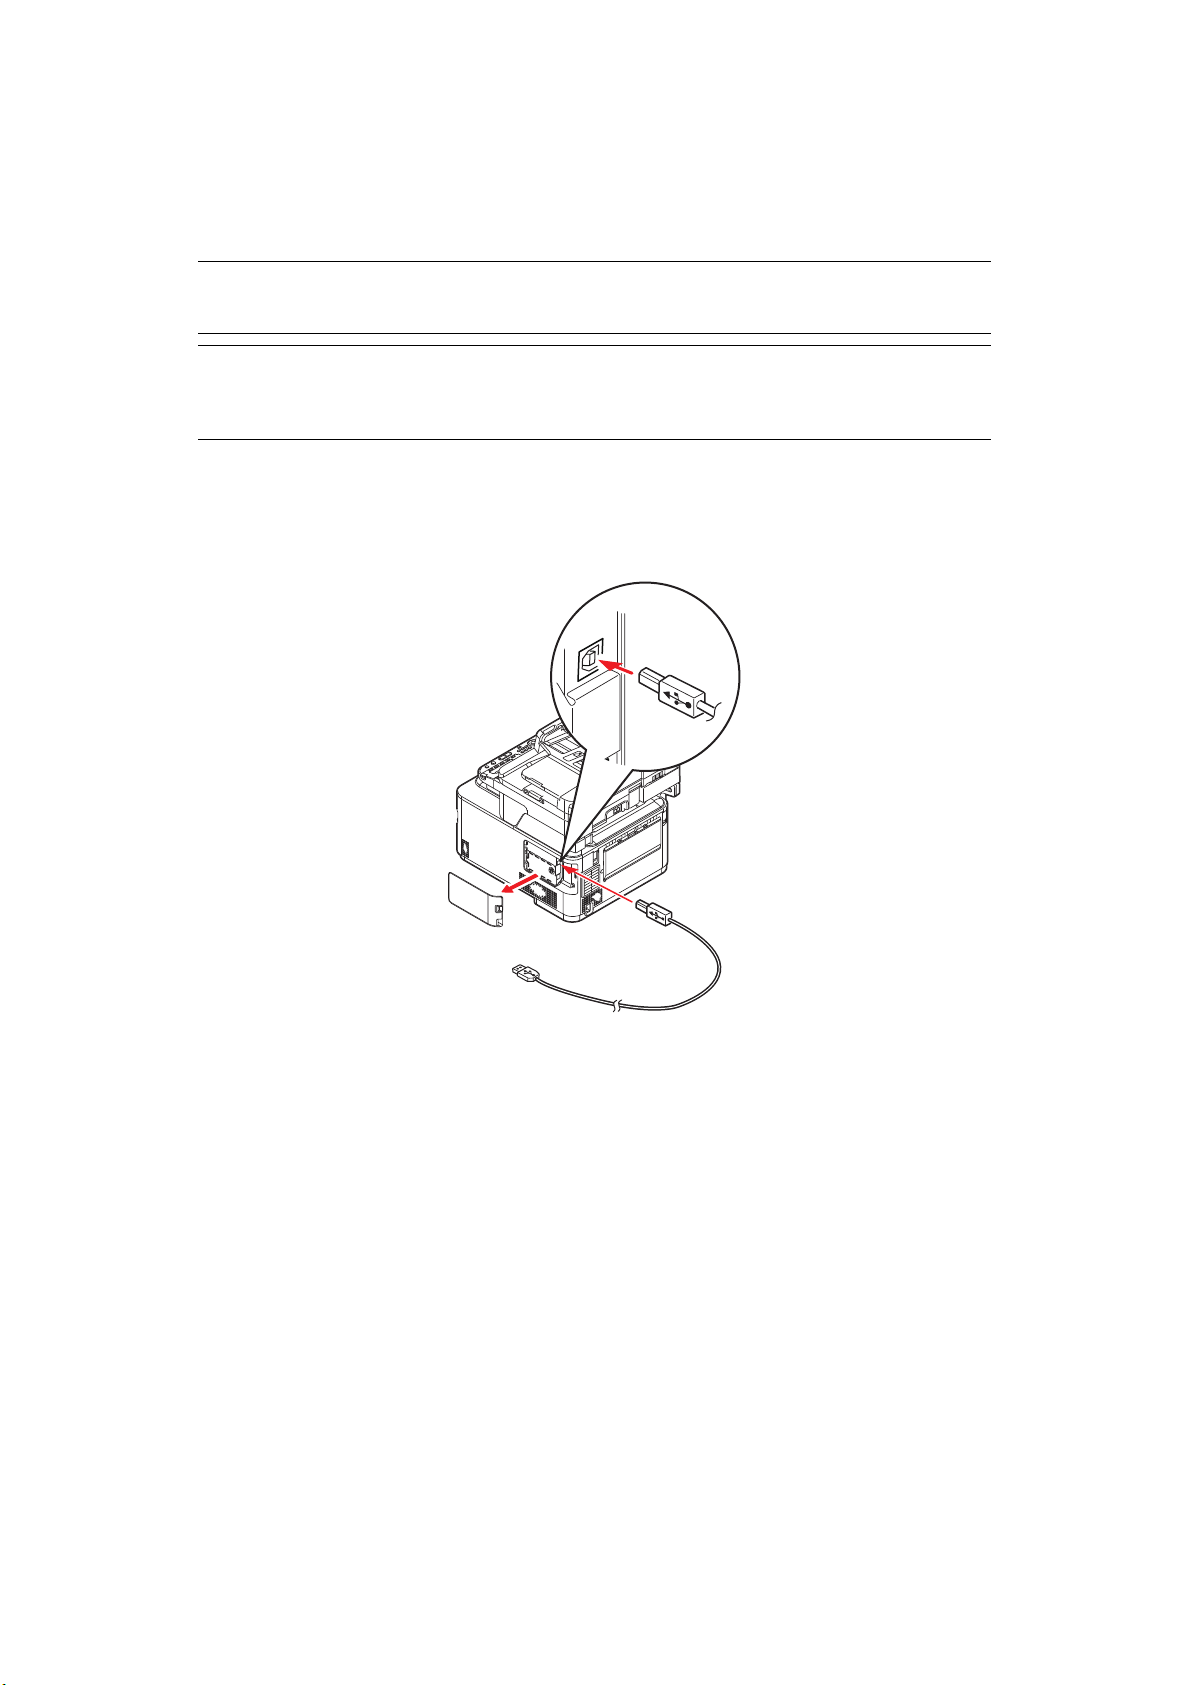
The installation instructions below refer to USB connection. For network connection details
refer to the Configuration Guide.
If you are running Windows Server 2008, Server 2008 R2 or Server 2012, you may need
to follow these steps to ensure the WIA service starts when using the scanner driver and
ActKey Utility:
NOTE
In the case of Server 2008, Server 2008 R2, Server 2012 or Server 2012 R2,
Desktop Experience needs to be installed.
1. Click Start > Administrative Tools > Services.
2. Double-click Services.
3. Double-click Windows Image Acquisition (WIA).
4. From the Startup type menu, select Automatic.
5. Under Service status, click Start.
6. Click OK.
Getting started > 23
Page 24
W
INDOWS
-
SCANNER AND PRINTER DRIVERS
The scanner driver is used for “Pull Scan”, i.e. Initiating a scan from your PC via software.
Compare this to “Push Scan” where you start the scan by pressing a button on the MFP's
front panel.
NOTE
The Oki driver installer program is the recommended installation method.
NOTE
Do not connect the USB cable at this time. You will be instructed when to
connect the USB cable when you run the Oki driver installer program.
1. Insert the DVD-ROM and click Install bunch to start the Oki driver installer
program.
2. Follow the on-screen instructions to install the drivers.
3. Attach the printer to a USB port of your computer.
4. Switch on the printer.
Getting started > 24
Page 25
MAC -
PRINTER DRIVER
The information in this section is based on Mac OS X 10.9. Other versions may appear
slightly different, but the principles are the same.
1. Insert the DVD-ROM and run the Oki driver installer program.
2. Follow the on-screen instructions to install the printer driver.
3. Attach the printer to a USB port of your computer.
4. Switch on the printer.
5. Choose Apple Menu > System Preferences > Printers & Scanners.
6. If the printer is already in the list of printers, click “-” to remove it.
NOTE
This is necessary as Lion may not be using the correct Oki printer driver files.
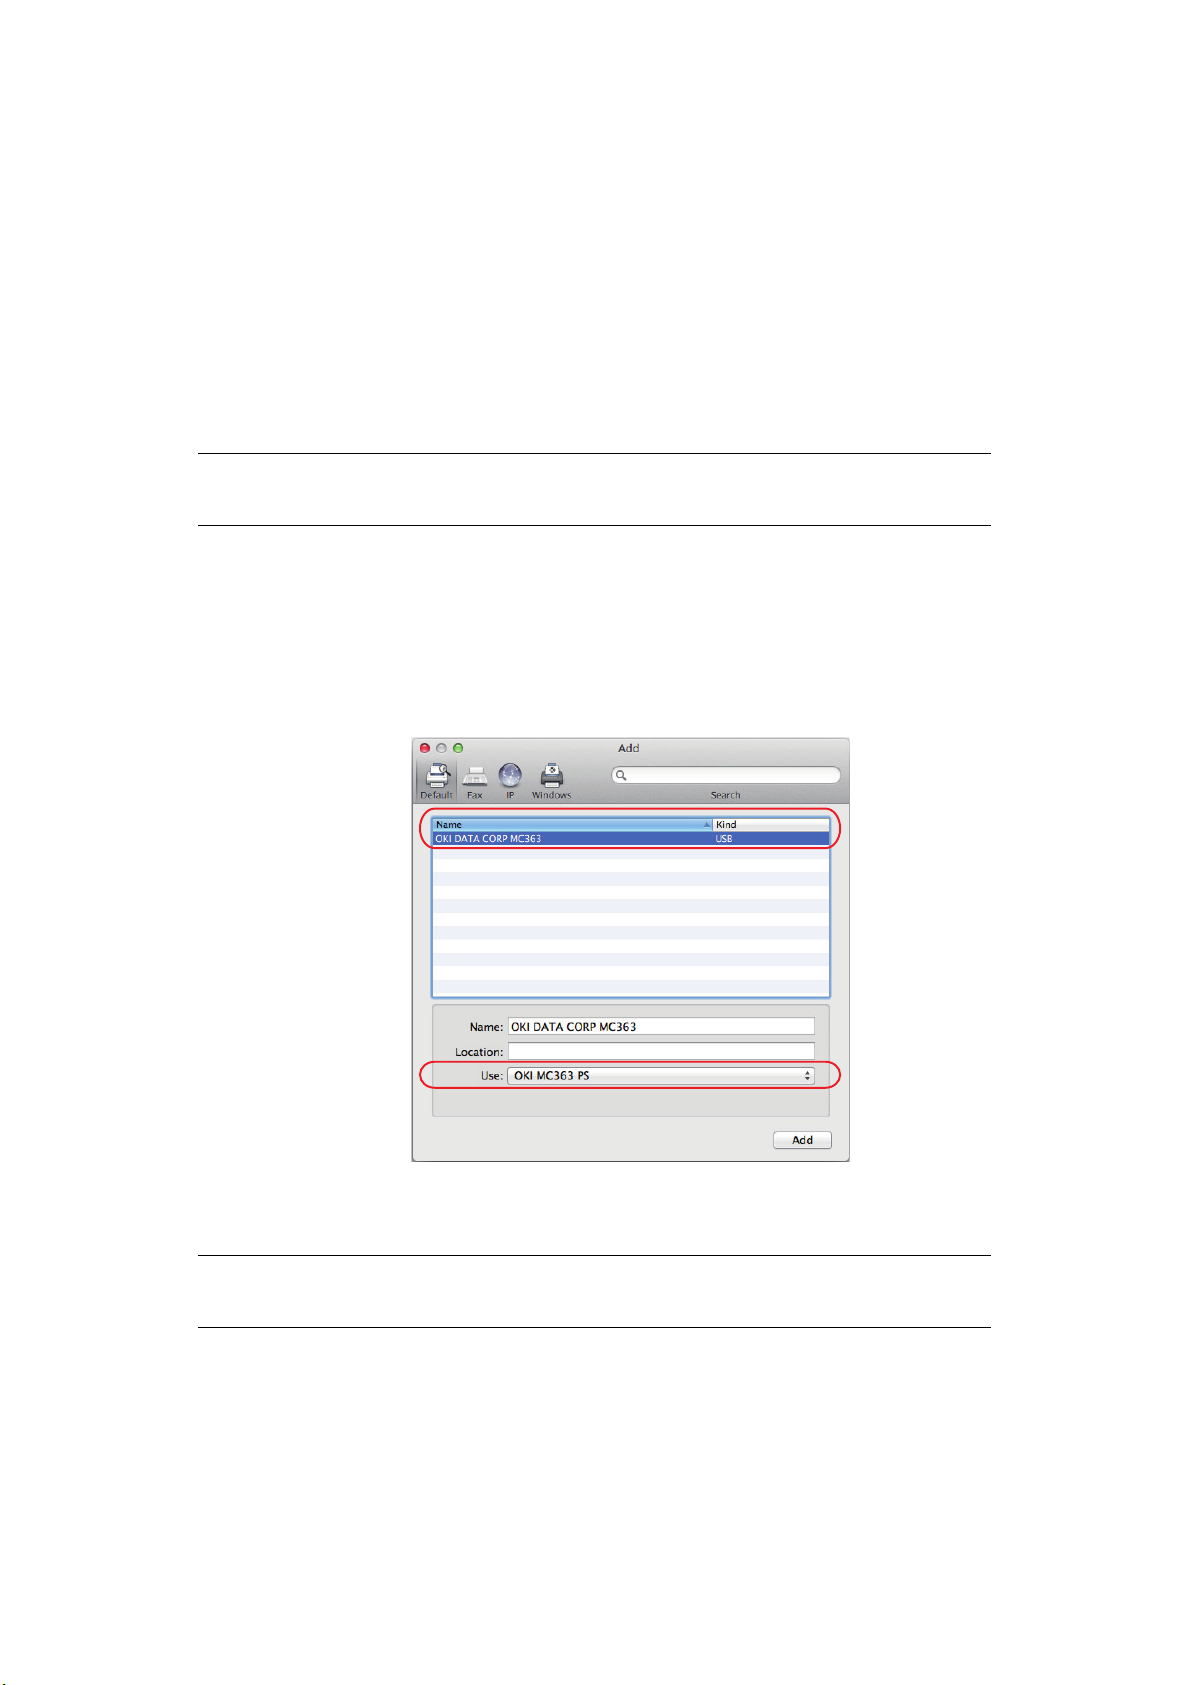
7. Click “+” to add a new printer.
8. Ensure:
> The Default tab is selected and select your machine from the list.
> Your machine is displayed as Kind “USB” in the list of available printers.
> The Use: selection matches your machine.
If “AirPrint” is displayed, select a driver that matches.
9. Click Add.
10. Click Configure... and ensure the hardware options displayed match your machine.
NOTE
Hardware options are not configured automatically.
11. The printer is added to the list of printers.
12. Restart your computer.
Getting started > 25
Page 26

FAX
DRIVER
The fax driver allows you to send faxes directly from your computer without printing the
document first.
With Oki's fax driver you are sending the fax data from your computer to the MFP, and then
the MFP automatically sends the document.
NOTE
Before using the internet fax function, you need to configure the server
settings. Refer to the Configuration Guide for details.
Installing the fax driver
This is installed as part of the Oki driver installer wizard.
Getting started > 26
Page 27
C
ONFIGURATION TOOL
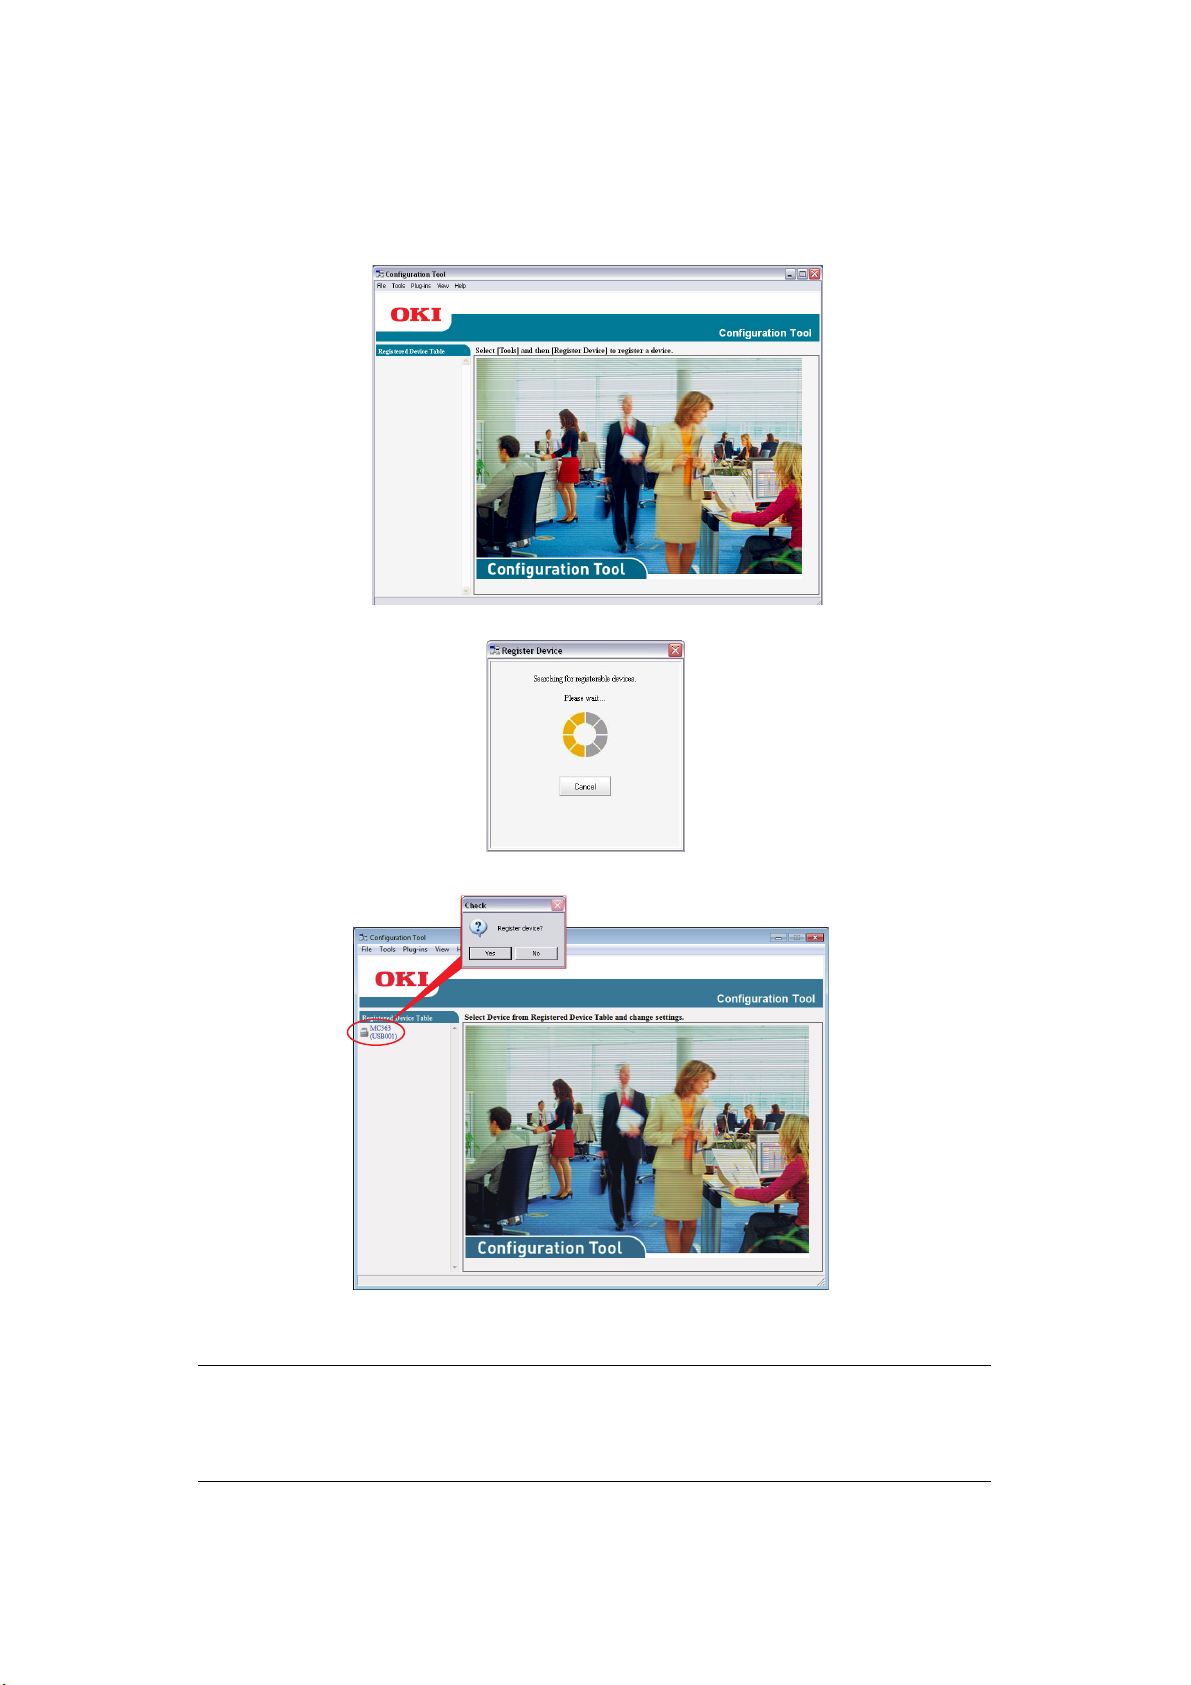
Installation of the Configuration Tool is optional and can be found on the DVD in the Utilities
folder. Follow the on-screen instructions to complete the Configuration Tool installation.
The Configuration Tool can discover devices over USB or network connections.
1. To search and install, select Tools > Register Device.
2. Highlight the required search result and when prompted click Yes.
The Configuration Tool allows you to set up and manage your MFP. Refer to the
Configuration Guide for detailed instructions.
NOTE
Network settings, such as LDAP configuration, cannot be saved to the MFP
from the Configuration Tool. For such settings, use the MFP operator panel or
MFP web page.
Getting started > 27
Page 28
ACTKEY
3
2
1
UTILITY
NOTE
The ActKey utility only supports Windows.
You must have the scanner driver installed.
The ActKey utility enables the MFP to receive one key touch commands from a connected
computer.
Installation of the ActKey utility is optional and can be found on the DVD in the Utilities
folder.
Information on using the ActKey utility can be found in “Remote Scan” on page 71.
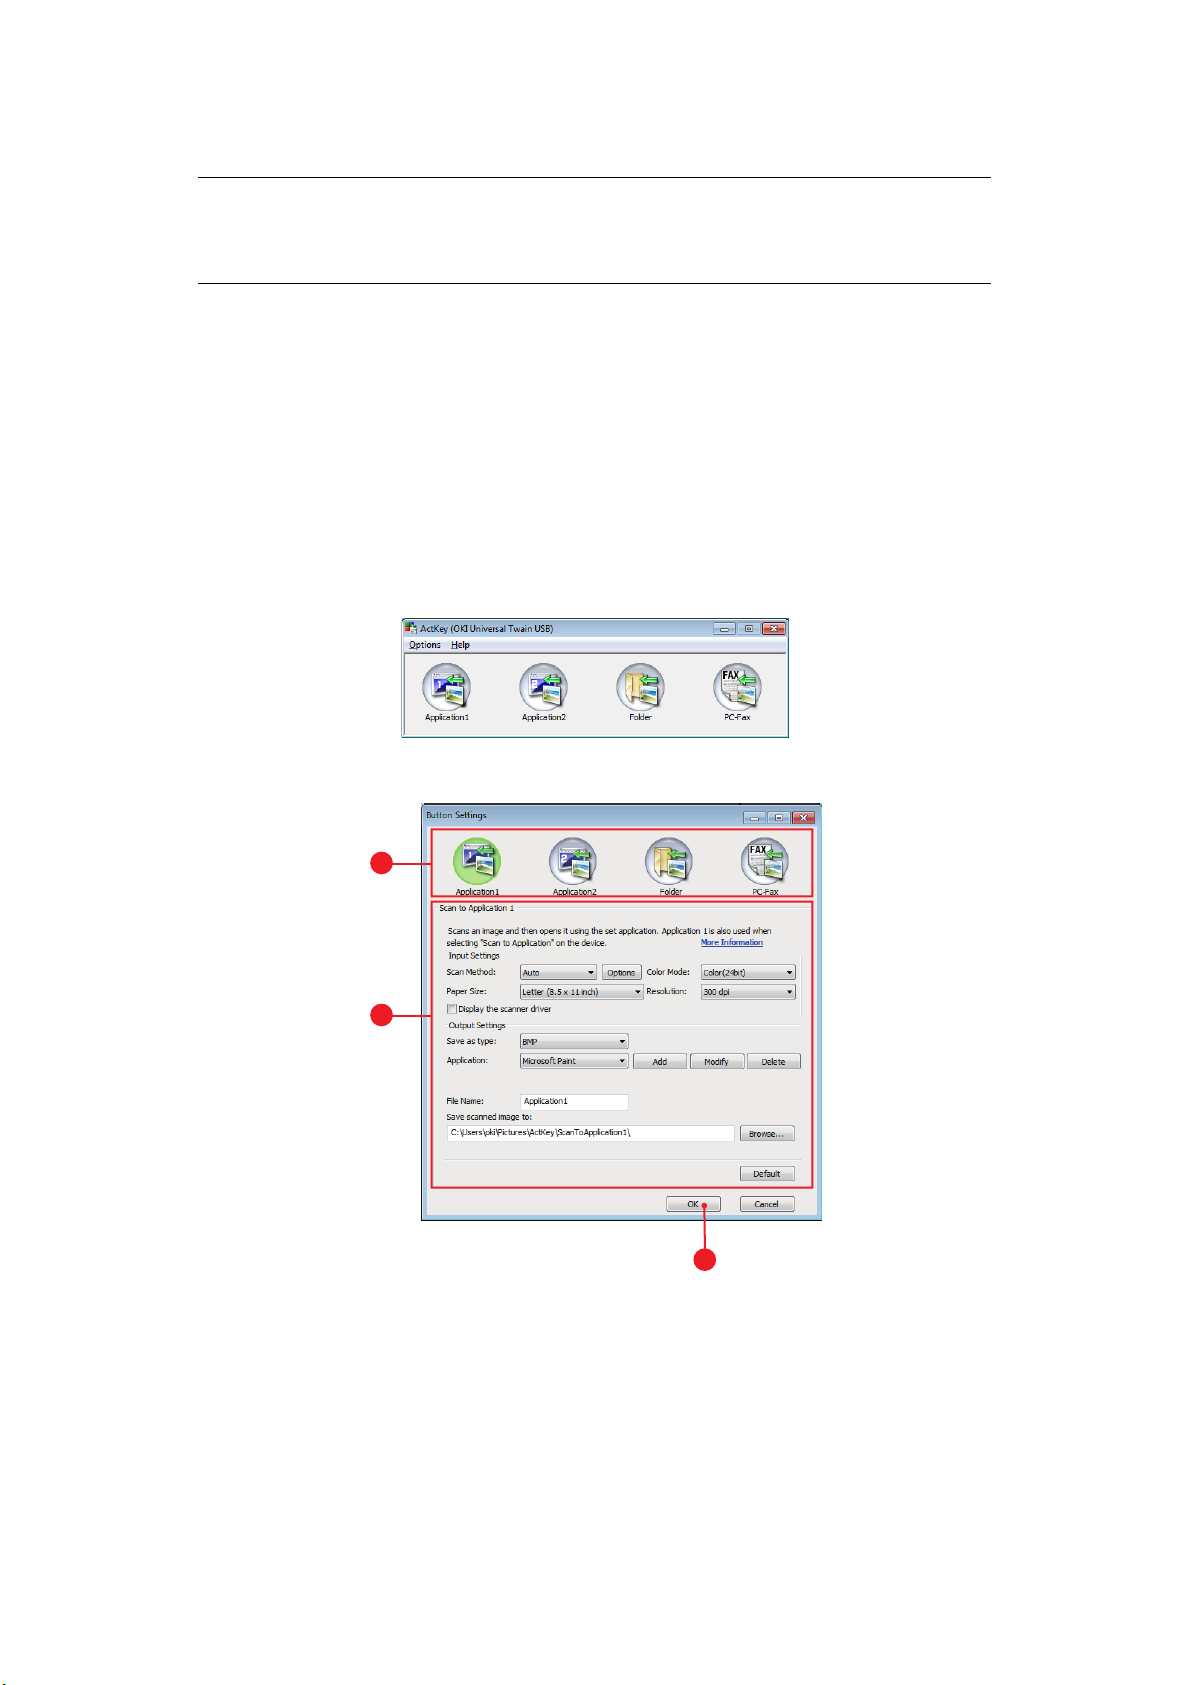
Setting up the ActKey utility
1. Install the ActKey utility from the DVD:
Set-up will place an “ActKey” icon on your desktop.
2. Double-click this icon to open the ActKey console.
3. Select Options > Button Settings. The following screen displays.
4. Select the function you want to set in section (1).
5. Set the parameters for this function in section (2).
6. When you have completed settings, press OK (3).
The Utility will return to the ActKey console.
Getting started > 28
Page 29
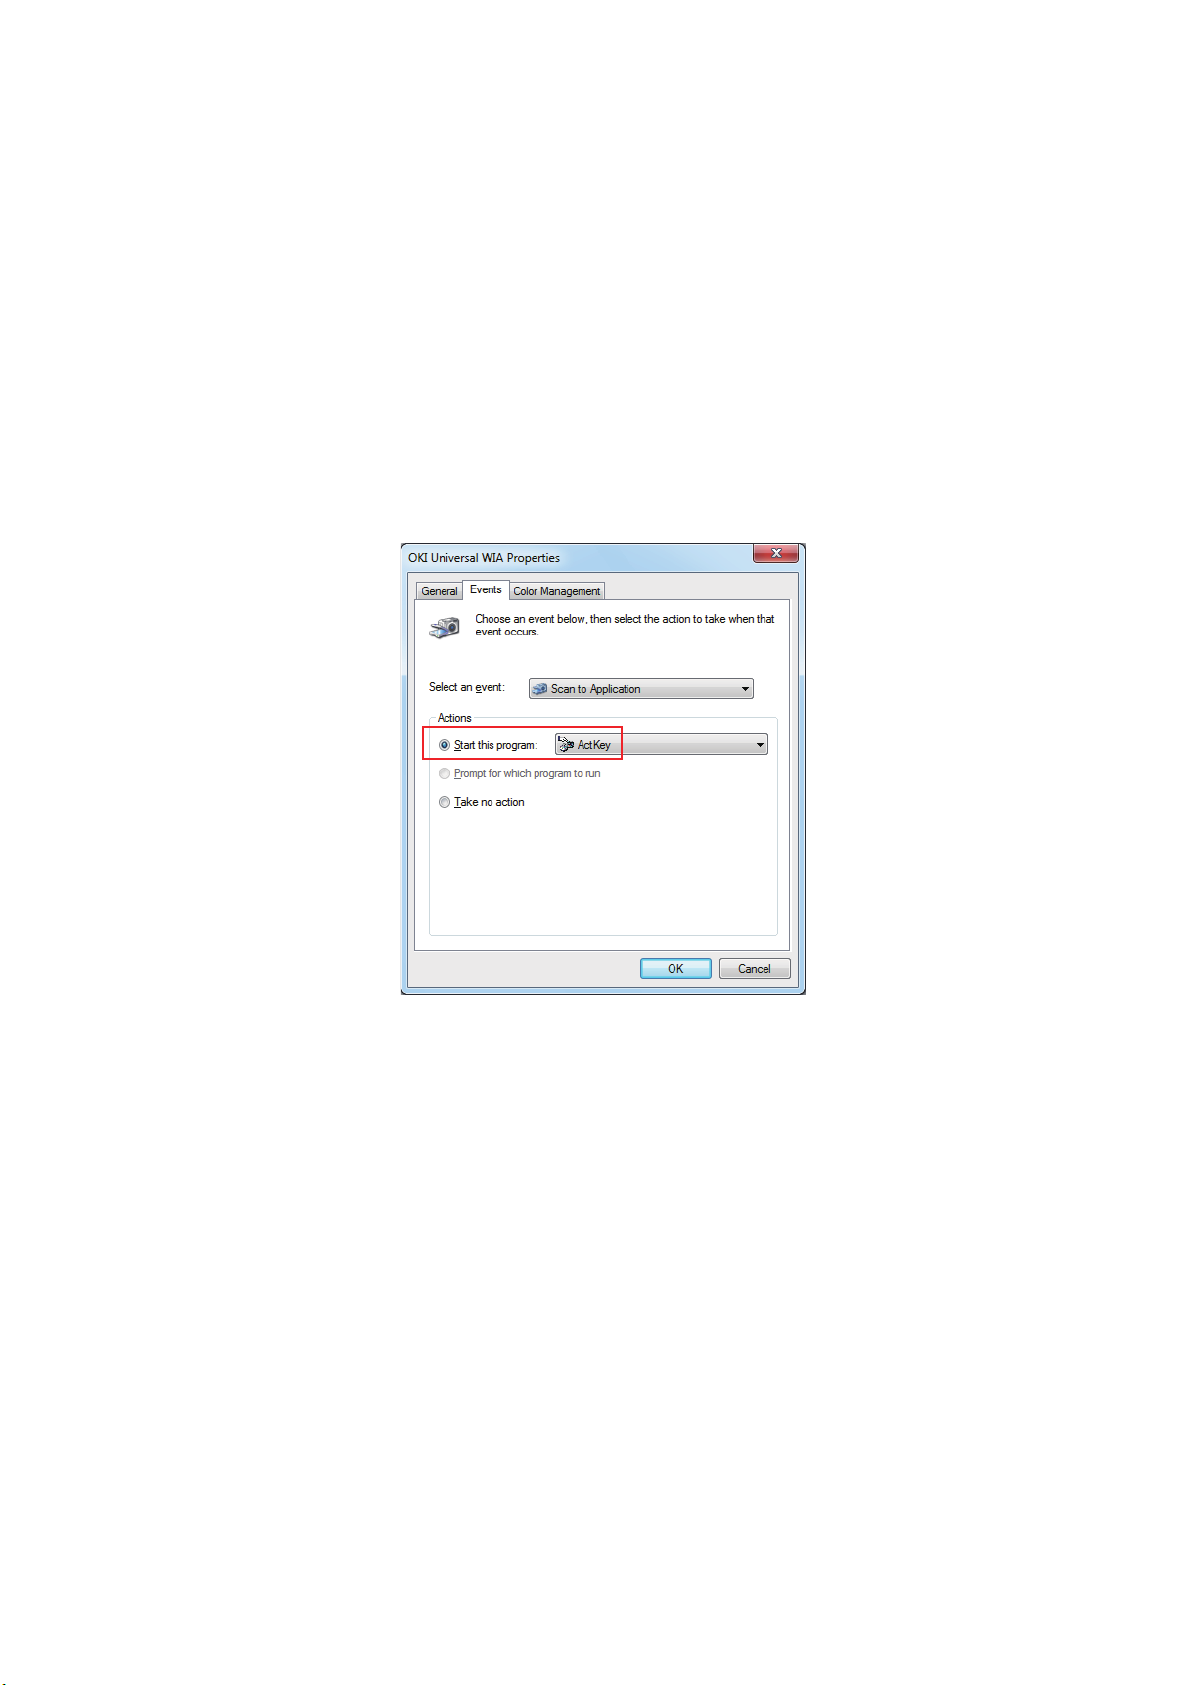
7. To use ActKey in Local PC mode (i.e. push scanning), it must be set as the program
to handle scanner events:
(a) Click [Start] to select [Control Panel].
(b) Enter [View scanners and cameras] in [Search Control Panel].
(c) Click the [View scanners and cameras] under [Devices and Printers].
(d) Select [OKI Universal WIA] and click [Properties]. If the [User Account
Control] dialog box appears, click [Yes].
(e) Click the [Events] tab.
(f) Select an event for [Select an event].
(g) Select the [Start this program] check box and then select [ActKey].
(h) Repeat steps (f) and (g) so that [ActKey] is set to all events.
(i) Click [OK].
Getting started > 29
Page 30

P
APER RECOMMENDATIONS
Your MFP will handle a variety of print media, including a range of paper weights and sizes.
This section provides general advice on choice of media, and explains how to use each type.
The best performance will be obtained when using standard 75~90g/m² paper designed
for use in copiers and laser printers.
Use of heavily embossed or very rough textured paper is not recommended.
Pre-printed stationery can be used, but the ink must not offset when exposed to the high
fuser temperatures used in the printing process.
Envelopes
CAUTION!
Envelopes should be free from twist, curl or other deformations.
They should also be of the rectangular flap type, with glue that
remains intact when subjected to hot roll pressure fusing used in
this type of printer. Window envelopes are not suitable.
Labels
CAUTION!
Labels should also be of the type recommended for use in copiers
and laser printers, in which the base carrier page is entirely
covered by labels. Other types of label stock may damage the
printer due to the labels peeling off during the printing process.
Paper recommendations > 30
Page 31

C
ASSETTE TRAYS
SIZE DIMENSIONS WEIGHT (G/M²)
a
A6
A5 148 x 210mm
B5 182 x 257mm
16K (184x260mm) 184 x 260mm
Executive 184.2 x 266.7mm
16K (195x270mm) 195 x 270mm
16K (197x273mm) 197 x 273mm
A4 210 x 297mm
Letter 215.9 x 279.4mm
Legal 13in. 215.9 x 330.2mm
Legal 13.5in. 215.9 x 342.9mm
Legal 14in. 215.9 x 355.6mm
Custom
COM-9 Envelope
COM-10 Envelope
Monarch Envelope
DL Envelope
C5 Envelope
Hagaki
Oufukuhagaki
Nagagata #3
Nagagata #4
You gata # 4
Futo A4
Index Card
a. this paper size can be printed from Tray1 or MP Tray only.
b. this paper size can be printed from the MP Tray only.
105 x 148mm Light 64 - 74g/m²
Medium Light 75 - 82g/m²
Medium 83 - 104g/m²
Heavy 105 - 120g/m²
Ultra heavy1 121 - 176g/m²
Ultra heavy2 177 - 220g/m²
Tray 1/2: 64 - 176g/m²
MP Tray: 64 - 220g/m²
Duplex: 64 - 176g/m²
b
b
b
a
b
b
b
b
b
b
98.4 x 225.4mm
b
104.8 x 241.3mm
b
98.4 x 190.5mm
110 x 220mm
162 x 229mm
100 x 148mm
148 x 200mm
120 x 235mm
90 x 205mm
105 x 235mm
210 x 297mm
76.2 x 127mm
If you have identical paper stock loaded in another tray (2nd tray if you have one, or multi
purpose tray) you have the printer automatically switch to the other tray when the current
tray runs out of paper. When printing from Windows applications, this function is enabled
in the driver settings. When printing from other systems, this function is enabled in the
Print Menu.
Paper recommendations > 31
Page 32

M
ULTI PURPOSE TRAY
The multi purpose tray can handle the same sizes as the cassette trays but in weights up
to 220
paper path through the printer is almost straight.
The multi purpose tray can feed paper widths from 76mm to 215.9mm and lengths from
127.0mm to 1320mm (banner printing).
For paper lengths exceeding 356mm (Legal 14in.) use paper stock between 90g/m² and
128g/m² and the rear output tray.
Use the multi purpose tray for printing on envelopes. Up to 10 envelopes can be loaded at
one time, subject to a maximum stacking depth of 10mm.
O
The output tray on the top of the printer can hold up to 150 sheets of 80g/m² standard
paper, and can handle paper stocks up to 176g/m².
Pages printed in reading order (page 1 first) will be sorted in reading order (last page on
top, facing down).
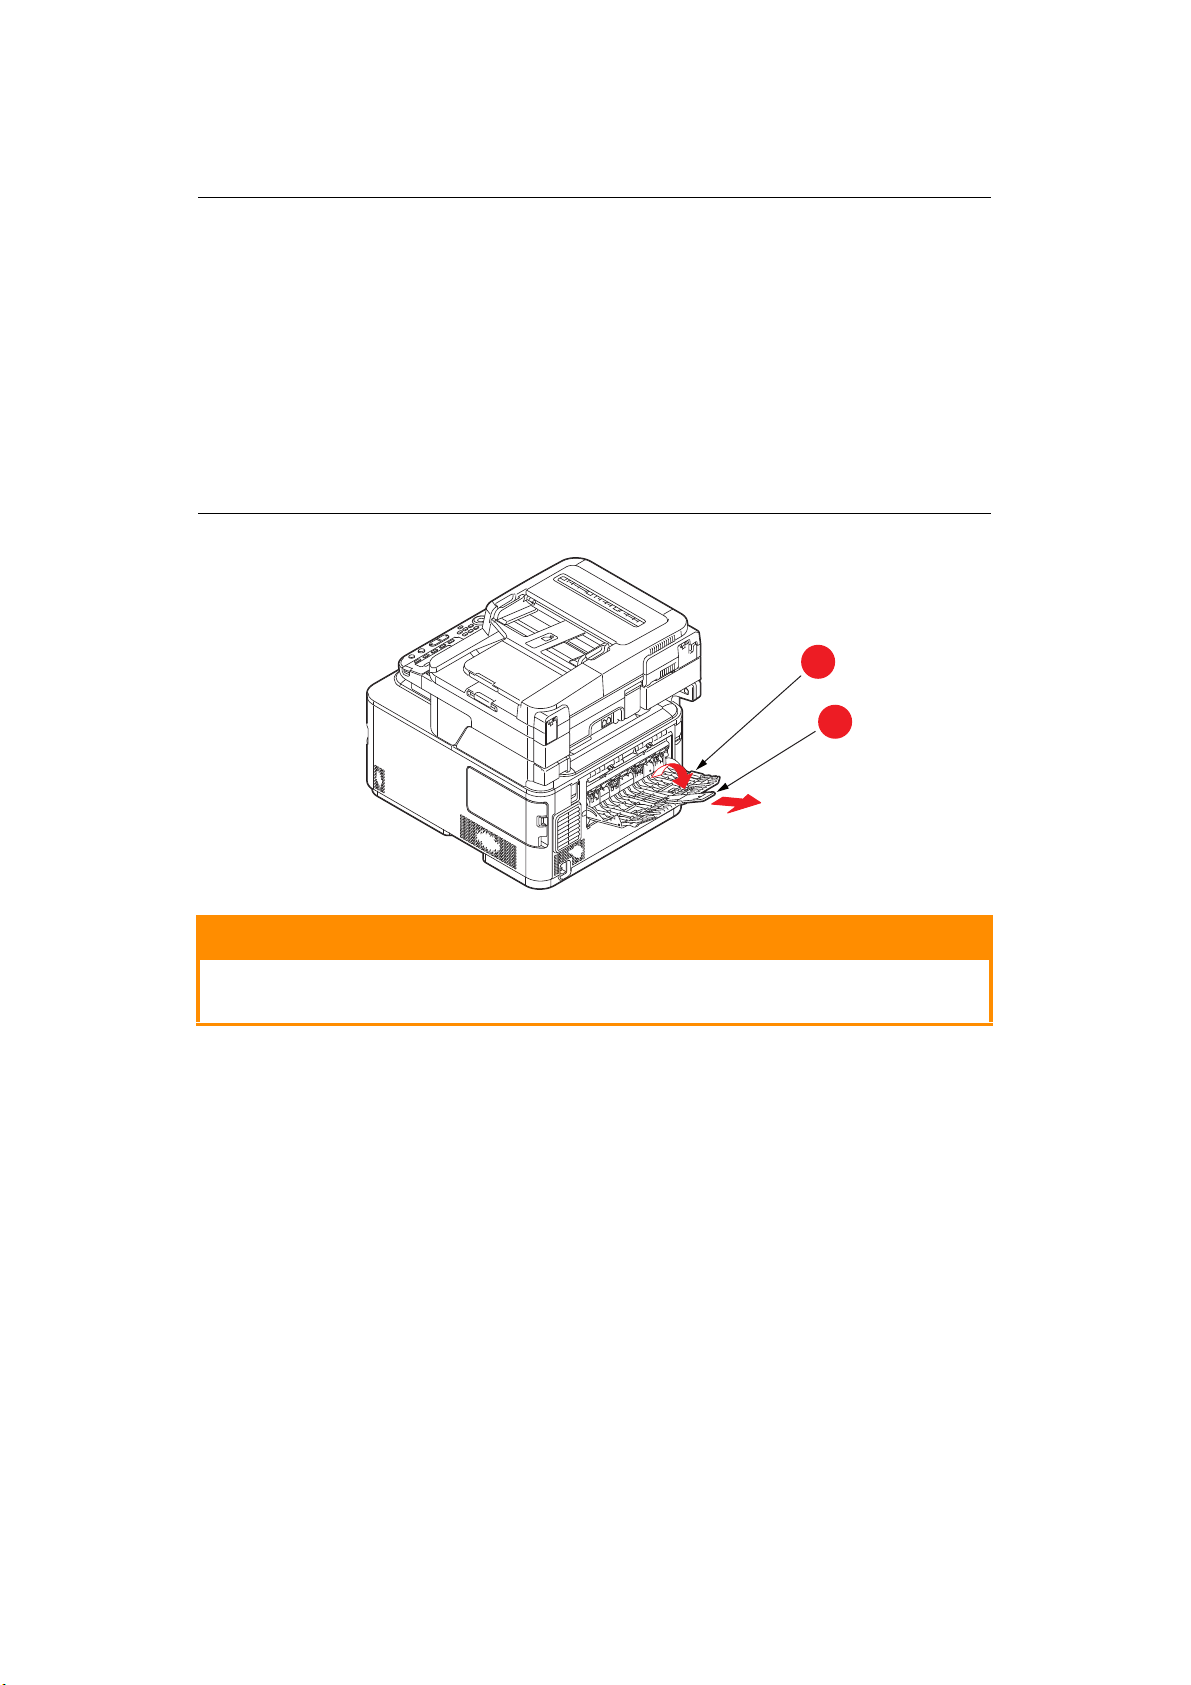
R
The rear output tray at the rear of the printer should be opened and the tray extension
pulled out when required for use. In this condition paper will exit via this path, regardless
of driver settings.
g/m². For very heavy paper stock use the rear output tray. This ensures that the
UTPUT TRAY
EAR OUTPUT TRAY
NOTE
The rear output tray cannot be used when printing duplex.
The rear output tray can hold up to 100 sheets of 80g/m² standard paper, and can handle
stocks up to 220
Always use this rear output tray and the multi purpose feeder for paper stocks heavier than
176g/m².
D
UPLEX
Automatic two-sided printing on the same range of paper sizes as tray 2 (i.e. all cassette
sizes except A6), using paper stocks from 64 - 176g/m².
g/m².
Paper recommendations > 32
Page 33

L
OADING PAPER
C
ASSETTE TRAYS
1. Remove the paper tray from the machine.
Fan the paper to be loaded at the edges (1) and in the middle (2) to ensure that all
2.
sheets are properly separated, then tap the edges of the stack on a flat surface to
make it flush again (3).
1
2
3
Loading paper > 33
Page 34
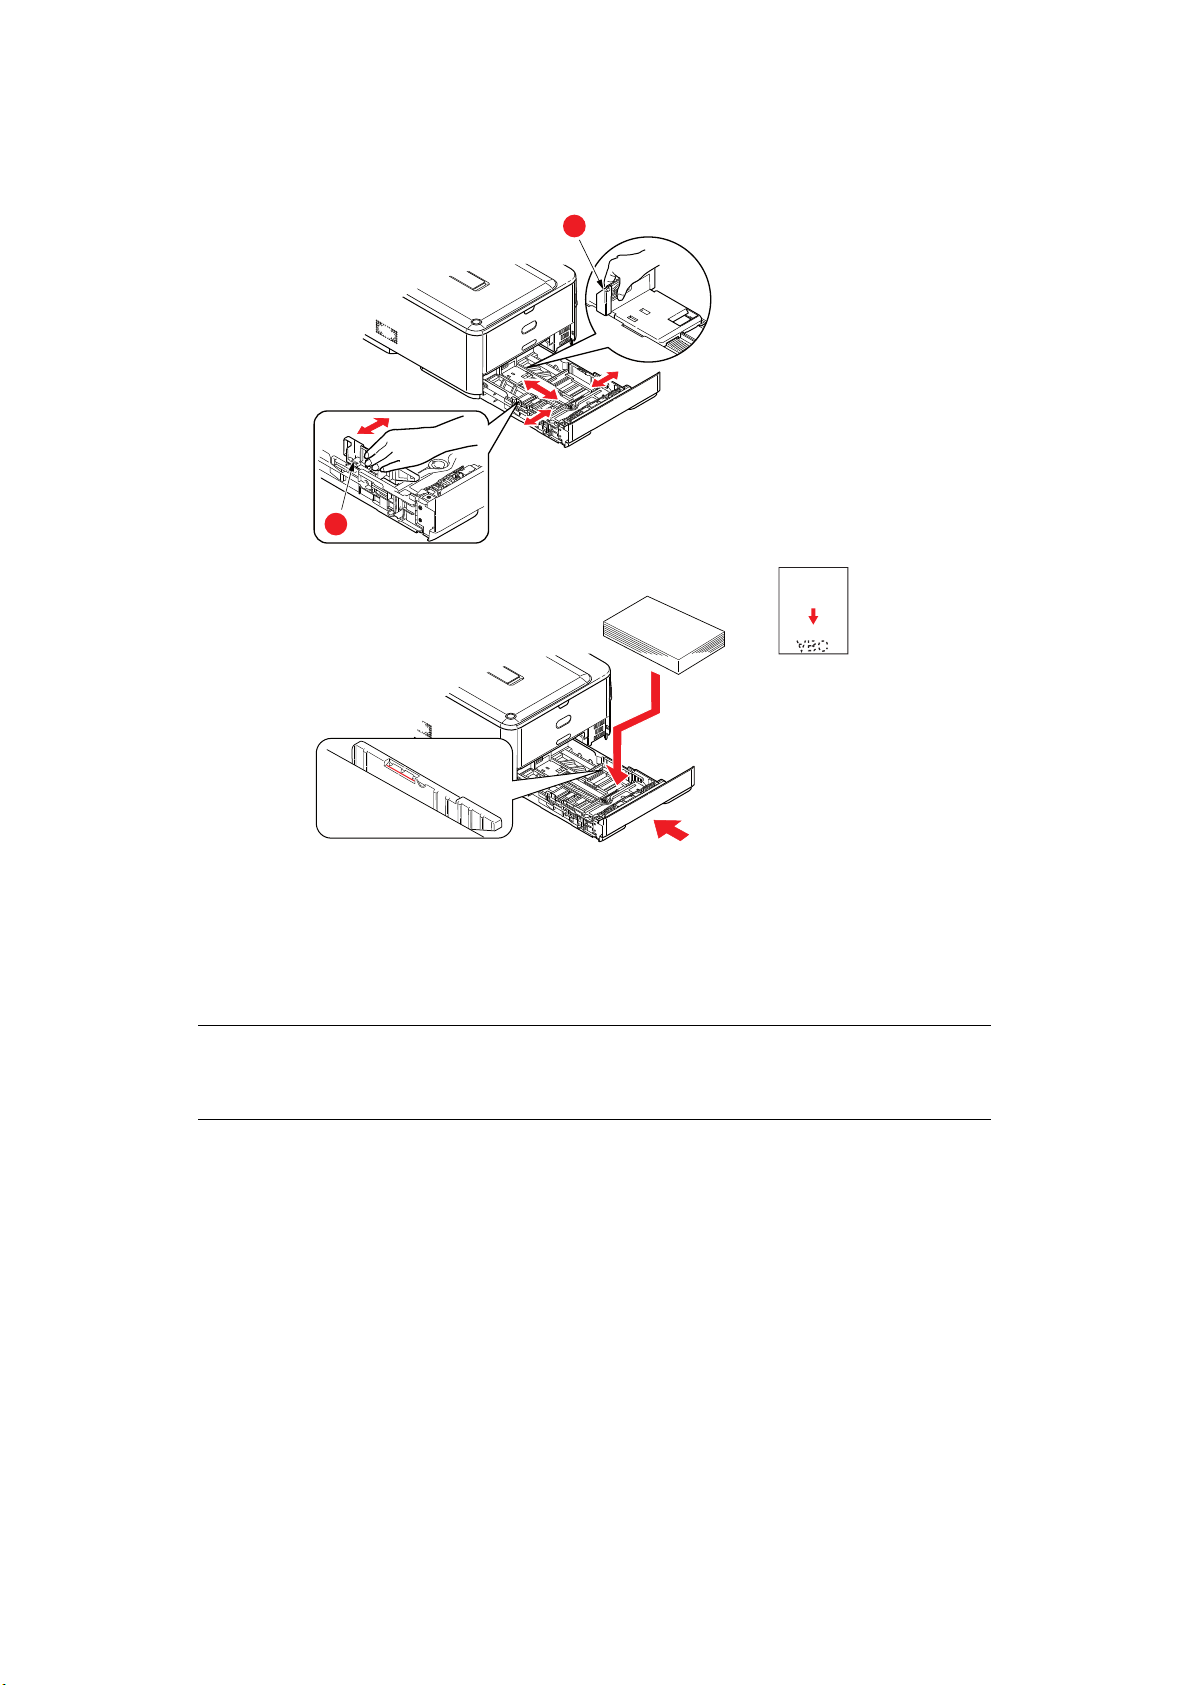
3. Load paper (letter headed paper face down and top edge towards the front of the
a
b
printer), as shown.
4. Adjust the rear stopper (a) and paper guides (b) to the size of paper being used.
5. Close the paper tray gently.
6. Set the correct paper size. Refer to “Configuring the tray settings” on page 36 and
“Registering custom sizes” on page 37.
NOTE
After closing the tray, the media selection screen will be displayed on the
panel.
To prevent paper jams:
> Do not leave space between the paper and the guides and rear stopper.
> Do not overfill the paper tray. Capacity depends on the type of paper stock.
> Do not load damaged paper.
> Do not load paper of different sizes or types at the same time.
> Close the paper tray gently.
Loading paper > 34
Page 35
> Do not pull the paper tray out during printing (except as described below for the 2nd
b
a
tray).
NOTE
> If you have two trays and you are printing from the 1st (upper) tray, you
can pull out the 2nd (lower) tray during printing to reload it. However, if
you are printing from the 2nd (lower) tray, do not pull out the 1st (upper)
tray. This will cause a paper jam.
> For face down printing, make sure the rear output tray (a) is closed (the
paper exits from the top of the printer). Stacking capacity is
approximately 150 sheets, depending on paper weight.
> For face up printing, make sure the rear output tray (a) is open and the
paper support (b) is extended. Paper is stacked in reverse order and tray
capacity is approximately 100 sheets, depending on paper weight.
> Always use the rear output tray for heavy paper (card stock, etc.).
CAUTION!
Do not open or close the rear paper exit while printing as it may
result in a paper jam.
Loading paper > 35
Page 36

M
b
d
d
c
a
ULTI PURPOSE TRAY
1. Open the multi purpose tray (a).
2. Fold out the paper supports (b).
3. Press gently down on the paper platform (c) to ensure it is latched down.
4. Load the paper and adjust the paper guides (d) to the size of paper being used.
> For single-sided printing on headed paper load the paper into the multi purpose
tray with pre-printed side up and top edge into the printer.
> For two-sided (duplex) printing on headed paper load the paper with pre-printed
side down and top edge away from the printer.
> Envelopes should be loaded face up with top edge to the left and short edge into
the printer. Do not select duplex printing on envelopes.
> Do not exceed the paper capacity of about 100 sheets or 10 envelopes. Maximum
stacking depth is 10mm.
5. Press the tray latch button inwards to release the paper platform, so that the paper
is lifted and gripped in place.
6. Set the correct paper size. Refer to “Configuring the tray settings” on page 36 and
“Registering custom sizes” on page 37.
C
ONFIGURING THE TRAY SETTINGS
After you load paper in tray 1, tray 2 (optional), or the MP tray, you need to register the
loaded paper on your machine.
1. Press the SETTING button on the control panel.
2. Using the Down arrow key, scroll to Paper Setup and press OK.
3. Using the arrow keys, scroll to the required paper tray and press OK.
4. Press OK to select Paper Size.
5. Using the arrow keys, scroll to the loaded paper size and press OK.
6. Using the Down arrow key, scroll to Media Type and press OK.
7. Using the arrow keys, scroll to the type of media loaded and press OK.
8. Using the Down arrow key, scroll to Media Weight and press OK.
9. Using the arrow keys, scroll to the weight of the loaded paper and press OK.
10. Press the Left arrow key to exit the menu.
Loading paper > 36
Page 37

R
EGISTERING CUSTOM SIZES
To load custom size paper, you need to register the width and length of the paper before
printing.
The range of the sizes you can set differs according to the paper tray.
TRAY AVAILABLE SIZE RANGE
Tra y 1 Width: 105 to 216 mm (4.1 to 8.5 inches)
Length: 148 to 356 mm (5.8 to 14.0 inches)
Tra y 2 ( op t io na l ) Width: 148 to 216 mm (5.8 to 8.5 inches)
Length: 210 to 356 mm (8.3 to 14.0 inches)
MP tray Width: 64 to 216 mm (2.5 to 8.5 inches)
Length: 127 to 1321 mm (5.0 to 52.0 inches)
NOTE
For tray 1 and tray 2, you can configure the
Size
is set to Custom.
The available size range for duplex printing is the same as that for tray 2.
Custom setting only when Paper
1. Press the SETTING button on the control panel.
2. Using the Down arrow key, scroll to Paper Setup and press OK.
3. Using the arrow keys, scroll to the required paper tray and press OK.
4. Using the Down arrow key, scroll to Custom and press OK.
5. Using the keypad, enter the Width and Length of the loaded paper.
Press the Right arrow key to move between digits.
6. Press OK.
7. Press the Left arrow key to exit the menu.
Loading paper > 37
Page 38

U
SER AUTHENTICATION AND ACCESS CONTROL
If your Administrator has enabled access control on yo ur m a chi ne, i t wi l l au toma tic a lly star t
up in access control mode. You will not be able to use it until you have provided valid login
information. If the access control setting is:
> PIN; you will need to provide a valid PIN (personal identification number).
> User name and password; you will need to provide a valid user name and
password.
After using it, you will be expected to log out, leaving the machine in access control mode,
unable to be used by unauthorised users.
PIN
AUTHENTICATION
L
OGGING INTO THE MACHINE
1. Enter your PIN using the keypad on the control panel.
2. Press OK.
If authentication succeeds, the top screen displays.
L
OGGING OUT OF THE MACHINE
When you have finished operations, be sure to log out of the machine.
1. Press the BACK button or Left arrow key until the top screen displays.
2. Press the RESET/LOGOUT button on the control panel.
NOTE
After a certain period of time, the machine automatically logs out users.
U
SER NAME AND PASSWORD AUTHENTICATION
L
OGGING INTO THE MACHINE
1. Make sure that User Name is selected and then press the Right arrow key.
2. Enter your name.
3. Using the arrow keys, highlight Done and then press OK.
4. Make sure that Password is selected and then press OK.
5. Enter your password.
6. Using the arrow keys, highlight Done and then press OK.
7. At the Login screen, press OK.
If authentication succeeds, the top screen displays.
L
OGGING OUT OF THE MACHINE
When you have finished operations, be sure to log out of the machine.
1. Press the BACK button or Left arrow key until the top screen displays.
2. Press the RESET/LOGOUT button on the control panel.
NOTE
After a certain period of time, the machine automatically logs out users.
User authentication and access control > 38
Page 39

O
PERATION FROM THE COMPUTER
NOTE
The authentication type specified on the computer overrides the one specified
on the machine.
Printing from Windows
NOTE
You cannot use the XPS printer driver for this function.
This procedure uses Windows 7 and NotePad as an example. The procedures
and menus may differ depending on the OS you use.
1. Open the file you want to print.
2. From the File menu, select Print.
3. Choose the printer driver you want in Select Printer and click Preferences.
4. Select the Job Options tab.
5. Click User Auth....
6. Select the Use User Authentication check box.
7. Enter the user name in Username and the password in Password.
Clicking Use Windows Login automatically enters your login name on Windows.
8. Click OK.
9. Click OK and then click Print.
Printing from Mac
NOTE
This procedure uses Mac OS X 10.9 as an example. The procedures and menus
may differ depending on the OS you use.
1. Open the file you want to print.
2. From the File menu, select Print.
3. Select your machine’s printer driver.
4. Select User Auth... from the panel menu under the Printer and Presets menus.
5. Select the Use User Authentication check box.
6. Enter the user name in User Name and the password in Password.
7. Click Print.
User authentication and access control > 39
Page 40

Faxing (Windows only)
NOTE
This procedure uses Windows 7 and NotePad as an example. The procedures
and menus may differ depending on the OS you use.
1. Open the file you want to fax.
2. From the File menu, select Print.
3. Select your machine (fax driver) in Select Printer and click Preferences.
4. On the Setup tab, click User Authentication....
5. Select the Use User Authentication check box.
6. Enter the user name in Username and the password in Password.
Clicking Use Windows Login automatically enters your login name on Windows.
7. Click OK.
8. Click OK and then click Print.
User authentication and access control > 40
Page 41

O
PERATION
With its intuitive control panel, this Multi Function Product (MFP) is designed to be easy to
use. After the machine has been configured, operating is quite straight forward.
NOTE
If your Administrator has enabled access control on your machine, it will
automatically start up in access control mode. You will not be able to use it
until you have provided valid login information. Refer to “User authentication
and access control” on page 38 for details.
The following sections describe how to copy, fax, and scan your documents.
Refer to “Printing” on page 83 for details of how to use the printing options available from
the control panel. For full details of how to use your machine and any optional accessories
to print jobs efficiently and effectively, please refer to the Printing Guide and the Barcode
Printing Guide.
For full details of how to access and use the security features, please refer to the Security
Guide.
Operation > 41
Page 42

M
ULTI-TASKING
Your machine can handle more than one task at a time. The table below details which
combination of tasks can be performed.
Copy Scan to
Scan to
email/
2
n
d
network
PC
Internet
memory
Fax (Tx)
1st
f
Copy
Scan to
Yes
Yes Yes Yes No Yes Yes Yes Yes Yes
Yes Yes No
email/
network
PC
Internet
Fax (Tx)
Scan to
No No No No Yes No No Yes Yes
USB
memory
Fax Tx Yes Yes Yes
d
Fax Rx
Print
from USB
No
Yes
Yes Yes
g
Yes Yes Yes
(direct
print)
USB
Yes
Yes
Fax
Tx
c
c
Fax
Rx
Print
from
USB
(direct
print)
PC scan
(remote
PC)
Email to
print
Internet
Fax (Rx)
(direct
Yes
a
Yes
b
Yes
Yes
a
Yes
No Yes Yes Yes Yes
No
Yes
b
Yes
a
Yes
b
Yes
Yes
Yes
No
a
e
Yes
Yes
Print
Print
from
Web
print)
a
a
a
PC scan
No No No No Yes No No Yes Yes
(remote
PC)
Email to
print
Yes
g
Yes Yes Yes Yes
Yes
b
Yes
No
e
Yes
Internet
Fax (Rx)
Print
Yes
g
Yes Yes Yes
Yes
a
Yes
b
Yes
Yes
a
Yes
Print
from Web
(direct
print)
a. Data is accepted but printing is halted until the 1st action is complete.
b. While only printing the first print action (scan is completed), the second action can be allowed to browse the
files on the USB memory.
c. Operation is accepted but operation is halted until the 1st action is complete.
d. Copy is enabled only before the start of printing of a received fax image.
e. The second action won't be able to do due to less available memory.
f. The second scan action is enabled after the first one has completed. The second print action is enabled after
the first one has completed.
g. The second print action is enabled after the first one has completed.
a
a
Operation > 42
Page 43
L
OADING DOCUMENT(S
The MFP can scan/copy/send document(s) either from the ADF (Automatic Document
Feeder) or on the glass. If you need to send multiple pages, load your papers in the ADF.
The ADF can hold up to 50 pages at one time.
If you need to scan/copy/send pages from books, newspaper clippings, or paper with
wrinkles or curls, place them on the glass.
D
OCUMENT REQUIREMENTS
Before using the ADF, please make sure that your paper meets the following specifications:
> Document(s) can range in size from 114.3 x 139.7mm to 215.9 x 355.6mm.
> Document(s) can range in weight from 60 to 120 g/m
> Document(s) should be square or rectangular and in good condition (not fragile or
worn).
> Document(s) should be free of curl, wrinkle, tears, wet ink, or punch holes.
> Document(s) should be free of staples, paper clips, paper sticky notes.
> Keep the glass clean and without any documents left on it.
NOTE
To transmit irregular types of document(s), place the document(s) on the
glass or make a copy first and then transmit the copy instead.
When faxing, you can load only A4, letter, or legal size documents in the ADF,
and A4 or letter size documents on the document glass. You cannot load mixed
size documents.
)
²
.
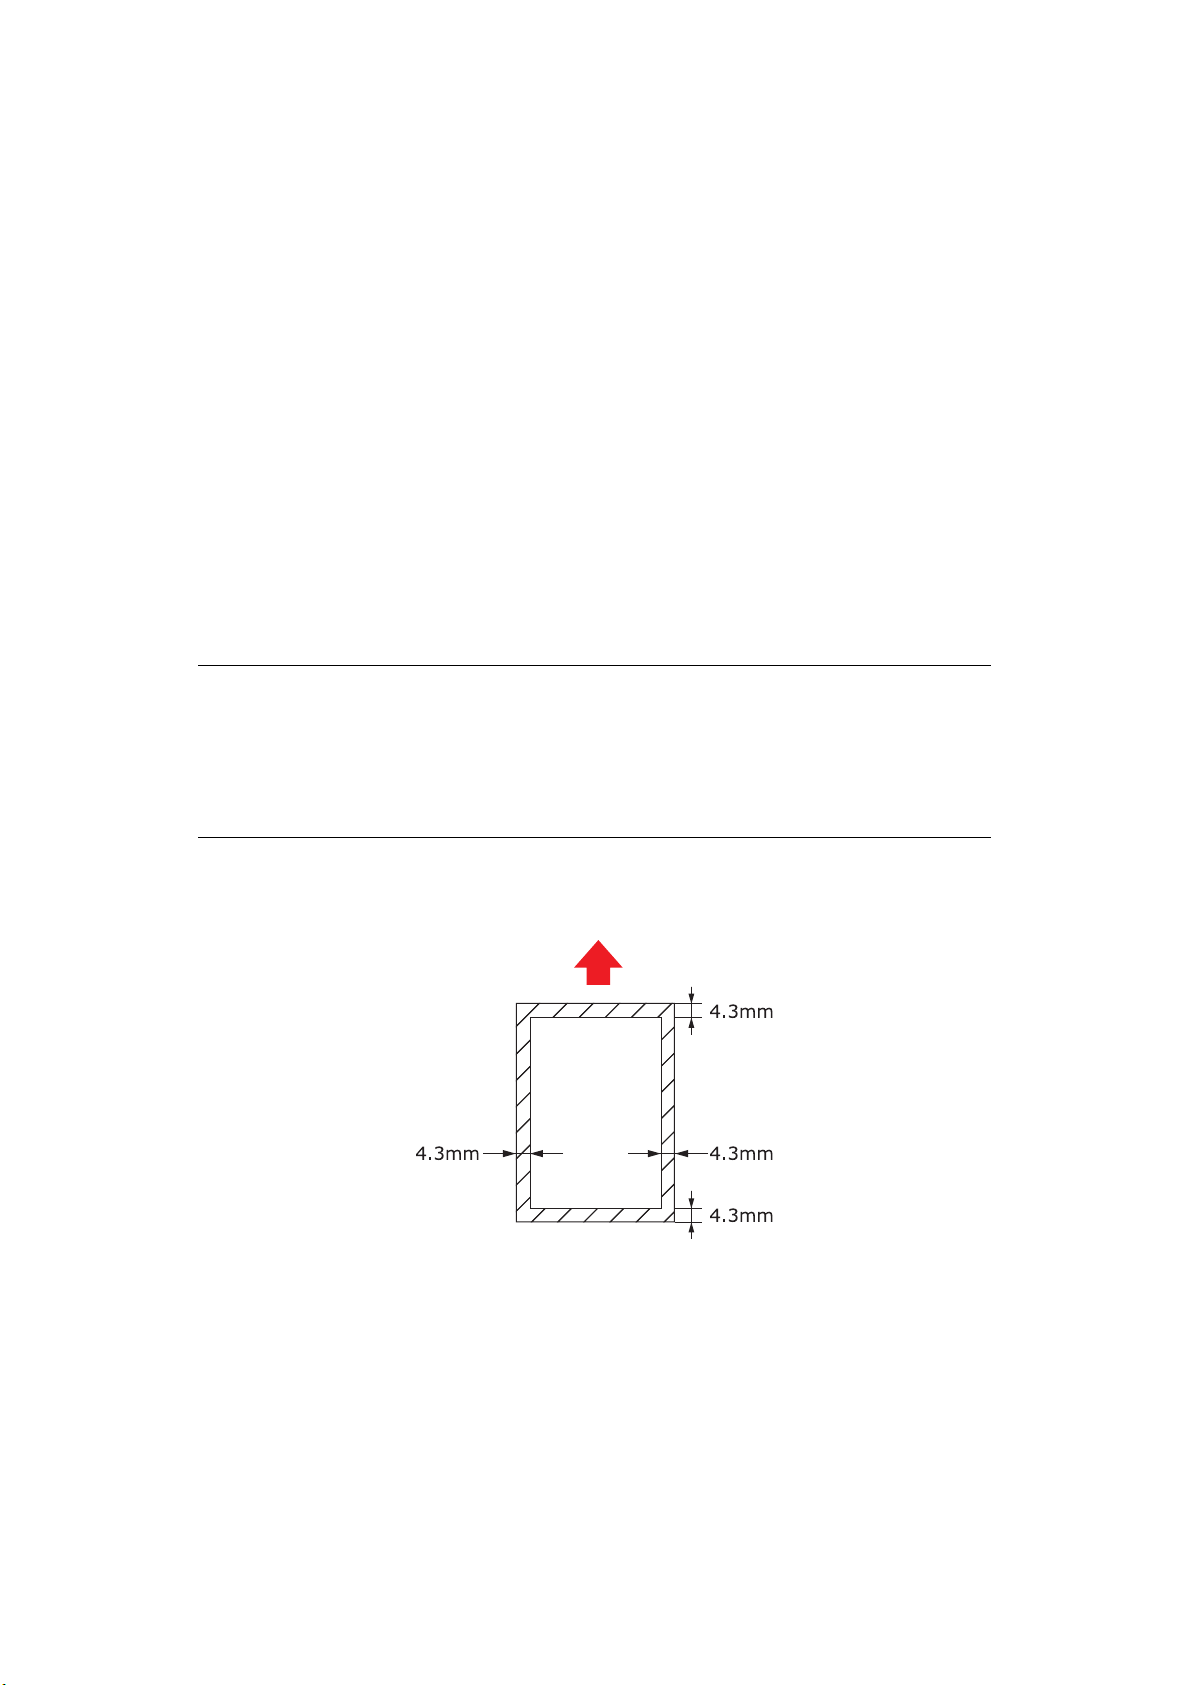
S
CANNABLE AREA
Text or images within the shaded area are not scanned.
Operation > 43
Page 44

P
LACING DOCUMENT(S) IN THE
ADF
1. If you have multiple pages, fan the pages to avoid paper jams. The ADF holds up to
50 pages at one time.
a
b
c
2. Place the document with the text face UP in the ADF:
> If your document is portrait, load with the top edge of the document in first.
> If your document is landscape, load with the left edge of the document in first.
3. Adjust the Paper Guides to centre the document in the ADF.
Operation > 44
Page 45

P
LACING DOCUMENT(S) ON THE GLASS
1. Open the document cover.
2. Place your document with the text face DOWN on the glass:
> If your document is portrait, align its top edge to the upper-left corner of the
glass.
> If your document is landscape, align its right edge to the upper-left corner of the
glass.
3. Close the document cover.
Operation > 45
Page 46

C
2 3 4
1
OPYING
NOTE
If your Administrator has enabled access control on your machine, it will
automatically start up in access control mode. You will not be able to use it
until you have provided valid login information. Refer to “User authentication
and access control” on page 38 for details.
B
ASIC OPERATION
1. Place your document(s) with text face UP in the ADF or face DOWN on the glass.
2. If required, press the Copy button (1) on the control panel to prompt the Copy
screen.
NOTE
Factory default setting is Copy mode.
3. Press Mono (2) to copy your document(s) in black and white, or Color(3) to copy
your document(s) in color.
NOTE
If you wish to cancel the copy process, press Stop (4) to abort the operation.
I
NCREASING COPY COUNT
The machine is preset to a copy count of 1. If you wish to increase the number of copies,
select the number of copies with the numeric keypad.
To increase the copy count:
1. If required, press the Copy button on the control panel to prompt the Copy screen.
2. Enter number of copies required using the numeric keypad. The screen display will
confirm the copy count selected.
NOTE
You can select up to 99 copies.
Copying > 46
Page 47

A
DVANCED OPERATION
Using the options available you can alter the copy output to suit your needs:
1. Press the Right arrow key.
2. Select required parameter with Down arrow key and press the OK button or the
Right arrow key to display the available options.
3. Using Up or Down arrow keys, select value and press OK.
Options are (factory default settings in bold text):
FEATURE OPTION DESCRIPTION
Scan Size A4, A5, A6, B5, B6, Letter, Legal 13, Legal 13.5,
Legal 14, Executive, Statement, 8.5SQ, Folio
Duplex Copy OFF(Simplex), Simplex -> Duplex LE,
Simplex -> Duplex SE, Duplex -> Duplex,
Duplex LE -> Simplex, Duplex SE -> Simplex
Binding Long Edge Bind, Short Edge Bind Sets the default binding to LEF or SEF.
Paper Feed Auto, Tr a y 1( A4 ) , Tr a y 2( A 4) *, M P Tr a y (A 4) A llows you to define the paper tray for
Zoom Auto, 100%, Zoom (25-400%), A4->A5(70%),
Leg14->Let(78%), Leg13.5->Let(81%),
Leg13->Let(84%), A4->B5(86%),
A4->Let(94%), Let->A4(97%),
Fit to page(98%), B5->A4(115%),
A5->B5(122%), A5->A4(141%)
Sort ON, OFF ON prints 1 entire copy/set of the
Allows you to select the document
size.
Turns the duplex (2-sided) function
off or on.
Note: A6 duplex scan is not
supported.
Display condition: Duplex Copy is set
to Duplex -> Duplex and N-up or
Repeat is ON.
printing.
Auto - Allows for automatic tray
selection based on the document
image size and/or scaling setting
defined.
* If fitted.
Allows you to scale the copy using the
presets values or by scaling in 1%
increments up to 400% and down to 0
by entering the value using the
keypad.
multiple copy document at a time
(e.g. pages 1,2,3,1,2,3,1,2,3,…)
OFF batch prints the multiple copy
document page by page (e.g. pages
1,1,1,2,2,2,3,3,3,…)
Copying > 47
Page 48

FEATURE OPTION DESCRIPTION
Image
Settings
Density -3, -2, -1, 0, +1,
+2, +3
Do c u men t Ty pe Text , Text&Photo,
Photo, Photo
(Glossy)
Resolution For Color Normal, Extra Fine Allows you to select the scanning
Background Removal Auto, OFF, 1, 2, 3,
4, 5, 6
Show-Through Removal OFF, Low, Middle,
High
Adjust density
Darker: Keep color intensity and
darker image.
Lighter: Reduce color intensity and
gives lighter image.
Allows you to specify the type of
images on the document.
resolution. The Extra Fine setting
reproduces a higher resolution image
with greater detail, however this
requires more disk space.
Note: In Mono copy mode, the
resolution is fixed to Extra Fine.
Allows you to block out the color
background of the image (assuming
document has a color background) such that the background color is not
printed.
Adjusts the level of show-through
removal.
Note: It is available only when
“Background Removal” is set to “Auto”
and “Document Type” is “Text” or
“Text&Photo”.
Contrast -3, -2, -1, 0, +1,
+2, +3
Hue -3, -2, -1, 0, +1,
+2, +3
Saturation -3, -2, -1, 0, +1,
+2, +3
RGB Red: -3, -2, -1, 0,
+1, +2, +3
Green: -3, -2, -1, 0,
+1, +2, +3
Blue: -3, -2, -1, 0,
+1, +2, +3
Direction Portrait, Landscape Selects the default page orientation.
N-In-1 OFF
2-in-1
4-in-1: Vertical
4-in-1: Horizontal
Contrast setting
High: Enhance brightness
Low: Reduce brightness
Red/green balance adjustment.
Low: Enhance red.
High: Enhance green.
Saturation setting
High: Enhance image sharpness
Low: Reduce hue
Adjust RGB contrast settings. Use the
arrow keys to increment and
decrement the values and to move to
the next color setting.
Allows you to print multiple pages of
the document to a single sheet of
paper.
2-n-1 layout orientation and image
order is fixed. If you specify 4-in-1
you can specify horizontal or vertical
orientation. If you specify 2-in-1 or 4in-1, set your original documents on
the ADF, alternatively enable
Continuous Scan mode and use the
document glass (see “Continuous
Scan” on page 49).
Copying > 48
Page 49

FEATURE OPTION DESCRIPTION
Repeat OFF
x2
x4
ID Card Copy ON, OFF Allows you to set ID card copying as
Continuous
Scan
Mixed Size ON, OFF Allows you to load originals of same
Margin ON, OFF Allows you to change the document
Edge Erase ON, OFF Allows you to block out the peripheral
ON, OFF Allows you to continue scanning more
Allows you to print multiple images of
an original document on a single
sheet.
the default copy mode.
documents. Allows you to construct a
single scan job from multiple
individual sheets or originals.
width but different length in the ADF.
The following document sizes can be
set concurrently; A3 and A4 LEF, B4
and B5 LEF, A4SEF and A5 LEF.
When enabled, the tray setting is
automatic, you cannot specify a tray
manually.
top and left margin areas.
Input range: -25 to +25mm.
areas of the document where spurious
shadows and borders may arise when
copying with the document cover
open (such as with books and
magazines) or for other purposes.
Input range: 2 to 50mm.
4. Press the Left arrow key or Back button to return to the start menu.
5. If access control is enabled, logout once you are finished to avoid any unauthorised
access.
R
ESETTING COPY SETTINGS
A
UTO RESET
All settings you configured for your copy job return to their default values if no operation
is made for a set period of time.
The factory default setting is 3 minutes.
U
SING THE RESET/LOGOUT BUTTON
By pressing the RESET/LOGOUT button, the settings you configured for your copy job
return to their default values.
After copying, press the RESET/LOGOUT key to reset the default settings for the next
user.
Copying > 49
Page 50

S
CANNING
I
NSTALLING SCANNER DRIVERS
This section explains the procedure to install the scanner driver. Before using scan function,
install the scanner driver. You can install TWAIN driver and WIA (Windows only) driver at the
same time. Install the TWAIN driver and ICA driver (dedicate to the Mac OS X) separately.
If you want to use the network scan function, follow the installation procedure below and
register the information of your computer and then install the scanner driver.
MEMO
When using the network scan function in Windows, please install the ActKey
utility.
REFERENCE
Before installing the scanner driver manual, do the network settings.For
details on how to do network settings, refer to the Configuration Guide.
NOTE
When using a scanner with a network connection in Windows, if the equipment
IP address is changed, please change the settings in Network Configuration.
For Mac OS X, please change settings in network scanner setting tools. For
details, refer to Configuration Guide.
(TWAIN/WIA/ICA
DRIVER
)
INSTALLATION PROCEDURE
MEMO
When using the network scan function in Windows, please install the Network
Configuration. For Mac OS X, the network scanner setting tools will be installed
automatically.
For Windows
1. Ensure that your machine and the computer are turned on and connected, and then
insert the “Software DVD-ROM” into the computer.
2. Click Run setup.exe after Auto Play is displayed.
If the User Account Control dialog box appears, click Yes.
3. Select the language and then click Next.
4. Select the device of your machine, and then click Next.
5. Read the license agreement and then click I Agree.
6. Select the proper driver under Software, and then click the install icon.
7. Click Next, and then click Custom Installation.
Scanning > 50
Page 51

If the scanner driver has been installed, the setup maintenance program of the
scanner driver is displayed. Check the checkbox of Add and then click Next to
proceed to the step 8.
8. Click Next.
9. Check the checkbox of Network scanner and click Next.
10. Select IP Address or Search MFP check box to enter the address of the machine
and then click Next.
If you want to set the IP Address, follow procedure 10.
Scanning > 51
Page 52

11. If Search MFP is selected, select the machine and click Next.
12. Set the scanner driver name and click Next.
13. Enter the host name, IP address and port number and then click Configure.
14. Click Next.
15. Click Next.
Scanning > 52
Page 53

16. Click Finish.
For Mac OS X
1. Make sure that the machine is connected to the PC and the power switch of the
machine is turned ON. Then, load the “Software DVD-ROM” on the drive of the PC.
2. Double-click the OKI icon on the desktop.
3. Double-click Drivers > Scanner > Installer for OS X 10.8.
4. Click Continue.
5. Click Continue.
6. Check the display and click Continue if OK.
Scanning > 53
Page 54

7. Read the license agreement and click Continue.
8. Click Agree if you agree.
9. Click Install.
To change the installation location of the driver, click Change Install Location.
10. Enter the administrator's name and password, and click OK.
11. Click Continue Installation.
12. Click Restart.
Scanning > 54
Page 55

U
SING ACTKEY SOFTWARE
Using the ActKey, you can start a scan job in specified settings with a click a button.
MEMO
ActKey does not support Mac OS X.
Using WSD Scanning, Actkey does not work.
When ActKey is installed, Network Configuration is also installed
simultaneously.
REFERENCE
For details on how to start a scan job, refer to the Configuration Guide.
Installing the Software
1. Insert the “Software DVD-ROM” into your computer.
A window opens.
2. Select ActKey from Software.
3. Install the software as instructed.
4. Click Finish.
Starting the Software
1. Click Start to select All Programs > Okidata > ActKey > ActKey.
Scanning > 55
Page 56

S
ETUP TO USE THE
WSD S
CAN
The following explains how to set up the PC to use the WSD Scan function. In order to use
the WSD Scan function, install this device on the PC.
WSD Scan can be used from Scan To Computer and Remote Scan via Network.
To use WSD Scan, the machine has to be connected with the computer which Windows
Vista/ Windows7/ Windows8/ Windows10/ Windows Server 2008/ Windows Server
2008R2/ Windows Server 2012/ Windows Server 2012 R2 was installed via Network.
REFERENCE
Before starting the following procedure, be sure to check the network
connection. For details, see the Configuration Guide.
NOTE
If a scanner is used via WSD Scan connection and if the device IP address is
changed, select Uninstall in step 2 of Installation procedure and uninstall the
scanner, and then execute the install procedure again.
I
NSTALLATION PROCEDURE
MEMO
When you follow the procedure below, the WIA is installed automatically as
the scanner driver.
NOTE
Before starting the installation, select Network and Sharing Center from
the Control
Panel and make sure that Network Search is enabled.
1. From the Start menu, select Network. The devices connected to the network are
displayed.
2. Right-click the MC363 icon under Multifunction Devices and select Install.
If the User Account Control dialog box is displayed, click Yes.
Scanning > 56
Page 57

3. When the balloon message saying that the installation is complete is displayed on
2 3 4
1
the task bar, click the balloon to check the details, and click Close.
Check the device installation on the machine as follows.
4. Press the SCAN key on the operator panel.
5. Press the
to select Computer and then press OK.
6. Check that Select A Connecting PC is selected, and press OK.
7. Press the to select From WSD Scan, and press OK.
8. Make sure that the device installation PC is displayed as the destination PC.
MEMO
A maximum of 50 PCs can be registered.
S
CANNING METHODS
NOTE
If your Administrator has enabled access control on your machine, it will
automatically start up in access control mode. You will not be able to use it
until you have provided valid login information. Refer to “User authentication
and access control” on page 38 for details.
1. Place your document(s) with text face UP in the ADF or face DOWN on the glass.
2. Press the Scan button (1) on the control panel to prompt the Scan Menu screen.
3. Select the scan destination from the following options:
> E-mail
> Computer
Scanning > 57
Page 58

> USB Memory
> Shared Folder
> Remote Scan
NOTE
Computer; select target application from the control panel on the MFP.
Remote Scan; select target application from utility on your PC.
“Remote Scan” is not shown when PC Scan Mode is in Simple Scan Mode.
4. Set your scanning options as required. For further details refer to the following
sections.
5. Press Mono (2) to scan your document(s) in black and white, or Color (3) to scan
your document(s) in color.
NOTE
If you wish to cancel the scan process, press Stop (4) to abort the operation.
Scanning > 58
Page 59
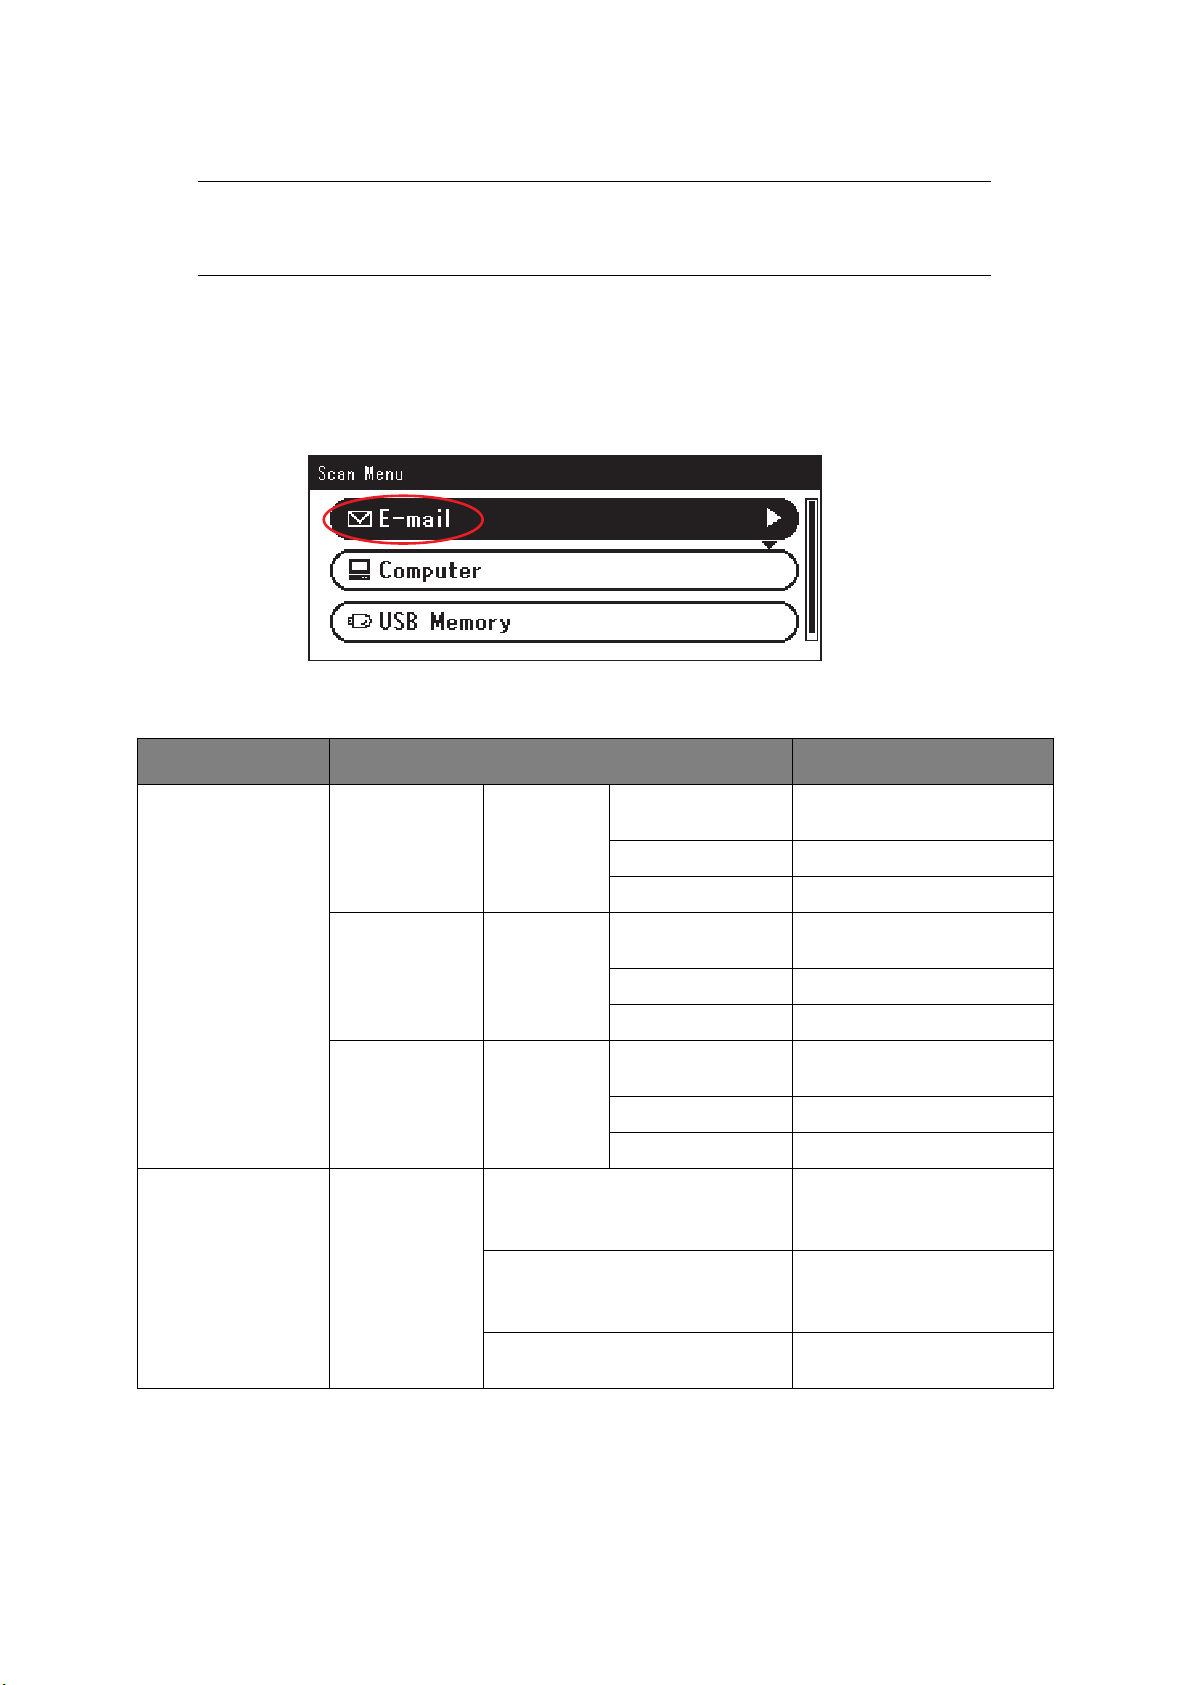
S
CAN TO
E-
MAIL
NOTE
For illustration purposes only, the features shown are as accessed from the
control panel.
Using the options available, you can enter E-mail information and alter the scan output to
suit your needs:
1. Place your document(s) with text face UP in the ADF or face DOWN on the glass.
2. Press the Scan button on the control panel to prompt the Scan Menu screen.
3. If required, use the arrow keys and scroll to E-mail, then press OK.
4. Using the options available, you can enter E-mail destination(s) and alter the scan
output to suit your needs.
FEATURE OPTION DESCRIPTION
Destination To Operation
Cc Operation
Bcc Operation
Add Destination To:
Cc:
Bcc:
Menu
Menu
Menu
Address Book Select E-mail address from
Group List Select destination group
Edit Destination
Type
Delete The Address
Close The List
Edit Destination
Type
Delete The Address
Close The List
Edit Destination
Type
Delete The Address
Close The List
the address book.
Input range: 001-300
from the list.
Input range: 01-20
Tx History Displays the list of sent
E-mails.
Scanning > 59
Page 60

FEATURE OPTION DESCRIPTION
Add Destination
(cont.)
Scan Settings Scan Size
Duplex Scan OFF, Long Edge Bind, Short Edge
Image Settings Density -3, -2, -1, 0, +1,
To:
Cc:
Bcc:
(cont.)
Direct Input Enter E-mail address using
LDAP Simple Search Use the on-screen keyboard
Advanced Search
Search Method:
User Name:
E-mail Address:
A4
, A5, A6, B5, B6, Letter, Legal 13,
Legal 13.5, Legal 14, Executive,
Statement, 8.5SQ, Folio
Bind
+2, +3
Document
Type
Text , Text&Photo,
Photo, Photo
(Glossy)
the on-screen keyboard.
to enter a search value.
Use Advanced Search to
search the LDAP address
book by user name and/or
E-mail address.
Can display up to 100
addresses.
Allows you to select the scan
size.
Select the bound originals
binding position.
Note: A6 duplex scan is not
supported.
Adjust density
Darker: Keep color intensity
and darker image.
Lighter: Reduce color intensity
and gives lighter image.
Allows you to specify the
type of images on the
document.
Resolution 75dpi, 100dpi,
Background
Removal
ShowThrough
Removal
Contrast -3, -2, -1, 0, +1,
Hue -3, -2, -1, 0, +1,
Saturation -3, -2, -1, 0, +1,
RGB Red: -3, -2, -1, 0,
150dpi, 200dpi,
300dpi, 400dpi,
600dpi
Auto, OFF, 1, 2, 3,
4, 5, 6
OFF, Low, Middle,
High
+2, +3
+2, +3
+2, +3
+1, +2, +3
Green: -3, -2, -1,
0, +1, +2, +3
Blue: -3, -2, -1, 0,
+1, +2, +3
Allows you to select the
appropriate resolution.
Remember the higher the
resolution the bigger the file size!
Allows you to block out any
unintended background color.
Adjusts the level of showthrough removal.
Note: It is available only
when “Background Removal”
is set to “Auto” and
“Document Type” is “Text” or
“Text&Photo”.
Contrast setting
High: Enhance brightness
Low: Reduce brightness
Red/green balance adjustment.
Low: Enhance red.
High: Enhance green.
Saturation setting
High: Enhance image
sharpness
Low: Reduce hue
Adjust RGB contrast settings.
Use the arrow keys to
increment and decrement
the values and to move to
the next color setting.
Reply To Address Book Select E-mail address from
Scanning > 60
the address book.
Input range: 001-300
Page 61

FEATURE OPTION DESCRIPTION
Scan Settings
(cont.)
Reply To
(cont.)
Edit E-mail Subject Select Subject Enter new or edit the default
File Name User defined Use the on-screen keyboard
Continuous
Scan
Direct Input Enter E-mail address using
LDAP Simple Search Use the on-screen keyboard
Advanced Search
Search Method:
User Name:
E-mail Address:
Direct Input
E-mail Body Select Text
Direct Input
ON, OFF Allows you to continue
the on-screen keyboard.
to enter a search value.
Use Advanced Search to
search the LDAP address
book by user name and/or
E-mail address.
Can display up to 100
addresses.
E-mail subject and text
templates.
For further details refer to
“Creating E-mail templates”
on page 79.
to enter an appropriate file
name.
scanning more documents.
Allows you to construct a
single scan job from multiple
individual sheets or originals.
Refer to “Continuous scan
mode” on page 109 for
details.
Grayscale ON, OFF Select ON to print in
grayscale.
File Format Color:
Single-PDF, Multi-PDF, Single-HCPDF, Multi-HC-PDF, Multi-PDF/A,
Single-TIFF, Multi-TIFF, JPEG, XPS
Mono (Grayscale):
Single-PDF, Multi-PDF, Single-HCPDF, Multi-HC-PDF, Multi-PDF/A,
Single-TIFF, Multi-TIFF, JPEG, XPS
Mono (Binary):
Single-PDF, Multi-PDF, Multi-PDF/A,
Single-TIFF, Multi-TIFF, XPS
Encrypted PDF Not Encrypt
Encrypt Low, Medium, High
Compression
Rate/Color,
Grayscale
Edge Erase ON, OFF Use the keypad to enter the
Tx History Displays the list of sent
High, Medium, Low Select the appropriate
Select the appropriate file
format.
Select the appropriate
encryption level.
compression level.
width settings.
Input range: 5 to 50mm
E-mails.
Scanning > 61
Page 62

NOTE
> If you want to use the address book or group list features, be sure to
register the E-mail addresses in advance. Refer to “Managing the address
book” on page 78.
> This machine allows you to send scanned document(s) to multiple E-mail
addresses. Simply select the destination you require and press OK, then
repeat until all the destinations you require are selected.
> Up to 48 characters can be entered in the “Destination”, “Reply to” and
the “Subject” fields.
> If the administrator has set SMTP or POP3 authentication, after sending
your scanned document to E-mail addresses, and if no more transmission
is required, log out of the system. This is to prevent misuse of the user's
E-mail account for sending E-mails. If there is no other operation within
3 minutes, the system will log out automatically.
5. Press the Mono button to scan your document(s) in black and white, or the
Color button to scan your document(s) in color.
NOTE
If you wish to cancel the scan process, press the Stop button to abort the
operation.
On completion the machine will beep and a confirmation message displays.
NOTE
MDN (message disposition notification) and DSN (delivery status notification)
can enabled/disabled by the administrator.
6. If access control is enabled, logout once you are finished to avoid any unauthorised
access.
Scanning > 62
Page 63

S
CAN TO SHARED FOLDER
NOTE
The MFP must be connected to a Network server to enable Scan to Shared
Folder to be set up. Refer to the Configuration Guide for details.
Before sending your document to a file server, profiles should be set up first to speed up
the process. A profile contains a list of filing parameters such as your filing protocol,
directory, file name and other scanning parameters.
NOTE
Profiles can be created and managed using the machine’s web page or the MFP
Setup Tool.
You can create up to 50 profiles. Refer to “Managing profiles” on page 76.
1. Place your document(s) with text face UP in the ADF or face DOWN on the glass.
2. Press the Scan button on the control panel to prompt the Scan Menu screen.
3. Using the Down arrow key, scroll to Shared Folder and press OK.
4. Using the Down arrow key, scroll to Select Profile and press OK.
The list of registered profiles displays.
5. Using the Down arrow key, scroll to the required profile and press OK.
6. Using the Down arrow key, scroll to Scan Setting and press OK.
Using the options available, you can enter network information and alter the scan out
put to suit your needs.
FEATURE OPTION DESCRIPTION
Select Profile
A4
Scan Setting Scan Size
Duplex Scan OFF, Long Edge Bind, Short Edge
Image Settings Density -3, -2, -1, 0, +1,
, A5, A6, B5, B6, Letter, Legal 13,
Legal 13.5, Legal 14, Executive,
Statement, 8.5SQ, Folio
Bind
+2, +3
Allows you to select the scan
size.
Select the bound originals
binding position.
Note: A6 duplex scan is not
supported.
Adjust density
Darker: Keep color intensity
and darker image.
Lighter: Reduce color
intensity and gives lighter
image.
Document
Type
Scanning > 63
Text , Text&Photo,
Photo, Photo
(Glossy)
Allows you to specify the
type of images on the
document.
Page 64

FEATURE OPTION DESCRIPTION
Scan Setting
(cont.)
Image Settings
(cont.)
Background
Removal
ShowThrough
Removal
Resolution 75dpi, 100dpi,
Contrast -3, -2, -1, 0, +1,
Hue -3, -2, -1, 0, +1,
Saturation -3, -2, -1, 0, +1,
Auto, OFF, 1, 2, 3,
4, 5, 6
OFF, Low, Middle,
High
150dpi, 200dpi,
300dpi, 400dpi,
600dpi
+2, +3
+2, +3
+2, +3
Allows you to block out the
color background of the
image (assuming document
has a color background) such that the background
color is not printed.
Adjusts the level of showthrough removal.
Note: It is available only
when “Background Removal”
is set to “Auto” and
“Document Type” is “Text” or
“Text&Photo”.
Allows you to select the
appropriate resolution.
Remember the higher the
resolution the bigger the file size!
Contrast setting
High: Enhance brightness
Low: Reduce brightness
Red/green balance
adjustment.
Low: Enhance red.
High: Enhance green.
Saturation setting
High: Enhance image
sharpness
Low: Reduce hue
RGB Red: -3, -2, -1, 0,
File Name User defined
Subfolder User defined Enter the subdirectory where
Continuous
Scan
Grayscale ON, OFF Select ON to print in
ON, OFF Allows you to continue
+1, +2, +3
Green: -3, -2, -1,
0, +1, +2, +3
Blue: -3, -2, -1, 0,
+1, +2, +3
Adjust RGB contrast settings.
Use the arrow keys to
increment and decrement
the values and to move to
the next color setting.
Use the on-screen keyboard to
enter an appropriate file name.
the scanned document will
be stored.
scanning more documents.
Allows you to construct a
single scan job from multiple
individual sheets or originals.
Refer to “Continuous scan
mode” on page 109 for
details.
grayscale.
Scanning > 64
Page 65

FEATURE OPTION DESCRIPTION
Scan Setting
(cont.)
File Format Color:
Encrypted PDF Not Encrypt
Compression
Rate/Color,
Grayscale
Edge Erase ON, OFF Use the keypad to enter the
Single-PDF, Multi-PDF, Single-HCPDF, Multi-HC-PDF, Multi-PDF/A,
Single-TIFF, Multi-TIFF, JPEG, XPS
Mono (Grayscale):
Single-PDF, Multi-PDF, Single-HCPDF, Multi-HC-PDF, Multi-PDF/A,
Single-TIFF, Multi-TIFF, JPEG, XPS
Mono (Binary):
Single-PDF, Multi-PDF, Multi-PDF/A,
Single-TIFF, Multi-TIFF, XPS
Encrypt Low, Medium, High
High, Medium, Low Select the appropriate
Select the appropriate file
format.
Select the appropriate
encryption level.
compression level.
width settings.
Input range: 5 to 50mm
7. Press the Mono button to scan your document(s) in black and white, or the Color
button to scan your document(s) in color.
NOTE
If you wish to cancel the scan process, press the Stop button to abort the
operation.
On completion the machine will beep and a confirmation message displays.
8. If access control is enabled, logout once you are finished to avoid any unauthorised
access.
Scanning > 65
Page 66
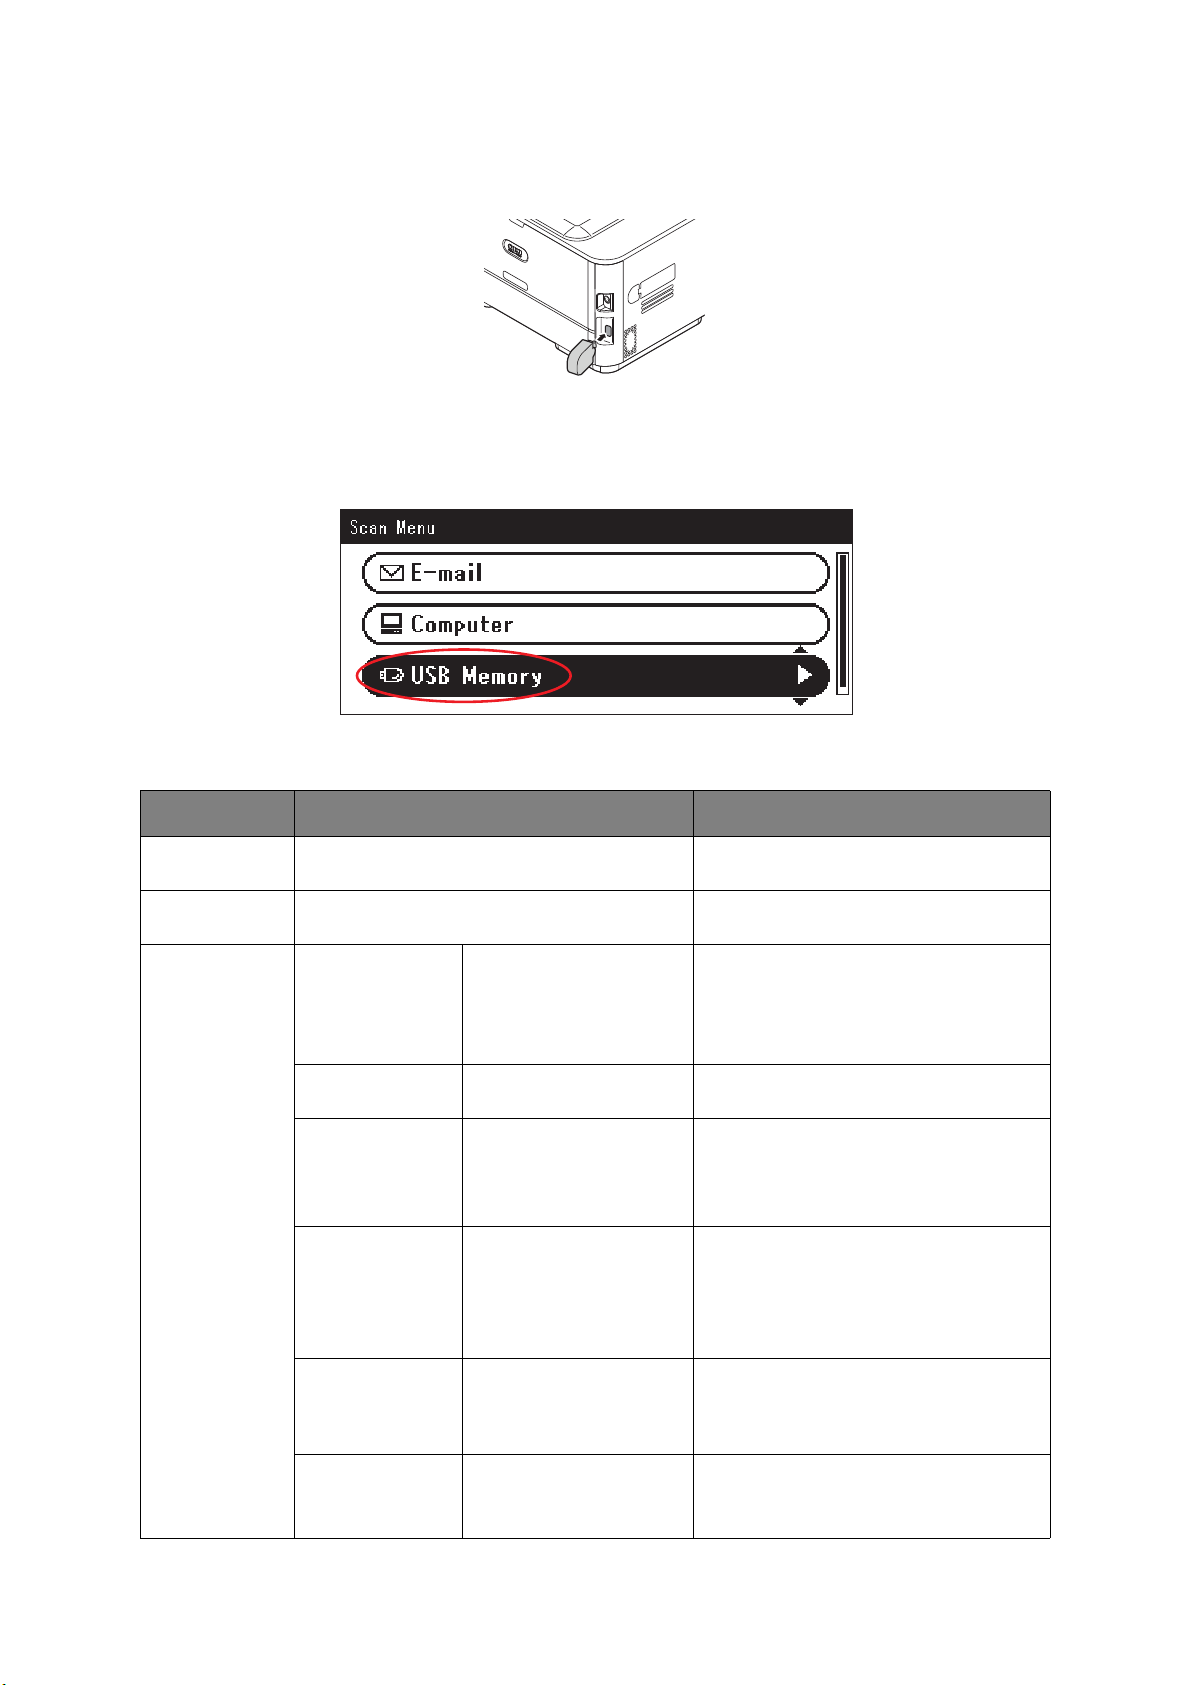
S
CAN TO
USB
MEMORY
1. Plug the USB memory into the USB port at the front of the machine.
2. Place your document(s) with text face UP in the ADF or face DOWN on the glass.
3. Press the Scan button on the control panel to prompt the Scan Menu screen.
4. Using the Down arrow key, scroll to USB Memory and press OK.
Using the options available, you can enter a file name and alter the scan output to
suit your needs.
FEATURE OPTION DESCRIPTION
Scan Size
Duplex Scan OFF, Long Edge Bind, Short Edge Bind
Image Settings Density -3, -2, -1, 0, +1, +2, +3 Adjust density
A4
, A5, A6, B5, B6, Letter, Legal 13, Legal 13.5,
Legal 14, Executive, Statement, 8.5SQ, Folio
Document Type Text, Text&Photo,
Background
Removal
Show-Through
Removal
Photo, Photo (Glossy)
Auto, OFF, 1, 2, 3, 4,
5, 6
OFF, Low, Middle, High Adjusts the level of show-through
Allows you to select the scan size.
Select the bound originals binding position.
Note: A6 duplex scan is not supported.
Darker: Keep color intensity and darker
image.
Lighter: Reduce color intensity and gives
lighter image.
Allows you to specify the type of images
on the document.
Allows you to block out the color
background of the image (assuming
document has a color background) such that the background color is not
printed.
removal.
Note: It is available only when
“Background Removal” is set to “Auto”
and “Document Type” is “Text” or
“Text&Photo”.
Resolution 75dpi, 100dpi, 150dpi,
200dpi, 300dpi, 400dpi,
600dpi
Contrast -3, -2, -1, 0, +1, +2, +3 Contrast setting
Scanning > 66
Allows you to select the appropriate
resolution.
Remember the higher the resolution the
bigger the file size!
High: Enhance brightness
Low: Reduce brightness
Page 67

FEATURE OPTION DESCRIPTION
Image Settings
(cont.)
File Name User defined Use the on-screen keyboard to enter an
Continuous
Scan
Grayscale ON, OFF Select ON to print in grayscale.
File Format Color:
Hue -3, -2, -1, 0, +1, +2, +3 Red/green balance adjustment.
Low: Enhance red.
High: Enhance green.
Saturation -3, -2, -1, 0, +1, +2, +3 Saturation setting
High: Enhance image sharpness
Low: Reduce hue
RGB Red: -3, -2, -1, 0, +1,
+2, +3
Green: -3, -2, -1, 0, +1,
+2, +3
Blue: -3, -2, -1, 0, +1,
+2, +3
ON, OFF Allows you to continue scanning more
Single-PDF, Multi-PDF, Single-HC-PDF, MultiHC-PDF, Multi-PDF/A, Single-TIFF, Multi-TIFF,
JPEG, XPS
Mono (Grayscale):
Single-PDF, Multi-PDF, Single-HC-PDF, MultiHC-PDF, Multi-PDF/A, Single-TIFF, Multi-TIFF,
JPEG, XPS
Mono (Binary):
Single-PDF, Multi-PDF, Multi-PDF/A, SingleTIFF, Multi-TIFF, XPS
Adjust RGB contrast settings. Use the
arrow keys to increment and decrement
the values and to move to the next color
setting.
appropriate file name.
documents. Allows you to construct a
single scan job from multiple individual
sheets or originals. Refer to “Continuous
scan mode” on page 109 for details.
Select the appropriate file format.
Encrypted PDF Not Encrypt
Encrypt Low, Medium, High
Compression
Rate/Color,
Grayscale
Edge Erase ON, OFF Use the keypad to enter the width
High, Medium, Low Select the appropriate compression level.
Select the appropriate encryption level.
settings.
Input range: 5 to 50mm
5. Press the Mono button to scan your document(s) in black and white, or the Color
button to scan your document(s) in color.
NOTE
If you wish to cancel the scan process, press the Stop button to abort the
operation.
On completion a confirmation message displays.
6. Remove the USB memory from the machine.
7. If access control is enabled, logout once you are finished to avoid any unauthorised
access.
Scanning > 67
Page 68

S
MONO
R
CAN TO COMPUTER
You can save the scanned data into your local computer.
When you press the or , the scan job starts and the ActKey utility and the
COLO
TWAIN driver start automatically. You can send the scanned document to a specified
application, save it in a specified folder, or send it by fax.
In the WSD Scan connection, you can set an application to start and a location where you
send or store document for each recipient.
The machine can be connected to USB interface or network, but only a computer can be
connected at the same time.
If the Mac OS X is running, the image capture and the ICA driver start up automatically.
You can select a folder and save the scanned documents in it.
NOTE
Connect the machine to a computer via USB or a network.
Install ActKey and scanner driver before scanning to a local computer.
If you conect the machine to network, follow these instructions.
> Set TCP/IP setting to Enable.
> Conform the IP version of the machine to that of your computer.
> Set up the DNS server.
> Enable the network TWAIN setting.
If the Mac OS X is running, you can scan a document in the fixed A4 size only
on the document glass.
If the Mac OS X is running, you can save a file only as JPEG.
If the Mac OS X is running and if you scan documents through network
connection, you need to start the image capture first. Then, you need to
select the machine from the list displayed at the left of image capture screen.
To use the MFP in WSD Scan connection, set the followings.
> Set the TCP/IP setting of the MFP to Enable.
> Match the IP version between the MFP and the PC.
> Enable the WSD Scan.
> Install the MFP on the PC.
REFERENCE
For details on how to enable the network TWAIN setting, refer to the
Configuration Guide.
For details on how to install the ActKey utility, refer to the Configuration Guide.
For the procedure to enable WSD Scan, see the Configuration Guide.
For the procedure to install the MFP on the PC, see
Scan” on page 56
.
Scanning > 68
“Setup to use the WSD
Page 69

C
MONO
MONO
COLOR
COLOR
ONNECTING
VIA USB
1. Press the SCAN key on the operator panel.
2. Place your document with text face up in the ADF or face down on the document
glass.
3. Press the to select Computer and then press OK.
If the Network TWAIN setting is set to Disable, proceed to the step 6.
4. Check that Select A Connecting PC is selected and then press OK.
5. Press the to select From USB Interface and then press OK.
6. Press the to select Select An Application and then press OK.
7. Press the to select where to send the scanned document and then press OK.
Selectable location Values to send:
Application Folder PC-FAX
NOTE
If the Mac OS X is running, you can select Folder only.
8. Press
C
ONNECTING
or .
MEMO
If you select Application, the specified application starts and the scanned
image is displayed on the application.
If you select Folder, the scanned image is saved in the specified folder.
If you select PC-FAX, the application for fax transmission starts. After sending
the scanned image, send a fax with the fax transmission software on your
computer.
VIA N
ETWORK
1. Press the SCAN key on the operator panel.
2. Place your document with text face up in the ADF or face down on the document
glass.
3. Press the to select Computer and then press OK.
4. Check that select Select A Connecting PC is selected and then press OK.
5. Check that From Network is selected and then press OK.
6. Press the to select the computer you want and then press OK.
7. Press the to select Select An Application and then press OK.
8. Press the to select where to send the scanned document and then press OK.
Scanning > 69
Page 70

9. Press or .
MONO
R
COLOR
MONO
R
COLOR
MONO
COLO
MEMO
If you select Application, the specified application starts and the scanned
image is displayed on the application.
If you select Folder, the scanned image is saved in the specified folder.
If you select PC-FAX, the application for fax transmission starts. After sending
the scanned image, send a fax with the fax transmission software on your
computer.
WSD S
CAN CONNECTION
1. Press the SCAN key on the Operation Panel.
2. Place the original on the automatic document feeder or on the scanner glass.
3. Press the to select Computer and then press OK.
4. Check that the Select A Connecting PC is selected, and press OK.
5. Press the to select From WSD Scan and then press OK.
6. Press the to select the destination PC and then press OK.
7. Press the to select Duplex Scan and then press OK.
8. Press the or to select ON or OFF and then press OK.
9. Press
or .
MONO
COLO
MEMO
To start the dual-sided scan, turn its setting On and place the original on the
automatic document feeder. If you turn the dual-sided scan On but place the
document on the scanner glass, you cannot scan the dual sides of document.
When using the scanner application on PC, it will be scanned by the scanner
type of scan profile setup on PC, regardless of where the document is set or
the setting of Duplex Scan. (A6 is only simplex scanning)
Scanning > 70
Page 71

R
EMOTE SCAN
This will launch the Scanner driver from a utility installed on the PC (ActKey, PaperPort,
Image, Adobe Photoshop, etc.) and will begin scanning.
Connect the machine to a computer via USB or a network.
TWAIN (USB connection and Network connection) and WSD Scan are supported.
There are 3 Modes of Operation: Simple Scan Mode, Manual Scan Mode, and Secure Scan
Mode.
In Simple Scan Mode, the scanning can be started from all computers via USB, Network
and WSD Scan connection, without special operation on the operator panel.
In Manual Scan Mode, the scanning can be started from all computers via USB, Network
and WSD Scan connection.
In Secure Scan Mode, the scanning can only be started from selected machine among the
already registered computers in the machine via USB, Network and WSD Scan connection.
Only one computer can be connected at the same time.
MEMO
For the following procedure, ActKey will be used as an example for Windows,
and Adobe Photoshop for Mac OS X. The items in this manual may differ
depending on the application you are using.
NOTE
Connect the machine to a computer via USB or a network.
Install an application (ActKey, PaperPort, etc.) and a scanner driver before
starting a scan job. This installation is NOT required for WSD Scan
connection.
If you connect the machine to network, follow these instructions.
> Set TCP/IP setting to Enable.
> Conform the IP version of the machine to that of your computer.
> Set up the DNS server.
> Enable the network TWAIN setting.
When in Secure Scan Mode, the administrator needs to register the computer
information for carrying out security scans from the control panel or the web
site beforehand.
For Mac OS X, when carrying out a network scan for the first time, you need
to set the connection target when using a driver. When you use the driver for
the first time, the connection target selection tool will launch. You do not
need to set the connection target after the first time.
To operate the MFP in the WSD Scan connection, set the followings.
> Set the TCP/IP setting of the MFP to Enable.
> Match the IP version between the MFP and the PC.
> Enable the WSD Scan.
> Install the MFP on the PC.
REFERENCE
For details on how to install a scanner driver, refer to “Installing scanner
drivers (TWAIN/WIA/ICA driver)” on page 50.
Scanning > 71
Page 72

S
IMPLE SCAN MODE
NOTE
If you failed to start scan, please check whether the panel is in operation.
For Windows
1.
Place your document with text face up in the ADF or face down on the document glass.
2. Start ActKey on your computer.
3. Click the scan button you want.
The scan job starts.
Scan Button Name:
Application1, Application2, Folder, PC-Fax
MEMO
If you select Application1 or Application2, the specified application starts and
the scanned document is displayed on the application.
If you select Folder, the scanned document is saved in the specified folder.
If you select PC-FAX, the application for fax transmission starts and the
scanned document is sent to the application. Send a fax with the fax
transmission software on your computer.
For Mac OS X
1.
Place your document with text face up in the ADF or face down on the document glass.
2. Start Image Capture on your computer.
3. Select the device.
4. Click a scan button.
Scanning starts.
5. Select Quit Image Capture from Image Capture.
For WSD Scan
1.
Place your document with text face up in the ADF or face down on the document glass.
2. Start any scan program on the PC.
3. Click a scan button. The document scan starts.
M
ANUAL SCAN MODE
For Windows
1. Press the SCAN key on the operator panel.
2. Place your document with text face up in the ADF or face down on the document glass.
3. Press the to select Remote Scan and then press OK.
4. Check that the TWAIN is selected, and press OK.
Scanning > 72
Page 73

5. Start ActKey on your computer.
6. Click the scan button you want.
The scan job starts.
Scan Button Name:
Application1, Application2, Folder, PC-Fax
MEMO
If you select Application1 or Application2, the specified application starts and
the scanned document is displayed on the application.
If you select Folder, the scanned document is saved in the specified folder.
If you select PC-FAX, the application for fax transmission starts and the
scanned document is sent to the application. Send a fax with the fax
transmission software on your computer.
For Mac OS X
1. Press the SCAN key on the operator panel.
2. Place your document with text face up in the ADF or face down on the document glass.
3. Press the to select Remote Scan and then press OK.
4. Check that the TWAIN is selected, and press OK.
5. Start Image Capture on your computer.
6. Select the device.
7. Click a scan button.
Scanning starts.
8. Select Quit Image Capture from Image Capture.
For WSD Scan
1. Press the SCAN key on the Operation Panel.
2. Place the original on the automatic document feeder or on the scanner glass.
3. Press the to select Remote Scan and then press OK.
4. Press the to select WSD Scan and then press OK.
5. Start any scan program on the PC.
6. Click a scan button. The document scan starts.
S
ECURE SCAN MODE (FOR NETWORK CONNECTION
)
For Windows
1. Press the SCAN key on the operator panel.
2. Place your document with text face up in the ADF or face down on the document glass.
3. Press the to select Remote Scan and then press OK.
4. Check that the TWAIN is selected, and press OK.
5. Check that Select a connecting PC is selected and then press OK.
6. Check that From Network is selected and then press OK.
Scanning > 73
Page 74

7. Press the to select the destination you want and then press OK.
MONO
R
COLOR
MONO
R
COLOR
8. Press
or .
MONO
COLO
9. Start the ActKey on your computer.
10. Click a scan button.
For Mac OS X
1. Press the SCAN key on the operator panel.
2. Place your document with text face up in the ADF or face down on the document glass.
3. Press the to select Remote Scan and then press OK.
4. Check that the TWAIN is selected, and press OK.
5. Check that Select a connecting PC is selected and then press OK.
6. Check that From Network is selected and then press OK.
7. Press the to select the destination you want and then press OK.
8. Press
9. If your device’s PC Scan Mode is set to Secure Scan Mode, you must use the Network
or .
MONO
COLO
Scanner Setup Tool to make the following settings:
>The address of your Mac must be registered with your device.
>The port number used for scanning must be registered. This port number can be
changed in your device’s “Network Scan Destination” settings.
The Network Scanner Setup Tool is installed in the following location:
/Applications/OKIDATA/Scanner/
Start the Network Scanner Setup Tool, select your MFP device and change the
settings.
10. Start Image Capture on your computer.
11. Select the device.
12. Click a scan button.
Scanning starts.
13. Select Quit Image Capture from Image Capture.
For WSD Scan
1. Press the SCAN key on the Operation Panel.
2. Place the original on the automatic document feeder or on the scanner glass.
3. Press the to select Remote Scan and then press OK.
4. Press the to select WSD Scan and then press OK.
5. Start any scan program on the PC.
6. Click a scan button. The document scan starts.
Scanning > 74
Page 75
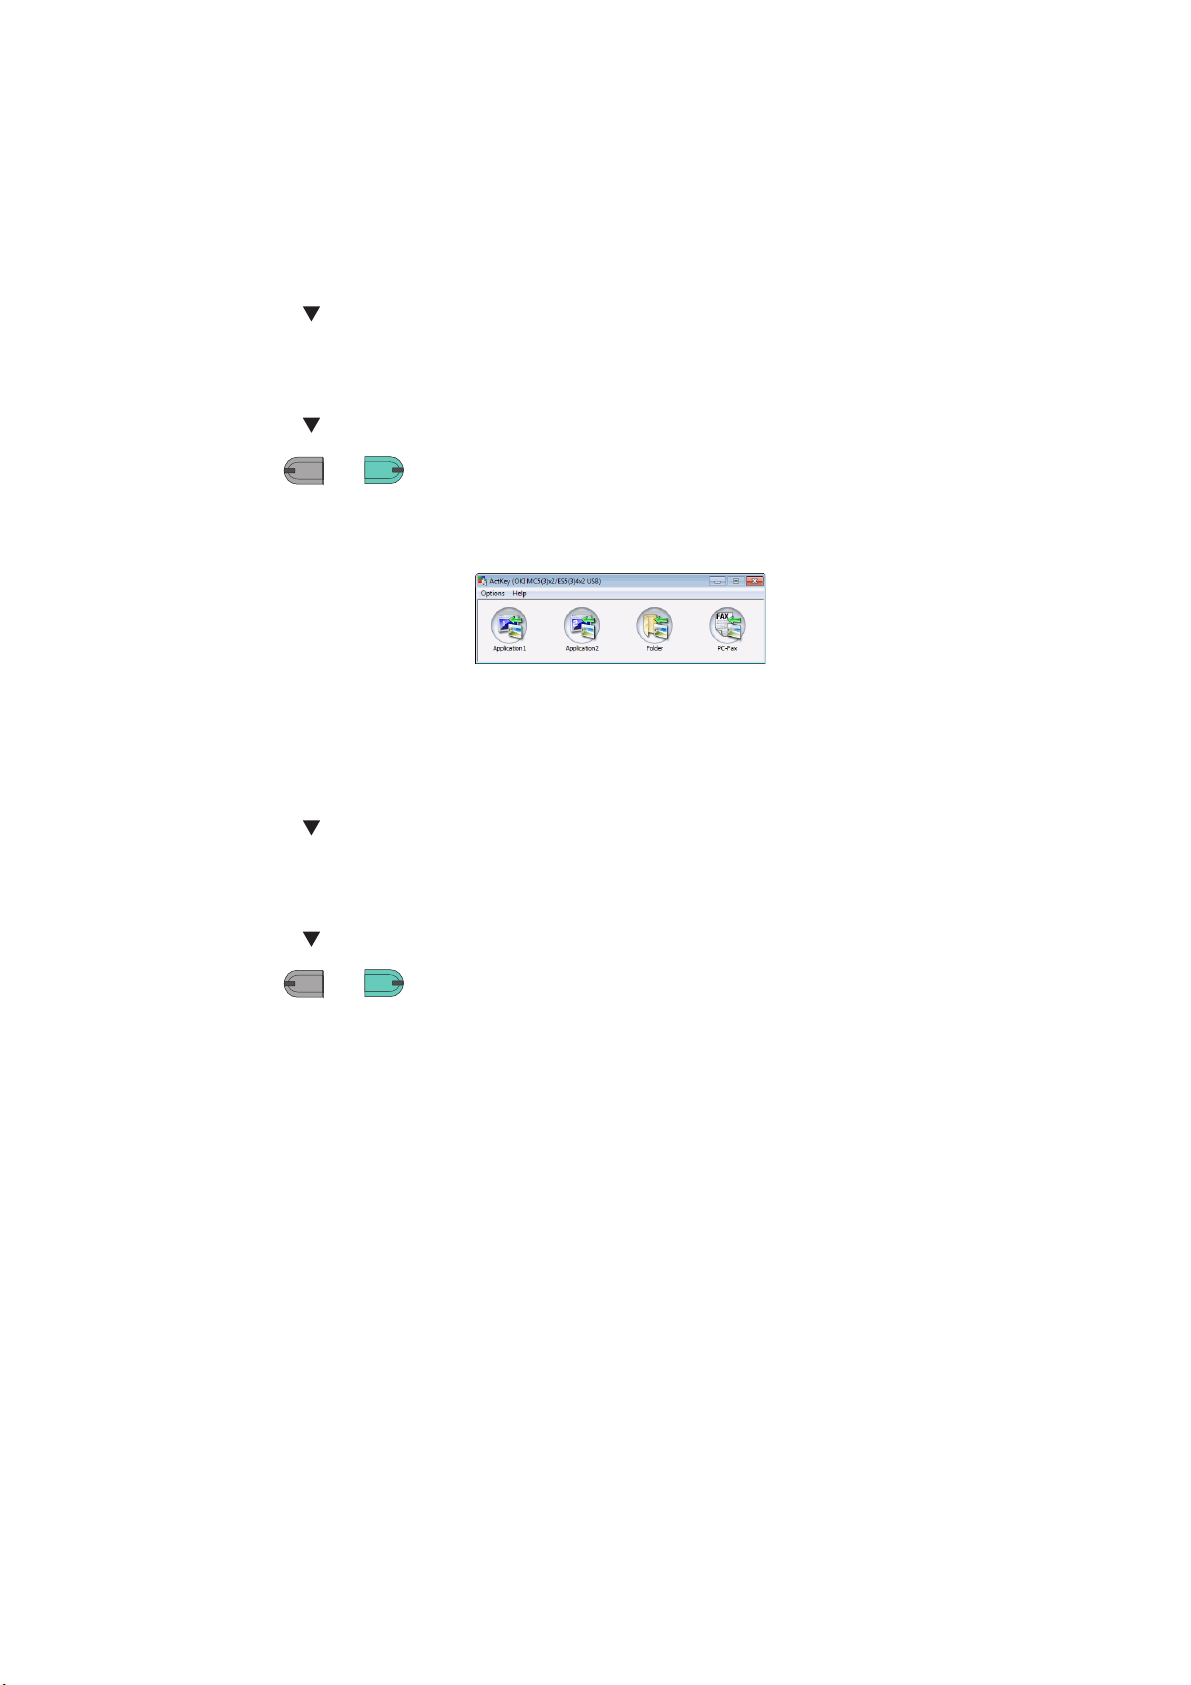
S
MONO
R
COLOR
MONO
MONO
COLOR
COLOR
ECURE SCAN MODE (FOR
USB
CONNECTION
)
For Windows
1. Press the SCAN key on the operator panel.
2. Place your document with text face up in the ADF or face down on the document glass.
3. Press the to select Remote Scan and then press OK.
4. Check that the TWAIN is selected, and press OK.
5. Check that Select a connecting PC is selected and then press OK.
6. Press the to select From USB interface and then press OK.
7. Press
or .
MONO
COLO
8. ActKey start on the computer.
9. Click the Scan button.
For Mac OS X
1. Press the SCAN key on the operator panel.
2. Place your document with text face up in the ADF or face down on the document glass.
3. Press the to select Remote Scan and then press OK.
4. Check that the TWAIN is selected, and press OK.
5. Check that Select a connecting PC is selected and then press OK.
6. Press the to select From USB interface and then press OK.
7. Press
8. Start Image Capture on your computer.
9. Select the device.
10. Click a scan button.
or .
Scanning starts.
11. Select Quit Image Capture from Image Capture.
Scanning > 75
Page 76

M
ANAGING PROFILES
A
DDING A NEW NETWORK PROFILE
Register the information you configured on the computer as a profile. It is necessary when
you perform Scan To Shared Folder with the computer.
1. Press the SETTING button on the control panel to prompt the Setting screen.
2. Using the Down arrow key, scroll to Profile and press OK.
3. Select the desired profile number.
4. Press the Right arrow key to prompt the Operation Menu screen.
From here you can register or sort profiles.
5. When registering a new profile, press the Right arrow key to prompt the Profile
screen.
6. Ensure Profile Name: is highlighted then press the Right arrow key.
7. Using the arrow keys and on-screen keypad, enter a suitable profile name.
8. Using the arrow keys, highlight Done and press OK.
9. Using the Down arrow key, scroll to Target URL then press the Right arrow key.
10. Using the arrow keys and on-screen keypad, enter the name of the destination
computer and the shared folder name as “\\name of the destination
computer\shared folder name”.
11. Using the arrow keys, highlight Done and press OK.
12. Using the Down arrow key, scroll to User Name then press the Right arrow key.
13. Using the arrow keys and on-screen keypad, enter a suitable user name.
NOTE
If domain management is done, enter “user name@domain name”.
14. Using the arrow keys, highlight Done and press OK.
15. Using the Down arrow key, scroll to Password then press the Right arrow key.
16. Using the arrow keys and on-screen keypad, enter a suitable password.
17. Using the arrow keys, highlight Done and press OK
18
. Using t
he Down arrow key, scroll to File Name then press the Right arrow key.
.
19. Using the arrow keys and on-screen keypad, enter a suitable file name.
NOTE
You can enter up to 64 characters.
By adding “#n” to the end of the file name, a serial number is automatically
assigned to the end of the name of sent files.
By adding “#d” to the end of the file name, a date is automatically assigned
to the end of the name of sent files.
20. Using the arrow keys, highlight Done and press OK.
21. Configure other items if necessary, for example:
\\PC1\SalesDev
22. Press OK to register the settings and save the profile entry.
The setup for Scan To Shared Folder is complete.
Scanning > 76
Page 77

D
ELETING A NETWORK PROFILE
To delete a network profile:
1. Press the SETTING button on the control panel to prompt the Setting screen.
2. Using the Down arrow key, scroll to Profile List and press OK.
3. Select the desired profile number.
4. Ensure Delete is highlighted then press the Right arrow key.
5. At the prompt:
> press OK to continue deleting the profile entry,
or...
> use the Right arrow key to highlight No, then press OK to cancel.
Scanning > 77
Page 78

M
ANAGING THE ADDRESS BOOK
S
ETTING SENDER AND REPLY TO
You can set the E-mail address from which E-mails are sent and the address to which
responses are sent.
1. Press the SETTING button on the control panel.
2. Using the Down arrow key, scroll to Admin Setup and then press OK.
3. Using the arrow keys and on-screen keyboard, enter the administrator password.
NOTE
The default password is “999999”.
4. Select Done and then press OK.
5. Using the Down arrow key, scroll to Scanner Setup and then press OK.
6. Using the Down arrow key, scroll to E-mail Setup and then press OK.
7. Using the Down arrow key, scroll to From/Reply to and then press OK.
8. Using the Down arrow key, scroll to From or Reply to and then press OK.
9. Using the on-screen keyboard, enter the E-mail address up to 48 characters.
10. Select Done and then press OK.
E-
MAIL ADDRESSES (FROM/REPLY TO
)
NOTE
You can select E-mail addresses from the address book.
11. Using the Down arrow key, scroll to Close and then press OK.
12. Press the RESET/LOGOUT button.
Scanning > 78
Page 79

C
REATING
You can create up to five E-mail templates with various subject lines and body text.
E-
MAIL TEMPLATES
Registering a subject
1. Press the SETTING button on the control panel.
2. Using the Down arrow key, scroll to Admin Setup and then press OK.
3. Using the arrow keys and on-screen keyboard, enter the administrator password.
NOTE
The default password is “999999”.
4. Select Done and then press OK.
5. Using the Down arrow key, scroll to Scanner Setup and then press OK.
6. Using the Down arrow key, scroll to E-mail Setup and then press OK.
7. Using the Down arrow key, scroll to Template and then press OK.
8. Make sure that Edit Subject is selected and then press OK.
9. Using the Down arrow key, select a template entry number and then press OK.
10. Using the on-screen keyboard, enter the subject up to 80 characters.
11. Select Done and then press OK.
Registering body text
1. Follow steps 1 to 7 in “Registering a subject” on page 79.
2. Using the Down arrow key, scroll to Edit Body and then press OK.
3. Using the on-screen keyboard, enter the body text up to 256 characters.
4. Select Done and then press OK.
Scanning > 79
Page 80

A
DDING AN
E-
MAIL ADDRESS ENTRY TO THE ADDRESS BOOK
The machine can hold up to 300 E-mail addresses in the address book. To assign a new
E-mail address to the address book:
1. Press the SETTING button on the control panel.
2. Using the Down arrow key, scroll to Address Book and press OK.
3. Press OK to select E-mail Address.
4. Using the arrow keys, scroll to the required entry position and press OK.
5. Press OK to select Register.
6. Press the Right arrow key to select Name.
7. Using the keypad or arrows keys and the on-screen keypad, type in the name.
NOTE
The maximum length of name is 16 characters.
If you do not enter a name, this column remains blank.
8. Highlight Done and press OK.
9. Using the Down arrow key, scroll to E-mail Address and press the Right arrow
key.
10. Using the keypad or arrows keys and the on-screen keypad, type in the new E-mail
address.
NOTE
The maximum length of address is 80 characters.
11. Highlight Done and press OK.
12. If required, use the arrow keys and scroll to Group No. then press the Right arrow
key.
13. Using the arrow keys, select the group number to assign the E-mail address to and
press OK.
The check box is selected. You can select multiple entries.
14. Press the Right arrow key to complete.
15. Press OK to confirm.
16. Press OK once more to add your entry to the address book.
17. Press the Left arrow key to exit the menu.
D
ELETING AN
E-
MAIL ADDRESS ENTRY FROM THE ADDRESS BOOK
To delete an E-mail address entry from the address book:
1. Press the SETTING button on the control panel.
2. Using the Down arrow key, scroll to Address Book and press OK.
3. Press OK to select E-mail Address.
4. Using the arrow keys, scroll to the required entry position and press OK.
5. Using the arrow keys, scroll to Delete and press OK.
6. At the prompt select Yes to continue or select No to cancel the operation.
7. Press OK.
Scanning > 80
Page 81

8. Press the Left arrow key to exit the menu.
M
ODIFYING AN
To edit an E-mail address entry from the address book:
1. Press the SETTING button on the control panel.
2. Using the Down arrow key, scroll to Address Book and press OK.
3. Press OK to select E-mail Address.
4. Using the arrow keys, scroll to the required entry position and press OK.
5. Press OK to select Edit.
6. Modify the Name, E-mail Address and/or Group No. details as required then press
OK.
7. Press the Left arrow key to exit the menu.
A
DDING A GROUP ENTRY TO THE ADDRESS BOOK
The machine can hold up to 20 group addresses. To add a new group address to the address
book:
1. Press the SETTING button on the control panel.
2. Using the Down arrow key, scroll to Address Book and press OK.
E-
MAIL ADDRESS ENTRY FROM THE ADDRESS BOOK
3. Using the Down arrow key, scroll to E-mail Group and press OK.
4. Using the arrow keys, scroll to the required entry position and press OK.
5. Press OK to select Register.
6. Press the Right arrow key to select Name.
7. Using the keypad or arrows keys and the on-screen keypad, type in the name.
NOTE
The maximum length of name is 16 characters.
8. Highlight Done and press OK.
9. Using the Down arrow key, scroll to Address No. and press the Right arrow key.
10. Using the arrow keys, select the destination to assign the E-mail group to and press
OK.
The check box is selected. You can select multiple entries.
11. Press the Right arrow key to complete.
12. Press OK to confirm.
13. Press OK once more to add your entry to the address book.
14. Press the Left arrow key to exit the menu.
Scanning > 81
Page 82

D
ELETING A GROUP ADDRESS ENTRY FROM THE ADDRESS BOOK
To delete a group address entry from the address book:
1. Press the SETTING button on the control panel.
2. Using the Down arrow key, scroll to Address Book and press OK.
3. Using the Down arrow key, scroll to E-mail Group and press OK.
4. Using the arrow keys, scroll to the required entry position and press OK.
5. Using the arrow keys, scroll to Delete and press OK.
6. At the prompt select Yes to continue or select No to cancel the operation.
7. Press OK.
8. Press the Left arrow key to exit the menu.
M
ODIFYING A GROUP ADDRESS ENTRY FROM THE ADDRESS BOOK
To edit a group address entry from the address book:
1. Press the SETTING button on the control panel.
2. Using the Down arrow key, scroll to Address Book and press OK.
3. Using the Down arrow key, scroll to E-mail Group and press OK.
4. Using the arrow keys, scroll to the required entry position and press OK.
5. Press OK to select Edit.
6. Modify the Name and/or Address No. details as required then press OK.
7. Press the Left arrow key to exit the menu.
Scanning > 82
Page 83

P
2 3 4
1
RINTING
NOTE
If your Administrator has enabled access control on your machine, it will
automatically start up in access control mode. You will not be able to use it
until you have provided valid login information. Refer to “User authentication
and access control” on page 38 for details.
This chapter details how to use the following print options from the control panel:
> Job Lists
> Print from USB memory
> Switch Online/Offline
For full details of how to use your machine and any optional accessories to print jobs
efficiently and effectively, please refer to the Printing Guide and the Barcode Printing Guide.
JOB
LISTS
You can cancel a print job by deleting it from the job list:
1. Press the Print button (1) on the control panel to prompt the Print Menu screen.
2. Press OK to select Job Lists.
3. Using the arrow keys, scroll to the job you want to cancel and then press OK.
Printing > 83
Page 84

P
2 3 4
1
RINT FROM
B
ASIC OPERATION
USB
NOTE
Supported file systems: FAT12, FAT16, FAT32.
Supported file formats: JPEG, PDF (v1.7), M-TIFF (v6 Baseline), XPS, PRN
(PCL, PS, XPS).
Supported: Up to 32 GB capacity of USB memory.
Not Supported: USB hubs, external USB HDDs and encrypted PDFs.
NOTE
Up to 100 files in supported file formats stored in USB memory are displayed
on the file list. If more files are stored in USB memory, the list of the stored
files may not be displayed properly.
You can select and print one file in your USB memory at a time.
MEMORY
1. Plug the USB memory into the USB port at the front of the machine.
2. Press the Print button (1) on the control panel to prompt the Print Menu screen.
3. Using the Down arrow key, scroll to Print From USB Memory and press OK.
4. Ensure Select Print File is highlighted, then press OK.
The list of supported files on the USB stick are display.
Printing > 84
Page 85

5. If your file is contained within a folder:
(a) Using the arrow keys, scroll to the required folder and press OK.
NOTE
If required, scroll to Folder Property and press OK to check the file
information.
(b) Press OK to select Open Folder.
6. Using the arrow keys scroll to the file you want to print and press the OK.
NOTE
If required, scroll to File Property and press OK to check the file information.
7. Ensure Select is highlighted, then press OK.
8. If required, scroll to Print Setup and configure the print settings then press OK.
Refer to “Advanced operation” on page 85 for details.
9. Press Mono (2) to print your document(s) in black and white, or Color (3) to print
your document(s) in color.
NOTE
If you wish to cancel the print process, press Stop (4) to abort the operation.
10. Remove the USB memory from the port after a message is displayed indicating that
it is OK to remove the USB memory.
A
DVANCED OPERATION
Using the options available you can alter the print output to suit your needs:
1. Select required parameter with Down arrow key and press the OK button or the
Right arrow key to display the available options.
2. Using Up or Down arrow keys, select value and press OK.
Options are (factory default settings in bold text):
PARAMETER VALUE DESCRIPTION
Paper Feed Tray 1(A4), MP Tray(A4) Allows you to define the paper tray for
printing.
Copies 1 Enter the number of copies of a document to
be printed from 1 to 999.
Duplex OFF, Long Edge Bind, Short Edge
Bind
Fit ON, OFF Match the page size to the paper size. If the
Select the duplex copy method.
page size of your file is larger or smaller than
the effective print area, the page is resized to
fit the paper size.
3. Press the Back button to return to the print menu.
Printing > 85
Page 86

S
2 3 4
1
WITCHING ONLINE/OFFLINE
If you wish to alter the print status of your machine:
1. Press the Print button (1) on the control panel to prompt the Print Menu screen.
2. Using the Down arrow key, scroll to Switch Online/Offline and press OK.
3. Using the arrow keys, scroll to your required option and press OK.
NOTE
If you switch the machine
P
RINTING WITH
AirPrint-enabled applications can print to an AirPrint-enabled device. You don't need to
install a driver.
Tap print, select a AirPrint-enabled device, and print.
P
RODUCTS AFFECTED
> iPhone, iPad, or iPod touch with iOS 4.2 or later
> MAC OSX 10.8.5 or later
HOW TO
1. Connect using Network.
2. Print from applications such as Apple iBook, E-mail, photos, and Safari, etc.
PRINT
AirPrint supports wireless connections that use infrastructure mode.
Tap the control icon, and then tap the “Print” button. Select the printer, and then set
the printer options, and tap the “Print” button.
AirPrint
Offline it will disable the Copy function also.
Printing > 86
Page 87

F
2 3
1
AXING
S
ENDING A FAX FROM THE
This section details how to send a fax directly from your MFP.
B
ASIC OPERATION
NOTE
If your Administrator has enabled access control on your machine, it will
automatically start up in access control mode. You will not be able to use it
until you have provided valid login information. Refer to “User authentication
and access control” on page 38 for details.
When faxing, you can load only A4, letter, or legal size documents in the ADF,
and A4 or letter size documents on the document glass. You cannot load mixed
size documents.
MFP
1. Place your document(s) with text face UP in the ADF or face DOWN on the glass.
2. Press the Fax button (1) on the control panel to prompt the Fax Mode screen.
3. Ensure Fax is highlighted, then press OK.
4. Set your destination and send properties as required. Refer to “Advanced operation”
on page 88 for details.
5. Press the Mono button (2) to start sending your document(s).
NOTE
If you wish to cancel faxing, press Stop (3) to abort the operation.
You can cancel a job that is being transmitted as long as the message
indicating the job has been completed has not displayed. Refer to “Fax job
view/cancel” on page 97 for details on how to cancel a reserved job.
When you select a broadcast job, the job itself is cancelled. If you want to
cancel an individual destination within a broadcast job, refer to “Deleting
specified destinations” on page 90.
Fax transmissions are sent in black and white only.
Faxing
> 87
Page 88

A
DVANCED OPERATION
Using the options available, you can alter the fax output to suit your needs:
FEATURE OPTION DESCRIPTION
Fax
Add Destination Speed Dial List Select the required speed dial number.
You can select multiple entries.
Entries must be registered in advance, refer
to “Adding a speed dial entry to the phone
book” on page 100.
Group List Select the required group dial number.
You can select multiple entries.
Entries must be registered in advance, refer
to “Adding a group entry to the phone book”
on page 101.
Direct Input Enter the destination fax number, a pause and
Tx History Select a destination from the ten most recent
Rx History Select a destination from the ten most recent
Fax Functions Scan Size A4, Letter, Legal 13,
Legal 13.5, Legal 14,
Folio
Resolution Normal, Fine, Extra-
Fine, Photo
the tone dialing by the using the keypad:
> Pause (press # key twice. A P appears on the
screen) pauses two seconds when dialing. You
can use multiple pauses.
> Tone (press * key twice. A T appears on the
screen) switches to tone dialing if pulse dialing
is selected.
Use the Arrow keys and the OK button to
select dialing function from the on-screen
options:
> - (Hyphen) Inserts a hyphen to the entered fax
number.
> PreFix Inserts a prefix number registered in
advance.
> Flash Notify a PBX of a switch to a public
telephone line.
transmissions.
receptions.
Allows you to select the paper size to match
the document size.
Allows you to specify the type of images on
the document.
Background
Removal
Auto, OFF, 1, 2, 3, 4,
5, 6
Allows you to select the setting of document
background removal (to scan a document
with background color better): to be adjusted
automatically, to be adjusted manually in 6
steps, or not to remove.
Density -3, -2, -1, 0, +1, +2, +3Adjust density
Darker: Keep color intensity and darker image.
Lighter: Reduce color intensity and gives
lighter image.
Duplex Scan OFF, Long Edge Bind,
Select the bound originals binding position.
Short Edge Bind
Continuous
Scan(Document
Glass)
ON, OFF Allows you to continue scanning more
documents. Allows you to construct a single
fax job from multiple individual sheets or
originals. Refer to “Continuous scan mode” on
page 109 for details.
Faxing
> 88
Page 89

FEATURE OPTION DESCRIPTION
Fax Functions
(cont.)
Continuous
Scan(ADF)
Edge Erase ON, OFF Erases the black shadow around the edge
TTI ON, OFF Prints the sender name on the header of the
TTI Select user defined Select the user defined TTI header.
Transm i t
Confirmation
Report
Delayed Tx OFF
Fcode Polling ON, OFF To turn ON, use the numeric keypad to enter
ON, OFF Allows you to continue scanning more
ON, OFF Select ON to print a fax confirmation after
Date
Time
documents. Allows you to construct a single
fax job from multiple individual sheets or
originals. Refer to “Continuous scan mode” on
page 109 for details.
when scanning a document like a book.
The range is from 2 mm to 50 mm.
transmitted fax. By default, the name you
specified in Sender ID is printed.
Note: TTI must be ON.
transmission.
Delayed transmission allows you to fax
documents at a specific date and time.
Up to one hundred transmission times can be
scheduled up to one month in advance.
the sub-address of the remote machine.
If required, use the numeric keypad to enter
the password of the remote machine.
Fcode Tx ON, OFF F Code transmission is a function to
communicate using sub addresses or
passwords in accordance with the standard of
ITU-T. by creating and registering F Code
boxes you can execute confidential
communication and notice board
communication.
Use the numeric keypad to enter the subaddress.
If required, use the numeric keypad to enter
the password of the remote machine.
Note: up to 20 F code boxes can be
registered, Up to 30 documents can be stored
in one box.
Note: Polling and FPolling must be OFF.
Memory Tx ON, OFF Select OFF to enable real time transmission,
i.e. fax transmission synchronisation with
scanning.
Fax Job V iew/
Cancel
Fax History Tx History Check the transmission or reception history
Rx History
View or cancel a reserved fax job from the
list.
and results of a fax job.
Manual feed
If you wish to send multiple sets of documents from the ADF or flatbed, enable the
“continuous scan” feature. Refer to “Continuous scan mode” on page 109 for full details.
Faxing
> 89
Page 90

Broadcasting
This f un ct io n a ll ow s y ou to se nd a f ax to multiple recipients at the same time. By combining
abbreviation dials, groups and entering addresses using the numeric keypad, you can
specify up to 100 destinations at one time.
NOTE
When real time transmission (Memory Tx set to OFF) or polling is executed
during broadcasting data, they are executed preferentially. In the case of
polling, it is executed preferentially when there is only one address specified.
When Broadcast Destination is enabled, the destination numbers are
displayed before transmission.
Deleting specified destinations
You can cancel an individual destination within a broadcast job.
1. Make sure that the required destination is selected on the fax standby screen and
then press OK.
2. Using the arrow keys, scroll to the destination you want to delete and then press
OK.
A check box is selected. You can select multiple entries.
3. When you have selected all the destinations to be deleted, press the Right arrow
key.
4. Make sure that Delete The Address is selected and then press OK.
Manual redial
Your machine is set to redial automatically, if you wish to manually redial:
1. Press the FAX button on the control panel.
2. Press OK to select Fax.
3. Press OK to select Add Destination.
4. Using the Down arrow key, scroll to Tx History and press OK.
5. Using the arrow keys, scroll to the required destination and press OK.
The check box is selected. You can select multiple entries.
6. When you have selected all the destinations, press the Right arrow key.
7. Press OK to select Complete.
8. Press the Mono button (2) to start sending your document(s).
Faxing
> 90
Page 91

F Code communication
F Code transmission is a function to communicate, using sub addresses or passwords in
accordance with the ITU-T standard. By creating F code boxes/sub addresses/passwords,
you can execute secure communication, bulletin box communication and polling
communication.
NOTE
Up to 20 F code boxes can be registered.
Sub address and ID code
> A sub address is a number to distinguish various F code boxes that are set in the
memory.
> An ID code is a key to access a secure box.
By using a sub address, the following functions can be used:
> F Code Confidential Communication
When an F code confidential box is set in the recipient machine, by specifying the sub
address of its box, confidential communication can be executed.
On the receiving side of the confidential communication, unless the specified ID code
is entered, a received document cannot be printed, therefore, this function is useful
when sending a document that needs a security protection. Refer to:
> “Transmission using a sub address (F code transmission)” on page 94.
> “Printing stored documents” on page 96.
> F Code Bulletin Box Communication
When the F code bulletin box is set in the recipient machine, by specifying the sub
address of its notice board, a document can be sent to the bulletin box or a document
stored in the bulletin box can be taken out (polling). (A password can be specified, if
necessary.) Refer to:
> “Transmission using a sub address (F code transmission)” on page 94.
> “Receiving using a sub address (F code polling)” on page 95.
> “Storing documents in a bulletin box” on page 95.
Registering an F code box
To use F code communication, register an F code box. Register a sub address in each F code
box.
NOTE
Make sure to register a sub address.
When a secret number is set, only the specific person can operate the F code
box.
1. Press the SETTING button on the control panel.
2. Using the Down arrow key, scroll to Admin Setup and press OK.
3. Using the arrow keys and on-screen keypad, enter the Administrator password.
Highlight Enter and press OK.
4. Using the Down arrow key, scroll to Fax Setup and press OK.
5. Using the Down arrow key, scroll to Fcode Box and press OK.
6. Using the arrow keys, scroll to the required entry position and press OK.
7. Press OK to select Register.
Faxing
> 91
Page 92

8. Select a type of F code box:
> Bulletin Box - refer to “Registering an F code Bulletin box” on page 92
> Confidential Box - refer to “Registering an F code confidential box” on page 92.
Registering an F code Bulletin box
1. Press OK to select Bulletin Box.
2. Press the Right arrow key to select Box Name.
(a) Using the arrow keys and on screen keyboard, enter a box name.
(b) Highlight Enter and press OK.
NOTE
If using one-byte characters, up to 16 characters can be registered.
3. Using the Down arrow, scroll to Sub-Address and press the Right arrow key.
(a) Using the keypad enter the sub address.
(b) Highlight Enter and press OK.
NOTE
A sub address can be registered using up to 20 digits. Numbers, # and * can
be registered.
If you make a mistake when entering the digits, press the Clear button to
delete and then enter the correct digit.
4. Press OK to complete.
Registering an F code confidential box
1. Press OK to select Confidential Box.
2. Press the Right arrow key to select Box Name.
(a) Using the arrow keys and on screen keyboard, enter a box name.
(b) Highlight Enter and press OK.
NOTE
If using one-byte characters, up to 16 characters can be registered. If using
double-byte characters, up to 8 characters can be registered.
3. Using the Down arrow, scroll to Sub-Address and press the Right arrow key.
(a) Using the keypad enter the sub address.
(b) Highlight Enter and press OK.
NOTE
A sub address can be registered using up to 20 digits. Numbers, # and * can
be registered.
If you make a mistake when entering the digits, press the Clear button to
delete and then enter the correct digit.
Faxing
> 92
Page 93

4. Using the Down arrow key, scroll to I.D.Code and press the Right arrow key:
(a) Register an ID Code number (4 digits) using the numeric keypad.
NOTE
The ID code is not displayed, write it down and keep it safe!
(b) Press OK.
5. If required, use the Down arrow key to scroll to Hold Time. Press the Right arrow
key:
(a) Enter the required hold time (00 ~ 31) using the numeric keypad.
(b) Press OK.
NOTE
Specify a retention period between 0 and 31 days.
If “00” is specified, the data will be retained for an indefinite period.
Retention period input range is between 0 and 31 days). When 0 is set,
documents are retained for an indefinite period.
6. Press OK to complete.
Faxing
> 93
Page 94

Deleting an F code box
NOTE
You cannot delete an F code box in which documents are stored, it must be
empty.
1. Press the SETTING button on the control panel.
2. Using the Down arrow key, scroll to Admin Setup and press OK.
3. Using the arrow keys and on-screen keypad, enter the Administrator password.
Highlight Done and press OK.
4. Using the Down arrow key, scroll to Fax Setup and press OK.
5. Using the Down arrow key, scroll to Fcode Box and press OK.
6. Using the arrow keys, scroll to the required entry position and press OK.
7. Using the Down arrow key, scroll to Delete and press OK.
8. Using the arrow keys, highlight Yes to continue or No to cancel.
9. Press the OK button to execute.
Transmission using a sub address (F code transmission)
By entering a sub address and ID code, F code confidential transmission, F code bulletin
transmission and F code polling transmission can be performed.
NOTE
Before operating, ensure you have the necessary sub address and ID code to
hand.
1. Place your document(s) with text face UP in the ADF or face DOWN on the glass.
2. Press the Fax button on the control panel to prompt the Fax Ready screen.
3. Press OK to select Fax.
4. Using the Down arrow key, scroll to Fax Functions and press OK.
5. Using the Down arrow key, scroll to Fcode Tx and press OK.
6. Using the arrow keys, scroll to ON and press OK.
7. Using the numeric keypad, enter the sub-address of the box registered in the
recipient machine.
8. Highlig
ht
Enter and press OK.
9. Press the Left arrow key to exit.
10. Press OK to select Add Destination.
11. Using the arrow keys, scroll to the required destination input method and press OK.
12. Specify a destination.
13. Press OK to complete.
14. Press the Mono button to start sending your document(s).
Faxing
> 94
Page 95

Receiving using a sub address (F code polling)
By entering a sub address and ID code, a document stored in the bulletin box of a recipient
machine can be taken out (polling).
NOTE
Before operating, ensure you have the necessary sub address and ID code to
hand.
1. Press the Fax button on the control panel to prompt the Fax Ready screen.
2. Press OK to select Fax.
3. Using the Down arrow key, scroll to Fax Functions and press OK.
4. Using the Down arrow key, scroll to Fcode Polling and press OK.
5. Using the arrow keys, scroll to ON and press OK.
6. Using the numeric keypad, enter the sub-address of the box registered in the sender
machine.
7. Highlight Enter and press OK.
8. Press the Left arrow key to exit.
9. Press OK to select Add Destination.
10. Using the arrow keys, scroll to the required destination input method and press OK.
11. Specify a destination.
12. Press OK to complete.
13. Press the Mono button to start receiving your document(s)
Storing documents in a bulletin box
NOTE
Before operating, ensure you have registered the bulletin box in the F-Code
box.
1. Place your document(s) with text face UP in the ADF or face DOWN on the glass.
2. Press the SETTING button on the control panel.
3. Using the Down arrow key, scroll to Store Document Settings and press OK.
4. Press OK to select Store.
5. Press OK to select Fcode Bulletin Board.
6. Select the F code box in which to store the document.
7. Press OK.
8. Confi
rm the disp
layed Over Write, and press OK.
> Over Write: replace a document in the box.
9. Using the arrow keys, highlight Yes to continue or No to cancel.
10. Press the OK button to execute.
Faxing
> 95
Page 96

Printing stored documents
Printing received confidential documents.
NOTE
When a document is received into an F code box, the F code receiving notice
is printed.
Check the F code box number and print the stored document.
1. Press the SETTING button on the control panel.
2. Using the Down arrow key, scroll to Store Document Settings and press OK.
3. Using the Down arrow key, scroll to Print and press OK.
4. Press OK to select Fcode Box.
5. Select the F code box storing the document you want to print.
6. If an ID code is set, enter the number (4 digits) using the numeric keypad. Press
OK.
7. Select the file number of the document you want to print. Press OK.
8. Using the arrow keys, highlight Yes to continue or No to cancel.
9. Press the OK button to execute.
The document that is stored or received is printed.
NOTE
Confidential received documents are automatically deleted after printing.
Deleting stored documents
1. Press the SETTING button on the control panel.
2. Using the Down arrow key, scroll to Store Document Settings and press OK.
3. Using the Down arrow key, scroll to Delete and press OK.
4. Press OK to select Fcode Bulletin Board.
5. Select the F code box storing the document you want to delete. Press OK.
6. Select the file number of the document you want to delete. Press OK.
7. Using the arrow keys, highlight Yes to continue or No to cancel.
8. Press the OK button to execute.
Faxing
> 96
Page 97

Fax job view/cancel
If you no longer require a stored fax job, you can cancel and remove it from your MFP’s
memory.
1. Press the Fax button on the control panel to prompt the Fax Mode screen.
2. Using the arrow keys, scroll to Fax and press OK.
3. Using the Down arrow key, scroll to Fax Job View/Cancel and press OK.
4. Using the Down arrow key, scroll to the fax job you wish to delete and press OK.
5. Check the job contents, then press the Right arrow key.
6. Using the Down arrow key, scroll to Delete Reserved Tx and press OK.
7. Using the arrow keys, select Yes to continue or No to cancel and press OK.
NOTE
When you select a broadcast job, the job itself is deleted. If you wish to cancel
an individual destination within the broadcast job, refer to “Deleting specified
destinations” on page 90 for details.
Fax job reports and listings
FAX
RECEIVING
Your MFP is set to receive faxes automatically.
NOTE
If the MFP is actively sending or receiving a fax, then any incoming faxes will
be rejected.
The machine behaviour differs depending on the specified reception mode.
When the machine is receiving faxes, the DATA IN MEMORY indicator is lit and the sender
information is displayed on screen. The indicator remains lit while the data is stored in
memory.
NOTE
> The sender name and fax number registered on the sender machine are
displayed on screen.
> If the memory overflows while the machine is receiving data, the
reception is cancelled. If this happens, ask the sender to resend the fax.
Fax ready mode
This is the factory default setting; your machine is set so that it automatically receives
faxes.
Tel/Fax ready mode
When the machine is set to Tel/Fax Ready Mode, you can receive calls and faxes. You must
connect an external telephone in advance to receive calls, refer to the Configuration Guide
for details.
Faxing
> 97
Page 98

Receiving faxes
The machine automatically starts fax reception.
Receiving calls
The telephone starts ringing when it receives calls.
1. Pick up the handset to talk when the machine rings.
2. If necessary, press the mono START button and then put down the handset to
receive faxes.
NOTE
In case of connecting with far distance telephone, faxes can be received by
pressing “remote receiver number”. Refer to page 114 of “Configuration
Guide”.
Ans/Fax ready mode
When the machine is set to Ans/Fax Ready Mode, you can use an answering machine and
receive faxes automatically. You must connect an external answering machine in advance,
refer to the Configuration Guide for details.
NOTE
Depending on the answering machine and the sender machine, Ans/Fax
Ready Mode
may not operate correctly.
Receiving faxes
The machine automatically starts fax reception.
Receiving calls
The answering machine rings, the reply message starts, and then it starts recording a
message.
Tel ready mode
Tel Ready Mode is recommended if you often use the external telephone connected to the
machine. You must connect an external telephone in advance to receive calls, refer to the
Configuration Guide for details.
Receiving calls
The telephone starts ringing when it receives calls.
Receiving faxes
The telephone starts ringing when it receives a signal.
1. Pick up the handset when the machine rings.
2. Press the mono START button and then put down the handset to receive faxes.
Faxing
> 98
Page 99

DRD
This mode allows the machine to detect a distinctive ring if it has been enabled on the
phone line. In this mode, the machine distinguishes the DRD type of the sender. The
machine then answers only when it matches the registered DRD type.
There are several type of DRD ring pattern. The length of ring ON time and ring OFF time
is different. It depends on the Country Code. Please set the Country Code and DRD Type
for your suitable DRD ring pattern. You can register up to four DRD types.
Country Code: except New Zealand, Australia and Hong Kong (This pattern is to apply to
America's DRD.)
Type 1: 2 sec ON - 4 sec OFF repeat
Type 2: 0.8 sec ON - 0.4 sec OFF - 0.8 sec ON - 4 sec OFF repeat
Type 3: 0.4 sec ON - 0.2 sec OFF - 0.4 sec ON - 0.2 sec OFF - 0.8 sec ON - 4 sec OFF repeat
Type 4: 0.3 sec ON - 0.2 sec OFF - 1 sec ON - 0.2 sec OFF - 0.3 sec ON - 4 sec OFF repeat
Country Code: New Zealand (This pattern is to apply to New Zealand's DRD.)
Type 1: 0.4 sec ON - 0.2 sec OFF - 0.4 sec ON - 2 sec OFF repeat
Type 2: 0.4 sec ON - 2.6 sec OFF repeat
Type 3:
0.4 sec ON - 0.2 sec OFF - 0.4 sec ON - 0.2 sec OFF - 0.4 sec ON - 1.4 sec OFF repeat
Type 4: 0.4 sec ON - 0.8 sec OFF - 0.4 sec ON - 1.4 sec OFF repeat
Country Code: Australia (This pattern is to apply to Australia's DRD.)
Type 1: 0.4 sec ON - 0.2 sec OFF - 0.4 sec ON - 2 sec OFF repeat
Type 2:
0.2 sec ON - 0.4 sec OFF - 0.2 sec ON - 0.4 sec OFF - 0.2 sec ON - 1.6 sec OFF repeat
Country Code: Hong Kong (This pattern is to apply to Hong Kong's DRD.)
Type 1: 1.2 sec ON - 3 sec OFF repeat
Type 2:
0.4 sec ON - 0.2 sec OFF - 0.4 sec ON - 0.2 sec OFF - 0.8 sec ON - 0.4 sec OFF repeat
Type 3: 0.5 sec ON - 0.5 sec OFF - 1 sec ON - 0.5 sec OFF - 0.5 sec ON - 3 sec OFF repeat.
Printing received faxes
The machine automatically prints out the received fax.
NOTE
> Use only standard or recycled paper.
> Available paper sizes are A4, A5, B5, Letter, Legal13/13.5/14, Statement.
Images larger than the specified paper are reduced, discarded, or printed onto multiple sheets
of paper depending on the reception print settings.
If the machine cannot print received faxes due to a lack of paper or a paper jam, it will
store the received fax data temporarily it’s memory. When the problem is resolved, it starts
printing automatically.
NOTE
For details on how to load paper, refer to “Loading paper” on page 33.
For details on how to clear paper jams, refer to “Clearing paper jams” on page 127.
To check the reception history, refer to “Rx History” on page 89.
Faxing
> 99
Page 100

M
ANAGING THE PHONE BOOK
The following section describes how to add/remove/modify speed and group dial entries to/
from the Phone Book.
A
DDING A SPEED DIAL ENTRY TO THE PHONE BOOK
The machine can hold up to 300 speed dial numbers in the phone book. To add a new speed
dial number to the phone book:
1. Press the SETTING button on the control panel.
2. Using the Down arrow key, scroll to Phone Book and press OK.
3. Press OK to select Speed Dial.
4. Using the arrow keys, scroll to the required entry position and press OK.
5. Press OK to select Register.
6. Press the Right arrow key to select Name.
7. Using the keypad or arrows keys and the on-screen keypad, type in the name.
NOTE
The maximum length of name is 24 characters.
8. Highlight Enter and press OK.
9. Using the Down arrow key, scroll to Fax Number and press the Right arrow key.
10. Using the keypad, type in the destination fax number.
NOTE
The maximum length of number is 40 digits.
If the destination fax number has an “extension number”, press the Pause
button between numbers. The machine will enter a pause when dialling.
If your MFP is connected to a PBX (private branch exchange), you will need to
add a Prefix in order to access to the outside line. Refer to the Configuration
Guide for details.
If you need to change the dialling method for the region, press the
button to change the call parameters for this particular number.
If you make a mistake while entering the number, press the Clear button to
delete the last digit.
Tone
11. Highlight Enter and press OK.
12. If required, use the arrow keys and scroll to Group No. then press the Right arrow
key.
13. Using the arrow keys, select the group number to assign the fax number to and
press OK.
The check box is selected. You can select multiple entries.
NOTE
Numbers registered to groups from the Speed Dial function are synchronized
with the numbers that are registered to groups using the Group No. function.
14. Press the Right arrow key to complete.
15. Press OK to confirm.
16. Press OK once more to add your entry to the phone book.
Faxing
> 100
 Loading...