

Page 1
MC363/MC563/ES5463 MFP
Advanced Manual
Page 2
About This Manual
This manual describes how to print from mobile terminals and how to use the
OKI MFP in various ways.
It also describes advanced features such as security settings and color adjustment.
Please read this manual carefully to achieve the maximum performance of the
product in various conditions.
This manual uses as an example Windows 7 for Windows, Mac OS X 10.9 for
Mac OS X and MC563 for the device.
This manual uses MC563 as an example to illustrate buttons and icons on the
operator panel, driver screens, and the method of inputting characters and oper-
ating the device.
Some functions are not available for MC363.
Depending on your OS, the actual display of the product may differ from the
descriptions in this manual. In addition, depending on the model you are using,
some functions described in this manual may not be available.
Depending on the device you are using, buttons or the like on the operator panel
and the actual operations may differ from the descriptions in this manual. Please
read the user’s manual for the specic model that comes with your device.
About Descriptions
This section describes the marks, symbols, abbreviations and illustrations used
in this manual.
About Marks
This manual uses the following marks.
Mark Meaning
Indicates cautions and restrictions for the correct operation of the
device. Be sure to read them to avoid misoperation.
Indicates useful tips and references on how to use the device. We
recommend you read them.
Indicates reference items. Please read them to learn the detailed
information.
Indicates related items. Please read them to learn the relevant
information.
About Symbols
This section describes the symbols used in this manual and their meanings.
Symbol Meaning
Illustration (button
name)
[ ] Indicates menu names, item names, options, etc.
" " Indicates messages and input texts on the displayed screen.
< > Indicates keys on the computer keyboard.
Indicates button shapes (button names) on the
operator panel of the device.
displayed on the screen of the operator panel.
Indicates menus, windows and dialog box names
displayed on the computer screen.
They can be clearly distinguished in the description
and procedure illustration.
Indicates le names on the computer.
Indicates item titles of link destinations.
> Indicates the transition of device or computer menus.
About Illustrations
The illustrations used in this manual are based on MC563.
The displayed screens on the operator panel used in this manual are based on
the default settings.
- 2 -
Page 3

Table of contents
1 Basic Operations ......................................................................................... 9
Adjusting the Contrast of the Display Screen ..............................................................................10
Setting Output Destination ...........................................................................................................11
Output Tray ................................................................................................................................................. 11
Rear Output Tray ........................................................................................................................................12
Adjusting Volume .........................................................................................................................13
Simultaneous Operation (Multitasking) ........................................................................................14
Checking the Information of the Machine ....................................................................................15
Printing a Report to Check ......................................................................................................................... 15
Checking the Status on the Operator Panel ...............................................................................................16
Easy Setup ..................................................................................................................................17
Configuring One Touch Button .....................................................................................................19
JOB MACRO ...............................................................................................................................20
Registering a Frequently-used Setting as a Macro ....................................................................................20
Using a Registered Macro ..........................................................................................................................21
Editing a Macro Title ...................................................................................................................................21
Checking the Macro Content ......................................................................................................................22
Deleting a Registered Macro ......................................................................................................................22
2 Copy ............................................................................................................ 23
Useful Functions ..........................................................................................................................24
Specifying the Paper Feed Tray (Paper Feed) ........................................................................................... 24
Making Enlarged or Reduced Copies (Zoom) ............................................................................................25
Copying on Both Sides of Paper (Duplex Copy) ........................................................................................26
Combining Multiple Pages on One Sheet of Paper (N-in-1) .......................................................................28
Changing the Scan Size (Scan Size) .........................................................................................................29
Sorting Each Set in Page Order (Sort) ....................................................................................................... 29
Enabling Continuous Scan Mode (Continuous Scan) ................................................................................30
Copying Different Size Documents (Mixed Size) ........................................................................................31
Resetting Copy Settings (Reset) ................................................................................................................ 32
Changing the Document Orientation (Direction) .........................................................................................32
For a Better Finish .......................................................................................................................33
Adjusting the Density (Density) ..................................................................................................................33
Selecting the Document Type (Document Type) ........................................................................................34
Specifying the Scan Resolution (Resolution) ..............................................................................................34
Copying a Document with a Colored Background Clearly (Background Removal) ....................................35
Erasing Edge Shadows (Edge Erase) ........................................................................................................35
Removing Show-Through (Show-Through Removal) .................................................................................36
Color Settings ............................................................................................................................. 37
Adjusting the Contrast (Contrast) ............................................................................................................... 37
Adjusting Hue for Color Copy .................................................................................................................... 38
Adjusting Saturation ................................................................................................................................... 38
Adjusting RGB ........................................................................................................................................... 39
Advanced Copy Settings ............................................................................................................ 40
Making Multiple Copies on a Sheet of Paper (Repeat) .............................................................................. 40
Copying Both Sides of a Card to One Side (ID Card Copy) ...................................................................... 41
Setting Margins (Margin) ............................................................................................................................ 42
3 Scan ............................................................................................................. 45
Basic Operations of Scan Functions ........................................................................................... 46
Setting to Scan a Document ...................................................................................................................... 46
Other Settings to Scan ............................................................................................................................... 50
Items on Transmit and Receipt Journal Report (E-mail/Internet fax/FaxServer) ....................................... 54
Sending Scanned Data as an E-mail Attachment ....................................................................... 55
Specifying a Destination from Address Book or Group List ....................................................................... 55
Specifying a Destination Using One-touch Button ..................................................................................... 56
Specifying a Destination from Transmission History .................................................................................. 56
Specifying a Destination Searching LDAP Server ..................................................................................... 57
Setting the Sender's Address ..................................................................................................................... 58
Setting the Reply Address ......................................................................................................................... 58
Registering an E-mail Template ................................................................................................................. 59
Using an E-Mail Template .......................................................................................................................... 59
Saving Transmission Data ......................................................................................................................... 60
Checking Results of Scan To E-mail .......................................................................................................... 60
Saving Scanned Data to a Computer ......................................................................................... 61
Changing the Machine Settings ................................................................................................................. 61
Using ActKey ............................................................................................................................................. 62
Using WSD Scan ....................................................................................................................................... 66
Using Image Capture (Mac OS X) ............................................................................................................. 68
Using a Scanner Supported Application .................................................................................................... 69
Adding Destination for Scan To Computer ................................................................................................. 71
Deleting Destination for Scan To Computer ............................................................................................... 71
Saving Scanned Data to USB Memory ....................................................................................... 72
Saving Scanned Data in a Shared Folder .................................................................................. 73
Changing a Destination (Profile) from the Operator Panel ........................................................................ 73
Deleting a Destination (Profile) from the Operator Panel ........................................................................... 74
Tables of Profile Setting Items ................................................................................................................... 74
4 Print ..............................................................................................................77
Printing on Various Types of Paper ............................................................................................. 78
- 3 -
Page 4

Printing on Envelopes .................................................................................................................................78
Printing on Labels ....................................................................................................................................... 81
Printing on Long Paper ...............................................................................................................................83
Printing on Custom Size Paper ..................................................................................................................84
Printing with Various Settings from a Computer ..........................................................................87
Printing Manually One by One ...................................................................................................................87
Enlarging or Reducing to Fit the Specified Paper Size ...............................................................................89
Printing Only the Cover from a Different Tray .............................................................................................90
Making a Booklet ........................................................................................................................................ 91
Dividing a Document to Print on Some Sheets for Making a Poster .......................................................... 92
Adding Semi-transparent Text (Watermarks) ..............................................................................................92
Overlaying Forms or Logos (Overlay) ........................................................................................................93
Outputting a Document to a File Instead of Printing on Paper ................................................................... 95
Storing Frequently-printed Documents in the Printer (Except MC363) ....................................................... 95
Printing E-mail Attachment Files ................................................................................................................ 97
Saving Paper, Saving Toner ........................................................................................................98
Printing on Both Sides of Paper (Duplex Printing) ......................................................................................98
Saving Toner ...............................................................................................................................................99
Combining Multiple Pages onto One Sheet of Paper ...............................................................................100
Adjusting Color on the Computer ...............................................................................................102
Printing Color Data in Grayscale ............................................................................................................. 102
Using Color Matching on Printer Driver .................................................................................................... 103
Simulating Printing Results for Ink ............................................................................................................104
Color Separation .......................................................................................................................................105
Correcting Color Registration Error Manually ...........................................................................................106
Correcting Density Manually .....................................................................................................................107
Adjusting Color Balance (Density) ............................................................................................................107
Adjusting Color with Software ................................................................................................................... 108
For a Better Finish .....................................................................................................................109
Enhancing Photos .................................................................................................................................... 109
Printing with a Specified Resolution ......................................................................................................... 110
Emphasizing Fine Lines ........................................................................................................................... 111
Specifying the Font to Use ........................................................................................................................ 112
Changing Black Finish .............................................................................................................................. 113
Eliminating White Gap Between Text and Background (Overprinting Black) ........................................... 114
Useful Functions ........................................................................................................................ 116
Collating a Multiple Page Document in Units of Copies ........................................................................... 116
Printing from the Last Page of a Document .............................................................................................. 117
Selecting a Tray Automatically for the Specified Paper ............................................................................ 118
Switching to Another Paper Feed Tray Automatically When a Tray Runs Out Of Paper ......................... 119
Changing the Default Settings with a Printer Driver ................................................................................. 121
Saving Frequently-Used Settings in the Printer Driver to Use ..................................................................121
Storing Print Data in This Machine before Printing .................................................................................. 122
Printing without Opening a PDF File (PDF Print Direct) .......................................................................... 123
Printing Data in USB Memory .................................................................................................................. 124
Printing Confidential Document ................................................................................................125
Encrypting the Print Data and Setting a Password Before Printing (Private Print) (Except MC363) ....... 125
5 Fax .............................................................................................................. 127
Basic Operations of Fax Functions ........................................................................................... 128
About the Dial Function ............................................................................................................................ 128
Specifying a Destination from Phone Book .............................................................................................. 129
Specifying a Destination Using One-touch Button ................................................................................... 129
Specifying a Destination from Transmission History and Reception History ............................................ 130
Deleting a Specified Destination .............................................................................................................. 130
Receiving a Fax ....................................................................................................................................... 131
Specifying a Tray to Be Used When Printing Received Fax .................................................................... 131
Paper Size Priority ................................................................................................................................... 132
Checking the Communication Status/Transmission and Reception History ............................................ 132
Items on Transmit and Receipt Journal Report ........................................................................................ 133
Sending a Fax via the Internet .................................................................................................. 135
About the Internet Fax Function ............................................................................................................... 135
Receiving an Internet Fax ........................................................................................................................ 136
Entering a Destination E-mail Address .................................................................................................... 136
Specifying a Destination from Address Book/Group List ......................................................................... 137
Selecting a Destination Using One Touch Buttons .................................................................................. 138
Selecting a Destination from Transmission History .................................................................................. 138
Searching for a Destination in the LDAP Server ...................................................................................... 139
Checking, Deleting or Changing a Specified Destination ......................................................................... 140
Setting Scanning for Transmission .......................................................................................................... 141
Checking the Transmission History .......................................................................................................... 146
Receiving Results of Internet Fax ............................................................................................................ 146
Setting Scanning for Transmission ........................................................................................... 147
Scanning a Duplex Document (Duplex Scan) .......................................................................................... 147
Specifying a Scan Resolution (Resolution) .............................................................................................. 148
Sending a Fax to Multiple Destinations at the Same Time ...................................................................... 148
Specifying a Scan Size (Scan Size) ......................................................................................................... 149
Adjusting the Density (Density) ................................................................................................................ 149
Scanning a Document with a Colored Background Clearly (Background Removal) ............................... 150
Erasing Edge Shadows When Sending (Edge Erase) ............................................................................. 151
Disclosing a Sender Name (Originator) to the Recipient ......................................................................... 151
Changing the Sender Name That is Printed on Faxes ............................................................................ 152
Printing Transmission Results Automatically (Transmit Conf. Report) ..................................................... 152
Registering the Sender Name (Originator) .............................................................................................. 153
- 4 -
Page 5

Changing the Standard Originator Name ................................................................................................. 154
Adding a Prefix (Prefix) .............................................................................................................................154
Setting the Number of Redial Attempts and Redial Intervals ...................................................................155
Settings for Transmission ..........................................................................................................156
Scanning Multiple Documents Continuously on the Document Glass (Continuous Scan (Glass)) ..........156
Scanning Multiple Documents Continuously with the ADF (Continuous Scan (ADF)) .............................157
Sending at a Specified Date and Time (Delayed Tx) ................................................................................157
Sending While a Document is being Scanned (Memory Transmission/Real time Transmission) ............158
Sending a Fax after Calling (Manual Transmission) .................................................................................159
Manual Sending (On-hook dial) ................................................................................................................ 160
Preventing Wrong Fax Transmissions ...................................................................................................... 160
Setting for Receptions ...............................................................................................................162
Setting a Tray to Print Received Documents ............................................................................................162
Setting a Print Method for When a Received Image Exceeds Paper Size ...............................................163
Duplex Printing .........................................................................................................................................164
Setting So That You Can Hear Line Monitor Sound .................................................................................165
Forwarding a Fax to Another Fax Number ...............................................................................................165
Setting When to Ring the External Telephone (Tel Priority Mode) ............................................................166
Setting Fax Detection Mode .....................................................................................................................166
Setting the T/F Timer ................................................................................................................................ 167
Setting TAD Mode ....................................................................................................................................167
Block Junk Fax .........................................................................................................................................168
Performing Confidential Communication and Bulletin Board Communication (Fcode
Communication) .........................................................................................................................170
About Fcode Communication ...................................................................................................................170
Registering an Fcode Box ........................................................................................................................ 171
Sending a Fax to a Destination Confidential Box (Fcode Transmission) ..................................................172
Printing a Document That is Received in the Confidential Box of This Machine ...................................... 173
Receiving a Document That is Saved in a Destination Bulletin Board Box by Fax (Fcode Polling) .........173
Saving a Document in a Bulletin Board Box of This Machine ..................................................................174
Deleting a Document in a Bulletin Board Box of This Machine ................................................................ 174
Deleting a Registered Fcode Box .............................................................................................................175
Useful Functions ........................................................................................................................176
Instructing a Fax Reception from a Telephone Remotely (Remote Switchover Number) ........................176
Setting Secure Reception ......................................................................................................................... 177
Sending a Fax from a Computer ................................................................................................178
Sending a PC Fax ....................................................................................................................................178
Sending a Fax from a Computer with a Cover Sheet ............................................................................... 180
Sending a PC Fax to Multiple Destinations at the Same Time .................................................................181
Cancelling a PC Fax Transmission ...........................................................................................................182
Managing the PC Fax Phone Book ..........................................................................................................182
Sending Data to the Fax Server ................................................................................................188
Basic Procedure for Scan to Fax Server .................................................................................................. 188
Enabling the Scan to Fax Server Function .............................................................................................. 189
Editing a Destination E-mail Address ....................................................................................................... 190
Editing E-mail Body Text .......................................................................................................................... 190
Checking Results of Scan To Fax Server ................................................................................................. 191
6 Maintenance ..............................................................................................192
Replacing Maintenance Parts ...................................................................................................193
Replacing the Belt Unit ............................................................................................................................ 193
Replacing the Fuser Unit ......................................................................................................................... 196
Cleaning Each Part of the Machine .......................................................................................... 200
Cleaning the Surface of the Machine ....................................................................................................... 200
Cleaning the Document Feed Rollers ...................................................................................................... 201
Cleaning the Paper Feed Rollers (Tray 1/Tray 2/Tray 3 (Except MC363)) .............................................. 202
Cleaning the Paper Feed Rollers (MP Tray) ............................................................................................ 203
Updating Installed Drivers ......................................................................................................... 206
Updating the Printer Driver (Windows) .................................................................................................... 206
Updating the Fax Driver (Windows) ......................................................................................................... 207
Updating the Scanner Driver (Windows) .................................................................................................. 207
Updating the Printer Driver (Mac OS X) ................................................................................................... 208
Updating the Scanner Driver (Mac OS X) ................................................................................................ 208
Removing Installed Drivers ....................................................................................................... 209
Removing the Printer Driver (Windows) ................................................................................................... 209
Removing the Fax Driver (Windows) ....................................................................................................... 210
Removing the Scanner Driver (Windows) ................................................................................................ 210
Removing the Printer Driver (Mac OS X) ................................................................................................. 211
Removing the Scanner Driver (Mac OS X) .............................................................................................. 212
Updating Firmware ................................................................................................................... 213
Initializing Memory and Settings ............................................................................................... 214
Initializing Flash Memory ......................................................................................................................... 214
Initializing the Settings of the Device ....................................................................................................... 215
7 Troubleshooting ........................................................................................217
If the STATUS Button on the Operator Panel Lights Up or Flashes ......................................... 218
Copy Problems ......................................................................................................................... 219
The Copied Output is Different from the Original ..................................................................................... 219
Other Problems (Copy) ............................................................................................................................ 220
Scan Problems ......................................................................................................................... 221
Scan To E-Mail Problems ......................................................................................................................... 221
E-mail/Internet fax/FaxServer Error Code ................................................................................................ 222
Scan To Computer Problems ................................................................................................................... 222
- 5 -
Page 6

Unable to Save Files in a Network Folder ................................................................................................223
Network Connection Problems (Scan) .....................................................................................................223
Wireless LAN Connection Problems (If Wireless LAN Module is Fitted) (Scan) ......................................224
Print Problems ...........................................................................................................................225
Network Connection Problems (Print) ......................................................................................................225
Wireless LAN Connection Problems (If Wireless LAN Module is Fitted) (Print) .......................................226
USB Connection Problems .......................................................................................................................227
Fax Problems .............................................................................................................................228
Unable to Send or Received a Fax ........................................................................................................... 228
Other Problems (Fax) ............................................................................................................................... 229
Fax Error Codes .......................................................................................................................................229
About Problems with Printing Results ........................................................................................232
Table of Problems with Printing Results ...................................................................................................232
Vertical White Lines Appear ..................................................................................................................... 234
Printed Images are Fading Vertically ........................................................................................................234
Printed Images are Light .......................................................................................................................... 235
White Spots and Lines Appear .................................................................................................................235
Dew Condensation Appears on Printed Paper .........................................................................................236
Vertical Lines Appear ................................................................................................................................236
Horizontal Lines and Spots Appear Periodically .......................................................................................237
White Area on Paper is Lightly Stained ....................................................................................................237
The Periphery of Characters is Smudged ................................................................................................238
The Entire Paper Area is Lightly Stained When Printing on Envelopes or Coated Paper ........................238
Toner Comes Off When Printed Paper is Rubbed ....................................................................................239
Uneven Gloss ...........................................................................................................................................239
Black or White Dots Appear .....................................................................................................................240
Dirt is Printed ............................................................................................................................................240
The Entire Page is Printed Black ..............................................................................................................241
Nothing is Printed ..................................................................................................................................... 241
White Patches Appear .............................................................................................................................. 242
The Entire Page is Dirty ............................................................................................................................242
The Peripheral Area of the Page is Dirty ..................................................................................................243
The Printed Image is Skewed ................................................................................................................... 243
Color of the printed image is not what you expect .................................................................................... 244
Solid printing of CMY 100% is too light ....................................................................................................244
Problems about Software ..........................................................................................................245
Problems on Configuration Tool ...............................................................................................................245
Problems on a Web Browser .................................................................................................................... 246
Printer Problems on a Windows PC ......................................................................................................... 247
Problems on the Machine or Paper ...........................................................................................248
Problems on the Machine .........................................................................................................................248
Problems on Document and Paper ..........................................................................................................251
If a Power Failure Occurs ........................................................................................................................ 253
Before Relinquishing Your Device ............................................................................................................ 254
AirPrint Problems ...................................................................................................................... 255
Google Cloud Print Problems ...................................................................................................256
8 Editing Address Book ..............................................................................258
E-mail Address ......................................................................................................................... 259
Registering an E-mail Address from the Operator Panel ......................................................................... 259
Registering an E-mail Group from the Operator Panel ............................................................................ 260
Registering an E-mail Address from the History ...................................................................................... 260
Deleting a Registered E-mail Address from the Operator Panel ............................................................. 261
Deleting a Registered E-mail Group from the Operator Panel ................................................................. 261
Fax Numbers ............................................................................................................................ 262
Registering a Fax Number from the Operator Panel ............................................................................... 262
Registering a Group Number from the Operator Panel ........................................................................... 263
Registering Fax Number from the History ................................................................................................ 264
Deleting a Registered Fax Number from the Operator Panel .................................................................. 264
Deleting a Registered Group Number from the Operator Panel .............................................................. 265
9 Operating Management/ Specifications .................................................266
Administrator Setup .................................................................................................................. 267
Changing Administrator Settings ............................................................................................................. 267
Copy Setup .............................................................................................................................................. 268
Fax Setup ................................................................................................................................................. 269
FaxServer Function .................................................................................................................................. 271
Internet Fax Setup ................................................................................................................................... 272
Scanner Setup ......................................................................................................................................... 272
Print From USB Memory Setup ............................................................................................................... 275
Print Setup ............................................................................................................................................... 275
Network Menu .......................................................................................................................................... 280
Manage Unit ............................................................................................................................................. 283
User Install ............................................................................................................................................... 285
Management Software .............................................................................................................. 287
User Authentication (Access Control) ....................................................................................... 288
Preparation (For Administrator) ................................................................................................................ 288
Log in to This Machine ............................................................................................................................. 295
Printing from a Computer ......................................................................................................................... 296
Sending a Fax from a Computer (Windows) ............................................................................................ 299
Registering IC Card Information (Except MC363) ................................................................................... 301
Account Management ............................................................................................................... 302
Enabling Account Management ............................................................................................................... 302
- 6 -
Page 7

Setting a Number of Points to Each Account ...........................................................................................304
Creating a Shared Account ......................................................................................................................305
Setting Paper Size Points/Toner Points ....................................................................................................307
Printing When Account Management is Enabled .....................................................................................308
Precautions when Operating ....................................................................................................................309
Moving/Transporting This Machine ............................................................................................310
Moving This Machine ................................................................................................................................ 310
Transporting This Machine ....................................................................................................................... 311
10 Network ..................................................................................................... 313
AirPrint .......................................................................................................................................314
About AirPrint (Print/Scan/FaxOut Service) ..............................................................................................314
Setting AirPrint (Print/Scan/FaxOut Service) ............................................................................................315
Registering the Machine in a Computer (Mac OS X) ...............................................................................316
Printing with AirPrint (Print) ...................................................................................................................... 317
Scanning with AirPrint (Scan) ...................................................................................................................319
Sending a Fax with AirPrint (FaxOut Service) .......................................................................................... 320
Google Cloud Print ....................................................................................................................322
About Google Cloud Print ......................................................................................................................... 322
Setting Google Cloud Print .......................................................................................................................323
Printing with Google Cloud Print ...............................................................................................................326
Checking Google Cloud Print Registrations .............................................................................................327
Checking or Changing the Use of Cloud Service Settings ....................................................................... 328
Deleting the Registered Information .........................................................................................................329
Checking That Deletion is Complete ........................................................................................................329
About Importing the CA Licenses of the Proxy Server .............................................................................331
Network-Related Software .........................................................................................................332
Network Settings ........................................................................................................................333
Using Wired LAN and Wireless LAN at the Same Time (Only When the Wireless LAN Module is Mounted)
333
Initializing the Network Settings ................................................................................................................ 334
Setting the DHCP Server ..........................................................................................................................335
Network Problems .....................................................................................................................336
11 Utility Software ......................................................................................... 337
List of Utility Software ................................................................................................................338
Windows Utilities ...................................................................................................................................... 338
Mac OS X Utilities .....................................................................................................................................339
Installing Software .....................................................................................................................340
For Windows .............................................................................................................................................340
For Mac OS X ........................................................................................................................................... 343
Web Page of This Machine ........................................................................................................344
Open the Web Page of This Machine ...................................................................................................... 344
Log In as the Administrator ...................................................................................................................... 345
Changing the Administrator Password (Web Page) ................................................................................. 347
Checking or Changing the Settings of This Machine ............................................................................... 347
Encrypting Communication with SSL/TLS ............................................................................................... 349
Using IPP ................................................................................................................................................. 350
Encrypting Communication with IPSec .................................................................................................... 351
Limiting by Using an IP Address (IP Filtering) ......................................................................................... 354
Limiting by Using a MAC Address (MAC Address Filtering) .................................................................... 355
E-mail Alert .............................................................................................................................................. 355
Using SNMPv3 ......................................................................................................................................... 356
Using IEEE802.1X (Wired LAN) .............................................................................................................. 357
Setting IEEE802.1X (Wireless LAN) ........................................................................................................ 358
Setting the LDAP Server .......................................................................................................................... 360
E-mail Setup ............................................................................................................................................ 361
Setting Power Save Mode (Web Page) ................................................................................................... 361
Setting Sleep Mode (Web Page) .............................................................................................................. 362
Setting Auto Power Off Mode (Web Page) .............................................................................................. 362
Registering a Destination (Profile) (Web Page) ....................................................................................... 363
Changing a Destination (Profile) (Web Page) .......................................................................................... 364
Deleting a Destination (Profile) (Web Page) ............................................................................................ 365
Forwarding Received Document Data to an E-mail Destination or Shared Folder (Auto Delivery) .........366
Saving Sent and Received Data (Transmission Data Save) .................................................................... 370
Fax Reception Notification ....................................................................................................................... 371
JOB MACRO (Web Page) ........................................................................................................................ 372
About Items That Can be Set or Checked ............................................................................................... 373
Color Correct Utility ................................................................................................................... 379
Changing Palette Color ............................................................................................................................ 379
Changing Gamma Value or Hue .............................................................................................................. 381
Printing in Adjusted Color Settings .......................................................................................................... 382
Saving Color Correction Settings ............................................................................................................. 383
Importing Color Correction Settings ......................................................................................................... 383
Deleting Color Correction Settings ........................................................................................................... 384
Color Swatch Utility ................................................................................................................... 385
Printing Color Swatch .............................................................................................................................. 385
Customizing the Color Swatch ................................................................................................................. 386
Printing a File With the Color You Want ................................................................................................... 386
PS Gamma Adjuster Utility ....................................................................................................... 387
Registering an Adjusted Halftone ............................................................................................................ 387
Printing with a Registered Halftone .......................................................................................................... 388
Configuration Tool ..................................................................................................................... 389
Registering This Machine ........................................................................................................................ 390
- 7 -
Page 8

Starting Configuration Tool ....................................................................................................................... 390
Checking the Status of This Machine .......................................................................................................391
Changing the Device Settings ..................................................................................................................391
Setting a Network Scan ............................................................................................................................393
Cloning Settings ....................................................................................................................................... 394
Displaying the Alert Info ............................................................................................................................395
Setting the Network ..................................................................................................................................399
Registering ICC Profile .............................................................................................................................400
Registering Forms (Form Overlay) ...........................................................................................................401
Checking the Free Space in Memory/Hard Disk Drive ............................................................................. 402
Registering a User Name and Password .................................................................................................402
Setting Power Save Mode (Configuration Tool) ........................................................................................404
Setting Sleep Mode (Configuration Tool) ..................................................................................................404
Setting Auto Power Off Mode (Configuration Tool) ...................................................................................405
Registering a Destination (Profile) (Configuration Tool) ........................................................................... 405
Changing a Destination (Profile) (Configuration Tool) .............................................................................. 407
Importing and Exporting Destinations (Profile) .........................................................................................408
Deleting a Destination (Profile) (Configuration Tool) ................................................................................409
Registering an E-mail Address (Configuration Tool) ................................................................................. 411
Registering E-mail Group (Configuration Tool) .........................................................................................412
Deleting a Registered Destination (Configuration Tool) ............................................................................414
Deleting a Registered E-mail Group (Configuration Tool) ........................................................................ 415
Importing and Exporting Destination E-mail Addresses ...........................................................................416
Registering a Fax Number (Configuration Tool) .......................................................................................417
Registering a Group Number (Configuration Tool) ................................................................................... 418
Deleting a Registered Fax Number (Configuration Tool) ..........................................................................420
Deleting a Registered Group Number (Configuration Tool) ......................................................................421
Importing and Exporting Speed Dials of Destinations ..............................................................................422
Removing This Machine ...........................................................................................................................423
Descriptions of Screens for Configuration Tool ........................................................................................423
ActKey .......................................................................................................................................427
OKI LPR Utility ...........................................................................................................................428
Starting OKI LPR Utility ............................................................................................................................428
Registering a Device to OKI LPR Utility ...................................................................................................429
Checking the Status of a Registered Device ............................................................................................ 429
Forwarding Print Jobs to a Registered Device .........................................................................................430
Printing the Same Document from the Registered Multiple Devices ........................................................431
Opening the Web Page of the Registered Device ....................................................................................431
Following the IP Address of the Registered Device Automatically ...........................................................432
Setting the Web Port Number of the Machine ..........................................................................................432
Sending a File to a Device That is Registered in OKI LPR Utility .............................................................433
Deleting an Unnecessary Print Job ..........................................................................................................433
Uninstalling OKI LPR Utility (Uninstall) .................................................................................................... 434
Network Extension .................................................................................................................... 435
Showing Printer Properties ...................................................................................................................... 435
Checking the Settings of the Machine ..................................................................................................... 436
Set Options Automatically ........................................................................................................................ 437
Uninstall the Utility ................................................................................................................................... 437
Network Scanner Setup Tool (Mac OS X) ................................................................................ 438
Network Card Setup (Mac OS X) .............................................................................................. 439
Setting the IP Address ............................................................................................................................. 439
Configuring Web Settings ........................................................................................................................ 440
Quitting Network Card Setup ................................................................................................................... 440
Print Job Accounting Client ....................................................................................................... 441
For Windows ............................................................................................................................................ 441
For Mac OS X .......................................................................................................................................... 443
- 8 -
Page 9

1
Basic Operations
Adjusting the Contrast of the Display Screen
Setting Output Destination
Adjusting Volume
Simultaneous Operation (Multitasking)
Checking the Information of the Machine
Easy Setup
Configuring One Touch Button
JOB MACRO
This section describes basic operations of this machine.
Page 10

Adjusting the Contrast of the Display Screen
Brightness of the display screen can be adjusted. The larger number you set, the darker the
screen becomes, and the smaller number you set, the brighter the screen becomes.
Values from -10 to +10 can be set.
Press the (SETTING) button on the operator panel.
1
Press the button once to select [Admin Setup] and press the button.
2
Enter the administrator password, and then press the (OK) button.
3
The factory default administrator password is "999999". If the administrator password is changed, enter the
updated password.
Press the or button repeatedly to select [Manage Unit] and press the
4
button.
Press the or button repeatedly to select [System Setup] and press the
5
button.
1. Basic Operations
Press the or button repeatedly to select [Panel Contrast] and press the
6
button.
Enter the setting value, and then press the (OK) button.
7
Press the button to return to the standby screen.
8
- 10 -
Page 11
1. Basic Operations
Setting Output Destination
The machine outputs paper to the output tray or rear output tray.
Do not open or close the rear output tray during printing. Paper jams may result.
• Output Tray
• Rear Output Tray
Output Tray
Use this output tray when printing on plain paper. Paper is output with the printed side down.
It is not available for envelopes, labels, or long paper.
Check that the rear output tray on the rear side of the machine is closed. If the rear output
tray is open, paper is always output to the rear output tray.
Open the paper support so that outputs do not slip down from the output tray.
- 11 -
Page 12
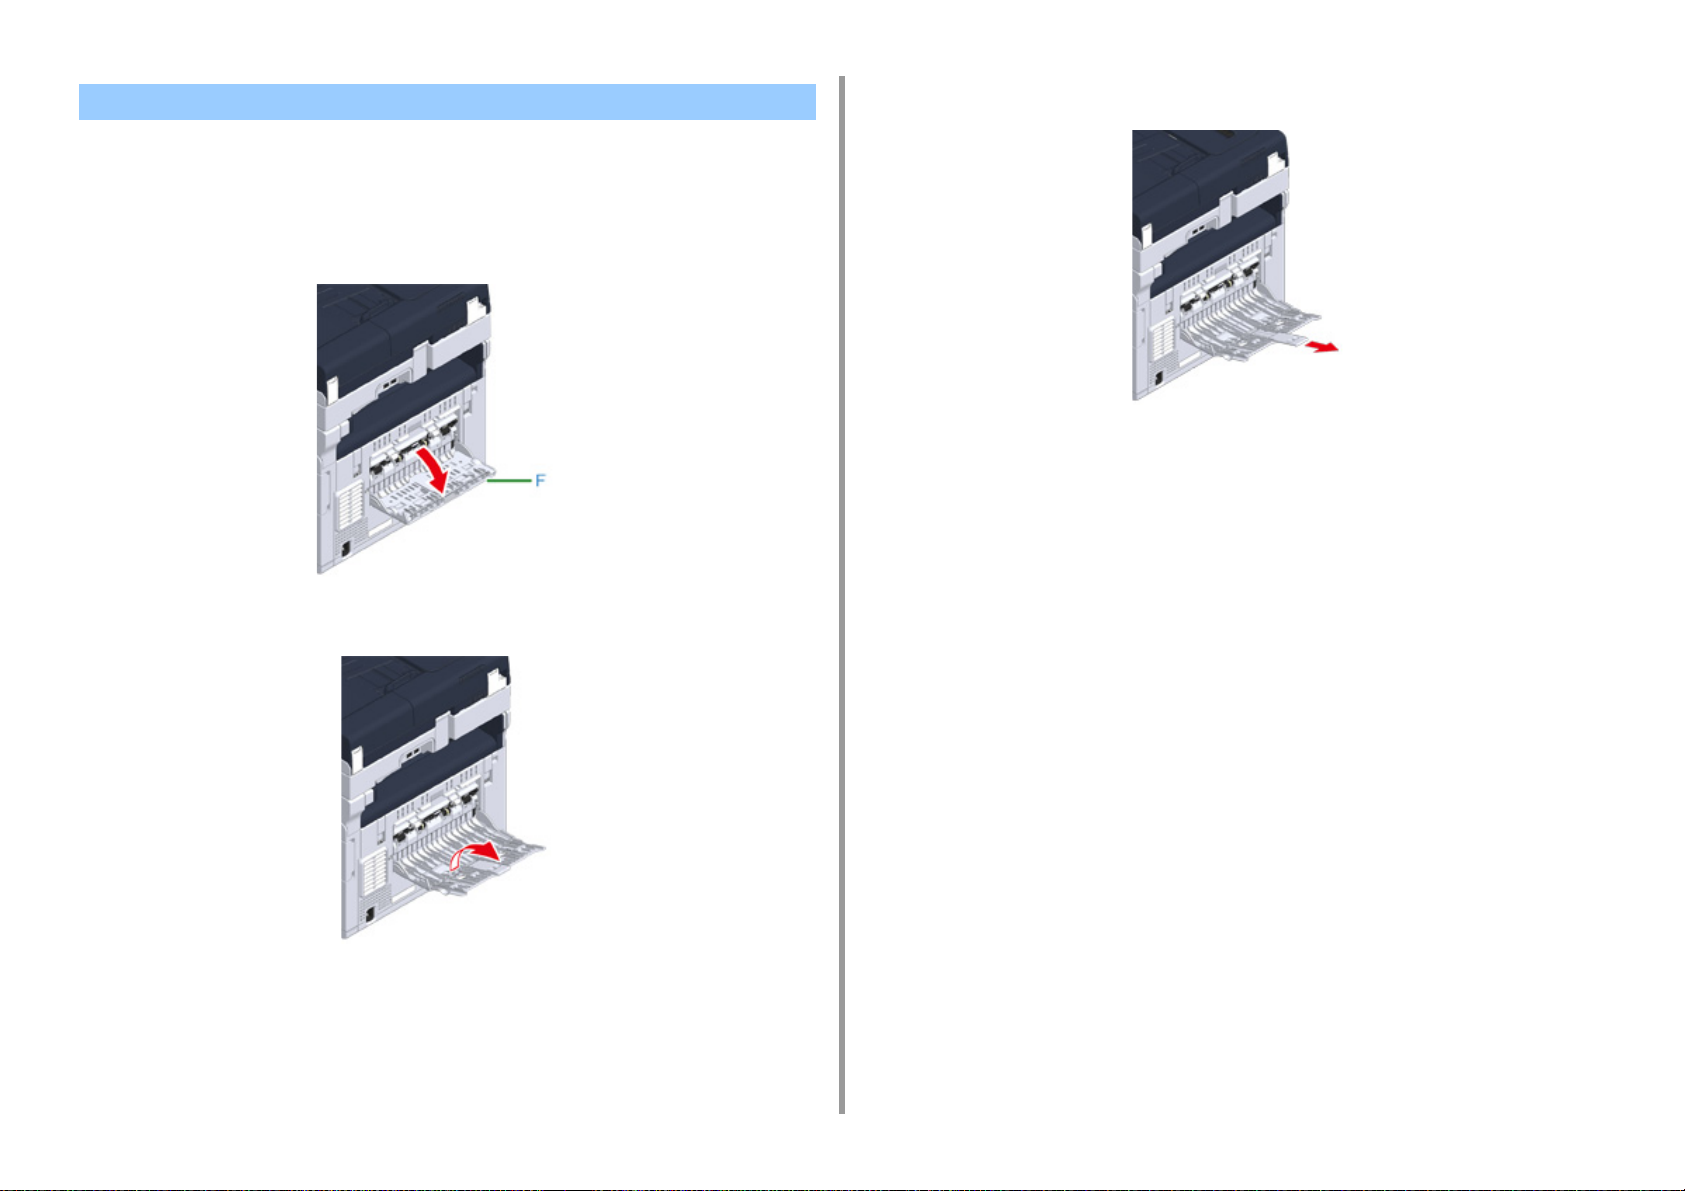
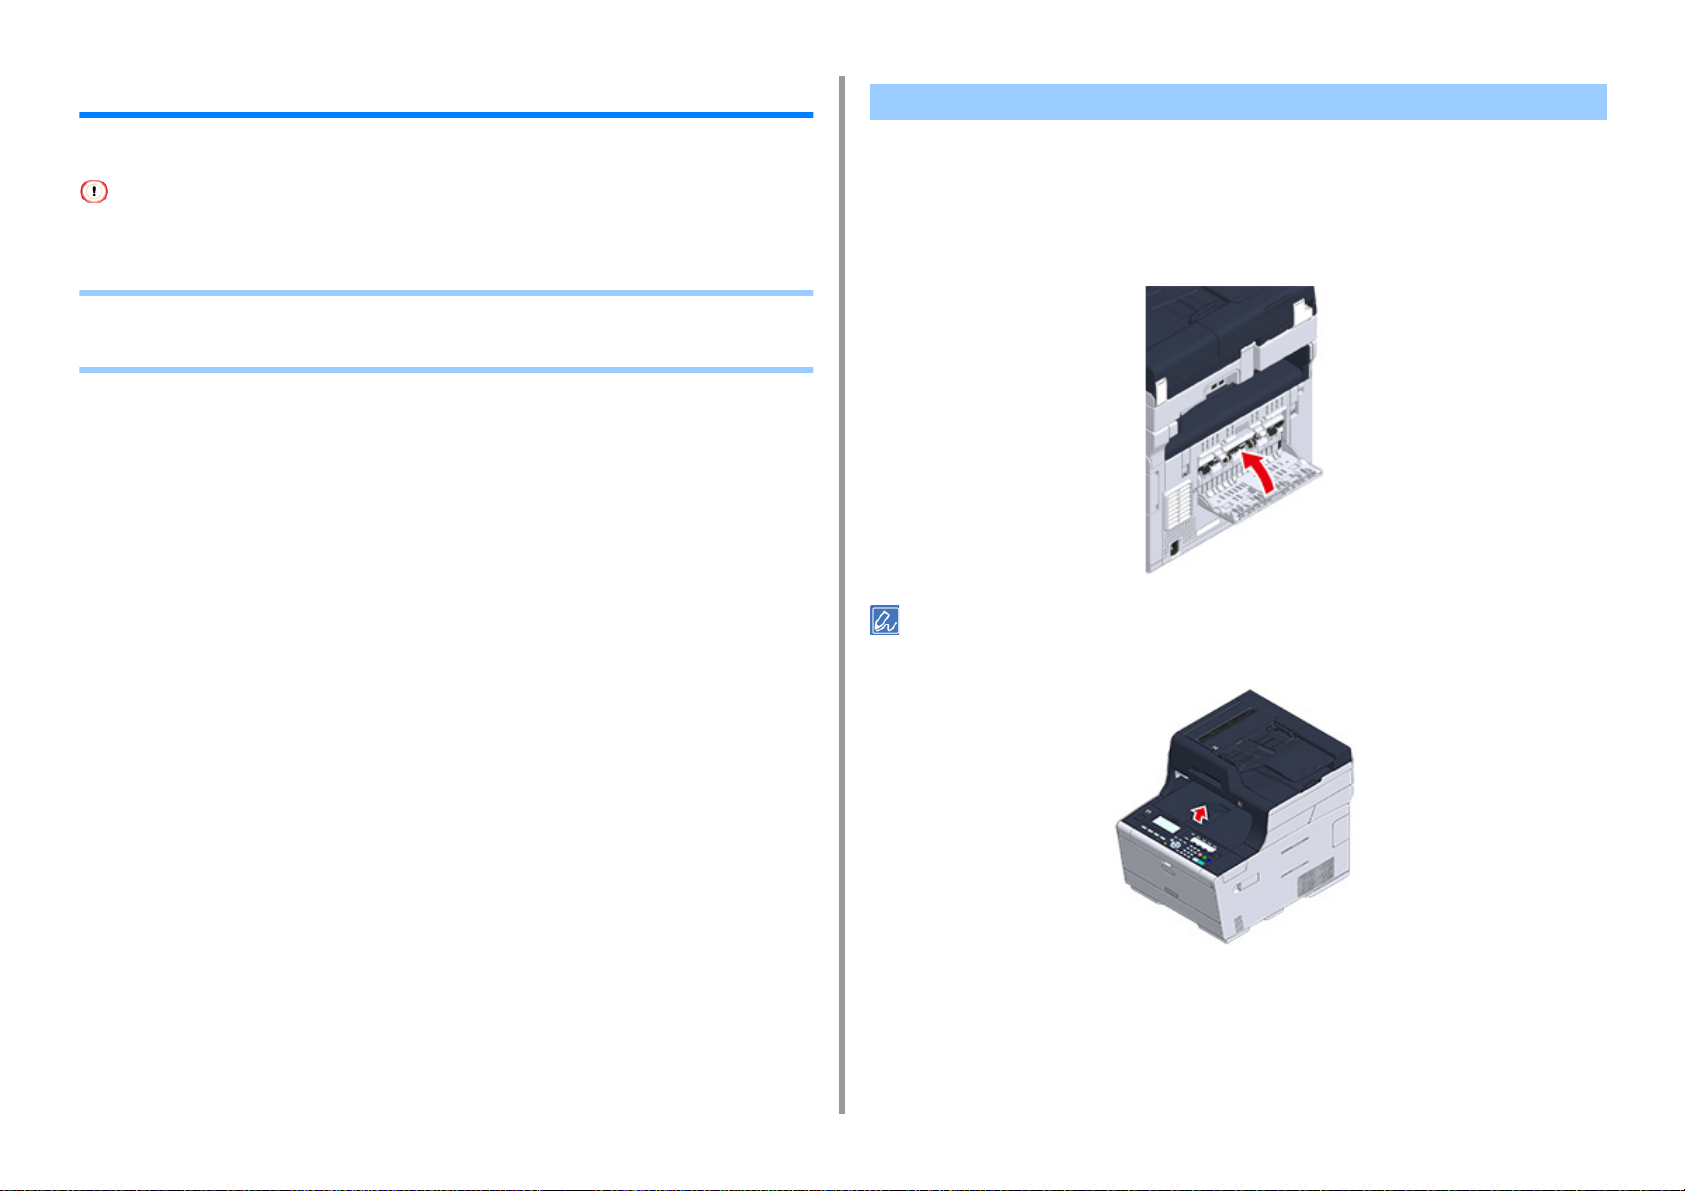
Rear Output Tray
Use the rear output tray when printing on envelopes, labels, or long paper.
Paper is output with the printed side up. Plain paper is also available for this output tray.
Open the rear output tray (F) on the rear side of the machine.
1
Unfold the paper support.
2
Draw the sub support.
3
1. Basic Operations
- 12 -
Page 13

Adjusting Volume
The volume of the sounds which are emitted in the following conditions can be adjusted in
four levels.
• When a button or key on the operator panel is pressed
• When copying is complete
• Fax communication is complete
• When a paper jam occurs
• AirPrint Buzzer Volume
Press the (SETTING) button on the operator panel.
1
Press the button once to select [Admin Setup] and press the button.
2
Enter the administrator password, and then press the (OK) button.
3
The factory default administrator password is "999999". If the administrator password is changed, enter the
updated password.
1. Basic Operations
Press the or button repeatedly to select [Manage Unit] and press the
4
button.
Press the or button repeatedly to select [Sound Control] and press the
5
button.
Press the or button to select the item whose volume you want to adjust
6
and press the (OK) button.
Press the or button to select the volume level and press the (OK)
7
button.
- 13 -
Page 14
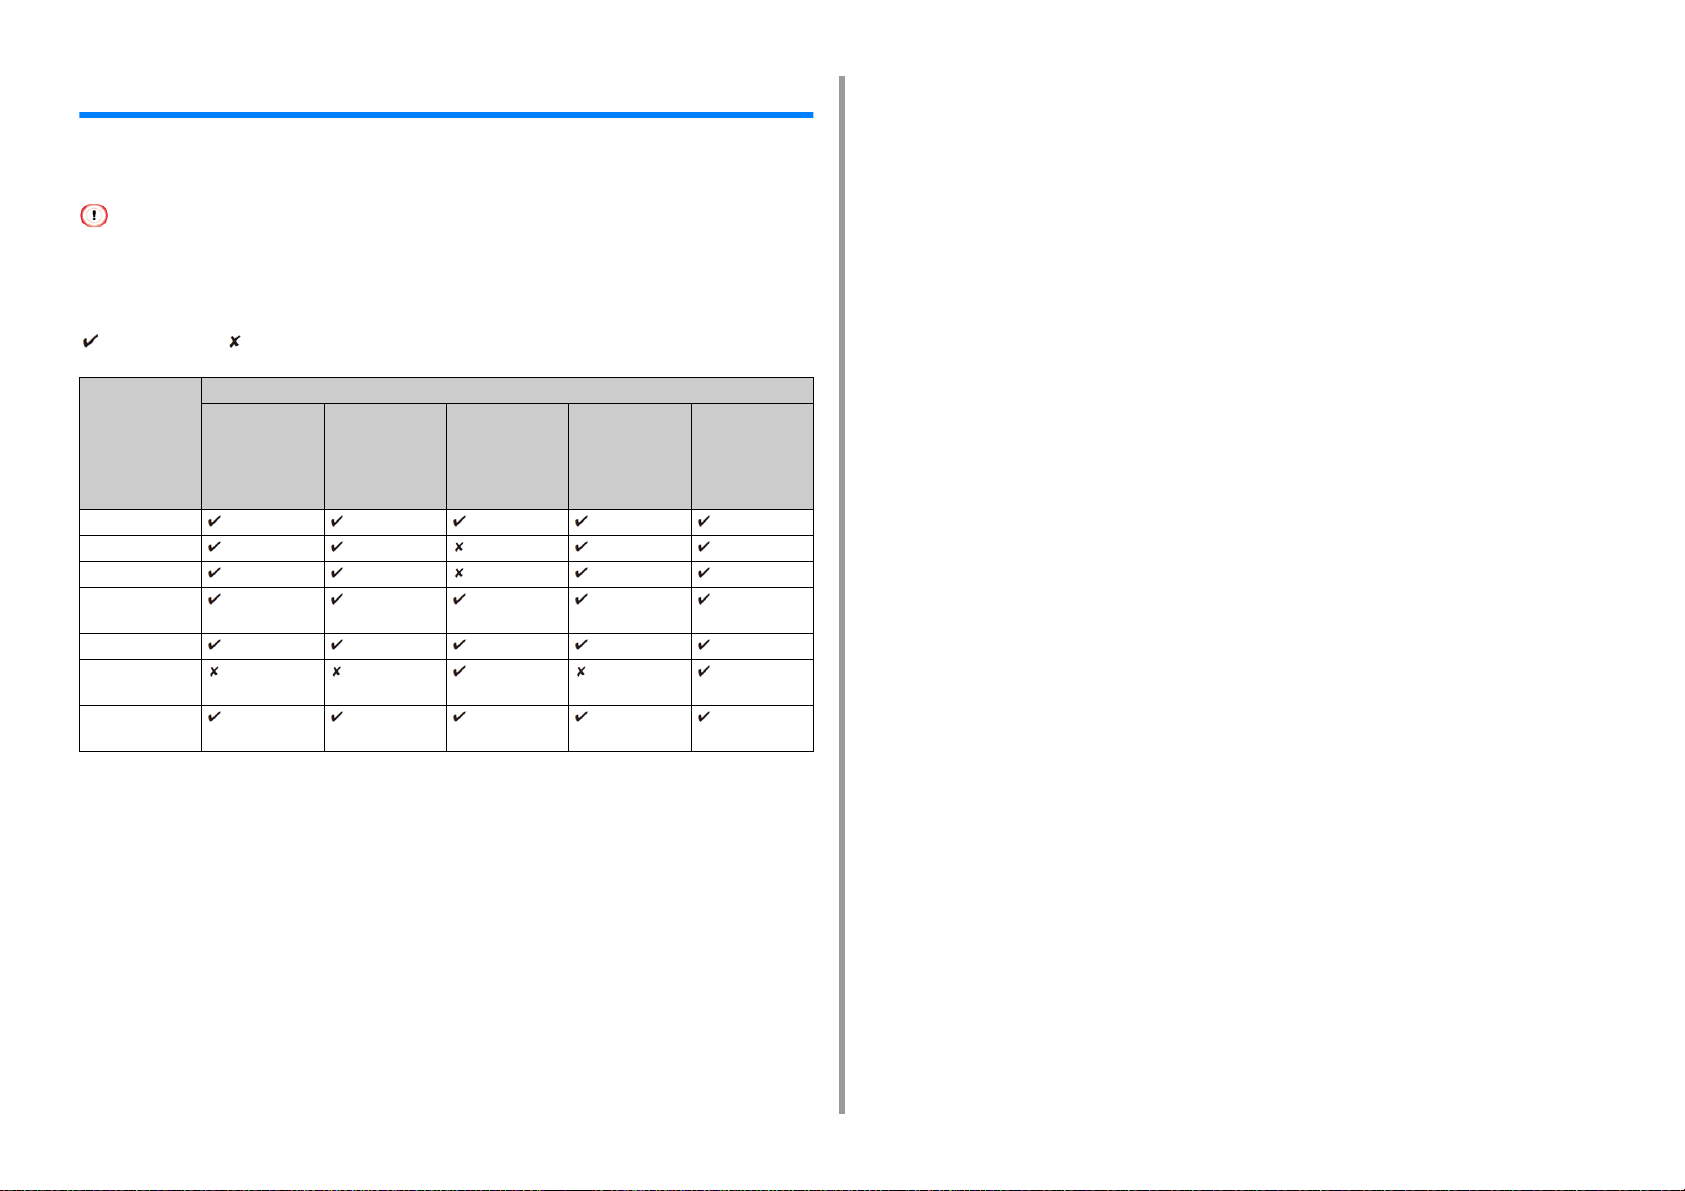
Simultaneous Operation (Multitasking)
This machine can operate several functions simultaneously. For details, refer to the following
table.
• You cannot use the operator panel while the machine reads documents.
• During the simultaneous operation, each operation performance may be deteriorated.
• Depending on the machine condition, such as memory full, simultaneous operation may not be accepted.
: Available : Not available
First task Second task
Copy Fax
transmission
Copy *
Fax transmission *
Fax reception *
Scan To Shared
Folder
Scan To E-Mail
Scan To USB
Memory
Printing from a
computer
2
1
2
2
*
1
*
Fax reception Scan To
Shared Folder/
Scan To Email/Scan To
USB Memory
2
*
2
*
Printing from a
computer
2
*
2
*
2
*
1. Basic Operations
*1 If the first task is sending, the second task is suspended until the first task is completes.
*2 When the first task completes, the second task starts to be printed.
- 14 -
Page 15
1. Basic Operations
Checking the Information of the Machine
Print the machine information and check the status. Press the (STATUS) button on
the operator panel to check the information such as remaining level of consumables.
• Printing a Report to Check
• Checking the Status on the Operator Panel
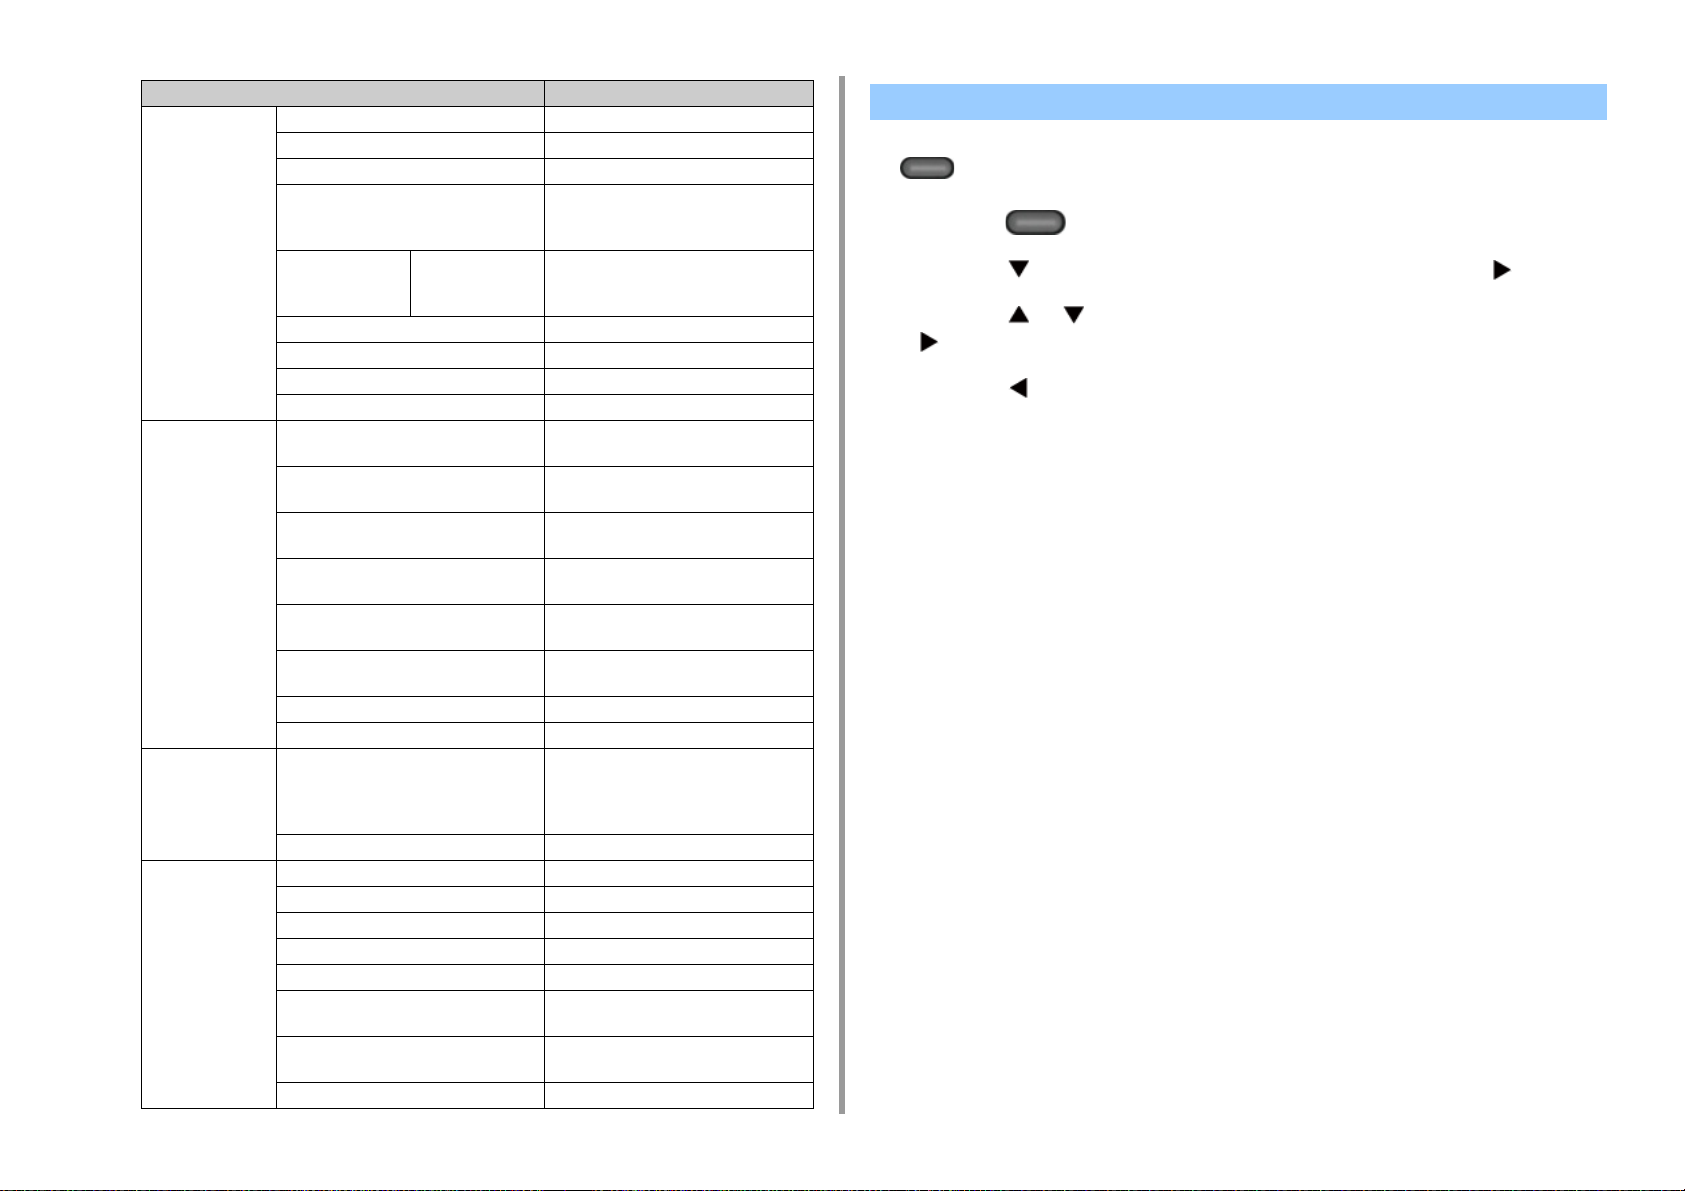
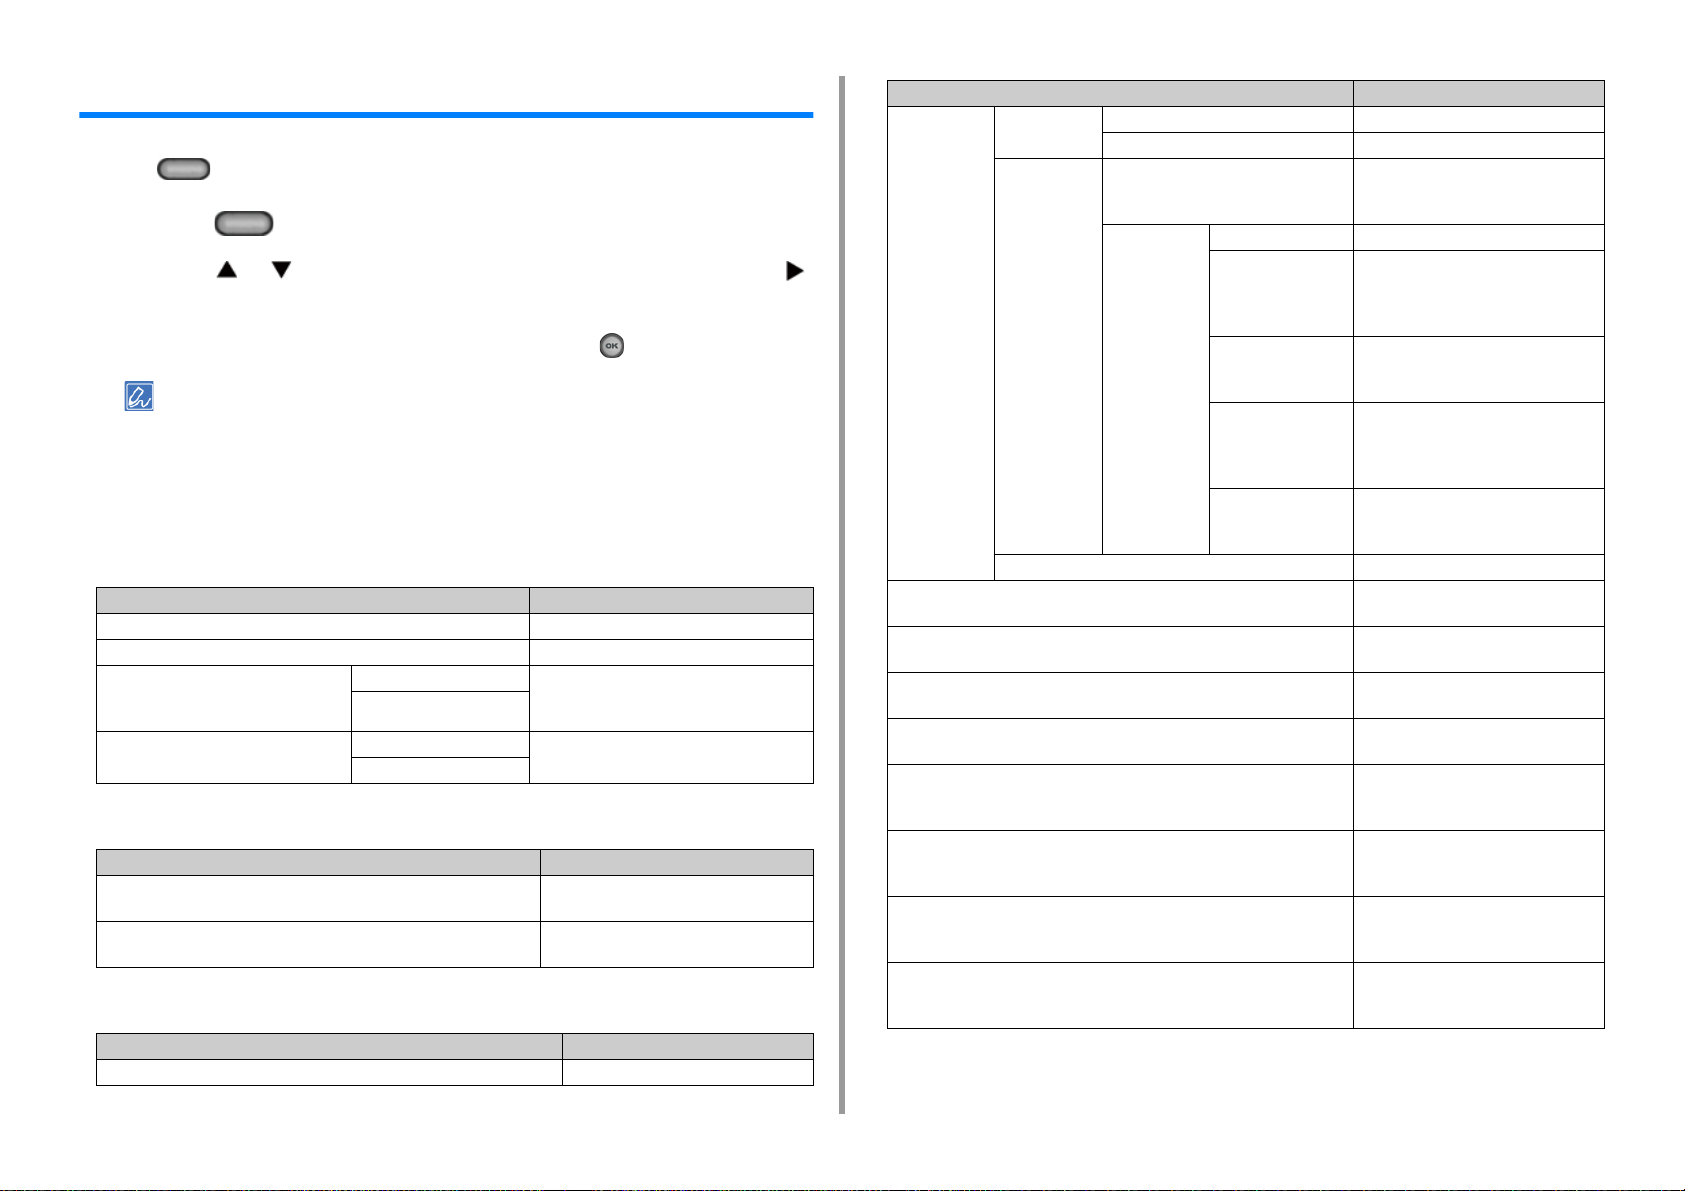
Printing a Report to Check
You can print and check the configuration or the job logs of this machine.
Press the (SETTING) button on the operator panel.
1
Check that [Reports] is selected, and then press the button.
2
Press the or button to select the category of the report you want to print
3
and press the button.
Press the or button to select the report to print and press the button.
4
If the administrator login screen is displayed, enter administrator password.
The factory default administrator password is "999999". If the administrator password is changed, enter the
updated password.
Check that [Yes] is selected on the confirmation screen, and press the (OK)
5
button.
If you press the (SETTING) button on the operator panel and select [Admin Setup] > [Manage Unit] >
[System Setup] and then set [Allow All Reports To Print] to [Disable], log in as the administrator to print the
following reports.
•Scan To Log
• Speed Dial List
• Group List
• Fax Log
• Address Book
- 15 -
Item Description
Configuration Prints detailed settings of this machine.
Page 16
1. Basic Operations
Item Description
System File List Prints a list of job files.
Demo Page Prints a demo page.
Error Log Prints an error log.
Scan To Log Prints the results of the jobs of Scan To E-
mail, Scan To Shared Folder, or Scan To
USB Memory.
Usage Report Copies Prints the total of the job logs. Specifies
the number of pages to print on the
[Copies] screen.
Network Information Prints general information on the network.
Suppies Report Prints the information about consumables.
User Counter Report Prints the user counter report.
Job Log Prints the Job Log.
Fax Speed Dial List Prints the list of the fax numbers
registered for speed dials.
Group List Prints the list of the fax numbers
registered in groups.
Fax Tx Log Prints the lis t of the transmission results of
the latest 100 fax jobs.
Fax Rx Log Prints the list of the reception results of the
latest 100 fax jobs.
Fax Tx/Rx Log Prints the list of the transmission and
reception results of the latest 100 fax jobs.
Daily Tx/Rx Log Report Prints Tx/Rx report for communications
within 24 hours.
Fcode Box List Prints the list of Fcode boxes.
Block Junk Fax Prints the address list for Block Junk Fax.
E-mail/Internet Fax Journal Report Prints the transmission and reception
results of the latest 50 items of Scan To Email, Internet Fax, printing e-mail
attachment files, and Scan to Fax server.
Address Book Prints the registered address list.
Print PCL Font List Prints a list of PCL font samples.
PSE Font List Prints a list of PSE font samples.
PPR Font List Prints a list of IBMPPR font samples.
FX Font List Prints a list of EPSON FX font samples.
Color Tuning Pattern Prints a color tuning pattern.
ID Check Pattern Prints the pre-supplied ID check pattern
for detecting wrong IDs.
Engine Status Prints the current values of engine
parameter.
Color Profile List Prints a color profile list.
Checking the Status on the Operator Panel
You can check the residual life of consumables, the counter information, and the job list from
the (STATUS) button.
Press the (STATUS) button on the operator panel.
1
Press the button to select [Device Information] and press the button.
2
Press the or button to select the item you want to check and press the
3
button.
Press the button to go back to the standby screen.
4
- 16 -
Page 17
1. Basic Operations
Easy Setup
In [Easy Setup], you can change the settings of date/time, fax, network, e-mail function by
using the (SETTING) button on the operator panel.
Press the (SETTING) button on the operator panel.
1
Press the or button repeatedly to select [Easy Setup] and press the
2
button.
Enter the administrator password, and then press the (OK) button.
3
The factory default administrator password is "999999". If the administrator password is changed, enter the
updated password.
Follow the on screen instructions.
4
• Date/Time Setting
Item Description
Time Zone Sets the GMT time zone.
Daylight Saving Sets daylight saving to ON or OFF.
Server SNTP Server (Primary) Sets the SNTP server to use for setting the
SNTP Server (Secondary)
Manual Date Sets the current date and time manually.
Time
•Fax Setting
Item Description
Fax Number Sets the fax number of this machine. You
Sender ID Sets the sender's information. You can
•Network Setting
Item Description
Enabling Default Gateway (If wireless LAN module fitted) Sets a wired LAN or wireless LAN.
current date and time. You can enter up to
64 characters.
can enter up to 20 digits.
enter up to 22 characters.
Item Description
Wireless
Setting (If
wireless LAN
module fitted)
Obtaining IP address Sets to obtain the IP address
IP Address Sets the IP address. You can enter up
Subnet Mask Sets the subnet mask. You can enter
Default Gateway Sets the gateway address. You can
DNS Server (Primary) Sets the IP address for a Primary DNS
DNS Server (Secondary) Sets the IP address for a Secondary
WINS Server (Primary) Sets the name or the IP address for the
WINS Server (Secondary) Sets the name or the IP address for the
WPS WPS-PBC WPS-PBC is executed.
WPS-PIN WPS-PIN is executed.
Search A list of access point name found in the
search
Manual Setup SSID Enter an SSID.
Security Selects the security of the wireless LAN
WEP Key Enter WEP Key.
WPA Encryption Type Select a WPA/WPA2-PSK or WPA2-
WPA Pre-shared Key Enter the Pre-shared Key.
Reconnect Wireless reconnection is executed.
Displays a list of wireless LAN access
points' names that are found in a
search.
function.
"WPA-EAP" and "WPA2-EAP" can be
set only in Web.
Displays if [WEP] is selected for
[Security].
PSK encryption type.
Displays if [WPA/WPA2-PSK] or
[WPA2-PSK] is selected for [Security].
Displays if [WPA/WPA2-PSK] or
[WPA2-PSK] is selected for [Security].
automatically or manually.
to 15 characters.
up to 15 characters.
enter up to 15 characters.
server. You can enter up to
15 characters.
DNS server. You can enter up to
15 characters.
WINS server. You can enter up to
15 characters.
WINS server. You can enter up to
15 characters.
- 17 -
Page 18

• E-mail Setting
Item Description
Mail Server Address Sets the IP address or host name for
the SMTP server. You can enter up to
64 characters.
Sender's Address (From) Sets an e-mail address for this
machine.
Receive Setting Sets the protocol to be used for
receiving e-mails.
Authentication Method Sets the authentication method.
SMTP User ID Sets the login ID to the server used for
SMTP authentication. You can enter up
to 64 characters.
SMTP Password Sets the password to the server used
for SMTP authentication. You can enter
up to 64 characters.
POP3 Server Sets the IP address or host name for
the POP3 server. You can enter up to
64 characters.
POP User ID Sets the login ID to the server used for
POP authentication. You can enter up
to 64 characters.
POP Password Sets the password to the server used
for POP authentication. You can enter
up to 16 characters.
1. Basic Operations
- 18 -
Page 19
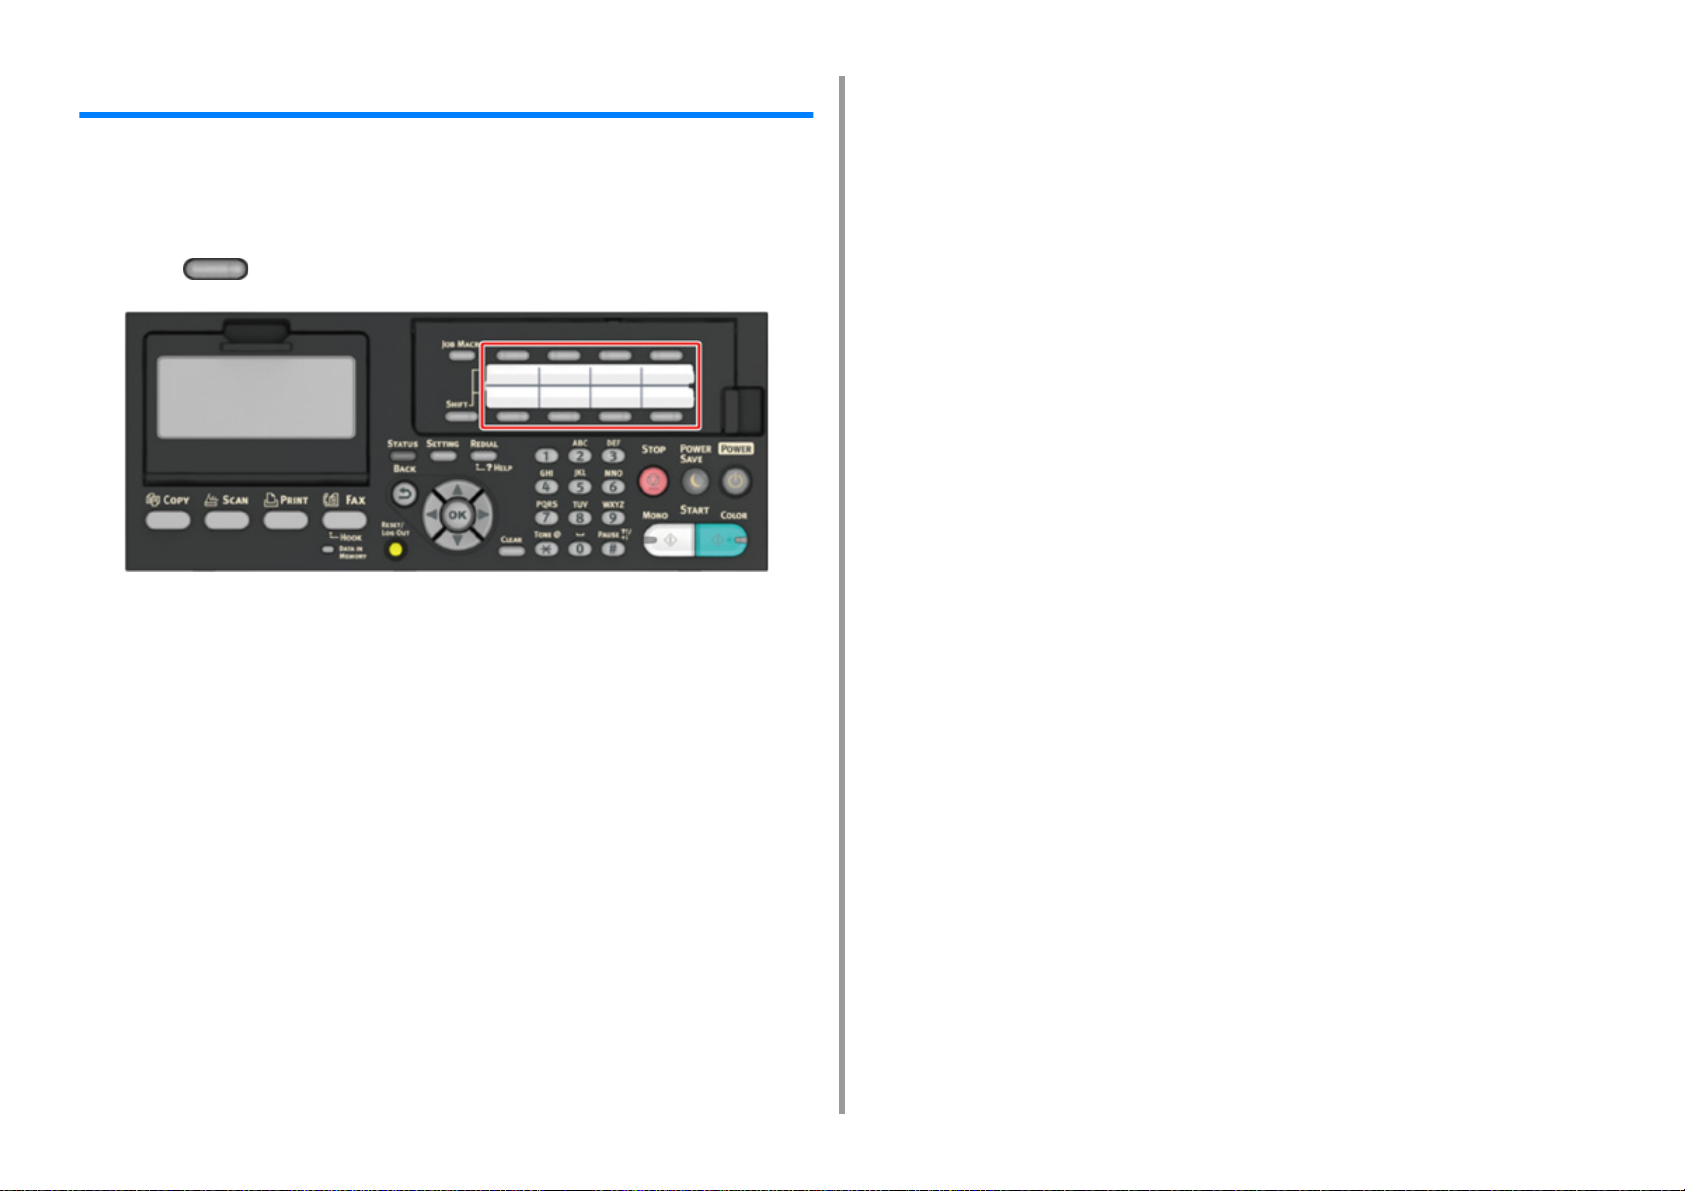
Configuring One Touch Button
On the one-touch buttons, items registered on the address book No. 01 to 16 and speed dial
numbers 001 to 016 are registered automatically.
One-touch buttons can be used for Scan To E-mail, Fax, and Internet Fax operations.
To select the speed dial numbers 009 to 016 that are assigned to one-touch buttons, press
and hold the (SHIFT) button and press the one-touch button.
1. Basic Operations
- 19 -
Page 20
1. Basic Operations
JOB MACRO
You can register macros for frequently used function settings for copying, scanning, faxing,
Internet faxing, and printing in the machine. This "Job Macro" allows you to perform
operations more simply and quickly.
You can create a macro for settings on the following functions.
Copying
Printing from USB Memory
Scanning to e-mail
Scanning to Shared Folder
Scanning to USB Memory
Fax Sending
Internet Fax Sending
Scanning to Fax Server
If the user authentication is enabled, log in to the machine before creating a macro.
You can register up to 16 macros.
Registering a Frequently-used Setting as a Macro
You can create a macro for a frequently-used setting.
Press the (COPY) button on the operator panel.
1
Change a setting value to register.
2
Press the (JOB MACRO) button on the operator panel.
3
Check the settings, and then press the (OK) button.
4
Press the or button to select a number indicated [Unregistered] and
5
press the button.
Enter a new macro name.
6
Select [Enter], and then press the (OK) button.
7
Check that [Yes] is selected on the confirmation screen, and press the (OK)
8
button.
• Registering a Frequently-used Setting as a Macro
• Using a Registered Macro
• Editing a Macro Title
• Checking the Macro Content
• Deleting a Registered Macro
- 20 -
Page 21
Using a Registered Macro Editing a Macro Title
1. Basic Operations
You can use a macro by reading out it.
Press the (JOB MACRO) button on the operator panel.
1
Press the or button to select the macro you want to use and press the
2
button.
Check that [Execute] is selected, and then press the (OK) button.
3
If the access control is enabled on the functions you want to use, a message is
displayed to inform you that you are not permitted to use them, and the screen returns
to the JOB MACRO menu.
Perform a job.
4
You can edit a macro title.
Press the (JOB MACRO) button on the operator panel.
1
Press the or button to select the macro you want to edit and press the
2
button.
Press the button to select [Title Edit] and press the (OK) button.
3
Press the (OK) button.
4
Enter a new title.
5
Entering Characters (User's Manual)
Select [Enter], and then press the (OK) button.
6
- 21 -
Page 22
Checking the Macro Content Deleting a Registered Macro
1. Basic Operations
Press the (JOB MACRO) button on the operator panel.
1
Press the or button to select the macro you want to check and press
2
the button.
Press the or button to select [Execute] or [Register], and then press the
3
button.
Check the content, and then press the button.
4
If you select [Execute] to check and press (OK), the macro is applied.
You can delete a macro.
Press the (JOB MACRO) button on the operator panel.
1
Press the or button to select the macro you want to delete and press
2
the button.
Press the or button to select [Delete] and press the (OK) button.
3
Press the (OK) button.
4
Check that [Yes] is selected on the confirmation screen, and press the (OK)
5
button.
- 22 -
Page 23

2
Copy
Useful Functions
For a Better Finish
Color Settings
Advanced Copy Settings
Page 24
2. Copy
Useful Functions
This chapter describes various settings for copying, such as N-in-1 and duplex printing.
Settings on the copy top screen is temporarily enabled. To change the default settings, Press the (SETTING)
button on the operator panel and select [Admin Setup] > [Copy Setup] > [Default Settings].
Copy Setup
• Specifying the Paper Feed Tray (Paper Feed)
• Making Enlarged or Reduced Copies (Zoom)
• Copying on Both Sides of Paper (Duplex Copy)
• Combining Multiple Pages on One Sheet of Paper (N-in-1)
• Changing the Scan Size (Scan Size)
• Sorting Each Set in Page Order (Sort)
• Enabling Continuous Scan Mode (Continuous Scan)
• Copying Different Size Documents (Mixed Size)
• Resetting Copy Settings (Reset)
• Changing the Document Orientation (Direction)
Specifying the Paper Feed Tray (Paper Feed)
• Setting the Paper Feed Tray to Tray 1/Tray 2/Tray 3 (Except MC363)
• Using the MP (Multi-Purpose) Tray
Setting the Paper Feed Tray to Tray 1/Tray 2/Tray 3 (Except MC363)
Press the (COPY) button on the operator panel.
1
Set a document in the ADF or on the document glass.
2
Press the button.
3
Press the button to select [Paper Feed] and press the button.
4
Press the or button to select the tray to use and press the (OK)
5
button.
Press the (MONO) or (COLOR) button.
6
• To use the MP (Multi-Purpose) tray with [Paper Feed] being set to [Auto], press the (SETTING) button on
the operator panel and select [Paper Setup] > [Select Tray] > [Copy] > [MR Tray], and then select [ON] or
[ON(Prior)].
• [Tray 2]/[Tray 3] are displayed only when the optional tray unit is installed.
• If [Paper Feed] is set to [Auto], you can select a paper tray that holds A4, A5, A6, B5, B6, Letter, Legal13/13.5/14,
Ex ecu tiv e, S tate men t, F oli o, or 8.5 SQ p aper . To use a dif fer ent paper size, select the paper tray in the [Paper Feed]
setting.
Using the MP (Multi-Purpose) Tray
Press the (COPY) button on the operator panel.
1
Set a document in the ADF or on the document glass.
2
Press the button.
3
Press the button to select [Paper Feed] and press the button.
4
- 24 -
Page 25
Press the or button to select [MP Tray] and press the (OK) button.
5
Load paper in the MP tray.
6
Loading Paper in the MP Tray (User's Manual)
Press the (MONO) or (COLOR) button.
7
Check the message, and press the or button to select [Start] and press
8
the (OK) button.
2. Copy
Making Enlarged or Reduced Copies (Zoom)
You can use [Auto] only if copying on A4, A5, A6, B5, B6, Letter, Legal13/13.5/14, Executive, Statement, Folio, or 8.5
SQ paper.
Press the (COPY) button on the operator panel.
1
Set a document in the ADF or on the document glass.
2
Press the button.
3
Press the or button to select [Zoom] and press the button.
4
Select the zoom ratio and press the (OK) button.
5
• When using [Auto]
(1) Select [Auto], and then press the (OK) button.
• When selecting a preset zoom rate
(1) Press the or button to select the value you want to set and press the
(OK) button.
- 25 -
If [Fit to page(98%)] is selected and the size of the document and the paper are the same, the document is
reduced to fit the paper.
•
When setting the zoom rate by using the numeric keypad
(1) Enter the zoom rate from 25 to 400% by using the numeric keypad or pressing
on the operator panel, and then press the (OK) button.
• You can set the rate in units of 1%.
• If you enter an incorrect value, press the (CLEAR) button, and then enter the correct value.
Press the (MONO) or (COLOR) button.
6
Page 26

• If [Paper Feed] is set to [Auto], [Zoom] is automatically set to [100%]. To select a different rate, set [Paper Tray],
and then set [Zoom].
• If [Paper Feed] is set to [Auto], the paper tray is automatically selected according to the selected zoom rate. To use
a specific paper tray, reset [Paper Feed] again.
• Even if [Paper Feed] is set to [Auto], you cannot select a paper tray that holds paper other than A4, A5, A6, B5, B6,
Letter, Legal13/13.5/14, Executive, Statement, Folio, or 8.5 SQ paper. In this case, specify from [Paper Feed].
• If [Paper Feed] is set to [Auto], the [Paper Feed] setting automatically changes from [Zoom] to [Auto]. A message
is displayed on the display screen to inform you that the setting has been changed.
Copying on Both Sides of Paper (Duplex Copy)
• Available Printing Methods
• Use plain paper of a standard size. Use of paper other than paper of standard sizes may cause paper jams.
Loading Paper (User's Manual)
• To copy a document in your preferred orientation, specify the orientation in [Direction] in advance.
Changing the Document Orientation (Direction)
Press the (COPY) button on the operator panel.
1
Set a document in the ADF or on the document glass.
2
• When printing duplex documents on the both sides of paper or on the single side of paper, set the documents
in the ADF.
• When making duplex copies from simplex documents using the document glass, Continuous Scan mode is
automatically enabled. Follow the on-screen instructions.
Enabling Continuous Scan Mode (Continuous Scan)
Press the button.
3
Press the button to select [Duplex Copy] and press the button.
4
Press the or button to select the duplex copy mode.
5
Select [Duplex Duplex] to add options on the binding position.
2. Copy
To make simplex copies of two-sided document, select [Duplex LE Simplex] or [Duplex SE Simplex].
Press the button to select [Binding] and press the button.
6
Press the or button to select [Long Edge Bind] or [Short Edge Bind] and
7
then press the (OK) button.
Changing the Document Orientation (Direction)
Press the (MONO) or (COLOR) button.
8
You can change other copy settings.
- 26 -
Page 27
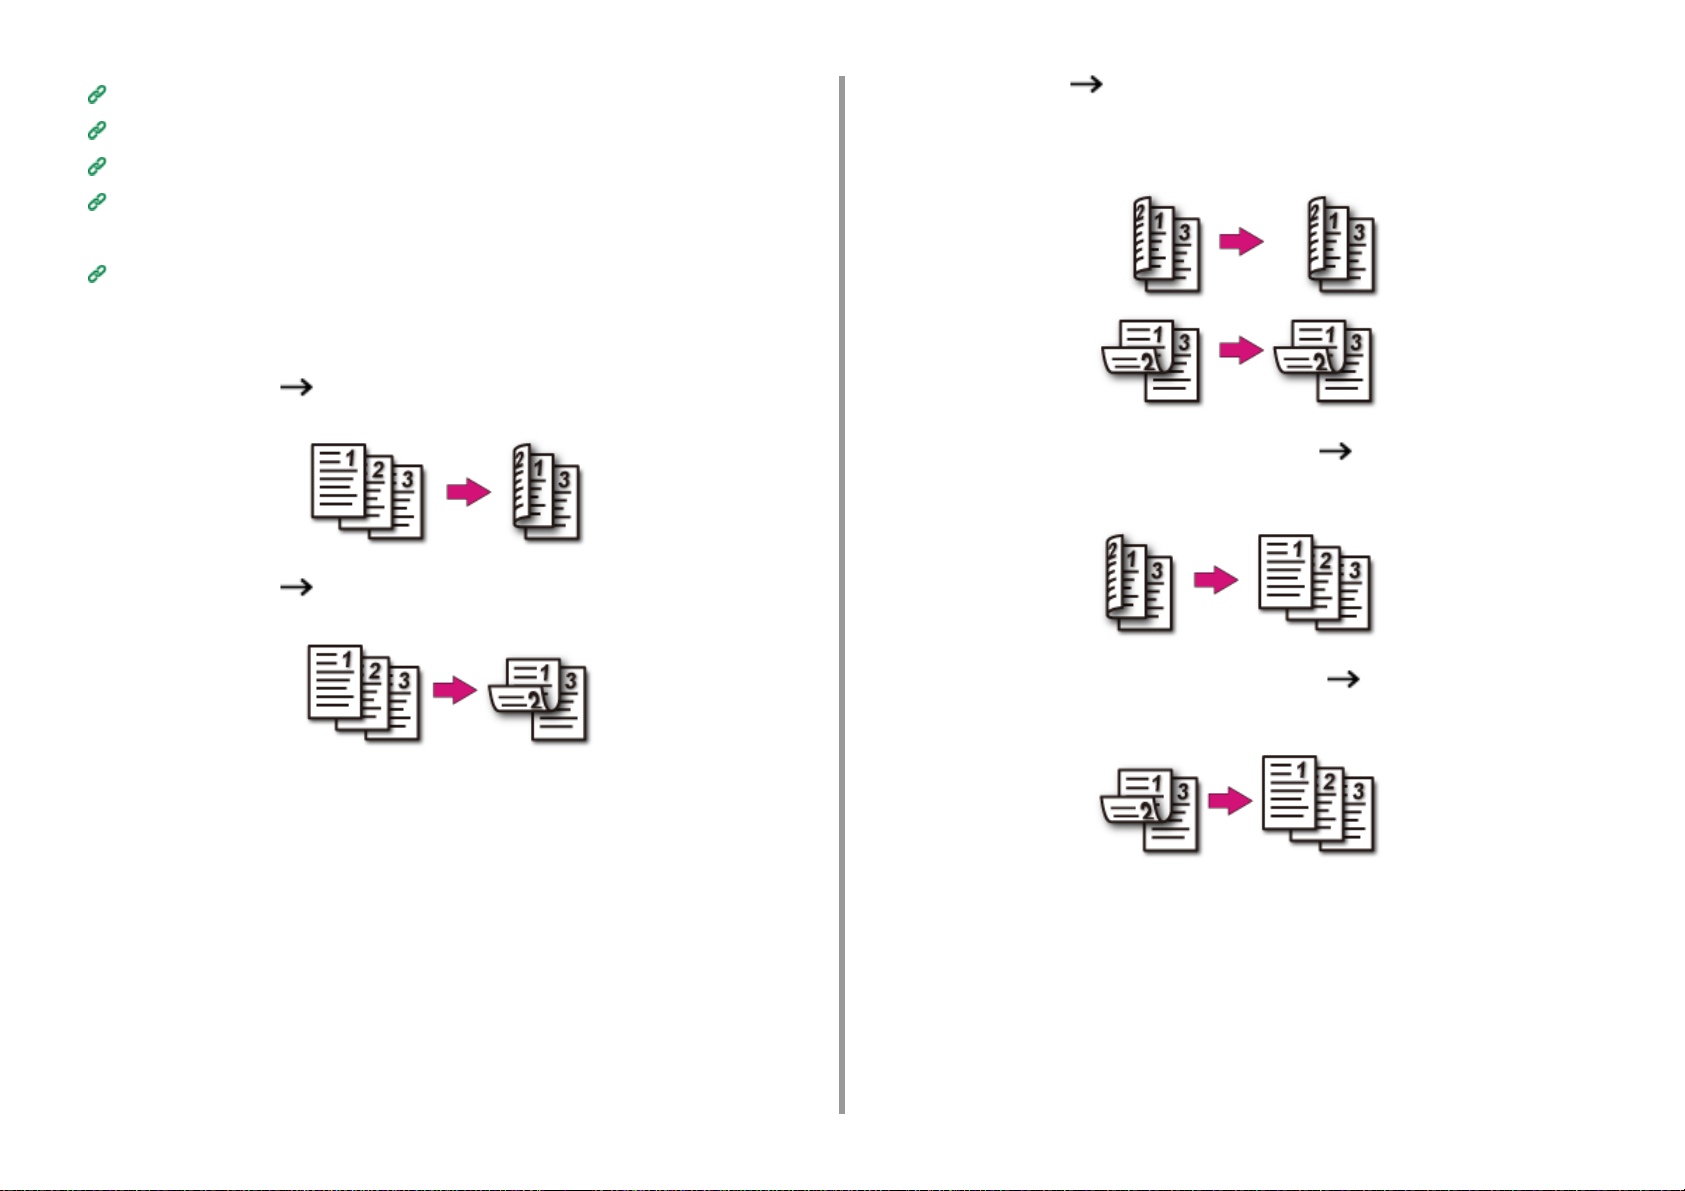
2. Copy
Useful Functions
For a Better Finish
Color Settings
Advanced Copy Settings
It is recommended to set a margin when you want to staple or punch holes in duplex copies.
Setting Margins (Margin)
Available Printing Methods
• Simplex document Duplex copies with the long edge bound
• Simplex document Duplex copies with the short edge bound
• Duplex documents Duplex copies with the long edge bound or the short
edge bound
Set a document in the ADF.
• Duplex documents with the long edge bound Simplex copies
Set a document in the ADF.
• Duplex documents with the short edge bound Simplex copies
Set a document in the ADF.
- 27 -
Page 28
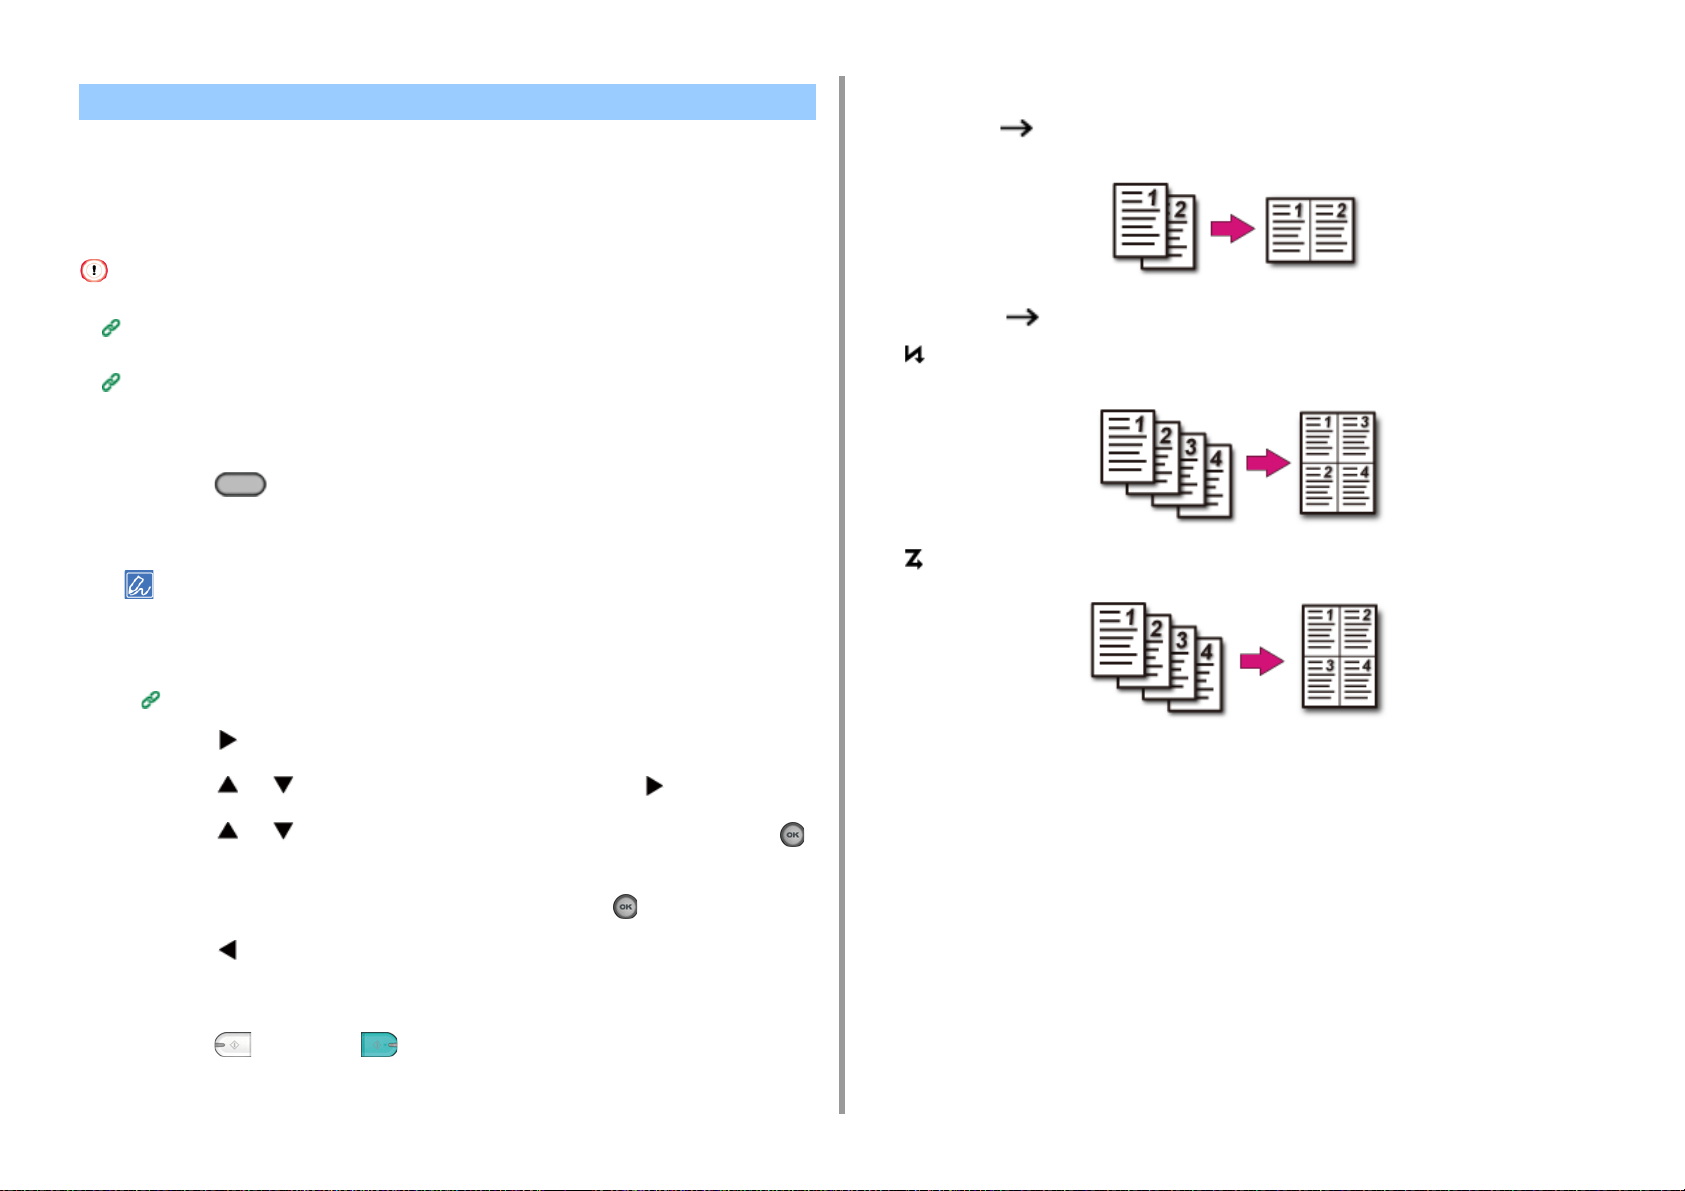
2. Copy
Combining Multiple Pages on One Sheet of Paper (N-in-1)
• Available Printing Methods
You can copy two or four pages of a document into one side of a single sheet of paper.
Setting [Duplex Copy] at the same time can save more sheets of paper.
• To copy a document in your preferred orientation, specify the orientation in [Direction] in advance.
Changing the Document Orientation (Direction)
• If [N-in-1] is enabled, [Zoom] is automatically set to [Auto]. To specify a zoom rate, set [N-in-1], and then [Zoom].
Making Enlarged or Reduced Copies (Zoom)
• A part of the document may not be copied properly depending on the paper size, document size or specified rate.
• If [N-in-1] is enabled you cannot select [Auto] for paper feeding source. Select the paper tray to be used.
Press the (COPY) button on the operator panel.
1
Set a document in the ADF or on the document glass.
2
• When using the document glass, Continuous Scan mode is automatically enabled. Follow the on-screen
instructions.
• Continuous Scan mode enables you to copy multiple documents at once. You can use both the ADF and
document glass for copying multiple documents as a single job.
Enabling Continuous Scan Mode (Continuous Scan)
Available Printing Methods
• Two sheets One side of a sheet
• Four sheets One side of a sheet
• Vertical
• Horizontal
Press the button.
3
Press the or button to select [N-in-1] and press the button.
4
Press the or button to select an N-in-1 method, and then press the
5
(OK) button.
Change other settings if necessary, and then press the (OK) button.
6
Press the button to go back to the standby screen.
7
Enter the number of copies.
8
Press the (MONO) or (COLOR) button.
9
- 28 -
Page 29
Changing the Scan Size (Scan Size) Sorting Each Set in Page Order (Sort)
2. Copy
You can select the appropriate size of the document to be scanned.
Press the (COPY) button on the operator panel.
1
Set a document in the ADF or on the document glass.
2
Press the button.
3
Check that [Scan Size] is selected, and then press the button.
4
Press the or button to select the paper size, and then press the
5
(OK) button.
Press the (MONO) or (COLOR) button.
6
The sort function is enabled by factory default.
Press the (COPY) button on the operator panel.
1
Set a document in the ADF or on the document glass.
2
• Continuous Scan mode enables you to copy multiple documents at once.
• You can use both the ADF and document glass for copying multiple documents as a single job.
Enabling Continuous Scan Mode (Continuous Scan)
Press the button.
3
Press the or button to select [Sort] and press the button.
4
Press the or button to select [ON] and press the (OK) button.
5
Press the button to go back to the standby screen.
6
Enter the number of copies.
7
Press the (MONO) or (COLOR) button.
8
- 29 -
Page 30

Enabling Continuous Scan Mode (Continuous Scan)
This function is useful when you want to copy multiple books.
To scan multiple sets of documents and make copies as a single job, enable the Continuous
Scan mode. This mode is useful when using the [Sort], [N-in-1], or [Duplex Copy] function.
In Continuous Scan mode, you can copy your documents from the ADF, document glass, or
both of them.
Sorting Each Set in Page Order (Sort)
Combining Multiple Pages on One Sheet of Paper (N-in-1)
Copying on Both Sides of Paper (Duplex Copy)
Cancelling Copying (User's Manual)
Press the (COPY) button on the operator panel.
1
Set the first sheet of a document in the ADF or on the document glass.
2
When making N-in-1 and/or duplex copies by using the document glass, the [Please set next document] screen
is displayed after scanning the documents even if [Continuous Scan] is set to [OFF].
Check that [Start Scan] is selected, and then press the (OK) button.
10
When scanning all sets of the documents is complete, press the button to
11
select [Scan Complete] and press the (OK) button.
If you select [Scan Complete] after scanning all the documents with multiple copies (2 or more) being set for
[Copies] and press the (OK) button, the remaining number of copies are copied.
2. Copy
Press the button.
3
Press the or button to select [Continuous Scan] and press the
4
button.
Press the or button to select [ON] and press the (OK) button.
5
Press the button to go back to the standby screen.
6
Enter the number of copies by using the numeric keypad.
7
Press the (MONO) or (COLOR) button.
8
When the [Please set next document.] screen is displayed, set the next
9
document in the ADF or on the document glass.
When changing the place to set the next document, be sure to remove the document from the place you used first.
- 30 -
Page 31

Copying Different Size Documents (Mixed Size)
You can set multiple documents having the same width but different lengths in the ADF so
that they can be copied on their respective paper sizes.
Documents can be set at the same time are as follows.
Specify the size of the larger document (size with *mark) for the document size.
• A4 and Folio*
• Letter and Legal 13*
• Letter and Legal 13.5*
• Letter and Legal 14*
• If [Mixed Size] is enabled, [Paper Feed] cannot be selected. The paper tray that matches the document is
automatically selected to feed the paper.
• [Mixed Size] is available only if [Zoom] is set to [98% (Fit To Page)] or [100%].
• You cannot set [Edge Erase] and [Mixed Size] at the same time.
• To use the mixed size function with the MP tray, press the (SETTING) button on the operator panel, and then
select [Paper Setup] > [Select Tray] > [Copy] to enable [MP tray].
• When you use the MP tray, load paper in the MP tray, and then display the [Mixed Size] menu.
Press the button to go back to the standby screen.
7
Press the (COPY) button on the operator panel.
8
Set a document that is mixed with Legal 13 and Letter sizes in the ADF.
9
Setting in the ADF (User's Manual)
Press the button.
10
Press the or button to select [Mixed Size] and press the button.
11
Press the or button to select [ON] and press the (OK) button.
12
Press the button to go back to the standby screen.
13
Check that the following settings are displayed on the standby screen.
14
• [Mixed Size]: ON
• [Paper Feed]: Auto
• [Zoom]: 100%
• [Scan size]: A4 or Letter
Enter the number of copies by using the numeric keypad if necessary.
15
Press the (MONO) or (COLOR) button.
16
2. Copy
This section covers an example of Legal 13 loaded in Tray 1 and Letter loaded in the MP tray.
Load Legal 13 paper in Tray 1, and then load Letter paper in the MP tray.
1
You can use only standard paper for this function.
Press the (SETTING) button on the operator panel.
2
Press the button to select [Paper Setup] and press the button.
3
Press the button to select [MP Tray] and press the button.
4
Check that [Paper Size] is selected, and then press the button.
5
Press the or button to select [Letter] and press the (OK) button.
6
When using the Mixed Size function, be careful about the binding position of duplex documents.
When copying mixed-size duplex documents, specify the binding position for the bigger documents and bind smaller
documents in the same direction as the bigger ones. (Their binding positions may not be the same.)
• For Legal/Letter
- For Legal documents with long-edge binding, set Letter documents with long-edge binding. (When loading in the
ADF, set the documents so that their binding positions align to the top or bottom of the ADF.)
- For Legal documents with short-edge binding, set Letter documents with short-edge binding. (When loading in the
ADF, set the documents so that their binding positions align to the left or right of the ADF.)
- 31 -
Page 32

Resetting Copy Settings (Reset) Changing the Document Orientation (Direction)
2. Copy
You can reset the copy function you changed to their default settings in the following ways.
• Auto Reset
If you do not perform any operation for a certain period of time, all the copy settings
for your copy job return to their default settings. The auto reset time is set to
3 minutes by factory default.
To set the auto reset time, press the (SETTING) button on the operator panel and select [Admin Setup] >
[Manage Unit] > [Operation Clear] and set [Operation Timeout].
• Using the (RESET/LOG OUT) Button
Press the (RESET/LOG OUT) button on the standby screen or setting item
screen to initialize the copy function.
You can select [Portrait] or [Landscape] for the document orientation. Specify the appropriate
orientation to get the copy result you want.
Press the (COPY) button on the operator panel.
1
Set a document in the ADF or on the document glass.
2
Press the button.
3
Press the or button to select [Direction] and press the button.
4
Press the or button to select the document orientation, and then press
5
the (OK) button.
If you press the button, the screen returns to the previous screen without saving the changes.
Press the (MONO) or (COLOR) button.
6
When copying is complete, press the (RESET/LOG OUT) button to reset the default settings for the next user.
- 32 -
Page 33

2. Copy
For a Better Finish
This section describes how to obtain a better finish.
• Adjusting the Density (Density)
• Selecting the Document Type (Document Type)
• Specifying the Scan Resolution (Resolution)
• Copying a Document with a Colored Background Clearly (Background Removal)
• Erasing Edge Shadows (Edge Erase)
• Removing Show-Through (Show-Through Removal)
Adjusting the Density (Density)
You can adjust the copy density in seven levels.
Press the (COPY) button on the operator panel.
1
Set a document in the ADF or on the document glass.
2
Press the button.
3
Press the or button to select [Image settings] and press the button.
4
Check that [Density] is selected, and then press the button.
5
Press the or button to select the value you want to set and press the
6
(OK) button.
[0] is the standard value. To increase the density, select [+1], [+2], or [+3] (darkest). To decrease the density,
select [-1], [-2], or [-3] (lightest).
Press the (MONO) or (COLOR) button.
7
- 33 -
Page 34

Selecting the Document Type (Document Type) Specifying the Scan Resolution (Resolution)
2. Copy
You can select a document type from [Text], [Text&Photo], [Photo], or [Photo (Glossy)] to
make copies at the most suitable quality.
• If you select [Text], the gray level may be reduced depending on the document.
• If you select [Photo] or [Photo (Glossy)], fine texts or lines may be blurred depending on the document.
• If you select [Photo (Glossy)], images may be bright.
Press the (COPY) button on the operator panel.
1
Set a document in the ADF or on the document glass.
2
Press the button.
3
Press the or button to select [Image settings] and press the button.
4
Press the button to select [Document Type] and press the button.
5
Press the or button to select the document type, and then press the
6
(OK) button.
• [Text]: Set when copying a text document.
• [Text&Photo]: Set when copying a document having texts and photos. The well-balanced text and photo are
reproduced on an image.
• [Photo]: Set when copying photos and graphic documents. Images are reproduced with the focus on
grayscales.
• [Photo (Glossy)]: Set when copying a glossy photography or photo documents printed on glossy inkjet paper.
Images are reproduced with the focus on grayscales in consideration of the glossy.
You can change the resolution to scan a document.
Press the (COPY) button on the operator panel.
1
Set a document in the ADF or on the document glass.
2
Press the button.
3
Press the or button to select [Image settings] and press the button.
4
Press the button to select [Resolution] and press the button.
5
Press the or button to select the value you want to set and press the
6
(OK) button.
If you select [ExtraFine], the reproducibility and gray level of fine lines or small characters will be improved.
Press the (MONO) or (COLOR) button.
7
Press the (MONO) or (COLOR) button.
7
- 34 -
Page 35

2. Copy
Copying a Document with a Colored Background Clearly (Background Removal)
To adjust a level of the document background removal, you can select Auto or OFF, or adjust
in six levels.
If you select [Auto], the background is automatically removed in a level that suits the
document.
• If a greater value of the background removal is set, fine lines, texts or light colors may not be reproduced depending
on the document.
• In the following cases, background color may not be correctly detected and not be eliminated successfully.
- When a custom-size document is loaded
- When a document with the front edge folded is loaded
- When a document missing the front edge or an oblique document is loaded
- When a document having a hole near the front edge is loaded
- When a document is placed without aligning it with the guide on the document glass
Press the (COPY) button on the operator panel.
1
Set a document in the ADF or on the document glass.
2
Press the button.
3
Press the or button to select [Image settings] and press the button.
4
Press the or button to select [Background Removal] and press the
5
button.
Erasing Edge Shadows (Edge Erase)
When you copy a document with the document glass cover opened or when you copy a
book, a black shadow may appear around the edges on the printed copy. This function
enables you to erase the black shadow.
Press the (COPY) button on the operator panel.
1
Set a document in the ADF or on the document glass.
2
Press the button.
3
Press the or button to select [Edge Erase] and press the button.
4
Check that [ON] is selected, and then press the button.
5
Press the numeric keypad to enter a value from 2 to 50 mm in [Width] and
6
then press the (OK) button.
Press the (MONO) or (COLOR) button.
7
Press the or button to select the value you want to set and press the
6
(OK) button.
[3] for [Background removal] is the standard level. To increase a level of the document background removal,
select [4], [5], or [6]. To decrease a level of the document background removal, select [2], [1], or [OFF] (no
removal).
Press the (MONO) or (COLOR) button.
7
- 35 -
Page 36

Removing Show-Through (Show-Through Removal)
Show-Through Removal removes show-through of text from the reverse side. You can select
the removal level from OFF, Low, Middle, or High.
• This function is enabled only when [Background Removal] is set to [Auto].
• This function is enabled only when [Document Type] is set to [Text] or [Text&Photo].
Press the (COPY) button on the operator panel.
1
Set a document in the ADF or on the document glass.
2
Press the button.
3
Press the or button to select [Image settings] and press the button.
4
Press the or button to select [Show-Through Removal] and press the
5
button.
Press the or button to select the value you want to set and press the
6
(OK) button.
2. Copy
• [Middle] is set by default.
• If light color becomes too faint with Middle (default value), set to [Low] (show-through may not be removed
completely).
• If show-through is not completely removed with Middle (default value), set to [High] (light color may not be
represented).
• For documents printed only one side or when reproducing light color, set to [OFF]. (For documents printed on
two side, show-through remains.)
Press the (MONO) or (COLOR) button.
7
- 36 -
Page 37

2. Copy
Color Settings
This section describes color settings when copying.
• Adjusting the Contrast (Contrast)
• Adjusting Hue for Color Copy
• Adjusting Saturation
• Adjusting RGB
Adjusting the Contrast (Contrast)
Differences between bright and dark sections on a document are adjusted to make images
and texts easier to view and read.
Press the (COPY) button on the operator panel.
1
Set a document in the ADF or on the document glass.
2
Press the button.
3
Press the or button to select [Image settings] and press the button.
4
Press the or button to select [Contrast] and press the button.
5
Press the or button to select the value you want to set and press the
6
(OK) button.
Press the (MONO) or (COLOR) button.
7
- 37 -
Page 38

Adjusting Hue for Color Copy Adjusting Saturation
2. Copy
Red/green balance adjustment. Reddish: Enhance red. Greenish: Enhance green.
Press the (COPY) button on the operator panel.
1
Press the button.
2
Press the or button to select [Image settings] and press the button.
3
Press the or button to select [Hue] and press the button.
4
Press the or button to select the value you want to set and press the
5
(OK) button.
Press the (MONO) or (COLOR) button.
6
Saturation setting. Vivid: Enhance image sharpness. Light: Mute color.
Press the (COPY) button on the operator panel.
1
Press the button.
2
Press the or button to select [Image settings] and press the button.
3
Press the or button to select [Saturation] and press the button.
4
Press the or button to select the value you want to set and press the
5
(OK) button.
Press the (MONO) or (COLOR) button.
6
- 38 -
Page 39

Adjusting RGB
Adjust RGB contrast settings.
Press the (COPY) button on the operator panel.
1
Press the button.
2
Press the or button to select [Image settings] and press the button.
3
Press the or button to select [RGB] and press the button.
4
Press the or button to select the value you want to set and press the
5
(OK) button.
Press the (MONO) or (COLOR) button.
6
2. Copy
- 39 -
Page 40

2. Copy
Advanced Copy Settings
This section describes advanced settings when copying.
• Making Multiple Copies on a Sheet of Paper (Repeat)
• Copying Both Sides of a Card to One Side (ID Card Copy)
• Setting Margins (Margin)
Making Multiple Copies on a Sheet of Paper (Repeat)
This function enables you to repeatedly copy the same document on one side of a sheet of
paper. The document can be repeated two or four times.
•Two repeat
• Four repeat
• If [Repeat] is enabled, [Zoom] is automatically set to [Auto]. To specify a zoom rate, enable [Repeat], and then set
[Zoom].
• To copy a document in your preferred orientation, specify the orientation in [Direction] in advance.
Changing the Document Orientation (Direction)
• A part of the document may not be copied depending on the paper, document, or zoom rate.
• If the repeat function is enabled, the paper tray is automatically set.
- 40 -
Press the (COPY) button on the operator panel.
1
Set a document in the ADF or on the document glass.
2
Continuous Scan mode enables you to copy multiple documents at once.
Enabling Continuous Scan Mode (Continuous Scan)
Press the button.
3
Press the or button to select [Repeat] and press the button.
4
Press the or button to select the value you want to set and press the
5
(OK) button.
Page 41

Press the (MONO) or (COLOR) button.
6
2. Copy
Copying Both Sides of a Card to One Side (ID Card Copy)
This function enables you to copy both sides of an ID card, such as a driver's license, on one
side of a sheet of paper.
• You cannot use the ADF for this ID Card Copy function.
• Set the ID card with the upper side facing leftward.
• 2 mm from the edge of the document glass is the scan margin.
• The machine scans an area half the size of the specified paper. If the document is more than half the size of the paper
size, the excess part is discarded.
Press the (COPY) button on the operator panel.
1
Press the button.
2
Press the or button to select [ID Card Copy] and press the button.
3
Press the or button to select [ON] and press the (OK) button.
4
Press the button to go back to the standby screen.
5
Set your card with the front side down on the document glass.
6
- 41 -
Enter the number of copies.
7
Press the (MONO) or (COLOR) button.
8
When the [Please set back side of document.] screen is displayed, place your
9
card with the back side down on the document glass.
If you press [Scan Complete], only the front side is copied without scanning the back side.
Page 42

Check that [Start Scan] is selected, and then press the (OK) button.
10
2. Copy
Setting Margins (Margin)
• Copying with Margins on One Side
• Copying with Margins on Both Sides
The margin function enables you to set margins. This function is useful when you want to
staple or punch holes in copies. You can set the top, bottom, right, and left margins by
specifying the [Top] and [Left] values.
• For Portrait Printing
• Specifying the left margin is suitable for long edge binding printing.
• Specifying the top margin is suitable for short edge binding printing.
• For Landscape Printing
• Specifying the left margin is suitable for short edge binding printing.
• Specifying the top margin is suitable for long edge binding printing.
• A part of a document may not be copied.
• The specified margin values stay active even after you change the zoom rate.
• To copy a document in your preferred orientation, specify the orientation in [Direction] in advance.
Changing the Document Orientation (Direction)
- 42 -
Page 43

• If all the values are set to [0], [Margin] is disabled.
• You can set [Margin] as default so that you do not have to set margins every time you make copies.
• To change the margin values, press the (SETTING) button on the operator panel and select [Admin Setup]
> [Copy Setup] > [Default Settings] > [Margin].
Copying with Margins on One Side
Set margins to a simplex document before copying.
Set [Direction] correctly.
Changing the Document Orientation (Direction)
Press the (COPY) button on the operator panel.
1
Set a document in the ADF or on the document glass.
2
Press the button.
3
Press the or button to select [Margin] and press the button.
4
Press the or button to select [ON] and press the button.
5
To set the left or right margin, press the or button to set margin in [Left]
6
of [Front], and then press the (OK) button.
• To create a margin on the left side of the output, specify a positive value.
• To create a margin on the right side of the output, specify a negative value.
To set the top or bottom margin, press the or button to set margin in
7
[Top] of [Front], and then press the (OK) button.
• To create a margin at the top of the output, specify a positive value.
• To create a margin at the bottom of the output, specify a negative value.
• You do not need to specify the [Back] margin when copying on a single side.
• If you press the button, the screen returns to the previous screen without saving the changes.
Press the button to go back to the standby screen.
8
Enter the number of copies.
9
2. Copy
Press the (MONO) or (COLOR) button.
10
Copying with Margins on Both Sides
When you make duplex copies with [Margin] enabled, you must specify the [Back] margin.
Set [Direction] correctly.
Changing the Document Orientation (Direction)
Press the (COPY) button on the operator panel.
1
Set a document in the ADF or on the document glass.
2
Press the button.
3
Press the button to select [Duplex Copy] and press the button.
4
Press the or button to select value in Duplex Copy and press the
5
button.
Copying on Both Sides of Paper (Duplex Copy)
Press the or button to select [Margin] and press the button.
6
Press the or button to select [ON] and press the button.
7
Enter the [Left] margin and [Top] margin for [Front] and [Back].
8
Press the or button to enter the value. Press the button to move to the next
item.
When all items are entered, press the (OK) button.
Margins you can enter vary depending on the [Direction] you set. Set the margins referring the below.
For portrait documents with long edge binding
•
(1) Enter values in [Left].
Enter a positive value in [Front].
Enter a negative value in [Back].
• For portrait documents with short edge binding
(1) Enter values in [Top].
Enter a positive value in [Front].
- 43 -
Page 44

Enter a negative value in [Back].
• For landscape documents with long edge binding
(1) Enter values in [Top].
Enter a positive value in [Front].
Enter a negative value in [Back].
• For landscape documents with short edge binding
(1) Enter values in [Left].
Enter a positive value in [Front].
Enter a negative value in [Back].
Press the button to go back to the standby screen.
9
Check the set values.
Enter the number of copies.
10
Press the (MONO) or (COLOR) button.
11
• The margins' positions conform to [Direction].
• When using the document glass, Continuous Scan mode is automatically enabled. Follow the on-screen
instructions.
2. Copy
- 44 -
Page 45

3
Scan
Basic Operations of Scan Functions
Sending Scanned Data as an E-mail Attachment
Saving Scanned Data to a Computer
Saving Scanned Data to USB Memory
Saving Scanned Data in a Shared Folder
Page 46

3. Scan
Basic Operations of Scan Functions
This section describes basic operations when scanning.
• Setting to Scan a Document
• Other Settings to Scan
• Items on Transmit and Receipt Journal Report (E-mail/Internet fax/FaxServer)
Setting to Scan a Document
This section describes how to set image quality when scanning documents.
Specifying a Document Type
If you select a document type, the document can be scanned at the most suitable quality.
Press the (SCAN) button on the operator panel.
1
Set a document in the ADF or on the document glass.
2
Setting a Document (User's Manual)
When scanning a document with the machine, a document in the ADF is given priority. Check that there is no
document in the ADF when using the document glass.
Press the or button to select a scan function and press the button.
3
If you selected [USB Memory], go to step 5.
Sending Scanned Data as an E-mail Attachment
Saving Scanned Data to USB Memory
Saving Scanned Data in a Shared Folder
- 46 -
Press the or button to select [Scan Setting] and press the button.
4
Press the or button to select [Image settings] and press the button.
5
Press the or button to select [Document Type] and press the button.
6
Press the or button to select the value you want to set and press the
7
(OK) button.
• [Text]: Set when copying a text document.
• [Text/Photo]: Set when copying a document having texts and photos. The well-balanced text and photo are
reproduced on an image.
• [Photo]: Set when copying photos and graphic documents. Images are reproduced with the focus on
grayscales. In [Photo] mode, it takes longer to scan.
• [Photo (Glossy)]: Set when copying a glossy photography or photo documents printed on glossy inkjet paper.
Images are reproduced with the focus on grayscales in consideration of the glossy.
Page 47

• If you select [Text], the gray level may decrease depending on the document.
• If you select [Photo] or [Photo (Glossy)], fine texts or lines may be blurred depending on the document. It takes
longer to scan.
• If you select [Photo (Glossy)], images may be bright.
Press the or button to select a scan function and press the button.
3
If you selected [USB Memory], go to step 5.
Sending Scanned Data as an E-mail Attachment
Saving Scanned Data to USB Memory
Saving Scanned Data in a Shared Folder
3. Scan
Change other settings if necessary, and then press the (MONO) or
8
(COLOR) button.
Specifying a Scan Resolution
Specify a resolution to scan a document to obtain the most suitable quality.
Press the (SCAN) button on the operator panel.
1
Set a document in the ADF or on the document glass.
2
Press the or button to select a scan function and press the button.
3
If you selected [USB Memory], go to step 5.
Sending Scanned Data as an E-mail Attachment
Saving Scanned Data to USB Memory
Saving Scanned Data in a Shared Folder
Press the or button to select [Scan Setting] and press the button.
4
Press the or button to select [Image settings] and press the button.
5
Press the or button to select [Resolution] and press the button.
6
Change other settings if necessary, and then press the (MONO) or
7
(COLOR) button.
Adjusting the Density
You can adjust the density in seven levels.
Press the (SCAN) button on the operator panel.
1
Set a document in the ADF or on the document glass.
2
Press the or button to select [Scan Setting] and press the button.
4
Press the or button to select [Image settings] and press the button.
5
Press the or button to select [Density] and press the button.
6
Press the or button to select the value you want to set and press the
7
(OK) button.
[0] is the standard value. To increase the density, select [+1], [+2], or [+3] (darkest). To decrease the density,
select [-1], [-2], or [-3] (lightest).
Change other settings if necessary, and then press the (MONO) or
8
(COLOR) button.
Scanning a Document with a Colored Background Clearly (Background Removal)
To adjust a level of the document background removal, you can select Auto or OFF, or adjust
in six levels.
If you select [Auto], the background is automatically removed in a level that suits the
document.
• In the following cases, background color may not be correctly detected and not be eliminated successfully.
- When a custom-size document is loaded
- When a document with the front edge folded is loaded
- When a document missing the front edge or an oblique document is loaded
- When a document having a hole near the front edge is loaded
- When a document is placed without aligning it with the guide on the document glass
• If a greater value of the background removal is set, fine lines, texts or light colors may not be reproduced depending
on the document.
- 47 -
Page 48

3. Scan
Press the (SCAN) button on the operator panel.
1
Set a document in the ADF or on the document glass.
2
Press the or button to select a scan function and press the button.
3
If you selected [USB Memory], go to step 5.
Sending Scanned Data as an E-mail Attachment
Saving Scanned Data to USB Memory
Saving Scanned Data in a Shared Folder
Press the or button to select [Scan Setting] and press the button.
4
Press the or button to select [Image settings] and press the button.
5
Press the or button to select [Background Removal] and press the
6
button.
Press the or button to select the value you want to set and press the
7
(OK) button.
Change other settings if necessary, and then press the (MONO) or
8
(COLOR) button.
Saving Scanned Data in a Shared Folder
Press the or button to select [Scan Setting] and press the button.
4
Press the or button to select [Image settings] and press the button.
5
Press the or button to select [Show-Through Removal] and press the
6
button.
Press the or button to select the value you want to set and press the
7
(OK) button.
• [Middle] is set by default.
• If light color becomes too faint with Middle (default value), set to [Low] (show-through may not be removed
completely).
• If show-through is not completely removed with Middle (default value), set to [High] (light color may not be
represented).
• For documents printed only one side or when reproducing light color, set to [OFF]. (For documents printed on
two side, show-through remains.)
Change other settings if necessary, and then press the (MONO) or
8
(COLOR) button.
Removing Show-Through (Show-Through Removal)
Show-Through Removal removes show-through of text from the reverse side. You can select
the removal level from OFF, Low, Middle, or High.
• This function is enabled only when [Background Removal] is set to [Auto].
• This function is enabled only when [Document Type] is set to [Text] or [Text&Photo].
Press the (SCAN) button on the operator panel.
1
Set a document in the ADF or on the document glass.
2
Press the or button to select a scan function and press the button.
3
If you selected [USB Memory], go to step 5.
Sending Scanned Data as an E-mail Attachment
Saving Scanned Data to USB Memory
Adjusting the Contrast
Differences between bright and dark sections on a document are adjusted to make images
and texts easier to view and read.
Press the (SCAN) button on the operator panel.
1
Set a document in the ADF or on the document glass.
2
Press the or button to select a scan function and press the button.
3
If you selected [USB Memory], go to step 5.
Sending Scanned Data as an E-mail Attachment
Saving Scanned Data to USB Memory
Saving Scanned Data in a Shared Folder
Press the or button to select [Scan Setting] and press the button.
4
Press the or button to select [Image settings] and press the button.
5
- 48 -
Page 49

3. Scan
Press the or button to select [Contrast] and press the button.
6
Press the or button to select the value you want to set and press the
7
(OK) button.
Change other settings if necessary, and then press the (MONO) or
8
(COLOR) button.
Adjusting the Hue
Press the (SCAN) button on the operator panel.
1
Set a document in the ADF or on the document glass.
2
Press the or button to select a scan function and press the button.
3
If you selected [USB Memory], go to step 5.
Sending Scanned Data as an E-mail Attachment
Saving Scanned Data to USB Memory
Saving Scanned Data in a Shared Folder
Press the or button to select [Scan Setting] and press the button.
4
Press the or button to select [Image settings] and press the button.
5
Press the or button to select [Hue] and press the button.
6
Press the or button to select the value you want to set and press the
7
(OK) button.
Change other settings if necessary, and then press the (MONO) or
8
(COLOR) button.
Adjusting the Saturation
Press the (SCAN) button on the operator panel.
1
Set a document in the ADF or on the document glass.
2
Press the or button to select a scan function and press the button.
3
If you selected [USB Memory], go to step 5.
Sending Scanned Data as an E-mail Attachment
Saving Scanned Data to USB Memory
Saving Scanned Data in a Shared Folder
Press the or button to select [Scan Setting] and press the button.
4
Press the or button to select [Image settings] and press the button.
5
Press the or button to select [Saturation] and press the button.
6
Press the or button to select the value you want to set and press the
7
(OK) button.
Change other settings if necessary, and then press the (MONO) or
8
(COLOR) button.
Adjusting RGB
Press the (SCAN) button on the operator panel.
1
Set a document in the ADF or on the document glass.
2
Press the or button to select a scan function and press the button.
3
If you selected [USB Memory], go to step 5.
Sending Scanned Data as an E-mail Attachment
Saving Scanned Data to USB Memory
Saving Scanned Data in a Shared Folder
Press the or button to select [Scan Setting] and press the button.
4
Press the or button to select [Image settings] and press the button.
5
Press the or button to select [RGB] and press the button.
6
Press the or button to select the value you want to set and press the
7
(OK) button.
- 49 -
Page 50

Change other settings if necessary, and then press the (MONO) or
8
(COLOR) button.
Erasing Edge Shadows (Edge Erase)
When you scan a document with the document glass cover opened or when you scan a
book, a black shadow may appear around the edges on the scanned image. The edge erase
function allows you to erase the black shadow.
[Edge Erase] is set to [ON], and [Width] to 5 mm by factory default.
The default value of the edge width to erase can be changed by pressing the (SETTING) button on the operator
panel and selecting [Admin Setup] > [Scanner Setup] > [Default Settings] > [Edge Erase] > [ON] > [Width].
Press the (SCAN) button on the operator panel.
1
Set a document in the ADF or on the document glass.
2
Press the or button to select a scan function and press the button.
3
If you selected [USB Memory], go to step 5.
Sending Scanned Data as an E-mail Attachment
Saving Scanned Data to USB Memory
Saving Scanned Data in a Shared Folder
Press the or button to select [Scan Setting] and press the button.
4
Press the or button to select [Edge Erase] and press the button.
5
Press the or button to select [ON] and press the (OK) button.
6
Press the numeric keypad to enter a value you want to set and then press the
7
(OK) button.
Change other settings if necessary, and then press the (MONO) or
8
(COLOR) button.
3. Scan
Other Settings to Scan
This section describes how to read documents for the scan function.
Scanning Multiple Documents Continuously (Continuous Scan)
To scan multiple documents as a single job, enable Continuous Scan mode.
In Continuous Scan mode, you can scan your documents from the ADF, document glass, or
both of them.
Press the (SCAN) button on the operator panel.
1
Set the first sheet of a document in the ADF or on the document glass.
2
Press the or button to select a scan function and press the button.
3
If you selected [USB Memory], go to step 5.
Sending Scanned Data as an E-mail Attachment
Saving Scanned Data to USB Memory
Saving Scanned Data in a Shared Folder
Press the button to select [Scan Setting] and press the button.
4
Press the or button to select [Continuous Scan] and press the
5
button.
Press the or button to select [ON] and press the (OK) button.
6
Change other settings if necessary, and then press the (MONO) or
7
(COLOR) button.
When the [Please set next document] screen is displayed, set the next
8
document in the ADF or on the document glass.
If you set the next document to a different place, remove the document from the place you used first.
- 50 -
Check that [Start Scan] is selected, and then press the (OK) button.
9
When scanning all sets of the documents is complete, press the button to
10
select [Scan Complete] and press the (OK) button.
Page 51

3. Scan
Specifying a Scan Size
You can specify the suitable size to scan a document.
Press the (SCAN) button on the operator panel.
1
Set a document in the ADF or on the document glass.
2
Press the or button to select a scan function and press the button.
3
If you selected [USB Memory], go to step 5.
Sending Scanned Data as an E-mail Attachment
Saving Scanned Data to USB Memory
Saving Scanned Data in a Shared Folder
Press the button to select [Scan Setting] and press the button.
4
Check that [Scan Size] is selected, and then press the button.
5
Press the or button to select the scan size, and then press the (OK)
6
button.
For both of the ADF and document glass, available custom sizes are as follows. Width: 105 to 297 mm / Height:
148 to 432 mm
*For custom sizes of 210 mm or more in height, duplex scanning is available.
Change other settings if necessary, and then press the (MONO) or
7
(COLOR) button.
Press the or button to select a scan function and press the button.
3
If you selected [USB Memory], go to step 5.
Sending Scanned Data as an E-mail Attachment
Saving Scanned Data to USB Memory
Saving Scanned Data in a Shared Folder
Press the button to select [Scan Setting] and press the button.
4
Press the button to select [Duplex Scan] and press the button.
5
Press the or button to select the scan method, and then press the
6
(OK) button.
Change other settings if necessary, and then press the (MONO) or
7
(COLOR) button.
Changing the Document Orientation (Direction)
You can specify the orientation of images.
Specify the top edge position of the image.
Press the (SCAN) button on the operator panel.
1
Set a document in the ADF or on the document glass.
2
Press the or button to select a scan function and press the button.
3
If you selected [USB Memory], go to step 5.
Scanning a Duplex Document (Duplex Scan)
This section describes how to scan two-sided documents.
• Use standard size plain paper. Use of paper other than standard size plain paper may cause paper jams.
• To scan a duplex document, set the document in the ADF.
Press the (SCAN) button on the operator panel.
1
Set a document in the ADF.
2
- 51 -
Sending Scanned Data as an E-mail Attachment
Saving Scanned Data to USB Memory
Saving Scanned Data in a Shared Folder
Press the button to select [Scan Setting] and press the button.
4
Press the button to select [Direction], and then press the button.
5
Press the or button to select the document orientation, and then press
6
the (OK) button.
Change other settings if necessary, and then press the (MONO) or
7
(COLOR) button.
Page 52

3. Scan
Specifying a File Name
You can specify a name of a scanned data file.
Press the (SCAN) button on the operator panel.
1
Set a document in the ADF or on the document glass.
2
Press the or button to select a scan function and press the button.
3
If you selected [USB Memory], go to step 5.
Sending Scanned Data as an E-mail Attachment
Saving Scanned Data to USB Memory
Saving Scanned Data in a Shared Folder
Press the button to select [Scan Setting] and press the button.
4
Press the or button to select [File Name] and press the button.
5
Press the , , , or button to enter a file name.
6
You can enter up to 64 characters.
Select [Enter], and then press the (OK) button.
7
Change other settings if necessary, and then press the (MONO) or
8
(COLOR) button.
Press the button to select [Scan Setting] and press the button.
4
Press the or button to select [File Format] and press the button.
5
Press the or button to select the item you want to set and press the
6
button.
Press the or button to select the file format you want to set and press
7
the (OK) button.
The available file formats vary depending on the selected color type.
Color type File format
Color Single-PDF, Multi-PDF, Single-HC-PDF, Multi-HC-PDF, Multi-PDF/A, Single-
TIFF, Multi-TIFF, JPEG, XPS
Grayscale Single-PDF, Multi-PDF, Single-HC-PDF, Multi-HC-PDF, Multi-PDF/A, Single-
Mono Single-PDF, Multi-PDF, Multi-PDF/A, Single-TIFF, Multi-TIFF, XPS
Change other settings if necessary, and then press the (MONO) or
8
(COLOR) button.
Specifying a File Compression Rate
Press the (SCAN) button on the operator panel.
1
TIFF, Multi-TIFF, JPEG, XPS
Specifying a File Format
You can specify a file format of a scanned document.
Press the (SCAN) button on the operator panel.
1
Set a document in the ADF or on the document glass.
2
Press the or button to select a scan function and press the button.
3
If you selected [USB Memory], go to step 5.
Sending Scanned Data as an E-mail Attachment
Saving Scanned Data to USB Memory
Saving Scanned Data in a Shared Folder
- 52 -
Set a document in the ADF or on the document glass.
2
Press the or button to select a scan function and press the button.
3
Sending Scanned Data as an E-mail Attachment
Saving Scanned Data to USB Memory
Saving Scanned Data in a Shared Folder
Press the or button to select [Compression Rate / Color, Grayscale]
4
and press the button.
Press the or button to select the item you want to set and press the
5
button.
Change other settings if necessary, and then press the (MONO) or
6
(COLOR) button.
Page 53

3. Scan
Encrypting a PDF File
When converting a scanned document to a PDF file, you can encrypt the file. You can set an
encryption level, a document open password, a permission password, and use permissions
for the created PDF file. The higher the encryption level is, the higher the security level is.
A document open password is intended to open an encrypted PDF file. A document open
password cannot be the same as a permission password. You can enter up to 32 characters.
A permission password is intended to control printing, extracting, editing, or other operations
for encrypted PDF files. A permission password cannot be the same as a document open
password. You can enter up to 32 characters.
• [Encrypted PDF] can be selected only if [File Format] is set to [PDF] or [HC-PDF]. [PDF/A] cannot be selected.
• To encrypt a PDF file, you must set a document open password or permission password.
• The permission setting items for printing and editing a PDF file vary depending on the encryption level.
• A permission to print a document, a permission to extract text and graphic, and a permission to change a document
are displayed only if you select [Enable] or [Apply Default Password] for [Permissions Password].
Press the (SCAN) button on the operator panel.
1
Set a document in the ADF or on the document glass.
2
Press the or button to select a scan function and press the button.
3
If you selected [USB Memory], go to step 5.
Sending Scanned Data as an E-mail Attachment
Saving Scanned Data to USB Memory
Saving Scanned Data in a Shared Folder
Press the button to select [Scan Setting] and press the button.
4
Press the or button to select [Encrypted PDF] and press the button.
5
Press the button to select [Encrypt] and press the button.
6
Press the or button to select the encryption level, and then press the
7
(OK) button.
To set a document open password, press the or button to select
8
[Enable] or [Apply Default Password] and then press the button.
If you want to select [Apply Default Password], press the (SETTING) button on
the operator panel and select [Admin Setup] > [Scanner Setup] > [Default Settings]
>[Encrypted PDF Setting], and then set the password in advance.
Administrator Setup
Press the button to enter the password, and then press the (OK) button.
9
You can enter up to 32 characters.
Re-enter the password and select [Enter], and then press the (OK) button.
10
To set a permission password, press the or button to select [Enable] or
11
[Apply Default Password] and then press the (OK) button.
Press the button to enter the password and select [Enter], and then press
12
the (OK) button.
A permission password cannot be the same as a document open password. You can
enter up to 32 characters.
Re-enter the password and select [Enter], and then press the (OK) button.
13
Select a permission to print, and then press the (OK) button.
14
Select a permission to extract, and then press the (OK) button.
15
Select a permission to edit, and then press the (OK) button.
16
Check the security settings, and then press the (OK) button.
17
Change other settings if necessary, and then press the (MONO) or
18
(COLOR) button.
- 53 -
Page 54

3. Scan
Items on Transmit and Receipt Journal Report (E-mail/Internet fax/FaxServer)
This section describes Items on Transmit and Receipt Journal Report (E-mail/Internet fax/
FaxServer).
For instructions on how to print Transmit and Receipt Journal Report, refer to "Checking the
Information of the Machine
To print Transmit and Receipt Journal Report of E-mail/Internet fax/FaxServer automatically,
press the (SETTING) button on the operator panel and select [Admin Setup] >
[Scanner Setup] > [E-mail Setup], and then set [A/R Full Print] to [ON].
Scanner Setup
".
Item Description
5 Result OK: Communication success
6 Error Code Indicates the error code when a
Transmission history of receiving fax and forwarding received e-mail is not displayed on Transmit and Receipt Journal
Report of E-mail/Internet fax/FaxServer.
You can check from the Web page "Transmission Settings" - "Automated Delivery Log".
For details, see "Transmission Settings" in "
About Items That Can be Set or Checked".
ERROR: Communication failure
communication error occurs.
For details, see "E-mail/Internet fax/
FaxServer Error Code".
When the communication is
successful, it is blank.
Item Description
1 Distant Station • Print Scan To E-mail, Internet Fax
2 Uni/Multi When you send to multiple
3 Page Sending: Indicates pages of the
4 TxKind • IFAX: Send with Internet Fax
Sending, and e-mail attachment
files: Indicates an e-mail address
of the other party (destination or
originator).
• Send with Scan To Fax Server:
Indicates the destination number.
recipients, this indicates "Multicast".
scanned document.
Receiving: Always blank.
• FAXSERVER: Send with Scan To
Fax Server
For Scan To Fax Server and email attachment file printing, it is
blank.
- 54 -
Page 55

3. Scan
Sending Scanned Data as an E-mail Attachment
This section describes how to send scanned data as an e-mail attachment.
• Before Using Scan To E-mail (User's Manual)
• Entering E-mail Address to Send E-mail (User's Manual)
•
Specifying a Destination from Address Book or Group List
• Specifying a Destination Using One-touch Button
• Specifying a Destination from Transmission History
• Specifying a Destination Searching LDAP Server
• Setting the Sender's Address
• Setting the Reply Address
• Registering an E-mail Template
• Using an E-Mail Template
• Saving Transmission Data
• Checking Results of Scan To E-mail
Specifying a Destination from Address Book or Group List
You can select a destination from the address book or group list. You must register
destinations in the address book or group list in advance.
For details on how to add an e-mail address to the address book or group list, refer to "
Address
".
Press the (SCAN) button on the operator panel.
1
Set a document in the ADF or on the document glass.
2
Check that [E-mail] is selected, and then press the button.
3
Check that [Add Destination] is selected, and then press the button.
4
Check that [To: ---Empty---] is selected, and then press the button.
5
Press the or button to select [Address Book] or [Group List] and press
6
the button.
The address book or group list are displayed.
Press the or button to select destinations, and then press the (OK)
7
button.
The check box is selected. You can select multiple destinations.
E-mail
- 55 -
When you select all destinations needed, press the button.
8
Operation menu is displayed.
Check that [Complete] is selected, and then press the (OK) button. The
9
destinations are entered in the To field.
Press the button to display the [Add Destination] screen.
10
When you complete the selection of all the destinations, press the (OK)
11
button.
Set scan settings if necessary.
12
Press the (OK) button.
13
Press the (MONO) or (COLOR) button.
14
Page 56

Specifying a Destination Using One-touch Button Specifying a Destination from Transmission History
3. Scan
Press the (SCAN) button on the operator panel.
1
Set a document in the ADF or on the document glass.
2
Check that [E-mail] is selected, and then press the button.
3
Check that [Add Destination] is selected, and then press the button.
4
Press the (One-touch) button to which the destination is registered.
5
If you register E-mail addresses, the first 16 E-mail addresses are automatically registered to the (Onetouch) buttons No. 1 to 16.
Press the (SCAN) button to specify E-mail addresses registered to the (One-touch) buttons No.1
to 16 as destinations.
To select the (One-touch) buttons No. 9 to 16, press the (One-touch) button with the
(SHIFT) button pressed.
Set scan settings if necessary.
6
Press the (OK) button.
7
Press the (MONO) or (COLOR) button.
8
Press the (SCAN) button on the operator panel.
1
Set a document in the ADF or on the document glass.
2
Check that [E-mail] is selected, and then press the button.
3
Press the or button to select [Tx History] and press the button.
4
Select the destination.
5
You can select multiple items.
When you complete the selection of all the destinations, press the (OK)
6
button.
Set scan settings if necessary.
7
Press the (OK) button.
8
Press the (MONO) or (COLOR) button.
9
- 56 -
Page 57

Specifying a Destination Searching LDAP Server
You can search for a destination from a list on the LDAP server. There are two search
methods, as shown below.
• [Simple Search]: You can run a search with only one keyword as a user
name. You can only search for character strings included in usernames, and
not in e-mail addresses.
• [Advanced Search]: You select search conditions to search for items that
include all the specified keywords or any of the keywords. You can specify
user names or e-mail addresses as search keywords.
Up to 100 search results are displayed.
Set scan settings if necessary.
12
Press the (OK) button.
13
Press the (MONO) or (COLOR) button.
14
3. Scan
For details on setting the LDAP server, refer to "Setting the LDAP Server
Press the (SCAN) button on the operator panel.
1
Set a document in the ADF or on the document glass.
2
Check that [E-mail] is selected, and then press the button.
3
Press the or button to select [LDAP] and press the button.
4
Press the or button to select [Simple Search] or [Advanced Search],
5
and press the button.
Enter a keyword to search.
6
Select [Enter], and then press the (OK) button.
7
When the search results are displayed, press the or button to select
8
destinations, and then press the (OK) button.
You can select multiple items.
Press the or button to select all destinations needed, and then press
9
the (OK) button.
Check that [Complete] is selected, and then press the (OK) button.
10
Press the button to go back to the standby screen.
11
".
- 57 -
Page 58

Setting the Sender's Address Setting the Reply Address
3. Scan
Press the (SETTING) button on the operator panel.
1
Press the button to select [Admin Setup] and press the button.
2
Enter the administrator password, and then press the (OK) button.
3
The factory default administrator password is "999999". If the administrator password is changed, enter the
updated password.
Press the or button to select [Scanner Setup] and press the button.
4
Press the button to select [E-mail Setup] and press the button.
5
Press the or button to select [From / Reply To] and press the button.
6
Press the or button to select [Reply To: ] and press the button.
7
Specify a destination.
8
Select [Enter], and then press the (OK) button.
9
Press the button to go back to the standby screen.
10
- 58 -
Page 59

Registering an E-mail Template Using an E-Mail Template
3. Scan
You can register up to five templates with a variety of subjects and body text.
Press the (SETTING) button on the operator panel.
1
Press the button to select [Admin Setup] and press the button.
2
Enter the administrator password, and then press the button.
3
The factory default administrator password is "999999". If the administrator password is changed, enter the
updated password.
Press the or button to select [Scanner Setup] and press the button.
4
Press the button to select [E-mail Setup] and press the button.
5
Press the button to select [Template] and press the button.
6
Press the or button to select [Edit Subject] or [Edit Body] and press the
7
button.
Select the number to register, and then press the button.
8
Enter subject and body texts you want to register.
9
Up to 80 characters for a subject and up to 256 characters for body text can be
entered.
You can use subjects and body texts that are registered as a template in standard e-mails.
Press the (SCAN) button on the operator panel.
1
Set a document in the ADF or on the document glass.
2
Check that [E-mail] is selected, and then press the button.
3
Press the button to select [Scan Setting] and press the button.
4
Press the or button to select [Edit E-mail] and press the button.
5
Press the or button to select [Subject] or [E-mail Body] and press the
6
button.
[Select Subject] or [Select Text] is displayed.
Press the or button to select the subject or text to select and press the
7
(OK) button.
Press the button to go back to the [Scan Setting] screen, select the
8
destination entry method.
Specify a destination.
9
Press the (MONO) or (COLOR) button.
10
Select [Enter], and then press the (OK) button.
10
Press the button to go back to the standby screen.
11
Setting the Sender's Address
- 59 -
Page 60

Saving Transmission Data Checking Results of Scan To E-mail
3. Scan
You can save data sent via Scan To E-mail, etc. For details, refer to "Saving Sent and
Received Data (Transmission Data Save)
".
You can check the Scan To E-mail result in Transmit and Receipt Journal Report.
For details, refer to "Items on Transmit and Receipt Journal Report (E-mail/Internet fax/
FaxServer)
".
- 60 -
Page 61

3. Scan
Saving Scanned Data to a Computer
This section describes how to save scanned data to a computer.
Use Scan To Computer function of the machine or use software of the computer to scan.
To scan, use one of the following software.
For Windows
ActKey: To be installed if you install software from [Install Optional Software].
WSD: Preinstalled on Windows.
For Mac OS X
Image Capture: Supplied with Mac OS X
• Changing the Machine Settings
• Using ActKey
• Using WSD Scan
• Using Image Capture (Mac OS X)
• Using a Scanner Supported Application
• Adding Destination for Scan To Computer
• Deleting Destination for Scan To Computer
Changing the Machine Settings
Enabling Network TWAIN
Enable the Network TWAIN function so that you can use the Scan to Computer function on a
computer that is connected via a network.
Press the (SETTING) button on the operator panel.
1
Press the button once to select [Admin Setup] and press the button.
2
Enter the administrator password, and then press the (OK) button.
3
The factory default administrator password is "999999". If the administrator password is changed, enter the
updated password.
Press the or button to select [Scanner Setup] and press the button.
4
Press the or button to select [TWAIN Setup] and press the button.
5
Press the or button to select [Network TWAIN] and check that [ON] is
6
set.
Press the button until the home screen is displayed.
7
Setting PC Scan mode
Set the scan mode when scanning from a computer. This machine has the following three
scan modes.
- 61 -
Page 62

3. Scan
• Simple Scan mode: You can start scanning anytime if the machine is in
standby status.
• Manual Scan mode: Turn on the Remote Scan function on the display screen
before starting scanning.
• Secure Scan mode: You can just operate from a computer specified when
you turn on the remote scan function on the display screen. Only one
computer can be connected at a time.
If you perform a remote scan via the WSD Scan connection, you can scan from computers
that are already registered in this machine, regardless of the Remote Scan modes.
Press the (SETTING) button on the operator panel.
1
Press the button to select [Admin Setup] and press the button.
2
Enter the administrator password, and then press the (OK) button.
3
The factory default administrator password is "999999". If the administrator password is changed, enter the
updated password.
Press the or button to select [Scanner Setup] and press the button.
4
Press the or button repeatedly to select [PC Scan Mode] and press the
5
button.
Press the or button to select the mode and press the button.
6
Press the button until the home screen is displayed.
7
If [Manual Scan Mode] or [Secure Scan Mode] is selected, remote scan menus appear
on the home screen.
Using ActKey
If you use ActKey, you can start scanning according to the settings you specified just by
clicking the button.
ActKey and scanner driver are included in the software DVD-ROM, and will be automatically
installed if [Install Optional Software] is selected when installing the software.
Starting Scanning on a Device (ActKey)
Press the (SCAN) button on the operator panel.
1
Set a document in the ADF or on the document glass.
2
Press the button to select [Computer] and press the button.
3
Check that [Select A Connecting PC] is displayed, and then press the
4
button.
According to the connection method of the machine and computer, press the
5
or button to select [From Network] or [From USB Interface], and then
press the (OK) button.
For the network connection, destination computer to which scan data will be
6
sent is displayed on the operator panel. Press the or button to select
the destination, and then press the (OK) button.
If the target computer is not listed in the destination computers, register the computer with Network Configuration.
Registering the Machine (New Device) to a Computer Using Network Configuration
Press the button to select [Select An Application] and press the (OK)
7
button.
- 62 -
• If you select [Application], the application that you specify [Application-1] of ActKey or dedicated application for
Windows starts, and then the scanned image is displayed on the application.
• If you select [Folder], the scanned document is saved in the specified folder.
• If you select [PC-FAX], a fax transmission application starts. After sending the scanned document, send a fax
with the fax transmission application on your computer.
Page 63

3. Scan
Press the (MONO) or (COLOR) button.
8
If the machine is connected via USB and ActKey does not start on the computer even when
the (MONO) or (COLOR) button is pressed, follow the steps to start ActKey.
Click [Start], and then select [Devices and Printers].
1
Right-click [OKI MC563], and then [Scan properties].
2
If the [User Account Control] dialog box is displayed, click [Yes].
Click the [Events] tab.
3
Select an event from [Select an event].
4
Select [Start this program], and then select [ActKey].
5
Repeat steps 4 and 5 so that all events are set to [ActKey].
6
Click [OK].
7
Starting Scanning from a Computer (Remote Scan) (ActKey)
Set a document in the ADF or on the document glass.
1
If PC Scan Mode is set to [Manual Scan Mode] or [Secure Scan Mode], press
2
the or button to select [Remote Scan TWAIN] and press the button.
Click the [Folder] button.
4
Scanning starts and scanned documents are stored in a specified folder.
Sending Scanned Data by Fax (ActKey)
For the PC-FAX transmission function, the resolution is fixed to 200 dpi.
Set a document in the ADF or on the document glass.
1
If PC Scan Mode is set to [Manual Scan Mode] or [Secure Scan Mode], press
2
the or button to select [Remote Scan TWAIN] and press the button.
Click [Start], and then select [All Programs] > [Okidata] > [ActKey] > [ActKey].
3
Click [PC-FAX] on a computer.
4
If PC Scan Mode is set to [Simple Scan Mode], go to step 3.
Click [Start] on the computer screen, and then select [All Programs] >
3
[Okidata] > [ActKey] > [ActKey].
If the scanner selection screen is displayed, select [OKI Universal Twain USB] for a
USB connection or [OKI Universal Twain ****** (*; the last six digits of the MAC
address)] for a network connection, and then click [OK].
- 63 -
Page 64

3. Scan
Send a fax by following the on-screen instructions.
5
Changing the Setting of Each ActKey Button (ActKey)
Click a button to set.
3
You can change the settings of each of four scan buttons.
Start ActKey.
1
Select [Button settings] from the [Options] menu.
2
- 64 -
Change the setting if necessary.
4
• The default save destination is automatically created when ActKey is installed.
• The scanned data is saved in the save destination folder with "file name (date) sequential number".
Click [OK].
5
Page 65

3. Scan
Registering the Machine (New Device) to a Computer Using Network Configuration
You can add the network connected machine (new device) to a computer with the scanner
driver of the machine installed using Network Configuration.
Network Configuration is installed at the same time as ActKey is installed, and is
automatically included in the task bar when you start a computer.
Click [Start], and then select [All Programs] > [Okidata] > [ActKey] > [Tools] >
1
[Network Configuration].
Right-click [Show Network Configuration] in the task tray.
2
Click [Start], and then select [All Programs] > [Okidata] > [ActKey] > [Tools] >
1
[Network Configuration].
Right-click [Show Network Configuration] in the task tray.
2
Select the scanner driver to change and select [Edit Scanner] from the
3
[Scanner] menu.
The setting value that is currently set to the computer is displayed.
Change to the address and port number of the machine. For address, IP
4
address or device short name can be specified.
Select [Add Scanner] from the [Scanner] menu.
3
Select the scanner driver name to be added.
4
Add the new machine by following the procedure when the installer of the
5
scanner driver starts.
Changing the Setting Information of the Registered Machine Using Network Configuration
Change the address of the machine registered to a computer as a network scanner. Update
the address and port number if you cannot scan using ActKey because the address of the
machine was changed.
Registering Computer Using Network Configuration
Register your computer using Network Configuration when the computer is not registered to
Network Scan Destination of Scan To Computer of the machine.
Your computer may automatically be registered when the scanner driver is installed usually.
Check that the machine is turned on.
1
- 65 -
Page 66

Click [Start], and then select [All Programs] > [Okidata] > [ActKey] > [Tool] >
2
[Network Configuration].
Right-click [Show Network Configuration] in the task tray.
3
Select the scanner driver to be used, and then select [Properties] from the
4
[Scanner] menu.
3. Scan
Using WSD Scan
You can set WSD Scan from Scan To Computer or Remote Scan via a network.
To use WSD Scan, the machine must be connected to a computer with the following installed
via a network: Windows 10/Windows 8.1/Windows 8/Windows Vista/Windows 7/Windows
Server 2012/Windows Server 2012 R2/Windows Server 2008/Windows Server 2008 R2
Click the [Register] tab.
5
As the computer information, the computer name, IP address and port number are
displayed.
You do not need to set the computer name, because the computer's host name is
automatically acquired.
Computer name (host name) is used as default address, but you can clear the "use
computer name (host name)" check box and select IP address of the computer.
If multiple network cards are installed in the computer, multiple IP addresses are
displayed.
Select the IP address of the network card that is currently used.
Change the current setting for the port number that is displayed if necessary.
Click [Register] to register your computer to Network Scan Destination of Scan
6
To Computer of the machine.
Deleting Computer Using Network Configuration
You can delete unnecessary computers from Network Scan Destination of Scan To
Computer of the machine.
Click [Start], and then select [All Programs] > [Okidata] > [ActKey] > [Tools] >
1
[Network Configuration].
To use the WSD Scan function, follow the steps to install the machine to the computer as a
WSD device.
Check the network connection before starting the procedure below.
Enabling WSD Scan
To use the Scan To Computer (WSD Scan) function and the Remote Scan (WSD Scan)
function via the WSD Scan connection, follow the procedure below.
Press the (SETTING) button on the operator panel.
1
Press the button to select [Admin Setup] and press the button.
2
Enter the administrator password, and then press the (OK) button.
3
The factory default administrator password is "999999". If the administrator password is changed, enter the
updated password.
Press the or button to select [Scanner Setup] and press the button.
4
Press the or button to select [WSD Scan Setup] and press the
5
button.
Right-click [Show Network Configuration] in the task tray.
2
Select [Properties] from the [Scanner] menu.
3
Click the [Unregister] tab.
4
Select the computer name to unregister, and then click [Unregister].
5
Press the or button to check that [WSD Scan] is set to [Enable].
6
Press the button until the home screen is displayed.
7
Installing This Machine as a WSD Device to a Computer
Install this machine as a WSD Scan device with a Windows computer that supports WSD
Scan so that you can use the WSD Scan function.
- 66 -
Page 67

• If a computer for WSD Scan recognizes this machine and the IP address of this machine is changed, you must
register from the beginning. Uninstall this machine, and then install it again.
• Before starting this installation, check that Network Search is enabled.
From [Control Panel], click [Network and Internet] > [Network and Sharing Center] > [Change advanced sharing
settings], select [Turn on network discovery] for [Network discovery], and then click [Save Changes].
You can register up to 50 computers in this machine.
Enter the administrator password, and then press the (OK) button.
3
The factory default administrator password is "999999". If the administrator password is changed, enter the
updated password.
Press the or button to select [Scanner Setup] and press the button.
4
Press the or button to select [WSD Scan Setup] and press the
5
button.
3. Scan
Select [Computer] from the [Start] menu and select [Network].
1
Right-click the [OKI MC563] icon under [Multifunction Devices], and then
2
select [Install].
If the [User Account Control] dialog box is displayed, click [Yes].
When a balloon message is displayed to inform you that the installation is
3
complete on the task bar, click the balloon to check the details, and then click
[x (Close)].
Press the (SCAN) button on the machine.
4
Press the button to select [Computer] and press the button.
5
Press the button when [Select A Connecting PC] is displayed.
6
Press the or button to select [From WSD Scan] and press the (OK)
7
button.
Check that a computer is displayed on this machine as a connection
8
destination of WSD Scan.
Setting a Binding Position for Duplex Scanning (WSD)
To set a binding position for duplex scanning with Scan To Computer and Remote Scan via
WSD Scan, follow the procedure below.
Press the (SETTING) button on the operator panel.
1
Press the button to select [Admin Setup] and press the button.
2
Press the or button to select [Binding] and press the button.
6
Press the or button to select biding position, and then press the
7
(OK) button.
Press the button until the home screen is displayed.
8
Starting Scanning from a Device (WSD)
Press the (SCAN) button on the operator panel.
1
Set a document in the ADF or on the document glass.
2
Press the button to select [Computer] and press the button.
3
Check that [Select A Connecting PC] is displayed, and then press the
4
button.
Press the or button to select [From WSD Scan] and press the (OK)
5
button.
Select a destination computer to which the data is sent.
6
Press the (MONO) or (COLOR) button.
7
Operating Scan Function from a Computer (Remote Scan) (WSD)
Select a WSD scanner driver from a scanner supported application and scan.
Using a Scanner Supported Application
- 67 -
Page 68

Using Image Capture (Mac OS X)
For Mac OS X, you can use Image Capture to save data to the computer.
Install the scanner driver of the machine.
Installing a Driver and Software to a Computer (User's Manual)
Starting Scanning from a Device (Image Capture)
• A document on the document glass can be scanned to the A4 size only.
• A file can be saved only in JPEG.
• Start Image Capture in advance. Select a device from a list that is displayed on the left side of the Image Capture
screen.
• Use Image Capture in the standard view. This function cannot be used in the detail view.
Set a document on the document glass.
4
Press the button to select [Computer] and press the button.
5
Check that [Select A Connecting PC] is displayed, and then press the (OK)
6
button.
According to the connection method of the machine and computer, select
7
[From Network] or [From USB Interface], and then press the (OK) button.
For the network connection, select a destination computer to which the data is
8
sent.
Press the button to select [Select An Application] and press the (OK)
9
button.
If you select [Application] or [PC-FAX] on Mac OS X, the same action as when [Folder] is selected takes place.
Press the (MONO) or (COLOR) button.
10
Starting Scanning from a Computer (Image Capture)
3. Scan
Follow the steps below to register a computer.
Select [Application] > [OKIDATA] > [Scanner] > [Network Scanner Setup Tool].
1
Select the machine from the [Scan Settings] dialog box, click [Register],
2
register [Name] and Host in the [Register host address], and then click [OK].
Press the (SCAN) button on the operator panel.
3
- 68 -
Set a document in the ADF or on the document glass.
1
Set the scan mode on the operator panel.
2
For details, refer to "Setting PC Scan mode" in "Changing the Machine Settings"
Start Image Capture on the computer.
3
Select the machine from the list on the left side of the Image Capture screen.
4
If you want to change the scan settings, click [Display the detailed information]
5
and then change the settings.
Click [Scan].
6
Page 69

Using a Scanner Supported Application
For TWAIN Applications
This section describes how to start scanning from a TWAIN application (Adobe Photoshop,
etc.) installed on a computer.
The procedure when scanning with Adobe Photoshop on a computer connected via a USB
cable to the machine is used as an example.
Scanning
Set a document in the ADF or on the document glass.
1
Set the scan mode on the operator panel.
2
For details, refer to "Setting PC Scan mode" in "Changing the Machine Settings"
Start Adobe Photoshop on the computer.
3
Click [Import] from [File], and then select the scanner driver of the machine.
4
Click [Scan].
5
Select [Simple] or [Advanced] from [Mode].
6
Change the setting if necessary. If [Simple] is selected, click [Settings] and
7
change the settings for the scan button.
Click a scan button.
8
The screen image shows the setting screen when [Simple] is selected.
Click [Quit].
9
If you do not scan other pages or the back side, click [Quit].
10
3. Scan
The five buttons ([Scan Photograph], [Scan Magazine], [Scan for OCR], [Scan for Internet], [Customize]) are
registered as the default settings.
For WIA Applications
This section describes how to start scanning from a WIA application (Adobe Photoshop, etc.)
installed on a computer.
The procedure when scanning with Adobe Photoshop on a computer connected via a USB
cable or WSD Scan connection to the machine is used as an example.
- 69 -
Page 70

• The WIA driver does not support Mac OS X.
• The WIA 2.0 driver supports Windows 10/Windows 8.1/Windows Sever 2012 R2/Windows 8/Windows Server
2012/Windows 7/Windows Server 2008 R2.
• The WIA 1.0 driver supports Windows Vista/Windows Server 2008.
Scanning
Set a document in the ADF or on the document glass.
1
Set the scan mode on the operator panel.
2
For details, refer to "Setting PC Scan mode" in "Changing the Machine Settings".
Start Adobe Photoshop on the computer.
3
Select [Import] from [File], and then select [WIA: OKI Universal WIA] for the
4
USB connection or select [WIA-OKI-XXXXX] for the WSD scan.
Click [Scan].
5
Select a paper feed method.
6
Select an image type.
7
Specify the area to scan.
8
Click [Scan].
9
To complete scanning, click [Cancel].
10
If you do not scan other pages or the back side, click [Quit].
11
Click [New Scan].
3
Select [OKI Universal WIA] for the USB connection or select [OKI-XXXXX] for
4
the WSD scan, and then click [OK].
Set the setting if necessary.
5
Click [Scan].
6
Exit [Windows FAX and Scan].
7
3. Scan
Using "Windows FAX and Scan"
"Windows FAX and Scan" is a function available with Windows 10/Windows 8.1/Windows 8/
Windows 7/Windows Vista.
Set a document in the ADF or on the document glass.
1
Start Windows Fax and Scan on a computer from.
2
- 70 -
Page 71

Adding Destination for Scan To Computer Deleting Destination for Scan To Computer
3. Scan
This section describes how to add or delete destination computers for Scan To Computer
when the machine is connected via network.
The computer with the scanner driver installed is registered to the device when it was installed.
Press the (SETTING) button on the operator panel.
1
Press the or button to select [Network Scan Destination] and press the
2
button.
Press the or button to select the number and press the button.
3
Press the or button to select [Register] of the computer you want to
4
register and press the button.
Check that [Destination] is selected, and then press the button.
5
Enter a destination.
6
You can enter up to 16 characters.
Select [Enter], and then press the (OK) button.
7
Press the button to select [Destination Address], and then press the
8
button.
This section describes how to delete a computer that is registered in this machine as a
destination of scanned documents.
Press the (SETTING) button on the operator panel.
1
Press the or button to select [Network Scan Destination] and press the
2
button.
Press the or button to select the report to print and press the button.
3
Press the or button to select [Delete] and press the (OK) button.
4
Check that [Yes] is selected on the confirmation screen, and press the (OK)
5
button.
Press the button until the home screen is displayed.
6
Enter an IP address, host name, or computer name.
9
You can enter up to 64 characters.
Select [Enter], and then press the (OK) button.
10
Press the button to select [Port No.] and press the button.
11
Enter a port number, and then press the (OK) button.
12
Press the (OK) button to register the setting.
13
Press the button until the home screen is displayed.
14
- 71 -
Page 72

Saving Scanned Data to USB Memory
To save scanned data to USB Memory, follow the procedure below.
Press the (SCAN) button on the operator panel.
1
Set a document in the ADF or on the document glass.
2
Insert USB Memory into the USB port.
3
3. Scan
Insert USB Memory straight into the USB port. Inserting USB Memory at a wrong angle may damage the USB
port.
Press the button to select [USB Memory] and press the button.
4
Set scan settings if necessary.
5
Press the (MONO) or (COLOR) button.
6
When a message is displayed to inform you that you can remove USB
7
Memory from the port, remove it.
- 72 -
Page 73

3. Scan
Saving Scanned Data in a Shared Folder
This section describes how to save scanned data in a shared folder on a network.
• Creating a Shared Folder in a Computer (User's Manual)
• Registering a Destination (Profile) (User's Manual)
• How to Use Scan To Shared Folder (User's Manual)
•
Changing a Destination (Profile) from the Operator Panel
• Deleting a Destination (Profile) from the Operator Panel
• Tables of Profile Setting Items
Changing a Destination (Profile) from the Operator Panel
Press the (SETTING) button on the operator panel.
1
Press the button to select [Profile] and press the button.
2
Press the or button to select the profile you want to change and press
3
the button.
Check that [Edit] is selected, and then press the button.
4
Press the or button to select the item you want to change and press the
5
button.
Press the or button to select the item, and then press the (OK)
6
button.
To change multiple items, repeat steps 5 to 6.
7
Press the (OK) button to register the setting.
8
- 73 -
Page 74

Deleting a Destination (Profile) from the Operator Panel Tables of Profile Setting Items
3. Scan
Press the (SETTING) button on the operator panel.
1
Press the button to select [Profile] and press the button.
2
Press the or button to select the profile No. you want to delete and
3
press the button.
Press the button to select [Delete] and press the (OK) button.
4
Check that [Yes] is selected on the confirmation screen, and press the (OK)
5
button.
Changing a Destination (Profile) from the Operator Panel
• Server Setting
Item Factory default
setting
No. - Displays an item number.
Profile Name (NULL) Set a profile name. You can enter up to
16 characters.
Protocol CIFS Selects a protocol to use for storing files.
Target URL (NULL) Sets a server address and directory to store
the scanned data. You can enter up to
144 characters.
User Name (NULL) Sets a user name log in to the server. You
can enter up to 32 characters.
Password (NULL) Sets a password log in to the server. You can
enter up to 32 characters.
Description
• Transmission Option
Item Factory default
setting
Encode Communication None Selects an encryption method for
communication. Not available when using
CIFS protocol. Choices vary depending on
the protocol being selected.
Port No. 445 Sets a port number. Available range: 1 to
65535
PASV Mode OFF Sets whether to use a FTP Passive mode.
Displayed when FTP is set as a protocol.
CIFS Character Set UTF-16 Select the character code to use. Displayed
when CIFS is set as a protocol.
Description
•Scan Setting
Scan Size A4 or Letter Selects a scan size.
- 74 -
Item Factory default
setting
Description
Page 75

3. Scan
Item Factory default
Description
setting
Image Settings Density 0 Sets the density of images.
Document Type Text & Photo Sets the image quality of documents.
Background Removal Auto Sets the background removal of documents.
Show-Through
Removal
Resolution 200 dpi Selects a resolution for scanning.
Contrast 0 Sets the contrast of documents. The default
Hue 0 Sets the red-green color balance. The default
Saturation 0 Sets the color saturation of documents. The
RGB Red : 0
File Name (NULL) Sets a file name. You can enter up to
Glayscale OFF Set the color to be used between grayscale
File Format Color Multi-PDF Sets a file format for scanning.
Mono (Grayscale) Multi-PDF
Mono (Binary) Multi-PDF
Compression Rate / Color, Grayscale High Sets a compression rate for scanned images.
Edge Erase Setting OFF Sets whether to erase the edge shadow
Width 5 mm (0.2 inch) Sets an erasing width.
Middle Sets show-through removal for documents.
value is the value set on [Admin Setup]
menu.
value is the value set on [Admin Setup]
menu.
default value is the value set on [Admin
Setup] menu.
Green : 0
Blue : 0
Sets the RGB contrast. The default value is
the value set on [Admin Setup] menu.
64 characters.
The following options can be set.*
#n: adding a serial number from 00000 to
99999
#d: adding the date of a file creation
(yymmddhhmmss)
(ON) and white and black (OFF) when
scanning black-and-white pages.
created in the surrounding of 2-page spread
documents.
Available range: 5 to 50 mm (0.2 to
2.0 inches)
1
•Encrypted PDF
Item Factory default
setting
Encrypted PDF Not Encrypt Sets whether to enable PDF encryption.
Encryption Level Medium Sets the encryption level.
Document Open
Password
Password
Password (Verify)
Permissions
Password
Password
Password (Verify)
Permission Permission To Print Not Allowed Sets the permission settings on an encrypted
Permission To Extract Not Allowed
Permission To Edit Not Allowed
Disable Sets a password to open an encrypted PDF
file.
A document open password cannot be the
same as a permission password.
To encrypt a PDF file, you must set a
document open password or permission
password.
You can enter up to 32 characters.
(NULL) Enter a password (twice).
Disable Sets a password to control printing,
extracting or editing an encrypted PDF file.
A permission password cannot be the same
as a document open password.
To encrypt a PDF file, you must set a
document open password or permission
password.
You can enter up to 32 characters.
(NULL) Enter a password (twice).
PDF file.
This item is displayed when the permission
password is set.
Description
• Other Commands
Item Factory default
setting
Delete Deletes profiles.
Sort By Name Sorts profile by alphabetical order.
Sort By Number Sorts profile by registered numerical order.
Search Searches for a profile.
*1
For profiles, "#n" or "#d" can be specified for [File Name].
If specifying "#n": 5-digit serial number from 00000 to 99999
If specifying "#d": Date and time when a file is created. 12-digit number in
yymmddhhmmss format
Description
- 75 -
Page 76

3. Scan
yy: Year created (the last two
hh: Hours created (00 to 23)
digits of the Christian Era)
mm: Month created (01 to 12) mm: Minute created (00 to 59)
dd: Date created (01 to 31) ss: Second created (00 to 59)
* The date and time when a file is created are values of the timer of MC563.
An example of file name specification (if the file format is PDF)
If specifying "Data#n": Saved as file names such as "Data0000.pdf" and "Data00001.pdf".
If specifying "File#d": Saved as file names such as "File090715185045.pdf".
If specifying "Scan": "Scan.pdf" is created first, and then data is saved with the name of
"Scan#.pdf".
If nothing is specified: "Image.pdf" is created first, and then data is saved with the name of
"Image#d.pdf".
For "#d", refer to the above.
File names registered in profiles are applied when executing Scan To Shared Folder.
When performing auto delivery using profiles with these file names, the above names are not applied.
The file name at auto delivery is fixed to "yymmddhhmmss_xxxxxxxx.pdf". The part of "yymmddhhmmss" is date and
time when a file is created for the above "#d", and the part of "_xxxxxxxx" is additional 8-digit alphanumeric characters
(meaningless value) so as not to duplicate other files.
- 76 -
Page 77

4
Printing on Various Types of Paper
Printing with Various Settings from a Computer
Saving Paper, Saving Toner
Adjusting Color on the Computer
For a Better Finish
Useful Functions
Printing Confidential Document
”WordPad" for Windows and "TextEdit" for Mac OS X are used as examples. The screens and steps may vary depending on the application.
Page 78

4. Print
Printing on Various Types of Paper
This section describes how to print on various type of paper.
• Printing on Envelopes
• Printing on Labels
• Printing on Long Paper
• Printing on Custom Size Paper
Printing on Envelopes
• Attaching the Envelope Lever (Except MC363)
• Loading Envelopes
• For Windows PCL Printer Driver
• For Windows PS Printer Driver
• For Mac OS X
• Removing the Envelope Lever (Except MC363)
• Curling or creasing may occur after printing. Be sure to perform a test print to check that no problems exist.
• Load envelopes with the address side up in the direction as described below.
- If you are using envelopes with the flap (for gluing) on the long edge (Monarch, Com-9, Com-10, DL, C5), load
them with the flap folded so that the flap is on the left side when fed.
• Duplex printing is not available for envelopes.
Attaching the Envelope Lever (Except MC363)
If a printed envelope is wrinkled, attach the envelope lever to the fuser unit.
Remove the envelope lever from the MP tray.
1
- 78 -
Page 79

4. Print
Remove the fuser unit from the machine.
2
For details, see "Replacing the Fuser Unit".
Possible to get burned.
Since the fuser unit gets hot, carry out the operation carefully, and when lifting it up you
must hold it by the handle. Do not try to hold it whilst it is hot. Wait until it has cooled
down and then carry out the operation.
Attach the envelope lever to the fuser unit.
3
Press the jam release lever, and then insert the envelope lever into the nearby hole.
Push the lever to lock.
Loading Envelopes
When printing on envelopes, change the paper size setting, and use the MP tray and rear
output tray.
Load envelopes until their edges touch the paper feed entrance with the print
1
side up.
Com-9, Com-10, DL, C5, Monarch
Open the rear output tray.
2
Press the (SETTING) button on the operator panel.
3
Press the button to select [Paper Setup] and press the button.
4
Press the button to select [MP Tray] and press the button.
5
Check that [Paper Size] is selected, and then press the button.
6
Press the or button to select the envelope to use and press the (OK)
7
button.
Press the button until the home screen is displayed.
8
Replace the fuser unit to the machine.
4
For details, see "Replacing the Fuser Unit".
Available envelope types.
Loading Paper (User's Manual)
For Windows PCL Printer Driver
Open the file to print.
1
Select [Print] from the [File] menu.
2
Click [Preferences].
3
- 79 -
Page 80

4. Print
Select the envelope size from [Size] on the [Setup] tab.
4
Select [Multi Purpose Tray] from [Source].
5
Select [Landscape] from [Orientation].
6
Change other settings if necessary, and then click [OK].
7
Click [Print] on the [Print] screen.
8
Open the output tray and remove the fuser unit, and then remove the envelope
9
lever.
For details, see "Removing the Envelope Lever".
For Windows PS Printer Driver
Open the file to print.
1
Select [Print] from the [File] menu.
2
Click [Preferences].
3
Click [Advanced] on the [Layout] tab and select the envelope size from [Paper
4
Size].
For Mac OS X
Open the file to print.
1
Select [Print] from the [File] menu.
2
Select the envelope size from [Paper Size] and select the orientation from
3
[Orientation].
Select [Multi-Purpose Tray] for [All Pages From] on the [Paper Feed] panel.
4
Change other settings if necessary, and then click [Print].
5
Open the output tray and remove the fuser unit, and then remove the envelope
6
lever.
For details, see "Removing the Envelope Lever".
If setting details are not displayed in the print dialog box, click [Show Details] at the bottom of the dialog box.
Removing the Envelope Lever (Except MC363)
When all the envelopes are printed, remove the envelope lever from the fuser unit.
Click [OK].
5
Select [Landscape] from [Orientation] on the [Layout] tab.
6
Select [Multi-Purpose Tray] from [Paper Source] on the [Paper/Quality] tab.
7
Change other settings if necessary, and then click [OK].
8
Click [Print] on the [Print] screen.
9
Open the output tray and remove the fuser unit, and then remove the envelope
10
lever.
For details, see "Removing the Envelope Lever".
- 80 -
Remove the fuser unit from the machine.
1
For details, see "Replacing the Fuser Unit".
Press the jam release lever and lift the envelope lever, and then remove it.
2
Page 81

Replace the fuser unit to the machine.
3
For details, see "Replacing the Fuser Unit".
Attach the envelope lever to the MP tray.
4
4. Print
Printing on Labels
• Loading Labels
• For Windows PCL Printer Driver
• For Windows PS Printer Driver
• For Mac OS X
Set a paper size and paper type for the MP tray from the operator panel. Then, set a paper
size, paper tray, and other printing settings with a printer driver.
Duplex printing is not available for labels.
Loading Labels
When printing on labels, change the paper type and paper size setting, and use the MP tray
and rear output tray.
Load labels in the MP tray.
1
Open the rear output tray.
2
Press the (SETTING) button on the operator panel.
3
Press the button to select [Paper Setup] and press the button.
4
Press the button to select [MP Tray] and press the button.
5
Check that [Paper Size] is selected, and then press the button.
6
Press the or button to select [A4] or [Letter] and press the (OK)
7
button.
- 81 -
Press the button to select [Media Type] and press the button.
8
Press the or button to select [Labels], and then press the (OK)
9
button.
Press the button until the home screen is displayed.
10
Page 82

4. Print
For Windows PCL Printer Driver
Open the file to print.
1
Select [Print] from the [File] menu.
2
Click [Preferences].
3
Select [A4 210x297mm] or [Letter 8.5x11in] from [Size] on the [Setup] tab.
4
Select [Multi Purpose Tray] from [Source].
5
Select [Portrait] or [Landscape] from [Orientation].
6
Change other settings if necessary, and then click [OK].
7
Click [Print] on the [Print] screen.
8
For Windows PS Printer Driver
Open the file to print.
1
Select [Print] from the [File] menu.
2
Click [Preferences].
3
Click [Advanced] on the [Layout] tab and select [A4] or [Letter] from [Paper
4
size].
For Mac OS X
Open the file to print.
1
Select [Print] from the [File] menu.
2
Select [Letter] or [A4] from [Paper Size] and select the orientation from
3
[Orientation].
Select [Multi-Purpose Tray] for [All Pages From] on the [Paper Feed] panel.
4
Change other settings if necessary, and then click [Print].
5
If setting details are not displayed in the print dialog box, click [Show Details] at the bottom of the dialog box.
Click [OK].
5
Select [Landscape] or [Portrait] from [Orientation] on the [Layout] tab.
6
Select [Multi-Purpose Tray] from [Paper Source] on the [Paper/Quality] tab.
7
Change other settings if necessary, and then click [OK].
8
Click [Print] on the [Print] screen.
9
- 82 -
Page 83

Printing on Long Paper
• Loading Long Paper
• For Windows PCL Printer Driver
• For Windows PS Printer Driver
• For Mac OS X
Press the button until the home screen is displayed.
10
Available long paper
Loading Paper (User's Manual)
4. Print
Set a paper size for the MP tray on the operator panel. Then, register a paper size with a
printer driver.
Paper sizes of 64 to 216 mm in width and 90 to 1321 mm in length can be registered.
• Register the paper size so that the length is longer than the width. You cannot set the length that is shorter than the
width.
• This function may not be available for some applications.
• If the paper length exceeds 356 mm, the print quality may not be guaranteed even if the paper is used under the
recommended conditions.
Loading Long Paper
When printing on long paper, change the paper type setting, and use the MP tray and rear
output tray.
Load paper in the MP tray.
1
Open the rear output tray.
2
Press the (SETTING) button on the operator panel.
3
Press the button to select [Paper Setup] and press the button.
4
Press the button to select [MP Tray] and press the button.
5
Check that [Paper Size] is selected, and then press the button.
6
Press the or button to select [Custom] and press the button.
7
Press the button to select [Custom] and press the button.
8
Enter the setting value, and then press the (OK) button.
9
For Windows PCL Printer Driver
Open the file to print.
1
Select [Print] from the [File] menu.
2
Click [Preferences].
3
Select [User Defined Size] from [Size] on the [Setup] tab.
4
• You can select the paper size from [Banner *** x *** mm] if the paper size is set to 210.0 x 900.0 mm,
215.0 x 900.0 mm, or 215.0 x 1200.0 mm.
• For instructions on how to set custom size, refer to "
Select [Multi Purpose Tray] from [Source].
5
Change other settings if necessary, and then click [OK].
6
Click [Print] on the [Print] screen.
7
For Windows PS Printer Driver
Click [Start], and then select [Devices and Printers].
1
Right-click the [OKI MC563 PS] icon, and then select [Printing Preferences].
2
Click [Advanced] on the [Layout] tab.
3
Click [Paper Size], select [PostScript Custom Page Size] from the drop-down
4
list, and then enter values in [Width] and [Height].
Click [OK] until the print setting dialog box is closed.
5
Printing on Custom Size Paper".
- 83 -
Page 84

Open the file to print.
6
Select [Print] from the [File] menu.
7
Click [Advanced].
8
Click [Advanced] on the [Layout] tab and select [PostScript Custom Page
9
Size] from [Paper size].
Click [OK].
10
Select [Multi-Purpose Tray] from [Paper Source] on the [Paper/Quality] tab.
11
Change other settings if necessary, and then click [OK].
12
Click [Print] on the [Print] screen.
13
For Mac OS X
Open the file to print.
1
Select [Print] from the [File] menu.
2
Select [Manage Custom Sizes] from [Paper Size].
3
Click [+] to add an item to the list of paper sizes.
4
Double-click [Untitled], and then enter a name of the long paper size.
5
Enter values in [Width] and [Height].
6
Click [OK].
7
Select the registered paper size from [Paper Size].
8
Select [Multi-Purpose Tray] for [All Pages From] on the [Paper Feed] panel.
9
Change other settings if necessary, and then click [Print].
10
4. Print
Printing on Custom Size Paper
• Loading Custom Size Paper
• For Windows PCL Printer Driver
• For Windows PS Printer Driver
• For Mac OS X
Set a custom paper size and paper type on the operator panel. Then, register a paper size
with a printer driver.
Paper sizes of 64 to 216 mm in width and 90 to 1321 mm in length can be registered.
• Register paper in portrait, and load paper in a tray in portrait.
• If the paper length exceeds 432 mm (17 inches), use the rear output tray.
• This function may not be available for some applications.
• If the paper length exceeds 432 mm (17 inches), the print quality cannot be guaranteed.
• If paper is so long that it exceeds the paper supports of the MP tray, support the paper with your hands.
• It is not recommended to use a paper width of less than 100 mm (3.9 inches), because paper jams may result.
• About available paper sizes for each tray and for duplex printing
Loading Paper (User's Manual)
• The auto tray switch function is set to [ON] by factory default. When a tray runs out of paper during printing, another
tray automatically starts feeding paper. To feed custom size paper from a specified tray, set the auto tray switch
function to [OFF].
• If images are not correctly printed on large size paper, select [Normal(600x600dpi)] for [Quality] in the PS printer
driver. Printing may be improved.
Loading Custom Size Paper
When printing on custom paper size, change the paper type setting, and specify a paper tray.
Load paper that can be set to the custom size in the MP tray or tray.
1
Press the (SETTING) button on the operator panel.
2
Press the button to select [Paper Setup] and press the button.
3
Press the or button to select the tray on which paper is loaded in step
4
1, and then press the button.
If setting details are not displayed in the print dialog box, click [Show Details] at the bottom of the dialog box.
- 84 -
Check that [Paper Size] is selected, and then press the button.
5
Page 85

4. Print
Press the or button to select [Custom] and press the button.
6
Press the button to select [Custom] and press the button.
7
Enter the setting value, and then press the (OK) button.
8
Change other settings if necessary.
9
Press the button until the home screen is displayed.
10
For Windows PCL Printer Driver
Click [Start], and then select [Devices and Printers].
1
Right-click the [OKI MC563 PCL6] icon, and then select [Printing Preferences].
2
Click [Paper Feed Options] on the [Setup] tab.
3
Click [Custom Size].
4
Enter a name of the new size in [Name].
5
Enter values in [Width] and [Length].
6
Click [Add] to save the custom paper size to the list, and then click [OK].
7
You can save up to 32 custom sizes.
Click [OK] until the [Printing Preferences] dialog box is closed.
8
Open the file to print.
9
Select [Print] from the [File] menu.
10
Click [Preferences].
11
Select a registered paper size from [Size] on the [Setup] tab.
12
Change other settings if necessary, and then click [OK].
13
Click [Print] on the [Print] screen.
14
For Windows PS Printer Driver
Click [Start], and then select [Devices and Printers].
1
Right-click the [OKI MC563 PS] icon, and then select [Printing Preferences].
2
Click [Advanced] on the [Layout] tab.
3
Click [Paper Size], and then select [PostScript Custom Page Size] from the
4
drop-down list.
Click [Edit Custom Page Size].
5
Enter values in [Width] and [Length], and then click [OK].
6
You cannot set [Offsets Relative to Paper Feed Direction].
Click [OK] until the [Printing Preferences] dialog box is closed.
7
Open the file to print.
8
Select [Print] from the [File] menu.
9
Click [Preferences].
10
Click [Advanced] on the [Layout] tab.
11
Click [Paper Size], and then select [PostScript Custom Page Size] from the
12
drop-down list.
Click [OK].
13
Change other settings if necessary, and then click [OK].
14
Click [Print] on the [Print] screen.
15
- 85 -
Page 86

For Mac OS X
• On Mac OS X, you can set a paper size out of the available range in the printer driver, resulting in improper printing.
Set a paper size within the available range.
• Custom sizes very close to regular sizes may be handled as regular size on the Mac OS X printer driver.
Open the file to print.
1
Select [Print] from the [File] menu.
2
Select [Manage Custom Sizes] from [Paper Size].
3
Click [+] to add an item to the list of custom paper sizes.
4
Double-click [Untitled], and then enter a name of the custom paper size.
5
Enter values in [Width] and [Height].
6
Click [OK].
7
Select the paper size created from [Paper Size].
8
Change other settings if necessary, and then click [Print].
9
4. Print
If setting details are not displayed in the print dialog box, click [Show Details] at the bottom of the dialog box.
- 86 -
Page 87

4. Print
Printing with Various Settings from a Computer
This section describes various print settings such as enlarging/reducing document size or
making a booklet.
• Printing Manually One by One
• Enlarging or Reducing to Fit the Specified Paper Size
• Printing Only the Cover from a Different Tray
• Making a Booklet
• Dividing a Document to Print on Some Sheets for Making a Poster
• Adding Semi-transparent Text (Watermarks)
• Overlaying Forms or Logos (Overlay)
• Outputting a Document to a File Instead of Printing on Paper
• Storing Frequently-printed Documents in the Printer (Except MC363)
• Printing E-mail Attachment Files
Printing Manually One by One
• For Windows PCL Printer Driver
• For Windows PS Printer Driver
• For Mac OS X
You can print one sheet at a time by loading paper in the MP tray.
The message prompting you to set paper on the MP tray is displayed on the display screen
every time you print one page. To continue printing, press the or button to select
[Start] and press the (OK) button.
To cancel printing, select [Cancel] and press the the (OK) button.
For Windows PCL Printer Driver
Open the file to print.
1
Select [Print] from the [File] menu.
2
Click [Preferences].
3
Select [Multi Purpose Tray] from [Source] on the [Setup] tab.
4
Click [Paper Feed Options].
5
Select the [Use MP tray as manual feed] check box, and then click [OK].
6
Change other settings if necessary, and then click [OK].
7
Click [Print] on the [Print] screen.
8
When the "Please install paper on MP Tray. Please set paper A4 (or another
9
paper size). To cancel, select [Cancel]." message is displayed on the display
screen, load paper in the MP tray.
- 87 -
Press the or button to select [Start] and press the (OK) button.
10
When printing a multiple page document, the same message is displayed every time
you print one page.
Page 88

4. Print
For Windows PS Printer Driver
Open the file to print.
1
Select [Print] from the [File] menu.
2
Click [Preferences].
3
Select [Multi-Purpose Tray] from [Paper Source] on the [Paper/Quality] tab.
4
Click [Advanced].
5
Click [Multipurpose tray is handled as manual feed], and then select [Yes].
6
Click [OK].
7
Change other settings if necessary, and then click [OK].
8
Click [Print] on the [Print] screen.
9
When the "Please install paper on MP Tray. Please set paper A4 (or another
10
paper size). To cancel, select [Cancel]." message is displayed on the display
screen, load paper in the MP tray.
Press the or button to select [Start] and press the (OK) button.
11
When printing a multiple page document, the same message is displayed every time
you print one page.
Change other settings if necessary, and then click [Print].
6
When the "Please install paper on MP Tray. Please set paper A4 (or another
7
paper size). To cancel, select [Cancel]." message is displayed on the display
screen, load paper in the MP tray.
Press the or button to select [Start] and press the (OK) button.
8
When printing a multiple page document, the same message is displayed every time
you print one page.
If setting details are not displayed in the print dialog box, click [Show Details] at the bottom of the dialog box.
For Mac OS X
Open the file to print.
1
Select [Print] from the [File] menu.
2
Select [Multi-Purpose Tray] for [All Pages From] on the [Paper Feed] panel.
3
Select [Print Options] from the panel menu.
4
Select [Multipurpose tray is handled as manual feed] check box in the [Feed]
5
tab.
- 88 -
Page 89

Enlarging or Reducing to Fit the Specified Paper Size
• For Windows PCL Printer Driver
• For Windows PS Printer Driver
• For Mac OS X
Select the paper size to print.
5
Change other settings if necessary, and then click [OK].
6
Click [Print] on the [Print] screen.
7
4. Print
You can print on different paper sizes without changing the print data.
This function may not be available for some applications.
For Windows PCL Printer Driver
Open the file to print.
1
Select [Print] from the [File] menu.
2
Click [Preferences].
3
Select a paper size to edit from [Size] on the [Setup] tab.
4
Select the [Resize document to fit printer page] checkbox, and then select a
5
paper size to print.
Change other settings if necessary, and then click [OK].
6
Click [Print] on the [Print] screen.
7
For Mac OS X
Open the file to print.
1
Select [Print] from the [File] menu.
2
Select the [Scale to fit paper size] check box on the [Paper Handling] panel.
3
Select a paper size to print from [Destination Paper Size].
4
Change other settings if necessary, and then click [Print].
5
If setting details are not displayed in the print dialog box, click [Show Details] at the bottom of the dialog box.
For Windows PS Printer Driver
Open the file to print.
1
Select [Print] from the [File] menu.
2
Click [Preferences].
3
Select the [Resize document to fit printer page] checkbox on the [Job Options]
4
tab.
- 89 -
Page 90

Printing Only the Cover from a Different Tray
• For Windows PCL Printer Driver
• For Mac OS X
Select a tray to feed the remaining pages from [Remaining From].
5
Change other settings if necessary, and then click [Print].
6
4. Print
You can feed the first page of a print job from one tray and the remaining pages from another
tray.
This function is not available with the Windows PS printer driver.
For Windows PCL Printer Driver
Open the file to print.
1
Select [Print] from the [File] menu.
2
Click [Preferences].
3
Click [Paper Feed Options] on the [Setup] tab.
4
Select the [Use different source for first page] check box.
5
Select a paper tray from [Source], and then click [OK].
6
Select a paper type from [Type] and media weight from [Weight] if necessary.
Change other settings if necessary, and then click [OK].
7
Click [Print] on the [Print] screen.
8
If setting details are not displayed in the print dialog box, click [Show Details] at the bottom of the dialog box.
For Mac OS X
Open the file to print.
1
Select [Print] from the [File] menu.
2
Select [Paper Feed] from the panel menu.
3
Select [First Page From], and then select a tray to feed the first page.
4
- 90 -
Page 91

4. Print
Making a Booklet
• For Windows PCL Printer Driver
• For Windows PS Printer Driver
• This function may not be available for some applications.
• This function is not available on Mac OS X.
• Watermarks may not be printed properly with this function.
For Windows PCL Printer Driver
Open the file to print.
1
Select [Print] from the [File] menu.
2
Click [Preferences].
3
Select [Booklet] from [Finishing Mode] on the [Setup] tab.
4
Click [Options], and then set booklet printing settings if necessary.
5
• [Signature]: Specify a unit of pages to be bound.
• [2 pages]: Print two pages on one page.
• [Right to Left]: Print a booklet that is opened from the right.
• [Bind Margin]: Set a margin.
For Windows PS Printer Driver
Open the file to print.
1
Select [Print] from the [File] menu.
2
Click [Preferences].
3
Select [Booklet] from [Page Format] on the [Layout] tab.
4
Select the [Draw Borders] check box if necessary.
5
Click [Advanced].
6
Click [Booklet Binding Edge], and then set margins.
7
• To make a right-fold booklet (a booklet with its binding on the right side when the first page is facing up), select
[On Right Edge].
• To make an A5 booklet by using A4 paper, select [A4] from [Paper Size].
Click [OK] until the print setting dialog box is closed.
8
Change other settings if necessary, and then click [OK].
9
Click [Print] on the [Print] screen.
10
Click [OK].
6
Change other settings if necessary, and then click [OK].
7
Click [Print] on the [Print] screen.
8
• To make an A5 booklet by using A4 paper, select [A4] from [Size] on the [Setup] tab.
• If this function is not available with the Windows PCL printer driver, select [Start] > [Devices and Printers], right-click
the [OKI MC563 PCL6] icon, and then select [Printer properties] > the [Advanced] tab > [Print processor] >
[OKX05HPP] > [OK].
- 91 -
Page 92

4. Print
Dividing a Document to Print on Some Sheets for Making a Poster
You can create a poster by printing a document onto multiple sheets of paper, and then
combining the sheets afterwards.
• This function is not available when you are using the IPP network.
• This function is not available with the Windows PS printer driver or on Mac OS X.
For Windows PCL Printer Driver
Open the file to print.
1
Select [Print] from the [File] menu
2
Click [Preference].
3
Click [Poster Print] from [Finishing Mode] on the [Setup] tab.
4
Click [Options].
5
Set values to [Enlarge], [Add Registration Marks], and [Add Overlap] if
6
necessary, and then click [OK].
Change other settings if necessary, and then click [OK].
7
Click [Print] on the [Print] screen.
8
• To make an A3 poster using two sheets of A4 paper, select [A4] for the paper size, and the select [2] for [Zoom].
• If this function is not available with the Windows PCL printer driver, select [Start] > [Devices and Printers], right-click
the [OKI MC563 PCL6] icon, and then select [Printer properties] > the [Advanced] tab > [Print processor] >
[OKX05HPP] > [OK].
Adding Semi-transparent Text (Watermarks)
• For Windows PCL Printer Driver
• For Windows PS Printer Driver
• This function is not available on Mac OS X.
• Watermarks are not printed properly for booklet printing.
• If the [Background] check box is selected on the [Watermark] screen for Windows PS printer driver, a watermark may
not be printed depending on the application. In such a case, clear the [Background] check box.
For Windows PCL Printer Driver
Open the file to print.
1
Select [Print] from the [File] menu.
2
Click [Preferences].
3
Click [Watermark] on the [Extend] tab.
4
Click [New].
5
Enter text that is printed as a watermark in [Text] in [Watermarks].
6
Set [Font], [Size], or other settings if necessary, and then click [OK].
7
Check that the watermark to print is selected, and then click [OK].
8
Change other settings if necessary, and then click [OK].
9
Click [Print] on the [Print] screen.
10
For Windows PS Printer Driver
- 92 -
Open the file to print.
1
Select [Print] from the [File] menu.
2
Click [Preferences].
3
Page 93

Click [Watermark] on the [Job Options] tab.
4
Click [New].
5
Enter text that is printed as a watermark in [Text] in [Watermarks].
6
Set [Font], [Size], or other settings if necessary, and then click [OK].
7
Check that the watermark to print is selected, and then click [OK].
8
Change other settings if necessary, and then click [OK].
9
Click [Print] on the [Print] screen.
10
Overlaying Forms or Logos (Overlay)
• Registering Forms
• For Windows PCL Printer Driver
• For Windows PS Printer Driver
You can print overlays (such as logos or forms) on a document. An overlay is a group of
forms. You can register four forms to an overlay. The forms are overlaid in order of
registration and printed. The form that is registered last is printed on the top.
Registering Forms
Before printing overlay, create a form and register it in this machine.
Registering Forms (Form Overlay)
For Windows PCL printer driver users, follow the following steps to register forms.
Create a form you want to register to the printer on the application.
1
Select [Print] from the [File] menu.
2
Click [Preferences].
3
Click [Overlays] on the [Extend] tab.
4
Select [Register print document as a new form].
5
Click [OK].
6
Change other settings if necessary, and then click [OK].
7
Click [Print] on the [Print] screen.
8
Enter [Form name] and [ID] you want to register to the printer in [New Form].
9
4. Print
- 93 -
The printing position for overlay can be specified.
Select the pages of the document on which you want to print the overlay from
10
[Print on Pages] as registration information on the driver. To apply an overlay
Page 94

4. Print
by specifying the pages, select [Custom], and then enter the pages to which
you want to apply the overlay in [Custom Pages].
Click [OK].
11
For Windows PCL Printer Driver
Open the file to print.
1
Select [Print] from the [File] menu.
2
Click [Preferences].
3
Select the [Extend] tab.
4
Click [Overlays].
5
Select [Overlay Print] and select a form you want to use for an overlay printing
6
from the drop-down list.
If you want to add a form registered using Configuration Tool or apply several forms as a group, click [Edit list...]
to add to the list.
When adding a form registered using Configuration Tool: Click [Add a registered form...], enter the form name in
[Form name] and ID of the form registered using the Storage Manager plugin of Configuration Tool, select pages
on which you want to apply the form from [Print on Pages], and then click [OK].
Click [OK].
7
Change other settings if necessary, and then click [OK].
8
Click [Print] on the [Print] screen.
9
Right-click the [OKI MC563 PS] icon, and then select [Printing Preferences].
2
Click [Overlays] on the [Job Options] tab.
3
Select [User Overlay] from the drop-down list, and then click [New].
4
Enter the form name that you registered with the Storage Manager plug-in for
5
Configuration Tool in [Form Name], and then click [Add].
Enter a name of the overlay in [Overlay Name].
6
Select the pages of the document on which to print the overlay from [Print on
7
Pages].
To apply an overlay by specifying the pages, select [Custom], and then enter the pages to which to apply the
overlay in [Custom Pages].
Click [OK].
8
Select an overlay to use from [Defined Overlays], and then click [Add].
9
Click [OK].
10
Change other settings if necessary, and then click [OK].
11
Open the file to print.
12
Select [Print] from the [File] menu.
13
Click [Print] on the [Print] screen.
14
For Windows PS Printer Driver
To use this function with the Windows PS printer driver, you must log in to a computer as the administrator.
Click [Start], and then select [Devices and Printers].
1
- 94 -
Page 95

Outputting a Document to a File Instead of Printing on Paper Storing Frequently-printed Documents in the Printer (Except
• For Windows
• For Mac OS X
You can output a document to a file.
You must log in to a computer as the administrator.
For Windows
Click [Start], and then select [Devices and Printers].
1
Right-click the [OKI MC563 *] icon and then select [Printer properties].
2
* Select a driver type to use.
MC363)
• For Windows PCL Driver
• For Windows PS Driver
• For Mac OS X
• Printing the Stored Document from This Machine
Store a print job in the internal memory of the printer. When printing, select a shared job from
the operator panel.
If you cannot store the spooled data due to insufficient free space in the memory, a message is displayed to inform you
that the file system is full, and the print job is not executed.
For Windows PCL Driver
4. Print
Select the [Ports] tab.
3
Select [FILE:] from the port list, and then click [OK].
4
Open a file.
5
Select [Print] from the [File] menu.
6
Click [Print].
7
Enter the name of a file, and then click [OK].
8
example : C: temp printdata.prn
For Mac OS X
Open the file to print.
1
Select [Print] from the [File] menu.
2
Click [PDF] in the print dialog box, and then select a file format.
3
Enter the name of a file, select a save destination, and then click [Save].
4
Open the file to print.
1
Select [Print] from the [File] menu.
2
Click [Preferences].
3
Select the [Job Options] tab.
4
Select [Shared Print].
5
You can name a print job from Job Type Options.
Set other settings if necessary, and click [OK].
6
Click [Print] on the [Print] Screen.
7
The print job is only sent to the printer, and it is not printed yet.
For Windows PS Driver
Open the file to print.
1
Select [Print] from the [File] menu.
2
- 95 -
Page 96

Click [Preferences].
3
Select the [Job Options] tab.
4
Click [Shared Print] from [Job Type].
5
You can name a print job from Job Type Options.
Set other settings if necessary, and click [OK].
6
Click [Print] on the [Print] screen.
7
The print job is only sent to the printer, and it is not printed yet.
For Mac OS X
Open the file to print.
1
Select [Print] from the [File] menu.
2
Select [Secure Print] from the panel menu.
3
Select [Shared Print] in the [Job Type].
4
You can name a print job from Job Type Options.
To stop a job search, press the (STOP) button.
Select the job you want to print, and press the button.
4
Check that [Print] is selected, and then press the (OK) button.
5
To print all the displayed shared jobs, press the or button to select [Print All], and
then press the (OK) button.
Select [Delete] and press the (OK) button to delete the specified shared job.
Select [Delete All] and press the (OK) button to delete all the displayed shared jobs.
Check that [Yes] is selected on the confirmation screen, and press the (OK) button.
Specify the number of copies, and press the (OK) button.
6
4. Print
Change other settings if necessary, and then click [Print].
5
The print job is only sent to the printer, and it is not printed yet.
If setting details are not displayed in the print dialog box, click [Show Details] at the bottom of the dialog box.
Printing the Stored Document from This Machine
Press the (PRINT) button on the operator panel.
1
Press the button to select [Print Job] and press the button.
2
Check that [Shared Print] is selected, and then press the button.
3
A job searching starts. Saved jobs are listed.
- 96 -
Page 97

Printing E-mail Attachment Files
Print attachment file of received E-mail.PDF (v1.7), JPEG, and TIFF (V6 Baseline) formats
can be printed.
To use this function, you must set the e-mail reception settings on a POP server or SMTP
server.
E-mail Setup
• For the number of copies, duplex printing or other printing settings, the current settings on the [Admin Setup] menu
are applied.
• Up to 10 files, each of which is a maximum of 8 MB, can be printed.
• You can forward attachment file of received E-mail.
Forwarding Received Document Data to an E-mail Destination or Shared Folder (Auto Delivery)
4. Print
- 97 -
Page 98

4. Print
Saving Paper, Saving Toner
This section describes how to print saving paper or toner.
• Printing on Both Sides of Paper (Duplex Printing)
• Saving Toner
• Combining Multiple Pages onto One Sheet of Paper
Printing on Both Sides of Paper (Duplex Printing)
• For Windows PCL Printer Driver
• For Windows PS Printer Driver
• For Mac OS X
You can print on both sides of a sheet of paper.
• Duplex printing is available for the following paper sizes.
A4, A5, B5, Letter, Legal (13 inches), Legal (13.5 inches), Legal (14 inches), Executive,
8.5SQ (8.5in x 8.5in), Folio (210 mm x 330 mm), 16K (197 mm x 273 mm, 195 mm x
270 mm, 184 mm x 260 mm), Custom size
• Duplex printing is available for the following media weight.
64 to 176 g/m2 (17 to 46.8 lb)
Do not use media weight other than the above, because paper jams may occur.
This function may not be available for some applications.
When printing on custom size paper, duplex printing is available for the following width and length ranges.
• Width: 148 to 216 mm (5.8 to 8.5 inches)
• Length: 210 to 356 mm (8.3 to 14.0 inches)
For Windows PCL Printer Driver
Close the rear output tray.
1
Open the file to print.
2
Select [Print] from the [File] menu.
3
Click [Preferences].
4
Select [Long Edge] or [Short Edge] from [2-Sided Printing] on the [Setup] tab.
5
Change other settings if necessary, and then click [OK].
6
Click [Print] on the [Print] screen.
7
- 98 -
Page 99

4. Print
For Windows PS Printer Driver
Close the rear output tray.
1
Open the file to print.
2
Select [Print] from the [File] menu.
3
Click [Preferences].
4
Select [Flip on Long Edge] or [Flip on Short Edge] from [Print on Both Sides]
5
on the [Layout] tab.
Change other settings if necessary, and then click [OK].
6
Click [Print] on the [Print] screen.
7
For Mac OS X
Close the rear output tray.
1
Open the file to print.
2
Select [Print] from the [File] menu.
3
Select [Long-Edge binding] or [Short-Edge binding] from [Two-Sided] on the
4
[Layout] panel.
Change other settings if necessary, and then click [Print].
5
If setting details are not displayed in the print dialog box, click [Show Details] at the bottom of the dialog box.
Saving Toner
• For Windows PCL Printer Driver
• For Windows PS Printer Driver
• For Mac OS X
Printing is possible with less toner.
The amount of toner can be saved in three levels.
• [Printer setting]: Conforms to the printer setting.
• [Off]: Prints at a normal density without saving toner.
• [Save Level Low]: Prints at a somewhat lower density level.
• [Save Level Middle]: Prints at a low density.
• [Save Level High]: Prints at a very low density.
If using this function, only [Normal (600x600)] or [Fast (600x600)] can be specified as the print quality.
The density of the image that is printed with this function may vary depending on the printed document.
For Windows PCL Printer Driver
Open the file to print.
1
Select [Print] from the [File] menu.
2
Click [Preferences].
3
Select the [Setup] tab.
4
Select the amount of toner to save from [Toner saving].
5
Change other settings if necessary, and then click [OK].
6
Click [Print] on the [Print] screen.
7
- 99 -
Page 100

4. Print
For Windows PS Printer Driver
Open the file to print.
1
Select [Print] from the [File] menu.
2
Click [Preferences].
3
Select the [Color] tab.
4
Select the amount of toner to save from [Toner Saving].
5
Change other settings if necessary, and then click [OK].
6
Click [Print] on the [Print] screen.
7
For Mac OS X
Open the file to print.
1
Select [Print] from the [File] menu.
2
Select [Print Options] from the panel menu.
3
Select the amount of toner to save from [Toner Saving] in the [Quality2] tab.
4
Change other settings if necessary, and then click [Print].
5
Combining Multiple Pages onto One Sheet of Paper
• For Windows PCL Printer Driver
• For Windows PS Printer Driver
• For Mac OS X
You can print multiple pages of a document onto a single side of a sheet of paper.
• This function reduces the page size of your document for printing. The center of the printed image may not be in the
center of the paper.
• This function may not be available for some applications.
For Windows PCL Printer Driver
Open the file to print.
1
Select [Print] from the [File] menu.
2
Click [Preferences].
3
Select the number of pages to print on each sheet at [Finishing Mode] on the
4
[Setup] tab.
Click [Options].
5
Set each setting at [Page Borders], [Page layout], and [Bind Margin], and then
6
click [OK].
If setting details are not displayed in the print dialog box, click [Show Details] at the bottom of the dialog box.
Change other settings if necessary, and then click [OK].
7
Click [Print] on the [Print] screen.
8
For Windows PS Printer Driver
Open the file to print.
1
Select [Print] from the [File] menu.
2
- 100 -
 Loading...