

Page 1
59381701.jpg
Page 2

Copyright Information
Copyright © 2006 by Oki Data. All Rights Reserved
Document Information ________________________________
C6100 Series User’s Guide
P/N 59381701, Revision 1.0
April, 2006
Disclaimer__________________________________________
Every effort has been made to ensure that the information in this document is
complete, accurate, and up-to-date. The manufacturer assumes no responsibility
for the results of errors beyond its control. The manufacturer also cannot guarantee
that changes in software and equipment made by other manufacturers and referred
to in this guide will not affect the applicability of the information in it. Mention of
software products manufactured by other companies does not necessarily
constitute endorsement by the manufacturer .
Whi l e a ll r e aso n a bl e e f fo r t s ha v e b ee n m a de t o ma k e t hi s d o cu m e n t a s a ccu r a t e a n d
helpful as possible, we make no warranty of any kind, expressed or implied, as to
the accuracy or completeness of the information contained herein.
The most up-to-date drivers and manuals are available from the web site:
http://www.okiprintingsolutions.com
Trademark Information _______________________________
Oki and Microline are registered trademarks of Oki Electric Industry Company Ltd.
Apple, Macintosh and Mac OS are registered trademarks of Apple Computers Inc.
ENERGY STAR is a trademark of the United States Environmental Protection
Agency.
Hewlett-Packard, HP, and LaserJet are registered trademarks of Hewlett-Packard
Company.
Microsoft, MS-DOS and Windows are either registered trademarks or trademarks of
Microsoft Corporation in the United States and/or other countries.
Other product names and brand names are registered trademarks or trademarks of
their proprietors.
Regulatory Information _______________________________
As an ENERGY STAR® Program Participant, the manufacturer has
determined that this product meets the ENERGY STAR guidelines
for energy efficiency.
This product complies with the requirements of the Council
Directives 89/336/EEC (EMC), 73/23/EEC (LVD) and 1999/5/EC
(R&TTE), as amended where applicable, on the approximation of
the laws of the member states relating to Electromagnetic
Compatibility, Low Voltage and Radio & Telecommunications
Terminal Equipment.
C6100 Series User’s Guide
2
Page 3

Contents
Copyright Information . . . . . . . . . . . . . . . . . . . . . . . . 2
Document Information . . . . . . . . . . . . . . . . . . . . . . . . 2
Disclaimer . . . . . . . . . . . . . . . . . . . . . . . . . . . . . . . . 2
Trademark Information . . . . . . . . . . . . . . . . . . . . . . . 2
Regulatory Information . . . . . . . . . . . . . . . . . . . . . . . 2
Notes, Cautions, etc. . . . . . . . . . . . . . . . . . . . . . . . . . .6
Illustrations . . . . . . . . . . . . . . . . . . . . . . . . . . . . . . . 6
Introduction . . . . . . . . . . . . . . . . . . . . . . . . . . . . . . . . 7
Features . . . . . . . . . . . . . . . . . . . . . . . . . . . . . . . . . . 7
Options . . . . . . . . . . . . . . . . . . . . . . . . . . . . . . . . . . 7
Parts of the Printer . . . . . . . . . . . . . . . . . . . . . . . . . . . 8
Front . . . . . . . . . . . . . . . . . . . . . . . . . . . . . . . . . . . . 8
Rear. . . . . . . . . . . . . . . . . . . . . . . . . . . . . . . . . . . . . 9
Paper (Print Media). . . . . . . . . . . . . . . . . . . . . . . . . . 10
General Information. . . . . . . . . . . . . . . . . . . . . . . . . 10
Driver Settings . . . . . . . . . . . . . . . . . . . . . . . . . . . . 11
Paper, US Bond . . . . . . . . . . . . . . . . . . . . . . . . . . . . 18
Paper, Index . . . . . . . . . . . . . . . . . . . . . . . . . . . . . . 20
Letterhead . . . . . . . . . . . . . . . . . . . . . . . . . . . . . . . 22
Envelopes . . . . . . . . . . . . . . . . . . . . . . . . . . . . . . . . 26
Labels . . . . . . . . . . . . . . . . . . . . . . . . . . . . . . . . . . 29
Transparencies . . . . . . . . . . . . . . . . . . . . . . . . . . . . 31
Paper Trays . . . . . . . . . . . . . . . . . . . . . . . . . . . . . . . .33
General Information. . . . . . . . . . . . . . . . . . . . . . . . . 33
Select in the driver . . . . . . . . . . . . . . . . . . . . . . . . . 34
Paper Size, Feed, and Exit . . . . . . . . . . . . . . . . . . . . 37
Tray 1 . . . . . . . . . . . . . . . . . . . . . . . . . . . . . . . . . . 39
Tray 2 . . . . . . . . . . . . . . . . . . . . . . . . . . . . . . . . . . 42
Multi-Purpose Tray (MP Tray)
[Manual Feed] . . . . . . . . . . . . . . . . . . . . . . . . . . . . . 45
Auto Tray Select . . . . . . . . . . . . . . . . . . . . . . . . . . . 48
Auto Switching . . . . . . . . . . . . . . . . . . . . . . . . . . . . 52
Paper Size Check. . . . . . . . . . . . . . . . . . . . . . . . . . . 57
Paper Exit Paths . . . . . . . . . . . . . . . . . . . . . . . . . . . .61
Face Down (Top Exit). . . . . . . . . . . . . . . . . . . . . . . . 61
Face Up (Rear Exit) . . . . . . . . . . . . . . . . . . . . . . . . . 62
Duplex Unit. . . . . . . . . . . . . . . . . . . . . . . . . . . . . . . 64
Loading Paper . . . . . . . . . . . . . . . . . . . . . . . . . . . . . .65
Trays 1 and 2 . . . . . . . . . . . . . . . . . . . . . . . . . . . . . 65
C6100 Series User’s Guide
3
Page 4

Multi-purpose Tray. . . . . . . . . . . . . . . . . . . . . . . . . . 68
Consumables and Replacement Supplies . . . . . . . . . 72
Life Expectancy . . . . . . . . . . . . . . . . . . . . . . . . . . . . 72
Part Numbers . . . . . . . . . . . . . . . . . . . . . . . . . . . . . 72
Replace a Toner Cartridge . . . . . . . . . . . . . . . . . . . . 73
Replace an Image Drum . . . . . . . . . . . . . . . . . . . . . . 79
Replace the Fuser . . . . . . . . . . . . . . . . . . . . . . . . . . 87
Replace the Belt Unit . . . . . . . . . . . . . . . . . . . . . . . . 91
Printer Settings
(Menu Settings) . . . . . . . . . . . . . . . . . . . . . . . . . . . .96
Print a list of the current settings. . . . . . . . . . . . . . . . 96
Changing Settings . . . . . . . . . . . . . . . . . . . . . . . . . . 97
Reset to Factory Defaults . . . . . . . . . . . . . . . . . . . . . 99
Lists of Available Settings by Menu . . . . . . . . . . . . . 100
Menu Defaults . . . . . . . . . . . . . . . . . . . . . . . . . . . . 113
Options . . . . . . . . . . . . . . . . . . . . . . . . . . . . . . . . . .118
Additional Memory (RAM) . . . . . . . . . . . . . . . . . . . . 118
Duplex Unit. . . . . . . . . . . . . . . . . . . . . . . . . . . . . . 119
Hard Disk Drive . . . . . . . . . . . . . . . . . . . . . . . . . . . 120
Second Paper Tray. . . . . . . . . . . . . . . . . . . . . . . . . 121
Specifications . . . . . . . . . . . . . . . . . . . . . . . . . . . . . 122
Troubleshooting . . . . . . . . . . . . . . . . . . . . . . . . . . .124
General Information. . . . . . . . . . . . . . . . . . . . . . . . 124
Display Panel Messages . . . . . . . . . . . . . . . . . . . . . 125
Paper Jams . . . . . . . . . . . . . . . . . . . . . . . . . . . . . . 129
Print Quality Problems . . . . . . . . . . . . . . . . . . . . . . 150
USB Problems . . . . . . . . . . . . . . . . . . . . . . . . . . . . 154
Application error . . . . . . . . . . . . . . . . . . . . . . . . . . 156
General Protection Fault . . . . . . . . . . . . . . . . . . . . . 156
Paper Size Change Request . . . . . . . . . . . . . . . . . . 157
Printer does not go online. . . . . . . . . . . . . . . . . . . . 157
Printer makes a strange noise . . . . . . . . . . . . . . . . . 157
Printer takes a long time to start printing . . . . . . . . . 158
Printing cancels . . . . . . . . . . . . . . . . . . . . . . . . . . . 158
Printing does not start . . . . . . . . . . . . . . . . . . . . . . 159
Printing is slow . . . . . . . . . . . . . . . . . . . . . . . . . . . 159
Cleaning Page . . . . . . . . . . . . . . . . . . . . . . . . . . . . 160
Printer Drivers. . . . . . . . . . . . . . . . . . . . . . . . . . . . . 162
General Information. . . . . . . . . . . . . . . . . . . . . . . . 162
Install . . . . . . . . . . . . . . . . . . . . . . . . . . . . . . . . . 162
Which Printer Driver to Use? . . . . . . . . . . . . . . . . . . 163
Change Driver Settings . . . . . . . . . . . . . . . . . . . . . 164
Save Driver Settings . . . . . . . . . . . . . . . . . . . . . . . 165
C6100 Series User’s Guide
4
Page 5

Check to see if saved Driver Settings are used . . . . . 167
Restore Default Driver Settings . . . . . . . . . . . . . . . . 168
Macintosh . . . . . . . . . . . . . . . . . . . . . . . . . . . . . . . 169
Printer Features . . . . . . . . . . . . . . . . . . . . . . . . . . .173
Overview . . . . . . . . . . . . . . . . . . . . . . . . . . . . . . . 173
Banners . . . . . . . . . . . . . . . . . . . . . . . . . . . . . . . . 174
Black Finish. . . . . . . . . . . . . . . . . . . . . . . . . . . . . . 178
Black Overprint . . . . . . . . . . . . . . . . . . . . . . . . . . . 181
Black Printing . . . . . . . . . . . . . . . . . . . . . . . . . . . . 184
Booklets (Binding Print) . . . . . . . . . . . . . . . . . . . . . 191
Collating. . . . . . . . . . . . . . . . . . . . . . . . . . . . . . . . 196
Color Matching . . . . . . . . . . . . . . . . . . . . . . . . . . . 200
Custom Page Sizes . . . . . . . . . . . . . . . . . . . . . . . . 260
Duplex Printing . . . . . . . . . . . . . . . . . . . . . . . . . . . 269
Grayscale . . . . . . . . . . . . . . . . . . . . . . . . . . . . . . . 282
N-Up Printing . . . . . . . . . . . . . . . . . . . . . . . . . . . . 283
Photographs . . . . . . . . . . . . . . . . . . . . . . . . . . . . . 287
Posters. . . . . . . . . . . . . . . . . . . . . . . . . . . . . . . . . 288
Print Resolution . . . . . . . . . . . . . . . . . . . . . . . . . . . 291
Save as File . . . . . . . . . . . . . . . . . . . . . . . . . . . . . 296
Toner Saving. . . . . . . . . . . . . . . . . . . . . . . . . . . . . 301
Watermarks . . . . . . . . . . . . . . . . . . . . . . . . . . . . . 305
Utilities . . . . . . . . . . . . . . . . . . . . . . . . . . . . . . . . . .315
Overview . . . . . . . . . . . . . . . . . . . . . . . . . . . . . . . 315
Accessing . . . . . . . . . . . . . . . . . . . . . . . . . . . . . . . 316
Descriptions of Utilities. . . . . . . . . . . . . . . . . . . . . . 317
Installing the Utilities . . . . . . . . . . . . . . . . . . . . . . . 320
Color Correction Utility . . . . . . . . . . . . . . . . . . . . . . 322
Color Swatch Utility . . . . . . . . . . . . . . . . . . . . . . . . 337
Direct Network Printing Utility (LPR) . . . . . . . . . . . . 341
Display Language Utility . . . . . . . . . . . . . . . . . . . . . 343
Network Printer Status Utility . . . . . . . . . . . . . . . . . 344
Network Setup Utility . . . . . . . . . . . . . . . . . . . . . . . 349
PS Gamma Adjuster Utility . . . . . . . . . . . . . . . . . . . 350
C6100 Series User’s Guide
5
Page 6
Notes, Cautions, etc.
Illustrations ______________________
Illustrations and components are representative only. Your
unit may differ slightly from those pictured in this document.
NOTE
A note appears like this. A note provides
additional information to supplement the main
text which helps you to use and understand the
product.
Important!
An important message appears like this. An important
message provides supplemental information which can
prevent potential problems.
CAUTION!
A caution appears like this. A caution provides
additional information which, if ignored, may result
in equipment malfunction or damage.
WARNING!
A warning appears like this. A warning provides
additional information which, if ignored, may
result in a risk of personal injury.
C6100 Series User’s Guide
6
Page 7

Introduction
Your new printer is designed with advanced features to give
you clear, vibrant color printing and crisp black and white
pages at high speed on a range of print media.
Features _________________________
• Up to 26 pages per minute full color.
• Up to 32 pages per minute in black and white.
• 600 x 1200 dpi (dots per inch) print resolution.
• Single Pass Color Digital LED technology.
• 10 Base-T and 100 Base-TX network connection.
Options __________________________
• Additional Memory: see page 118
256 MB or 512 MB
• Duplex Unit: see page 119
for automatic two-sided printing
• Hard disk drive: see page 120
allows you to use secure (confidential) printing, spool
print jobs, and store print jobs for later use
• Second Paper Tray: see page 121.
capacity 530 sheets 20-lb. paper
C6100 Series User’s Guide
7
Page 8
Parts of the Printer
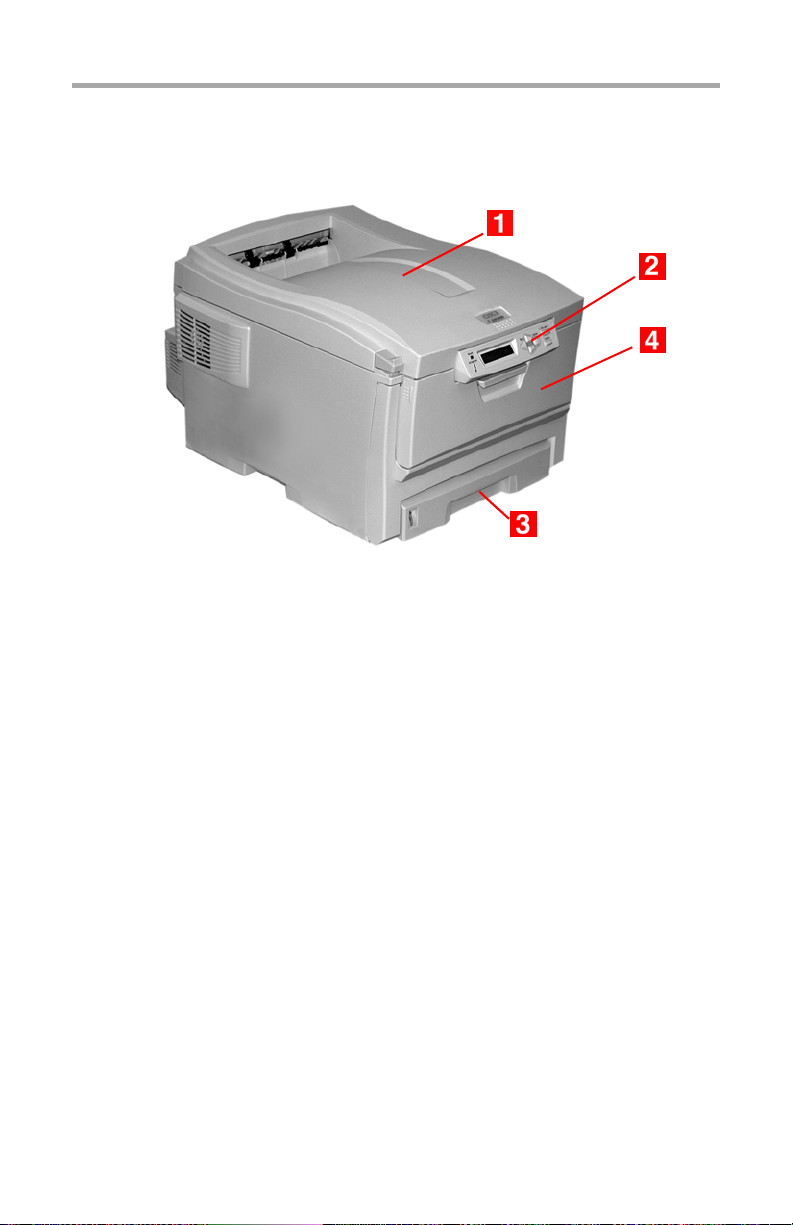
Front____________________________
c53_01_printerfull.jpg
1. Output Stacker, face down
Standard printed copy delivery point.
Holds up to 250 sheets of 20-lb. (75 g/m²) paper.
2. Operator Panel
Menu driven operator controls and LCD display panel
3. Paper Tray
Standard paper tray.
Holds up to 300 sheets of 20-lb. (75 g/m²) paper.
4. Multi-Purpose Tray
Used for feeding transparencies, heavier paper stocks,
envelopes and other special media.
Also for manual feeding of single sheets when required.
C6100 Series User’s Guide
8
Page 9
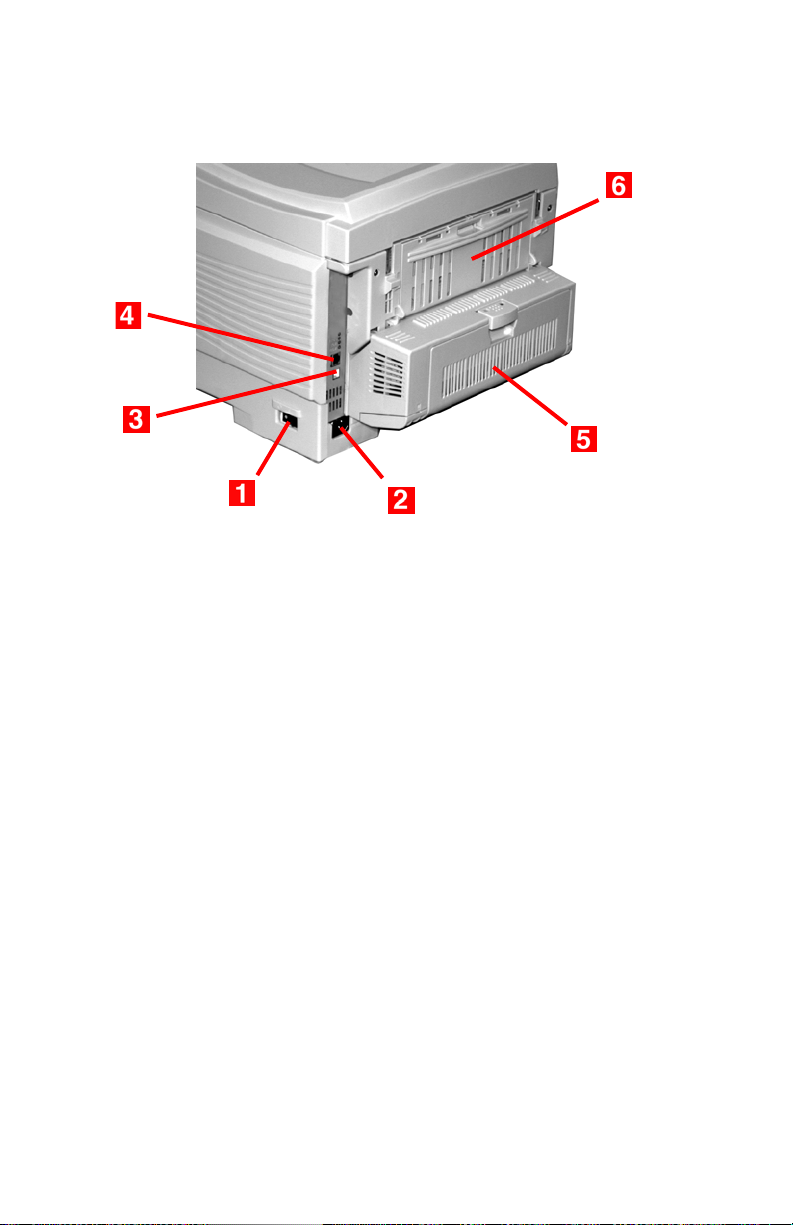
Rear ____________________________
c51_01_backview.jpg
1. On/Off Switch
2. Socket for Power Cord
3. USB Interface
4. Network Interface
5. Duplex Unit
6. Rear Stacker (face up)
Capacity 100 sheets
When the rear paper stacker is folded down, paper exits
the printer through the rear of the printer and is stacked
face up.
This is used for labels, heavy print media, envelopes and
custom paper sizes.
When used with the Multi-Purpose Tray, the paper path
through the printer is essentially straight. This avoids
bending the print media around curves in the paper path
and makes paper feeding more reliable.
C6100 Series User’s Guide
9
Page 10

Paper (Print Media)
General Information _____________________
CAUTION!
Print media must be able to withstand 446°F
(230°C) for 0.2 second.
You need to know three characteristics about any paper (print
media) you want to use with your printer:
• Type
• Weight
• Size
The type, weight, and size of the paper (print media)
determine:
• which paper feed tray can be used
Choices are multipurpose tray (MP Tray/manual feed)
or Trays 1 - 2
• which paper exit path can be used
Choices are face-down or face-up (straight-through)
• whether you can use double sided (duplex) printing
For type, see
• Paper: US Bond (Metric): see page 18
• Paper: Index: see page 20
• Letterhead: see page 22
• Envelopes: see page 26
• Transparencies: see page 31
• Labels: see page 29
For weight, refer to the correct paper type. Each paper type
has a table (matrix) of paper size, paper weight, paper feed,
paper exit, simplex/duplex correlations.
For general information on paper sizes, see “Paper Size, Feed,
and Exit” on page 37.
C6100 Series User’s Guide
10
Page 11

Driver Settings ____________________
General Information
Select the thickness/type of media on which you are printing a
particular job, to produce optimum print results. This setting
overrides the setting in the printer menu.
If you are printing on a thick media such as card stock, be sure
to select one of the thicker settings (Heavy, Ultra Heavy,
Labels1, Labels 2) to get proper fusion of the toner to the page
and to prevent possible damage to the printer.
If the Ultra Heavy setting does not give proper toner fusion,
you can try the Label settings.
The default printer menu setting is Medium.
Choices are: Printer Setting, Light, Medium, Heavy, Ultra
Heavy, Labels1, Labels2, Transparency, Glossy, User Type 1,
User Type 2, User Type 3, User Type 4, and User Type 5.
C6100 Series User’s Guide
11
Page 12

Choices
Choices are: Printer Setting, Light, Medium, Heavy, Ultra
Heavy, Labels1, Labels2, Transparency, Glossy, User Type 1,
User Type 2, User Type 3, User Type 4, and User Type 5.
Light
16-19 lb. US Bond (64-74 g/m2)
Medium
20-27 lb. US Bond (75-104 g/m2)
Heavy
28-32 lb. US Bond (105-120 g/m2)
58-67 lb. Index
Ultra Heavy
33-54 lb. US Bond (124-203 g/m2)
68-113 lb. Index
If the Ultra Heavy setting does not give proper toner
fusion, you can try the Label settings.
Labels1
For labels 0.1 to 0.169 mm thick.
Labels2
For labels 0.17 to 0.2 mm thick.
C6100 Series User’s Guide
12
Page 13
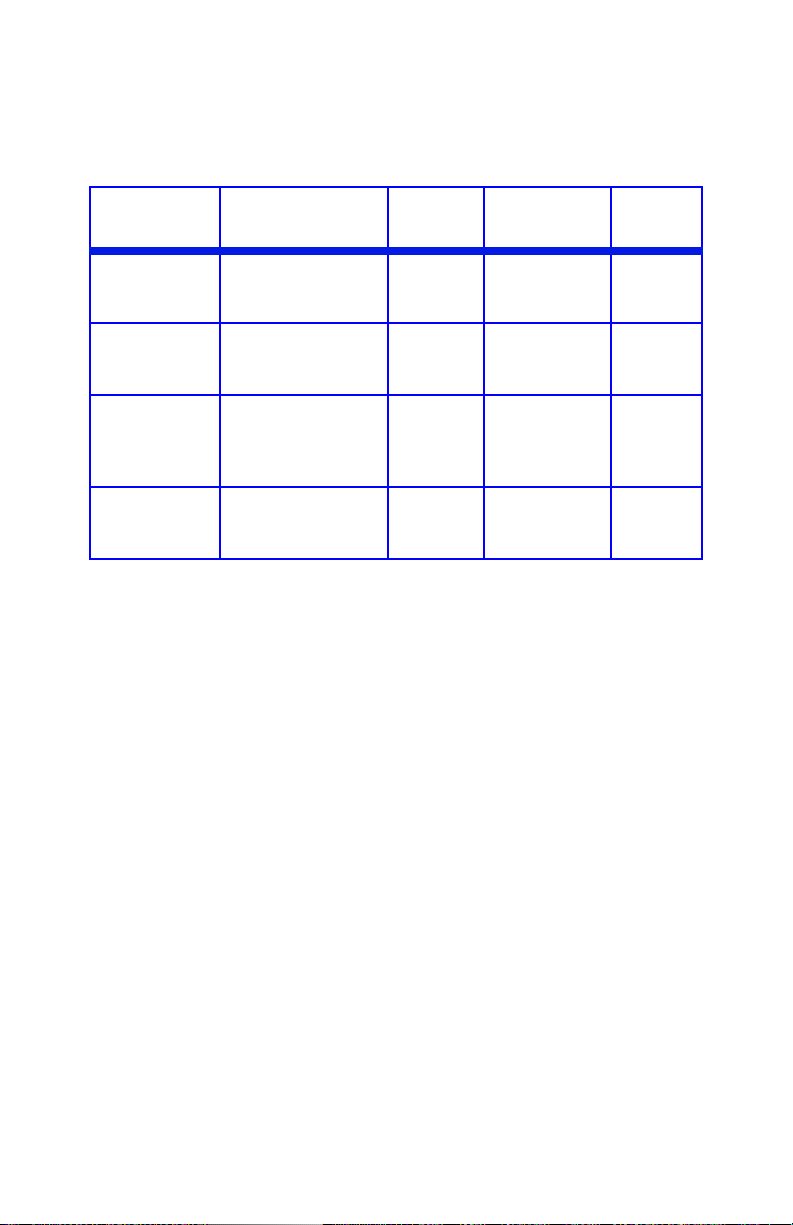
Matrix: Driver Setting, Actual Weight, Paper
Tray, Duplex Option, and Paper Exit
Driver
Setting
Light 16-19 lb. US Bond
Medium 20-27 lb. US Bond
Heavy 28-32 lb. US Bond
Ultra Heavy
Actual
Weight
64-74 g/m²
55-64 Kg
75-104 g/m²
65 - 89 Kg
(105-120 g/m²)
90 - 103 Kg
c
33-54 lb. US Bond
121-200 g/m²
104 - 172 Kg
Feed
Tray Duplexer?
Tra y 1
Tra y 2
Tra y 1
Tra y 2
MP Tray
Tra y 1
Tra y 2
MP Tray
Tra y 2
MP Tray
No
Yes Top
Yes
(restricted to
28 lb.
maximum)
d
No Rear Only
Exit
Tray
Top
Rear
Rear
Rear Only
a. Face Down Stacker
b. Face Up Stacker
c. If the Ultra Heavy setting does not give proper toner fusion,
you can try the Label settings.
d. 47 lb. (177 g/m²) maximum for Tray 2
a
b
C6100 Series User’s Guide
13
Page 14
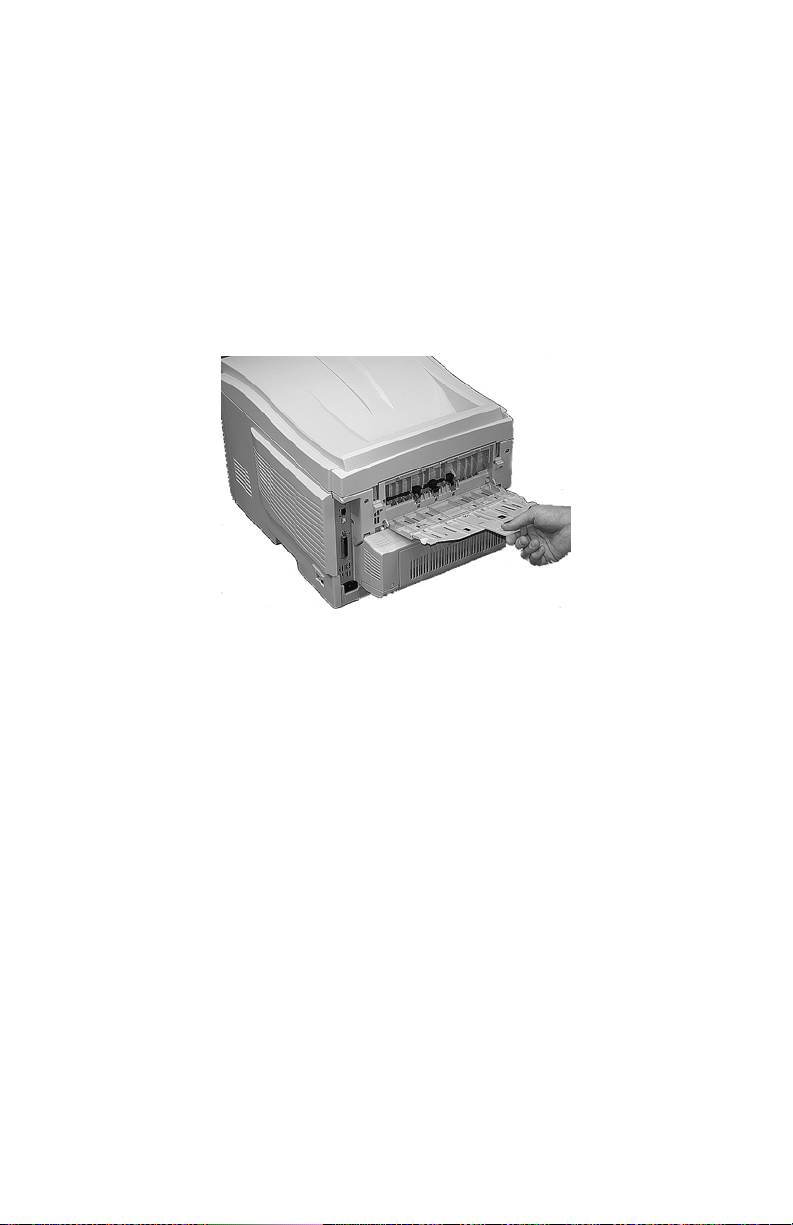
Face up / Straight through / Rear Exit
If you are using heavy media, transparencies, envelopes or
labels, use the face up (straight through) paper feed path.
For face up printing (straight-through path), make sure the
rear exit is open and the paper support is extended.
• Paper is stacked in reverse order.
• Tray capacity is about 100 sheets. Actual capacity
depends on paper weight.
c53_72_rear3.jpg
C6100 Series User’s Guide
14
Page 15

Windows
The normal default for these items is automatic detection.
CAUTION!
1. If type and weight are not correctly set,
• print quality deteriorates
• the fuser roller may be damaged.
2. If the settings in the printer differ from those selected on
your computer, the printer does not print.
An error message displays.
3. The following printer settings are given as a guide only.
Some software applications require the paper feed, size and
media settings to be selected from within the application
(page setup).
1. Open the file you want to print.
2. Click File → Print.
3. Select your printer.
4. Click Properties.
5. Under Layout, click Advanced.
6. Under Document Options, Printer Features, click Media
Typ e .
7. Use the drop down list to make your selection.
See “Driver Settings” on page 11.
See “Face up / Straight through / Rear Exit” on page 14.
8. Change any other settings as desired.
9. Click OK.
10. The Layout tab screen appears.
11. Change any other settings as desired.
12. Click OK.
13. The main Print screen appears.
14. Change any other settings as desired.
C6100 Series User’s Guide
15
Page 16

15. Click OK.
16. The document prints.
C6100 Series User’s Guide
16
Page 17

Macintosh OS 10.2 and 10.3
CAUTION!
1. If type and weight are not correctly set,
• print quality deteriorates
• the fuser roller may be damaged.
2. If the settings in the printer differ from those selected on
your computer, the printer does not print.
An error message displays.
3. The following printer settings are given as a guide only.
Some software applications require the paper feed, size and
media settings to be selected from within the application
(page setup).
1. Open the file you want to print.
2. Click File → Print.
3. Open the drop-down list below Presets. Select Printer
Option.
4. At Media Weight, make your selection.
See “Driver Settings” on page 11.
See “Face up / Straight through / Rear Exit” on page 14.
5. Change any other settings as desired.
6. Click Print.
C6100 Series User’s Guide
17
Page 18

Paper, US Bond____________________
General Information
NOTE
To determine if a paper weight is US Bond or Index,
check the metric equivalent.
35 lb US Bond = 132 g/m
35 lb Index = 64 g/m
For more information, go to www.paper-paper.com/
weight.html
The size, weight, and type of the paper (print media)
determine:
• which paper feed tray can be used
• which paper exit path can be used
• whether you can use double sided (duplex) printing
Single sided printing is also known as simplex printing.
These settings can be made in the printer menu or in the
printer driver.
2
2
Application settings override driver settings.
Driver settings override printer menu settings.
The best performance is obtained when using paper designed
for use in copiers and laser printers. Suitable types include:
• Hammermill
®
Laser Printer Radiant White, 24 lb. US
Bond (90 g/m²)
• Xerox
• Oki
®
4024, 20 lb.US Bond (75 g/m²)
®
52206101 Bright White Proofing Paper, 32 lb. US
Bond (120 g/m
2
)
C6100 Series User’s Guide
18
Page 19

Recommendations
• Check www.okiprintingsolutions.com for the latest
information on recommended papers for your printer.
• Paper should be stored flat, away from moisture, direct
sunlight and heat sources.
• The use of heavily laid or textured paper will
seriously affect the life of the image drum and give
poor print quality. Print quality can be improved by
changing the media setting to ‘Ultra Heavy.’ However,
this will reduce the output speed and prevent the use of
the duplex option.
If the Ultra Heavy setting does not give proper toner
fusion, you can try the Label settings.
• Avoid:
– Damp, damaged or curled paper.
– Very smooth, shiny or glossy paper.
– Heavily embossed letterhead paper, very rough
paper or paper that has a large grain difference
between the two sides.
– Paper with perforations, cut-outs or ragged edges.
– Carbon paper, recycled paper, NCR paper,
photosensitive paper, pressure sensitive paper or
thermal transfer paper.
Driver Settings
To select a paper type in the driver, see:
Windows: page 15
Macintosh OS 10.2 and 10.3: page 17
C6100 Series User’s Guide
19
Page 20

Paper, Index ______________________
General Information
NOTE
To determine if a paper weight is US Bond or Index,
check the metric equivalent.
• 35 lb US Bond = 132 g/m
• 35 lb Index = 64 g/m
For more information, go to www.paper-paper.com/
weight.html
The size, weight, and type of the paper (print media)
determine:
• which paper feed tray can be used
• which paper exit path can be used
• whether you can use double sided (duplex) printing
Single sided printing is also known as simplex printing.
These settings can be made in the printer menu or in the
printer driver.
2
2
Application settings override driver settings.
Driver settings override printer menu settings.
The best performance is obtained when using paper designed
for use in copiers and laser printers. Suitable types include:
• Hammermill
®
Laser Printer Radiant White, 24 lb. US
Bond (90 g/m²)
• Xerox
• Oki
®
4024, 20 lb.US Bond (75 g/m²)
®
52206101 Bright White Proofing Paper, 32 lb. US
Bond (120 g/m
2
)
C6100 Series User’s Guide
20
Page 21

Recommendations
• Check www.okiprintingsolutions.com for the latest
information on recommended papers for your printer.
• Paper should be stored flat, away from moisture, direct
sunlight and heat sources.
• The use of heavily laid or textured paper will
seriously affect the life of the image drum and give
poor print quality. Print quality can be improved by
changing the media setting to ‘Ultra Heavy.’ However,
this will reduce the output speed and prevent the use of
the duplex option.
If the Ultra Heavy setting does not give proper toner
fusion, you can try the Label settings.
• Avoid:
– Damp, damaged or curled paper.
– Very smooth, shiny or glossy paper.
– Heavily embossed letterhead paper, very rough paper
or paper that has a large grain difference between the
two sides.
– Paper with perforations, cut-outs or ragged edges.
– Carbon paper, recycled paper, NCR paper,
photosensitive paper, pressure sensitive paper or
thermal transfer paper.
Driver Settings
To select a paper type in the driver, see:
Windows: page 15
Macintosh OS 10.2 and 10.3: page 17
C6100 Series User’s Guide
21
Page 22

Letterhead _______________________
General Information
The size, weight, and type of the paper (print media)
determine:
• which paper feed tray can be used
• which paper exit path can be used
• whether you can use double sided (duplex) printing
Single sided printing is also known as simplex printing.
These settings can be made in the printer menu or in the
printer driver.
Application settings override driver settings.
Driver settings override printer menu settings.
When using heavily laid or textured paper
• the life of the image drum is seriously shortened
• print quality may deteriorate
• change the media setting to ‘Ultra Heavy’.
This will improve print quality.
When using ‘Ultra Heavy’:
• print speed slows
• duplexing cannot be used.
If the Ultra Heavy setting does not give proper toner
fusion, you can try the Label settings.
C6100 Series User’s Guide
22
Page 23

Recommendations
CAUTION
Print media must be able to withstand 446°F
(230°C) for 0.2 second.
Only use letterhead designed for color laser printers and
photocopiers.
Don’t use very smooth, shiny or glossy paper.
Don’t use heavily embossed headed paper, very rough paper
or paper that has a large grain difference between the two
sides.
• Check www.okiprintingsolutions.com for the latest
information on recommended papers for your printer.
• Paper should be stored flat, away from moisture, direct
sunlight and heat sources.
• The use of heavily laid or textured paper will
seriously affect the life of the image drum and give
poor print quality. Print quality can be improved by
changing the media setting to ‘Ultra Heavy.’ However,
this will reduce the output speed and prevent the use of
the duplex option.
If the Ultra Heavy setting does not give proper toner
fusion, you can try the Label settings.
• Avoid:
– Damp, damaged or curled paper.
– Very smooth, shiny or glossy paper.
– Heavily embossed letterhead paper, very rough paper or
paper that has a large grain difference between the two
sides.
– Paper with perforations, cut-outs or ragged edges.
– Carbon paper, recycled paper, NCR paper,
photosensitive paper, pressure sensitive paper or
thermal transfer paper.
C6100 Series User’s Guide
23
Page 24
Driver Settings
To select a paper type in the driver, see:
Windows: page 15
Macintosh OS 10.2 and 10.3: page 17
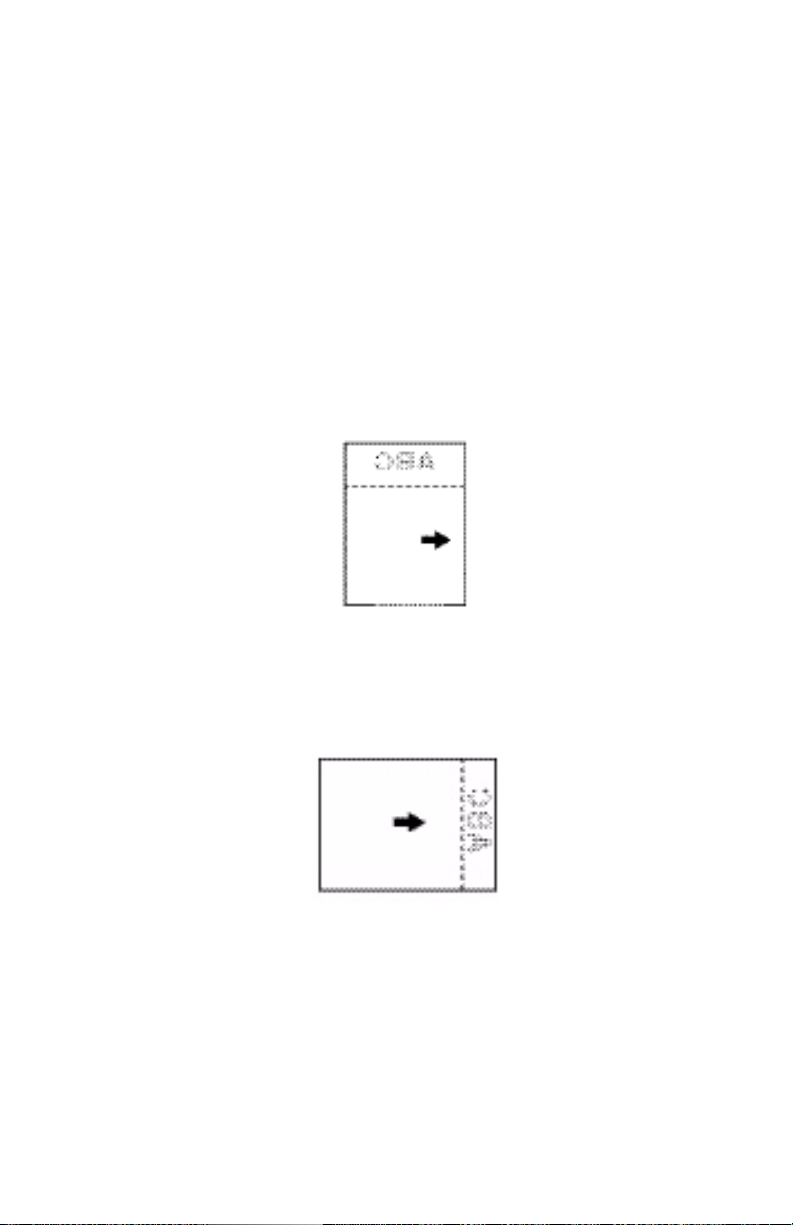
Loading
Trays 1 and 2
Long edge feed
Face down, top toward the back of the printer.
Letr_lef.bmp
Short edge feed
face down, top to the right
ltrhd_se.jpg
C6100 Series User’s Guide
24
Page 25
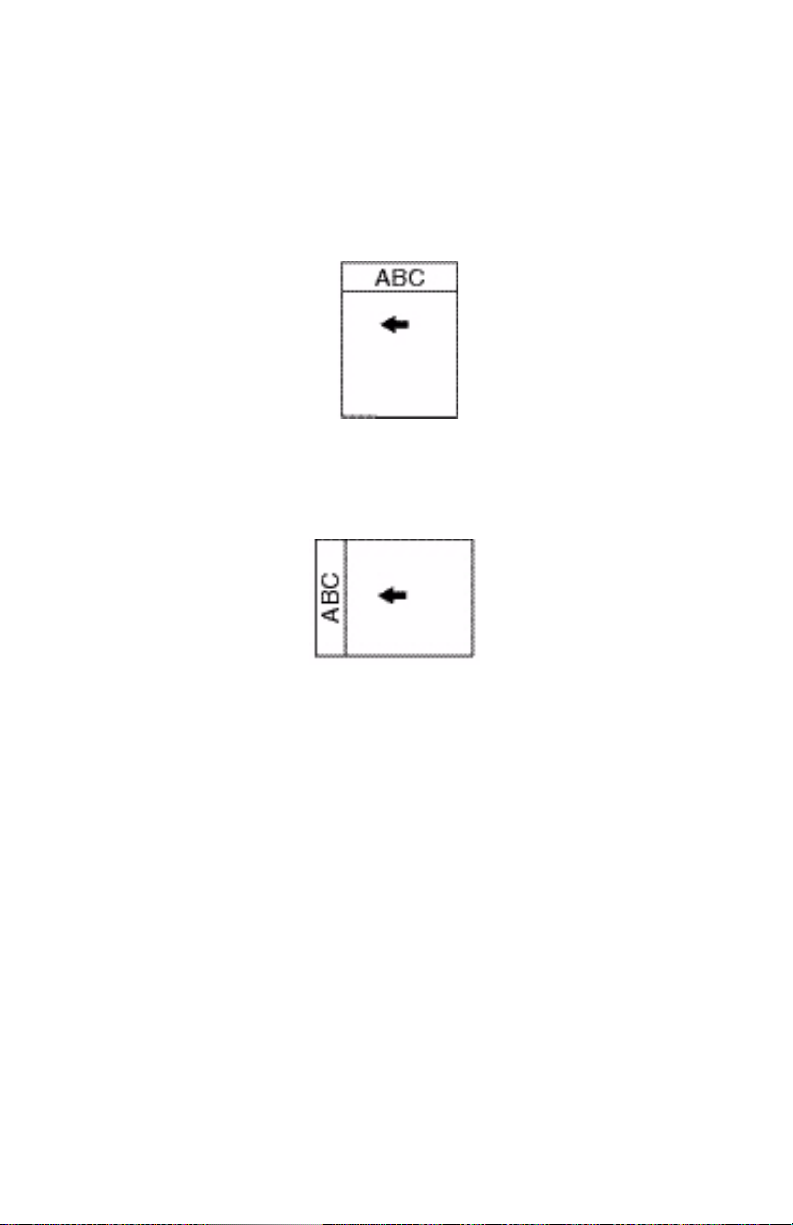
Loading
Multi-purpose Tray (Manual Feed)
Long edge feed
Face up, top to the back of the printer
manl_le.jpg
Short edge feed
Face up, top to the left
manl_se.jp
C6100 Series User’s Guide
25
Page 26

Envelopes ________________________
General Information
Envelopes can only be fed from the multi-purpose (MP /
manual feed) tray.
Envelopes can only exit the printer face-up (straight through,
rear exit).
Recommendations
CAUTION
Print media must be able to withstand 446°F
(230°C) for 0.2 second.
Envelopes.jpg
1. Use only recommended envelopes.
Oki 52206301 and 52206302
For more information, see “Print Media, Oki“ in your
Handy Reference Guide or www.okiprintingsolutions.com.
2. Store envelopes flat and away from
• moisture
• direct sunlight
• heat sources
3. Don’t use envelopes with
• windows
• metal clasps
• self-sealing flaps
C6100 Series User’s Guide
26
Page 27
• damp, damaged or curled paper envelopes
Driver Settings
To select a paper type in the driver, see:
Windows: page 15
Macintosh OS 10.2 and 10.3: page 17
Loading
Trays 1 - 2
Envelopes cannot be fed from paper trays 1 - 2.
Multi-purpose Tray (Manual Feed)
Face up (flap side down), top to the left (into the printer)
C96_LoadPaperMPTray_Envelopes_crop.JPG
Paper Exit
If you are using heavy media, transparencies, envelopes or
labels, use the face up (straight through) paper feed path.
For face up printing (straight-through path), make sure the
rear exit is open and the paper support is extended.
• Paper is stacked in reverse order.
C6100 Series User’s Guide
27
Page 28
• Tray capacity is about 100 sheets. Actual capacity
depends on paper weight.
c53_72_rear3.jpg
C6100 Series User’s Guide
28
Page 29

Labels ___________________________
General Information
Labels can only be fed from the multi-purpose (MP / manual
feed) tray.
Labels can only exit the printer face-up (straight through, rear
exit).
Avery 5161 White Laser Labels (letter size) work well with your
printer.
Check www.okiprintingsolutions.com for the latest information
on media for your printer.
Recommendations
CAUTION
Print media must be able to withstand 446°F
(230°C) for 0.2 second.
• Only use labels designed for color laser printers and
photocopiers.
• Labels must cover the entire carrier sheet.
• The carrier sheet or adhesive must not be exposed to
any part of the printer.
Driver Settings
To select a paper type in the driver, see:
Windows: page 15
Macintosh OS 10.2 and 10.3: page 17
Loading
Trays 1 - 2
Labels cannot be fed from paper trays 1 - 2.
C6100 Series User’s Guide
29
Page 30
Multi-purpose Tray (Manual Feed)
Face up (print side up)
Default = long edge feed.
C96_LoadPaperMPTray_Labels_crop.JPG
Paper Exit
If you are using heavy media, transparencies, envelopes or
labels, use the face up (straight through) paper feed path.
For face up printing (straight-through path), make sure the
rear exit is open and the paper support is extended.
• Paper is stacked in reverse order.
• Tray capacity is about 100 sheets. Actual capacity
depends on paper weight.
c53_72_rear3.jpg
C6100 Series User’s Guide
30
Page 31

Transparencies ____________________
General Information
Transparencies can only be fed from the multi-purpose (MP /
manual feed) tray.
Transparencies can only exit the printer face-up (straight
through, rear exit).
Recommendations
CAUTION
Print media must be able to withstand 446°F
(230°C) for 0.2 second.
1. Only use transparencies designed for color laser printers
and photocopiers.
2. Only use recommended transparencies
Oki 52205701
3M CG3720
3. Avoid office transparencies designed for use by hand with
marker pens.
These will melt in the fuser and cause damage.
Driver Settings
To select a paper type in the driver, see:
Windows: page 15
Macintosh OS 10.2 and 10.3: page 17
Loading
Trays 1 - 2
Transparencies cannot be fed from paper trays 1 - 2.
C6100 Series User’s Guide
31
Page 32

Multi-purpose Tray (Manual Feed)
Face up (print side up)
Default = long edge feed.
C96_LoadPaperMPTray.jpg
Paper Exit
If you are using heavy media, transparencies, envelopes or
labels, use the face up (straight through) paper feed path.
For face up printing (straight-through path), make sure the
rear exit is open and the paper support is extended.
• Paper is stacked in reverse order.
• Tray capacity is about 100 sheets. Actual capacity depends
on paper weight.
c53_72_rear3.jpg
C6100 Series User’s Guide
32
Page 33

Paper Trays
General Information ________________
You can select
• the paper tray used by your print job
• if the printer checks whether the size paper loaded in the
selected tray matches that required for the document
being printed (Paper Size Check)
• if the printer automatically matches the printer job’s
paper size to a paper tray (Auto Select)
• if a paper tray (Tray 1) runs out of paper, your printer
can automatically switch to another paper tray (MP Tray,
optional Tray 2) loaded with the same type of paper
(Auto Switching).
The settings for Paper Feed (Paper Tray/Source), Paper Size,
Paper Exit, and Paper Weight interact. For more information,
see “Paper Size, Feed, and Exit” on page 37.
C6100 Series User’s Guide
33
Page 34

Select in the driver _________________
Windows PostScript
1. Open the file you want to print.
2. Click File → Print.
3. Select your printer.
4. Click Properties.
5. Click the Paper/Quality tab.
6. Under Tray Selection, at Paper Source, click on the arrow
to open the drop down list. Make your selection.
Choices are: Automatically select, Multi-purpose tray,
Tray 1, Tray 2, Plain Paper, Letterhead, Transparency,
Labels, Bond Paper, Recycled Paper, Card Stock, Rough
Paper, Envelopes.
Automatically select
The printer automatically selects the paper tray.
Multi Purpose Tray / Tray1 / Tray 2
Tray 2 appears only if an optional tray is installed.
Select a specific paper tray.
For example:
You are printing a job on special media (letterhead).
Place the media in the Multi Purpose Tray.
Select the Multi Purpose Tray here (in the driver) when
printing the job.
7. Change any other settings as desired.
8. Click OK.
9. The main Print screen appears.
10. Change any other settings as desired.
11. Click OK.
12. The document prints.
C6100 Series User’s Guide
34
Page 35

Windows PCL
1. Open the file you want to print.
2. Click File → Print.
3. Select your printer.
4. Click Properties.
5. Click the Setup tab.
6. Under Source, click on the arrow to open the drop down
list. Make your selection.
Choices are: Automatically select, Multi-purpose tray,
Tray 1, Tray 2, Plain, Recycled, Letterhead, Bond, Card
Stock, Rough, Labels, Transparency
Automatically select
The printer automatically selects the paper tray.
Multi Purpose Tray / Tray1 / Tray 2
Tray 2 appears only if an optional tray is installed.
Select a specific paper tray.
For example:
You are printing a job on special media (letterhead).
Place the media in the Multi Purpose Tray.
Select the Multi Purpose Tray here (in the driver) when
printing the job.
7. Change any other settings as desired.
8. Click OK.
9. The main Print screen appears.
10. Change any other settings as desired.
11. Click OK.
12. The document prints.
C6100 Series User’s Guide
35
Page 36

Macintosh
1. Open the file you want to print.
2. Click File → Print.
3. Open the drop-down list below Presets. Select Paper
Source.
4. Make your selection.
Auto
The printer automatically selects the paper tray.
Multi Purpose Tray / Tray1 / Tray 2
Tray 2 appears only if an optional tray is installed.
Select a specific paper tray.
For example:
You are printing a job on special media (letterhead).
Place the media in the Multi Purpose Tray.
Select the Multi Purpose Tray here (in the driver) when
printing the job.
5. Change any other settings as desired.
6. Click Print.
C6100 Series User’s Guide
36
Page 37

Paper Size, Feed, and Exit ___________
Tray 1 and Optional Tray 2
Feed Exit
Paper size Tray 1 Tray 2
Letter
(8½ x 11'')
Legal-14
(8½ x 14'')
Legal-13.5
(8½ x 13.5'')
Legal-13
(8½ x 13'')
Executive
(7¼ x 10½'')
A4
(210 x 297 mm)
A5
(145 x 210 mm)
A6
(105 x 148 mm)
B5
(182 x 257 mm)
Custom S: min. 3.94 x
c
S, D
S, D S, D S, D S, D
S, D S, D S, D S, D
S, D S, D S, D S, D
S, D S, D S, D S, D
S, D S, D S, D S, D
S, D S, D S, D S, D
SNot UsableNot
S, D S, D S, D S, D
5.83'' [100 x
148 mm],
D: min. 5.8 x
8.25'' [148 x
210 mm]
S, D: max. 8.5
x 14'' [215.9 x
355.6 mm]
S, D S, D S, D
S: min. 3.94 x
5.83'' [100 x
148 mm],
D: min. 5.8 x
8.25'' [148 x
210 mm]
S, D: max. 8.5
x 14'' [215.9 x
355.6 mm]
a
Top
Usable
S, D Not
Rearb
S
Usable.
a. Use the Top Ex it (Face D own Stack er) only f or paper u p to 47
lb. US Bond (98 lb. Index, 177 g/m
2
).
b. Switch to the Rear Exit (Face Up Stacker) when you are print-
ing paper heavier than 47 lb. US Bond (98 lb. Index, 177 g/
2
m
).
c. S = Simplex; D = Duplex (printing on both sides)
C6100 Series User’s Guide
37
Page 38

Multi-Purpose Tray
Paper size Feed
MP Tray
Letter
8½ x 11''
Legal-14
8½ x 14''
Legal-13.5
8½ x 13.5''
Legal-13
8½ x 13''
Executive
7¼ x 10½''
A4
210 x 297 mm
A5
145 x 210 mm
B5
182 x 257 mm
Envelopes
COM-10
Custom
Minimum
3.94 to 5.83''
100 x 148 mm
Maximum
8½ x 14''
216 x 356 mm
Banner
c
Yes Yes Yes
Yes Yes Yes
Yes Yes Yes
Yes Yes Yes
Yes Yes Yes
Yes Yes Yes
Yes Yes Yes
Yes Yes Yes
Yes Yes No
Yes Yes No
Exit
Rear
Exit
a
Top
b
a. Use the Rear Exit (Face Up Stacker) for heavy paper,
transparencies, envelopes, and labels.
b. Use the Top Exit (Face Down Stacker) only for paper up to
47 lb. US Bond (98 lb. Index, 177 g/m
2
).
c. Banner specifications:
– Length: up to 47'' (1.2 m)
– Width Range = 8¼ to 8½'' (210 to 215.9 mm)
– Weight Range = 28 to 34 lb. US Bond (105 to 128 g/m2)
– Path = Rear Exit (Face Up Stacker) only
– Feed one sheet at a time.
C6100 Series User’s Guide
38
Page 39

Tray 1 ___________________________
General Information
Use Tray 1 for regular paper, standard sizes, standard weights.
If a paper tray (Tray 1) runs out of paper, your printer can
automatically switch to another paper tray (MP Tray, optional
Tray 2) loaded with the same type of paper. This is called Auto
Switching. See “Auto Switching” on page 52.
• Capacity
about 300 sheets (20-lb. [75 g/m²] paper)
• Loading
See Loading Paper, “Trays 1 and 2” on page 65.
• Exit path
top exit (Face Down Stacker), best for general use
rear exit (Face Up Stacker)
See “Paper Sizes and Exit Paths” on page 41
duplex (printing on both sides), with restrictions
See “Duplexing Restrictions” on page 40
Choose in the driver
See Paper Trays, “Select in the driver” on page 34.
C6100 Series User’s Guide
39
Page 40

Duplexing Restrictions
Important!
You can duplex
•paper
•paper weights up to
28 lb. US Bond
58 lb. Index
105 g/m
You cannot duplex
•labels
• envelopes
• transparencies
• paper weights above
28 lb. US Bond
58 lb. Index
105 g/m
2
metric
2
metric
C6100 Series User’s Guide
40
Page 41

Paper Sizes and Exit Paths
Feed Exit
Paper size Tray 1 Tray 2
Letter
(8½ x 11'')
Legal-14
(8½ x 14'')
Legal-13.5
(8½ x 13.5'')
Legal-13
(8½ x 13'')
Executive
(7¼ x 10½'')
A4
(210 x 297 mm)
A5
(145 x 210 mm)
A6
(105 x 148 mm)
B5
(182 x 257 mm)
Custom S: min. 3.94 x
c
S, D
S, D S, D S, D S, D
S, D S, D S, D S, D
S, D S, D S, D S, D
S, D S, D S, D S, D
S, D S, D S, D S, D
S, D S, D S, D S, D
SNot UsableNot
S, D S, D S, D S, D
5.83'' [100 x
148 mm],
D: min. 5.8 x
8.25'' [148 x
210 mm]
S, D: max. 8.5
x 14'' [215.9 x
355.6 mm]
S, D S, D S, D
S: min. 3.94 x
5.83'' [100 x
148 mm],
D: min. 5.8 x
8.25'' [148 x
210 mm]
S, D: max. 8.5
x 14'' [215.9 x
355.6 mm]
Topa
Usable
S, D Not
Rearb
S
Usable.
a. Use the Top Ex it (Face D own Stack er) only f or paper u p to 47
lb. US Bond (98 lb. Index, 177 g/m
2
).
b. Switch to the Rear Exit (Face Up Stacker) when you are print-
ing paper heavier than 47 lb. US Bond (98 lb. Index, 177 g/
2
m
).
c. S = Simplex; D = Duplex (printing on both sides)
C6100 Series User’s Guide
41
Page 42

Tray 2 ___________________________
General Information
Use Tray 2 for regular paper, standard sizes, standard weights.
If a paper tray (Tray 1) runs out of paper, your printer can
automatically switch to another paper tray (MP Tray, optional
Tray 2) loaded with the same type of paper. This is called Auto
Switching. See “Auto Switching” on page 52.
• Capacity
about 530 sheets (20-lb. [75 g/m²] paper)
• Loading
See Loading Paper, “Trays 1 and 2” on page 65.
• Exit path
top exit (Face Down Stacker), best for general use
rear exit (Face Up Stacker)
See “Paper Sizes and Exit Paths” on page 44
duplex (printing on both sides), with restrictions
See “Duplexing Restrictions” on page 43
Choose in the driver
See Paper Trays, “Select in the driver” on page 34.
C6100 Series User’s Guide
42
Page 43

Duplexing Restrictions
Important!
You can duplex
•paper
•paper weights up to
28 lb. US Bond
58 lb. Index
105 g/m
You cannot duplex
•labels
• envelopes
• transparencies
• paper weights above
28 lb. US Bond
58 lb. Index
105 g/m
2
metric
2
metric
C6100 Series User’s Guide
43
Page 44

Paper Sizes and Exit Paths
Feed Exit
Paper size Tray 1 Tray 2
Letter
(8½ x 11'')
Legal-14
(8½ x 14'')
Legal-13.5
(8½ x 13.5'')
Legal-13
(8½ x 13'')
Executive
(7¼ x 10½'')
A4
(210 x 297 mm)
A5
(145 x 210 mm)
A6
(105 x 148 mm)
B5
(182 x 257 mm)
Custom S: min. 3.94 x
c
S, D
S, D S, D S, D S, D
S, D S, D S, D S, D
S, D S, D S, D S, D
S, D S, D S, D S, D
S, D S, D S, D S, D
S, D S, D S, D S, D
SNot UsableNot
S, D S, D S, D S, D
5.83'' [100 x
148 mm],
D: min. 5.8 x
8.25'' [148 x
210 mm]
S, D: max. 8.5
x 14'' [215.9 x
355.6 mm]
S, D S, D S, D
S: min. 3.94 x
5.83'' [100 x
148 mm],
D: min. 5.8 x
8.25'' [148 x
210 mm]
S, D: max. 8.5
x 14'' [215.9 x
355.6 mm]
Topa
Usable
S, D Not
Rearb
S
Usable.
a. Use the Top Ex it (Face D own Stack er) only f or paper u p to 47
lb. US Bond (98 lb. Index, 177 g/m
2
).
b. Switch to the Rear Exit (Face Up Stacker) when you are print-
ing paper heavier than 47 lb. US Bond (98 lb. Index, 177 g/
2
m
).
c. S = Simplex; D = Duplex (printing on both sides)
C6100 Series User’s Guide
44
Page 45

Multi-Purpose Tray (MP Tray)
[Manual Feed] ____________________
General Information
This tray is also called the manual feed tray.
Use the Multi-Purpose Tray (MP Tray) for printing card stock,
labels, envelopes and transparencies.
If a paper tray (Tray 1) runs out of paper, your printer can
automatically switch to another paper tray (MP Tray, optional
Tray 2) loaded with the same type of paper. This is called Auto
Switching. See “Auto Switching” on page 52.
• Capacity
stack of media about 3/8'' (10 mm) high
about 10 envelopes
50 transparencies
• Loading
print side up, top edge facing into the printer.
See Loading Paper, “Multi-purpose Tray” on page 68.
• Exit path
rear exit (Face Up Stacker), best for general use
top exit (Face Down Stacker), with restrictions
See “Paper Sizes and Exit Paths” on page 47
duplex (printing on both sides), with restrictions
See “Duplexing Restrictions” on page 46
Choose in the driver
See Paper Trays, “Select in the driver” on page 34.
C6100 Series User’s Guide
45
Page 46

Duplexing Restrictions
Important!
You can duplex
•paper
•paper weights up to
28 lb. US Bond
58 lb. Index
105 g/m
You cannot duplex
•labels
• envelopes
• transparencies
• paper weights above
28 lb. US Bond
58 lb. Index
105 g/m
2
metric
2
metric
C6100 Series User’s Guide
46
Page 47

Paper Sizes and Exit Paths
Paper size Feed
MP Tray
Letter
8½ x 11''
Legal-14
8½ x 14''
Legal-13.5
8½ x 13.5''
Legal-13
8½ x 13''
Executive
7¼ x 10½''
A4
210 x 297 mm
A5
145 x 210 mm
B5
182 x 257 mm
Envelopes
COM-10
Custom
Minimum
3.94 to 5.83''
100 x 148 mm
Maximum
8½ x 14''
216 x 356 mm
Banner
c
Yes Yes Yes
Yes Yes Yes
Yes Yes Yes
Yes Yes Yes
Yes Yes Yes
Yes Yes Yes
Yes Yes Yes
Yes Yes Yes
Yes Yes No
Yes Yes No
Exit
Rear
Exit
a
Top
b
a. Use the Rear Exit (Face Up Stacker) for heavy paper,
transparencies, envelopes, and labels.
b. Use the Top Exit (Face Down Stacker) only for paper up to
47 lb. US Bond (98 lb. Index, 177 g/m
2
).
c. Banner specifications:
– Length: up to 47'' (1.2 m)
– Width Range = 8¼ to 8½'' (210 to 215.9 mm)
– Weight Range = 28 to 34 lb. US Bond (105 to 128 g/m
2
)
– Path = Rear Exit (Face Up Stacker) only
– Feed one sheet at a time.
C6100 Series User’s Guide
47
Page 48

Auto Tray Select ___________________
General Information
Your printer can automatically match the printer job’s paper
size to a paper tray (1-5 and Manual Feed [Multipurpose
Tray]).
NOTE
The Paper Size for Manual Feed (Multipurpose Tray)
must be set through the operator panel for Auto Tray
Select to work.
For more information,
Windows, PostScript: see page 49
Windows, PCL: see page 50
Macintosh OS 9.x: see page 51
Macintosh OS 10.1 & 10.2: see page 51
Macintosh OS 10.3: see page 51
C6100 Series User’s Guide
48
Page 49

Windows PostScript
For more information, see “General Information” on page 48.
1. Open the file you want to print.
2. Click File → Print.
3. Select your printer.
4. Click Properties.
5. Click the Layout tab.
6. Next:
Windows 98 / Me : On Settings, next to Paper Source, click
Automatically Select.
Windows NT: On Advanced, next to Paper Source, click
Automatically Select.
Windows XP/2000: On Paper Quality, next to Paper
Source, click Automatically Select.
7. Change any other settings as desired.
8. Click OK.
9. The main Print screen appears.
10. Change any other settings as desired.
11. Click OK.
12. The document prints.
C6100 Series User’s Guide
49
Page 50

Windows PCL
For more information, see “General Information” on page 48.
1. Open the file you want to print.
2. Click File → Print.
3. Select your printer.
4. Click Properties.
5. On Setup, under Media, beside Source, click
Automatically Select.
6. Change any other settings as desired.
7. Click OK.
8. The main Print screen appears.
9. Change any other settings as desired.
10. Click OK.
11. The document prints.
C6100 Series User’s Guide
50
Page 51

Macintosh OS 9.x
For more information, see “General Information” on page 48.
1. Open the file you want to print.
2. Click File → Print.
3. On General Controls, under Paper Feed Tray, select
Automatic Selection.
Macintosh OS 10.1 & 10.2
For more information, see “General Information” on page 48.
1. Open the file you want to print.
2. Click File → Print.
3. On the Paper Feed panel, select All Pages.
4. Select Automatic Selection.
Macintosh OS 10.3
For more information, see “General Information” on page 48.
1. Open the file you want to print.
2. Click File → Print.
3. On the Paper Feed panel, select All Pages.
4. Select Automatic Selection.
C6100 Series User’s Guide
51
Page 52

Auto Switching ____________________
General Information
NOTE
When a paper tray runs out of paper, the printer
automatically switches to the next available paper tray
when
• more than one paper tray is installed
and
• AUTO TRAY SWITCH is set to ON.
This setting is in the Tray Configuration Sub Menu
of the top level menu Menus.
Refer to “Printer Menu” on page 53.
If you use the Multi-Purpose (MP) Tray, you must set a
paper size for the MP Tray through the control panel.
See “Changing Settings” on page 97.
In the menu, if “Media Type” is set to anything other
than “Regular Paper”, you must select a specific “Tray”.
You cannot use Automatic Selection.
If a paper tray (Tray 1) runs out of paper, your printer can
automatically switch to another paper tray (MP Tray, optional
Tray 2) loaded with the same type of paper. This is called Auto
Switching.
This feature is enabled either through the printer menu or the
printer driver.
Application settings override driver settings.
Driver settings override printer menu settings.
For more information,
Printer Menu: see page 53
Windows, PostScript: see page 54
Windows, PCL: see page 55
C6100 Series User’s Guide
52
Page 53

Macintosh OS 9.x: see page 56
Macintosh OS 10.1 & 10.2: see page 56
Macintosh OS 10.3: see page 56
Printer Menu
This function is enabled in the Print Menu.
The factory default is ON.
To change the setting:
C53_Panel.eps
1. Press MENU + repeatedly until you see
PRINT MENU
AUTO TRAY SWITCH
2. Press ENTER.
3. Press MENU + repeatedly until you see
PRINT MENU
AUTO TRAY SWITCH
4. Press ENTER.
5. Press MENU + and/or MENU – repeatedly until you see the
desired setting (ON or OFF).
6. Press ENTER to select the new setting.
7. Press ON LINE to exit the menu and return the printer to
standby.
C6100 Series User’s Guide
53
Page 54

Windows PostScript
For more information, see “General Information” on page 52.
1. Open the file you want to print.
2. Click File
3. Select your printer.
4. Click Properties.
5. Click the Layout tab.
6. Click Advanced.
7. Under Document Options, Printer Features, next to Tray
Switch, select ON.
8. Change any other settings as desired.
9. Click OK.
10. The main Print screen appears.
11. Change any other settings as desired.
12. Click OK.
13. The document prints.
→ Print.
C6100 Series User’s Guide
54
Page 55

Windows PCL
For more information, see “General Information” on page 52.
1. Open the file you want to print.
2. Click File
3. Select your printer.
4. Click Properties.
5. Click the Setup tab.
6. Click Paper Feed Options.
7. Click in the box next to Media Check.
If the box has a check mark, the feature is ON.
If the box is empty, the feature is OFF.
8. Change any other settings as desired.
9. Click OK.
10. The Setup tab screen appears.
11. Change any other settings as desired.
12. Click OK.
13. The main Print screen appears.
14. Change any other settings as desired.
15. Click OK.
16. The document prints.
→ Print.
C6100 Series User’s Guide
55
Page 56

Macintosh OS 9.x
For more information, see “General Information” on page 52.
1. Open the file you want to print.
2. Click File
3. On General Controls, under Paper Feed Tray, select Automatic
Selection.
→ Print.
Macintosh OS 10.1 & 10.2
For more information, see “General Information” on page 52.
1. Open the file you want to print.
2. Click File
3. On the Paper Feed panel, select All Pages.
4. Select Automatic Selection.
→ Print.
Macintosh OS 10.3
For more information, see “General Information” on page 52.
1. Open the file you want to print.
2. Click File
3. O pe n t h e dr op -d ow n l i s t b el ow Pr es e t s. Se le ct Pr i n te r O pt io n.
4. At Auto tray switch, make your selection.
If the box has a check mark, the feature is ON.
→ Print.
If the box is empty, the feature is OFF.
5. Change any other settings as desired.
6. Click Print.
C6100 Series User’s Guide
56
Page 57

Paper Size Check __________________
General Information
If Paper Size Check is turned on (enabled), the printer checks
whether the size paper loaded in the selected tray matches
that required for the document being printed.
For more information,
Windows, PostScript: see page 58
Windows, PCL: see page 59
Macintosh: see page 60
C6100 Series User’s Guide
57
Page 58

Windows PostScript
1. Open the file you want to print.
2. Click File → Print.
3. Select your printer.
4. Click Properties.
5. Click the Layout tab.
6. Click Advanced.
7. Under Document Options, Printer Features, click Media
Check.
8. Change any other settings as desired.
9. Click OK.
10. The Layout tab screen appears.
11. Change any other settings as desired.
12. Click OK.
13. The main Print screen appears.
14. Change any other settings as desired.
15. Click OK.
16. The document prints.
C6100 Series User’s Guide
58
Page 59

Windows PCL
1. Open the file you want to print.
2. Click File → Print.
3. Select your printer.
4. Click Properties.
5. Click the Setup tab.
6. Click Paper Feed Options.
7. Click in the box next to Media Check.
If the box has a check mark, the feature is ON.
If the box is empty, the feature is OFF.
8. Change any other settings as desired.
9. Click OK.
10. The Setup tab screen appears.
11. Change any other settings as desired.
12. Click OK.
13. The main Print screen appears.
14. Change any other settings as desired.
15. Click OK.
16. The document prints.
C6100 Series User’s Guide
59
Page 60

Macintosh
1. Open the file you want to print.
2. Click File → Print.
3. Open the drop-down list below Presets. Select Printer
Option.
4. Make your selection for Paper size check.
If the box has a check mark, the feature is ON.
If the box is empty, the feature is OFF.
5. Change any other settings as desired.
6. Click Print.
C6100 Series User’s Guide
60
Page 61

Paper Exit Paths
Face Down (Top Exit) _______________
CAUTION!
Don’t open or close the rear paper exit while
printing.
If you do, it may cause a paper jam.
Always use the face up (rear) stacker [straight
through exit path] for thick paper (card stock
etc.).
• Capacity
up to 250 sheets of standard paper
20-lb. US Bond
42 lb. Index, 75 g/m² metric
• Paper Weights
up to 47 lb. US Bond
98 lb. Index, 176 g/m² metric
• Print Sequence
Pages are printed in reading order
Page 1 first; last page on top, facing down
C6100 Series User’s Guide
61
Page 62

Face Up (Rear Exit) ________________
CAUTION!
Don’t open or close the rear paper exit while
printing.
If you do, it may cause a paper jam.
Always use the face up (rear) stacker [straight
through exit path] for thick paper (card stock
etc.).
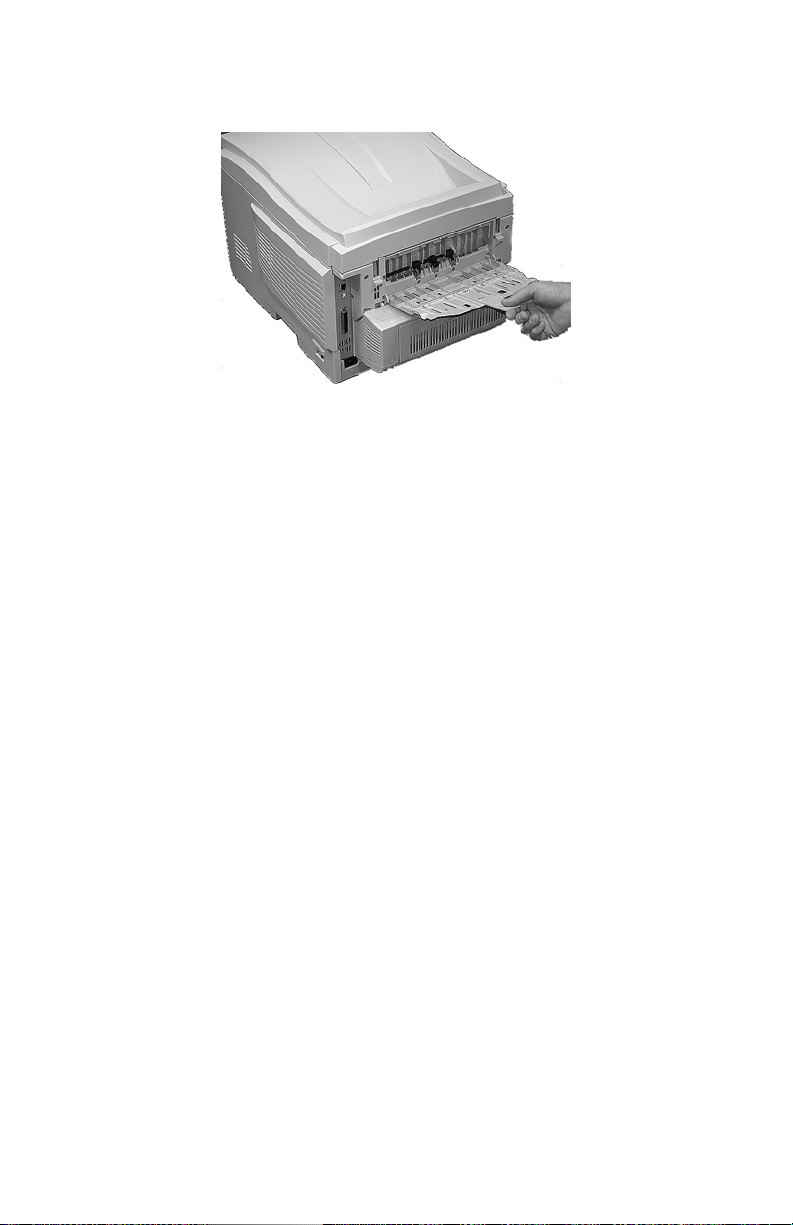
c53_72_rear3.jpg
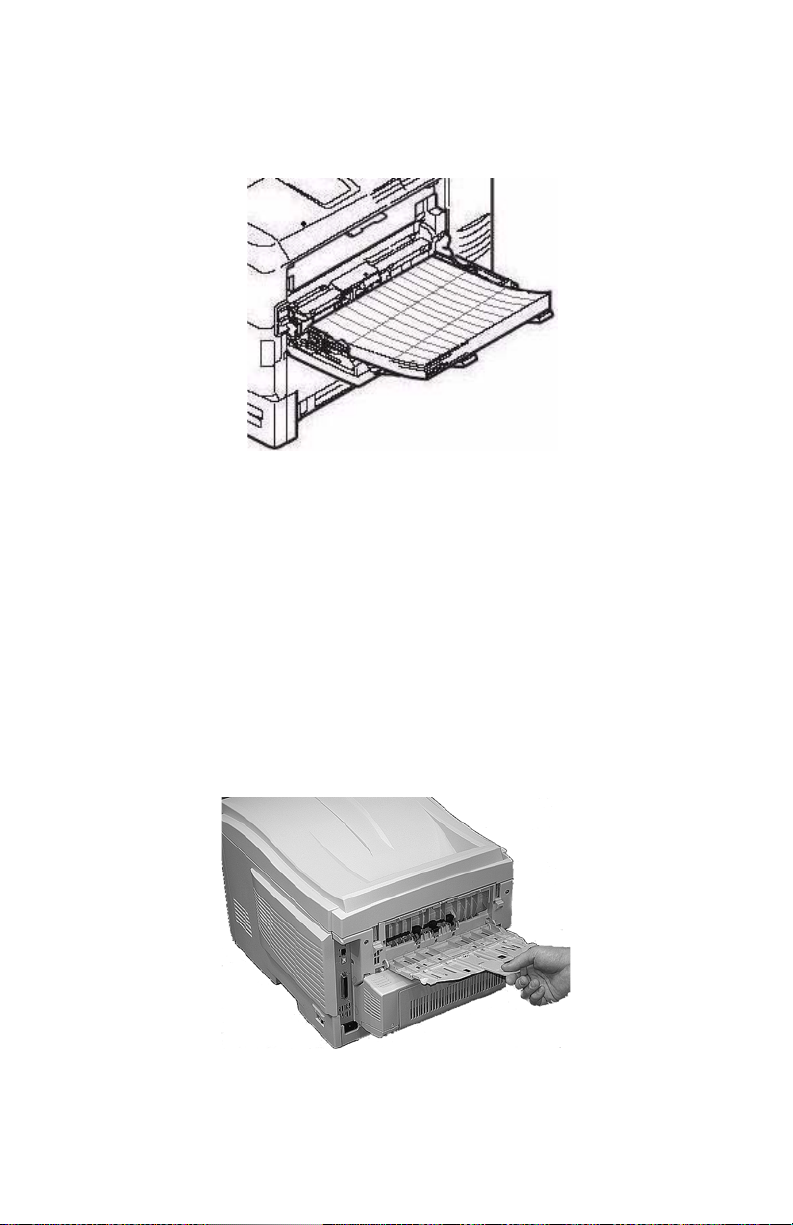
Open the face up stacker at the rear of the printer and pull out
the tray extension.
When the face up stacker is open, paper exits via this path,
regardless of driver settings.
• Capacity
up to 100 sheets of standard paper
20 lb. US Bond
42 lb. Index, 75 g/m²
C6100 Series User’s Guide
62
Page 63

• Paper Weights up to
NOTE
Always use this stacker and the Multi-Purpose
Tray for paper stocks heavier than 47 lb. US
Bond (98 lb. Index, 176 g/m² metric).
54 lb. US Bond
113 lb. Index
203 g/m² metric
• Print Sequence
Papers are printed face up.
For multi-page documents,
Select “Reverse print order” in your application Print
dialog box (Click File → Print → Options).
This puts the printed stack in the correct order.
C6100 Series User’s Guide
63
Page 64

Duplex Unit_______________________
General Information
The Duplex Unit enables your printer to print on both sides of
the page.
See “Duplex Printing” on page 269.
C6100 Series User’s Guide
64
Page 65

Loading Paper
Trays 1 and 2 _____________________
NOTE
If you have the optional second paper tray
installed:
• If you are printing from the 1st (upper) tray,
you can pull out the 2nd (lower) tray and
reload it while the printer is printing.
• If you are printing from the 2nd (lower) tray,
do not pull out the 1st (upper) tray while
printing. This will cause a paper jam.
1. Remove the paper tray from the printer.
c53_11_opntra.jpg
2. Fan the paper to be loaded at the edges (1) and in the
middle (2). Then tap the edges of the stack on a flat
surface to make it flush again (3).
Fan Paper.eps
C6100 Series User’s Guide
65
Page 66

3. Load paper print side down. Make sure the rear stopper
(1) and paper guides (2) are snug against the paper.
c53_13_instlpapr.jpg
NOTE
Load letterhead paper face down. The top edge
is aimed towards the front of the printer.
c53_76_trayabc.jpg
C6100 Series User’s Guide
66
Page 67

4. Gently close the paper tray.
c53_16_closetray.jpg
NOTE
To prevent paper jams:
• Do not leave space between the paper and
the guides and rear stopper.
• Do not overfill the paper tray. Capacity
depends on the type of paper stock.
• Do not load damaged paper.
• Do not load paper of different sizes or types
at the same time.
• Do not pull the paper tray out during printing
(except as described above for the 2nd tray).
C6100 Series User’s Guide
67
Page 68

Multi-purpose Tray _________________
(MP Tray/Manual Feed)
NOTE
The MP Tray will take
• a stack of media about 3/8'' (10 mm) high
• about 10 envelopes
• about 50 transparencies.
Do not exceed the 3/8'' (10 mm) media stack
height.
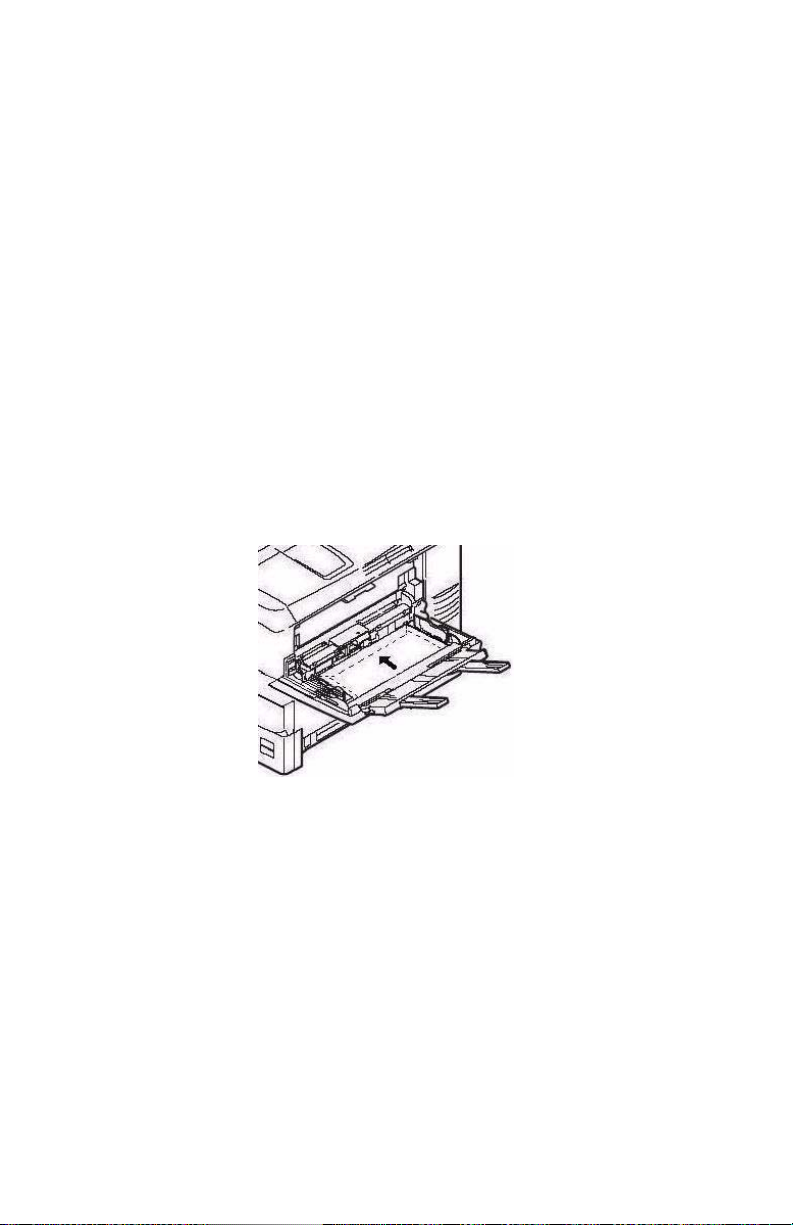
1. Open the MP Tray.
c53_40_mptrayopen1_crop.jpg
c53_41_mptrayopen2_crop.jpg
C6100 Series User’s Guide
68
Page 69

c53_42_mptrayopen3_crop.jpg
2. Press down on the loading platform.
c53_87a_mptrayplatformdwn.jpg
C6100 Series User’s Guide
69
Page 70

3. Load the print media. Adjust the guides (1) to the size
media being used.
c53_39_mptrayload.jpg
Letterhead
Single-sided printing
load with pre-printed side up and the top edge into
the printer.
Double-sided printing (duplex)
load with pre-printed side down and top edge away
from the printer (duplex unit must be installed).
Envelopes
Load print side up (flap down) with top edge to the left
and short edge into the printer.
You cannot duplex envelopes.
C6100 Series User’s Guide
70
Page 71

4. Press the blue tray latch (1) toward the paper stack to lift
the paper platform into the feed position.
c53_86_mptraylevercolr.jpg
C6100 Series User’s Guide
71
Page 72

Consumables and Replacement
Supplies
Life Expectancy _________________________
See “Specifications” on page 122
Part Numbers __________________________
Toner
Black 43324420
Cyan 43324419
Magenta 43324418
Yellow 43324417
Image Drum
Black 43381720
Cyan 43381719
Magenta 43381718
Yellow 43381717
Fuser
Belt
120 V 43363201
230V 43363202
Belt 43363401
C6100 Series User’s Guide
72
Page 73

Replace a Toner Cartridge ___________
c53_30_tonergroup.jpg
REPLACE TONER
nnn: zzzz TONER EMPTY
nnn: ZZZZ =
410: YELLOW
411: MAGENTA
412: CYAN
413: BLACK
1. Press the cover release. Open the printer’s top cover
fully.
c53_02_opencvr.jpg
C6100 Series User’s Guide
73
Page 74

WARNING!
If the printer has been powered on, the fuser is HOT.
This area is clearly labelled. Do not touch it.
2. Note the positions of the four cartridges: Cyan (1),
Magenta (2), Yellow (3), Black (4).
c53_09_lidup.jpg
3. Pull the colored toner release lever on the cartridge to be
replaced towards the front of the printer.
Shown: replacement of the black toner cartridge
c53_74_tonerlvropen.jpg
C6100 Series User’s Guide
74
Page 75

4. Lift the right-hand end of the cartridge. Then, pull the
cartridge to the right to release the left-hand end.
Remove the toner cartridge. Discard it in accordance
with your local regulations.
c53_80_tonrout.jpg
Install a Toner Cartridge
5. Unpack the new toner cartridge. Gently shake it from
side to side to loosen and distribute the toner evenly
inside the cartridge.
c53_04_shk_tnr.jpg
C6100 Series User’s Guide
75
Page 76

6. Remove the adhesive tape from the underside of the
cartridge.
CAUTION!
Do not touch the toner release lever until the toner
cartridge is installed in the image drum. If you do, it
will open the toner release slot and spill toner.
7. Hold the cartridge by its top center with the colored
release lever to the right. Insert the left end of the
cartridge into the top of the image drum. Push it firmly
against the spring on the drum unit.
c53_80_tonrout.jpg
C6100 Series User’s Guide
76
Page 77

c53_73_tonerdrum.jpg
8. Lower the right end of the cartridge into the image drum
unit. Press it firmly down in place. Then, push the
colored lock lever back to open the toner slot and lock it
in place.
c53_75_tonrlvrclose.jpg
C6100 Series User’s Guide
77
Page 78

IMPORTANT!
The lever should move easily.
If it does not, STOP!
Push down on the toner cartridge to be sure that it is
properly seated in the image drum. Press back on the
lever again.
To avoid toner spillage, DO NOT open the toner release
lever until the toner cartridge is firmly seated in the
image drum.
9. Use the provided LED
lens cleaner. Gently
wipe the LED.
c5x_ledarray_bw.jpg
10. Close and latch the
top cover.
c53_45_latchcvr.jp
g
C6100 Series User’s Guide
78
Page 79

Replace an Image Drum _____________
c53_31_drumREV.jpg and c53_30_single_toner.JPG
REPLACE IMAGE DRUM
nnn: ZZZZ DRUM LIFE
nnn: ZZZZ =
350: YELLOW
351: MAGENTA
352: CYAN
353: BLACK
Important!
You must replace the toner cartridge when you replace
the image drum. The life expectancy of the cartridge will
be reduced as the toner charges the new drum.
1. Press the cover release and open the top cover fully.
c53_02_opencvr.jpg
C6100 Series User’s Guide
79
Page 80

WARNING!
If the printer has been powered on, the fuser is
HOT. This area is clearly labelled. Do not touch it.
2. Note the positions of the four image drums: Cyan (1),
Magenta (2), Yellow (3), Black (4).
c53_09_lidup.jpg
3. Lift the image drum, complete with its toner cartridge,
out of the printer. Discard it in accordance with your
local regulations.
c53_53_drumremove.jpg
C6100 Series User’s Guide
80
Page 81

4. Unpack the new image drum.
CAUTION!
Image drum handling
The image drum contains toner. To avoid spilling
toner, be careful to keep it upright.
c53_31_drum.jpg, Checkmark.bmp
c53_79_drumtilt_3.jpg
c53_78_drumtilt_2.jpg
C6100 Series User’s Guide
81
Page 82

CAUTION!
The green surface at the base of each image drum is
very delicate and light sensitive.
• Do not touch the green surface.
• Never expose the drum to direct sunlight or to
very bright room lighting.
• Do not expose it to normal room light for more
than 5 minutes.
• If the image drum must be out of the printer for
longer than 5 minutes, place the image drum
inside a black plastic bag or carefully place it in
a drawer or cabinet to keep it away from light.
5. Grasp the white tape tab and peel the tape off the drum.
c53_28_removedrumtape.jpg
6. Remove the paper sheet.
c53_26removepaper.jpg
C6100 Series User’s Guide
82
Page 83

7. Remove the clear plastic film.
c53_25_removeclearsheet.jpg
8. If present, remove the silica gel pack.
c53_24_removejell.jpg
C6100 Series User’s Guide
83
Page 84

9. Place the image drum in the printer.
c53_84_removedrumwithorange.jpg
10. Remove the orange drum seal.
c53_83_removeorangething.jpg
C6100 Series User’s Guide
84
Page 85

11. Install the new toner cartridge in the image drum.
See “Install a Toner Cartridge” on page 75.
c53_04_shk_tnr_CROP.JPG
c53_05_remv_tape_CROP.jpg
c53_80_tonrout_CROP.JPG
c53_75crop_tonrlvrclose.jpg
C6100 Series User’s Guide
85
Page 86

12. Use the provided LED lens cleaner. Gently wipe the LED.
c5x_ledarray_bw.jpg
13. Close and latch the top cover.
c53_45_latchcvr.jpg
C6100 Series User’s Guide
86
Page 87

Replace the Fuser __________________
c53_104_fuser_transport_loc.jpg
REPLACE FUSER
354: FUSER LIFE
WARNING!
If the printer has been powered on, the fuser is
HOT. This area is clearly labelled. Do not touch it.
Handle the fuser with extreme care. Hold it only
by its handle, which is only mildly warm to the
touch.
If in doubt, switch the printer off. Wait at least
10 minutes for the fuser to cool before opening
the printer cover.
1. Press the cover release. Fully open the printer’s top
cover.
c53_02_opencvr.jpg
C6100 Series User’s Guide
87
Page 88

2. Pull the two blue fuser lock levers (1) towards the front
of the printer.
c53_59_fuser1.jpg
3. Hold the fuser by its handle. Lift the fuser out of the
printer. If the fuser is still warm, place it on a flat surface
which will not be damaged by heat. After letting the fuser
cool down, discard it.
c53_60_fuser2.jpg
C6100 Series User’s Guide
88
Page 89

4. Remove the new fuser from its packaging. Remove any
packing tape.
5. Push the orange transport lock to the left to release it.
You’ll hear it snap. Remove it.
c53_104_fuser_transport_loc.jpg
6. Hold the new fuser by the handle. The fuser pressure
release lever (1) should be on the right. Lower the fuser
into the printer.
c53_60a_fuser2.jpg
C6100 Series User’s Guide
89
Page 90

7. Push the two blue retaining levers (1) toward the rear of
the printer to lock the fuser in place.
c53_61a_fuser3.jpg
8. Close and latch the top cover.
c53_45_latchcvr.jpg
C6100 Series User’s Guide
90
Page 91

Replace the Belt Unit _______________
REPLACE BELT
355: BELT LIFE
The belt unit is located under the four image drums.
1. Press the cover release and open the top cover fully.
c53_02_opencvr.jpg
WARNING!
If the printer has been powered on, the fuser is
HOT. This area is clearly labelled. Do not touch it.
2. Note the positions of the four image drums: Cyan (1),
Magenta (2), Yellow (3), Black (4). It is essential that
they go back in the correct order!
c53_09_lidup.jpg
C6100 Series User’s Guide
91
Page 92

3. Lift each of the image drum units out of the printer.
Place them on a flat surface in a safe place away from
direct sources of heat and light.
CAUTION!
The green surface at the base of each image drum is
very delicate and light sensitive.
• Do not touch the green surface.
• Never expose the drum to direct sunlight or to
very bright room lighting.
• Do not expose it to normal room light for more
than 5 minutes.
• If the image drum must be out of the printer for
longer than 5 minutes, place the image drum
inside a black plastic bag or carefully place it in
a drawer or cabinet to keep it away from light.
4. Locate the two blue locks (1) and the handle (2).
c53_48_belt1.jpg
C6100 Series User’s Guide
92
Page 93

5. Turn the two locks about 45° counterclockwise to release
the belt.
c53_49_belt2.jpg
6. Pull up the handle and lift the belt unit out of the printer.
c53_50_belt3.jpg
7. Unpack the new belt unit. Hold it with the blue handle
toward the front of the printer.
C6100 Series User’s Guide
93
Page 94

8. Place the drive gear at the back of the belt unit in the
gear at the left rear corner of the printer. Lower the belt
unit into the printer.
c53_51_belt4.jpg
9. Turn the two belt locks about 45° clockwise to secure the
belt unit in place.
c53_48_belt1.jpg
C6100 Series User’s Guide
94
Page 95

10. Place the four image drums/toner cartridges back in the
printer (1 = Cyan, 2 = Magenta, 3 = Yellow, 4 = Black).
It is essential that they go back in the correct
order!
c53_09_lidup.jpg
11. Close and latch the top cover.
c53_45_latchcvr.jpg
C6100 Series User’s Guide
95
Page 96

Printer Settings
(Menu Settings)
This section lists the menus accessed via the controls on the
printer’s operator panel and displayed in the LCD window.
Many of these settings can be overridden by settings in the
printer driver. However, several of the driver settings can be
left at “Printer Setting,” which will then default to the settings
entered in these printer menus
Print a list of the current settings _____
Menu Map
NOTE
.. = keep pressing the button repeatedly until
you see the display indicated.
To print a list of the current menu settings:
1. Press + …
INFORMATION MENU
2. Press ENTER …
PRINT MENU MAP
Execute
3. Press ENTER.
4. The Menu Map prints. The printer goes back on line.
C6100 Series User’s Guide
96
Page 97

Changing Settings _________________
C53_Panel.eps
1. Press + to enter the menu mode.
2. Press +/ – to scan through the available menus until the
menu you wish to enter appears on the display.
NOTE
The menus and their various listings vary
depending on which options you have installed
on your printer.
3. Press ENTER to enter the menu.
4. Use +/ – to move up and down through the items in the
selected menu. When the item you want to change is
displayed, press ENTER to edit that item.
5. Use +/ – to move up and down through the available
settings for this item.
6. When the setting you wish to use appears on the display,
press ENTER.
An asterisk (*) appears next to the setting. The setting
flashes.
7. To f i ni sh :
a. If you are through making settings in the menu, press
ON LINE to engage the setting and exit the menu.
b. If you wish to make additional changes in the menu,
press BACK to engage the setting.
–To change another setting in the same menu, use +/
– to move through the list of menu items to the one
you wish to change, then follow steps 5 though 7.
–To change the setting for an item in a different menu,
press BACK again, then follow steps 2 through 7.
C6100 Series User’s Guide
97
Page 98

Example: Power Save Time
To change the time interval for the printer to wait before going
into Power Save mode (default setting is 60 MIN):
1. Press + to enter the menu mode.
2. Press + and/or – repeatedly until you see
SYS CONFIG MENU
3. Press ENTER to go into the Sys Config Menu.
POW SAVE TIME
60 MIN *
4. Press ENTER to select the Power Save Time item.
The value on the second line of the display begins
flashing.
POW SAVE TIME
60 MIN *
5. Press + repeatedly until the interval (e.g., 240 MIN) you
wish to select appears on the second line.
POW SAVE TIME
240 MIN
6. Press ENTER to select the new setting:
An asterisk appears on the second line of the display.
POW SAVE TIME
240 MIN *
7. Press ON LINE to engage the new setting and to exit the
menu.
The printer returns to standby mode.
C6100 Series User’s Guide
98
Page 99

Reset to Factory Defaults ____________
NOTE
… = keep pressing the button repeatedly until
you see the display indicated.
To reset the printer menu to its original default settings:
1. Press + to enter the Menu mode.
2. Press + …
MAINTENANCE MENU
3. Press ENTER.
MENU RESET
Execute
4. Press ENTER.
5. The printer resets and returns to the on-line state.
C6100 Series User’s Guide
99
Page 100

Lists of Available Settings by Menu ____
Information Menu
Item Action Explanation
PRINT MENU MAP EXECUTE Prints the MenuMap (menu listing)
with current settings shown.
Information about your printer is also
shown at the top of each MenuMap
page.
DEMO1 EXECUTE Prints the built-in Demo page.
C6100 Series User’s Guide
100
 Loading...