

Page 1
Page 2

COPYRIGHT INFORMATION Copyright © 1995–2000 by ScanSoft, Inc. All rights reserved. No part of this
I
MPORTANT NOTICE ScanSoft, Inc. provides this publication “as is” without warranty of any
T
RADEMARKS AND CREDITS TextBridge is a registered trademark, and Smart Zones, Instant Access
publication may be transmitted, transcribed, reproduced, stored in any
retrieval system or translated into any language or computer language
in any form or by any means, mechanical, electronic, magnetic, optical,
chemical, manual, or otherwise, without the prior written consent of
ScanSoft, Inc., 9 Centennial Drive, Peabody, Massachusetts 01960.
Printed in the United States of America.
The software described in this book is furnished under license and may
be used or copied only in accordance with the terms of such license.
kind, either express or implied, including but not limited to the implied
warranties of merchantability or fitness for a particular purpose. Some
states or jurisdictions do not allow disclaimer of express or implied
warranties in certain transactions; therefore, this statement may not
apply to you. ScanSoft reserves the right to revise this publication and to
make changes from time to time in the content hereof without obligation
of ScanSoft to notify any person of such revision or changes.
OCR, and Custom Proof are trademarks, of ScanSoft, Inc.
Excel and Word are trademarks; Windows and FrontPage are registered
trademarks of Microsoft Corp.
WordPerfect is a registered trademark of WordPerfect Corp.
Other terms used in this manual are the trademarks of their respective
holders.
Animated character designed by Dreamlight Incorporated.
www.dreamlight.com.
Portions of this product copyright © 1994–2000, Inso Corporation.
Authors: Lois West and Beth Paddock
© SCANSOFT, INC.
9 Centennial Drive
Peabody, Massachusetts 01960
TextBridge Pro Millenium User’s Guide
Part Number 00-09682-00
February 2000
Page 3

CONTENTS
PREFACE
About This User’s Guide ............................. vii
Organization of this user’s guide ....................viii
Documentation conventions.........................ix
Related Documentation ............................... x
Technical Support ...................................xi
1 INTRODUCTION TO TEXTBRIDGE
Basic OCR Concepts ............................... 1–1
Features and Benefits .............................. 1–3
New Features ................................. 1–4
Enhanced Features ............................. 1–4
Other Features ................................ 1–8
Documents TextBridge Can Recognize................. 1–10
Input Image File Formats .......................... 1–11
Output Text File Formats .......................... 1–12
Output Image File Formats......................... 1–13
Where to Go From Here............................ 1–14
TextBridge Pro Millennium User’s Guide iii
Page 4

2 INSTALLING AND SETTING UP TEXTBRIDGE
What Comes with TextBridge ........................ 2–2
Supported Scanners................................ 2–2
Installing and Testing Your Scanner ................... 2–4
System Requirements .............................. 2–5
Before Installing TextBridge ......................... 2–6
Uninstalling a Previous Version of TextBridge ........ 2–6
Using TextBridge with Pagis...................... 2–8
Learning about TextBridge before you install it........ 2–8
Installing TextBridge .............................. 2–9
Scanner Setup................................... 2–10
Setting Up Instant Access to TextBridge ............... 2–11
Updating your TextBridge Software .................. 2–12
Uninstalling TextBridge Pro Millennium............... 2–13
Where to Go From Here............................ 2–14
3 OCR AND BASIC TEXTBRIDGE OPERATIONS
What is TextBridge OCR? ........................... 3–2
Page types.................................... 3–2
Page sources .................................. 3–4
Recomposition ................................. 3–4
Running TextBridge Standalone and Instant Access ....... 3–6
Standalone Program ............................ 3–6
Instant Access ................................. 3–7
Improving Page Recognition with Settings .............. 3–8
Page Type Settings ............................. 3–8
Text Document Settings ........................ 3–13
Recognizing Other Languages ....................... 3–15
Language Installation .......................... 3–16
Language Processing........................... 3–16
Where to Go From Here............................ 3–18
iv TextBridge Pro Millennium User’s Guide
Page 5

4 LEARNING TO USE TEXTBRIDGE
Before Beginning to Process a Document................ 4–2
Using TextBridge to Process a Document ............... 4–2
Starting TextBridge................................ 4–3
Using Automatic Processing ......................... 4–5
Using Manual Processing ........................... 4–8
Performing Basic Operations......................... 4–9
Selecting the Page Source ....................... 4–10
Selecting the Page Type......................... 4–10
Previewing the Page ........................... 4–12
Zoning the Page............................... 4–14
Proofreading the Document...................... 4–17
Saving the Document .......................... 4–18
Getting Help While Using TextBridge ................. 4–20
Using the Welcome Window ..................... 4–20
Using the Show Me How Window ................. 4–21
Using Tips................................... 4–22
Getting Information from Help ................... 4–23
Using the TextBridge Web Site ................... 4–25
5 SAMPLE SESSIONS WITH TEXTBRIDGE
Using the Sample Documents ........................ 5–2
Session 1: Recognizing a Simple Document Using Auto . . . . . . 5–7
Session 2: Using Instant Access to TextBridge........... 5–14
Session 3: Recognizing a Complex Document Using Manual
Processing ................................ 5–20
Session 4: Processing Text, Pictures, and a Table ........ 5–29
Where to Go From Here............................ 5–38
Table of Contents v
Page 6

6 ADVANCED SAMPLE SESSIONS
Session 1: Processing a Document to Use in a Database..... 6–1
Session 2: Using Zone Templates and Page Types ......... 6–7
Session 3: Training TextBridge OCR .................. 6–14
Where to Go From Here............................ 6–20
INDEX
vi TextBridge Pro Millennium User’s Guide
Page 7

PREFACE
ScanSoft, Inc. welcomes you to TextBridge Pro Millennium for
Windows® 95, 98, 2000, and Windows NT® 4.0.
The documentation that comes with TextBridge provides you with
the information you need to operate TextBridge. The
documentation includes this user’s guide, a Help system, and
Release Notes. ScanSoft invites your comments about the
information provided in the documentation.
The documentation is part of an extensive user assistance
program designed to provide you with information you may need
to understand and use TextBridge. The section “Getting Help
while using TextBridge” provides further information about user
assistance.
Before going on to find out more about TextBridge, please read
this preface because it describes these important items:
◆ About this user’s guide
◆ Related documentation
◆ Technical support
ABOUT THIS USER’S GUIDE
This user’s guide is a reference tool that provides information
about TextBridge. It is for users with a wide range of computer
experience. It assumes that you are familiar with the
management and operation of your computer and Windows.
TextBridge Pro Millennium User’s Guide vii
Page 8

This manual is provided both in print and electronic form. The
entire user’s guide is provided as a digital document in Adobe
Portable Document Format (PDF).
To view the user’s guide in PDF format you need Adobe Acrobat
Reader which is installed with TextBridge unless you already
have it on your PC. You can access the user’s guide from the
installation menu and the TextBridge Help menu, or you can
open it from Adobe Acrobat Reader. After you open it, you can
view it on your PC and print all or part of it using Adobe Acrobat
Reader.
Organization of this user’s guide
The user’s guide organization is as follows:
The Table of Contents at the beginning of the user’s guide
describes the basic information in this book and helps you to find
general information quickly.
This Preface describes the documentation provided with
TextBridge and technical support.
Chapter 1 “Introduction to TextBridge” discusses TextBridge
features. It also describes basic OCR concepts, documents
TextBridge can recognize, supported scanners, and input file
formats TextBridge can read and output file formats to which
TextBridge can save the recognized text.
®
Chapter 2 “Installing TextBridge” describes what comes with
TextBridge, system requirements, installation, Instant Access set
up, and TextBridge uninstall.
Chapter 3 “OCR and TextBridge” explains the basic
TextBridge functions that enable it to recognize and OCR your
documents.
Chapter 4 “Learning to Use TextBridge” describes the basic
processes of using TextBridge.
viii TextBridge Pro Millennium User’s Guide
Page 9

Chapter 5 “Sample Sessions with TextBridge” walks you
through several practice sessions designed to help you to learn
and use the important features of TextBridge.
Chapter 6 “Advanced Sample Sessions” describes more
complex and less frequent uses of TextBridge.
The Index provides a comprehensive list of topics to assist you in
quickly locating the specific information you need.
Documentation conventions
TextBridge documentation uses certain graphical elements and
formatting to emphasize information and give more meaning to
text.
Table 1: Documentation Conventions
bold Introduces a new term or the first use of an
italic Denotes titles of other user’s guides or books
important term in a chapter. It is sometimes
used to denote strong emphasis.
and generic representations of file name entries
in examples; for example, filename
monospace Denotes text that appears on the computer
screen such as examples, menu text, and
messages plus actual file names.
“ ” (quotes) Denotes titles of chapters and sections in this
user’s guide.
☞
Note Introduces information of note about the
Preface ix
Introduces tips that provide useful information
about a procedural step or system function.
current subject.
Page 10

RELATED DOCUMENTATION
TextBridge provides a comprehensive set of printed and digital
documentation designed to assist you in learning and operating
the product. The documentation provided with TextBridge covers
all aspects of installation and operation.
Note Information provided in individual documents is not duplicated
in other documents except for basic information about
TextBridge. If you do not find the information you want in a
particular document, please check another. For example, if you do
not find information you want in this user’s guide, look for it in
the Help system
Refer to the documentation in the following list for information:
◆ Online Release Notes. Before or after you install TextBridge,
read the Release Notes. These provide the most up-to-date
information about TextBridge. They describe technical
information, including specifics about using a particular scanner.
Release Notes also include information unavailable at the time
the user’s guide and Help were finalized. During installation you
can access the Release Notes from the installation menu. After
installation you can access the Release Notes from the TextBridge
Program menu in the Start menu.
◆ Help. The Help system provides you with detailed information
about using TextBridge. It includes instructions on how to get
started in TextBridge, step-by-step procedures for most
operations and user tips. Context-sensitive Help is always
available by pressing F1 from any menu command or dialog box.
x TextBridge Pro Millennium User’s Guide
Page 11

Note You may also need to refer to additional publications, such as the
TECHNICAL SUPPORT
◆ Online User’s Guide. An online version of the complete user’s
guide is provided in Adobe Acrobat format (.pdf). You can access
the user’s guide from the installation menu and the TextBridge
Help menu, or you can open it from Adobe Acrobat Reader.
◆ Printed User’s Guide. A printed version of the user’s guide is
provided. The user’s guide provides you with basic information
about OCR and how TextBridge performs OCR, information about
installing TextBridge, information about how to run TextBridge
and improve its performance, and tutorials to help you learn the
basic-to-advanced use of TextBridge.
manufacturer’s documentation for your scanner.
If you should experience problems with TextBridge that you
cannot resolve on your own using the documentation and
software, contact TextBridge Technical Support at the following
Web site:
www.scansoft.com
The ScanSoft Web site provides a link to TextBridge pages,
including Technical Support with Frequently Asked Questions,
technical information bulletins, and a problem report form.
Before sending a problem report form to ScanSoft Technical
Support, be sure to visit FastTrack, ScanSoft’s electronic support
system on the web site. Using an Intelligent Expert Reasoning™
methodology, FastTrack delivers intuitive self-service via the
Internet and allows you to successfully resolve your problems
online 24 hours a day, seven days a week. Software downloads,
product upgrades and product updates are also available in
FastTrack.
Preface xi
Page 12

Additional information about contacting TextBridge Technical
Support is provided in the TextBridge Help menu.
If you must contact ScanSoft Technical Support, the following
information will help in solving the problem:
◆ Your software version number
(This is on the back of the CD envelope and in the Help menu
under About TextBridge.)
◆ Your software serial number
(This is the serial number on the back of the TextBridge CD-ROM
envelope and in the Help menu under About TextBridge.)
◆ Your scanner make and model
◆ A description of the steps that led up to the problem
◆ If TextBridge generated an error message, a verbatim description
of the error message or its number and when it appeared.
xii TextBridge Pro Millennium User’s Guide
Page 13

1
◆ Basic OCR concepts
◆ Features and benefits
◆ Characteristics of documents TextBridge can recognize
◆ Input image file formats
◆ Output text file formats
◆ Output image file formats
BASIC OCR CONCEPTS
INTRODUCTION TO TEXTBRIDGE
Welcome to ScanSoft’s TextBridge Pro Millennium, optical
character recognition (OCR) software for Microsoft Windows® 95,
98, 2000 and Windows NT® 4.0.
This chapter provides an introduction to TextBridge including:
OCR technology enables you to convert paper documents into
fully editable text with images on your computer. Originally, OCR
technology performed simple character recognition of text
characters, numbers, and symbols. Today, TextBridge OCR
includes full document recognition including recognizing text
plus formatting such as headlines, multiple columns, tables, and
running headers and footers and capturing photographs and line
drawings. TextBridge even retains the layout of the original
document as much as possible.
TextBridge Pro Millennium User’s Guide 1–1
Page 14
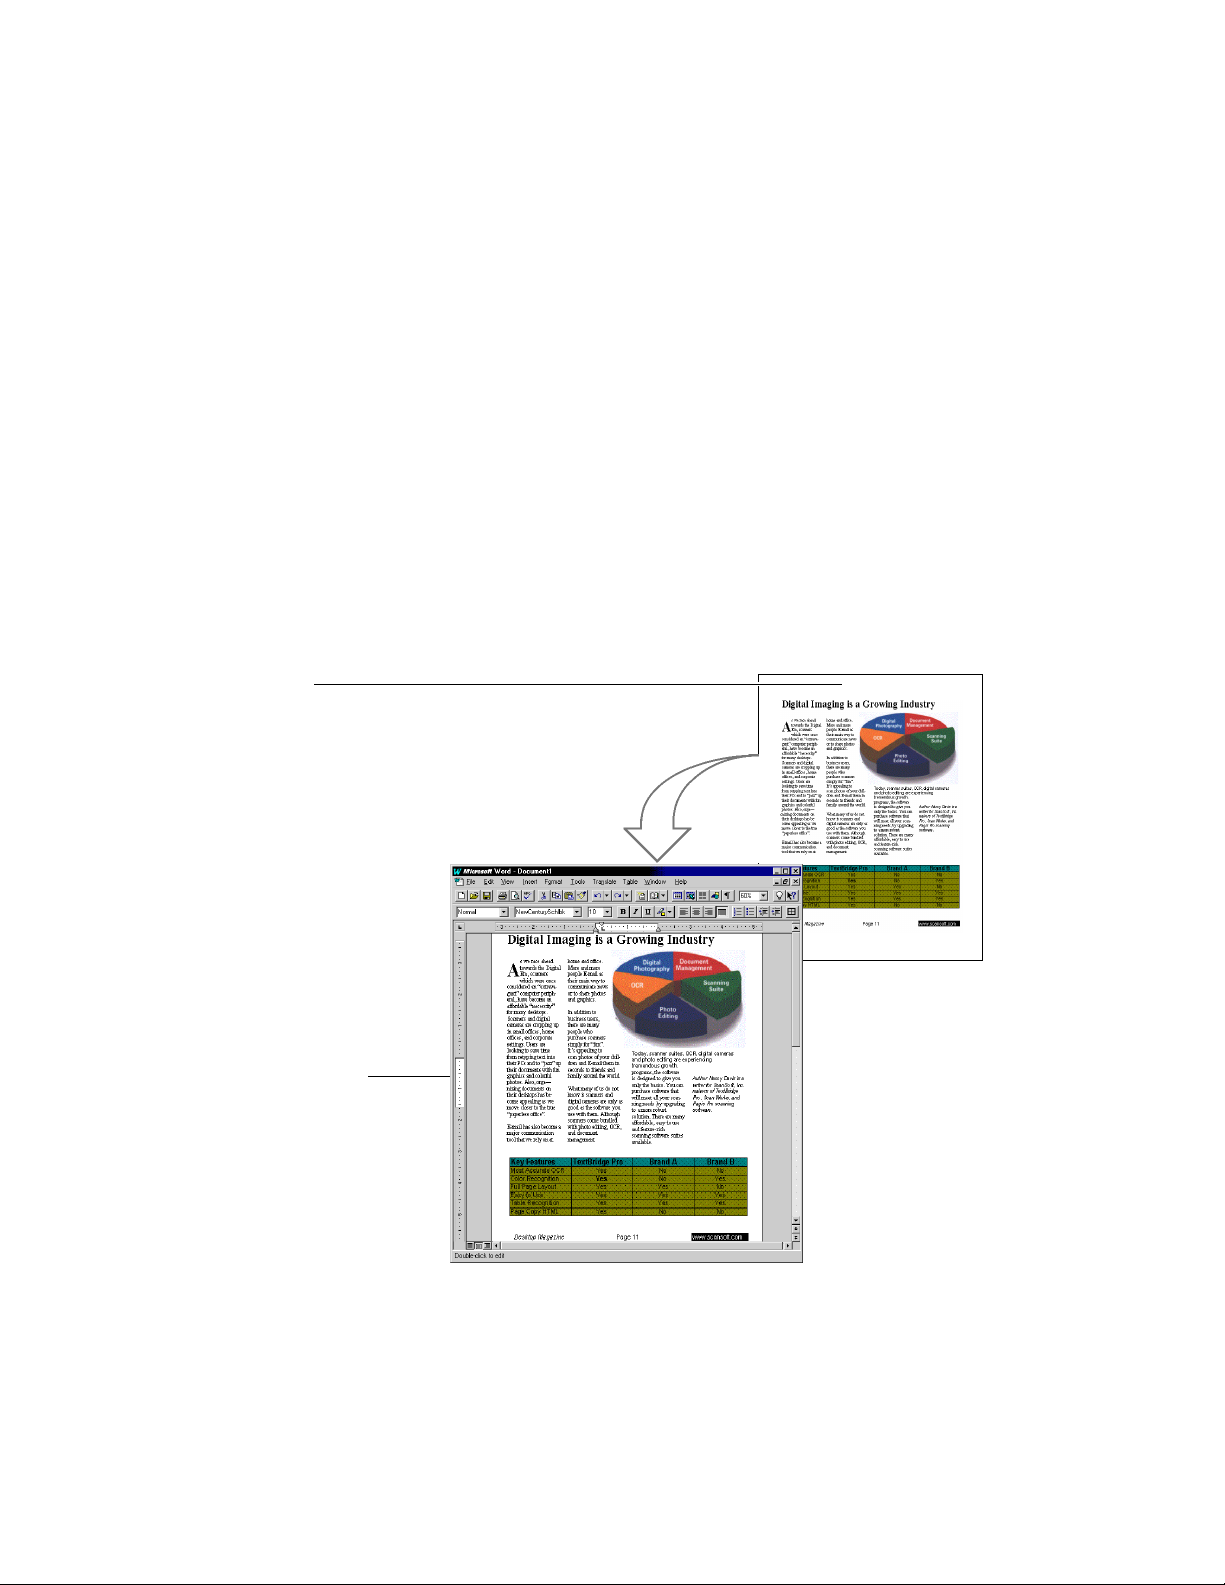
Original document
You can use TextBridge to scan and convert printed pages to
text documents for your word processor, spreadsheet program,
web browser, database program, or other text application. Pages
may be from most sources, including computer printers, fax
machines, photocopiers, magazines, and newspapers. Pages can
be black and white or color. TextBridge can also recognize
standard page image files from fax modems, image applications,
and other sources.
Using the latest document recognition technology from ScanSoft,
TextBridge OCR uses its recomposition capability to produce a
fully-editable electronic document with the original pictures and
document layout (Figure 1–1).
Recomposed document
in word processor
Figure 1–1. TextBridge document recomposition
1–2 TextBridge Pro Millennium User’s Guide
Page 15

In most cases, TextBridge understands your original document’s
format and maintains the layout, including columns, headers,
footers, pictures, and picture captions. Pictures can be black and
white, grayscale, or color.
Recomposition is possible only if your text program supports
pictures and layout. For example, recomposition is supported in
Microsoft Word and Corel WordPerfect but not in Notepad. Forms
and documents created in desktop publishing programs are
usually too complex for recomposition by TextBridge as well as
your word processor. As a result, the text and pictures are
retained but the full layout is not.
FEATURES AND BENEFITS
TextBridge offers many features designed to make it easy to use
and increase your productivity. Whether you need to capture a
simple one-page letter, a magazine article, a spreadsheet, or a
long transcript, TextBridge can save you valuable time and effort.
In addition, TextBridge provides all the capabilities that
experienced OCR users expect.
With TextBridge, you can import most paper documents or
document image files to your computer. TextBridge attains the
highest degree of OCR accuracy and provides the output in fully
editable form in your favorite program. Many of these features
and benefits are described in more detail in the user’s guide and
Help.
Introduction to TextBridge 1–3
Page 16

New Features
TextBridge Pro Millennium offers these new features to increase
your productivity:
◆ Windows 2000 Certification. Makes use of latest Windows
technology to assure a consistent user experience and a more
reliable and manageable application.
◆ Updated scanner support. Includes latest Scanner Wizard hint
file for easy setup of popular scanners.
◆ Live updates. Stay up-to-date with the latest product changes
from the ScanSoft, Inc. web site.
Enhanced Features
◆ Instant Access
™
to FrontPage® 2000 and The Print Shop
®
ProPublisher 2000. Use TextBridge Instant Access to scan,
recognize, and paste text and pictures directly into your
FrontPage and Print Shop documents.
In addition to the new features, TextBridge offers enhanced
features that were available in previous versions. These features
were available before and are even better now. They are described
in the following list:
◆ Instant Access. Start TextBridge within most Windows text
programs such as Word or Excel. After recognizing and
converting the page, TextBridge then automatically pastes
recognition data (text and pictures) directly into the program’s
open document.
◆ OCR accuracy. Dramatically save time and eliminate retyping.
◆ Color and grayscale pictures and text. Recognition and
output of color and grayscale pictures. Recognition of color text
and text on a color or shaded background and output of black on
white or white on black.
1–4 TextBridge Pro Millennium User’s Guide
Page 17

◆ Table recomposition. Advanced analytical capability results in
very accurate table reformatting. Ability to edit the entire table
as well as individual cells for improved recognition. Cell table
recomposition is supported even if you do not choose to retain
layout.
◆ Flexible multi-page document handling. Ability to view and
manipulate the pages of a document using the page thumbnails.
Zone multiple pages before recognition. Process the pages of a
document in any order. Delete, rearrange, and re-recognize
individual pages. You can also control the output.
◆ Extensive language recognition. Ability to recognize many
Eastern, Central, and Western European languages.
◆ Multiple language recognition. Ability to recognize multiple
languages on the same page if all languages belong to the same
language group.
◆ Usability and user assistance. Enhanced ease of use including
a redesigned user interface and extensive user assistance. User
assistance includes a multimedia assistant, information screens,
context-sensitive tips, status area messages, Help system, and
printed and online documentation.
◆ TextBridge Assistant. An easy-to-use assistant guides you
through each step of the most common TextBridge activities, such
as how to scan a page and send it to Word, recognize an image
file, and recognize just part of a page.
◆ Convenient batch processing. The ability to select multiple
files and process each file separately plus the ability to schedule
processing for a specific time in the future.
◆ Integration with e-mail programs. Input to popular programs
such as Lotus cc:Mail, Microsoft Outlook, and America Online
(AOL).
Introduction to TextBridge 1–5
Page 18

◆ Integration with the latest scanners. TextBridge works with
the most recent scanners. The Release Notes and the ScanSoft
Web site at www.scansoft.com provides the latest information
about supported scanners and getting your scanner to work with
TextBridge.
◆ HTML 4.0 output and WYSIWYG capability. Output files in
the latest version of HTML and preserve the original look using
cascading style sheets.
◆ Dual page scanning. Scan both pages of an open book at the
same time but handle them as two separate pages.
◆ Easy database importing. Use of standard delimited text file
output that allows you to import data into many databases.
◆ ToolTips. Instant context-sensitive information about
commands, dialog boxes, and buttons on the interface.
◆ Document recomposition. TextBridge offers true document
recomposition to retain your original page layout. It reproduces
multiple columns, tables, and pictures and keeps them in the
same location as they are in your original document.
For example, when you specify output to the Microsoft Word™ or
Corel WordPerfect® format, TextBridge can retain the original
document layout in fully-editable form, even for pages containing
tables, line art, reverse video, drop caps, insets, and pictures.
When you edit the document, the original text flow is maintained.
When you specify output to the Microsoft Excel™ or Lotus 1-2-3
format, spreadsheets and cell tables retain their original layout
as cell tables, not tabbed columns. When you edit the table
information, the lines move to fit.
1–6 TextBridge Pro Millennium User’s Guide
Page 19

TextBridge supports formats for the programs that retain page
layout in the following list:
◆ Internet Explorer
◆ Netscape
◆ Word 6.0, 7.0, 97, and 2000
◆ Word Perfect 6.0, 6.1, 7.0, 8.0, and 9.0
◆ Any word processor that supports RTF
Retaining pictures is independent of retaining layout. Some text
programs retain pictures even though they do not retain layout.
◆ Page Types. TextBridge provides many predesigned Page Types
to make processing easier and more efficient. You do not have to
go through a complicated process of determining and specifying
settings for common types of pages. These Page Types
automatically provide appropriate settings for the type of page
you want to process. For example, there is a Letter page type and
a Magazine page type that automatically activate settings for
improved results for letters and pages from magazines.
◆ Automatic zoning. TextBridge automatically zones your page
into text, picture, and table zones. You do not need to zone the
page manually.
◆ Zone editing. You can edit the automatically recognized zones to
further refine the zoning. Use zone editing to increase the
accuracy and efficiency of page processing by reshaping zones,
specifying the language, and renumbering zones.
◆ Built-in Proofreader
™
. After document recognition, you can use
the built-in proofreader to view and accept or correct any words
that TextBridge suspects may not be recognized accurately. The
proofreader provides suggestions from which you may choose.
Introduction to TextBridge 1–7
Page 20

Other Features
◆ Dynamic OCR training. You can train TextBridge’s OCR to
improve recognition accuracy as the job progresses. Use dynamic
training with difficult documents, such as faxes or multigeneration photocopies. TextBridge enables you to interact with
the OCR process by viewing then accepting or correcting its
automatic recognition decisions. The software actually learns
special symbols and words.
◆ Output files to the latest version of programs. These include
Microsoft Word 2000, Excel 2000, FrontPage 2000, WordPerfect
9.0, and Adobe FrameMaker 5.0.
◆ Custom dictionaries. To improve recognition accuracy further,
you can create specialized word lists (scientific terminology,
proper names, acronyms, and so on) within TextBridge or in
ASCII text files and load them into TextBridge. You can also use
your Microsoft Word or Office custom dictionary with TextBridge.
In addition to the features listed in the previous sections
TextBridge provides these other features.
◆ Broad scanner support. TextBridge supports most popular
desktop scanners with TWAIN device interface standard.
◆ Image processing. TextBridge accepts a wide range of images
from a variety of sources for processing. Specifically, the program
imports and recognizes online document images in BMP, PCX,
DCX, TIFF, and XIF formats that originate from fax modems and
other sources. For more information, see the “Input Image File
Formats” section in this chapter.
1–8 TextBridge Pro Millennium User’s Guide
Page 21

◆ Deferred processing. TextBridge enables you to scan all the
pages of a document to a TIFF or XIF file, then later open the
image file for document recognition. You can also save all the
pages to a multi-page image file or save each page as a separate
file.
◆ Output text file formats including HTML. TextBridge
supports a number of output text file formats, including word
processor, desktop publishing, spreadsheet, HTML, and database
formats. Now you can process your text for publication on the
Web.
◆ Preview of page images. TextBridge provides a set of tools for
previewing page images before processing them. You can
manually define areas of page images as zones to be processed
and capture only the text, tables, or pictures you want. You can
also edit the automatic zoning by adjusting the text, table, and
picture zones.
◆ Zone templates. After you create a set of zones, TextBridge lets
you save and reload zone templates for new jobs. In this way you
can consistently process or ignore specific areas on the same type
of pages and save time without rezoning each page.
◆ Re-usable training data. After you interactively train OCR, you
can save the training data in a file. You can reload this training
file for similar documents of the same page type. Using this
training file assures the highest recognition accuracy without
your having to repeat the training.
◆ Two-sided document processing. If your scanner has a sheet
feeder, you can scan the fronts (odd sides) of the pages first, then
flip the stack and scan the reverse (even) sides. When scanning
and recognition are complete, TextBridge automatically collates
the text and keeps it in the original order.
Introduction to TextBridge 1–9
Page 22

DOCUMENTS TEXTBRIDGE CAN RECOGNIZE
TextBridge includes a number of advances developed by ScanSoft,
Inc. and at the Xerox Palo Alto Research Center (PARC).
Consequently, TextBridge provides highly accurate OCR and
format retention on the widest range of documents. TextBridge
can recognize documents with the characteristics in the following
list:
◆ Documents printed on typewriters, phototypesetters, and impact,
ink-jet, dot-matrix, and laser printers
◆ Photocopied, degraded, or dirty documents
◆ Documents with single- or multiple-column layouts
◆ Spreadsheets and cell tables
◆ Paper documents with black and white, grayscale, and color
pictures including photos and line art
◆ Page image files with black and white, grayscale, and color
pictures
◆ Dual page documents, such as bound books
◆ Multi-page documents
◆ Single- or multiple-page images from fax modems and other
sources
◆ Hard-copy faxes
◆ Documents with point sizes ranging from 5-point to 72-point type
in practically any typeface
◆ Documents composed in any of many Eastern, Central, or
Western European languages as well as one or more of the
languages within one of these groups in the same document
1–10 TextBridge Pro Millennium User’s Guide
Page 23

INPUT IMAGE FILE FORMATS
The source of page images for TextBridge can be your scanner or
it can be image files. TextBridge can recognize the following types
of image file formats:
Image File Format File Name Extension
Windows bitmap .bmp
PCX .pcx
Multi-page PCX used in some fax
programs
Tag image file format (including
Alacrity TIFF)
Delrina WinFax fax image files .fxr, .fxd,
eXtended image file .xif
Image files can be black and white (binary), grayscale, or color.
TextBridge can process images in resolutions from 72 to 900 dots
per inch (dpi). Recognition results are generally better from
grayscale images than binary images. For the most accurate
results, we recommend scanning grayscale images at 200 dpi. For
better results on difficult documents, we recommend scanning
grayscale images at 300 dpi; however, this requires more
processing time.
Note Refer to the ScanSoft Web site at www.scansoft.com for the
latest list of supported input image file formats.
.dcx
.tif, .ala
.fxm, .fxs
Introduction to TextBridge 1–11
Page 24

OUTPUT TEXT FILE FORMATS
TextBridge can convert its recognized text and pictures to files for
the following programs and formats:
Programs and Formats File Name
Ami Pro 2.0 and 3.0 .sam
dBase IV .dbf
DisplayWrite 5 .rft
Excel 97 and 2000 .xls
Excel 3.0, 4.0, and 5.0 .xls
Excel for the Macintosh 3.0 to 7.0 .xls
FrameMaker .mif
HTML WYSIWYG .htm
HTML .htm
Interleaf .wps
Lotus 1-2-3 .wk1
Lotus Word Pro .lwp
MultiMate Advantage II .doc
PostScript .ps
Professional Write 2.0 and 2.2 .doc
Quattro Pro for Windows .wb2
RFT-DCA .rft
Rich Text Format (RTF) .rtf
RTF for the Macintosh .rtf
Text .txt
Text with line breaks .txt
Text DOS format .txt
Text with line breaks DOS format .txt
Text comma-delimited .csv
Text tab-delimited .txt
Word 2.x (RTF) .doc
Extension
1–12 TextBridge Pro Millennium User’s Guide
Page 25

Programs and Formats File Name
Extension
Word 6.0 and 7.0 (RTF) .doc
Word 97 and 2000 (RTF) .doc
WordPerfect 4.2 and 5.1 .wpf
Word Perfect 6.0, 6.1, 7.0, and 8.0 .wpd
WordStar .wsd
Works .rtf
☞ Microsoft Word (RTF) format is also accepted by a number of
other applications, including ClarisWorks® and Adobe
PageMaker®, and WordPad. See the documentation for your
particular application for more information about importing files
in RTF format.
Note Refer to the ScanSoft Web site at www.scansoft.com for the
latest list of supported output text files.
OUTPUT IMAGE FILE FORMATS
With deferred processing, TextBridge can convert its scanned
documents and save them as image files for the following formats:
Programs and Formats File Name
Tag Image File Format .tif
eXtended Image File .xif
We recommend XIF for deferred processing, as this format retains
the full fidelity of any scan, producing an image ideal for OCR.
®
Extension
Introduction to TextBridge 1–13
Page 26

WHERE TO GO FROM HERE
To learn how to install and set up TextBridge on your system, go
to Chapter 2.
To learn how TextBridge recognizes a document and how you
prepare TextBridge to do this, read Chapter 3. This chapter
explains the basic concepts and functions of the software.
To learn how you use TextBridge to process simple and complex
documents, refer to Chapter 4. It also explains how to view, zone,
train, and proofread your document in TextBridge and edit your
document in your word processor.
Chapters 5 and 6 provide sample sessions that are step-by-step
tutorials. Chapter 5 shows you how to use auto processing,
Instant Access, recognize a document with complex layout, and
process a document with text, pictures and a table.
Chapter 6 shows how to process a document for a database, to use
advanced settings for zones and page types, and to train
TextBridge’s OCR.
The Help system provides a complete reference to the TextBridge
user interface. Help includes overview information on key
features, getting started instructions, step-by-step procedures for
most operations and user tips. Typical user questions are
answered in a “How Do I?” section and Troubleshooting helps
when you have problems. Context-sensitive Help is always
available by pressing F1 from any menu command or dialog box.
1–14 TextBridge Pro Millennium User’s Guide
Page 27
2
INSTALLING AND SETTING UP TEXTBRIDGE
This chapter describes the TextBridge software installation and
setup procedures. Specifically, it covers these topics:
◆ What comes with TextBridge
◆ Supported scanners
◆ Installing and testing your scanner
◆ System requirements
◆ Before installing TextBridge
◆ Installing TextBridge
◆ Scanner setup
◆ Setting up Instant Access to TextBridge
◆ Updating your TextBridge software
◆ Uninstalling TextBridge Pro Millennium
To get started quickly, proceed to the installation procedure on
page 2–9.
TextBridge Pro Millennium User’s Guide 2–1
Page 28

WHAT COMES WITH TEXTBRIDGE
TextBridge comes with the following items:
◆ One installation CD-ROM. The CD-ROM includes software
programs, language packs, sample document image files, release
notes, Help files, online user’s guide in Adobe PDF format, and
Adobe Acrobat Reader.
◆ A printed user’s guide to get you started.
Check to be sure that you have all the items listed above. If any
item is missing from your TextBridge package, call your
authorized ScanSoft dealer. To contact ScanSoft, visit the
ScanSoft Web site at www.scansoft.com or refer to the
TextBridge Help system.
Note Be sure to register electronically or print and return the printed
software registration form. Registration qualifies you for
technical support and assures that you are kept up-to-date on
new software releases and other information related to
TextBridge and the ScanSoft family of products.
SUPPORTED SCANNERS
TextBridge works with many popular desktop scanners using
your scanner's TWAIN interface. You can use TextBridge with
any fully TWAIN-compliant scanner that provides a binary,
grayscale, or color image in a supported size and resolution.
Exceptions to this include the design of some TWAIN drivers, i.e.,
the Hewlett-Packard Scanjet 5100C scanner with the
PrecisionScan TWAIN interface, triple-pass scanners, and
Visioneer sheetfed scanners.
2–2 TextBridge Pro Millennium User’s Guide
Page 29

Depending upon the design of your TWAIN driver, you may not
be able to scan in color with TextBridge. If you have a triple-pass
scanner, use it in single pass, black and white mode only.
If you have a Visioneer sheetfed scanner, use the Visioneer
Paperport software and drag and drop an image onto TextBridge
or your word processor.
☞ An ISIS driver will be installed by TextBridge to support the
Hewlett-Packard Scanjet 5100C model scanners. Other ISIS
drivers previously installed on your system will be accessible
through TextBridge and may work, however only the HP Scanjet
5100C ISIS driver is supported by ScanSoft.
The full list of scanners supported by TextBridge is always
growing. Check the TextBridge Web site at www.scansoft.com
to view the most up-to-date list of supported scanners.
Note Install your scanner before you install TextBridge.
Scanners require a TWAIN source driver or an ISIS driver, which
are provided by the scanner or interface card manufacturer.
Consult the scanner documentation for details about installing
your scanner, interface card, and driver.
After installing your scanner, test that the scanner is functioning.
Refer to the scanner manufacturer’s documentation to answer
any questions about the scanner.
Note Your scanner must be working independently of TextBridge prior
to connecting it to TextBridge.
In general, we recommend that you turn on your scanner before
you turn on your PC.
Next, install and test your scanner.
Installing TextBridge 2–3
Page 30

INSTALLING AND TESTING YOUR SCANNER
Refer the to manufacture's detailed instructions for installing
your scanner. They provide the most precise information for
setting up your scanner. The basic steps for installing a scanner
are:
1. Install the correct scanner interface card (if one is necessary) in
the PC bus. Note that many scanners simply plug into the PC’s
parallel port, universal serial bus (USB), or occasionally the
standard serial port.
2. Hook up your scanner to the interface card or standard port with
the correct cable and turn on the scanner, then turn on your PC.
3. Install the system-level scanner driver (.sys) file or TWAIN
source driver on your PC’s hard disk, as directed by the scanner
documentation.
4. Test the scanner using software tools provided by the scanner
manufacturer.
☞ If your scanner runs independently of TextBridge, you can be
sure that it is functioning correctly. Setting it up to run with
TextBridge should then be a simple matter.
5. After the scanner is functioning, go on to install and link your
scanner to TextBridge software.
2–4 TextBridge Pro Millennium User’s Guide
Page 31

SYSTEM REQUIREMENTS
To install and run TextBridge, your Windows-compatible PC
must be equipped with the following:
◆ An Intel (or compatible) 80486 or Pentium
™
microprocessor. We
recommend Pentium for the best performance.
◆ A VGA, SVGA, or multi-sync color monitor.
◆ A minimum of 24 megabytes (MB) of random access memory
(RAM) for Windows 95 and 98; a minimum of 32 MB for Windows
2000 or Windows NT. We recommend 64 MB for the best
performance.
◆ Microsoft Windows 95, 98, or 2000 or Windows NT 4.0.
◆ A hard disk with a minimum of 30 MB of free space in which to
install TextBridge. This enables installation of the TextBridge
software and one language pack. Please allow one megabyte
(1 MB) for each additional language pack you intend to install.
Another version of TextBridge is available for the Macintosh
computer. Refer to the Web site at www.scansoft.com for
further information. TextBridge will not run on Windows 3.1, NT
3.51, or OS/2.
Installing TextBridge 2–5
Page 32

BEFORE INSTALLING TEXTBRIDGE
After you install your scanner and check that it is working
properly, you are ready to complete other preparations for
installing TextBridge and learn more about TextBridge.
Uninstalling a Previous Version of TextBridge
If you have on older version of TextBridge, uninstall it before
installing TextBridge Pro Millenium. You can still keep certain
customized files you have created, such as custom page types and
user dictionaries.
Note Uninstalling the older version of TextBridge later may require
you to reinstall TextBridge Pro Millenium to restore full
operation.
When you insert the TextBridge CD-ROM into your CD-ROM
drive, if there is an older version of TextBridge installed, a dialog
box appears and recommends that you uninstall that older
version. To save disk space, you can uninstall any of these older
versions of TextBridge; however, you are not required to do so. If
you choose not to do this before installing the new version of
TextBridge, you can uninstall it at a later time.
To uninstall a previous version of TextBridge, use the following
procedure:
1. Close all active applications, including TextBridge.
2. On the Windows task bar, click Start.
3. Point to Programs, then point to the TextBridge folder.
4. Click TextBridge Uninstall.
The TextBridge Uninstall dialog box appears.
2–6 TextBridge Pro Millennium User’s Guide
Page 33

5. Click Yes to continue the uninstall process.
TextBridge proceeds with the uninstall. When it is finished, the
Uninstall Complete dialog box appears.
Click No if you decide to quit the uninstall process.
6. Click OK to restart your computer.
With these steps finished, TextBridge is removed from your PC.
If you have saved any user dictionary, training, zone template, or
text files in the TextBridge folder, these are not deleted by the
uninstall. You can use your user dictionary files with the new
version of TextBridge. Just move them to the Windows folder
...All Users\Application Data\TextBridge\Bin\User Dictionaries
Zone Templates created with TextBridge 9.0 can be used with
TextBridge Pro Millennium. Just move them to the Windows
folder
...All Users\Application Data\TextBridge\Bin\Zone Templates
Training data created with TextBridge 9.0 can be used with
TextBridge Pro Millennium. Just move them to the Windows
folder
...All Users\Application Data\TextBridge\Bin\Training Data
Training data and zone templates created with versions of
TextBridge earlier than TextBridge 9.0 cannot be used with this
version of TextBridge and can be deleted. You can delete the
entire TextBridge folder after you have moved any files that you
want to keep.
Installing TextBridge 2–7
Page 34

Using TextBridge with Pagis
The Pagis program from ScanSoft is a color scanning suite of
software that enables you to scan, copy, fax, view and edit, index,
search, and manage electronic documents and includes
TextBridge.
If you have Pagis Pro 2.0 or later installed, Pagis will use the
latest version of TextBridge available on your PC.
If you have an earlier version of Pagis (e.g., Pagis SE or Pagis Pro
97), continue to use the previous version of TextBridge with
Pagis.
Learning about TextBridge before you install it
When you insert the TextBridge CD-ROM into your CD-ROM
drive, an autorun program on the CD-ROM launches TextBridge
setup. You can learn more about TextBridge at this point, before
you install the program.
After setup starts, select one of the options in the following list:
◆ Install TextBridge Pro Millennium. The setup program begins
for you to install the components of TextBridge.
◆ View Release Notes. The Release Notes appear for you to read
and review before you install TextBridge. The Release Notes
provide information about TextBridge that was not available
when the user’s guide and Help system were finalized. The
Release Notes may include special installation instructions,
known issues, in-depth information about using TextBridge with
specific scanners and other programs, and other technical
information.
◆ View Online Documentation. If Adobe Acrobat Reader is not
already installed on your PC, TextBridge starts Acrobat’s
installation program. The complete online user’s guide appears
for you to read and review.
2–8 TextBridge Pro Millennium User’s Guide
Page 35

◆ Browse the CD. Windows Explorer opens the TextBridge CD for
you to view the folders and files that come with the TextBridge
installation program.
◆ Visit ScanSoft’s Web site. Your Web browser goes to the
ScanSoft Web page where there is additional information about
TextBridge and other ScanSoft products. To use this, you must
have a Web browser and a connection to the Internet.
◆ Exit. Quit the TextBridge autorun program.
INSTALLING TEXTBRIDGE
This section provides procedures to install TextBridge.
Note If you want TextBridge to run on more than one version of
Windows with a dual boot system, install TextBridge separately
under each operating system.
Before you begin installation, quit any open applications so that
only Windows is running. If you typically run programs in the
background, close them as well. There should be no applications
listed in the task bar and no floating toolbars on the Windows
desktop. You can press CTRL + ALT + DEL to do this in the Close
Program dialog box.
To install TextBridge:
1. Insert the TextBridge CD into your CD-ROM drive.
An autorun program on the CD-ROM launches the TextBridge
setup program. (If necessary, you can use Windows Explorer and
open the drive and double-click the autorun.exe program)
The TextBridge setup program menu appears.
Installing TextBridge 2–9
Page 36

SCANNER SETUP
2. Click Install TextBridge Pro Millennium.
Follow the onscreen prompts and instructions to install
TextBridge Pro Millennium.
3. Specify when you want to restart your PC, then click
Finish.
Restarting is necessary to complete the TextBridge setup. We
recommend that you restart immediately. However, if you want to
perform other activities before restarting, click No.
Congratulations! TextBridge setup is now complete, and your new
software is installed on your PC.
Note Updates to your TextBridge software may be available on the
ScanSoft web site. Refer to "Updating your TextBridge Software"
later in this chapter for more information.
The first time you attempt to scan after installing TextBridge,
TextBridge automatically runs the Scanner Setup wizard. You
can also run the Scanner Setup wizard yourself from the
TextBridge program group in the Windows Start menu. Check
that the proper driver for your scanner is selected.
For scanners not listed as supported by TextBridge (on the
ScanSoft web site), be sure to use the Scanner Setup wizard
scanner test. The scanner test assures operation of your scanner
with TextBridge and determines optimal settings. You can also
run the scanner test if you are experiencing problems with your
scanner.
2–10 TextBridge Pro Millennium User’s Guide
Page 37

1. On the Windows task bar, click Start.
2. Point to Programs, then point to the TextBridge Pro
Millennium folder, and then point to Scanner Setup.
☞ Scanner Setup is also available from the TextBridge Tools menu.
Follow the instruction in the Scanner Setup wizard to install or
test your scanner setup.
SETTING UP INSTANT ACCESS TO TEXTBRIDGE
Instant Access enables you to use TextBridge directly from a
number of other programs, such as Word. With Instant Access
you can select TextBridge from the File menu of another program.
TextBridge starts, recognizes your pages, and then pastes the
results at the cursor in the open document.
TextBridge automatically includes Instant Access to many of the
applications on your PC. You can use the TextBridge Instant
Access Control Panel to view and specify which applications have
Instant Access to TextBridge. Open the Instant Access Control
Panel from the Start menu or from the TextBridge Tools menu.
Applications commonly used with Instant Access to TextBridge
are listed on the Instant Access Control Panel. If a program that
you want to use Instant Access from is not in the list in the
Instant Access Control Panel, close the control panel, open the
program, then open the control panel again. The program is now
included in the list and can be selected.
Installing TextBridge 2–11
Page 38

To provide Instant Access to TextBridge from an application, use
the following procedure:
1. On the Windows task bar, click Start.
2. Point to Programs, then point to the TextBridge Pro
Millennium folder, and then point to the Instant Access
Control Panel.
The TextBridge Instant Access Control Panel dialog box appears.
TextBridge automatically lists the programs from which Instant
Access is available as well as any programs that are currently
open. TextBridge excludes any programs known not to work with
Instant Access.
3. Click one or more programs in the list to select or unselect
it. Click All to check all programs. Click None to uncheck
all programs.
4. When you click OK, TextBridge will be available from the
File menu in all the checked programs.
UPDATING YOUR TEXTBRIDGE SOFTWARE
You can get live updates to TextBridge from the ScanSoft Web
site. These updates can include new scanner support, software
patches, and other updates.
To update TextBridge:
1. In the TextBridge Help menu, select ScanSoft on the Web
and click TextBridge Updates.
If your computer is set up for Internet access, your Web browser
opens at the ScanSoft Web site.
2. Check for updates to your TextBridge software.
3. If your version of TextBridge is not completely up to date,
follow the instructions displayed to install the updates.
2–12 TextBridge Pro Millennium User’s Guide
Page 39

UNINSTALLING TEXTBRIDGE PRO MILLENNIUM
To restore your PC to the state it was in before you installed
TextBridge Pro Millennium, use the following procedure:
1. Close all active applications, including TextBridge.
2. On the Windows task bar, click Start.
3. Point to Settings, then click on the Control Panel folder to
open it.
4. In the Control Panel folder, double-click on Add/Remove
Programs.
5. In the Add/Remove Programs Properties, select
TextBridge Pro Millennium and then click the
Add/Remove button.
The TextBridge Uninstall dialog box appears.
6. Click Yes to continue the uninstall process.
Respond to any prompts as necessary.
7. The Uninstall Complete dialog box appears. Click OK to
restart your computer.
When you complete these steps, TextBridge is uninstalled from
your PC.
☞ If you have created any files in the TextBridge folder, your files
and the TextBridge folder are not deleted by the uninstall
process. You can delete the entire TextBridge folder and its
contents after you have moved any files that you want to keep to
another location.
Installing TextBridge 2–13
Page 40

WHERE TO GO FROM HERE
To learn how TextBridge recognizes a document and how you
prepare TextBridge to do this, read Chapter 3. This chapter
explains the basic concepts and functions of the software.
To learn how you use TextBridge to process simple and complex
documents, refer to Chapter 4. It also explains how to view, zone,
train, and proofread your document in TextBridge and edit your
document in your word processor.
Chapters 5 and 6 provide sample sessions that are step-by-step
tutorials. Chapter 5 shows you how to use auto processing,
Instant Access, recognize a document with complex layout, and
process a document with text, pictures and a table.
Chapter 6 shows how to process a document for a database, to use
advanced settings for zones and page types, and to train
TextBridge’s OCR.
The Help system provides a complete reference to the TextBridge
user interface. Help includes overview information on key
features, getting started instructions, step-by-step procedures for
most operations and user tips. Typical user questions are
answered in a “How Do I?” section and Troubleshooting helps
when you have problems. Context-sensitive Help is always
available by pressing F1 from any menu command or dialog box.
2–14 TextBridge Pro Millennium User’s Guide
Page 41

3
OCR AND BASIC TEXTBRIDGE OPERATIONS
This chapter provides information about the process of page
recognition. Use this chapter to learn about optical character
recognition (OCR), page recognition, recomposition, and
operations that will help you use TextBridge effectively including
automatic and manual processing and page types and
settings for recognition.
This chapter provides information about OCR and TextBridge
including:
◆ What is TextBridge OCR?
◆ Running TextBridge standalone and Instant Access
◆ Improving page recognition with settings
◆ Recognizing other languages
◆ Improving OCR with training
Page recognition or optical character recognition is the
technology that converts documents that you can read into
documents that your computer can read. Recomposition is the
technology that reproduces the formatting of text and the layout
of the page, including the positioning of text, pictures, and tables.
TextBridge Pro Millennium User’s Guide 3–1
Page 42

WHAT IS TEXTBRIDGE OCR?
TextBridge is OCR software that turns paper documents or page
image files into text documents on your PC. Page image data is
electronic information about the pages of a document that comes
from a source such as your scanner or fax software. This data
becomes an image document and is stored in an image file.
Text documents are files containing information about the text
and pictures in your document. A text document contains one or
more pages and is expressed in text form and stored in a text
file. You can open, edit, reformat, and republish this information.
Page types
TextBridge can recognize a wide variety of pages. All you need to
do is select the page type that most closely matches your original
page. TextBridge gives you common page types with settings that
are used most often to process pages of that type. You can also
define your own page types to handle processing of other types of
pages.
Using page types makes it quick and easy for you to perform page
recognition. You can modify these page types or create new page
types and save them for future use.
Page type settings include: page orientation, page layout, print
type, scanner brightness, scanner color and resolution, document
language, training data, and user dictionary. The page types to
choose from and some of their characteristics are described in the
following table:
Page Type Scan
Size
Any Page (b&w) Letter Any Any Gray
Any Page (color) Letter Any Any Color
Book (Dual page) Scan
max.
Business Card Card Good Single column Color
3–2 TextBridge Pro Millennium User’s Guide
Print
Type
Any Any B & W
Page
Layout
Picture
Output
Page 43

Page Type Scan
Size
Print
Type
Page
Layout
Picture
Output
Fax Letter Fax Any Gray
Legal Legal Good Single column B & W
Letter Letter Good Single column B & W
Magazine
Letter Good Multi-column Gray
(b & w)
Magazine (color) Letter Good Multi-column Color
Newspaper A3 News
Multi-column Gray
paper
Table Letter Good Table Gray
Figure 3–1. Original Page tab in Page Type Settings dialog box
The page type also specifies Scanner Settings controlling how
pages of this type will be scanned. The scan page size is set
according to the Size setting. Your scanner’s capabilities, together
with the Print Type and Picture Output settings determine the
scan resolution and whether scanning is color, grayscale, or black
and white.
OCR and Basic TextBridge Operations 3–3
Page 44

Page sources
Recomposition
☞ Scanning grayscale (or color) rather than black and white can
improve text recognition on pages with difficult-to-recognize text.
However, grayscale scanning is slower than black and white
scanning.
You can get pages to process from your scanner or from page
images. Use your scanner as a source to input documents on
paper to TextBridge, which then takes the scanned images,
performs OCR, converts the recognized text and pictures to the
text file format of your choice, and stores it on your PC.
Alternatively, use TextBridge to recognize and convert page
images stored in image files that come from fax modems or other
sources.
TextBridge recomposition lets you keep the layout of the original
page. When you select Retain page layout in the Save As
dialog box, TextBridge recomposes the layout, while maintaining
full ability to edit in the output file (except WYSIWYG HTML).
After recomposition, text, pictures, and tables are in the same
position in relation to each other as in the original page. You can
see the results of recomposition when you print the page or look
at it in layout view, if your word processor supports these
elements.
You can retain page layout when outputting to Word or
WordPerfect. Outputting HTML WYSIWYG preserves page
layout for Internet Explorer and Netscape.
It is important to note that in reconstructing the layout of the
original document, TextBridge is limited by the composition
capabilities of the text program. For example, there are some
complex magazine pages originally created with a publishing
program for which you will not get identical output in your word
processor. Even the most powerful word processors do not have
some of the composition capabilities of publishing software.
3–4 TextBridge Pro Millennium User’s Guide
Page 45

In addition, some complex, free-form layouts defeat TextBridge’s
recomposition capabilities. For these types of documents, it is
often best to preview pages and manually zone text and image
zones that you want to capture.
Retain pictures keeps pictures in the saved document if the
document format supports pictures. If you do not select retain
page layout, pictures are saved at the end or beginning of the
document, depending on your word processor. If you select retain
page layout, the pictures are in the same position in relation to
the text and each other as they were in the original page when
you print the page or view it so that you can see the layout.
Format with paragraph styles makes it possible for you to
see the specific formatting styles assigned to paragraphs of text
by TextBridge. Paragraph styles have names that begin with
“TxBr” Formatting styles include indentation, font size and style,
underline, bold, and italic. Paragraph styles make it easier for
you to change formatting when you open the output document in
your word processor. Paragraph styles are only available if your
word processor or other text program supports this capability.
For some documents, you may want only the text in simple
galley (one-column) form. In this case, you would not want to
retain the layout. The output document will have a single column
of all the text in the original document. If you choose to format
with paragraph styles, the text formatting but not the page
layout will be retained. For example, the final document will have
paragraphs and headings in styles like the original document and
in the order of the original document. If you choose to retain
pictures, the pictures will be at the end of the document. If you
use zone ordering, you can number the zones in the order in
which you want them to be in the final document.
Note TextBridge is not designed to recognize and retain the layout of
forms, including forms designed with fill in the blanks, check
boxes, or vertical and horizontal lines separating fields of
information.
OCR and Basic TextBridge Operations 3–5
Page 46

RUNNING TEXTBRIDGE STANDALONE AND INSTANT ACCESS
You can run TextBridge as a standalone program or invoke it
from within another program with Instant Access. You can also
invoke TextBridge through image file context menus and dragand-drop.
Note Instant Access is also available from the Start menu.
Standalone Program
The TextBridge standalone program is a conventional,
document-oriented Windows program. When you start TextBridge
from the Start menu, it operates as standalone program and runs
independently of any other program. You interact with the
program through common user interface components, such as
pulldown menus, toolbars, a main window, dialog boxes, and
context menus.
You add image pages to the document by opening image files or
scanning pages, instructing TextBridge to automatically process
the pages or manually interacting with the processing.
TextBridge recognizes pages and saves them in the output format
that you specify. You can then open the output file in the program
that uses the format you specified.
3–6 TextBridge Pro Millennium User’s Guide
Page 47

Instant Access
Instant Access runs more automatically than TextBridge
standalone with a minimal, dialog box-based user interface. The
entire document is processed with little intervention by you.
Instant Access gives you direct access to TextBridge from
programs such as Word and WordPerfect. Programs with Instant
Access have a TextBridge command in the File menu. Clicking
TextBridge in the File menu starts TextBridge, which recognizes
pages and pastes them directly into the open document in the
program.
Instant Access to TextBridge can also be run as a standalone
program. When you start Instant Access from the Windows Start
menu, the Save dialog box appears for you to control the output
rather than the output’s being pasted into an open document.
In addition, you can use Instant Access by starting it from an
image file’s context menu and selecting TextBridge in the Send To
menu.
The Instant Access Control Panel, which is available from the
Start menu, enables you to specify which programs have Instant
Access to TextBridge. The programs in the following list
automatically have Instant Access:
Ami Pro 2.0 and 3.0
Corel WordPerfect 4.2, 5.1, 6.0, 6.1, 7.0, 8.0, 9.0
FrontPage 2000
Lotus 1-2-3
Lotus WordPro
Microsoft Excel 3.0, 4.0, 5.0, 97, 2000
Microsoft Notepad
Microsoft Word 2.x, 6.0, 7.0, 97, 2000
Microsoft WordPad
The Print Shop ProPublisher 2000
OCR and Basic TextBridge Operations 3–7
Page 48

The programs in the following list do not have Instant Access
capability:
Acrobat Exchange
Acrobat Reader
Clipboard Viewer
Corel Quattro Pro
File Manager
HotMetal Light
Netscape
Netscape Editor
IMPROVING PAGE RECOGNITION WITH SETTINGS
There are a number of settings that you select in TextBridge at
the beginning of the recognition process to help it recognize a
document with more accuracy. Many of these options are related
to the manual processes described in the previous section. Use the
Page Type Settings, Save As, and Options dialog boxes to specify
which options of the software you want to use.
Usually, you will want to use the settings automatically assigned
to a page type. However, it is possible for you to change these
settings.
Page Type Settings
You can view and change the settings for a page type in the Page
Type Settings dialog box (Figure 3–2). Check the settings to be
sure they are the best ones for processing the original page.
3–8 TextBridge Pro Millennium User’s Guide
Page 49

Figure 3–2. Original Page tab in Page Type Settings dialog box
This dialog box has three tabs: Original Page, Scanner, and
Processing. Each lets you view or change Page Type settings.
Original Page Settings
On the Original Page tab, you can choose the following settings:
◆ Set the page orientation for the way text and images are printed
on the original page:
• Any orientation
• Portrait
• Landscape
If you select Any orientation, TextBridge automatically
determines the page orientation. Use this setting if you don’t
know the orientation of your pages or have pages with different
orientations. Use Portrait or Landscape for faster processing.
OCR and Basic TextBridge Operations 3–9
Page 50

◆ Select the page layout of the original page:
• Any layout
• Single column
• Multi-column
• Table
• As zoned by template
When you select Any layout, TextBridge automatically
determines the page layout. Use Any layout when pages in your
document have different layouts or when your pages have
complex layouts that do not fit the above layouts.
Select Table for pages with a table or spreadsheet and singlecolumn text.
◆ Select Book (dual page)
If your scanned page contains two pages (for example, when you
scan an open book) check Book (dual page), so TextBridge will
know to split the scanned page into two separate pages.
◆ Set the print type of the document to be processed.
• Any print type
• Good
• Fax
• Dot matrix
• Newspaper
When you select Any print type, TextBridge automatically
determines the print type.
3–10 TextBridge Pro Millennium User’s Guide
Page 51

Scanner Settings
You can view and change the settings for your scanner in the
Scanner tab of the Page Type Settings dialog box (Figure 3–3,
next page).
On the Scanner tab you can set:
◆ Original Page quality:
• Good print
• Difficult or degraded
◆ Picture Output:
• Black and White
• Gray
• Color
Figure 3–3. Scanner tab in Page Type Settings dialog box
OCR and Basic TextBridge Operations 3–11
Page 52

◆ TextBridge determines the best scan resolution and color for the
Original Page and Picture Output settings. Click Custom if you
want to override this default scan resolution setting.
◆ Set the scan page size to reflect the actual size of the original
page.
◆ To override the default scan Brightness setting, uncheck Adjust
Automatically and move the slider.
Processing Settings
You can view and change the settings for processing in the
Processing tab of the Page Type Settings dialog box (Figure 3–4,
next page). Check the settings to be sure they are the best ones
for processing your pages.
Figure 3–4. Processing tab in Page Type Settings dialog box
3–12 TextBridge Pro Millennium User’s Guide
Page 53

◆ Select the primary language of the document. If you select more
◆ Select the user dictionary you want used when processing pages.
◆ Select the appropriate training data if you have trained on pages
Text Document Settings
On the Processing tab:
than one language, they all must be in the same language group.
You cannot change the language group after you begin processing
a document.
You can add technical terms and proper names to a user
dictionary during proofreading and training. The user dictionary
assists TextBridge in recognizing words it does not know.
of this type and saved the training data.
You specify the type of output, whether to include pictures and
page layout, and the name of the output files in the Save As
dialog box (Figure 3–5).
Figure 3–5. Save As dialog box
OCR and Basic TextBridge Operations 3–13
Page 54

☞ For Auto Save and Send To, use the Auto Save Settings dialog
box available from the Process menu to make these settings.
You can view and change the settings for the output document in
the Save As dialog box, each time you save a document.
Except for the File name, these settings are “sticky” and do not
change from document to document, unless you change them.
When you save a document, you can change the settings to be
sure they are the best ones for your document.
◆ Specify one or more recomposition settings to reflect the output
results you want based on the original page:
• Retain the layout of the original page.
• Retain the pictures of the original page.
A related setting, Format with paragraph styles, can be selected
in the Text Page tab of the Options dialog, available from the
Tools menu.
Note Retaining page layout and pictures is only done for output
formats that support this.
◆ Specify how you want to save the results of document processing:
• Save the output as one document in one file.
• Save each page as a separate document in a separate files.
• Save a new document for each image file.
• Save a new document whenever a blank page is found in the
original document.
3–14 TextBridge Pro Millennium User’s Guide
Page 55

◆ Specify where you want to save the results of document
processing.
◆ Specify the type of format in which to save the results from the
list of options.
◆ Specify the default name of the scanned document to save.
The default name is from text at the top of the first page
recognized, or type in another name, if desired.
If you are saving more than one document, each document has
the same base name appended with an integer in parentheses.
For example, ScanSoft, Inc., (2).
◆ Select Open file when done if you want to open the recognized
document in your word processor or other text application, after
the document has been saved.
RECOGNIZING OTHER LANGUAGES
TextBridge can recognize text in the the languages in the
following list:
Afrikaans Albanian Aymara Basque
Breton Bulgarian Byelorussian Catalan
Croatian Czech Danish Dutch
English Estonian Faroese Finnish
Flemish French Friulian Gaelic
Galician German Greek Greenlandic
Hawaiian Hungarian Icelandic Indonesian
Italian Kurdish Latin Latvian
Lithuanian Lower Sorbian Macedonian Malaysian
Norwegian Pigin English Polish Portuguese
Romanian Russian Serbo-Croatian Slovak
Slovenian Spanish Swahili Swedish
Tahitian Turkish Ukrainian Upper
Welsh West Frisian Zulu Sorbian
OCR and Basic TextBridge Operations 3–15
Page 56

Language Installation
Language Processing
When you install TextBridge, you select one or more languages to
use. If a language you want is not available at that time, check
the TextBridge Web site to see if additional languages are
available.
TextBridge assumes your PC has the fonts needed to display text
in the recognized language. If your PC does not have an available
font for the code page of the recognized text, a message informs
you and suggests that you load a font for the code page.
Language support is based on code pages, which contain
characters from a related group of languages. TextBridge
provides code pages for American/European, Baltic, Central
Europen, Cyrillic, Greek, and Turkish language groups. A
code page can have one or more associated language packs,
which are dictionaries for particular languages. TextBridge uses
language packs to recognize documents printed in that language.
Your document may contain text in one or more of the languages
in a language group. You can select more than one language to
recognize multi-language documents. Because only one
language group can be used per document, TextBridge cannot
recognize languages from different language groups in the same
document during the same OCR process.
You could run TextBridge more than once with different language
groups and zoning to recognize a document that contains
languages in more than one language group.
3–16 TextBridge Pro Millennium User’s Guide
Page 57

The following items describe methods for recognizing multiple
languages in the same document:
◆ Document Language Group
Before you begin to process any pages, you can change the
Language Group using the Document Language Group drop down
list in the Processing tab of the Page Type Settings dialog box.
However, once you have a page in your document, the language
group control is disabled and you cannot change the language
group. To process pages in a language in a different language
group, click New in the File menu to begin a new document.
Then, change to the appropriate language group and language.
◆ Document Language
Select the main language of your document from the Language
checklist in the Processing tab of the Page Type Settings dialog
box. The Language list shows all the languages in the current
language group (code page). If the language of your document is
not listed, select a different language group from the Group list. If
the language pack for this language has not been installed,
TextBridge will install it.
If your language is not in any of the language groups, you may
still be able to recognize your document. Choose the language
group which has the same characters as your language. Uncheck
all the languages in the checklist because you do not want to use
their language rules.
☞ For better accuracy and faster processing, choose only those
languages used in your document.
☞ For best accuracy of multi-lingual documents, choose a single
main language for the document and specify the language of other
text through zoning.
OCR and Basic TextBridge Operations 3–17
Page 58

◆ Language and Zones, Tables, and Cells
TextBridge assumes that all text and table zones are in the
languages that you have specified for the document.
You can change the language of the selected zone, table, or table
cells from the document language to any other language in the
same language group. Right-click the zone and click Properties in
the context menu. In the Properties dialog select the language for
this zone using the language drop down list.
WHERE TO GO FROM HERE
To learn how you use TextBridge to process simple and complex
documents, refer to Chapter 4. It also explains how to start
TextBridge and use the Help system.
Chapters 5 and 6 provide sample sessions that are step-by-step
tutorials. Chapter 5 shows you how to use auto processing,
Instant Access, recognize a document with complex layout, and
process a document with text, pictures and a table.
Chapter 6 shows how to process a document for a database, to use
advanced settings for zones and page types, and to train
TextBridge’s OCR.
The Help system provides a complete reference to the TextBridge
user interface. Help includes overview information on key
features, getting started instructions, step-by-step procedures for
most operations and user tips. Typical user questions are
answered in a “How Do I?” section and Troubleshooting helps
when you have problems. Context-sensitive Help is always
available by pressing F1 from any menu command or dialog box.
3–18 TextBridge Pro Millennium User’s Guide
Page 59

4
LEARNING TO USE TEXTBRIDGE
The previous chapters introduced you to TextBridge and
document recognition. This chapter describes the most basic
capabilities of TextBridge. You will become familiar with the
basic functionality of TextBridge so that you can understand how
TextBridge works. The following chapters take you from the
beginning to the end of using TextBridge to process different
kinds of documents.
The topics presented in this chapter are in the following list:
◆ Before beginning to process a document
◆ Using TextBridge to process a document
◆ Starting TextBridge
◆ Using automatic processing
◆ Using manual processing
◆ Performing basic operations
◆ Getting Help while using TextBridge
TextBridge Pro Millennium User’s Guide 4–1
Page 60

BEFORE BEGINNING TO PROCESS A DOCUMENT
The following checklist will take you through the most important
questions to ask before you start to process a document.
1. Is this document a good candidate for OCR? If you have difficulty
reading a page, TextBridge may also have trouble recognizing it.
2. Is my document coming from my scanner or an image file?
3. What type of page does it have? What kind of document is it?
4. Do I want to retain the original layout and format of the
document?
5. Does the original document have pictures? If so, do I want to
retain the pictures?
6. Do I want to capture the whole page or just part of it?
7. Are the pages I am processing all similar in layout and style?
8. Do I want to proofread the results before saving?
9. Are there any other settings I want to check and change?
The rest of this chapter provides information that helps you to
answer these questions.
USING TEXTBRIDGE TO PROCESS A DOCUMENT
TextBridge provides an easy-to-use interface and a powerful set of
built-in capabilities. You can use it in a number of ways to do
OCR, depending on the complexity of the document you want to
recognize and the results you want.
4–2 TextBridge Pro Millennium User’s Guide
Page 61

TextBridge provides flexibility in performing the steps of the OCR
process. You can:
◆ Process your pages automatically or interact with processing in
manual mode
◆ Optimize processing by specifying settings using page types
◆ View and mark parts (zones) of pages to be recognized
◆ View and manipulate the pages of a document with page
thumbnails
◆ Process pages in any order
◆ Zone multiple pages before recognition
◆ Proofread the OCR results and correct any recognition errors
◆ Save the recognized text and optionally retain page layout and
pictures
☞ A thumbnail is a small image representation of your document.
Thumbnails make it easier for you to select and redo a poorly
recognized page, insert a page, delete a page, reorder pages, or
recognize a specific page.
STARTING TEXTBRIDGE
There are two ways to start TextBridge. You can start
TextBridge as a standalone application or you can start
TextBridge through Instant Access from most Windowsbased text applications or directly from Explorer.
In this section you will learn to start TextBridge as a
standalone application.
Learning to Use TextBridge 4–3
Page 62

Menu Bar
Main toolbar
Process toolbar
View area showing welcome
Thumbnail area
To start TextBridge as a standalone application:
1. On the Windows task bar, click Start.
2. Point to Programs, then point to the TextBridge Pro
Millennium folder.
3. Click TextBridge.
The TextBridge main window appears (Figure 4–1).
Tip and Status bar
Figure 4–1. TextBridge Pro Millennium main window
Note The Welcome message appears when you start TextBridge for the
first time and each time you start TextBridge until you uncheck
Show this welcome when starting.
4–4 TextBridge Pro Millennium User’s Guide
Page 63

USING AUTOMATIC PROCESSING
When you use TextBridge’s automatic processing feature,
TextBridge processes pages with very little interaction with you.
In automatic mode, after you select the page type and page
source, TextBridge automatically recognizes your page(s).
TextBridge only stops for you to add more pages and to save the
results of recognition.
TextBridge also allows you to automatically save and open the
recognized documents in another application, such as a word
processor or editor.
Automatic processing is only three steps. The following steps
describe the automatic process of using TextBridge for page
recognition.
Note Before automatic processing can begin, you must select the page
source from the Get Pages drop down menu and select the Page
Type. Refer to “Performing Basic Operations” in this chapter or
TextBridge Help for more information. If scanning, insert your
page in your scanner.
1. Click the Auto button (Figure 4–2).
TextBridge scans all the pages in your scanner or reads the
selected image file(s).
Learning to Use TextBridge 4–5
Page 64

Click Auto button
Figure 4–2. Click the Auto button in the TextBridge window
2. If TextBridge is getting a document from an image file, in
the Get Pages dialog box, select the file to process.
If TextBridge is getting a document from your scanner,,
you may do one or more of the following:
Click the More Pages button in the Add More Pages to Scanner
dialog box (Figure 4–3) to scan another page.
or
Click the Other Side button to scan the other side of two-sided
pages.
or
Click the Done button when there are no more pages to add.
4–6 TextBridge Pro Millennium User’s Guide
Page 65

Click Done to proceed when
all pages are scanned
Click to scan second side(s)
of a two-sided document
TextBridge recognizes the text, saves any pictures to be placed in
your output, and remembers the format for your output.
Click to scan more pages
Figure 4–3. Add Pages to Scanner dialog box
3. Save the text with any picture(s) in a file format of your
choice.
Figure 4–4. Save the document using the Save As dialog box
Learning to Use TextBridge 4–7
Page 66

USING MANUAL PROCESSING
TextBridge enables you to get remarkably accurate results from
page recognition. However, page recognition is a complex process,
and with some documents it can require your interaction with
TextBridge to get the best output.
Using manual processing, you will find a number of opportunities
during page recognition that allow you to enhance the results for
the particular document. In manual mode, you step TextBridge
through document processing.
During manual processing you can stop the page recognition
process steps to perform the activities in the following list:
◆ Preview the scanned page
◆ Mark (zone) text, tables, and pictures to be recognized
◆ Proofread recognized pages
◆ Redo a page
Manual processing is a five-step process. The following steps
describe the manual process of page recognition. Refer to the Help
system for the step-by-step procedures for these activities.
Note Select the page source from the Get Pages drop down menu and
the Page Type before beginning OCR. Refer to “Performing Basic
Operations” in this chapter or TextBridge Help for more
information about these steps.
If scanning, insert your page in the scanner.
1. Click the Get Pages button.
TextBridge scans your page or reads the selected image file(s). To
get more pages, click Get Pages again.
4–8 TextBridge Pro Millennium User’s Guide
Page 67

2. View and zone the page images.
Click Find Zones to have TextBridge automatically find text,
tables and pictures on the page or use the zoning tools to mark
the zones yourself.
3. Click the Recognize button.
TextBridge recognizes the page, including text, picture, and
format.
☞ To recognize all your pages at once, click the Recognize button
drop-down arrow to be sure it is set to recognize all pages.
4. Proofread the results of recognition.
Correct any errors using the tools in the Text view.
5. Save the text and picture(s) in a file format of your choice.
Check the Open file when done option in the Save As dialog box to
automatically open the saved document.
Each of these activities is explained in more detail in the next
section, “Performing Basic Operations.”
PERFORMING BASIC OPERATIONS
When you OCR your document automatically or manually,
certain basic operations allow you to refine the procedures. They
are:
◆ Selecting the Page Source (with Get Pages)
◆ Selecting the Page Type
◆ Previewing the Page (manual only)
◆ Zoning the Page (manual only)
◆ Proofreading the Document
◆ Saving the Document
Learning to Use TextBridge 4–9
Page 68

Selecting the Page Source
Before you start processing a new document, you can indicate
whether pages are from your scanner or an image file.
To do so, click the drop down arrow on the Get Pages button to
select the source of the page image: your scanner, scanner feeder,
or image file (Figure 4–5).
Click the drop down arrow
to display page image
source options
Figure 4–5. Select the Page image source
Note Some scanners have a scanner feeder in which you can place a
stack of pages to be scanned. The Scanner Feeder setting is only
available if your scanner has a scanner feeder.
Selecting the Page Type
TextBridge provides Page Types for the following kinds of
documents:
Any Page (b&w) Letter
Any Page (color) Legal
Book (Dual page) Magazine (b & w)
Business Card Magazine (color)
Fax Newspaper
Table
4–10 TextBridge Pro Millennium User’s Guide
Page 69

Click the page
type button
Select a page type
For the best OCR results and performance, you can select the
page type that best matches your original page(s). Page types
make it to get the best settings for processing specific kinds of
pages. A page type encapsulates all the processing settings for a
kind of document, such as a magazine of fax. Refer to the section
on page types and page type settings in Chapter 3 “OCR and
Basic TextBridge Operations,” for more detailed information.
Most documents can be processed using the default setting, Any
Page (b&w). If you wish to select a different setting, click the
Page Type button and select a different page type (Figure 4–6).
View or change settings
Figure 4–6. Select the Page type matching your pages
To view or change the settings for the selected page type, click the
Settings button from the Page Type dialog box,(Figure 4–7).
Learning to Use TextBridge 4–11
Page 70

Previewing the Page
Figure 4–7. Change settings for this page type
TextBridge provides page types for the most common types of
pages. You can also define your own page types with settings
optimized for other specialized types of documents.
When manually processing, TextBridge displays the image of
each page in the Image view (Figure 4–8). Click the Image tab to
display the Image View if necessary.
Processing stops after TextBridge gets pages and displays the
image of the original page. At this point, you can perform one or
more of the activities in the following list:
◆ Check that this is the page you want.
◆ Use the Zoom commands to magnify or reduce the page view.
4–12 TextBridge Pro Millennium User’s Guide
Page 71

Preview tools
◆ Check the “scan” quality of the scanned page.
◆ Delete the page, adjust scanner settings and rescan the page.
◆ Rotate the page to make the page upright.
◆ Delete the page from the document.
◆ Add more pages to the document.
◆ Cancel the process by creating a new file or opening another file.
◆ Look at the properties of the page.
◆ Continue processing the page.
You can use the Image Tab toolbar or View and Page menu
commands to examine and orient the acquired page.
Figure 4–8. Preview the page using the Preview tools
Learning to Use TextBridge 4–13
Page 72

Zoning the Page
Before recognizing text on a page, TextBridge finds the text,
table, and picture areas (or zones) on the page (Figure 4–9).
TextBridge does this automatically when processing in Automatic
mode. In Manual mode, you can mark the zone yourself or click
Find Zones to have TextBridge automatically zone the page.
A zoned page is divided into one or more zones. There are three
types of zones: text, table, and picture.
Text zone
Contains text and can be normal or reverse (light
characters on a dark background).
Table zone
Contains cell or tabular tables. Tables can be ruled
or unruled.
Picture
zone
Contains any graphic art such as line art, color
photographs, or halftone images.
Note A form is not a table. TextBridge does not OCR forms and does
not retain the original layout of most forms.
Each type of zone has a different transparent color so you can
easily distinguish among them. TextBridge assigns the default
colors to each type of zone: yellow for text, blue for pictures, and
brown for tables. You can change the assigned colors in the Color
Tab of the Options dialog box, available from the Tools menu.
Only those parts of the page that are marked with zones are
recognized by TextBridge. If you want to recognize only part of a
page, mark only that portion. TextBridge does OCR on text and
table zones and converts both to text. TextBridge does not do
OCR on picture zones but does save picture zones as part of the
output.
4–14 TextBridge Pro Millennium User’s Guide
Page 73

You can use Find Zones to generate zones automatically. Then,
Manual zoning tools
Highlighted zones
Find zones
you can adjust these zones before continuing the zoning process
and recognizing the page.
You can also manually zone the page. Use the text marker, table
marker, picture marker, and erase marker zoning tools in the
Image toolbar like highlighting markers to create and adjust
zones.
Figure 4–9. Zone the page using the Zoning tools
TextBridge also orders zones for output. You can change the order
of the zones during preview, by drawing zones in the order in
which you want to output them or by clicking the Order Zones
button. This is useful when you want to output the document
without retaining the page layout and arrange the paragraphs in
a different order in the output document.
Note TextBridge displays Zone numbers only when you click the Order
Zones button.
Learning to Use TextBridge 4–15
Page 74

You can perform these activities related to zones:
◆ Mark text, table, and picture zones.
◆ Draw irregularly shaped zones.
◆ Have TextBridge automatically Find Zones.
◆ Edit automatic zoning.
◆ Erase a zone or part of a zone.
◆ Drag a selected zone to adjust its position.
◆ Display and edit the properties of a zone (such as language).
◆ Zone only part of a page.
◆ Delete zones so that text, tables, or pictures are not included in
the final document using the Clear command.
◆ Change a zone from one type, such as text, to another type, such
as table.
◆ Zoom In or Out to enlarge or reduce the page view.
You can also perform these less common activities related to
zones:
◆ Find and edit the cell structure of a table.
◆ Use the same zoning for subsequent pages of the same document.
◆ Save the current set of zones (including their size, location, and
type) as a template and use the zone template on other
documents.
◆ Change the colors used to highlight different types of zones.
◆ Select zone order. Select zones and assign a number to each zone
to determine the order in which zones are output to the text
document. However, if you choose to Retain Page Layout,
TextBridge ignores the zone order.
Use the Zoning tools to perform many of these activities or use
commands in the Edit, View, Page, Process, and Tools menus.
Refer to Help for more information. After you complete the
preview, instruct TextBridge to recognize the page.
4–16 TextBridge Pro Millennium User’s Guide
Page 75

Proofreading the Document
In manual mode, after TextBridge recognizes each page, it stops
for you to proofread the recognition results (Figure 4–10).
TextBridge displays recognized pages in the Text view. Click the
Text tab to display the Text view if necessary. The page is laid out
like the original page. Pictures found by OCR are displayed in the
same location as in the original page.
Proofreading tools
Original image
Recognized text ready for
proofing
Figure 4–10. Proofreading the page using the Proofreading tools
Words that TextBridge suspects may not have been recognized
correctly are color coded. Suspect words are identified by one color
and unrecognized characters are highlighted in another color. By
default, the suspect words are blue, and the current word in the
Suspect box is yellow in the view. Use the Proofreading tools to
correct words.
Learning to Use TextBridge 4–17
Page 76

Note You can add pages to your document or save the recognized pages
Saving the Document
Note Not all formats can retain pictures and page layout. Some formats
You can add corrected words to the user dictionary, which can
improve recognition in subsequent pages of the same document
and subsequent documents. The user dictionary is most useful for
non-standard words that you frequently need to recognize, such
as proper nouns and technical words.
While you are still in proofreading mode, you can add pages to the
final document by getting a page using either the automatic or
manual process.
without proofreading the current page.
After you finish proofreading the document, you are ready to save
it. You can specify the location, name, and format of the output
document. TextBridge converts the document to the format of
your choice and saves it. You can choose to save the pictures and
retain the original page format in your output.
preserve only part of the original page layout. Refer to the Help
for more detailed information.
You can save the same document more than once using the Save
As command. For example, you can save the document as text
only and then save it with pictures and layout.
4–18 TextBridge Pro Millennium User’s Guide
Page 77

Figure 4–11. Saving the page using the Save As dialog box
After you save the document, your document remains in
TextBridge. You can then do any of the following:
◆ Save the document in another format.
◆ Add or delete pages.
◆ Change zoning.
◆ Recognize the document again.
◆ “Send To” a text application.
◆ Use the New command in the File menu to begin a new job.
◆ Close TextBridge.
Learning to Use TextBridge 4–19
Page 78

GETTING HELP WHILE USING TEXTBRIDGE
TextBridge is designed to be easy to learn and use. It contains
many user assistance options to guide you. The goal of user
assistance is to provide you with information at the time you
need it and to provide it primarily from within the program.
TextBridge offers you a variety of types of user assistance
including context-sensitive tips, information screens, Help, an
interactive assistant, online user’s guide, Release Notes, and
direct connections to web sites.
This section describes the following user assistance:
◆ Using the Welcome Screen
◆ Using the Show Me How window
◆ Using the tips and information screens
◆ Getting information from Help
◆ Using the Web site
Using the Welcome Window
When you start TextBridge for the first time, the Welcome
window appears (Figure 4–12). This window describes the basic
steps for using TextBridge. This window appears every time
you start TextBridge until you uncheck Show this welcome
when starting.
Click the Show Me How button to learn more about using
TextBridge or use the main toolbar to begin processing your
document.
4–20 TextBridge Pro Millennium User’s Guide
Page 79

Main toolbar
View area showing welcome
Click to display Show Me
How window
Uncheck to stop displaying
welcome
Figure 4–12. Welcome window
Using the Show Me How Window
In the Welcome window, click Show Me How to display the Show
Me How window (Figure 4–13). The Show Me How Window
guides you through a specific task. It explains how to:
◆ Use the TextBridge tools
◆ Scan a document into your word processor
◆ OCR an existing image file such as a fax file or a TIF file
◆ OCR part of a page rather than the entire page
Click on the activity that you want to learn about. An animated
character describes the activity for you.
Learning to Use TextBridge 4–21
Page 80

Click a topic to call the Assistant
Using Tips
4–22 TextBridge Pro Millennium User’s Guide
Figure 4–13. Show Me How window
☞ You can also click Show Me How in the Help menu. The Show Me
How window appears, and you can select what you would like to
learn. After you have a page, you can also learn about the Image
or Text tab tools by clicking Show Me How in the Help menu.
Note If you want to end the Assistant’s explanation early, right-click
on him and select Hide.
Context-sensitive tips provide explanations, alternative
activities, and related suggestions. They are embedded
throughout the application and appear at the bottom of the screen
or current dialog box based upon the context within which you are
working. You can click on Next Tip to loop through the tips. You
can choose not to display the tips in the main window from the
Toolbars dialog box available from the View menu.
Page 81

Getting Information from Help
The Help system provides general information about TextBridge,
including getting started instructions, and step-by-step
procedures for most operations. Use the How Do I? section to look
for answers to real-life questions that you may have while using
TextBridge. Tips & Tricks describes the best way to perform most
tasks. Context-sensitive Help is always available from any menu
command or dialog box.
What you want to know
about
General information Click TextBridge Help in the
A concept not listed in the
Contents or Index
How to do something Click TextBridge Help in the
Meaning of a word Click TextBridge Help in the
Entire dialog box Click the Help button in the dialog
A menu command Point to the menu item and click F1.
How to get Help
Help menu.
Click TextBridge Help in the
Help menu then click Find and
follow the directions.
Help menu, then click How Do I?
or Step-by-Step Procedures in
the Contents tab or use the Index.
Help menu, and in the Contents
tab, click Glossary or use the
Index.
box.
Learning to Use TextBridge 4–23
Page 82

You can get Help by using the main Help Topics window (Figure
4–14) and by performing one of the activities in the following list:
◆ Select a topic from a book in the Contents tab.
◆ Select a topic from the Index tab.
◆ Search for information about a specific word or phrase using the
Find tab.
◆ Jump from one topic to a related topic.
Figure 4–14. Help Topics: TextBridge Pro Millennium Help
window
4–24 TextBridge Pro Millennium User’s Guide
Page 83

Using the TextBridge Web Site
The TextBridge Web site provides the latest product information,
an up-to-date scanner list, tips, and links to related Web sites.
Select ScanSoft on the Web from the Help menu to see this
information. Links are provided to the ScanSoft Home Page,
Product Information, Product Support, and TextBridge Updates.
WHERE TO GO FROM HERE
Proceed to Chapters 5 and 6 of this booklet for step-bystep sample sessions showing how to using TextBridge.
Chapter 5 shows you how to use auto processing, Instant
Access, recognize a document with complex layout, and
process a document with text, pictures and a table.
Chapter 6 shows how to process a document for a database, to use
advanced settings for zones and page types, and to train
TextBridge’s OCR.
The Help system provides a complete reference to the TextBridge
user interface. Help includes overview information on key
features, getting started instructions, step-by-step procedures for
most operations and user tips. Typical user questions are
answered in a “How Do I?” section and Troubleshooting helps
when you have problems. Context-sensitive Help is always
available by pressing F1 from any menu command or dialog box.
Learning to Use TextBridge 4–25
Page 84

5
SAMPLE SESSIONS WITH TEXTBRIDGE
The previous chapters have introduced you to TextBridge and
document recognition. This chapter provides step-by-step
instructions to teach you how to use the most important
capabilities of TextBridge.
The learning sessions build on each other and assume that you
understand the procedures explained in the previous sessions. It’s
best to do them in order or skim through prior sessions to
familiarize yourself with the steps. Each learning session begins
with introductory information including a list of what you will
learn followed by step-by-step procedures and explanations.
The topics presented in this chapter are in the following list:
◆ Using the sample documents
◆ Recognizing a simple document using auto processing
◆ Using Instant Access to TextBridge
◆ Processing a complex document using manual processing
◆ Processing text, pictures, and a table
TextBridge Pro Millennium User’s Guide 5–1
Page 85

USING THE SAMPLE DOCUMENTS
In this section, you will learn about the sample documents and
how to open a sample document.
Use the sample documents provided with TextBridge for the
learning sessions in this chapter. They provide a cross-section of
the types of pages that TextBridge can process. You can find the
seven sample documents in the following location:
C:\Program Files\TextBridge Pro Millennium\Image Files\Samples
This is the default location for these files; however, you may have
installed TextBridge in another location. The sample documents
are:
◆ complex.xif
◆ dual page.tif
◆ fax.pcx
◆ letter.tif
◆ multipage.xif
◆ scanning.tif
◆ table.bmp
The sample documents are designed to provide you with a variety
of documents on which to learn and to highlight the capabilities of
the application. In each of the learning sessions, you are asked to
use a specific sample document.
5–2 TextBridge Pro Millennium User’s Guide
Page 86

☞ For this session, use letter.tif (Figure 5–1).
Figure 5–1. Letter sample document
After you have started TextBridge, to find and open a sample
document:
1. Select image file as the page source.
Click the drop down arrow on the Get Pages button and select
Image File.
2. Select the page type.
Click the Page Type button and select Any Page (b&w), which
will handle most black and white pages (Figure 5–2, next page).
Sample Sessions with TextBridge 5–3
Page 87

Click the page
type button
Select a page type
Figure 5–2. Select Page Type
3. Click the Get Pages button.
The Get Pages dialog box appears (Figure 5–3).
5–4 TextBridge Pro Millennium User’s Guide
Page 88

Note The default folder for image files is
Select an image file
C:\My Documents\TextBridge\Image Files
However, unless you installed TextBridge in another directory,
sample image files are installed in Location of sample image files
C:\Program Files\TextBridge Pro Millennium\Image Files\Samples
If Samples is not the open folder, access the sample documents
folder from the Look In: box in the Get Pages dialog box.
The sample files are listed in the Get Pages dialog box
(Figure 5–3).
Figure 5–3. Get Pages dialog box with letter.tif selected
4. In the Get Pages dialog box, double-click a file name to
open it. In this case, double-click letter.tif.
TextBridge displays the document in the Image view (Figure 5–4).
Sample Sessions with TextBridge 5–5
Page 89

Figure 5–4. TextBridge - Image view
☞ For this lesson, you just want to go back to where you started
without recognizing the document. This can be useful if you
change your mind and want to start over without processing a
document further.
5. Click the New command in the File menu to discard the
current page.
A dialog box appears and tells you that the current page has not
been saved.
6. Click OK to return to the original TextBridge screen.
Now you know how to find and open a sample document. Proceed
to the learning sessions where you will use sample documents to
work with TextBridge and familiarize yourself with using its
capabilities.
5–6 TextBridge Pro Millennium User’s Guide
Page 90

SESSION 1: RECOGNIZING A SIMPLE DOCUMENT USING AUTO PROCESSING
TextBridge provides a range of powerful features. However,
TextBridge is also designed to be very easy to use. For many
documents, you can use default settings and automatically
process a document.
☞ For this learning session, use the sample document named
letter. This document has a single column of text and a logo.
In this session you’ll learn to:
◆ Select the appropriate page type
◆ Use Auto Process
◆ Save a document after recognition
When you select Any Page (b&w), the default setting, as the
page type, it automatically specifies the following settings:
◆ Any page layout
◆ Any print type
◆ Any page orientation
For scanning, Any Page (b&w) page type specifies:
◆ Good print original page
◆ Letter size paper
◆ Grayscale picture output
Refer to Chapter 3 and Help for more information about these
settings.
Sample Sessions with TextBridge 5–7
Page 91

Click the page
type button
To process a simple document, use the following procedure:
1. Start TextBridge.
TextBridge appears.
2. Select the page source.
Click the drop down arrow on the Get Pages button to select
Image File.
3. Select the page type.
Click the Page Type button and select Any Page (b&w),
Figure 5–5).
Select Any Page (b&w)
Figure 5–5. Page Type dialog box with Any Page (b&w) selected
5–8 TextBridge Pro Millennium User’s Guide
Page 92

4. Click the Auto process button.
Select an image file
The Get Pages dialog box appears (Figure 5–6).
Figure 5–6. Get Pages dialog box with letter.tif selected
5. In the Get Pages dialog box, double-click the sample
document, letter.tif.
TextBridge reads the image file as shown in Figure 5–7).
Sample Sessions with TextBridge 5–9
Page 93

Figure 5–7. TextBridge - Getting Page dialog box
TextBridge then automatically zones the page and identifies text,
tables, and pictures as shown in the Zoning dialog box (Figure 5–8).
Figure 5–8. TextBridge - Zoning dialog box
5–10 TextBridge Pro Millennium User’s Guide
Page 94

Accept the default name,
or type a new name
TextBridge automatically recognizes the characters and page
layout as shown in the Recognizing dialog box (Figure 5–9).
Figure 5–9. TextBridge - Recognizing dialog box
After TextBridge reads the page image and processes it, it asks
you to save the document (Figure 5–10).
Select the output format
Click Save
Figure 5–10. Save As dialog box
Sample Sessions with TextBridge 5–11
Page 95

6. In the Save As dialog box, complete the following steps:
• In the Save in list, select the folder in which to save the text
file.
☞ Be sure to notice where the document is saved so that you can
find it easily.
• In the File name box, type a file name.
• In the Save as type list, select the output format for your
word processor or other text application.
• Check that Retain pictures, Retain page layout, and Open file
when done are selected.
• Click the Save button.
With retain page layout selected, TextBridge includes
information describing the layout of the original page in the
output file. When you open the file or print the page in an
application that supports recomposition, such as Word,
WordPerfect, or Excel, in most cases the page is recomposed like
the original page. Text, tables, and pictures are in the same
position in relation to each other as in the original document.
With retain pictures selected, TextBridge includes pictures
in the final output document. If retain page layout is not
selected too, pictures are placed at the end of the text rather than
the same position in relation to the text that they were in the
original page.
With Open file when done selected, TextBridge formats and
saves the document and opens it in the word processor or other
application associated with it. You can see the document and
make any further changes if necessary.
5–12 TextBridge Pro Millennium User’s Guide
Page 96

7. Compare the recognized document in your word processor
with the picture of the sample document, letter.tif
(Figure 5–11).
Figure 5–11. Letter sample document
With a word processor such as Word or WordPerfect in the print
or page layout view, the recognized document should have the
same or similar layout as the TIFF image or sample document.
The difference is that now you have formatted, fully editable text,
just as if you had typed it in yourself. At this point, you could
spell check the document and make any other changes in your
word processor.
8. Close the word processing application.
Notice that TextBridge is still running. The recognized page is
displayed in the Text view. You can save the document in another
format or recognize a new document.
9. For now, simply close TextBridge.
Sample Sessions with TextBridge 5–13
Page 97

SESSION 2: USING INSTANT ACCESS TO TEXTBRIDGE
You can use TextBridge Instant Access to run TextBridge from
within another application, such as a word processor. To use
Instant Access to TextBridge, simply start TextBridge from
within an application, such as Word or WordPerfect. During
Instant Access, TextBridge processes a document then pastes it
into the open document in your text application.
☞ For this learning session, use the sample document named
letter.tif. This document has a single column of text, and a
logo. The procedure is similar to processing a simple document in
Session 1.
In this session you’ll learn to:
◆ Use TextBridge Instant Access from within your word processor.
◆ Select the Letter page type.
When you select Letter as the page type, it automatically
specifies the following settings:
◆ Single column page layout
◆ Good print type
◆ Portrait orientation
For scanning, Letter page type specifies:
◆ Letter page size
◆ Black and White (binary scan)
Refer to Chapter 3 and Help for more information about these
settings.
5–14 TextBridge Pro Millennium User’s Guide
Page 98

If TextBridge is still running from the previous learning session,
exit from TextBridge. You can have more than one copy of
TextBridge running at the same time, but it is not recommended.
Before you run Instant Access to TextBridge, you may need to use
the Instant Access Control Panel (Figure 5–12) to choose which
applications have Instant Access. TextBridge automatically
provides Instant Access for the applications listed in the control
panel.
To access the Instant Access Control Panel:
• Click Start on the Windows taskbar,
• then Programs,
• then TextBridge,
• and Instant Access Control Panel.
You can also access the Instant Access Control Panel from the
main TextBridge application in the Tools menu. Help provides
additional information about Instant Access.
Check one or more programs
Click OK
Figure 5–12. TextBridge Instant Access Control Panel
Sample Sessions with TextBridge 5–15
Page 99

The Enable access to TextBridge list shows the text applications
from which TextBridge can be invoked. The list includes
applications commonly used with TextBridge and applications
that are currently running. If your application does not appear in
this list, close the TextBridge Instant Access Control Panel, start
your application, and reopen the TextBridge Instant Access
Control Panel. Your application should now appear in the list.
Note: Only applications with a File menu will appear in the list.
Click on applications in the list to check or uncheck them. Click
All to check all items in the list. Click None to uncheck all items
in the list. Instant Access to TextBridge will be available from all
checked applications.
Note: The Instant Access Control Panel may also list applications that
are not compatible with Instant Access. Be sure to select only
those applications that you intend to use.
Click OK to close the Instant Access Control Panel and save any
changes you have specified.
To use Instant Access from your word processor, use the following
procedure:
1. Start your word processor, and open a new document.
2. In the File menu, click the TextBridge... command
immediately above the Exit command (Figure 5–13).
5–16 TextBridge Pro Millennium User’s Guide
Page 100

Start Instant Access to
TextBridge
1. Select Letter
2. Select Image File
Figure 5–13. TextBridge... command in File menu
The TextBridge Instant Access dialog box appears (Figure 5–14).
Notice that the Instant Access dialog box looks similar to the
Page Type dialog box in the standalone version of TextBridge.
Auto OCR and Manual buttons have been added, as well as
choices for Page Source and Output.
3. Click Auto OCR
to start processing
Figure 5–14. TextBridge Instant Access dialog box
Sample Sessions with TextBridge 5–17
 Loading...