

NorthStar Navigation NAIS-300 User Manual

N
A
MANUAL
I
S
3
0
NAVICO NAIS-300
Class B Transceiver
English
0

© 2007 Navico AS
The technical data, information and illustrations contained in this publication were to the best of
our knowledge correct at the time of going to print. We reserve the right to change specications,
equipment, installation and maintenance instructions without notice as part of our policy of
continuous development and improvement.
No part of this publication may be reproduced, stored in a retrieval system or transmitted in any
form, electronic or otherwise, without prior permission from Navico AS.
No liability can be accepted for any inaccuracies or omissions in the publication, although every
care has been taken to make it as complete and accurate as possible.
2 Contents
Iss.1.0 DEC 07 WP

Contents
1 Introduction 5
1.1 General overview 5
1.2 SimNet/NMEA2000 6
2 Installation 7
2.1 General 7
2.2 Mounting 7
2.3 Cabling 8
2.4 SimNet/NMEA2000 cable 9
SimNet (300-N model only) 9
NMEA2000 (300-L model only) 10
2.5 NMEA0183-HS (RS232) 10
2.6 NMEA0183-HS (RS485) 10
2.7 Transmit disable switch 10
2.8 GPS antenna 10
2.9 VHF antenna 11
3 Conguration 15
3.1 General 15
3.2 Connecting to a computer 15
4 Operation 17
4.1 General 17
4.2 Indicators 17
PWR 17
BIIT (Built In Integrity Test) 17
TX 18
Contents 3

RX 18
4.3 Enable/disable switch (Silent Mode) 18
5 Appendix 19
5.1 Maintenance 19
5.2 Troubleshooting 19
5.3 Accessories 19
5.4 Product specications 20
5.5 Dimensions 22
5.6 Service and warranty 22
5.7 Declaration of Conformity (EU) 23
4 Contents

1 Introduction
1.1 General overview
The NAIS-300 is a Class B Transponder that’s purpose is
to transmit the position and other information about your
vessel, to other AIS equipped vessels. It is housed in a
rugged waterproof enclosure to withstand the rigors of
the marine environment.
The NAIS-300 uses a sophisticated automatic digital time
sharing technology which enables the exchange of static
information like; MMSI (Maritime Mobile Service Identifier)
Number, Vessel’s Name, Call Sign and Type. Also dynamic
data like; Position, Course, Distance and more, from ship
to ship, and from ship to shore based traffic stations.
When connected to a compatible chart plotter, it will
provide a representation of the position and movements
of all AIS equipped vessels within VHF range
The advantages of the NAIS-300 are:
Increased awareness of the current shipping
•
situation within your VHF range through the
exchange of data between vessels.
Improving traffic management in busy shipping
•
lanes through exchanging information between
vessels and shore based traffic stations.
Reporting information automatically in shipping
•
areas where it is mandatory.
As with all electronic navigational equipment, it is
only an aid to navigation and should not be used as
a substitute for good seamanship.
Remember - Maritime law requires that you keep a
good lookout at all times.
Introduction 5

1.2 SimNet/NMEA2000
SimNet is Navico’s proprietary high speed data bus
network compatible with NMEA2000. It provides
intelligent sharing of data and control information
between a wide range of marine electronics and
instruments.
6 Introduction

2 Installation
2.1 General
The NAIS-300 is designed to be mounted on a flat surface
somewhere out of sight, but easily accessible. However,
to determine the best possible location, you need to
consider how and where, you are going to run the cabling
from the sides of the unit.
The NAIS-300 is very simple to install, however, the
performance of the equipment is directly affected by the
quality of the installation. Please read these instructions
carefully before attempting installation. If in any doubt,
consult a qualied marine electronics engineer.
2.2 Mounting
The transceiver requires a at surface with a minimum
area of at least 210mm x 130mm (8.3in x 5.1in) for
mounting, with an overall area of 210mm x 250mm (8.6in
x 9.8in) to allow for cables.
The surface should be rigid and sturdy enough to be able
to support the weight of the unit, taking into account the
shock loads likely to be encountered when the vessel is
under way in heavy seas.
Hold the unit against the surface where it is to be
1
mounted, and mark the position of the four holes
with a pencil.
Drill a 3.7mm (.145in) hole on each corner mark.
2
Align the holes on the NAIS-300 with those you
3
have just drilled, and fasten with the 4 - No.8 x 3/4
self tapping screws supplied.
Installation 7
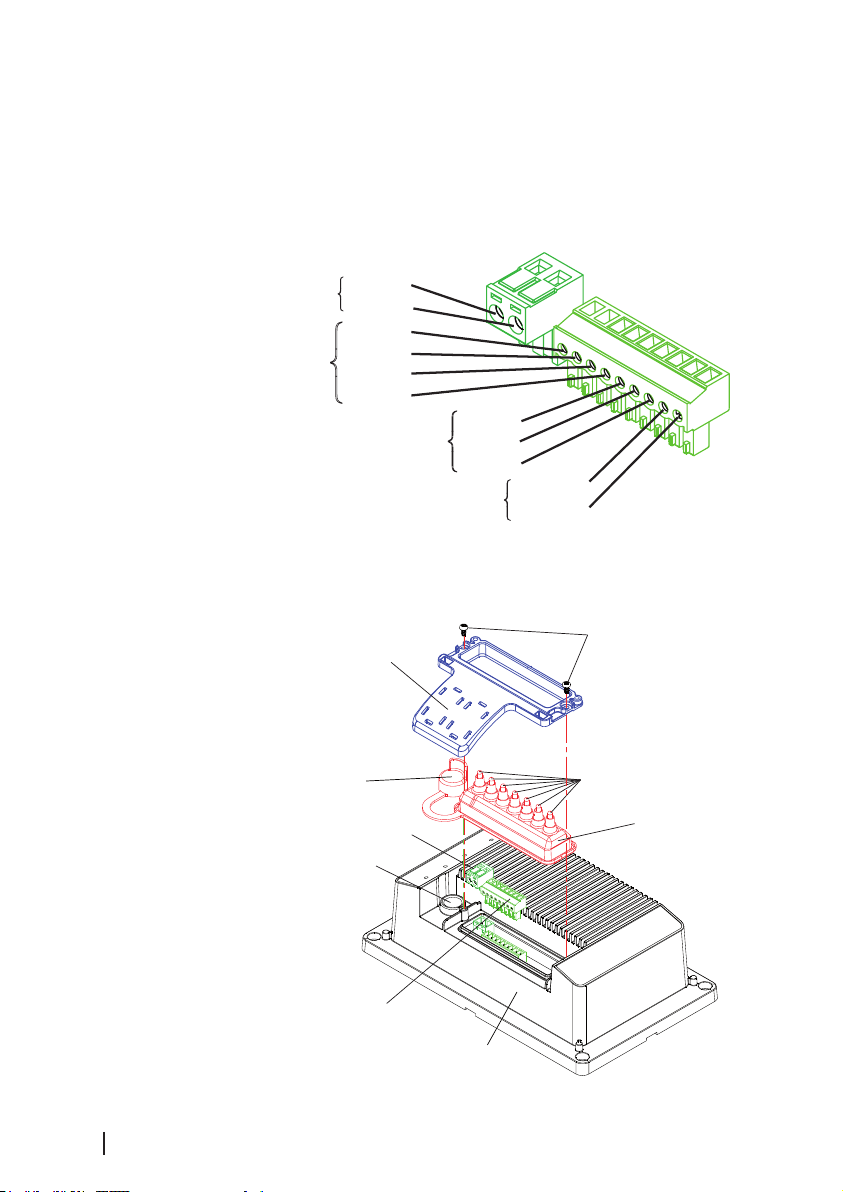
2.3 Cabling
+12vdc
0v.
NMEA0183-HS
(RS485)
Out +ve
Out -ve
In -ve
In +ve
NMEA0183-HS
(RS232)
Out -ve
Gnd.
In +ve
Switch +
Switch -
Power
External Switch
SimNet/NMEA2000
Connector
NAIS-300 Case
Power
Connector
NMEA0183-2 & Switch
Connector
Grommet
Nipples
SimNet/NMEA2000
Socket Splash
Cover
Clamp
Retaining Screws
Once you have secured your NAIS-300 to a flat surface,
you will need to connect the power, SimNet/NMEA2000
and RS232 cables supplied with the unit. The RS485 cable
and switch are not supplied, but would be fitted in the
same manner.
Figure 2.1 - Connector wiring
With reference to the connector wiring, Figure 2.1 and the
assembly diagram, Figure. 2.2, wire your unit as follows:
8 Installation
Figure 2.2 - NAIS-300 assembly
 Loading...