

NorthStar Navigation 8000I User Manual 2
Northstar 8000i
System Operation Manual
www.northstarnav.com
Important Safety and Warning Information
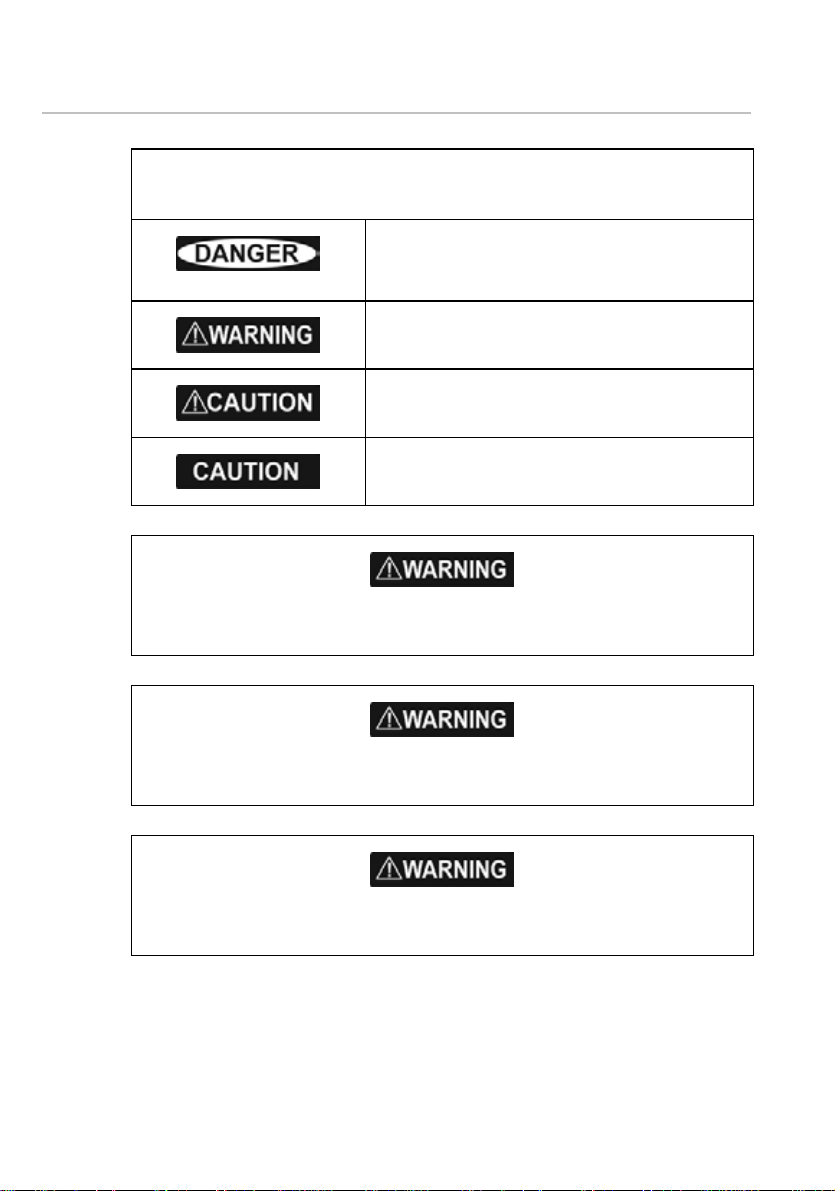
IMPORTANT SAFETY INFORMATION
Please read carefully before use
This is the safety alert symbol. It is used to alert you to
potential personal injury hazards. Obey all safety
measures that follow this symbol to avoid possible
injury or death.
WARNING indicates a potentially hazardous situation
which, if not avoided, could result in death or serious
injury.
CAUTION indicates a potentially hazardous situation
which, if not avoided, may result in minor or moderate
injury.
CAUTION used without the safety alert symbol indicates
a potentially hazardous situation which, if not avoided,
may result in property damage.
It is your sole responsibility to use the Northstar 8000i in a manner that will not cause
accidents, personal injury or property damage. Always observe safe boating practices.
When navigating the vessel, use the Northstar 8000i only as a navigational aid. Proper
navigation of the vessel is the sole responsibility of the vessel operator.
Depth soundings should be used only for navigation. Never use a depth sounding to gauge
depth, range or other conditions for swimming or diving.
2
Northstar 8000i Operation Manual
The Global Positioning System (GPS) is operated by the US Government which is solely
responsible for its operation, accuracy, and maintenance. The GPS system is subject to
changes which could affect the accuracy and performance of all GPS equipment
anywhere in the world.
The electronic chart used by the Northstar 8000i is an aid to navigation designed to
supplement, not replace, official government charts. Only official government charts
supplemented by notices to mariners contain the information required for safe and
prudent navigation. Always supplement the electronic information provided by the
Northstar 8000i with other plotting sources such as observations, depth soundings,
radar and hand compass bearings. Should the information not agree, the discrepancy
must be resolved before proceeding any further.
It is the user's responsibility to ensure that Simulate Mode is used only in safe situations
Never operate the 8000i in Simulate Mode while you're underway.
such as when you are moored in a marina.
The accuracy of the sonar depth display can be limited by many factors, including the
type of transducer, the location of the transducer, and water conditions. Ensure that the
transducer is installed and used correctly.
The radar must be set up before it is used for the first time.
See "Set up the radar before using it" in the Radar Installation manual.
Northstar 8000i Operation Manual
3
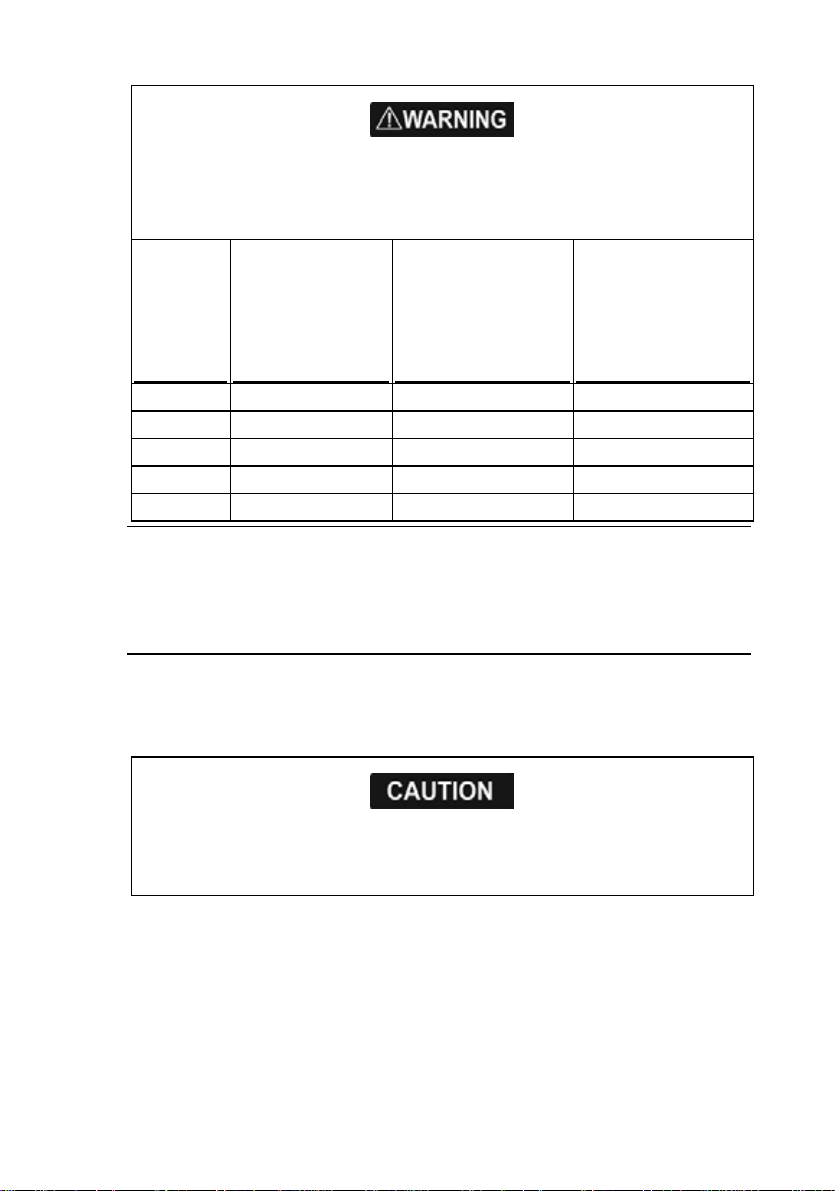
Never look directly into the scanner at close range while the radar is operating.
Radar scanners emit electromagnetic energy at a frequency that can be harmful at close
range. Always keep the recommended safe distance from the scanner as follows:
Minimum safe
distance
Scanner
Model
2 kW 30 1.6 ft (0.5 m) 4.6 ft (1.4 m)
4 kW 25 3 ft (0.9 m) 9.3 ft (2.8 m)
6 kW 20 3.6 ft (1.1 m) 11.5 ft (3.5 m)
10 kW 20 9.5 ft (2.9 m) 30 ft (9.0 m)
25 kW 20 18 ft (5.5 m) 57 ft (17.4 m)
Vertical beam
angle of scanner
(degrees)
(100 Watts per m²
average power
density) Note 1
Minimum safe
distance
(10 Watts per m²
average power
density) Note 2
NOTES: Limits apply to exposure within the vertical beam angle.
Note 1: Peak occupational exposure limit pursuant to IEC 60936 Clause 3.27 and
IEC 62252 Clause 4.32
Note 2: General public exposure limit pursuant to IEC 60936 Clause 3.27 and IEC
62252 Clause 4.32
Failure to adhere to these warnings may lead to death, serious injury or property
damage. Northstar disclaims all liability for installation or use of this product that
causes or contributes to death, injury or property damage or that violates any law.
You are strongly recommended to scan all removable media (such as USB memory sticks or
CDs) for viruses or corrupt data on a separate device BEFORE connecting or using the
removable media with the 8000i.
4
Northstar 8000i Operation Manual

Disclaimer
As Northstar is continuously improving this product we retain the right to make
changes to the product at any time which may not be reflected in this version of
the manual. Please contact your nearest Northstar distributor if you require any
further assistance.
It is the owner’s sole responsibility to install and use the instrument and
transducers in a manner that will not cause accidents, personal injury or property
damage. The user of this product is solely responsible for observing safe boating
practices.
BRUNSWICK NEW TECHNOLOGIES INC. AND ITS SUBSIDIARIES AND AFFILIATES
DISCLAIM ALL LIABILITY FOR ANY USE OF THIS PRODUCT IN A WAY THAT MAY
CAUSE ACCIDENTS, DAMAGE OR THAT MAY VIOLATE THE LAW.
Governing Language: This statement, any instruction manuals, user guides and
other information relating to the product (Documentation) may be translated to,
or has been translated from, another language (Translation). In the event of any
conflict between any Translation of the Documentation, the English language
version of the Documentation will be the official version of the Documentation.
This manual represents the product as at the time of printing. Brunswick New
Technologies Inc. and its subsidiaries and affiliates reserve the right to make
changes to specifications without notice.
Copyright © 2006 Brunswick New Technologies Inc. Northstar™ is a registered
trademark of Brunswick New Technologies Inc.
Warranty
The Northstar Warranty Statement is supplied as a separate document.
It is shipped with the Product Registration Card.
In case of any queries, refer to www.northstarnav.com.
Northstar 8000i Operation Manual
5

Contents
Important Safety and Warning Information ..................................................................................................2
Disclaimer..................................................................................................................................................................5
Warranty.....................................................................................................................................................................5
1 Welcome to the Northstar 8000i 16
1.1 Networking the 8000i ...........................................................................................................................16
1.2 How to use this manual........................................................................................................................ 17
1.3 Conventions.............................................................................................................................................17
2 Introduction to the Northstar 8000i 18
2.1 Turn on the 8000i ...................................................................................................................................18
2.2 Turn off the 8000i...................................................................................................................................19
2.3 The keys on the 15 inch Monitor....................................................................................................... 19
2.4 The keys on the remote keypad........................................................................................................ 21
2.5 The keys on the 12 inch Display Processor.................................................................................... 22
2.6 The buttons .............................................................................................................................................. 23
2.7 How to select an item ...........................................................................................................................23
2.8 Single pane options............................................................................................................................... 23
2.9 What is the active pane? ......................................................................................................................24
2.10 What are pages? .....................................................................................................................................24
2.11 Expand a small pane.............................................................................................................................. 25
2.12 Cycle through the panes on a page.................................................................................................25
2.13 Select a page............................................................................................................................................ 26
2.14 Edit a page................................................................................................................................................26
3 Set up the Northstar 8000i basics 27
3.1 Adjust the brightness on the 15 inch Monitor .............................................................................27
3.2 Adjust the brightness on a 12 inch Display Processor............................................................... 27
3.3 Turn the keypad beeps on or off.......................................................................................................28
3.4 Turn the keypad backlight on or off ................................................................................................ 28
3.5 Adjust the volume.................................................................................................................................. 28
3.6 Select a palette........................................................................................................................................ 29
3.7 Show/hide the control panel.............................................................................................................. 29
3.8 Show/hide the instruments bar......................................................................................................... 29
3.9 Show/hide the top control bar ..........................................................................................................29
3.10 Select the time format .......................................................................................................................... 30
3.11 Select your time zone ...........................................................................................................................30
3.12 Select the large scale distance units................................................................................................31
3.13 Select the small scale distance units................................................................................................ 31
3.14 Select the temperature units.............................................................................................................. 31
3.15 Select the depth units........................................................................................................................... 32
3.16 Select the speed units........................................................................................................................... 32
3.17 Select the volume units for liquids................................................................................................... 32
3.18 Select the pressure units...................................................................................................................... 33
3.19 Specify your vessel statistics............................................................................................................... 33
6
Northstar 8000i Operation Manual

4 Chart 34
5 Set up the chart library 35
5.1 Display the C-MAP MAX Pro Chart Manager screen................................................................... 35
5.2 What does the C-MAP PRO Chart Manager screen show?........................................................35
5.3 The Chart Manager control panel.....................................................................................................36
5.4 The Chart Manager icons.....................................................................................................................36
5.5 Information on C-Map chart licenses and subscriptions...........................................................38
5.6 Purchase or rent?....................................................................................................................................38
5.7 Different ways to choose a chart collection ..................................................................................38
5.8 Purchase a chart license over the internet..................................................................................... 40
5.9 Purchase a chart license over the phone........................................................................................40
5.10 Purchase a chart license through a dealer..................................................................................... 41
5.11 Load the chart licenses.........................................................................................................................42
5.12 Install the chart data.............................................................................................................................. 42
5.13 Update charts over the internet ........................................................................................................44
5.14 Update the database by DVD............................................................................................................. 45
5.15 Uninstall chart collections ...................................................................................................................45
6 Chart screen basics 47
6.1 Display the chart screen....................................................................................................................... 47
6.2 What does the chart screen show?................................................................................................... 48
6.3 Display your current position in real time......................................................................................49
6.4 Display your current position data ...................................................................................................49
6.5 Instant GoTo.............................................................................................................................................49
6.6 GoTo or show a Lat/Long coordinate..............................................................................................49
6.7 Zoom in or out on a chart screen......................................................................................................50
6.8 Pan the chart............................................................................................................................................50
6.9 Zoom in or out on part of a chart screen........................................................................................50
6.10 Change the chart view.......................................................................................................................... 51
6.11 What is the chart orientation?............................................................................................................51
6.12 Change the chart orientation.............................................................................................................52
6.13 What is the vessel offset mode? ........................................................................................................52
6.14 Select the vessel offset mode.............................................................................................................53
6.15 Select the level of chart detail............................................................................................................53
6.16 Show details about an object on the chart.................................................................................... 53
6.17 Show range and bearing from your vessel....................................................................................54
6.18 Show range and bearing between two points............................................................................. 54
7 Customize the chart screen 56
7.1 What is the course predictor line? ....................................................................................................56
7.2 Show/hide the course predictor line ...............................................................................................56
7.3 Keep your vessel in view on the chart screen...............................................................................57
7.4 Select the vessel symbol ......................................................................................................................57
7.5 What is the chart guard zone?............................................................................................................57
7.6 Set up the chart guard zone ...............................................................................................................58
7.7 Turn the chart guard zone on or off.................................................................................................58
Northstar 8000i Operation Manual
7

7.8 Select the default icon for a waypoint ............................................................................................59
7.9 Select the default icon for an event mark ...................................................................................... 59
7.10 Set the deep water contour................................................................................................................59
7.11 Show/hide your current track ............................................................................................................60
7.12 Show/hide the chart boundaries ......................................................................................................60
7.13 Show/hide shade safe depths............................................................................................................ 61
7.14 Show/hide the Lat/Long grid overlay .............................................................................................61
7.15 What are light sectors? .........................................................................................................................62
7.16 Show/hide the light sectors................................................................................................................ 62
7.17 Show/hide tidal flow and currents ...................................................................................................62
8 Use the chart views 63
8.1 Default settings for the chart views .................................................................................................63
9 Use the chart overlays 65
9.1 Overlay the radar.................................................................................................................................... 65
9.2 Adjust the settings for the radar .......................................................................................................66
9.3 Change the radar mode.......................................................................................................................66
9.4 Adjust the radar opacity....................................................................................................................... 66
9.5 Overlay satellite or aerial photos ......................................................................................................67
9.6 Overlay the ports and marinas........................................................................................................... 67
9.7 Overlay roads, terrain, SAR and/or GMDSS areas ........................................................................67
10 Use waypoints 69
10.1 Create a waypoint ..................................................................................................................................69
10.2 Create an event mark............................................................................................................................69
10.3 Select and show a waypoint on the chart...................................................................................... 70
10.4 Hide a waypoint...................................................................................................................................... 70
10.5 Delete a waypoint ..................................................................................................................................70
10.6 Navigate to a waypoint ........................................................................................................................71
10.7 Stop navigating to a waypoint ..........................................................................................................71
10.8 Set/remove the warning zone for a waypoint.............................................................................. 71
10.9 Find a waypoint ......................................................................................................................................72
10.10 Display the waypoint details ..............................................................................................................72
10.11 Change the waypoint details .............................................................................................................73
10.12 Display the waypoints library............................................................................................................. 73
10.13 Delete a waypoint from the Waypoints Library...........................................................................74
11 Use routes and waypoints 75
11.1 Copy an existing route.......................................................................................................................... 75
11.2 Create a new route................................................................................................................................. 76
11.3 Move a waypoint in a route ................................................................................................................77
11.4 Add a new waypoint into a route .....................................................................................................77
11.5 Add a waypoint to the start or end of the route.......................................................................... 78
11.6 Remove a waypoint from a route using the Routes Library ....................................................79
11.7 Remove a waypoint from a route using the Chart screen........................................................ 79
11.8 Change the order of the waypoints in a route .............................................................................80
11.9 Add an existing waypoint to a route ...............................................................................................80
11.10 Display the Routes Library................................................................................................................... 81
8
Northstar 8000i Operation Manual

11.11 Select and follow a route from the Routes Library...................................................................... 81
11.12 Select and follow a route with GoTo................................................................................................ 81
11.13 Follow a route.......................................................................................................................................... 82
11.14 Navigate to the previous or next waypoint................................................................................... 82
11.15 Stop following a route ..........................................................................................................................82
11.16 Hide an inactive route........................................................................................................................... 83
11.17 Delete a route ..........................................................................................................................................83
11.18 Reverse your route.................................................................................................................................83
11.19 Display and/or change the route details ........................................................................................84
11.20 Reset the XTE on an active route or waypoint.............................................................................. 84
11.21 Set up routes to be shown or hidden ..............................................................................................85
11.22 Show the route length and estimated travel time......................................................................85
12 Set up navigation 87
12.1 Select the bearing mode...................................................................................................................... 87
12.2 Select the variation source..................................................................................................................88
12.3 Set the manual variation...................................................................................................................... 88
12.4 Select the position data format .........................................................................................................89
12.5 Set the look ahead distance to update chart ................................................................................89
12.6 Set the center circle to update chart................................................................................................90
12.7 Set the amount of time represented by the course predictor line........................................90
12.8 Set the angle delay to update the chart .........................................................................................91
12.9 Set the waypoint arrival distance...................................................................................................... 91
12.10 Select whether to continue navigating at the route end .........................................................92
13 Introduction to 3D Chart 93
13.1 Display the 3D Chart screen................................................................................................................ 93
13.2 Reposition the 3D Chart screen to show your vessel .................................................................93
13.3 Pan the 3D Chart to show new areas...............................................................................................94
13.4 Rotate the view of the 3D Chart manually.....................................................................................94
13.5 Change the azimuth setting on 3D Chart ......................................................................................94
13.6 Change the camera angle for 3D Chart...........................................................................................95
13.7 Change the elevation manually.........................................................................................................95
13.8 Enhance the vertical scale ...................................................................................................................96
13.9 Change the vessel mode...................................................................................................................... 96
13.10 Show/hide the bathymetric data......................................................................................................96
13.11 Overlay satellite or aerial photos on 3D Chart.............................................................................. 97
13.12 Synchronize 3D Chart and the chart screen..................................................................................97
14 3D Steer 99
14.1 Display the 3D Steer screen ................................................................................................................99
14.2 What does 3D Steer show?.................................................................................................................. 99
14.3 When to reset the XTE........................................................................................................................... 99
Northstar 8000i Operation Manual
9

15 The sounder 101
15.1 How the sounder works.....................................................................................................................101
16 Use the sounder 101
16.1 Display the sounder screen...............................................................................................................102
16.2 What does the sounder screen show? ..........................................................................................102
16.3 What does the sounder status bar show?....................................................................................103
16.4 Change the scroll speed.....................................................................................................................103
16.5 Change the palette..............................................................................................................................104
16.6 Show/hide the depth value ..............................................................................................................104
16.7 Show/hide the depth line..................................................................................................................105
16.8 Move the depth line ............................................................................................................................105
16.9 Change the sounder operating mode...........................................................................................105
16.10 When to use 50 kHz, 200 kHz, or mixed frequency...................................................................106
16.11 Select 50 kHz, 200 kHz or mixed frequency screen...................................................................107
16.12 Select a split 50/200 kHz screen ......................................................................................................107
16.13 Select a split zoom screen .................................................................................................................108
16.14 What is zoom range and zoom range shift?................................................................................108
16.15 Change the zoom range shift...........................................................................................................108
16.16 Select a split bottom lock screen ....................................................................................................109
16.17 Change the ratio of a split screen ...................................................................................................109
16.18 What is the A-Scope? ..........................................................................................................................110
16.19 Show/hide the A-Scope .....................................................................................................................111
16.20 Change the ratio of the A-Scope.....................................................................................................111
17 How to interpret the sounder screens 112
17.1 What are fish arches? ..........................................................................................................................112
17.2 Problems with fish arches?................................................................................................................112
17.3 How to recognize different types of fish ......................................................................................113
17.4 How to recognize and avoid shadows..........................................................................................113
17.5 How to recognize the type of bottom...........................................................................................113
17.6 How the water depth and scroll speed affect the history ......................................................113
17.7 Factors that affect the echo strength ............................................................................................114
18 Change the sounder range and gain 115
18.1 What is gain?..........................................................................................................................................115
18.2 Change the gain setting.....................................................................................................................115
18.3 What is the gain threshold? ..............................................................................................................116
18.4 Change the gain threshold ...............................................................................................................116
18.5 What is auto range and range shift? ..............................................................................................117
18.6 Turn the auto range on or off...........................................................................................................117
18.7 Change the range shift.......................................................................................................................118
18.8 Change the range.................................................................................................................................118
10
Northstar 8000i Operation Manual

19 Set up the sounder 119
19.1 Change the transducer depth..........................................................................................................119
19.2 Change the water temperature offset...........................................................................................120
19.3 Change the water temperature averaging time........................................................................120
19.4 Change the sounder's speed offset................................................................................................120
19.5 Change the sounder's speed filter..................................................................................................121
19.6 Change the zoom range.....................................................................................................................121
20 Radar 123
20.1 How the radar works ...........................................................................................................................123
20.2 What are the radar modes?...............................................................................................................123
21 Use the radar 125
21.1 Display the radar screen.....................................................................................................................125
21.2 Start the radar transmitting ..............................................................................................................125
21.3 Stop the radar transmitting ..............................................................................................................126
21.4 What does the radar screen show?.................................................................................................126
21.5 What does the radar status bar show? ..........................................................................................127
21.6 What is the radar orientation?..........................................................................................................127
21.7 Change the radar orientation...........................................................................................................128
21.8 Change the radar range offset.........................................................................................................128
21.9 Customize the position of the PPI center.....................................................................................128
21.10 Set the PPI position to Look Ahead or Center.............................................................................129
21.11 Select True or Relative Motion mode ............................................................................................129
21.12 Reset the TM position .........................................................................................................................130
22 Optimize the quality of the radar display 131
22.1 Change the radar gain mode............................................................................................................131
22.2 Change the radar gain setting .........................................................................................................132
22.3 What is sea clutter? ..............................................................................................................................132
22.4 Change the sea clutter mode ...........................................................................................................132
22.5 Change the sea clutter setting.........................................................................................................133
22.6 What is rain clutter? .............................................................................................................................133
22.7 Change the rain setting......................................................................................................................134
22.8 Reduce interference from other radars.........................................................................................134
23 Customize the radar screen 136
23.1 Change the radar palette...................................................................................................................136
23.2 Show/hide the North indicator........................................................................................................136
23.3 Show/hide the heading marker.......................................................................................................137
23.4 Show/hide the range rings................................................................................................................137
23.5 Show/hide the active waypoint on radar.....................................................................................137
23.6 Show/hide the active route on radar.............................................................................................138
23.7 Show/hide waypoint or route details on radar ..........................................................................138
Northstar 8000i Operation Manual
11

24 Measure range and bearing 139
24.1 Find range and bearing with the cursor.......................................................................................139
24.2 Show/hide a VRM/EBL ........................................................................................................................139
24.3 Find range and bearing with fixed VRM/EBL ..............................................................................140
24.4 Find range and bearing with floating VRM/EBL.........................................................................141
24.5 Set the EBL reference bearing..........................................................................................................142
25 Target presentation 143
25.1 Make small targets more easy to see.............................................................................................143
25.2 Turn off or customize target trails ..................................................................................................143
25.3 Remove target trails from the radar...............................................................................................144
26 Use the radar guard zones 145
26.1 What is a radar guard zone? .............................................................................................................145
26.2 Turn a radar guard zone on or off...................................................................................................145
26.3 Set the sensitivity of the radar guard zone alarm......................................................................146
26.4 Customize a radar guard zone.........................................................................................................146
27 Set up the radar 148
27.1 Change the radar startup mode......................................................................................................148
27.2 Change the radar antenna height ..................................................................................................148
27.3 Change the parking angle.................................................................................................................148
27.4 Change the range of the radar.........................................................................................................149
27.5 Change the radar bearing alignment............................................................................................149
28 Instruments 151
28.1 Choose how to view the instruments ...........................................................................................151
28.2 Select an instrument panel...............................................................................................................151
28.3 Rename an instrument panel...........................................................................................................151
28.4 Select the color scheme for an instrument panel .....................................................................152
28.5 Change the layout of the instrument panel................................................................................152
28.6 Resize an instrument...........................................................................................................................152
28.7 Add an instrument...............................................................................................................................153
28.8 Create an instrument panel ..............................................................................................................154
28.9 Delete an instrument ..........................................................................................................................154
28.10 Delete an instrument panel..............................................................................................................154
29 Alarms 156
29.1 Which alarms can be changed?.......................................................................................................156
29.2 View the current settings for an alarm..........................................................................................156
29.3 Turn an alarm On/Off ..........................................................................................................................157
29.4 Change the upper or lower trigger settings for an alarm.......................................................157
29.5 Set the alarm audio..............................................................................................................................157
29.6 Set the delay for an alarm..................................................................................................................158
29.7 Trigger an alarm in case of a loss of input data..........................................................................159
12
Northstar 8000i Operation Manual

29.8 View the alarm log ...............................................................................................................................159
29.9 Acknowledge one or more alarms..................................................................................................160
29.10 Reset an alarm .......................................................................................................................................161
29.11 Set an anchor alarm.............................................................................................................................161
30 Entertainment 162
30.1 Show multiple entertainment panes.............................................................................................163
30.2 What file formats are supported?....................................................................................................163
30.3 Turn the volume up or down............................................................................................................163
31 Manage your media files with a portable drive 164
31.1 Copy media files to a portable drive..............................................................................................164
31.2 Copy media files from a portable drive.........................................................................................165
31.3 Play media files from a portable drive...........................................................................................166
31.4 Delete media files from a portable drive......................................................................................166
32 Delete an item from the music library 168
33 Delete a video from the video library 169
34 Use the music jukebox 170
34.1 Select and play music from the jukebox.......................................................................................170
34.2 Pause playing music from the jukebox.........................................................................................171
34.3 Repeat the whole album or playlist in the jukebox ..................................................................171
34.4 Play the previous or next track in the music jukebox ..............................................................171
34.5 Change an album's cover art ............................................................................................................172
34.6 Create and name a new playlist.......................................................................................................172
34.7 Change a playlist...................................................................................................................................173
34.8 Play tracks randomly in the album or playlist.............................................................................173
34.9 Delete a playlist.....................................................................................................................................173
34.10 Edit an item in the music library......................................................................................................174
34.11 View the music details ........................................................................................................................174
34.12 Select and play a playlist....................................................................................................................175
34.13 Queue more music...............................................................................................................................175
35 CD/DVD options 176
35.1 Play a music CD .....................................................................................................................................176
35.2 Set random play On/Off on a music CD........................................................................................176
35.3 Select a particular track on a music CD.........................................................................................176
35.4 Set repeat play On/Off on a music CD...........................................................................................177
35.5 Play the previous or next track on a music CD ...........................................................................177
35.6 Pause playing a music CD..................................................................................................................177
35.7 Resume playing a music CD..............................................................................................................177
35.8 Stop and eject a music CD.................................................................................................................178
Northstar 8000i Operation Manual
13

36 Video jukebox options 179
36.1 Select and play a video.......................................................................................................................179
36.2 Play a video in full screen mode...................................................................................................... 180
36.3 Pause or resume playing a video ....................................................................................................180
36.4 Stop or restart a video ........................................................................................................................180
36.5 Fast forward a video............................................................................................................................180
36.6 Rewind a video......................................................................................................................................181
36.7 Set repeat play On/Off for a video..................................................................................................181
36.8 Play a different video ..........................................................................................................................181
37 DVD options 182
37.1 Play a DVD...............................................................................................................................................182
37.2 Show the DVD menu...........................................................................................................................182
37.3 Play a DVD in full screen mode........................................................................................................182
37.4 Play or resume playing a DVD..........................................................................................................183
37.5 Stop or restart a DVD...........................................................................................................................183
37.6 Play the previous or next scene on a DVD ...................................................................................183
37.7 Fast forward a DVD ..............................................................................................................................183
37.8 Rewind a DVD........................................................................................................................................184
37.9 Stop and eject a DVD ..........................................................................................................................184
38 Manage your Media Libraries 185
38.1 Change the automatic ejection setting for music CDs............................................................185
38.2 Set the volume levels for the entertainment applications.....................................................185
38.3 Set the location of the media library .............................................................................................186
39 Video Aux In 187
39.1 What video formats are supported? ..............................................................................................187
39.2 Select and play the Video Aux In source ......................................................................................187
39.3 Select the audio source for Video Aux In .....................................................................................187
39.4 Play Video Aux In in full screen mode ...........................................................................................188
40 Camera 189
40.1 What types of camera are supported? ..........................................................................................189
40.2 Add the camera to the network ......................................................................................................189
40.3 View the camera in full screen mode.............................................................................................189
41 Maintain the Northstar 8000i 190
41.1 How to clean the touch screen........................................................................................................190
41.2 How to clean a display unit...............................................................................................................190
41.3 Restore settings and information ...................................................................................................190
41.4 Calibrate the touch screen................................................................................................................190
41.5 Find the software version number .................................................................................................191
41.6 Technical support, service and repairs..........................................................................................191
41.7 Upgrading the 8000i system ............................................................................................................191
14
Northstar 8000i Operation Manual

42 Troubleshooting 193
42.1 Touch screen is inaccurate ................................................................................................................193
42.2 Camera screen goes blank or camera isn't available................................................................193
42.3 Sounder - Bottom is not displayed ................................................................................................193
42.4 Sounder shows a double bottom trace ........................................................................................193
42.5 Radar overlay doesn't appear on the chart screen....................................................................194
42.6 Radar shows random or grouped dots .........................................................................................194
42.7 Radar shows random signals in center..........................................................................................194
42.8 Radar shows different patterns on each sweep.........................................................................194
42.9 Radar shows multiple echoes off the same object....................................................................194
42.10 Radar shows arcs and/or shadows..................................................................................................194
42.11 Radar shows false echoes and/or background noise...............................................................195
42.12 Charts won't display ............................................................................................................................195
42.13 Waypoints and/or Routes aren’t shown on all the display units..........................................195
42.14 3D Chart won't display photo overlays.........................................................................................195
42.15 3D Chart photo overlays switch off................................................................................................195
42.16 Restore routes, tracks, and waypoints...........................................................................................196
42.17 Restore global settings.......................................................................................................................196
42.18 Restore local settings ..........................................................................................................................197
42.19 Gray screen with message: "Master" name unavailable.........................................................197
Glossary 198
Index 207
Man Overboard 223
Northstar 8000i Operation Manual
15

1 Welcome to the Northstar 8000i
Congratulations on your purchase of the Northstar 8000i, the revolutionary new
integrated marine electronics system. The 8000i is designed for ease of use in the
marine environment, with Touch Screen technology and Online Help.
The 8000i can integrate navigation, fishfinding, instrumentation, multimedia
entertainment, and an onboard camera. Whatever type of boat you have and
however you use it, you can customize the 8000i to meet your needs.
Flexible, modular, and innovative, the 8000i delivers awesome performance.
Please take a few minutes to read through this Northstar 8000i Quickstart Guide and
learn how to get started with your 8000i.
NOTE: The 8000i has several requirements that must be met to ensure safe and
proper operation. Installation and interfacing of the 8000i should be handled by a
marine technician using the guidelines found in the various Northstar 8000i
installation manuals.
1.1 Networking the 8000i
The 8000i can be connected to a wide variety of compatible marine devices,
including Northstar's sounder and radar. A qualified marine electronics technician
should perform these installations.
The 8000i integrated networking technology lets you connect two or more display
units in order to share navigation, sounder, radar, entertainment, and
instrumentation data. Any changes that you make to any of these functions, such
as creating a new waypoint or saving a new video in the video jukebox, are
instantly available to everyone using the 8000i.
If more than one display unit is used in the 8000i system, one of them must be
specified as the network master unit. The master unit MUST:
• have all the data wiring (such as NMEA) run to it. Incoming navigation date,
such as GPS and NMEA, is received by the master unit and then distributed
over the network to other display units.
• have the GPS antenna is connected to it.
• have the chart license key connected to it. When the chart license key is
connected and the charts unlocked, other display units can share the one
license and display the charts.
• have the autopilot (if one is fitted) connected to it.
The master unit MUST be operating in order for the other display units to function
with navigational information. The other display units are sometimes referred to
as client units.
If the master unit is NOT operating, all the other display units will show a grey
screen with the message "Master ‘‘name’’ unavailable". This will be the case for
Chart, Radar, Sounder, and 3D Chart.
16
Northstar 8000i Operation Manual

1.2 How to use this manual
The Northstar 8000i Quickstart Guide has all the basic information you need to start
operating the 8000i after it has been installed and set up. Be sure to read this
when you start using the 8000i so you can try out the various functions and see
the results.
The Northstar 8000i System Operation Manual has more detailed information about
all the different functions to help you get the most from your 8000i.
Detailed information on how to use all the 8000i functions is also available as
online help - just select Display, then Help.
1.3 Conventions
This manual uses certain conventions to provide a consistent mean of recognizing
specific information, as follows:
Text written like Radar refers to a function that's included in your 8000i, such as
the radar or the camera.
A "pane" is the part of the screen that shows an 8000i function, such as the
sounder.
A "page" is a multi-pane screen. You can have a maximum of four panes on the
screen at any one time.
The "active pane" contains the 8000i function that you're currently using; it's
identified by an orange border.
The "cursor" is the cross hair or arrow that may be shown on the screen.
"keys" are physical keys that you can depress; these may be on the surround of
your display unit or located on a remote keypad.
"buttons" are displayed graphically on the screen.
"Select ...." means touch an item on the screen, or, if you are using a remote
keypad, use the four directional arrows or the cursor control pad to move to the
item then press the confirm bar.
The "control panel" refers to the onscreen buttons that are displayed in the right
hand side of the screen. They show the options available for the selected function.
Text written like Chart refers to the names of keys and buttons.
Text written like this identifies a task, and is followed by numbered steps that
explain how to do the task.
Northstar 8000i Operation Manual
17

2 Introduction to the Northstar 8000i
This section introduces the 8000i and shows you how to use the basic
functionality.
It's best to work through this section with the 8000i set up and running so you can
2.1 Turn on the 8000i
try out the various functions and see the results.
To turn on the 8000i using a 12" Display Processor:
1. Just press the Power key to turn on the 8000i.
2. The Northstar 8000i screen appears briefly, followed by an information
screen. (This appears each time that you start the 8000i.) If you agree to
the conditions of use, select Accept Conditions of Use.
3. The Chart screen appears in a single pane. The 8000i is ready to use.
To turn on the 8000i using a 15" Monitor (preferred method):
Use this method when the Black Box Processor and the 15" Monitor are both wired
together as recommended in the 15’’ Installation Manual.
1. Press the Power key on the 15" Monitor.
2. The Northstar Marine Monitor screen may appear briefly, followed by
the Northstar 8000i screen.
3. An information screen appears. (This appears each time that you start
the 8000i.) If you agree to the conditions of use, select Accept
Conditions of Use.
4. The Chart screen appears in a single pane. The 8000i is ready to use.
To turn on the 8000i using a 15" Monitor (alternative method):
Use this method when the Black Box Processor and the 15" Monitor are wired
independently.
1. If the Black Box Processor is turned off, press the Power (ON/OFF) key
at the rear.
2. The Power LED at the rear will glow red when the Black Box Processor
is on.
3. Press the Power key on the 15" Monitor.
4. The Northstar Marine Monitor screen may appear briefly, followed by
the Northstar 8000i screen.
5. An information screen appears. (This appears each time that you start
the 8000i.) If you agree to the conditions of use, select Accept
Conditions of Use.
6. The Chart screen appears in a single pane. The 8000i is ready to use.
18
Northstar 8000i Operation Manual
2.2 Turn off the 8000i
To turn off the 8000i using a 12" Display Processor:
1. Hold down the Power key. The Northstar 8000i countdown screen
appears, then the 12" Display Processor turns off automatically. (If you
want to cancel shutdown, just release the button.)
To turn off the 8000i using a 15" Monitor (preferred method):
Use this method when the Black Box Processor and the 15" Monitor are both wired
together as recommended in the 15’’ Installation Manual.
1. Hold down the Power key on the 15" Monitor for about three seconds
to turn off the 8000i.
To turn off the 8000i using a 15" Monitor (alternative method):
Use this method when the Black Box Processor and the 15" Monitor are wired
independently.
1. Hold down the Power key on the 15" Monitor for about three seconds
to turn off the 15" Monitor.
2. Hold down the Power (ON/OFF) key at the back of the Black Box
Processor until the red Power LED goes out.
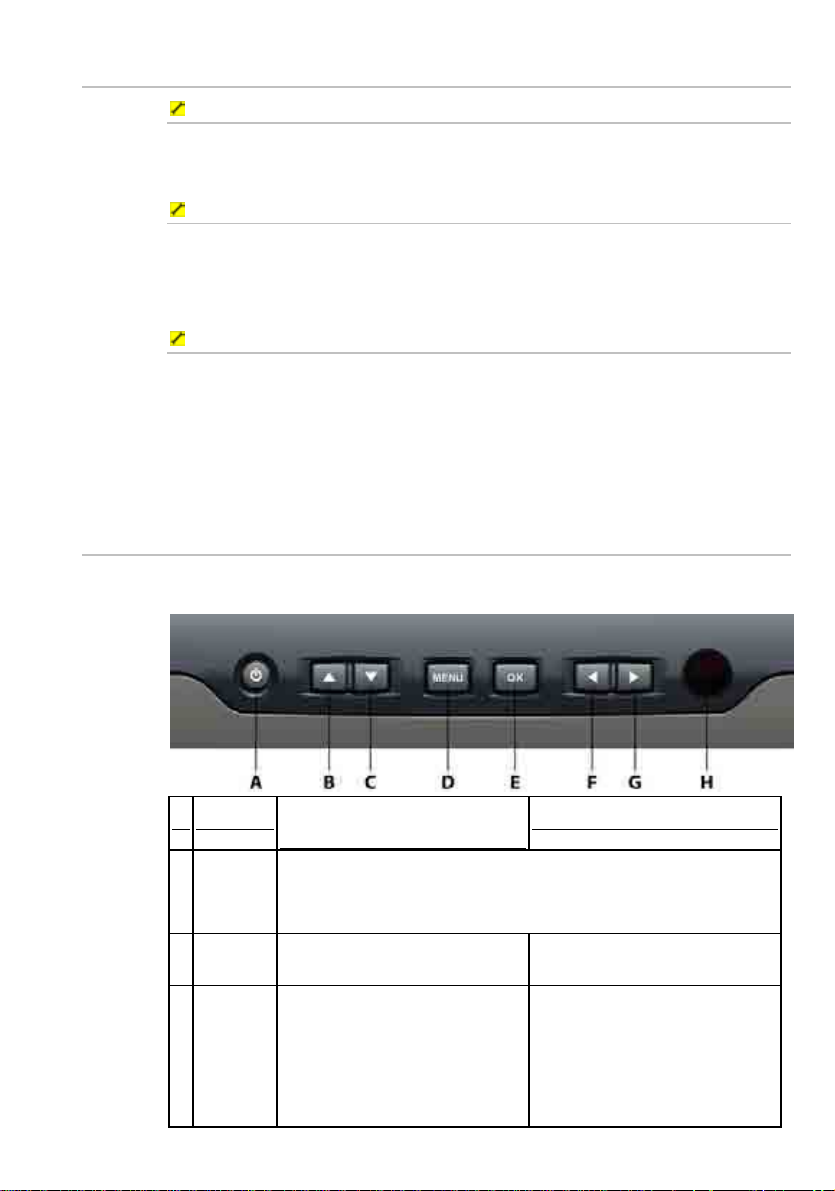
2.3 The keys on the 15 inch Monitor
The "keys" are physical keys that you can depress. The following keys are shown on
your 15" Monitor:
Key
A Power Press once to turn on. Hold down for three seconds to t urn off.
B Up Arrow Press to step up through the
C Down
Arrow
Function when NOT in
OSD mode
If correctly wired using the Remote Power On feature this key also
controls the power status of the Northstar 8000i Black Box Processor
other video input source options.
Press to show the current video
input source in the top left corner
of the screen.
Press again to step down through
the other video input source
options.
Northstar 8000i Operation Manual
Function in OSD mode
Press once to step up through
the OSD options.
Press once to step down through
the OSD options.
19

D MENU Press once to show the OSD
Press to exit the OSD options.
options.
E OK Press to show the current video
input source in the top left corner
of the screen.
F Left
Arrow
Press once to decrease the
brightness one step or hold down
to change it rapidly.
Press to select or accept changes
to the OSD options and exit the
OSD options.
Press once to change an OSD
setting (such as contrast) one
step or hold down to change the
setting rapidly.
G Right
Arrow
Press once to increase the
brightness one step or hold down
to change it rapidly.
Press once to change an OSD
setting (such as contrast) one
step or hold down to change the
setting rapidly.
H Infrared
Not yet implemented
Receiver
I Screen 1024 x 768 resolution touch screen (XGA)
J Finger
Guides
K Mounting
Bezel
To guide fingers to the onscreen controls when using the 8000i
software.
Clip-on bezel.
20
Northstar 8000i Operation Manual
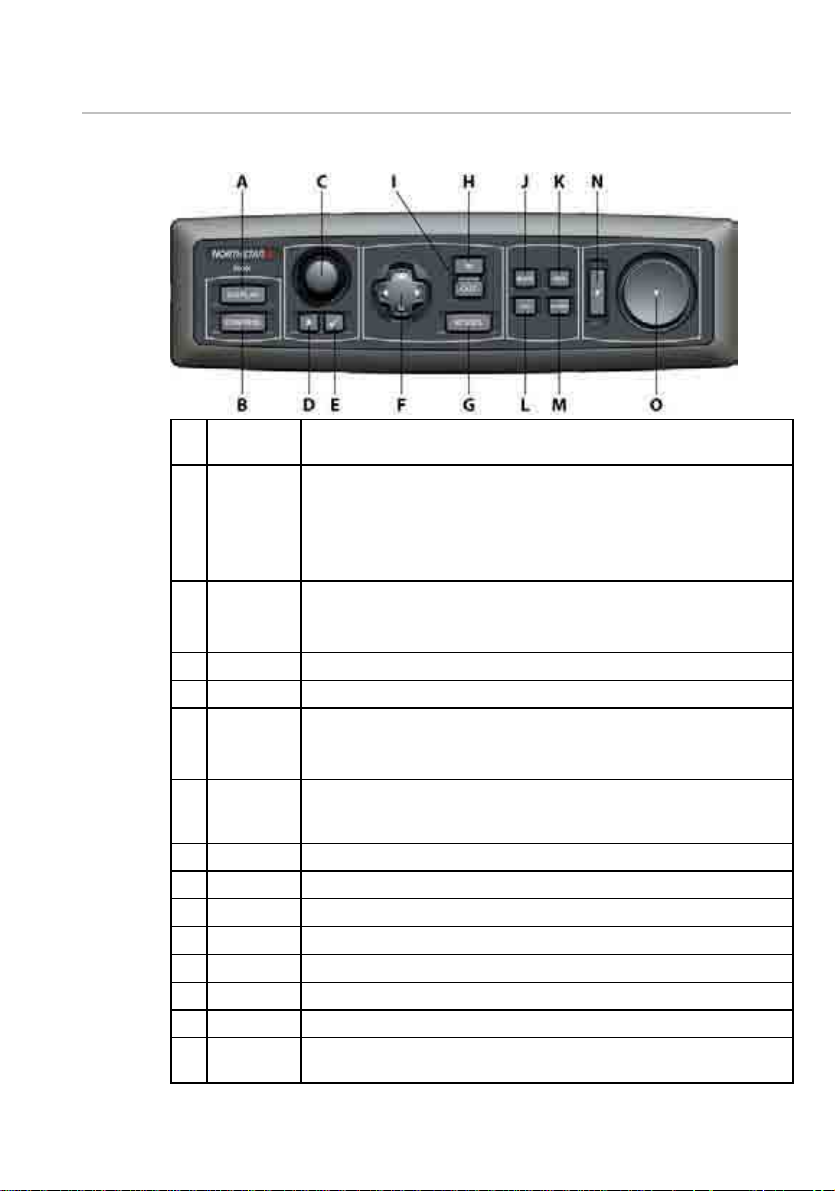
2.4 The keys on the remote keypad
The "keys" are physical keys that you can depress. The following keys are shown on
your remote keypad:
A DISPLAY Press once to show the single pane options; press again to show the
B CONTROL If the control panel is hidden, press once to show it.
C Rotary knob Turn left (counter-clockwise) to scroll down or decrease a value or
D Cancel Press to cancel or exit.
E Confirm Press to select or confirm.
F 4
directional
arrows
G VESSEL Press to return to the selected vessel offset position on your Chart
H IN Press once to zoom in one step.
I OUT Press once to zoom out one step.
J MARK Press to mark the current position with a default event mark icon.
K MOB Press to activate the Man Overboard waypoint.
L VOL Press to adjust the volume of the audio that you're playing.
M ALARM Press to show the alarm log and to set up the alarms.
N Confirm bar Press to select the chosen item on the screen.
O Cursor
control pad
page options.
On a multi-pane screen, press once to make the next pane the active
pane. Repeat if necessary.
On a multi-pane screen, where you have expanded the active pane to
full size, press to show the next pane at full size. Repeat if necessary.
setting.
Turn right (clockwise) to scroll up or increase a value or setting.
Press or hold down an arrow to move in that direction, or to move the
selection highlight.
These work only for some functions, such as Chart.
screen (Look Ahead or Center) or to remove any offset on your Radar
screen.
Press an edge to move the cursor in that direction on the screen.
Northstar 8000i Operation Manual
21
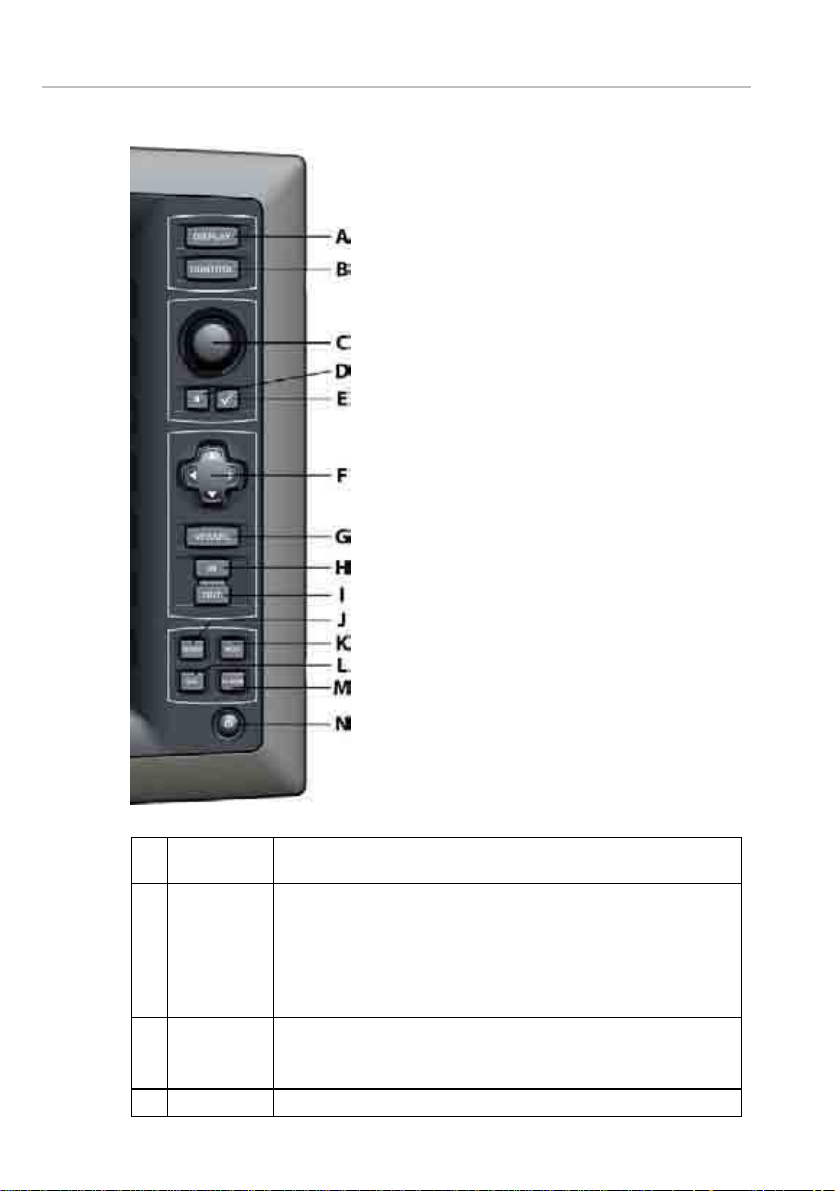
2.5 The keys on the 12 inch Display Processor
The "keys" are physical keys that you can depress. The following keys are shown on
your 12" Display Processor:
A DISPLAY Press once to show the single pane options; press again to show the
B CONTROL If the control panel is hidden, press once to show it.
C Rotary knob Turn left (counter-clockwise) to scroll down or decrease a value or
D Cancel Press to cancel or exit.
22
page options.
On a multi-pane screen, press once to make the next pane the active
pane. Repeat if necessary.
On a multi-pane screen, where you have expanded the active pane
to full size, press to show the next pane at full size. Repeat if
necessary.
setting.
Turn right (clockwise) to scroll up or increase a value or setting.
Northstar 8000i Operation Manual
E Confirm Press to select or confirm.
F 4 directional
arrows
G VESSEL Press to return to the selected vessel offset position on your Chart
H IN Press once to zoom in one step.
I OUT Press once to zoom out one step.
J MARK Press to mark the current position with a default event mark icon.
K MOB Press to activate the Man Overboard sequence.
L VOL Press to adjust the volume of the audio that you're playing.
M ALARM Press to show the alarm log and to set up the alarms.
N Power Press to power On. Hold down for about ten seconds to power Off.
2.6 The buttons
Buttons are displayed graphically on the screen. There are two groups of buttons:
• Page buttons are shown along the bottom of the screen. Just select a button
to show that function or page.
• Control panel buttons are shown down the right hand side of the screen
when a function is active. The names of the buttons will vary, depending on
the function that you're using. Use these buttons to manage the function.
NOTE: If you can't see the buttons because a pane has been set to maximum view
(for example, when you're viewing a video or DVD) just touch anywhere on the
screen or select Control to re-display the control panel.
Press or hold down an arrow to move in that direction. These work
only for some functions, such as Chart.
screen (Look Ahead or Center) or to remove any offset on your Radar
screen.
2.7 How to select an item
To select an item with the touch screen:
1. Just touch the item gently on the screen.
To select an item with the remote keypad:
1. Use the cursor control pad to move to the item you want to select,
then press the confirm bar.
2.8 Single pane options
You can use the 8000i to view a single function, such as the Chart screen, in one
single pane that takes up the whole screen.
To see the choice of full size, single pane screens:
1. Select Display to see the single pane screen functions available on
your 8000i.
Northstar 8000i Operation Manual
23

2. Some of these functions require extra components to be installed
(such as a radar) and some functions must be linked to other Northstar
or third party equipment. These functions can include:
Chart
3D Chart
3D Steer
Radar (you must set this up before using it)
Sounder (you must set this up before using it)
Position
Instruments
Camera (available only when an onboard camera is connected)
Help (displays this manual on the screen)
Music CD
Music JB (you'll need to store music in the jukebox before using it)
Video JB (you'll need to store videos in the jukebox before using it)
DVD
Video Aux In
3. If you select one of these functions and if it is available, it'll immediately
expand to fill most of the screen. Just select Display again to close
the function.
2.9 What is the active pane?
The active pane shows the 8000i function that you're currently using. It's identified
by an orange border.
It's possible to have a maximum of four panes showing four different functions on
the 8000i screen at any one time, but only one of these can be active.
Just select a pane to make it active. The control panel on the right hand side of the
screen changes to show the options for that function.
2.10 What are pages?
A page is any one of up to nine preset favorite screen displays. They can be single
or multi-page screens. Just select Pages to see the selection.
A multi-page screen contains two, three, or four functions all shown on the screen
at the same time in individual panes; this example shows the Chart screen, the
Radar screen, and the Sounder screen simultaneously.
24
Northstar 8000i Operation Manual

You can select your own combination of functions, or you can use the default
pages that are already set up for your convenience and designed to suit different
activities such as cruising or fishing.
You can configure the pages in various ways to suit your own preferences:
• Single - a single pane
• Bi - two equal size panes, side by side
• Tri - one large pane and two smaller panes
• ThreeToOne - one large pane and three small panes
• Quad - four equal size panes
To change the configuration of a page, (see "Edit a page" page 26)
2.11 Expand a small pane
This works only when a page with more than one pane is displayed.
To expand a pane:
1. Select the pane that you want to expand. This becomes the active
pane, identified by an orange border.
2. Select Max. The active pane expands into a single pane.
To shrink the pane:
1. Select Min to return to the multi-pane display.
2.12 Cycle through the panes on a page
This works only when a page with more than one pane is displayed. Use this to
cycle quickly through each pane at full size.
Northstar 8000i Operation Manual
25

To cycle through the panes on a page:
1. When the page is displayed, select Max from the top of the screen.
The active pane expands into a single pane.
2. Select Control. The 8000i makes the next pane active, and displays it
as a single pane at full size.
3. Select Control again to make the next pane active, and to display
this as a single page at full size. Repeat this to cycle through each of
the panes as often as you want.
4. When you want to display the page with all the panes visible on one
screen again, select Min.
2.13 Select a page
You can view a single function in a page; or two, three, or four functions in a multipane page.
To select a page:
1. The favorite five pages are shown as buttons along the bottom of the
screen. Just select a button to have the 8000i immediately display that
page. (The factory default favorite pages are Chart, Radar,
Sounder, Cruising, and Fishing.)
2. You can also:
select Pages to see all the pages that are available, then select a
page.
select Display, select Display again to show all the pages, then
select a page.
2.14 Edit a page
You can use this to change the layout and the contents of a page.
To edit a page:
1. Select Display, then select Pages.
2. Select Edit Pages from the control panel. The 8000i displays the
Select Page box and asks you to select the page to edit.
3. Select the page that you want to edit, then select Next from the
control panel.
4. Select the type of layout, then select Next again. You can:
choose the content for each pane (select a pane, then choose the
change the page's name (select EDIT, then enter the new name
show or hide the instrument bar on the page (select the check box
5. Select Save. The new setting is applied immediately and stays until
you change it again.
26
function to be displayed in that pane from the list)
using the online keyboard and select OK)
to toggle to the other setting if necessary)
Northstar 8000i Operation Manual

3 Set up the Northstar 8000i basics
The following items should already be set up as part of the installation process,
but you can change any of these to suit your own preferences and local
conditions.
You can:
• adjust the brightness of the display unit
• turn the keyboard beeps on or off
• turn the keyboard backlight on or off
• adjust the volume
• choose a palette to suit day time, night time, or twilight
• show or hide the control panel
• show or hide the instruments bar
• show/hide the top control bar
• specify your vessel's statistics, such as the cruising speed
You can also select your choice of:
• time format and time zone
• distance units for large scale and small scale measurements
3.1 Adjust the brightness on the 15 inch Monitor
• units for temperature, depth, speed, liquid volume, and pressure.
To adjust the brightness on the 15" Monitor:
1. Press the left arrow key to decrease the brightness, or the right arrow
key to increase the brightness. If you hold down an arrow key, the
brightness changes more quickly.
2. When the brightness is at the correct level, wait for a few seconds until
the 8000i screen is re-displayed. The new setting is applied
immediately and stays until you change it again.
3.2 Adjust the brightness on a 12 inch Display Processor
The brightness on the 8000i can be adjusted to allow for various lighting
situations. For night time, the backlight can be turned down to aid night vision.
To adjust the backlight brightness
1. Briefly press the 8000i processor power key to bring up the onscreen
display.
2. Select brightness control.
3. Use the rotary knob to adjust the brightness, then either:
wait until the 8000i exits the onscreen display automatically, or
select the Exit option (using the down arrow) then press the
Confirm key.
Northstar 8000i Operation Manual
27

3.3 Turn the keypad beeps on or off
You can have the 8000i beeps On or Off. On is the default.
To turn the beeps on or off:
1. Select Display.
2. Select Setup from the control panel.
3. Select + System to display a list of system specification options.
4. The Keyboard Beeps check box shows the current setting.
5. Select the check box if you want to toggle to the other setting. The
new setting is applied immediately and stays until you change it again.
6. When you are finished, select – System.
Alternatively:
1. If you are using a 12" Display Processor, press the Power key briefly
to display a list of options, then use the directional arrows to select
Key Beep. Use the Confirm or Cancel keys to change the setting.
2. When you are finished, use the directional keys to select Exit, then
select the Confirm key.
3.4 Turn the keypad backlight on or off
You can have the backlight On or Off. On is the default.
To turn the backlight on or off:
1. Select Display.
2. Select Setup from the control panel.
3. Select + System to display a list of system specification options.
4. The Keyboard Backlight check box shows the current setting.
5. Select the check box if you want to toggle to the other setting. The
new setting is applied immediately and stays until you change it again.
6. When you are finished, select – System.
Alternatively:
1. If you are using a 12" Display Processor, press the Power key briefly
to display a list of options, then use the directional arrows to select
Key Backlight. Use the rotary knob to change the setting.
3.5 Adjust the volume
To adjust the volume of the audio that you're playing:
1. Select VOL. The 8000i shows the current volume setting as a line
within a solid box of color and as a percentage.
2. Drag the line, or use the rotary knob to change the volume setting,
28
then select OK.
Northstar 8000i Operation Manual

3.6 Select a palette
You can select a palette to suit sunlight, daytime, or night time conditions.
To select a palette:
1. Select Display. The Palette button shows the current setting.
Select the button if you want to change the setting and a list of choices
appears.
2. Select the new setting. The new setting is applied immediately and
stays until you change it again.
3.7 Show/hide the control panel
You can show or hide the control panel (the buttons down the right hand side of
the screen) when you're using a function.
Show is the default.
To hide the control panel:
1. Select Display, then select Hide Control Panel.
To show the control panel:
1. Select Display, then select Control.
3.8 Show/hide the instruments bar
You can show or hide the instruments bar along the bottom of the screen.
To show the instruments bar:
1. Select Display, then select Show Instruments Bar.
To hide the instruments bar:
1. Select Display, then select Hide Instruments Bar.
3.9 Show/hide the top control bar
You can choose whether to show or hide the top control bar along the top of the
screen. (The buttons in the top control bar duplicate the keys.)
If you change this setting, the 8000i will restart automatically.
To show or hide the top control bar:
1. Select Display, then select Setup from the control panel.
2. Select +Installation to display the installation specification
options.
3. The Display Top Control Bar check box shows the current
setting.
4. Select the check box if you want to toggle to the other setting. The
8000i restarts automatically and the new setting stays until you change
it again.
Northstar 8000i Operation Manual
29
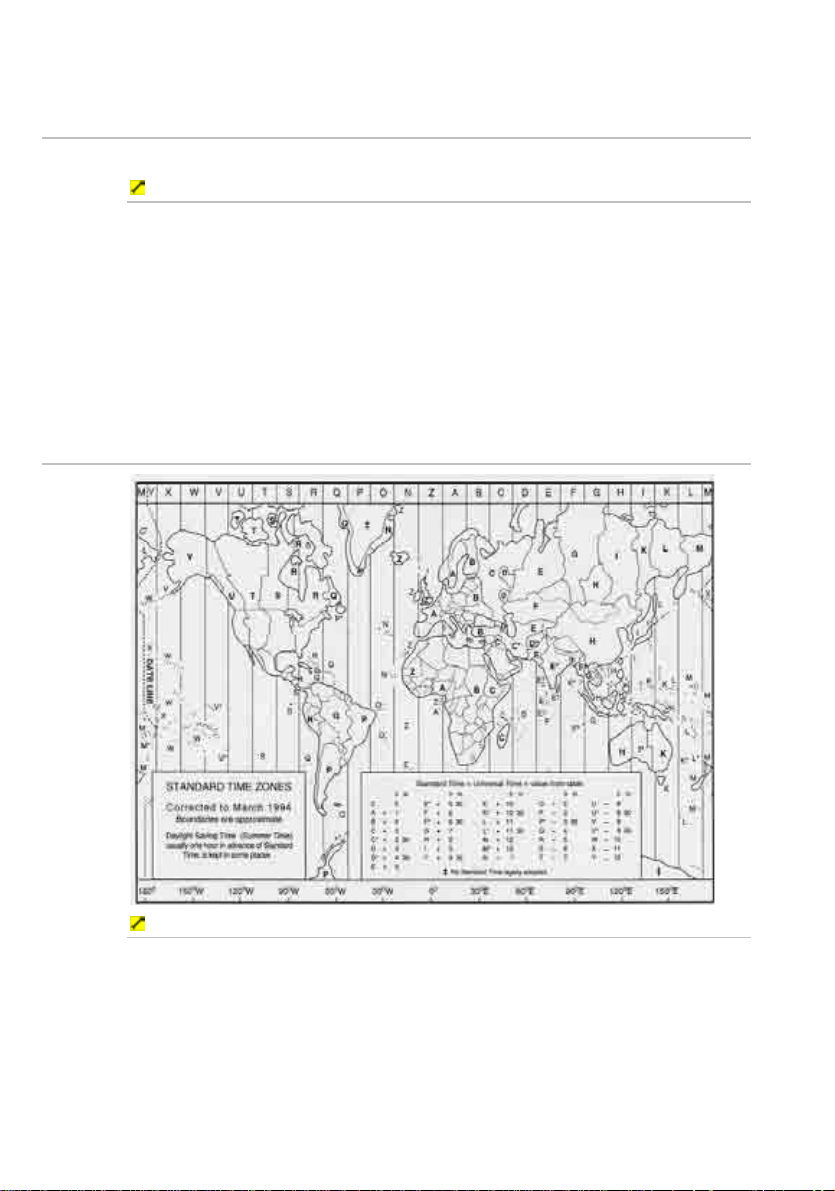
5. When you are finished, select – Installation.
3.10 Select the time format
You can use the 12 hour or 24 hour time format. 24 hour is the default.
To select the time format:
1. Select Display.
2. Select Setup from the control panel.
3. Select + System to display a list of system specification options.
4. The Time Format button shows the current setting. Select the
button if you want to change the setting and a list of choices appears.
5. Select the new setting. The new setting is applied immediately and
stays until you change it again.
6. When you are finished, select – System.
3.11 Select your time zone
To select your time zone:
1. Select Display.
2. Select Setup from the control panel.
3. Select + System to display a list of system specification options.
4. The Time Zone button shows the current setting offset from GMT.
Select EDIT if you want to change the setting and enter the offset
using the onscreen keyboard.
30
Northstar 8000i Operation Manual
 Loading...