


Contents
List of Figures . . . . . . . . . . . . . . . . . . . . . . . . . . . . . . . . . . . . . . . . . . . . . . . . . . . . . . . . . . . . . . . . . . . . . . . . . . vii
List of Tables. . . . . . . . . . . . . . . . . . . . . . . . . . . . . . . . . . . . . . . . . . . . . . . . . . . . . . . . . . . . . . . . . . . . . . . . . . . ix
List of Screens. . . . . . . . . . . . . . . . . . . . . . . . . . . . . . . . . . . . . . . . . . . . . . . . . . . . . . . . . . . . . . . . . . . . . . . . . . xi
Chapter 1: Quick Start . . . . . . . . . . . . . . . . . . . . . . . . . . . . . . . . . . . . . . . . . . . . . . . . . . . . . . . . . . . . . . . . . 1-1
Welcome. . . . . . . . . . . . . . . . . . . . . . . . . . . . . . . . . . . . . . . . . . . . . . . . . . . . . . . . . . . . . . . . .1-2
Technical support . . . . . . . . . . . . . . . . . . . . . . . . . . . . . . . . . . . . . . . . . . . . . . . . . . . . . . . . . 1-7
Turning the system on. . . . . . . . . . . . . . . . . . . . . . . . . . . . . . . . . . . . . . . . . . . . . . . . . . . . . 1-9
Turning the system off. . . . . . . . . . . . . . . . . . . . . . . . . . . . . . . . . . . . . . . . . . . . . . . . . . . .1-13
Basic navigation terminology . . . . . . . . . . . . . . . . . . . . . . . . . . . . . . . . . . . . . . . . . . . . . .1-14
Highlight One: Basic navigation terms . . . . . . . . . . . . . . . . . . . . . . . . . . . . . . . . . . . . . .1-15
Introducing the function keys . . . . . . . . . . . . . . . . . . . . . . . . . . . . . . . . . . . . . . . . . . . . .1-16
Using the chart-view screens . . . . . . . . . . . . . . . . . . . . . . . . . . . . . . . . . . . . . . . . . . . . . .1-17
Navigating to a point . . . . . . . . . . . . . . . . . . . . . . . . . . . . . . . . . . . . . . . . . . . . . . . . . . . . .1-24
Reading and clearing alarm messages. . . . . . . . . . . . . . . . . . . . . . . . . . . . . . . . . . . . . . .1-30
Chapter 2: Introducing the 961/962 . . . . . . . . . . . . . . . . . . . . . . . . . . . . . . . . . . . . . . . . . . . . . . . . . . . 2-1
System overview . . . . . . . . . . . . . . . . . . . . . . . . . . . . . . . . . . . . . . . . . . . . . . . . . . . . . . . . . .2-2
Introducing the controls . . . . . . . . . . . . . . . . . . . . . . . . . . . . . . . . . . . . . . . . . . . . . . . . . . .2-6
Entering data . . . . . . . . . . . . . . . . . . . . . . . . . . . . . . . . . . . . . . . . . . . . . . . . . . . . . . . . . . . . .2-7
Caring for the system . . . . . . . . . . . . . . . . . . . . . . . . . . . . . . . . . . . . . . . . . . . . . . . . . . . . . .2-8
About interfacing the system . . . . . . . . . . . . . . . . . . . . . . . . . . . . . . . . . . . . . . . . . . . . . .2-10
Introducing GPS and DGPS . . . . . . . . . . . . . . . . . . . . . . . . . . . . . . . . . . . . . . . . . . . . . . . .2-11
Chapter 3: Using the Controls . . . . . . . . . . . . . . . . . . . . . . . . . . . . . . . . . . . . . . . . . . . . . . . . . . . . . . . . . 3-1
More navigation terminology . . . . . . . . . . . . . . . . . . . . . . . . . . . . . . . . . . . . . . . . . . . . . . .3-2
Highlight Two: More navigation terms. . . . . . . . . . . . . . . . . . . . . . . . . . . . . . . . . . . . . . .3-2
PWR key . . . . . . . . . . . . . . . . . . . . . . . . . . . . . . . . . . . . . . . . . . . . . . . . . . . . . . . . . . . . . . . . .3-3
Function keys . . . . . . . . . . . . . . . . . . . . . . . . . . . . . . . . . . . . . . . . . . . . . . . . . . . . . . . . . . . . 3-5
Brightness key . . . . . . . . . . . . . . . . . . . . . . . . . . . . . . . . . . . . . . . . . . . . . . . . . . . . . . . . . . .3-27
SAVE key. . . . . . . . . . . . . . . . . . . . . . . . . . . . . . . . . . . . . . . . . . . . . . . . . . . . . . . . . . . . . . . .3-28
MOB key . . . . . . . . . . . . . . . . . . . . . . . . . . . . . . . . . . . . . . . . . . . . . . . . . . . . . . . . . . . . . . . .3-28
IN and OUT keys. . . . . . . . . . . . . . . . . . . . . . . . . . . . . . . . . . . . . . . . . . . . . . . . . . . . . . . . .3-31
Cursor pad . . . . . . . . . . . . . . . . . . . . . . . . . . . . . . . . . . . . . . . . . . . . . . . . . . . . . . . . . . . . . .3-31
Arrow keys . . . . . . . . . . . . . . . . . . . . . . . . . . . . . . . . . . . . . . . . . . . . . . . . . . . . . . . . . . . . . .3-32
Menu keys . . . . . . . . . . . . . . . . . . . . . . . . . . . . . . . . . . . . . . . . . . . . . . . . . . . . . . . . . . . . . .3-33
961/962 Operations and Reference Manual, Rev. A Page iii

Chapter 4: Understanding the Chart Screen . . . . . . . . . . . . . . . . . . . . . . . . . . . . . . . . . . . . . . . . . . . 4-1
Understanding electronic charts . . . . . . . . . . . . . . . . . . . . . . . . . . . . . . . . . . . . . . . . . . . . 4-2
Understanding the chart screen . . . . . . . . . . . . . . . . . . . . . . . . . . . . . . . . . . . . . . . . . . . . .4-2
Displaying your vessel’s position on a chart . . . . . . . . . . . . . . . . . . . . . . . . . . . . . . . . . . 4-4
Functions performed at the chart screen . . . . . . . . . . . . . . . . . . . . . . . . . . . . . . . . . . . . . 4-4
Using the cursor on the chart screen . . . . . . . . . . . . . . . . . . . . . . . . . . . . . . . . . . . . . . .4-17
Chapter 5: Understanding Position Coordinates . . . . . . . . . . . . . . . . . . . . . . . . . . . . . . . . . . . . . . . 5-1
Using GPS to determine position . . . . . . . . . . . . . . . . . . . . . . . . . . . . . . . . . . . . . . . . . . . .5-2
Using DGPS to determine position. . . . . . . . . . . . . . . . . . . . . . . . . . . . . . . . . . . . . . . . . . .5-4
Understanding Loran-C . . . . . . . . . . . . . . . . . . . . . . . . . . . . . . . . . . . . . . . . . . . . . . . . . . . . 5-7
Using Phantom loran to determine position . . . . . . . . . . . . . . . . . . . . . . . . . . . . . . . . .5-10
Chapter 6: Creating Waypoints . . . . . . . . . . . . . . . . . . . . . . . . . . . . . . . . . . . . . . . . . . . . . . . . . . . . . . . . 6-1
Introducing waypoints . . . . . . . . . . . . . . . . . . . . . . . . . . . . . . . . . . . . . . . . . . . . . . . . . . . . . 6-2
Displaying waypoints . . . . . . . . . . . . . . . . . . . . . . . . . . . . . . . . . . . . . . . . . . . . . . . . . . . . . . 6-3
Sorting the list of waypoints . . . . . . . . . . . . . . . . . . . . . . . . . . . . . . . . . . . . . . . . . . . . . . . .6-6
Searching for a waypoint . . . . . . . . . . . . . . . . . . . . . . . . . . . . . . . . . . . . . . . . . . . . . . . . . . .6-7
Creating a new waypoint . . . . . . . . . . . . . . . . . . . . . . . . . . . . . . . . . . . . . . . . . . . . . . . . . . .6-8
Editing a waypoint . . . . . . . . . . . . . . . . . . . . . . . . . . . . . . . . . . . . . . . . . . . . . . . . . . . . . . .6-14
Erasing a waypoint . . . . . . . . . . . . . . . . . . . . . . . . . . . . . . . . . . . . . . . . . . . . . . . . . . . . . . .6-16
Changing the display of coordinates. . . . . . . . . . . . . . . . . . . . . . . . . . . . . . . . . . . . . . . .6-16
Chapter 7: Creating Avoidance Points . . . . . . . . . . . . . . . . . . . . . . . . . . . . . . . . . . . . . . . . . . . . . . . . . 7-1
Introducing avoidance points . . . . . . . . . . . . . . . . . . . . . . . . . . . . . . . . . . . . . . . . . . . . . . .7-2
Displaying avoidance points . . . . . . . . . . . . . . . . . . . . . . . . . . . . . . . . . . . . . . . . . . . . . . . .7-3
Sorting the list of avoidance points . . . . . . . . . . . . . . . . . . . . . . . . . . . . . . . . . . . . . . . . . .7-7
Searching for an avoidance point. . . . . . . . . . . . . . . . . . . . . . . . . . . . . . . . . . . . . . . . . . . .7-8
Creating a new avoidance point . . . . . . . . . . . . . . . . . . . . . . . . . . . . . . . . . . . . . . . . . . . . . 7-9
Editing an avoidance point . . . . . . . . . . . . . . . . . . . . . . . . . . . . . . . . . . . . . . . . . . . . . . . .7-13
Erasing an avoidance point . . . . . . . . . . . . . . . . . . . . . . . . . . . . . . . . . . . . . . . . . . . . . . . .7-14
Changing the display of coordinates. . . . . . . . . . . . . . . . . . . . . . . . . . . . . . . . . . . . . . . .7-15
Chapter 8: Creating Routes. . . . . . . . . . . . . . . . . . . . . . . . . . . . . . . . . . . . . . . . . . . . . . . . . . . . . . . . . . . . 8-1
Introducing routes . . . . . . . . . . . . . . . . . . . . . . . . . . . . . . . . . . . . . . . . . . . . . . . . . . . . . . . .8-2
Displaying routes . . . . . . . . . . . . . . . . . . . . . . . . . . . . . . . . . . . . . . . . . . . . . . . . . . . . . . . . .8-3
Sorting the list of routes. . . . . . . . . . . . . . . . . . . . . . . . . . . . . . . . . . . . . . . . . . . . . . . . . . . .8-6
Searching for a route . . . . . . . . . . . . . . . . . . . . . . . . . . . . . . . . . . . . . . . . . . . . . . . . . . . . . .8-7
Creating a new route . . . . . . . . . . . . . . . . . . . . . . . . . . . . . . . . . . . . . . . . . . . . . . . . . . . . . .8-8
Editing a route . . . . . . . . . . . . . . . . . . . . . . . . . . . . . . . . . . . . . . . . . . . . . . . . . . . . . . . . . . .8-17
Erasing a route. . . . . . . . . . . . . . . . . . . . . . . . . . . . . . . . . . . . . . . . . . . . . . . . . . . . . . . . . . .8-24
Page iv 961/962 Operations and Reference Manual, Rev. A

Chapter 9: Creating Tracks . . . . . . . . . . . . . . . . . . . . . . . . . . . . . . . . . . . . . . . . . . . . . . . . . . . . . . . . . . . . 9-1
Introducing tracks. . . . . . . . . . . . . . . . . . . . . . . . . . . . . . . . . . . . . . . . . . . . . . . . . . . . . . . . .9-2
Displaying tracks. . . . . . . . . . . . . . . . . . . . . . . . . . . . . . . . . . . . . . . . . . . . . . . . . . . . . . . . . .9-3
Sorting the list of tracks . . . . . . . . . . . . . . . . . . . . . . . . . . . . . . . . . . . . . . . . . . . . . . . . . . . .9-6
Creating a new track . . . . . . . . . . . . . . . . . . . . . . . . . . . . . . . . . . . . . . . . . . . . . . . . . . . . . .9-7
Editing a track . . . . . . . . . . . . . . . . . . . . . . . . . . . . . . . . . . . . . . . . . . . . . . . . . . . . . . . . . . .9-10
Erasing a track . . . . . . . . . . . . . . . . . . . . . . . . . . . . . . . . . . . . . . . . . . . . . . . . . . . . . . . . . . .9-12
Chapter 10: Waypoint and Route Navigation. . . . . . . . . . . . . . . . . . . . . . . . . . . . . . . . . . . . . . . . . 10-1
Steering to a waypoint . . . . . . . . . . . . . . . . . . . . . . . . . . . . . . . . . . . . . . . . . . . . . . . . . . . .10-2
Navigating from the routes screen . . . . . . . . . . . . . . . . . . . . . . . . . . . . . . . . . . . . . . . . .10-6
Navigating from the chart screen . . . . . . . . . . . . . . . . . . . . . . . . . . . . . . . . . . . . . . . . 10-10
Navigating from the waypoints screen . . . . . . . . . . . . . . . . . . . . . . . . . . . . . . . . . . . . 10-17
Restarting the track . . . . . . . . . . . . . . . . . . . . . . . . . . . . . . . . . . . . . . . . . . . . . . . . . . . . 10-19
Chapter 11: Using the Trip Function . . . . . . . . . . . . . . . . . . . . . . . . . . . . . . . . . . . . . . . . . . . . . . . . . . 11-1
Introducing the trip function . . . . . . . . . . . . . . . . . . . . . . . . . . . . . . . . . . . . . . . . . . . . . .11-2
Displaying the trip . . . . . . . . . . . . . . . . . . . . . . . . . . . . . . . . . . . . . . . . . . . . . . . . . . . . . . .11-3
Changing the trip . . . . . . . . . . . . . . . . . . . . . . . . . . . . . . . . . . . . . . . . . . . . . . . . . . . . . . . .11-5
Saving the trip as a route. . . . . . . . . . . . . . . . . . . . . . . . . . . . . . . . . . . . . . . . . . . . . . . . 11-11
Erasing the trip . . . . . . . . . . . . . . . . . . . . . . . . . . . . . . . . . . . . . . . . . . . . . . . . . . . . . . . . 11-12
Restarting the track at the trip screen . . . . . . . . . . . . . . . . . . . . . . . . . . . . . . . . . . . . . 11-14
Stopping navigation . . . . . . . . . . . . . . . . . . . . . . . . . . . . . . . . . . . . . . . . . . . . . . . . . . . . 11-15
Chapter 12: Alarms, TideTrack, Currents, and Echo Sounding. . . . . . . . . . . . . . . . . . . . . . . . . 12-1
Understanding alarms . . . . . . . . . . . . . . . . . . . . . . . . . . . . . . . . . . . . . . . . . . . . . . . . . . . .12-2
Understanding the TideTrack function. . . . . . . . . . . . . . . . . . . . . . . . . . . . . . . . . . . . 12-11
Understanding the currents function . . . . . . . . . . . . . . . . . . . . . . . . . . . . . . . . . . . . . 12-15
Adding the echo sounder overlay . . . . . . . . . . . . . . . . . . . . . . . . . . . . . . . . . . . . . . . . 12-19
Chapter 13: Customizing Setup Functions . . . . . . . . . . . . . . . . . . . . . . . . . . . . . . . . . . . . . . . . . . . . 13-1
Changing the display setup. . . . . . . . . . . . . . . . . . . . . . . . . . . . . . . . . . . . . . . . . . . . . . . .13-2
Changing navigation setup . . . . . . . . . . . . . . . . . . . . . . . . . . . . . . . . . . . . . . . . . . . . . . 13-10
Changing the chart setup . . . . . . . . . . . . . . . . . . . . . . . . . . . . . . . . . . . . . . . . . . . . . . . 13-24
Loading, updating, and deleting charts. . . . . . . . . . . . . . . . . . . . . . . . . . . . . . . . . . . . 13-35
Using demo mode . . . . . . . . . . . . . . . . . . . . . . . . . . . . . . . . . . . . . . . . . . . . . . . . . . . . . . 13-69
Viewing the time information screen . . . . . . . . . . . . . . . . . . . . . . . . . . . . . . . . . . . . . 13-72
Chapter 14: Service and Maintenance Functions . . . . . . . . . . . . . . . . . . . . . . . . . . . . . . . . . . . . . 14-1
Service functions . . . . . . . . . . . . . . . . . . . . . . . . . . . . . . . . . . . . . . . . . . . . . . . . . . . . . . . . .14-2
Maintenance functions . . . . . . . . . . . . . . . . . . . . . . . . . . . . . . . . . . . . . . . . . . . . . . . . . 14-17
961/962 Operations and Reference Manual, Rev. A Page v

961/962 Features and Specifications . . . . . . . . . . . . . . . . . . . . . . . . . . . . . . . . . . . . . . . . . . . . . . . . A-1
Navigation . . . . . . . . . . . . . . . . . . . . . . . . . . . . . . . . . . . . . . . . . . . . . . . . . . . . . . . . . . . . . . A-1
Position data . . . . . . . . . . . . . . . . . . . . . . . . . . . . . . . . . . . . . . . . . . . . . . . . . . . . . . . . . . . . A-2
Steer screens . . . . . . . . . . . . . . . . . . . . . . . . . . . . . . . . . . . . . . . . . . . . . . . . . . . . . . . . . . . . A-2
Waypoint and route management . . . . . . . . . . . . . . . . . . . . . . . . . . . . . . . . . . . . . . . . . . A-2
Waypoint navigation . . . . . . . . . . . . . . . . . . . . . . . . . . . . . . . . . . . . . . . . . . . . . . . . . . . . . A-3
Trip functions . . . . . . . . . . . . . . . . . . . . . . . . . . . . . . . . . . . . . . . . . . . . . . . . . . . . . . . . . . . A-3
Echo sounder . . . . . . . . . . . . . . . . . . . . . . . . . . . . . . . . . . . . . . . . . . . . . . . . . . . . . . . . . . . . A-4
Miscellaneous functions . . . . . . . . . . . . . . . . . . . . . . . . . . . . . . . . . . . . . . . . . . . . . . . . . . A-4
GPS receiver . . . . . . . . . . . . . . . . . . . . . . . . . . . . . . . . . . . . . . . . . . . . . . . . . . . . . . . . . . . . . A-4
DGPS receiver (961XD/962XD) . . . . . . . . . . . . . . . . . . . . . . . . . . . . . . . . . . . . . . . . . . . . . A-5
Interfacing . . . . . . . . . . . . . . . . . . . . . . . . . . . . . . . . . . . . . . . . . . . . . . . . . . . . . . . . . . . . . . A-6
Physical features . . . . . . . . . . . . . . . . . . . . . . . . . . . . . . . . . . . . . . . . . . . . . . . . . . . . . . . . . A-6
Options . . . . . . . . . . . . . . . . . . . . . . . . . . . . . . . . . . . . . . . . . . . . . . . . . . . . . . . . . . . . . . . . . A-7
Warranty. . . . . . . . . . . . . . . . . . . . . . . . . . . . . . . . . . . . . . . . . . . . . . . . . . . . . . . . . . . . . . . . A-8
GPS Antenna . . . . . . . . . . . . . . . . . . . . . . . . . . . . . . . . . . . . . . . . . . . . . . . . . . . . . . . . . . . . A-8
GPS/DGPS Combination Antenna . . . . . . . . . . . . . . . . . . . . . . . . . . . . . . . . . . . . . . . . . . A-8
Glossary . . . . . . . . . . . . . . . . . . . . . . . . . . . . . . . . . . . . . . . . . . . . . . . . . . . . . . . . . . . . . . . . . . . . . . . . . . . . . G-1
Index . . . . . . . . . . . . . . . . . . . . . . . . . . . . . . . . . . . . . . . . . . . . . . . . . . . . . . . . . . . . . . . . . . . . . . . . . . . . . . . . . I-1
Page vi 961/962 Operations and Reference Manual, Rev. A

List of Figures
Figure 1: 961/962 function keys . . . . . . . . . . . . . . . . . . . . . . . . . . . . . . . . . . . . . . . . . . . . . .1-16
Figure 2: 961/962 controls . . . . . . . . . . . . . . . . . . . . . . . . . . . . . . . . . . . . . . . . . . . . . . . . . . . .2-7
Figure 3: GPS satellites communicating with vessel . . . . . . . . . . . . . . . . . . . . . . . . . . . . .2-12
Figure 4: Position variances with uncorrected GPS . . . . . . . . . . . . . . . . . . . . . . . . . . . . . . .5-9
Figure 5: Restarting the desired track . . . . . . . . . . . . . . . . . . . . . . . . . . . . . . . . . . . . . . . 10-20
Figure 6: Passing a waypoint . . . . . . . . . . . . . . . . . . . . . . . . . . . . . . . . . . . . . . . . . . . . . . . 13-21
Figure 7: North-up orientation: vessel on northerly leg . . . . . . . . . . . . . . . . . . . . . . . . 13-31
Figure 8: North-up orientation: vessel on southeasterly leg . . . . . . . . . . . . . . . . . . . . 13-31
Figure 9: Course-up chart orientation . . . . . . . . . . . . . . . . . . . . . . . . . . . . . . . . . . . . . . . 13-32
961/962 Operations and Reference Manual, Rev. A Page vii

Page viii 961/962 Operations and Reference Manual, Rev. A

List of Tables
Table 1: Contacting Northstar . . . . . . . . . . . . . . . . . . . . . . . . . . . . . . . . . . . . . . . . . . . . . . . . . 1-7
Table 2: Noise-level meanings . . . . . . . . . . . . . . . . . . . . . . . . . . . . . . . . . . . . . . . . . . . . . . . . . 5-5
Table 3: DGPS status messages. . . . . . . . . . . . . . . . . . . . . . . . . . . . . . . . . . . . . . . . . . . . . . . . . 5-6
Table 4: Displaying waypoints . . . . . . . . . . . . . . . . . . . . . . . . . . . . . . . . . . . . . . . . . . . . . . . . . 6-3
Table 5: Displaying avoidance points . . . . . . . . . . . . . . . . . . . . . . . . . . . . . . . . . . . . . . . . . . . 7-3
Table 6: Displaying routes . . . . . . . . . . . . . . . . . . . . . . . . . . . . . . . . . . . . . . . . . . . . . . . . . . . . . 8-3
Table 7: Displaying tracks . . . . . . . . . . . . . . . . . . . . . . . . . . . . . . . . . . . . . . . . . . . . . . . . . . . . . 9-3
Table 8: 961/962 alarms. . . . . . . . . . . . . . . . . . . . . . . . . . . . . . . . . . . . . . . . . . . . . . . . . . . . . . 12-5
Table 9: Cross-track scale options . . . . . . . . . . . . . . . . . . . . . . . . . . . . . . . . . . . . . . . . . . . . . 13-4
Table 10: Datum list . . . . . . . . . . . . . . . . . . . . . . . . . . . . . . . . . . . . . . . . . . . . . . . . . . . . . . . . 13-12
Table 11: Reference ellipsoid constants . . . . . . . . . . . . . . . . . . . . . . . . . . . . . . . . . . . . . . . 13-19
Table 12: HCRF chart errors . . . . . . . . . . . . . . . . . . . . . . . . . . . . . . . . . . . . . . . . . . . . . . . . . 13-55
Table 13: Service checklist. . . . . . . . . . . . . . . . . . . . . . . . . . . . . . . . . . . . . . . . . . . . . . . . . . . 14-18
961/962 Operations and Reference Manual, Rev. A Page ix

Page x 961/962 Operations and Reference Manual, Rev. A

List of Screens
Initial startup screen . . . . . . . . . . . . . . . . . . . . . . . . . . . . . . . . . . . . . . . . . . . . . . . . . . . . . . . . . . .1-9
System test screen . . . . . . . . . . . . . . . . . . . . . . . . . . . . . . . . . . . . . . . . . . . . . . . . . . . . . . . . . . . .1-10
Owner’s message screen. . . . . . . . . . . . . . . . . . . . . . . . . . . . . . . . . . . . . . . . . . . . . . . . . . . . . . .1-11
Advisory message screen . . . . . . . . . . . . . . . . . . . . . . . . . . . . . . . . . . . . . . . . . . . . . . . . . . . . . .1-11
Power-off dialog box. . . . . . . . . . . . . . . . . . . . . . . . . . . . . . . . . . . . . . . . . . . . . . . . . . . . . . . . . .1-13
Chart view A . . . . . . . . . . . . . . . . . . . . . . . . . . . . . . . . . . . . . . . . . . . . . . . . . . . . . . . . . . . . . . . .1-18
Chart screen with info bars . . . . . . . . . . . . . . . . . . . . . . . . . . . . . . . . . . . . . . . . . . . . . . . . . . . .1-23
Chart screen with cursor location info bar. . . . . . . . . . . . . . . . . . . . . . . . . . . . . . . . . . . . . . .1-25
Selected cursor position dialog box . . . . . . . . . . . . . . . . . . . . . . . . . . . . . . . . . . . . . . . . . . . . .1-26
Chart screen with COORD waypoint . . . . . . . . . . . . . . . . . . . . . . . . . . . . . . . . . . . . . . . . . . . .1-27
Go to coordinates dialog box . . . . . . . . . . . . . . . . . . . . . . . . . . . . . . . . . . . . . . . . . . . . . . . . . .1-28
Chart screen with COORD waypoint . . . . . . . . . . . . . . . . . . . . . . . . . . . . . . . . . . . . . . . . . . . .1-29
Initial startup screen . . . . . . . . . . . . . . . . . . . . . . . . . . . . . . . . . . . . . . . . . . . . . . . . . . . . . . . . . . .3-3
Power-off dialog box. . . . . . . . . . . . . . . . . . . . . . . . . . . . . . . . . . . . . . . . . . . . . . . . . . . . . . . . . . .3-5
Chart screen with menu keys . . . . . . . . . . . . . . . . . . . . . . . . . . . . . . . . . . . . . . . . . . . . . . . . . . .3-7
Echo sounder screen. . . . . . . . . . . . . . . . . . . . . . . . . . . . . . . . . . . . . . . . . . . . . . . . . . . . . . . . . . . 3-9
Alarms screen. . . . . . . . . . . . . . . . . . . . . . . . . . . . . . . . . . . . . . . . . . . . . . . . . . . . . . . . . . . . . . . .3-10
Chart-screen alarm message . . . . . . . . . . . . . . . . . . . . . . . . . . . . . . . . . . . . . . . . . . . . . . . . . . .3-11
Setup menu screen . . . . . . . . . . . . . . . . . . . . . . . . . . . . . . . . . . . . . . . . . . . . . . . . . . . . . . . . . . .3-12
Service menu screen . . . . . . . . . . . . . . . . . . . . . . . . . . . . . . . . . . . . . . . . . . . . . . . . . . . . . . . . . .3-14
Traditional steer screen . . . . . . . . . . . . . . . . . . . . . . . . . . . . . . . . . . . . . . . . . . . . . . . . . . . . . . .3-16
3-D steer screen . . . . . . . . . . . . . . . . . . . . . . . . . . . . . . . . . . . . . . . . . . . . . . . . . . . . . . . . . . . . . .3-17
Trip screen . . . . . . . . . . . . . . . . . . . . . . . . . . . . . . . . . . . . . . . . . . . . . . . . . . . . . . . . . . . . . . . . . .3-18
Waypoints screen . . . . . . . . . . . . . . . . . . . . . . . . . . . . . . . . . . . . . . . . . . . . . . . . . . . . . . . . . . . .3-20
Routes screen . . . . . . . . . . . . . . . . . . . . . . . . . . . . . . . . . . . . . . . . . . . . . . . . . . . . . . . . . . . . . . . .3-22
Tracks screen . . . . . . . . . . . . . . . . . . . . . . . . . . . . . . . . . . . . . . . . . . . . . . . . . . . . . . . . . . . . . . . .3-24
Avoidance points screen . . . . . . . . . . . . . . . . . . . . . . . . . . . . . . . . . . . . . . . . . . . . . . . . . . . . . .3-26
Man overboard dialog box. . . . . . . . . . . . . . . . . . . . . . . . . . . . . . . . . . . . . . . . . . . . . . . . . . . . .3-29
Chart screen with *MOB06* waypoint . . . . . . . . . . . . . . . . . . . . . . . . . . . . . . . . . . . . . . . . . . .3-30
Go to coordinates dialog box . . . . . . . . . . . . . . . . . . . . . . . . . . . . . . . . . . . . . . . . . . . . . . . . . . .4-6
Vessel-position charts screen . . . . . . . . . . . . . . . . . . . . . . . . . . . . . . . . . . . . . . . . . . . . . . . . . . . 4-9
Cursor-position charts screen . . . . . . . . . . . . . . . . . . . . . . . . . . . . . . . . . . . . . . . . . . . . . . . . . . . 4-9
Chart screen with tide stations and station coverage bar . . . . . . . . . . . . . . . . . . . . . . . . . .4-11
Chart screen with tide graph and tide station bar. . . . . . . . . . . . . . . . . . . . . . . . . . . . . . . . .4-12
961/962 Operations and Reference Manual, Rev. A Page xi

Chart screen with current stations and station coverage bar . . . . . . . . . . . . . . . . . . . . . . .4-13
Chart screen with currents graph and current station bar . . . . . . . . . . . . . . . . . . . . . . . . .4-14
Chart view A with two info bars. . . . . . . . . . . . . . . . . . . . . . . . . . . . . . . . . . . . . . . . . . . . . . . .4-16
Chart view B with two info bars . . . . . . . . . . . . . . . . . . . . . . . . . . . . . . . . . . . . . . . . . . . . . . . .4-16
Chart screen with cursor info bar . . . . . . . . . . . . . . . . . . . . . . . . . . . . . . . . . . . . . . . . . . . . . .4-18
Chart screen with selected object . . . . . . . . . . . . . . . . . . . . . . . . . . . . . . . . . . . . . . . . . . . . . .4-19
Selected cursor position dialog box . . . . . . . . . . . . . . . . . . . . . . . . . . . . . . . . . . . . . . . . . . . . .4-21
Store as a waypoint dialog box . . . . . . . . . . . . . . . . . . . . . . . . . . . . . . . . . . . . . . . . . . . . . . . . .4-23
Store as a waypoint dialog box . . . . . . . . . . . . . . . . . . . . . . . . . . . . . . . . . . . . . . . . . . . . . . . . .4-25
Store as a waypoint (for on-chart route) dialog box . . . . . . . . . . . . . . . . . . . . . . . . . . . . . . .4-26
Selected route point dialog box . . . . . . . . . . . . . . . . . . . . . . . . . . . . . . . . . . . . . . . . . . . . . . . .4-28
Selected trip point dialog box . . . . . . . . . . . . . . . . . . . . . . . . . . . . . . . . . . . . . . . . . . . . . . . . . .4-29
Selected route point dialog box . . . . . . . . . . . . . . . . . . . . . . . . . . . . . . . . . . . . . . . . . . . . . . . .4-31
Selected trip leg dialog box . . . . . . . . . . . . . . . . . . . . . . . . . . . . . . . . . . . . . . . . . . . . . . . . . . . .4-32
Selected route leg dialog box . . . . . . . . . . . . . . . . . . . . . . . . . . . . . . . . . . . . . . . . . . . . . . . . . .4-33
Selected waypoint dialog box . . . . . . . . . . . . . . . . . . . . . . . . . . . . . . . . . . . . . . . . . . . . . . . . . .4-35
Edit selected waypoint dialog box . . . . . . . . . . . . . . . . . . . . . . . . . . . . . . . . . . . . . . . . . . . . . .4-35
Use selected waypoint dialog box . . . . . . . . . . . . . . . . . . . . . . . . . . . . . . . . . . . . . . . . . . . . . .4-36
Selected route point dialog box . . . . . . . . . . . . . . . . . . . . . . . . . . . . . . . . . . . . . . . . . . . . . . . .4-37
GPS satellite status screen . . . . . . . . . . . . . . . . . . . . . . . . . . . . . . . . . . . . . . . . . . . . . . . . . . . . . .5-3
Chart screen with waypoints. . . . . . . . . . . . . . . . . . . . . . . . . . . . . . . . . . . . . . . . . . . . . . . . . . . .6-4
Waypoints screen . . . . . . . . . . . . . . . . . . . . . . . . . . . . . . . . . . . . . . . . . . . . . . . . . . . . . . . . . . . . .6-5
Selected cursor position dialog box . . . . . . . . . . . . . . . . . . . . . . . . . . . . . . . . . . . . . . . . . . . . . .6-9
Store as a waypoint dialog box . . . . . . . . . . . . . . . . . . . . . . . . . . . . . . . . . . . . . . . . . . . . . . . . .6-10
Vessel position dialog box . . . . . . . . . . . . . . . . . . . . . . . . . . . . . . . . . . . . . . . . . . . . . . . . . . . . .6-11
Chart screen with avoidance points. . . . . . . . . . . . . . . . . . . . . . . . . . . . . . . . . . . . . . . . . . . . . .7-4
3-D steer screen with avoidance points. . . . . . . . . . . . . . . . . . . . . . . . . . . . . . . . . . . . . . . . . . .7-5
Avoidance points screen . . . . . . . . . . . . . . . . . . . . . . . . . . . . . . . . . . . . . . . . . . . . . . . . . . . . . . .7-6
Selected cursor position dialog box . . . . . . . . . . . . . . . . . . . . . . . . . . . . . . . . . . . . . . . . . . . . .7-10
Store as a waypoint dialog box . . . . . . . . . . . . . . . . . . . . . . . . . . . . . . . . . . . . . . . . . . . . . . . . .7-10
Chart screen with displayed route . . . . . . . . . . . . . . . . . . . . . . . . . . . . . . . . . . . . . . . . . . . . . . .8-4
Routes screen sorted by name . . . . . . . . . . . . . . . . . . . . . . . . . . . . . . . . . . . . . . . . . . . . . . . . . .8-5
Selected cursor position dialog box . . . . . . . . . . . . . . . . . . . . . . . . . . . . . . . . . . . . . . . . . . . . . .8-8
Store as a waypoint dialog box . . . . . . . . . . . . . . . . . . . . . . . . . . . . . . . . . . . . . . . . . . . . . . . . . .8-9
Store as a waypoint (with on-chart route) dialog box. . . . . . . . . . . . . . . . . . . . . . . . . . . . . .8-10
Page xii 961/962 Operations and Reference Manual, Rev. A

Vessel-position dialog box . . . . . . . . . . . . . . . . . . . . . . . . . . . . . . . . . . . . . . . . . . . . . . . . . . . . .8-11
Timed vessel-position dialog box . . . . . . . . . . . . . . . . . . . . . . . . . . . . . . . . . . . . . . . . . . . . . . .8-12
Create new route dialog box . . . . . . . . . . . . . . . . . . . . . . . . . . . . . . . . . . . . . . . . . . . . . . . . . . .8-13
Edit new route screen . . . . . . . . . . . . . . . . . . . . . . . . . . . . . . . . . . . . . . . . . . . . . . . . . . . . . . . . .8-14
Save trip as route dialog box. . . . . . . . . . . . . . . . . . . . . . . . . . . . . . . . . . . . . . . . . . . . . . . . . . .8-16
Edit the route dialog box . . . . . . . . . . . . . . . . . . . . . . . . . . . . . . . . . . . . . . . . . . . . . . . . . . . . . .8-18
Edit route screen . . . . . . . . . . . . . . . . . . . . . . . . . . . . . . . . . . . . . . . . . . . . . . . . . . . . . . . . . . . . .8-18
Selected route point dialog box . . . . . . . . . . . . . . . . . . . . . . . . . . . . . . . . . . . . . . . . . . . . . . . .8-24
Chart screen with displayed tracks . . . . . . . . . . . . . . . . . . . . . . . . . . . . . . . . . . . . . . . . . . . . . .9-4
Tracks screen sorted by name. . . . . . . . . . . . . . . . . . . . . . . . . . . . . . . . . . . . . . . . . . . . . . . . . . .9-5
New track screen . . . . . . . . . . . . . . . . . . . . . . . . . . . . . . . . . . . . . . . . . . . . . . . . . . . . . . . . . . . . . .9-7
Start saving track screen . . . . . . . . . . . . . . . . . . . . . . . . . . . . . . . . . . . . . . . . . . . . . . . . . . . . . . . 9-9
Edit track screen . . . . . . . . . . . . . . . . . . . . . . . . . . . . . . . . . . . . . . . . . . . . . . . . . . . . . . . . . . . . .9-11
Steer screen . . . . . . . . . . . . . . . . . . . . . . . . . . . . . . . . . . . . . . . . . . . . . . . . . . . . . . . . . . . . . . . . .10-3
3-D steer screen . . . . . . . . . . . . . . . . . . . . . . . . . . . . . . . . . . . . . . . . . . . . . . . . . . . . . . . . . . . . . .10-4
Routes screen . . . . . . . . . . . . . . . . . . . . . . . . . . . . . . . . . . . . . . . . . . . . . . . . . . . . . . . . . . . . . . . .10-7
Follow route screen. . . . . . . . . . . . . . . . . . . . . . . . . . . . . . . . . . . . . . . . . . . . . . . . . . . . . . . . . . .10-7
Join leg dialog box. . . . . . . . . . . . . . . . . . . . . . . . . . . . . . . . . . . . . . . . . . . . . . . . . . . . . . . . . . . .10-9
Selected route point dialog box . . . . . . . . . . . . . . . . . . . . . . . . . . . . . . . . . . . . . . . . . . . . . . 10-11
Selected route leg dialog box . . . . . . . . . . . . . . . . . . . . . . . . . . . . . . . . . . . . . . . . . . . . . . . . 10-12
Selected waypoint dialog box . . . . . . . . . . . . . . . . . . . . . . . . . . . . . . . . . . . . . . . . . . . . . . . . 10-14
Selected cursor position dialog box . . . . . . . . . . . . . . . . . . . . . . . . . . . . . . . . . . . . . . . . . . . 10-16
Selected cursor position dialog box . . . . . . . . . . . . . . . . . . . . . . . . . . . . . . . . . . . . . . . . . . . 10-17
Go to waypoint dialog box . . . . . . . . . . . . . . . . . . . . . . . . . . . . . . . . . . . . . . . . . . . . . . . . . . 10-18
Go to waypoint dialog box . . . . . . . . . . . . . . . . . . . . . . . . . . . . . . . . . . . . . . . . . . . . . . . . . . 10-19
Trip screen . . . . . . . . . . . . . . . . . . . . . . . . . . . . . . . . . . . . . . . . . . . . . . . . . . . . . . . . . . . . . . . . . .11-3
Active trip point dialog box. . . . . . . . . . . . . . . . . . . . . . . . . . . . . . . . . . . . . . . . . . . . . . . . . . . .11-7
Future trip point dialog box . . . . . . . . . . . . . . . . . . . . . . . . . . . . . . . . . . . . . . . . . . . . . . . . . . .11-8
Go to selection dialog box . . . . . . . . . . . . . . . . . . . . . . . . . . . . . . . . . . . . . . . . . . . . . . . . . . . . .11-9
Go to selection dialog box . . . . . . . . . . . . . . . . . . . . . . . . . . . . . . . . . . . . . . . . . . . . . . . . . . . 11-10
Past trip point dialog box. . . . . . . . . . . . . . . . . . . . . . . . . . . . . . . . . . . . . . . . . . . . . . . . . . . . 11-11
Save trip as route dialog box. . . . . . . . . . . . . . . . . . . . . . . . . . . . . . . . . . . . . . . . . . . . . . . . . 11-12
Erasures dialog box . . . . . . . . . . . . . . . . . . . . . . . . . . . . . . . . . . . . . . . . . . . . . . . . . . . . . . . . . 11-13
Restart here dialog box . . . . . . . . . . . . . . . . . . . . . . . . . . . . . . . . . . . . . . . . . . . . . . . . . . . . . 11-15
Alarms screen. . . . . . . . . . . . . . . . . . . . . . . . . . . . . . . . . . . . . . . . . . . . . . . . . . . . . . . . . . . . . . . .12-2
961/962 Operations and Reference Manual, Rev. A Page xiii

Alarm settings screen . . . . . . . . . . . . . . . . . . . . . . . . . . . . . . . . . . . . . . . . . . . . . . . . . . . . . . . 12-10
Chart screen with tide stations and station coverage bar . . . . . . . . . . . . . . . . . . . . . . . . 12-12
Chart screen with tide graph and tide station bar. . . . . . . . . . . . . . . . . . . . . . . . . . . . . . . 12-13
Chart screen with current stations and station coverage bar . . . . . . . . . . . . . . . . . . . . . 12-16
Chart screen with current graph and current station bar . . . . . . . . . . . . . . . . . . . . . . . . 12-17
Chart screen with live echo sounder data overlay . . . . . . . . . . . . . . . . . . . . . . . . . . . . . . 12-19
Display setup screen . . . . . . . . . . . . . . . . . . . . . . . . . . . . . . . . . . . . . . . . . . . . . . . . . . . . . . . . . .13-2
Password dialog box . . . . . . . . . . . . . . . . . . . . . . . . . . . . . . . . . . . . . . . . . . . . . . . . . . . . . . . . . .13-8
Owner’s message display screen. . . . . . . . . . . . . . . . . . . . . . . . . . . . . . . . . . . . . . . . . . . . . . . .13-9
Navigation setup screen. . . . . . . . . . . . . . . . . . . . . . . . . . . . . . . . . . . . . . . . . . . . . . . . . . . . . 13-10
Chart setup screen . . . . . . . . . . . . . . . . . . . . . . . . . . . . . . . . . . . . . . . . . . . . . . . . . . . . . . . . . 13-24
Chart setup screen (waypoints) . . . . . . . . . . . . . . . . . . . . . . . . . . . . . . . . . . . . . . . . . . . . . . 13-26
Chart inventory screen. . . . . . . . . . . . . . . . . . . . . . . . . . . . . . . . . . . . . . . . . . . . . . . . . . . . . . 13-36
HCRF summary dialog box . . . . . . . . . . . . . . . . . . . . . . . . . . . . . . . . . . . . . . . . . . . . . . . . . . 13-47
HCRF summary dialog box . . . . . . . . . . . . . . . . . . . . . . . . . . . . . . . . . . . . . . . . . . . . . . . . . . 13-49
Charts on disk screen . . . . . . . . . . . . . . . . . . . . . . . . . . . . . . . . . . . . . . . . . . . . . . . . . . . . . . . 13-51
Enter navigator permit dialog box . . . . . . . . . . . . . . . . . . . . . . . . . . . . . . . . . . . . . . . . . . . . 13-52
Deleting all HCRF dialog box . . . . . . . . . . . . . . . . . . . . . . . . . . . . . . . . . . . . . . . . . . . . . . . . 13-54
HCRF charts screen. . . . . . . . . . . . . . . . . . . . . . . . . . . . . . . . . . . . . . . . . . . . . . . . . . . . . . . . . 13-58
HCRF charts in database screen . . . . . . . . . . . . . . . . . . . . . . . . . . . . . . . . . . . . . . . . . . . . . . 13-59
HCRF permits screen (Skipper version) . . . . . . . . . . . . . . . . . . . . . . . . . . . . . . . . . . . . . . . . 13-60
HCRF permits screen (Navigator version). . . . . . . . . . . . . . . . . . . . . . . . . . . . . . . . . . . . . . 13-61
HCRF user permit screen . . . . . . . . . . . . . . . . . . . . . . . . . . . . . . . . . . . . . . . . . . . . . . . . . . . . 13-62
Charts in database screen . . . . . . . . . . . . . . . . . . . . . . . . . . . . . . . . . . . . . . . . . . . . . . . . . . . 13-64
Select chart source screen . . . . . . . . . . . . . . . . . . . . . . . . . . . . . . . . . . . . . . . . . . . . . . . . . . . 13-68
Charts on disk screen . . . . . . . . . . . . . . . . . . . . . . . . . . . . . . . . . . . . . . . . . . . . . . . . . . . . . . . 13-68
Setup demo mode screen . . . . . . . . . . . . . . . . . . . . . . . . . . . . . . . . . . . . . . . . . . . . . . . . . . . . 13-70
Time information screen . . . . . . . . . . . . . . . . . . . . . . . . . . . . . . . . . . . . . . . . . . . . . . . . . . . . 13-73
Product information screen. . . . . . . . . . . . . . . . . . . . . . . . . . . . . . . . . . . . . . . . . . . . . . . . . . . .14-2
Receiver information screen . . . . . . . . . . . . . . . . . . . . . . . . . . . . . . . . . . . . . . . . . . . . . . . . . . .14-4
GPS satellite status screen . . . . . . . . . . . . . . . . . . . . . . . . . . . . . . . . . . . . . . . . . . . . . . . . . . . . .14-9
Database function screen. . . . . . . . . . . . . . . . . . . . . . . . . . . . . . . . . . . . . . . . . . . . . . . . . . . . 14-12
Select database to save dialog box . . . . . . . . . . . . . . . . . . . . . . . . . . . . . . . . . . . . . . . . . . . . 14-12
Page xiv 961/962 Operations and Reference Manual, Rev. A

Select database to restore dialog box. . . . . . . . . . . . . . . . . . . . . . . . . . . . . . . . . . . . . . . . . . 14-14
Select a restored database to undo dialog box. . . . . . . . . . . . . . . . . . . . . . . . . . . . . . . . . . 14-15
Save log data dialog box . . . . . . . . . . . . . . . . . . . . . . . . . . . . . . . . . . . . . . . . . . . . . . . . . . . . 14-16
961/962 Operations and Reference Manual, Rev. A Page xv

Page xvi 961/962 Operations and Reference Manual, Rev. A

1
Welcome . . . . . . . . . . . . . . . . . . . . . . . . . . . . . . . . . . 1-2
Technical support . . . . . . . . . . . . . . . . . . . . . . . . . 1-7
Turning the system on . . . . . . . . . . . . . . . . . . . . . 1-9
Turning the system off . . . . . . . . . . . . . . . . . . . 1-13
Basic navigation terminology . . . . . . . . . . . . . 1-14
Introducing the function keys . . . . . . . . . . . . 1-16
Using the chart-view screens . . . . . . . . . . . . . 1-17
Navigating to a point . . . . . . . . . . . . . . . . . . . . . 1-24
Reading and clearing alarm messages . . . . 1-30
T
his chapter introduces the 961/962 Operations and
Reference Manual; describes initial startup and basic
installation procedures; and briefly discusses the function keys
and CHART screens.
After reading this chapter, you’ll know how to turn on the
961/962 and start basic navigation operations.
Quick Start
961/962 Operations and Reference Manual, Rev. A Page 1-1

Chapter 1 - Quick Start
Welcome
Overview
Congratulations on your purchase of the Northstar 961X/962X
or 961XD/962XD Color GPS/Raster Charting System. The
system is a high-performance, easy-to-use, full-featured GPS
chart navigator that meets your marine navigation needs in a
comprehensive and logical manner. Wherever you are, the
961/962 helps guide you effortlessly to your next location.
Your 961/962 also offers echo sounding capability, either
built-in or retrofitted, for locating fish and tracking the
contours of the seabed.
In this manual, the 961X/962X and 961XD/962XD are
collectively referred to as the 961/962 or the system.
The 961X/962X uses an internal, high-performance GPS
receiver as its primary source of position data. Your vessel’s
position, course-over-ground (COG), and speed-over-ground
(SOG) are calculated directly from the received satellite data,
as well as the time, date, and an estimate of the system’s
accuracy. For enhanced accuracy, the Northstar 961XD/962XD
combines GPS navigation with DGPS capability using an
internal, fully automatic differential receiver. The Northstar
961/962 also can be interfaced with other equipment; for
details about interfacing, see the Northstar 961/962 GPS Chart
Navigator Installation Manual.
Both the 961X/962X and the 962XD/962XD have an internal
hard drive inside their processors, and a CD-ROM drive for
installing software updates and charts from different chart CDs
onto this hard drive. The hard drive stores 1000 routes and
2000 waypoints, and enough chart data to cover an entire
coastline. Using BSB charts (Maptech or NDI’s ChartKit charts),
Maptech’s ChartPack charts, or the United Kingdom
Hydrographic Office’s (UKHO) Admiralty Raster Chart Service
(commonly called ARCS) charts, the 961/962 can provide you
with truly worldwide chart coverage. With its large color
screen, the Northstar 961/962 offers a 10.4-inch diagonal chart
display, an intuitive graphical user interface, advanced
steering screens, graphical display of tides and currents, and
easy management of waypoints, routes, tracks, and avoidance
points. The system offers high-definition, high-speed CHART
Page 1-2 961/962 Operations and Reference Manual, Rev. A

Chapter 1 - Quick Start
screens; loran compatibility; tide data up to the year 2099; a
currents overlay; echo sounding capability; and many other
navigation functions. For a list of major features, see “System
overview” starting on page 2-2. For a list of specifications, see
“961/962 Features and Specifications” starting on page A-1.
The 961/962 anticipates your most common requests:
Accessing most functions requires pushing only one or two
buttons. By reducing the time and attention required to
navigate, you can devote more time and attention to enjoying
your trip. Welcome to the world of Northstar 961/962
color-chart navigation!
CAUTION!
CAUTION!
Although Northstar products are designed to be
very useful navigation tools, they are not
substitutes for good seamanship. The prudent
navigator should never rely on any single device as
the sole source of navigation guidance. Exercise
caution and good judgment whenever underway.
Proper installation of your Northstar 961/962 is of
utmost importance to accurately receive and
effectively use GPS signals under a variety of
weather conditions. For the best performance,
Northstar strongly recommends that you have an
authorized Northstar dealer perform the installation.
If you prefer to perform the installation, however,
please carefully follow the instructions in the
Northstar 961/962 GPS Chart Navigator Installation
Manual.
961/962 Operations and Reference Manual, Rev. A Page 1-3

Chapter 1 - Quick Start
Scope of this
manual
Using this manual
CAUTION!
Whether you’re an experienced mariner or a novice boater,
the 961/962 Operations and Reference Manual is a complete
guide to understanding and operating the Northstar 961/962
GPS chart navigator. Each of its functions is discussed in the
appropriate chapter of the manual. The manual complements
the system’s ease-of-use by describing and illustrating these
functions in a reference format that promotes quick learning.
For complete instructions on installing and using the echo
sounder to locate fish and track the contours of the seabed,
refer to the:
• Northstar 490 Echo Sounder Installation Manual (GM491)
• Northstar 490 Echo Sounder Operations Manual (GM490)
If you’re new to the 961/962, you’ll find the first few chapters
of this manual extremely helpful. As you learn more about the
system, later chapters will help you understand many of its
advanced, yet still easy-to-use, capabilities (see “Organization”
starting on page 1-5).
Certain terms that either have a special meaning in this
manual or that are important to understand clearly are defined
in the margin. In addition, readers who are new to marine
navigation may want to refer to either “Highlight One: Basic
navigation terms” later in this chapter, “Highlight Two:
Understanding more navigation terms,” or the “Glossary”
starting on page G-1 for definitions of 961/962 and related
navigational terms. If you encounter a term you don’t
understand, turn to the Glossary for its meaning.
Although every effort has been made to ensure that
the electronic chart data is as close to paper charts
as possible, errors and omissions are inevitable:
Use extra care when navigating with electronic
charts. The captain is responsible for
cross-checking the 961/962 against other sources
of navigation data.
Page 1-4 961/962 Operations and Reference Manual, Rev. A

Chapter 1 - Quick Start
After using the system for a while, you’ll find that you can
quickly learn its functions without constantly referring to this
manual. After you’ve read through the manual, you probably
won’t have to refer to it too often.
Organization
This “Quick Start” chapter tells you how to start up the system
and become familiar with its CHART display screens.
Chapter 2 is an introduction that reviews key features and
controls and introduces overall maintenance. This
introduction also presents the concepts of GPS and DGPS.
Chapters 3, 4, and 5 detail the controls, chart display screens,
and position coordinates, respectively, before moving to more
advanced waypoint and route navigation operations
comprising Chapters 6 through 12.
Chapters 13 and 14 describe customizing the setup of your
system—including the loading of charts—and the maintenance
and service procedures, respectively.
A glossary is found at the back of the manual, as is the
appendix with the system’s specifications, its GPS and DGPS
antenna (if applicable), and the optional internal DGPS
receiver. To locate specific terms or procedures, see the index
at the back of the manual.
Sample display screens throughout the manual illustrate each
function, supplementing the text with an accurate visual
description.
961/962 Operations and Reference Manual, Rev. A Page 1-5

Chapter 1 - Quick Start
Conventions
Specific conventions, or standards, are used to provide a
consistent way to recognize certain information, as follows:
• is the universal caution symbol used for caution and
warning information that pertains to your personal safety
or prevents damage to the system. The
WARNING
them!
NOTE
•
notes contain valuable information purposely highlighted
so that you don’t miss it while reading the main text.
• KEY is the type style used to refer to the function keys
(located along the bottom of the control head) as well as
the menu keys (located in a vertical row on the right side
of the control head). These keys are discussed further in
“Introducing the 961/962” starting on page 2-1, and in
“Using the Controls” starting on page 3-1.
• DISPLAY TEXT is the type style representing text that
appears on the display screens.
• Sample 961/962 screen is the type style used for captions
of display screens.
•
Figure 1
as parts illustrations.
• A bulleted list contains a series of related items or topics.
• A numbered list contains a series of steps in a procedure.
• The command “Press a button or key” means push and
release that button or key—unless otherwise indicated.
• The product name 961/962 refers to both the
961XD/962XD with its internal differential receiver, and
the 961X/962X, which is differential-ready only.
• Latitude and longitude coordinates are collectively
referred to as lat/lon coordinates or lat/lon.
•The CHART screen may also be referred to as the chart
view.
boxes contain critical information—please read
is the type style used for titles of reader notes. These
is the type style used for captions of figures, such
CAUTION
and
Page 1-6 961/962 Operations and Reference Manual, Rev. A

Technical support
Chapter 1 - Quick Start
After you follow the instructions in this manual, if you need
technical support or if you have any other questions, you can
contact Northstar by email, fax, phone, or U.S. mail as follows:
Table 1: Contacting Northstar
Email
:
Service: service@northstarcmc.com
Sales: sales@northstarcmc.com
Fax
:
Service: 978/897-1595
Sales: 978/897-7241
Telephone:
Main number: 978/897-6600 or 800/628-4487
U.S. mail:
30 Sudbury Road
Acton, MA 01720
Web site:
www.northstarcmc.com (you can send email to
Northstar from this site)
Hearing from you
Service and repair
961/962 Operations and Reference Manual, Rev. A Page 1-7
Your feedback is important and helps ensure that this manual
is a valuable resource for all 961/962 users. Send your
questions, comments, or suggestions about this manual to:
docs@northstarcmc.com
In case of an operating problem, you may contact your dealer
or return the system to the Northstar factory for diagnosis and
repair. (You may want to back-up any user-defined waypoints
and routes before returning the system for repair; for details,
see “Maintenance functions” starting on page 14-17.) When
describing an operating problem, be as complete and accurate
as possible. Be sure to have your serial number and software

Chapter 1 - Quick Start
revision available whenever contacting or corresponding with
either your dealer or the Northstar factory. For details, see
“Viewing product information” starting on page 14-2. If you
need assistance, feel free to call the Northstar Service
Department at 978-897-6600.
To prevent delays, it is critical that you first obtain a Return
Materials Authorization (RMA) number before returning your
961/962 to the factory.
The 961/962 is covered by a two-year limited warranty (see
the Limited Warranty Policy at the beginning of this manual),
which, in summary, states that if the system is returned to the
Northstar factory by the owner or dealer during the warranty
period, Northstar will repair or replace, free of charge, any part
found to be defective due to faulty materials or workmanship,
if the system has been properly installed and hasn’t been
abused. The only cost to the owner will be the one-way
shipping charges and any associated charges that may be
imposed by the dealer.
Shipments to Northstar should be made to the following
address:
Northstar Technologies
30 Sudbury Road
Acton, MA 01720
If you have special overnight or second-day shipping
requirements (UPS or Federal Express), please call the
Northstar factory for turnaround time and freight costs before
shipping.
Refer to the Limited Warranty Policy at the front of this
manual, and to Chapter 14 “Service and Maintenance
Functions” for more details about service procedures.
Page 1-8 961/962 Operations and Reference Manual, Rev. A

Turning the system on
Chapter 1 - Quick Start
Using the PWR key
To turn on the 961/962:
1. Press the PWR (power) key in the upper left-hand corner
(pressing the PWR key activates the control head and the
processor).
After several minutes, the INITIAL STARTUP screen
appears, which is displayed for about five to ten seconds.
Initial startup screen
After the INITIAL STARTUP screen, the 961/962 automatically
displays the SYSTEM TEST screen for about 10 seconds.
961/962 Operations and Reference Manual, Rev. A Page 1-9

Chapter 1 - Quick Start
System test screen
After the SYSTEM TEST screen, the OWNER’S MESSAGE
screen is automatically displayed for about 10 seconds. To
create a personal owner’s message, such as the owner’s name
and the name of the vessel, see “System security” starting on
page 13-7.
If inconsistencies are found in the system test, the CONFIRM
menu key will appear in the upper right of the screen. Press
this key to acknowledge that you are aware of the problem
and accept it.
Page 1-10 961/962 Operations and Reference Manual, Rev. A

Chapter 1 - Quick Start
Owner’s message screen
After the OWNER’S MESSAGE screen, the ADVISORY
MESSAGE screen is automatically displayed, warning you not
to rely solely on the 961/962’s chart cartography for safe
navigation.
Advisory message screen
961/962 Operations and Reference Manual, Rev. A Page 1-11

Chapter 1 - Quick Start
2. To proceed, accept the ADVISORY MESSAGE by pressing
any key.
If chart CDs for your geographical area have already been
installed onto the system’s hard drive, and after GPS
signals are acquired, you’ll see your vessel symbol
centered on the
Until GPS signals are acquired, a small position-fix circle
will be located at the last known position.
If there aren’t any charts covering your geographic
location installed on the hard drive, a plotter grid will be
displayed instead of a chart.
It’s normal to hear a single beep whenever you press any of the
keys. An invalid keypress, however, elicits a single “boop,” which
sounds like an off-key beep.
CHART
screen at your present position.
NOTE:
For new systems
only
Checking GPS signal
quality
When you first turn your 961/962 on, you’ll see your present
vessel position at the center of the chart, represented as a
small circle. A 961/962 that recently has been used either at or
near that same position will usually be ready to navigate within
several minutes.
If GPS signals aren’t acquired soon enough, however, your last
position fix (from the last time the 961/962 ran) will be
represented by a small position-fix circle; you’ll see an alarm
message in the upper portion of the CHART screen; and you’ll
hear the GPS alarm beep. This sequence often occurs when a
system is used for the first time in a new location hundreds of
miles from where it was last used, and means that the system
is searching for the necessary satellites. This data should take
two to five minutes to acquire, after which the 961/962 is
ready to navigate.
After satellite data has been acquired, you may check the
quality of the received GPS signals by viewing the various
satellites’ SNR readings; see “GPS receiver status summary”
starting on page 5-2. For an introduction to GPS, see “Highlight
One: Basic navigation terms” starting on page 1-15.
Page 1-12 961/962 Operations and Reference Manual, Rev. A

Chapter 1 - Quick Start
About the display’s
brightness
If you don’t touch any key on the control head for one hour or
more, its LCD screen automatically dims to about half its
normal brightness (based on its current brightness), if required
by the system. Pressing any key at any time automatically
restores the display’s previous brightness level. This function
helps maintain the integrity of the display screen and reduce
power consumption when power is on for many hours at a
time. It is still recommended, however, that you keep the
lighting level low when you don’t actually need it; for more
details, see “Controlling LCD-screen brightness” starting on
page 3-27.
Turning the system off
The procedure for turning off a system with two control heads
is slightly different than turning off a system with one head.
To turn off an entire system (both the head and the processor)
with one control head:
1. Press and hold the PWR key for approximately three
seconds, and the system will turn off.
To turn off an entire system (the two heads and the processor)
with two control heads that are on:
1. Press and hold the PWR key for approximately three
seconds until the POWER-OFF dialog box appears.
Power-off dialog box
2. To turn off only one head (where you pressed the PWR
key), press the THIS HEAD key. Otherwise, to turn off the
entire system, press the BOTH HEADS key.
961/962 Operations and Reference Manual, Rev. A Page 1-13

Chapter 1 - Quick Start
On this dialog box (and on many other 961/962 screens), keys with
✔
mark designate the final step in a sequence, the step that will
a
actually carry out the operation.
cancel an operation, and return you to the screen you were
previously viewing.
Basic navigation terminology
If you’re new to navigation, before proceeding you may want
to review the basic navigation terms on the following page in
Highlight One. It is suggested that you review these terms
carefully because many of them are used in a very specific way
in this manual. Soon you’ll be ready to get underway!
NOTE:
Menu keys with a red
✖
mark
Page 1-14 961/962 Operations and Reference Manual, Rev. A

Highlight One: Basic navigation terms
Chapter 1 - Quick Start
Bearing:
present position to a waypoint
Coordinates:
earth’s surface using latitude and longitude (see
this table), Loran-C TDs, or distance and bearing
from a fixed location. (The term Loran-C TDs refers
to Loran-C Time Differences; for details, see the
Glossary.)
Course-over-ground (COG):
your vessel in relation to the surface of the earth;
that is, the direction your vessel is actually moving.
Cross-track error (XTE): The distance between
your position and your desired track; that is, how far
off you are from your intended course line. XTE is
displayed both numerically (as nm, mi, or km and
the equivalent ft or M) and graphically.
Desired track: An imaginary line that the system
calculates, which represents the path that you plan
to follow, usually from one waypoint to the next. On
the
as a green line.
Global Positioning System (GPS):
the U.S. Department of Defense, GPS is a satellite
navigation system that computes your position
using signals from a system of 24 earth-orbiting
satellites.
Latitude:
running east/west, expressed as the number of
degrees (0 to 90) north or south of the Equator.
Leg: The line, or path, between any two waypoints
in a route or a trip.
The true or magnetic course from your
.
Coordinates specify a position on the
The actual path of
CHART
screen, the desired track is displayed
Imaginary lines on the earth’s surface
Developed by
Longitude:
surface running north/south, expressed as the
number of degrees (0 to 180) east or west of the
Prime Meridian, a line running from the North
Pole to the South Pole.
Nautical mile (nm): One nm equals 6,076 feet,
compared to a statute mile, which is 5,280 feet.
A nautical mile also equals one minute of
latitude.
Position: See Coordinates.
Route
waypoints that form a connected path to and/or
from specific locations. A typical route consists
of a starting waypoint, a destination waypoint,
and a series of legs connecting those
waypoints. On the
displayed as a dark blue line. (If you’re
“following” a route, however, the route is copied
into the trip, so it isn’t displayed as dark blue
anymore. For details about following a route,
see “What is a route?” starting on page 8-2.)
Speed-over-ground (SOG):
of your vessel in relation to the surface of the
earth.
Track: As used in 961/962 operations, a path
that you either plan to follow or have already
followed. For complete details about the track
feature, see “Introducing tracks” starting on
page 9-2.
Waypoint: A specific position defined by its
coordinates of latitude and longitude, TDs, or
distance and bearing, and used as either an
intermediate or a final destination.
Imaginary lines on the earth’s
:
A group of two or more pre-defined
CHART
screen, a route is
The actual speed
961/962 Operations and Reference Manual, Rev. A Page 1-15
Chapter 1 - Quick Start
Introducing the function keys
Five keys located on the lower left part of the control head
instantly select the most common functions. Each successive
press of a function key selects additional display screens
belonging to that function. There are several screens under
each function key (except for the TRIP key). For each function,
the system remembers the last-viewed screen, returning there
when you later select the function. The one exception is the
STAR function key, which always brings you directly to the
ECHO SOUNDER screen if the 490 has been installed.
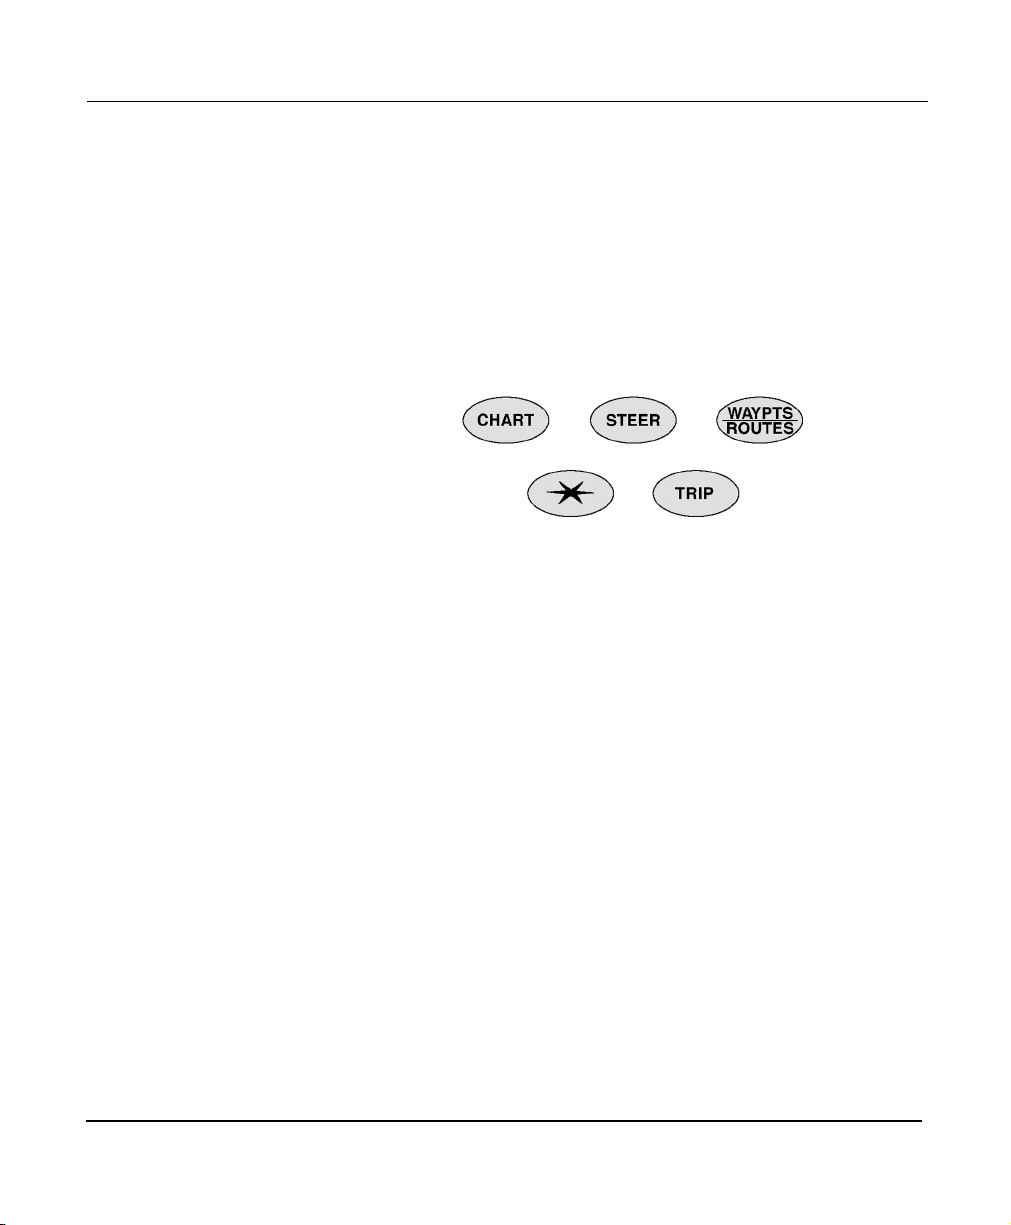
Figure 1: 961/962 function keys
The function keys are briefly described below.
• CHART displays two independent CHART screens (views
A and B) showing your position on the chart, information
about the chart-in-use, all the data you need to navigate,
tides (using Northstar’s exclusive TideTrack™ feature),
and currents overlay. You can create and store new
waypoints, avoidance points, and routes at these screens,
and view existing waypoints, avoidance points, and
routes. You can also view the echo sounder’s picture on
part of the CHART screen.
• STEER displays two screens helping you to steer precisely
along the desired track to your upcoming, or active,
waypoint. This screen includes a display of your
speed-over-ground (SOG), course-over-ground (COG),
name of the active waypoint, distance, estimated time of
arrival (ETA) and estimated time enroute (ETE) to that
waypoint, bearing, numerical and graphical cross-track
error (XTE), and mapped waypoints.
Page 1-16 961/962 Operations and Reference Manual, Rev. A
 Loading...