

Page 1

User Guide
Nokia Asha 500 Dual SIM
RM-934
Issue 1.0 EN
Page 2

User Guide
Nokia Asha 500 Dual SIM
Contents
Safety 4
Get started 5
Keys and parts 5
Insert SIM, battery and memory card 5
Charge the battery 6
Set which SIM card to use 7
Copy contacts from your old phone 7
Basics 9
Display indicators 9
Touch screen actions 9
Switch between views 11
Check your activity 11
Change settings quickly 12
Prolong battery life 12
Reorganise the apps menu 13
Personalise the lock screen 13
Change your ringtone 13
Add a full keyboard or phone keypad 14
Add a writing language 14
Keys on the keyboard 14
Write using the keyboard 14
Keys on the keypad 15
Write using the keypad 15
Use predictive text 16
Nokia Store 16
People & messaging 17
Make a call 17
Save a name and phone number 17
Add social info to contacts 18
Update your status 18
Send a message 18
Set up your mail account 19
Send a mail 19
Chat with your friends 20
Check your voice mail 20
Camera 21
Take a photo 21
Record a video 21
Share your photo or video 21
Maps & navigation 23
Find nearby places 23
Internet 24
Browse the web 24
Add a website to your favourites 24
Entertainment 25
Play a song 25
Listen to the radio 25
Start using Nokia Music Unlimited 25
Download music 25
Office 27
Add a calendar entry 27
Change the time and date 27
Set an alarm 27
Phone management & connectivity 28
Share your content using Slam 28
Connect to a Wi-Fi network 28
Copy content between your phone and
computer 28
Update your phone software 29
Use your phone in flight mode 29
© 2013 Nokia. All rights reserved.
2
Page 3

Access codes 29
Product and safety information 31
© 2013 Nokia. All rights reserved.
3
Page 4
Safety
Read these simple guidelines. Not following them may be dangerous or illegal.
SWITCH OFF IN RESTRICTED AREAS
Switch the device off when mobile phone use is not allowed or when it may cause interference
or danger, for example, in aircraft, in hospitals or near medical equipment, fuel, chemicals, or
blasting areas. Obey all instructions in restricted areas.
ROAD SAFETY COMES FIRST
Obey all local laws. Always keep your hands free to operate the vehicle while driving. Your first
consideration while driving should be road safety.
INTERFERENCE
All wireless devices may be susceptible to interference, which could affect performance.
QUALIFIED SERVICE
Only qualified personnel may install or repair this product.
BATTERIES, CHARGERS, AND OTHER ACCESSORIES
Use only batteries, chargers, and other accessories approved by Nokia for use with this device.
Do not connect incompatible products.
KEEP YOUR DEVICE DRY
Your device is not water-resistant. Keep it dry.
GLASS PARTS
The device screen is made of glass. This glass can break if the device is dropped on a hard
surface or receives a substantial impact. If the glass breaks, do not touch the glass parts of
the device or attempt to remove the broken glass from the device. Stop using the device until the
glass is replaced by qualified service personnel.
PROTECT YOUR HEARING
To prevent possible hearing damage, do not listen at high volume levels for long periods.
Exercise caution when holding your device near your ear while the loudspeaker is in use.
SAR
This device meets RF exposure guidelines when used either in the normal use position against
the ear or when positioned at least 1.5 centimetres (5/8 inch) away from the body. The specific
maximum SAR values can be found in the Certification Information (SAR) section of this user guide.
For more info, go to www.sar-tick.com.
When a carry case, belt clip or other form of device holder is used for body-worn operation, it should
not contain metal and should provide at least the above-stated separation distance from the body.
Note that mobile devices may be transmitting even if you are not making a voice call.
© 2013 Nokia. All rights reserved.
4
Page 5
Get started
Get to grips with the basics, and have your phone up and running in no time.
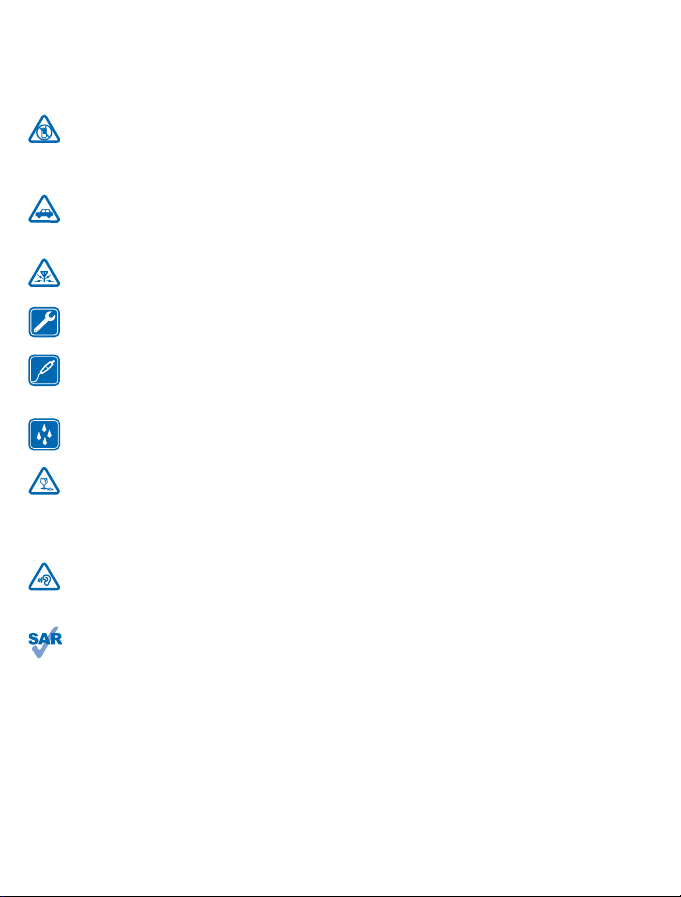
Keys and parts
Explore the keys and parts of your new phone.
1Micro-USB connector
2Loudspeaker
3 Audio connector (3.5 mm AHJ)
4 Volume/Zoom keys
5 Lock/Power key
6Microphone
7 Back key
8 Touch screen
9 Camera lens. Before using the camera,
remove the protective tape from the lens.
10 Back cover release button
11 Antenna area
The antenna area is highlighted.
Avoid touching the antenna area while the
antenna is in use. Contact with antennas affects the communication quality and may reduce battery
life due to higher power level during operation.
Do not connect products that create an output signal, as this may damage the device. Do not connect
any voltage source to the audio connector. If you connect an external device or headset, other than
those approved for use with this device, to the audio connector, pay special attention to volume
levels.
Insert SIM, battery and memory card
Learn how to insert a battery and SIM and memory cards.
Important: This devi ce is desig ned t o be u sed wi th a mini-UICC SIM card, also known as a microSIM card only. A micro-SIM card is smaller than the standard SIM card. Use of incompatible SIM
cards, or use of SIM card adapters, may damage the card or the device, and may corrupt data
stored on the card.
Use only compatible memory cards approved for use with this device. Incompatible cards may
damage the card and the device and corrupt data stored on the card.
1. Press the release button at the back of the phone, and carefully lift and remove the back cover.
© 2013 Nokia. All rights reserved.
5
Page 6

2. If the battery is in the phone, lift it out.
3. Open the SIM holder, and slide the SIM into the holder. Close the holder, and lock it into place. Make
sure the SIM contact area is face down.
4. Line up the battery contacts, and push the battery in.
5. Insert the second SIM into the SIM2 slot with the contact area face down. Push the SIM in until it
locks into place.
Tip: To remove the SIM, push the card in until it's released, then pull it out.
6. Insert the memory card into the memory card slot. Push the memory card in until it locks into place.
Tip: To remove the memory card, push it in until it's released, then pull it out.
Important: Do not remove the memory card when an app is using it. Doing so may damage the
memory card and the device and corrupt data stored on the card.
7. Replace the back cover.
8. To switch your phone on, press and hold the power key until the phone vibrates.
Note: Switch the device off and disconnect the charger and any other device before removing
any covers. Avoid touching electronic components while changing any covers. Always store and
use the device with any covers attached.
Charge the battery
Your battery has been partially charged at the factory, but you may need to recharge it before you
can use your phone.
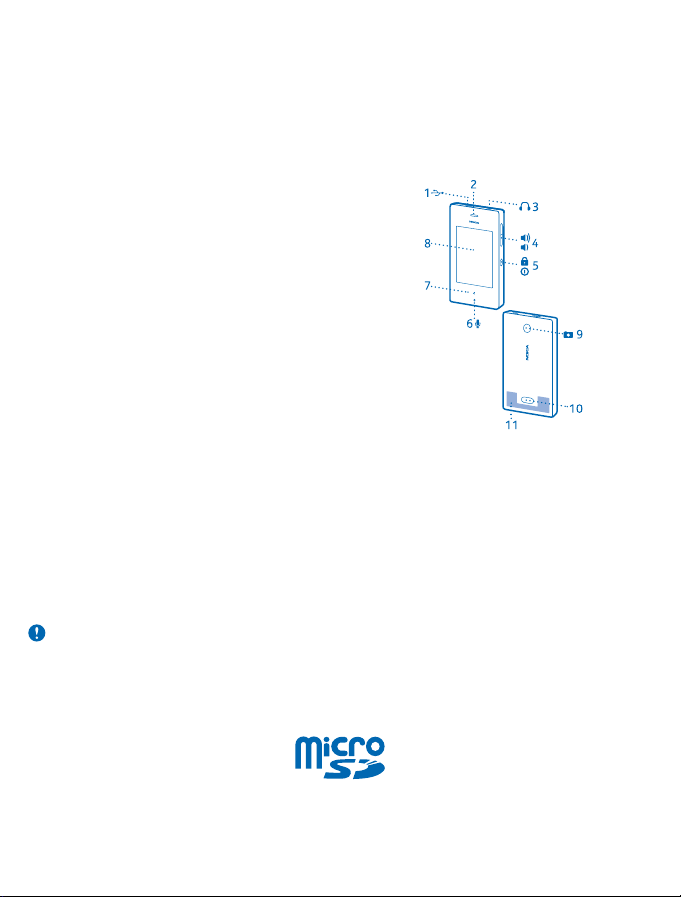
1. Plug the charger into a wall outlet.
© 2013 Nokia. All rights reserved.
6
Page 7
2. Connect the charger to the phone. When done, unplug the charger from the phone, then from the
wall outlet.
If the battery is completely discharged, it may take several minutes before the charging indicator is
displayed or before any calls can be made.
Tip: You can use USB charging when a wall outlet is not available. Data can be transferred while
charging the device. The efficiency of USB charging power varies significantly, and it may take
a long time for charging to start and the device to start functioning.
Set which SIM card to use
By default, your phone asks you which SIM to use for the connection. You can also set the default
SIM for calls or messaging. If you name your SIMs, you can see at a glance which is, for example, for
work or personal use.
Settings > Dual SIM.
Tap
1. Switch Always ask to Off
2. Select which SIM to use for which connection.
Availability of SIMs
• If you only have one SIM, put it into the SIM1 holder. Some features may only be available with the
SIM in the SIM1 holder.
• When you set one SIM to be used for outgoing calls or messages, or for data connections, the
other SIM can still receive calls or messages.
• When one SIM is having an active connection, the other SIM is not available.
Rename SIM
Tap SIM settings, and type in the new name under the card you want to name.
.
Copy contacts from your old phone
Get all your contacts to your new phone in one go.
Your old phone must have Bluetooth, and the contacts must be stored in the phone memory, not on
the SIM.
1. On both your new and old phone, switch Bluetooth on, and make sure both phones are visible to
others.
2. On your new phone, tap
Tip: If you already have contacts on your phone, swipe up from the bottom of the screen, and
tap Import contacts > Another device.
3. Move the phones close to each other. When the phones are connected using Bluetooth, the
contacts transfer starts.
© 2013 Nokia. All rights reserved.
Contacts > Import contacts > Another device.
7
Page 8

If your contacts are written in a language that is not supported by your new phone, the contact info
may not show correctly.
© 2013 Nokia. All rights reserved.
8
Page 9

Basics
Learn how to get the most out of your new phone.
Display indicators
The display indicators on your phone tell you the current time, battery and signal strength, and much
more.
An alarm is set.
The silent profile is on.
Battery power level
You have new notifications. Swipe down from the top of the screen to see the details.
Wi-Fi is on.
Signal strength
Flight mode is on.
Bluetooth is on.
The type of mobile network you're currently connected to may be shown with a single letter, a
combination of letters, or a combination of letters and numbers. For example,
your network service provider.
The icons may vary depending on your region or network service provider.
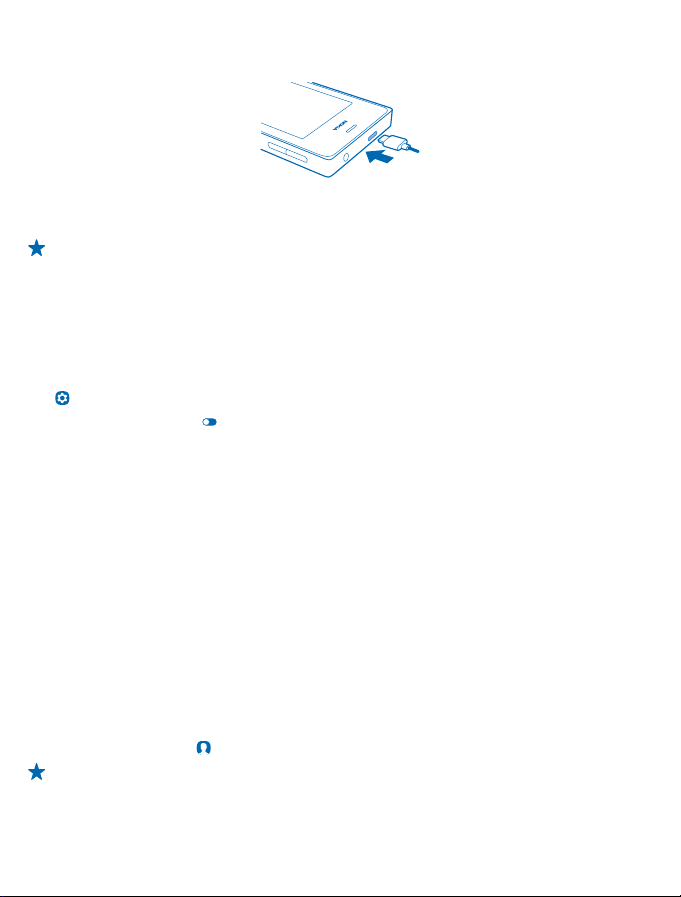
Touch screen actions
Explore your phone with a tap or swipe.
1. To open an app or other item, tap the app or item.
, depending on
Important: Avoid scratching the touch screen.
2. To switch a setting on or off, tap the switch.
© 2013 Nokia. All rights reserved.
9
Page 10
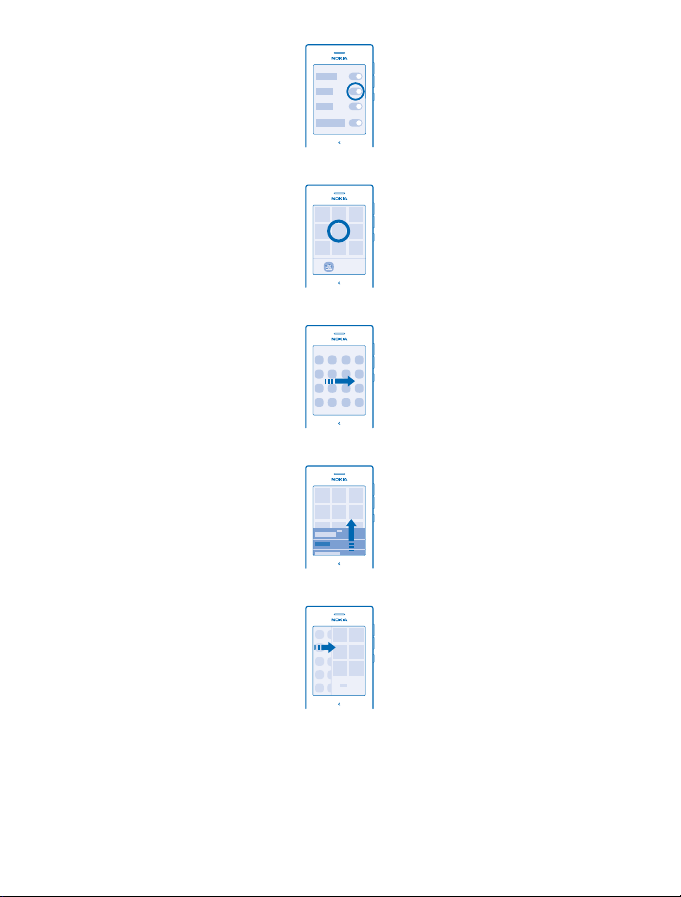
3. To see more options, tap and hold an item.
4. To swipe, for example, to another home screen, steadily slide your finger left or right.
5. To see more options, swipe up from the bottom of the screen if you can see three lines there.
6. To close an app and go back to the home screen, swipe in from the left or right of the screen.
7. To see notifications and change settings, swipe down from the top of the screen. To close the
menu, swipe up, or tap an empty area outside the menu.
© 2013 Nokia. All rights reserved.
10
Page 11
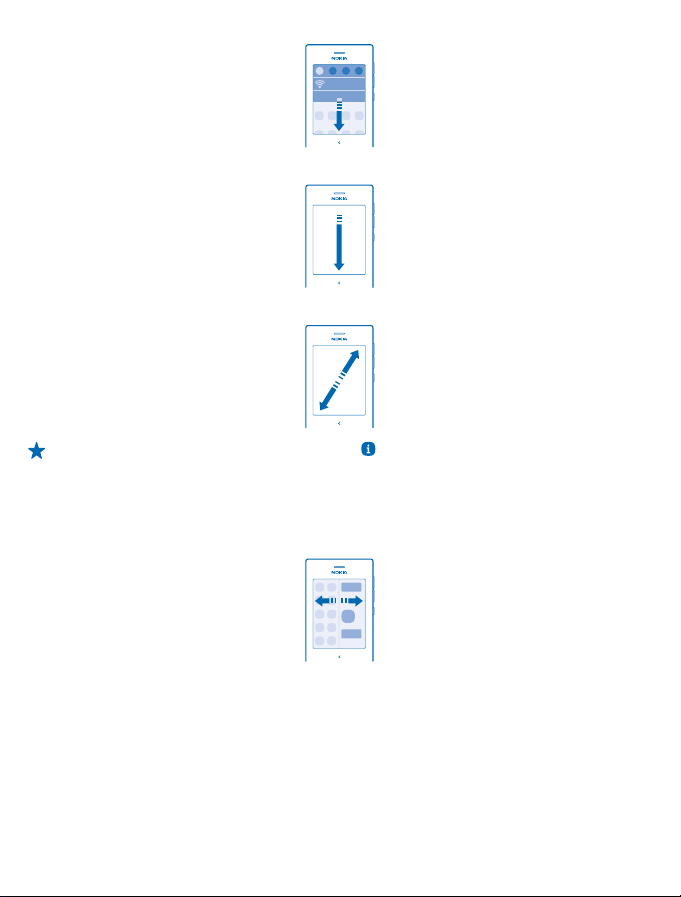
8. To scroll through a long list or menu, slide your finger quickly up or down, and lift your finger.
9. To zoom, slide two fingers apart or together on an item.
Tip: For more info on touch screen actions, tap Care > Nokia Care > Tutorial.
Switch between views
Your phone has 2 home screens: one for keeping up with your activities, and another one for apps.
Swipe left or right to switch between home screens.
Choose your view according to your needs:
• Easily see what you've been doing lately, and check what's happening next in your calendar.
• In the apps menu you can open apps and shortcuts, and rearrange them as you like.
Check your activity
Your phone makes it easy for you to always keep up with what's happening.
In the apps menu, swipe left or right to view your activities. Here, you can see the following:
© 2013 Nokia. All rights reserved.
11
Page 12
• Apps you've opened recently, grouped by date
• Your upcoming calendar events. Swipe down at the top of the activity list to see what you've got
planned next.
• Your social networking activities, like status updates and comments
• Your latest messages, missed calls, downloads, recent music, alarms, and more
Tip: You can easily pause or resume the currently-playing song directly from the list.
Tip: If you've set up a social networking account, you can post your status update in this screen
when you're signed in.
Clear your activities
Tap and hold an item, and tap
Control your activities
To decide which activities you want to see, tap
. To clear all activity, tap Clear all.
Settings > Fastlane.
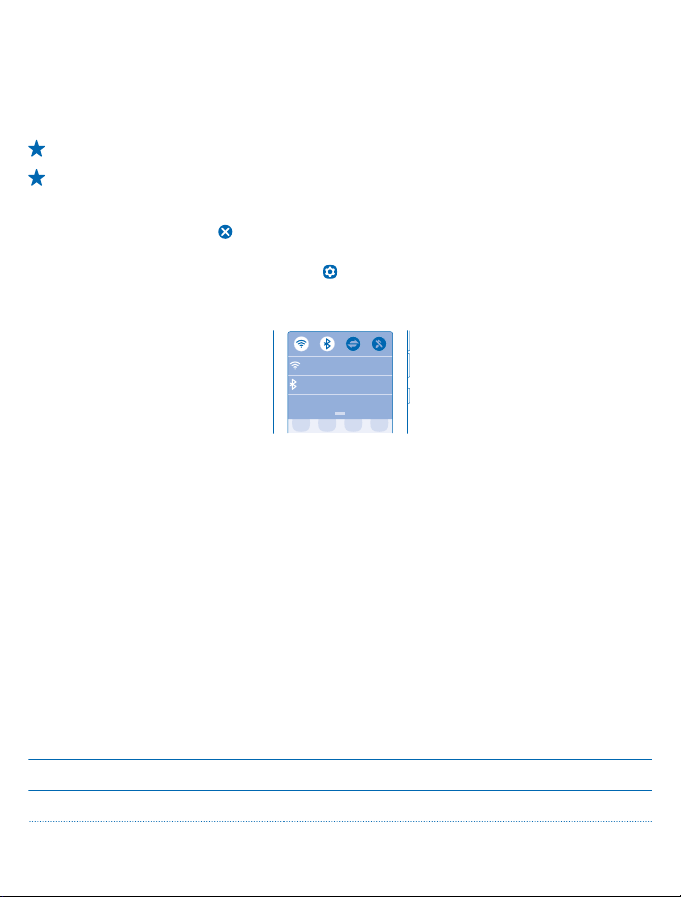
Change settings quickly
Need to quickly switch your phone to silent mode? Rather than going into the phone menus, in most
views, you can quickly change some settings and check notifications in the menu that opens from
the top of the screen.
1. Swipe down from the top of the screen.
In this screen, you can:
• See your missed calls or unread messages
• Switch your phone to silent mode
•Check for Wi-Fi networks, and connect to them
• Switch Bluetooth on or off
2. To close the menu, press the back key.
Prolong battery life
Get the most out of your phone while getting the battery life you need. There are steps you can take
to save power on your phone.
To save power:
Charge wisely Always charge the battery fully.
Select only the sounds that you need Mute unnecessary sounds, such as key press sounds.
© 2013 Nokia. All rights reserved.
12
Page 13
Use wired headphones Use the loudspeaker selectively.
Lower the backlight brightness Tap
Set the backlight to switch off after a
short time
Use network connections selectively • Switch Bluetooth on only when needed.
Settings, and drag the Brightness slider.
Settings > Phone lock, and change the setting for
Tap
Screen time-out.
• To switch off automatic update of a mail account, tap
Accounts and an account, and switch Update Inbox
to Manually.
• If you're listening to music or otherwise using your
phone, but don't want to make or receive calls, switch
flight mode on. Tap
mode on
.
Settings, and switch Flight
Reorganise the apps menu
You can organise your apps as you like. Move your favour ite apps and shortcuts to the top, or remove
shortcuts. You can also uninstall apps you don't need.
1. Tap and hold an item in the apps menu.
2. Drag and drop the item you want to move to a new location. You can move as many items as you
like.
3. When you're done, tap the apps menu.
Remove a shortcut
Tap and hold the shortcut, and tap
Uninstall an app
Tap and hold the app, and tap
.
. You may not be able to uninstall some apps.
Personalise the lock screen
Would you like to make your lock screen unique? You can, for example, have your own favourite photo
in the background.
1. To change the wallpaper of the lock screen, tap
2. Tap the photo you want to use, and tap Set.
Tip: You can also use a photo that you've taken with your phone camera.
Hide notification content on the lock screen
Settings, and switch Notifications to Off .
Tap
Settings > Wallpaper for lock screen.
Change your ringtone
Set a ringtone for your phone. You can set a different ringtone for each SIM card.
1. Tap
Settings > Sounds and vibra.
2. Tap the ringtone options. If needed, select a SIM card.
© 2013 Nokia. All rights reserved.
13
Page 14

3. Select a ringtone from a list of preloaded tones or from your downloaded music. The ringtone plays
so you can see if you like it.
4. When you've found a ringtone you like, tap Set.
Tip: Download more ringtones from Store. To learn more about Store, go to store.nokia.com.
Tip: You can also change the message alert tone. Tap Message tone, and select a tone.
Add a full keyboard or phone keypad
You can use either the full keyboard or phone keypad when writing.
Tap
Settings > Writing settings > Add keyboards, and tap the keyboards or keypads you want to
use.
Switch between the keyboard and keypad
Swipe left or right on the space key.
This option is available if you have chosen more than one keyboard or keypad.
Add a writing language
Need to write in another language? You can easily switch between several writing languages. In some
countries, the languages have been selected by default.
Settings > Writing settings > Add keyboards and the language.
Tap
Switch between languages when writing
Swipe left or right on the space key.
Keys on the keyboard
The layout of the keyboard may vary, depending on the writing language, input mode, and character
range you use.
To start writing, tap a text box.
1Character keys
2Shift key
3 Numbers and symbols key
4Space key
5Enter key
6 Backspace key
Write using the keyboard
With the keyboard, you can write your messages in no time.
To type in a character, tap the key.
Switch between character cases
Tap
.
© 2013 Nokia. All rights reserved.
14
Page 15

Add an accent to a character
Tap and hold the character, then tap the accented character you want. This may not be available in
all languages.
Switch between number and letter mode
Tap the numbers and symbols key or the letter key.
Type in a special character
Tap the numbers and symbols key, then tap the special character.
Move the cursor to the next row
.
Tap
Tip: Tap and hold the text until you see the cursor. Without lifting your finger, drag the cursor
to the place you want.
Delete a character
Tap .
Keys on the keypad
The layout of the keypad may vary, depending on the writing language, input mode, and character
range you use.
To start writing, tap a text box.
1Character keys
2Shift key
3 Space/Language key
4Smiley key
5Enter key
6Symbol key
7Number key
8 Backspace key
Write using the keypad
Writing with the keypad is easy and fun.
Tap a character key repeatedly until the character is shown. There are more characters available than
are shown on the key.
Tip: To see all the characters found on a character key, tap and hold the key.
Switch between character cases
.
Tap
Switch between number and letter mode
Tap the number key or the letter key.
Type in a special character
Tap the symbol key, then tap the special character.
© 2013 Nokia. All rights reserved.
15
Page 16

Move the cursor to the next row
.
Tap
Tip: Tap and hold the text until you see the cursor. Without lifting your finger, drag the cursor
to the place you want.
Delete a character
. If it's a compound character, tap the key repeatedly until the character is removed. Compound
Tap
characters are not available in all languages.
Use predictive text
To speed up your writing, your phone can guess what you are starting to write. Predictive text is based
on a built-in dictionary. This feature is not available for all languages.
To switch predictive text on or off, tap
or keypad, and switch Prediction to On
Use predictive text when writing
Start writing a word, and when the word you want is shown in the suggestion bar, tap the word.
Tip: To see more suggestions, swipe left on the suggestion bar.
Correct a word
If you notice that you have misspelled a word, tap it, and you see suggestions for correcting the word.
Add a new word to the dictionary
If the word you want isn't in the dictionary, write the word, tap it, and tap the plus sign (+) in the
suggestion bar.
Settings > Writing settings and your language keyboard
or Off .
Nokia Store
Download mobile games, apps, themes, wallpapers, and ringtones to your phone from Store.
Select
Store.
Many items are free of charge; some you need to pay for with your credit card or on your phone bill.
The availability of payment methods depends on your country of residence and your network service
provider.
To learn more about Store, go to store.nokia.com.
© 2013 Nokia. All rights reserved.
16
Page 17

People & messaging
Contact your friends and family, and share your files, such as photos, using your phone. Stay tuned
with the latest updates to your social networking services even when on the go.
Make a call
Learn how to make a call with your new phone.
1. Tap
Phone.
2. Type in the phone number.
To type in the + character, used for international calls, tap * twice.
3. Tap
. If asked, select which SIM to use.
4. To end the call, tap
Tip: Is your friend's voice too loud or quiet? Press the volume keys to change the volume.
Answer a call
Swipe down.
Swap between calls
Tap
.
Decline a call
Swipe up, and tap
Reply to a call with a text message
Swipe up, tap
Call last dialled number
On the activity screen, tap the contact name or phone number you called, and tap
View your missed calls
If you missed a call, a notification is shown on the lock screen. Swipe over the notification to see the
call info. Then swipe to the activity screen, and tap
Missed and received calls are logged only if supported by the network, and if the phone is switched
on and within the network service area.
Tip: To view missed calls later, tap Call log > > Missed.
.
.
, and write your message.
.
to call back.
Save a name and phone number
Add new contacts to your phone.
1. Tap
Contacts.
2. Swipe up from the bottom of the screen, and tap Add new contact.
3. Write the name, number, and other details.
Tip: To save a phone number in the dialler, type in the number, and tap .
© 2013 Nokia. All rights reserved.
17
Page 18

Edit the details of a contact
Tap the contact, and swipe up from the bottom of the screen. Then tap Edit, and edit the details,
such as the mail address or ringtone.
Add more details
When editing a contact, swipe up from the bottom of the screen, tap Add details, and tap a detail.
Add social info to contacts
Sign in to social networking services to add your friends' info to your phone contacts list.
1. Tap
Contacts.
2. Swipe up from the bottom of the screen, and tap Accounts.
3. Tap an account, or tap
4. Select whether you want to import all or only those that are already in your contacts list.
Info from the account shows up in your contacts list.
to set one up.
Update your status
When you're signed in to your social networking services, you can post your status update on the
home screen showing your activity.
1. In the apps menu, swipe left or right to view your activities.
2. Tap What's on your mind?, or if not available, tap Tap here to get connected.
3. Sign in to a social networking service, and write your status message.
.
4. Tap
Send a message
With text and multimedia messages, you can quickly contact your friends and family.
1. Tap
Messaging > .
2. To add a contact as a recipient, tap
phone number. You can add more than one recipient.
3. Write your message in the text box.
Tip: To add a smiley, tap .
4. To add an attachment, such as a photo or video, tap
Tip: You can also take a new photo while writing your message. Tap > Camera, take a photo,
and tap Done.
. If asked, select which SIM to use.
5. Tap
If the item you insert in a multimedia message is too large for the network, the device may
automatically reduce the size.
Only compatible devices can receive and show multimedia messages. Messages may look different
in different devices.
You can send text messages that are longer than the character limit for a single message. Longer
messages are sent as two or more messages. Your service provider may charge accordingly.
, or tap Add recipient to start writing a name or typing in a
.
© 2013 Nokia. All rights reserved.
18
Page 19
Characters with accents, other marks, or some language options, take more space, and limit the
number of characters that can be sent in a single message.
Set up your mail account
Do you use more than one mail address? You can have several mailboxes on your phone.
You must be connected to the internet to add a mailbox.
1. Tap
Mail > and a mail account.
2. Write your username and password.
3. Tap Sign in.
Tip: You can add a Mail for Exchange account to your phone if you want to sync your work or
other mail with your phone. Tap the Mail for Exchange account, and type in the required details.
Add a mailbox later
Mail, swipe up from the bottom of the screen, and tap Accounts. Then tap and an account,
Tap
and sign in.
Switch off the automatic update of the inbox
Accounts and an account. Then tap Update Inbox, and change the setting, if needed.
Tap
Your phone updates your inbox at certain intervals to show your new mails when they have arrived.
This may cause transfer of large amounts of data, which may result in data traffic costs. To save
costs, you can switch the automatic update feature off and update your inbox manually using a WiFi connection.
Delete a mailbox
Accounts, tap and hold the account, and tap Delete.
Tap
Send a mail
Would you like to send a mail while on the go? With your phone, you can read and send mail, even
when not sitting at your desk.
You must be connected to the internet to send and receive mail.
Mail and a mail account.
1. Tap
2. Swipe up from the bottom of the screen, and tap Compose email.
3. To add a recipient from your contacts, tap
than one recipient.
4. Write the subject and your message.
Tip: To add a suggested word, tap it. To browse the list, swipe over the suggestions. If you don't
want to use this feature, swipe up from the bottom of the screen, and switch Prediction to Off
.
5. To add an attachment, such as a photo, swipe down to close the keyboard, then swipe up from the
bottom of the screen, and tap Add attachment.
Tip: You can also take a new photo while writing your mail. Swipe down to close the keyboard,
then swipe up from the bottom of the screen, and tap Add attachment >
to take a photo, and tap Done.
6. Tap Send.
© 2013 Nokia. All rights reserved.
. You can also write the address. You can add more
> . Tap the screen
19
Page 20

Read a mail
Mail and a mail account, then tap a message to read it.
Tap
Tip: When viewing your inbox, drag down to refresh it.
Chat with your friends
Do you like chatting online with your friends? You can send instant messages with your phone when
you're out on the town.
You must be connected to the internet to chat.
You need a Nokia account to chat. If you don't have one, you can create a new account during setup.
Chat, type in your username and password, and sign in.
Tap
If you have added friends to your chat contacts, they are automatically included in your contacts. If
you have no contacts yet, you are asked to invite friends to chat. You can also chat with others than
just your chat contacts.
Chat.
1. Tap
2. To start a chat, tap a contact. Green colour indicates that your friend is online.
3. Write your message.
.
4. Tap
Using services or downloading content may cause the transfer of large amounts of data, which may
result in data costs.
Check your voice mail
Did you let your calls go to voice mail when you couldn't answer? Call your voice mailbox and listen
to the messages at a more convenient time.
To use voice mail, you may need to subscribe to the service. For more info, contact your network
service provider.
Before using your voice mailbox, get your voice mailbox number from your network service provider.
Check your order confirmation or your network service provider's support website.
To set up your voice mail, tap
. Your phone automatically calls your voice mail.
tap
1. To check your voice mail when you just missed a call, swipe down from the top of the screen, and
tap the message notification.
2. Tap Call mailbox to listen to your voicemails?.
Listen to your voice mail later
Phone, and tap and hold 1.
Tap
Change your voice mailbox number later
Settings > Calls > Voice mailbox. Then type in your voice mailbox number, and tap . To save
Tap
the number, swipe up from the bottom of the screen, and tap Confirm.
Phone, and tap and hold 1, type in your voice mailbox number, and
© 2013 Nokia. All rights reserved.
20
Page 21

Camera
Why carry a separate camera if your phone has all you need for capturing memories? With your phone
camera, you can easily take photos or record videos.
Take a photo
Capture the best moments with your phone camera.
1. To switch the camera on, tap
2. To zoom in or out, place 2 fingers on the screen, and slide them apart or together.
3. To access the settings, like timer, white balance, or photo resolution, tap and hold the screen.
4. To take the photo, tap the screen.
The photos are saved in
Tip: Need to capture a moment quickly? To switch on the camera when your phone is locked,
swipe the lock screen up.
Tip: When the camera is open, it's easy to switch to video mode or go to Gallery. To switch the
video camera on, swipe left from the centre of the screen. To go to Gallery, swipe right from
the centre of the screen.
Record a video
Besides taking photos, you can also record videos with your phone.
1. To switch the video camera on, swipe left from the centre of the screen.
2. To zoom in or out, place 2 fingers on the screen, and slide them apart or together.
3. To start recording, tap the screen.
4. To stop recording, tap the screen.
Videos are saved in
Tip: You can send your video in a multimedia or mail message. To limit the video size for sending,
in video camera, before recording, tap and hold the screen, and switch Video quality to Low.
Gallery.
Camera.
Gallery.
Share your photo or video
Let others admire your great shots. Send them to your friends or share them on a social networking
service.
1. Tap
Gallery.
2. Tap and hold the photo or video, and tap Share.
3. Select how to share, and follow the instructions shown on the screen.
© 2013 Nokia. All rights reserved.
21
Page 22

Not all sharing services support all file formats or videos recorded in high quality.
Using services or downloading content may cause the transfer of large amounts of data, which may
result in data costs.
Share your photo straight to a social networking site
To make your sharing even quicker, you can add the logo of your favourite social network site on the
Gallery toolbar. Tap
Settings > Sharing, and switch Instant sharing to On .
© 2013 Nokia. All rights reserved.
22
Page 23
Maps & navigation
Explore what’s out there and how to get there.
Find nearby places
Explore the world around you – with Nokia Nearby, you can check for nearby places, such as
restaurants and shopping centres.
Nokia Nearby.
1. Tap
2. To see a list of certain types of places, such as restaurants, tap the category. If you don't see the
category you want in the main view, to see more categories, tap More.
Tip: To see the place on a map, tap the place, and in the place details view, tap MAP.
3. To search for a place, in the main view, write the place name in the search box.
Tip: You can save a place, so you can easily find it later. Tap the place and > SAVE. To see
your saved places, in the Nokia Nearby main view, tap More >
Using services or downloading content may cause the transfer of large amounts of data, which may
result in data costs.
This service may not be available in all countries or regions, and may be provided only in selected
languages. The service may be network dependent. For more info, contact your network service
provider.
Contents of digital maps may sometimes be inaccurate and incomplete. Never rely solely on the
content or the service for essential communications, such as in emergencies.
Note: Before sharing your location, always consider carefully with whom you are sharing. Check
the privacy settings of the social networking service you are using, as you might share your
location with a large group of people.
.
© 2013 Nokia. All rights reserved.
23
Page 24
Internet
Learn how to create wireless connections and browse the web while keeping your data costs down.
Browse the web
Catch up on the news, and visit your favourite websites on the go.
Tip: If your network service provider doesn't charge you a fixed fee for data transfer, to save
on data costs, use a Wi-Fi network to connect to the internet.
Internet.
1. Tap
2. Write the web address in the address bar, and tap
Tip: To search the internet, write a search word in the address bar. If asked, select your default
search engine.
Zoom in or out
Place two fingers on the screen, and slide your fingers apart or together.
Tip: To view the page in a single column of larger, readable text and pictures without having to
zoom in, swipe up from the bottom of the screen, tap More > Settings, and switch Column
view to On
Share a web page
When browsing, swipe up from the bottom of the screen, and tap Share and how you want to share.
Tip: Follow your data usage with the Counters app.
.
Add a website to your favourites
If you visit the same websites all the time, add them to your favourites so you can easily access them.
1. Tap
Internet.
2. While browsing, swipe up from the bottom of the screen, and tap Add to favourites.
Go to a favourite website
Swipe up from the bottom of the screen, and tap Favourites and a favourite.
Tip: You can also pin your favourite websites to the apps menu. While browsing, swipe up from
the bottom of the screen, and tap Add to Home.
.
© 2013 Nokia. All rights reserved.
24
Page 25

Entertainment
Having a spare moment and in need of entertainment? Learn how to listen to the radio on your phone.
Play a song
You can use your phone's music player to listen to music and podcasts while on the move.
1. Tap
Music.
2. Tap Songs, Artists, Playlists, or Albums.
3. Tap a song.
4. To pause or resume playing, tap
Tip: You can buy music from Nokia Music. To learn more, go to music.nokia.com.
Skip to the previous or next song
or .
Tap
Rewind or fast-forward
Drag the slider.
Play songs in a random order
.
Tap
Listen to the radio
You can listen to FM radio stations using your phone – just select a station.
To listen to the radio, you need to connect a compatible headset to the device. The headset acts as
an antenna.
FM radio.
1. Tap
2. To tune in to the station you want to listen to, use your finger to rotate the wheel left or right.
Start using Nokia Music Unlimited
With your Nokia Music Unlimited phone, you can start downloading music to your phone right away.
Once you have started to use your phone, you may receive text messages from Nokia. Keep the text
messages, as they contain important info.
You need a full Nokia Music Unlimited membership to use all the features. To get a full membership,
sign in with your Nokia account. If you don't have an account yet, create one.
When you have a Nokia Music Unlimited membership associated with your Nokia account, do not close
the account. If you do, you can no longer use your membership.
or .
Download music
Keep up with the beat and download your favourite music from Nokia Music.
Where available, use a Wi-Fi connection to download music from Nokia Music. For info on how to
connect to the internet, see your phone user guide.
© 2013 Nokia. All rights reserved.
25
Page 26

1. Tap Music > Music store.
2. Browse to the song or album you want to download, and tap Download all. If asked, sign in to your
Nokia account.
Downloaded songs are automatically added to your music collection.
Downloading and streaming music and other content may involve transfer of large amounts of data
through your service provider’s network. For info about data transmission charges, contact your
network service provider.
© 2013 Nokia. All rights reserved.
26
Page 27

Office
Learn how to use the calendar to keep yourself organised.
Add a calendar entry
Need to remember an event? Add it to your calendar.
1. Tap
Calendar.
.
2. Tap
3. Edit the event details.
4. If the event is a birthday, set Birthday to On
5. Tap Save.
Tip: To delete an entry, tap and hold the entry, then tap Delete.
Change the time and date
You can set your phone clock manually.
Tap
Settings > Time and date.
Change the time zone when travelling
Tap Time zone, and tap the time zone of your location. The time and date on your phone are set
according to the time zone.
Set an alarm
You can use your phone as an alarm clock.
Alarms.
1. Tap
.
2. Tap
3. Set the alarm time.
4. To set the alarm to go off at the same time on certain days, swipe up from the bottom of the
screen, tap Repeat, select the days, and tap Done.
5. To set a ringtone for the alarm, swipe up from the bottom of the screen, tap Alarm tone, select
the ringtone, and tap Set.
6. Tap Done.
Tip: You can set multiple alarms. After you've set an alarm, tap to set a new one.
.
© 2013 Nokia. All rights reserved.
27
Page 28

Phone management & connectivity
Take care of your phone and its contents. Learn how to connect to accessories and networks, transfer
files, create backups, lock your phone, and keep the software up to date.
Share your content using Slam
Have a vacation photo you'd like to show your friend? Share things easily with Slam. Just move your
phone close to another phone and content is transferred.
1. Switch Bluetooth on in both phones.
2. Make sure both phones are visible to other phones.
3. Tap, for example, a photo and
4. Move your phone close to the other phone.
Slam searches for the nearest phone, and sends the item to it.
Operating the device in hidden mode is a safer way to avoid malicious software. Do not accept
Bluetooth connection requests from sources you do not trust. You can also switch the Bluetooth
function off when you are not using it.
Connect to a Wi-Fi network
To help save on data costs, you can use a Wi-Fi network to connect to the internet, whether you're
at home or at a library or internet café.
1. Swipe down from the top of the screen, and tap
2. Tap Wi-Fi and the network you want.
3. If the connection is secured, type in the password.
Connect to the previously used Wi-Fi network
Swipe down from the top of the screen, and tap
Add a new network
Swipe down from the top of the screen, tap Wi-Fi, make sure Wi-Fi is on, tap Add new network, and
type in the required info.
Close the Wi-Fi connection
Swipe down from the top of the screen, and tap
Important: Use encryption to increase the security of your Wi-Fi connection. Using encryption
reduces the risk of others accessing your data.
> Slam via Bluetooth.
.
.
.
Copy content between your phone and computer
Copy photos, videos, music, and other content created by you (and stored on the memory card)
between your phone and computer.
To copy content from the phone memory, you need to have a memory card inserted in your phone.
1. Connect your phone to a compatible computer with a compatible USB cable.
2. Tap Mass storage.
© 2013 Nokia. All rights reserved.
28
Page 29
3. On your computer, open a file manager, such as Windows Explorer, and browse to your phone. You
can see the content stored on the memory card.
4. Drag and drop items between your phone and computer.
Update your phone software
Stay in step with the beat – update your phone software and apps to get new and enhanced features
for your phone.
1. When your phone notifies you of an update, swipe down from the top of the screen, and tap the
update notification.
2. To download and install an update, tap Update, and follow the instructions shown on the phone.
The update may take several minutes. If you encounter problems, contact your network service
provider.
After the update, go to www.nokia.com/support to get your new user guide.
Your network service provider may send updates over the air directly to your phone. For more info
on this service, contact your network service provider.
Using services or downloading content may cause the transfer of large amounts of data, which may
result in data costs.
Before starting the update, connect a charger or make sure the device battery has enough power.
Warning: If you install a software update, you cannot use the device, even to make emergency
calls, until the installation is completed and the device is restarted.
Use your phone in flight mode
In places where you're not allowed to connect to the internet with your phone, you can still access
your music, videos, and offline games if you switch flight mode on.
1. Tap
Settings.
2. Switch Flight mode to On
Switch flight mode off
Settings, and switch Flight mode to Off .
Tap
Flight mode closes connections to the mobile network and switches your phone's wireless features
off. Comply with the instructions and safety requirements given by, for example, an airline, and any
applicable laws and regulations. Where allowed, you can connect to a Wi-Fi network to, for example,
browse the internet or switch Bluetooth on in flight mode.
Warning: When the flight profile is activated, you cannot make or receive any calls, including
emergency calls, or use other features that require network coverage. To make a call, switch to
another profile.
.
Access codes
Ever wondered what the different codes on your phone are for?
© 2013 Nokia. All rights reserved.
29
Page 30
PIN or PIN2 code
(4-8 digits)
PUK or PUK2 These are required to unblock a PIN or PIN2 code.
Security code (lock code, password) This helps you protect your phone against
IMEI This is used to identify phones in the network.
These protect your SIM card against
unauthorised use or are required to access some
features.
You can set your phone to ask for the PIN code
when you switch it on.
If you forget the codes or they aren't supplied
with your card, contact your network service
provider.
If you type in the code incorrectly 3 times in a
row, you need to unblock the code with the PUK
or PUK2 code.
If not supplied with your SIM card, contact your
network service provider.
unauthorised use.
You can set your phone to ask for the lock code
that you define.
Keep the code secret and in a safe place,
separate from your phone.
If you forget the code and your phone is locked,
your phone will require service. Additional
charges may apply, and all the personal data on
your phone may be deleted.
For more information, contact Nokia Care or
your phone dealer.
You may also need to give the number to Nokia
Care services.
To view your IMEI number, dial *#06#.
© 2013 Nokia. All rights reserved.
30
Page 31

Product and safety information
Network services and costs
You can only use your device on the GSM 900, 1800 MHz networks. You need a subscription with a service provider.
You may also need to subscribe to some features.
Emergency calls
1. Make sure the device is switched on.
2. Check for adequate signal strength.
You may also need to do the following:
• Put a SIM card in the device.
• Switch the call restrictions off in your device, such as call barring, fixed dialling, or closed user group.
• Make sure the flight profile is not activated.
• If the device screen and/or keys are locked, unlock them.
3. Press the back key repeatedly, until the home screen is shown.
4. To open the dialler, select
5. Type in the official emergency number for your present location. Emergency call numbers vary by location.
.
6. Select
7. Give the necessary info as accurately as possible. Do not end the call until given permission to do so.
To make an emergency call during the first start-up, tap
Important: Activate both cellular and internet calls, if your phone supports internet calls. The phone may attempt to make
emergency calls both through cellular networks and through your internet call se rvice provider. Connect ions in all
conditions cannot be guaranteed. Never rely solely on any wireless phone for essential communications like medical
emergencies.
Take care of your device
Handle your device, battery, charger and acce ssories with care. The followin g suggestions help you ke ep your device operational .
• Keep the device dry. Precipitation, humidity, and all types of liquids or moisture can contain minerals that corrode electronic
circuits. If your device gets wet, remove the battery, and let the device dry.
• Do not use or store t he device in dusty or dirty areas.
• Do not store the device in high temperatures. High temperatures may damage the device or battery.
• Do not store the device in cold temperatures. When the device warms to its normal temperature, moisture can form inside
the device and damage it.
• Do not open the device other than as instructed in the user guide.
• Unauthorised modifications may damage the device and violate regulations governing radio devices.
• Do not drop, knock, or shake the device. Rough handling can break it.
• Only use a soft, clean, dry cloth t o clean the surface of the device.
• Do not paint the device. Paint can prevent proper operation.
• For optimal performance, switch the device off and remove the battery from time to time.
• Keep the device away from magnets or magnetic fields.
• To keep your important data safe, store it in at least two separate places, such as your device, memory card, or computer,
or write down important info.
Recycle
Phone.
.
© 2013 Nokia. All rights reserved.
31
Page 32

Always return your used electronic products, batteries, and packaging materials to dedicated collection points. This way you
help prevent uncontrolled waste disposal and promote the recycling of materials. All materials of the device can be recovered
as materials and energy. Check how to recycle your Nokia products at www.nokia.com/recycle.
Crossed-out wheeled-bin symbol
The crossed-out wheeled-bin symbol on your product, battery, literature, or packaging reminds you that all electrical and
electronic products and batteries must be taken to separate collection at the end of their working life. Do not dispose of these
products as unsorted municipal waste: take them for recycling. For info on your nearest recycling point, check with your local
waste authority, or go to www.nokia.com/support. For more info on the environmental attributes of your device, see
www.nokia.com/ecoprofile.
About Digital Rights Management
When using this device, obey all laws and respect local customs, privacy and legitimate rights of others, including copyrights.
Copyright protection may prevent you from copying, modifying, or transferring photos, music, and other content.
Digital rights management (DRM) protected content comes with an associated licence that defines your rights to use the content.
With this device you can access content protected with OMA DRM 1.0. If certain DRM software fails to protect the content, content
owners may ask that such DRM software's ability to access new DRM-protected content be revoked. Revocation may also prevent
renewal of such DRM-protected content already in your device. Revocation of such DRM software does not affect the use of
content protected with other types of DRM or the use of non-DRM-protected content.
Battery and charger info
Use your device only with an original BL-4U rechargeable battery.
Charge your device with AC-20 or AC-18 charger. Charger plug type may vary.
Nokia may make additional battery or charger models available for this device.
Important: Talk and standby times are estimates only. Actual times are affected by, for example, network conditions,
device settings, features being used, battery condition, and temperature.
Battery and charger safety
Always switch the device off and unplug the charger before removing the battery. To unplug a charger or an accessory, hold and
pull the plug, not the cord.
When your charger is not in use, unplug it. If left unused, a fully charged battery will lose its charge over time.
Always keep the battery between 15°C and 25°C (59°F and 77°F) for optimal performance. Extreme temperatures reduce the
capacity and lifetime of the battery. A device with a hot or cold battery may not work temporarily.
Accidental short-circuiting can happen when a metallic object touches the metal strips on the battery. This may damage the
battery or the other object.
Do not dispose of batteries in a fire as they may explode. Obey local regulations. Recycle when possible. Do not dispose as
household waste.
Do not dismantle, cut, crush, bend, puncture, or otherwise damage the battery in any way. If a battery leaks, do not let liquid
touch skin or eyes. If this happens, immediately flush the affected areas with water, or seek medical help. Do not modify, attempt
to insert foreign objects into the battery, or immerse or expose it to water or other liquids. Batteries may explode if damaged.
Use the battery and charger for their intended purposes only. Improper use, or use of unapproved or incompatible batteries or
chargers may present a risk of fire, explosion, or other hazard, and may invalidate any approval or warranty. If you believe the
battery or charger is damaged, take it to a service centre before continuing to use it. Never use a damaged battery or charger.
Do not charge your device during a lightning storm. Only use the charger indoors.
© 2013 Nokia. All rights reserved.
32
Page 33

Additional safety information
Small children
Your device and its accessories are not toys. They may contain small parts. Keep them out of the reach of small children.
Medical devices
Operation of radio transmitting equipment, including wireless phones, may interfere with inadequately shielded medical devices'
function. Consult a physician or the medical device's manufacturer to determine if it is adequately shielded from external radio
energy.
Implanted medical devices
To avoid potential interference, manufacturers of implanted medical devices recommend a minimum separation of 15.3
centimetres (6 inches) between a wireless device and the medical device. Persons who have such devices should:
• Always keep the wireless device more than 15.3 centimetres (6 inches) from the medical device.
• Not carry the wireless device in a breast pocket.
• Hold the wireless device to the ear opposite the medical device.
• Switch the wireless device off if there is any reason to suspect that interference is taking place.
• Follow the manufacturer directions for the implanted medical device.
If you have any questions about using your wireless device with an implanted medical device, consult your health care provider.
Accessibility solutions
Nokia is committed to making mobile phones easy to use for all individuals, including those with disabilities. For more information,
visit the Nokia website at www.nokiaaccessibility.com.
Hearing
Warning: When you use the headset, your ability to hear outside sounds may be affected. Do not use the headset where
it can endanger your safety.
Some wireless devices may interfere with some hearing aids.
Nickel
The surface of this device is nickel-free.
Protect your device from harmful content
Your device may be exposed to viruses and other harmful content. Take the following precautions:
• Be cautious when opening messages. They may cont ain malicious software or otherwise be har mful to your device or
computer.
• Be cautious when accepting connectivity requests, browsing the internet, or downloading content. Do not accept Bluetooth
connections from sources you do not trust.
• Only install and use services and software from sources that you trust and that offer adequate security and protection.
• Install antivirus and other security software on your device and any connected computer. Only use one antivirus app at a
time. Using more may affect performance and operation of the device and/or computer.
• If you access preinstalled bookmarks and links to third party internet sites, take the appropriate precautions. Nokia does
not endorse or assume liability for such sites.
Vehicles
Radio signals may affect improperly installed or inadequately shielded electronic systems in vehicles. For more info, check wit h
the manufacturer of your vehicle or its equipment.
© 2013 Nokia. All rights reserved.
33
Page 34

Only qualified personnel should install the device in a vehicle. Faulty installation may be dangerous and invalidate your warranty.
Check regularly that all wireless device equipment in your vehicle is mounted and operating properly. Do not store or carry
flammable or explosive materials in the same compartment as the device, its parts, or accessories. Do not place your device or
accessories in the air bag deployment area.
Potentially explosive environments
Switch your device off in potentially explosive environments, such as near petrol pumps. Sparks may cause an explosion or fire
resulting in inju ry or death. Note restrictions in a reas with fuel; chemical plants; or where blasting operations are in progress.
Areas with a potentially explosive environment may not be clearly marked. These usually are areas where you are advised to
switch your engine off, below deck on boats, chemical transfer or storage facilities, and where the air contains chemicals or
particles. Check with the manufacturers of vehicles using liquefied petroleum gas (such as propane or butane) if this device can
be safely used in their vicinity.
Certification information (SAR)
This mobile device meets international guidel ines for exposure to radio waves.
Your mobile device is a radio transmitter and receiver. It is designed not to exceed the limits for exposure to radio waves (radio
frequency electromagnetic fields), recommended by international guidelines from the independent scientific organization
ICNIRP. These guidelines incorporate substantial safety margins assure the protection of all persons regardless of age and health.
The exposure guidelines are based on the Specific Absorption Rate (SAR), which is an expression of the amount of radio frequency
(RF) power deposited in the head or body when the device is transmitting. The ICNIRP SAR limit for mobile devices is 2.0 W/kg
averaged over 10 grams of tissue.
SAR tests are carried out with the device in standard operating positions, transmitting at its highest certified power level, in all
its frequency bands. The maximum recorded SAR values for this device are:
Maximum SAR value Frequency bands used when Maximum
When held against the head 0.64 W/kg over 10g GPRS900+WLAN2450
When operated at a separation distance
of 1.5 centimetres (5/8 inch) from the
body
Your mobile device is also designed to meet the requirements for exposure to radio waves established by the India Department
of Telecommunications. These requirements set a SAR limit of 1.6 W/kg averaged over one gram of tissue. The highest SAR value
reported under this standard during product certification for use at the ear is:
When held against the head 1.11 W/kg over 1g GSM1800+WLAN2450
0.60 W/kg over 10g GPRS900+WLAN2450
Maximum SAR value Frequency bands used when Maximum
SAR value was recorded
SAR value was recorded
This device meets RF exposure guidelines when used against the head or when positioned at least 1.5 centimetres (5/8 inch)
away from the body. When a carry case, belt clip or other form of device holder is used for body-worn operation, it should not
contain metal and should provide at least the above stated separation distance from the body.
To send data or messages, a good connection to the network is needed. Sending may be delayed until such a connection is
available. Follow the separation distance instructions until the sending is finished.
During general use, the SAR values are usually well below the values stated above. This is because, for purposes of system
efficiency and to minimise interference on the network, the operating power of your mobile is automatically decreased when
full power is not needed for the call. The lower the power output, the lower the SAR value.
Device models may have different versions and more than one value. Component and design changes may occur over time and
some changes could affect SAR values. The latest available SAR information for this and other Nokia device models can be found
at www.nokia.com/sar.
© 2013 Nokia. All rights reserved.
34
Page 35

The World Health Organization (WHO) has stated that current scientific information does not indicate the need for any special
precautions when using mobile devices. If you are interested in reducing your exposure, they recommend you limit your us age
or use a hands-free kit to keep the device away from your head and body. For more information and explanations and discussions
on RF exposure, go to the WHO website at www.who.int/peh- emf/en.
Nokia original accessories
For availability of approved accessories, check with your dealer.
An extensive range of accessories is available for your device. For more details, see www.nokia.com/accessories.
Practical rules about accessories
• Keep all accessories out of the reach of small children.
• When you disconnect the power cord of any accessory, grasp and pull the plug, not the cord.
• Check regularly that accessories installed in a vehicle are mounted and are operating properly.
• Installation of any complex car accessories must be made by qualified personnel only.
Battery
Type: BL-4U
Talk time:
Up to 14 hours (GSM).
Standby:
Up to 22 days (GSM).
Important: Battery talk and stand-by times are estimates and only possible under optimal network conditions. Actual
battery talk and standby times depend on SIM cards, features used, battery age and condition, temperatures to which
battery is exposed, network conditions, and many other factors, and may be significantly shorter than those specified
above. Ringing tones, ha nds free call handling, use in digital mode, and other fe atures will also consume the battery, and
the amount of time a device is used for calls will affect its stand-by time. Likewise, the amount of time that the device is
turned on and in the standby mode will affect its talk time.
Nokia support messages
To help you take maximum advantage of your phone and services, you receive free customised text messages from Nokia. The
messages contain tips and tricks and support.
To stop receiving the messages, select
To provide the service described above, your mobile phone number, the serial number of your phone, and some identifiers of
the mobile subscription are sent to Nokia when you use the phone for the first time. Some or all information may also be sent
to Nokia when updating software. This information may be used as specified in the privacy policy, available at www.nokia.com.
Accounts > Nokia account > Get news and offers.
Copyrights and other notices
DECLARATION OF CONFORMITY
Hereby, NOKIA CORPORATION declares that this RM-934 product is in compliance with the essential requirements and other
relevant provisions of Directive 1999/5/EC. A copy of the Declaration of Conformity can be found at www.nokia.com/global/
declaration/declaration-of-conformity.
The availability of products, features, apps and services may vary by region. For more info, contact your Nokia dealer or your
service provider. This device may contain commodities, technology or software subject to export laws and regulations from the
US and other countries. Diversion contrary to law is prohibited.
The contents of this document are provided "as is". Except as required by applicable law, no warranties of any kind, either express
or implied, including, but not limited to, the implied warranties of merchantability and fitness for a particular purpose, are made
in relation to the accuracy, reliability or contents of this document. Nokia reserves the right to revise this document or withdraw
it at any time without prior notice.
© 2013 Nokia. All rights reserved.
35
Page 36

To the maximum extent permitted by applicable law, under no circumstances shall Nokia or any of its licensors be responsible
for any loss of data or income or any special, incidental, consequential or indirect damages howsoever caused.
Reproduction, transfer or distribution of part or all of the contents in this document in any form without the prior written
permission of Nokia is prohibited. Nokia operates a policy of continuous development. Nokia reserves the right to make changes
and improvements to any of the products described in this document without prior notice.
Reverse engineering of software in the device is prohibited to the extent permitted by applicable law. Insofar as this user guide
contains any limitations on Nokia's representations, warranties, damages and liabilities, such limitations shall likewise limit any
representations, warranties, damages and liabilities of Nokia's licensors.
Nokia does not provide a warranty for or take any responsibility for the functionality, content, or end-user support of third-party
apps provided with your device. By using an app, you acknowledge that the app is provided as is. Nokia does not make any
representations, provide a warranty, or take any responsibility for the functionality, content, or end-user support of third-party
apps provided with your device.
The availability of particular products, services and features may vary by region. Please check with your local Nokia dealer for
further details and availability of language options.
TM & © 2013 Nokia. All rights reserved. Third party products/names may be TMs of their respective owners.
The Bluetooth word mark and logos are owned by the Bluetooth SIG, Inc. and any use of such marks by Nokia is under license.
This product is licensed under the MPEG-4 Visual Patent Portfolio License (i) for personal and noncommercial use in connection
with information which has been encoded in compliance with the MPEG-4 Visual Standard by a consumer engaged in a personal
and noncommercial activity and (ii) for use in connection with MPEG-4 video provided by a licensed video provider. No license is
granted or shall be implied for any other use. Additional information, including that related to promotional, internal, and
commercial uses, may be obtained from MPEG LA, LLC. See www.mpegla.com.
In the event of any inconsistencies between the English language version and any Indic language translation, the English language
version shall always prevail over the Indic language translation.
© 2013 Nokia. All rights reserved.
36
 Loading...