


Nokia 3155 User Guide
i

LEGAL INFORMATION
Copyright ©2005 Nokia. All rights reserved.
Nokia, Nokia Connecting People, Nokia 3155, Pop-Port™, and the Nokia Original
Enhancements logos are trademarks or registered trademarks of Nokia Corporation. Other
company and product names mentioned herein may be trademarks or trade names of their
respective owners.
Copyright ©1999-2005. Tegic Communications, Inc. All rights reserved.
Includes RSA BSAFE cryptographic or security protocol software from
RSA Security.
Java™ is a trademark of Sun Microsystems, Inc.
The information contained in this user guide was written for the Nokia 3155 products. Nokia
operates a policy of ongoing development. Nokia reserves the right to make changes to any
of the products described in this document without prior notice.
UNDER NO CIRCUMSTANCES SHALL NOKIA BE RESPONSIBLE FOR ANY LOSS OF DATA OR
INCOME OR ANY SPECIAL, INCIDENTAL, AND CONSEQUENTIAL OR INDIRECT DAMAGES
HOWSOEVER CAUSED. THE CONTENTS OF THIS DOCUMENT ARE PROVIDED “AS IS.” EXCEPT
AS REQUIRED BY APPLICABLE LAW, NO WARRANTIES OF ANY KIND, EITHER EXPRESS OR
IMPLIED, INCLUDING, BUT NOT LIMITED TO, THE IMPLIED WARRANTIES OF
MERCHANTABILITY AND FITNESS FOR A PARTICULAR PURPOSE, ARE MADE IN RELATION TO
THE ACCURACY AND RELIABILITY OR CONTENTS OF THIS DOCUMENT. NOKIA RESERVES THE
RIGHT TO REVISE THIS DOCUMENT OR WITHDRAW IT AT ANYTIME WITHOUT PRIOR NOTICE.
EXPORT CONTROLS This device may contain commodities, technology, or software subject
to export laws and regulations from the U.S. and other countries. Diversion contrary to law
is prohibited.
Issue 1
ii
Copyright © 2005 Nokia. All rights reserved.

Contents
For your safety ...................................... vi
About your device ............................... vii
Network Services................................. vii
Shared memory................................... viii
Phone at a glance.................................. 1
Keys and parts........................................ 1
Standby mode......................................... 2
Quick keys................................................ 2
Indicators and icons ............................. 2
Get the most out of this guide.......... 3
Phone menus .......................................... 3
Scroll method...................................... 4
In-phone help...................................... 4
Security feature ..................................... 4
Go to functions...................................... 5
Choose Go to functions.................... 5
Organise functions............................. 5
Set up your phone................................. 6
Antenna.................................................... 6
Battery...................................................... 6
Remove the back cover.................... 7
Remove the battery........................... 7
UIM card slot....................................... 7
Replace the battery........................... 7
Replace the back cover .................... 8
Charge the battery............................. 8
Turn your phone on or off................... 9
Connect the headset ............................ 9
Make a call.............................................. 9
Keypad................................................... 9
Contacts list....................................... 10
Last dialled number......................... 10
Conference calling ........................... 10
Answer calls.......................................... 10
An incoming call .............................. 10
Adjust the earpiece volume .......... 11
Answer a call with the
keypad locked.................................... 11
Loudspeaker....................................... 11
Call options........................................ 11
Keyguard................................................ 12
Lock the keypad................................ 12
Unlock the keypad........................... 12
Text entry............................................... 13
Standard mode..................................... 13
Text (Abc) ........................................... 13
Numbers (123).................................. 13
Punctuation and
special characters............................ 13
Predictive text mode.......................... 13
Activate or deactivate.................... 14
Text entry ........................................... 14
Change case and mode...................... 14
Messages................................................ 15
Text messages....................................... 15
Compose and send........................... 15
Read message ................................... 17
Reply to message............................. 17
Templates........................................... 18
Text message folders....................... 18
Distribution list................................. 19
Delete messages............................... 19
Change sending options................. 20
Change message settings.............. 20
Picture messages................................. 21
Receive and save.............................. 21
Compose and send........................... 21
Multimedia messages......................... 22
MMS settings.................................... 23
Voice messages.................................... 27
Save voice mailbox number.......... 27
Call and setup voice mail .............. 27
Listen to voice messages............... 27
Automate voice mail....................... 27
Clear voice mail icon....................... 29
Web messaging.................................... 29
Copyright © 2005 Nokia. All rights reserved.
iii

Call register .......................................... 30
View missed calls................................ 30
View received calls............................. 30
View dialled numbers......................... 31
View call times................................. 31
Delete call registers............................ 31
Call duration......................................... 31
Data and fax call duration ............... 32
Minibrowser duration........................ 32
Contacts................................................. 34
Add new contacts............................... 34
Save contact name and number . 34
Save contact number only............ 34
Save an entry.................................... 34
Save numbers and text items ...... 34
Change default number................. 35
Caller groups..................................... 35
Set up speed dial ............................. 35
Voice tags.............................................. 36
Assign a voice tag to an entry..... 36
Dial a number................................... 36
Voice tags .......................................... 37
Edit contacts list entries................... 37
Delete contacts entries ..................... 38
Access the contacts menu................ 38
Search for a name........................... 38
Configure settings........................... 38
Send and receive contacts ............... 39
Send a business card...................... 39
Gallery.................................................... 40
Folders.................................................... 40
Media...................................................... 42
Media player......................................... 42
Radio....................................................... 42
Turn the radio on and off.............. 42
Voice recorder...................................... 43
Record speech or sound................. 44
Options ............................................... 44
Media equaliser................................... 44
Activate an equaliser set............... 44
Settings.................................................. 46
Profiles ................................................... 46
Personalise a profile ....................... 46
Set a timed profile .......................... 46
Tone settings........................................ 47
Themes................................................... 47
Main display settings......................... 47
Wallpaper .......................................... 47
Screen saver...................................... 48
Power saver....................................... 48
Colour schemes................................ 48
Choose a banner.............................. 48
Backlight time-out.......................... 48
Mini display settings.......................... 48
Power saver....................................... 48
Time and date settings...................... 48
Clock.................................................... 48
Date..................................................... 48
Date and time auto-update.......... 49
Call settings.......................................... 49
Anykey answer................................. 49
Automatic redial.............................. 49
Speed dial.......................................... 49
Open fold to answer....................... 50
Calling card ....................................... 50
International prefix......................... 51
Data or fax calls............................... 51
Call summary.................................... 51
Ringing tone for no caller ID........ 51
Phone settings..................................... 52
Phone language ............................... 52
Memory status ................................. 52
Automatic keyguard....................... 52
DTMF tones ....................................... 52
Start-up tone.................................... 53
Help text activation........................ 53
Voice commands................................. 53
Hands-free operation..................... 53
Enhancement settings....................... 54
Headset .............................................. 54
Hands-free operation..................... 54
Loopset ............................................... 55
iv
Copyright © 2005 Nokia. All rights reserved.

Charger................................................ 55
Security settings.................................. 55
Phone lock.......................................... 55
Allow numbers.................................. 56
Change lock code............................. 56
Call restrictions................................. 57
Voice privacy..................................... 57
Application settings............................ 58
Network.................................................. 58
Roaming options.............................. 58
Mode.................................................... 58
Network services.................................. 59
Store a feature code........................ 59
Call diverting..................................... 59
Restore factory settings..................... 60
Organiser................................................ 61
Alarm clock............................................ 61
Set or change alarm setting ......... 61
Repeat alarm..................................... 61
Set the alarm tone........................... 61
Snooze time-out .............................. 61
Alarm conditions.............................. 61
Turn an alarm off ............................. 62
Calendar................................................. 62
Open..................................................... 62
Go to a date....................................... 62
Note a specific date ........................ 62
View notes (day view)..................... 62
Options while viewing
a list of notes .................................... 63
Send a note........................................ 63
Notes....................................................... 64
To-do list................................................ 64
Add a to-do note.............................. 64
Calculator .............................................. 65
Currency converter.......................... 66
Countdown timer ................................ 66
Set the timer ..................................... 66
Change the time............................... 67
Interrupt the timer .......................... 67
Stopwatch ............................................. 67
Measure time.................................... 67
Operation note.................................. 68
Options................................................ 68
Extras...................................................... 69
Games..................................................... 69
Collection............................................... 69
Memory .................................................. 69
Mobile web .......................................... 70
Mobile Internet access....................... 70
Sign on ................................................... 71
Navigate the mobile Internet........... 71
Phone keys......................................... 71
Receive a call while online............ 71
Make an emergency call
while online....................................... 71
Clear the cache and disconnect... 72
PC connectivity.................................... 73
USB data transfer................................ 73
Transfer with Windows Explorer . 73
Nokia PC Suite...................................... 74
Enhancements...................................... 75
Battery information............................ 76
Charging and discharging................. 76
Nokia battery authentication
guidelines............................................... 77
Care and maintenance....................... 79
Additional safety informatsion........ 80
Operating environment...................... 80
Medical devices.................................... 80
Vehicles.................................................. 81
Potentially explosive
environments........................................ 81
Emergency calls ................................... 82
Certification information (SAR) ...... 82
Index ....................................................... 84
Copyright © 2005 Nokia. All rights reserved.
v

For your safety
For your safety
Read these simple guidelines.
Not following them may be dangerous
or illegal. Read the complete user
guide for further information.
SWITCH ON SAFELY
Do not switch the device on
when wireless phone use is
prohibited or when it may
cause interference or
danger.
ROAD SAFETY COMES FIRST
Obey all local laws. Always
keep your hands free to
operate the vehicle while
driving. Your first
consideration while driving
should be road safety.
INTERFERENCE
Do not switch the device on
when wireless phone use is
prohibited or when it may
cause interference or
danger.
SWITCH OFF IN HOSPITALS
Follow any restrictions.
Switch the device off near
medical equipment.
SWITCH OFF IN AIRCRAFT
Follow any restrictions.
Wireless devices can cause
interference in aircraft.
SWITCH OFF WHEN
REFUELLING
Don't use the device at a
refuelling point. Don't use
near fuel or chemicals.
SWITCH OFF NEAR BLASTING
Follow any restrictions.
Don't use the device where
blasting is in progress.
USE SENSIBLY
Use only in the normal
position as explained in the
product documentation.
Don't touch the antenna
unnecessarily.
QUALIFIED SERVICE
Only qualified personnel
may install or repair this
product.
ENHANCEMENTS AND
BATTERIES
Use only approved
enhancements and
batteries. Do not connect
incompatible products.
WATER-RESISTANCE
Your phone is not waterresistan t. Keep it dry.
BACK-UP COPIES
Remember to make backup copies or keep a written
record of all important
information.
CONNECTING TO OTHER
DEVICES
When connecting to any
other device, read its user
guide for detailed safety
instructions. Do not
connect incompatible
products.
Copyright © 2005 Nokia. All rights reserved.
vi

For your safety
EMERGENCY CALLS
Ensure the device is
switched on and in service.
Press the end key as many
times as needed to clear th e
display and return to the
main screen. Enter the
emergency number, then
press the call key. Give your
location. Do not end the
call until given permission
to do so.
■ About your device
The wireless devices described in this
guide are approved for use on the
CDMA 800 and 1900 and AMPS
networks. Contact your service
provider for more information
about networks.
When using the features in this device,
obey all laws and respect privacy and
the legitimate rights of others.
Warning: To use any features
in this device, other than the
alarm clock, the device must
be switched on. Do not switch
the device on when wireless
phone use may cause
interference or danger.
■ Network Services
To use the device you must have
service from a wireless service provider
or network operator. Many of the
features in this device depend on
features in the wireless network to
function. These network services may
not be available on all networks or you
may have to make specific
arrangements with your service
provider before you can utilise them.
Your service provider may need to give
you additional instructions for their
use and explain what charges will
apply. Some networks may have
limitations that affect how you can
use network services. For instance,
some networks may not support all
language-dependent characters
and services.
Your service provider may have
requested that certain features be
disabled or not activated in your
device. If so, they will not appear on
your device menu. Contact your service
provider for more information.
vii
Copyright © 2005 Nokia. All rights reserved.

■ Shared memory
The following device features may
share memory: contacts; text
messages; photos, images, and tones in
gallery; calendar notes; games; and
applications. Use of one or more of
these features may reduce the memory
available for the remaining features
sharing memory. If your phone displays
a message that the memory is full
when you try to use a shared memory
feature, delete some of the
information or entries stored in the
shared memory features before
continuing. Some of the features,
such as photos, images, and tones
in gallery; text messages; and
applications may have a certain
amount of memory specially allotted
to them in addition to the memory
shared with other features.
For your safety
Copyright © 2005 Nokia. All rights reserved.
viii

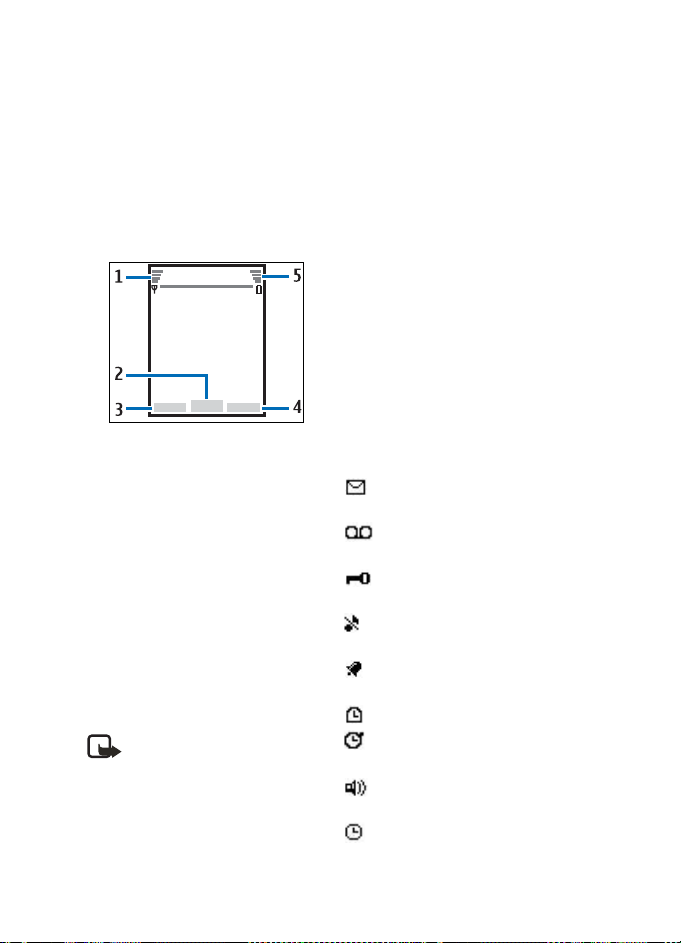
1. Phone at a glance
Phone at a glance
• Right selection key (7)
• Power key/end key (8)
• Charger port (9)
• Pop-Port™ connector (10)
• Microphone (11)
■ Keys and parts
• Loudspeaker (1)
• Voice key (2)
• Volume key (3)
• Front display (4)
•Headset jack (5)
• Earpiece port (1)
•Display screen (2)
• Left selection key (3)
• Call key (4)
• Keypad (5)
• Four-way scroll and
selection key (6)
Copyright © 2005 Nokia. All rights reserved.
The voice key functions as follows:
• Press once (Short press)—Answer
an incoming call.
• Press and hold (Long press)—
Answer or make a voice dialling.
1
Phone at a glance
■ Standby mode
Depending on your wireless service
provider or network operator and the
model number of your phone, some or
all of the following selection keys may
appear in standby mode.
The standby mode is home base and
indicates your phone is in the idle
state..
Signal strength (1)—A higher bar
indicates a stronger network signal.
Menu (2)—Press the centre selection
key to select this option.
Go to (3)—Press the left selection key
to select this option.
Names or network operator menu (4)—
Press the right selection key to select
this option.
Battery level (5)—A higher bar
indicates more power in the battery.
■ Quick keys
Note: Depending on your
wireless service provider or
network operator or network
operator and the model
number of your phone, some or
all of the following Quick keys
may appear in standby mode.
In standby mode, the four-way scroll
key instantly takes you to
frequentlyaccessed menus:
Scroll up key—Go to the contacts list.
Scroll right key—View the calendar.
Scroll down key—Go to the contacts
list.
Scroll left key—Quickly create a text
message.
Centre selection key—Go to the main
menu or a selected submenu.
■ Indicators and icons
Depending on your wireless service
provider or network operator and the
model number of your phone, some or
all of the following indicators and
icons may appear in standby mode.
You have new text or picture
messages. See "Text messages," p. 15.
You have new voice messages.
See "Voice messages," p. 27.
Your phone keypad is locked. See
"Keyguard," p. 12.
Your phone is set to the silent
profile. See "Profiles," p. 46.
The alarm clock is set to on. See
"Alarm clock," p. 61.
The countdown timer is running.
The stopwatch timer is running in
the background.
Integrated hands-free is active.
See "Loudspeaker," p. 11.
The timed profile is selected. See
"Profiles," p. 46.
2
Copyright © 2005 Nokia. All rights reserved.

Phone at a glance
or An enhancement is
connected to the phone. See
"Enhancement settings," p. 54.
Voice privacy encryption is active
(or is not active) in the network.
You are in a digital network. See
"Network Services," p. vii.
You are in an analogue network.
See "Network Services," p. vii.
You are in a 1XRTT network. See
"Network Services," p. vii.
You are roaming outside your
home network. See "Roaming options,"
p. 58.
■ Get the most out of
this guide
The following sections illustrate the
various components of your phone.
Familiarise yourself with these
sections to help you understand the
instructions that follow.
This guide uses certain terms for the
steps you need to perform.
• Press means to press and release a
key quickly (short press). For
example, press 7 means press the
key on the keypad labeled with the
number 7 and the letters pqrs.
• Press and hold means to press and
hold a key for 2–3 seconds; then
release the key (long press).
• Use selection keys to select a menu
option. To select an option, press
the selection key below the menu
item on the phone screen.
• Use scroll keys to move up, down,
left, or right in the menus.
• Call and end keys: Press the call key
to place a call or to answer an
incoming call. Press the end key to
end a call or return to the idle state
(standby mode).
■ Phone menus
Phone features are grouped according
to function and are accessed through
the main menus. Each main menu
contains submenus and lists from
which you can select or view items and
personalise your phone features.
To access these menus and submenus,
use the scroll method or a shortcut.
You can change your menu view from
list to grid. Select Menu > Options >
Main menu view > List or Grid.
Note: Some features may not
be available, depending on
your network. For more
information, contact your
wireless service provider or
network operator.
Copyright © 2005 Nokia. All rights reserved.
3

Phone at a glance
Scroll method
You can use the four-way
scroll key to scroll up,
down, left, and right
through the options.
1. In standby mode, select Menu,
and scroll through the main menus
using the scroll key.
As you scroll through the menus,
the menu number appears in the
upper right corner of the display.
Below the battery level indicator is
a scroll bar with a tab that moves
up or down on the right side of the
display screen as you scroll through
the menus, providing a visual
representation of your current
position in the menu structure.
2. When you arrive at a menu, press
the centre selection key to select
submenus.
•Select Back (the right selection
key) to return to the previous
menu.
• Press the end key to return to
standby mode from any menu
or submenu.
In-phone help
Many features have brief descriptions
(help text) you can view on the display.
To view these descriptions, you must
first activate help text as follows.
In standby mode, select Menu >
Settings > Phone > Help text
activation > On or Off.
Scroll to a feature and wait about 14
seconds. Scroll down to view all of the
description, or select Back to exit.
■ Security feature
The security feature protects your
device from unauthorised outgoing
calls or access to the stored
information with the lock and security
codes. The lock code and security code
are both preset to 12345. By default,
the security feature uses the lock code
(defaulted to the last four digits of
your phone number) instead of the
security code to protect your phone.
You need to enter the lock code to
access the following Security option:
1. In standby mode, select Menu >
Settings > Security.
2. Enter the lock code, and select OK.
See "Security settings," p. 55.
4
Copyright © 2005 Nokia. All rights reserved.

Phone at a glance
Your device, by default, requires you to
enter the lock code to restore factory
settings:
1. In standby mode, select Menu >
Settings > Restore factory sett..
2. Enter the security code, and select
OK. See "Change lock code," p. 56.
Note: Depending on your
wireless service provider or
network operator, your device
may sometimes ask you for the
security code (defaulted to
12345) instead of the lock
code.
■ Go to functions
The Go to menu enables you to change
the function of the left selection key
on your phone. With this function,
you can quickly access your most
frequently used functions from the Go
to menu in standby mode.
Choose Go to functions
1. In standby mode, select Go to >
Options > Select options.
2. Scroll up or down to highlight the
desired function.
3. Select Mark to add a function or
Unmark to remove a function.
4. Select Done when you have added
all desired functions.
5. Select Yes to save the changes.
6. In standby mode, select Go to to
display a list of the functions you
selected in step 2.
Organise functions
1. In standby mode, select Go to >
Options > Organise.
2. Scroll up or down to highlight the
function you want to rearrange,
and select Move > Move up, Move
down, Move to top, or Move to
bottom.
3. Select Done > Yes to save the
changes.
Copyright © 2005 Nokia. All rights reserved.
5

Set up your phone
2. Set up your phone
■ Antenna
Your device has two
antennas—the fixed
antenna is active unless
the extendable antenna
is fully extended.
Your device has a
fixed and
extendable
antenna located
towards the top
of the phone with
the fold closed.
Hold the phone
with the antenna
area pointed up
and over your
shoulder.
Note: Do not touch the
antenna unnecessarily with
the device switched on.
Contact with the antenna
affects call quality and may
cause the device to operate
at a higher power level than
otherwise needed.
Not touching the antenna
area during a phone call
optimises the antenna
performance and battery life.
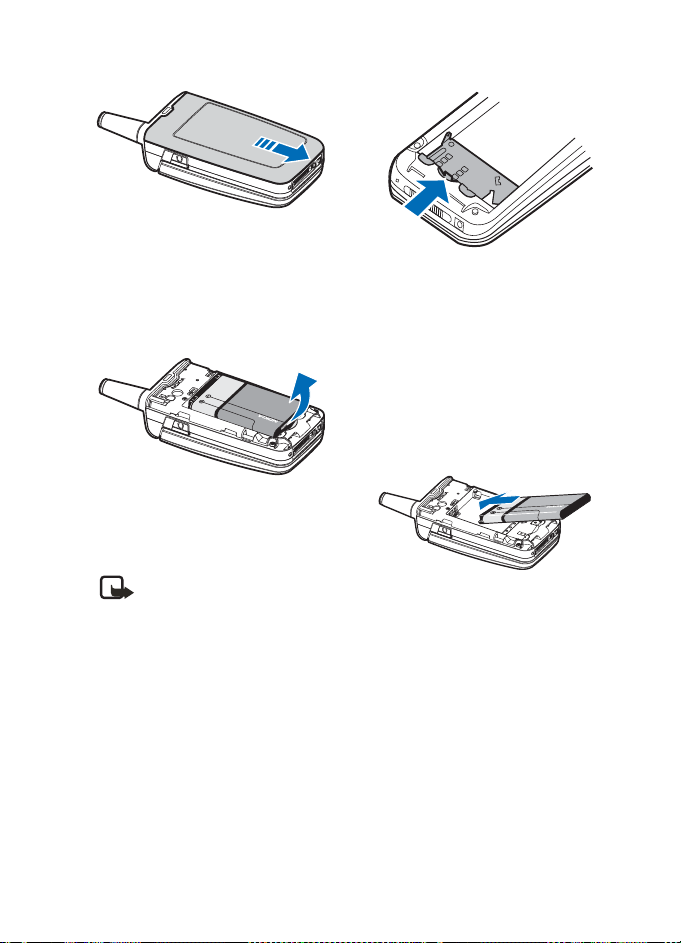
■ Battery
Note: Always switch off the
power, and disconnect the
charger and any other device
before removing the cover.
Always store and use
the device with the cover
attached.
6
Copyright © 2005 Nokia. All rights reserved.
Set up your phone
Remove the back cover
1. With the back of the phone facing
you, push down on the back cover.
2. Slide the back cover toward the
bottom of the phone and remove.
Remove the battery
After you have removed the back
cover, insert your finger into the finger
grip, and lift the battery from its
compartment.
Note: Al wa ys swit ch off t he
device, and disconnect the
charger before removing the
battery.
UIM card slot
Your phone has a UIM (CDMA SIM)
card slot built into the mechanics.
However, the UIM is not functional in
this phone model. Avoid placing
anything into the UIM card slot.
Replace the battery
1. Insert the battery, gold-coloured
contact end first, into the battery
slot.
2. Push down on the other end of the
battery to snap the battery into
place.
Copyright © 2005 Nokia. All rights reserved.
7

Set up your phone
Replace the back cover
1. Set the back cover on the phone
with the cover tabs aligned with
the slots in the phone.
2. Slide the back cover toward the top
of the phone until the back cover is
securely in place.
Charge the battery
Note: Check the model
number of any charger before
use with this device. This
device is intended for use
when supplied with power
from the AC-3 or AC-4
charger.
1. Plug the charger transformer into a
standard AC outlet.
2. Insert the charger output plug into
the round jack at the bottom end of
the phone.
After a few seconds, the battery
indicator in the display starts to
scroll from bottom to top. If the
battery is completely
discharged,it may take a few
minutes before the charging
indicator appears on the display or
before any calls can be made.
You can also use the CA-44 charger
adapter to connect the phone with
Nokia chargers having a larger barrel
size, including ACP-7, ACP-8, ACP-9,
ACP-12, AC-1 (retractable charger),
and LCH-12 (mobile charger).
1. Plug the charger transformer into a
standard AC outlet.
2. Insert the charger output plug into
the CA-44 adapter jack.
3. Insert the CA-44 plug into the jack
on the bottom of the phone.
Warning: Use only batteries,
chargers, and enhancements
approved by Nokia for use
with this particular model.
The use of any other types
may invalidate any approval
or warranty, and may be
dangerous.
8
Copyright © 2005 Nokia. All rights reserved.

Set up your phone
■ Turn your phone on
or off
1. To turn your phone on or off, press
and hold the end key on the keypad
for at least 4 seconds.
2. Enter the lock code, if necessary,
and select OK. See "Change lock
code," p. 56.
Warning: Do not switch the
phone on when wireless
phone use is prohibited or
when it may cause
interference or danger.
■ Connect the headset
A compatible headset, such as HS-5,
may be purchased with your phone
or separately as an enhancement.
See "Enhancement settings," p. 54.
1. Plug the headset connector into
the Pop-Port connector at the
bottom end of your phone.
appears in standby mode.
2. Position the headset on your ear.
With the headset connected, you can
make, answer, and end calls as usual.
• Use the keypad to enter numbers.
• Press the call key to place a call.
See "Phone at a glance," p. 1.
• Press the end key to end a call.
You can also plug a compatible
headset, such as the HS-9 Universal
Headset, into the 2.5-mm headset jack
on the right side of your ph one to allow
hands-free operation. See
"Enhancement settings," p. 54.
■ Make a call
Note: Before making or
receiving a call, fully extend
the whip antenna.
Keypad
1. Enter the phone number and press
the call key. (To delete a character
to the left of the cursor, select
Clear.)
2. Press the end key to end the call,
or select End call to cancel the call
attempt.
Copyright © 2005 Nokia. All rights reserved.
9

Set up your phone
Contacts list
1. In standby mode, scroll down to
display your contacts list and
highlight your desired entry.
2. Select Details to highlight your
desired number, and then select
Call.
Last dialled number
1. In standby mode, press the call key
to display the last 30 numbers
dialled.
2. Scroll to the number (or name) you
want to redial, and press the call
key.
Conference calling
Conference calling is a network
dependant service that allows you to
take part in a conference call with two
other participants.
Note: Conference calling is a
network dependant service.
1. Make a call to the first participant.
2. With the first participant on the
line, select Options > New call.
3. Enter the phone number of the
second participant, or select
Search to retrieve a number from
the contacts list. Select Call.
The first participant is put on hold.
4. When the second participant picks
up, press the call key to connect
the calls.
5. To end the conference call, select
Options > End all calls, or press the
end key.
■ Answer calls
An incoming call
1. With the fold open, press the call
key, or select Answer to answer the
call.
2. Press the end key to reject the call.
Select Silence to mute the ringing
tone, then Dismiss, or do nothing.
The call is eventually diverted to
voicemail.
With your phone set to silent in the
profiles menu, select Dismiss to
divert the call to voicemail.
3. With the fold closed, press the
volume key to mute the ringing
tone.
A short press of the voice key
answers an incoming call with the
loudspeaker.
By default, your phone answers an
incoming call when you open the fold.
You can change the setting to not
answer the call when the fold opens.
In standby mode, select Menu >
Settings > Call > Answer when fold is
opened > On or Off.
10
Copyright © 2005 Nokia. All rights reserved.

Set up your phone
Adjust the earpiece volume
Whether in or out of a call, you can
scroll the volume key located on the
left side of your device up or down to
adjust the volume of the earpiece.
When you adjust the volume, a bar
chart indicates the volume level.
Answer a call with the keypad locked
To answer a call with the keypad
locked, press the call key with the fold
open. To answer a call with the fold
closed and the keypad locked, press
and hold the voice key to answer with
the loudspeaker. During the call,
all features function as normal. When
you end or reject the call, the keypad
automatically relocks. See "Keyguard,"
p. 12.
When the keypad lock is on, calls still
may be possible to the official
emergency number programmed into
your device. Enter the emergency
number, and press the call key.
Loudspeaker
Warning: Do not hold the
device near your ear when the
loudspeaker is in use, because
the volume may be extremely
loud.
You can use your phone as a
loudspeaker during a call.
• To activate the loudspeaker while
in a call with the fold open, select
Loudsp..
• To activate the loudspeaker when
answering a call with the fold
closed, press the voice key.
• To deactivate the loudspeaker
during a call, with the fold open,
select Normal.
The loudspeaker is deactivated
automatically when a call (or a call
attempt) ends or when certain
enhancements are connected.
Call options
Many of the options you can use
during a call are network services.
Check with your wireless service
provider or network operator for
more information.
1. Select Options during a call to
display the following options:
Loudspeaker or Handset—Activate
or deactivate the loudspeaker
while in a call.
New call—Initiate a conference
call. See "Conference calling,"
p. 10.
Copyright © 2005 Nokia. All rights reserved.
11

Set up your phone
Save—Save a number while in a call
to your contacts list. You can
also save a number directly from
the standby screen.
Add to contact—Add a phone
number to an existing contact in
your contacts list while in a call.
This option is available only when
entering numbers during a call.
End all calls—Disconnect from all
active calls.
Send DTMF—Enter the numbers,
and select DTMF to send the
numbers as tones.
Contacts—View the contacts menu.
Menu—View the phone menu.
2. Scroll to and select an option to
activate the option or enter its
submenu.
■ Keyguard
With keyguard, you can lock the
keypad to prevent keys from being
pressed accidentally. The locked
keypad unlocks when you receive a
call. After the call, the lock
automatically reactivates.
With the keyguard on, calls still may be
possible to the official emergency
number programmed into your phone.
Enter the emergency number, and
press the call key.
Lock the keypad
Select Menu with the centre selection
key; then press * within 2 seconds.
Unlock the keypad
Select Unlock with the centre selection
key; then press * within 2 seconds.
12
Copyright © 2005 Nokia. All rights reserved.

3. Text entry
Text entry
You can use two methods for entering
text and numbers: standard mode and
predictive text mode.
Select Clear to backspace the cursor
and delete a character. Select and hold
Clear to backspace continuously and
delete characters.
■ Standard mode
Standard mode is the only way to enter
text into the contacts list and to
rename caller groups.
Text (Abc)
• Press a key once to insert the first
letter on the key, twice for the
second letter, etc. If you pause
briefly, the last letter in the display
is accepted and your device awaits
the next entry.
• Press 0 to enter a space, thereby
accepting a completed word.
• Press 1 to insert a period into your
message.
• Press * to display a complete list of
special characters.
• Press and hold # to bring up the
Editor settings (Number mode,
Dictionary on or Dictionary off,
Writing language).
Numbers (123)
To switch to 123 mode from Abc mode,
press and hold # at any message entry
screen to bring up the Editor settings
menu list of Number mode, Dictionary
on or Dictionary off, and Writing
language. Select Number mode, and
the device returns to the message
entry screen and switches the Abc icon
in the upper left corner of the display
to the 123 icon (or back).
Punctuation and special characters
While at any text entry screen, press *
to display special characters (press and
hold * if predictive text is on). Press *
again to cycle through all available
characters. Scroll to navigate through
the list of special characters. With a
character highlighted, select Use to
insert the character into your message.
■ Predictive text mode
Much faster than the standard mode
method, predictive text input enables
you to write messages quickly using
your keypad and the built-in
dictionary. In predictive text mode,
your phone predicts the words as you
enter them.
Copyright © 2005 Nokia. All rights reserved.
13

Text entry
Activate or deactivate
1. At any text entry screen, select
Options > Dictionary on to activate
or Dictionary off to deactivate.
Text entry
The following illustration shows your
text entry of the word Nokia in
predictive text mode. With the English
dictionary selected, press each of the
following number keys once, and the
screen will display Nokia by predicting
the appropriate letter to use based on
your keypad entry:
Enter:
66 5 42
• Press 0 to enter a space, and begin
writing the next word.
• If a displayed word is not correct,
press * to see other matches. To
return to the previous word in the
list of matches, select Prev.
• If ? appears after a word, select
Spell to add the word to the
dictionary.
• Press 1 to insert a period into your
message.
• Press and hold * to display special
characters. Press * again to cycle
through all available characters.
■ Change case and
mode
Press # to switch between uppercase,
lowercase, and sentence case text.
As you press #, the following icons
(not the descriptions) appear in the
upper left of the display screen:.
Uppercase text: standard
mode is on.
Lowercase text: standard
mode is on.
Sentence case text:
standard mode is on. This option is
available only at the beginning of a
sentence.
Note: You can press # within
2 seconds to switch between
standard mode and predictive
text mode.
Uppercase text: predictive
text is on.
Lowercase text: predictive
text is on.
Sentence case text:
predictive text is on. This option is
available only at the beginning of a
sentence.
14
Copyright © 2005 Nokia. All rights reserved.

4. Messages
Messages
You can send and receive messages to
compatible phones. You can also send
and receive picture, multimedia, and
e-mail messages if supported by your
service provider. Also, you can make
distribution lists that contain phone
numbers and names from your
contacts list. See "Text entry," p. 13.
When composing text, picture, or
multimedia messages, check the
number of characters allowed in the
top right corner of the message. Using
Unicode characters takes up more
space. With Unicode characters in your
message, the indicator may not show
the message length correctly. Before
sending the message, the phone tells
you if the message exceeds the
maximum length allowed for one
message.
Important: Exercise caution
opening messages. Messages
may contain malicious
software or otherwise be
harmful to your device or PC.
Note: When you send a
message, your device may
display Message sent,
indicating your de vice has sent
the message to the message
centre number programmed
into your device. This is not an
indication that the message
has been received at the
intended destination. For more
details about messaging
services, check with your
service provider.
■ Text messages
Compose and send
1. In standby mode, select Menu >
Messages > Text messages >
Create message.
To go quickly to Create message,
scroll left in standby mode.
2. Compose and send a message using
the keypad.
Depending on the messaging
service enabled, some or all of the
following options are available
while composing your message:
Preview—Preview the message
when sending a picture message
(only available with a picture
inserted).
Copyright © 2005 Nokia. All rights reserved.
15

Messages
Sending options—Mark or Unmark
the sending options of a single
message as Urgent, Delivery
reports, Callback no., or Signature
(not available with a picture
inserted). See "Change sending
options," p. 20.
Clear text —Erase all the text from
the message editor.
Insert picture—Insert a picture
from a templates folder into your
message.
Change picture—Change the
picture in a picture message (only
available with a picture inserted).
Delete picture—Delete the picture
in a picture message (only available
with a picture inserted).
Insert contact—Insert a name from
your contacts list into your
message.
Insert number—Insert a phone
number or find a phone number in
the contacts list.
Save—Select Drafts to save the
message in the drafts folder; select
Temp lates to save the message as
one of your predefined templates
in the templates folder.
Exit editor—Exits the message
editor.
Use template—Insert a predefined
template into your message.
Insert smiley—Insert a smiley into
your message.
Insert word or Edit word—Enter or
edit the text of a new word that
might not appear in the predictive
text dictionary (only available with
predictive text on).
Insert symbol—Insert a special
character into your message (only
available with predictive text on).
Dictionary on or Dictionary off—
Turn the predictive text on or off.
Matches—View matches in the
dictionary for the word you wa nt to
use (only available with predictive
text on and when the same set of
key strokes can produce multiple
words).
3. To send the message, select Send to
> Send to number, Send to many, or
Send to distrib. list (if a distribution
list has been created). Enter the
recipient’s phone number or e-mail
address; or select Search to retrieve
a number or e-mail address from
your contacts list, and select OK.
16
Copyright © 2005 Nokia. All rights reserved.

Messages
Read message
When you receive a message, a
notification message and are
displayed.
1. Select Show to read the message or
Exit to dismiss the notification and
read the message later from your
inbox. See "View saved messages,"
p. 18.
2. Scroll up or down to view the
whole message, if necessary.
Options
When reading a text message, select
Options to access some or all of the
following options:
Delete—Discard the message.
Use detail—Access the following three
options:
• Number—Uses or saves the
number. Select Options > Add to
contact, Send message, or Call.
• E-mail address—Lists the e-mail
addresses included in the message
(available only if the message
contains an e-mail address). Select
Save to save the email address as a
new phone book entry or Options >
Add to contact or Send message.
• Web address—Displays if a URL is
included in the message.
Move—Save the message to Templates,
Archive, or a folder you have created.
Forward—Divert the message to
another phone number or e-mail
address.
Lock or Unlock—Lock or unlock the
message.
Save picture—Save the picture to
your Templates folder for later use.
You can enter a title for the picture,
and select OK.
Rename—Edit the title of the message.
Reply to message
1. In standby mode, select Menu >
Messages > Text messages > Inbox
and your desired message, or when
you receive a message, select
Show.
2. Select Reply > Empty screen,
Original text, Templ ate, or one of
the predefined answers; then
compose your reply using the
keypad.
3. After creating the reply, select
Send. The sender’s phone number
or e-mail is used as the default.
Copyright © 2005 Nokia. All rights reserved.
17

Messages
Templates
Templates are short, prewritten
messages you can recall and insert into
new text messages when you are short
on time.
1. In standby mode, select Menu >
Messages > Text messages >
Create message > Options > Use
template.
2. Select your desired template.
3. Select Send to > Send to number,
Send to many, or Send to distrib. list
(with a distribution list created).
4. Enter the recipient’s phone number
select Search to retrieve a number
or e-mail address from your
contacts list; and select Send.
A distribution list only contains phone
numbers of recipients and is selected
from a list of predefined groups you
create.
Text message folders
Save messages
You can save drafts of messages or
received messages to an existing folder
or to a folder that you have created.
1. Open the received message or
create a new message, and select
Options.
2. To save a received message, select
Move > Archive, Templates, or a
folder you have created.
3. To save the draft of a message you
have created, select Save > Drafts
or Templates.
View saved messages
1. In standby mode, select Menu >
Messages > Text messages.
2. Select the folder containing the
message you want to view:
Inbox—Automatically stores any
incoming messages.
Outbox—Stores messages that
have not been sent
Sent items—Stores messages that
have been sent.
Drafts—Stores messages created as
drafts.
Archive—Stores messages that you
choose to archive, including unread
ones.
Templates—Stores pictures and
prewritten templates. Preloaded
templates can be edited and
personalised.
My folders—Allows you to organise
your messages by creating custom
folders and saving some of your
messages here. Select Options >
Add folder, Rename folder, or
Delete folder to add a custom
folder or rename or delete a folder
you have created.
18
Copyright © 2005 Nokia. All rights reserved.

Messages
You can only delete folders created
in my folders; the inbox, sent items,
archive, and templates folders are
protected. When deleting a folder,
you are also deleting all messages
in the folder.
Distribution lists—Stores created
distribution lists.
3. When the folder opens, select the
message you want to view.
Distribution list
The distribution list enables you to
send messages to a group of contacts.
In standby mode, select Menu >
Messages > Text messages >
Distribution lists.
To create a distribution list, select New
list with no list created or Options >
Create new list to create additional
lists. To populate your list, select Add
new and a contact from your
contacts list.
To use, rename, or modify a
distribution list, highlight the
distribution list; and select Options >
Send message, Rename list, Clear list,
or Delete list.
Delete messages
If your message memory is full and you
have more messages waiting at the
network, No space for new text
messages appears in standby mode.
You can do the following:
• Read some of the unread messages,
and delete them individually.
• Delete messages from some of your
folders.
Delete a single message
1. In standby mode, select Menu >
Messages > Text messages.
2. Select the folder containing the
message you want to delete.
3. Highlight the message you want
to delete.
4. Select Options > Delete.
5. Select Yes to delete the message or
No to exit.
Delete all messages inder
1. In standby mode, select Menu >
Messages > Text mes sages > Delete
messages.
2. Select the messages you want
to delete:
All—Deletes all messages in all of
the folders.
All read—Deletes any messages
that have been read in all of the
folders.
Copyright © 2005 Nokia. All rights reserved.
19

Messages
All unread—Deletes any messages
that have not been read in al l of
the folders.
3. Select and Mark the folders that
have messages you want to delete:
Inbox—Deletes all messages from
the inbox folder.
Sent items—Deletes all messages
from the Sent items folder.
Outbox—Deletes all messages from
the outbox folder.
Drafts—Deletes all messages from
the drafts folder.
Archive—Deletes all messages from
the archive folder.
User defined folders—Deletes all
messages from the user defined
folder.
4. Select Done > Yes to empty the
marked folder.
Change sending options
To change sending options for all
future text messages, in standby mode,
select Menu > Messages > Text
messages > Message settings >
Sending options and the setting you
want to change:
Priority—Set the priority of the note as
Normal or Urgent.
Delivery reports—Send a note to
yourself confirming delivery of the
message. Select On or Off.
Send callback number—Send a callback
number to the recipient. Select Off or
enter your desired phone number to
send to the recipient as a callback
number, and select OK.
Signature—Select On to create a
signature to send with text messages
or Off to turn this feature off.
To change sending options for one
message, in standby mode, select
Menu > Messages > Text messages >
Create message > Options > Sending
options, and Mark or Unmark the
setting you want to change:
Urgent—Set the priority of the note as
urgent.
Delivery reports—Send a note to
yourself confirming delivery of the
message.
Send callback number—Enter your
desired phone number to send to the
recipient as a callback number, and
select OK.
Signature—Create a signature to send
with text messages.
Change message settings
In standby mode, select Menu >
Messages > Text messages > Message
settings > Other settings and the
setting you want to change:
Message font size—Select Small font or
Large font.
Message overwriting—Select Sent
items only, Inbox only, S. items & Inbox,
or Off.
20
Copyright © 2005 Nokia. All rights reserved.

Messages
Note: When the message
memory is full, your phone
cannot send or receive any
new messages. To free up the
memory, you can select
Message overwriting to make
your phone automatically
replace old messages in the
inbox and outbox folders when
new ones arrive.
Save sent messages—Select Always
save, Always prompt, or Off.
Queue msgs. when digital
unavailable—Select On, On prompt, or
Off. Messages are stored in the outbox
until they can be sent with digital
service.
■ Picture messages
Your phone comes with five preloaded
pictures. If necessary, you can
overwrite any of the preloaded
pictures. You can send a text message
with pictures attached to compatible
phones. However, pictures take up
more space than text.
To select your desired picture in the
templates folder, in standby mode,
select Menu > Messages > Text
messages > Templates.
You cannot send a picture message
using e-mail.
Receive and save
Note: Only compatible devices
that offer picture message
features can receive and
display picture messages.
When you have unopened picture
messages in your inbox, appears.
Select Show to view the picture
message or Exit to view the picture
message in your inbox later. If you
have more than one picture message,
scroll to and select the message you
want to view. Scroll to view the whole
picture if necessary.
To save a received picture in your
templates folder, select Options > Save
picture. Enter a title, and select OK. If
your templates folder is full of pictures,
scroll to and select a picture you want
to replace.
Compose and send
When you insert a standard picture
into a message, the number of
characters you can add changes as
shown in the upper right corner of the
display screen.
1. In standby mode, select Menu >
Messages > Text messages >
Create message.
2. Write the message, and select
Options > Insert picture.
3. Scroll to a picture, and select Use
or View > Insert.
To replace with another picture,
select Options > Change picture,
Copyright © 2005 Nokia. All rights reserved.
21
 Loading...