


® |
|
BL682 |
|
OWNER’S GUIDE |
|
|
|
|
|
GUIDE DU PROPRIÉTAIRE |
|
|
GUÍA DEL USUARIO |
|
ninjakitchen.com 1 877 646-5288

IMPORTANT SAFETY INSTRUCTIONS
For Household Use Only
WHEN USING ELECTRICAL APPLIANCES, BASIC SAFETY PRECAUTIONS SHOULD ALWAYS BE FOLLOWED, INCLUDING THE FOLLOWING:
READ ALL INSTRUCTIONS BEFORE USING YOUR NUTRI NINJA® | NINJA® BLENDER SYSTEM WITH AUTO-iQ™ TECHNOLOGY.
POLARIZED PLUG
 WARNING: To reduce the risk of electric shock, this appliance has a polarized plug (one blade is wider than the other). This plug will fit into a polarized outlet only one way. If the plug does not fit fully into the outlet, reverse the plug. If it still does not fit, contact a qualified electrician to install the proper outlet. DO NOT modify the plug in any way.
 WARNING: Extension cords are not recommended for use with this product.
 WARNING:
TO REDUCE THE RISK OF FIRE, ELECTRIC SHOCK OR INJURY:
1 WARNING: Remove utensils prior to processing. Failure to remove may cause the jar to be damaged or to shatter which may cause personal injury.
2 WARNING: The blade assemblies are sharp, not locked in place and removable, handle with care. When handling the blade assemblies, always hold by the shaft. Failure to do so will result in a risk of laceration.
3 WARNING: Stacked Blade Assembly is sharp and not locked in place. If using the pour spout, ensure the lid is fully locked onto the pitcher. If pouring with the lid removed, carefully remove the Stacked Blade Assembly first, holding it by the shaft. Failure to do so will result in a risk of laceration.
4 WARNING: Chopping Blade Assembly is sharp and not locked in place. Before emptying contents carefully remove lid and Chopping Blade Assembly, holding it by the shaft. Failure to do so will result in a risk of laceration.
5 CAUTION: Do not blend hot liquids, doing so may cause excessive pressure build-up, resulting in risk of the user being burned.
6 CAUTION: We do not recommend grinding in any of our Nutri Ninja® Cups.
7 CAUTION: Remove the Pro Extractor Blades® Assembly from the Nutri Ninja cup upon completion of blending. Some ingredients have the potential to expand after blending resulting in excessive pressure buildup that can pose a risk of injury.
1 |
1-877-646-5288 |

8To protect against electrical shock, do not submerge the appliance or allow the power cord to come into contact with water or any other liquid.
9DO NOT allow the appliance to be used by children. Close attention is necessary when used near children. This is not a toy.
10Never leave an appliance unattended when in use.
11Appliance accessories are not intended to be used in the microwave as it may result in damage to the accessories.
12Turn the appliance Off and remove the power cord from the electrical outlet when not in use, before assembling or disassembling parts and before cleaning. To unplug, grasp the plug and pull from the electrical outlet. Never pull from the power cord.
13DO NOT abuse the power cord. Never carry the appliance by the power cord or yank it to disconnect from electrical outlet; instead grasp the plug and pull to disconnect.
14DO NOT operate any appliance with a damaged cord or plug, or after the appliance malfunctions, has been dropped or damaged in any manner.
This appliance has no serviceable parts. Return the appliance to SharkNinja Operating LLC for examination, repair or adjustment.
15DO NOT let the power cord hang over the edge of table or counter or touch hot surfaces such as the stove.
16Always use appliance on a dry, level surface.
17Keep hands, hair, clothing, as well as utensils out of container while processing to reduce the risk of severe injury to persons or damage to the appliance. A scraper may be used but only when the appliance is not running.
18Avoid contact with moving parts.
19DO NOT attempt to sharpen blades.
20DO NOT use the appliance if blade assemblies are bent or damaged.
21To reduce risk of injury, never place the blade assemblies on the base without the pitcher or Nutri Ninja cup properly attached.
22DO NOT operate this appliance on or near any hot surfaces (such as gas or electric burner or in a heated oven).
23The use of attachments or accessories including canning jars, not recommended by the manufacturer may result in fire, electric shock or personal injury.
24DO NOT remove the container from the motor base while the appliance is in operation.
25To reduce the risk of injury, NEVER operate the appliance without the lid in place; DO NOT try to defeat the interlock mechanism; make sure that the attachment is properly installed before operating the appliance.
26DO NOT expose containers to extreme temperature changes.
27DO NOT overfill.
28DO NOT operate the appliance empty.
29To reduce the risk of burns, always allow the appliance to cool before taking off parts and before cleaning.
30In the event that the unit overloads, the control panel lights will flash and the unit will shut down. Unplug the appliance and let it cool down for approximately 15 minutes before using again.
31THIS PRODUCT IS INTENDED FOR HOUSEHOLD USE ONLY. Do not use this appliance for anything other than its intended use. Do not use outdoors.
32The maximum rating is based on the Stacked Blade Assembly (pitcher) that drives the greatest power and other recommended attachments may draw significantly less power or current.
SAVE THESE INSTRUCTIONS
English
www.ninjakitchen.com 2

CONSIGNES DE SÉCURITÉ IMPORTANTES
Pour usage domestique seulement
LORS DE L’USAGE D’UN APPAREIL ÉLECTRIQUE, DES MESURES DE SÉCURITÉ ÉLÉMENTAIRES DEVRAIENT TOUJOURS ÊTRE RESPECTÉES, Y COMPRIS LES MESURES SUIVANTES :
LISEZ TOUTES LES CONSIGNES AVANT D’UTILISER VOTRE SYSTÈME MÉLANGEUR NUTRI NINJAMD | NINJAMD AVEC LA TECHNOLOGIE AUTO-iQMC.
FICHE POLARISÉE
 AVERTISSEMENT :
Afin de réduire les risques d’électrocution, cet appareil a été muni d’une fiche polarisée (une lame est plus large que l’autre). Cette fiche ne peut être insérée que d’un seul côté dans une prise polarisée. Si la fiche ne s’insère pas complètement dans la prise de courant, inversez-la. Si elle ne s’adapte toujours pas, contactez un électricien compétent afin d’installer la prise murale appropriée. N’altérez la fiche d’AUCUNE façon.
AVERTISSEMENT :
Il n’est pas recommandé d’utiliser des rallonges électriques pour brancher cet appareil.
 AVERTISSEMENT :
POUR RÉDUIRE LE RISQUE D’INCENDIE, D’ÉLECTROCUTION ET DE BLESSURES :
1 AVERTISSEMENT : Enlevez les ustensiles avant de mélanger les aliments. Le non-respect de cette directive pourrait endommager ou faire éclater le récipient, ce qui pourrait causer des
blessures.
2 AVERTISSEMENT : Le jeu de lames superposées est tranchant et amovible; il n’est
3 |
1-877-646-5288 |
pas verrouillé dans le récipient. Manipulez-le avec soin. Lorsque vous manipulez le jeu de lames superposées, tenez toujours l’arbre de cette pièce. Le non-respect de cette consigne peut entraîner des lacérations.
3 AVERTISSEMENT : Le jeu de lames superposées est tranchant et n’est pas verrouillé dans le récipient. Si vous transvidez un mélange par le bec verseur, assurez-vous que le couvercle est bien verrouillé sur le pichet. Pour verser sans le couvercle, retirez d’abord le jeu de lames superposées avec précaution en le tenant par le manche. Ne pas procéder de la sorte augmente le risque de lacération.
4 AVERTISSEMENT : Les lames de hachage sont coupantes et la tige n’est pas verrouillée en place. Avant de vider le contenu, retirez délicatement le couvercle et le jeu de lames de hachage, en le tenant par la tige. Ne pas procéder de la sorte augmente le risque de
lacération.
5  MISE EN GARDE : Ne mélangez pas des liquides chauds, car cela pourrait entraîner une accumulation de pression et causer des risques
de brûlure.
6 MISE EN GARDE : Nous ne recommandons pas l’utilisation des gobelets Nutri NinjaMD pour moudre des ingrédients.
7 MISE EN GARDE : Retirez le jeu de lames Pro ExtractorMD de la tasse Nutri Ninja après avoir mélangé les ingrédients. Certains ingrédients peuvent se dilater lorsqu’ils sont broyés, ce qui peut créer une accumulation de pression excessive et poser un risque de blessures.
8Pour éviter les risques d’électrocution, n’immergez pas l’appareil et assurez-vous que le cordon d’alimentation n’entre pas en contact avec l’eau ou un autre liquide.
9NE LAISSEZ PAS l’appareil être utilisé par des enfants. Une surveillance attentive est nécessaire lors de l’utilisation à proximité des enfants. Ceci n’est pas un jouet.

10Ne laissez jamais l’appareil sans surveillance pendant l’utilisation.
11Les accessoires accompagnant l’appareil ne sont pas conçus pour l’utilisation dans le four à micro-ondes, car cela pourrait endommager les accessoires.
12Veuillez éteindre l’appareil (position « Off ») et débrancher le cordon d’alimentation de la prise de courant lorsqu’il n’est pas utilisé et avant le nettoyage, l’assemblage ou le démontage des
pièces. Pour débrancher l’appareil, tirez sur la fiche et retirez-la de la prise d’alimentation. Ne tirez jamais sur le cordon.
13PRENEZ SOIN du cordon d’alimentation. Ne transportez jamais l’appareil en le tenant par le cordon. Ne débranchez jamais l’appareil de
l’alimentation électrique en tirant sur le cordon. Pour débrancher l’appareil, tirez sur la fiche et retirez-la de la prise d’alimentation.
14N’UTILISEZ PAS l’appareil si sa fiche ou son cordon est endommagé(e), s’il a fait défaut, s’il a été échappé ou endommagé. Retournez l’appareil à SharkNinja Operating LLC pour vérification, réparation ou réglage.
15NE LAISSEZ PAS le cordon traîner sur le dessus d’une table ou d’un comptoir. Ne le laissez pas entrer en contact avec des surfaces chaudes, comme la cuisinière.
16Posez toujours l’appareil sur une surface sèche et de niveau.
17Afin de réduire le risque de blessures graves ou de dommages à l’appareil, gardez les mains, les cheveux, les vêtements et les ustensiles hors du récipient pendant l’utilisation. Vous pouvez utiliser une raclette, mais seulement lorsque le mélangeur est éteint.
18Évitez le contact avec les pièces mobiles.
19NE TENTEZ PAS d’affûter les lames.
20N’UTILISEZ PAS l’appareil si l’ensemble de lames est tordu ou endommagé.
21Pour réduire les risques de blessures, ne déposez jamais les jeux de lames sur la base sans fixer le pichet ou une tasse Nutri Ninja correctement.
22N’UTILISEZ PAS cet appareil sur ou près des surfaces chaudes (telles qu’un brûleur à gaz ou électrique ou dans un four chauffé).
23L’usage des attachements accessoires, y compris les pots de conserve, n’est pas recommandé par le fabricant du fait qu’il peut causer un incendie, une décharge électrique ou une blessure corporelle.
24N’ENLEVEZ PAS le contenant du bloc-moteur pendant que l’appareil est en marche.
25Afin de réduire le risque de blessure, N’UTILISEZ JAMAIS l’appareil sans le couvercle en place. N’ALLEZ PAS à l’encontre du mécanisme de verrouillage ; assurez-vous que l’attachement soit correctement monté avant d’utiliser l’appareil.
26N’EXPOSEZ PAS les récipients aux changements de température extrêmes.
27NE REMPLISSEZ PAS excessivement le récipient.
28N’UTILISEZ PAS l’appareil lorsqu’il est vide.
29Afin de réduire le risque de brûlures, permettez toujours à l’appareil de refroidir avant de retirer les pièces et le nettoyer.
30Dans le cas d’une surcharge, les indicateurs du panneau de commande de l’appareil clignoteront et l’appareil arrêtera. Débranchez l’appareil et laissezle refroidir pendant environ 15 minutes avant de l’utiliser de nouveau.
31CE PRODUIT EST CONÇU POUR L’USAGE À DOMICILE SEULEMENT. N’utilisez pas l’appareil à d’autres fins que celles prévues. N’utilisez pas l’appareil à l’extérieur.
32La notation maximale est basée sur le jeu de lames superposées (pichet) qui procure le plus de puissance. D’autres accessoires recommandés peuvent nécessiter significativement moins de puissance ou de courant.
VEUILLEZ
CONSERVER CES
DIRECTIVES
Français
www.ninjakitchen.com 4

INSTRUCCIONES IMPORTANTES DE SEGURIDAD
Para uso doméstico solamente
AL USAR APARATOS ELÉCTRICOS, SIEMPRE DEBE SEGUIR PRECAUCIONES BÁSICAS DE SEGURIDAD, INCLUYENDO LAS SIGUIENTES:
LEA TODAS LAS INSTRUCCIONES ANTES DE USAR SU NUTRI NINJA® I SISTEMA DE LICUADORA NINJA® CON AUTO-iQMR TECHNOLOGY.
ENCHUFE POLARIZADO
 ADVERTENCIA: Para reducir el riesgo de una descarga eléctrica, este artefacto posee un enchufe polarizado (una pata es más ancha que la otra). Este enchufe sólo puede conectarse a un tomacorriente polarizado de una sola forma. Si el enchufe no entra completamente en el tomacorriente, inviértalo. Si aun así no entra completamente, llame a un electricista calificado para que instale un tomacorriente apropiado. NO intente modificar el enchufe de ninguna manera.
 ADVERTENCIA: No se
recomienda usar cables de extensión con este producto.
5 |
1-877-646-5288 |
 ADVERTENCIA:
PARA REDUCIR EL RIESGO DE INCENDIO, DESCARGA ELÉCTRICA O DAÑOS PERSONALES:
1 ADVERTENCIA: Retire los utensilios antes de procesar alimentos. De lo contrario, la jarra podría dañarse o romperse y causar lesiones personales.
2 ADVERTENCIA: Las cuchillas apiladas son filosas, no quedan trabadas en su lugar y son removibles; manipúlelas con cuidado. Al manipular las cuchillas apiladas, siempre sosténgalas del vástago. De lo contrario, podría cortarse.
3 ADVERTENCIA: Las cuchillas apiladas son filosas y no quedan trabadas en su lugar. Si usa el pico vertedor, asegúrese de que la tapa esté completamente trabada en la jarra. Si vierte el contenido con la tapa retirada, antes retire cuidadosamente las cuchillas apiladas sosteniéndolas del vástago. De lo contrario, podría cortarse.
4 ADVERTENCIA: Las cuchillas de corte son filosas y no quedan trabadas en su lugar. Antes de vaciar el contenido, retire cuidadosamente la tapa y las cuchillas de corte sosteniéndolas desde el eje. De lo contrario, podría cortarse.
5 CUIDADO: : No licúe líquidos calientes, ya que hacerlo podría causar una acumulación excesiva de presión y un riesgo de quemaduras para el usuario.
6 CUIDADO: No recomendamos moler en ninguna de las tazas Nutri Ninja®.
7 CUIDADO: Retire las cuchillas Pro Extractor Blades® de la taza Nutri Ninja al terminar de licuar. Algunos ingredientes pueden expandirse después del licuado, lo cual produce una acumulación excesiva de presión, que puede presentar un riesgo de lesiones.

8Para protegerse de una descarga eléctrica, no sumerja el artefacto ni permita que el cable de alimentación entre en contacto con agua o cualquier otro líquido.
9NO permita que el aparato sea utilizado por niños. Se requiere supervisión cuando se usa cerca de niños. Esto no es un juguete.
10Nunca deje un artefacto desatendido cuando lo use.
11Los accesorios del artefacto no están diseñados para usarlos en el microondas ya que podría dañarlas.
12Apague el artefacto y desenchufe el cable de alimentación del tomacorriente cuando no lo use, antes de colocarle o quitarle partes y antes de limpiarlo. Para desenchufarlo, sujete el enchufe y retírelo del tomacorriente. Nunca tire del cable de alimentación.
13NO maltrate el cable de alimentación. Nunca levante el artefacto por el cable, o tire del cable para desconectarlo del tomacorriente; agárrelo por el enchufe y tire para desconectarlo.
14NO utilice ningún artefacto si el cable o el enchufe están dañados o luego de una falla, o si ha sufrido cualquier tipo de daño. Retórnelo a SharkNinja Operating LLC para que sea examinado, reparado o ajustado.
15NO permita que el cable cuelgue por el borde de la mesa o mesada, o que toque superficies calientes como la estufa.
16Use siempre el artefacto sobre una superficie seca y nivelada.
17Mantenga sus manos, cabello, ropa y utensilios fuera del recipiente al procesar para reducir la posibilidad de daños graves a personas o de dañar la unidad. Puede utilizar una espátula, pero únicamente cuando el artefacto no esté funcionando.
18Evite tocar las partes móviles.
19NO intente afilar las cuchillas.
20NO use el artefacto si las cuchillas están dobladas o dañadas.
21Para reducir el riesgo de heridas, nunca coloque las cuchillas en la base sin tener la jarra o el tazón correctamente colocados.
22NO use este artefacto sobre o cerca de superficies calientes (como una estufa eléctrica o de gas, o en un horno caliente).
23El uso de accesorios no recomendados por el fabricante puede causar incendios, descargas eléctricas o daños personales.
24NO saque la jarra de la base del motor mientras el artefacto esté funcionando.
25Para reducir el riesgo de heridas, NUNCA use el artefacto sin la tapa colocada; NO intente alterar el mecanismo de traba; verifique que los accesorios estén correctamente instalados antes de usar el artefacto.
26NO exponga los recipientes a cambios bruscos de temperatura.
27NO llene la jarra de más.
28NO haga funcionar este artefacto cuando esté vacío.
29Para reducir el riesgo de quemaduras, siempre deje que el artefacto se enfríe antes de remover partes o de limpiarlo.
30Si la unidad se sobrecarga, las luces del panel de control parpadearán y la unidad se apagará. Desenchufe el artefacto y déjelo enfriar durante unos 15 minutos antes de usarlo nuevamente.
31ESTE PRODUCTO ELÉCTRICO ES PARA USO DOMÉSTICO SOLAMENTE. No utilice este artefacto para ningún otro destino distinto al indicado. No lo utilice en el exterior.
32La especificación máxima se basa en el uso del accesorio de 6 cuchillas (jarra) que consume la mayor cantidad de corriente y otros accesorios recomendados pueden llegar a consumir mucha menos corriente.
CONSERVE ESTAS INSTRUCCIONES
Español
www.ninjakitchen.com 6

THIS BOOK COVERS MODEL NUMBER:
BL682
TECHNICAL SPECIFICATIONS
Voltage: |
120V~, 60Hz. |
Power: |
1500 Watts |
Pitcher Capacity: |
72 oz. (9 cups, 2.1 L) |
Max Liquid Capacity: |
64 oz. (8 cups, 1.9 L) |
Bowl Capacity: |
64 oz. (8 cups, 1.8 L) |
Nutri Ninja®Cup Capacity: |
18 oz. (2.25 cups, 530 mL) |
|
24 oz. ( 3 cups, 710 mL) |
|
32 oz. (4 cups, 950 mL) |
CE MANUEL CONCERNE LE MODÈLE :
BL682
SPÉCIFICATIONS TECHNIQUES
Tension : |
120 V~, 60 Hz. |
Alimentation : |
1500 Watts |
Capacité du pichet : |
2,1 L (9 tasses, 72 oz) |
Cap. max. de liquide : 1,9 L (8 tasses, 64 oz) |
|
Capacité du bol |
1,8 L (8 tasses, 64 oz) |
Capacité du gobelet |
|
Nutri Ninja : |
530 ml (2,25 tasses, 18 oz) |
|
710 ml (3 tasses, 24 oz) |
|
950 ml (4 tasses, 32 oz) |
ESTE MANUAL CUBRE EL MODELO:
BL682
ESPECIFICACIONES TÉCNICAS
Voltaje: |
120 V, 60 Hz |
Potencia: |
1500 Vatios |
Capacidad de la jarra: |
72 onzas (9 tazas, 2,1 L) |
Max Liquid Capacity: |
64 onzas (8 tazas, 1,9 L) |
Capacidad del tazón: |
64 onzas (8 tazas, 1,8 L) |
Nutri Ninja® Capacidad |
|
del recipiente: |
18 onzas (2,25 tazas, 530 mL) |
|
24 onzas (3 tazas, 710 mL) |
|
32 onzas (4 tazas, 950 mL) |
7 |
1-877-646-5288 |

Thank you for purchasing the Nutri Ninja® | Ninja® Blender System with Auto-iQ™ Technology.
Contents
Getting to Know Your Nutri Ninja® | Ninja® Blender System with Auto-iQ™ Technology 9 Before First Use 11 Assembly and Use of the Pitcher 12 Assembly and Use of the Food Processor Bowl 14 Assembly and Use of the Nutri Ninja® Cups 16 Programs, Speed Settings & Uses 17 Care & Maintenance 19 Troubleshooting Guide 20 Replacement Parts 20 Warranty & Registration 22
English
Merci d’avoir acheté le système mélangeur
Nutri NinjaMD | NinjaMD avec la technologie AUTO-iQMC.
Table des matières
Comprendre votre système mélangeur Nutri NinjaMD | NinjaMD avec la technologie Auto-iQMC 23 Avant la première utilisation ..25 Assemblage et utilisation du pichet 26 Assemblage et utilisation du bol du robot culinaire 28 Assemblage et utilisation du gobelet Nutri NinjaMD 30 Programmes, réglages de vitesse et usages 31 Soins et entretien 33 Guide de dépannage 34 Pièces de remplacement 34 Garantie et enregistrement 36
Français
Gracias por haber comprado el sistema de licuadora Ninja® Nutri Ninja® con Auto-iQMR Technology.
Índice
Partes de su Nutri Ninja® | Sistema de licuadora Ninja® con Auto-iQMR Technology 37 Antes de su Primera Utilización. 39 Armado y uso de la licuadora 40 Armado y uso del tazón para procesar alimentos 42 Armado y uso de las tazas Nutri Ninja® 44 Programas, Ajustes de velocidad y usos 46 Cuidado y mantenimiento 48 Guía de diagnóstico de problemas 49 Partes de repuesto 49 Garantía y registro 51
Español
www.ninjakitchen.com 8
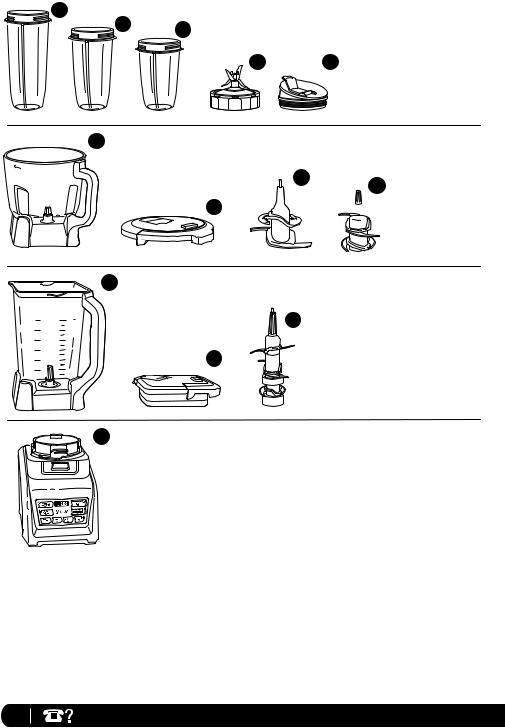
Getting To Know Your Nutri Ninja® | Ninja® Blender System with Auto-iQ™ Technology
a
b c
d |
e |
f
h
 i g
i g 

j
l
k
m
a Jumbo Multi-Serve 32 oz. Nutri |
|
f |
Food Processor Bowl |
|
j |
Pitcher |
|
|
|
||||||
Ninja Cup |
|
|
g |
Food Processor Lid |
|
k |
Pitcher Lid with Locking Handle |
b Regular 24 oz. Nutri Ninja Cup |
|
h |
Dough Blade Assembly |
|
l |
Stacked Blade Assembly |
|
c Small 18 oz. Nutri Ninja Cup |
|
i |
Chopping Blade Assembly |
|
m |
Motor Base |
|
d Pro Extractor Blades® Assembly |
|
|
|
|
n |
Power Cord (not shown) |
|
e Sip & Seal® Lids (x3) |
|
|
|
|
|
|
|
9 |
1-877-646-5288 |
|
|
|
|
|
|
|
|
|
|
|
|
||
The Nutri Ninja® | Ninja® Blender System with Auto-iQ™ Technology is a professional, high powered innovative tool with a sleek design and outstanding performance, a true asset to any kitchen. The Nutri Ninja | Ninja Blender System with
Auto-iQ Technology features intelligent programs that combine unique pulsing, blending and pausing patterns that do the work for you! Get great results every time with no guesswork required! For best results, be sure to carefully read all the instructions contained in the manual before using this appliance.
Nutri Ninja® | Ninja® Blender System with Auto-iQ™ Technology Features:
•Ninja Blade Technology
•BPA Free Pitcher, Nutri Ninja Cups, Food Processor Bowl and Lids
•Drip-Free Pour Spout
•Total Crushing® Technology
•LED Control Panel with Timer
•Sturdy, Non-Slip Base
•Smart Lid technology for easy release
•3 speeds: Low/Dough, Medium, & High
•5 Auto-iQ settings - Auto-iQ Frozen Drinks/Smoothies, Auto-iQ Food Puree, Nutri Ninja Auto-iQ Blend, Nutri Ninja Auto-iQ Ultra Blend and Auto-iQ Pulse
•Nutri Ninja Nutrient & Vitamin Extraction*
*Extract a Drink Containing Vitamins & Nutrients From Fruits & Veggies
English
www.ninjakitchen.com 10
Before First Use
PLEASE KEEP THESE IMPORTANT SAFEGUARDS IN MIND WHEN USING THE APPLIANCE:
IMPORTANT: Make sure that the motor base is plugged in for use.
IMPORTANT: Never add ingredients into the container before placing the Blade Assembly in first.
IMPORTANT: Blade Assemblies are not interchangeable.
IMPORTANT: DO NOT attempt to operate the appliance without the lid on.
IMPORTANT: Never run the appliance empty.
IMPORTANT: Appliance accessories are not intended to be used in the microwave as it may result in damage to the accessories.
11 |
1-877-646-5288 |
 WARNING: Stacked Blade Assembly is sharp and not locked in place. If using the pour spout, ensure the lid
is fully locked onto the pitcher. Failure to do so will result in a risk of laceration.
 WARNING: Stacked
Blade Assembly is sharp and not locked in place.
If pouring with the lid removed, carefully remove the Stacked Blade Assembly first,
holding it by the shaft. Failure to do so will result in a risk of laceration.
 WARNING: Chopping
Blade Assembly is sharp and not locked in place. Before emptying contents carefully remove lid and Chopping Blade Assembly, holding it by
the shaft. Failure to do so will result in a risk of laceration.
 CAUTION: Do not immerse the motor base into water or any other liquid.
1Remove all packaging material and labels from the appliance. Separate/remove all parts from each other.
2Wash the lids, pitcher, food processor bowl, Nutri Ninja® cups and Blade Assemblies in warm, soapy water. When washing the blade assemblies, use a dish-washing utensil with a handle to avoid direct hand contact with blades.
 CAUTION: Handle the Blade Assemblies with care when washing, as the blades are very sharp.
3Handle blade assemblies with care to avoid contact with sharp edges. Rinse and air dry thoroughly.
4The pitcher, food processor bowl, Nutri Ninja® cups, lids, and Blade Assemblies, are all dishwasher safe. It is recommended that the lids and blade assemblies be placed on the top rack. Ensure that the blade assemblies are removed from the containers before placing in the dishwasher.
5Wipe the motor base clean with a damp cloth.
Assembly and Use of the Pitcher
 WARNING: Handle the Stacked Blade Assembly with care, as the blades are sharp.
WARNING: Remove utensils prior to processing. Failure to remove may cause the pitcher to be damaged or to shatter, which may cause personal injury.
 WARNING: Never leave the appliance unattended while in use.
CAUTION: Do not blend hot liquids, doing so may cause excessive pressure buildup, resulting in risk of the user being burned.
IMPORTANT: Make sure that the motor base is plugged in for use.
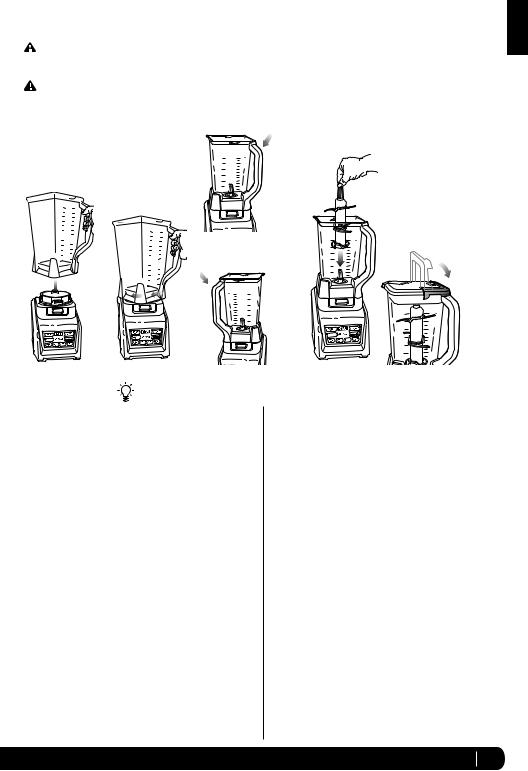
ASSEMBLY
English
Fig. 3a
OR
Fig. 1 |
Fig. 2 |
Fig. 3b |
Fig. 4 |
Fig. 5a |
It’s best to add the liquid ingredients first and then the dry ingredients.
1Review warning and caution statements above before proceeding to number 2.
2Place the motor base on a clean, dry, level surface such as a counter or table top. Press down on the motor base to make sure that the Suction Cups adhere to the counter or table top.
3Align and lower the Pitcher onto the motor base.
(Fig. 1) Handle should be aligned slightly to the right of the “LOCK” symbol on the motor base.
4Rotate the pitcher clockwise until it clicks in place. As the pitcher rotates, it will lower and the safety tabs on the bottom of the pitcher will slide under the safety tabs on the top of the motor base. (Fig. 2)
5The pitcher can be placed on the motor base two ways; the handle can be on the front right corner or the front left corner. (Fig. 3a, Fig. 3b)
6Holding the Stacked Blade Assembly by the top of the shaft, place it onto the drive gear inside the pitcher. Ensure that the Stacked Blade Assembly is seated properly and is standing upright. (Fig. 4)
NOTE: The Stacked Blade Assembly will fit loosely on the drive gear.
7Add the ingredients to the pitcher, making sure that they do not exceed the highest measured marking line on the side of the pitcher.
NOTE: If you need to add additional ingredients while the appliance is processing, open the pour spout cap and pour the ingredients in through the opening.
NOTE: When blending any kind of liquids, such as mixtures of any drinks or smoothies, do not exceed the “MAX” liquid mark (1.9 L) on the Pitcher.
8Holding the lid by the handle in the upright position, place it on top of the Pitcher aligning the triangle
( ) located on the lid with the triangle (
 ) located on the Pitcher’s handle. (Fig. 5a) Press the handle down until you hear a click. The triangles on the lid and
the blender handle MUST be aligned in order for the blender to turn on. (Fig. 5b)
IMPORTANT: As a safety feature, the power light ( ) will flash and the motor will not work if the Pitcher and lid are not installed correctly. When the Pitcher and lid are installed properly, the power light (
 ) will be solid, indicating that the appliance is ready for use.
9Plug the power cord into the electrical outlet and press the power button ( ).
).
www.ninjakitchen.com 12

Assembly and Use of the Pitcher - cont.
USE |
|
|
REMOVAL |
|
|
|
|
|
|
|
|
|
|
|
|
|
|
|
|
|
|
|
|
|
|
|
|
|
|
|
|
|
|
|
|
|
|
|
|
|
|
|
|
|
|
|
|
|
|
|
|
|
|
|
|
|
|
|
|
|
|
|
|
|
|
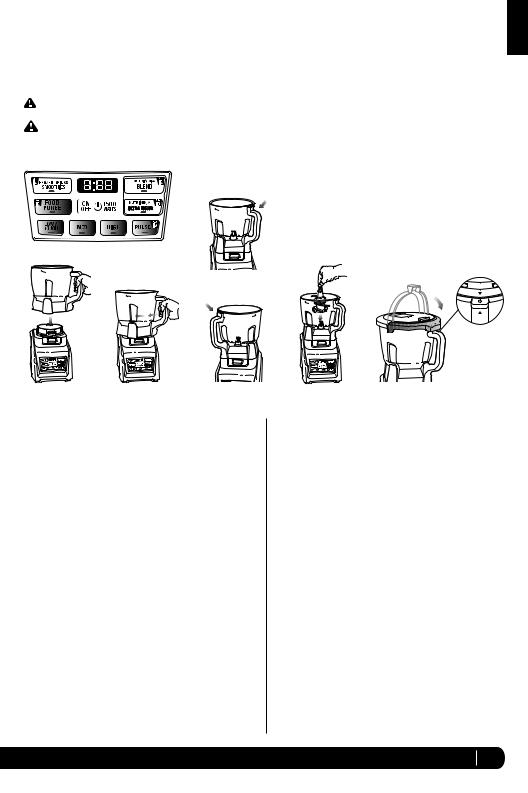
Fig. 6
Fig. 10
Fig. 9 |
Fig. 11 |
Fig. 7 |
Fig. 8 |
10Review warning and caution statements on page 12 before proceeding.
NOTE: Nutri Ninja® | Ninja® Blender with Auto-iQ™ Technology can sense which jar is on the motor base. The available function lights will illuminate depending on which jar is placed on the motor base. (Fig. 6)
11Press the power button to turn on the unit. Select the speed or Auto-iQ program that best suits your needs. The Auto-iQ program will stop the appliance automatically at the end of the program. (Fig. 7)
NOTE: Pulse ingredients for even chopping by holding the Auto-iQ Pulse button until your desired consistency is reached.
12To pause the appliance, press the selected speed or Auto-iQ program a second time. When the program is paused, the light on the program button will flash until you press it again to resume the rest of the program.
13When you have reached your desired consistency, stop the appliance by pressing the power button ( ) and wait for the blade to stop turning. (Fig. 8)
14Turn the pitcher counter clockwise to remove and then lift off the base. (Fig. 9)
 WARNING: Never insert your hands in the pitcher as the Stacked Blade Assembly is sharp. Always use a spatula to dislodge food that has stuck to the sides of the pitcher.
15Open the pour spout cap and use the spout to empty liquid contents.
16For thicker consistencies, first remove the lid by pressing the release button and pulling the lid handle up to a 90 degree angle to lift lid off the pitcher. Then, carefully remove the Stacked Blade Assembly by the top of the shaft. Place Stacked Blade Assembly away from the work area to avoid accidental contact. Finally, empty contents from the pitcher. (Fig. 10)
17Make sure that the unit is unplugged when not in use.
18To release the motor base from the counter or table top, place your hands underneath both sides of the motor base and gently pull the unit up and towards you.
(Fig. 11)
13 |
1-877-646-5288 |
Assembly and Use of the Food Processor Bowl
 WARNING: Chopping Blade Assembly is sharp and not locked in place. Before emptying contents carefully remove lid and Chopping Blade Assembly, holding it by the shaft. Failure to do will result in risk of laceration.
 WARNING: Remove utensils prior to processing. Failure to remove may cause the bowl to be damaged or to shatter, which may cause personal injury.
 WARNING: Never leave the appliance unattended while in use.
CAUTION: Do not blend hot liquids, doing so may cause excessive pressure buildup, resulting in risk of the user being burned.
CAUTION: Remove the lid from the bowl upon completion of processing. Some ingredients have the potential to expand after blending resulting in excessive pressure buildup that can pose a risk of injury.
IMPORTANT: Make sure that the motor base is plugged in for use.
ASSEMBLY
English
Fig. 1
Fig. 4a
OR
Fig. 6b
Fig. 2 |
Fig. 3 |
Fig. 4b |
Fig. 5 |
Fig. 6a |
NOTE: Nutri Ninja® | Ninja® Blender System with AutoiQ™ Technology can sense which jar is on the motor base. The function lights will illuminate depending on which jar is placed on the motor base. (Fig. 1)
1Review warning and caution statements above before proceeding to number 2.
2Place the motor base on a clean, dry, level surface such as a counter or table top. Press down on the motor base to make sure that the suction cups adhere to the counter or table top.
3Align and lower the Processor Bowl onto the motor base. (Fig. 2) Handle should be aligned slightly to the right of the “LOCK” symbol on the motor base.
4Rotate the bowl clockwise until it locks in place, you will hear a click when the lock is engaged. (Fig. 3)
5The bowl can be placed on the motor base two ways; the handle can be on the front right corner or the front left corner. (Fig. 4a, Fig. 4b)
6Holding the desired blade assembly by the top of the shaft, place it onto the drive gear inside the bowl. Ensure that the blade assembly is seated properly and is standing upright. (Fig. 5)
NOTE: The blade will fit loosely on the drive gear.
7Add the ingredients to the bowl, making sure that they do not exceed the highest measured marking line on the side of the bowl.
8Holding the lid by the handle in the upright position, place it on top of the Processor Bowl aligning the
triangle ( ) located on the lid with the triangle (
 ) located on the Processor Bowl handle. (Fig. 6a) Press the handle down until you hear a click. The triangles on the lid and the Processor Bowl handle MUST be aligned in order for the blender to turn on. (Fig. 6b)
NOTE: The 64 oz. bowl is not intended for blending drinks. Do not overfill.
9Plug the power cord into the electrical outlet and press the power button ( ).
).
NOTE: As a safety feature, the power button ( ) will flash and the motor will not work if the bowl and lid are not installed correctly. When the bowl and lid are installed properly, the power button (
 ) will be solid, indicating that the appliance is ready for use.
www.ninjakitchen.com 14

Assembly and Use of the Processor Bowl - cont.
USE |
|
REMOVAL |
USE |
CHOPPING BLADE |
|
|
DOUGH BLADE |
ASSEMBLY |
|
|
ASSEMBLY |
|
|
|
|
|
|
|
|
Fig. 1 |
Fig. 2 |
Fig. 3 |
USING THE CHOPPING BLADE ASSEMBLY
1Review warning and caution statements on page 14 before proceeding to number 2.
2Place the motor base on a clean, dry, level surface such as a counter or table top. Press down on the motor base to make sure that the suction cups adhere to the counter or table top.
3Secure the bowl onto the motor base.
4Holding the Chopping Blade Assembly by the shaft, place it onto the gear shaft inside the bowl. Ensure that the Chopping Blade Assembly fits around the gear shaft and that it is standing straight. (Fig. 1)
5Add the ingredients and secure the bowl lid onto the bowl.
6Plug the power cord into the electrical outlet and press on the power button ( ). Select the speed or Auto-iQ™ program that best suits your needs. Pulse ingredients for even chopping by holding the Auto-iQ Pulse button until your desired consistency is reached.
NOTE: Please refer to “Speed Settings & Uses” chart for suggested uses and speeds.
7When you have reached your desired consistency, stop the appliance by pressing the power button ( ) and wait for the blade to stop turning. (Fig. 2)
8To remove the lid, press the release button on the lid and pull the lid handle up to a 90° angle. (Fig. 2)
9Turn the bowl counter-clockwise and lift it to remove it from the motor base. (Fig. 3)
10To release the motor base from the counter or table top, place your hands underneath both sides of the motor base and gently pull the unit up and towards you.
(Fig. 4)
15 |
1-877-646-5288 |
Fig. 4 |
Fig. 5 |
USING THE DOUGH BLADE ASSEMBLY
1Review warning and caution statements on page 14 before proceeding to number 2.
2Place the motor base on a clean, dry, level surface such as a counter or table top. Press down on the motor base to make sure that the suction cups adhere to the counter or table top.
3Secure the bowl onto the motor base.
4Holding the Dough Blade Assembly by the shaft, place it onto the gear shaft inside the bowl. Ensure that the Dough Blade Assembly fits around the gear shaft and that it is standing straight. (Fig. 5)
5Add the ingredients and secure the bowl lid onto the bowl.
6Plug the power cord into the electrical outlet and press on the power button ( ). Select the LOW/DOUGH button and process until ingredients come together to form a mass.
NOTE: Please refer to “Speed Settings & Uses” chart for suggested uses and speeds.
7Once finished making dough, stop the appliance by pressing the power button ( ) and wait for the blade to stop turning.
8To remove the lid, press the release button on the lid and pull the lid handle up to a 90° angle. (Fig. 2)
9Turn the bowl counter-clockwise and lift it to remove it from the motor base. (Fig. 3)
10To release the motor base from the counter or table top, place your hands underneath both sides of the motor base and gently pull the unit up and towards you.
(Fig. 4)
 Loading...