


SYSTÈME |
CF090C series |
|
|
OWNER’S GUIDE |
|
|
|
|
|
GUIDE DU PROPRIÉTAIRE |
|
TM/MC
ninjakitchen.com 1-877-646-5288

IMPORTANT SAFEGUARDS
For Household Use Only
READ ALL INSTRUCTIONS BEFORE USING YOUR NINJA COFFEE BAR™ SYSTEM.
Safety Signal Words
This Owner’s Guide and the safety labels attached to this appliance use signal words that indicate safety hazards with differing levels of severity.
Below are the words used and their definitions:
•WARNING indicates a hazardous situation which, if not avoided, could result in death or serious injury.
•CAUTION indicates a hazardous situation which, if not avoided, could result in minor or moderate injury.
•NOTICE is used to address practices not related to physical injury.
The words “WARNING” and “CAUTION” are preceded by a triangle, signifying that these are safety-related.
The terms “IMPORTANT” and “NOTE” are also used to describe good ideas for better and more efficient equipment use.
THIS BOOK COVERS MODEL NUMBER:
CF090C CF4
TECHNICAL SPECIFICATIONS
Voltage: |
120V~, 60Hz. |
Power: |
1450 Watts |
Water Reservoir |
|
Capacity: |
1.5 L (50 Ounces) |
 WARNING:
To reduce the risk of fire, electric shock, serious injury, death or damage when using this appliance, follow these basic safety precautions.
General Precautions
1DO NOT allow young children to operate the appliance or use as a toy. Close supervision is necessary when any appliance is used near children.
2To reduce the risk of electric shock, this appliance has a polarized plug (one blade is wider than the other). As a safety feature, this plug will fit into a polarized outlet only one way. If the plug does not fit fully into the outlet, reverse the plug. If it still does not fit, contact a qualified electrician. DO NOT force into outlet or try to modify to fit.
3To protect against electrical shock, DO NOT submerge the appliance or allow the power cord to come into contact with water or any other liquid.
4Allow the appliance to cool before removing any parts and before cleaning.
5NEVER carry the appliance by the power cord or yank it to disconnect from electrical outlet; instead grasp the plug and pull to disconnect.
6DO NOT operate any appliance with a damaged cord or plug, or after the appliance malfunctions, or has been dropped or damaged in any manner.
7DO NOT let the power cord hang over the edges of tables or counters or touch hot surfaces such as the stove.
8DO NOT remove the brew basket or carafe while the appliance is brewing. Scalding may occur if any of these parts are removed during brewing cycles.
9The use of an accessory not recommended by the manufacturer may create an overflow condition and scalding hazard, or result in fire, electric shock, or personal injury.
1 |
1-877-646-5288 |

10DO NOT operate your appliance in an appliance garage or under a wall cabinet. When storing in an appliance garage always unplug the unit from the electrical outlet. Not doing so could create a risk of fire, especially if the appliance touches the walls of the garage or the door touches the unit as it closes.
Operating Notice
11DO NOT use well water; use tap water.
12Clogging and backing up of water and/or coffee in the filter basket can occur under any of the following conditions: The use of coffee that is too finely ground; using two or more paper filters; using a permanent filter in conjunction with a paper filter; not cleaning coffee grounds from a permanent filter; or allowing coffee grounds to spill over the filter.
13ALWAYS use appliance on a dry, level surface.
14DO NOT place on or near a hot gas or electric burner, or in a heated oven.
15DO NOT use this appliance for anything other than its intended use. DO NOT use outdoors.
16DO NOT touch hot surfaces. Use handles or knobs.
17DO NOT touch warming plate while the brewer is in use.
18DO NOT reach across top of brewer to froth during brewing. Steam is released from vent on top of brewer and can result in a steam burn.
19DO NOT run the appliance without water.
20ALWAYS place a vessel beneath the brew basket to receive the brewed coffee.
21DO NOT overfill the water reservoir. Fill water only to the Max Fill line.
Glass Carafe
22The carafe is designed for use with this appliance only. It must never be used on a stovetop.
23DO NOT set a hot carafe on a wet or cold surface.
24DO NOT use a cracked or scratched carafe or a carafe that has a loose or weakened handle.
25DO NOT clean carafe with abrasive cleansers, steel wool pads, or other abrasive material.
26DO NOT place carafe in microwave.
27DO NOT expose carafe to extreme temperature changes.
28DO NOT place carafe on or near a hot gas or electrical burner, or in a heated oven.
29DO NOT use carafe for carbonated beverages.
30DO NOT drink directly from the carafe. Liquid from the carafe may be very hot.
31DO NOT use the carafe to store food when not in use.
32Ensure the carafe is completely empty before starting a cleaning or brewing cycle. Starting a cycle with water or coffee in the carafe will cause an overflow.
Maintenance
33Remove the power cord from the electrical outlet and allow unit to cool before removing brew basket, water reservoir, or filters before surface cleaning.
34To prevent illness from bacterial growth in the appliance, follow all cleaning instructions in the Care & Maintenance section of this Owner’s Guide.
35If the product is not operating properly, contact SharkNinja Operating LLC at 1-877-646-5288 or ninjakitchen.com for examination, repair, or adjustment.
36Clean the system on a weekly basis.
Cord Statement
37A short power-supply cord is provided to reduce the risks resulting from becoming entangled in or tripping over a longer cord.
38DO NOT use extension cords with this product.
SAVE THESE INSTRUCTIONS
English
ninjakitchen.com 2
CONSIGNES DE SÉCURITÉ IMPORTANTES
Pour usage domestique seulement
LISEZ TOUTES LES DIRECTIVES AVANT D’UTILISER VOTRE SYSTÈME NINJA COFFEE BARMC.
Mots indicateurs de sécurité
Ce guide de l’utilisateur et les étiquettes de sécurité apposées à cet appareil utilisent des mots indicateurs avertissant des dangers de sécurité avec différents niveaux de risque.
Voici les mots utilisés et leur définition :
•AVERTISSEMENT indique une situation dangereuse qui, si elle n’est pas évitée, pourrait mener à la mort ou à une blessure grave.
•MISE EN GARDE indique une situation dangereuse qui, si elle n’est pas évitée, pourrait mener à une blessure de gravité mineure ou moyenne.
•AVIS concerne les pratiques qui ne sont pas liées aux blessures.
Les mots « AVERTISSEMENT » et « MISE EN GARDE » sont précédés d’un triangle pour
indiquer qu’ils sont liés à la sécurité.
Les termes « IMPORTANT » et « REMARQUE » sont également utilisés pour décrire de bonnes idées pour améliorer et rendre plus efficace l’utilisation de l’équipement.
CE GUIDE PORTE SUR LE NUMÉRO DE MODÈLE :
CF090C CF4
CARACTÉRISTIQUES TECHNIQUES
Tension électrique : |
120 V~, 60 Hz |
Puissance : |
1450 watts |
Capacité du |
|
réservoir d’eau : |
1,5 l (50 onces) |
3 |
1-877-646-5288 |
AVERTISSEMENT :
Pour réduire le risque d’incendie, d’électrocution, de blessures graves, de décès ou de dommages lors de l’utilisation de cet appareil, respectez ces précautions de sécurité élémentaires.
Précautions générales
1NE PERMETTEZ PAS aux jeunes enfants d’utiliser l’appareil ou de s’en servir comme jouet. Une surveillance étroite est nécessaire lorsqu’un appareil est utilisé en présence d’enfants.
2Afin de réduire le risque d’électrocution, cet appareil est muni d’une fiche polarisée (une lame est plus large que l’autre). Comme précaution, cette fiche s’insère dans une prise polarisée dans un seul sens. Si la fiche ne s’insère pas entièrement dans la prise, inversez celle-ci. Si elle ne s’insère toujours pas, communiquez avec un électricien qualifié.
NE FORCEZ PAS pour insérer la fiche dans la prise et ne tentez pas de la modifier pour qu’elle puisse entrer dans celle-ci.
3Pour éviter les électrocutions, NE SUBMERGEZ PAS l’appareil et ne laissez pas le cordon d’alimentation entrer en contact avec de l’eau ou tout autre liquide.
4Laissez l’appareil refroidir avant de retirer toute pièce et avant le nettoyage.
5NE PORTEZ JAMAIS l’appareil par le cordon d’alimentation et ne tirez pas sur celui-ci pour débrancher l’appareil; tirez plutôt sur la fiche.
6N’UTILISEZ PAS un appareil dont le cordon ou la fiche est endommagé, un appareil qui a subi une défaillance ou un appareil qui a été échappé ou endommagé de quelque façon que ce soit.
7NE LAISSEZ PAS le cordon d’alimentation pendre d’une table ou d’un comptoir ni toucher des surfaces chaudes, comme une cuisinière.
8NE RETIREZ PAS le panier à infusion ou la carafe pendant l’infusion. Le retrait de ces pièces pendant le cycle d’infusion pourrait mener à un échaudage.
9L’utilisation d’un accessoire n’étant pas recommandé par le fabricant pourrait causer un débordement et un danger d’échaudage ou mener à un incendie, à une électrocution ou à une blessure.

10NE FAITES PAS fonctionner votre appareil dans un meuble de rangement pour électroménagers ou
sous une armoire. Lors du stockage dans un meuble de rangement pour électroménagers, débranchez toujours l’appareil de la prise électrique. Ne pas le débrancher pourrait causer un risque d’incendie, surtout si l’appareil touche aux parois du meuble de rangement pour électroménagers ou si la porte touche à l’appareil lorsqu’on la ferme.
Avis d’utilisation
11N’UTILISEZ PAS l’eau d’un puits : utilisez l’eau du robinet.
12Les conditions suivantes peuvent causer une obstruction et un refoulement de l’eau ou du café dans le panier à filtre : utiliser un café trop finement moulu, utiliser plus d’un filtre en papier, utiliser
un filtre permanent avec un filtre en papier, ne pas nettoyer le café moulu du filtre permanent ou
permettre au café moulu de déborder par-dessus le filtre.
13UTILISEZ TOUJOURS l’appareil sur une surface plane et sèche.
14NE PLACEZ PAS l’appareil sur un élément de poêle électrique ou de poêle au gaz chaud ou à proximité de celui-ci, ou dans un four chaud.
15N’UTILISEZ PAS l’appareil pour d’autres fins que celles pour lesquelles il est prévu. N’UTILISEZ PAS cet appareil à l’extérieur.
16NE TOUCHEZ PAS aux surfaces chaudes. Utilisez les poignées ou les boutons.
17NE TOUCHEZ PAS la plaque chauffante pendant que la machine à café fonctionne.
18NE PASSEZ PAS la main au-dessus de la machine à café pour utiliser la buse à mousser pendant l’infusion. De la vapeur s’échappe de l’orifice audessus de la machine à café et pourrait causer une brûlure par la vapeur.
19NE FAITES PAS fonctionner l’appareil sans eau.
20PLACEZ TOUJOURS un contenant sous le panier à infusion pour recevoir le café infusé.
21NE REMPLISSEZ PAS trop le réservoir d’eau. Ajoutez de l’eau uniquement jusqu’au niveau de la ligne de remplissage maximal.
Carafe de verre
22La carafe est conçue pour être utilisée avec cet appareil seulement. Elle ne doit jamais être utilisée sur le dessus d’une cuisinière.
23NE PLACEZ PAS une carafe chaude sur une surface mouillée ou froide.
24N’UTILISEZ PAS une carafe fêlée ou égratignée ou une carafe avec une poignée lâche ou fragilisée.
25NE NETTOYEZ PAS la carafe avec des nettoyants abrasifs, des tampons de laine d’acier ou tout autre matériel abrasif.
26NE METTEZ PAS la carafe au four micro-ondes.
27N’EXPOSEZ PAS la carafe à des changements extrêmes de température.
28NE PLACEZ PAS la carafe sur un élément de poêle électrique ou de poêle au gaz chaud ou à proximité de celui-ci, ou dans un four chaud.
29N’UTILISEZ PAS la carafe pour des boissons pétillantes.
30NE BUVEZ PAS directement de la carafe. Le liquide dans la carafe pourrait être très chaud.
31N’UTILISEZ PAS la carafe pour stocker des aliments lorsqu’elle n’est pas utilisée.
32Assurez-vous que la carafe est complètement vide avant de commencer un cycle de nettoyage ou d’infusion. Commencer un cycle avec de l’eau ou du café dans la carafe causera un débordement.
Entretien
33Débranchez le cordon d’alimentation de la prise électrique et laissez l’appareil refroidir avant de retirer le panier à infusion, le réservoir d’eau ou les filtres à des fins de nettoyage de la surface.
34Afin d’éviter les maladies liées à la croissance bactérienne dans l’appareil, suivez toutes les instructions de nettoyage figurant dans la section « Soins et entretien » du présent guide d’utilisation.
35Si le produit ne fonctionne pas correctement, communiquez avec SharkNinja Operating LLC au 1 877 646-5288 ou ninjakitchen.com à des fins d’examen, de réparation ou d’ajustement.
36Nettoyez le système toutes les semaines.
Avis sur le cordon
37 Un cordon d’alimentation court est fourni; un cordon plus long augmente les risques qu’on s’y empêtre ou qu’on trébuche sur celui-ci.
38 N’UTILISEZ PAS de rallonge avec ce produit.
CONSERVEZ CES INSTRUCTIONS
Français
ninjakitchen.com 4

Thank you for purchasing the Ninja Coffee Bar™ System .
Contents |
|
Getting to Know Your Ninja Coffee Bar System................................................................. |
7 |
Control Panel................................................................................................................ |
8 |
Features of the Ninja Coffee Bar System ......................................................................... |
9 |
Before First Use .......................................................................................................... |
10 |
Setting the Clock & Program “PROG” Delay Brew.......................................................... |
11 |
Priming Your Ninja Coffee Bar System .......................................................................... |
12 |
Preparing & Using the Ninja Coffee Bar System............................................................. |
14 |
How Much Coffee do You get in Your Cup?............................................................... |
14 |
Would You Like a Hotter Coffee?.............................................................................. |
14 |
Pre-Heating ........................................................................................................... |
14 |
Filling the Brew Basket With Coffee ......................................................................... |
15 |
Drip Stop ............................................................................................................... |
16 |
Intelligent Warming Plate ........................................................................................ |
16 |
Stay Warm Button .................................................................................................. |
16 |
Brewing Coffee ...................................................................................................... |
17 |
Customs Brews:..................................................................................................... |
17 |
Classic & Rich..................................................................................................... |
17 |
Over Ice.............................................................................................................. |
18 |
Signature Brews: ................................................................................................... |
18 |
Specialty & Cafe Forte ......................................................................................... |
18 |
Frothing Your Milk .................................................................................................. |
19 |
Care & Maintenance ................................................................................................... |
20 |
Cleaning After a Brew............................................................................................. |
20 |
Cleaning Your Carafe .............................................................................................. |
20 |
Cleaning Your Water Reservoir................................................................................. |
20 |
Cleaning & Descaling Your Brewing System ............................................................. |
21 |
Troubleshooting Guide................................................................................................. |
22 |
Ordering Replacement Parts ........................................................................................ |
24 |
Warranty & Registration............................................................................................... |
45 |
5 |
1-877-646-5288 |

Merci d’avoir acheté le système Ninja Coffee BarMC.
Table des matières
Apprendre à connaître votre système Ninja Coffee Bar.................................................. |
25 |
|
|
Panneau de commande.............................................................................................. |
26 |
|
|
Caractéristiques du système Ninja Coffee Bar .............................................................. |
27 |
|
|
Avant la première utilisation........................................................................................ |
28 |
|
|
Réglage de l'horloge et du programme « PROG » d'infusion différée.............................. |
29 |
|
|
Préparation de votre système Ninja Coffee Bar............................................................. |
30 |
|
|
Préparation et utilisation du système Ninja Coffee Bar .................................................. |
32 |
|
|
Quelle quantité de café obtenez-vous dans votre tasse? .......................................... |
32 |
|
|
Aimeriez-vous un café plus chaud? ........................................................................ |
32 |
|
|
Préchauffage ........................................................................................................ |
32 |
|
|
Remplissage du panier à infusion de café ............................................................... |
33 |
|
|
Soupape d’arrêt d’écoulement ............................................................................... |
34 |
|
|
Plaque chauffante intelligente |
34 |
|
|
Français |
|||
Bouton Stay Warm (Garder chaud) |
34 |
||
|
|||
Infusion du café .................................................................................................... |
35 |
|
|
Infusions personnalisées :...................................................................................... |
35 |
|
|
...............................................................................................Classique et riche |
35 |
|
|
Infusion sur glace............................................................................................... |
36 |
|
|
Infusions spéciales : ............................................................................................. |
36 |
|
|
Infusion spécialisée et Café Forte ........................................................................ |
36 |
|
|
Faire mousser votre lait ......................................................................................... |
37 |
|
|
Soins et entretien....................................................................................................... |
38 |
|
|
Nettoyage après une infusion ................................................................................. |
38 |
|
|
Nettoyage de votre carafe ..................................................................................... |
38 |
|
|
Nettoyage de votre réservoir d’eau ......................................................................... |
38 |
|
|
Nettoyage et détartrage de votre système d’infusion................................................ |
39 |
|
|
Guide de dépannage .................................................................................................. |
40 |
|
|
Commande de pièces de rechange ............................................................................. |
42 |
|
|
Garantie et enregistrement ......................................................................................... |
46 |
|
ninjakitchen.com 6

Getting To Know Your Ninja Coffee Bar™ System
 CAUTION: DO NOT reach across the top of brewer to froth during brewing. Steam is released from vent on top of the brewer and can result in a steam burn.
k
a
|
|
|
d |
|
|
|
n |
|
|
|
i |
|
|
|
|
|
|
|
|
l |
|
|
|
|
|
m |
|
e |
|
|
|
|
|
|
|
o |
|
j |
|
|
|
|
|
|
|
|
|
|
|
g |
SIC |
|
RICH |
|
|
|
RICHE |
||
|
|
CLASIQUE |
|
||
|
p |
CLASS |
|
|
|
|
|
|
|
|
|
h
b
c
f
a |
Brewer |
|
j |
Drip Stop Toggle |
|
||||
b |
Flip-Top Water Reservoir Lid |
|
k |
Removable Filter Holder |
c |
Removable Water Reservoir |
|
l |
Integrated Frother |
d |
Showerhead |
|
m |
Frother Whisk |
e |
Water Tank Shelf |
|
n |
Brew-Through Carafe Lid |
f |
Control Panel |
|
o |
Glass Carafe |
g |
Multi-Serve Cup Platform |
|
p |
Double-Sided Scoop: Carafe Side and Single-Serve Side |
h |
Intelligent Warming Plate |
|
q |
Power Cord & Wrap (not shown) |
i |
Swinging Brew Basket |
|
|
|
|
|
|
|
|
7 |
1-877-646-5288 |
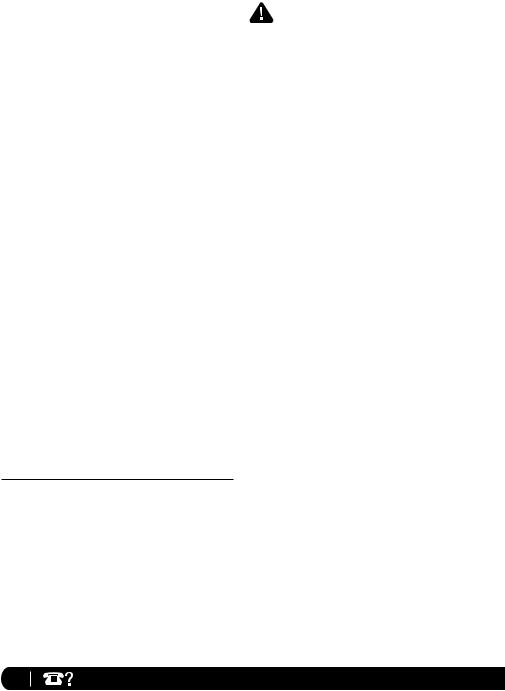
Control Panel
1 |
2 |
3 |
4 |
5c |
5d |
5b |
5e |
5a |
5f |
6a |
6b |
|
6c |
7a |
|
7b |
|
8 |
9 |
10 |
11 |
English
1Programmable Digital Clock
2Clock Hour & Minute Buttons
3Power Button
4PROG Button
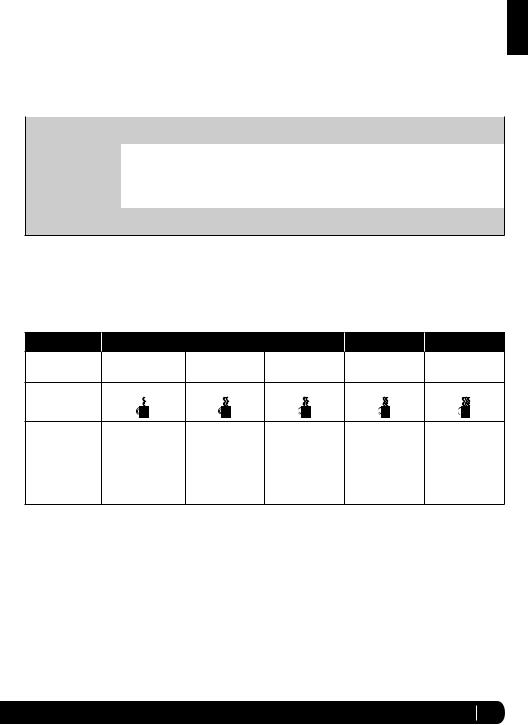
5Multi-Serve Dial a Cup
b XL Cup
c Travel Mug
d XL Multi-Serve e Half Carafe
f Full Carafe
6Custom Brew Types
a Classic Brew Button b Rich Brew Button
c Over Ice Brew Button
7Ninja® Signature Brews a Specialty Brew Button
b Cafe Forte Brew Button
8Drip Stop Indicator
9Pre-Heat Indicator
10Intelligent Clean Cycle Indicator/Button
11Stay Warm Button
ninjakitchen.com 8

Features of the Ninja Coffee Bar™ System
•Thermal Flavour Extraction™ Technology - Blends precision water delivery with automated controls for calibrated temperature, pre-infusion, coffee saturation, and flavor richness to unlock the full flavor potential of your coffee.
•Custom Brews – Brew directly into your favorite cup, travel mug, or carafe.
•Brew Types – Control the strength and style of your coffee:
a.Classic Brew for smooth, balanced flavor from your favorite coffee.
b.Rich Brew for a richer, never-bitter coffee flavor that stands up to milk, cream, or flavoring.
c.Over Ice Brew for a smooth, rich, freshly brewed iced coffee that’s not watered down.
d.Specialty Brew for creating a super-rich concentrate to use as a key ingredient in all kinds of hot milk-based, iced, and frozen coffeehouse-style drinks.
e.Cafe Forte for deep, full-bodied, and complex flavor that is so rich and drinkable, it tastes great black—no milk or sweeteners needed.
•Multi-Serve Cup Platform – Pull it down and place your favorite cup on it. Brew directly into your cup.
•Removable Water Reservoir with Easy-Access Flip-Top Lid – For quick and easy filling.
•Auto-iQ™ – The Ninja Coffee Bar System knows how much water to use for each size and brew type.
•1.5 L Glass Carafe
•LED Control Panels with Programmable Digital Clock
•24-Hour Programmable PROG Button – Set it to automatically brew the following morning.
•Drip Stop – Stops the flow of coffee from the brew basket, allowing you to pour a cup mid-brew. Switch toggle to the closed position to prevent dripping once the brew cycle is finished.
•Clean Function – When your Ninja Coffee Bar System senses there is hard-water calcium buildup in your brewer, which can affect the flavor of your coffee, the CLEAN light will illuminate. Follow the cleaning instructions in the Care & Maintenance section.
•Stay Warm Button – Your warming plate will automatically turn on after brewing a carafe and turn off after 2 hours. The Stay Warm button allows you to manually turn the warming plate off.
•Intelligent Warming Plate – Automatically adjusts the temperature of the warming plate to keep your coffee at the ideal drinking temperature without burning it.
•Audible Ready Signal – Alerts you that your coffee is ready.
•2-Hour Shutoff – Automatically turns off the warming plate two hours after you brew coffee.
•Pre-Heat - After plugging in and turning on your brewer by pressing the Power button, allow 3 minutes for your brewer to pre-heat. When plugged in, your Ninja Coffee Bar System will stay pre-heated for 72 hours unless you turn the brewer off by pressing the Power button.
Go to ninjakitchen.com for more information and how-to videos.
Brew into a cup, travel mug, or carafe.
Cup or XL Cup |
Travel Mug or XL Multi-Serve |
Half Carafe or Full Carafe |
9 |
1-877-646-5288 |
Before First Use
PLEASE KEEP THESE IMPORTANT SAFEGUARDS IN MIND WHEN USING THE APPLIANCE:
 CAUTION: APPLIANCE CREATES HOT LIQUID. HANDLE WITH CARE.
 CAUTION: DO NOT remove the vessel while the appliance is running without the Drip Stop in the closed position. Return the vessel quickly and open the Drip Stop to continue the brew.
 CAUTION: Never open the brew basket when the coffeemaker is in use.
 CAUTION: Please ensure you are using at least a 350 ml cup for the Cup size, 415 ml cup for the XL Cup size, 475 ml travel mug for the Travel Mug size, and 590 ml travel mug for the XL MultiServe size to prevent overflow and a scalding injury.
IMPORTANT: DO NOT run the appliance without water.
IMPORTANT: Always place a vessel beneath the brew basket to receive the brewed coffee.
IMPORTANT: DO NOT overfill the water reservoir. Fill water only to the Max Fill line.
English
1Remove all packaging material, stickers, and labels from the brewer.
2Wash the water reservoir, glass carafe, and removable filter holder in warm, soapy water with a soft cloth.
NOTE: The glass carafe is dishwasher safe. Place on top rack only.
3Rinse and dry thoroughly.
4Wipe the intelligent warming plate with a damp cloth.
5Before first use, prime the system by running two Full Carafe, Classic Brew cycles with water only. After each cycle is complete, discard the water.
NOTE: See the Priming Your Ninja Coffee Bar™ System section.
ninjakitchen.com 10
Setting the Clock & Program “PROG” Delay Brew
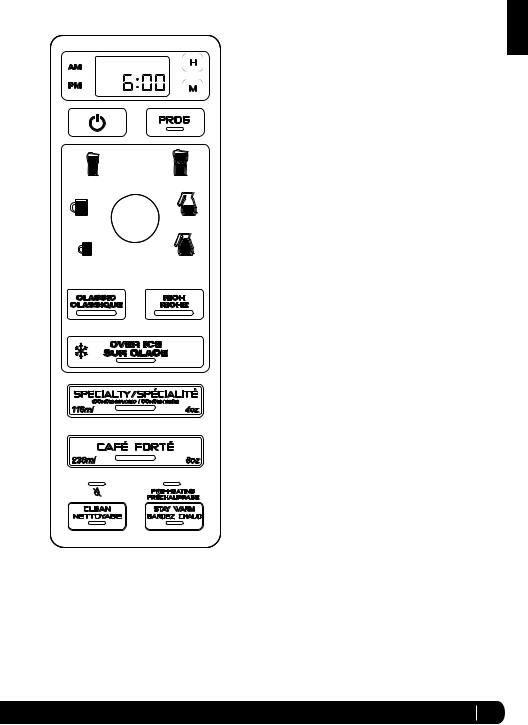
Fig. 1
Fig. 2
Fig. 3
SETTING THE CLOCK
1Plug the power cord into an electrical outlet. The clock will flash on the control panel to indicate that the time has not been set. (Fig. 1)
2Press the H (hour) or M (minute) button until you reach the current time. The AM or PM indicator will illuminate on the left side of the display as you are setting the time. (Fig. 2)
3After 5 seconds, the clock will stop flashing and the clock will be set.
NOTE: If the clock stops flashing and does not display the correct time of day, pressing the H (hour) or M (minute) button at any time will cause the clock to flash again. You can now reprogram the correct time of day by following the steps above.
NOTE: If you unplug the brewer or in the event of an extended power loss, you will need to reset the clock the next time the brewer is plugged in.
TO PROGRAM THE DELAY BREW TIME
NOTE: The Ninja Coffee Bar™ System must remain on for the delay brew function to work. Do not power off after setting delay brew.
1Turn the unit on by pressing the Power button located under the clock.
NOTE: The clock will remain on even if the unit is turned off. Ensure the unit is powered on before setting the delay brew.
2Press PROG. The PROG button will illuminate and the clock will begin to flash “12:00” or the last delay brew time that was set. (Fig. 3)
Fig. 4
3While the clock is flashing, press the H (hour) or M (minute) button to set the time that you would like the delay brew to begin. The AM or PM indicator will illuminate on the left side of the display as you are setting the desired time.
4Once the proper time has been set, select the size of the vessel that you would like to brew into.
5Select the Brew Type that you desire from the 5 flashing buttons. The selected brew type will be illuminated.
(Fig. 4)
6Once the time, brew size, and brew type have been set, allow the PROG button to stop flashing, or press the PROG button to activate. When the delay brew is activated, the PROG button will illuminate and an audible signal will play to verify the delay brew is set.
NOTE: To deactivate the delay brew cycle, press the PROG button once more and the light will turn off. Any change to the selected brew size or starting any other brew will cancel the programmed delay brew.
7Place the appropriate-sized vessel under brew basket.
IMPORTANT: Make sure the Drip Stop is in the open position.
Go to ninjakitchen.com for more information and how-to videos.
11 |
1-877-646-5288 |

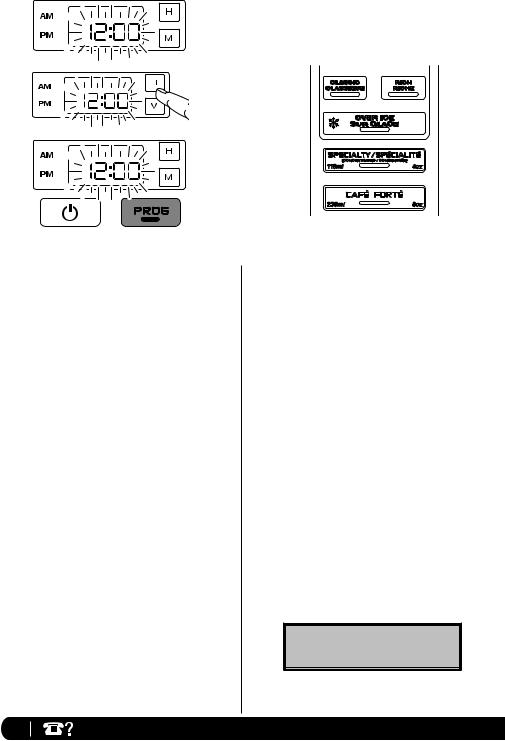
Priming Your Ninja Coffee Bar™ System
 CAUTION: Fill reservoir with water up to, but not exceeding, the Max Fill line. We recommend fresh, cool, filtered water. Do not fill water reservoir with any other liquids such as brewed coffee, carbonated beverages, etc. as other liquids may damage your brewer.
English
Fig. 5 |
Fig. 6 |
Fig. 7 |
Fig. 8 |
Fig. 9 |
1Place the brewer on a dry, clean, and level surface.
2To fill the water reservoir, use the hand grips to lift it to the right and up off the brewer. (Fig. 5) The water reservoir lid flips open for easy filling, and the entire lid is easily removable for quick cleaning. Add fresh, filtered water up to, but not exceeding, the Max Fill line (Fig. 6), then return the water reservoir to the brewer by angling it into the holder and pushing in toward the brewer to lock into place. (Fig. 7) Do not fill water
reservoir with anything other than water as other liquids may damage your brewer.
3Ensure removable filter holder is nested inside the brew basket. (Fig. 8) Once in place, slide the brew basket all the way in until you hear a slight click. (Fig. 9)
ninjakitchen.com 12
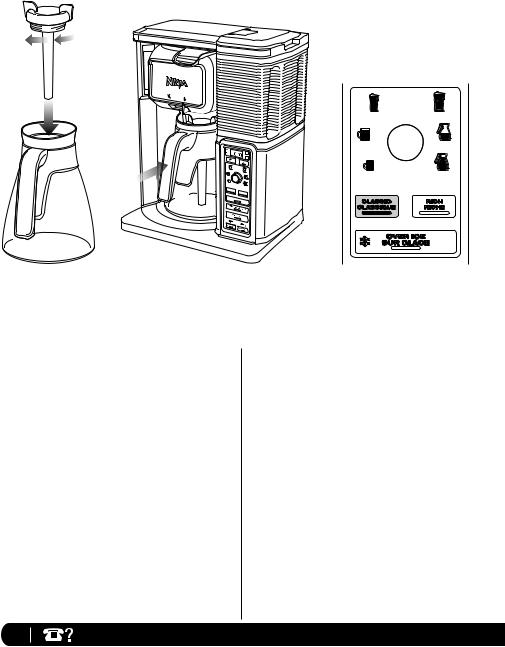
Priming Your Ninja Coffee Bar™ System cont.
BREW / CLASS CLAS IC SIQUE
INFUSION
RICH
RICHE
 OVER ICE / SUR
GLACE
Fig. 10 |
Fig. 11 |
Fig. 12 |
4Twist the brew-through lid clockwise onto the glass carafe to lock into place. (Fig. 10)
5Center the carafe below the brew basket. (Fig. 11)
NOTE: Do not place any ground coffee in the brew basket for the first two cycles.
6Plug the brewer into an electrical outlet.
7Once all parts are securely in place, press the Power button.
8With the unit powered on, make sure the Drip Stop toggle is set to the open position. Select the Full Carafe size and Classic Brew setting. (Fig. 12)
9When the cycle is complete, discard the water in the carafe. Repeat, beginning with step 2. You are now ready to use your Ninja Coffee Bar™ System to brew coffee.
13 |
1-877-646-5288 |
Preparing & Using the Ninja Coffee Bar™ System
HOW MUCH COFFEE DO YOU GET IN YOUR CUP?
 CAUTION: Please ensure that you are using at least a 350 ml cup for the Cup size, 415 ml cup for the XL Cup size, 475 ml travel mug for the Travel Mug size, and 590 ml travel mug for the XL Multi-Serve size to prevent overflow and a scalding injury.
Each size and brew type produces a different amount of coffee to optimize strength and taste.
NOTE: The coffee grounds will absorb some of the water that is brewed, resulting in slightly less brewed coffee than water used.
APPROXIMATE BREW VOLUME
Size/Brew |
Classic |
Rich |
Over Ice |
Over Ice |
|
(coffee only) |
(filled with ice) |
||||
|
|
|
|||
|
|
|
|
|
|
Cup |
281 ml |
258 ml |
111 ml |
281 ml |
|
|
|
|
|
|
|
XL Cup |
340 ml |
305 ml |
136 ml |
340 ml |
|
|
|
|
|
|
|
Travel Mug |
414 ml |
390 ml |
174 ml |
414 ml |
|
|
|
|
|
|
|
XL Multi-Serve |
532 ml |
473 ml |
216 ml |
532 ml |
|
|
|
|
|
|
Our Specialty Brew is always 118 ml and Cafe Forte is always 236 ml, so you don’t need to adjust the dial for those Signature Brews.
English
WOULD YOU LIKE A HOTTER COFFEE?
The type of cup you brew into can drastically influence the drinking temperature of your coffee.
|
|
CERAMIC CUP |
|
NINJA® CUP |
PAPER CUP |
Cup |
Room |
Pre-warmed with |
Pre-warmed in |
Room |
Room |
Temperature |
Temperature |
hot water |
microwave with milk |
Temperature |
Temperature |
Drinking |
Hot |
Hotter |
Hotter |
Hotter |
Hottest |
Temperature |
|
|
|
|
|
Why is there a |
A cold ceramic |
If the mug is |
Just like your |
The double- |
Unlike a ceramic |
difference? |
mug will steal heat |
already warm, it |
cold mug, cold |
walled Ninja cup |
mug, a thinner |
|
from the coffee as |
will not steal as |
milk lowers the |
is designed to |
paper cup |
|
it warms itself up. |
much heat from |
temperature of |
retain initial coffee |
does not steal |
|
|
the coffee. |
your coffee. |
temp better than |
substantial heat |
|
|
|
|
a ceramic cup. |
from the coffee. |
PRE-HEATING
1Plug in your brewer, then press the Power button to initiate pre-heating. You will see the Pre-Heating light turn on.
2Allow 3 minutes for your brewer to pre-heat.
3After 3 minutes, the Pre-Heating light will turn off. Your brewer is now pre-heated.
4Your Ninja Coffee Bar System will stay pre-heated for 72 hours unless you turn the brewer off by pressing the Power button.
ninjakitchen.com 14
 Loading...