

Nikon Coolpix P350 Quick Start Manual
Nikon
Quick
Confirming
First Steps 5
Shooting
Using
Other
For
ViewNX
Functions
Your
Safety 32
the
and
Playback 14
Start
Package
2
Guide
Contents
3
20
24

please
camera.
the
the
Thank you for purchasing
procedures necessary for first
ensure proper use,
To
([I}32)
before using
COOLPIX
Nikon
use
time
read and
P530 digital
this camera.
of
thoroughly
camera. This
understand
information
the
guide
introduces
"For Your Safety"
in
the
~~Reference
R
Refer
The
Downloading
Reference
the
to
Reference
Manual
the
Manual
can be
(PDF
downloaded
http://nikonimglib.com/manual/
Reference
The
website.
Manual
Nikon User
need
Should
you
can be viewed using
Support
technical
support,
Internet
Please
•
For customers in
For customers in
visit the Nikon
Search Nikon's
information.
Nikon a Question"
"Ask
Use
e-mail.
Download
receive
the
e-mail
support
continuously
latest
notification for software or firmware updates.
United States:
the
Canada:
home
updated
to
versions
of
help.nikon.ca
Manual"
detailed
format) for
offer a
we
page, where you can:
receive a
Nikon software
more
the
from
Adobe
Knowledge
prompt
Reader,
number
reply from a Nikon professional advisor
or
Nikon website.
available
options.
of
Database for
firmware updates for your
www.nikontechusa.com
(English),
nikoncanada-fr.custhelp.com
information
for free
latest technical
the
.
download
from
support
product
Adobe
the
your
to
or register
(Franc;ais)
to
I
For customers in Mexico:
For customers in
Brazil:
nikon.com.mx/soporte
http://nikon.com.br
Telephone
for technical
Please
to
For customers in the United States:
For customers in
For customers in Mexico:
For customers in Brazil:
call
your
with
help
Important
An
Nikon
electronic
adapters,
camera and are engineered and tested
circuitry
THE
NIKON
Genuine Nikon accessories
COOLPIX
circuitry.
AC
our cameras.·
of
OF
USE
WARRANTY
adapters, and cables
NON-NIKON
support
digital
Canada:
camera needs.
0800-886-4566 (0800-88
Notice
digital camera
Only Nikon accessories, such
and
1-877-534-9910
001-888-565-5452
about
Accessories
ACCESSORIES
are
professional advisers are standing by
other
product
assistance.
Our
1-800-N/KON-UX (1-800-645-6689)
NIKON)
highest standards and
the
designed
is
are
available
to
battery chargers, batteries, charging
as
certified by Nikon
operate
to
MAY
through
within
DAMAGE
your
YOUR
specifically
the
CAMERA
Nikon-authorized
for your Nikon
requirements
AND
includes
the
of
WILL VOID
dealer.
complex
AC
COOLPIX
electronic
YOUR
•~----------

In
the
event
that
any items are missing,
please
contact
the
store
where
Rechargeable Li-ion Battery
•
Quick Start
you purchased
COOLPIX
Digital
EN-ELS
P530
Camera
Guide
(this guide)
the
Charging
camera.
Camera
AC
EH-70P*
Strap
Adapter
Lens
Cap
LC
(with cord)
USB
Cable
• Warranty
UC-E6
-CP24
*
A
plug adapter
region that requires a
with the country or region
The
included charging
and
EH-69C
NOTE:
card';
CD:
A
Secure
is
not provided.
This
icon
is
included if the camera
in
Brazil.
Digital
indicates
plug
AC
(SD)
that
adapter.
of
purchase
adapter
memory
more
information
The
is
EH-70P
card,
was
purchased
shape
([D9).
hereafter referred to
is
of
the plug
in
countries other than
available
elsewhere
in
adapter
a country or
varies
Brazil,
as
a
"memory
in
this
guide.
I
Confirming
the
Package
Contents
.)
Parts
1 2 3
of
5 6
the
Camera
4
7 8 9
13
10
14
11
15
16
12
17
18 19
II
II
II
II
IJ
Power switch/power-on lamp
(function) button
Fn
Mode
Flash
Shutter-release button
Zoom control
dial
:wide-angle
W
:telephoto
T
:thumbnail
~
playback
q :
@:help
playback
zoom
II~
IJ
IJ
DJ
m •
m
mMonitor
II
m
1m
m
m
(flash
Diopter adjustment control
Electronic viewfinder
(monitor) button
IDI
(~If
Command dial
Charge lamp
Flash
(playback)
[E
MENU
(delete)
liD
(apply
®
Rotary multi selector
pop-up) button
movie-record) button
lamp
button
(menu) button
button
selection) button
I
Package
~
Confirming
the
(multi selector)
Contents
Step
1
Attaching the Camera Strap
Cap
and
Lens
Attach
camera.
the
Lens
Cap
LC
-CP24
to
the
strap,
and
then attach the
strap
to
the
Attach the strap at two places.
~
•
•
LensCap
At
times when
lens
to protect
Do
not attach anything other than the
you
are not shooting images, attach the
it.
lens
cap to the
lens
lens.
cap to the
First
Steps •
I
Step
2
Insert the Battery
and
the
Memory
Card
2.1
2.2
Open
card
Insert
•
•
the battery-chamber/memory
slot cover.
battery.
the
Push
direction indicated by the arrow
and
The battery locks into
inserted correctly.
the orange battery
fully insert the
battery(@).
latch
place
in the
(G)),
when
~
Be
Direction
Inserting
Careful
the battery upside down or
to Insert the Battery
backwards could damage the
in
camera.
Battery latch
Correct
I
.)
First
Steps

2.3
Insert
the
memory
card.
• Slide the memory card
into
place.
~
Inserting
Be
Careful
Direction
to
Insert
the memory card upside down
in
until it
the
clicks
Memory
Card
or
could damage the camera and the memory
Memory card
in Correct
backwards
card.
slot
2.4
Close
card slot
the
battery-chamber/memory
cover.
I
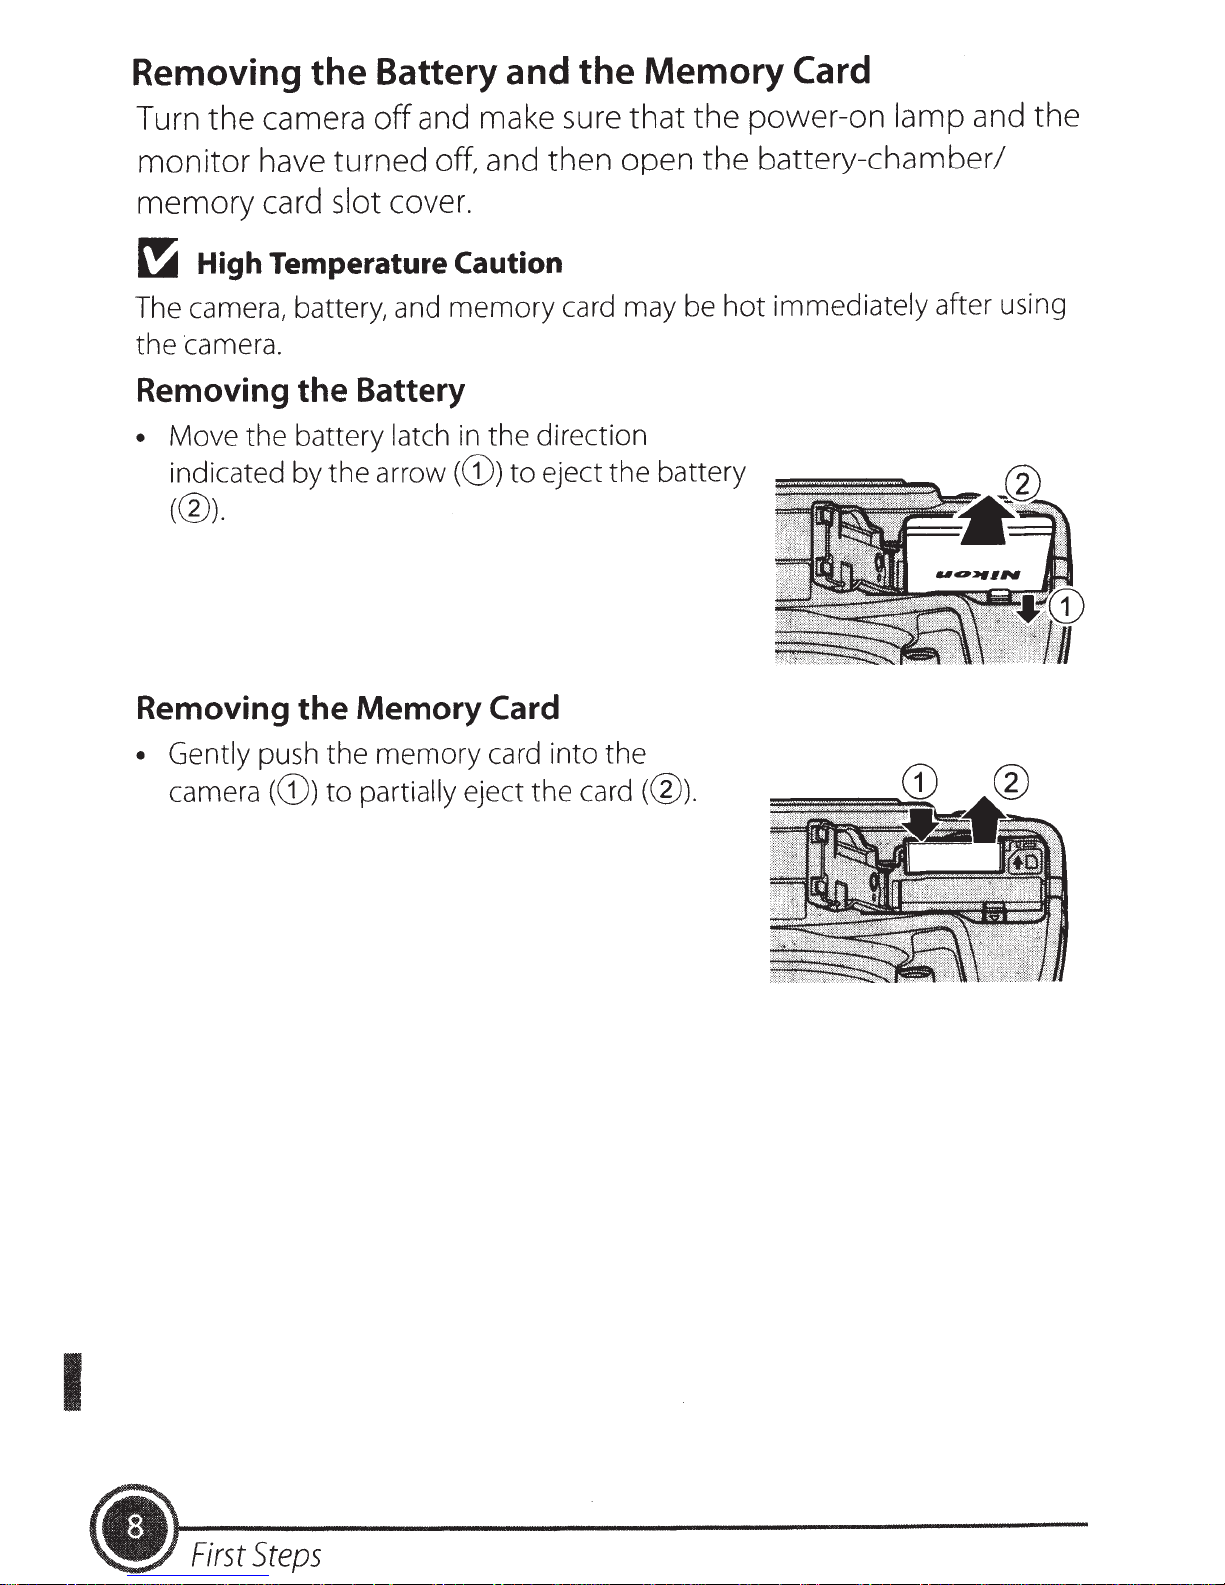
Removing the Battery and
the
Memory
Card
Turn the camera
and make sure that the power-on
off
lamp and the
monitor have turned off, and then open the battery-chamber/
cover.
memory card
High Temperature Caution
~
The camera, battery, and memory card may be
the camera.
Removing
Move the battery latch
•
indicated by the arrow
(@).
slot
the
Battery
in
(G))
the direction
eject the battery
to
immediately after using
hot
Memory
Removing
Gently push the memory card into the
•
camera
the
(G))
partially
to
Card
eject the card
(@).
I
•
First
Steps
Step3
Charge
the
Battery
3.1
3.2
Prepare
If a plug adapter*
the plug adapter
adapter.
securely held
attempting
damage the product.
* The shape
the country or region in which the camera was
purchased.
This step can be
permanently bonded
Make sure
the
camera
• Keep the camera turned off.
• Make
the
included
Push
sure
the plug adapter firmly until it
in
place. Once the
to
forcibly remove the plug adapter could
of
the plug adapter varies according
the
battery
to
the
that the plugs
charging
is
included
to
the plug on the charging
omitted
charging
with
if
the plug adapter comes
to
the
is
inserted in
are
AC
adapter.
your camera, attach
two
are
charging
the
AC
adapter in order
properly oriented. Do
connected,
AC
camera, and
AC
is
to
adapter.
not
then
of
CD
insert or remove
connect
to@.
the plugs at
Charge lamp Electrical outlet
• The charge lamp slowly flashes green
charging.
• When charging
and turns off.
an
angle when connecting or disconnecting them.
USB
cable (included)
to
indicate
is
complete, the charge lamp stops flashing green
About
4 hours and
10
minutes
are
required
that
the battery
to
charge
is
I
a fully exhausted battery.
First
Steps
3.3
Disconnect the charging
AC
adapter from the electrical
outlet
and then disconnect
R Turning On
The camera does
it even when you
button
Shooting
Step4
4.1
4.2
to
turn on the camera
is
not possible.
Turn
Remove
•
See
information.
Press
the
"Attaching the Camera Strap and
the
the
USB
the
Camera While
not
turn on while the charging
press
the power switch.
in
playback mode and play back images.
the
the Camera
lens cap.
power
switch.
cable.
Battery
Press
On
is
Charging
AC
adapter
and hold the (E) (playback)
Lens
Cap"
is
(0]5)
connected
for more
to
• The
•
R The Auto
• If no operations
camera will enter standby mode, and the power-on lamp will flash.
operations
automatically.
• The time that elapses before the camera enters standby mode
minute. The time can be changed using the Auto
menu
monitor
To
turn the camera off,
power switch again.
Off
are
(0]28).
turns on.
Function
are
performed for a while, the
performed for another 3 minutes, the camera will turn
press
the
monitor
off
setting
will turn off, the
in
O•
ON/
OFF
If
no
off
is
about 1
the setup
I
(.
First
Steps
Step
5 Setting the Display Language, Date,
and
When the camera
time, the language-selection screen and the
date and time setting screen for the camera
displayed.
clock
selector
• If
are
select
to
you exit
time,~
Select
the item on the
Return
without
will flash when the shooting screen
the item above*
display
previous screen
Time
turned on for the first
is
the rotary multi
Use
the settings.
setting the date and
Multi
to
Rotary
left/
the
----.
---=1
Selector
~=•-
displayed.
is
Select
right/Display sub-menu
(apply selection)
the item on the
Select the item
Items
*
selector.
5.1
Use
• T
language and
®button.
above or
the multi
select the desired
to
below*
below
selector
press
---
can
also
the
be selected by rotating the rotary
multi
First
Steps
I
(i)
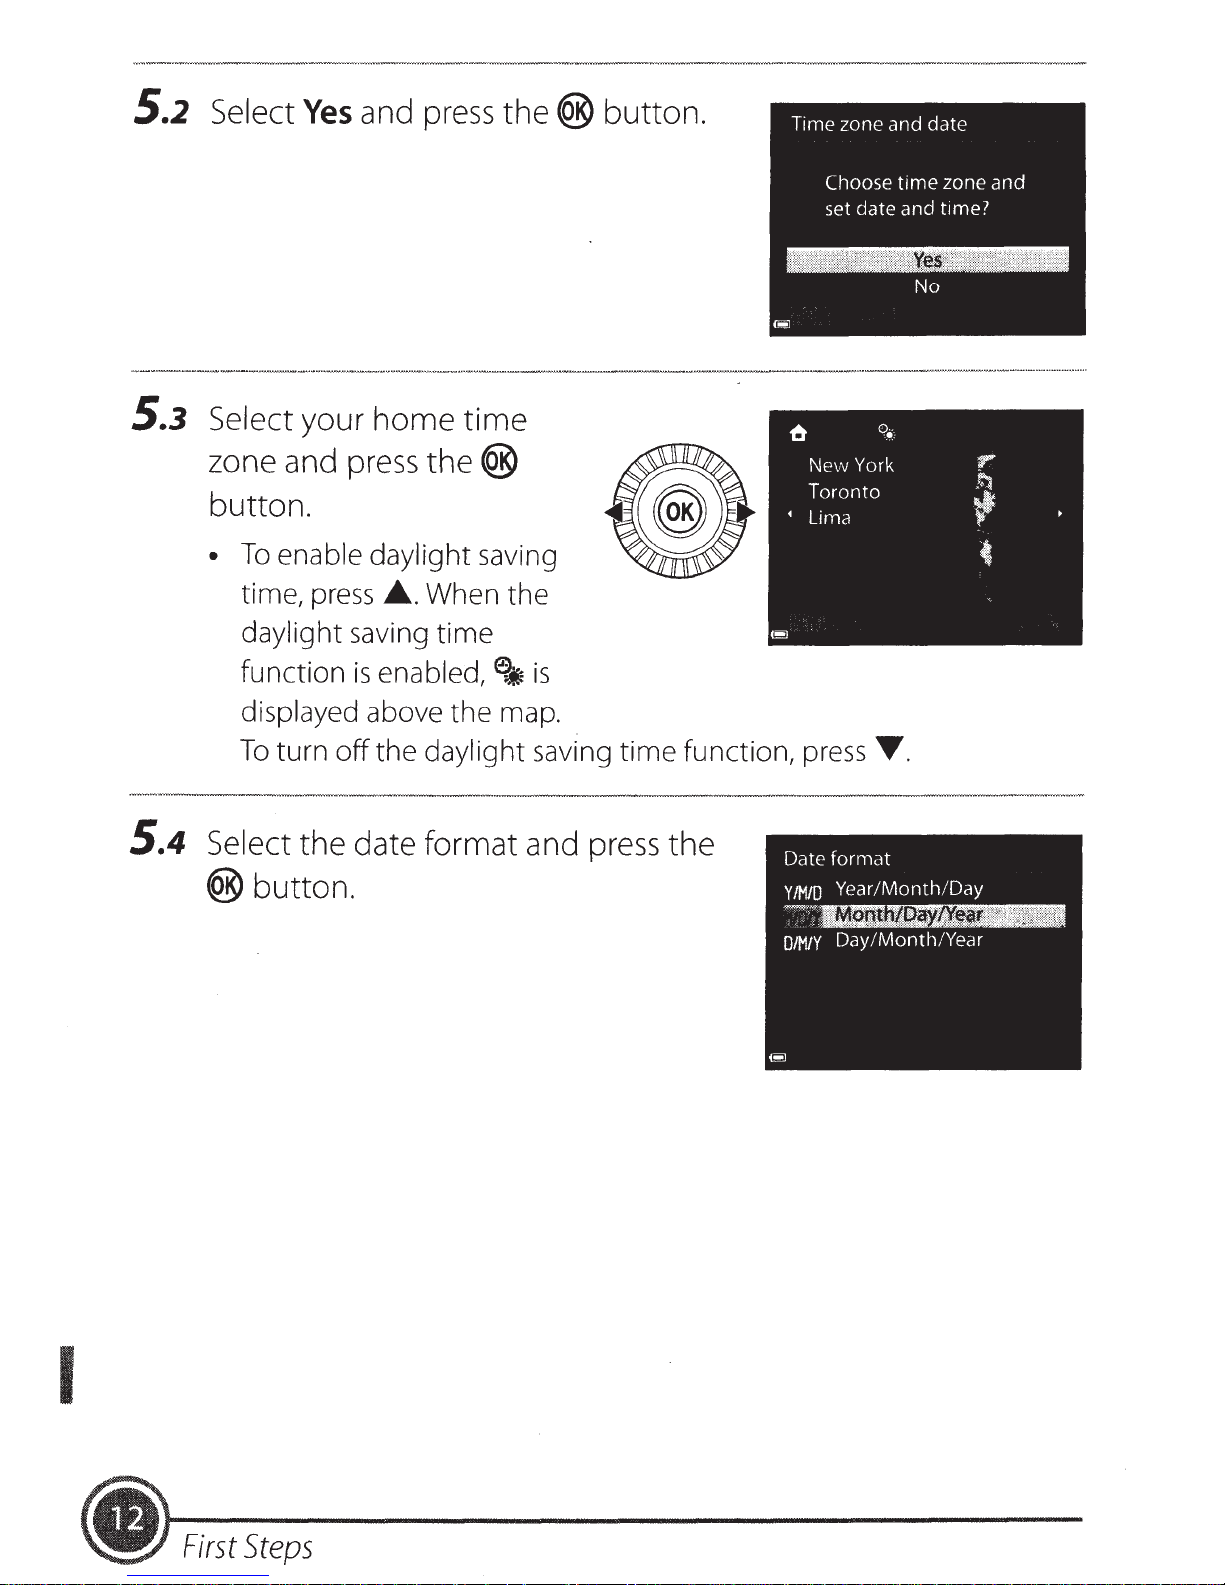
5.2
Select
Yes
and press
the®
button.
5.3
5.4
Select your home time
zone and press
the®
button.
•
To
enable daylight saving
time,
daylight saving time
function
displayed above the map.
To
press
turn
...
When the
is
enabled,~
off
the daylight saving
is
time
function,
Select the date format and press the
®button.
press
T.
I
(.
First
Steps

S.s
Set
the
date
and
®button.
D,
M,
time
Press
Y,
can
field:
• Select
between
Edit the date and time:
•
Date and
a
time,
h,
and
..
~
and
also be changed by
press
(changes
m).
Press
.6..
'Y.
the
rotating the
dial.
• Confirm the setting:
5.6
m
After setting the date and time, press the
Y
•
Select
When settings
•
Imprinting
(setup) menu and set
the rotary
Use
Yes
extends and the camera switches
shooting mode.
multi
and
Date
the
multi selector
selector or
Select
press
are
Print date
the®
finished, the
on Images
to
command
them
button.
While
setting
select
field
lens
MENU
and set menu options.
and press
to
Taking Images
button
([I)28).
the®
display
to
button.
the
exit the menu.
MENU
Press
•
H
Press
Time zone and date
The next step explains basic shooting operations using
I
the
Changing
MENU
the
button
the
button
to
Current
display
to
(ClJ29).
Date, Time,
theY
(setup) menu and set
Language
or
Language
(auto) mode.
0
or
I
First
Steps
(.
step
7
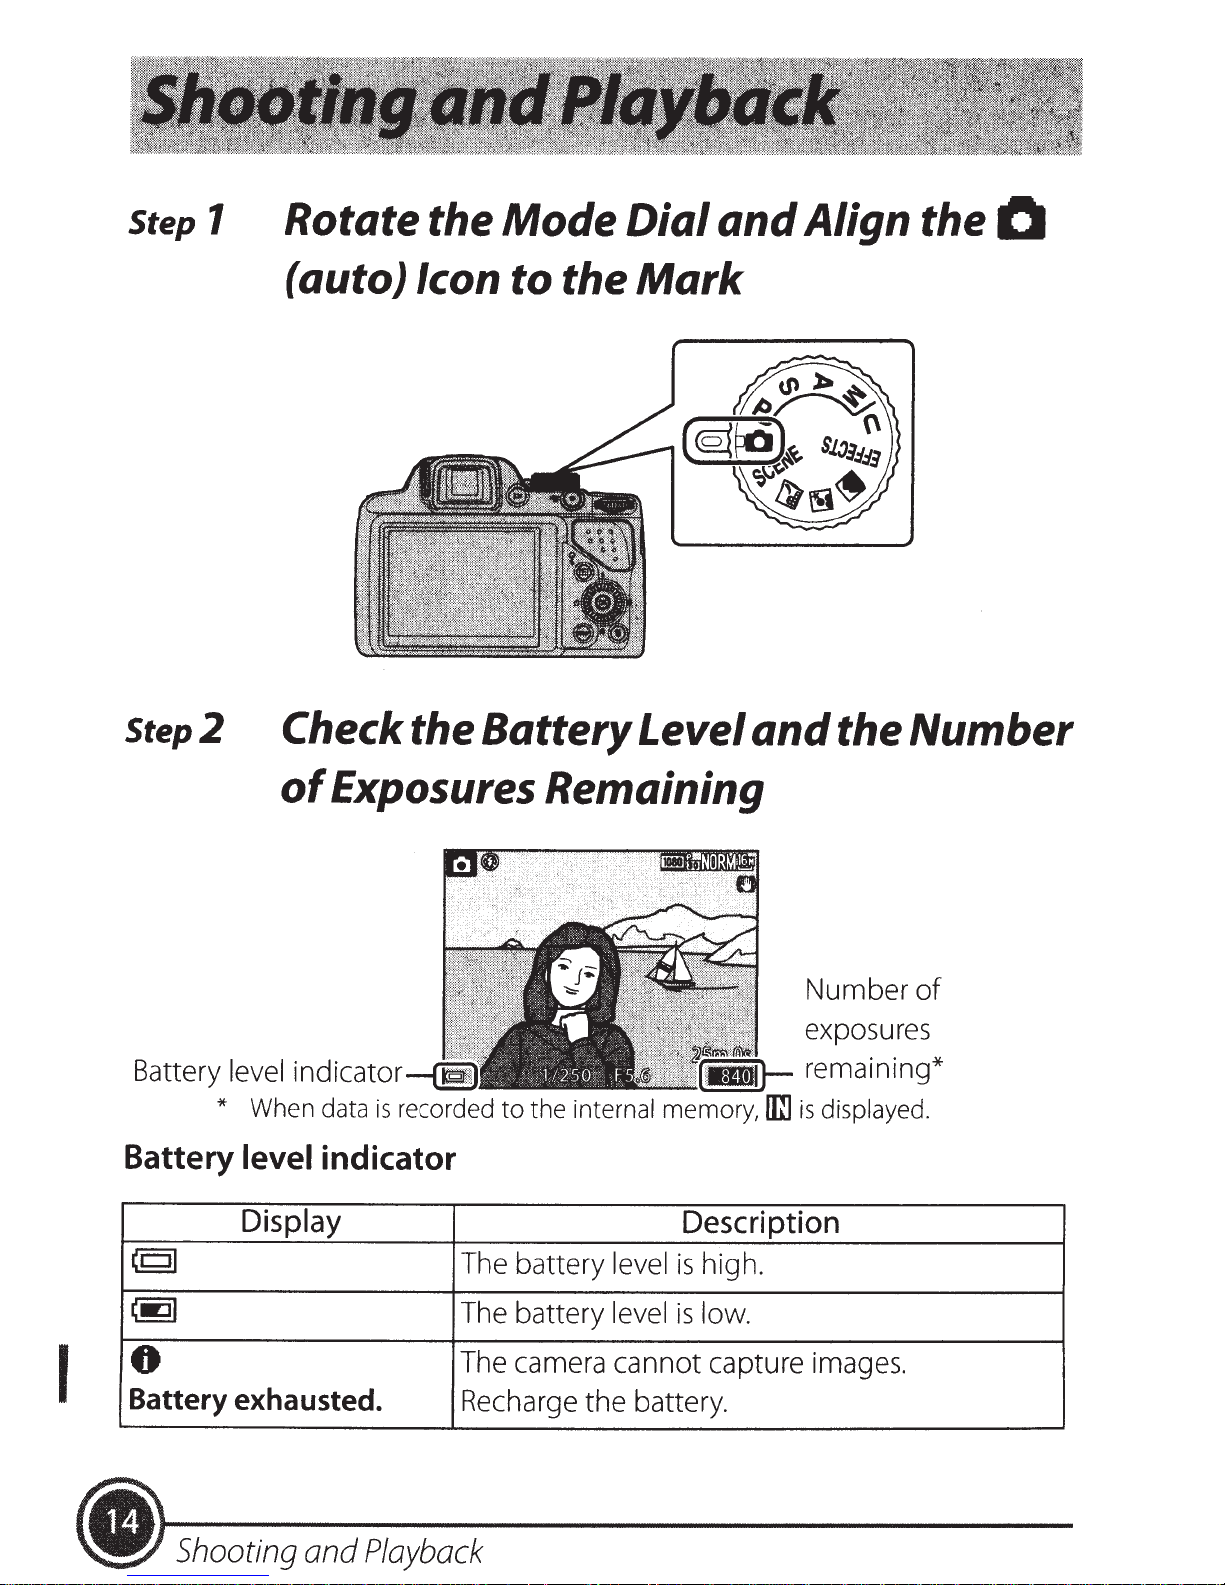
Rotate
the
Mode
Dial
and
Align
the
0
Step
2
(auto) Icon
Check
of
Exposures Remaining
the
to
the
Battery
Mark
Level
and
the
Number
Battery level
*
Battery
CCJI
CEll
indicator remaining*
When data
level
Display
is
recorded
indicator
8
I
Battery exhausted.
•
)
Shooting
and
Playback
Number
exposures
to
the internal memory,
Description
The battery
The battery level
The camera cannot capture images.
Recharge
level
the
is
high.
is
low.
battery .
lrn
is
displayed.
of
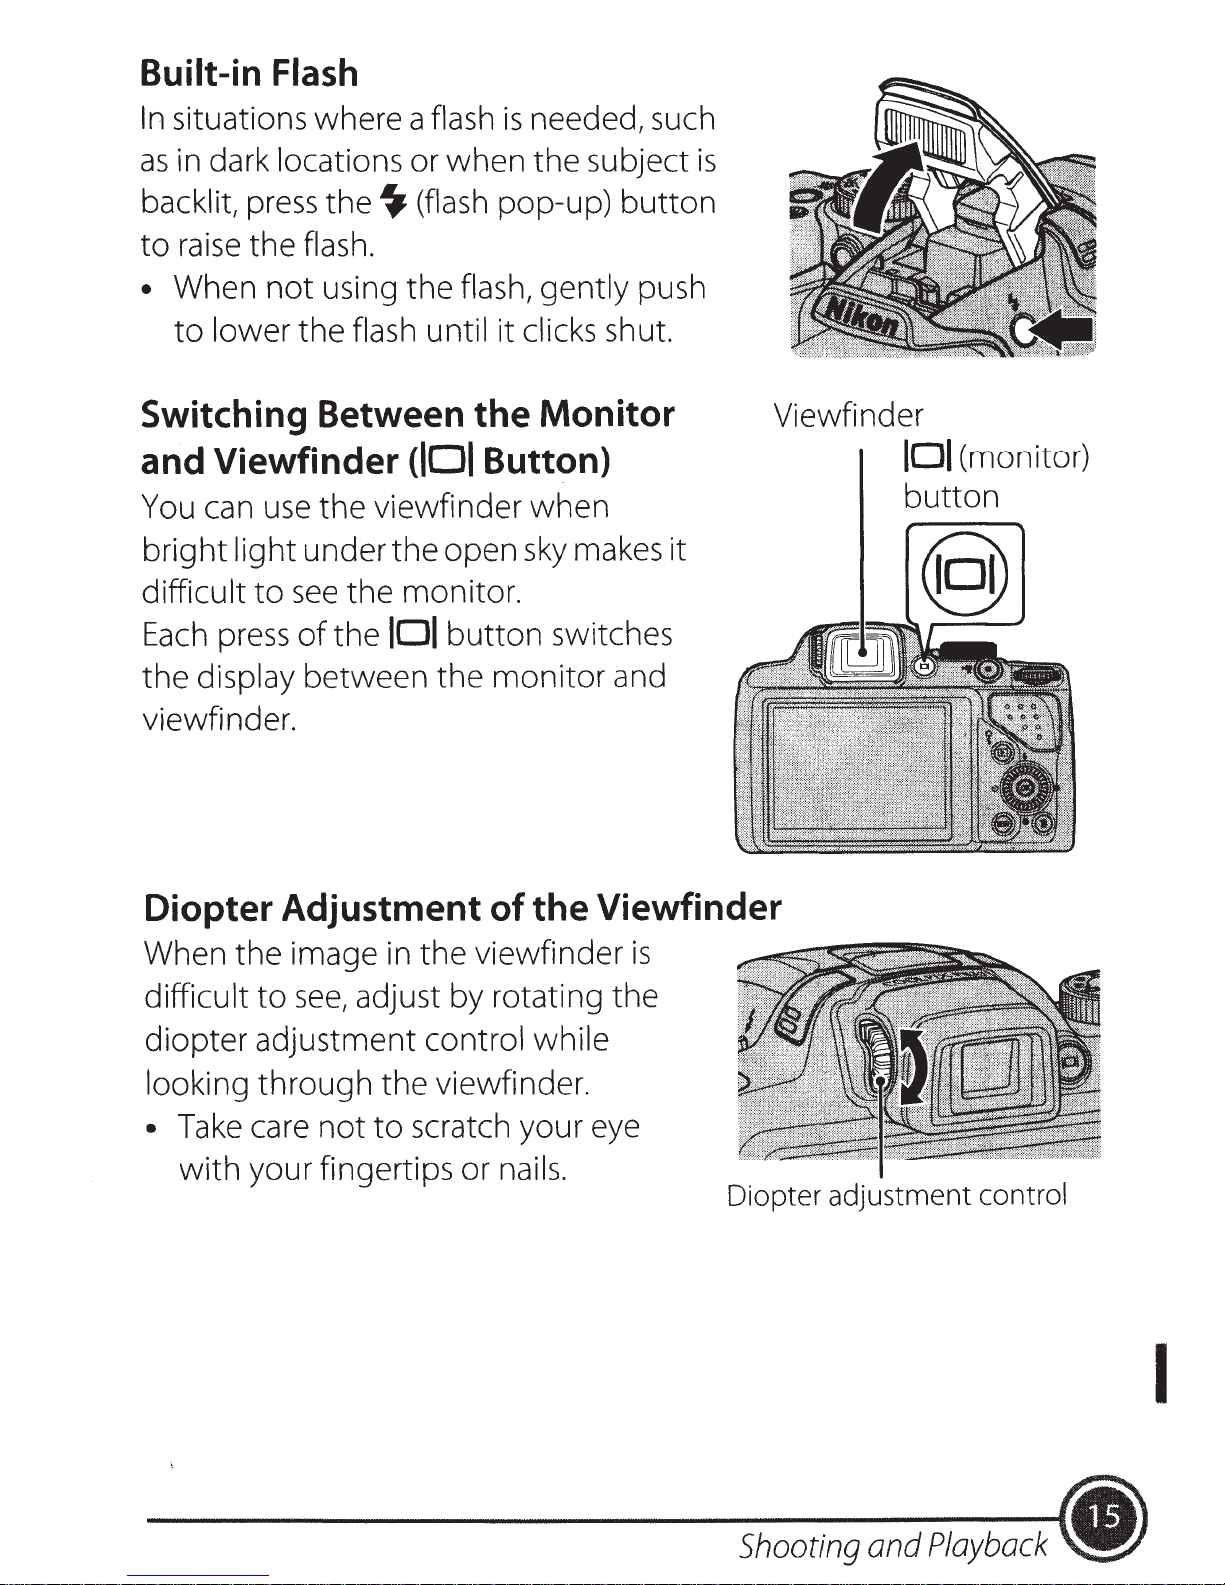
Built-in Flash
In
situations where a flash
as
in dark locations or when
is
needed, such
the
subject
is
backlit,
to
raise
• When
to
Switching Between
and Viewfinder
You can
bright light under the open
difficult
Each
the display between the
viewfinder.
press
the flash.
lower the flash until it clicks shut.
the~
not
using the flash, gently push
(flash pop-up)
the
use
to
press
the
viewfinder
see
the monitor.
of
the
IDI
(101
Button)
button
monitor
button
Monitor
when
sky
makes it
switches
and
Viewfinder
IDI
button
(monitor)
Diopter Adjustment
When the image in the viewfinder
difficult
diopter adjustment control while
looking
Take
•
with
to
see,
adjust by rotating the
through
care
your fingertips or nails.
not
the viewfinder.
to
scratch your eye
of
the
Viewfinder
is
Diopter adjustment control
I
Shooting
and
Playback
•
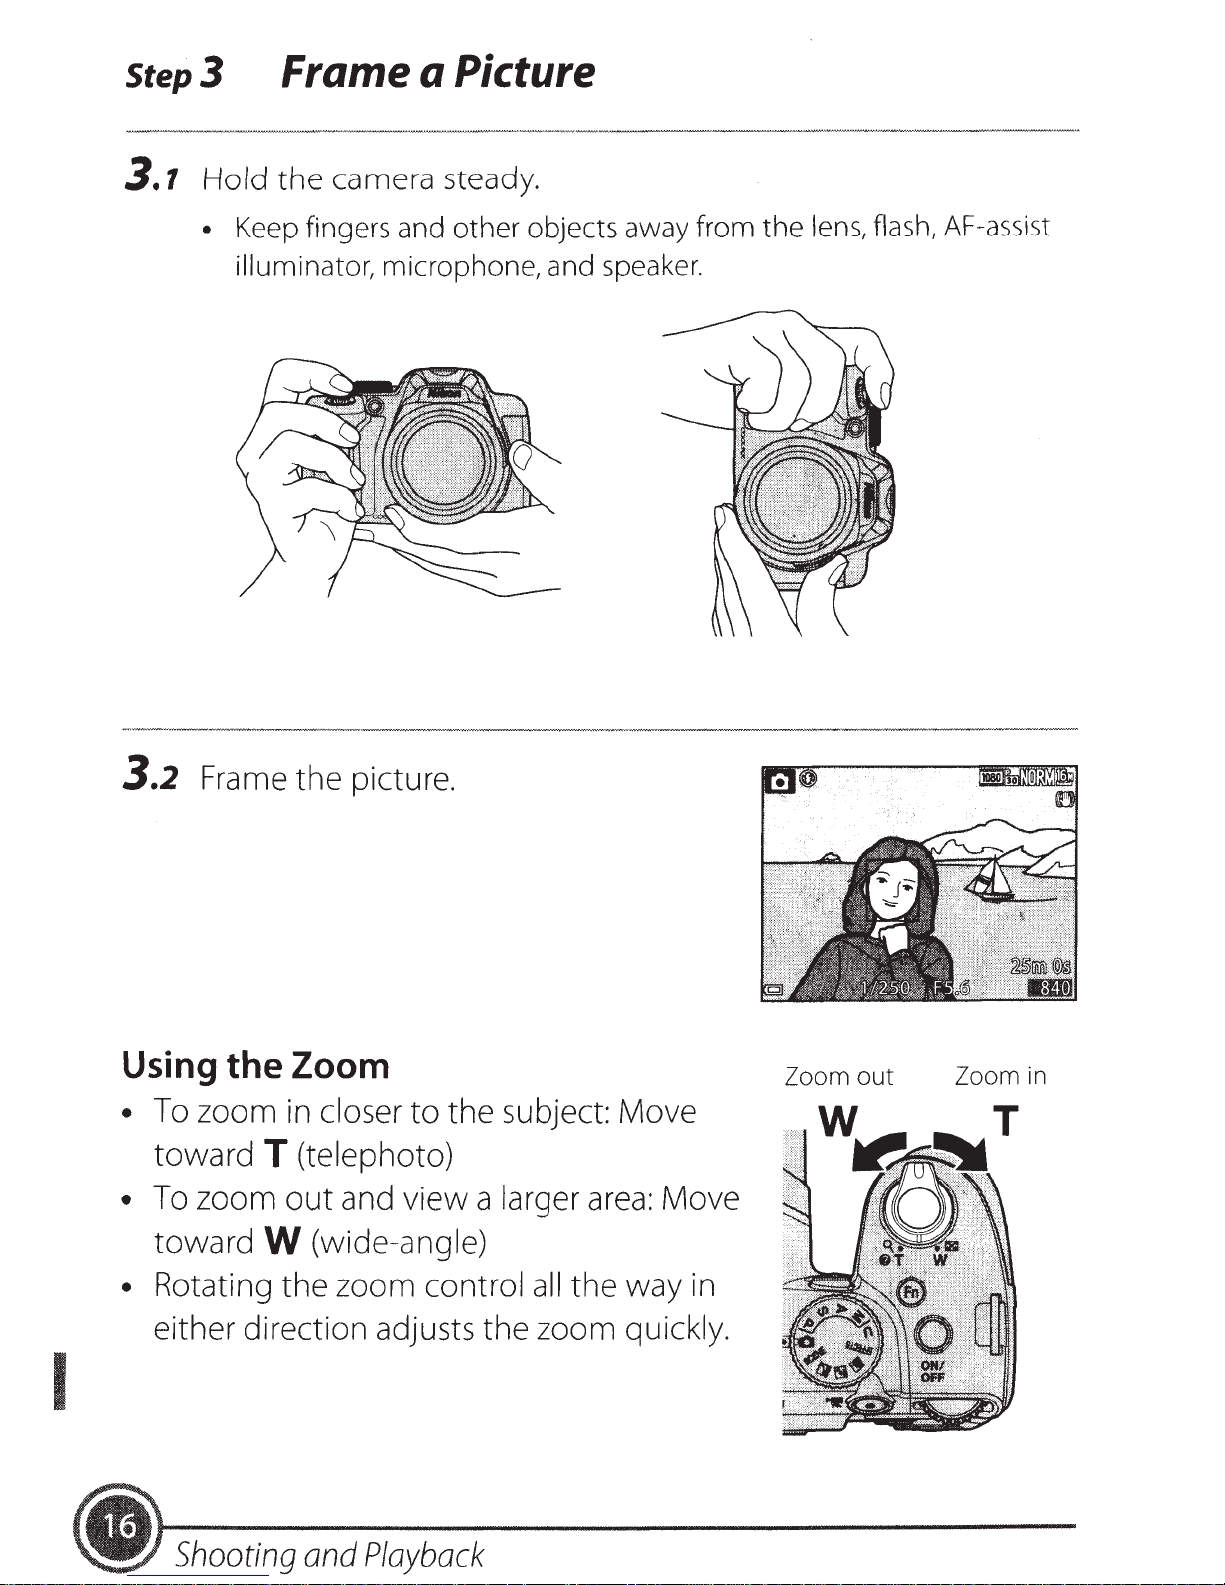
Step3
Frame a Picture
3.1
Hold
• Keep fingers and
the
camera
illuminator, microphone, and speaker.
steady.
other
objects away from
the
lens, flash, AF-assist
3.2
Using
• To zoom
•
• Rotating the zoom control
Frame the picture.
the
toward
To
zoom
toward
either direction adjusts the zoom quickly.
Zoom Zoom out
in
closer
to
the subject: Move
T (telephoto)
out
and view a larger
area:
W (wide-angle)
all
the way
Move
in
Zoom
in
I
Shooting
and
Playback

Step4
Focus
and shoot
4.1
Press
button
• When the subject
• When you are using digital
the
shutter-release
halfway.
is
in focus,
the
focus
subject
glows green
areas
zoom, the camera focuses on
the
subject in
frame and
displayed. When the camera
has
focused,
glows
area
or
focus
can
glow
green.
that
indicator
(multiple
green).
the
the
focus
the
focus indicator
includes
focus
center
area
of
is
the
the
not
- -
- - - ·- --
--
-
--·
-
-
•
• If
the
focus
indicator flashes
camera
the
shutter-release
4.2
The
The status
pressing the shutter-release
• On: The flash fires
•
• Off: The flash does
Without
rest
of
the
Flash
release
Flashing: The flash
cannot shoot images.
Lamp
of
the
button
area
or focus
red,
is
unable
lifting
way
flash can be confirmed by
when
all
the
is
to
your finger, press
down.
way
charging. The camera
not
fire
the
focus.
button
button
you press
down.
when
Modify
the composition and
halfway again.
the
shutter-release
halfway.
the
shutter-
an
image
is
Focus
area
try
pressing
button
the
taken.
Shooting and
I
Playback
PI
Focusing
set focus and exposure (shutter speed and aperture value),
To
shutter-release
The focus
0
In
when the shutter-release
detected, the camera automatically
area
(auto) mode, the camera detects the main subject and focuses on it
StepS
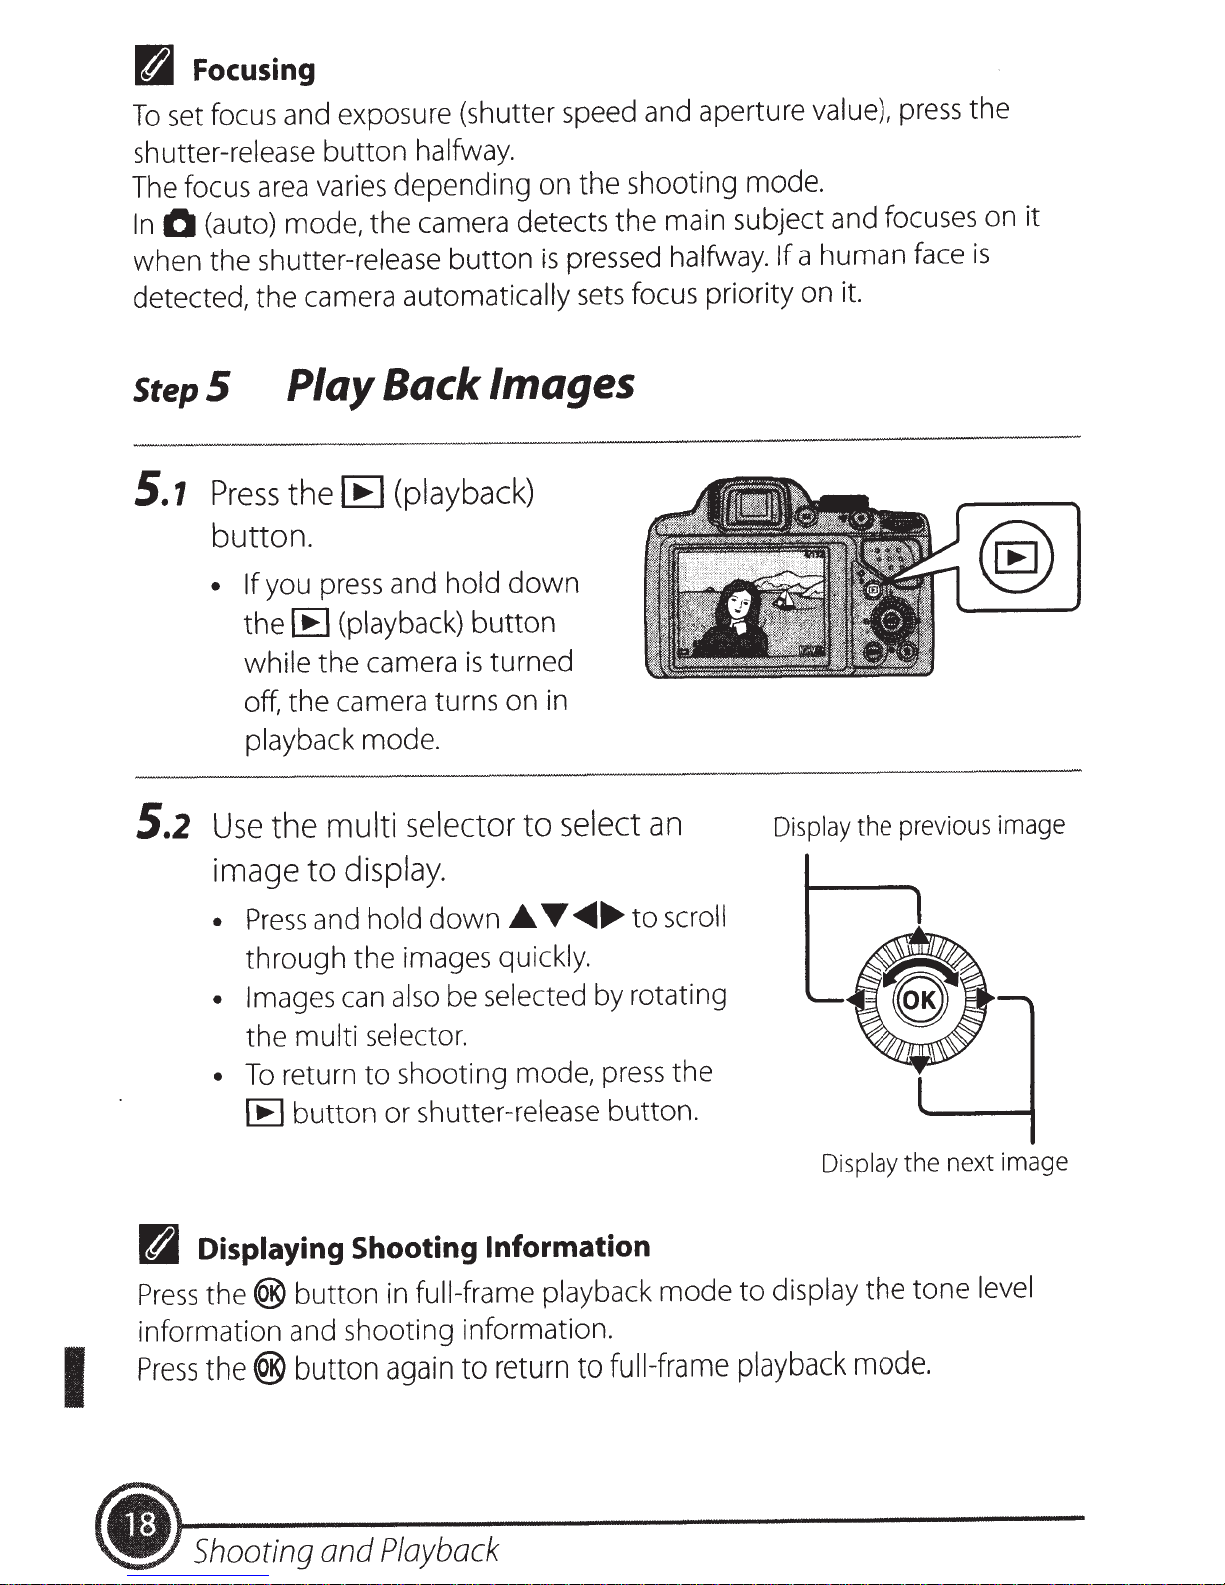
5.1
Press
button.
• If
the
while the camera
button
varies depending on the shooting mode.
Play Back Images
IE
the
press
you
(playback)
IE
halfway.
button
(playback)
and
hold
down
button
turned
is
pressed halfway.
is
focus priority on it.
sets
a human face
If
press
the
is
5.2
PI
off, the camera turns on in
playback mode.
select
multi
the
Use
display.
image
Press
•
through the images quickly.
• Images
the multi selector.
To
•
IE
Displaying Shooting Information
to
and hold
can
return
button
selector
down
be selected by rotating
also
shooting mode,
to
or shutter-release button.
to
.A.
'Y
...
~
press
to
an
scroll
the
Display
Display
the
previous
the next
image
image
Press
information and shooting information.
Press
the®
the@
button
button
in
again
I
(.
Shooting and
Playback
full-frame
return
to
playback mode
full-frame
to
display the tone level
to
playback
mode.

Step
6.
7
6 Delete Images
Press
the
liiJ
button
to
delete
6.2
6.3
the image
displayed
Use
the
the desired deletion method and
press
•
Select
the ®
To
exit
button.
Yes
currently
in the
multi
without
selector
button.
and
monitor.
deleting,
press
the®
• •
press
to
select
the
button.
MENU
•
Deleted images cannot be recovered.
•
To
cancel, select
button.
Step
Press
•
7
the power switch
When the flash
gently
lower
Turn
press
it.
the
Off
is
raised,
flash
No
and
press
the®
the Camera
to
turn the camera off.
down
to
O•
ON/
OFF
Shooting
and
Playback
I
(.
Install ViewNX
2
to
upload,
view, edit, and share photos and movies.
Step
An
other information,
1.1
1.2
1.3
1.4
1
Internet
Download the
Start the
http.llnikonimglib.com/nvnx/
Double-click
Follow
Exit the installer.
Installing ViewNX 2
connection
computer
the on-screen instructions.
required. For system requirements and
is
the Nikon website for your region.
see
installer.
ViewNX
and
downloaded
the
2
download the
file.
installer
from:
(Windows) or
Click
Yes
I
(.
Using
ViewNX
2
OK
(Mac).
Step2
2.
7
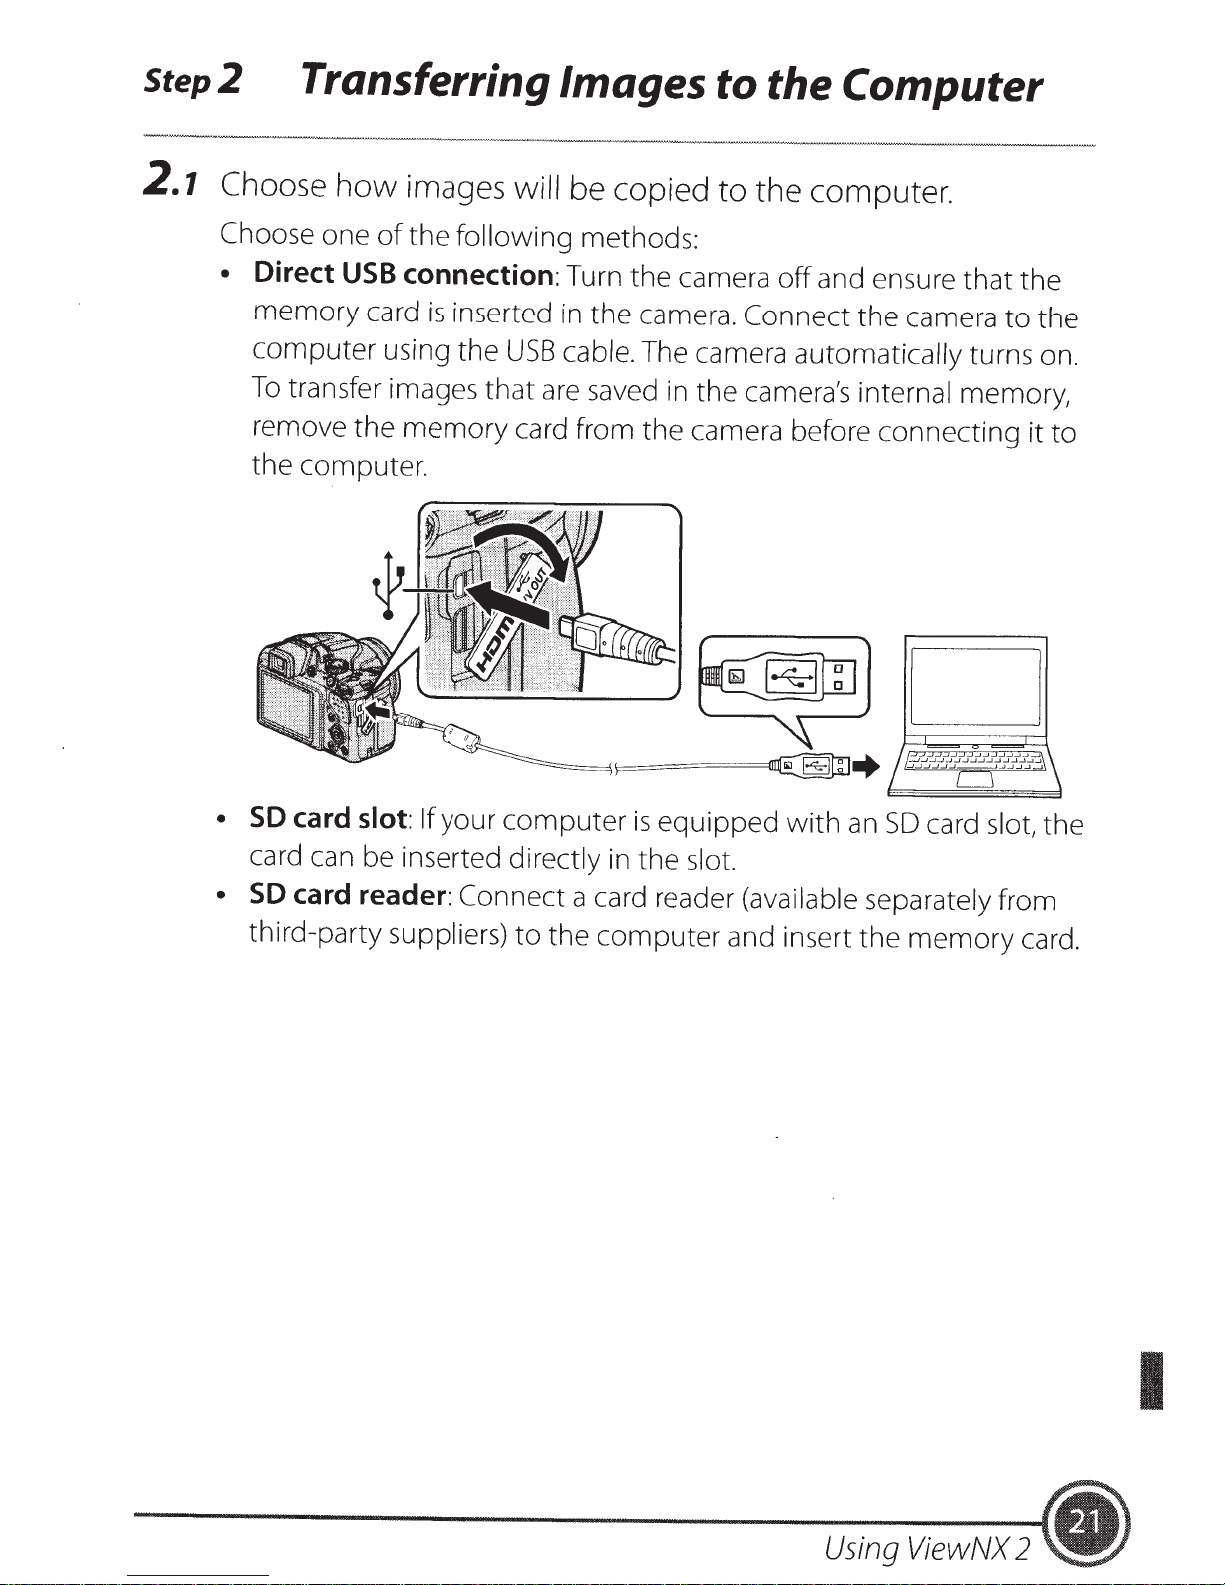
Choose
Transferring Images to the Computer
how
images will
be copied to the computer.
Choose one
•
Direct
memory
computer
To
remove
the computer.
USB
transfer images
the
of
the following methods:
connection:
card
is
inserted
using the
memory
that
Turn the camera
in
the camera.
USB
cable. The camera automatically turns on.
are
saved
card from the camera before connecting it
off
and ensure that the
Connect
in the camera's internal memory,
the camera
to
the
to
D
•
SO
card
card can be inserted directly
•
SO
card reader:
third-party suppliers)
slot:
If
your
Connect
computer
to
is
equipped
in
the slot.
a card reader (available separately from
the
computer
with
and insert the
an
SO
card slot, the
memory
card.
Using
ViewNX
2
I
(.
a message
If
displayed
is
prompting
you
choose a program, select
to
Nikon Transfer
When using Windows 7
•
the dialog shown at right
If
displayed,
is
steps
Transfer
1 Under
2 Double-click
the
If
while for Nikon Transfer 2
Connecting
~
The connection may
below
2.
Import
and videos,
Change program.
select
memory
Import
the
2.
follow
to
card contains a large
USB
not
the
select Nikon
pictures
click
A program selection dialog will be displayed;
using Nikon Transfer 2
File
Import
Cable
be recognized
File.
start. Wait until Nikon Transfer 2 starts.
to
if
number
camera
the
and click
images,
of
connected
is
OK.
may take a
it
the
to
computer
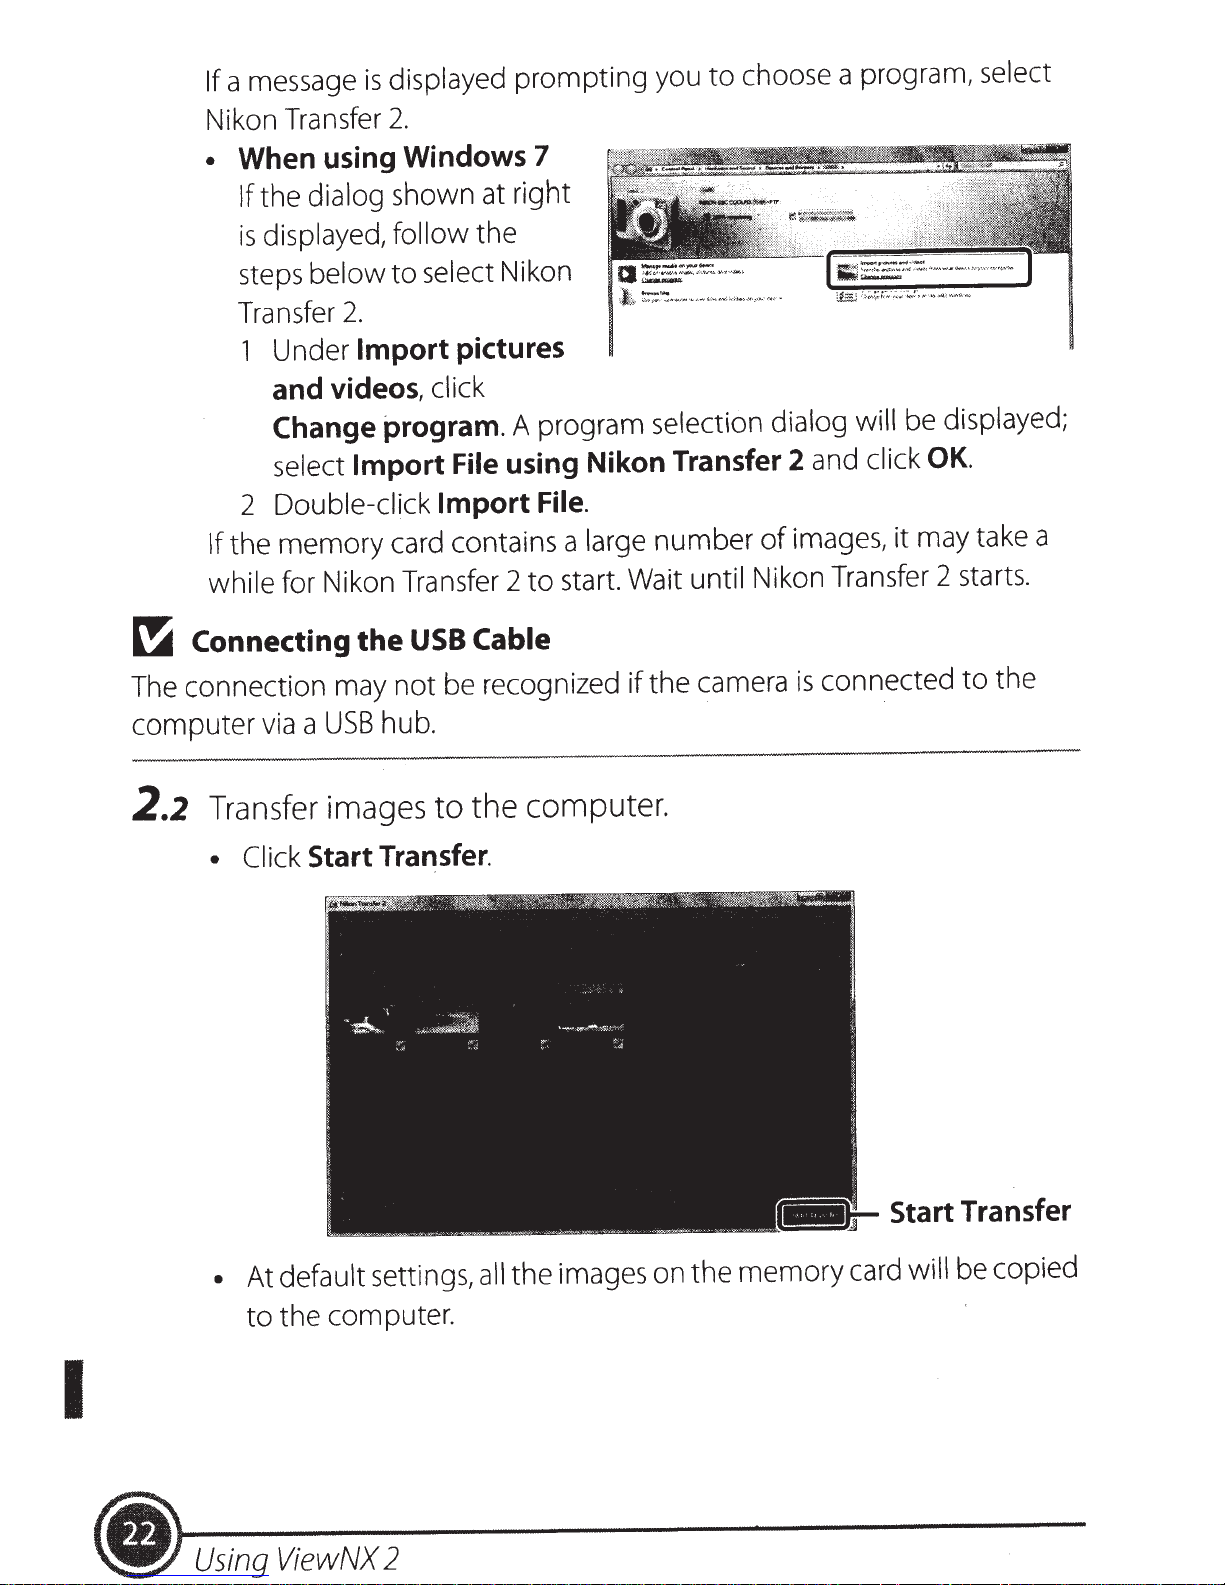
2.2
Transfer images
• Click
•
hub.
USB
a
via
to
Start Transfer.
At default settings,
computer.
the
the
all
images on
memory
the
Start Transfer
card will be copied
the computer.
to
I
(.
Using
ViewNX
2
2.3
Terminate the connection.
• If
the camera
disconnect the
• If
you
are
is
connected
USB
cable.
using a card reader or card slot, choose the appropriate
to
the computer, turn the camera
off
and
option in the computer operating system
disk corresponding
from the card reader or card slot.
Step3
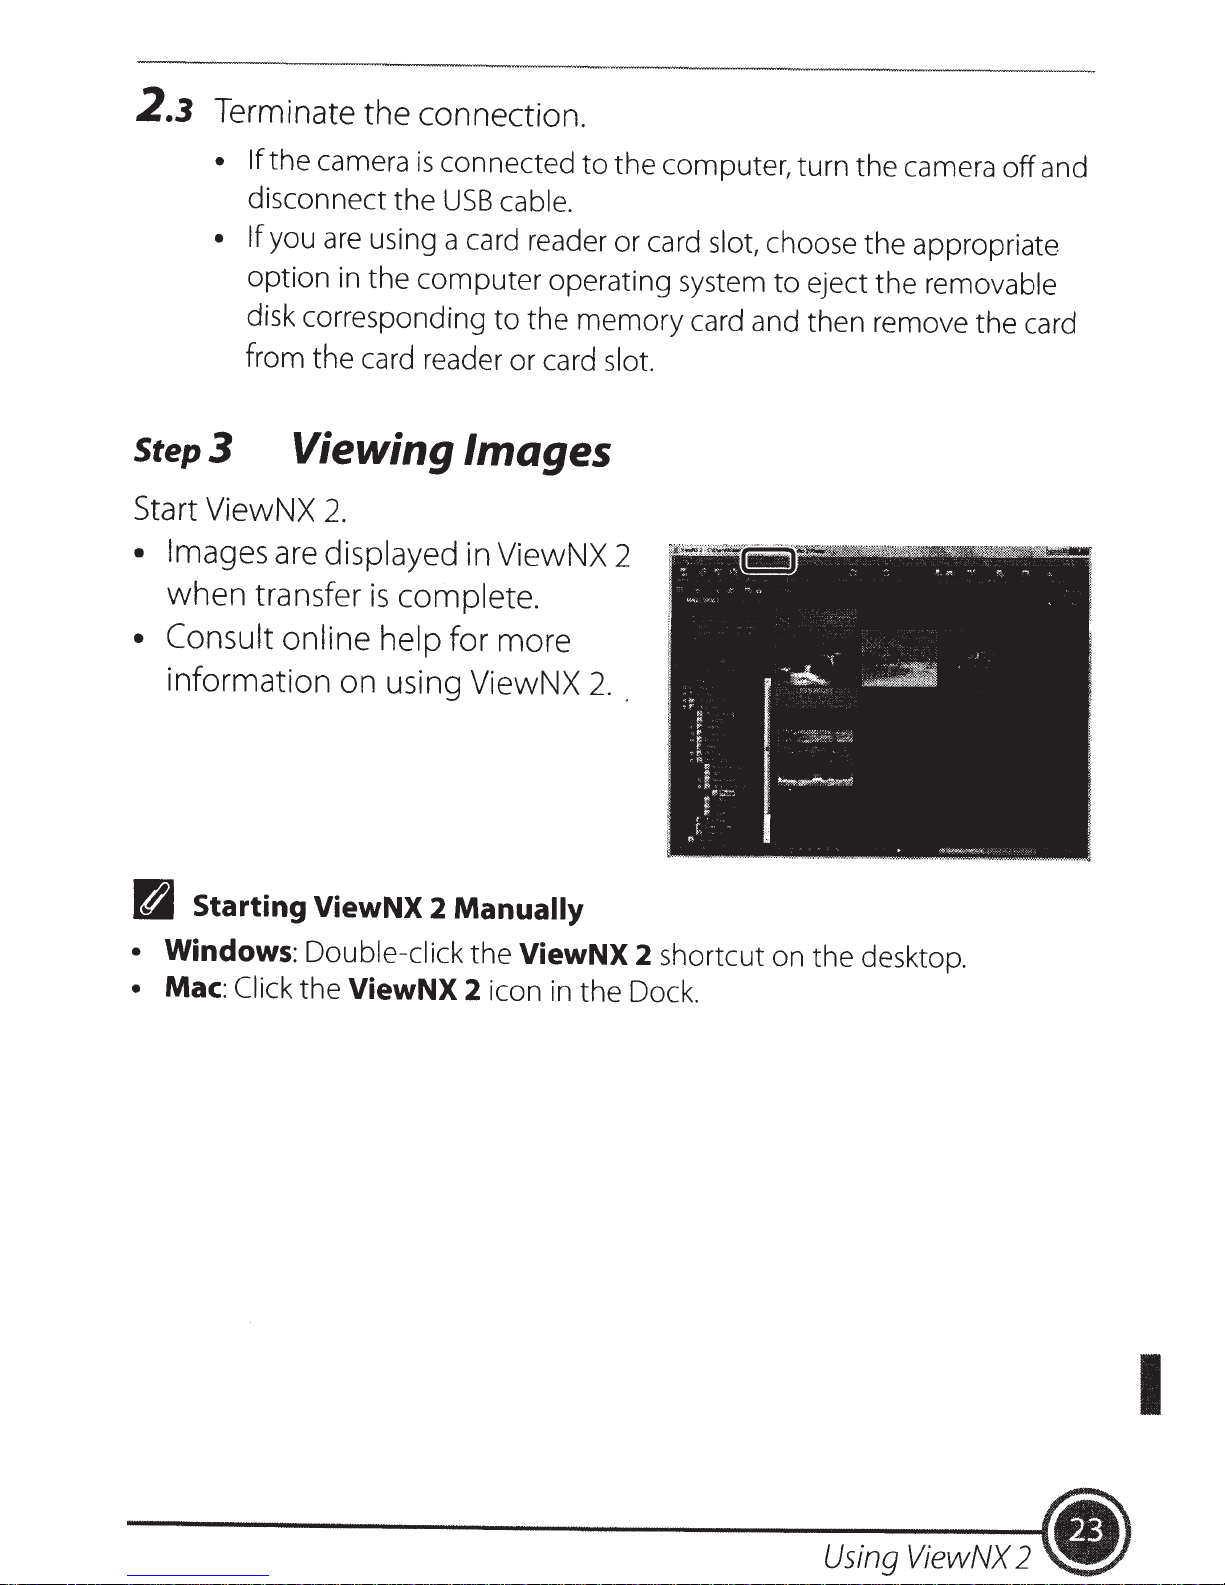
Start ViewNX
• Images
when
Viewing Images
2.
are
displayed in ViewNX 2
transfer
is
complete.
• Consult online help
to
the
for more
information on using ViewNX 2
memory
. .
to
eject the removable
card and then remove the card
tal
•
•
Starting
Windows:
Mac:
Click
ViewNX
Double-click the
the
ViewNX
2
Manually
2
icon in
ViewNX
the
2
shortcut on the desktop.
Dock.
I
Using
ViewNX
2
.)
Functions
Selector
That
Can
Be
Set Using
the
Multi
Press
the
shooting
Function
Flash
~
1
multi
to
selector_.
operate the following
mode
(~),
-~
2
The
raised.
~
flash
(~),
..
functions.
1
I
~
lit-
~
I
3
Description
mode
can be set
the
while
flash
(~),or~
.
4
(jB)
when
is
Self-timer
Focus
:t
3
Exposure
(2
(.
4
compensation
Other
I
mode
Functions
The camera
Choose from
up),~
I·
f
You
(infinity), and
can be selected
MF
S,
P,
is
Sports
can adjust overall
equipped
is
(autofocus),
AF
MF
U,
or
M
A,
Bird-watching
or
with
when
special
image brightness.
1
(macro
~
(manual
shooting
the
effects mode,
scene mode.
focus).
timers.
2s
Os,
close-
mode
or
Selecting
a Shooting
Mode
When the
to
the
mode
corresponding shooting
OAutomode
Used for general shooting.
dial
is
rotated next
to
mode
the mark,
the
shown below.
camera switches
SCENE,
EFFECJS
..
~,
Camera settings
select.
•
SCENE:
Scene
optimum
easier
•
~
•
li)
portraits
•
!;iii
(Spec::
Effects can be applied
liJ,
..
!;i·
(Scene)
Press
auto
to
(night landscape):
(night portrait):
(landscape):
·
ial
effects)
selector,
scene
take images using settings
that
·.
modes
are
optimized according
the
MENU
mode
Use
include background scenery.
Use
.
mode
to
to
button
the
when
Use
this
this
this
mode
images during shooting.
and select a scene. When using
camera automatically selects
you frame
mode
mode
to
to
shoot landscapes.
an
that
suit
to
shoot
shoot evening and
the
scene
image, making it even
the
night
that
the
scene.
landscapes.
night
you
Other Functions
I
.)
p,
A,Mmod~s
S,
Select these modes for greater control over shutter speed and
aperture value.
Setting combinations
saved.
simply
The saved settings can be immediately retrieved for shooting
by rotating the
that
mode
dial
to
U.
frequently
are
Recording Movies
Movies can be recorded in any shooting
mode.
Press
start movie recording.
Press
again
the
movie-record)
(~
e
the
stop movie recording.
to
movie-record)
(..,1!1
e
button
button
to
used for shooting can be
I
{.11
Other
Functions
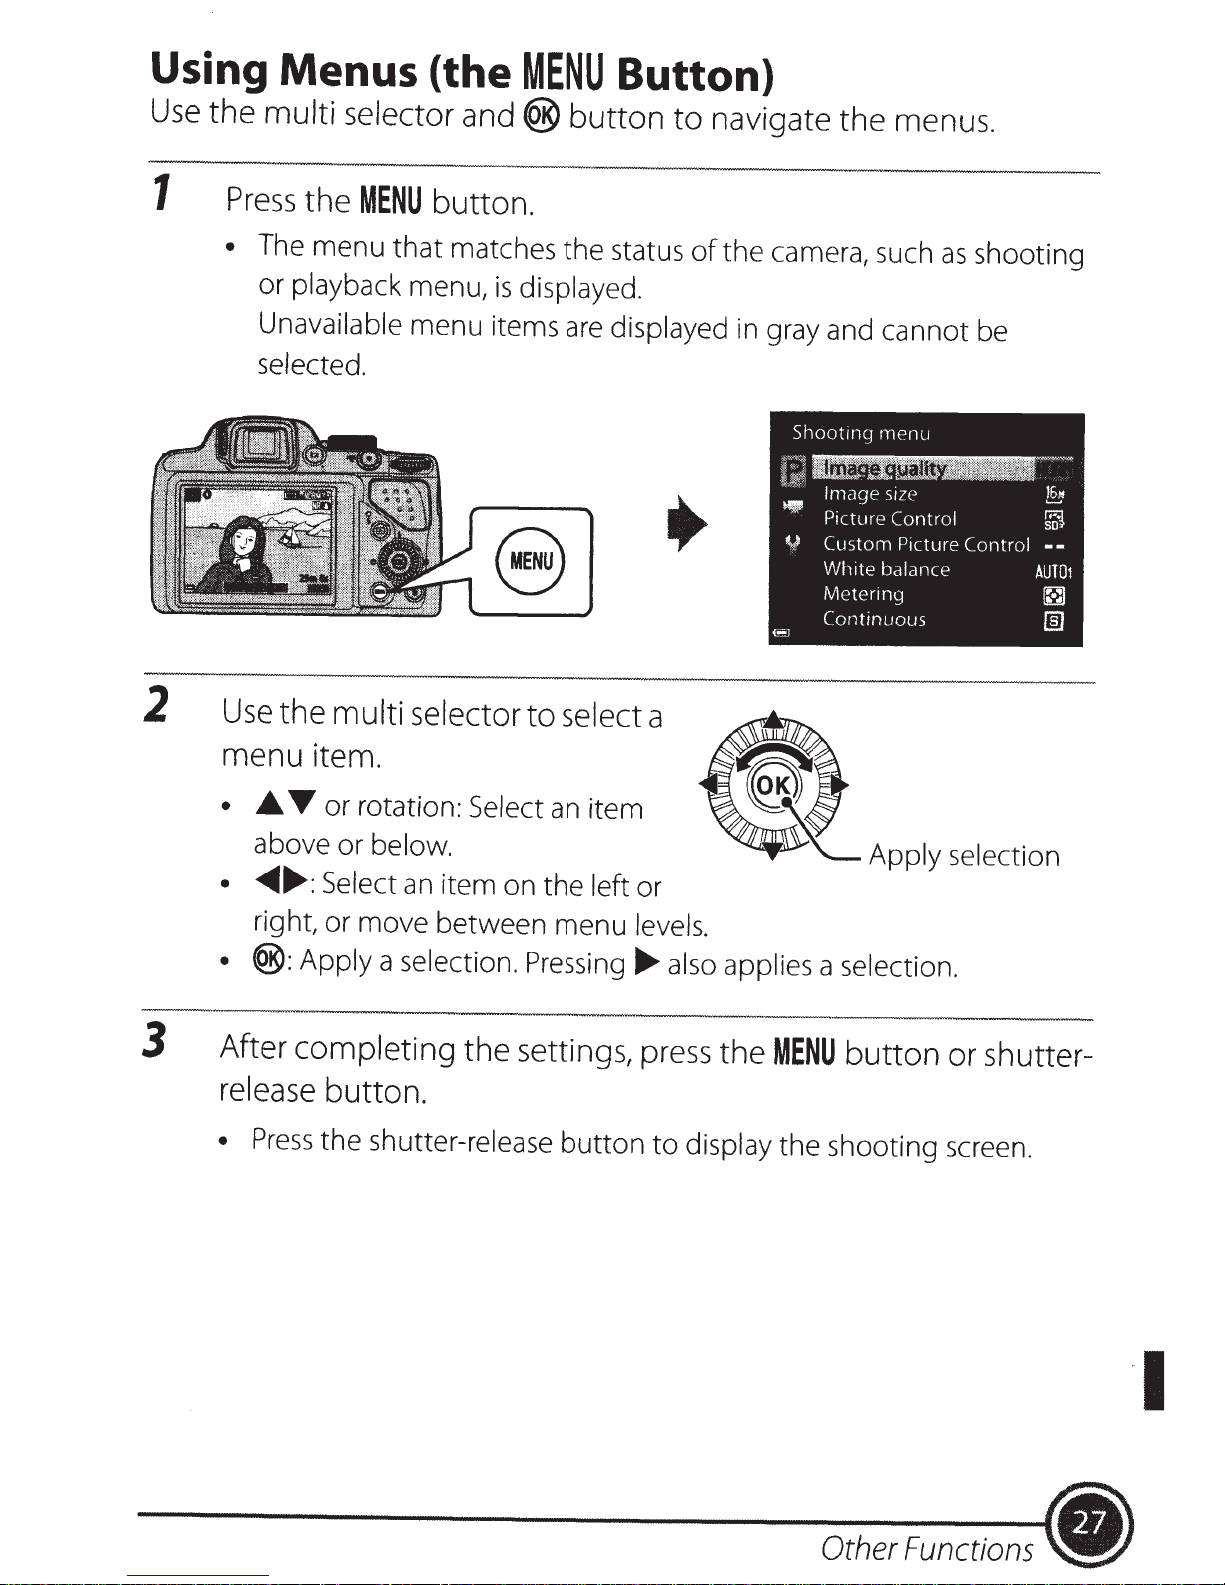
Using Menus (the
Use
the multi selector and
MENU
®
Button)
button
to
navigate the menus.
1
2
Press
• The menu
Use
menu item.
the
MENU
that
or playback menu,
Unavailable
selected.
the multi selector
button.
matches
menu
the
is
displayed.
items
are
to
select a
status
displayed
of
the
camera, such
in
gray and cannot be
as
shooting
3
•
AT
above or
• ........ :
right, or move between menu
•
®:
After completing the settings, press the
release button.
•
Press
or
rotation:
below.
Select
Apply a selection. Pressing
the
an
shutter-release
Select
item on
an
item
the
left
button
or
levels.
......
also
to
display
applies a selection.
MENU
the
button
shooting screen.
or shutter-
••
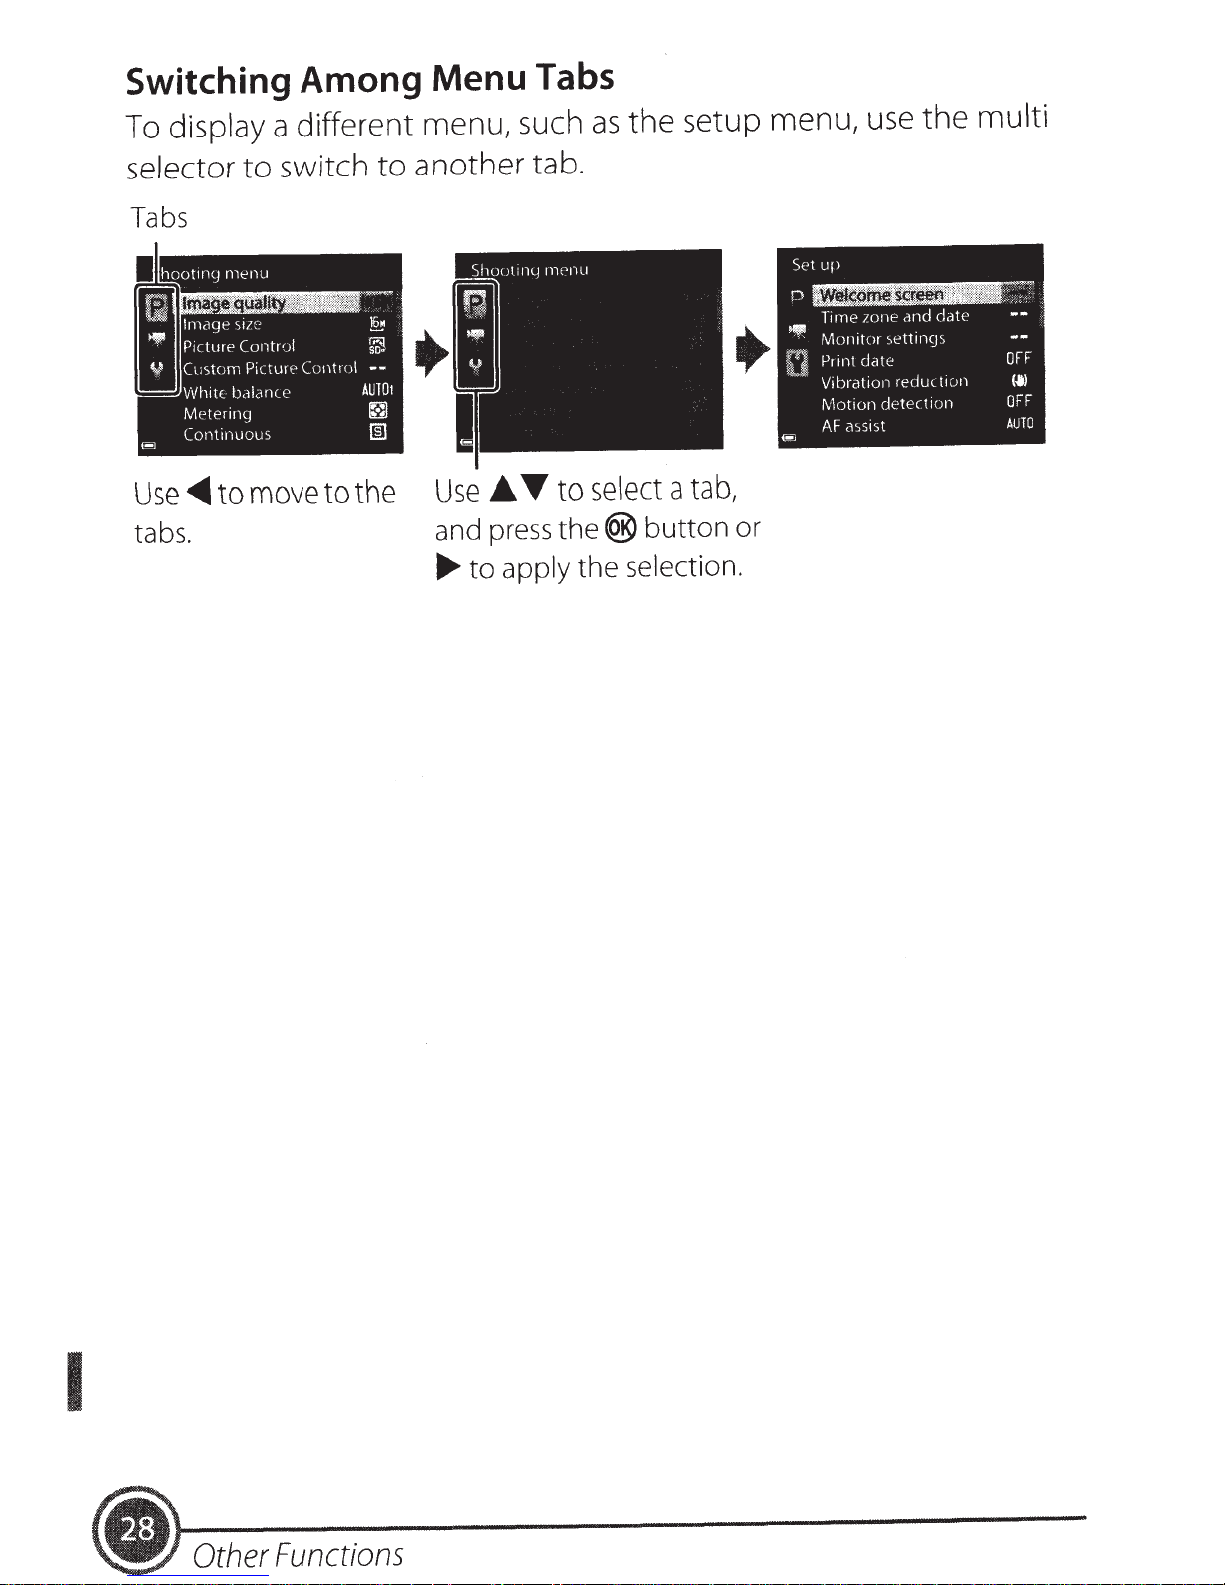
Switching Among
display a different menu, such
To
Menu
Tabs
as
the setup menu,
use
the
multi
selector
Tabs
Use~
tabs.
to
to
switch
move
to
to
the
another
AT
Use
press
and
apply
to
......
tab.
to
the®
select
selection.
the
tab,
a
button
or
I
.)
Other
Functions
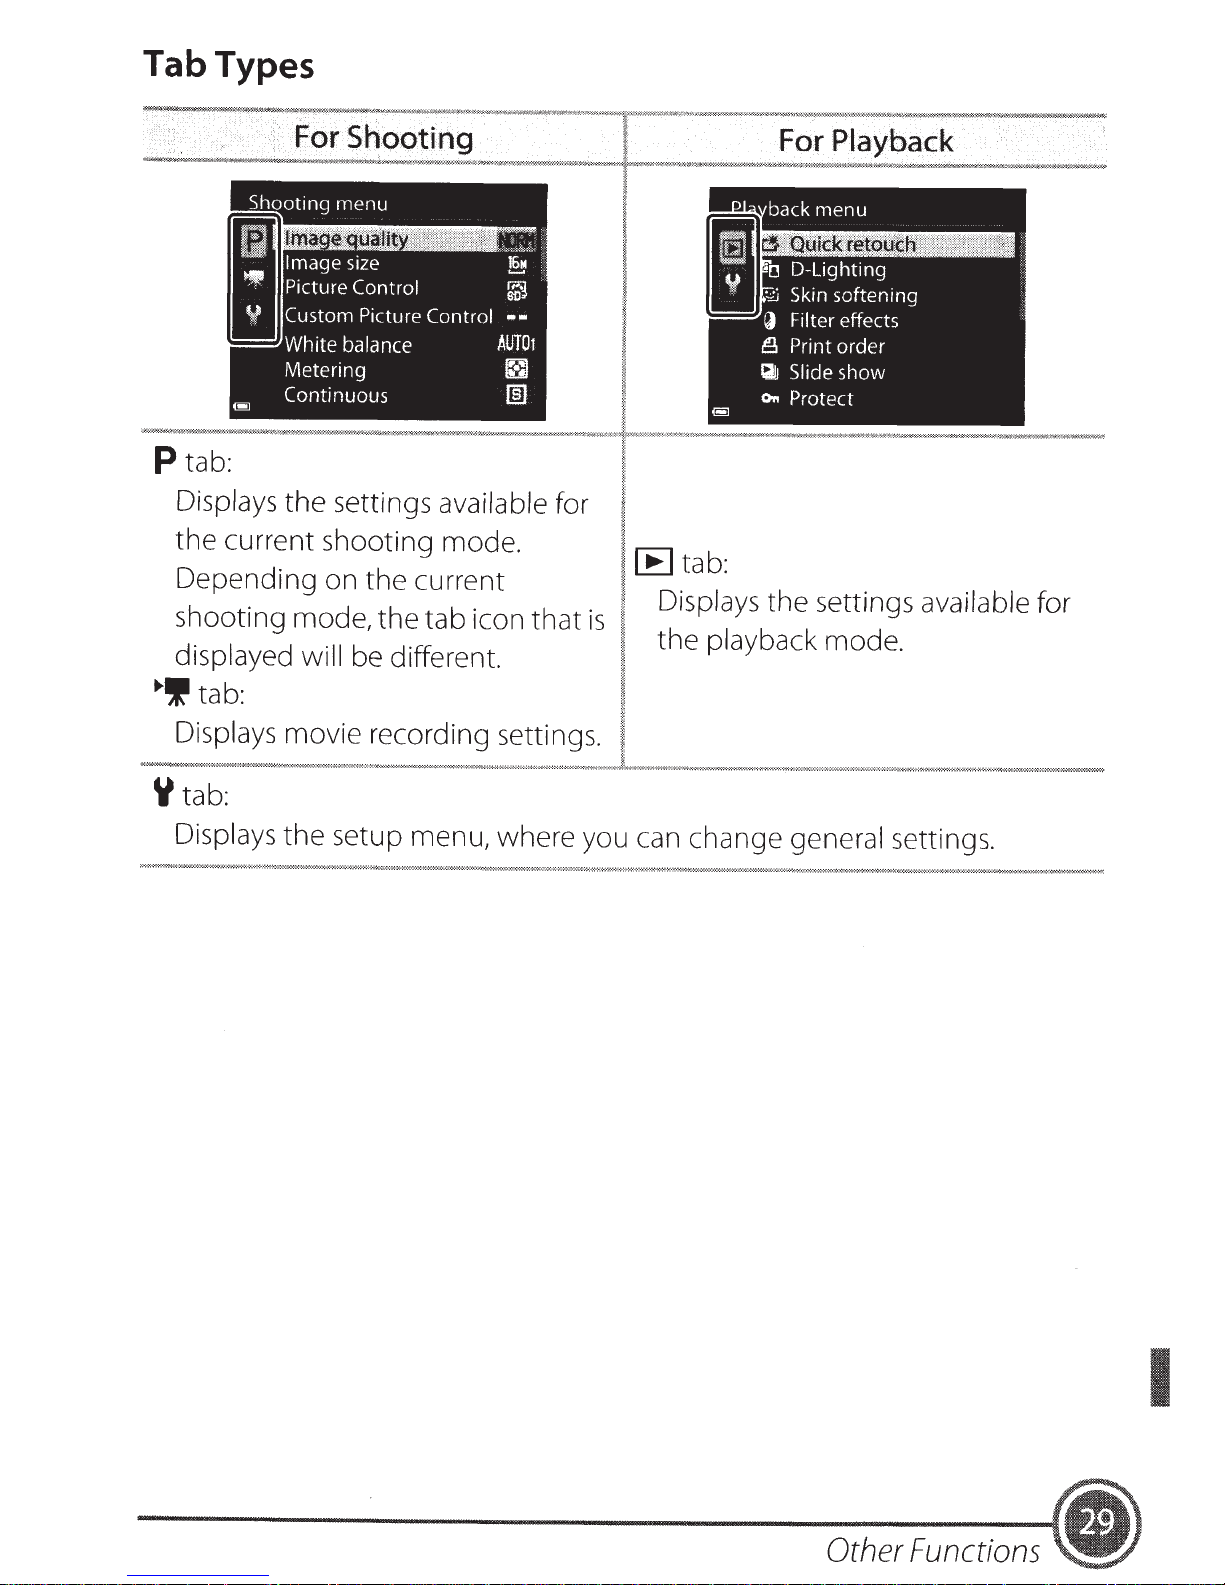
Tab Types
.·
For
~~.<V##.«~w~,.,.._.,~~~~--~~~;m~~~~·:·:~~"""'""''""=""'"'"~"~~<J«vM•'~'""k'~""'"'.,;<,::?><~~;.,:,;,""~'"''~');.;:~<k&;.,:-;m;,;-;,;.;~..::~~~~::'<«::m--~«,;,:
Shooting
P
tab:
For
Playback
.
.,.."f;,';;.-W_.!>0..,._:.:.;"'*z~~"'~"
'
-""""=.:.i=-::~
...
v..w.,.,...
Displays the settings
the current shooting
available
mode.
Depending on the current
shooting mode, the tab icon
displayed will
.,.
tab:
be different.
that
Displays movie recording settings.
Y
tab:
Displays
the
setup menu, where you can change general settings.
for
is
lE
tab:
Displays the settings
the playback mode.
available
for
Other
I
Functions
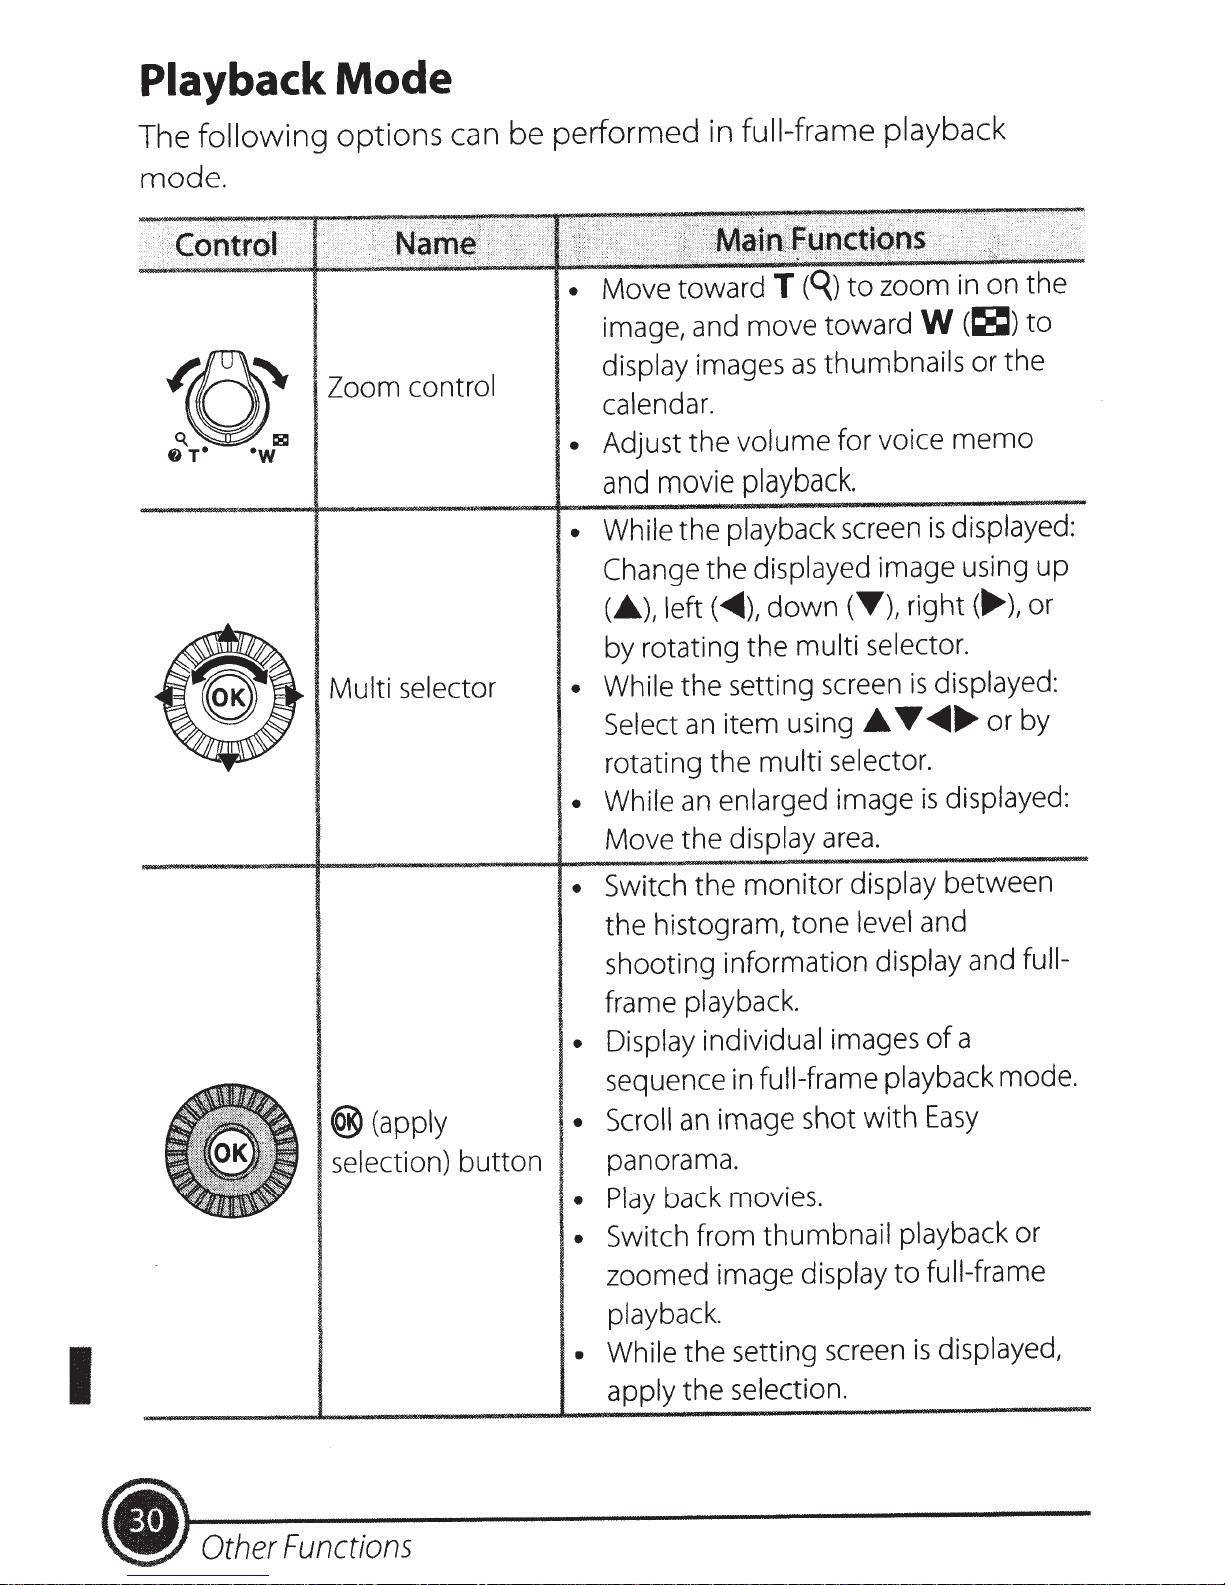
Playback
Mode
The
following
mode.
~0~
~
T•
•w
Zoom control
Multi selector
options
be performed in
can
Move toward
•
image, and move toward
display images
calendar.
Adjust the volume for voice
•
and
While the playback screen
•
Change
(A),
by rotating the multi selector.
• While the setting screen
full-frame playback
movie
left(~),
Select
playback.
the displayed image using up
down
item using
an
zoom
to
(q)
T
W
thumbnails or the
as
is
right(....,.),
(T),
displayed:
is
AT~
on the
in
(~)to
memo
displayed:
or
or by
....
®(apply
selection)
button
rotating the multi selector.
displayed:
with
to
is
a
of
Easy
full-frame
enlarged image
While
•
Move the display
Switch the
•
the histogram, tone level and
shooting information display and
frame playback.
• Display individual images
sequence
• Scroll
panorama.
Play
•
Switch from thumbnail playback or
•
zoomed image
playback.
an
monitor
full-frame playback mode.
in
image shot
an
back movies.
display
area.
display between
full-
I
(lj)
Other
Functions
• While the setting screen
apply the selection.
displayed,
is
 Loading...