


Nikon af-s dx nikkor 55-300mm f/4-5.6g ed vr Manual
AF-SDXNIKKOR55-300mmf/4.5-5.6GEDVR
|
|
|
P.2 |
|
User’s Manual |
Pg. 12 |
|
Benutzerhandbuch |
S. 20 |
||
Manuel d'utilisation |
P. 28 |
||
Manual del usuario |
Pág. 36 |
||
Användarhandbok |
S. 44 |
||
Pykoводство пользoвaтеля |
Стр. 52 |
||
Gebruikshandleiding |
P. 60 |
||
|
Manuale d'uso |
Pag. 68 |
|
Εγχειρίδιο οδηγιών χρήσης |
σελίδα 76 |
||
|
Návod k obsluze |
Str. 84 |
|
Užívateľská príručka |
Str. 92 |
||
Manualul utilizatorului |
Pag. 100 |
||
Посібник користувача |
Стор. 108 |
||
|
|
|
116 |
|
|
|
|
|
|
|
130 |
|
|
|
138#### |
Jp
En
De
Fr
Es
Sv
Ru
Nl
It
Gr
Cz
Sk
Ro
Ua
Sc
Tc
Kr

Jp ■
A
A
I L
E F
K D
A
E
G
C
2

A
K
C
依頼してください。
J
F
F
A
I
F
A
A
A
F
Jp
En
De
Fr
Es
Sv
Ru
Nl
It
Cz
Sk
Ro
Ua
Ck
Ch
Kr
3

Jp DX
• DX
D300 D90 DX35 mm 1.5
■
q ........................................ |
P. 5 |
w ................ |
P. 5 |
e ................ |
P. 6 |
r .......................... |
P. 6 |
t ....................... |
P. 11 |
y |
|
|
|
|
|
|
|
|
|
|
|
|
|
|
|
|
|
|
|
|
|
|
|
|
|
|
|
|
|
|
|
|
|
|
|
|
|
|
|
|
|
|
|
|
|
|
|
|
|
|
|
|
|
|
|
|
|
|
|
|
|
|
|
|
|
|
|
|
|
|
|
|
|
|
|
|
|
|
|
|
|
|
|
|
|
|
|
|
|
|
|
u |
|
P. 5 |
||||||||||||
|
||||||||||||||
i |
|
|
|
|||||||||||
|
...................... |
P. 10 |
||||||||||||
o CPU ...................... |
P. 10 |
|||||||||||||
!0 |
|
|
|
|
|
|
|
|
|
|
|
P. 6 |
||
|
A-M ...... |
|
||||||||||||
!1 |
|
|
|
|
|
|
|
|
|
|
|
P. 7 |
||
|
........... |
|
||||||||||||
4
■
z OFF x
•
z OFF
■
/
• q


 w
w


 •
• 


Jp
En
De
Fr
Es
Sv
Ru
Nl
It
Cz
Sk
Ro
Ua
Ck
Ch
Kr
5
Jp ■

 •
•
■
A-M
•
|
|
|
|
A |
M |
AF |
|
|
MF |
|
|
zAF
x A-M A
z A-M M
6

■ VR
VR 4
よって異なります。
ON
OFF
Jp
En
De
Fr
Es
Sv
Ru
Nl
It
Cz
Sk
Ro
Ua
Ck
Ch
Kr
7

Jp
• た方向の手ブレ補正は機能しません。例えば、横方向に流し撮りす ると、縦方向の手ブレだけが補正されます。
•OFFON
•OFFON
8

■
F
F 2/3F
■
Jp
En
De
Fr
Es
Sv
Ru
Nl
It
Cz
Sk
Ro
Ua
Ck
Ch
Kr
9

Jp ■
•CPU
• ら外周へ渦巻状に、拭きムラ、拭き残りのないように注意して拭い てください。
•NC
■
•58 mm LC-58
•LF-4
•HB-57
•CL-1020
10
■
• 58 mm
■
|
F CPU G AF-S DX |
|
|
||
|
||
|
55 mm―300 mm |
|
|
1 4.5―5.6 |
|
|
11 17 ED 2 |
|
1 |
||
|
||
|
28°50' ―5°20' |
|
|
55 70 100 135 200 300 mm |
|
|
|
|
|
|
|
|
|
|
|
||
|
||
|
|
|
|
VCM |
|
|
||
|
||
|
1.4 m |
|
|
9 |
|
|
|
|
|
• 55 mm f/4.5―22 |
|
• 300 mm f/5.6―29 |
||
|
||
|
|
58 mm P=0.75 mm
|
76.5 mm ×123 mm |
|
|
||
|
||
|
|
|
|
530 g |
Jp
En
De
Fr
Es
Sv
Ru
Nl
It
Cz
Sk
Ro
Ua
Ck
Ch
Kr
11

For Your Safety
En  CAUTIONS
•Do not disassemble. Touching the internal parts of the camera or lens could result in injury. In the event of malfunction, the product should be repaired only by a qualified technician. Should the product break open as the result of a fall or other accident, remove the camera battery and/or disconnect the AC adapter and then take the product to a Nikon-authorized service center for inspection.
•Turn the camera off immediately in the event of malfunction. Should you notice smoke or an unusual smell coming from the equipment, immediately unplug the AC adapter and remove the camera battery, taking care to avoid burns. Continued operation could result in fire or injury. After removing the battery, take the equipment to a Nikonauthorized service center for inspection.
•Do not use in the presence of flammable gas. Operating electronic equipment in the presence of flammable gas could result in explosion or fire.
•Do not look at the sun through the lens or the camera viewfinder.
Viewing the sun or other bright light source through the lens or viewfinder could cause permanent visual impairment.
•Keep out of reach of children. Failure to observe this precaution could result in injury.
•Observe the following precautions when handling the lens and camera:
-Keep the lens and camera dry. Failure to observe this precaution could result in fire or electric shock.
-Do not handle the lens or camera with wet hands. Failure to observe this precaution could result in electric shock.
-Keep the sun well out of the frame when shooting backlit subjects. Sunlight focused into the camera when the sun is in or close to the frame could cause a fire.
-If the lens will not be used for an extended period, attach the front and rear lens caps and store the lens out of direct sunlight. If left in direct sunlight, the lens could focus the sun’s rays onto flammable objects, causing fire.
•Do not carry tripods with a lens or camera attached. You could trip or accidentally strike others, resulting in injury.
•Do not leave the lens where it will be exposed to extremely high temperatures, such as in an enclosed automobile or in direct sunlight. Failure to observe this
12 |
precaution could adversely affect the lens’ internal parts, causing fire. |
Thank you for your purchase of an AF-S DX NIKKOR 55–300mm f/4.5–5.6G ED VR lens. Before using this product, please carefully read both these instructions and the camera manual.
Note: DX lenses are for use only with DX-format digital single-lens reflex cameras such as the D90 or D300 series. The angle of view of a lens on a DX-format camera is equivalent to that of a lens with a focal length about 1.5 × longer mounted on a 35 mm format camera.
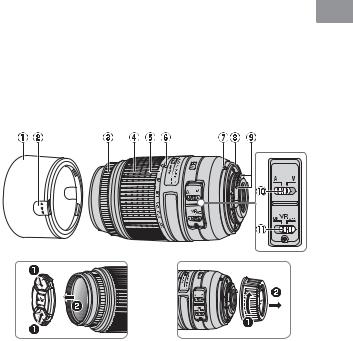
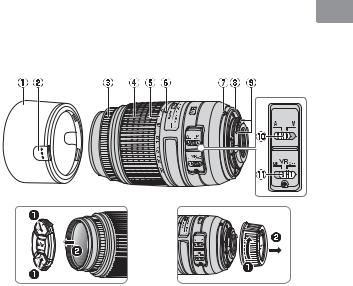
■ Parts of the Lens
q Lens hood ................................. |
14 |
w Latch............................................. |
14 |
e Focus ring.................................. |
15 |
r Zoom ring................................. |
15 |
t Focal length scale ................ |
19 |
y Focal length mark |
|
u Lens mounting mark .......... |
14 |
i Rubber lens-mount |
|
gasket...................................... |
18 |
o CPU contacts ........................... |
18 |
!0A-M mode switch ................. |
15 |
!1Vibration reduction |
|
ON/OFF switch.................. |
16 |
Jp
En
De
Fr
Es
Sv
Ru
Nl
It
Cz
Sk
Ro
Ua
Ck
Ch
Kr
13

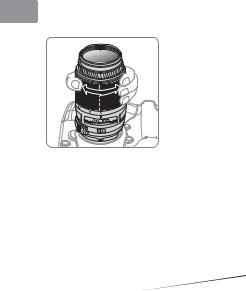
■ Attaching and Removing the Lens
En Attaching the Lens
z Turn the camera off and remove the camera body cap.
x Remove the lens cap.
cAttach the lens.
Keeping the lens mounting mark aligned with the mounting mark on the camera body, position the lens in the camera’s bayonet mount and then rotate the lens counter-clockwise until it clicks into place with the lens mounting mark at the top.
Removing the Lens z Turn the camera off.
xRemove the lens.
To remove the lens, press the lens release button while turning the lens clockwise.
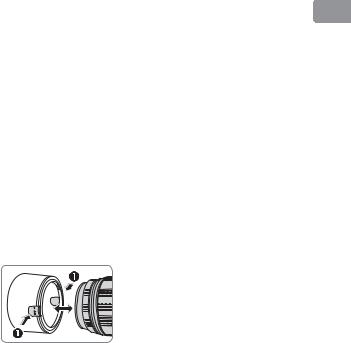
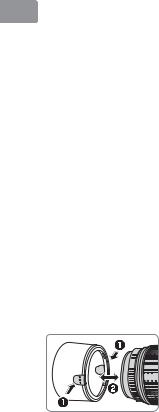
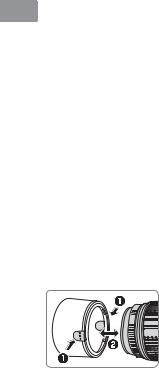
■ The Lens Hood
The lens hoods protect the lens and block stray light that would otherwise cause flare or ghosting.
Attaching and Removing the Hood
Press the latches (q) and attach or 


 remove the hood (w). The hood can


 be reversed and mounted on the lens


 when not in use.
14

■ Zoom and Depth of Field
Before focusing, rotate the zoom ring to adjust the focal length and frame the photograph. If the camera offers depth-of-field preview (stop down), depth of field can be previewed in the viewfinder.
Note: The focal length of this lens decreases as the focus distance shortens.
■ Focus
Focus mode is determined by the camera focus mode and the position of the lens A-M mode switch. See the camera manual for information on camera focus mode selection.
|
Lens focus mode |
|
Camera focus mode |
A |
M |
AF |
Autofocus |
Manual focus with |
MF |
— |
electronic rangefinder |
|
|
|
Autofocus
z Set the camera to AF (autofocus).
x Slide the lens A-M mode switch to A.
cFocus.
Press the shutter-release button halfway to focus. Be careful not to touch the focus ring while the camera focuses.
Manual Focus
z Slide the lens A-M mode switch to M.
xFocus.
Focus manually using the lens focus ring. Manual focus can be used regardless of the focus mode selected with the camera.
Jp
En
De
Fr
Es
Sv
Ru
Nl
It
Cz
Sk
Ro
Ua
Ck
Ch
Kr
15

■ Vibration Reduction (VRII)
En Vibration reduction (VRII) reduces blur caused by camera shake, allowing shutter speeds up to four stops slower than would otherwise be the case (Nikon measurements; effects vary with the photographer and shooting conditions). This increases the range of shutter speeds available and permits hand-held, tripod-free photography in a wide range of situations.
Using the Vibration Reduction ON/OFF Switch
Select ON to enable vibration reduction. Vibration
reduction is activated when the shutter-release button is pressed halfway, reducing the effects of camera shake for improved framing and focus.
Select OFF to turn vibration reduction off.
Using Vibration Reduction: Notes
•When using vibration reduction, press the shutter-release button halfway and wait for the image in the viewfinder to stabilize before pressing the shutter-release button the rest of the way down.
•When the camera is panned, vibration reduction applies only to motion that is not part of the pan (if the camera is panned horizontally, for example, vibration reduction will be applied only to vertical shake), making it much easier to pan the camera smoothly in a wide arc.
•When vibration reduction is active, the image in the viewfinder may be blurred after the shutter is released. This does not indicate a malfunction.
16

•Do not turn the camera off or remove the lens while vibration reduction is in effect. If power to the lens is cut while vibration reduction is on, the lens may rattle when shaken. This is not a malfunction, and can be corrected by reattaching the lens and turning the camera on.
•If the camera is equipped with a built-in flash, vibration reduction will be disabled while the flash charges.
•Turn vibration reduction off when the camera is securely mounted on a tripod, but leave it on if the tripod head is not secured or when using a monopod.
■ Aperture
Aperture is adjusted using camera controls.
Zoom and Maximum Aperture
Changes to zoom can alter the maximum aperture by up to 2/3 EV. The camera however automatically takes this into account when setting exposure, and no modifications to camera settings are required following adjustments to zoom.
■ Built-in Flash Units
When using the built-in flash on cameras equipped with a built-in flash unit, remove lens hoods to prevent vignetting (shadows created where the end of the lens obscures the built-in flash).
Jp
En
De
Fr
Es
Sv
Ru
Nl
It
Cz
Sk
Ro
Ua
Ck
Ch
Kr
17

■ Lens Care
En • Do not pick up or hold the lens or camera using only the lens hood.
•Keep the CPU contacts clean.
•Should the rubber lens-mount gasket be damaged, cease use immediately and take the lens to a Nikon-authorized service center for repair.
•Use a blower to remove dust and lint from the lens surfaces. To remove smudges and fingerprints, apply a small amount of ethanol or lens cleaner to a soft, clean cotton cloth or lenscleaning tissue and clean from the center outwards using a circular motion, taking care not to leave smears or touch the glass with your fingers.
•Never use organic solvents such as paint thinner or benzene to clean the lens.
•The lens hood or NC filters can be used to protect the front lens element.
•Attach the front and rear caps before placing the lens in its flexible pouch.
•If the lens will not be used for an extended period, store it in a cool, dry location to prevent mold and rust. Do not store in direct sunlight or with naphtha or camphor moth balls.
•Keep the lens dry. Rusting of the internal mechanism can cause irreparable damage.
•Leaving the lens in extremely hot locations could damage or warp parts made from reinforced plastic.
■Supplied Accessories
• 58 mm snap-on Front Lens Cap LC-58
• Rear Lens Cap LF-4
• Bayonet Hood HB-57
• Flexible Lens Pouch CL-1020
■Compatible Accessories
58 mm screw-on filters
18

■ Specifications
Type |
Type G AF-S DX lens with built-in CPU and |
||
|
Nikon F mount |
||
Focal length |
55–300 mm |
|
|
Maximum aperture |
f/4.5–5.6 |
|
|
Lens construction |
17 elements in 11 groups (including 2 ED lens |
|
|
|
elements and one HRI lens element) |
||
Angle of view |
28° 50′–5° 20′ |
|
|
|
|
|
|
Focal length scale |
Graduated in millimeters (55, 70, 100, 135, 200, 300) |
||
Distance information |
Output to camera |
|
|
Zoom |
Manual zoom using independent zoom ring |
|
|
Focusing |
Autofocus controlled by Silent Wave Motor, |
|
|
|
manual focus |
||
Vibration reduction |
Lens shift using voice coil motors (VCMs) |
|
|
Minimum focus |
1.4 m (4.59 ft) from focal plane at all zoom |
|
|
distance |
positions |
||
Diaphragm blades |
9 (rounded diaphragm opening) |
|
|
Diaphragm |
Fully automatic |
|
|
Aperture range |
• 55 mm focal length: f/4.5 to f/22 |
|
|
|
• 300 mm focal length: f/5.6 to f/29 |
||
Metering |
Full aperture |
|
|
Filter-attachment |
58 mm (P=0.75 mm) |
|
|
size |
|||
|
|
||
Dimensions |
Approx. 76.5 mm diameter × 123 mm (distance |
|
|
|
from camera lens-mount flange) |
||
Weight |
Approx. 530 g (18.7 oz) |
|
|
|
|
|
|
Nikon reserves the right to change the specifications of the hardware described in this manual at any time and without prior notice.
Jp
En
De
Fr
Es
Sv
Ru
Nl
It
Cz
Sk
Ro
Ua
Ck
Ch
Kr
19

|
Für Ihre Sicherheit |
|
SICHERHEITSHINWEISE |
De |
• Nicht auseinanderbauen. Das Berühren der Innenteile von Kamera oder Objektiv |
könnte zu Verletzungen führen. Im Falle einer Fehlfunktion sollte das Produkt |
|
|
auschließlich von einem qualifizierten Fachmann repariert werden. Sollte das |
|
Produkt aufgrund eines Herunterfallens oder eines Unfalles aufbrechen, |
|
entfernen Sie den Kamera-Akku und/oder trennen Sie den Netzadapter vom |
|
Netz und bringen Sie das Produkt zur Inspektion zum Nikon-Kundendienst. |
•Schalten Sie die Kamera im Falle einer Fehlfunktion unverzüglich ab. Wenn Sie Rauch oder einen ungewöhnlichen Geruch aus Ihrer Ausrüstung wahrnehmen, trennen Sie sofort den Netzadapter vom Netz und entfernen Sie den Kamera-
Akku. Geben Sie dabei acht, dass Sie sich nicht verbrennen. Ein weiterer Betrieb könnte zu einem Brand oder zu Verletzungen führen. Nach Entfernen des Akkus bringen Sie die Ausrüstung zur Inspektion zum Nikon-Kundendienst.
•Nicht in Gegenwart von entflammbarem Gas verwenden. Der Betrieb von Elektrogeräten in Gegenwart von entflammbarem Gas könnte zu einer Explosion oder zu einem Brand führen.
•Blicken Sie nicht durch das Objektiv oder den Kamerasucher in die Sonne. Das Betrachten der Sonne oder einer anderen hellen Lichtquelle durch das Objektiv oder den Sucher kann zu permanenten Sehstörungen führen.
•Außerhalb der Reichweite von Kindern aufbewahren. Ein Nichtbeachten dieser
Vorsichtsmaßnahme kann zu Verletzungen führen.
•Beachten Sie die folgenden Vorsichtsmaßnahmen beim Umgang mit Kamera und Objektiv:
-Halten Sie Objektiv und Kamera stets trocken. Ein Nichtbeachten dieser Vorsichtsmaßnahme kann zu Feuer oder Stromschlägen führen.
-Bedienen Sie die Kamera oder das Objektiv nicht mit nassen Händen. Ein
Nichtbeachten dieser Vorsichtsmaßnahme kann zu Stromschlägen führen.
-Halten Sie die Sonne sicher außerhalb des Bildbereiches, wenn Sie Motive im Gegenlicht aufnehmen. Sonnenlicht, das in der Kamera fokussiert wird, wenn sich die Kamera im oder nah beim Bildmotiv befindet, kann zu einem Brand führen.
-Wird das Objektiv für längere Zeit nicht verwendet, bringen Sie den vorderen und hinteren Objektivdeckel an und lagern Sie das Objektiv an einem Ort ohne direkte Sonneneinstrahlung. Wird es in direktem Sonnenlicht gelagert, könnte das Objektiv die Sonnenstrahlen auf entflammbare Objekte fokussieren und Sie so entzünden.
•Tragen Sie Stative nicht mit aufgesetzter Kamera oder aufgesetztem Objektiv. Es besteht die
Gefahr zu stolpern oder versehentlich andere Personen zu stoßen, was zu Verletzungen führen kann.
•Lagern Sie das Objektiv nicht an Orten, an denen es extrem hohen Temperaturen ausgesetzt ist, wie beispielsweise in einem geschlossenen Auto oder direkt in der Sonne. Andernfalls können die internen Teile des Objektivs nachteilig beeinflusst werden und es könnte zu einem Brand kommen.
20
Vielen Dank, dass Sie sich für ein AF-S DX NIKKOR 55–300 mm 1:4,5–5,6G ED VR Objektiv entschieden haben. Bitte lesen Sie vor der Verwendung dieses Produktes sowohl diese Anleitung als auch das Handbuch der Kamera sorgfältig.
Hinweis: DX-Objektive können nur mit digitalen Spiegelreflexkameras mit DXFormat wie der D90 oder einer Kamera der D300-Serie verwendet werden. Der Blickwinkel eines Objektives auf einer Kamera mit DX-Format entspricht dem eines Objektives mit einer etwa 1,5 × längeren Brennweite auf einer Kamera mit 35 mm Kleinbildformat.
■ Objektivkomponenten
q Gegenlichtblende ............................ |
22 |
w Verriegelung........................................ |
22 |
e Fokussierring ....................................... |
23 |
r Zoomring............................................... |
23 |
t Brennweitenskala ............................. |
27 |
y Markierung für Brennweitenskala |
|
u Markierung für die Ausrichtung |
|
des Objektivs................................. |
22 |
i Dichtungsmanschette .................. |
26 |
o CPU-Kontakte ..................................... |
26 |
!0A-M-Umschalter................................ |
23 |
!1Bildstabilisator |
|
AN/AUS-Schalter ........................ |
24 |
Jp
En
De
Fr
Es
Sv
Ru
Nl
It
Cz
Sk
Ro
Ua
Ck
Ch
Kr
21
■ Ansetzen und Abnehmen des Objektivs
|
Ansetzen des Objektivs |
De |
z Schalten Sie die Kamera ab und entfernen Sie den |
|
Gehäusedeckel der Kamera. |
x Entfernen Sie den Objektivdeckel.
cSetzen Sie das Objektiv an.
Richten Sie die Markierung für die Ausrichtung des Objektivs mit der Markierung am Kameragehäuse aus, setzen Sie das Objektiv in den Bajonettanschluss der Kamera ein und drehen es dann gegen den Uhrzeigersinn, bis es mit einem Klicken einrastet und die Markierung für die Ausrichtung des Objektivs nach oben zeigt.
Abnehmen des Objektivs z Schalten Sie die Kamera ab.
xNehmen Sie das Objektiv ab.
Um das Objektiv abzunehmen, drücken Sie die Objektiventriegelungstaste, während Sie das Objektiv im Uhrzeigersinn drehen.
■Die Gegenlichtblende
Die Gegenlichtblende schützt das Objektiv und verhindert das Eindringen von Streulicht, das ansonsten zu Streulicht oder Geisterbildern führen würde.
Anbringen und Abnehmen der Gegenlichtblende
Drücken Sie die Verriegelungen (q) 


 und bringen Sie die Gegenlichtblende


 (w) an oder nehmen Sie sie ab. Die


 Gegenlichtblende kann umgekehrt auf
dem Objektiv angebracht werden, wenn sie nicht verwendet wird.
22

■ Zoom und Tiefenschärfe
Drehen Sie, bevor Sie fokussieren, den Zoomring, um die Brennweite einzustellen und einen Bildausschnitt zu wählen. Verfügt die Kamera über eine Abblendtaste, kann die Tiefenschärfe im Sucher im Voraus bewertet werden.
Hinweis: Die Brennweite dieses Objektivs nimmt bei der Fokussierung auf nahe Motive ab.
■ Scharfeinstellung
Der Fokusmodus wird durch den Fokusmodus der Kamera und die Position des Objektiv-A-M-Umschalters bestimmt. Beachten Sie das Handbuch der Kamera für weitere Informationen zur Wahl des Fokusmodus an der Kamera.
|
|
Objektiv-Fokusmodus |
|
Kamera-Fokusmodus |
A |
|
M |
AF |
Autofokus |
|
Manueller Fokus mit |
MF |
— |
|
elektronischer Einstellhilfe |
|
|
|
|
Autofokus
z Versetzen Sie die Kamera in den AF (Autofokus)-Modus.
x Stellen Sie den Objektiv-A-M-Umschalter auf A.
cFokussieren Sie.
Drücken Sie den Auslöser bis zum ersten Druckpunkt, um zu fokussieren. Berühren Sie nicht den Fokussierring, während die Kamera fokussiert.
Manuelle Fokussierung
z Stellen Sie den Objektiv-A-M-Umschalter auf M.
xFokussieren Sie.
Fokussieren Sie manuell mit Hilfe des Fokussierrings am Objektiv. Die manuelle Fokussierung kann unabhängig vom an der Kamera gewählten Fokusmodus verwendet werden.
Jp
En
De
Fr
Es
Sv
Ru
Nl
It
Cz
Sk
Ro
Ua
Ck
Ch
Kr
23

■ Bildstabilisator (VRII)
Der Bildstabilisator (VRII) reduziert die Bewegungsunschärfe, die durch Kamera-Verwacklung entsteht und erlaubt so eine bis zu
De vier Stufen längere Belichtungszeit, als es ansonsten der Fall wäre (Nikon-Messungen; die Effekte können je nach Fotograf und Aufnahmesituation variieren). Dies vergrößert die Auswahl verfügbarer Belichtungszeiten und erlaubt Fotografien aus der Hand ohne Stativ in einer Vielzahl von Situationen.
Verwendung des Bildstabilisator AN/AUS-Schalters
Wählen Sie ON (EIN), um den Bildstabilisator zu aktivieren.
Der Bildstabilisator wird aktiviert, wenn der Auslöser bis zum ersten Druckpunkt gedrückt wird; er verringert die Effekte einer Kamera-Verwacklung für verbesserte Motivwahl und Scharfstellung.
Wählen Sie OFF (AUS), um den Bildstabilisator auszuschalten.
Verwendung des Bildstabilisators: Hinweise
•Drücken Sie bei Verwendung des Bildstabilitsators den Auslöser bis zum ersten Druckpunkt und warten Sie, bis sich das Bild im Sucher stabilisiert, bevor Sie den Auslöser vollständig drücken.
•Wird die Kamera geschwenkt, gleicht der Bildstabilisator nur die Bewegung aus, die sich nicht im Schwenkbereich befindet (wenn die Kamera beispielsweise horizontal geschenkt wird, wird der Bildstabilisator nur auf vertikale Verwacklungen angewendet), so dass ein sauberes Verschwenken der Kamera in einem weiten Bogen um ein Vielfaches erleichtert wird.
•Wenn der Bildstabilisator aktiv ist, ist das Bild im Sucher möglicherweise verschwommen, wenn der Auslöser gedrückt wurde. Dies stellt keine Fehlfunktion dar.
24

•Schalten Sie die Kamera nicht ab und entfernen Sie nicht das Objektiv, solange der Bildstabilisator aktiv ist. Wenn die Stromversorgung des Objektivs unterbrochen wird, solange der Bildstabilisator aktiv ist, könnte das Objektiv klappern, wenn es geschüttelt wird. Dies stellt keine Fehlfunktion dar und kann dadurch beseitigt werden, dass das Objektiv wieder angesetzt und die Kamera eingeschaltet wird.
•Verfügt die Kamera über ein eingebautes Blitzgerät, wird der Bildstabilisator deaktiviert, solange das Blitzgerät sich auflädt.
•Schalten Sie den Bildstabilisator ab, wenn die Kamera fest auf einem Stativ aufsitzt, lassen Sie ihn jedoch angeschaltet, wenn der Stativkopf nicht feststehend ist oder wenn Sie ein Einbein verwenden.
■ Blende
Die Blende wird mit den Bedienelementen der Kamera eingestellt.
Zoom und maximale Blende
Änderungen am Zoom können die maximale Blende um bis zu 2/3 LW verändern. Die Kamera berücksichtigt dies allerdings automatisch beim Einstellen der Belichtung und Sie müssen nach Anpassung des Zooms keine Veränderungen an den Kameraeinstellungen vornehmen.
■ Integrierte Blitzgeräte
Entfernen Sie die Gegenlichtblende, wenn Sie das integrierte Blitzgerät der Kamera verwenden (insofern vorhanden), da die Gegenlichtblende sonst einen Schatten ins Motiv würfe.
Jp
En
De
Fr
Es
Sv
Ru
Nl
It
Cz
Sk
Ro
Ua
Ck
Ch
Kr
25

|
■ Pflege des Objektivs |
|
• Halten oder heben Sie das Objektiv oder die Kamera nicht an |
De |
der angesetzten Gegenlichtblende. |
• Halten Sie die CPU-Kontakte sauber. |
|
|
• Sollte die Dichtungsmanschette beschädigt werden, setzen Sie |
|
den Gebrauch sofort aus und bringen Sie das Objektiv zum |
|
Nikon-Kundendienst zur Reparatur. |
|
• Verwenden Sie zum Entfernen von Staub und Verunreinigungen |
|
vom Objektiv einen Blasebalg. Um Schmierflecke und |
|
Fingerabdrücke zu entfernen, bringen Sie eine kleine Menge |
|
Ethanol oder Objektivreiniger auf ein weiches, sauberes |
|
Baumwolltuch oder ein Objektivreinigungstuch auf und reinigen |
|
Sie das Objektiv mit Kreisbewegungen von der Mitte nach |
|
außen. Achten Sie dabei darauf, dass keine Schmierflecke |
|
verbleiben, und dass sie das Glas nicht mit den Fingern berühren. |
|
• Verwenden Sie niemals organische Lösungsmittel wie |
|
Verdünner oder Waschbenzin zur Reinigung des Objektivs. |
|
• Zum Schutz der Frontlinse kann die Gegenlichtblende oder ein |
|
Klarglasfilter (NC) verwendet werden. |
|
• Bringen Sie den vorderen und den hinteren Objektivdeckel auf |
|
dem Objektiv an, bevor sie es in seiner Tasche verstauen. |
|
• Wenn das Objektiv für längere Zeit nicht verwendet wird, lagern |
|
Sie es an einem kühlen, trockenen Ort, um Schimmel und |
|
Korrosion zu vermeiden. Lagern sie das Objektiv nicht direkt in |
|
der Sonne oder mit Mottenkugeln aus Naphtha oder Kampfer. |
|
• Halten Sie das Objektiv stets trocken. Eindringendes Wasser |
|
kann zur Korrosion innenliegender Teile und irreparablen |
|
Schäden führen. |
|
• Das Lagern des Objektiv an sehr heißen Orten kann Teile aus |
|
verstärktem Plastik beschädigen oder verformen. |
■ Im Lieferumfang enthaltenes Zubehör
•58 mm aufschnappender vorderer Objektivdeckel LC-58
•Hinterer Objektivdeckel LF-4
•Bajonett-Gegenlichtblende HB-57
•Objektivbeutel CL-1020
26

■ Kompatibles Zubehör
58-mm-Schraubfilter
■ Technische Daten
Typ |
AF-S DX-Objektiv vom Typ G mit integrierter CPU |
|
und Nikon F-Bajonettanschluss |
Brennweite |
55–300 mm |
Lichtstärke |
1:4,5–5,6 |
Optischer Aufbau |
17 Linsen in 11 Gruppen (enthält 2 ED-Linsen und eine HRI- |
|
Linse) |
Bildwinkel |
28 ° 50 ′–5 ° 20 ′ |
Brennweitenskala |
Unterteilt im Millimeter (55, 70, 100, 135, 200, 300) |
Entfernungsinformation |
Übermittlung an die Kamera |
Zoom |
Manueller Zoom mit unabhängigem Zoomring |
Fokussierung |
Autofokus mit Silent-Wave-Motor, manueller Fokus |
Bildstabilisator |
Bewegliche Linsengruppe mit Voice-Coil-Motoren |
|
(VCMs) |
Naheinstellgrenze |
1,4 m von der Sensorebene gemessen, bei allen |
|
Zoompositionen |
Blendenlamellen |
9 (Blendenöffnung mit abgerundeten Lamellen) |
Blendensteuerung |
Vollautomatisch |
Blendenbereich |
• 55 mm Brennweite: 4,5 bis 22 |
|
• 300 mm Brennweite: 5,6 bis 29 |
Belichtungsmessung |
Offenblende |
Filtergewinde |
58 mm (P = 0,75 mm) |
Abmessungen |
Durchmesser ca. 76,5 mm × 123 mm (Länge ab |
|
Bajonettauflage) |
Gewicht |
ca. 530 g |
|
|
Änderungen und Irrtümer vorbehalten.
Jp
En
De
Fr
Es
Sv
Ru
Nl
It
Cz
Sk
Ro
Ua
Ck
Ch
Kr
27

|
Pour votre sécurité |
|
ATTENTION |
|
• Ne pas démonter. Toucher les parties internes de l’appareil photo ou de l’objectif |
|
peut provoquer des blessures. En cas de dysfonctionnement, le produit devra |
Fr |
être réparé par un technicien qualifié uniquement. Si le produit s’ouvre à cause |
d’une chute ou de tout autre accident, retirez l’accumulateur de l’appareil |
|
|
photo et/ou débranchez l’adaptateur secteur et confiez le produit à un centre |
|
Nikon agréé pour le faire vérifier. |
•Mettre immédiatement l’appareil hors tension en cas de dysfonctionnement. Si vous détectez de la fumée ou une odeur inhabituelle provenant de l’équipement, débranchez immédiatement l’adaptateur secteur et retirez l’accumulateur de l’appareil photo, tout en prenant soin de ne pas vous brûler. Poursuivre son utilisation peut provoquer un incendie ou des blessures. Après avoir retiré l’accumulateur, confiez l’équipement à un centre Nikon agréé pour le faire vérifier.
•Ne pas utiliser en présence de gaz inflammable. L’utilisation d’équipement électronique en présence d’un gaz inflammable peut provoquer une explosion ou un incendie.
•Ne pas regarder le soleil avec l’objectif ou le viseur de l’appareil photo. Regarder le soleil ou toute autre source lumineuse intense avec l’objectif ou le viseur peut provoquer des troubles de la vision irréversibles.
•Tenir éloigné des enfants. Le non-respect de cette précaution peut provoquer des blessures.
•Suivre les précautions ci-dessous lors de la manipulation de l’objectif et de l’appareil photo :
-Tenir l’objectif et l’appareil photo au sec. Le non-respect de cette précaution peut provoquer un incendie ou un choc électrique.
-Ne pas manipuler l’objectif ou l’appareil photo avec des mains mouillées. Le non-respect de cette précaution peut provoquer un choc électrique.
-Ne pas inclure le soleil dans le cadrage lors de la prise de vue de sujets en contre-jour. La concentration de la lumière du soleil dans l’appareil photo lorsque le soleil est dans ou à proximité du champ de l’image peut provoquer un incendie.
-Si vous n’avez pas l’intention d’utiliser l’objectif pendant une période prolongée, fixez les bouchons avant et arrière et rangez l’objectif hors de la lumière directe du soleil. Si l’objectif est laissé en contact direct avec la lumière du soleil, les rayons peuvent toucher des objets inflammables, provoquant ainsi un incendie.
•Ne pas porter un trépied sur lequel un objectif ou l’appareil photo est fixé. Vous risqueriez de trébucher ou de frapper accidentellement des personnes, provoquant ainsi des blessures.
•Ne pas laisser l’objectif là où il serait exposé à des températures élevées, comme une voiture fermée ou à la lumière directe du soleil. Le non-respect de cette précaution peut avoir des répercussions sur les parties internes de l’objectif, pouvant provoquer un incendie.
28
Nous vous remercions d’avoir acheté l’objectif AF-S DX NIKKOR 55–300 mm f/4.5–5.6G ED VR. Avant d’utiliser ce produit, veuillez lire attentivement ces instructions et le manuel de l’appareil photo.
Remarque : les objectifs DX ne doivent être utilisés qu’avec des appareils photo numériques reflex de format DX tels que la gamme D90 ou D300. L’angle de champ d’un objectif sur un appareil photo au format DX est équivalent à celui d’un objectif avec une focale environ 1,5 × plus longue montée sur un appareil photo au format 24×36 mm.
■ Parties de l’objectif
q Parasoleil................................................ |
30 |
w Repère ..................................................... |
30 |
e Bague de mise au point ............... |
31 |
r Bague de zoom.................................. |
31 |
t Échelle des focales........................... |
35 |
y Repère de l'échelle des focales |
|
u Repère de montage de |
|
l’objectif............................................ |
30 |
i Joint en caoutchouc de la |
|
monture d’objectif .................... |
34 |
o Contacts du |
|
microprocesseur......................... |
34 |
!0Commutateur de mode A-M.... |
31 |
!1Commutateur MARCHE / ARRÊT |
|
pour la réduction de |
|
vibration........................................... |
32 |
Jp
En
De
Fr
Es
Sv
Ru
Nl
It
Cz
Sk
Ro
Ua
Ck
Ch
Kr
29
■ Fixer et retirer l’objectif
Fixer l’objectif
zMettez l’appareil photo hors tension et retirez le bouchon de boîtier de l’appareil.
Fr x Retirez le bouchon d'objectif.
cFixez l’objectif.
En maintenant le repère de montage de l’objectif aligné avec le repère de montage sur le boîtier de l'appareil photo, positionnez l’objectif dans la monture à baïonnette de l’appareil puis faites tourner l’objectif dans le sens opposé des aiguilles d’une montre jusqu’à ce qu’il s'emboîte, le repère de montage de l’objectif vers le haut.
Retirer l’objectif
z Mettez l’appareil photo hors tension.
xRetirez l’objectif.
Pour retirer l'objectif, appuyez sur la commande de déverrouillage de l'objectif tout en tournant l'objectif dans le sens des aiguilles d'une montre.
■Parasoleil
Le parasoleil protège l’objectif et bloque la lumière diffusée pouvant causer de la lumière parasite ou une image fantôme.
Fixation et retrait du parasoleil
Appuyez sur les loquets (q) pour fixer 


 ou retirer le parasoleil (w). Le parasoleil


 peut être retourné et monté sur


 l’objectif lorsqu’il n’est pas utilisé.
30
 Loading...