

Page 1

Insight Managed Smart Cloud
Wireless Access Point
User Manual
Model WAC510
September 2017
202-11840-01
350 E. Plumeria Drive
San Jose, CA 95134
USA
Page 2

Insight Managed Smart Cloud Wireless Access Point WAC510 User Manual
Support
Thank you for purchasing this NETGEAR product.You can visit www.netgear.com/support to register your
product, get help, access the latest downloads and user manuals , and join our comm unity.We recommend that
you use only official NETGEAR support resources.
Conformity
For the current EU Declaration of Conformity, visit http://kb.netgear.com/app/answers/detail/a_id/11621.
Compliance
For regulatory compliance information, visit http://www.netgear.com/about/regulatory.
See the regulatory compliance document before connecting the power supply.
Trademarks
© NETGEAR, Inc., NETGEAR, and the NETGEAR Logo are trademarks of NETGEAR, Inc. An y non-NETGEAR
trademarks are used for reference purposes only.
Revision History
Publication
Part
Number
202-11840-01
Date
2017
CommentsPublish
We added or made major changes to the following sections:September
• Connect Over WiFi Using a WiFi-Enab led Computer or Mobile De vice on page
19
• Connect Over Ethernet Using a Computer Connected to the Same Network
on page 23
• Connect Over Ethernet Using a Directly Connected Computer on page 26
• Set Up an Open or Secure WiFi Network on page 32
• Register the Access Point With Facebook Wi-Fi on page 44
• Set Up a Captive Portal for a WiFi Network on page 46
• Unregister the Access Point From Facebook Wi-Fi on page 48
• Manage the Advanced WiFi Settings for the Radios on page 61
• Manage Neighbor AP Detection on page 77
• Set Up RADIUS Servers on page 82
• Disable the DHCP Client and Specify a Fixed IP Address on page 85
• Enable the DHCP Client on page 88
• Set the 802.1Q VLAN and Management VLAN on page 90
• Enable or Disable IGMP Snooping on page 94
2
Page 3

Insight Managed Smart Cloud Wireless Access Point WAC510 User Manual
Publication
Part
Number
CommentsPublish
Date
• Router Mode Only: Manage DHCP Servers on page 96, including Manage the
Default DHCP Server on page 97 and Enable or Disable Inter-VLAN Routing
on page 103
• Change the Management Mode to Insight or Standalone Mode on page 105
• Manage the LEDs on page 122
• View Unknown and Known Neighbor Access Points on page 128
• View Client Distribution, Connected Clients, and Client Trends on page 130
• View WiFi and WAN Traffic, Traffic Statistics, and Channel Utilization on page
133
• View a WiFi Bridge Connection on page 136
• Capture WiFi Packets on page 139
In addition, we made minor changes to other sections and updated some figures.
We made major changes to the following sections:April 2017202-11686-02
• Connect Over WiFi Using an iOS or Android Mobile Device on page 18
202-11686-01
• Connect Over WiFi Using a WiFi-Enab led Computer or Mobile De vice on page
19
• Connect Over Ethernet Using a Computer Connected to the Same Network
on page 23
• Connect Over Ethernet Using a Directly Connected Computer on page 26
• Set Up an Open or Secure WiFi Network on page 32
• Enable or Disable Radio Resource Management for a WiFi Network on page
40
• Change the RSSI Threshold for a WiFi Network on page 41
• Block Specific URLs and Keywords for Internet Access on page 70
• Change the System Mode to Router Mode or AP Mode on page 106
In addition, we made minor changes to other sections and updated some figures.
First publication.December
2016
3
Page 4

Contents
Chapter 1 Hardware Overview of the Access Point
Related Documentation.........................................................................................9
Unpack the Access Point.......................................................................................9
Top Panel With LEDs.............................................................................................9
Back Panel...........................................................................................................11
Product Label.......................................................................................................12
Chapter 2 Install the Access Point in Your Network and Access It for Initial
Configuration
Position Your Access Point...................................................................................14
Set Up and Connect the Access Point to Your Network or Internet Modem.........15
Set Up the Access Point With a PoE Network Connection..............................15
Set Up the Access Point With a Non-PoE Network Connection......................16
Set Up the Access Point With a Connection to Your Internet Modem.............17
Connect to the Access Point for Initial Configuration...........................................18
Connect Over WiFi Using an iOS or Android Mobile Device...........................18
Connect Over WiFi Using a WiFi-Enabled Computer or Mobile Device..........19
Connect Over Ethernet Using a Computer Connected to the Same Network..23
Connect Over Ethernet Using a Directly Connected Computer......................26
Log In to the Access Point After Initial Setup to View or Change Settings...........30
Chapter 3 Manage the Basic WiFi and Radio Features
Set Up and Manage WiFi Networks.....................................................................32
Set Up an Open or Secure WiFi Network........................................................32
View or Change the Settings of a WiFi Network..............................................36
Disable or Enable a WiFi Network...................................................................37
Remove a WiFi Network..................................................................................38
Enable or Disable Client Separation for a WiFi Network.................................38
Hide or Broadcast the SSID for a WiFi Networ k..............................................39
Enable or Disable Radio Resource Management for a WiFi Network.............40
Enable or Disable Band Steering for a WiFi Network......................................40
Change the RSSI Threshold for a WiFi Network.............................................41
Change the VLAN ID for a WiFi Network.........................................................42
Select a MAC ACL for a WiFi Network............................................................42
Set Bandwidth Rate Limits for a WiFi Networ k................................................43
Register the Access Point With Facebook Wi-Fi.............................................44
Set Up a Captive Por tal for a WiFi Network....................................................46
Unregister the Access Point From Facebook Wi-Fi.........................................48
Manage the Basic Radio Features.......................................................................49
Manage the Basic Settings for the Radios......................................................49
Turn a Radio On or Off....................................................................................52
Change the WiFi Mode for a Radio.................................................................53
4
Page 5

Insight Managed Smart Cloud Wireless Access Point WAC510 User Manual
Change the MCS Index and Data Rate for a Radio........................................54
Change the Channel Width for a Radio...........................................................54
Change the Output Power for a Radio............................................................55
Change the Guard Interval for a Radio...........................................................56
Change the Channel for a Radio.....................................................................57
Set Up a WiFi On/Off Schedule for the Radios...............................................57
Manage Quality of Service for a WiFi Radio...................................................58
Chapter 4 Manage the Advanced WiFi and Radio Features
Manage the Advanced Radio Features................................................................61
Manage the Advanced WiFi Settings for the Radios.......................................61
Manage the Maximum Number of Clients for a Radio....................................63
Manage the Broadcast and Multicast Settings for a Radio.............................64
Manage Load Balancing for the Radios..........................................................65
Set Up a WiFi Bridge Between Access Points.....................................................65
Chapter 5 Manage Access and Security
Block Specific URLs and Keywords for Internet Access......................................70
Manage Local MAC Access Control Lists............................................................71
Manually Set Up a MAC Access Control List..................................................71
Import an Existing MAC Access Control List...................................................73
Manage User Accounts........................................................................................75
Add a User Account........................................................................................75
Change the Settings for a User Account.........................................................76
Remove a User Account.................................................................................77
Manage Neighbor AP Detection..........................................................................77
Enable Neighbor Access P oints Detection and Move Access P oints to the Known
AP List.............................................................................................................78
Import an Existing Neighbor Access Point List in the Known AP List.............80
Set Up RADIUS Servers......................................................................................82
Chapter 6 Manage the Local Area Network and IP Settings
Disable the DHCP Client and Specify a Fixed IP Address...................................85
AP Mode: Disable the DHCP Client and Specify a Fixed IP Address.............85
Router Mode: Disable the DHCP Client and Specify a Fixed IP Address.......87
Enable the DHCP Client......................................................................................88
AP Mode: Enable the DHCP Client.................................................................88
Router Mode: Enable the DHCP Client...........................................................89
Set the 802.1Q VLAN and Management VLAN...................................................90
AP Mode: Set the 802.1Q VLAN and Management VLAN..............................91
Router Mode: Set the 802.1Q VLAN and Management VLAN........................92
Enable or Disable Spanning Tree Protocol...........................................................93
Enable or Disable Network Integrity Check..........................................................94
Enable or Disable IGMP Snooping......................................................................94
Enable or Disable Ethernet LLDP........................................................................95
Enable or Disable UPnP......................................................................................95
Router Mode Only: Manage DHCP Servers........................................................96
Manage the Default DHCP Server..................................................................97
5
Page 6

Insight Managed Smart Cloud Wireless Access Point WAC510 User Manual
Add a DHCP Server for a WiFi Network..........................................................98
View or Change the Settings for a DHCP Server..........................................100
Disable a DHCP Server.................................................................................101
Remove a DHCP Server...............................................................................102
Enable or Disable Inter-VLAN Routing..........................................................103
Chapter 7 Manage and Maintain the Access Point
Change the Management Mode to Insight or Standalone Mode.......................105
Change the System Mode to Router Mode or AP Mode....................................106
Change the Country or Region of Operation.....................................................107
Change the Admin User Account Password......................................................108
Change the System Name.................................................................................108
Specify a Custom NTP Server...........................................................................109
Set the Time Zone..............................................................................................110
Manage the Syslog Settings..............................................................................111
Upgrade the Firmware of the Access Point........................................................111
Check for New Firmware and Upgrade the Access Point..............................112
Manually Download Firmware and Upgrade the Access Point......................113
Use a TFTP Server to Upgrade the Access Point.........................................114
Use an FTP Server to Upgrade the Access Point.........................................115
Manage the Configuration File of the Access Point...........................................116
Back Up the Access Point Configuration.......................................................116
Restore the Access Point Configuration........................................................116
Reboot the Access Point From the Local Browser Interface..............................117
Return the Access Point to Its Factor y Default Settings....................................118
Use the Reset Button....................................................................................118
Use the Local Browser Interface...................................................................119
Enable or Disable Telnet....................................................................................120
Enable or Disable Secure Shell.........................................................................120
Enable SNMP and Manage the SNMP Settings................................................121
Manage the LEDs..............................................................................................122
Chapter 8 Monitor the Access Point and the Network
View the Access Point Internet, IP, and System Settings...................................124
View the WiFi Radio Settings.............................................................................126
View Unknown and Known Neighbor Access Points.........................................128
View Client Distribution, Connected Clients, and Client Trends.........................130
View WiFi and WAN Traffic, Traffic Statistics, and Channel Utilization...............133
View, Save, Download, or Clear the Logs..........................................................134
View a WiFi Bridge Connection..........................................................................136
View Alarms and Notifications...........................................................................136
Chapter 9 Diagnostics and Troubleshooting
Capture WiFi Packets.........................................................................................139
Quick Tips for Troubleshooting...........................................................................141
Troubleshoot With the LEDs...............................................................................142
Power LED Is Off...........................................................................................142
Power LED Remains Solid Amber.................................................................143
6
Page 7

Insight Managed Smart Cloud Wireless Access Point WAC510 User Manual
Power LED Is Blinking Amber Continuously..................................................143
Power LED Is Alternating Green and Amber.................................................143
Activity LED Is Off.........................................................................................143
2.4G or 5G WLAN LED Is Off........................................................................144
WAN PoE LED or LAN LED Is Off While a Device Is Connected..................144
Troubleshoot the WiFi Connectivity....................................................................145
Troubleshoot Internet Browsing.........................................................................145
You Cannot Log In to the Access Point Over a LAN Connection.......................146
Changes Are Not Saved....................................................................................146
Troubleshoot Your Network Using the Ping Utility..............................................146
Test the LAN Path to Your Access Point........................................................147
Test the Path From Your Computer to a Remote Device...............................147
Appendix A Factory Default Settings and Technical Specifications
Factory Settings.................................................................................................150
Technical Specifications.....................................................................................153
7
Page 8

Hardware Overview of the Access Point
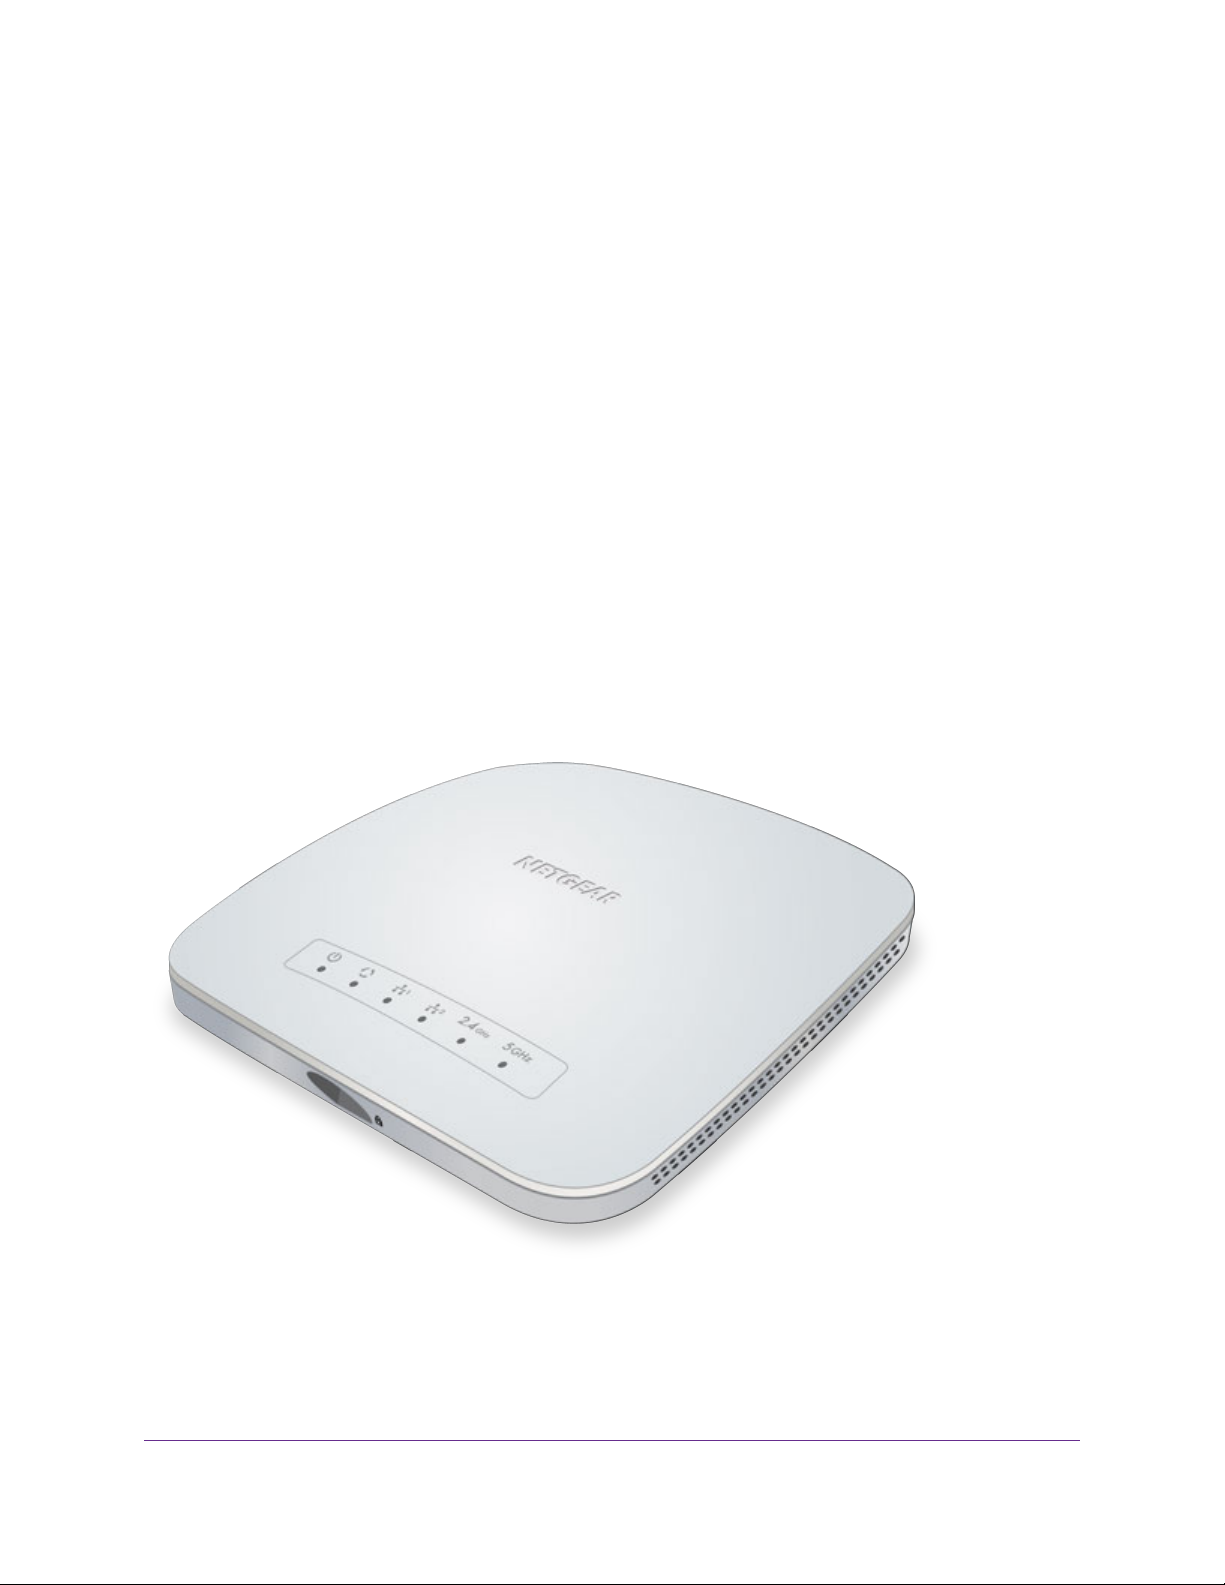
The NETGEAR Insight Managed Smart Cloud Wireless Access Point (WAC510) 802.11 Wave 2 AC1200, in
this manual referred to as the access point, supports dual-band concurrent operation at 2.4 GHz and 5 GHz
with combined throughput of 1.2 Gbps (300 Mbps at 2.4 GHz and 867 Mbps at 5 GHz).The access point supports
Power over Ethernet (PoE) and can function either as an access point in an existing network connected to a
PoE (or regular) switch or in standalone mode as both an access point and router connected to an Internet
modem.
The access point supports the NETGEAR Insight app, which lets you set up and manage the access point from
your iOS or Android mobile device. However, this user manual describes the local browser–based management
interface, in this manual referred to as the local browser interface. For information about the NETGEAR Insight
app, see the NETGEAR knowledge base articles at netgear.com/support.
The chapter contains the following sections:
• Related Documentation
• Unpack the Access Point
• Top Panel With LEDs
• Back Panel
• Product Label
1
For more information about the topics that are cov ered in this manual, visit the support website
Note
at netgear.com/support.
Firmware updates with new features and bug fixes are made available from time to time at
Note
downloadcenter.netgear.com.You can check for and download new firmware manually. If
the features or behavior of y our product does not match what is described in this guide, you
might need to update your firmware.
8
Page 9
Insight Managed Smart Cloud Wireless Access Point WAC510 User Manual
Related Documentation
The following related documentation is available at downloadcenter.netgear.com:
• Installation guide
• Ceiling and wall installation guide
• Data sheet
For information about the NETGEAR Insight app, see the NETGEAR knowledge base articles at
netgear.com/support.
Unpack the Access Point
The package contains the access point, installation guide, ceiling and wall installation kit, and mounting
installation guide. Because the access point supports Power over Ethernet (PoE), a power adapter is not
included in the product package but is available as an option.
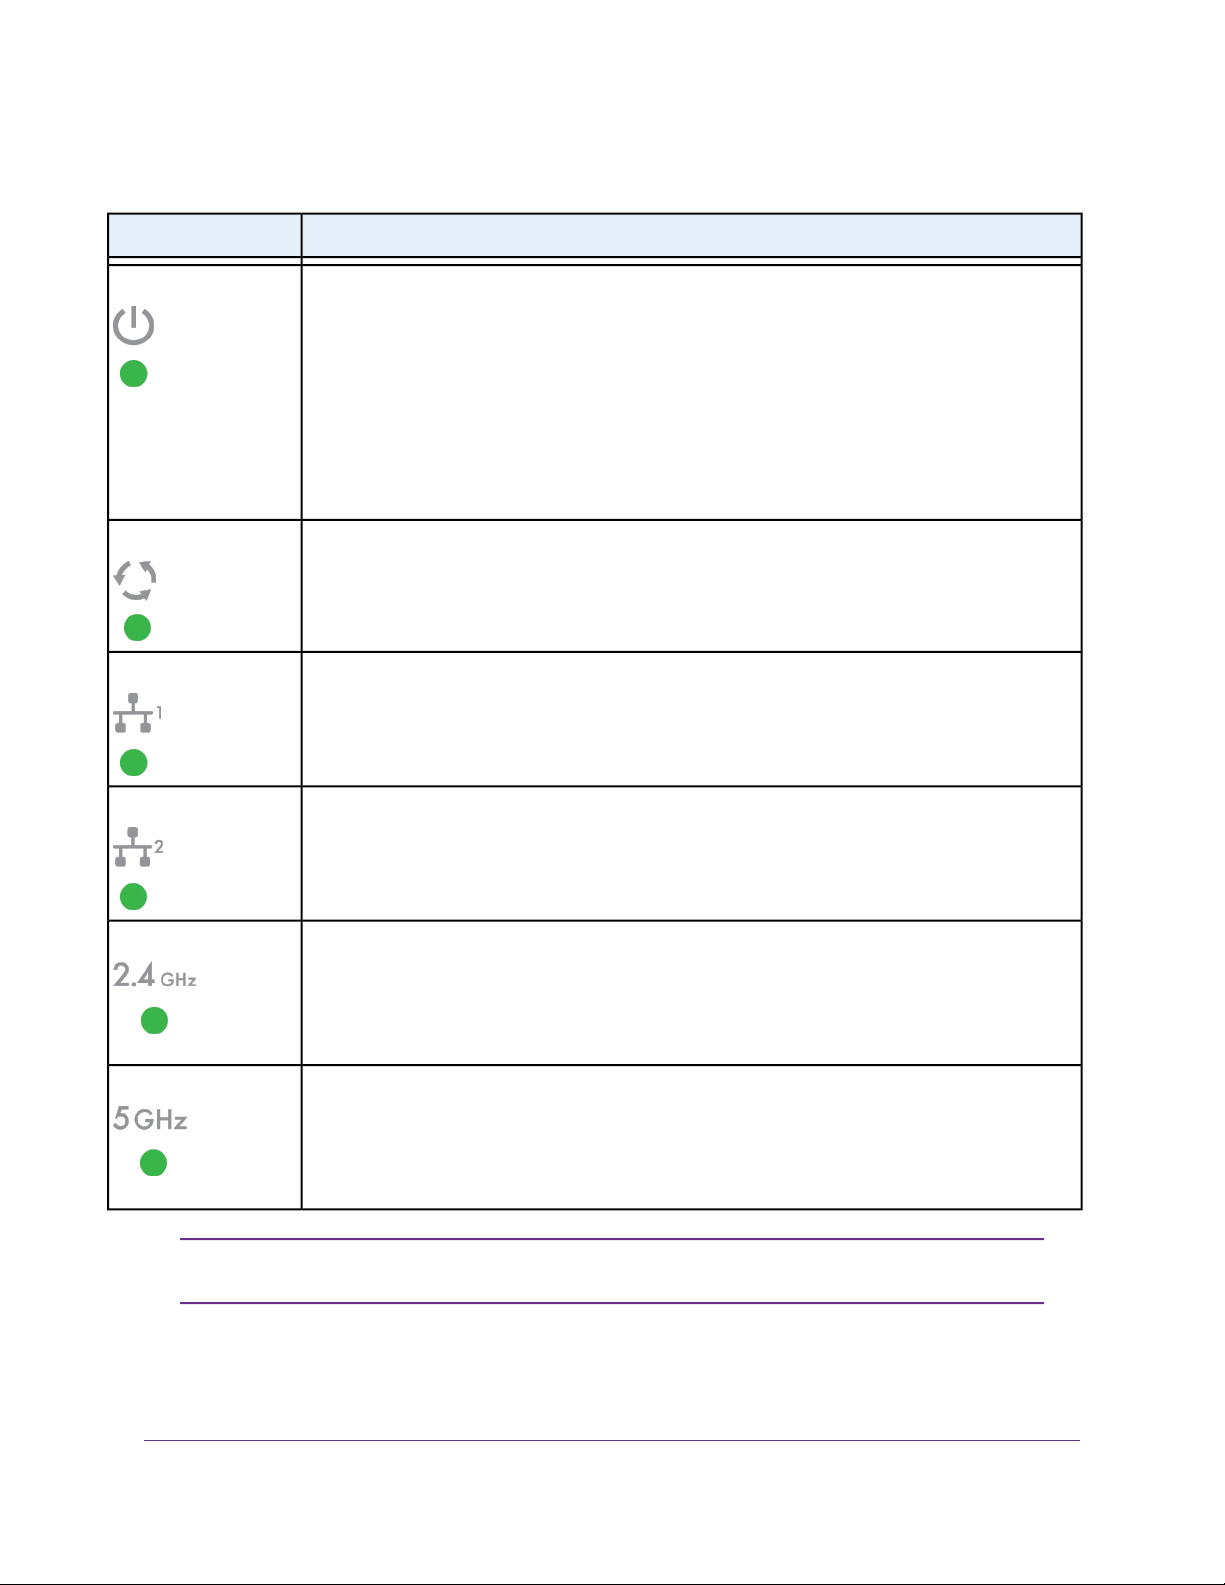
Top Panel With LEDs
The status LEDs are located on the top panel of the access point.
Figure 1. Status LEDs
Hardware Overview of the Access Point
9
Page 10
Insight Managed Smart Cloud Wireless Access Point WAC510 User Manual
Table 1. LED descriptions
DescriptionLED
Power LED
Activity LED
WAN PoE LED
LAN LED
Off. No power is supplied to the access point.
Solid green. Power is supplied to the access point and the access point is ready.
Solid amber. During startup, the Power LED lights solid amber. If after five minutes the amber
light remains on, a boot error occurred.
Blinking amber temporarily.The access point is upgrading firmware.
Blinking amber continuously.The access point did not receive an IP address from a DHCP
server.
Alternating green and amber.The access point is receiving insufficient PoE power.
Off. No link with the network is detected.
Solid green. A link with the network is detected.
Blinking green. Network traffic is detected.
Off. Either no po wered-on Ethernet device is connected to the WAN PoE port, or, if a powered-on
Ethernet device is connected, no Ethernet link is detected.
Solid amber. A 10 or 100 Mbps Ethernet link is detected on the WAN PoE port.
Solid green. A 1000 Mbps Ethernet link is detected on the WAN PoE port.
Off. Either no po wered-on Ethernet device is connected to the LAN port, or, if a powered-on Ethernet
device is connected, no Ethernet link is detected.
Solid amber. A 10 or 100 Mbps Ethernet link is detected on the LAN port.
Solid green. A 1000 Mbps Ethernet link is detected on the LAN port.
2.4G WLAN LED
5G WLAN LED
Note
Off.The 2.4 GHz WiFi radio is off.
Solid green.The 2.4 GHz WiFi radio is on.
Solid blue. One or more WLAN clients are connected to the 2.4 GHz WiFi radio.
Blinking blue.Traffic is detected on the 2.4 GHz WiFi radio.
Off.The 5 GHz WiFi radio is off.
Solid green.The 5 GHz WiFi radio is on.
Solid blue. One or more WLAN clients are connected to the 5 GHz WiFi radio.
Blinking blue.Traffic is detected on the 5 GHz WiFi radio.
For information about troubleshooting with the LEDs , see T roub leshoot With the LEDs
on page 142.
Hardware Overview of the Access Point
10
Page 11
Insight Managed Smart Cloud Wireless Access Point WAC510 User Manual
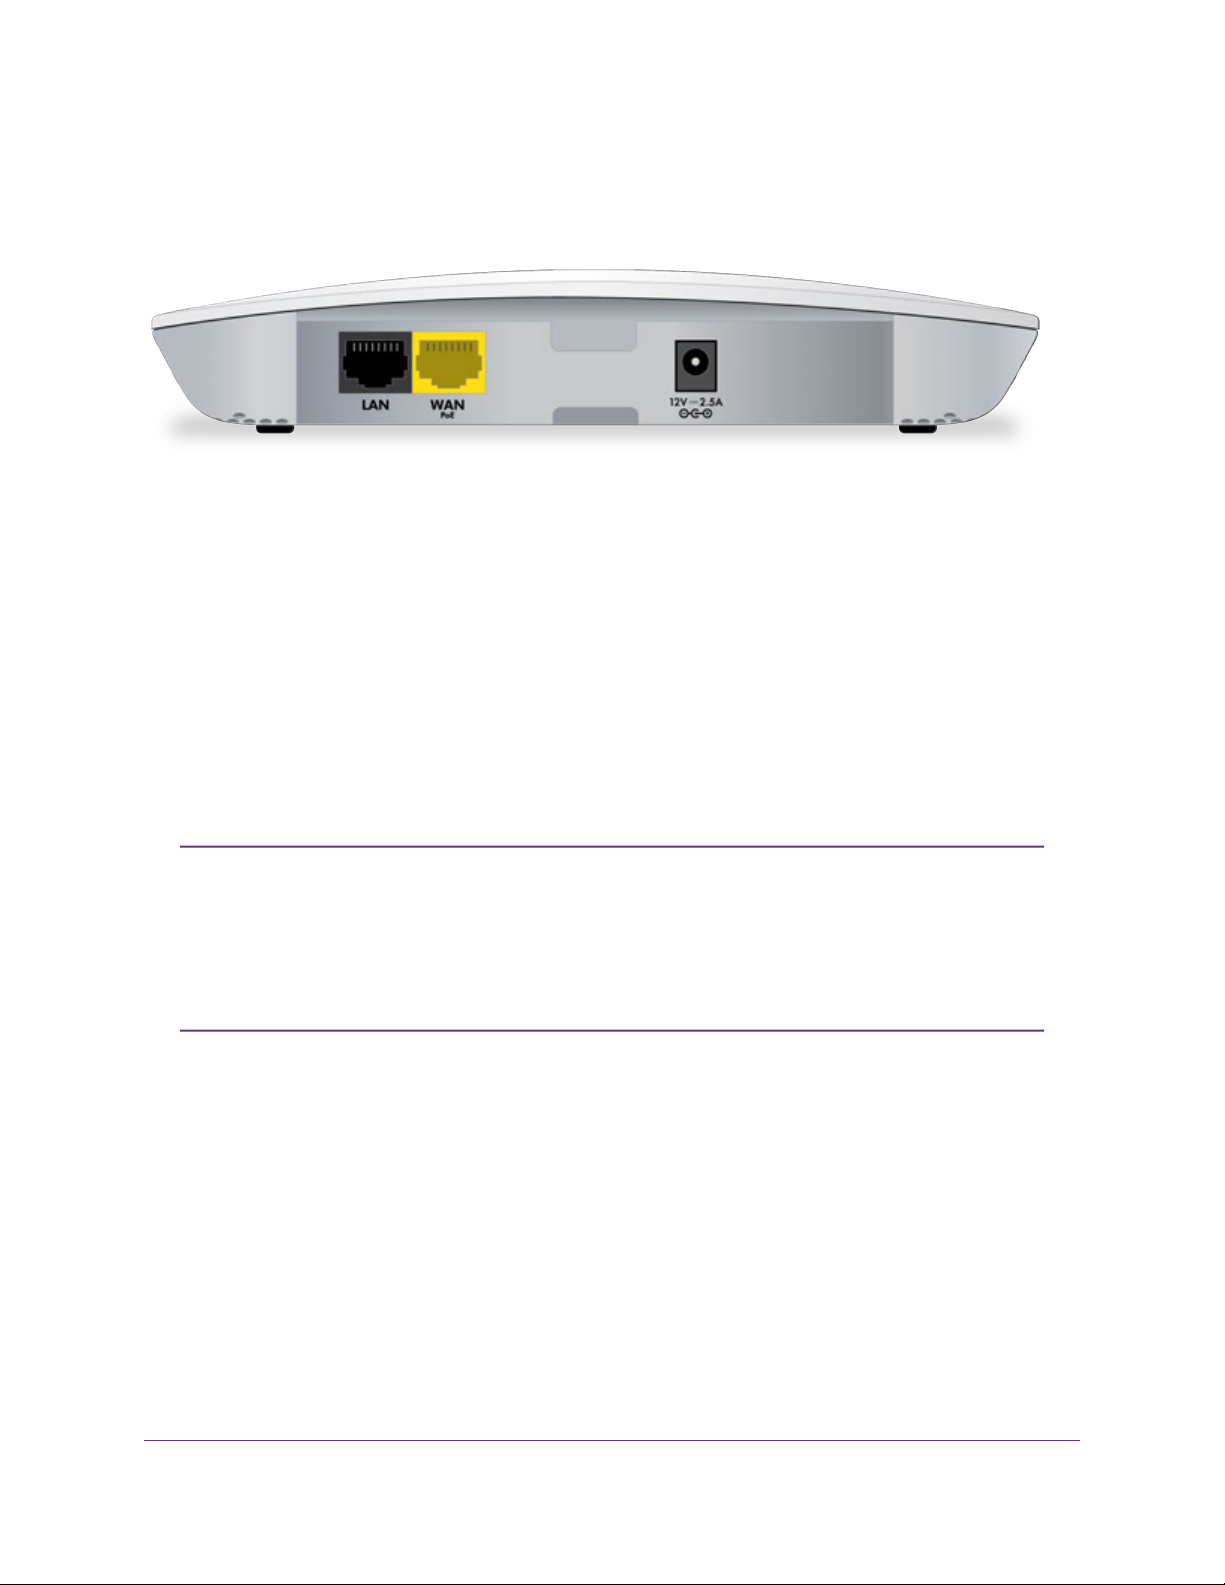
Back Panel
The back panel of the access point provides two ports and a DC power connector.
Figure 2. Access point back panel
Viewed from left to right, the back panel contains the following components:
• LAN port. One blac k Gigabit Ethernet RJ-45 LAN port to connect the access point to Ethernet devices.
You can use the LAN port to connect the access point to a switch, computer, or other Ethernet device.
• WAN PoE port. One yellow Gigabit Ethernet RJ-45 WAN PoE port that provides a connection to a PoE
switch or regular switch that is connected to your network and the Internet, for example, through an
Internet modem. If the access point functions in Router mode (see Change the System Mode to Router
Mode or AP Mode on page 106), you can connect the W AN P oE port directly to the LAN port of an Internet
modem.
• DC power connector. If you do not use a PoE connection, connect an optional power adapter to the
DC power connector.
The Reset button is located on the left side panel of the access point. Press the Reset
Note
button for about 2 seconds to reboot the access point or for more than 10 seconds
to reset the access point to factory default settings. If you added the access point to
a network on the Insight app before, you m ust first use the NETGEAR Insight app to
remove the access point from your netw ork before the factory default settings function
of the Reset button is available. For more information, see Use the Reset Button on
page 118.
For more information about WAN PoE and LAN port connections, see Set Up and Connect the Access
Point to Your Network or Internet Modem on page 15.
Hardware Overview of the Access Point
11
Page 12

Insight Managed Smart Cloud Wireless Access Point WAC510 User Manual
Product Label
The product label on the bottom panel of the access point consists of two parts and shows various compliance
statements, the default login information, default WiFi network name (SSID), serial number, network key
(password), and MAC address of the access point.
Figure 3. Access point label, part 1
Figure 4. Access point label, part 2
Hardware Overview of the Access Point
12
Page 13

Install the Access Point in Your Network and Access It for Initial Configuration
This chapter describes how you can install and access the access point in your network.
The chapter contains the following sections:
• Position Your Access Point
• Set Up and Connect the Access Point to Your Network or Internet Modem
• Connect to the Access Point for Initial Configuration
• Log In to the Access Point After Initial Setup to View or Change Settings
2
13
Page 14

Insight Managed Smart Cloud Wireless Access Point WAC510 User Manual
Position Your Access Point
Before you install your access point as described in the mounting installation guide, consider how you will
position the access point.
The access point lets you access your network anywhere within the operating range of your WiFi network.
However, the operating distance or range of your WiFi connection can vary significantly depending on the
physical placement of your access point. For example, the thickness and number of walls the WiFi signal
passes through can limit the range.
Additionally, other WiFi access points in and around your home might affect y our access point’ s signal.WiFi
access points can be routers, repeaters, WiFi range e xtenders, and any other de vices that emit WiFi signals
for network access.
Position your access point according to the following guidelines:
• Place your access point near the center of the area where your computers and other devices operate
and within line of sight to your WiFi devices.
• If you use a power adapter, make sure that the access point is within reach of an AC power outlet.
• Place the access point in an elevated location, minimizing the number walls and ceilings between the
access point and your other devices.
• Place the access point away from electrical devices such as these:
- Ceiling fans
- Home security systems
- Microwaves
- Computers
- Base of a cordless phone
- 2.4 GHz cordless phone
- 5.8 GHz cordless phone
• Place the access point away from large metal surfaces, large glass surfaces, insulated walls, and items
such as these:
- Solid metal door
- Aluminum studs
- Fish tanks
- Mirrors
- Brick
- Concrete
If you are using adjacent access points, use different radio frequency channels to reduce interference.
Install the Access Point in Your Network and Access It for Initial Configuration
14
Page 15
Insight Managed Smart Cloud Wireless Access Point WAC510 User Manual
Set Up and Connect the Access Point to Your Network or Internet Modem
The access point can function in AP system mode as a WiFi access point in your existing network or in
Router system mode as both a WiFi access point and router connected to your DSL or cab le Internet modem.
The following sections describe how you can connect the access point to your network or Internet modem:
• Set Up the Access Point With a PoE Network Connection on page 15
• Set Up the Access Point With a Non-PoE Network Connection on page 16
• Set Up the Access Point With a Connection to Your Internet Modem on page 17
To set up your access point, follow the procedure in one of these sections.
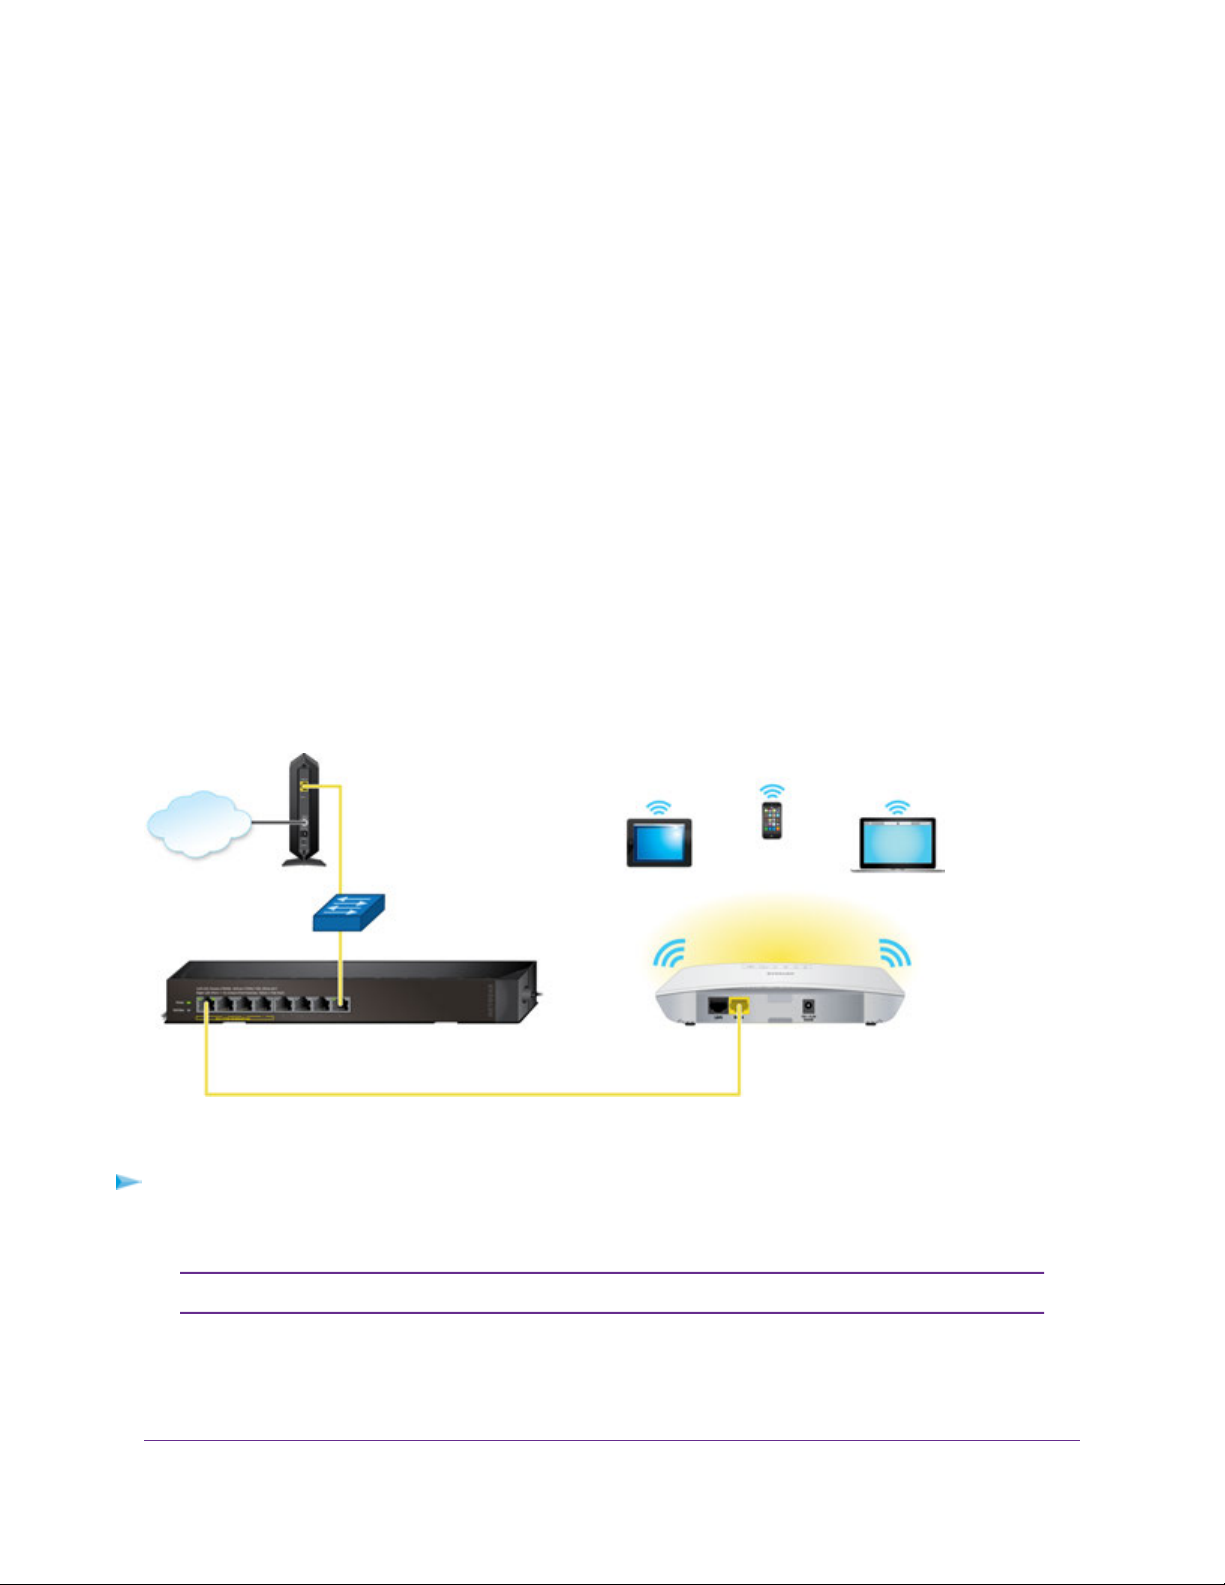
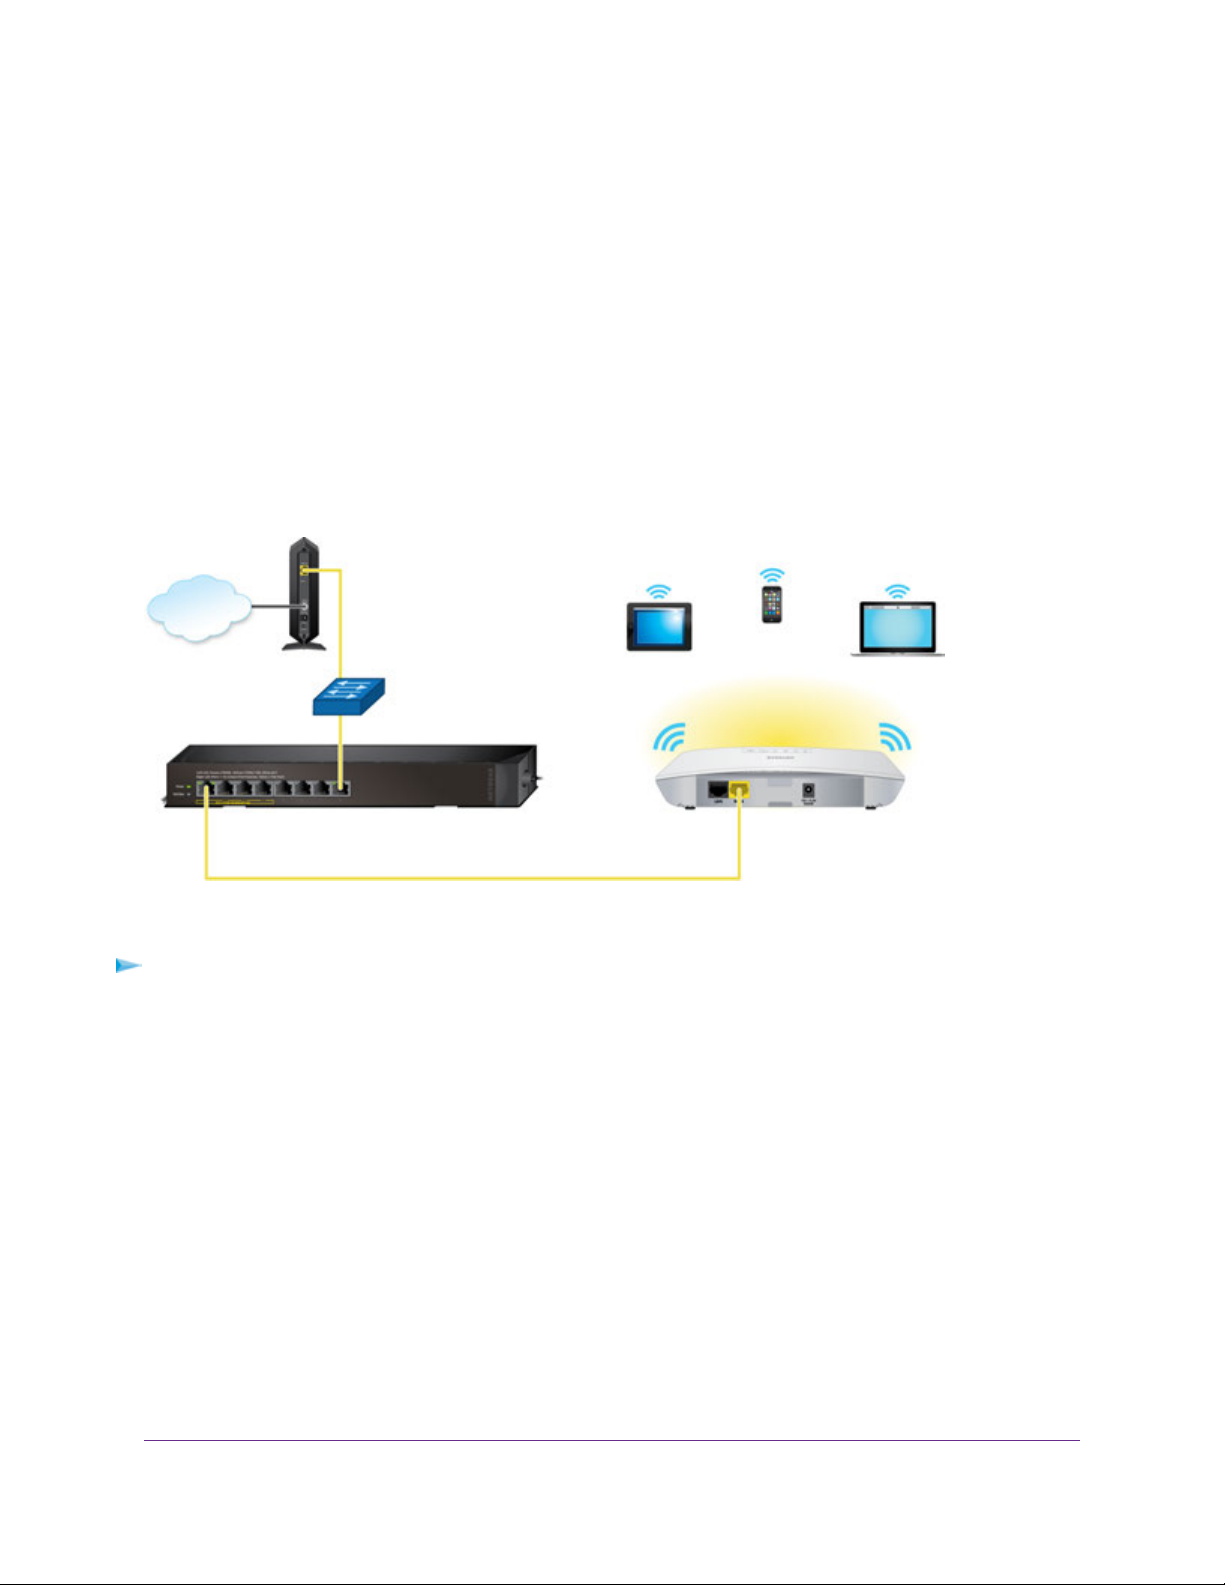
Set Up the Access Point With a PoE Network Connection
You can connect the access point to a Pow er over Ethernet (P oE) switch in y our network and use the access
point in its default AP mode, which lets WiFi clients connect to the access point and access your network
and the Internet.The switch must be connected to a network router, which, in turn, must be connected to
the Internet, for example, through an Internet modem. If you use a PoE connection, the access point does
not require a power adapter.
Figure 5. Set up the access point with a PoE connection to your network
To set up the access point with a PoE connection to your network:
1. Connect an Ethernet cable to the WAN PoE port on the access point.
Do not use the LAN port for a connection to the PoE switch.Note
2. Connect the other end of the Ethernet cable to a PoE port on a PoE switch that is connected to your
network and to the Internet.
Install the Access Point in Your Network and Access It for Initial Configuration
15
Page 16
Insight Managed Smart Cloud Wireless Access Point WAC510 User Manual
The Power LED of the access point lights solid amber. After about one minute, if the access point is
connected to a DHCP server, the Power LED turns solid green and the access point is ready for you to
perform the initial configuration.
For information about accessing the access point for initial configuration, see Connect to the Access Point
for Initial Configuration on page 18.
Set Up the Access Point With a Non-PoE Network Connection
You can connect the access point to a switch in your network and use the access point in its default AP
mode, which lets WiFi clients connect to the access point and access your network and the Internet.The
switch must be connected to a network router , which, in turn, must be connected to the Internet, for example,
through an Internet modem. If you use a regular switch, that is, a non–Power over Ethernet (PoE) switch,
the access point requires a power adapter, which is an option that you can purchase.
Figure 6. Set up the access point with a connection to your network
To set up the access point with a non-PoE connection to your network:
1. Connect an Ethernet cable to the WAN PoE port on the access point.
2. Connect the other end of the Ethernet cable to a switch that is connected to your network and to the
Internet.
3. Connect the power adapter to the access point and plug it into an electrical outlet.
The Power LED of the access point lights solid amber. After about one minute, if the access point is
connected to a DHCP server, the Power LED turns solid green and the access point is ready for you to
perform the initial configuration.
For information about accessing the access point for initial configuration, see Connect to the Access Point
for Initial Configuration on page 18.
Install the Access Point in Your Network and Access It for Initial Configuration
16
Page 17
Insight Managed Smart Cloud Wireless Access Point WAC510 User Manual
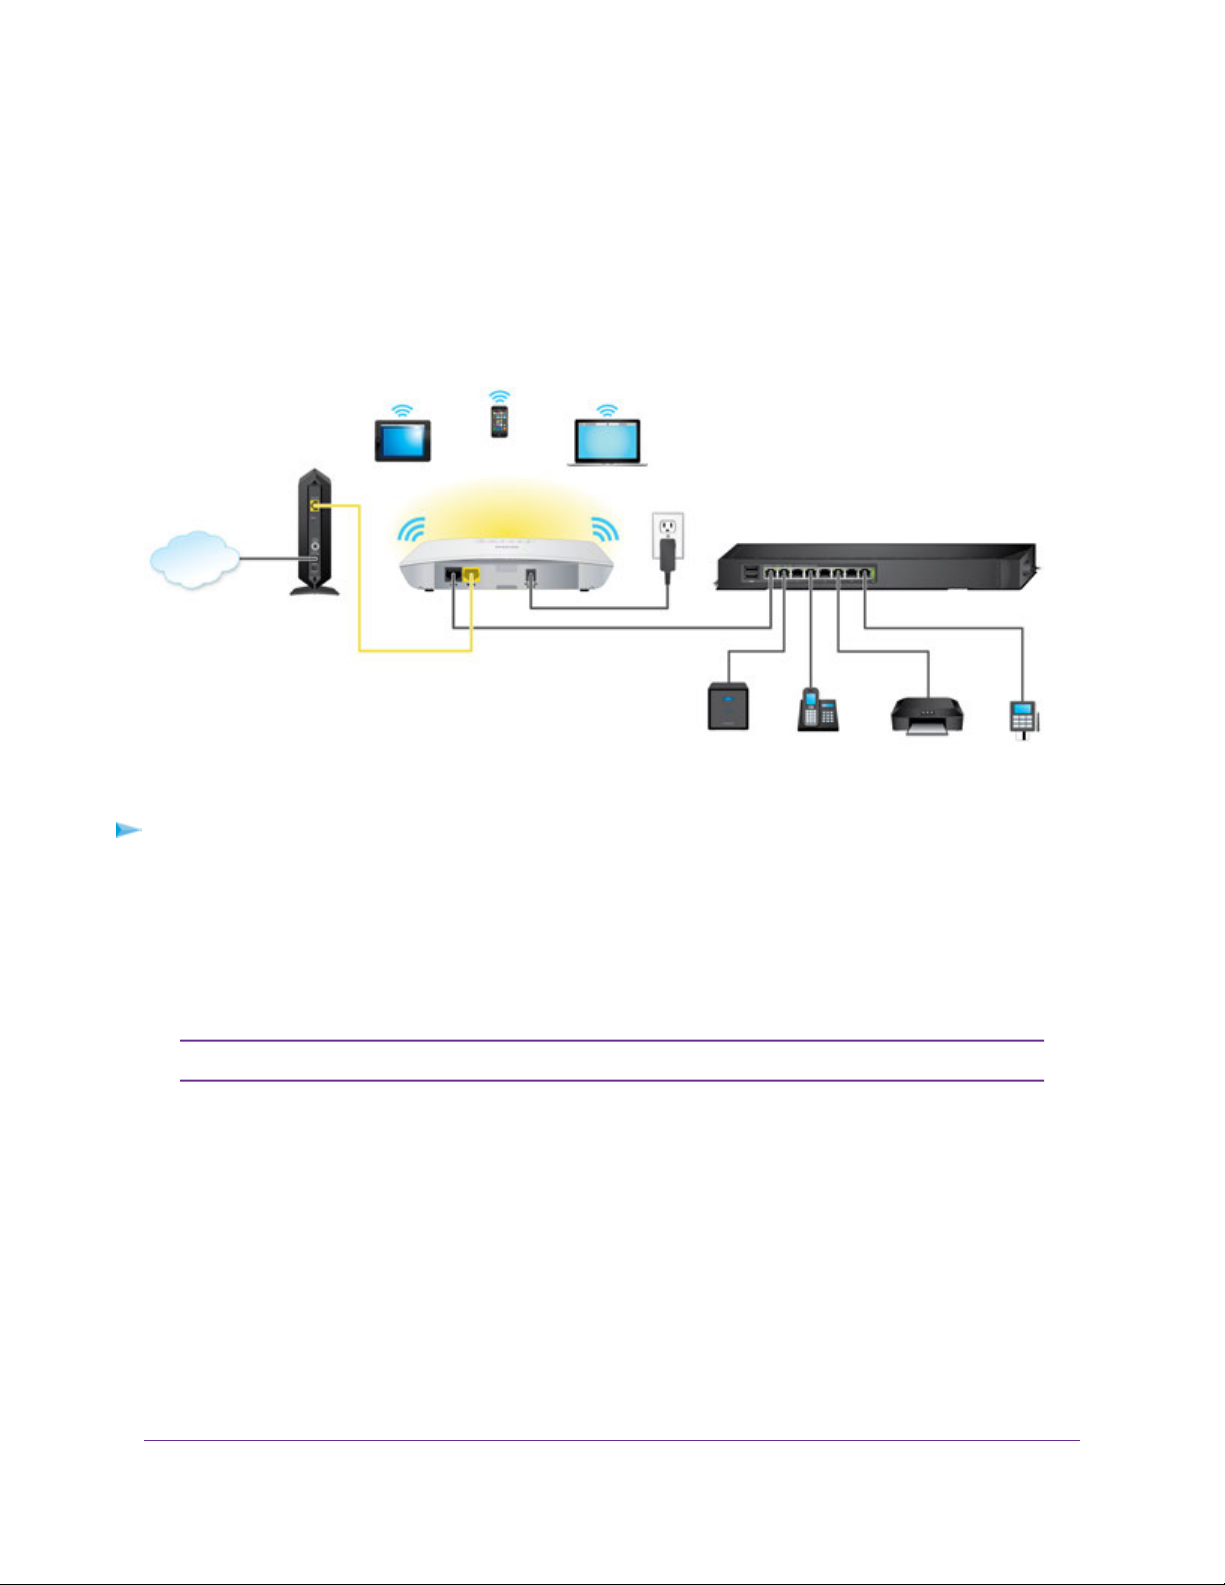
Set Up the Access Point With a Connection to Your Internet Modem
You can connect the access point directly to your a LAN port on your DSL or cable Internet modem and let
the access point function as both a WiFi access point and a router. In this configuration, WiFi clients can
connect to the access point and access your network and the Internet and you also can attach a switch to
the access point to enhance your network. Because you cannot use P ower ov er Ethernet (PoE) in this setup ,
the access point requires a power adapter, which is an option that you can purchase.
Figure 7. Set up the access point with a connection to a LAN port on your Internet modem
To connect the access point to your Internet modem:
1. Unplug your Internet modem’s power, leaving the modem connected to the wall jack for your Internet
service.
2. If your Internet modem includes a battery backup, remove the battery.
3. Use an Ethernet cable to connect the yellow WAN PoE port on the access point to a LAN port on the
Internet modem.
Do not use the LAN port on the access point for a connection to the Internet modem.Note
4. If your Internet modem includes a battery backup, reinsert the battery.
5. Plug in your Internet modem’s power and turn on your Internet modem.
6. To attach a switch to the access point, use an Ethernet cable to connect the switch to the black LAN
port on the access point.
7. Connect the power adapter to the access point and plug it into an electrical outlet.
The Power LED of the access point lights solid amber. After about one minute, if the access point is
connected to a DHCP server (an Internet modem usually also functions as a DHCP server), the Power
LED turns solid green and the access point is ready for you to perform the initial configuration.
Install the Access Point in Your Network and Access It for Initial Configuration
17
Page 18

Insight Managed Smart Cloud Wireless Access Point WAC510 User Manual
During initial configuration of the access point, you must change the default system
Note
mode of the access point from AP mode to Router mode.
For information about accessing the access point for initial configuration, see Connect to the Access Point
for Initial Configuration on page 18. After initial configuration, change the def ault system mode of the access
point from AP mode to Router mode (see Change the System Mode to Router Mode or AP Mode on page
106).
Connect to the Access Point for Initial Configuration
After you set up the access point, you can use several methods to connect to it for initial configuration.
You can either connect to the access point by using the NETGEAR Insight app on an iOS or Android mobile
device or by using the local browser interface.These two types of access are mutually exclusive.
The NETGEAR Insight app provides ease of access but lets you configure a limited number of features.
The local browser interface lets you configure all features that are available on the access point.
For information about how you can connect to the access point by using the NETGEAR Insight app, see
Connect Over WiFi Using an iOS or Android Mobile Device on page 18.
The following sections describe how you can connect to the access point b y using the local browser interface
(follow the procedure in one of these sections):
• Connect Over WiFi Using a WiFi-Enabled Computer or Mobile Device on page 19
• Connect Over Ethernet Using a Computer Connected to the Same Network on page 23
• Connect Over Ethernet Using a Directly Connected Computer on page 26
If your network does not include a DHCP server (or a router that functions as a DHCP
Note
server) and you do not perform the initial configuration of the access point as described
in one of these sections, you can connect only two clients to the access point and the
access point can provide an IP address to only two clients.To prevent this situation,
make sure that you perform the initial configuration of the access point.
Connect Over WiFi Using an iOS or Android Mobile Device
You can install the NETGEAR Insight app on an iOS or Android mobile device and set up the access point
(and perform many other tasks as well).
For information about the NETGEAR Insight app, see the NETGEAR knowledge base articles at
netgear.com/support.
Install the Access Point in Your Network and Access It for Initial Configuration
18
Page 19

Insight Managed Smart Cloud Wireless Access Point WAC510 User Manual
To connect to the access point over WiFi using an iOS or Android mobile device:
1. On your mobile device, go to the app store, search for NETGEAR Insight, and download the app.
2. Open the NETGEAR Insight app and log in to your existing NETGEAR account or create a ne w account
to log in with.
3. Follow the prompts in the NETGEAR Insight app to discov er and register the access point on the network
so that you can configure and manage the access point.
If the access point is not connected to the Internet, you can still use the NETGEAR
Note
Insight app to configure the access point by connecting to the access point’s default
SSID .The default SSID is on the access point label on the bottom of the access point
and is shown in the format NETGEARxxxxxx-SETUP, where xxxxxx is the last six
hexadecimal digits of the access point’s MAC address.The default password is
sharedsecret.
Connect Over WiFi Using a WiFi-Enabled Computer or Mobile Device
This section describes how to connect to the access point for the first time over WiFi using a WiFi-enabled
computer or mobile device (without using the NETGEAR Insight app).
To connect to the access point over WiFi using a WiFi-enabled computer or mobile device:
1. From your computer or mobile device, connect over WiFi to the access point’s default WiFi network.
The default SSID is on the access point label on the bottom of the access point and is shown in the
format NETGEARxxxxxx-SETUP, where xxxxxx is the last six hexadecimal digits of the access point’s
MAC address.The default password is sharedsecret.
2. On the computer or mobile device, open a web browser and, in the address bar, enter
www.routerlogin.net (or www.aplogin.net).
You can use www.routerlogin.net (and www.aplogin.net) only during initial setup of
Note
the access point.
Install the Access Point in Your Network and Access It for Initial Configuration
19
Page 20
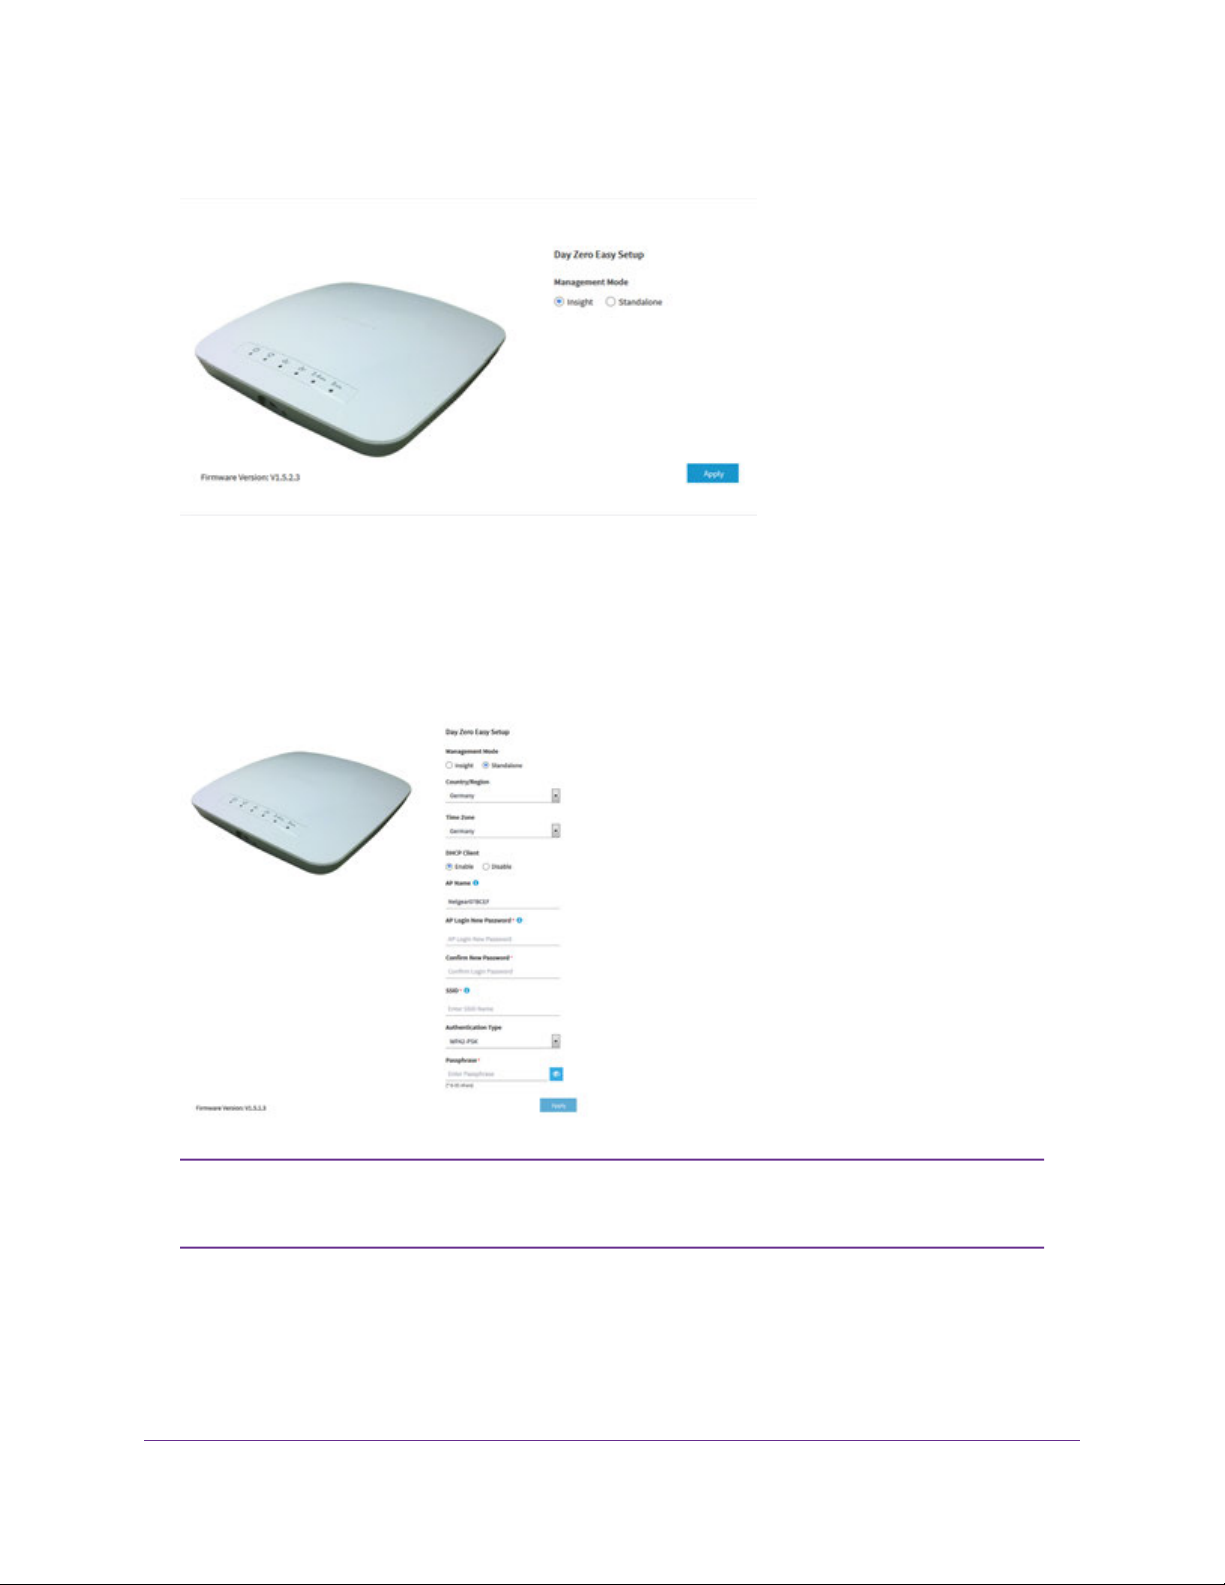
Insight Managed Smart Cloud Wireless Access Point WAC510 User Manual
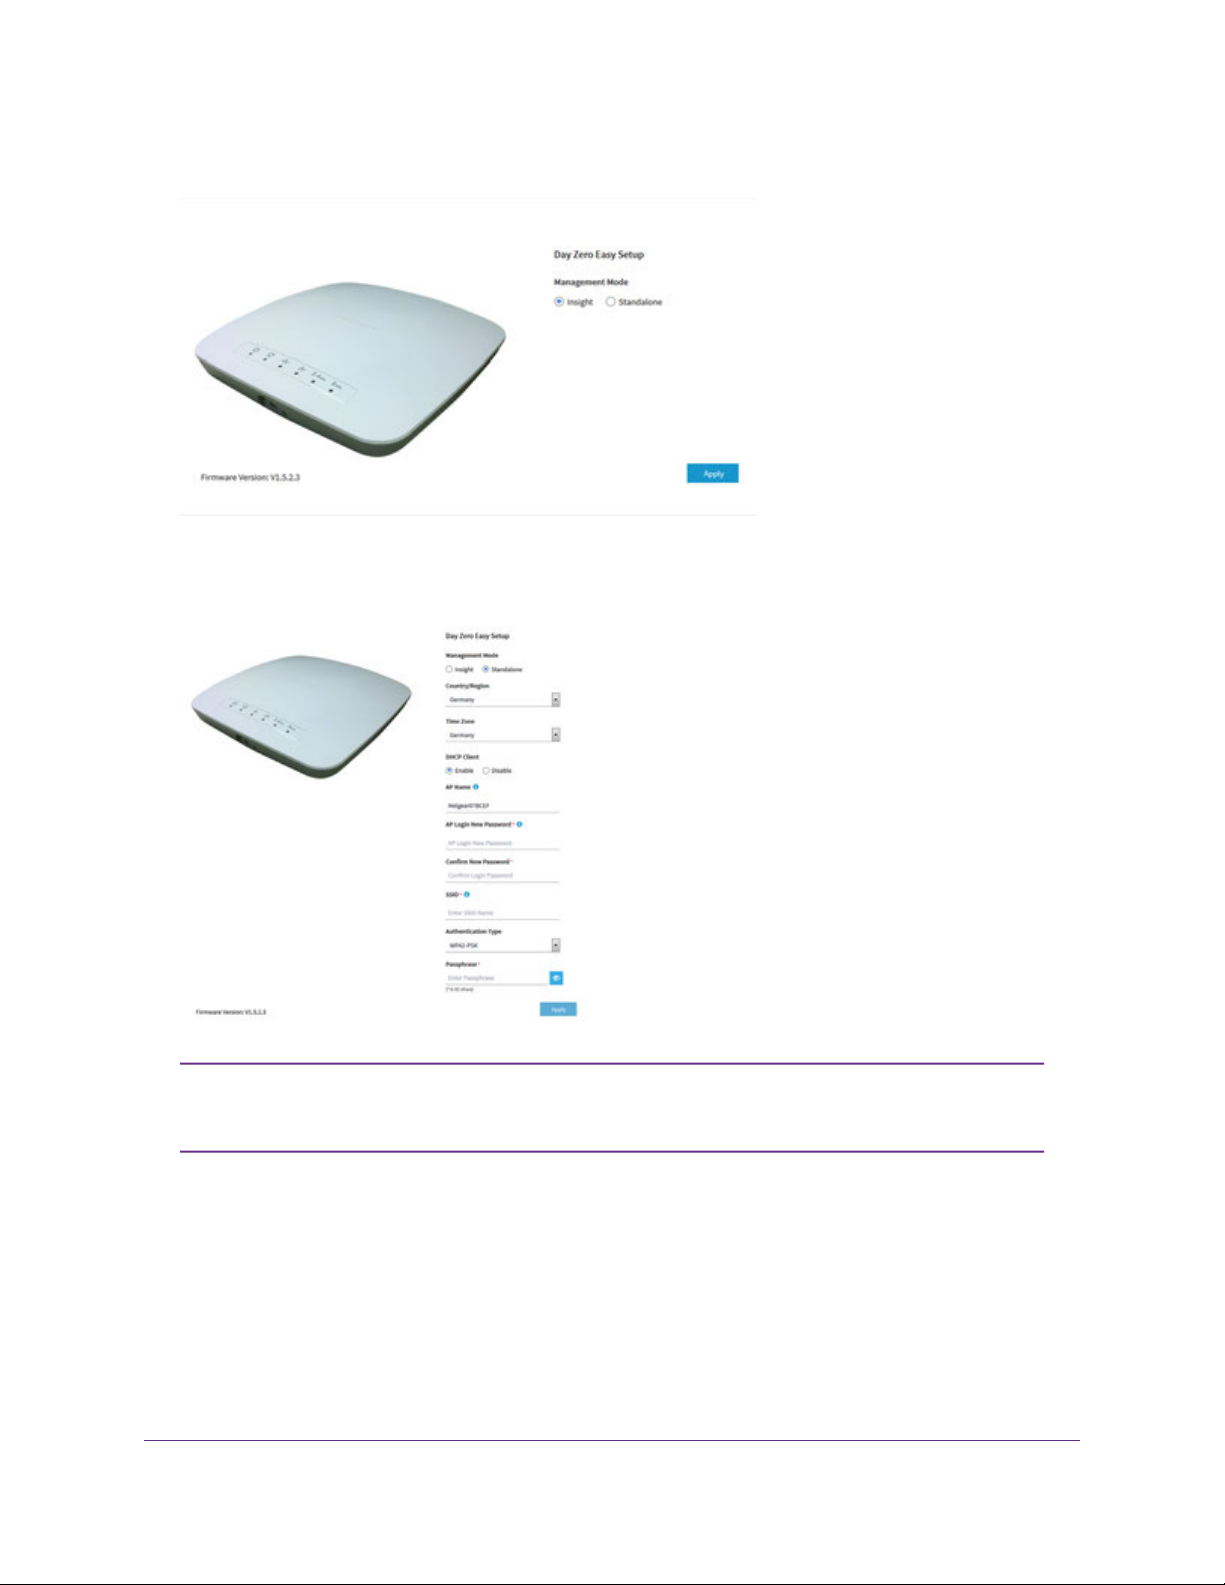
The Day Zero Easy Setup page displays.
In the address bar, www.routerlogin.net (or www.aplogin.net) is replaced by the IP address that is
assigned to the access point by the DHCP server in your network.
3. Write down the IP address of the access point.
4. Select the Standalone radio button.
5. Click the Apply button.
After you save the basic settings that are shown on the page, the Day Zero Easy
Note
Setup page no longer displays when you log in. Instead, a login window opens. After
you log in, the Dashboard page displays.
6. Enter the settings that are described in the following table.
Install the Access Point in Your Network and Access It for Initial Configuration
20
Page 21

Insight Managed Smart Cloud Wireless Access Point WAC510 User Manual
DescriptionSetting
Country/Region
Time Zone
DHCP Client
From the menu, select the country and region in which the access point is operating.
Make sure that the country is set to the location where the device
Note
is operating.You are responsible for complying with the local,
regional, and national regulations that are set for channels, power
levels, and frequency ranges.
It might not be legal to operate the access point in a region other
Note
than the regions listed in the menu. If your country or region is
not listed, check with your local government agency.
From the menu, select the time zone f or the country and region in which the access
point is operating.
By default, the DHCP client of the access point allows the access point to receive
an IP address from a DHCP server (or router that functions as a DHCP server) in
your network.
To set up the access point with a static (fixed) IP address, do the following:
a. Select the Disable radio button.
Additional fields display.
b. Specify the IP address, IP subnet mask, IP address of the default gateway,
and IP address of the DNS server.
AP Name
AP Login New Password
Confirm New Password
As an option, enter a new system name for the access point.The name must
contain alphanumeric characters, must contain at least one alphabetical character ,
cannot be longer than 15 characters, and can contain hyphens but cannot start
or end with a hyphen.
By default, the system name is Netgearxxxxxx, in which xxxxxx represents the
last six hexadecimal digits of the access point’s MAC address.
Enter a new admin password with a minimum of 6 characters and a maximum of
32 characters.
The ideal password contains no English dictionary words and contains uppercase
and lowercase letters, numbers, and symbols. However, do not include quotation
marks (") in the password.
Write down and save the password for future use.
The admin password is the password that you use to log in to
Note
the access point’s local browser interface. It is not the password
that you use for WiFi access.
Enter exactly the same password that y ou entered in the AP Login New Pass word
field.
Install the Access Point in Your Network and Access It for Initial Configuration
21
Page 22

Insight Managed Smart Cloud Wireless Access Point WAC510 User Manual
(Continued)
DescriptionSetting
SSID
Authentication Type
Passphrase
You cannot use the default SSID for regular operation (the default SSID is for
setup only). Enter a new name with a maximum of 32 characters.You can use a
combination of alphanumeric and special characters, except for quotation marks
(") and a backslash (\).
From the menu, select one of the following authentication types for the WiFi
network:
• Open. Authentication is not required and data encryption is not supported.
This setting does not provide any security and is not appropriate for most
situations.
• WPA2-PSK.This option allows only WiFi clients that support WP A2 to connect
to the SSID. Select this option if all WiFi clients are capable of supporting
WPA2.This option uses AES encryption.
• WPA-PSK / WP A2-PSK.This option allows both WPA and WPA2 WiFi clients
to connect to the SSID.This option uses TKIP and AES encryption. Broadcast
packets use TKIP. For unicast (that is, point-to-point) transmissions, WPA
clients use TKIP and WPA2 clients use AES.
For information about setting up WPA2 Enterprise security, see
Note
Set Up an Open or Secure WiFi Network on page 32.
Unless you select Open from the Authentication Type menu, enter a new
passphrase (network key or WiFi password) for the WiFi network.
7. Click the Apply button.
Your settings are saved and you are disconnected from the access point.
If you changed the default country, the access point restarts.
8. Reconnect over WiFi to the access point’s WiFi network using the new SSID and passphrase that you
just defined on the Day Zero Easy Setup page.
9. In the web browser, enter the access point IP address that you wrote down in Step 3.
If you assigned a static IP address to the access point, enter that IP address.
A login window opens.
10. Enter the access point user name and password.
The default user name is admin.The password is the one that you just defined on the Day Zero Easy
Setup page.The user name and password are case-sensitive.
The Dashboard page displays.You can now customize the access point settings for your network
environment.
Install the Access Point in Your Network and Access It for Initial Configuration
22
Page 23
Insight Managed Smart Cloud Wireless Access Point WAC510 User Manual
Connect Over Ethernet Using a Computer Connected to the Same Network
The following procedure assumes that your network includes a DHCP server (or router that functions as a
DHCP server) and that the access point and the computer are on the same network. By def ault, the access
point functions as a DHCP client. If you want to set up the access point with a static (fixed) IP address, see
Connect Over Ethernet Using a Directly Connected Computer on page 26.
T o connect to the access point using a computer that is connected to the same netw ork as
the access point:
1. To determine the IP address that the DHCP server assigned to the access point, access the DHCP
server or use an IP network scanner.
2. On the computer, open a web bro wser and, in the address bar, enter the IP address that is assigned to
the access point.
The Day Zero Easy Setup page displays.
3. Select the Standalone radio button.
4. Click the Apply button.
Install the Access Point in Your Network and Access It for Initial Configuration
23
Page 24

Insight Managed Smart Cloud Wireless Access Point WAC510 User Manual
After you save the basic settings that are shown on the page, the Day Zero Easy
Note
Setup page no longer displays when you log in. Instead, a login window opens. After
you log in, the Dashboard page displays.
5. Enter the settings that are described in the following table.
DescriptionSetting
Country/Region
Time Zone
DHCP Client
From the menu, select the country and region in which the access point is operating.
Make sure that the country is set to the location where the device
Note
is operating.You are responsible for complying with the local,
regional, and national regulations that are set for channels, power
levels, and frequency ranges.
It might not be legal to operate the access point in a region other
Note
than the regions listed in the menu. If your country or region is
not listed, check with your local government agency.
From the menu, select the time zone f or the country and region in which the access
point is operating.
By default, the DHCP client of the access point allows the access point to receive
an IP address from a DHCP server (or router that functions as a DHCP server) in
your network.
To set up the access point with a static (fixed) IP address, do the following:
a. Select the Disable radio button.
Additional fields display.
b. Specify the IP address, IP subnet mask, IP address of the default gateway,
and IP address of the DNS server.
AP Name
AP Login New Password
As an option, enter a new system name for the access point.The name must
contain alphanumeric characters, must contain at least one alphabetical character ,
cannot be longer than 15 characters, and can contain hyphens but cannot start
or end with a hyphen.
By default, the system name is Netgearxxxxxx, in which xxxxxx represents the
last six hexadecimal digits of the access point’s MAC address.
Enter a new admin password with a minimum of 6 characters and a maximum of
32 characters.
The ideal password contains no English dictionary words and contains uppercase
and lowercase letters, numbers, and symbols. However, do not include quotation
marks (") in the password.
The admin password is the password that you use to log in to
Note
the access point’s local browser interface. It is not the password
that you use for WiFi access.
Install the Access Point in Your Network and Access It for Initial Configuration
24
Page 25

Insight Managed Smart Cloud Wireless Access Point WAC510 User Manual
(Continued)
DescriptionSetting
Confirm New Password
SSID
Authentication Type
Enter exactly the same password that y ou entered in the AP Login New Pass word
field.
You cannot use the default SSID for regular operation (the default SSID is for
setup only). Enter a new name with a maximum of 32 characters.You can use a
combination of alphanumeric and special characters, except for quotation marks
(") and a backslash (\).
From the menu, select one of the following authentication types for the WiFi
network:
• Open. Authentication is not required and data encryption is not supported.
This setting does not provide any security and is not appropriate for most
situations.
• WPA2-PSK.This option allows only WiFi clients that support WP A2 to connect
to the SSID. Select this option if all WiFi clients are capable of supporting
WPA2.This option uses AES encryption.
• WPA-PSK / WP A2-PSK.This option allows both WPA and WPA2 WiFi clients
to connect to the SSID.This option uses TKIP and AES encryption. Broadcast
packets use TKIP. For unicast (that is, point-to-point) transmissions, WPA
clients use TKIP and WPA2 clients use AES.
For information about setting up WPA2 Enterprise security, see
Note
Set Up an Open or Secure WiFi Network on page 32.
Passphrase
Unless you select Open from the Authentication Type menu, enter a new
passphrase (network key or WiFi password) for the WiFi network.
6. Click the Apply button.
Your settings are saved.
If you changed the default country, the access point restarts.
Do not close the page!Note
After a short period, the Dashboard page displays automatically . If the Dashboard page does not displa y ,
for example, because you assigned a static IP address, see the next step.
You can now customize the access point settings for your network environment.
7. If the Dashboard does not display automatically, do the following:
Install the Access Point in Your Network and Access It for Initial Configuration
25
Page 26

Insight Managed Smart Cloud Wireless Access Point WAC510 User Manual
a. Take one of the following actions:
• If you assigned a static IP address to the access point, enter that IP address in the address bar
of the web browser.
• If you did not assign a static IP address, reenter the IP address that is display ed in the address
bar of the web browser . If that does not work, write down the IP address, close the web browser ,
reopen the web browser , and then reenter the IP address in the address bar of the web browser .
• If you did not assign a static IP address and you closed the page so that you cannot see the IP
address of the access point, use an IP scanner tool, use a network discovery tool, or access
the DHCP server to discover the IP address of the access point in your network.Then, open a
browser and enter the IP address in the address bar of the web browser.
A login window opens.
b. Enter the access point user name and password.
The default user name is admin.The password is the one that you just defined on the Day Zero
Easy Setup page.The user name and password are case-sensitive.
The Dashboard page displays.You can now customize the access point settings for your network
environment.
Connect Over Ethernet Using a Directly Connected Computer
If your network does not include a DHCP server (or router that functions as a DHCP server), you can use
a computer that is connected through an Ethernet cable to the LAN port of the access point.
To connect to the access point using a computer that is connected to the LAN port of the
access point:
1. Record the IP address and subnet mask of your computer so that you can reinstate these IP address
settings later.
2. T empor arily change the IP address on your computer to 192.168.0.210 with 255.255.255.0 as the subnet
mask.
(You can actually use any IP address in the 192.168.0.2–192.168.0.254 range, with the e xception of IP
address 192.168.0.100, which is the default IP address of the access point.)
For more information about changing the IP address on your computer, see the help or documentation
for your computer.
3. Use an Ethernet cable to connect your computer to the LAN port on the access point.
4. On the computer, open a web browser and enter 192.168.0.100 in the address bar.
Install the Access Point in Your Network and Access It for Initial Configuration
26
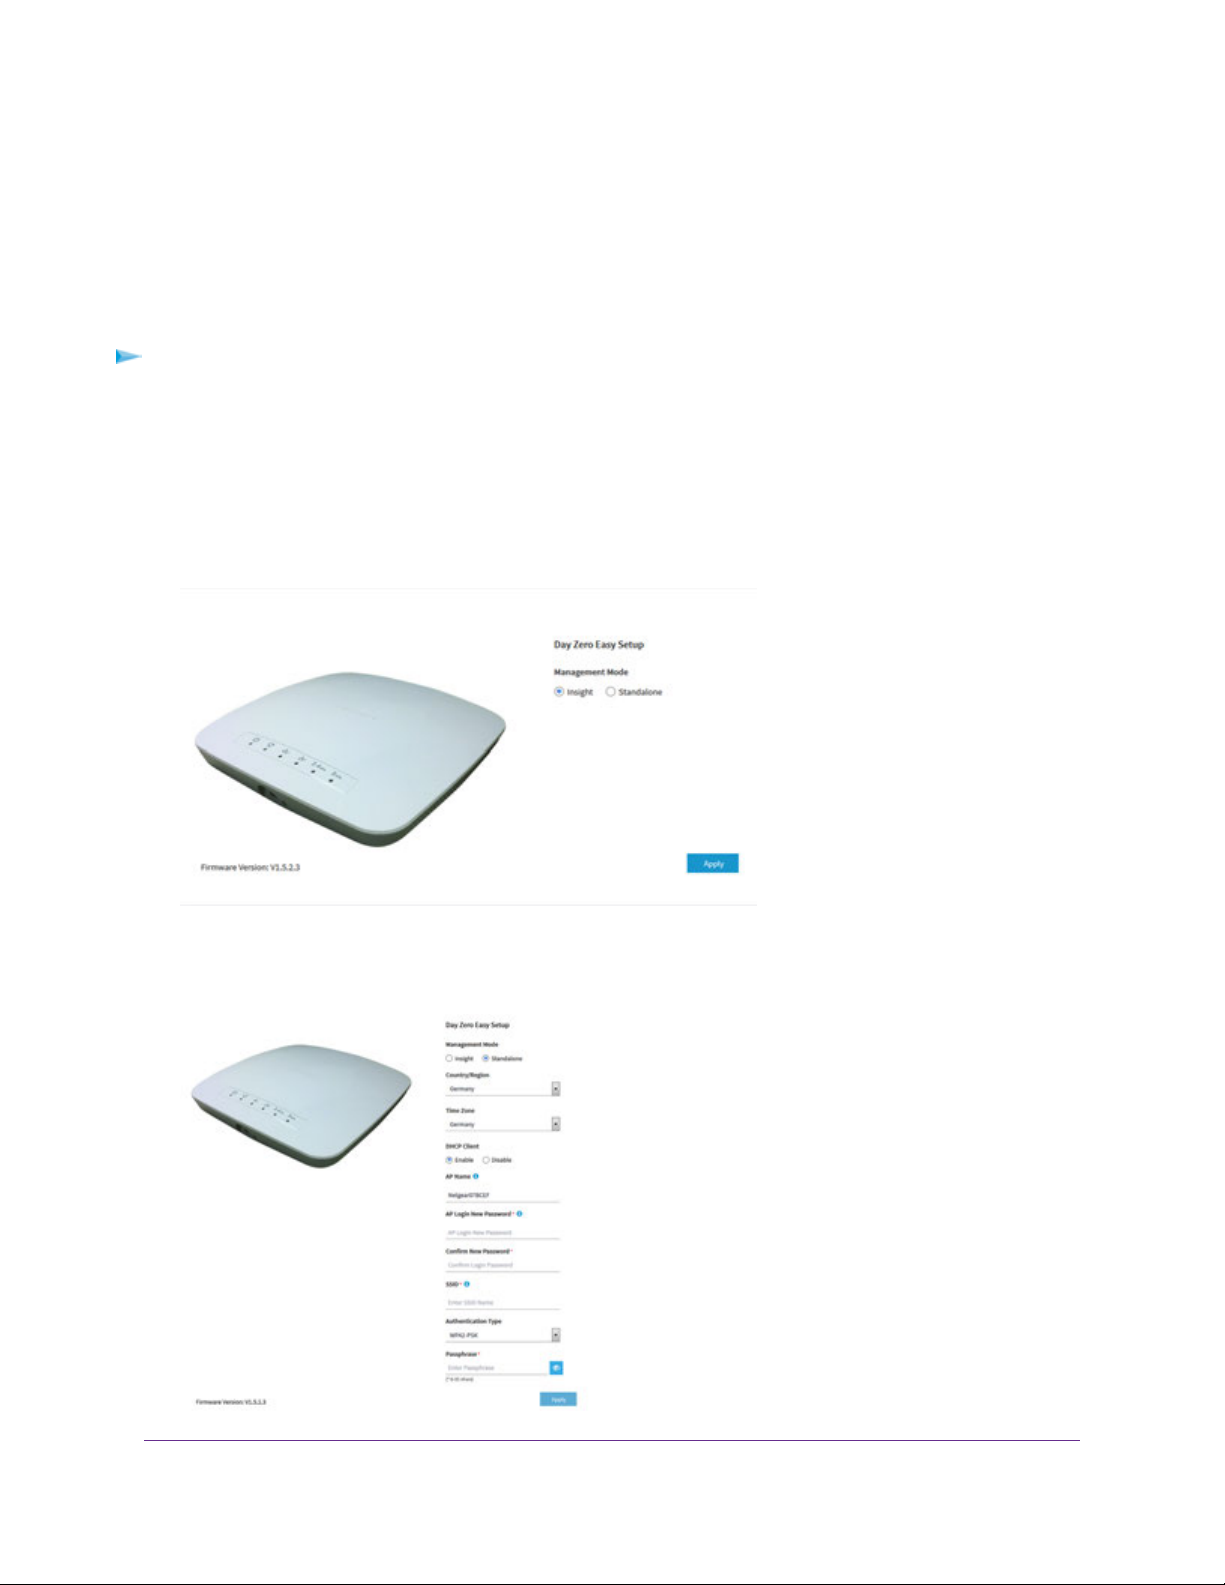
Page 27
Insight Managed Smart Cloud Wireless Access Point WAC510 User Manual
The Day Zero Easy Setup page displays.
5. Select the Standalone radio button.
6. Click the Apply button.
After you save the basic settings that are shown on the page, the Day Zero Easy
Note
Setup page no longer displays when you log in. Instead, a login window opens. After
you log in, the Dashboard page displays.
7. Enter the settings that are described in the following table.
Install the Access Point in Your Network and Access It for Initial Configuration
27
Page 28

Insight Managed Smart Cloud Wireless Access Point WAC510 User Manual
DescriptionSetting
Country/Region
Time Zone
DHCP Client
From the menu, select the country and region in which the access point is operating.
Make sure that the country is set to the location where the device
Note
is operating.You are responsible for complying with the local,
regional, and national regulations that are set for channels, power
levels, and frequency ranges.
It might not be legal to operate the access point in a region other
Note
than the regions listed in the menu. If your country or region is
not listed, check with your local government agency.
From the menu, select the time zone f or the country and region in which the access
point is operating.
By default, the DHCP client of the access point allows the access point to receive
an IP address from a DHCP server (or router that functions as a DHCP server) in
your network.
To set up the access point with a static (fixed) IP address, do the following:
a. Select the Disable radio button.
Additional fields display.
b. Specify the IP address, IP subnet mask, IP address of the default gateway,
and IP address of the DNS server.
AP Name
AP Login New Password
Confirm New Password
As an option, enter a new system name for the access point.The name must
contain alphanumeric characters, must contain at least one alphabetical character ,
cannot be longer than 15 characters, and can contain hyphens but cannot start
or end with a hyphen.
By default, the system name is Netgearxxxxxx, in which xxxxxx represents the
last six hexadecimal digits of the access point’s MAC address.
Enter a new admin password with a minimum of 6 characters and a maximum of
32 characters.
The ideal password contains no English dictionary words and contains uppercase
and lowercase letters, numbers, and symbols. However, do not include quotation
marks (") in the password.
Write down and save the password for future use.
The admin password is the password that you use to log in to
Note
the access point’s local browser interface. It is not the password
that you use for WiFi access.
Enter exactly the same password that y ou entered in the AP Login New Pass word
field.
Install the Access Point in Your Network and Access It for Initial Configuration
28
Page 29

Insight Managed Smart Cloud Wireless Access Point WAC510 User Manual
(Continued)
DescriptionSetting
SSID
Authentication Type
Passphrase
You cannot use the default SSID for regular operation (the default SSID is for
setup only). Enter a new name with a maximum of 32 characters.You can use a
combination of alphanumeric and special characters, except for quotation marks
(") and a backslash (\).
From the menu, select one of the following authentication types for the WiFi
network:
• Open. Authentication is not required and data encryption is not supported.
This setting does not provide any security and is not appropriate for most
situations.
• WPA2-PSK.This option allows only WiFi clients that support WP A2 to connect
to the SSID. Select this option if all WiFi clients are capable of supporting
WPA2.This option uses AES encryption.
• WPA-PSK / WP A2-PSK.This option allows both WPA and WPA2 WiFi clients
to connect to the SSID.This option uses TKIP and AES encryption. Broadcast
packets use TKIP. For unicast (that is, point-to-point) transmissions, WPA
clients use TKIP and WPA2 clients use AES.
For information about setting up WPA2 Enterprise security, see
Note
Set Up an Open or Secure WiFi Network on page 32.
Unless you select Open from the Authentication Type menu, enter a new
passphrase (network key or WiFi password) for the WiFi network.
8. Click the Apply button.
Your settings are saved and you are disconnected from the access point.
If you changed the default country, the access point restarts.
9. After a few minutes , if the login window does not open automatically, enter 192.168.0.100 in the address
bar of your browser.
If you changed the IP address (that is, you specified a static IP address), enter the new IP address.
A login window opens.
10. Enter the access point user name and password.
The default user name is admin.The password is the one that you just defined on the Day Zero Easy
Setup page.The user name and password are case-sensitive.
The Dashboard page displays.You can now customize the access point settings for your network
environment.
11. After you complete the setup process, or both the setup and customization process, you can change
the computer back to its original IP address settings.
Install the Access Point in Your Network and Access It for Initial Configuration
29
Page 30
Insight Managed Smart Cloud Wireless Access Point WAC510 User Manual
Log In to the Access Point After Initial Setup to View or Change Settings
After you set up the access point, you can view or change the settings for the access point.
To log in to the access point’s local browser interface:
1. Open a web browser from a computer that is connected to the same network as the access point or to
the access point directly through an Ethernet cable or WiFi connection.
2. Enter the IP address that is assigned to the access point.
A login window opens.
3. Enter the access point user name and password.
The default user name is admin.The password is the one that you specified the first time that you
logged in.The user name and password are case-sensitive.
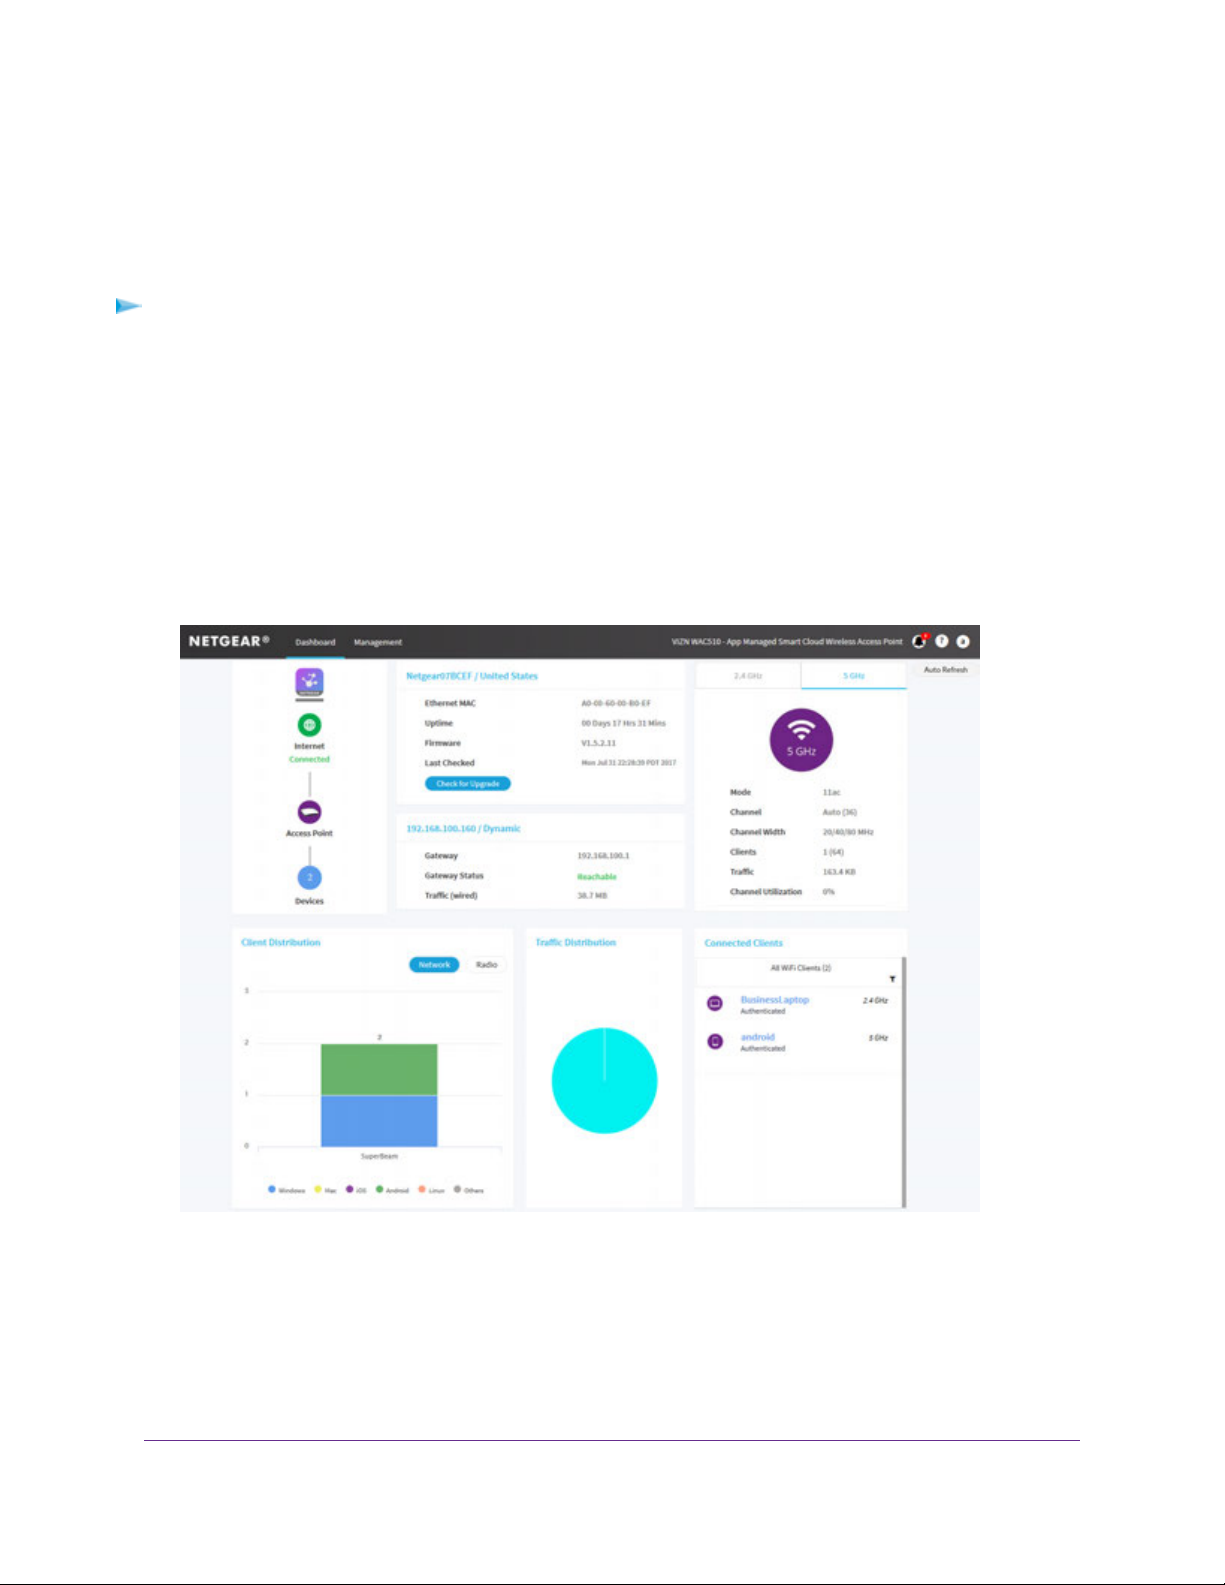
The Dashboard page displays.The following figure shows part of the Dashboard page.
The Dashboard page displays various panes that let you see the status of y our access point at a glance.
For more information about the Dashboard page and its various panes, see Monitor the Access Point
and the Network on page 123.
Install the Access Point in Your Network and Access It for Initial Configuration
30
Page 31

Manage the Basic WiFi and Radio Features
This chapter describes how you can manage the basic WiFi and r adio settings of the access point. For inf ormation
about the advanced WiFi and radio settings, see Manage the Advanced WiFi and Radio Features on page 60.
If you want to change the settings of the access point’s WiFi network, use a wired connection to
Tip
avoid being disconnected when the new WiFi settings take effect.
The chapter includes the following sections:
• Set Up and Manage WiFi Networks
• Manage the Basic Radio Features
3
31
Page 32

Insight Managed Smart Cloud Wireless Access Point WAC510 User Manual
Set Up and Manage WiFi Networks
The access point supports eight WiFi networks (four for each radio), each with its o wn unique WiFi settings .
The following sections describe how you can set up and manage WiFi networks on the access point:
• Set Up an Open or Secure WiFi Network on page 32
• View or Change the Settings of a WiFi Network on page 36
• Disable or Enable a WiFi Network on page 37
• Remove a WiFi Network on page 38
• Enable or Disable Client Separation for a WiFi Network on page 38
• Hide or Broadcast the SSID for a WiFi Network on page 39
• Enable or Disable Radio Resource Management for a WiFi Network on page 40
• Enable or Disable Band Steering for a WiFi Network on page 40
• Change the RSSI Threshold for a WiFi Network on page 41
• Change the VLAN ID for a WiFi Network on page 42
• Select a MAC ACL for a WiFi Network on page 42
• Set Bandwidth Rate Limits for a WiFi Network on page 43
• Set Up a Captive Portal for a WiFi Network on page 46
Set Up an Open or Secure WiFi Network
The access point provides one default SSID that is enabled by default and that broadcasts on the 2.4 GHz
band and the 5 GHz band.This is the SSID that you were required to rename when you logged in to the
access point for the first time.You can add more SSIDs: The access point supports four SSIDs for each
radio for a total of eight SSIDs. (If you enable four SSIDs on both radios , the maximum number of SSIDs is
reached.)
SSID stand for service set identifier, which is the WiFi network name. When you create a new SSID, you
are actually defining the settings for a new virtual access point (VAP). That means that the access point
supports up to eight VAPs.
The access point can simultaneously support the 2.4 GHz band for 802.11b/g/n WiFi de vices and the 5 GHz
band for 802.11a/n/ac WiFi devices.
If you plan to use WPA2 Enterprise security for y our WiFi network, first set up RADIUS servers (see Set Up
RADIUS Servers on page 82).
To set up a WiFi network:
1. Open a web browser from a computer that is connected to the same network as the access point or to
the access point directly through an Ethernet cable or WiFi connection.
2. Enter the IP address that is assigned to the access point.
A login window opens.
3. Enter the access point user name and password.
The default user name is admin.The password is the one that you specified the first time that you
logged in.The user name and password are case-sensitive.
Manage the Basic WiFi and Radio Features
32
Page 33

Insight Managed Smart Cloud Wireless Access Point WAC510 User Manual
The Dashboard page displays.
4. Select Management > Configuration > Wireless > Basic.
The page that displays lets you select and add an SSID.
5. Click the + button to the left of Add SSID.
6. Configure the WiFi, security, and radio settings as described in the following table.
DescriptionSetting
VAP
Band
Client Separation
When you set up an SSID , you are creating a ne w virtual access point (V AP). By default,
the new VAP is enabled. If you want to set up the SSID but temporarily disable the VAP,
select the No radio button.
Select a radio button for a single band (2.4 GHz or 5 GHz) or k eep the def ault selection,
which is the Both radio button, to enable the VAP to broadcast on both bands.
By default, client separation is disabled for the VAP.To block communication between
WiFi clients that are associated with different SSIDs on the access point, select the
Enable radio button.
Manage the Basic WiFi and Radio Features
33
Page 34

Insight Managed Smart Cloud Wireless Access Point WAC510 User Manual
(Continued)
DescriptionSetting
Wireless Network Name
(SSID)
Broadcast SSID
802.11K (RRM)
Band Steering
The SSID is the WiFi network name of the VAP. Enter a name for the SSID with a
maximum of 32 characters.You can use a combination of alphanumeric and special
characters, except for quotation marks (") and a backslash (\).
For a WiFi device to be able to connect to the VAP, the SSID on the WiFi device must
match the SSID of the VAP.
By default, the VAP broadcasts its SSID so that WiFi clients can detect the SSID in their
scanned network lists.To turn off the SSID broadcast, select the No radio button.
Turning off the SSID broadcast provides additional WiFi security, but users must know
the SSID to be able to join the VAP.
If you set up a wireless distribution system (WDS; see Set Up a WiFi Bridge Between
Access Points on page 65), you must keep the SSID broadcast enabled.
Select the 802.11K (RRM) check box to enable 802.11k Radio Resource Management
(RRM) so that the access point and 802.11k-aware clients can dynamically measure the
available radio resources. By default, RRM is disabled.
In an 802.11k-enabled network, access points and clients can send neighbor reports,
beacon reports, and link measurement reports to each other, allowing 802.11k-aware
clients to automatically select the best access point for initial connection or for roaming.
Select the Enable radio button to enable the access point to identify the WiFi devices
that are dual-band capable and steer those devices to the 5 GHz band rather than the
2.4 GHz band of the VAP. Generally, more channels and bandwidth are available in the
5 GHz band, causing less interference and allowing for a better user experience. By
default, band steering is disabled.
RSSI Threshold (-100 to
-10)
You can enter the minimum received signal strength indicator (RSSI) value in decibel
milliwatts (dBm) for a WiFi device to connect to the 2.4 GHz or 5 GHz radio on the access
point. If the RSSI v alue on the WiFi device is less than the configured RSSI value on the
access point, the WiFi device cannot connect to the access point.
Enter a value in the range of –100 to –10 dBm.The default is –100 dBm.
A higher value (for e xample , –10 dBm) indicates that the signal strength m ust be strong
for a WiFi de vice to be able to connect to the radio . A low er value (f or example, –100 dBm)
indicates that the signal strength can be weak for a WiFi device to be able to connect to
the radio. However, a connection that is based on a weak signal can be unreliable.
For example , if the configured RSSI value on the access point is –70 dBm but the RSSI
value on the WiFi de vice is –75 dBm, the WiFi de vice cannot connect to the access point.
If the WiFi device is connected to the access point and then mo ves aw ay from the access
point, causing its RSSI value to become too low, the WiFi device is disconnected from
the access point and an alarm is raised on the access point.
Manage the Basic WiFi and Radio Features
34
Page 35

Insight Managed Smart Cloud Wireless Access Point WAC510 User Manual
(Continued)
DescriptionSetting
VLAN ID
Network Authentication,
Data Encryption, and
Passphrase
You can enter the VLAN ID that must be associated with the VAP. By default, the VLAN
ID is 1.
This VLAN ID is not the same as the 802.1Q VLAN ID that is used for the wired network
(see Set the 802.1Q VLAN and Management VLAN on page 90).
If the access point functions in Router mode, you can use the VLAN ID to assign a
particular DHCP server to the clients on the WiFi network (see Add a DHCP Server for
a WiFi Network on page 98).
Select one of the following WiFi security options for the VAP:
• Open. An open WiFi network does not provide any security. Any WiFi device can
join the network.We recommend that you do not use an open WiFi network but
configure WiFi security. However, an open network might be appropriate for a WiFi
hotspot.
• WPA2-PSK.This option is the default setting and uses AES encryption.This type
of security enables only WiFi devices that support WPA2 to join the VAP. If you did
not change the passphrase, the default passphrase displa ys.The default passphrase
is sharedseceret.
WPA2 provides a secure connection but some legacy WiFi devices do not detect
WPA2 and support only WPA. If your network includes such older devices, select
the mixed mode security, WPA-PSK / WPA2-PSK.
In the Passphrase field, enter a phrase of 8 to 63 characters.To join the VAP, a
user must enter this passphrase.To view the passphrase in clear text, click the eye
icon.
• WPA-PSK / WPA2-PSK. This mixed mode security enables WiFi devices that
support either WPA or WPA2 to join the VAP.This option uses TKIP and AES
encryption.
WPA-PSK (which uses TKIP) is less secure than WPA2-PSK (which uses AES) and
limits the speed of WiFi devices to 54 Mbps.
In the Passphrase field, enter a phrase of 8 to 63 characters.To join the VAP, a
user must enter this passphrase.To view the passphrase in clear text, click the eye
icon.
• WPA2-enterprise.This enterprise-level security uses RADIUS for centralized
Authentication, Authorization, and Accounting (AAA) management. For WPA2
Enterprise security to function, you must set up RADIUS servers (see Set Up RADIUS
Servers on page 82).
From the Data Encryption menu, select the data encryption mode mode:
7. Click the Apply button.
- TKIP + AES. This type of data encryption enables WiFi devices that support
either WPA or WPA2 to join the access point’s WiFi network.This is the default
mode.
- AES.This type of data encryption provides a secure connection b ut some older
WiFi devices do not detect WPA2 and support only WPA.Therefore, if your
network includes such older devices, select TKIP + AES security.
Manage the Basic WiFi and Radio Features
35
Page 36

Insight Managed Smart Cloud Wireless Access Point WAC510 User Manual
Your settings are saved.
8. Make sure that you can connect to the new WiFi network.
If you cannot connect to the new WiFi network, check the following:
• If your WiFi-enabled computer or mobile de vice is already connected to another WiFi network in your
area, disconnect it from that WiFi network and connect it to the WiFi network that the access point
provides. Some WiFi devices automatically connect to the first open network without WiFi security
that they discover.
• If your WiFi-enabled computer or mobile device is trying to connect to your network with its old
settings (before you changed the settings), update the WiFi network selection in your WiFi-enabled
computer or mobile device to match the current settings for your network.
• Does your WiFi device display as a connected client? (See View Client Distribution, Connected
Clients, and Client Trends on page 130.) If it does, it is connected to the network.
• Are you using the correct WiFi network name (SSID) and password?
View or Change the Settings of a WiFi Network
You can view or change the settings of the default WiFi netw ork (SSID or VAP) or any custom WiFi network.
To view or change the settings of WiFi network:
1. Open a web browser from a computer that is connected to the same network as the access point or to
the access point directly through an Ethernet cable or WiFi connection.
2. Enter the IP address that is assigned to the access point.
A login window opens.
3. Enter the access point user name and password.
The default user name is admin.The password is the one that you specified the first time that you
logged in.The user name and password are case-sensitive.
The Dashboard page displays.
4. Select Management > Configuration > Wireless > Basic.
The page that displays lets you select an SSID.
5. Click the > button to the left the SSID.
The settings for the selected SSID display.
6. Change the settings of the WiFi network as needed.
For detailed descriptions of the settings, see Set Up an Open or Secure WiFi Network on page 32.
7. If you made changes, click the Apply button.
Your settings are saved.
8. If you made changes, make sure that y ou can reconnect o ver WiFi to the network with its new settings.
If you cannot connect over WiFi, check the following:
• If your WiFi-enabled computer or mobile de vice is already connected to another WiFi network in your
area, disconnect it from that WiFi network and connect it to the WiFi network that the access point
Manage the Basic WiFi and Radio Features
36
Page 37

Insight Managed Smart Cloud Wireless Access Point WAC510 User Manual
provides. Some WiFi devices automatically connect to the first open network without WiFi security
that they discover.
• If your WiFi-enabled computer or mobile device is trying to connect to your network with its old
settings (before you changed the settings), update the WiFi network selection in your WiFi-enabled
computer or mobile device to match the current settings for your network.
• Does your WiFi device display as a connected client? (See View Client Distribution, Connected
Clients, and Client Trends on page 130.) If it does, it is connected to the network.
• Are you using the correct WiFi network name (SSID) and password?
Disable or Enable a WiFi Network
You can temporarily disable a WiFi network (SSID or VAP) and you can reenable the WiFi network.
To disable or enable a WiFi network:
1. Open a web browser from a computer that is connected to the same network as the access point or to
the access point directly through an Ethernet cable or WiFi connection.
2. Enter the IP address that is assigned to the access point.
A login window opens.
3. Enter the access point user name and password.
The default user name is admin.The password is the one that you specified the first time that you
logged in.The user name and password are case-sensitive.
The Dashboard page displays.
4. Select Management > Configuration > Wireless > Basic.
The page that displays lets you select an SSID.
5. Click the > button to the left the SSID.
The settings for the selected SSID display.
6. Under VAP, select one of the following radio buttons:
• Disable.The WiFi network is disabled.
• Enable.The WiFi network is enabled.
7. Click the Apply button.
Your settings are saved.
Manage the Basic WiFi and Radio Features
37
Page 38

Insight Managed Smart Cloud Wireless Access Point WAC510 User Manual
Remove a WiFi Network
You can remove a custom WiFi network (SSID or VAP) that you no longer need.You cannot remove the
default WiFi network.
To remove a WiFi network:
1. Open a web browser from a computer that is connected to the same network as the access point or to
the access point directly through an Ethernet cable or WiFi connection.
2. Enter the IP address that is assigned to the access point.
A login window opens.
3. Enter the access point user name and password.
The default user name is admin.The password is the one that you specified the first time that you
logged in.The user name and password are case-sensitive.
The Dashboard page displays.
4. Select Management > Configuration > Wireless > Basic.
The page that displays lets you select an SSID.
5. Click the trash can icon to the right of the SSID.
The WiFi network is removed.
Enable or Disable Client Separation for a WiFi Network
By default, client separation is disabled f or a WiFi netw ork (SSID or VAP), allowing communication between
WiFi clients that are associated with different WiFi networks on the access point. For additional security,
you can enable client separation.
To enable or disable client separation for a WiFi network:
1. Open a web browser from a computer that is connected to the same network as the access point or to
the access point directly through an Ethernet cable or WiFi connection.
2. Enter the IP address that is assigned to the access point.
A login window opens.
3. Enter the access point user name and password.
The default user name is admin.The password is the one that you specified the first time that you
logged in.The user name and password are case-sensitive.
The Dashboard page displays.
4. Select Management > Configuration > Wireless > Basic.
The page that displays lets you select an SSID.
5. Click the > button to the left the SSID.
The settings for the selected SSID display.
6. Under Client Separation, select one of the following radio buttons:
Manage the Basic WiFi and Radio Features
38
Page 39

Insight Managed Smart Cloud Wireless Access Point WAC510 User Manual
• Enable. Client separation is enabled for the WiFi network.
• Disable. Client separation is disabled for the WiFi network.
7. Click the Apply button.
Your settings are saved.
Hide or Broadcast the SSID for a WiFi Network
By default, a WiFi network (SSID or VAP) broadcasts its network name (also referred to as the SSID) so
that WiFi clients can detect the SSID in their scanned network lists. For additional security, you can turn off
the SSID broadcast and hide the SSID so that users must know the SSID to be able to join the WiFi network.
If you set up a wireless distribution system (WDS; see Set Up a WiFi Bridge Between
Note
Access Points on page 65), you must keep the SSID broadcast enabled.
To hide or broadcast the network name for a WiFi network:
1. Open a web browser from a computer that is connected to the same network as the access point or to
the access point directly through an Ethernet cable or WiFi connection.
2. Enter the IP address that is assigned to the access point.
A login window opens.
3. Enter the access point user name and password.
The default user name is admin.The password is the one that you specified the first time that you
logged in.The user name and password are case-sensitive.
The Dashboard page displays.
4. Select Management > Configuration > Wireless > Basic.
The page that displays lets you select an SSID.
5. Click the > button to the left the SSID.
The settings for the selected SSID display.
6. Under Broadcast SSID, select one of the following radio buttons:
• No.The SSID is hidden for the WiFi network.
• Yes. The SSID is broadcast for the WiFi network.
7. Click the Apply button.
Your settings are saved.
Manage the Basic WiFi and Radio Features
39
Page 40

Insight Managed Smart Cloud Wireless Access Point WAC510 User Manual
Enable or Disable Radio Resource Management for a WiFi Network
Radio Resource Management (RRM), which is based on IEEE 802.11k, lets the access point and its clients
dynamically measure the available radio resources. By default, RRM is disabled.
In an 802.11k-enabled network, access points and clients can send neighbor reports, beacon reports, and
link measurement reports to each other, allowing 802.11k-aware clients to automatically select the best
access point for initial connection or for roaming.
To enable or disable RRM:
1. Open a web browser from a computer that is connected to the same network as the access point or to
the access point directly through an Ethernet cable or WiFi connection.
2. Enter the IP address that is assigned to the access point.
A login window opens.
3. Enter the access point user name and password.
The default user name is admin.The password is the one that you specified the first time that you
logged in.The user name and password are case-sensitive.
The Dashboard page displays.
4. Select Management > Configuration > Wireless > Basic.
The page that displays lets you select an SSID.
5. Click the > button to the left the SSID.
The settings for the selected SSID display.
6. Under 802.11K (RRM), select or clear the 802.11K (RRM) check box:
• Selecting the check box enables RRM.
• Clearing the check box disables RRM.
7. Click the Apply button.
Your settings are saved.
Enable or Disable Band Steering for a WiFi Network
Band steering enables the access point to identify the WiFi devices that are dual-band capable and steer
those devices to the 5 GHz band rather than the 2.4 GHz band of a WiFi netw ork (SSID or VAP). Gener ally,
more channels and bandwidth are available in the 5 GHz band, causing less interference and allowing for
a better user experience. By default, band steering is disabled.
To enable or disable band steering for a WiFi network:
1. Open a web browser from a computer that is connected to the same network as the access point or to
the access point directly through an Ethernet cable or WiFi connection.
2. Enter the IP address that is assigned to the access point.
A login window opens.
Manage the Basic WiFi and Radio Features
40
Page 41

Insight Managed Smart Cloud Wireless Access Point WAC510 User Manual
3. Enter the access point user name and password.
The default user name is admin.The password is the one that you specified the first time that you
logged in.The user name and password are case-sensitive.
The Dashboard page displays.
4. Select Management > Configuration > Wireless > Basic.
The page that displays lets you select an SSID.
5. Click the > button to the left the SSID.
The settings for the selected SSID display.
6. Under Band Steering, select one of the following radio buttons:
• Enable. Band steering is enabled for the WiFi network.
• Disable. Band steering is disabled for the WiFi network.
7. Click the Apply button.
Your settings are saved.
Change the RSSI Threshold for a WiFi Network
You can enter the minimum received signal strength indicator (RSSI) value in decibel milliwatts (dBm) for
a WiFi device to connect to the 2.4 GHz or 5 GHz radio on the access point. If the RSSI value on the WiFi
device is less than the configured RSSI value on the access point, the WiFi device cannot connect to the
access point. For example, if the configured RSSI value on the access point is –70 dBm but the RSSI value
on the WiFi device is –75 dBm, the WiFi device cannot connect to the access point. If the WiFi device is
connected to the access point and then moves aw ay from the access point, causing its RSSI v alue to become
too low, the WiFi device is disconnected from the access point and an alarm is raised on the access point.
The value must be in the range of –100 to –10 dBm.The default is –100 dBm.
To change the RSSI threshold for a WiFi network:
1. Open a web browser from a computer that is connected to the same network as the access point or to
the access point directly through an Ethernet cable or WiFi connection.
2. Enter the IP address that is assigned to the access point.
A login window opens.
3. Enter the access point user name and password.
The default user name is admin.The password is the one that you specified the first time that you
logged in.The user name and password are case-sensitive.
The Dashboard page displays.
4. Select Management > Configuration > Wireless > Basic.
The page that displays lets you select an SSID.
5. Click the > button to the left the SSID.
The settings for the selected SSID display.
Manage the Basic WiFi and Radio Features
41
Page 42

Insight Managed Smart Cloud Wireless Access Point WAC510 User Manual
6. In the RSSI Threshold (-100 to -10) field, enter a value from –100 to –10 dBm.
A higher value (for e xample, –10 dBm) indicates that the signal strength must be strong f or a WiFi de vice
to be able to connect to the radio. A lower value (for example, –100 dBm) indicates that the signal
strength can be weak for a WiFi device to be able to connect to the radio. However, a connection that
is based on a weak signal can be unreliable.
7. Click the Apply button.
Your settings are saved.
Change the VLAN ID for a WiFi Network
If the access point functions in Router mode, you can use the VLAN ID to assign a particular DHCP server
to the WiFi clients on the SSID (see Add a DHCP Server for a WiFi Network on page 98). By default, the
VLAN ID for a WiFi network is 1.
The VLAN ID for a WiFi network is not the same as the 802.1Q VLAN ID that is used for the wired network
(see Set the 802.1Q VLAN and Management VLAN on page 90).
To change the VLAN ID for a WiFi network:
1. Open a web browser from a computer that is connected to the same network as the access point or to
the access point directly through an Ethernet cable or WiFi connection.
2. Enter the IP address that is assigned to the access point.
A login window opens.
3. Enter the access point user name and password.
The default user name is admin.The password is the one that you specified the first time that you
logged in.The user name and password are case-sensitive.
The Dashboard page displays.
4. Select Management > Configuration > Wireless > Basic.
The page that displays lets you select an SSID.
5. Click the > button to the left the SSID.
The settings for the selected SSID display.
6. In the VLAN ID field, enter a value.
By default, the VLAN ID for a WiFi network is 1.
7. Click the Apply button.
Your settings are saved.
Select a MAC ACL for a WiFi Network
After you set up one or more local MAC access control lists (ACLs, also referred to as access lists; see
Manage Local MAC Access Control Lists on page 71), you can select an ACL for use with an SSID.
You can also set up a RADIUS server (see Set Up RADIUS Servers on page 82) and select the RADIUS
MAC ACL.You must define the ACL on the RADIUS server, using the following format for client MAC
Manage the Basic WiFi and Radio Features
42
Page 43

Insight Managed Smart Cloud Wireless Access Point WAC510 User Manual
addresses in the RADIUS server: If the client MAC address is 00:0a:95:9d:68:16, specify it as 000a959d6816
in the RADIUS server.
A RADIUS MAC ACL cannot function if the WiFi security is WPA2 Enterprise. If you
Note
want to use a RADIUS MAC ACL, select a different type of WiFi security for the WiFi
network (see Set Up an Open or Secure WiFi Network on page 32).
When selected, the MAC ACL blocks WiFi access to the SSID for WiFi devices that are not in the selected
access list.The blockage applies only to the SSID for which you enable the MAC ACL. Only WiFi devices
that are in the selected access list can connect to the SSID.
To select a MAC ACL for a WiFi network:
1. Open a web browser from a computer that is connected to the same network as the access point or to
the access point directly through an Ethernet cable or WiFi connection.
2. Enter the IP address that is assigned to the access point.
A login window opens.
3. Enter the access point user name and password.
The default user name is admin.The password is the one that you specified the first time that you
logged in.The user name and password are case-sensitive.
The Dashboard page displays.
4. Select Management > Configuration > Wireless > Basic.
The page that lets you select an SSID displays.
5. Select the SSID.
The WLAN settings for the SSID display.
6. Select the MAC ACL check box.
7. Do one of the following:
• Select the Local MAC ACL radio button, and from the Select Group menu, select the MAC ACL
that you defined earlier (see Manage Local MAC Access Control Lists on page 71).
• Select the Radius MAC ACL radio button.
This option functions only if you set up a RADIUS server (see Set Up RADIUS Servers on page
82).
8. Click the Apply button.
Your settings are saved. Only WiFi devices for which the MAC address is on the MAC ACL can connect
to the access point through this SSID. (These devices might be able to connect to the access point
through another SSID if you did not set up MAC ACL security for that SSID.)
Set Bandwidth Rate Limits for a WiFi Network
You can set rate limits for the upload and download bandwidths for devices that are connected to a WiFi
network.The minimum bandwidth rate is 64 Kbps, the maximum bandwidth rate is 1024 Mbps.You can set
one rate for the upload bandwidth and another rate for the download bandwidth.
Manage the Basic WiFi and Radio Features
43
Page 44

Insight Managed Smart Cloud Wireless Access Point WAC510 User Manual
To set bandwidth rate limits for devices that are connected to a WiFi network:
1. Open a web browser from a computer that is connected to the same network as the access point or to
the access point directly through an Ethernet cable or WiFi connection.
2. Enter the IP address that is assigned to the access point.
A login window opens.
3. Enter the access point user name and password.
The default user name is admin.The password is the one that you specified the first time that you
logged in.The user name and password are case-sensitive.
The Dashboard page displays.
4. Select Management > Configuration > Wireless > Basic.
The page that lets you select an SSID displays.
5. Select the SSID.
The WLAN settings for the SSID display.
6. Select the Rate Limit check box.
7. Specify the values:
• Upload. For the upload bandwidth limitation, enter a value from 64 to 1024 and select Kbps or
Mbps from the menu.
• Download. For the download bandwidth limitation, enter a value from 64 to 1024 and select Kbps
or Mbps from the menu.
8. Click the Apply button.
Your settings are saved.
Register the Access Point With Facebook Wi-Fi
Before you can set up Facebook Wi-Fi on the access point so that you can provide customers WiFi access
by letting them check in to an existing Facebook business page (see Set Up a Captive Portal for a WiFi
Network on page 46), you must register the access point with F acebook. By default, the capability to register
is disabled.
To register the access point with Facebook Wi-Fi:
1. Open a web browser from a computer that is connected to the same network as the access point or to
the access point directly through an Ethernet cable or WiFi connection.
2. Enter the IP address that is assigned to the access point.
A login window opens.
3. Enter the access point user name and password.
The default user name is admin.The password is the one that you specified the first time that you
logged in.The user name and password are case-sensitive.
The Dashboard page displays.
Manage the Basic WiFi and Radio Features
44
Page 45

Insight Managed Smart Cloud Wireless Access Point WAC510 User Manual
4. Select Management > Configuration > Wireless > Basic > Facebook Wi-Fi.
The Facebook Wi-Fi page displays.
5. Select the Yes radio button.
The capability to register is enabled. By default, this capability is disabled.
6. Click the Apply button.
Your settings are saved and the Add Page button displays.
7. Click the Add Page button.
A new browser page opens and displays the Facebook Login page.
8. Log in to the Facebook account with which the Facebook business page is associated.
9. From the Select a Page menu, select the Facebook business page.
10. Select one of the following bypass mode options:
• To allow customers to skip check-in, select the Skip check-in link radio button.
If you enable this option, users can either check in to the selected Facebook business page or skip
the check-in.
• To require users to enter a WiFi code before they can gain WiFi access, select the Require Wi-Fi
code radio button and type a WiFi code in the field that displays.
If you enable this option, users can either check in to the selected Facebook business page or skip
the check-in by using the WiFi code.
11. From the Session Length menu, select the period after which users are automatically logged out.
12. To add terms of service to the Facebook check-in page, select the Terms of Service check box and
type or copy the terms of service.
13. Click the Save Settings button.
The Facebook Wi-Fi settings are saved.
Manage the Basic WiFi and Radio Features
45
Page 46

Insight Managed Smart Cloud Wireless Access Point WAC510 User Manual
The name of the selected Facebook b usiness page displays on the Facebook Wi-Fi configuration page,
along with the Change Page button, which lets you replace the selected Facebook business page with
another one.
Set Up a Captive Portal for a WiFi Network
Use a captive portal to welcome or instruct WiFi users and limit their sessions.You can require users to
agree to an end user license agreement (EULA) and redirect them a specific website. A captive portal is
specific to an SSID.
If you want to provide customers WiFi access by letting them check in to a Facebook business page, first
register the access point with Facebook Wi-Fi (see Register the Access Point With Facebook Wi-Fi on page
44).
To set up a captive portal for a WiFi network:
1. Open a web browser from a computer that is connected to the same network as the access point or to
the access point directly through an Ethernet cable or WiFi connection.
2. Enter the IP address that is assigned to the access point.
A login window opens.
3. Enter the access point user name and password.
The default user name is admin.The password is the one that you specified the first time that you
logged in.The user name and password are case-sensitive.
The Dashboard page displays.
4. Select Management > Configuration > Wireless > Basic.
The page that lets you select an SSID displays.
5. Select the SSID.
The WLAN settings for the SSID display.
Manage the Basic WiFi and Radio Features
46
Page 47

Insight Managed Smart Cloud Wireless Access Point WAC510 User Manual
6. Select the Captive Portal check box.
7. Specify the type of captive portal by selecting one of the following radio buttons:
• Click Through.You must specify the captive portal settings as described in Step 8.
• Social Login. Customers receive WiFi access by checking in to a Facebook business page.To
use this option, first register the access point with Facebook Wi-Fi (see Register the Access Point
With Facebook Wi-Fi on page 44).
If you select his option, you can skip Step 8.
8. Specify the settings as described in the following table.
DescriptionSetting
Session Timeout (in min)
Redirect URL
Title
Message
Enter the time after which a WiFi session is terminated and a user must log in again.
The period is in the range from 1 to 1440 minutes.The default is 60 minutes.
To redirect a user to a specific website after login, select the Redirect URL check box
and enter the URL to which the user must be directed. If the Redirect URL check box
is cleared, a user is directed to a default web page.
Enter the title that is displayed on the captive portal login page. If you do not customize
the title, the default title displays on the captive portal login page.
Enter a message to the user.This message is displayed on the captive portal login page.
If you do not customize the message, the def ault message displays on the captiv e portal
login page.
Manage the Basic WiFi and Radio Features
47
Page 48

Insight Managed Smart Cloud Wireless Access Point WAC510 User Manual
(Continued)
DescriptionSetting
JPEG/JPG Image (Max
500KB)
EULA (Max 1KB)
9. To preview the captive portal login page, click the Preview button.
The following figure shows an example (that is, the figure does not show the default captive portal but
a customized one).
To customize the image that is displayed on the captive portal login page, click the
Browse button and na vigate to and select an image. If you do not customize the image,
the default image displays on the captive portal login page.
The field includes a default end user license agreement (EULA).You can enter or copy
custom text into the field.To show the EULA on the captive portal login page, select the
EULA check box.
10. Click the Apply button.
Your settings are saved.WiFi clients attempting to connect to the SSID are presented with the captive
portal login page.
Unregister the Access Point From Facebook Wi-Fi
If the access point is registered with Facebook Wi-Fi but you no longer want to use that option for a captive
portal or you want to use another Facebook account, you can unregister the access point from Facebook
Wi-Fi and remove the access point s entry.
To unregister the access point from Facebook Wi-Fi and remove the access point s entry:
1. Open a web browser from a computer that is connected to the same network as the access point or to
the access point directly through an Ethernet cable or WiFi connection.
2. Enter the IP address that is assigned to the access point.
A login window opens.
Manage the Basic WiFi and Radio Features
48
Page 49

Insight Managed Smart Cloud Wireless Access Point WAC510 User Manual
3. Enter the access point user name and password.
The default user name is admin.The password is the one that you specified the first time that you
logged in.The user name and password are case-sensitive.
The Dashboard page displays.
4. Select Management > Configuration > Wireless > Basic > Facebook Wi-Fi.
The Facebook Wi-Fi page displays.
5. Select the No radio button.
The capability to register is disabled. Howe v er , the access point s entry on the Facebook business page
is not yet removed.
6. Click the Apply button.
Your settings are saved.
7. Go to the Facebook business page and log in to your account.
8. Select the check box for the access point s entry.
9. Click the Delete button.
The access point s entry is removed.
Manage the Basic Radio Features
You can manage the basic radio features that are described in the following sections:
• Manage the Basic Settings for the Radios on page 49
• Turn a Radio On or Off on page 52
• Change the WiFi Mode for a Radio on page 53
• Change the MCS Index and Data Rate for a Radio on page 54
• Change the Channel Width for a Radio on page 54
• Change the Output Power for a Radio on page 55
• Change the Guard Interval for a Radio on page 56
• Change the Channel for a Radio on page 57
• Set Up a WiFi On/Off Schedule for the Radios on page 57
• Manage Quality of Service for a WiFi Radio on page 58
For information about the advanced r adio f eatures , see Manage the Adv anced Radio F eatures on page 61.
Manage the Basic Settings for the Radios
The basic WiFi settings f or the radios apply to all WiFi networks (VAPs or SSIDs).You can specify the radio
settings for the 2.4 GHz and 5 GHz radios individually. For information about the advanced radio settings,
see Manage the Advanced WiFi Settings for the Radios on page 61.
Manage the Basic WiFi and Radio Features
49
Page 50

Insight Managed Smart Cloud Wireless Access Point WAC510 User Manual
To manage the basic WiFi settings for the radios:
1. Open a web browser from a computer that is connected to the same network as the access point or to
the access point directly through an Ethernet cable or WiFi connection.
2. Enter the IP address that is assigned to the access point.
A login window opens.
3. Enter the access point user name and password.
The default user name is admin.The password is the one that you specified the first time that you
logged in.The user name and password are case-sensitive.
The Dashboard page displays.
4. Select Management > Configuration > Wireless > Basic > Wireless Settings.
5. Configure the settings as described in the following table.
The descriptions in the table apply to both radios, but y ou can specify the radio settings f or the 2.4 GHz
and 5 GHz radios individually.
Manage the Basic WiFi and Radio Features
50
Page 51

Insight Managed Smart Cloud Wireless Access Point WAC510 User Manual
DescriptionSetting
Turn Radio On
Wireless Mode
MCS Index / Data Rate
By default, the Turn Radio On check box is selected and the radio broadcasts.Turning
off a radio disables WiFi access for the band, which can be helpful during configuration,
network tuning, or troubleshooting.
Select one of the following WiFi modes for the 2.4 GHz radio:
• 11b. 802.11n, 802.11g, and 802.11b WiFi clients can connect to the access point.
However, the speed of 802.11n and 802.11g clients is limited.
• 11bg. 802.11n, 802.11g, and 802.11b WiFi clients can connect to the access point.
However, the speed of 802.11n clients is limited.
• 11ng. 802.11n, 802.11g, and 802.11b WiFi clients can connect to the access point.
This is the default setting.
Select one of the following WiFi modes for the 5 GHz radio:
• 11a. 802.11ac, 802.11na, and 802.11a WiFi clients can connect to the access point.
However, the speed of 802.11ac and 802.11na clients is limited.
• 11na. 802.11ac, 802.11na, and 802.11a WiFi clients can connect to the access
point. However, the speed of 802.11ac clients is limited.
• 11ac. 802.11ac, 802.11na, and 802.11a WiFi clients can connect to the access
point.This is the default setting.
From the menu, select the modulation and coding scheme (MCS) inde x and data transmit
rate for the radio. The default is Best. For most networks, the default settings work fine.
The available settings also depend on the selection from the Channel Width menu and
the selection from the Guard Interval menu.
Channel Width
Output Power
From the menu, select the channel width for the radio. Use the following guidelines:
• A wider channel improves the performance.
• The 802.11n specification allows a 40 MHz–wide channel in addition to the legacy
20 MHz channel that is available with other modes.
• The 40 MHz channel enables higher data rates but leaves f e wer channels a v ailab le
for use.
• The 802.11ac specification allows an 80 MHz–wide channel in addition to the dynamic
20/40 MHz channel that is available with other modes.
The channel width and guard interval determine the available MCS index and data
transmit rates.
From the menu, select the transmission power of the radio.You can select Max(100%),
50%, 25%, 12.5%, or Min(4%).The default is Max(100%).
If two or more access points are operating in the same area and on
Note
the same channel, interference can occur. In such a situation, you
might want to decrease the output power for an access point. Make
sure that you comply with the regulatory requirements for total radio
frequency (RF) output power in your country.
Manage the Basic WiFi and Radio Features
51
Page 52

Insight Managed Smart Cloud Wireless Access Point WAC510 User Manual
(Continued)
DescriptionSetting
Guard Interval
Channel
From the menu, select the value that protects radio transmissions from interference. An
Auto guard interval (which is the default) improv es performance, b ut some legacy devices
can operate only with a long –800ns guard interval.
The guard interval and channel width determine the available MCS index and data
transmit rates.
From the menu, select the WiFi channel for the radio.The available WiFi channels and
frequencies depend on the country and the radio.The default is Auto, which enables the
radio to automatically select the most suitable channel.
You do not need to change the WiFi channel unless you experience
Note
interference (which is indicated by lost connections).
If you use multiple WiFi access points (APs), reduce interference by
Note
selecting different channels for adjacent APs .We recommend a channel
spacing of four channels between adjacent APs (for example, use
Channels 1 and 5, or 6 and 10).
6. Click the Apply button.
Your settings are saved.The radio or radios restart and WiFi clients might need to reconnect.
Turn a Radio On or Off
By default, both the 2.4 GHz and 5 GHz radios broadcast.Turning off a radio disables WiFi access for the
associated band, which affects all VAPs (or SSIDs) in that band.Turning off a radio can be helpful during
configuration, network tuning, or troubleshooting.
To turn a radio on or off:
1. Open a web browser from a computer that is connected to the same network as the access point or to
the access point directly through an Ethernet cable or WiFi connection.
2. Enter the IP address that is assigned to the access point.
A login window opens.
3. Enter the access point user name and password.
The default user name is admin.The password is the one that you specified the first time that you
logged in.The user name and password are case-sensitive.
The Dashboard page displays.
4. Select Management > Configuration > Wireless > Basic > Wireless Settings.
The Wireless Settings page displays.
5. Take one of the following actions:
Manage the Basic WiFi and Radio Features
52
Page 53

Insight Managed Smart Cloud Wireless Access Point WAC510 User Manual
• Turn a radio on. Select the Turn Radio ON check box for the radio.
• Turn a radio off. Clear the Turn Radio ON check box for the radio.
6. Click the Apply button.
Your settings are saved.
Change the WiFi Mode for a Radio
By default, all types of WiFi clients can access a WiFi network on the access point, that is, the WiFi modes
on the access point support 802.11n, 802.11g, 802.11b, 802.11ac, 802.11na, and 802.11a clients.You can
change the modes to limit access to certain types of clients.
To change the WiFi mode for a radio:
1. Open a web browser from a computer that is connected to the same network as the access point or to
the access point directly through an Ethernet cable or WiFi connection.
2. Enter the IP address that is assigned to the access point.
A login window opens.
3. Enter the access point user name and password.
The default user name is admin.The password is the one that you specified the first time that you
logged in.The user name and password are case-sensitive.
The Dashboard page displays.
4. Select Management > Configuration > Wireless > Basic > Wireless Settings.
The Wireless Settings page displays.
5. Select the WiFi mode for the radio:
• 2.4 GHz radio. Select one of the following WiFi modes for the 2.4 GHz radio:
- 11b. 802.11n, 802.11g, and 802.11b WiFi clients can connect to the access point. However,
the speed of 802.11n and 802.11g clients is limited.
- 11bg. 802.11n, 802.11g, and 802.11b WiFi clients can connect to the access point. However,
the speed of 802.11n clients is limited.
- 11ng. 802.11n, 802.11g, and 802.11b WiFi clients can connect to the access point. This is the
default setting.
• 5 GHz radio. Select one of the following WiFi modes for the 5 GHz radio:
Manage the Basic WiFi and Radio Features
53
Page 54

Insight Managed Smart Cloud Wireless Access Point WAC510 User Manual
- 11a. 802.11ac, 802.11na, and 802.11a WiFi clients can connect to the access point. However,
the speed of 802.11ac and 802.11na clients is limited.
- 11na. 802.11ac, 802.11na, and 802.11a WiFi clients can connect to the access point. However ,
the speed of 802.11ac clients is limited.
- 11ac. 802.11ac, 802.11na, and 802.11a WiFi clients can connect to the access point.This is
the default setting.
6. Click the Apply button.
Your settings are saved.The radio or radios restart and WiFi clients might need to reconnect.
Change the MCS Index and Data Rate for a Radio
You can change the modulation and coding scheme (MCS) index and data transmit rate for a radio. By
default, the setting is Best.The settings that are available also depend on the selected channel width (see
Change the Channel Width for a Radio on page 54) and selected guard interval (see Change the Guard
Interval for a Radio on page 56).
To change the MCS index and data rate for a radio:
1. Open a web browser from a computer that is connected to the same network as the access point or to
the access point directly through an Ethernet cable or WiFi connection.
2. Enter the IP address that is assigned to the access point.
A login window opens.
3. Enter the access point user name and password.
The default user name is admin.The password is the one that you specified the first time that you
logged in.The user name and password are case-sensitive.
The Dashboard page displays.
4. Select Management > Configuration > Wireless > Basic > Wireless Settings.
The Wireless Settings page displays.
5. From the MCS Index / Data Rate menu, select a setting.
By default, the setting is Best.
6. Click the Apply button.
Your settings are saved.The radio or radios restart and WiFi clients might need to reconnect.
Change the Channel Width for a Radio
Use the following guidelines when you determine the channel width for a radio:
• A wider channel improves the performance.
• The 802.11n specification allows a 40 MHz–wide channel in addition to the legacy 20 MHz channel that
is available with other modes.
Manage the Basic WiFi and Radio Features
54
Page 55

Insight Managed Smart Cloud Wireless Access Point WAC510 User Manual
• The 40 MHz channel enables higher data rates but leaves fewer channels available for use.
• The 802.11ac specification allows an 80 MHz–wide channel in addition to the dynamic 20/40 MHz
channel that is available with other modes.
The channel width and guard interval determine the available MCS index and data transmit rates.
To change the channel width for a radio:
1. Open a web browser from a computer that is connected to the same network as the access point or to
the access point directly through an Ethernet cable or WiFi connection.
2. Enter the IP address that is assigned to the access point.
A login window opens.
3. Enter the access point user name and password.
The default user name is admin.The password is the one that you specified the first time that you
logged in.The user name and password are case-sensitive.
The Dashboard page displays.
4. Select Management > Configuration > Wireless > Basic > Wireless Settings.
The Wireless Settings page displays.
5. From the Channel Width menu, select one of the following settings.
• 20 MHz.
• 40 MHz.
• Dynamic 20 / 40 MHz.This is the default setting for the 2.4 GHz radio.
• Dynamic 20 / 40 / 80 MHz.This selection is available only for the 5 GHz radio and is the default
setting for that radio.
6. Click the Apply button.
Your settings are saved.The radio or radios restart and WiFi clients might need to reconnect.
Change the Output Power for a Radio
By default, the output power of the access point is set at the maximum. If two or more access points are
operating in the same area and on the same channel, interference can occur. In such a situation, you might
want to decrease the output power for an access point. Make sure that you comply with the regulatory
requirements for total radio frequency (RF) output power in your country.
To change the output power for a radio:
1. Open a web browser from a computer that is connected to the same network as the access point or to
the access point directly through an Ethernet cable or WiFi connection.
2. Enter the IP address that is assigned to the access point.
A login window opens.
3. Enter the access point user name and password.
Manage the Basic WiFi and Radio Features
55
Page 56

Insight Managed Smart Cloud Wireless Access Point WAC510 User Manual
The default user name is admin.The password is the one that you specified the first time that you
logged in.The user name and password are case-sensitive.
The Dashboard page displays.
4. Select Management > Configuration > Wireless > Basic > Wireless Settings.
The Wireless Settings page displays.
5. From the Output Power menu, select Max(100%), 50%, 25%, 12.5%, or Min(4%).
The default is Max(100%).
6. Click the Apply button.
Your settings are saved.The radio or radios restart and WiFi clients might need to reconnect.
Change the Guard Interval for a Radio
The guard interval protects radio transmissions from interference. An automatic guard interval (which is the
default) improv es performance, but some legacy de vices can operate only with a long –800ns guard interval.
The guard interval and channel width determine the available MCS index and data transmit rates.
To change the guard interval for a radio:
1. Open a web browser from a computer that is connected to the same network as the access point or to
the access point directly through an Ethernet cable or WiFi connection.
2. Enter the IP address that is assigned to the access point.
A login window opens.
3. Enter the access point user name and password.
The default user name is admin.The password is the one that you specified the first time that you
logged in.The user name and password are case-sensitive.
The Dashboard page displays.
4. Select Management > Configuration > Wireless > Basic > Wireless Settings.
The Wireless Settings page displays.
5. From the Guard Interval menu, select one of the following settings:
• Auto.This is the default setting.
• Long-800 ns.
6. Click the Apply button.
Your settings are saved.The radio or radios restart and WiFi clients might need to reconnect.
Manage the Basic WiFi and Radio Features
56
Page 57

Insight Managed Smart Cloud Wireless Access Point WAC510 User Manual
Change the Channel for a Radio
The available WiFi channels and frequencies depend on the country and the radio.The default is Auto,
which enables the radio to automatically select the most suitable channel.
You do not need to change the WiFi channel unless you experience interference
Note
(which is indicated by lost connections).
If you use multiple WiFi access points (APs), reduce interference by selecting diff erent
Note
channels for adjacent APs.We recommend a channel spacing of four channels
between adjacent APs (for example, use Channels 1 and 5, or 6 and 10).
To change the channel for a radio:
1. Open a web browser from a computer that is connected to the same network as the access point or to
the access point directly through an Ethernet cable or WiFi connection.
2. Enter the IP address that is assigned to the access point.
A login window opens.
3. Enter the access point user name and password.
The default user name is admin.The password is the one that you specified the first time that you
logged in.The user name and password are case-sensitive.
The Dashboard page displays.
4. Select Management > Configuration > Wireless > Basic > Wireless Settings.
The Wireless Settings page displays.
5. From the Channel menu, select a channel.
The default is Auto. When you select a particular channel, the channel selection becomes static.
6. Click the Apply button.
Your settings are saved.The radio or radios restart and WiFi clients might need to reconnect.
Set Up a WiFi On/Off Schedule for the Radios
Scheduling the WiFi radios to be turned off is a green feature that allows you to turn off the WiFi radios
during scheduled vacations, office shutdowns, on evenings, or on weekends.You can set up one WiFi
schedule that applies to both radios.
To set up and enable a WiFi on/off schedule:
1. Open a web browser from a computer that is connected to the same network as the access point or to
the access point directly through an Ethernet cable or WiFi connection.
2. Enter the IP address that is assigned to the access point.
A login window opens.
3. Enter the access point user name and password.
Manage the Basic WiFi and Radio Features
57
Page 58

Insight Managed Smart Cloud Wireless Access Point WAC510 User Manual
The default user name is admin.The password is the one that you specified the first time that you
logged in.The user name and password are case-sensitive.
The Dashboard page displays.
4. Select Management > Configuration > Wireless > Basic > Wireless Scheduling.
The Wireless Scheduling page displays.
5. Select the Enable radio button.
6. Specify the following settings:
• Days. Select the check boxes for the days that you want the radios to be turned on or turned off.
By default, Saturday and Sunday are selected.
• Mode. From the menu, select whether the schedule turns on the radios (ON Time) or turns off the
radios (OFF Time).
• Time. Mo v e the buttons on the slider to specify the time that y ou want the r adios to be either turned
on or turned off.
7. Click the Apply button.
Your settings are saved.
Manage Quality of Service for a WiFi Radio
You can specify the Quality of Service (QoS) setting for the 2.4 GHz and 5 GHz radios separately.These
settings are enabled by default for both radios.
To manage the QoS settings for WiFi:
1. Open a web browser from a computer that is connected to the same network as the access point or to
the access point directly through an Ethernet cable or WiFi connection.
2. Enter the IP address that is assigned to the access point.
A login window opens.
3. Enter the access point user name and password.
The default user name is admin.The password is the one that you specified the first time that you
logged in.The user name and password are case-sensitive.
The Dashboard page displays.
Manage the Basic WiFi and Radio Features
58
Page 59

Insight Managed Smart Cloud Wireless Access Point WAC510 User Manual
4. Select Management > Configuration > Wireless > Basic > QoS Settings.
5. Enable or disable the f ollowing features for a radio by selecting the applicable Enable or Disab le radio
buttons:
• Wi-Fi Multimedia (WMM).WiFi Multimedia (WMM) is a subset of the 802.11e standard.
Time-dependent information such as video or audio is given higher priority than normal traffic. For
WMM to function correctly, WiFi clients must also support WMM. By enabling WMM, you allow
WMM to control upstream traffic flowing from WiFi devices to the access point and downstream
traffic flowing from the access point to WiFi devices.WMM defines the following four queues in
decreasing order of priority:
- Voice.The highest priority queue with minimum delay, which makes it very suitable for
applications such as VoIP and streaming media.
- Video.The second highest priority queue with low delay.Video applications are routed to this
queue.
- Best effort.The medium priority queue with medium delay. Most standard IP applications use
this queue.
- Background.The low priority queue with high throughput. Applications such as FTP that are
not time-sensitive but require high throughput can use this queue.
• WMM Power save. Enabling the WMM P o wersav e feature sa ves pow er for battery-powered de vices
and fine-tunes power consumption.
6. Click the Apply button.
Your settings are saved.
Manage the Basic WiFi and Radio Features
59
Page 60

Manage the Advanced WiFi and Radio Features
This chapter describes how you can manage the advanced WiFi and radio features of the access point. For
information about the basic WiFi and radio settings, see Manage the Basic WiFi and Radio Features on page
31.
If you want to change the settings of the access point’s WiFi network, use a wired connection to
Tip
avoid being disconnected when the new WiFi settings take effect.
The chapter includes the following sections:
• Manage the Advanced Radio Features
• Set Up a WiFi Bridge Between Access Points
4
60
Page 61

Insight Managed Smart Cloud Wireless Access Point WAC510 User Manual
Manage the Advanced Radio Features
You can manage the advanced radio features that are described in the following sections:
• Manage the Advanced WiFi Settings for the Radios on page 61
• Manage the Maximum Number of Clients for a Radio on page 63
• Manage the Broadcast and Multicast Settings for a Radio on page 64
• Manage Load Balancing for the Radios on page 65
For information about the basic radio features, see Manage the Basic Radio Features on page 49.
Manage the Advanced WiFi Settings for the Radios
The advanced WiFi settings for the radios apply to all WiFi networks (VAPs or SSIDs).You can specify the
radio settings for the 2.4 GHz and 5 GHz radios individually. For information about the basic radio settings,
see Manage the Basic Settings for the Radios on page 49.
A radio must be turned on for you to specify the settings. For more information about turning a radio on, see
Turn a Radio On or Off on page 52.
To manage the advanced WiFi settings for the radios:
1. Open a web browser from a computer that is connected to the same network as the access point or to
the access point directly through an Ethernet cable or WiFi connection.
2. Enter the IP address that is assigned to the access point.
A login window opens.
3. Enter the access point user name and password.
The default user name is admin.The password is the one that you specified the first time that you
logged in.The user name and password are case-sensitive.
The Dashboard page displays.
Manage the Advanced WiFi and Radio Features
61
Page 62

Insight Managed Smart Cloud Wireless Access Point WAC510 User Manual
4. Select Management > Configuration > Wireless > Advanced.
5. Configure the settings as described in the following table.
The descriptions in the table apply to both radios. Except for the MU-MIMO feature, you can specify the
radio settings for the 2.4 GHz and 5 GHz radios individually.
DescriptionSetting
Max.Wireless Clients
RTS Threshold
(256-2346)
Beacon Interval
(100-300)
Broadcast/Multicast
Rate Limiting
Enter the maximum number of WiFi clients that can simultaneously associate with the
radio.The range is from 1 to 64.The default is 64 WiFi clients.
Enter the Request to Send (RTS) threshold.The range is from 256 to 2346.The default
is 2346.
If the packet size is equal to or less than the RTS threshold, the radio uses the Carrier
Sense Multiple Access with Collision Detection (CSMA/CD) mechanism and the data
frame is transmitted immediately after the silence period. If the pac ket siz e is larger than
the RTS threshold, the system uses the CSMA with Collision Avoidance (CSMA/CA)
mechanism. In this situation, the transmitting de vice sends the RTS pac ket to the receiving
device and waits for the receiving device to return a Clear to Send (CTS) packet before
sending the actual packet data.
Enter an interval between 100 ms and 300 ms for each beacon transmission, which
allows the radio to synchronize the WiFi network.The default is 100 ms.
Multicast and broadcast rate limiting is enabled by def ault to improv e the ov erall network
performance by limiting the number of packets that are transmitted across the network.
By default, the setting is 50 (the maximum possible value), which specifies a maximum
rate limit of 50 packets per second.To change the setting, move the slider.To disable
multicast and broadcast rate limiting, clear the small check box.
Fixed Multicast Rate
From the menu, select the multicast traffic transmission rate for the radio. The default is
54 Mbps (the maximum possible value).You can also select Auto and let the access
point automatically adjust the multicast traffic transmission rate.
Manage the Advanced WiFi and Radio Features
62
Page 63

Insight Managed Smart Cloud Wireless Access Point WAC510 User Manual
(Continued)
DescriptionSetting
DTIM Interval (1-255)
MU-MIMO
Move the slider to specify the delivery traffic indication message (DTIM) interval or the
data beacon rate, which indicates the beacon delivery traffic indication message period
in multiples of beacon intervals.This value must be between 1 and 255.The default is
1.
Select the MU-MIMO Enable radio button to enable multiuser MIMO (MU-MIMO). By
default, the MU-MIMO Disable radio button is selected and MU-MIMO is disabled.
802.11ac W ave 2 supports MU-MIMO, which enab les multiple users to receive data from
the access point simultaneously using the same channel.With MU-MIMO, the access
point can transmit to multiple clients simultaneously using the same channel. MU-MIMO
is used in the downstream direction and requires both the access point and the WiFi
clients to be capable of 802.11ac Wave 2.
You can enable or disable MU-MIMO for the 5 GHz radio but not for the 2.4 GHz radio.
6. Click the Apply button.
Your settings are saved.The radio or radios restart and WiFi clients might need to reconnect.
Manage the Maximum Number of Clients for a Radio
The number of clients that are allowed to associate with a radio affects the reliability and throughput of the
WiFi connection. A smaller number can increase the reliability and throughput and a large number can
decrease the reliability and throughput.
By default, a radio allows up to 64 client associations.You can specify a higher or lower number of clients.
If the number of associated clients exceeds the specified number, the radio rejects new client associations
until the number drops below the specified number.
To manage the maximum number of clients for a radio:
1. Open a web browser from a computer that is connected to the same network as the access point or to
the access point directly through an Ethernet cable or WiFi connection.
2. Enter the IP address that is assigned to the access point.
A login window opens.
3. Enter the access point user name and password.
The default user name is admin.The password is the one that you specified the first time that you
logged in.The user name and password are case-sensitive.
The Dashboard page displays.
4. Select Management > Configuration > Wireless > Advanced.
The Wireless Settings page displays.
5. In the Max.Wireless Clients field, enter the maximum number of WiFi clients that can simultaneously
associate with the radio.
Manage the Advanced WiFi and Radio Features
63
Page 64

Insight Managed Smart Cloud Wireless Access Point WAC510 User Manual
The range is from 1 to 64.The default is 64 WiFi clients.
6. Click the Apply button.
Your settings are saved.The radio or radios restart and WiFi clients might need to reconnect.
Manage the Broadcast and Multicast Settings for a Radio
Because multicast and broadcast traffic can adversely affect the throughput and latency of a WiFi network,
you can change the multicast and broadcast rate limiting settings and the fix ed multicast traffic transmission
rate for a radio.
By default, multicast and broadcast rate limiting is enabled to improve the overall network performance by
limiting the number of packets that are transmitted across the network. By default, the setting is 50 (the
maximum possible value), which specifies a maximum rate limit of 50 packets per second.You can lower
this number.
The multicast traffic transmission rate for the radio is 54 Mbps (the maximum possible value).You can
specify a lower transmission rate.
To manage the broadcast and multicast settings for a radio:
1. Open a web browser from a computer that is connected to the same network as the access point or to
the access point directly through an Ethernet cable or WiFi connection.
2. Enter the IP address that is assigned to the access point.
A login window opens.
3. Enter the access point user name and password.
The default user name is admin.The password is the one that you specified the first time that you
logged in.The user name and password are case-sensitive.
The Dashboard page displays.
4. Select Management > Configuration > Wireless > Advanced.
The Wireless Settings page displays.
5. To change the multicast and broadcast rate limiting settings for a radio , under Broadcast/Multicast Rate
Limiting, take one of the following actions in:
• To change the rate limiting setting, move the slider. By default, the setting is 50 (the maximum
possible value), which specifies a maximum rate limit of 50 packets per second.
• To disable or enable multicast and broadcast rate limiting, clear or select the small check box.
6. T o change the m ulticast traffic transmission rate f or a radio , from the Fixed Multicast Rate menu, select
a transmission rate.
The default is 54 Mbps (the maximum possible value).You can also select Auto and let the access
point automatically adjust the multicast traffic transmission rate.
7. Click the Apply button.
Your settings are saved.The radio or radios restart and WiFi clients might need to reconnect.
Manage the Advanced WiFi and Radio Features
64
Page 65

Insight Managed Smart Cloud Wireless Access Point WAC510 User Manual
Manage Load Balancing for the Radios
You can configure the radio utilization thresholds to enable both radios to maintain the speed and perf ormance
of the WiFi network as clients associate with and disassociate from the WiFi network.
Client associations depend on the percentage of network bandwidth utilization that you specify and the
WLAN utilization for each radio, which you can view in the Current Trend pane on the Dashboard page.
New client associations are allowed if a radio’s WLAN utilization is less than the percentage of network
bandwidth utilization for the radio. New client associations are not allowed if a radio’s WLAN utilization
exceeds the percentage of network bandwidth utilization for the radio.
To manage load balancing for the radios:
1. Open a web browser from a computer that is connected to the same network as the access point or to
the access point directly through an Ethernet cable or WiFi connection.
2. Enter the IP address that is assigned to the access point.
A login window opens.
3. Enter the access point user name and password.
The default user name is admin.The password is the one that you specified the first time that you
logged in.The user name and password are case-sensitive.
The Dashboard page displays.
4. Select Management > Configuration > Wireless > Advanced > Load Balancing.
5. To enable load balancing for both radios, select the Load Balancing Mode Enable radio button.
By default, load balancing is disabled.
6. Move the slider to specify the percentage of network bandwidth utilization that is allowed on each r adio
before a radio stops accepting new client associations.
The default is 0, which specifies that all new associations are allow ed, regardless of the utilization r ate .
(In effect, a setting of 0 disables load balancing.) The configured settings applies to both radios.
7. Click the Apply button.
Your settings are saved.
Set Up a WiFi Bridge Between Access Points
You can configure a wireless distribution system (WDS) that consists of point-to-point WiFi bridge connections
between two access points. Each WiFi bridge connection requires a WDS profile for which the settings m ust
match on the access points that make up the bridge.
Manage the Advanced WiFi and Radio Features
65
Page 66

Insight Managed Smart Cloud Wireless Access Point WAC510 User Manual
If the access point is connected to the Internet over a wired connection, the access point can function as
the WiFi base station for up to four other access points that function as WiFi repeaters.The access point
itself can also function as a WiFi repeater if it is connected to another access point that functions as a WiFi
base station.
A WiFi base station connects to the Internet, wired and WiFi clients can connect to the base station, and
the base station sends its WiFi signal to one or more access points that function as WiFi repeaters. Wired
and WiFi clients can also connect to a WiFi repeater, but the repeater connects to the Internet through the
WiFi base station.
The following figure shows a WiFi repeating scenario with a WiFi base station on the left side and a single
WiFi repeater on the right side.
Figure 8.WiFi bridge configuration between two access points
To use a WiFi bridge, you cannot use the auto channel f eature f or the access point and the SSID broadcast
must be enabled.
For a WiFi bridge, you must set up a WiFi base station (the master) and a WiFi repeater (the slave):
• WiFi base station.The access point functions as the master that bridges traffic to and from the repeater
access point (the slave).The base station also handles local WiFi and wired traffic.To configure this
mode, you must know the MAC address of the repeater access point.The MAC address is listed on on
the product label or on the WiFi bridge configuration page of the local browser interface.
• WiFi repeater.The access point functions as the slave and sends all traffic from its local WiFi or wired
computers to the WiFi base station (the master).To configure this mode, you must know the MAC
address of the base station.
By default, the access point functions in dual-band concurrent mode. If you enable the WiFi repeater in
either radio band, the WiFi base station or WiFi repeater cannot be enabled in the other radio band. Ho wev er ,
if you enable the WiFi base station in either radio band and use the other r adio band f or either client access
or as a WiFi base station, dual-band concurrent mode is not affected.
Before you can set up a WiFi network with WDS, your configuration must meet the following conditions:
Manage the Advanced WiFi and Radio Features
66
Page 67

Insight Managed Smart Cloud Wireless Access Point WAC510 User Manual
• Both access points must use the same WiFi channel and WiFi security settings.
• Both access points must be on the same LAN IP subnet.That is, all of the access point LAN IP addresses
are in the same network.
• All LAN devices (wired and WiFi computers) are configured to operate in the same LAN network address
range as the access points.
If you are using the access point as the base station with a non-NETGEAR access
Note
point as a repeater, y ou might need to change more configuration settings. In particular,
you might need to disable the DHCP server function on the non-NETGEAR access
point that is the repeater.
CAUTION:
If you set up a WiFi bridge between two P oE access points , each of which is connected
to a PoE switch with a network connection, you might be creating a loop and
connectivity problems might occur. In such a situation, use a power adapter for the
WiFi repeater (slave) so that you do not need to connect it to a PoE switch.
To set up a WiFi bridge between two access points:
1. Open a web browser from a computer that is connected to the same network as the access point or to
the access point directly through an Ethernet cable or WiFi connection.
2. Enter the IP address that is assigned to the access point.
A login window opens.
3. Enter the access point user name and password.
The default user name is admin.The password is the one that you specified the first time that you
logged in.The user name and password are case-sensitive.
The Dashboard page displays.
4. Select Management > Configuration > Wireless > Wireless Bridge.
The page that displays lets you select a WDS profile (WDS 1, WDS 2, WDS 3, or WDS 4).
5. Click the > button to the left of a WDS profile.
The WDS profile page displays.
6. Select the Band 2.4 GHz or 5 GHz radio button.
Your selection determines the radio band on which the WDS is established. For countries that do not
support dual-band operation, you cannot select the radio.
7. Select the VAP Enable radio button.
Manage the Advanced WiFi and Radio Features
67
Page 68

Insight Managed Smart Cloud Wireless Access Point WAC510 User Manual
By default, a WDS profile is disabled.
8. Configure the WDS profile settings as described in the following table.
DescriptionSetting
Wireless Network Name
(SSID)
Local MAC Address
Remote MAC Address
Network Authentication,
Data Encryption, and
Passphrase
The WiFi network name on which the WDS is established.The default name is
Netgear-WDS-x, in which x is the number of the WDS (1, 2, 3, or 4).
The MAC address of the local WDS r adio interf ace, that is , the MAC address of the local
radio on which the WDS is established.You cannot change this MAC address on this
page.The MAC address is displayed for your information.
Enter this MAC address on the remote access point of the WDS connection.
The MAC address of the remote WDS radio interface, that is, the MAC address of the
remote radio on which the WDS is established.
By default, the selection from the menu is Open System, in which case authentication
and data encryption are not applicable.To secure the WDS connection, select WP A2-PSK
and specify the following settings:
• Data Encryption. The data encryption is AES and you cannot change this setting.
• Passphrase.The passphrase for the WDS connection. For you to enable the WDS
connection, the passphrase on the remote access point must match the passphrase
that you define in this field.
9. Click the Apply button.
Your settings are saved.The access point restarts with the new settings.
10. Configure the WiFi bridge settings on the access point at the other end of the WiFi bridge and restart
that access point.
The WiFi bridge is established.
11. Verify connectivity across the LANs of both access points.
If the configuration is set up correctly, a computer on any WiFi or wired LAN segment of the access
point that functions as the WiFi repeater can connect to the Internet or share files and printers with any
other computer or server connected to the access point that functions as the WiFi base station.
Manage the Advanced WiFi and Radio Features
68
Page 69

Manage Access and Security
This chapter describes how you can manage access and security features and user accounts.
The chapter includes the following sections:
• Block Specific URLs and Keywords for Internet Access
• Manage Local MAC Access Control Lists
• Manage User Accounts
• Manage Neighbor AP Detection
• Set Up RADIUS Servers
For information about essential WiFi security (network authentication and encryption),
Note
see Set Up an Open or Secure WiFi Network on page 32.
5
69
Page 70

Insight Managed Smart Cloud Wireless Access Point WAC510 User Manual
Block Specific URLs and Keywords for Internet Access
You can set up a blacklist by specifying URLs (web addresses) for which Internet access must be blocked.
You can also specify keywords that cause the access point to reject URLs that contain those keywords.
To set up a blacklist with URLs and keywords for which Internet access must be blocked:
1. Open a web browser from a computer that is connected to the same network as the access point or to
the access point directly through an Ethernet cable or WiFi connection.
2. Enter the IP address that is assigned to the access point.
A login window opens.
3. Enter the access point user name and password.
The default user name is admin.The password is the one that you specified the first time that you
logged in.The user name and password are case-sensitive.
The Dashboard page displays.
4. Select Management > Configuration > Security > URL Filtering.
The URL Filtering page displays.
5. Select the Enable radio button.
6. Compose the blacklist in the following ways:
• Blocked URLs.To add a URL to the blacklist, type or copy the URL in the upper field (to the left
of the upper Add button) and click the upper Add button.You can also select one or more URLs
Manage Access and Security
70
Page 71

Insight Managed Smart Cloud Wireless Access Point WAC510 User Manual
from the Popular URL list by selecting the check boxes for the URLS and clicking the << Move
button.
T o remo ve a URL from the blac klist, select the check bo x for the URL and click the upper left Remo ve
button.
When you block a URL, the domain and all URLs in the domain are blocked. For example, if you
enter and add www.google .com, all web pages in the www .google.com domain are block ed, including,
for example, www.google.com/finance.
• Blocked Keywords.To add a keyword entry to the blacklist, enter the keyword in the lower field
(to the left of the lower Add button) and click the lower Add button.
To remove a keyw ord entry from the blacklist, select the check box for the entry and click the lower
Remove button.
All URLs that contain the keyword are blocked. For example, if you enter and add Jobs, all URLs
that contains Jobs (or jobs) are blocked.
7. Click the Apply button.
Your settings are saved.
Manage Local MAC Access Control Lists
The access point supports two local access control lists (ACLs) that are based on MAC addresses. Each
local MAC ACL can contain a total number of 64 MAC addresses.
A WiFi device for which you place the MAC address on the ACL is allowed access to the WiFi network to
which you apply the ACL.WiFi devices that are not on the ACL are not allowed access to the WiFi network
to which you apply the ACL.
An ACL takes effect only after you apply it to a WiFi network. For information about applying an ACL to a
WiFi network, see Select a MAC ACL for a WiFi Network on page 42.You can apply a MAC ACL to more
than one WiFi network.
The following sections describe how you can manage MAC ACLs:
• Manually Set Up a MAC Access Control List on page 71
• Import an Existing MAC Access Control List on page 73
Manually Set Up a MAC Access Control List
You can compose up to two access control lists (ACLs) that are each based on up to 64 MAC addresses.
The default name for the first MAC ACL (referred to as Group 1) is Corporate.The default name for the
second MAC ACL (referred to as Group 2) is Guest.
You can use a MAC ACL to control which WiFi devices can access a WiFi network.You can apply a MAC
ACL to more than one WiFi network.
To manually set up a MAC ACL:
1. Open a web browser from a computer that is connected to the same network as the access point or to
the access point directly through an Ethernet cable or WiFi connection.
2. Enter the IP address that is assigned to the access point.
A login window opens.
Manage Access and Security
71
Page 72

Insight Managed Smart Cloud Wireless Access Point WAC510 User Manual
3. Enter the access point user name and password.
The default user name is admin.The password is the one that you specified the first time that you
logged in.The user name and password are case-sensitive.
The Dashboard page displays.
4. Select Management > Configuration > Security > MAC ACL.
The previous figure shows some examples. Devices in the Trusted Stations table are manually added,
imported, or both added and imported. Devices in the A v ailable Stations table are automatically detected
by the access point, but you can also man ually add devices to this table (see Step 7). All devices in the
Availab le Stations table are common to Group 1 and Group 2, which allows you to add a device to both
groups.
By default, Group 1 is selected. Group 1 is the first MAC ACL.
5. To select Group 2 (which is the second MAC ACL), scroll down and click the > Group 2 link.
6. To change the name for Group 1 or Group 2, enter a new name in the Group Name field.
The default name for Group 1 is Corporate.The default name for Group 2 is Guest.
7. To manually add a device to the Available Stations table, do the following:
a. Enter the MAC address in the format 00-00-00-00-00-00 in the field below the Available Stations
table.
b. Click the Add button.
The device is added to the Available Stations table.
8. Compose the ACL in the following way:
Manage Access and Security
72
Page 73

Insight Managed Smart Cloud Wireless Access Point WAC510 User Manual
• To move a device from the Available Stations table to the Trusted Stations table, select the check
box for the device and click the << Move button.
• To remove a device from the Trusted Stations table, select the check box for the device and click
the Remove button.
When you remove the de vice from the Trusted Stations table, the device is not mov ed to the A vailable
Stations table.
9. Click the Apply button.
Your settings are saved.WiFi devices in the Trusted Stations table can access the WiFi network to
which you apply the ACL (see Select a MAC ACL for a WiFi Network on page 42).
Import an Existing MAC Access Control List
You can import an existing access control list (ACL) that is based on up to 64 MAC addresses.You can
import the list into the first MAC ACL (referred to as Group 1 and named Corporate), into the second MAC
ACL (referred to as Group 2 and named Guest), or into both.
The file with MAC addresses must be in the following format:
• Entries in the file must be MAC addresses only in hexadecimal format with each octet separated by a
hyphen, for example 00-11-22-33-44-55.
• You must separate entries with a comma.
• The file must be in text format (that is, with a .txt or .cfg extension).
You can use a MAC ACL to control which WiFi devices can access a WiFi network.You can apply a MAC
ACL to more than one WiFi network.
To import an existing MAC ACL:
1. Open a web browser from a computer that is connected to the same network as the access point or to
the access point directly through an Ethernet cable or WiFi connection.
2. Enter the IP address that is assigned to the access point.
A login window opens.
3. Enter the access point user name and password.
The default user name is admin.The password is the one that you specified the first time that you
logged in.The user name and password are case-sensitive.
The Dashboard page displays.
Manage Access and Security
73
Page 74

Insight Managed Smart Cloud Wireless Access Point WAC510 User Manual
4. Select Management > Configuration > Security > MAC ACL.
The previous figure shows some examples. Devices in the Trusted Stations table are manually added,
imported, or both added and imported. Devices in the A v ailable Stations table are automatically detected
by the access point, but you can also manually add devices to this table (see Manually Set Up a MAC
Access Control List on page 71). All de vices in the Available Stations table are common to Group 1 and
Group 2, which allows you to add a device to both groups.
By default, Group 1 is selected. Group 1 is the first MAC ACL.
5. To select Group 2 (which is the second MAC ACL), scroll down and click the > Group 2 link.
6. To change the name for Group 1 or Group 2, enter a new name in the Group Name field.
The default name for Group 1 is Corporate.The default name for Group 2 is Guest.
7. To download a sample of a MAC ACL in the format that is required for importing, click the Download
Sample link.
8. Import and compose the ACL in the following way:
a. Replace or merge the MAC addresses in the import list with the MAC addresses in the Trusted
Stations table by selecting one of the following radio buttons:
• Replace. MA C addresses in the Trusted Stations table are replaced with the ones in the import
list.
• Merge. MAC addresses in the Trusted Stations table are merged with the ones in the import
list.
b. Click the Browse button and navigate to and select the import file.
The MAC addresses on the import list are placed in the Trusted Stations table.
c. To remove a MAC address from the Trusted Stations table, select the MAC address and click the
Remove button.
Manage Access and Security
74
Page 75

Insight Managed Smart Cloud Wireless Access Point WAC510 User Manual
When you remove the de vice from the Trusted Stations table, the device is not mov ed to the A vailable
Stations table.
9. Click the Apply button.
Your settings are saved. For information about manually adding MAC addresses to those in the T rusted
Stations table, see Manually Set Up a MAC Access Control List on page 71.
WiFi devices in the Trusted Stations table can access the WiFi network to which you apply the ACL
(see Select a MAC ACL for a WiFi Network on page 42).
Manage User Accounts
User accounts provide either read/write or read-only access to the local browser interface of the access
point.You can add, change, or delete user accounts.You cannot delete or change the default admin user
account except for the password.
The following sections describe how you can manage user accounts:
• Add a User Account on page 75
• Change the Settings for a User Account on page 76
• Remove a User Account on page 77
For information about changing the password for the default admin user account, see Change the Admin
User Account Password on page 108.
Add a User Account
To add a user account:
1. Open a web browser from a computer that is connected to the same network as the access point or to
the access point directly through an Ethernet cable or WiFi connection.
2. Enter the IP address that is assigned to the access point.
A login window opens.
3. Enter the access point user name and password.
The default user name is admin.The password is the one that you specified the first time that you
logged in.The user name and password are case-sensitive.
The Dashboard page displays.
4. Select Management > Configuration > System > Advanced > User Accounts.
Manage Access and Security
75
Page 76

Insight Managed Smart Cloud Wireless Access Point WAC510 User Manual
5. Click the add user account icon.
Additional fields and a menu display.
6. Specify the settings for the new user account:
• User Name. Enter a user name.
• Password. Enter a password between 4 and 12 characters in length.
The ideal password contains no English dictionary words and contains uppercase and lowercase
letters, numbers, and symbols. However, do not include quotation marks (") in the password.
• Privilege. From the menu, select Read-Write or Read-Only.
7. Click the Apply button.
Your settings are saved.
Change the Settings for a User Account
You cannot change the access privilege for the default admin user account.
To change the user name, password, or access privilege for a user account:
1. Open a web browser from a computer that is connected to the same network as the access point or to
the access point directly through an Ethernet cable or WiFi connection.
2. Enter the IP address that is assigned to the access point.
A login window opens.
3. Enter the access point user name and password.
The default user name is admin.The password is the one that you specified the first time that you
logged in.The user name and password are case-sensitive.
The Dashboard page displays.
4. Select Management > Configuration > System > Advanced > User Accounts.
The existing user accounts display.
5. To the right of the user account, change the existing settings as needed:
• User Name. Enter another user name.
• Password. Enter another password between 4 and 12 characters in length.
Manage Access and Security
76
Page 77

Insight Managed Smart Cloud Wireless Access Point WAC510 User Manual
The ideal password contains no English dictionary words and contains uppercase and lowercase
letters, numbers, and symbols. However, do not include quotation marks (") in the password.
• Privilege. From the menu, select Read-Write or Read-Only.
6. Click the Apply button.
Your settings are saved.
Remove a User Account
You can remove a user account that you no longer need.You cannot remove the default admin user account.
To remove a user account:
1. Open a web browser from a computer that is connected to the same network as the access point or to
the access point directly through an Ethernet cable or WiFi connection.
2. Enter the IP address that is assigned to the access point.
A login window opens.
3. Enter the access point user name and password.
The default user name is admin.The password is the one that you specified the first time that you
logged in.The user name and password are case-sensitive.
The Dashboard page displays.
4. Select Management > Configuration > System > Advanced > User Accounts.
The existing user accounts display.
5. Click the X to the right of the user account.
The user account is removed.
Manage Neighbor AP Detection
The access point can detect neighbor access points (APs) and you can classify them as known APs.
If you enable neighbor AP detection, the access point continuously scans the WiFi network, collects
information about all access points on the channels, and maintains a list of access points it detects in the
area. Initially all detected access points are displayed in the Unknown AP List.You can add access points
that you are familiar with to the Known AP List.You can also import a list of known access points in the
Known AP List.
CAUTION:
Access points in the Unknown AP List require further investigation.They could be
rogue access points, which use the SSID of a legitimate network.These types of
access points can present a serious security threat.
Manage Access and Security
77
Page 78

Insight Managed Smart Cloud Wireless Access Point WAC510 User Manual
The following sections describe how you can manage neighbor AP detection and add neighbor access
points to the Known AP List:
• Enable Neighbor Access Points Detection and Move Access Points to the Known AP List on page 78
• Import an Existing Neighbor Access Point List in the Known AP List on page 80
Enable Neighbor Access Points Detection and Move Access Points to the Known AP List
The access point can detect neighbor access points (APs) and lets you classify them as known APs. After
you enable neighbor AP detection, the access point maintains a list of access points it detects in the area.
Initially all detected access points are displayed in the Unknown AP List.You can manually move access
points from the Unknown AP List to the Known AP List.
By default neighbor access point detection is disabled.
T o enab le neighbor access point detection and mo ve detected access points to the Known
AP List:
1. Open a web browser from a computer that is connected to the same network as the access point or to
the access point directly through an Ethernet cable or WiFi connection.
2. Enter the IP address that is assigned to the access point.
A login window opens.
3. Enter the access point user name and password.
The default user name is admin.The password is the one that you specified the first time that you
logged in.The user name and password are case-sensitive.
The Dashboard page displays.
4. Select Management > Configuration > Security > Neighbor AP.
The page that displays lets you select the radio band (2.4GHz or 5GHz).
5. Click the > button to the left of the radio band.
The Neighbor AP page displays for the selected radio band.
6. Select the Enable Neighbor AP check box.
7. Click the Apply button.
Manage Access and Security
78
Page 79

Insight Managed Smart Cloud Wireless Access Point WAC510 User Manual
Your settings are saved. Neighbor AP detection is now enabled.
8. From the Detection Policy menu, select the scan method:
• Mild.The access point scans for neighbor access points ev ery 15 minutes.This is the default setting.
• Moderate.The access point scans for neighbor access points every 5 minutes.
• Aggressive.The access point scans for neighbor access points every 1 minute.
9. To move access points from the Unknown AP List to the Known AP List, do the following:
Manage Access and Security
79
Page 80

Insight Managed Smart Cloud Wireless Access Point WAC510 User Manual
a. Click the Unknown AP List tab.
b. If no access points display, click the Refresh button.
c. Select the check boxes for the access points that you are familiar with.
d. Click the << Move to Known AP List button.
e. Click the Known AP List tab.
The selected access points display in the Known AP List.
You can delete access points from the Known AP List. After being detected, these
Note
access points once more display in the Unknown AP List.
10. Click the Apply button.
Your settings are saved.
Import an Existing Neighbor Access Point List in the Known AP List
You can import a list with MAC addresses of known neighbor access points in the Known AP List.
The file with MAC addresses must be in the following format:
• Entries in the file must be MAC addresses only in hexadecimal format with each octet separated by a
hyphen, for example 00-11-22-33-44-55.
• You must separate entries with a comma.
• The file must be in text format (that is, with a .txt or .cfg extension).
For information about enabling neighbor AP detection, see Enable Neighbor Access Points Detection and
Move Access Points to the Known AP List on page 78.
Manage Access and Security
80
Page 81

Insight Managed Smart Cloud Wireless Access Point WAC510 User Manual
To import a list with MAC addresses of known neighbor access points in the Known AP
List:
1. Open a web browser from a computer that is connected to the same network as the access point or to
the access point directly through an Ethernet cable or WiFi connection.
2. Enter the IP address that is assigned to the access point.
A login window opens.
3. Enter the access point user name and password.
The default user name is admin.The password is the one that you specified the first time that you
logged in.The user name and password are case-sensitive.
The Dashboard page displays.
4. Select Management > Configuration > Security > Neighbor AP.
The page that displays lets you select the radio band (2.4GHz or 5GHz).
5. Click the > button to the left of the radio band.
6. To download a sample of a MAC ACL in the format that is required for importing, click the Download
Sample link.
7. Import and compose the Known AP List in the following way:
Manage Access and Security
81
Page 82

Insight Managed Smart Cloud Wireless Access Point WAC510 User Manual
a. Replace or merge the MAC addresses in the import list with the MAC addresses in the Known AP
List by selecting one of the following radio buttons:
• Replace. MAC addresses in the Known AP List are replaced with the ones in the import list.
• Merge. MAC addresses in the Known AP List are merged with the ones in the import list.
b. Click the Browse button and navigate to and select the import file.
The MAC addresses on the import list are placed in the Known AP List.
c. To remove a MAC address from the Known AP List, select the MAC address and click the Delete
button.
When you remove the device from the Known AP List, the device is not moved to the Unknown AP
List.
8. Click the Apply button.
Your settings are saved.
Set Up RADIUS Servers
If you use WPA2 Enterprise security or a RADIUS MAC ACL, you must set up RADIUS servers for
authentication, accounting, or both authentication and accounting using RADIUS.You must set up primary
IPv4 servers and you can set up secondary IPv4 servers.These RADIUS server settings apply either to all
WiFi networks that use WPA2 Enterprise security (see Set Up an Open or Secure WiFi Network on page
32) or to all WiFi networks that use a RADIUS MAC ACL.
WPA2 Enterprise security and a RADIUS MAC ACL are mutually exclusive. If you
Note
want to use a RADIUS MAC ACL for a WiFi network, select a different type of WiFi
security (see Set Up an Open or Secure WiFi Network on page 32). If you want to
use WPA2 Enterprise security for a WiFi network, use a local MAC A CL (see Manage
Local MAC Access Control Lists on page 71).
If you use a RADIUS MAC ACL, you must define the ACL on the RADIUS server, using the format in the
following example for client MAC addresses in the RADIUS server: If the client MAC address is
00:0a:95:9d:68:16, specify it as 000a959d6816 in the RADIUS server.
To set up RADIUS servers:
1. Open a web browser from a computer that is connected to the same network as the access point or to
the access point directly through an Ethernet cable or WiFi connection.
2. Enter the IP address that is assigned to the access point.
A login window opens.
3. Enter the access point user name and password.
The default user name is admin.The password is the one that you specified the first time that you
logged in.The user name and password are case-sensitive.
The Dashboard page displays.
Manage Access and Security
82
Page 83

Insight Managed Smart Cloud Wireless Access Point WAC510 User Manual
4. Select Management > Configuration > Security > RADIUS Settings.
5. For each RADIUS server that you want to set up, configure the following settings:
• IPv4 Address. Enter the IPv4 address of the RADIUS server.The access point must be able to
reach this IP address.
• Port. Enter the number of the UDP port on the access point that is used to access the RADIUS
server. For authentication servers, the default port number is 1812. For accounting servers, the
default port number is 1813.
• Password. Enter the password (shared key) that is used between the access point and
the RADIUS server during the authentication or accounting process. By default, the password is
sharedsecret.
6. Configure the following authentication settings, which apply to all RADIUS server that you set up:
• Reauthentication time. Enter the interval in seconds after which the supplicant (the WiFi client)
must be reauthenticated with the RADIUS server.The default interval is 3600 seconds (1 hour).
Enter 0 to disable reauthentication.
• Update Global Key. Select the check box to allow the global key update, and enter the interval in
seconds.The check box is selected b y default, and the def ault interval is 1800 seconds (30 minutes).
Clear the check box to prevent the global key update.
7. Click the Apply button.
Your settings are saved.
Manage Access and Security
83
Page 84

Manage the Local Area Network and IP Settings
This chapter describes how you can manage the local area network (LAN) and IP settings of the access point.
The chapter includes the following sections:
• Disable the DHCP Client and Specify a Fixed IP Address
• Enable the DHCP Client
• Set the 802.1Q VLAN and Management VLAN
• Enable or Disable Spanning Tree Protocol
• Enable or Disable Network Integrity Check
• Enable or Disable IGMP Snooping
• Enable or Disable Ethernet LLDP
• Enable or Disable UPnP
• Router Mode Only: Manage DHCP Servers
6
84
Page 85

Insight Managed Smart Cloud Wireless Access Point WAC510 User Manual
Disable the DHCP Client and Specify a Fixed IP Address
By default, the DHCP client of the access point is enabled and the access point receiv es an IP address from
a DHCP server in your network.
How your access point receives its IP address depends on whether it functions in AP mode (which is the
default system mode) or Router mode:
• If the access point functions in its default system mode (AP mode), it receives an IP address from a
DHCP server (or a router that functions as a DHCP server) in your network. If your network does not
include a DHCP server or you prefer to specify a fixed (static) IP address, disable the DHCP client of
the access point.
• If the access point functions in Router mode, it receives an IP address from your Internet modem.
Although it is highly unlikely that you must disable the DHCP client when the access point functions in
Router mode, you can do so and specify a fixed (static) IP address for the WAN PoE port.
The following sections describe how you can disable the DHCP client and specify a fixed IP address:
• AP Mode: Disable the DHCP Client and Specify a Fixed IP Address on page 85
• Router Mode: Disable the DHCP Client and Specify a Fixed IP Address on page 87
AP Mode: Disable the DHCP Client and Specify a Fixed IP Address
To disable the DHCP client and specify a fixed IP address if the access point functions in
AP mode:
1. Open a web browser from a computer that is connected to the same network as the access point or to
the access point directly through an Ethernet cable or WiFi connection.
2. Enter the IP address that is assigned to the access point.
A login window opens.
3. Enter the access point user name and password.
The default user name is admin.The password is the one that you specified the first time that you
logged in.The user name and password are case-sensitive.
The Dashboard page displays.
4. Select Management > Configuration > IP > LAN.
The page that displays lets you specify the LAN settings, but the fields are masked because the DHCP
client is enabled.
Manage the Local Area Network and IP Settings
85
Page 86

Insight Managed Smart Cloud Wireless Access Point WAC510 User Manual
5. Select the Disable radio button.
6. Specify the settings that are described in the following table.
DescriptionSetting
IP address in the range that is used by your LAN (usually 255.255.255.0).IP Address
The subnet mask must be compatible with your LAN.Subnet Mask
IP address of the gateway on your LAN.Gateway
IP address of the primary Domain Name System (DNS) server on your LAN.Primary DNS
IP address of the secondary DNS server on your LAN, or leave this field blank.Secondary DNS
7. Click the Apply button.
Your settings are saved.The access point restarts with the new IP settings.
Manage the Local Area Network and IP Settings
86
Page 87

Insight Managed Smart Cloud Wireless Access Point WAC510 User Manual
Router Mode: Disable the DHCP Client and Specify a Fixed IP Address
To disable the DHCP client and specify a fixed IP address if the access point functions in
Router mode:
1. Open a web browser from a computer that is connected to the same network as the access point or to
the access point directly through an Ethernet cable or WiFi connection.
2. Enter the IP address that is assigned to the access point.
A login window opens.
3. Enter the access point user name and password.
The default user name is admin.The password is the one that you specified the first time that you
logged in.The user name and password are case-sensitive.
The Dashboard page displays.
4. Select Management > Configuration > IP > WAN.
The page that displays lets you specify the WAN settings, but the fields are masked because the DHCP
client is enabled.
5. Select the Disable radio button.
The page also displays the WAN Interface field, which is fixed at WAN (Ethernet Port).
6. Specify the settings that are described in the following table.
DescriptionSetting
IP address in the range that is used by your Internet modem.IP Address
The subnet mask must be compatible with your Internet modem.Subnet Mask
IP address of the gateway that is used by your Internet modem.Gateway
Manage the Local Area Network and IP Settings
87
Page 88

Insight Managed Smart Cloud Wireless Access Point WAC510 User Manual
(Continued)
DescriptionSetting
IP address of the primary DNS server that is used by your Internet modem.Primary DNS
Secondary DNS
7. Click the Apply button.
Your settings are saved.The access point restarts with the new IP settings.
IP address of the secondary DNS server that is used by your Internet modem, or leave
this field blank.
Enable the DHCP Client
By default, the DHCP client of the access point is enabled and the access point receiv es an IP address from
a DHCP server.
How your access point receives its IP address depends on whether it functions in AP mode (which is the
default system mode) or Router mode:
• If the access point functions in its default system mode (AP mode), it receives an IP address from a
DHCP server (or a router that functions as a DHCP server) in your network.
• If the access point functions in Router mode, it receives an IP address from your Internet modem.
If you disabled the DHCP client, you can reenable it.
The following sections describe how you can reenable the DHCP client:
• AP Mode: Enable the DHCP Client on page 88
• Router Mode: Enable the DHCP Client on page 89
AP Mode: Enable the DHCP Client
To enable the DHCP client if the access point functions in AP mode:
1. Open a web browser from a computer that is connected to the same network as the access point or to
the access point directly through an Ethernet cable or WiFi connection.
2. Enter the IP address that is assigned to the access point.
A login window opens.
3. Enter the access point user name and password.
The default user name is admin.The password is the one that you specified the first time that you
logged in.The user name and password are case-sensitive.
The Dashboard page displays.
Manage the Local Area Network and IP Settings
88
Page 89

Insight Managed Smart Cloud Wireless Access Point WAC510 User Manual
4. Select Management > Configuration > IP > LAN.
5. Select the Enable radio button.
The fields are masked.
6. Click the Apply button.
Your settings are saved.The access point restarts with the new IP settings. It might tak e a while before
the access point receives its IP address setting from the DHCP server.
Router Mode: Enable the DHCP Client
To enable the DHCP client if the access point functions in Router mode:
1. Open a web browser from a computer that is connected to the same network as the access point or to
the access point directly through an Ethernet cable or WiFi connection.
2. Enter the IP address that is assigned to the access point.
A login window opens.
3. Enter the access point user name and password.
The default user name is admin.The password is the one that you specified the first time that you
logged in.The user name and password are case-sensitive.
The Dashboard page displays.
Manage the Local Area Network and IP Settings
89
Page 90

Insight Managed Smart Cloud Wireless Access Point WAC510 User Manual
4. Management > Configuration > IP > WAN.
5. Select the Enable radio button.
The fields are masked.
6. Click the Apply button.
Your settings are saved.The access point restarts with the new IP settings. It might tak e a while before
the access point receives its IP address setting from the DHCP server.
Set the 802.1Q VLAN and Management VLAN
The 802.1Q VLAN protocol on the access point logically separates traffic on the same physical (wired)
network.This protocol can work with tagged and untagged VLANs, as follows:
• Untagged VLAN. The access point sends untagged frames from its Ethernet interface. Incoming
untagged frames are assigned to the untagged VLAN. By default, the untagged VLAN is VLAN 1. By
default, the access point functions with an untagged VLAN.
• Tagged VLAN.The access point tags all frames that it sends from its Ethernet interface. Only the
incoming frames that are tagged with known VLAN IDs are accepted.
The management VLAN is used for managing traffic such as Telnet, SNMP, and HTTP traffic to and from
the access point. Frames that belong to the management VLAN and that are sent over the trunk do not
receive an 802.1Q header. If a port is a member of a single VLAN, its traffic can be untagged.
The following sections describe how you can set up the 802.1Q VLAN and management VLAN:
• AP Mode: Set the 802.1Q VLAN and Management VLAN on page 91
• Router Mode: Set the 802.1Q VLAN and Management VLAN on page 92
Manage the Local Area Network and IP Settings
90
Page 91

Insight Managed Smart Cloud Wireless Access Point WAC510 User Manual
AP Mode: Set the 802.1Q VLAN and Management VLAN
To set the 802.1Q VLAN and management VLAN when the access point functions in AP
mode:
1. Open a web browser from a computer that is connected to the same network as the access point or to
the access point directly through an Ethernet cable or WiFi connection.
2. Enter the IP address that is assigned to the access point.
A login window opens.
3. Enter the access point user name and password.
The default user name is admin.The password is the one that you specified the first time that you
logged in.The user name and password are case-sensitive.
The Dashboard page displays.
4. Select Management > Configuration > IP > LAN.
5. To change the 802.1Q VLAN, either clear or select the Untagged VLAN check box:
• Untagged VLAN. By default, the Untagged VLAN check box is selected.The access point sends
untagged frames from its Ethernet interface. Incoming untagged frames are assigned to the untagged
VLAN. By default, the untagged VLAN is VLAN 1 but you can enter another VLAN ID in the field if
that VLAN ID is supported on your network.
• Tagged VLAN. Clear the Untagged VLAN check box only if the hubs and switches on your LAN
support the 802.1Q VLAN protocol.The access point tags all frames that it sends from its Ethernet
interface. Only the incoming frames that are tagged with known VLAN IDs are accepted. Similarly,
change the ID for the untagged VLAN only if the hubs and switches on y our LAN support the 802.1Q
VLAN protocol and the new VLAN ID is supported on your network.
6. To change the VLAN ID for the management VLAN, enter another VLAN ID in the Management VLAN
field.
Manage the Local Area Network and IP Settings
91
Page 92

Insight Managed Smart Cloud Wireless Access Point WAC510 User Manual
By default, the management VLAN is VLAN 1. If you change the VLAN ID, be sure that the VLAN ID is
supported on your network.
7. Click the Apply button.
Your settings are saved.The access point restarts with the new VLAN settings.
Router Mode: Set the 802.1Q VLAN and Management VLAN
To set the 802.1Q VLAN and management VLAN when the access point functions in Router
mode:
1. Open a web browser from a computer that is connected to the same network as the access point or to
the access point directly through an Ethernet cable or WiFi connection.
2. Enter the IP address that is assigned to the access point.
A login window opens.
3. Enter the access point user name and password.
The default user name is admin.The password is the one that you specified the first time that you
logged in.The user name and password are case-sensitive.
The Dashboard page displays.
4. Select Management > Configuration > IP > LAN.
5. To change the 802.1Q VLAN, either clear or select the Untagged VLAN check box:
Manage the Local Area Network and IP Settings
92
Page 93

Insight Managed Smart Cloud Wireless Access Point WAC510 User Manual
• Untagged VLAN. By default, the Untagged VLAN check box is selected.The access point sends
untagged frames from its Ethernet interface. Incoming untagged frames are assigned to the untagged
VLAN. By default, the untagged VLAN is VLAN 1 but you can enter another VLAN ID in the field if
that VLAN ID is supported on your network.
• Tagged VLAN. Clear the Untagged VLAN check box only if the hubs and switches on your LAN
support the 802.1Q VLAN protocol.The access point tags all frames that it sends from its Ethernet
interface. Only the incoming frames that are tagged with known VLAN IDs are accepted. Similarly,
change the ID for the untagged VLAN only if the hubs and switches on y our LAN support the 802.1Q
VLAN protocol and the new VLAN ID is supported on your network.
6. To change the VLAN ID for the management VLAN, enter another VLAN ID in the Management VLAN
field.
By default, the management VLAN is VLAN 1. If you change the VLAN ID, be sure that the VLAN ID is
supported on your network.
7. Click the Apply button.
Your settings are saved.The access point restarts with the new VLAN settings.
Enable or Disable Spanning Tree Protocol
For locations where multiple access points are active, Spanning Tree Protocol (STP) can provide network
traffic optimization by preventing path redundancy. If your location includes more than one access point,
we recommend that you enable STP.
To enable or disable Spanning Tree Protocol:
1. Open a web browser from a computer that is connected to the same network as the access point or to
the access point directly through an Ethernet cable or WiFi connection.
2. Enter the IP address that is assigned to the access point.
A login window opens.
3. Enter the access point user name and password.
The default user name is admin.The password is the one that you specified the first time that you
logged in.The user name and password are case-sensitive.
The Dashboard page displays.
4. Select Management > Configuration > System > Advanced > General.
The General page displays.
5. Select one of the following radio buttons:
• Enable. STP is enabled.
• Disable. STP is disabled.This is the default setting.
6. Click the Apply button.
Your settings are saved.
Manage the Local Area Network and IP Settings
93
Page 94

Insight Managed Smart Cloud Wireless Access Point WAC510 User Manual
Enable or Disable Network Integrity Check
The network integrity check function enables the access point to validate whether the upstream link is activ e
before the access point allows WiFi associations. Make sure that the default gatewa y is configured correctly.
By default, the network integrity check function is disabled.
To enable or disable the network integrity check function:
1. Open a web browser from a computer that is connected to the same network as the access point or to
the access point directly through an Ethernet cable or WiFi connection.
2. Enter the IP address that is assigned to the access point.
A login window opens.
3. Enter the access point user name and password.
The default user name is admin.The password is the one that you specified the first time that you
logged in.The user name and password are case-sensitive.
The Dashboard page displays.
4. Select Management > Configuration > System > Advanced > General.
The General page displays.
5. Select one of the following radio buttons:
• Enable.The network integrity check function is enabled.
• Disable.The network integrity check function is disabled.This is the default setting.
6. Click the Apply button.
Your settings are saved.
Enable or Disable IGMP Snooping
IGMP snooping allows IP multicast packets to be transmitted only to the members of a corresponding
multicast group. Enabling IGMP snooping prevents flooding of multicast tr affic to all the ports in a broadcast
domain. By default IGMP snooping is disabled on the access point.
To enable or disable IGMP snooping:
1. Open a web browser from a computer that is connected to the same network as the access point or to
the access point directly through an Ethernet cable or WiFi connection.
2. Enter the IP address that is assigned to the access point.
A login window opens.
3. Enter the access point user name and password.
The default user name is admin.The password is the one that you specified the first time that you
logged in.The user name and password are case-sensitive.
The Dashboard page displays.
Manage the Local Area Network and IP Settings
94
Page 95

Insight Managed Smart Cloud Wireless Access Point WAC510 User Manual
4. Select Management > Configuration > System > Advanced > General.
The General page displays.
5. Select one of the following radio buttons:
• Enable. IGMP snooping is enabled.
• Disable. IGMP snooping is disabled.This is the default setting.
6. Click the Apply button.
Your settings are saved.
Enable or Disable Ethernet LLDP
Link Layer Discovery Protocol (LLDP), as specified in IEEE 802.1AB, can provide link-layer messages to
adjacent network devices. For example, LLDP lets network devices such as switches and management
devices discover the access point in a network and detect if the access point receives power through PoE.
By default, LLDP is enabled.
To enable or disable the LLDP:
1. Open a web browser from a computer that is connected to the same network as the access point or to
the access point directly through an Ethernet cable or WiFi connection.
2. Enter the IP address that is assigned to the access point.
A login window opens.
3. Enter the access point user name and password.
The default user name is admin.The password is the one that you specified the first time that you
logged in.The user name and password are case-sensitive.
The Dashboard page displays.
4. Select Management > Configuration > System > Advanced > Ethernet LLDP.
The Ethernet LLDP page displays.
5. Select one of the following radio buttons:
• Enable. LLDP is enabled.This is the default setting.
• Disable. LLDP is disabled.
6. Click the Apply button.
Your settings are saved.
Enable or Disable UPnP
Universal Plug and Play (UPnP) lets the access point be discovered by other devices in the network that
support UPnP. UPnP is enabled by default.
Manage the Local Area Network and IP Settings
95
Page 96

Insight Managed Smart Cloud Wireless Access Point WAC510 User Manual
To enable or disable UPnP:
1. Open a web browser from a computer that is connected to the same network as the access point or to
the access point directly through an Ethernet cable or WiFi connection.
2. Enter the IP address that is assigned to the access point.
A login window opens.
3. Enter the access point user name and password.
The default user name is admin.The password is the one that you specified the first time that you
logged in.The user name and password are case-sensitive.
The Dashboard page displays.
4. Select Management > Configuration > System > Advanced > UPnP.
The UPnP page displays.
5. Select one of the following radio buttons:
• Enable. UPnP is enabled.This is the default setting.
• Disable. UPnP is disabled.
6. Click the Apply button.
Your settings are saved.
Router Mode Only: Manage DHCP Servers
When the system mode of the access point is Router mode (see Change the System Mode to Router Mode
or AP Mode on page 106), you can add up to seven Dynamic Host Configuration Protocol (DHCP) servers
in addition to the default DHCP server . (The access point can support a total of eight DHCP servers.) Each
DHCP server can issue IP addresses from a unique address pool to the clients of a WiFi network with a
unique VLAN ID. Each DHCP server corresponds to a unique VLAN ID.
The access point delivers the following settings to any WiFi device that requests DHCP:
• An IP address from the range that you define
• Subnet mask
• Gateway IP address
• DNS server IP address
• WINS server IP address, if any
The following sections describe how you can manage DHCP servers:
• Manage the Default DHCP Server on page 97
• Add a DHCP Server for a WiFi Network on page 98
• View or Change the Settings for a DHCP Server on page 100
• Disable a DHCP Server on page 101
Manage the Local Area Network and IP Settings
96
Page 97

Insight Managed Smart Cloud Wireless Access Point WAC510 User Manual
• Remove a DHCP Server on page 102
• Enable or Disable Inter-VLAN Routing on page 103
Manage the Default DHCP Server
The information in this section applies only when the system mode of the access point is Router mode (see
Change the System Mode to Router Mode or AP Mode on page 106). If it is , the management VLAN DHCP
server (the default DHCP server) of the access point is enabled and assigns IP addresses to clients of the
default WiFi network.
To manage the default DHCP server:
1. Open a web browser from a computer that is connected to the same network as the access point or to
the access point directly through an Ethernet cable or WiFi connection.
2. Enter the IP address that is assigned to the access point.
A login window opens.
3. Enter the access point user name and password.
The default user name is admin.The password is the one that you specified the first time that you
logged in.The user name and password are case-sensitive.
The Dashboard page displays.
4. Select Management > Configuration > IP > LAN.
Manage the Local Area Network and IP Settings
97
Page 98

Insight Managed Smart Cloud Wireless Access Point WAC510 User Manual
The settings of the default DHCP server apply to the management VLAN, which, by default, is VLAN 1.
For information about setting the 802.1Q VLAN and the management VLAN, see Set the 802.1Q VLAN
and Management VLAN on page 90.
By default, the Management VLAN DHCP Server Enable radio button is selected.
5. Specify the settings that are described in the following table.
DescriptionSetting
Starting Address
Ending Address
Subnet Mask
Gateway
Primary DNS
Secondary DNS
Primary WNS
Secondary WNS
Enter the starting IP address of the DHCP IP address range.
By default, the address is 192.160.0.2.
Enter the ending IP address of the DHCP IP address range.
By default, the address is 192.168.0.50.
Enter the subnet mask that is used for all IP addresses in the DHCP IP address range.
By default, the mask is 255.255.255.0.
The IP address of the gateway that is used by your Internet modem.
By default, the address is 192.168.0.100.
The IP address of the primary Domain Name System (DNS) serv er that is used b y your
Internet modem.
By default, the address is 8.8.8.8.
The IP address of the secondary DNS server that is used by your Internet modem.
By default, the address is 8.8.4.4.
The IP address of the primary Windows Internet Name Service (WINS) server that is
used by your Internet modem, if any.
The IP address of the secondary WINS server that is used by your Internet modem, if
any.
Lease
From the menus, specify the duration of the IP address lease. By default, the lease
expires after one day (24 hours), after which the WiFi client must renew the lease.
6. Click the Apply button.
Your settings are saved.
Add a DHCP Server for a WiFi Network
The information in this section applies only when the system mode of the access point is Router mode (see
Change the System Mode to Router Mode or AP Mode on page 106). If it is , the def ault DHCP server of the
access point is enabled and you can also add up to seven additional DHCP servers for WiFi clients only.
IMPORTANT:
You can add an additional DHCP server only after you set up a WiFi network
with a unique VLAN ID that is not yet serviced by an existing DHCP server
(see Set Up an Open or Secure WiFi Network on page 32).
Manage the Local Area Network and IP Settings
98
Page 99

Insight Managed Smart Cloud Wireless Access Point WAC510 User Manual
To add a DHCP server:
1. Open a web browser from a computer that is connected to the same network as the access point or to
the access point directly through an Ethernet cable or WiFi connection.
2. Enter the IP address that is assigned to the access point.
A login window opens.
3. Enter the access point user name and password.
The default user name is admin.The password is the one that you specified the first time that you
logged in.The user name and password are case-sensitive.
The Dashboard page displays.
4. Select Management > Configuration > IP > LAN > DHCP Server Settings.
If you did not yet add any DHCP servers, only + Add Server displays.
5. Click the + button to the left of Add Server.
Servers that you add are designated Server 2 through Server 7.
By default, the Enable radio button is selected.
6. Specify the settings that are described in the following table.
DescriptionSetting
VLAN ID
From the VLAN ID menu, select the VLAN ID for the WiFi network (SSID) to which you
assign the DHCP server. For information about assigning a VLAN ID to a WiFi network,
see Change the VLAN ID for a WiFi Network on page 42.
Enter the starting IP address of the DHCP IP address range.Starting Address
Enter the ending IP address of the DHCP IP address range.Ending Address
Enter the subnet mask that is used for all IP addresses in the DHCP IP address range.Subnet Mask
Manage the Local Area Network and IP Settings
99
Page 100

Insight Managed Smart Cloud Wireless Access Point WAC510 User Manual
(Continued)
DescriptionSetting
The IP address of the gateway that is used by your Internet modem.Gateway
Primary DNS
Secondary DNS
Primary WNS
Secondary WNS
Lease
The IP address of the primary Domain Name System (DNS) serv er that is used b y your
Internet modem.
The IP address of the secondary DNS server that is used by your Internet modem. Or
leave this field blank.
The IP address of the primary Windows Internet Name Service (WINS) server that is
used by your Internet modem, if any.
The IP address of the secondary WINS server that is used by your Internet modem. Or
leave this field blank.
From the menus, specify the duration of the IP address lease. By default, the lease
expires after one day (24 hours), after which the WiFi client must renew the lease.
7. Click the Apply button.
Your settings are saved.
8. To view the SSIDs to which the DHCP server is assigned, click the SSID link just below the VLANID
field at the top of the page.
View or Change the Settings for a DHCP Server
The information in this section applies only when the system mode of the access point is Router mode (see
Change the System Mode to Router Mode or AP Mode on page 106). If it is , the def ault DHCP server of the
access point is enabled and you can also add up to seven additional DHCP servers for WiFi clients only.
You can view or change the setting of a DHCP server that you added. For information about the default
DHCP server, see Manage the Default DHCP Server on page 97.
To view or change the setting of a DHCP server:
1. Open a web browser from a computer that is connected to the same network as the access point or to
the access point directly through an Ethernet cable or WiFi connection.
2. Enter the IP address that is assigned to the access point.
A login window opens.
3. Enter the access point user name and password.
The default user name is admin.The password is the one that you specified the first time that you
logged in.The user name and password are case-sensitive.
The Dashboard page displays.
Manage the Local Area Network and IP Settings
100
 Loading...