

Page 1
1. Register with the NETGEAR Insight app
3. Check the PoE status
Installation Guide
8-Port Gigabit PoE+ Ethernet
Smart Managed Pro Switch with 2 Copper
Ports and Cloud Management
GS110TPP
Package contents
1. On your iOS or Android mobile device, visit the app store, search for
NETGEAR Insight, and download the latest version of the app.
2. Open the NETGEAR Insight app.
3. If you did not set up a NETGEAR account, tap Create NETGEAR Account
and follow the onscreen instructions.
4. Enter the email address and password for your account and tap LOG IN.
5. Tap + in the upper-right corner.
6. Either use the camera on your phone to scan the serial number bar code
located on the bottom of the switch, or enter the serial number.
7. Tap Go.
8. Follow the onscreen instructions to add your switch to a network location.
9. The switch is registered and added to your account.
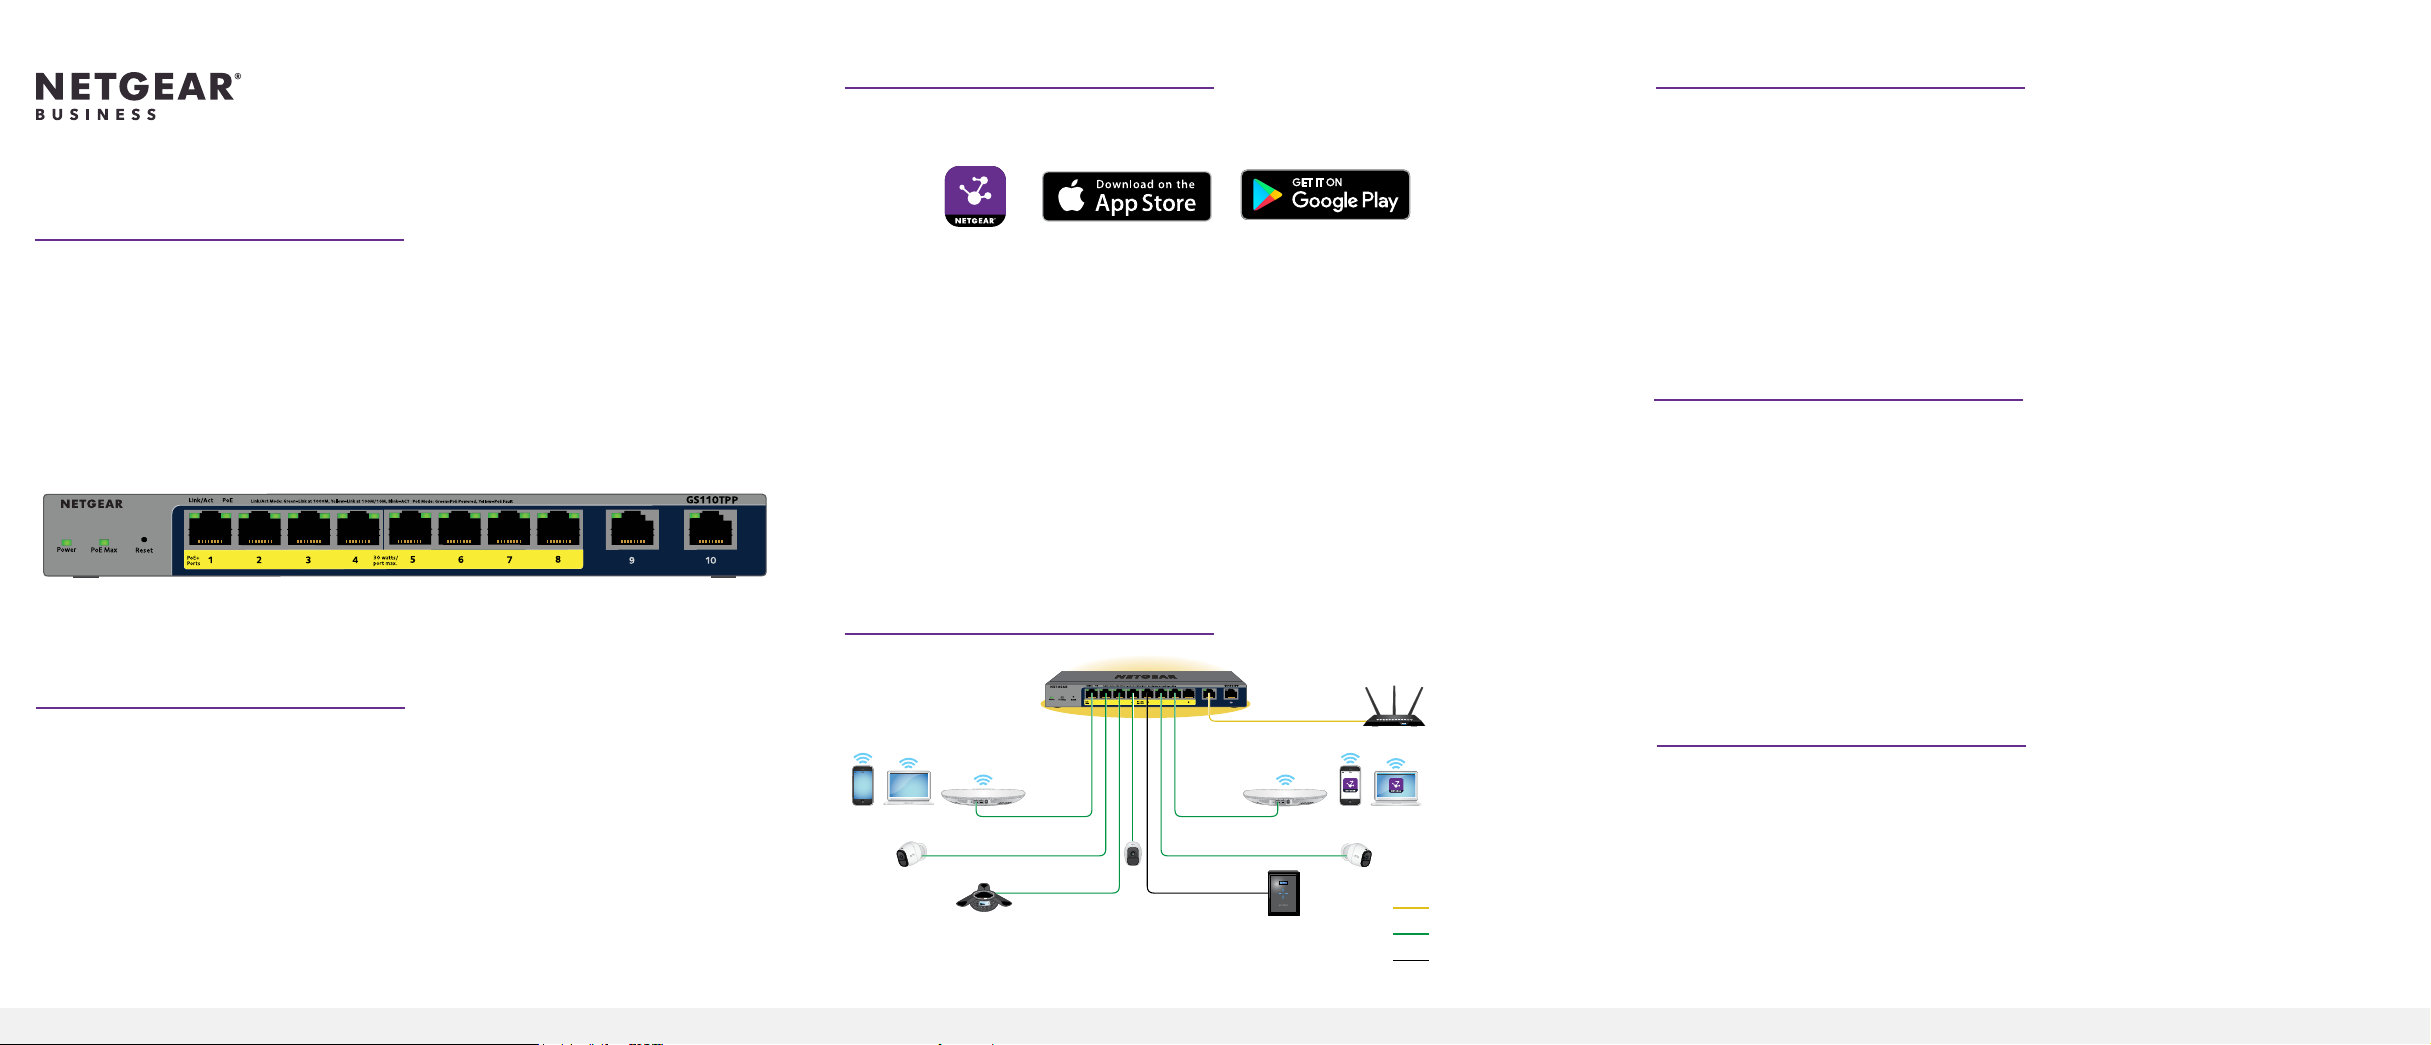
2. Connect the switch
PoE+ power is provided by the GS110TPP switch on ports 1-8. The switch can
supply up to 30W PoE+ (IEEE 802.3at) to each port, with a PoE power budget of
120W across all active PoE+ ports.
The PoE Max LED indicates the status of the PoE budget on the switch:
• Off. Sufficient. More than 7W of PoE power is available.
• Solid yellow. Less than 7W of PoE power is available.
• Blinking yellow. At least once during the previous two minutes, less than
7W of PoE power was available.
4. Discover the IP address of the switch
An IP address is required to configure your switch. The switch gets an IP
address from a DHCP server (such as your router) by default. If your switch is not
connected to a DHCP server, use the default IP address: 192.168.0.239.
1. Connect your mobile device to the same WiFi network as the switch.
2. Make sure that the network connects to the Internet.
3. Launch the NETGEAR Insight app from your mobile device.
4. Log in to your account.
The current IP address of the switch displays.
• Switch model GS110TPP
• DC power adapter (varies by region)
• Detachable power cable (varies by region)
• Wall-mount kit
• Four rubber footpads
• Installation guide
Note: For more information about installation, see the hardware installation
guide, which you can download from https://www.netgear.com/support/.
Sample connections to the GS110TPP switch
Internet
PoE
Ethernet
5. Log in to congure the switch
You can use the switch as a plug-and-play device or you can log in to the switch
to change its settings. Make sure that the switch is connected to the Internet.
During the initial login, the switch must access a NETGEAR server before you can
log in to your NETGEAR account to configure the switch.
1. Open a web browser from a computer or tablet connected to the same
network as your switch.
You can use a WiFi or wired connection.
2. Enter the IP address of the switch.
Page 2

Your browser might display a security message; you can ignore it or add an
exception.
The NETGEAR Business page displays the switch model.
3. Click the Login button.
The NETGEAR Account Login page displays. If you did not create a NETGEAR
account, click the Create button, create a NETGEAR account, and log in.
4. If you already registered the switch with your NETGEAR account, enter the
same NETGEAR account email and password and click the LOG IN button.
The System Information page displays.
Note: For information about how to configure the switch, see the user manual,
which you can download from https://www.netgear.com/support/.
Other discovery and conguration methods
The NETGEAR Switch Discovery Tool and the Smart Control Center Utility let you
discover the IP address and configure the switch.
• NETGEAR Switch Discovery Tool. You can use a Mac or a 64-bit Windows-
based computer on the same network as the switch. To download this tool,
visit www.netgear.com/support/product/netgear-switch-discovery-tool.aspx.
• Smart Control Center Utility. You can use a Windows-based computer on
the same network as the switch. To download this utility, visit
www.netgear.com/support/product/SCC.
Change the switch’s exible PoE budget
Device
Class
Standard Class Description Power
Reserved by
the Device
0 PoE and PoE+ Default power (full) 15.4W 0.44W–12.95W
1 PoE and PoE+ Very low power 4.0W 0.44W–3.84W
2 PoE and PoE+ Low power 7.0W 3.84W–6.49W
3 PoE and PoE+ Mid power 15.4W 6.49W–12.95W
4 PoE+ only High power 30.0W 12.95W–25.5W
Power
Delivered to
the Device*
If a device receives insufficient PoE power from the switch, consider using a
shorter cable.
Change the management mode to cloud management
By default, the management mode is set to Directly Connect to Web Browser
Interface. You can change the management mode to manage the switch
remotely from the cloud with the NETGEAR Insight app, or, if you are an Insight
Premium or Pro subscriber, the Insight Cloud Portal.
1. While you are logged in to the local browser interface, on the System
Interface page, select the NETGEAR Insight Mobile App and Insight Cloud
Portal radio button.
2. When the pop-up window opens, click the OK button.
3. Click the Apply button.
4. Another pop-up window that opens; click the OK button.
When the switch is connected to Insight Cloud, the Power LED lights blue.
The switch is now ready for cloud management.
© NETGEAR, Inc., NETGEAR and the NETGEAR Logo
April 2019
are trademarks of NETGEAR, Inc. Any non‑NETGEAR
trademarks are used for reference purposes only.
The switch features a flexible PoE power budget. To upgrade the PoE power
budget of your switch, you need the power adapter EPS200W, which is sold
separately. For information about how to use the switch’s flexible PoE budget,
visit https://kb.netgear.com/000060621/ or see the hardware installation guide,
which you can download from https://www.netgear.com/support/.
PoE considerations
The PoE and PoE+ power supplied by the switch is prioritized in ascending port
order (from port 1 to port 8), with a total power budget of 120 watts with a 130
watt power adapter. If the power requirements for the attached powered devices
(PDs) exceed the total power budget of the switch, the PD on the highestnumbered port is disabled to make sure that the PDs that are connected to the
higher-priority, lower-numbered ports are supported first.
Just because a PD is listed as an 802.3at PoE powered device does not
necessarily mean that it requires the maximum power limit of the specification.
Many PDs require less power, potentially allowing all eight PoE ports to be active
simultaneously.
You can override the detected device class and specify the power allocation
for the device connected to each port. The following table shows the standard
power ranges without overrides applied and calculated with the maximum cable
length of 328 feet (100 meters).
Support
Thank you for purchasing this NETGEAR product. You can visit
https://www.netgear.com/support/ to register your product, get help, access the
latest downloads and user manuals, and join our community. We recommend
that you use only official NETGEAR support resources.
Si ce produit est vendu au Canada, vous pouvez accéder à ce document en
français canadien à https://www.netgear.com/support/download/.
(If this product is sold in Canada, you can access this document in Canadian
French at https://www.netgear.com/support/download/.)
For regulatory compliance information including the EU Declaration of
Conformity, visit https://www.netgear.com/about/regulatory/.
See the regulatory compliance document before connecting the power supply.
Do not use this device outdoors. If you connect cables or devices that are
outdoors to this device, see https://kb.netgear.com/000057103 for safety and
warranty information.
NETGEAR, Inc.
350 East Plumeria Drive
San Jose, CA 95134, USA
NETGEAR INTL LTD
Building 3, University Technology Centre
Curraheen Road, Cork, Ireland
 Loading...