

Page 1
Nero Scout Manual
Nero AG
Page 2

Copyright and Trademark Information
The Nero Scout manual and all its contents are protected by copyright and are the property
of Nero AG. All rights reserved. This manual contains material that is protected by
internationally valid copyright. No part of this manual may be reproduced, transmitted or
transcribed without the express written permission of Nero AG.
All trade names and trademarks are the property of their respective owners.
Nero AG rejects any claims that transcend the clauses of the guarantee rights. Nero AG
does not undertake any liability for the correctness of the content of the Nero Scout manual.
The contents of the software supplied, as well as of the Nero Scout manual, may be
changed without prior warning.
All trade names and trademarks are the property of their respective owners.
The trademarks mentioned here are named for information purposes only.
Copyright © 2006 by Nero AG, Karlsbad, Germany.
Copyright © 2006 by Nero AG
REV2, SW 1.5.999.9
Page 3

Contents
Contents
1 General information 5
1.1 Conventions of the manual 5
1.2 About Nero Search 5
1.3 About Nero Scout 5
2 Enabling and configuring Nero Scout 7
2.1 Enabling Nero Scout 7
2.2 General options 7
2.3 Indexing 9
2.3.1 Adding folders 10
2.3.2 Selecting file types 11
2.3.3 Selecting e-mails 12
2.4 Internet services 13
2.4.1 Creating an entry 14
2.4.2 Deleting an entry 15
3 Quick search using the task bar 16
3.1 Overview 16
3.2 Nero Search Index Status window 17
3.3 Searching the desktop using the quick search function 17
3.4 Searching web pages using the quick search function 19
4 Nero Search main window 20
4.1 Desktop Search tab 20
4.1.1 Performing a desktop search 21
4.1.2 Performing an advanced desktop search 22
4.2 Web Search tab 23
4.2.1 Performing a web search 24
4.3 Saved Searches tab 26
4.3.1 Saving a search query 27
4.3.2 Editing a search query 27
4.3.3 Deleting a search query 28
Page 3
Page 4

Contents
5 List of figures 29
6 Index 30
7 Contact 31
Page 4
Page 5
General information
1 General information
1.1 Conventions of the manual
In order to make best use of this manual, please note the following conventions:
Symbol Meaning
Indicates warnings, preconditions or instructions that have to be
1. Start …
Æ
Î
OK
Chapter
followed strictly.
Indicates additional information or advice.
A number at the beginning of a line indicates a request for
action. Carry out these actions in the order specified.
Indicates an intermediate result.
Indicates a result.
Indicates text passages or buttons that appear in the program
interface of Nero Search. They are shown in bold face.
Indicates references to other chapters. They are executed as
links and are shown in red and underlined.
1.2 About Nero Search
Nero Search is a search wizard that allows you to search for files on your computer quickly
and easily. Note however that the desktop search function can only find files indexed by
Nero Scout (see
can be accessed in the task bar. It is also integrated in the following Nero applications:
Nero Burning ROM
Nero Express
Nero Vision
Nero WaveEditor
Nero SoundTrax
Nero Recode
Nero PhotoSnap
Nero PhotoSnap Viewer
Nero Search is a permanent feature of Nero and does not have to be installed separately.
Nero Scout must be enabled to be able to use the desktop search function of Nero Search.
Indexing). Nero Search also provides a web search function. Nero Search
1.3 About Nero Scout
Nero Scout is a database program which indexes and catalogs all media files on your
computer and makes this database available to all programs in the Nero product package. In
Page 5
Page 6

General information
contrast to other databases, which are created by different media players and only catalog
the files belonging to this program, Nero Scout makes its universal database available to all
playback programs.
Nero Scout creates an entry in Windows Explorer, so that you have a complete overview of
the media library at all times. The structure of the Windows
®
Media® Player library with
details such as artist, year of release, etc. is generated by Nero Scout in the entry.
The Nero Search application provides lightning quick access to the files indexed by Nero
Scout.
Nero Scout is of particular significance for Nero Home, since file searches using Nero Home
only find and display cataloged files. We therefore recommend that you always leave Nero
Scout enabled.
Page 6
Page 7
Enabling and configuring Nero Scout
2 Enabling and configuring Nero Scout
In Nero Scout you can define the folders and files to be indexed and consequently searched
by Nero Search.
Nero Search will only search for files previously indexed by Nero Scout. To be able to use
Nero Search, you must enable Nero Scout.
2.1 Enabling Nero Scout
If Nero Scout is not enabled, proceed as follows:
1. Select Start > Programs > Nero 7 (Premium) > Tools > Nero Scout.
Æ The Nero Scout Options window opens.
2. Check the Enable Nero Scout box.
Î You have opened Nero Scout. You can now proceed to change the general optio ns
General options).
(see
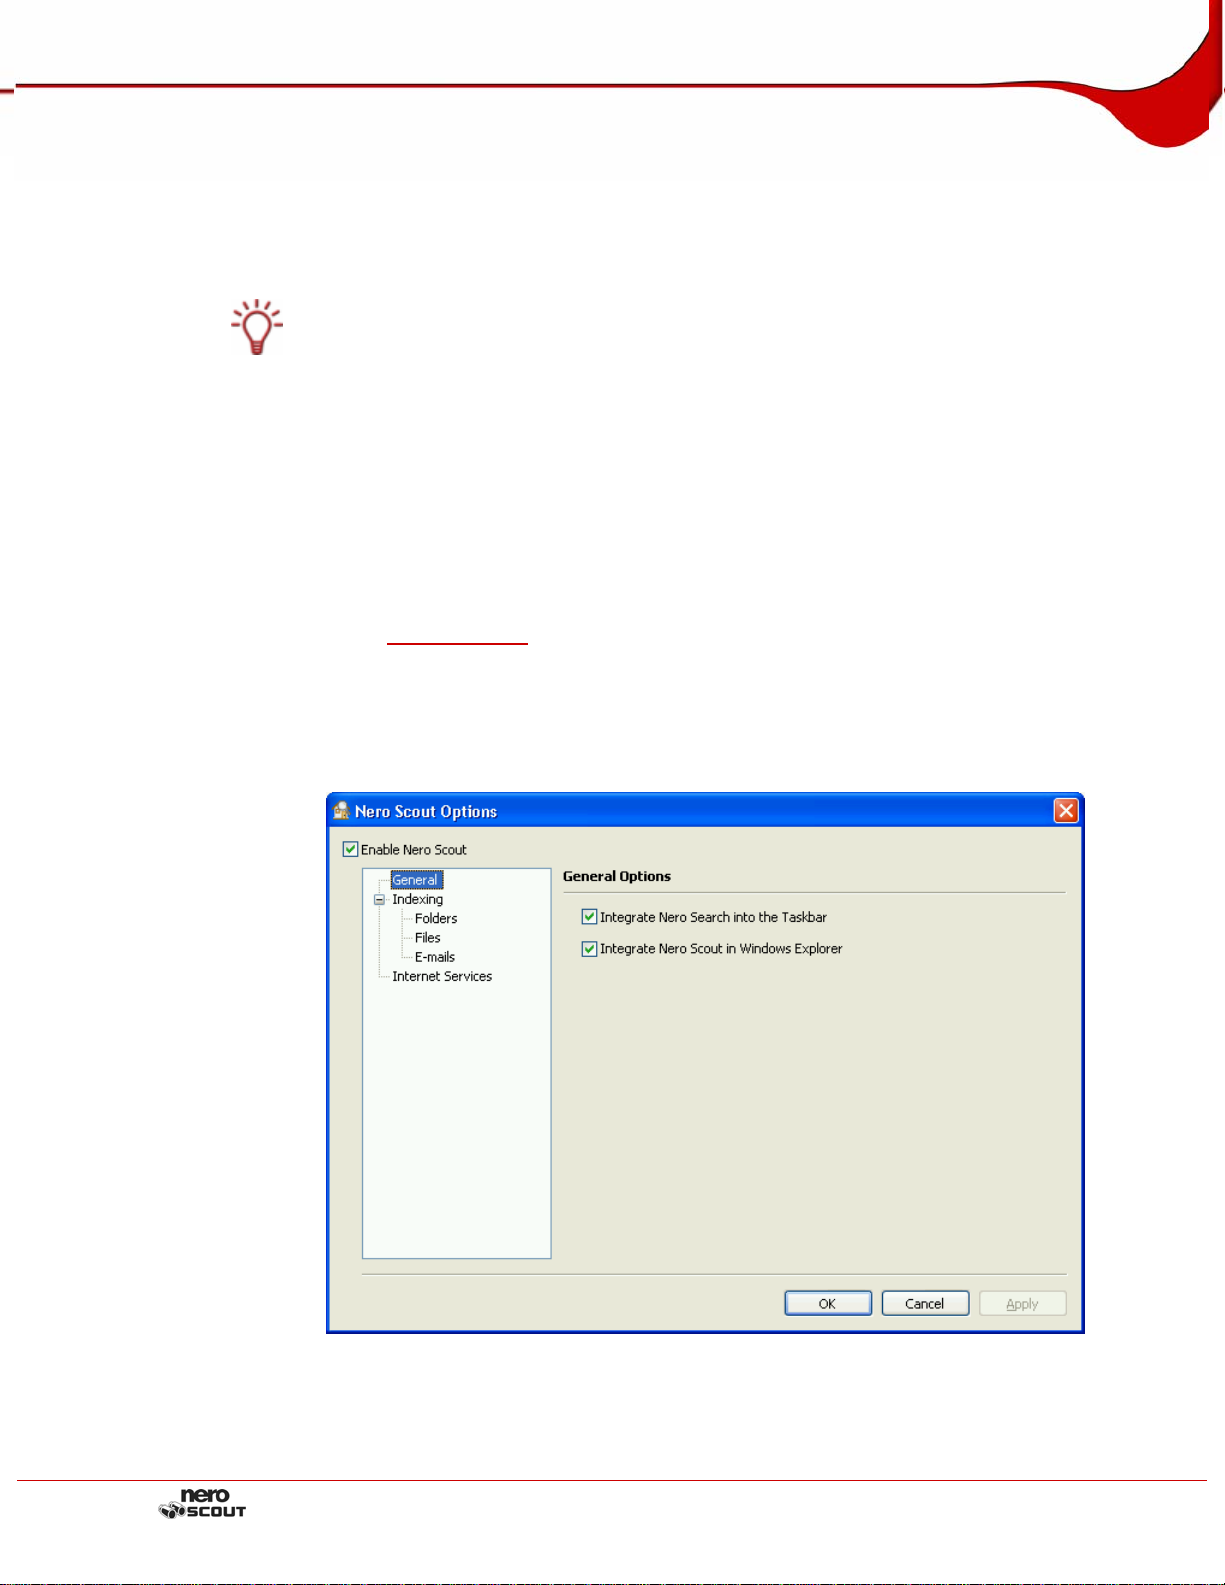
2.2 General options
Define the general options for Nero Scout in the General entry.
Fig. 1: Nero Scout Options window, General navigation item
Page 7
Page 8

Enabling and configuring Nero Scout
To define the general options, proceed as follows:
1. Select Start > Programs > Nero 7 (Premium) > Tools > Nero Scout.
Æ The Nero Scout Options window opens.
2. Click on General in the navigation tree.
3. If you want to make the Nero Search quick search feature available in the task bar, check
the Integrate Nero Search in the Task Bar box.
4. To see Nero Scout as a separate folder in Windows Explorer, check the Sho w Nero Scout
in Windows Explorer box.
5. Click on the Apply button.
Î You have changed the general options in line with your requirements. You can now
continue to make settings for indexing purposes (see
Indexing).
Page 8
Page 9
Enabling and configuring Nero Scout
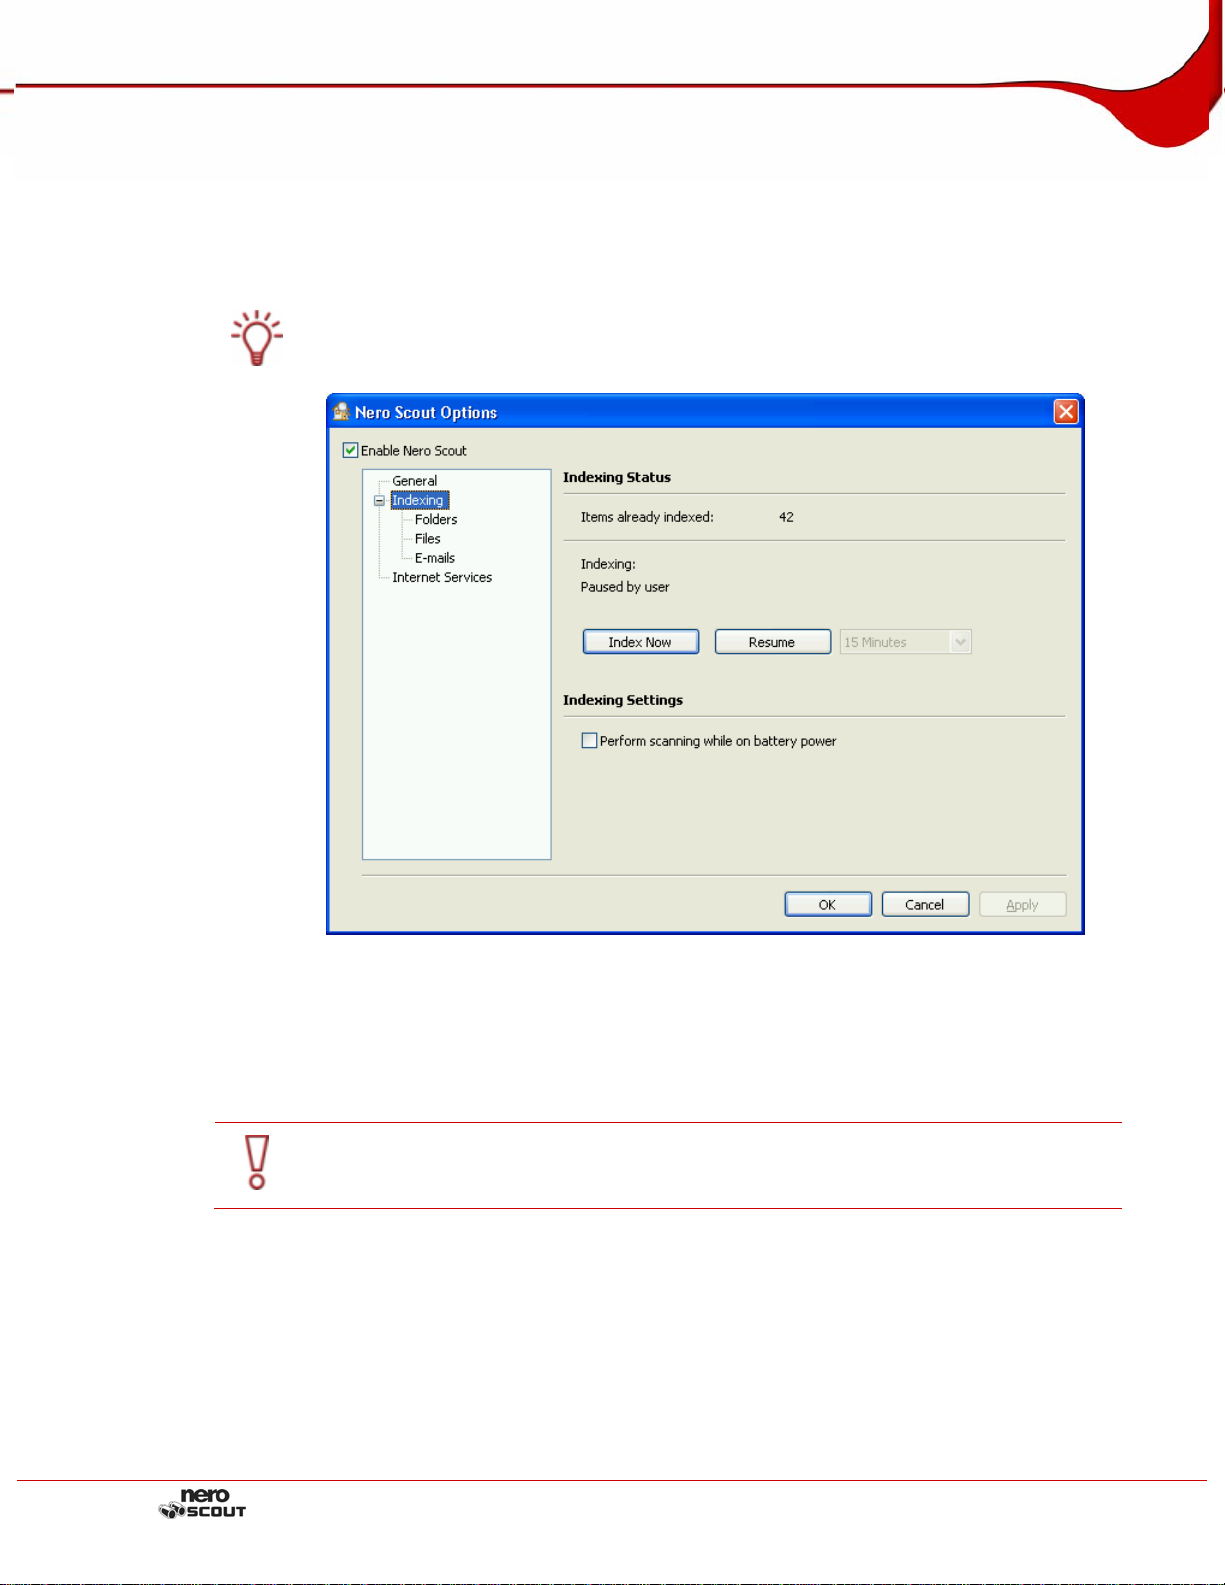
2.3 Indexing
The Indexing entry in the navigation tree offers you an overview of the already indexed files.
These files are available when searching using Nero Search.
You can see how many files are already indexed, as well as the status of the indexing
process.
Nero Scout indexes the "My Documents" folder by default. You can manually add other
folders that are also to be indexed.
Fig. 2: Nero Scout Options window, Indexing navigation item
You can now use the Index Now button to start indexing. Use the Snooze button to stop
indexing for the period indicated in the drop-down menu.
If you are working with a laptop, you can set whether indexing is also to be activated in
battery mode. Check the Scan in Battery Mode box if you want this.
Reduced battery operating period
Indexing in battery mode can shorten the battery operating period of your laptop because
the processor is required to perform more calculations.
Page 9
Page 10
Enabling and configuring Nero Scout
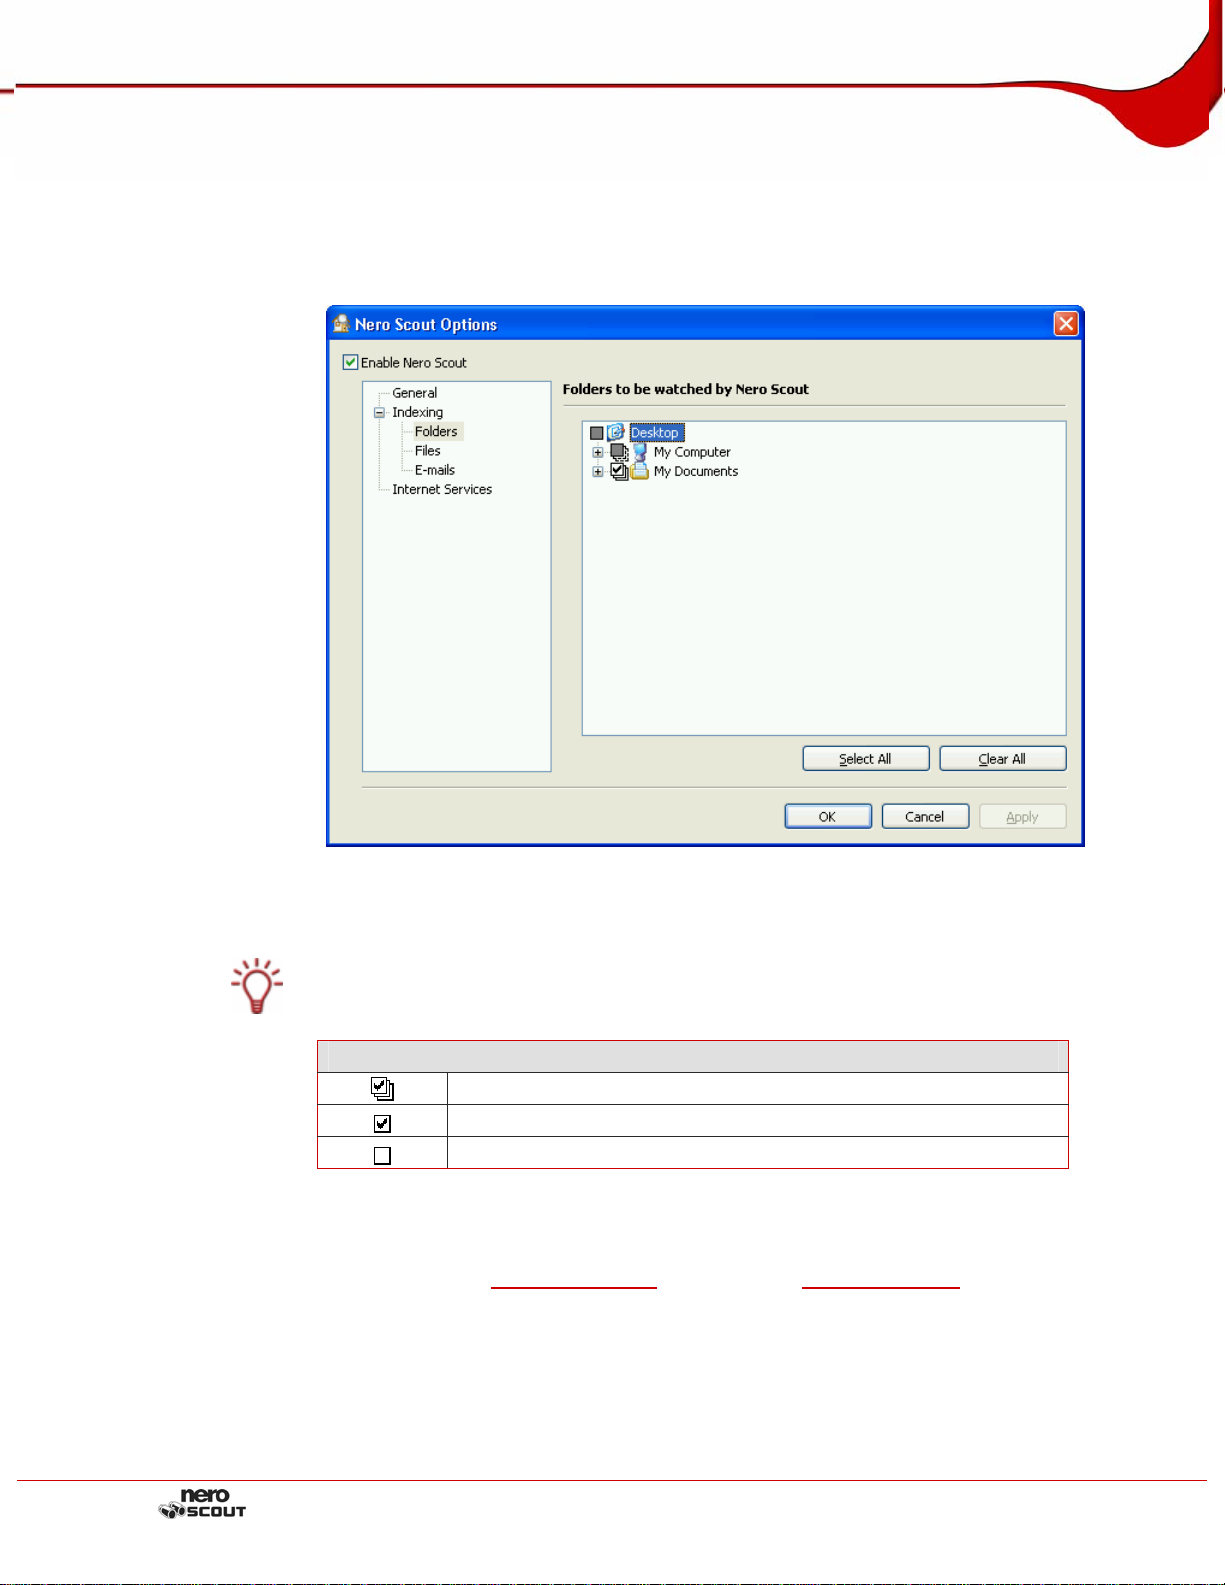
2.3.1 Adding folders
You can use Nero Scout to define special folders for indexing.
To add more folders for indexing, proceed as follows:
1. Click on Indexing > Folder in the navigation tree.
Fig. 3: Nero Scout Options window, Folder navigation item
2. Check off the folders you want to index in the directory structure on the right-hand side.
You can select a folder and all its subfolders or just precisely the folder you want.
Check boxes
This selects a folder and all its subfolders.
This just selects the folder you want.
The folder is not selected.
3. Click on the Apply button.
Î You have added the required folders for indexing. You can now proceed to add ce rtain
file formats (see
Selecting file types) or e-mails (see Selecting e-mails) for indexing.
Page 10
Page 11

Enabling and configuring Nero Scout
2.3.2 Selecting file types
Nero Scout allows you to select the file types you want to index.
To select file types to be indexed, proceed as follows:
1. Click on Indexing > Files in the menu tree.
Fig. 4:Nero Scout Options window, Files navigation item
2. To index all file formats, select the All option button.
3. If you only want to index certain file formats:
1. Select the Selected option button.
2. Check the boxes for the formats you want.
4. If you want to exclude certain file types from indexing:
1. Enter the extensions for the file types you want to exclude from indexing in the Exclude
the following file types from indexing text box.
2. If you want to return the settings to their original state, click on the Restore Defaults
button.
The file extensions must always start with a dot and must be separated from the other
extensions with a semicolon. For example: ".exe; .dat".
5. When you have selected all the required folders, click on the Apply button.
Î You have selected files for indexing. You can now continue to select e-mails for
indexing (see
Selecting e-mails).
Page 11
Page 12

Enabling and configuring Nero Scout
2.3.3 Selecting e-mails
Nero Scout allows you to select folders from your e-mail management program for indexing.
The directory structure on the right-hand side displays the e-mail management prog ram you
have installed and its folder structure.
At present, Nero Scout supports Microsoft
To define certain folders from the e-mail management program, proceed as follows:
1. Click on Indexing > E-mails.
®
Outlook® and Microsoft® Outlook® Express.
Fig. 5: Nero Scout Options window, E-mails navigation item
2. Check off the folders from your e-mail management program you want to index in the
directory structure on the right-hand side.
You can select a folder and all its subfolders or just precisely the folder you want.
Check boxes
This selects a folder and all its subfolders.
This just selects the folder you want.
The folder is not selected.
3. Click on the Apply button.
Î You have added the required folders for indexing.
Page 12
Page 13

Enabling and configuring Nero Scout
2.4 Internet services
You can enter, save, and update the URLs of the following media in the Internet Services
entry in the navigation tree:
Web radios
Web TV
Audio casts
Video casts
Image casts
You can select these Internet services in Nero Home or Nero ShowTime and use them
there.
Fig. 6: Nero Scout Options window, Internet Services navigation item
The Internet Services entry in the navigation tree contains the following elements on the
right-hand side of the window:
Tabs
Web Radio
Web TV
Audio Casts
Page 13
Displays the subscribed web radio stations, their URLs, and the
status of the update.
Displays the subscribed web TV stations, their URLs, and the
status of the update.
Displays the subscribed audio casts, their URLs, and the status
of the update.
An audio cast is a series of audio recordings in the Internet that
can mostly be automatically accessed in a newsfeed (mostly
RSS).
Page 14

Enabling and configuring Nero Scout
Video Casts
Image Casts
Buttons
Displays the subscribed video casts, their URLs, and the status
of the update.
A video cast is a series of video recordings in the Internet that
can mostly be automatically accessed in a newsfeed (mostly
RSS).
Displays the subscribed image casts, their URLs, and the
status of the update.
An image cast is a series of images in the Internet that can
mostly be automatically accessed in a newsfeed (mostly RSS).
Subscribe
Unsubscribe
RSS (Really Simple Syndication) is used to save articles on a web site or their abstracts
and to make them available in machine-readable form.
A so-called RSS feed consists of an XML file with just the structured content as it might
appear on a news page but no layout, navigation or other additional information.
Many web services that regularly publish articles provide an automatically generated RSS
file containing the new articles.
2.4.1 Creating an entry
To create an entry on one of the tabs, proceed as follows:
1. Click on the Internet Services entry in the navigation tree.
2. Click on the Subscribe button on the right-hand side of the window.
Æ The Dialog window appears.
Opens the Dialog window. A new entry on the tab can be
created there (see
Deletes an entry from the tab.
Creating an entry).
Fig. 7: Dialog window, Web Radio drop-down menu
Page 14
Page 15

Enabling and configuring Nero Scout
The Dialog window contains the following elements:
Category
list box
Title
text box
URL
text box
Update Interval area
Automatically
(recommended)
option button
Once a day
option button
Never (only
manual)
option button
Update Now
button
Provides the entry categories and therefore the tabs on which
the entry appears for selection.
Defines the name of the entry.
Defines the URL of the entry.
Automatically updates the entry.
Updates the entry once each day.
Only updates the entry when an update is manually initiated.
Initiates the update manually.
3. Select the required category for the entry in the Category drop-down menu.
4. Enter the name for the entry in the Title text box.
5. Enter the URL for the entry in the URL text box.
6. Specify the frequency with which the entry is to be updated using the option buttons in the
Update Interval area.
7. To update the entry immediately, click on the Update Now button.
8. To discard the entry, click on the Cancel button.
9. To confirm your entries, click on the OK button.
Î You have made an entry on a tab.
2.4.2 Deleting an entry
To delete an entry on one of the tabs, proceed as follows:
1. Click on the Internet Services entry in the navigation tree.
2. Select the entry to be deleted.
3. Click on the Unsubscribe button on the right-hand side of the window.
Î You have deleted an entry.
Page 15
Page 16

Quick search using the task bar
3 Quick search using the task bar
3.1 Overview
The quick search function of Nero Search can be accessed in the Windows® task bar.
The text box for the search is located to the right of the task bar.
Clicking on the white arrow opens the Nero Search main window (seeNero Search main
window
Clicking on the black triangle to the right of the text box opens the quick search context
menu. The following options can be selected:
).
Menu items
Snooze Indexing
15 Minutes
Index Status
Index Now
Advanced
Search
Show History
Options
Help
This interrupts indexing for 15 minutes. This function is
particularly useful if you want to use the computing capacity
used in indexing for other applications.
Opens the Nero Search Index Status window. The number of
files already indexed and the current index status are shown
here. Indexing can also be stopped completely or just for a
predefined period of time (see Nero Search Index Status
window
Starts indexing the files selected with Nero Scout.
Opens the Nero Search main window. The main window
shows the search results in greater detail than the quick
search window. In the main window you can also define search
criteria to refine the desktop search (see
window
Shows the last ten search entries.
Opens the Nero Scout options (see
Nero Scout
Opens the online help.
).
).
).
Fig. 8:Nero Search text box
Nero Search main
Enabling and configuring
Page 16
Page 17

Quick search using the task bar
3.2 Nero Search Index Status window
The Nero Search Index Status window displays information about the number of files
already indexed. Indexing is automatically stopped as soon as you start working on your
computer. This happens to offer you the best possible computing performance when using
other applications. You can enable and disable indexing manually via the Nero Search
Index Status window. You can stop indexing for an unlimited time or simply interrupt it for a
particular period of time.
The following buttons are available in the Nero Search Index Status window:
Buttons
Index Now
Deactivate /
Resume
Close
Starts indexing the files selected in Nero Scout.
Stops indexing. Clicking on the button again resumes indexing
after the period of time selected in the adjacent selection menu.
Closes the Nero Search Index Status window.
Fig. 9:Nero Search text box
3.3 Searching the desktop using the quick search function
To search for files on your computer using the quick search function, proceed as follows:
1. Click in the Nero Search text box and enter the required search text.
Æ The Nero Search window in which the results are displayed opens while you are
entering the search text. The Desktop tab is opened by default. Depending on the media
type, the results will already be allocated to the correct category.
Fig. 10:Nero Search window, Desktop tab
Page 17
Page 18

Quick search using the task bar
The results adapt dynamically to the search text while you are entering it.
2. If you want to open a file, click on it with the left mouse button.
Æ The file opens in the default application for the selected file type.
3. If you want to open further options for the selected search result, move the mouse over it
and click with the right mouse button.
Æ The context menu opens.
Menu items
Open
Open With
Copy
Properties
4. If you want to define further search criteria to refine the search, click on more.
Opens the selected file in the default application for the file type.
Here you can select the application in which the selected file is to
be opened. This option is not available for the Documents
category.
Copies the selected file to the clipboard.
Opens the Properties window.
Î The Nero Search main window opens (see Performing an advanced desktop search).
Page 18
Page 19

Quick search using the task bar
3.4 Searching web pages using the quick search function
To search for web pages using the quick search function in the task bar, proceed as follows:
1. Click in the Nero Search text box and enter the required search text.
Æ The Nero Search window in which the results are displayed opens while you are
entering the search text. The Desktop tab is opened by default.
2. Click on the Web tab.
Æ The results are displayed.
Fig. 11:Nero Search window, Web tab
The results adapt dynamically to the search text while you are entering it.
3. If you want to open a web page, click on it with the left mouse button.
Æ The web page opens in the browser.
4. If you want to open further options for the selected search result, move the mouse over it
and click with the right mouse button.
Æ The context menu opens.
Menu items
Open
Copy Link
Opens the selected web page in the browser.
Copies the address of the web page to the clipboard.
5. If you want to display all search results, click on more.
Æ The Nero Search main window opens (see Performing a web search).
Î You have performed a web search using the task bar.
Page 19
Page 20

Nero Search main window
4 Nero Search main window
The Nero Search main window contains the full functional scope of Nero Search. It
comprises the following three tabs:
Desktop search (see Desktop Search tab)
Web search (see Web Search tab)
Saved searches (see Saved Searches tab)
4.1 Desktop Search tab
The Desktop Search tab allows you to define advanced search criteria to refine the desktop
search. You can save your search settings for use again in the future. The search results are
listed in the various categories and can be displayed in various views.
Fig. 12: Nero Search window, Desktop Search tab
You can open or close the Advanced Search and Results areas using the and
buttons or by clicking on the area name.
Page 20
Page 21

Nero Search main window
The following display options for the search results are available on the right-hand side in the
Results area when you click on the
Menu icons
Entry
Info View
Entry
Group View
Entry
Image View
Entry
List View
Entry
Show
Thumbnail
The search results are listed in the following categories:
button:
Shows a miniature view of the search results, the title, the
time of last modification, and the file type.
Shows the search results arranged according to the letters of
the alphabet. The results under the individual letters can be
hidden.
Shows the search results as miniature views.
Shows the search results in a list. The results can be sorted
alphabetically, by the date of last modification, and by the file
type (see Microsoft
Shows a preview of the highlighted file in the right-hand side
of the results display.
®
Windows® Explorer).
All Results
Audio
Photos
Video
Documents
Others
E-mails
You can switch between the categories by clicking on the tabs.
The following buttons are available on the Desktop Search tab:
Buttons
Search
Options
Save
Search
Open
Selection
Starts the highlighted search query.
Opens the Nero Scout options (see
).
Scout
Saves the current search query (see
Opens all selected files.
Enabling and configuring Nero
Saved Searches tab).
4.1.1 Performing a desktop search
To search for files on your computer, proceed as follows:
1. Click in the Search Query text box and enter the required search text.
Page 21
Page 22

Nero Search main window
Æ Depending on the media type, the results will already be allocated to the correct
category.
The results adapt dynamically to the search text while you are entering it.
2. If you want to open a file, double-click on it with the left mouse button.
Æ The file opens in the default application for the selected file type.
You can open a number of search results at the same time by highlighting them with the
Shift key pressed and then clicking on the Open Selection button.
3. If you want to open further options for the selected search result, move the mouse over it
and click with the right mouse button.
Æ The context menu opens. The following menu items are available:
Menu items
Open With
Properties
Open
Copy
Opens the selected file in the default application for the file
type.
Selects the application in which the selected file is to be
opened.
Copies the selected file to the clipboard.
Opens the Windows
®
Properties window.
Î You have performed a desktop search.
4.1.2 Performing an advanced desktop search
The advanced desktop search allows you to define search criteria to refine your search.
To define a new search criterion, proceed as follows:
1. Click on the plus icon in the Advanced Search area.
Æ The input row for the search criteria opens.
2. Select the required metadata in the Title drop-down menu.
Metadata is data that contains information about other data. Metadata for video files, for
example, can contain the following information: title, director, producer, and genre.
3. If you want to further restrict the search for the required metadata, select the required
restriction in the adjacent drop-down menu.
Fig. 13:Nero Search window, Advanced Search area
Page 22
Page 23

Nero Search main window
The possible restrictions can vary depending on the metadata selected. In the case of title,
for example, only contains or does not contain can be selected, while logical operators
such as greater than or less than can be selected for bit rate.
4. If you want to define further search criteria, click on the plus icon once more. You can define
as many search criteria as you want.
5. To delete search criteria, click on the minus icon for the relevant criterion.
Æ All the defined search criteria are shown summarized in the Search Query text box.
The advanced search criteria can also be entered directly in the Search Query text box.
This method is only recommended for advanced users as the exact metadata designations
have to be entered.
6. Enter the required search text.
Æ Depending on the media type, the search results will already be allocated to the correct
category.
The results adapt dynamically to the search text while you are entering it.
7. If you want to open a found file, double-click on it with the left mouse button.
Æ The file opens in the default application for the selected file type.
You can open a number of results at the same time by highlighting them with the Shift key
pressed and then clicking on the Open Selection button.
8. If you want to open further options for the selected search result, move the mouse over it
and click with the right mouse button.
Æ The context menu opens. The following menu items are available:
Menu items
Open
Open With
Copy
Properties
Î You have performed an advanced desktop search.
4.2 Web Search tab
The Web Search tab shows you all the search results in greater detail than the quick search
window. In addition to the hyperlinks found, a short summary of the relevant web page and
its Internet address is also shown. You can either display all search results or just those in
your language. You can save your search settings for use again in the future.
Opens the selected file in the default application for the file type.
Here you can select the application in which the selected file is to
be opened.
Copies the selected file to the clipboard.
Opens the Properties window.
Page 23
Page 24

Nero Search main window
Fig. 14: Nero Search window, We b Search tab
The Web Results area can be opened or closed with the and buttons or by clicking
on the area name.
The following buttons and option buttons are available on the Web Search tab.
Buttons and option buttons
Search
Options
Save
Search
Open
Selection
Any
language
In 'Target
Language'
Starts the highlighted search query.
Opens the Nero Scout options (see
).
Scout
Saves the current search query (see
Enabling and configuring Nero
Saved Searches tab).
Opens the selected web page.
All search results are displayed.
Only the search results in your own language are displayed.
4.2.1 Performing a web search
To search for web pages using the web search function, proceed as follows:
1. Click in the Search Query text box and enter the required search text.
Æ The results are displayed.
Page 24
Page 25

Nero Search main window
The results adapt dynamically to the search text while you are entering it.
2. If you want to open a found web page, click on it.
Æ The web page opens in the browser.
3. If you want to open further options for the selected search result, use the right mouse button
to call up the context menu.
Æ The context menu opens. The following menu items are available:
Menu items
Open
Copy
Î You have performed a web search.
Opens the selected web page in the browser.
Copies the address of the web page to the clipboard.
Page 25
Page 26

Nero Search main window
4.3 Saved Searches tab
The Saved Searches tab allows you to call up as well as change and delete saved search
queries.
Fig. 15: Nero Search window, Saved Searches tab
The results area automatically adapts to the type of search performed.
The Saved Searches and Results/Web Results areas can be opened or clo sed using the
and buttons or by clicking on the area name.
The Saved Searches area contains the following columns:
Columns
The name of the saved search is displayed here. Also displayed is a
Name
suitable icon for the respective search. Desktop searches are
indicated by a small monitor and web searches by a small globe with
a magnifying glass.
The search criteria you defined in the Advanced Search area on the
Search
String
Desktop Search tab are displayed here (see
advanced desktop search
).
Performing an
Example: TITLE:“The Magic Flute“ COMPOSER: “W. A. Mozart“
Page 26
Page 27

Nero Search main window
The following buttons are available on the Saved Searches tab:
Buttons
Delete
Edit
Search
Open
Selection
Deletes the highlighted search (see
Edits the highlighted search (see
Starts the highlighted search query.
Opens the selected search result.
4.3.1 Saving a search query
To save a search query, proceed as follows:
1. Perform a desktop search (see Performing a desktop search) or web search (see Performing
a web search
).
2. Click on the Save Search button.
Æ The view automatically changes to the Saved Searches tab. A new search query is
created in the Saved Searches area.
Deleting a search query).
Editing a search query).
3. Enter the name for the new search query and press the Enter key.
Î The search query has been saved.
4.3.2 Editing a search query
To edit a saved search query, proceed as follows:
1. Select the required search in the Saved Searches area.
2. Click on the Edit button.
Æ The view automatically changes to the correct tab for the type of search.
3. Edit the search query and click on the Save Search button.
Æ The Nero Search dialog box is displayed.
Fig. 16: Nero Search dialog box
4. Click on the Replace button.
Î You have edited the saved search.
Page 27
Page 28

Nero Search main window
4.3.3 Deleting a search query
To delete a saved search query, proceed as follows:
1. Select the required search in the Saved Searches area.
2. Click on the Delete button.
Æ A dialog box in which you are asked to confirm that you want to delete the saved search
appears.
3. Click on the Yes button to confirm the deletion.
Î You have deleted a saved search query.
Page 28
Page 29

List of figures
5 List of figures
Fig. 1: Nero Scout Options window, General navigation item.........................................................................7
Fig. 2: Nero Scout Options window, Indexing navigation item .......................................................................9
Fig. 3: Nero Scout Options window, Folder navigation item.........................................................................10
Fig. 4:Nero Scout Options window, Files navigation item.............................................................................11
Fig. 8:Nero Search text box.............................................................................................................................16
Fig. 9:Nero Search text box.............................................................................................................................17
Fig. 10:Nero Search window, Desktop tab.....................................................................................................17
Fig. 11:Nero Search window, Web tab............................................................................................................19
Fig. 12: Nero Search window, Desktop Search tab.......................................................................................20
Fig. 13:Nero Search window, Advanced Search area...................................................................................22
Fig. 14: Nero Search window, Web Search tab..............................................................................................24
Fig. 15: Nero Search window, Saved Searches tab ......................................................................................26
Fig. 16: Nero Search dialog box......................................................................................................................27
Page 29
Page 30

Index
6 Index
A
About Nero Scout 5
About Nero Search 5
B
Buttons
Desktop Search Tab 17, 21
Saved Searches Tab 27
Web Search Tab 24
C
Categories Search Results 21
Contact 32
Conventions of the Manual 5
D
Desktop Search
Refining 22
Search Result Context Menu 22, 23
Search Results Context Menu 18
Displaying Search Results 21
E
Extended Desktopn Search 22
O
Opening a Search Result 18
Opening a Web Page 19
Opening Multiple Search Results 22, 23
Opening Multple Search Results 23
Q
Quick Search
Context-Sensitive Menu 16
Desktop 17
Web 19
S
Saved Searches Tab 26
Search Criteria
Defining 22
Deleting 23
Search Query
Changing 27
Deleting 28
Saving 27
Search Query Input Field 23
Simple Desktop Search 21
F
Folders
Adding 9
Indexing 7, 9
G
gespeicherte Suchabfragen 26
M
Main Window Nero Search 20
Meta Data 22
N
Nero Desktop Search 8
Nero Scout
Defining General Options 7
Enabling 7
Options 7, 8
Page 30
T
Tab
Desktop Search 20
Web Search 23
Task Bar 16
V
Verlauf anzeigen 16
W
Web Results
Detailed Display 23
Web Search
Search Result Context-sensitive Menu 25
Web Seqarch
Context Menu Search Result 19
Page 31

Contact
7 Contact
Nero Search is a Nero AG product.
Nero AG
Im Stoeckmaedle 18
76307 Karlsbad
Germany
Web:
Help:
E-mail:
Fax:
www.nero.com
http://support.nero.com
techsupport@nero.com
+49 7248 928 499
Copyright © 2006 Nero AG. All rights reserved.
Page 31
 Loading...