

Page 1
How to use Nero Recodes ‘Remake a DVD’ feature
(Important Note: Nero Recode will only work with VOB, IFO, and BUP files that you will normally
find located in a ‘Video_TS’ folder contained on a DVD-Video DVD, or stored on your Hard Drive.
Nero Recode will also not be able to read/obtain these files from a ‘Protected’ DVD-Video DVD,
such as you find when you purchase or rent a commercial DVD. Only unprotected DVD’s can be
accessed and used by Nero Recode directly. Programs such as ‘NeroVision Express 2’ can
create VOB, IFO, and BUP files in a folder called ‘Video_TS’ on your Hard Drive or onto a DVDVideo DVD, from source files such as MPEG, AVI, WMV, ASF, MP4, DV, etc. You can then use
these VOB, IFO, and BUP files with Nero Recode.)
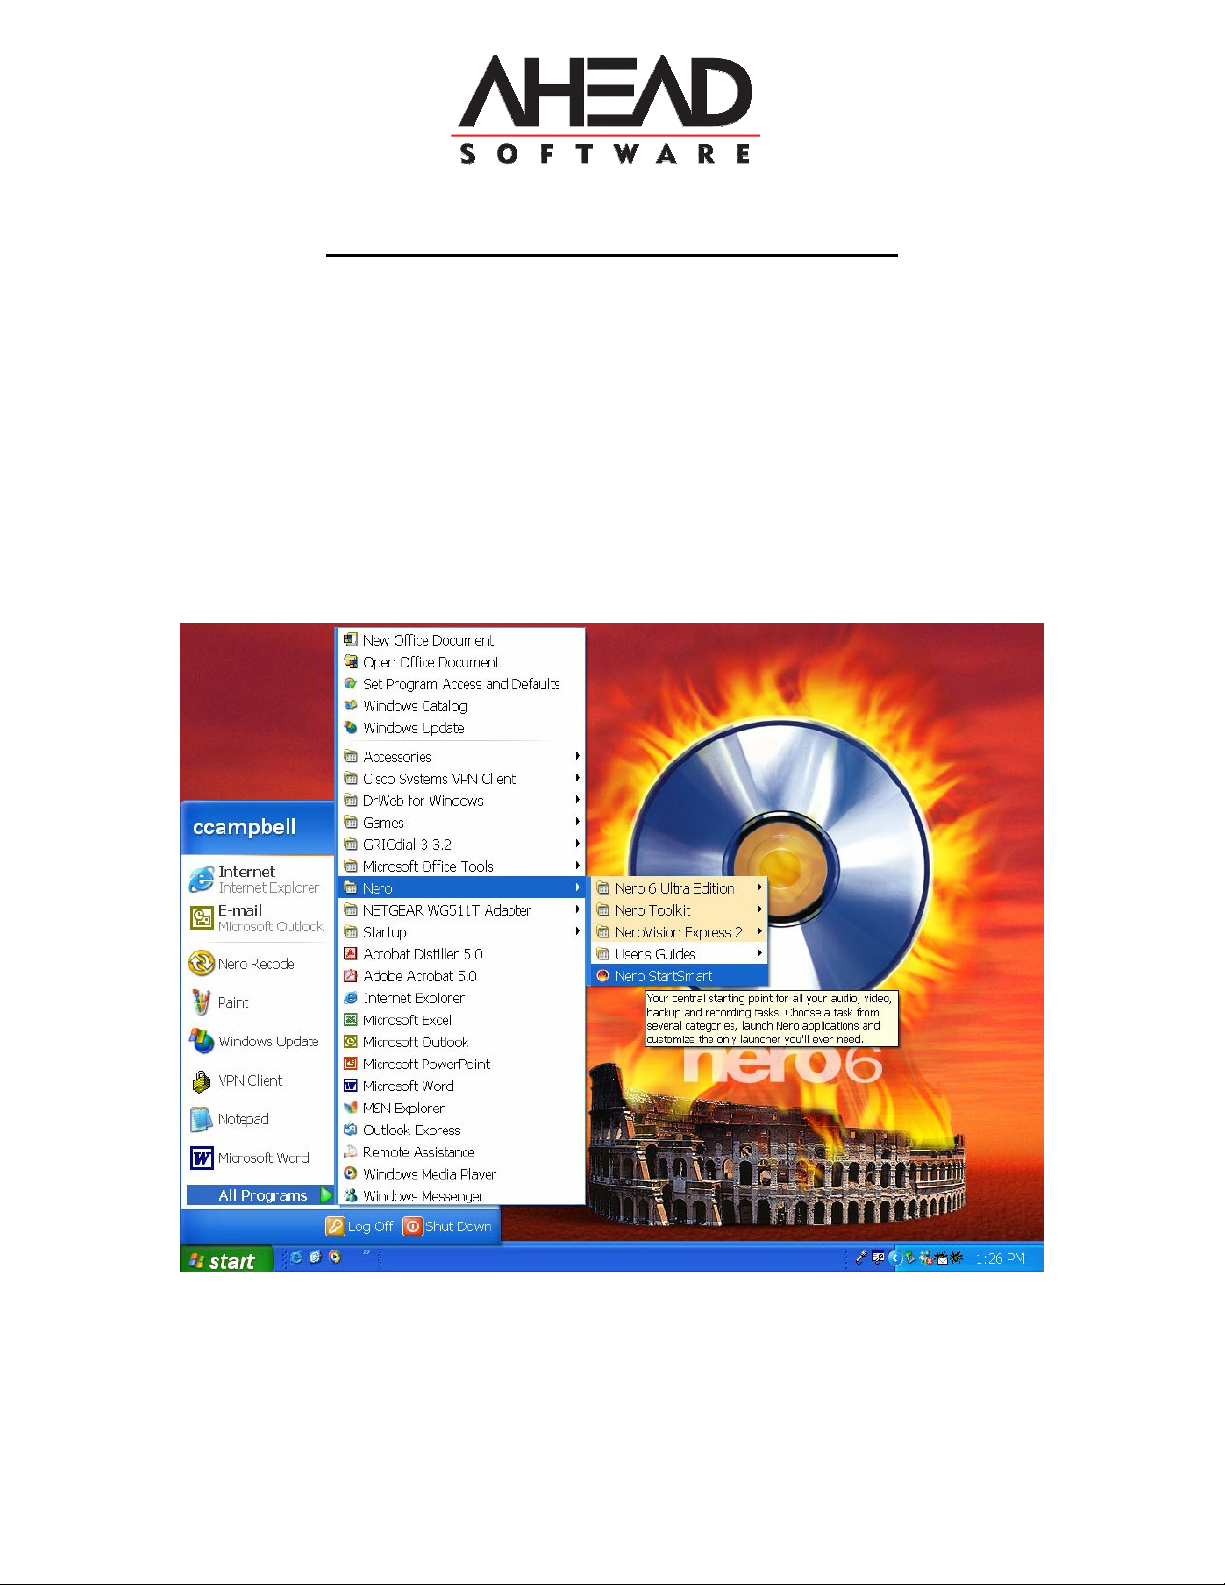
1. To Launch Nero Recode: Click on Start->All Programs->Nero->Nero StartSmart
Page 2
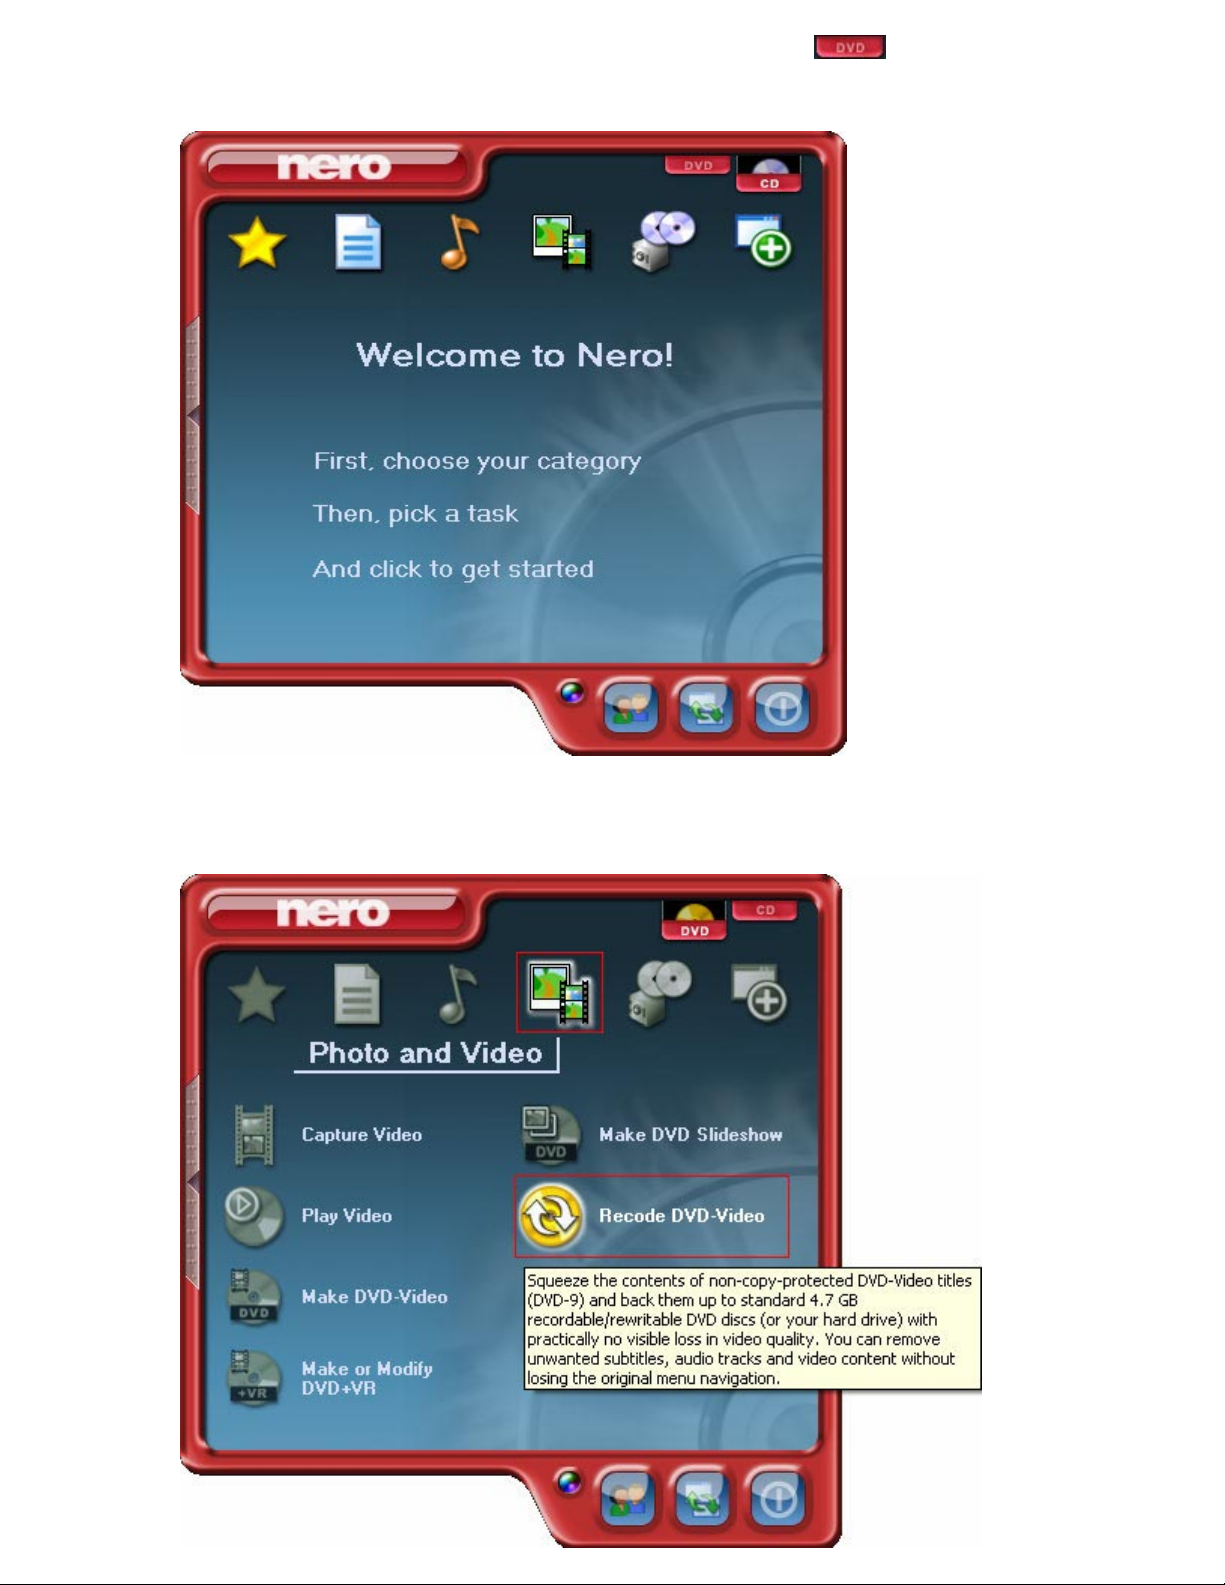
2. This will bring up the Nero StartSmart interface. Now select the icon located in
the top-right of the window. (Note: You need a DVD Recorder connected to your system
for the DVD icon to appear.)
3. The DVD Icon will drop down to show that you are now in DVD mode. Now put your
mouse over the ‘Photo and Video’ icon, and then select the option for ‘Recode DVD-
Video’.
Page 3
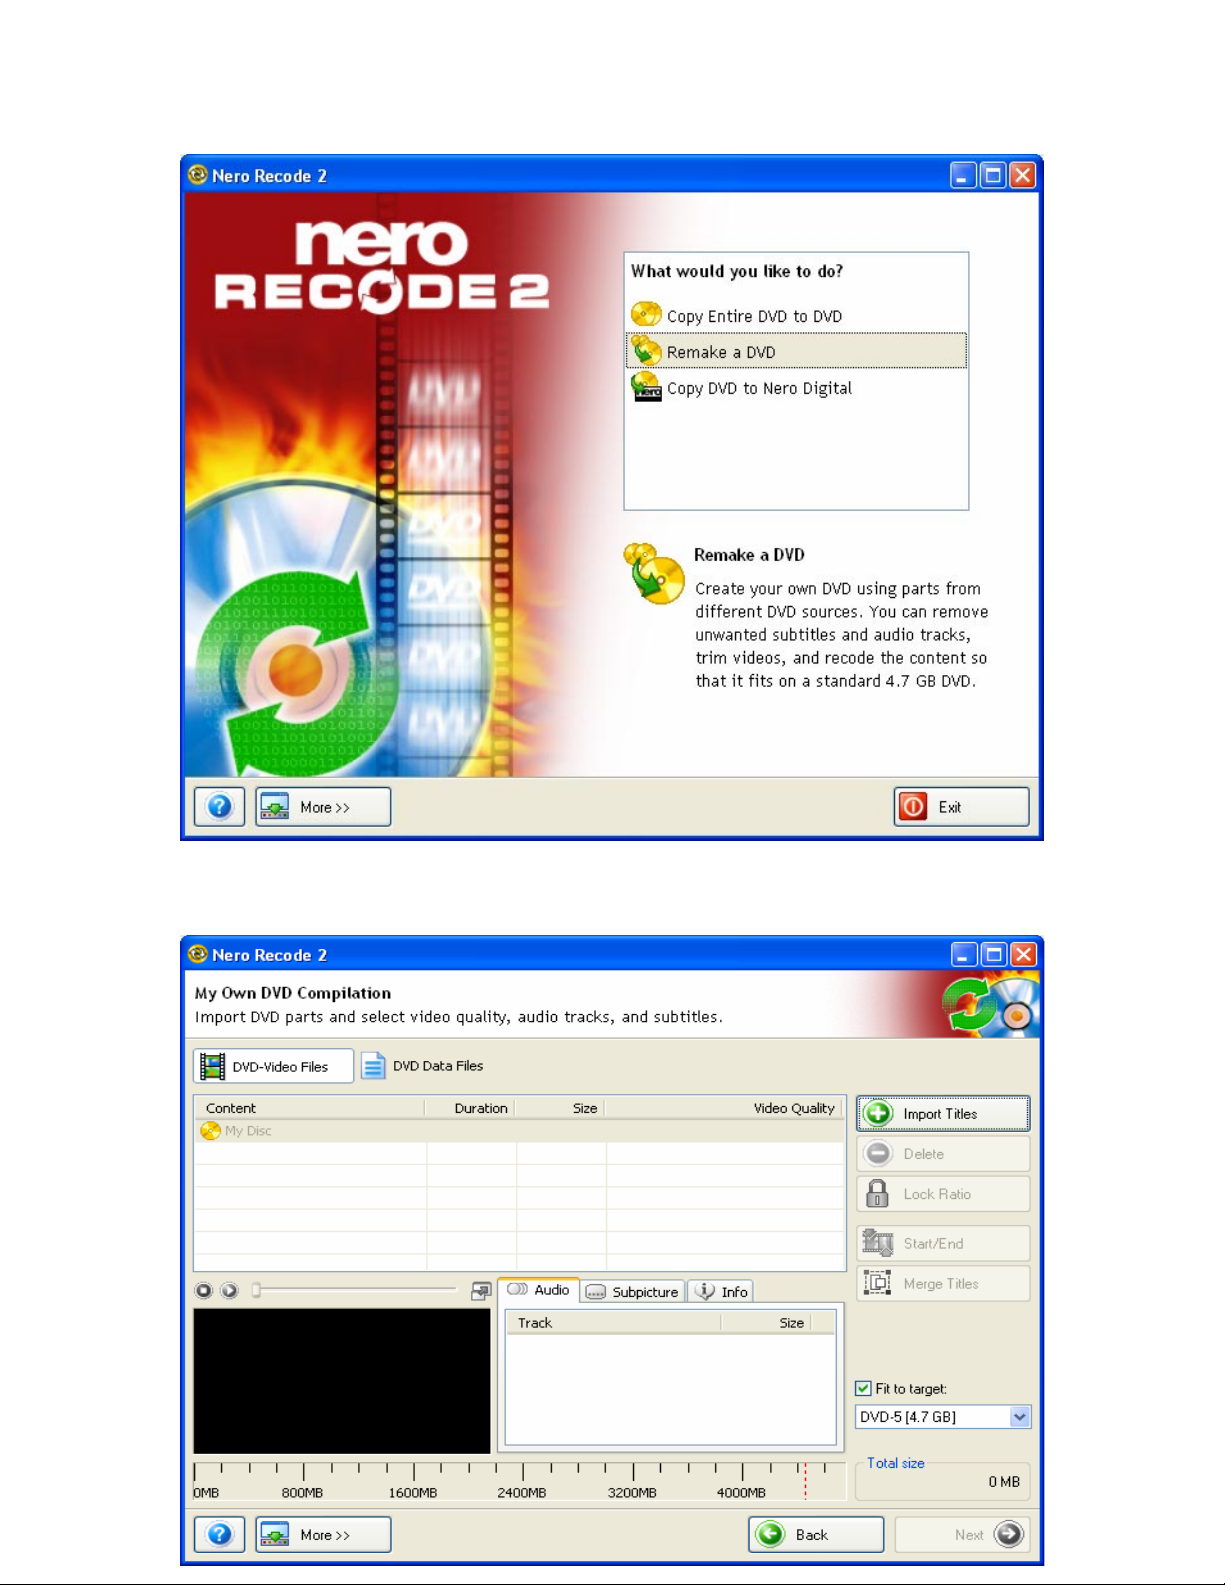
4. This will bring up the Nero Recode Program window. Now you can select the ‘Copy
Entire DVD to DVD’ option. (Note: As soon as you put your mouse over this option, you
will see text appear in the bottom right of the window that will explain what you can do
with this option.)
5. This brings you to the ‘My Own DVD Compilation’ window. Select the ‘Import Titles’
button.
Page 4
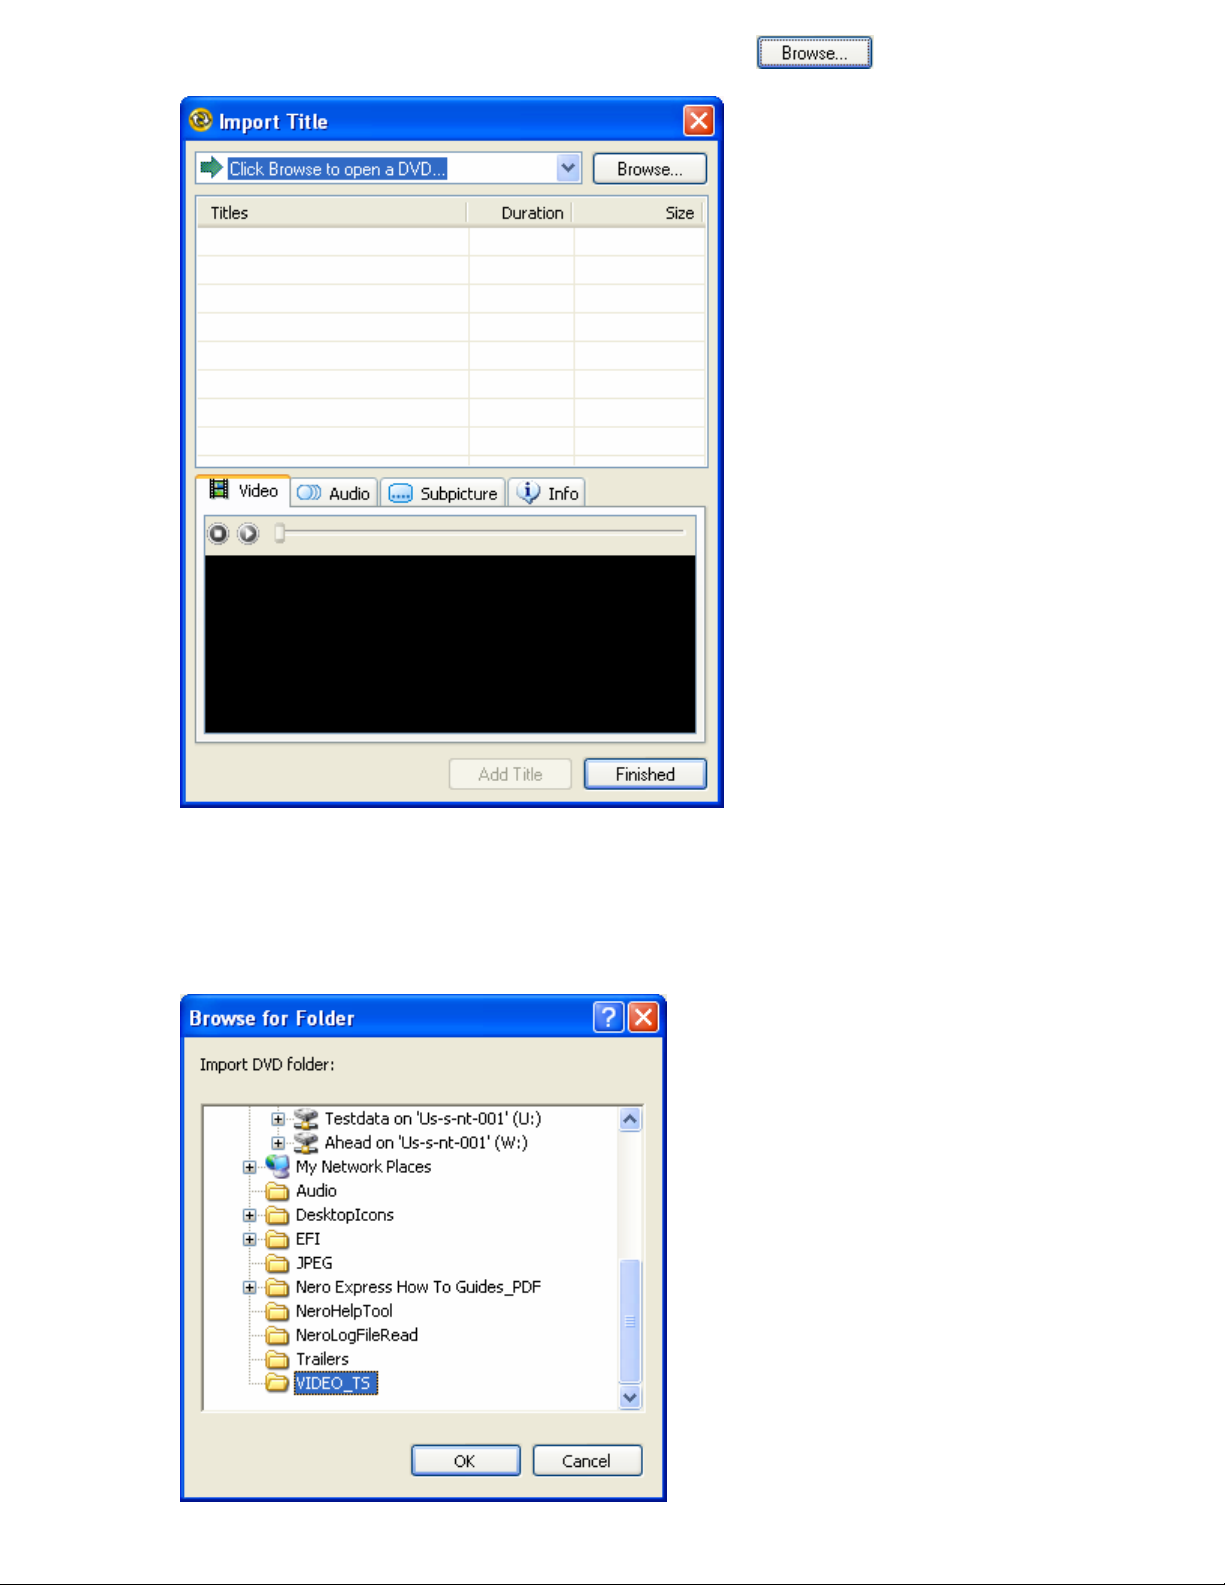
6. This brings up the ‘Import Title’ window. Now select the button.
7. Here you need to select a ‘Video_TS’ folder contained on your Hard Drive, or select a
‘Video_TS’ folder from a Non-Protected DVD-Video DVD. Once you have highlighted
your selection, click on the ‘OK’ button.
Page 5
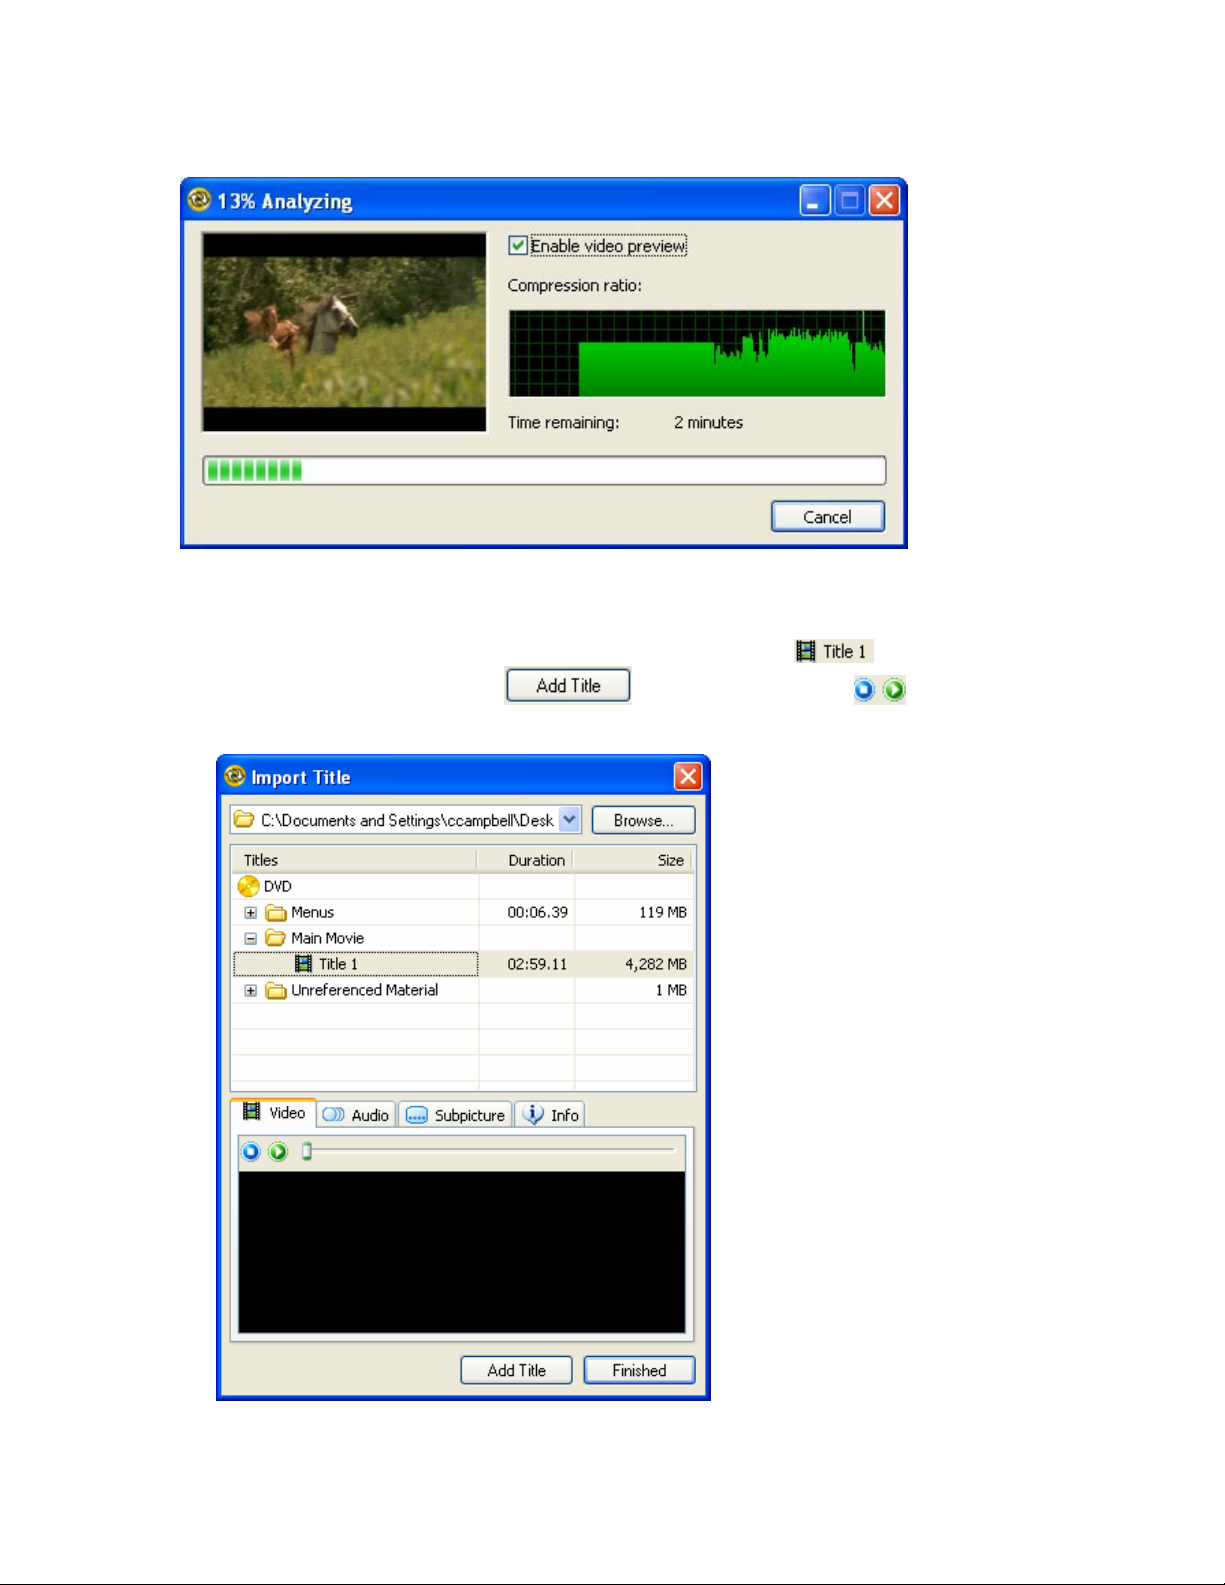
8. This will bring up the ‘Analyzing’ window. This only comes up the first time a source is
analyzed by Nero Recode. You can preview the source video while it’s being analyzed to
insure it’s the video you wish to work with. And there is a graphical display window that
will display the compression ratio on the source video selected. As well as a count down
to the time remaining for the analyzing process.
9. This brings you back to the ‘Import Title’ window. Select the from the ‘Main
Movie’ and then click on the
preview the selected movie title before adding it to the project.
button. You can use the buttons to
Page 6
10. You will see that ‘Title 1’ was added in the background. Repeat this step till you have all
the movie titles you want written to DVD added. Then click on the
button.
11. This brings you back to the ‘My Own DVD Compilation’ window. But as we can see
from the bar chart at the bottom of the window that shows in RED, we have exceeded the
capacity of the media we are about to write too. And still be able to create a DVD-Video
with acceptable quality for playback. So we will need to cut some video out to make this
fit. Most movies will have Credits and other information at the beginning that you can
remove without affecting the main movie. You can remove these by using the
button. Click on this button now.
Page 7

12. This brings up the ‘Set Start/End Frames’ window.
13. You can use the drop down box next to ‘Chapter:’ to select at what chapter point you
wish the movie to begin at, or end at. You can also use the
manually select a location in the movie to begin and end at. Or you can use the
and
time to select start and end points for the movie. This window will display the exact Start
Frame and End Frame selected. As well as display the Total Duration in Frames, and
Total size of Title you are editing. Click on the ‘OK’ button when you are done making
your changes.
buttons to move frame by frame, or jump forward a number of frames at a
slide bar to
Page 8

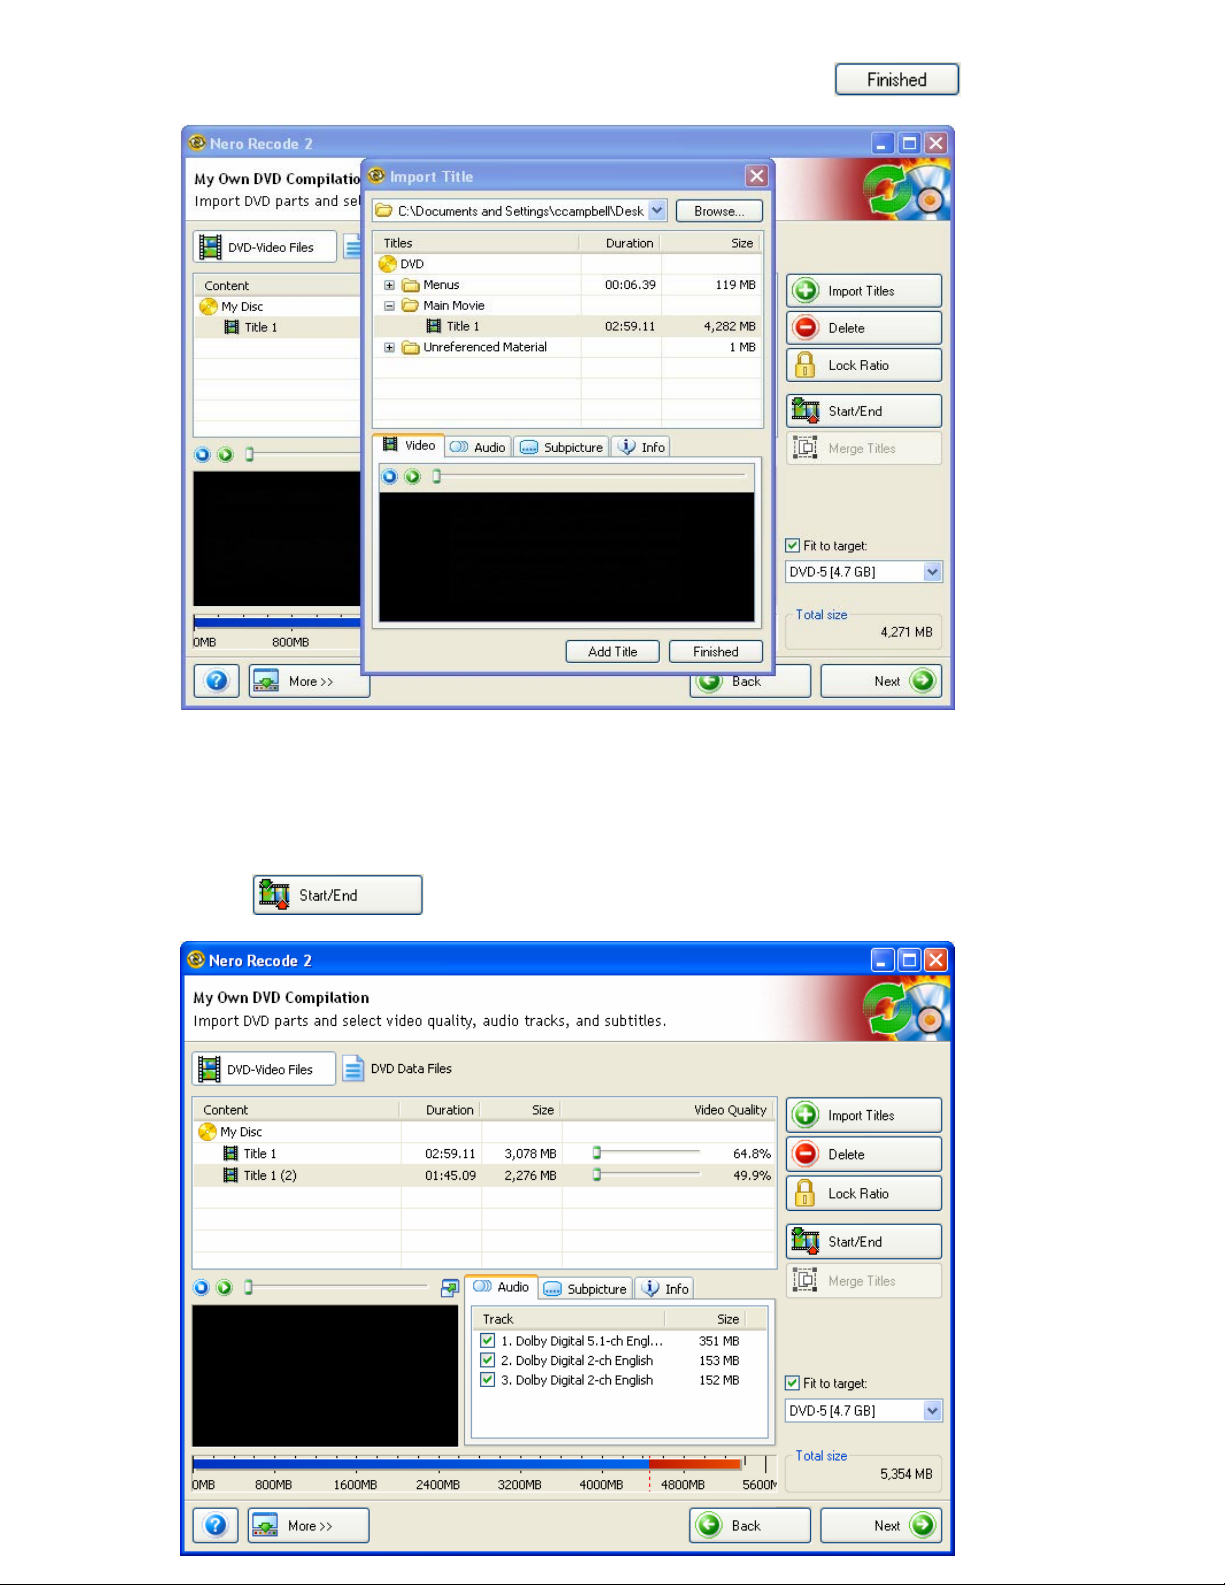
14. This brings you back to the ‘My Own DVD Compilation’ window. And now you can see
from the bar graph at the bottom of this window, that we can now fit both titles onto one
DVD media.
15. At this point you can just click on ‘Next’ and begin the burn. Or you can make some
changes to the project first. Under the
choice of Dolby Digital 2-channel or 5.1 channel audio. If the movie contains more than
one language in audio, such as German/English/Spanish, etc. You can select those
languages you want or do not want the audio for. You will see the ‘Total size’ change as
you select or unselect an option. Do this for each Title Movie in your project.
tab, you can deselect or select your
Page 9

16. There is also a ‘Preview’ option in this window. You can use the buttons to begin
playing the selected video or to stop playing the selected video. You can use the
slide bar to movie to any location in the movie and then
begin playing from there. Or you can use the
for better viewing. (Note: Be sure to carefully click on the green arrow exactly or it will not
expand the preview window properly.)
button to expand the preview window
17. The below screenshot shows an example of the expanded preview window. As you can
see, all other options are hidden while in this mode of viewing. Just click on the
to return to a minimized preview mode.
icon
Page 10

18. Now select the option to choose which subtitles you wish to include or
exclude from the project. In this case we only have an English and French subtitle to
choose from, but in most cases you will have others such as Spanish, German, etc.
19. And now click on the tab to view details about your source video. This window
will display information about Resolution; Compression used; Display; Frame Rate;
Picture; and Average Bitrate.
Page 11

20. Depending on the size of the source Video you are working with, you can use the
drop down box located in the bottom right of the window, shown in the below picture with
a red box around it, to choose what type of medium you prefer to burn this too. You have
a choice of DVD-5 [4.7GB] media; CD [80 min] media; CD [74 min] media; or you can
choose Custom to select your own size. For instance you may have access to CD [99
min] media and a recorder that supports CD [99 min] media.
21. If you chose ‘Custom’, you would get the below ‘Custom Target Size’ window to appear.
Just enter the size of the media you have to work with, and then click ‘OK’.
.
Page 12

22. As soon as you select ‘OK’, you will see an option for 900MB show up in the drop down
box. And depending on the source video selected, the graphical display will show how
much space used on this media. In this example, we have again exceeded the capacity
of the media we are to write too as indicated by the red portion of the bar graph. We
would need to either remove some source video, edit the Start/End of the source video to
make fit to the select media type, or change the media type back to DVD 5 [4.7GB]. We
will change it back to the DVD Media for this example.
23. Now that you have freed up more room to increase the quality of the video, you can use
the
Title. As long as you have the option for
bars for the video quality adjust themselves to keep within the 4.7GB capacity of the DVD
media you will be writing too.
slide bar to increase the quality of one Title over the other
enabled, you will see that the slide
Page 13

24. Here you can see how adjusting the quality for one Title causes the quality setting for the
other Title to drop.
25. Now the last option you have is to add DVD Data Files. Click on the icon
in the top left of the window, shown with a red box around it below.
Page 14

26. This brings up a window to allow you to add data files from your Hard Drive or other
sources. Click on the
button.
27. This brings up the ‘Select Files and Folders’ window. Select your files and/or
folders and then click the ‘Add’ button. Once you’re done adding your data, select
the ‘Close’ button.
Page 15

28. This brings you back to the ‘DVD Data Files’ window. Now you can either click on
icon, or you can just click ‘Next’ to set up the burn process. In this
example we will be clicking on ‘Next.
29. This brings us to the ‘Burn Settings’ window. Select the icon to see a list of
‘Destination devices’ to choose from. You can write the video to your Hard Drive where it
will store it in a Video_TS folder; You can select the ‘Image Recorder’ to create and ISO
or NRG image file which you can burn to DVD at a later date; or you can select a DVD
recorder that you have connected to your system. We will select a DVD Recorder.
Page 16

30. Now click on the button to select a Temp directory to store the encoded
files that Nero Recode must create.
31. This brings up the ‘Browse For Folder’ window. You can select an existing folder to
use as a temp directory, or create a new folder using the button to
create a new folder to use as a temp directory. Click on ‘OK’ when you have
finished. ( Note: After the burn is completed, the encoded files will automatically
be deleted from the temp directory.)
Page 17

32. Now you can select the write speed and click on the icon to begin
burning to DVD.
33. Or, if you are short on Hard Drive Space, you can enable the option for ,
and instead of using a temp directory to save the encoded files too before burning, it will
burn to disc while recoding without creating the DVD structure on the Hard Drive first.
Page 18

34. The Burn process begins. You will see faster than real-time encoding going on in the
bottom left window. Or you can click on the
icon to enlarge the preview window.
35. And this is the expanded preview window. You can watch the movie as its being recoded,
and burned to DVD.
Page 19

36. Once the recording has completed, click on ‘Next’.
37. And this brings you to the Final window. Now you can choose to ‘Burn the Same Project
Again’. If you choose this option, you will not need to recode the video, as it will stay in
the temp directory until you click Exit or ‘New Project’. Or you can select the ‘New project’
option to select a new operation. Or you can create a Cover for your DVD-Video using
the Nero Cover Designer. (Note: If you used the ‘Direct Burn’ option, it will need to recode
the video as it was not saved to the Hard Disk to begin with.)
 Loading...