

Page 1
USER'S MANUAL
http://www.nero.com
Page 2

Welcome
WELCOME!
Thank you for your Nero PhotoShow Deluxe 4 Purchase!
We are confident you will enjoy using this software to create memories
that last for generations to come.
This User’s Manual is designed to help you through each step as you
Manage, Make and Share your photos, albums and slideshows. For more
information, please refer to the help files within the software, or visit us
online at
http://www.nerophotoshow.com.
Enjoy!
Your Nero Team
Information on Copyright and Trademarks
The Nero PhotoShow Deluxe 4 User’s Manual and all its contents are protected by copyright
and are the property of Nero (AG). All rights reserved. This User’s Manual contains material
that is protected by internationally valid copyright. This manual may not-in whole or in partsbe copied, transmitted, or otherwise reproduced without the express written permission of Nero.
All trademark names and trademarks are the property of their respective owners. Nero rejects
any claims that transcend the legal guarantee agreement. Nero does not accept any liability
for the correctness of the content of the Nero PhotoShow Deluxe 4 User’s Manual. The contents of the software supplied, as well as of the Nero PhotoShow Deluxe 4 User’s Manual, are
subject to change without prior notice. The trademarks mentioned here are only listed for information purposes.
Unless you won the copyright or have the permission of the copyright holder, the unauthorized copying of discs can represent a violation of national or international laws and may result in serious penalties.
Copyright 2006 by Nero AG
4.5.1070
Page 2 Nero PhotoShow Deluxe 4
Page 3

Table of Contents
Table of Contents
1 Nero PhotoShow Deluxe 4 5
1.1 General Information 5
1.2 General System Requirements 5
2 Installation of Nero PhotoShow Deluxe 4 5
2.1 Installation Instructions 5
3 THE MAIN MENU SCREEN 6
3.1 The Manage, Make and Share Buttons 6
3.2 The Preferences Link 7
3.3 Home Photos Folder 7
3.4 Folders to Watch 7
3.5 Camera Connection/Photo CD Auto Launch 7
3.6 Title Bar Buttons 7
3.7 About Saving Your Work 8
4 THE MAKE SCREEN 9
5 THE MANAGE SCREEN 10
5.1 The Photo Finder 10
5.2 Quick Views 10
5.3 Photo Finder Buttons 11
5.4 The Viewer 11
5.5 Viewer Buttons 11
6 MANAGING YOUR PHOTOS & VIDEO CLIPS 13
6.1 Creating a New Folder, PhotoShow, Quick View, or Favorite 14
6.2 Importing Photos and Video Clips 14
6.3 Searching for Photos and Video Clips 14
6.4 Printing Photos 15
7 THE EDIT SCREEN 16
7.1 The Edit Tab 17
7.2 The Photo Info Dialog Box 18
7.3 Video Clips 18
7.4 The Edit Clip Window 19
7.5 The Touch Up Tab 19
Nero PhotoShow Deluxe 4 Page 3
Page 4

Table of Contents
7.6 The Text Tab 22
7.7 The Clip Art Tab 23
7.8 The Playback Tab 23
8 EDITING YOUR PHOTOSHOWS 25
8.1 Creating a PhotoShow 26
8.2 One Click Styles 27
8.3 Watching a PhotoShow 27
8.4 Adding Photos to a PhotoShow 27
8.5 Adding Music to a PhotoShow 28
8.6 Adding Introductory & Ending Credits to a PhotoShow 28
8.7 Applying PhotoShow Playback Settings 29
8.8 Saving a Copy of a PhotoShow 29
8.9 PhotoShow Authoring Suggestions 29
9 THE SHARE SCREEN 30
9.1 About PhotoShow Circle 30
9.2 Share PhotoShows 31
9.3 Email Photos 32
9.4 Upload 32
9.5 Export 33
9.6 Video 33
9.7 HTML 33
9.8 Executable 34
9.9 CD-ROM 34
10 Support Contact 35
Page 4 Nero PhotoShow Deluxe 4
Page 5

Nero PhotoShow Deluxe 4
1 Nero PhotoShow Deluxe 4
1.1 General Information
Welcome to Nero PhotoShow Deluxe 4, the easy and complete photo suite. With Nero PhotoShow Deluxe 4 you can manage your digital photos and video clips, create musical slideshows,
and share your photos and shows in a variety of ways.
A slideshow made with Nero PhotoShow Deluxe 4 software is called a PhotoShow. PhotoShows are different from ordinary slideshows: they feature digital photos and video clips, custom transitions and effects, animated clip art and text, and musical soundtracks.
1.2 General System Requirements
Windows® 98 SE/ME/2000/XP
Pentium Class 700MHz Processor or Better
256 MB of RAM (512 MB recommended)
Minimum 500 MB hard drive space
CD/DVD-R/RW drive to burn Photos or PhotoShows
800x600 video display, High Color 16-bit
33.6Kbps modem or faster and Internet Service Provider
(Account required for sharing online)
Web browser that supports Flash Player
Macromedia Flash Player V.6
2 Installation of Nero PhotoShow Deluxe 4
2.1 Installation Instructions
Prior to installing Nero PhotoShow Deluxe 4 we recommend that you exit all open applications.
1. Insert the Nero PhotoShow Deluxe 4 CD-ROM into your computer. The Nero
PhotoShow Deluxe 4 Installation screen is displayed if CD-ROM AutoPlay is enabled.
If CD-ROM AutoPlay is turned off, click the Start button and choose Run. In the Run dialog,
enter the CD-ROM drive’s letter and add :\setup.exe after it. Click on OK in the Run dialog to
begin installation.
2. Follow the on-screen directions within the installer to install Nero PhotoShow Deluxe 4.
At the final installer screen, click Finish to quit the installer and run Nero PhotoShow Deluxe 4.
Nero PhotoShow Deluxe 4 Page 5
Page 6
THE MAIN MENU SCREEN
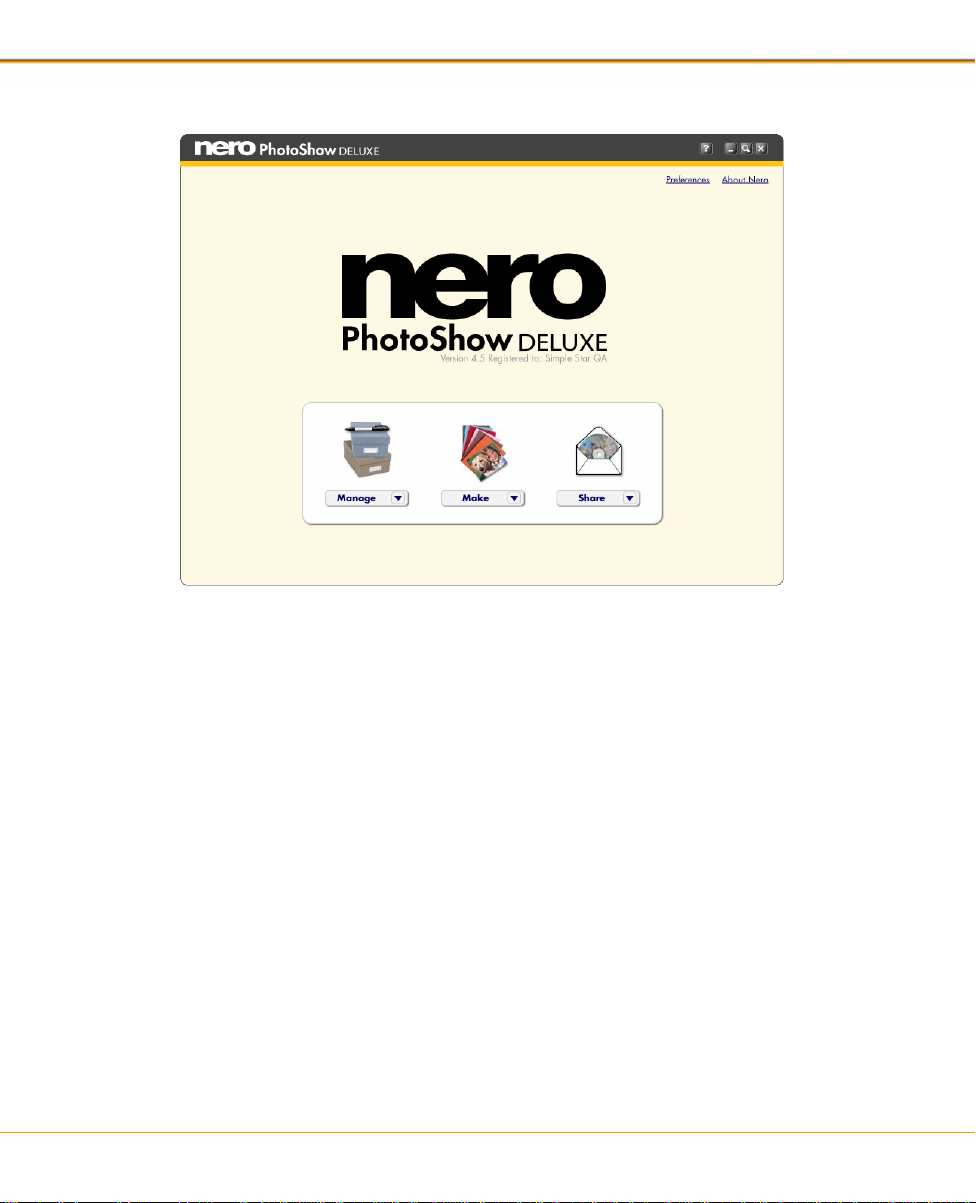
3 THE MAIN MENU SCREEN
This is the Main Menu screen of Nero PhotoShow Deluxe 4, which you use to navigate through
the application. You can return to it at any time by clicking on the Nero PhotoShow Deluxe 4
logo in the top left corner of the screen.
The Nero PhotoShow Deluxe 4 application is divided into three primary sections: Manage,
Make, and Share. You can switch from one section to another by clicking the Manage, Make,
or Share buttons on the Main Menu screen, or by pressing the similarly labeled tabs at the top
of the screen at any other time.
3.1 The Manage, Make and Share Buttons
Click the Manage button to organize and edit your photos and video clips, print your pho-
tos, or watch and edit PhotoShows. The Manage button drop-down menu provides quick
access to commonly used Manage functions: Organize My Photos, Watch a PhotoShow,
Received PhotoShows, and Import Photos and Videos.
Click the Make button to create things from your photos like PhotoShows, DVDs, and
screen savers.
Click the Share button to email photos and PhotoShows, upload them to the web, and ex-
port them in various formats.
Click the About PhotoShow link on the Main Menu screen to discover useful information
about your version of Nero PhotoShow Deluxe 4.
Page 6 Nero PhotoShow Deluxe 4
Page 7

THE MAIN MENU SCREEN
3.2 The Preferences Link
Click the Preferences link on the Main Menu screen to access the Preferences Screen. Here
you can set your Home Photos Folder, choose your Folders to Watch, and adjust your camera
connection and photo CD auto launch settings.
3.3 Home Photos Folder
When you first install Nero PhotoShow Deluxe 4, it asks you to specify the folder where you
keep your digital photos. This will be designated as your Home Photos Folder. Nero PhotoShow Deluxe 4 will automatically inventory all the photos and video clips in your Home Photos
Folder. You can click the Change Folder button on the Preferences screen to designate a
different folder as your Home Photos Folder.
3.4 Folders to Watch
Folders to Watch are folders outside of your Home Photos Folder which you would also like
Nero PhotoShow Deluxe 4 to display (in other words, any photo folder which is not contained
in your My Pictures folder). On the Preferences screen, you can click the Add Folder button to
designate a folder on your computer as a Folder to Watch.
If you add or remove photos from the Home Photos Folder or a Folder to Watch, the corresponding photos will be added or removed from Nero PhotoShow Deluxe 4.
3.5 Camera Connection/Photo CD Auto Launch
When you plug your digital camera into your computer and turn it on, Nero PhotoShow Deluxe
4 will automatically launch and offer to import the photos and video clips on your camera into
your Home Photos Folder. The same thing will happen when you insert a photo CD into your
CD-ROM drive.
1. To prevent Nero PhotoShow Deluxe 4 from automatically launching when a digital cam-
era or media card is connected to your computer, uncheck the box to Automatically
launch Nero PhotoShow Deluxe 4 when a camera or media card is connected on the
preferences screen.
2. To prevent Nero PhotoShow Deluxe 4 from automatically launching when a photo CD is
inserted into your computer, uncheck the box to Automatically launch Nero PhotoShow
Deluxe 4 when a Photo CD is inserted on the preferences screen.
3.6 Title Bar Buttons
1. Click the Question Mark button to access the application's Help Section. The Help Sec-
tion will open to the topic most pertinent to the screen you are currently viewing. Because
of this, the best way to find helpful information about any given topic is first to view the
screen most relevant to that topic, and then click the Question Mark.
2. Click the Minimize button to minimize Nero PhotoShow Deluxe 4 and display your desk-
top.
3. Click the Magnify button to view Nero PhotoShow Deluxe 4 in full screen mode. This will
reset your monitor's display resolution to 800 x 600, so that images on the screen will appear larger. Click the Magnify button again to return to your original display setting.
4. Click the Close button to close Nero PhotoShow Deluxe 4.
Nero PhotoShow Deluxe 4 Page 7
Page 8

THE MAIN MENU SCREEN
3.7 About Saving Your Work
Nero PhotoShow Deluxe 4 automatically saves any changes you make to a photo, video clip,
photo folder, or PhotoShow. Changes made to photos or video clips using the edit tools can be
reversed using the Undo or Revert to Original buttons (see the Edit Screen section of the
Help Section for more information).
Page 8 Nero PhotoShow Deluxe 4
Page 9
THE MAKE SCREEN
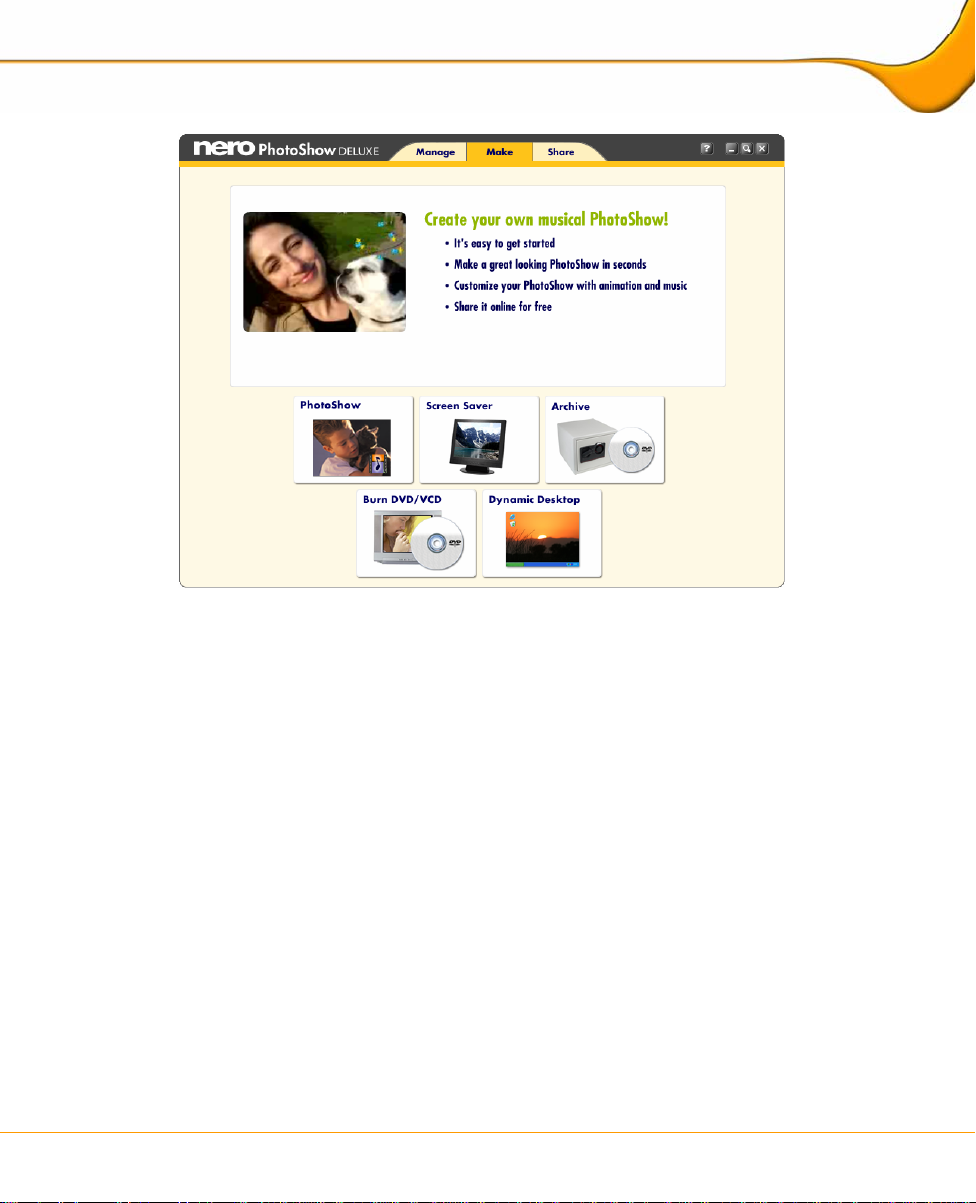
4 THE MAKE SCREEN
The Make Screen is where you can make fun things with your digital photos.
Click PhotoShow to quickly and easily make a musical show.
Click Screen Saver to make your photos into a screen saver for your computer.
Click Archive to create a back-up copy of a folder or PhotoShow which contains precious
photos and video clips.
Click Burn DVD/VCD to burn a DVD, SVCD, or VCD for playback on your home DVD
player.
Click Dynamic Desktop to set one or more photos as your computer’s desktop back-
ground.
Nero PhotoShow Deluxe 4 Page 9
Page 10

THE MANAGE SCREEN
5 THE MANAGE SCREEN
This is the Manage Screen, where you can organize, edit or print your digital photos and video
clips, and watch and edit your PhotoShows.
The left side of the screen is the Photo Finder. The right side of the screen is the Viewer. The
Photo Finder lets you browse through the folders and PhotoShows that you have stored on
your computer. The Viewer displays a thumbnail view of the contents of the folder or PhotoShow you have currently selected in the Photo Finder.
5.1 The Photo Finder
The Photo Finder contains two navigational elements: the Quick Views menu and the Photos
on My PC menu. It also contains the Trash Bin, where deleted photos, folders, and Photo-
Shows are temporarily stored.
5.2 Quick Views
The Quick Views menu makes it easy to find and manage your digital photos, video clips, and
PhotoShows. Quick Views are collections of photos and video clips or folders and PhotoShows
based on certain criteria. Clicking on a Quick View folder causes its contents to display in the
Viewer to the right.
These are the default Quick Views in Nero PhotoShow Deluxe 4:
Entire Collection is a view of all your Folders to Watch and PhotoShows, sorted chrono-
logically or alphabetically.
My PhotoShows is a view of all of the PhotoShows that you have created or edited.
Page 10 Nero PhotoShow Deluxe 4
Page 11

THE MANAGE SCREEN
Received PhotoShows is a view of all the PhotoShows that you have received from other
people.
Recent view shows a history of the last three folders or PhotoShows that you have ac-
cessed.
The Calendar view organizes all of your folders and PhotoShows by year and month so
you can quickly access photos and video clips from a specific period of time.
The People & Places view allows you to see folders that contain photos of certain people
or locations, based on your own keyword tags.
The Favorites view provides access to all of your five-star rated photos, photos that you
have emailed or printed, and also any other Favorite photo Views that you choose to create.
The Photos on My PC menu is a nested navigational hierarchy which displays all the
Watch Folders on your computer, including your Home Photos Folder. You can edit which
folders are displayed in this menu on the Preferences screen; the default setting is to display the contents of your computer's My Pictures folder. When you click a folder in the
Photos on My PC menu, the contents of that folder are displayed as thumbnails in the
Viewer to the right.
The Nero PhotoShow Deluxe 4 Trash Bin appears at the bottom of the Photo Finder.
When you delete photos, video clips, folders, or PhotoShows from within Nero PhotoShow
Deluxe 4, they are moved to the Trash Bin. Emptying t he Trash Bin will permanently remove its contents from your computer. Items emptied from the Trash Bin cannot be restored.
5.3 Photo Finder Buttons
The Photo Finder features three buttons: New, Import, and Search.
Click the New button to create a new folder, PhotoShow, Quick View, or Favorite.
Click the Import button to add photos from a disk drive or media device (such as a digital
camera or scanner) to a new or existing folder.
Click Search to search Nero PhotoShow Deluxe 4 for photos, video clips, folders, or Pho-
toShows.
5.4 The Viewer
The Viewer displays a thumbnail view of the contents of the folder or PhotoShow you have
selected in the Photo Finder. Thumbnail types are distinguished by an icon in the lower left
corner of the thumbnail. Folder thumbnails contain a folder icon; PhotoShow thumbnails contain a filmstrip with musical note; video clips contain a movie camera; still photos contain no
icon.
5.5 Viewer Buttons
Viewer buttons and their functions vary depending upon the contents of the Viewer.
Click the Size button to change the display size of the thumbnails in the Viewer.
Nero PhotoShow Deluxe 4 Page 11
Page 12

THE MANAGE SCREEN
Click the Sort button to sort your folders and/or PhotoShows alphabetically or chronologi-
cally.
Click the Info button to change the name and thumbnail icon for a folder or PhotoShow, or
to add keywords and comments.
Click the Add More button to add more photos or videos to a PhotoShow.
Click the Email button to send photos or a PhotoShow to a friend.
Click the Print button to print your photos.
Click the Watch button to view a PhotoShow, add a One Click Style to your PhotoShow,
or use the Save As function to create a copy of your PhotoShow with a new name.
Click the Make PhotoShow button to create a new PhotoShow from the photos in the
Viewer.
Click the Edit button to go to the Edit Screen, where you can edit the photos and video
clips in your PhotoShow, adjust the playback settings, add music and effects, and more.
Page 12 Nero PhotoShow Deluxe 4
Page 13

MANAGING YOUR PHOTOS & VIDEO CLIPS
6 MANAGING YOUR PHOTOS & VIDEO CLIPS
The Manage Screen is where you organize your photos and video clips into folders and PhotoShows. Use drag-and-drop techniques to reorder your photos, and cut-and-paste techniques
to copy your photos or move them from one folder or PhotoShow to another.
Running the mouse pointer over a photo thumbnail will create a pop-up menu with some quick
editing shortcuts:
Click the Pencil to edit the thumbnail that you are currently viewing.
Click the Rotate Arrows to rotate the photo. Click the Star to rate the photo.
Click the Heart to add the photo to one of your Favorite Views.
Click the Trash Bin to remove the photo from its folder and place it in the Nero
PhotoShow Deluxe 4 Trash Bin.
If the thumbnail is a video clip, the pop-up menu will also include a triangular Play button.
Clicking this button will launch the Play Video Clip window. Here, y our video clip will playback
in a continuous loop. You can use the playback controls to rewind, pause, or play your clip, or
grab the handle beneath the photo and move it back and forth to scan through the clip.
Note: Nero PhotoShow Deluxe 4 supports video clips in the avi, mov and mpg file formats. To
use clips which are encoded in a different file format, the clip must first be converted to avi,
mov or mpg using a third party encoding software.
Nero PhotoShow Deluxe 4 Page 13
Page 14

MANAGING YOUR PHOTOS & VIDEO CLIPS
6.1 Creating a New Folder, PhotoShow, Quick View, or Favorite
You can make a new folder, PhotoShow, Quick View, or Favorite by clicking New, making a
selection from the drop-down menu, providing a name, and then finding the photos and video
clips you’d like to use from your current folders.
If the photos you want to use are not already in a folder, click Import to import new photos
from another source. If you can’t find the photos you want to use, click Search to search
through your folders in Nero PhotoShow Deluxe 4.
6.2 Importing Photos and Video Clips
1. On the Manage Screen, click Import to add new photos or video clips to Nero PhotoShow
Deluxe 4. In the photo finder, you will see a list of folders on your computer and any devices (such as cameras) that are connected to your computer. Click a folder in the Photo
Finder to view its contents in the Viewer.
2. In the Viewer, check the photos or video clips you wish to import in order to select them.
You can select photos and clips from multiple folders.
3. Use the Add Photos drop-down menu to specify a target folder or to create a new folder
to receive the photos you're importing.
4. Click Continue. The photos and video clips that you selected will be copied into the
specified folder inside your Home Photos Folder.
6.3 Searching for Photos and Video Clips
1. On the Manage Screen, click Search to locate PhotoShows, folders, photos, or video
clips.
2. The Search Dialog Box allows you to search for folders or photos by entering a keyword
in the search field, or by choosing a Quick Keyword from the drop-down menu. The
matches will be determined by folder and photo name, and by any text that has been entered into the People and Places fields in the Folder Info and Photo Info dialog boxes.
3. You can filter your results by specifying ratings, dates, and image or folder types. Click
Search to begin searching.
Page 14 Nero PhotoShow Deluxe 4
Page 15

MANAGING YOUR PHOTOS & VIDEO CLIPS
6.4 Printing Photos
With Nero PhotoShow Deluxe 4, you can print your photos on a printer connected to your
computer, or order prints through online services and have them delivered to your doorstep.
To print on a printer connected to your computer:
1. Open the folder which contains the photos you would like to print and click the Print but-
ton. This will open the Print Screen. On the left, you can check or uncheck the thumbnails of the photos you wish to print. On the right, you will see a larger preview of what is
to be printed.
2. Select the number of Copies per photo that you would like to print, choose the Printer
from the Printer menu, and pick a layout from the Layout menu.
3. Once you are happy with your settings and the print preview, click Print to start printing.
Nero PhotoShow Deluxe 4 Page 15
Page 16

THE EDIT SCREEN
7 THE EDIT SCREEN
The Edit Screen is where you edit your digital photos and video clips. You can reach the Edit
Screen by clicking on the Pencil in the pop-up menu when you mouse-over a photo or video
clip thumbnail. The Edit Screen features a palette of tools on the left, a close-up of your photo
or clip on the right, and a filmstrip showing all the photos in your folder or show across the bottom.
Click the Watch button to view the contents of your folder or PhotoShow as a show.
Click the View All button to return to the Manage Screen.
The Edit Screen has five tabs: Edit, Touch Up, Text, Clip Art, and Playback. Pressing a tab
allows you to access its editing tools and use them on your photo or video clip.
Feel free to experiment with photo editing. You can always undo your last edit by clicking
Undo or restore your original photo by clicking Revert to Original. Also, you can save a copy
of your edited photo by clicking Save a Copy.
Page 16 Nero PhotoShow Deluxe 4
Page 17

THE EDIT SCREEN
7.1 The Edit Tab
The Edit Tab helps you perform many basic photo editing operations.
You can automatically improve the look of your photo with just one click of the mouse by
pressing the Perfectly Clear® Auto Fix button.
To remove red eye from people's eyes:
1. Click the Red Eye button and drag a selection rectangle around the red portion of the eye.
2. Click Fix. For best results, try to fit the square snugly to the red portion of the eye and do
not include other parts of the face.
3. Click the Levels button to change the brightness, contrast, or color saturation of your
photo or video clip. Use the slider controls to adjust the level's intensity.
To add Filters:
1. Click the Filters button to select a custom filter to apply to your photo or video clip. With
filters you can apply many effects to your images, to improve their quality or change their
appearance. Various filters are available when you click the Filters button, depending on
whether you are viewing a still photo or a video clip in the Edit Screen.
2. For photos, each filter effect has a slider which you can use to control settings related to
that effect. Filter adjustments will be previewed in the close-up window.
3. When you are satisfied with the preview, click OK to apply the filter to your photo.
Filters applied to video clips cannot be previewed in advance. However, they will be apparent
during PhotoShow playback.
To Crop an image:
1. Adjust the size of the crop area by dragging one of the corners.
2. Move the crop area by clicking inside it and dragging it over the part of the image that you
want to keep. You can use the Constrain Menu to crop your photo to a preset size.
3. Click Crop when you are satisfied with your crop selection. You can undo it by clicking
Undo Crop.
4. Click the Rotate Left or Rotate Right arrow buttons to rotate your photo or video clip
counter-clockwise or clockwise. The Delete button sends the file to the Trash Bin and the
Info button accesses the Photo
Info Dialog Box.
Nero PhotoShow Deluxe 4 Page 17
Page 18

THE EDIT SCREEN
7.2 The Photo Info Dialog Box
1. In the Photo Info dialog box you can change a photo or video clip's Name or Date and
add Comments.
2. Under Keywords, enter the names of people and places in the photo into the People and
Places fields, so you can search for these words when you want to find them.
3. You can Rate a photo by assigning up to five stars to it. Each photo starts at a two-star
rating when you import it into Nero PhotoShow Deluxe 4. If you don’t manually rate a
photo, its rating will increase every time you email, or print it. You can easily find highly
rated photos by searching for photos that have a rating of four or five stars.
4. Click the Details tab to view the EXIF data for your photo or video clip. EXIF data is text
information about your photo or video clip, including the date and time it was taken, the
camera and settings.
7.3 Video Clips
When a video clip is viewed in the Edit Screen, the clip will automatically play.
1. Click the Edit Tab to edit your video clip.
2. Check the Stretch box to automatically resize your video clip to full screen proportions
during show playback.
3. Check the Audio in PhotoShows box to hear the video clip's audio track during show
playback.
4. Click the Rewind button to view the clip from its beginning. Click the Pause button to
pause clip playback. Click the Play button to resume clip playback.
5. Click the Edit button to adjust the length of your video clip. Clicking the Edit button
launches the Edit Clip window.
Page 18 Nero PhotoShow Deluxe 4
Page 19

THE EDIT SCREEN
7.4 The Edit Clip Window
The Edit Clip window allows you to adjust the duration of your video clip as it appears in your
PhotoShow. Changes made in the Edit Clip window only apply to the video clip during PhotoShow playback; the original clip is not affected by these changes.
In the Edit Clip window, your video clip will loop automatically while you use the slider controls
to trim the length of your clip.
1. Use the left slider handle to set the start point for your clip and the right slider to set the
end point.
2. When you're satisfied with the changes you've made, click OK.
Note: the default duration for a video clip appearing in a PhotoShow is five seconds, even if the
original clip is longer. The length of a video clip appearing in a PhotoShow can be adjusted in
the Edit Clip window, to a maximum duration of up to 15 seconds. Video clips in PhotoShows
cannot be more than 15 seconds long.
3. Click the Export button to save a new copy of your video clip which reflects the changes
you have made in the Edit Clip window.
7.5 The Touch Up Tab
The Touch Up tab allows you to fix common problems you may experience with your photos.
The Touch Up tab provides several different and powerful tools which you can use to modify
and improve your photos.
Note: The tools on the Touch Up tab cannot be used on video clips. When a video clip is being
viewed in the Edit Screen, the Touch Up tab is not accessible.
7.5.1 Using the Paint Brush Tool
With the Paint Brush Tool you can paint on your photos using different sized brushes.
1. Select different brush sizes by clicking the triangles on either side of the Brush. The
Blend slider changes opacity and the Color menu changes the color that is used.
2. If you want to match a color exactly to part of your photo, use the Eye Dropper. Click it
and then click the color in your photo that you want to use for painting. You will see the
color you chose appear in the Color menu. You are now ready to paint with this color.
7.5.2 Using the Spray Paint Tool
With the Spray Paint Tool you can spray color on your photos as if you were using a can of
spray paint. With this tool, the longer you hold down the mouse button without releasing, the
more paint will build up on the photo.
1. Select different brush sizes by clicking the triangles on either side of the Brush. You can
change how quickly the paint builds up by adjusting the Flow slider, and you can change
the color in the Color menu.
2. Change the color of the paint by clicking on the Color menu and then choosing the color
that you want to use.
3. If you want to match a color exactly to part of your photo, use the Eye Dropper. Click it
and then click the color in your photo that you want to use for painting. You will see the
color you chose appear in the Color menu. You are now ready to paint with this color.
Nero PhotoShow Deluxe 4 Page 19
Page 20

THE EDIT SCREEN
7.5.3 Using the Smudge Tool
With the Smudge Tool you can remove small blemishes such as dust spots or scratches from
your photos.
Select different Smudge Tool sizes by clicking the triangles on either side of the Brush.
To remove a blemish:
1. You should first use the Zoom Tool to zoom in on the blemish in your photo.
2. Click the blemish with the Smudge Tool to blend it with the other colors around it. When
you zoom back out to normal size, the blemish should be much less noticeable.
7.5.4 Using the Clone Tool
The Clone Tool allows you to obscure portions of your photo by copying a nearby area of your
photo on top of it.
1. Select different Clone Tool sizes by clicking the triangles on either side of the Brush. To
set the clone source, click any area in your photo.
2. Once the source is set, click and drag over the target area that you would like to cover. In
this way, you can paint the source area over the target area in your photo.
3. If you want to reset the clone source, click Reset Source and then click a new source lo-
cation in your photo.
7.5.5 Using the Zoom Tool
The Zoom Tool allows you to enlarge the view of portions of your photo. Use this tool in conjunction with the Smudge or Clone Tools, so you can zoom in on a blemish and remove it
without affecting the rest of your photo.
The Zoom Tool does not actually change your photos. It is meant to be used with another tool
to allow a greater degree of precision while editing.
To use the Zoom Tool:
1. Click the plus magnifying glass to zoom in, then click the portion of your photo that you
would like to enlarge. To zoom out, click the minus magnifying glass and then click your
photo to zoom out.
2. Click Fit on Screen if you are zoomed very close into a portion of your photo and now
want to see the entire photo. Clicking this button will display the entire photo on the
screen.
3. Click Actual Size to change the photo to its actual size so you can edit it in more detail.
Clicking this button makes each pixel of the photo equal to a pixel on your screen.
7.5.6 Using the Hand Tool
The Hand Tool is used to grab a photo that you have zoomed in on, and move it around so as
to view different portions of it. The Hand Tool does not alter your photo in any way. To use it:
1. Select the Hand Tool.
2. Click and hold the mouse on the photo to drag it around.
7.5.7 Using the Eraser Tool
The Eraser Tool lets you erase work that you have done with the Touch Up tools. To use it:
1. Select different eraser sizes by clicking the triangles on either side of the Brush.
Page 20 Nero PhotoShow Deluxe 4
Page 21

THE EDIT SCREEN
2. Click and drag over an edit you've previously made in order to erase it.
7.5.8 Using the Selection Tools
The Selection Tools are used to select and then cut or copy a portion of your photo. There are
two Selection Tools which you can utilize: the Marquee Tool is used to make rectangular selections, while the Lasso Tool is used to draw freehand selection areas with the mouse. To
use it:
1. Choose a selection tool.
2. Click and drag around the area on your photo that you would like to select. You should
see a blinking selection line that defines your selection area.
3. Once you have an area selected, you can choose to cut it by clicking Cut or copy it by
clicking Copy. You can also duplicate the selected area by clicking on it and dr agging it to
a new location in your photo.
4. Click Paste to paste the cut or copied selection onto your photo. In this way, you can
move a portion of your photo onto a different part of the same photo, or even onto a completely different photo.
7.5.9 Using the Paint Bucket Tool
The Paint Bucket Tool is used in conjunction with the Selection Tools. Once you have delineated a selection area, you can choose to fill it in with a color using the Paint Bucket Tool. To do
this:
1. Select an area on your photo.
2. Click the Paint Bucket Tool and choose a color using the color menu or the eye dropper.
3. Click in the selection area to fill the selected area.
Nero PhotoShow Deluxe 4 Page 21
Page 22

THE EDIT SCREEN
7.6 The Text Tab
The Text tab lets you add text captions or speech and thought bubbles to your photos. The
Text tab has two sub-tabs: one for Captions and one for Bubbles.
1. Press the Captions tab and type your text into the text window.
2. Use the Size slider to control the size of the text, and the Color chooser to pick the color.
3. You can click the Clear button to remove the text you've added, or click the Preview but-
ton to see how it will look. The animation style can be selected in the Animation dropdown menu.
4. Control the placement of your text on the photo by adjusting the Left/Right and
Top/Bottom sliders.
5. Press the Bubbles tab to add speech and thought bubbles to your photos. Scroll up and
down to select the bubble you want, then drag and drop it directly onto your photo.
6. In the text box which appears, type the text you want to fill the bubble. You can click and
drag to reposition your bubble, and use the slider to adjust its size. Click Edit to revise the
text in your bubble, or Delete to remove the bubble from your photo.
Page 22 Nero PhotoShow Deluxe 4
Page 23

THE EDIT SCREEN
7.7 The Clip Art Tab
The Clip Art tab allows you to add fun clip art to your photos.
1. You can scroll through the clip art by clicking the Left and Right Arrows at the top of the
clip art panel. Or, if you know which category you would like to view, you can use the
Category drop-down menu to go directly to it.
2. Click the piece of clip art you would like to use and drag it to your photo. Clip art can be
dragged anywhere on your photo.
3. Resize it with the Size slider, which is located below the photo.
4. To remove a piece of clip art, click Delete.
5. Check the Animate box to ensure that your clip art will be animated during show play-
back.
7.8 The Playback Tab
The Playback Tab allows you to control playback settings for the photo you are viewing in the
Edit Screen, as well as for the folder or PhotoShow which contains that photo.
1. In the One Click Styles drop-down menu, choose a show playback style for your folder
or PhotoShow. Each preset One Click Style applies certain music, transitions, and effects
to your show, or you can select the Custom option to choose your own settings.
2. Click the Music drop-down menu to open the Soundtrack Jukebox, where you can se-
lect songs for your show's soundtrack. You can choose from the songs provided in the
Jukebox, or you can browse your computer for a custom mp3 to add to your show. Note:
in accordance with international copyright law, PhotoShows with custom mp3s in the
soundtrack cannot be shared via email or uploaded to PhotoShow Circle.
Nero PhotoShow Deluxe 4 Page 23
Page 24

THE EDIT SCREEN
3. Click the Frame drop-down menu and then choose Standard Pack to select a frame to
border the photos in your show. To clear a Frame selection from your PhotoShow,
choose No Frame.
4. Click the Intro Credits menu to select an animation style for your show's opening credits.
5. Click the Edit button to launch the Intro Credits dialog box, where you can specify your
show's opening credits. The same credits will also play at the end of your show.
6. Click the Custom Settings button to specify your own playback settings.
7. Click the Transition drop-down menu to select a transition style for the photos and video
clips in your show. A transition is the segue between one photo or clip and the next.
8. Click the Motion Effects drop-down menu to select a Motion Effect to add to the photos
in your show. Motion Effects apply eye-catching movement or color to your photos and
video clips.
9. Click the Speed menu to set the duration for the photos in your show.
10. Check the Loop Playback box to make your PhotoShow continuously repeat playback.
Page 24 Nero PhotoShow Deluxe 4
Page 25

EDITING YOUR PHOTOSHOWS
8 EDITING YOUR PHOTOSHOWS
With Nero PhotoShow Deluxe 4, it's possible to edit and watch shows in two distinct ways:
1. The first way is to edit and view the contents of a folder as a show. You can choose play-
back settings, add music and effects, and so on. However, it is important to note that
changes made to the photos and clips in a folder will affect the original photos: if you edit
or delete them, the original photos will be edited or deleted from your hard drive.
2. The second way to watch and edit a show is to create a PhotoShow. A PhotoShow is dif-
ferent from a folder in that changes made to the photos in a PhotoShow do not affect the
original photos on your hard drive. For example, if you apply a filter to a photo in your
PhotoShow, the original photo will remain unchanged. Similarly, photos deleted from a
PhotoShow will not be deleted from your computer.
Nero PhotoShow Deluxe 4 Page 25
Page 26

EDITING YOUR PHOTOSHOWS
8.1 Creating a PhotoShow
To create a PhotoShow:
1. On the Manage Screen, click the New button.
2. Choose a PhotoShow from the pull-down menu, or just select a folder of photos and
press the Make PhotoShow button.
3. In the Viewer window, select the photos you would like to include in your show by clicking
the thumbnail to check or uncheck each photo. You can include photos from different
folders by using the Photo Finder to navigate to another source folder, then selecting the
photos you want by checking them.
4. When you have selected all the photos you wish to include in your show, click the Make
PhotoShow button.
Nero PhotoShow Deluxe 4 will now create a new PhotoShow using your selected photos, and
immediately play the PhotoShow from within the application.
Page 26 Nero PhotoShow Deluxe 4
Page 27

EDITING YOUR PHOTOSHOWS
8.2 One Click Styles
Nero PhotoShow Deluxe 4 makes it easy to apply various preset style themes to your PhotoShow with just one click of the mouse. Adding a One Click Style to your show will automatically
set an appropriate song as your soundtrack, apply a suitable frame, and adjust the transition
style accordingly. For example, choosing the One Click Style entitled "Wedding" will add a
wedding border to your photos, a wedding march as your soundtrack, and gentle dissolves as
your transitions.
Some One Click Styles feature randomized elements. This means that every time you select a
certain style, Nero PhotoShow Deluxe 4 will choose between several possible combin ations of
music, transitions, and effects to add to your show. Consequently, adding a One Click Style
will never make your show predictable or repetitive.
When you first create a PhotoShow, you can apply a One Click Style to it by choosing one
from the Make PhotoShow button pull-down menu. You can also apply a One Click Style to
your PhotoShow at any time by accessing the One Click Styles drop-down menu which appears on the Playback tab of the Edit Screen.
8.3 Watching a PhotoShow
If you move your mouse while watching a PhotoShow from within the application, a Control
Panel will appear at the bottom of the screen. The Control Panel buttons allow you to control
show playback and perform other functions:
The Playback Controls let you restart your PhotoShow from the beginning, go back to
the previous photo, or skip forward to the next.
The Pause button will pause the PhotoShow, and the Play button will r e sum e playback.
Use the Speaker button to mute the sound.
Click the Rotate Arrows to rotate the current photo.
Click the Trash Bin to delete the current photo.
To watch your PhotoShow in full screen mode during playback, check the Full Screen box.
Click Edit to return to the Edit screen.
Click Share to publish the show you are watching via Email.
The Close button will take you back to the Manage screen.
8.4 Adding Photos to a PhotoShow
To add photos to your PhotoShow:
1. Click the Add More button in the viewer.
2. Use the Photo Finder to browse through the folder containing the photos you wish to add.
3. Check the photos you want to include in your show. You can browse through many differ-
ent folders selecting photos in this way.
4. When your selection is complete, click Done.
You can also add photos to your PhotoShow by using the Photo Finder to navigate to a source
folder, copy the photos you want, then navigate back to your PhotoShow and paste the photos
into the Viewer window.
Nero PhotoShow Deluxe 4 Page 27
Page 28

EDITING YOUR PHOTOSHOWS
8.5 Adding Music to a PhotoShow
To add a song to your PhotoShow soundtrack or change the existing song:
1. Open any photo in your show in the Edit Screen.
2. On the Playback Tab, click the Music button and select Choose Music.
3. From the pop-up menu, select For entire show to launch the Soundtrack Jukebox and
choose the song you want to be your new soundtrack.
4. Click the Done button to add the selected song to your PhotoShow.
To add a second song to your PhotoShow's soundtrack:
1. On the Edit Screen, click in the filmstrip on the photo where you want your first song to
end and your second song to begin.
2. On the Playback tab, click the Music menu and select From this photo onward to
launch the Soundtrack Jukebox.
3. Select your song and click Done to add it to your PhotoShow. You can repeat these steps
as many times as you would like to add multiple songs to your soundtrack.
8.6 Adding Introductory & Ending Credits to a PhotoShow
To add credits to your PhotoShow or make changes to your existing credits:
1. Open any photo in your PhotoShow for viewing in the Edit Screen.
2. Press the Playback tab and click the Intro Credits Edit button. This will open the Intro
Credits dialog box where you can add, change, and preview your show credits.
3. When you're finished making your changes, click Done.
Page 28 Nero PhotoShow Deluxe 4
Page 29

EDITING YOUR PHOTOSHOWS
8.7 Applying PhotoShow Playback Settings
You can personalize your PhotoShow by changing Music, Transition, Motion Effects, and
Speed settings for individual photos or for your entire PhotoShow. When adjusting any of these
settings in the Edit Screen, a pop-up menu will appear with three options:
Choose For this photo onward if you want the changes you have specified to apply to
the photo displayed in the Edit Screen and to every photo thereafter.
Choose For this photo only if you want the changes you have specified to apply only to
the photo displayed in the Edit Screen.
Choose For entire PhotoShow if you want the changes you have specified to apply to
the entire PhotoShow.
8.8 Saving a Copy of a PhotoShow
Whenever you make changes to a PhotoShow, those changes are automatically saved by
Nero PhotoShow Deluxe 4. However, if you wish to save a copy of your PhotoShow, you can
use the Save As feature.
To use the Save As feature:
1. Open your PhotoShow in the Viewer and click the Watch Button.
2. From the button pull-down menu, choose Save As.
3. Enter a name for your new PhotoShow.
8.9 PhotoShow Authoring Suggestions
1. Before creating a new PhotoShow, determine why and for whom you are making it. If you
want to tell the story of an event, be sure to include photos that show the beginning, the
middle, and the end. Select only the best photos to include in your PhotoShow, and try to
minimize repetition. PhotoShows with fewer photos tend to have more impact.
2. Decide what tone you want to set in the PhotoShow and choose your soundtrack accord-
ingly. You can use multiple songs to emphasize a change in mood.
3. Adding custom transitions and effects can have a dramatic effect on your PhotoShow.
Placing multiple pieces of animated clip art on a single photo and varying their sizes can
create interesting layers of depth and dimension. Control your PhotoShow's pace by setting its speed (i.e., frame duration). To put special emphasis on a given photo, change its
speed to a longer duration. This is a good idea when you are using text or captions, since
you want to give the viewer time enough to read them.
4. If you plan to share your PhotoShow with people online, be careful not to use too many
songs or video clips, because your PhotoShow's file size will increase and it will take
longer to download for viewing.
Nero PhotoShow Deluxe 4 Page 29
Page 30

THE SHARE SCREEN
9 THE SHARE SCREEN
The Share screen helps you easily share your digital photos and PhotoShows with friends and
family. With Nero PhotoShow Deluxe 4, you can email your PhotoShows and still photos, upload them to online sharing communities, or export them in various formats.
The Share screen has four buttons:
Click Share PhotoShows to upload a PhotoShow to PhotoShow Circle and email a link to
view your online show to multiple recipients.
Click Upload to upload your photos or PhotoShows to PhotoShow Circle or another online
sharing community.
Click Email Photos to send photos as email attachments.
Click Export to share your PhotoShow as a video file, executable, HTML, or CD-ROM.
9.1 About PhotoShow Circle
PhotoShow Circle is an online photo sharing community: the perfect place to share your photos, videos, and PhotoShows with your friends and family. Anyone can create a PhotoShow
Circle account which entitles them to their own PhotoShow Circle web site. New owners of
Nero PhotoShow Deluxe 4 are given a free PhotoShow Circle premium membership for one
year, which entitles them to extra benefits and features. For example, only premium members
can upload PhotoShows which include video clips, and premium members' PhotoShow Circle
sites never expire.
The first time you email a PhotoShow to someone via PhotoShow Circle, you will be asked to
create a PhotoShow Circle account. Creating an account requires only a valid email address
Page 30 Nero PhotoShow Deluxe 4
Page 31

THE SHARE SCREEN
and a password. After you've created an account, in the future you will be asked to sign in
before uploading your PhotoShows.
9.2 Share PhotoShows
1. Click the Share PhotoShows button to upload a PhotoShow to PhotoShow Cir cle and
simultaneously email someone a link to view the show.
2. Simply check the PhotoShow you wish to share in order to select it.
3. Click the Share PhotoShow button.
4. Sign in to your PhotoShow Circle account and fill in the required fields regarding your
email recipient(s).
5. Choose which of your PhotoShow Circle galleries you'd like to include the show.
6. Click the Add to Gallery drop-down menu to choose from a list of your galleries. If you
want to share your show without including it in a gallery, select No gallery–Just send a
link.
7. Check the Make this PhotoShow Private box to control who can view your online Pho-
toShow. When this box is checked, only those people who have been specified as email
recipients will be able to watch your online PhotoShow. For more information on privacy
settings, consult the online PhotoShow Circle Help Section.
8. When you're ready to share your PhotoShow, click Send. Your show will be uploaded
and your personalized emails will be sent.
Nero PhotoShow Deluxe 4 Page 31
Page 32

THE SHARE SCREEN
9.3 Email Photos
You can email photos by adding them as attachments to your emails:
1. Click Email Photos.
2. Select the photos you want to email.
3. When you have finished your selection, click the Email Photos button again to continue
to the Email Photos screen. The Email Photos screen features two tabs:
a. The Email Photos tab lets you send your photos as attachments with embedded
HTML previews in your outgoing emails, which makes it easy for your recipients to
see the photos you've sent them.
b. Using the Email with Outlook tab lets you create a new message in Microsoft Out-
look with your photos automatically attached.
4. You can select the attached photo's dimensions with the Photo Size menu. By default,
emailed photos will be downsized to a resolution of 640 x 480 to reduce file size.
5. You can control image quality with the Quality menu. Higher quality settings produce lar-
ger file sizes. If you're sending photos to people with slow internet connections, consider
using smaller photo sizes and lower quality settings. If your recipients intend to print t he
photos you're sending them, keep the s ize and qu ality sett ings high .
9.4 Upload
The Upload feature allows you to upload a photo folder or PhotoShow to your online PhotoShow Circle gallery, or to upload still photos to your online photo service account.
1. Click the Upload button.
2. Choose PhotoShow Circle or your online photo service.
Page 32 Nero PhotoShow Deluxe 4
Page 33

THE SHARE SCREEN
a. If you choose PhotoShow Circle, sign in to your account, then select the show you
wish to upload and use the Gallery Destination menu to choose the gallery where
you’d like to showcase your PhotoShow. Then click Upload.
b. If you choose your online photo service, choose the still photos you wish to upload
and then click Upload Photos. You will be prompted to sign in to your photo service
account. If you don’t already have an account, you can quickly create one.
3. On the Upload screen, you can choose to order prints of the photos you’ve selected,
share them by inviting other people to view your online albums, or simply upload them to
your albums for future use. You can create a new album to receive the photos, or choose
an existing album from the drop-down menu.
4. When you’re ready, click Continue.
9.5 Export
You can export a photo folder or PhotoShow in one of four formats: as a Video file, an Executable file, an HTML web page, or a CD-ROM.
To export your PhotoShow as a video file, on the Export PhotoShows and Photos
screen, select Video and click OK.
To export your PhotoShow as an Executable file, select Executable and click OK.
To export your PhotoShow as HTML or burn it to CD-ROM, click Photo Album including
your PhotoShow and click OK.
9.6 Video
You can export your PhotoShow as a video file for playback on Mac and Windows PCs and on
handheld devices. You have two video file formats to choose from: avi, or mpg.
The avi file format provides excellent playback quality but also creates a larger size file. To
create an avi:
1. Select avi on the Export PhotoShows and Photos screen.
2. Click OK.
The mpg file format is the most versat ile and pr ovides goo d playback quality. To create an m pg:
1. Select mpg on the Export PhotoShows and Photos screen.
2. Click OK.
Note: some computers may require additional software to playback mpg files correctly.
3. Next, select the PhotoShow you wish to export as a video and click Export Movie.
4. In the dialog box which appears, choose a target folder and name for your video.
5. Click Save.
9.7 HTML
This allows you to easily create an HTML web page from a folder or PhotoShow. To export a
PhotoShow as HTML:
1. In the Export Photos and PhotoShows screen, select Photo Album including your
PhotoShow.
2. In the Destination drop-down menu, choose HTML. If you want to email your newly cre-
ated HTML folder, check the box to Save as .zip. Then click OK.
Nero PhotoShow Deluxe 4 Page 33
Page 34

THE SHARE SCREEN
3. Select the folder or show you want to publish, then click Export HTML.
4. On the Export Photos and PhotoShow to HTML screen, you can select your Layout
from the drop-down menu and use the color choosers to select a Background Color and
Text Color.
9.8 Executable
This export function will create a folder that contains an Executa ble file of your PhotoShow. An
Executable is a stand-alone application which will play your PhotoShow in full sc reen mode on
any Windows computer.
To create an Executable of your PhotoShow:
1. Select Stand-Alone Application in the Export PhotoShows and Photos screen.
2. If you intend to email the exe file to someone, check the box to Include a .zip version for
emailing (this will deposit the exe in a zipped file on your hard drive).
3. Click OK.
4. Select the folder or PhotoShow you want to export.
5. Click the Export EXE button. In the dialog box which appears choose a target folder and
name for your exe.
6. Then click Save.
7. Nero PhotoShow Deluxe 4 will create a new folder containing the Executable version of
your PhotoShow and save it in the destination folder you have specified. To view the
presentation, click the PhotoShow Player icon in the newly created folder.
9.9 CD-ROM
Select this option to burn a CD-ROM of your photo folder or PhotoShow.
1. In the Export Photos and PhotoShows screen, select Photo Album including your Pho-
toShow.
2. In the Destination drop-down menu, choose CD.
3. Click OK.
4. Select the folder or PhotoShow you wish to export and click the Export CD button.
5. On the Export Photos and PhotoShow to CD screen, you can select your Page Layout
from the drop-down menu and use the color choosers to select a Background Color and
Text Color.
6. The Title is the text that will appear at the top of your CD's browser interface. The Photo
Size menu sets the resolution of your photos. The Photo Quality menu sets the picture
quality.
7. To adjust advanced burning settings, click the Options button. Use the DVD/CD Drive
drop-down menu to select which of the disc drives on your computer you'd like to use,
and use the Write Speed drop-down menu to select the speed at which your disc will be
burned. Note: CD-ROMs burned at high speed sometimes suffer from playback problems.
For best results, select the slowest write speed.
8. When you’re satisfied with your settings, click OK to create your CD-ROM.
Page 34 Nero PhotoShow Deluxe 4
Page 35

Support Contact
10 Support Contact
Nero PhotoShow Deluxe 4 is a Nero AG product.
Nero AG
Im Stoeckmaedle 18
76307 Karlsbad
Germany
Web:
Help:
Mail:
Fax: +49 724 892 8499
http://www.nero.com
http://www.nero.com/nerophotoshow/eng/Contact_Us_.html
techsupport@nero.com
Copyright © 1995 - 2006 Nero AG. All rights reserved.
Printed in Germany.
Nero PhotoShow Deluxe 4 Page 35
 Loading...