

Page 1
Version
1.1.20
User’s Guide
English / Français / Italiano / Deutsch /
Español / Русский язык / 简体中文
Page 2
Version
1.1.20
User’s Guide
English
Page 3

2 | NEC SPECTRAVIEW II - USER’S GUIDE
Software Updates and Feedback
Occasionally updates and enhancements to the SpectraView software will be made available. Visit the SpectraView II
section of the NEC DISPLAY SOLUTIONS Internet web site to check for availability.
NEC DISPLAY SOLUTIONS welcomes feedback and suggestions for product improvements. Please use the feedback
form on the SpectraView section of the NEC DISPLAY SOLUTIONS Internet web site.
Within Europe please visit the NEC Display Solutions Europe web site, www.nec-display-solutions.com.
Within Australia and New Zealand, please visit the NEC Australia web site, www.spectraview.nec.com.au.
Technical Support
For technical support with the SpectraView II product, please visit the SpectraView II section of the NEC DISPLAY
SOLUTIONS Internet web site and check for any Frequently Asked Questions that may help to solve the issue. An
online feedback from is available for submitting questions and feedback.
For technical Support within Europe please visit the NEC Display Solutions Europe web site, www.nec-display-solutions.
com, or by e-mail to spectraview@nec-displays.com.
For technical Support within Australia and New Zealand, please visit the NEC Australia web site, www.spectraview.nec.
com.au, or by e-mail to spectraview.support@nec.com.au. Sales support Tel : 131 632.
Trademarks and Copyright
SpectraView is a registered trademark of NEC Display Solutions of America, Inc.
Adobe, the Adobe logo, Acrobat and Photoshop, are either registered trademarks or trademarks of Adobe Systems
Incorporated in the United States and/or other countries.
Apple, Macintosh, ColorSync, Mac and the Mac logo are trademarks of Apple Computer, Inc., registered in the U.S. and
other countries.
Microsoft, Excel and Windows are either registered trademarks or trademarks of Microsoft Corporation in the United
States and/or other countries.
Copyright © 2003-15 NEC Display Solutions, Ltd.
The content of this manual is furnished for informational use only, is subject to change without notice, and should not
be construed as a commitment by NEC Display Solutions, Ltd. NEC Display Solutions, Ltd. assumes no responsibility
or liability for any errors or inaccuracies that may appear in this manual.
All rights reserved. Your rights of ownership are subject to the limitations and restrictions imposed by the copyright laws
as outlined below.
It is against the law to copy, reproduce or transmit, including without limitation electronic transmission over any network,
any part of the manual except as permitted by the Copyright Act of the United States, Title 17, United States Code.
Under the law, copying includes translation into another language or format.
The above is not an inclusive statement of the restrictions imposed on you under the Copyright Act.
For a complete statement of the restrictions imposed on you under the copyright laws of the United States of America,
see Title 17, United States Code.
USA and Canada: www.necdisplay.com
Australia: www.spectraview.nec.com.au
Europe www.nec-display-solutions.com
Revision 150210
Page 4

3 | NEC SPECTRAVIEW II - USER’S GUIDE
HARDWARE LIMITED WARRANTY (U.S.A. and Canada only)
NEC DISPLAY SOLUTIONS warrants the SpectraView II Color Sensor Hardware (hereinafter “Product” or “Products”)
to be free from defects in material and workmanship and, subject to the conditions set forth below, agrees to repair or
replace (at NEC DISPLAY SOLUTIONS’s sole option) any part of the enclosed unit which proves defective for a period
of one (1) year from the date of rst consumer purchase. Spare parts are warranted for ninety (90) days. Replacement
parts or unit may be new or refurbished and will meet specications of the original parts or unit.
This warranty gives you specic legal rights and you may also have other rights, which vary from state to state. This
warranty is limited to the original purchaser of the Product and is not transferable. This warranty covers only NEC
DISPLAY SOLUTIONS-supplied components. Service required as a result of third party components is not covered
under this warranty. Service required as a result of abuse or improper usage is also not covered under this warranty.
In order to be covered under this warranty, the Product must have been purchased in the U.S.A. or Canada by the original
purchaser. This warranty only covers Product distribution in the U.S.A. or Canada by NEC DISPLAY SOLUTIONS No
warranty service is provided outside of the U.S.A. or Canada. Proof of Purchase will be required by NEC DISPLAY
SOLUTIONS to substantiate date of purchase. Such proof of purchase must be an original bill of sale or receipt
containing name and address of seller, purchaser, and the serial number of the product.
NEC DISPLAY SOLUTIONS SHALL NOT BE LIABLE FOR DIRECT, INDIRECT, INCIDENTAL, CONSEQUENTIAL,
OR OTHER TYPES OF DAMAGES RESULTING FROM THE USE OF ANY NEC DISPLAY SOLUTIONS PRODUCT
OTHER THAN THE LIABILITY STATED ABOVE. THESE WARRANTIES ARE IN LIEU OF ALL OTHER WARRANTIES
EXPRESS OR IMPLIED, INCLUDING, BUT NOT LIMITED TO, THE IMPLIED WARRANTIES OF MERCHANTABILITY
OR FITNESS FOR A PARTICULAR PURPOSE. SOME STATES DO NOT ALLOW THE EXCLUSION OF IMPLIED
WARRANTIES OR THE LIMITATION OR EXCLUSION OF LIABILITY FOR INCIDENTAL OR CONSEQUENTIAL
DAMAGES SO THE ABOVE EXCLUSIONS OR LIMITATIONS MAY NOT APPLY TO YOU.
This Product is warranted in accordance with the terms of this limited warranty. Consumers are cautioned that Product
performance is affected by system conguration, software, the application, customer data, and operator control of
the system, among other factors. While NEC DISPLAY SOLUTIONS Products are considered to be compatible with
many systems, specic functional implementation by the customers of the Product may vary. Therefore, suitability of a
Product for a specic purpose or application must be determined by consumer and is not warranted by NEC DISPLAY
SOLUTIONS.
Federal Communications Commission (FCC) Notice (U.S.A. Only)
WARNING: This equipment has been tested and found to comply with the limits for a Class B digital device, pursuant to
Part 15 of the FCC Rules. These limits are designed to provide reasonable protection against harmful interference in a
residential installation. This equipment generates, uses, and can radiate radio frequency energy and, if not installed and
used in accordance with the instructions, may cause harmful interference to radio communications. However, there is no
guarantee that interference will not occur in a particular installation. If this equipment does cause harmful interference
to radio or television reception, which can be determined by turning the equipment off and on, the user is encouraged
to try to correct the interference by one or more of the following measures:
• Reorient or relocate receiving antenna.
• Increase the separation between the equipment and receiver.
• Connect the equipment into an outlet on a circuit different from that to which the receiver is connected.
• Consult the dealer or an experienced radio/TV technician for help.
This device complies with Part 15 of the FCC rules. Operation is subject to the following two conditions:
• This device may not cause harmful interference.
• This device must accept any interference received including interference that may cause undesired operation.
Page 5

4 | Table of Contents
Contents
Precautions: . . . . . . . . . . . . . . . . 6
Supported Display Monitors . . . . . . . . . . . 7
System Requirements . . . . . . . . . . . . . 8
Introduction to SpectraView II 9
Overview . . . . . . . . . . . . . . . . . . 9
Main Features and benets . . . . . . . . . . 9
Dialogs, Settings and Menus 11
Main SpectraView II window . . . . . . . . . .11
Target Settings . . . . . . . . . . . . . . .12
Calibration . . . . . . . . . . . . . . . . . 12
Display . . . . . . . . . . . . . . . . . .13
Display Conguration dialog . . . . . . . . . . 13
Edit Calibration Target Conguration dialog . . . . 14
Custom Color Gamut dialog . . . . . . . . . . 17
Custom Gamma Curve dialog . . . . . . . . .19
Custom White Point dialog . . . . . . . . . . . 20
Preferences dialog . . . . . . . . . . . . . . 21
Information window. . . . . . . . . . . . . . 27
Colorimeter window . . . . . . . . . . . . .34
Ambient Light Measurement window . . . . . . . 35
Monitor Settings window. . . . . . . . . . . . 36
Update Internal Calibration window . . . . . . .37
Menus . . . . . . . . . . . . . . . . . . . 38
File menu . . . . . . . . . . . . . . . . .38
Edit menu . . . . . . . . . . . . . . . . . 38
Tools menu . . . . . . . . . . . . . . . . . 38
Help menu . . . . . . . . . . . . . . . . . 39
Calibration Overview 40
Introduction to display monitor calibration . . . . .40
About Targets . . . . . . . . . . . . . . . . 42
Gamma and Tone Response Curves (TRC) . . . . 42
White Point . . . . . . . . . . . . . . . . . 42
Intensity . . . . . . . . . . . . . . . . . . 43
Contrast Ratio. . . . . . . . . . . . . . . . 43
Color Gamut . . . . . . . . . . . . . . . . 43
6 Axis Color Trim . . . . . . . . . . . . . .44
Using SpectraView 45
Launching. . . . . . . . . . . . . . . . . . 45
Selecting a calibration Target . . . . . . . . . . 45
Modifying Targets . . . . . . . . . . . . . . . 45
Calibrating and Proling the Display . . . . . . .46
Proling the Display . . . . . . . . . . . . . . 46
Validating the current Calibration . . . . . . . . . 46
Outside of SpectraView 47
Using ICC/ColorSync Monitor Proles . . . . . . . 47
Adobe Photoshop Overview . . . . . . . . . . . 47
Frequently Asked Questions 48
Page 6

5 | Table of Contents
Calibration . . . . . . . . . . . . . . . . .48
Troubleshooting 51
Installation and Setup . . . . . . . . . . . . . 51
Test Pattern Guide 54
SpectraView Engine Information 55
Using 6 Axis Color Trim 56
Features by Model 57
Glossary 59
Page 7

6 | NEC SPECTRAVIEW II - USER’S GUIDE
Precautions:
• The LCD display monitor screen is fragile and can be easily damaged if force is applied. Never
use suction cups to attach a color sensor to the display. Always use the supplied cable or sling and
counterweight to gently rest the color sensor on the face of the display.
• During the display calibration procedure, highly sensitive light measurements are made on the
screen using the color sensor. High ambient light levels such as direct sunlight on the screen, may
affect measurements and cause an inaccurate display calibration. Changes in ambient lighting can alter
how images on the screen are perceived. Locate the display away from bright direct lighting whenever
possible and keep a constant ambient lighting level.
• Always store the color sensor in the holder when not in use.
• Never touch the measurement window in the color sensor.
• Never disconnect the color sensor while the SpectraView software is running.
• Always allow the display to warm up for at least 30 minutes before calibrating.
• Do not adjust the monitor color, brightness or contrast controls once it has been calibrated, otherwise
the color calibration of the monitor may become invalid.
• (Mac OS only) Do not use the ColorSync control panel to switch between different display monitor
calibrations by selecting different monitor color proles. Always use the SpectraView application to load
a previous monitor calibration. This is because all of the necessary color adjustments, including the
Look Up Tables, are stored in the display monitor and these must be set by SpectraView. The ColorSync
proles generated by SpectraView contain linear Look Up Tables for the video graphics adapter.
Note: This document covers the Mac OS, Windows, and Linux versions of the SpectraView II software. The features and functions
of all versions are identical unless noted otherwise. The majority of the User Interface screen images in this document show
the Mac OS version, however the Windows and Linux versions are identical in layout unless noted otherwise.
Page 8

7 | NEC SPECTRAVIEW II - USER’S GUIDE
Supported Display Monitors
SpectraView II supports the following NEC display monitor models:
• LCD1980SXi – 19” LCD monitor
• LCD1980FXi – 19” LCD monitor
• LCD1990SX – 19” LCD monitor
• LCD1990SXi – 19” LCD monitor
• LCD1990SXp – 19” LCD monitor
• LCD2090UXi – 20” LCD monitor
• LCD2180UX – 21” LCD monitor
• LCD2180WG-LED – 21” LED wide color gamut LCD monitor
• LCD2190UXi – 21” LCD monitor
• LCD2190UXp – 21” LCD monitor
• LCD2490WUXi – 24” LCD monitor
• LCD2490WUXi2 – 24” LCD monitor
• LCD2690WUXi – 26” wide color gamut LCD monitor
• LCD2690WUXi2 – 26” wide color gamut LCD monitor
• LCD3090WQXi – 30” wide color gamut LCD monitor
• LCD4020 – 40” LCD monitor
• LCD4620 – 46” LCD monitor
• LCD5220 – 52” LCD monitor
• LCD6520 – 65” LCD monitor
• M40, M40B, and M40-2 – 40” LCD monitors
• M46, M46B, and M46-2 – 46” LCD monitors
• X431BT – 43” LCD monitor
• X461UN – 46” LCD monitor
• X462UN – 46” LCD monitor
• X461HB – 46” LCD monitor
• X651UHD – 65” Ultra-high-denition LCD monitor
• X841UHD – 84” Ultra-high-denition LCD monitor
• X981UHD – 98” Ultra-high-denition LCD monitor
• P401 – 40” LCD monitor
• P461 – 46” LCD monitor
• P521 – 52” LCD monitor
• P551 – 55” LCD monitor
• P701 – 70” LCD monitor
• P221W – 22” wide color gamut LCD monitor
• P232W – 23” LCD monitor
• P241W – 24” LCD monitor
• P242W – 24” LCD monitor
• PA231W – 23” LCD monitor
• PA241W – 24” wide color gamut LCD monitor
• PA242W – 24” wide color gamut LCD monitor
• PA271W – 27” wide color gamut LCD monitor
• PA272W – 27” wide color gamut LCD monitor
• PA301W – 30” wide color gamut LCD monitor
• PA302W – 30” wide color gamut LCD monitor
• PA322UHD – 32” wide color gamut, Ultra-high-denition LCD monitor
• EA244UHD – 24” wide color gamut, Ultra-high-denition LCD monitor
• EA304WMi – 30” wide color gamut LCD monitor
Page 9

8 | NEC SPECTRAVIEW II - USER’S GUIDE
System Requirements
SpectraView has the following system requirements:
ÿ
Mac OS
Operating
System
Video
Graphics
Adapter
Video Color
Depth
Video
Resolution
Supported
Calibration
Sensors
USB At least one available USB port for Color Sensor, or display USB connection (MultiSync PA Series, P232W, P241W,
Intel based Apple Mac with
OS X version 10.5 or higher.
See README le for details.
PPC based Macs are no longer
supported as of version 1.1.11.
All Apple standard video graphics
cards, including most newer
PowerBooks. Digital (DVI or
DisplayPort) output is highly
recommended.
See the README le and NEC
website for the latest information
on Macs with DisplayPort video
output.
At least 24 bit color (Millions of colors).
Displays native resolution highly recommended (1280x1024, 1600x1200, 1680x1050, 1920x1080, 1920x1200,
2560x1440, 2560x1600, or 3840x2160 depending on monitor)
• GretagMacbeth Eye-One Display
V1
• X-Rite/GretagMacbeth Eye-One
Display V2
• X-Rite/GretagMacbeth Eye-One
Monitor, Eye-One Pro.
• X-Rite iOne Pro2.
• X-Rite ColorMunki.
• X-Rite iOneDisplay Pro
• NEC SpectraSensor Pro
• NEC MDSVSensor
• NEC MDSVSENSOR3
• ColorVision/Datacolor Spyder 2.
• Datacolor Spyder 3 and Spyder 4.
• BasICColor Discus.
• Photo Research PR-655, 670, 680,
730, and 740 Spectroradiometers.
P242W, EA244UHD, EA304WMi, X651UHD, X841UHD, and X981UHD models only).
Microsoft Windows XP, XP x64, Server
2003, Vista and Vista x64, Windows
7, Windows 7 x64, Windows 8, and
Windows 8 x64.
Most recent ATI, Nvidia, Matrox, S3
Graphics, and Intel graphics adapters.
Digital (DVI or DisplayPort) output is
highly recommended. See README le
for details.
• GretagMacbeth Eye-One Display V1
• X-Rite/GretagMacbeth Eye-One Display
V2
• X-Rite/GretagMacbeth Eye-One Monitor,
Eye-One Pro.
• X-Rite iOne Pro2.
• X-Rite ColorMunki.
• X-Rite iOneDisplay Pro
• NEC SpectraSensor Pro
• NEC MDSVSensor
• NEC MDSVSENSOR3
• Monaco OptixXR (X-Rite DTP 94).
• ColorVision/Datacolor Spyder 2.
• Datacolor Spyder 3 and Spyder 4.
• BasICColor Discus.
• Photo Research PR-655, 670, 680, 730,
and 740 Spectroradiometers.
Microsoft Windows Linux
64 bit versions of Ubuntu
Linux version 10.04 or higher
and variants. See Installation
Instructions for details.
Most recent ATI, Nvidia, and Intel
graphics adapters. Digital (DVI
or DisplayPort) output is highly
recommended. See Installation
Instructions for details.
• X-Rite/GretagMacbeth Eye-One
Display V2
• X-Rite iOneDisplay Pro
• NEC SpectraSensor Pro
• NEC MDSVSensor
• NEC MDSVSENSOR3
• Photo Research PR-655, 670, 680,
730, and 740 Spectroradiometers.
Page 10

9 | NEC SPECTRAVIEW II - USER’S GUIDE
Chapter
Introduction to SpectraView II
1
Overview
Designed for professionals with color critical applications, SpectraView II combines the award winning NEC display
monitor technology with a color measurement sensor and sophisticated software. The result is highly accurate, reliable,
repeatable, and feature rich display calibration and proling solution.
The SpectraView system uses a color sensor to take color measurements of the display screen during calibration. The
software analyzes these measurements and sends color adjustment commands directly to the display monitor. This
means that color adjustments are made in the monitor rather than in the video graphics adapter, resulting in full use of
the number of colors available on the graphics adapter and a much brighter image with the maximum possible color
gamut. With SpectraView, the video graphics adapter is not used at all to make any gamma or Tone Response Curve
corrections to the display, so the full color resolution and delity of the system is maintained.
Main Features and benets
SpectraView provides the following features and benets:
• Automatic calibration - SpectraView communicates with the display monitors using Display Data Channel -
Command Interface (DDC/CI) which is a two-way communications link between the video graphics adapter and
display monitor using the normal video signal cable. No extra cables are necessary. All adjustments to the monitor
settings are done automatically using this communications link. A USB connection between the host PC and display
can also be used if supported (All MultiSync PA Series models, P232W, P241W, P242W, EA244UHD,EA304WMi,
X651UHD, X841UHD, and X981UHD. See the “Features by Model” on page 57 for all model specic functionality.).
It is not necessary to manually congure the monitor as all of the necessary settings are made by the software.
• High bit depth internal Look Up Tables (LUTs) - Each LCD display monitor supported by SpectraView II
features three internal 10, 12, or 14 bit LUTs (depending on the model). These tables allow very precise adjustments
to be made to the display’s Tone Response Curve without reducing the number of displayable colors or introducing
color banding artifacts.
• Multiple Calibration Sets - Different display monitor calibrations can be instantly loaded allowing quick and
easy switching between different calibration settings without the need to re-calibrate the display. Each time a
calibration set is loaded, the necessary monitor settings and ICC/ColorSync proles are automatically updated.
• Informative - At the end of each display monitor calibration, an information window is displayed which shows
the results of the calibration and includes a wealth of information about the display such as the measured color
gamut, grayscale color tracking, Delta-E, and luminance values. Additional information about the display monitor
such as the model name, serial number and the total number of hours that it has been in use are also displayed.
• Calibration status validation - SpectraView will query each calibrated monitor to see if any controls have
changed since the last calibration. If anything has changed, the previous calibrated state can be restored
automatically.
• Flexible - SpectraView provides many features and options that make it exible enough to be used in a large
variety of applications, including full DICOM support for medical imaging. The display luminance can be adjusted
to either a specic value or to the maximum possible that the display can achieve.
• Monitor locking - Once calibrated the OSD (On Screen Display) controls for the display monitors can be
locked to prevent accidental or unauthorized adjustment which may invalidate the calibrated state of the monitor.
• Monitor Proling - After calibration, the display is automatically proled and highly accurate ICC/ColorSync
Page 11

10 | NEC SPECTRAVIEW II - USER’S GUIDE
color proles are generated and automatically registered with the Color Management System. These proles use
the Bradford Chromaticity Adaptation matrix.
• Colorimeter function - The software features a Colorimeter function which allows direct measurements to be
taken by the color sensor and the results displayed in a variety of different formats.
• Ambient Light Measurement function - Allows measurements to be taken of the ambient light of the
viewing environment surrounding the display monitor. This is useful in determining the optimal viewing conditions
for the display monitor so that the ambient light level and color do not inuence the viewing of images on the
screen.
Page 12
11 | NEC SPECTRAVIEW II - USER’S GUIDE
Chapter
Dialogs, Settings and Menus
2
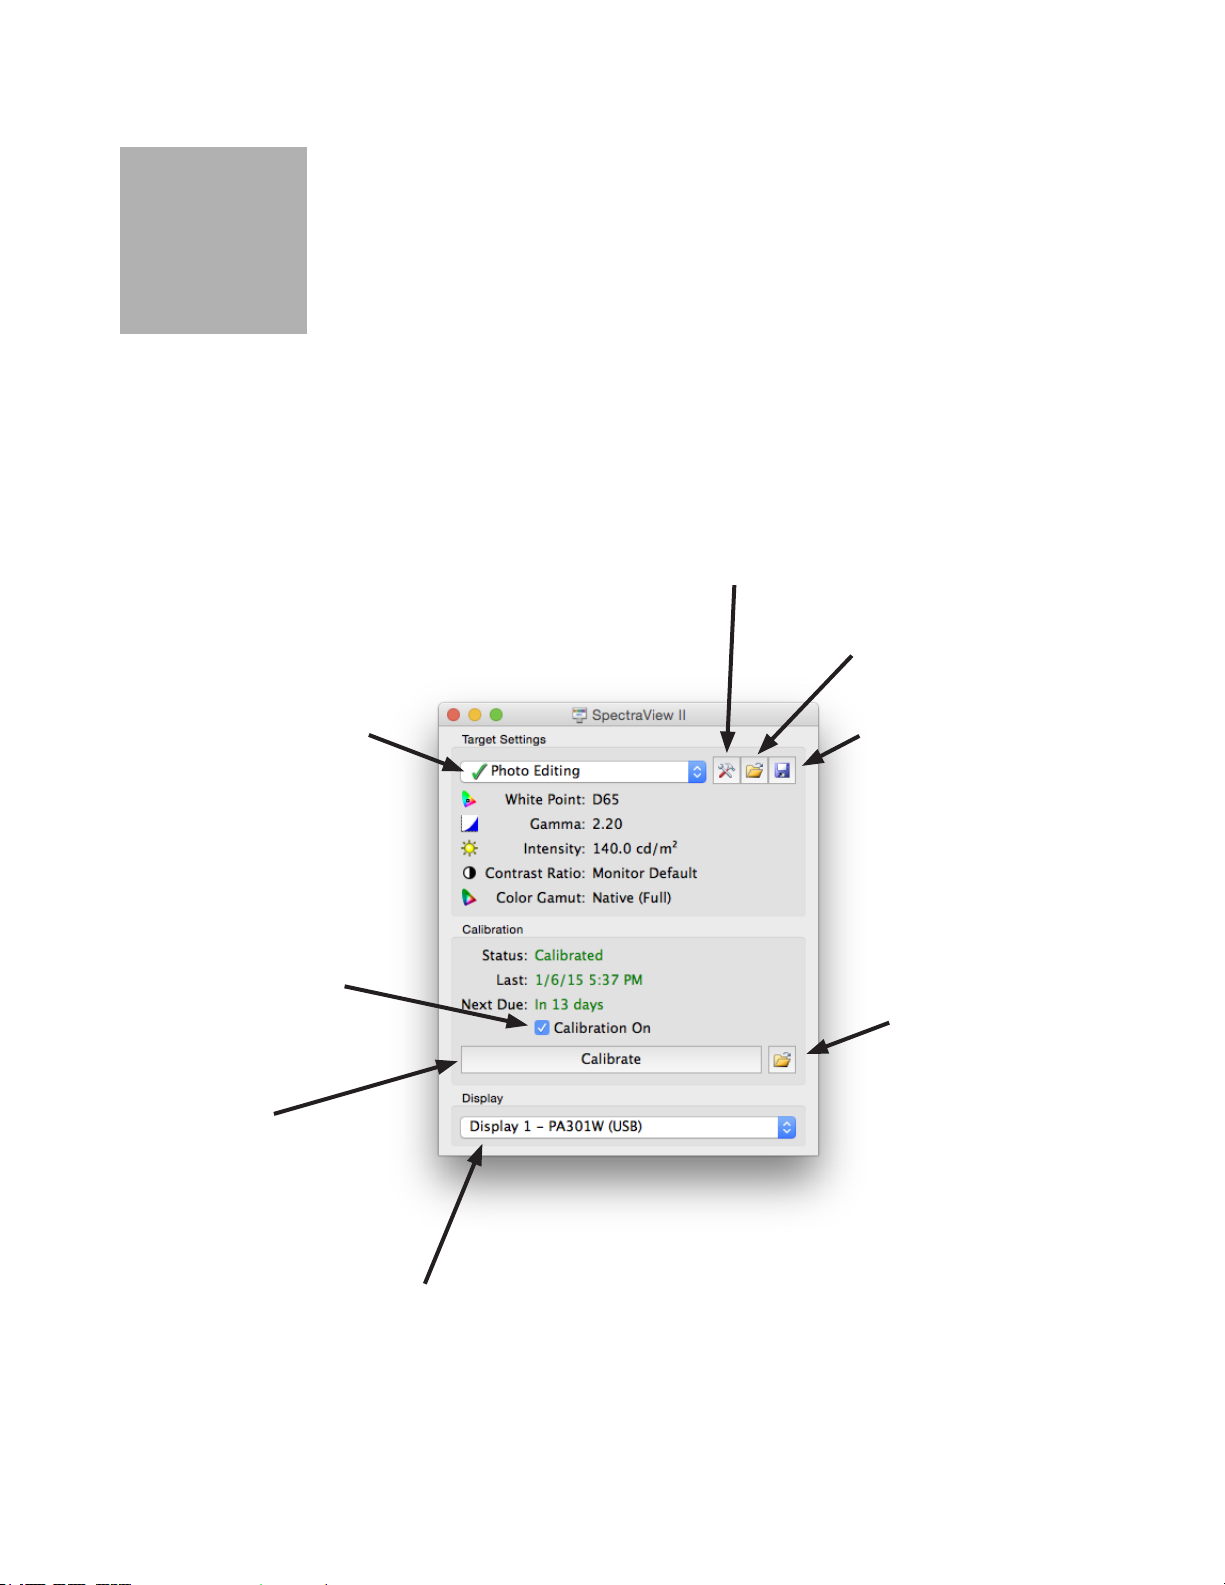
Main SpectraView II window
The SpectraView II window shows the current settings and status of the display calibration. All of the features of
SpectraView are accessed from this window and the menus.
Edit Target
Opens the Calibration Target
Conguration dialog box used to
modify Target settings.
Open Target
Opens a Calibration Target
Targets listbox
Selects an existing
Target setting.
Targets that have
been calibrated have
green check mark.
le.
Save Target
Saves the current Target
Settings to a Calibration Target
le.
Calibration On
Turns the display
calibration on or off.
Calibrate
Calibrates the currently
selected display to the
currently selected Target
Settings.
Display listbox
Selects which display to
calibrate if more than one
display is present.
Open Previous Monitor
Calibration
Previous calibrations can
be loaded and viewed.
The display settings and
ICC/ColorSync prole
for the display will be set
automatically.
Page 13

12 | NEC SPECTRAVIEW II - USER’S GUIDE
Target Settings
The Target Settings group shows the current calibration Target parameters for the currently selected display monitor.
The Target Settings can be modied, saved and loaded using the Edit, Open and Save buttons.
The Target listbox shows all of the available Targets. When the display has been calibrated to a particular Target, a
green check mark appears next to the Target name, indicating that the calibration is available. Different calibrations can
be automatically restored by selecting different Targets that have been calibrated. This makes it easy to quickly change
between different calibrated Target settings. The green check mark will change to yellow once the calibration for that
Target has passed the recommended recalibration time, indicating it is time to recalibrate that particular Target.
White Point shows the Target White Point.
Gamma shows the Target gamma or Tone Response Curve type.
Intensity shows the Target display intensity value.
Contrast Ratio shows the Target contrast ratio.
Color Gamut shows the Target color gamut for display models that support gamut adjustment. This will be grayed out
if the currently selected display does not support color gamut adjustment.
Calibration
The Calibration group shows the current calibration status of the currently selected display monitor and is where the
monitor calibration process is started.
The display monitor can be calibrated to the current Target Settings by clicking the Calibrate button.
Note: The Calibrate button will be disabled if either no supported color sensor or display monitor was detected. See the chapter
“Troubleshooting” on page 51 for more information.
Status shows the current calibration status of the display monitor, either Calibrated, Uncalibrated, or Calibration Off.
Last shows the date and time that the display monitor was last calibrated.
Next Due shows the number of days until the display is next due for recalibration, or the number of days past when it
was last due for recalibration. This is based on the date of last calibration, and the Recalibration Reminder Period in
the Preferences dialog.
If the display is not currently in a calibrated state the Calibration On checkbox will be unchecked. If the monitor
OSD controls are locked using the Lock OSD Controls option in the Preferences dialog, the OSD controls will be
automatically unlocked when the Calibration On checkbox is cleared. Selecting the checkbox will automatically re-
congure the display monitor to its previously calibrated state.
The Open button will open the Previous Monitor Calibration dialog which shows all of the previous calibrations that
have been performed. It is possible to view the detailed results of each calibration, as well as manually selecting a
previous calibration to load. Loading a previous Monitor Calibration will automatically congure the display and regenerate the ICC/ColorSync prole, if one was generated when the calibration was performed. This feature can be
used to manually switch between different monitor calibrations with different Target settings, or to restore a particular
calibration.
Note: The Monitor Calibrations are specic to each individual display monitor and can not be used to load the calibrated
settings of one display monitor into another, even if they are the same model. This is because of the individual tolerances
and characteristics of each display monitor.
Page 14
13 | NEC SPECTRAVIEW II - USER’S GUIDE
Display
The Display group is used to select the display monitor to calibrate if more than one display is present on the system.
Displays can be selected from the listbox and the Target Settings and Calibration status will be automatically updated.
Note that Target Settings are independent for each monitor when multiple monitors are used, so each display monitor
can be calibrated to different Target settings if desired.
Display Conguration button (Windows and Linux versions only)
opens the Display Conguration dialog which is used to congure
SpectraView II if more than one display is used on the system. See
the following section.
Display Conguration dialog (Windows and Linux versions only)
The Display Conguration dialog is accessed either from the
Edit menu, or by clicking on the Display: Congure button in
the main SpectraView window.
It may be necessary to manually congure the relationship
between the display layout on the desktop, and the display
monitors that are connected to the system. Correct conguration
of this relationship is necessary so that the display monitor
adjustments are sent to the correct monitor, and that the
calibration is performed on the correct part of the desktop.
A diagram depicting the display desktop layout is shown and the
display monitors associated with each desktop screen is shown.
The monitor associated with each display can be selected using
the listboxes.
Clicking on the display rectangles will also select different
displays on the system desktop.
If a USB connection is made to the display (all MultiSync
PA Series models, P232W, P241W, P242W, EA244UHD,
EA304WMi, X651UHD, X841UHD, and X981UHD only), the
USB connection will be shown and should be selected instead
of the DDC/CI connection. See the “Features by Model” on page
57 for all model specic functionality.
Note: Some video graphics adapters may show several duplicate displays due to issues with the video drivers for that adapter. In
this case the duplicate displays can be selected to “None”.
Auto Congure - Attempts to automatically detect and congure the display monitors to the display layout on the system
desktop. In most cases this will correctly congure the correct relationship, but in some cases it may be necessary to
manually congure.
Test LUT - Tests that the video graphics adapter card LUT (Look Up Table) can be correctly set. Clicking this button
with ash the screen brightness by setting the LUT in the video graphics adapter card for the currently selected display.
Verify that the correct screen ashes when this button is clicked.
Page 15
14 | NEC SPECTRAVIEW II - USER’S GUIDE
Note: Since SpectraView applies all correction curves to the 10, 12, or 14 bit LUT inside the monitor, the video graphics adapter
card LUT is always set to linear.
Test Monitor - Tests the communications with the currently selected display monitor. Clicking this button will send a
command to ash the monitor’s power LED color or brightness, or ash the screen brightness (depending on display
model). If the wrong display monitor ashes then change the monitor associated with each display can be selected
using the listboxes.
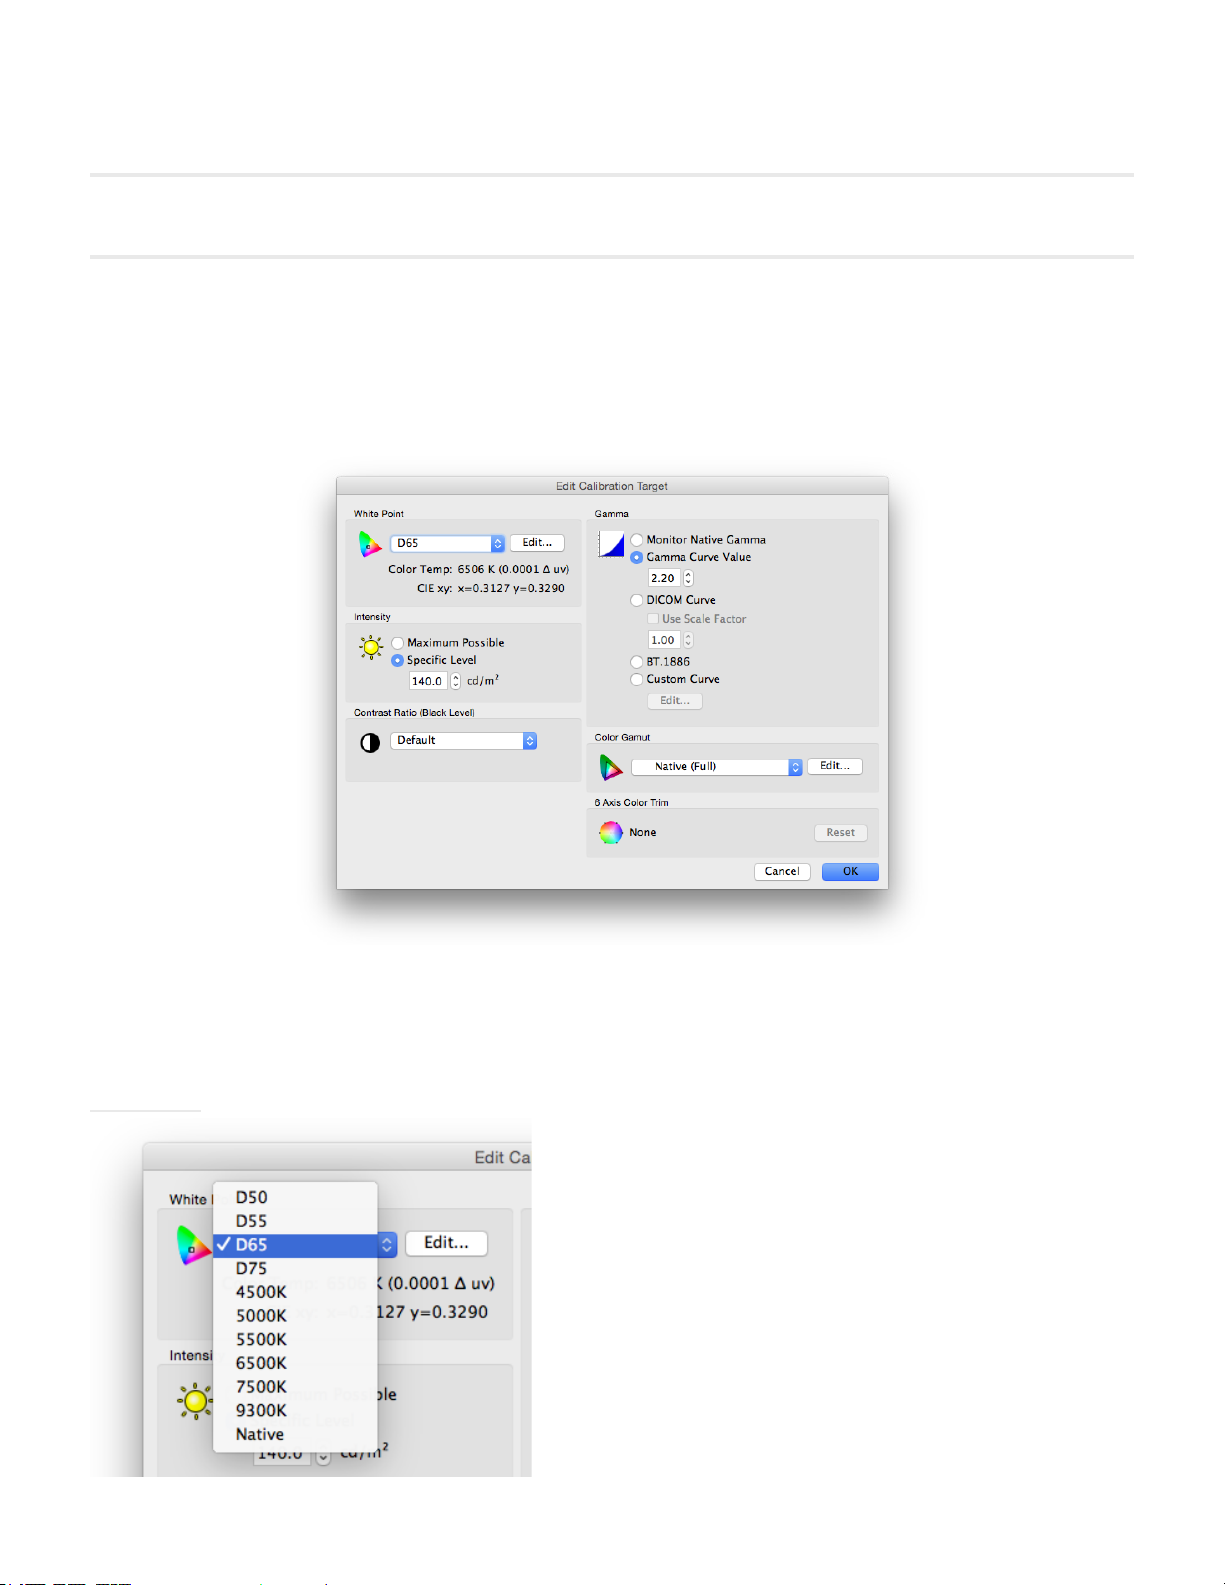
Edit Calibration Target Conguration dialog
The Edit Calibration Target dialog is accessed by clicking the Edit Target button on the main SpectraView II window,
or by selecting Target from the Edit menu. Custom Targets can be created using this dialog. After a new Target has
been created, the display must be Calibrated to it. It is possible to share Target les with other users of SpectraView on
Windows, Linux, and Mac OS platforms.
White Point
White Point selects the Target white point for the calibration.
Several popular industry standard White Point values, such as
D50 and D65, are provided.
A Native option is available that can be used to leave the White
Point at the display’s native characteristic white point. This is
useful when the maximum possible luminance is desired but the
white point is not critical.
A custom white point can be specied by clicking the Edit... button
to open up the Custom Color Temperature dialog.
Page 16

15 | NEC SPECTRAVIEW II - USER’S GUIDE
Gamma Curve
Gamma Curve selects the desired tone response curve of the calibrated display. Options are:
• Monitor Native Gamma - No correction is applied and the display’s Look Up Tables are set to linear.
• Gamma Curve Value - The response curve will follow a simple gamma curve. Values between 1.0 and 3.0
can be entered. A gamma value of 2.2 is the most popular for most applications.
• DICOM Curve - The response curve follows the DICOM (Digital Imaging and Communications in Medicine)
specication. This response curve is aimed at medical use, however it can be used for other applications. The
goal of the DICOM response curve is to have a visually linear display response.
Use Scale Factor - The DICOM response curve shape is based on the measured black level and Intensity. If
the black level or Intensity of the display changes, then the shape of the DICOM response curve also changes.
If a display is not expected to be re-calibrated for a period of several months, this feature can be used to
increase the longevity of the DICOM calibration using the knowledge that the displays brightness will decrease
slightly as it ages. By scaling the black level and Intensity values used to calculate the DICOM response
curve, using the Use Scale Factor value, the response curve can be based on the lower future black level and
Intensity. The value used will depend on the display, its usage, and the time interval until it is expected to next
be re-calibrated.
• BT.1886 - A response curve recommended for at panel displays used in HDTV studio production. It
approximates a gamma of 2.4 but automatically adjusts to improve detail based on the black level.
• Custom Curve - Advanced and custom response curves can be selected from presets or created by
importing a table of values. Click the Edit... button to open the Custom Gamma Curve dialog.
Intensity
The Intensity selects the luminance or “brightness” of white for the calibration. Options are:
• Maximum possible - calibrates the display to the maximum possible luminance that it can achieve.
The actual value achieved will depend on the display’s type, its age and the white point used. This is not
recommended when trying to exactly match two or more displays, since there may be a difference between what
Intensity each display can achieve.
• Specic Level - calibrates the display’s Intensity to a specied target value. If the display can not achieve the
specied value, it will be calibrated to the closest possible Intensity, and a message will be displayed after the
calibration has completed.
Note: If you are unsure about what level to use for the Specic Level for a particular application, it is possible to interactively
adjust both the White Point and Intensity using the Visual Match feature in the Custom White Point dialog.
Page 17
16 | NEC SPECTRAVIEW II - USER’S GUIDE
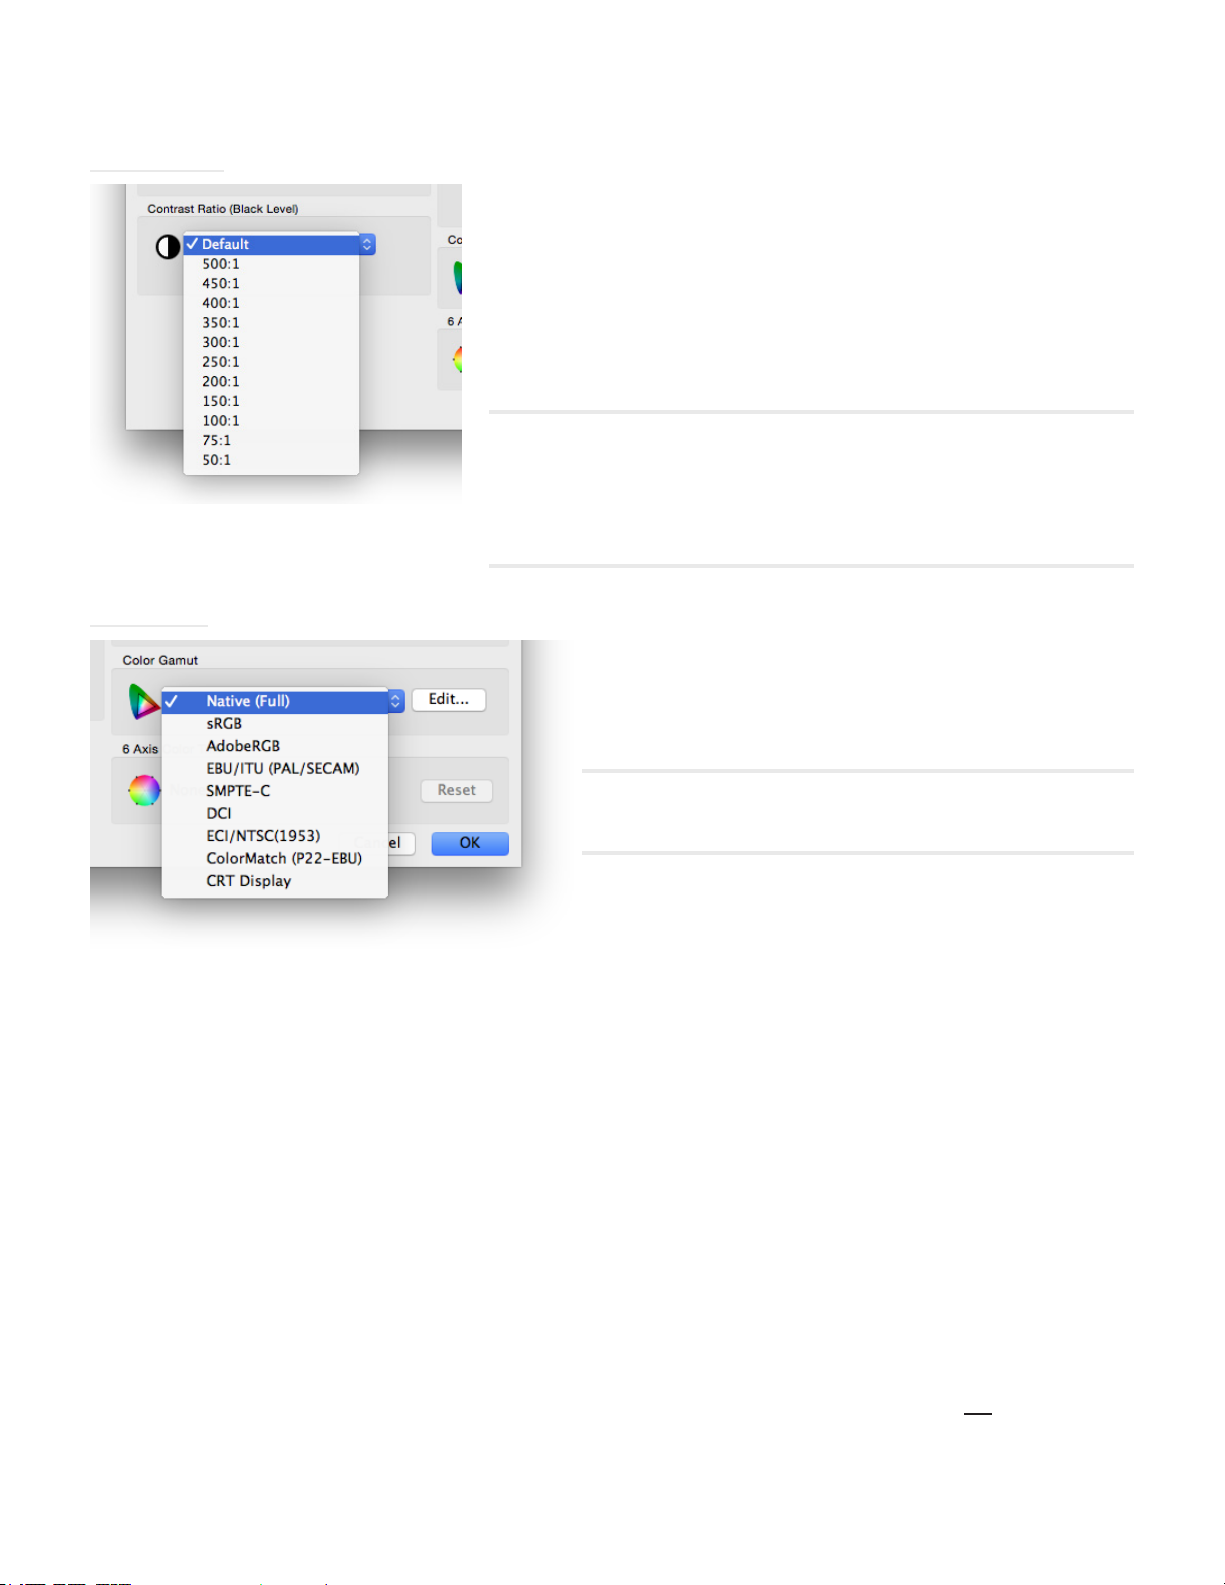
Contrast Ratio
Color Gamut
Contrast Ratio allows a particular contrast ratio to be used if necessary.
The contrast ratio is the ratio of white to black luminance.
Selecting Monitor Default will calibrate the display to the highest possible
contrast ratio, which is limited by the display technology, the selected
White Point, Intensity value, and other factors.
In some applications, such as simulating low contrast images such as
in newsprint, it is useful to have a lower contrast ratio than the display’s
native value. Contrast Ratios in the range of 50:1 to 500:1 can be selected.
Note: If the selected contrast ratio is higher than what the display is actually
capable of achieving, then the display will calibrate to the highest possible
contrast ratio. If a specic Contrast Ratio is selected, it is recommended that
the number of Calibration and Measurement Steps be set to at least 32 in the
Preferences dialog.
Color Gamut allows a particular color gamut to be selected if
the display supports color gamut adjustment. The color gamut
is the range of colors that can be displayed by the monitor, and
is dened and bounded by the red, green and blue primaries
which together make up all other colors.
Note: Depending on the display model, this control may be
disabled or limited to Native and sRGB.
For advanced models such as the MultiSync PA series, the
color gamut can be fully controlled and customized, and the
internal SpectraView engine will manipulate the primary colors
in order to display different colorspaces.
Several preset Color Gamuts are available in the list, or a custom gamut can be created. Click the Edit.. button to open
the Custom Color Gamut dialog.
By using the Native (Full) setting, the color gamut will be that of the LCD panel which will result in the widest possible
color gamut. Use this setting if you are using color managed applications such as Adobe Photoshop which use a Color
Management System to correctly convert colors for display.
Examples of typical usage scenarios when using a non-native color gamut can be benecial:
Video Editing: When editing video in an application that is not color managed. In this case the video is typically
encoded and intended to be viewed on a display that either has SMPTE-C or ITU-R BT.709 color primaries. Since the
video editing application is not color managed, no color conversion is made between the colorspace of the encoded
video, and that of the display. If the display was set to the Native color gamut, video images would appear oversaturated because they are being displayed directly on the wide color gamut display without any kind of compensation.
By setting the Color Gamut of the calibration Target to that of the encoded video, the display will handle the color
conversion that would have normally been done if the video was color managed, and will be displayed correctly
without being over-saturated.
Web Viewing: When viewing web pages using a web browser application and system that are not color managed,
images and graphics would otherwise appear over-saturated since they were probably intended to be viewed on a
typical sRGB gamut display. In this case using the sRGB Color Gamut as a Target will assign the display to handle
Page 18
17 | NEC SPECTRAVIEW II - USER’S GUIDE
the color conversion so it appears to be an sRGB colorspace display, even though it is actually a wide color gamut
LCD panel.
6 Axis Color Trim
The 6 Axis Color Trim function allows the screen colors to
be adjusted after calibration. Adjustments are made in the 6
Axis Color Trim dialog, available on the Tools menu. Any
adjustments to the settings for the current Target can be
reset by clicking the Reset button. See ”Using 6 Axis Color
Trim” on page 56 for more information on using this
feature.
Custom Color Gamut dialog
The Custom Color Gamut dialog is accessed by clicking the Edit.. button in the Color Gamut section of the Edit
Calibration Target dialog.
Note: This feature is only available on all MultiSync PA series models, P232W, P241W, P242W, X651UHD, X841UHD, and
X981UHD models. See the “Features by Model” on page 57 for all model specic functionality.
The color gamut of the monitor can be altered by changing the positions of the red, green and blue primary colors. This
can be done by either clicking and dragging the positioning controls on the CIE xy diagram, or by modifying the CIE xy
values for each primary color.
The native color gamut of the monitor is shown as a yellow triangle on the CIE xy chromaticity diagram in the dialog. This
triangle represents the limits for displayable colors, and colors outside it can not be represented correctly by the display.
The LCD panels used in the NEC MultiSync PA Series (except the PA231W, P232W, P241W, and P242W) are known
as wide color gamut panels, meaning they can display a much wider range of colors than typical monitors.
However, for some applications, it is not desirable to use such a wide color gamut, and in these cases, the Color Gamut
control can be used to manipulate the color gamut size and shape.
Page 19

18 | NEC SPECTRAVIEW II - USER’S GUIDE
In other instances it is desirable for the monitor to behave as though it has an even larger color gamut than it actually
has. In this case colors that lie outside the displayable range of the LCD panel will be automatically converted to
the nearest displayable color. An example is the DCI colorspace used for Digital Cinema applications. Parts of this
colorspace lie outside the range of displayable colors, but it is still advantageous to have the display appear as DCI color
gamut for all of the parts of the colorspace which lie within the displayable color range.
Note: When the Color Gamut setting is set to anything other than Native, the ICC/ColorSync proles generated by SpectraView
will automatically use the color primary chromaticity values calculated by the display’s internal SpectraView engine, rather
than measurements taken by the color sensor if the current Source of primary color chromaticities for ICC Prole setting
in the Preferences is set to Automatic (default). This feature allows the use of color gamuts that are larger than that which
the display actually has, and encodes the correct color primary chromaticity values within the ICC/ColorSync prole, even
though they may not all be actually be displayable and measurable.
If desired, this behavior can be changed by selecting Calibration Sensor in the Preferences, however note that if a color
gamut larger than that of the display is used, the color primary chromaticity values within the ICC/ColorSync prole will not
correctly represent the Target color gamut.
Page 20
19 | NEC SPECTRAVIEW II - USER’S GUIDE
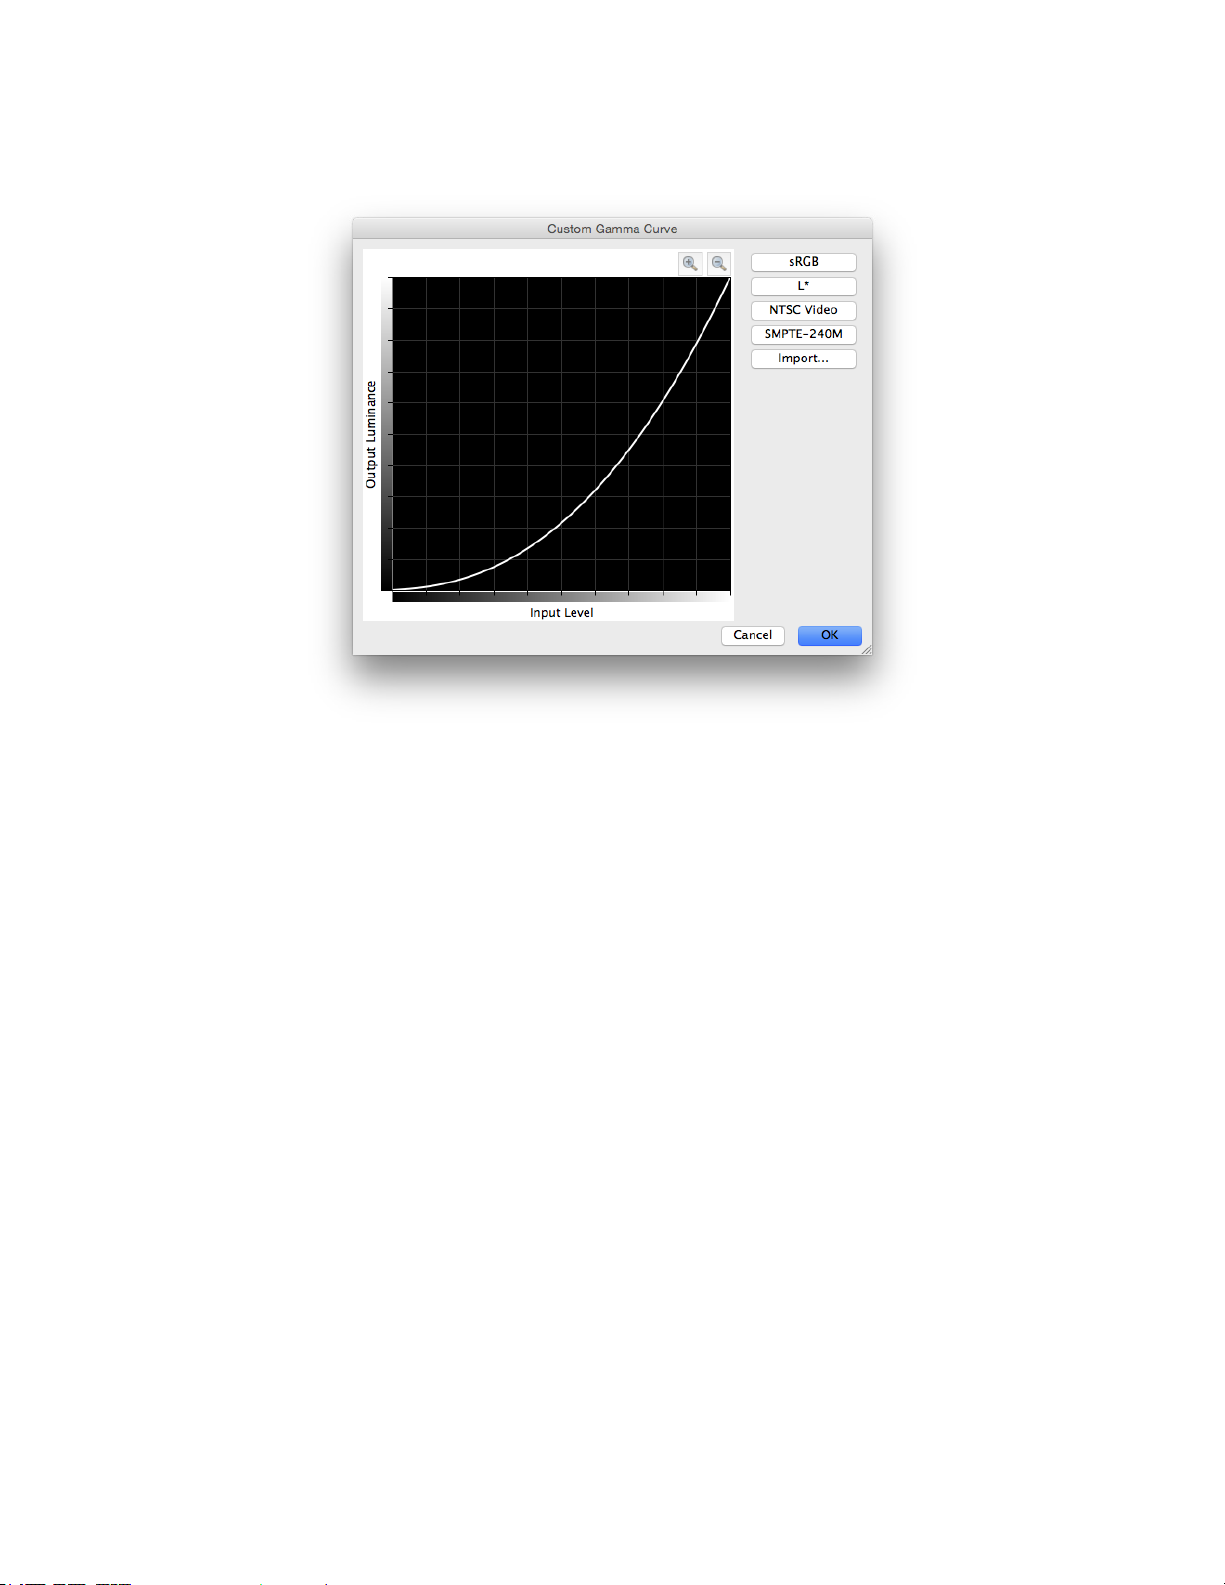
Custom Gamma Curve dialog
The Custom Gamma Curve dialog is accessed by clicking the Edit.. button in the Gamma Curve section of the Edit
Calibration Target dialog.
Advanced response curves can be selected from presets or custom curves can be created by importing a table of
values.
The following preset curves are available:
• sRGB - A curve based on the sRGB specication that includes the offset, transition and slope components.
• L* - A curve based on L* in the Lab specication. The L* curve is intended to be more perceptually uniform
than a simple gamma value curve.
• NTSC Video - A curve based on the SMPTE-170M specication for NTSC that includes the offset, transition
and slope components.
• SMPTE-240M - A curve based on the SMPTE-240M specication for 1125 line HD video that includes the
offset, transition and slope components.
Custom curves can be created and imported into SpectraView by creating a text le with a list of numerical values. The
text le must conform to the following specications:
• Must contain between 3 and 256 values.
• Each value must be on a separate line.
• The rst value must be 0.
• Values must be monotonically increasing.
When imported, the values will be automatically scaled and interpolated to create a Target curve.
Page 21
20 | NEC SPECTRAVIEW II - USER’S GUIDE
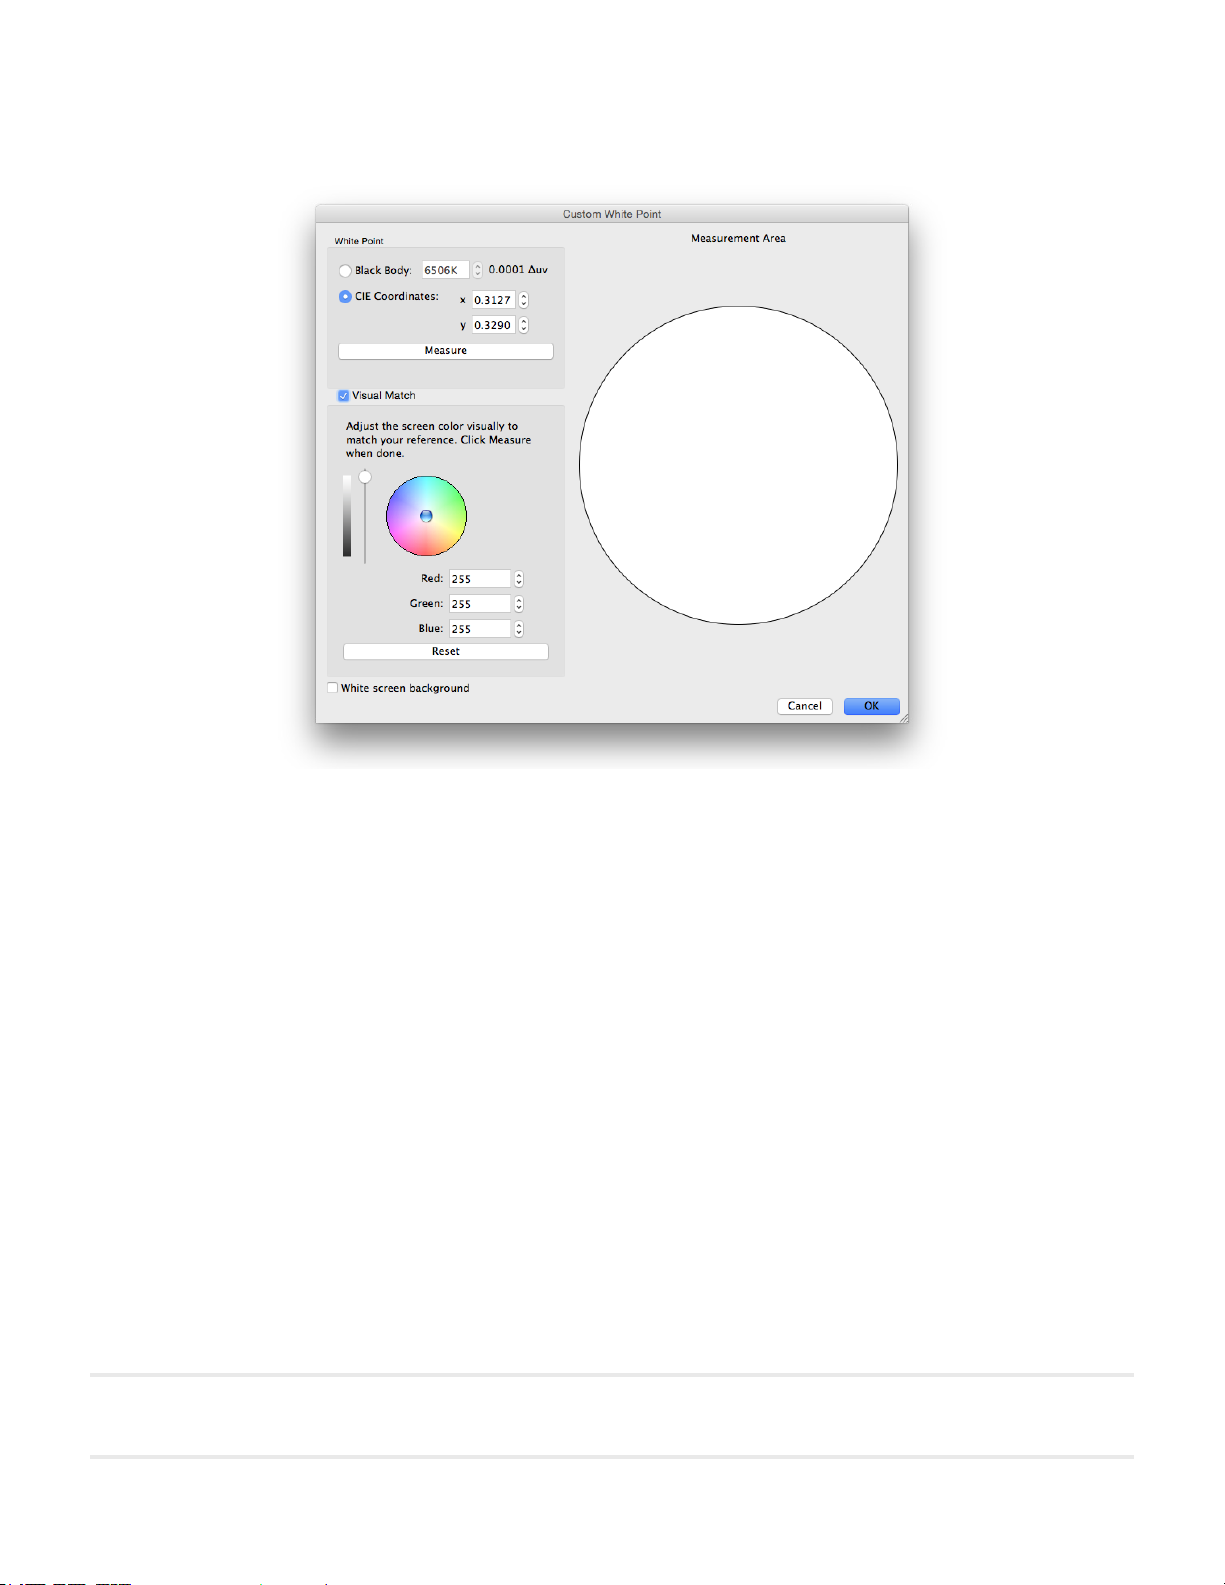
Custom White Point dialog
The Custom White Point dialog is accessed by clicking the Edit.. button in the White Point section of the Edit
Calibration Target dialog.
A custom White Point can be created by either specifying it as a Black Body radiator temperature in Kelvin, as CIE (xy
chromaticity) Coordinates, or by interactive visual adjustment and measurement.
Values between 2500K and 10000K may be entered in the Black Body K eld. The corresponding CIE xy coordinates
are automatically calculated and displayed for reference.
CIE xy chromaticity coordinates can be entered by selecting the CIE Coordinates radio button and entering the x and
y values. The corresponding correlated black body radiator temperature and Δuv (Delta-uv) values are automatically
calculated and displayed for reference. The Delta-uv value indicates how far the xy coordinates entered are from the
black body radiator locus.
A custom White Point may be measured using the calibration sensor, and automatically entered in the CIE xy chromaticity
coordinate elds by clicking the Measure button. This is useful for “cloning” the white point of another monitor.
The color sensor can be placed over the white circle on the right of the dialog in order to take a measurement of the
white point by clicking the Measure button. The circle can also be used to visually compare the white point to another
reference such as a lightbox. If a larger area of white reference is needed, selecting White Screen Background will ll
the entire screen background with white.
The luminance and color of the display can be interactively adjusted to visually match a reference if necessary. To
interactively adjust the color of the display, click and drag within the color circle or use the arrow keys. Use the vertical
slider control to adjust the Intensity. Specic Red, Green and Blue values can also be entered.
Once a visual match is found, the adjusted white point must be measured by clicking the Measure button and measuring
the white circle with the color sensor. This will update the Target white point values with the new White Point values.
Note: Due to the technology limitations of the color sensor compared to the human eye, for some applications, it is sometimes
better to visually match a white point using this interactive method, and then measure it using the color sensor.
Page 22
21 | NEC SPECTRAVIEW II - USER’S GUIDE
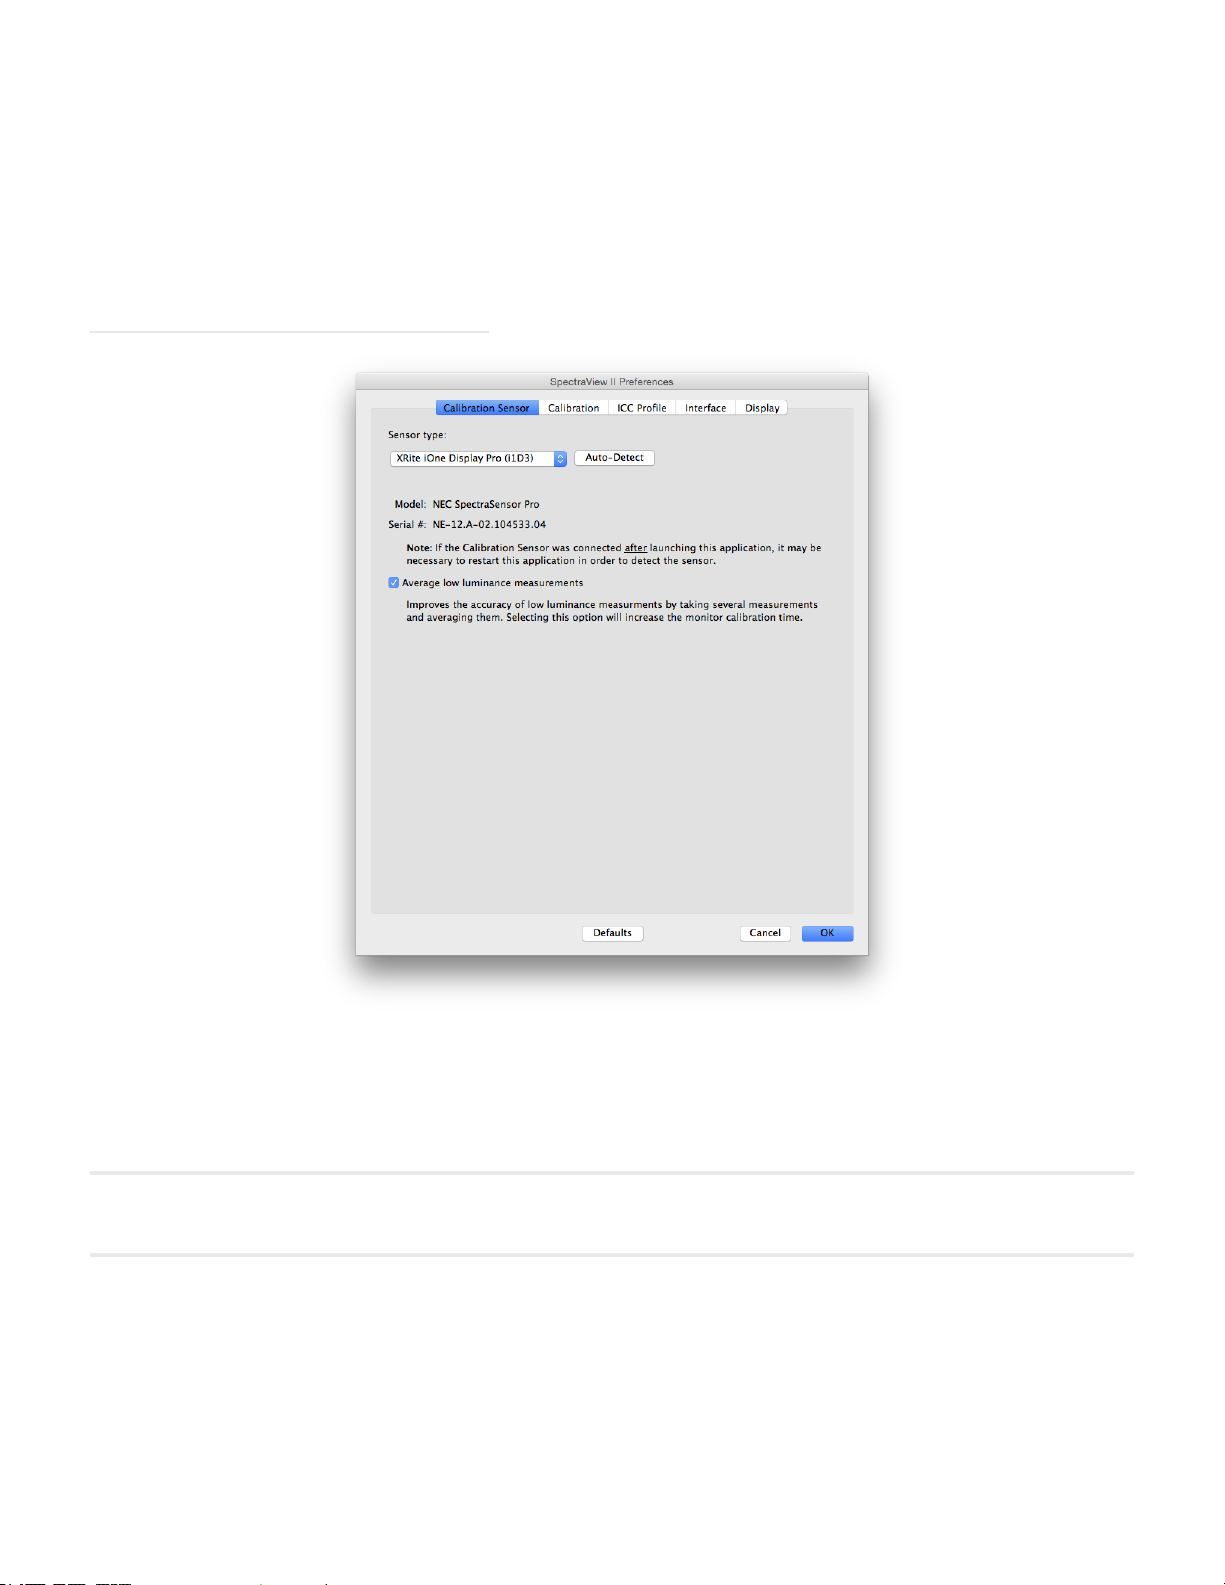
Preferences dialog
The Preferences dialog is accessed from the Edit menu on Windows and Linux, and on the SpectraView II application
menu on Mac OS. The selections are divided into 5 different tabs.
The default settings for the entire Preferences can be restored by clicking the Defaults button.
Preferences dialog - Calibration Sensor tab
Sensor Type - selects the model of calibration sensor to use, and shows the current model being used.
Auto-Detect - attempts to detect the selected model of calibration sensor. SpectraView will automatically detect the
calibration sensor when the application is started, however if the sensor was not connected at that time, or if it was being
used by another application, then it may be necessary to re-detect it.
Note: If the sensor was not attached when SpectraView was launched, then it may be necessary to exit the SpectraView
application and launch it again.
COM port - selects the port used to communicate with the sensor (Photo Research Spectroradiometers only).
Model and Serial # - shows the model and serial number of the currently selected calibration sensor device.
Average low light measurements - will average several color sensor measurements to improve the accuracy of low
luminance measurements (below 10 cd/m²). Selecting this option will increase the monitor calibration time.
Page 23
22 | NEC SPECTRAVIEW II - USER’S GUIDE
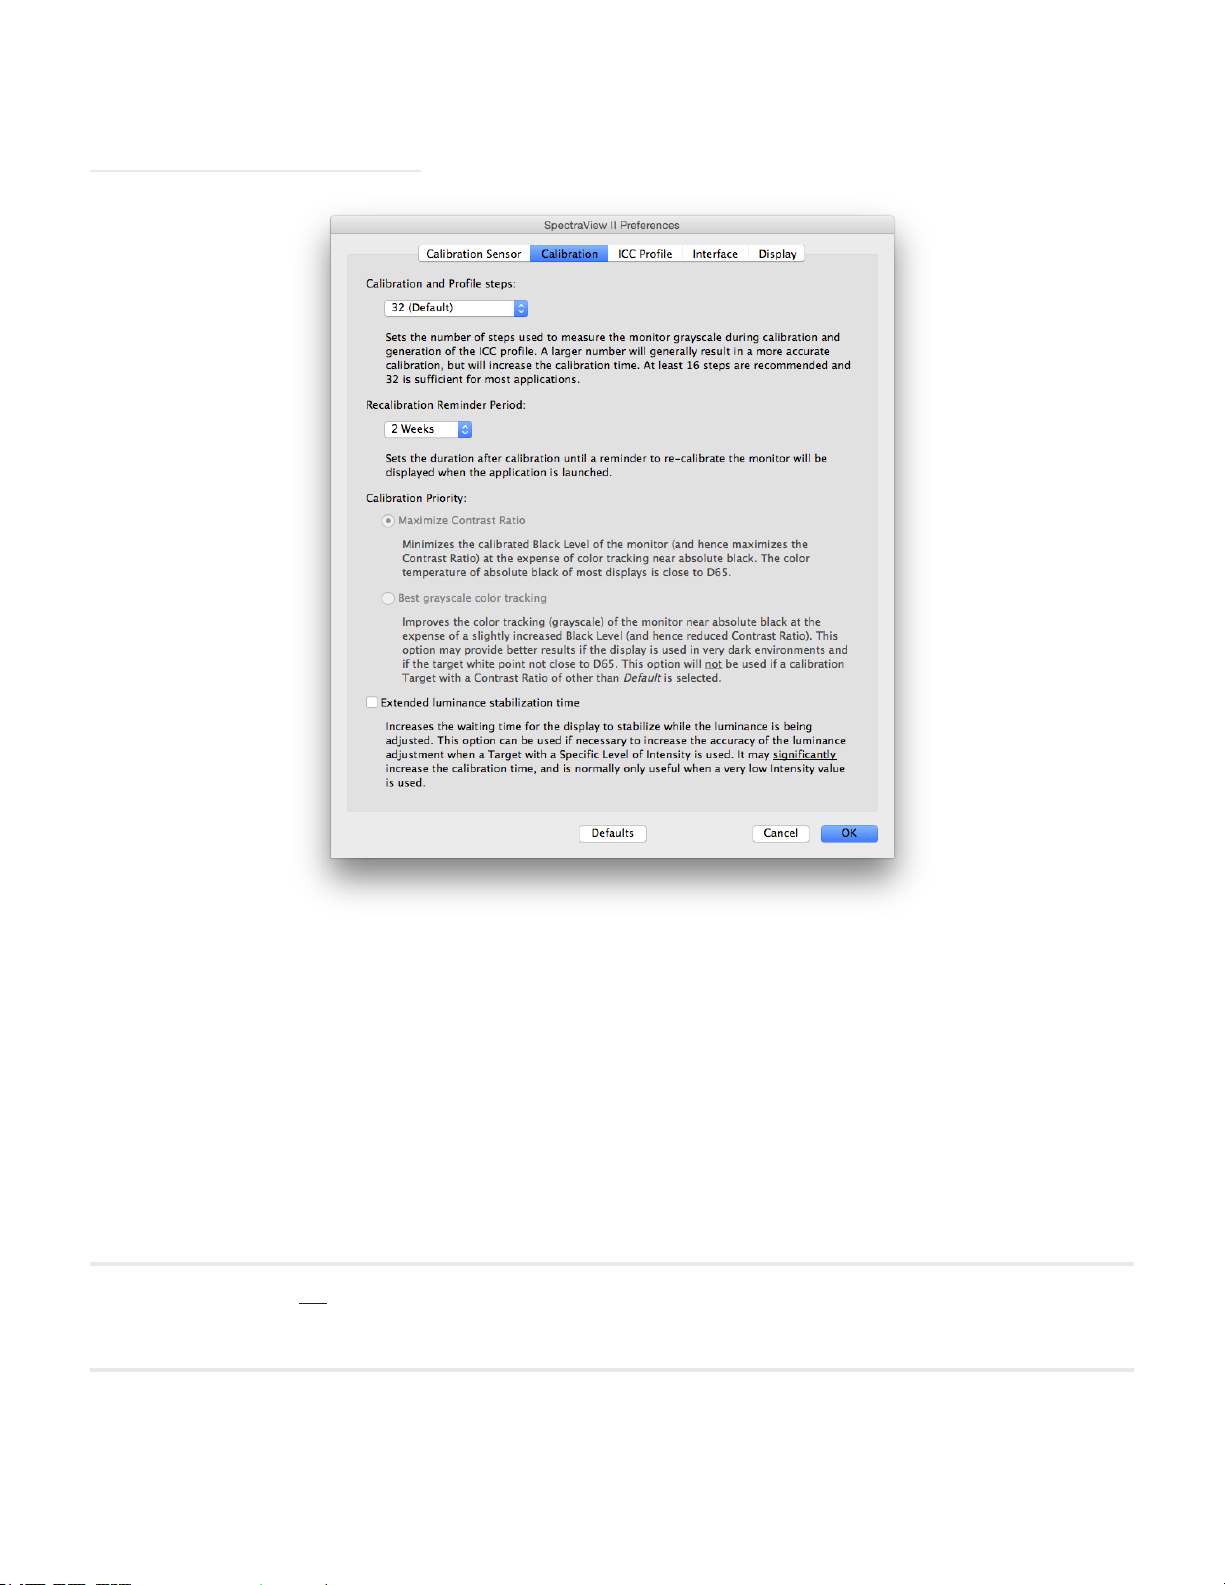
Preferences dialog - Calibration tab
Calibration and Prole Steps - selects the number of measurement steps to take when calibrating and proling the
display. A larger number of steps will generally result in a more accurate grayscale calibration, but will increase the
calibration time. 32 steps is the recommended setting for most applications.
Recalibration Reminder Period - sets the interval after the display is calibrated until a calibration reminder message
is displayed. The default value is 2 weeks. Select Never if you do not want to be reminded to recalibrate the display.
Calibration Priority - selects the algorithm used to calculate the display’s response curve. Options are:
• Maximize Contrast Ratio - will maximize the display’s contrast ratio by making black as dark as possible at
the expense of grayscale color tracking near black.
• Best grayscale color tracking - will generate the best grayscale color tracking in the black areas, at the
expense of a slightly reduced contrast ratio. This option will not be used if a calibration Target with a Contrast
Ratio of other than Default is used.
Note: This setting does not have any impact on the calibration of the MultiSync PA series models, P232W, P241W, P242W,
EA244UHD, EA304WMi, X651UHD, X841UHD, or X981UHD model displays and will be disabled if no relevant displays are
connected.
Extended luminance stabilization time - increases the waiting time for the display to stabilize while the luminance
is being adjusted. This option can be used if necessary to increase the accuracy of the luminance adjustment when a
Target with a Specic Level of Intensity is being used. It may signicantly increase the calibration time, and is normally
only useful when a very low intensity value is used. Try selecting this option if the calibrated Intensity is signicantly
Page 24
23 | NEC SPECTRAVIEW II - USER’S GUIDE
different than the Target value due to the display stabilizing during the calibration and proling steps.
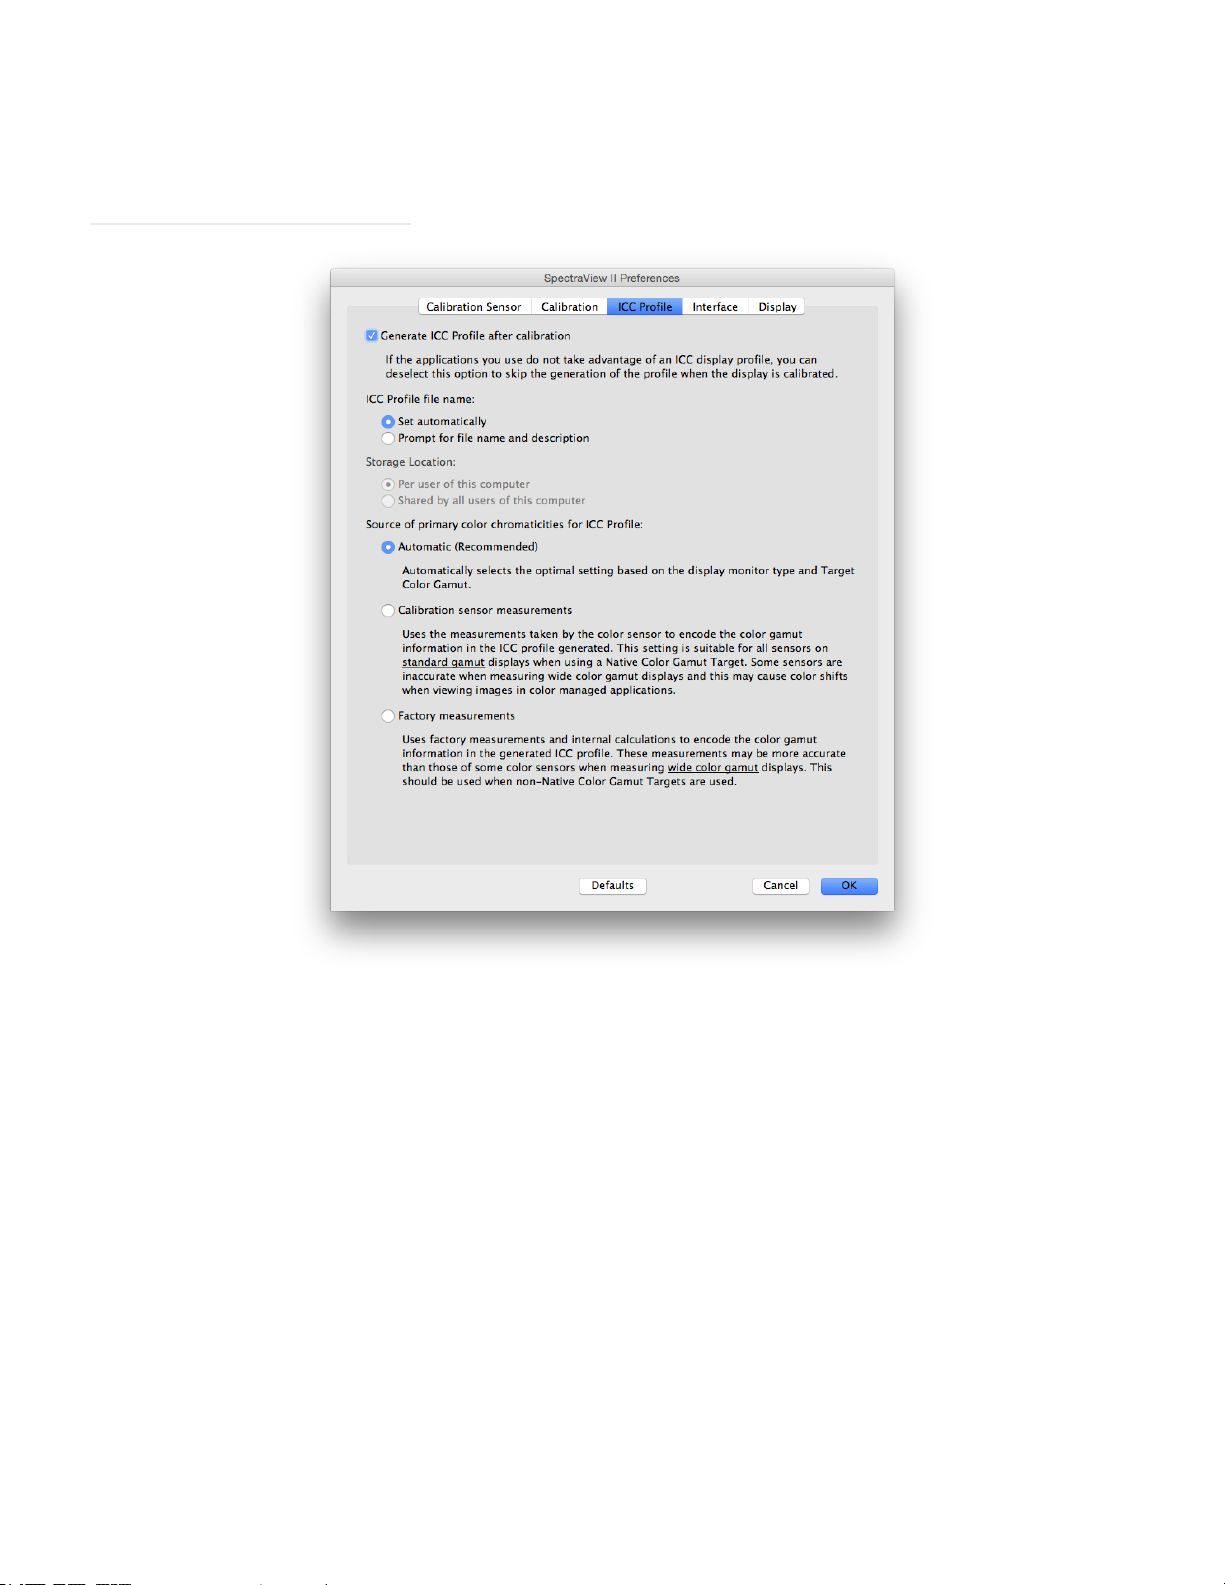
Preferences dialog - ICC Prole tab
Generate ICC Prole after calibration - selecting this will automatically generate an ICC/ColorSync monitor prole
after the display is calibrated. This option should be checked for most applications.
Set as Windows Color Management System Monitor Prole (Windows version only) - selecting this will automatically
associate the generated ICC monitor prole with the Windows Color Management System. This option should be
checked for most applications.
ICC Prole le name - selects how the ICC Prole le is named when an ICC Prole is generated, for example after
calibration.
• Set Automatically - the prole will be automatically given a name and description. This is the default setting
as it is not normally necessary to manually name the prole le.
• Prompt for le name and description - a prompt will appear and the le name and description can be
entered manually.
Storage Location (Mac OS 10.6 and earlier only. Disabled in OS 10.7 and later, and defaults to Per User of this
computer due to system folder permissions.) - species where the generated ICC/ColorSync proles are stored.
Options are:
• Per User of this computer - the prole is stored in the User’s prole folder. Proles in this folder are typically
not accessible from other user accounts.
Page 25

24 | NEC SPECTRAVIEW II - USER’S GUIDE
• Shared by all users of this computer - the prole is stored in the shared prole folder that is accessible by
all user accounts.
Source of primary color chromaticities for ICC Prole - selects what values are used for the Primary Color
Chromaticities that are encoded in the ICC/ColorSync monitor prole. The values are used to describe the color gamut
of the display.
Options are:
• Automatic (Recommended) - the optimal setting based on the display monitor type and Target Color Gamut
selected is automatically used. It is recommended to use this setting.
• Calibration Sensor Measurements - uses the values measured by the calibration sensor. For normal color
gamut displays this is the recommended option when using a Native Color Gamut Target since the calibration
sensor can accurately measure these primary colors. For wide color gamut displays some colorimeter based
calibration sensors may not be able to accurately measure the primary colors and it is recommended to use the
Factory Measurements option.
When using a Target Color Gamut other than Native, it is recommended to use the Factory Measurements option
since the SpectraView Engine will calculate the correct primary color chromaticities, even if they lie outside of
the native color gamut of the display. Otherwise the actual measured values will be used, which may result in
an incorrect color gamut being encoded in the ICC prole since the effective color gamut of the display extends
outside the measurable color gamut.
• Factory Measurements - uses the measurements taken during production of the display monitor and data
calculated by the display’s internal SpectraView engine to encode the color gamut information in the generated
ICC Prole. These measurements may be more accurate than those of some color sensors when measuring
wide gamut displays. See “Supported Display Monitors” on page 7 for a listing of display gamut types. This
setting is recommended when using a Target Color Gamut other than Native.
Page 26
25 | NEC SPECTRAVIEW II - USER’S GUIDE
Preferences dialog - Interface tab
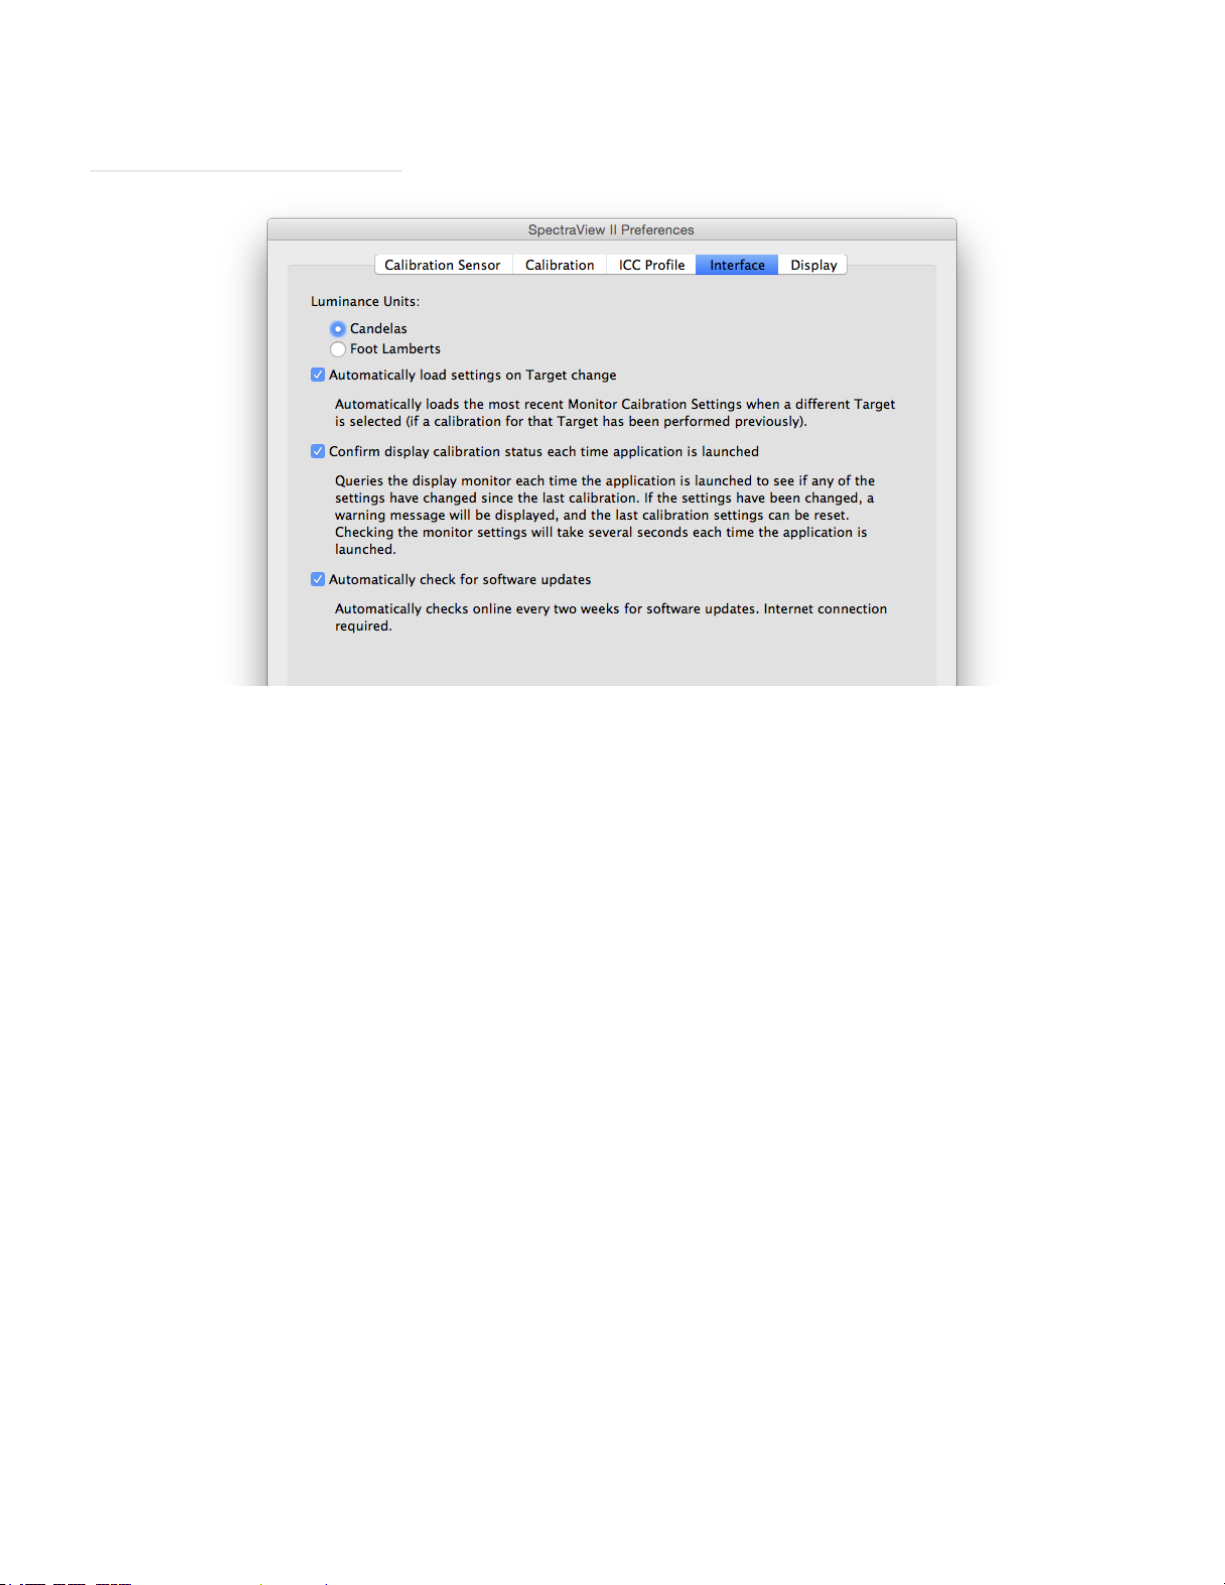
Luminance Units - selects the units that luminance values are displayed in. Options are:
• Candelas (cd/m²)
• Foot Lamberts (fL)
Automatically load settings on Target change - automatically loads the most recent Monitor Calibration Settings
when a different Target is selected, and will generate a new corresponding ICC Prole. Using this option allows different
Targets to be selected and the monitor will be automatically congured.
Conrm display calibration status each time application is launched - selects if the current monitor settings should
be checked and compared with the settings for the last calibration when SpectraView is launched. If the monitor settings
are different a warning message will be displayed, and the last calibration settings can be reset. This checking operation
will take several seconds each time SpectraView is launched.
Delay loading of SpectraView II Gamma loader on Windows Startup (Windows version only) - selecting this will
delay the loading of the SpectraView II Gamma Loader when Windows starts by 60 seconds in order to allow other
applications and utilities to initialize rst. Select this option if you are experiencing monitor detection or video blanking
issues only when the SpectraView II Gamma Loader runs as Windows starts.
Automatically check for software updates - when selected the software will automatically check for any software
updates every two weeks when the software is launched. An Internet connection is required.
User Interface Language - selects the language the application’s user interface. Auto (System Language) will use
the current system language setting if the language is available. Supported languages are: English, German, French,
Spanish, Italian, Russian, and Chinese.
Page 27
26 | NEC SPECTRAVIEW II - USER’S GUIDE
Preferences dialog - Display tab
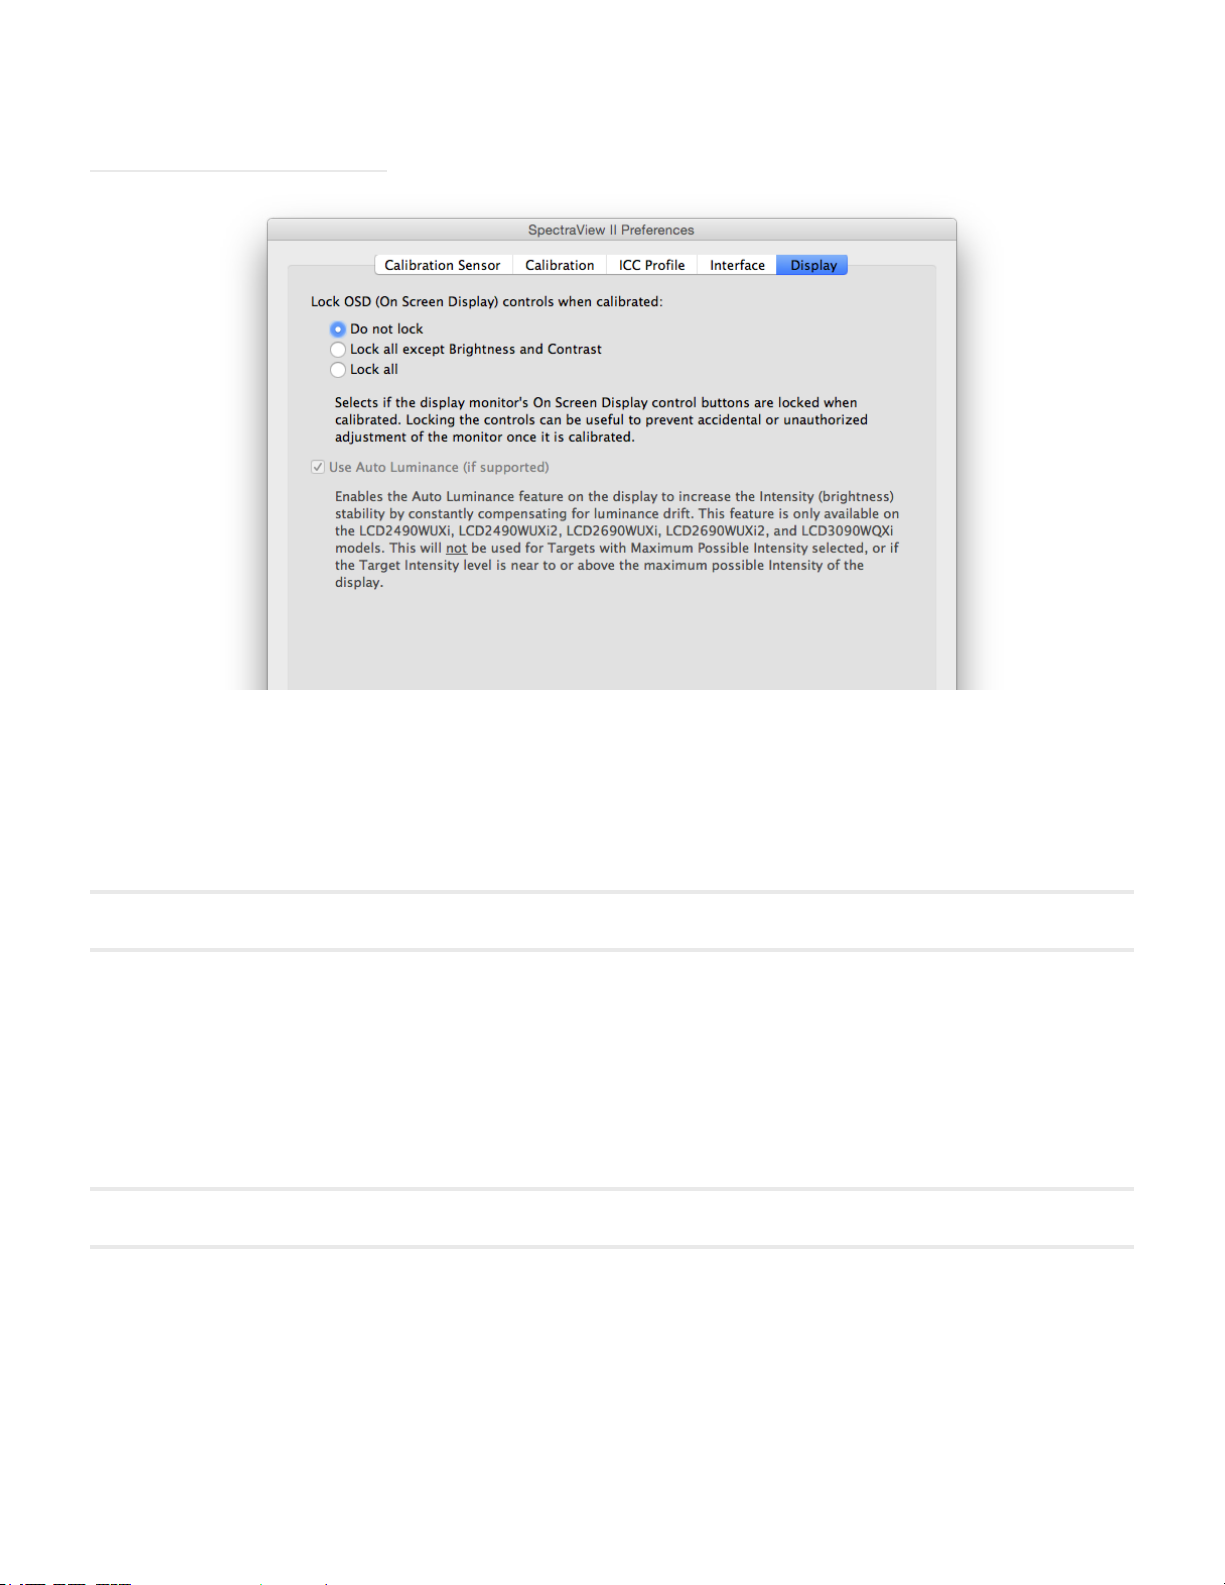
Lock OSD (On Screen Display) controls when calibrated - selects if the monitor’s On Screen Display control buttons
are locked when the monitor is calibrated. Locking the controls can be useful to prevent accidental or unauthorized
adjustment of the monitor once it is calibrated. Options are:
• Don’t lock
• Lock all except Bright and Contrast
• Lock all
Note: The controls will be unlocked if the calibration is turned o in the main window.
Use Auto Luminance (if supported) - enables the Auto Luminance sensor circuit inside the display monitor to increase
the Intensity (brightness) stability as the display ages and warms up. This feature will not be used for Targets with
“Maximum Possible” Intensity selected, or if the Target Intensity falls outside the range that the Auto Luminance circuit
is capable of controlling. This feature is only available on the following models: LCD2490WUXi, LCD2490WUXi2,
LCD2690WUXi, LCD2690WUXi2, and LCD3090WQXi.
The MultiSync PA Series of displays (except the PA231W) automatically always use Auto Luminance to maintain the
stability of the monitor. The PA231W does not support Auto Luminance.
See the “Features by Model” on page 57 for all model specic functionality.
Note: This setting will be disabled if no relevant displays are connected.
Page 28

27 | NEC SPECTRAVIEW II - USER’S GUIDE
Information window
The Information window is accessed from the Tools menu. It will also be automatically displayed after a display
calibration is completed.
Note: The graphs shown in the Information window can be panned, zoomed and scaled. Click and drag to select a zoom area.
Use the arrow keys to pan. Size the dialog to scale the graphs.
The graphs and information can also be copied to the clipboard and
pasted into other document and image editing applications by rightclicking and selecting Copy. This is useful for sharing and documenting
various results.
Information window - Summary tab
White Point
The Target values are the currently selected Target’s White Point. The Calibrated values show the actual measured
White Point after the display has been calibrated.
The Delta E value is the calculated color difference between the Target and Calibrated White Point using both the
color and luminance. This is calculated using the Delta E CIE 94 color formula. A Delta E value of 1 is considered just
perceptible to 50% of users. Values under 3 are generally considered excellent for display calibration.
Page 29

28 | NEC SPECTRAVIEW II - USER’S GUIDE
Primary Colors
Red, Green and Blue CIE x,y - shows the measured color coordinates of the display’s primary colors. These values
represent the color gamut of the display. The Source of the color measurements indicates if the Red, Green and
Blue values came from either the Calibration Sensor or Factory Measurements, and will depend on the Primary
Colors Chromaticity Source setting in the Preferences dialog.
Display Luminance
The Target values show the currently selected Target’s Black Level and Intensity.
The Calibrated values show the actual measured Black Level and Intensity after the display has been calibrated.
Contrast Ratio
The Contrast Ratio is the ratio of the Intensity to the Black Level. The Target value shows the currently selected
Target’s Contrast Ratio. For LCD display monitors, this is set to “N/A” since the monitor’s Black Level is xed.
The Calibrated values show the actual contrast ratio calculated using the actual measured Black Level and
Intensity after the display has been calibrated.
Gamma Curve
Target shows the type or gamma value of the Target Gamma Curve.
Calibration Steps - shows the number of calibration steps used to measure the grayscale when the calibration was
performed.
ICC Prole
File Name shows the name of the ICC/ColorSync prole, if one was generated after the display was calibrated.
Description shows the description tag text of the ICC/ColorSync prole, if one was generated after the display was
calibrated.
Display Monitor
Model shows the model name of the currently selected display.
Serial # - shows the serial number of the currently selected display.
Firmware - shows the internal rmware version of the currently selected display.
Current Usage shows the total number of hours that the currently selected display has been in use.
Last Calibration shows the number of hours that the currently selected display has been used since it was last
calibrated.
Calibration Date shows the date and time that the monitor was last calibrated to the currently selected target.
6 Axis Color Trim
Shows the 6 axis color trim adjustments, if any, that are applied to the currently selected Target. See the “Using 6
Axis Color Trim” on page 56 for more information on using this feature.
Calibration Sensor
Model shows the model name of the calibration sensor used when the calibration was performed.
Serial # - shows the serial number of the calibration sensor used when the calibration was performed.
Page 30
29 | NEC SPECTRAVIEW II - USER’S GUIDE
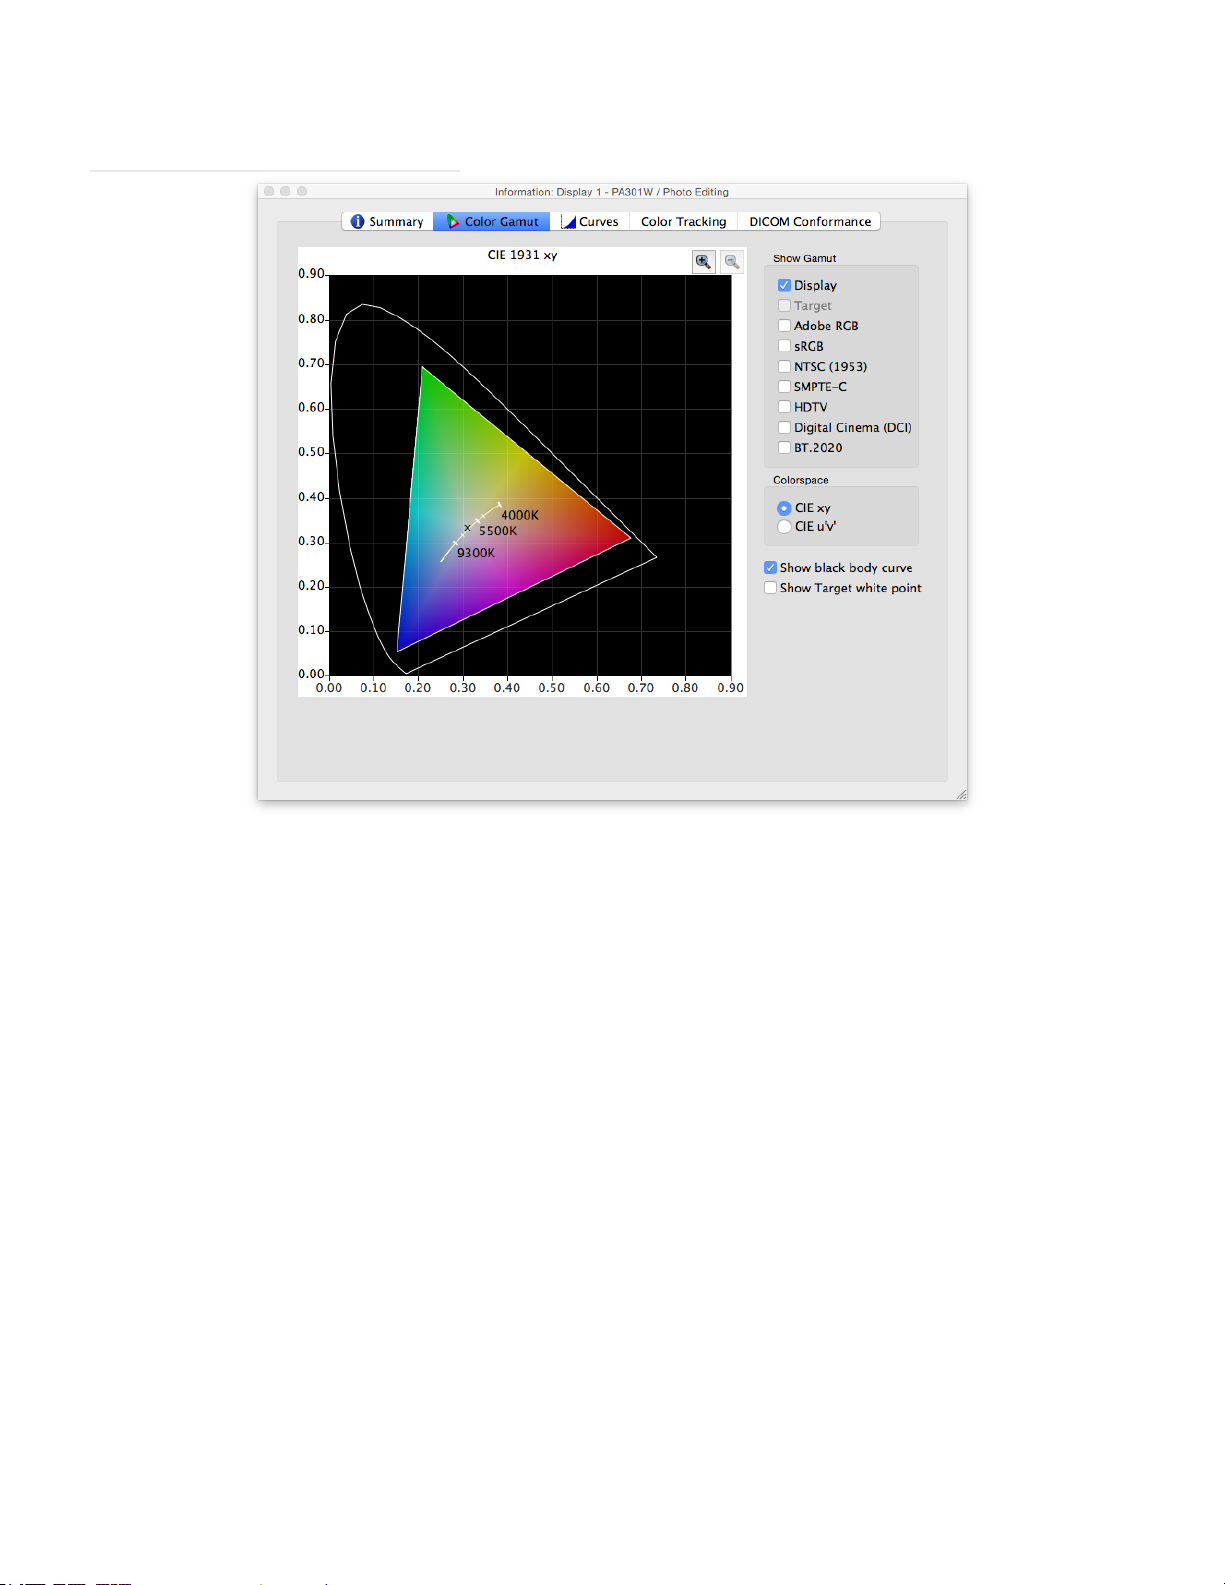
Information window - Color Gamut tab
The Color Gamut tab graphically illustrates the color gamut of the display for comparison purposes as a 2D representation
of the 3D color gamut volume. The display’s color gamut can be compared to the color gamut of several popular color
spaces.
The source of the color measurements for the display’s color gamut will depend on the Primary Colors Chromaticity
Source setting in the Preferences dialog.
If a Target Color Gamut other than Native is being used, then selecting Target will show the Target color gamut. This
will be disabled if the Native color gamut is used since it will depend on each individual display.
Selecting a reference color space will overlay the color gamut onto the display’s.
Colorspace
• CIE xy - shows the gamut projected in CIE xy colorspace. This is probably more familiar to most users, however
it does not allow color differences to be easily judged because this projection overemphasizes differences in green
colors, and underemphasizes differences in blue colors.
• CIE u’v’ - shows the gamut projected in CIE u’v’ colorspace. This is projection is an improvement over CIE xy
in that different colors are more equally represented in scale.
Show black body curve - shows the black body locus as yellow curve.
Show Target white point - shows the White Point of the currently selected target as a green X.
Page 31

30 | NEC SPECTRAVIEW II - USER’S GUIDE
Information window - Curves tab
The Curves tab graphically illustrates the various tone response and correction curves measured and generated during
the calibration process.
Show Curve Type
Target - illustrates the target tonal response curve of the currently selected Target. This display will be calibrated to
match this curve. This curve will be disabled and not shown if the Target Gamma is set to Monitor Native Gamma.
Calibrated - illustrates the actual measured tonal response curves of the calibrated display. These curves are
generated from measurements taken while generating an ICC/ColorSync monitor prole of the display. If no ICC/
ColorSync prole was generated after the monitor was calibrated, then this checkbox will be disabled.
Uncalibrated - illustrates the actual measured tonal response curves of the uncalibrated display, without any
corrections applied to the Look Up Tables. These curves are generated from measurements taken during the
calibration process.
Correction - illustrates the correction that is applied to the display’s Look Up Tables in order to achieve the selected
Target tonal response curve characteristics.
Note: The Uncalibrated and Correction curves are not available with the MultiSync PA series display models, P232W, P241W,
P242W, EA244UHD, EA304WMi, X651UHD, X841UHD, or X981UHD models because they are calculated within the display
automatically. See the “Features by Model” on page 57 for all model specic functionality.
Show Curve Color
The All, Red, Green and Blue buttons select which curve colors are displayed on the graph.
Page 32

31 | NEC SPECTRAVIEW II - USER’S GUIDE
Information window - Color Tracking tab
The Color Tracking tab shows graphically how well the grayscale (colors from black to white) of the display is conforming
to the currently selected Target. Ideally all points along a grayscale measured on the display should have the same
white point (chromaticity) and should follow the luminance curve of the Target.
Deviations from this ideal can result in grayscale color tracking errors which can be seen as shifts in chromaticity along
the grayscale, and/or shifts in luminance. The Delta E values are a mathematical measure of these deviations. A Delta
E value of 1 is considered to be just perceptible to 50% of users. Values under 3 are generally considered excellent for
display calibration. Values above 3 will be highlighted in yellow or red and may indicate a problem with the display’s
calibration.
The graph shows the displays actual measured grayscale color tracking using measurements taken while generating
an ICC/ColorSync monitor prole of the display.
The horizontal axis shows the Delta E values for each measured point on the grayscale. The vertical axis shows the
luminance for each of the measured points on the grayscale.
Note: Since the Delta E values are calculated based on the currently selected Target, if a Target using Intensity: Specic Level is
being used, and the display was not able to actually achieve the Target’s specied Intensity value, then this will result in large
Delta E values.
Delta E
Average - shows the average of all the calculated Delta E values.
Maximum - shows the maximum of all the calculated Delta E values.
Include Dark Values - selects if the graph and average Delta E value calculation include measurements taken near
absolute black (having a luminance of less than 5 cd/m²) on the display. Typically these values are not included
Page 33

32 | NEC SPECTRAVIEW II - USER’S GUIDE
since the low luminance can cause measurement errors that may cause articially high Delta E values to be shown.
Selecting this option will cause all measured values to be included.
Show Average - shows the average Delta E value as a vertical line on the graph display.
Information window - DICOM Conformance tab
The DICOM Conformance tab shows graphically and numerically how well the calibrated display conforms to the ideal
DICOM (Digital Imaging and Communications in Medicine) response when a DICOM Target curve of is used.
The aim of the DICOM response is to have a perceptually linear luminance response. Each step along the display’s
grayscale should have an equally perceptive increase in luminance. The actual shape of the DICOM response curve
is based on the display’s measured Black Level and Intensity, since the DICOM response considers the human eye’s
non-linear response to light.
In DICOM terminology, the grayscale level is called the Digital Driving Level and represents the digital output video
level, from 0 to 255. Each step in Digital Driving Level, should result in an equal step in perceived luminance. In DICOM
terminology, a change in luminance that is just perceptible, is considered to be 1 JND (Just Noticeable Difference).
So, ideally, each step in Digital Driving Level should result in an equal change in Just Noticeable Difference value. The
JND values are calculated using a complex formula from two measured luminance values.
The display calibration results can be viewed in two different types of graphs, JND per DDL, and Contrast Response,
by selecting the corresponding graph type.
JND per DDL (Just Noticeable Difference per Digital Driving Level)
Average - shows the average JND per DDL value. The actual value will depend on the Black Level and Intensity of
the display.
Std Dev - shows the standard deviation of all of the calculated JND per DDL values.
Page 34

33 | NEC SPECTRAVIEW II - USER’S GUIDE
Show Average - shows the average JND per DDL value as a horizontal line on the graph.
Show Linear Fit - shows the best t line between all the calculated JND per DDL values as a line on the graph.
Ideally this line should be horizontal, indicating equal steps in JDN per DDL along the display’s grayscale.
Contrast Response
Max error - shows the highest percentage error deviation from the Barten Model curve, as well as the JND Index of
the highest error point.
Show Barten Model - shows the Barten Model curve on the graph. The Barten Model curve is calculated based on
the measured Intensity (white luminance) and black level values.
Show 10% Limits - shows two lines representing 10% error deviations from the Barten Model curve. Medical
displays used for Primary Class image viewing should be within the 10% deviation curves.
Show 20% Limits - shows two lines representing 20% error deviations from the Barten Model curve. Medical
displays used for Secondary Class image viewing should be within the 20% deviation curves.
Page 35

34 | NEC SPECTRAVIEW II - USER’S GUIDE
Colorimeter window
The Colorimeter tool allows measurements of colors displayed on the screen to be taken with the calibration sensor,
and is accessed from the Tools menu. The measurement results are displayed in a variety of useful formats.
To take color measurements using the Colorimeter, place the calibration sensor to the screen so that it is centered on
the large white area in the Colorimeter window.
Measure:
• Single - clicking this button will take a single color measurement and display the results.
• Continuous - selecting this will take repeated measurements automatically and display the results.
The CIE XYZ and xyY elds show the calibration sensor’s measurements translated into each of the respective color
spaces. These color spaces are device independent color spaces, which means that they are not relative to any specic
device, as opposed to dependent color spaces, such as RGB, which is relative to the device that is displaying the color.
The Color Temp eld shows the corresponding correlated black body radiator temperature of the measurement in
Kelvin. The Δuv (Delta-uv) value indicates how far the measurement is from the black body radiator locus. The Kelvin
value is only meaningful for colors that are near the black body radiator locus, such as most shades of white.
Sample Color: By selecting this group a custom color can be shown in the measurement area. To interactively adjust
the color, click and drag within the color circle or use the arrow keys. Use the vertical slider control to adjust the Intensity.
Specic Red, Green and Blue values can also be entered.
Page 36

35 | NEC SPECTRAVIEW II - USER’S GUIDE
Ambient Light Measurement window
The Ambient Light Measurement tool allows measurements to be taken of the ambient light of the viewing environment
around the display monitor. This feature is only available when using a supported color sensor.
Currently supported color sensors are:
• X-Rite/GretagMacbeth Eye-One Display V2
• X-Rite/GretagMacbeth Eye-One Pro
• X-Rite iOne Pro2
• X-Rite iOneDisplay Pro / NEC SpectraSensor Pro / NEC MDSVSENSOR3
• X-Rite ColorMunki
• Datacolor Spyder3 and Spyder4
• BasICColor Discus
These measurements are useful in determining the optimal viewing conditions for the area surrounding the display
monitor. Ideally the ambient light level and color temperature should not inuence the viewing of images on the display
screen.
Follow the instructions on-screen for conguring the color sensor for Ambient Light measurement mode. Measurements
are taken every few seconds and updated on the display as both a Luminance value and approximate color temperature
value.
Note: The Datacolor Spyder3 and Spyder4 ambient light sensor measures luminance only and not color temperature.
Page 37

36 | NEC SPECTRAVIEW II - USER’S GUIDE
Monitor Settings window
The Monitor Settings window provides access to some of the display monitor control settings, if supported by the
display.
The Power LED Indicator controls can be used to change the color of the LED, and also adjust the brightness. The
brightness can be reduced as necessary in dim environments if the LED is distracting.
The ColorComp control adjusts the screen uniformity correction applied to the display in order to improve the screen
luminance and color uniformity. This compensation is done at the expense of some screen brightness. A higher level of
correction will give a more uniform screen, but the maximum Intensity (brightness) that can be achieved will be lower.
It is recommended to recalibrate if the ColorComp setting is changed.
Page 38

37 | NEC SPECTRAVIEW II - USER’S GUIDE
Update Internal Calibration window
Note: This feature is only available on the PA242W, PA272W, PA302W, PA322UHD, X651UHD, X841UHD, and X981UHD models.
See the “Features by Model” on page 57 for all model specic functionality.
The Update Internal Calibration feature sets the internal reference calibration of the display by using measurements
from the currently connected calibration sensor.
The display has an internal reference calibration that was originally set during production using lab-grade measurement
equipment. This reference calibration is used by the display’s internal SpectraView color engine to provide the advanced
color control functionality, such as the ability to set a specic brightness/Intensity value, and set the white point and color
gamut settings in CIE xy values, by using either the OSD (On Screen Display), or the MultiProler application (see page
55 for more information on MultiProler). The reference calibration is accurately tracked automatically as the display
ages.
By performing this update operation, the internal reference calibration information used to calculate all of the picture
mode settings in the display will be updated. The color related settings on the OSD and in the MultiProler application
will closely match the measurements from the calibration sensor. This allows the OSD controls and MultiProler to be
used to set different picture mode settings with almost the same accuracy (relative to the calibration sensor being used)
as calibrating with SpectraView, but without the need to use a calibration sensor after the update has been performed.
Update - will start the internal reference calibration process of the display by taking measurements on the
screen using the currently connected calibration sensor.
Reset - will restore the original production reference calibration settings.
Note:
• Because changing the internal reference calibration changes the internal SpectraView color engine’s
reference settings, any Targets calibrated in SpectraView should be recalibrated after performing either an
Update or Reset operation.
• The display must be warmed up by operating continuously for at least 30 minutes before performing an
Update. Do not power off the display or change Picture Modes while the display is warming up.
Page 39

38 | NEC SPECTRAVIEW II - USER’S GUIDE
• When enabled, the display’s Metamerism setting (available on the OSD and in MultiProler) will impact the
correlation between color measurement values and the color control values shown. Turning off the Metamerism
setting will improve the correlation, but may impact the visual match between the display and standard color
gamut displays.
• Since performing an Update will use measurements from the connected calibration sensor, the results will
only be as good as the accuracy of the calibration sensor used.
Menus
File menu
Open Target... - opens a Target le. This is the same as clicking the Target Settings: Open button.
Save Target As... - saves the current Target Settings to a le. This is the same as clicking the Target Settings: Save
button.
Calibrate... - starts the display monitor calibration routine for the currently selected display using the currently selected
Target Settings. This is the same as clicking the Calibrate button.
Generate ICC Prole... - starts the process of creating an ICC/ColorSync monitor prole for the currently selected
display in its current state without calibrating.
Validate Calibration... - measures the current state of the display monitor and compares to the currently selected
Target in order to quickly determine if the current calibration is still accurate, or if the display should be recalibrated.
Open previous calibration.. - opens a previous Monitor Calibration Settings le. This is the same as clicking the
Calibration: Open button.
Edit menu
Preferences... - opens the Preferences dialog. (shown on the Application menu on Mac OS)
Display Conguration... - (Windows and Linux only) opens the Display Conguration dialog. This is the same as
clicking the Display: Congure button.
Target... - opens the Edit Calibration Target dialog.
Tools menu
Information Window... - opens the Information window.
Colorimeter Window... - opens the Colorimeter window.
Test Pattern - displays a variety of test patterns on the screen that can be used to evaluate the status of the monitor
calibration and performance. Click the left and right arrow buttons to select different test patterns, or use the [ and ]
keyboard keys. Select this menu again to turn off the test pattern, or click the X button.
Ambient Light Measurement... - opens the Ambient Light Measurement window and is used to measure the ambient
light of the viewing environment around the display monitor. This feature is only available when using sensors that
support this measuring ambient light.
Monitor Settings... - opens the Monitor Settings window and is used to access some settings on the display monitor.
Update Internal Calibration... - opens the Update Internal Calibration window and is used to update the internal
calibration of the display monitor by using the currently connected color sensor. This feature is only available on the
PA242W, PA272W, PA302W, PA322UHD, X651UHD, X841UHD, and X981UHD models. See the “Features by Model”
Page 40

39 | NEC SPECTRAVIEW II - USER’S GUIDE
on page 57 for all model specic functionality.
6 Axis Color Trim... - opens the 6 Axis Color Trim window and is only available when using MultiSync PA, P232W,
P241W, or P242W models. See “Using 6 Axis Color Trim” on page 56 for more information on using this feature.
Help menu
About... - displays the About dialog box which shows the software version number. (shown on the Application menu
on Mac OS)
Check for updates... - contacts the NEC Display Solutions website and checks to see if a newer version of SpectraView
is available. If a newer version is available, information about the version and download links will be shown. An Internet
connection is required for this feature to operate.
Diagnostics... - runs a series of tests and collects various operating parameters that are useful in diagnosing problems.
If requested by NEC support personnel, please run these diagnostics and save the resulting report le and sent it back
to NEC to assist with any troubleshooting.
Page 41

40 | NEC SPECTRAVIEW II - USER’S GUIDE
Chapter
Calibration Overview
3
Introduction to display monitor calibration
Computer display monitors display images by giving off light from the screen. On LCD display monitors, light is emitted
from a backlight source such as uorescent lamps or array of LEDs (Light Emitting Diodes) and passes through individual
red, green and blue lters for each pixel on the screen.
Combining red, green, and blue light, known as additive primary colors, creates the color that appears as an image on
the screen. Different colors are displayed by varying the relative brightness of the three additive primary colors. The
range of colors that can be represented on a display is known as the color gamut.
Printers create images by applying inks or dyes known as colorants to paper. These colorants absorb or subtract light
of certain wavelengths, stopping it from being reected. Cyan, magenta, and yellow colorants, known as subtractive
primary colors, are used to create color prints. Each colorant absorbs light of its color complement. For example,
magenta ink absorbs green light, while cyan ink absorbs red light, and yellow ink absorbs blue light. Sometimes an
additional black colorant is used to improve the overall color gamut possible with a printer.
It is because of these fundamental differences between displaying an image on a computer display monitor and printed
media that a Color Management System such as Apple ColorSync or Microsoft Image Color Management and a color
calibrated display monitor are necessary. The Color Management System ensures that what is displayed on a monitor,
is representative of what will be printed.
In order to accurately view and exchange images with others with condence that the images look identical when
displayed on different systems and at different locations, the display monitors used should be calibrated to a known
state. The Color Management System being used must also know the current state of the monitor so that it can determine
how to accurately display images on that particular monitor.
Once the display has been calibrated and the Color Management System knows the color characteristics (via the use
of the ICC/ColorSync monitor prole), the display can be used to preview or soft proof what images will look like when
printed. In order to do this, the Color Management System must also know the color printing characteristics of the printer
being used. This is usually done by an ICC printer prole or Printer Color Separation Tables supplied by either the
printer manufacturer or a third party. Various desktop publishing and image editing software packages, such as Adobe
Photoshop, have CMYK preview modes to soft proof images.
It is important to be aware of the limitations of soft proong. Many factors will limit the accuracy to which prints will match
what is displayed on the screen. The accuracy of the printer prole or color separation tables as well as the type of inks
and paper used all affect how accurate the nal prints will be. The lighting conditions used when viewing the nal print is
also absolutely critical and the use of a calibrated lightbox is highly recommended. Be aware that it is almost impossible
to get an absolute perfect match under all conditions on any color management system or display.
Before calibrating the SpectraView display, the desired color characteristics of the calibrated monitor must be selected. In
SpectraView, these characteristics are called Targets. SpectraView then adjusts the monitor to the color characteristics
in the selected Target. Once the calibration is complete, SpectraView can then re-measure the display and create an
ICC/ColorSync prole of the monitor, which contains information used by the Color Management System to retain the
various color characteristics of the calibrated monitor. The calibration target used will depend on the application.
Page 42

41 | NEC SPECTRAVIEW II - USER’S GUIDE
SpectraView includes several industry standard targets for a variety of applications:
Target Name Application White Point
CIE (x,y)
Print Standard Commonly referred to as Proong
Standard. Used widely for the
proong of color transparencies or
press output.
Photo Editing Used for editing and previewing
images in a controlled lighting
environment. An Intensity of 140
candelas (cd/m²) is used.
Broadcast
Video
sRGB
Emulation
DICOM GSDF
- Blue Base
DICOM GSDF
- Clear Base
Digital Cinema Images and video intended for
Used for editing images and
video intended to be displayed on
televisions using the NTSC, PAL,
or SECAM standards.
Digital images, printing and the
Internet
Medical Imaging using blue-base
lm.
Medical Imaging. (0.292, 0.321) DICOM Curve Native (Full)
cinematic projection using DCI.
D50 (0.346, 0.359) 1.8 Native (Full)
D65 (0.313, 0.329) 2.2 Native (Full)
D65 (0.313, 0.329) 2.2 SMPTE-C
D65 (0.313, 0.329) 2.2 sRGB
(0.265, 0.320) DICOM Curve Native (Full)
(0.314, 0.351) 2.6 DCI
Tone Response
Curve (Gamma)
Color Gamut
Note 1:
• Color Gamuts other than Native (Full) and sRGB are only available on the MultiSync PA series displays.
When used on other display models that do not support color gamut control the Color Gamut setting will be
ignored.
Note 2: When using the sRGB Emulation target
• This is a special target that will switch the display into the sRGB Emulation mode which reduces the color
gamut to approximate that of sRGB.
• The Factory Preset white point is used on the following models: LCD2690WUXi, LCD3090WQXi and P221W.
It is not possible to adjust the white point of the sRGB Emulation mode on these models. The calibration will only
adjust the Intensity and generate an ICC/ColorSync prole of the display on these models. The resulting Delta-E
values may be higher than normal because the white point is not adjusted using the calibration sensor.
• On the LCD2690WUXi ,the range of Intensity values that the display can be calibrated to using the sRGB
Emulation target is limited. It may not be possible to achieve low Intensity values (below roughly 120-150 cd/m²).
• The P232W, P241W, P242W, LCD2690WUXi2, X651UHD, X841UHD, X981UHD, and all MultiSync PA series
displays will adjust the white point as well as the Intensity.
• See the “Features by Model” on page 57 for all model specic functionality.
Note 3: When using the Broadcast Video target with P232W, P241W, P242W, LCD2690WUXi2, X651UHD, X841UHD,
X981UHD, and all MultiSync PA series displays
• This target preset uses the SMPTE-C color gamut primaries typically used for NTSC video.
• For applications using HDTV, the color gamut can be modied to use the sRGB preset color gamut which is
the same as ITU-R BT.709.
• For applications using PAL or SECAM, the color gamut can be modied to use the EBU/ITU (PAL/SECAM)
preset color gamut.
Page 43

42 | NEC SPECTRAVIEW II - USER’S GUIDE
About Targets
SpectraView can also create custom Targets, which can then be exchanged with other SpectraView display users,
providing identical calibrated displays.
A Target consists of up to six specications that describe the color characteristics of the display:
• Gamma or Tone Response Curve (TRC)
• White Point
• Intensity
• Contrast Ratio
• Color Gamut
• 6 Axis Color Trim
Gamma and Tone Response Curves (TRC)
The Gamma or Tone Response Curve of a display is the relationship between the video input signal level and the light
output (“brightness”) displayed on the monitor. The display monitor is a nonlinear display device. In simple terms, this
means that doubling the level of the video input signal to the display does not double the light output. For CRT based
displays, the light output follows a mathematical power function of the input video signal. This power function has an
exponent called gamma, which is commonly used to describe the relationship between the video input signal and light
output of the screen.
A gamma value of 1 would result in a perfectly linear display (doubling the signal level doubles the light output) and
the Tone Response Curves would be straight lines. The particular Tone Response Curves of a display will change with
the display color settings and may vary from one display to the next. If accurate color matching is to be performed,
the display’s Tone Response Curves must be accurately measured and compensated for. SpectraView uses the color
sensor to automatically measure the Tone Response Curves of the display.
Note: If you are unsure what gamma value to use for a Target, try 2.2 which is the most popular on Windows, and on Macs for
most applications. A value of 1.8 is popular for some printing applications on Macs.
Normally, a standard Gamma value is required when working with images. For example, the sRGB standard color space
target species a display Gamma value of 2.2. Since the Gamma value of the display may be different than the required
Gamma value, a correction needs to be applied so that the apparent display Gamma matches that of the required
Target. In SpectraView, this correction is applied to the LUTs (Look Up Tables) inside the monitor. SpectraView also
uses the monitor’s LUTs for targets that have Tone Response Curves which do not follow a normal Gamma curve. An
example is DICOM, which uses a curve that changes shape based on how bright the display is.
White Point
The White Point species the color of pure “white” on a display. Since there is no unique perceptual or physical denition
of what “white” is, it must be dened in terms of a standard or device-independent color space to be measured and
reproduced.
There are several methods of specifying a white point, including using a blackbody radiator color temperature or as a
location in a device-independent color space. SpectraView allows the white point to be specied either as a black body
radiator color temperature in Kelvin, as a CIE standard illuminant, or as CIE xy chromaticity coordinates.
A White Point expressed as a black body radiator color temperature in Kelvin represents the light given off by an object,
known as a blackbody, as it is heated to a given temperature. Low color temperatures, such as 5000K, are reddish,
while higher color temperatures, such as 9300K, are bluish. A color temperature of 6500K is considered to be “neutral”
Page 44

43 | NEC SPECTRAVIEW II - USER’S GUIDE
white.
A CIE Standard Illuminant is a dened white color based on a known light source. In SpectraView the D or Daylight
Illuminant series can be used to specify a white point. Daylight Illuminants are named according to their corresponding
correlated color temperature. For example, D50 is very close in color to a 5000K blackbody radiator.
Intensity
Intensity species the luminance or “brightness” of white when displayed on the screen. The maximum Intensity value
of the display will depend on the color temperature of the White Point selected, the type of monitor and its age.
The choice of Intensity value will depend on the application and viewing environment. If the display is being used in a
very bright environment and there is no visual reference (such as a proof in a lightbox), then the Intensity generally can
be selected to the maximum possible setting.
However if the display is being used in controlled lighting environment and there is a visual reference being used, then
normally a lower specic Intensity value is used. Using a specic value will allow the display to be calibrated to the same
value each time, provided it is within the capable range of the display.
Contrast Ratio
The Contrast Ratio of the display is the ratio of the measured Intensity to the measured Black Level. The Black Level
is the luminance or “brightness” of black when displayed on the screen. For LCD monitors the minimum or native Black
Level is typically xed in ratio to the Intensity value due to the display technology.
SpectraView allows the Contrast Ratio to be selected for applications that require a specic contrast ratio. However the
calibrated contrast ratio can not be higher than the native contrast ratio, since the minimum Black Level that the display
can achieve is limited by the display technology.
For most applications the highest possible Contrast Ratio is most suitable and can be achieved by selecting Monitor
Default as the Contrast Ratio.
Specic Contrast Ratios in the range 50:1 to 500:1 can be selected.
Note: If the selected contrast ratio is higher than what the display is actually capable of achieving, then the display will calibrate
to the highest possible contrast ratio. For example if you select 500:1, but the display only capable of say 320:1 with the
current Target settings, then the resulting calibration will have a contrast ratio of 320:1.
Color Gamut
The color gamut is the range of colors that can be displayed by the monitor. The color gamut of a monitor is dened and
bounded by the red, green and blue primaries which together make up all other colors.
Depending on the display model being used, the Color Gamut can be fully customized for specialized applications. See
the Color Gamut section for more information on selecting and conguring the Color Gamut.
The choice of Color Gamut will depend on the applications and operating system being used.
Typically if a color managed application is being used, then the Native (Full) color gamut should be used since this will
allow the application to make full use of the color capabilities of the display. This applies even if the image, document,
etc. is intended for another color gamut such as sRGB or AdobeRGB. The color gamut should not normally be set to
that of the color workspace of the application, if it is color managed. Likewise the color workspace should not normally
be set to the color gamut of the display.
For non-color managed applications a specic color gamut such as sRGB can be selected to make the display appear
Page 45

44 | NEC SPECTRAVIEW II - USER’S GUIDE
as if it has such a color gamut. In this case, all of the necessary color conversions are done automatically within the
display.
6 Axis Color Trim
The 6 Axis Color Trim is an advanced feature that allows screen colors to be adjusted after the display has been
calibrated. The color adjustments only impact a specic range of colors, and each range can be adjusted in Hue,
Saturation, and Offset (Brightness).
This feature is only available with the MultiSync PA series, P232W, P241W, and P242W models. See the “Features by
Model” on page 57 for all model specic functionality.
See “Using 6 Axis Color Trim” on page 56 for more information on using this feature.
Page 46

45 | NEC SPECTRAVIEW II - USER’S GUIDE
Chapter
Using SpectraView
4
Launching
(Mac OS)
Double click the SpectraView II application
icon in the Applications folder.
As SpectraView launches, it will automatically search for any supported displays, and supported color sensors.
If SpectraView is unable to detect either a supported display or a supported color sensor, an error message will be
displayed and the Calibrate button will be disabled. Refer to the Troubleshooting section of this manual.
Select SpectraView II from the NEC Display
Solutions program group on the Windows
(Windows)
Start menu.
Selecting a calibration Target
A Target species the color characteristics of the display for the calibration process. A Target can be either predened,
or custom dened.
Existing Targets can be selected in the main SpectraView II window from the Target listbox.
Selecting a Target will automatically congure the White Point, Tone Response Curves, Intensity and Black Level (if
applicable).
The choice of Target depends on the particular application and viewing conditions such as the ambient light level.
Modifying Targets
The parameters of Targets can be modied using the Edit Target button which will display the Edit Target dialog. Note
that modifying a Target will require the display monitor to be recalibrated to the new Target parameters.
Page 47

46 | NEC SPECTRAVIEW II - USER’S GUIDE
Calibrating and Proling the Display
If more than one supported display monitor is connected, select the display to be calibrated from the Display listbox.
Note that each display has an independent Target.
Click the Calibrate button to start the calibration process. The software will provide instructions for placing the calibration
sensor on the screen and provide updates as the calibration progresses.
Once the calibration process has been completed, an ICC/ColorSync prole will be generated if the Generate prole
after calibration option in the Preferences dialog is selected. The prole will automatically be associated with the
system’s Color Management System.
The results of the calibration process will then be displayed in the Information window.
It is also good practice to use the Test Patterns to quickly visually verify the integrity of the calibration.
Proling the Display
An ICC/ColorSync monitor prole of the display can be generated without calibrating the display by selecting Generate
ICC Prole.. from the File menu. Non-SpectraView displays can be proled but not calibrated by SpectraView.
Validating the current Calibration
The current state of the display monitor can be measured and compared to the currently selected Target in order to quickly
determine if the current calibration is still accurate, or if the display should be recalibrated. A series of measurements
will be taken on the display and a brief report will be shown of the results. The Information window will also be updated
with a more detailed analysis of the results.
Note: Several factors can inuence the results of the validation process and a Delta-E values of 3-5 do not always indicate that
the display needs to be recalibrated. Even very slight dierences in the positioning of the sensor from when it was calibrated,
and the length of time the monitor has been powered on, and the basic measurement repeatability accuracy of the sensor
itself, all impact the results. Also keep in mind that the Delta-E value is comprised of the luminance and color dierence.
Dierences in color are much more critical than a dierence in relative luminance.
Page 48

47 | NEC SPECTRAVIEW II - USER’S GUIDE
Chapter
Outside of SpectraView
5
Using ICC/ColorSync Monitor Proles
The ICC/ColorSync monitor proles generated by SpectraView are used to inform the Color Management System of the
color characteristics of the display monitor.
Color Management Systems use this information to determine how to display images on-screen. Depending on the
image editing software package being used, proles for printers and scanners can also be utilized to create accurate
image prints and scans.
The exact method of loading ICC monitor proles into the Color Management System will depend on the software
application being used. Most software applications rely on the operating system (Mac OS or Microsoft Windows) to
provide the current prole information. However some applications may have a color management setup where the
display monitor prole can be selected.
SpectraView will automatically select and associate the generated ICC/ColorSync monitor proles with the system’s
Color Management System.
Refer to the instructions for the particular software package being used to determine how to correctly load and use the
ICC/ColorSync monitor proles generated by SpectraView.
Adobe Photoshop Overview
When combined with accurate printer proles, Photoshop can perform accurate CMYK previews or soft proofs of what
an image will look like when printed.
The hardware based calibration of the SpectraView display monitor will provide superior results compared to the basic
visual calibration offered by the Photoshop or ColorSync Control Panels.
Note that it is not necessary to perform any of the monitor settings in the Adobe Gamma Control Panel since all of the
necessary monitor calibration and measurements will be done by SpectraView.
In Photoshop, images are manipulated in what is known as an image color workspace. This color workspace is
independent of the display monitor color characteristics, allowing images to be transferred between systems with
different monitor settings without loosing any color information or restricting the color gamut of the image. Photoshop
will convert colors on the y when it displays the image on the SpectraView monitor, so the colors you see accurately
reect the le’s working color space.
The selection of an RGB color workspace will depend on the application. For details of the standard color workspaces
included in Photoshop, consult the online help in Photoshop. Note that typically the color workspace will be different
to that of the display monitor. Do not attempt to load the ICC/ColorSync monitor prole as the color workspace in
Photoshop.
When editing an image in CMYK format, Photoshop uses the monitor color characteristics to perform the CMYK-to-RGB
conversion necessary to display the image accurately on the display monitor, which uses a RGB device dependent color
space.
When editing or viewing an image in RGB format, Photoshop also uses the display monitor color characteristics,
together with a set of printer separation tables or printer ICC/ColorSync prole to perform the RGB-to-CMYK conversion
necessary to preview or soft proof a print the image. Printer separation tables are usually provided by the printer
manufacturer or other third party, or can be generated using a 3rd party printer proling application.
Page 49

48 | NEC SPECTRAVIEW II - USER’S GUIDE
Chapter
Frequently Asked Questions
6
Calibration
Question 1: How often do I need to calibrate my monitor?
Answer: The answer will depend on how critical a color accuracy is necessary, how long the monitor is used per
day, environmental conditions and the characteristics of each individual monitor. Some users working in highly critical
color applications may calibrate their displays every couple of days. Others may only need to do it once a month. The
recommended and default re-calibration period is every 2 weeks. The Validate Calibration feature can always be used
to verify the display’s white point and Intensity and determine if the monitor needs to be re-calibrated. Always remember
to allow the monitor sufcient time to warm up and reach optimum color performance before performing any color critical
work or calibrating the display.
Question: (Mac OS only) Why can’t I use the ColorSync control panel to switch between different display calibrations
like I can do with other monitors?
Answer: When used with the SpectraView software, NEC display monitors store all of the necessary color adjustments
internally, including the 10 or 12 bit Look Up Tables. The ColorSync utility switches the display color settings by changing
the Look Up Tables in the video graphics adapter. The ColorSync proles generated by SpectraView contain linear Look
Up Tables for the video graphics adapter. Therefore the SpectraView software must be used to update the display
monitor.
Question 2: (Mac OS only) I’m using a wide color gamut display together with the standard gamut screen on my
MacBook. Colors in Safari look oversaturated when the window is on the wide gamut display. What is wrong?
Answer: The color management in Safari and some other Mac applications will only apply color correction for the
primary display (the display with the menu bar). When a window is moved to the secondary display, the correct color
correction for that display is not applied. This causes the images to be oversaturated on the secondary display. To
display colors correctly on the wide color gamut display it must be made the primary display. Use the Mac OS System
Preferences - Displays to congure the display as the primary.
Question 3: I’m using two different displays and calibrating both to the same target, however the white points do not
match exactly. What can I do to improve this?
Answer: This issue can be caused by the different spectral outputs of the two displays causing the human eye to see
color differences differently than the color sensor used to calibrate the displays. In this case the numerical measurements
from the color sensor are identical on both displays, but they do not visually match. Manually visually matching one
display to another can usually avoid this issue. The basic steps to take are as follows:
1. Calibrate both displays.
2. Pick one of the displays to be a reference. Call this display #1.
3. Select display #2 in SpectraView, open the Edit Calibration Target dialog then open the Custom White Point
dialog by clicking on the Edit... button. Use the Visual Match tool to adjust the white color so it visually matches
white shown on display #1.
4. When a visual match is achieved, put the sensor over the measurement area and click Measure. This will enter
Page 50

49 | NEC SPECTRAVIEW II - USER’S GUIDE
the value that the sensor perceives into the White Point. Save this as a new Target.
5. Recalibrate display #2 with this new Target. From now on always use the respective Target to calibrate each
display.
Question 4: I’m trying to match my display to my prints in order to soft proof, however after calibrating using a standard
Target white point such as D65 or D50, the screen still appears too pink/magenta/green compared to the print. What
can I do to make them match?
Answer: Depending on many factors such as the lighting conditions used to view the prints, paper type, and the
printer proles used for the soft proong, the display white point may not visually match that of the paper. It is important
to remember that the preset white points such as D65 are not magic numbers that must be used regardless. The
calibration Target white point can be adjusted as necessary in this scenario. This is especially true if a standard viewing
environment such as a light box is not being used to view the prints.
Adjusting the white point using a Kelvin or Daylight value alone is adjusting the white point along the xed Black Body
curve as viewed on a CIE xy diagram, and can vary the white point from cool to warm.
However, the color cast between the print and display may be at right angles to this curve, so in this case no Kelvin value
will be able to fully compensate. A white point that lies off the standard Black Body curve can be entered by specifying
it in terms of CIE xy instead of as a Kelvin or Daylight value.
To get an idea of how CIE xy values relate to the actual White Point color, try zooming in on the Color Gamut diagram
on the Information window. In the example below, the Black Body curve is shown. If for example the display appears to
be too green, then the white point should be moved slightly towards the lower right - this corresponds to increasing the
CIE x value, and decreasing the y value slightly. Modify the Target White Point values by making small adjustment (for
example increments of +/-0.003) and recalibrate the display. Several iterations may be required to nd the best values.
In addition to this method, the Visual Match tool described in the previous answer can be used to interactively nd a
visual match between the print and display.
Black Body curve
Page 51

50 | NEC SPECTRAVIEW II - USER’S GUIDE
Question 5: Each time I calibrate my monitor I receive a different Delta-E result. Should I recalibrate again if I receive
a value that is high?
Answer: For Delta-E values of less than 2 there is almost certainly no need to recalibrate. For values higher than 3 it is
important to understand what the cause is, and if it is signicant.
The calibration and adjustment process has inherent variability due to many factors such as the repeatability of
color sensor measurements, and changes within the display as it is adjusted. The basic accuracy and repeatability
specications for most sensors is typically +/- 0.002 or higher for CIE xy, and +/- 2% for luminance. These variances
alone can give rise to Delta-E values of up to 2 or 3.
When a specic Intensity value is being used for the calibration, the Delta-E value is comprised of the luminance and
color differences. Differences in color are much more critical than a difference in relative luminance. Look at the results
of the calibration shown in the Information window to determine if the high Delta-E value is caused mainly by a shift in
color or in luminance.
High Delta-E values can also occur if a specic Intensity value is being used for the calibration and the display is not
capable of achieving the specied Intensity value. The calibration will always aim to achieve the specied White Point,
even if the Intensity value could not be reached. If the display can not be calibrated to achieve the specied Intensity
value modify the value accordingly.
In some situations, the display Intensity will drift slightly for several minutes after it is adjusted. Since the measured
value used to calculate the nal Delta-E result is taken up to one or two minutes after the display was adjusted, a higher
Delta-E value may be shown, even though the calibration process achieved the specied Target values during the
calibration process. Selecting the Extended luminance stabilization time option in the Preferences can be used to try
and minimize this effect.
Question 6: The Delta-E result values shown in SpectraView are higher than those shown in other display calibration
applications. Does that mean they are better at calibrating the display than SpectraView?
Answer: No. SpectraView calculates the Delta-E values using both the luminance and color differences for more
realistic and accurate values. Other applications may calculate Delta-E differently.
Question 7: After calibration I manually adjusted some of the monitor controls to get a better color match for my
particular application. What happens the next time I calibrate the monitor?
Answer: The manual adjustments will be reset by the calibration process.
In general it is not a good idea to manually adjust the monitor after calibration because it not only invalidates the
calibration and ICC/ColorSync prole, but also means that the adjustments will be lost the next time the monitor is
calibrated.
If you still feel it is necessary to tweak the display after calibration, a much better approach is to create a new Target
le based from the measurements of the display after it has been manually adjusted. That way the monitor will be
automatically calibrated to that particular set of characteristics the next time it is calibrated. Use the Custom White Point
tool to measure and set the white point and Intensity values.
Page 52

51 | NEC SPECTRAVIEW II - USER’S GUIDE
Chapter
Troubleshooting
7
Installation and Setup
Problem: Calibrate button is disabled.
Solution: The calibrate button is disabled for either of the following reasons:
• No supported calibration sensor was detected.
• No supported display monitor was detected.
See the following sections for further explanations.
Problem: No supported monitor was detected.
Solution:
• Verify that the display monitor connected is a model supported by this version of SpectraView II. Check if a
newer version of the software is available from NEC.
• If more than one video output is present on the computer, try connecting to the other output connector.
• Always use a DVI or DisplayPort video output if possible.
• Connect a USB cable between display to the host PC (MultiSync PA Series, P232W, P241W, P242W,
EA244UHD, EA304WMi, X651UHD, X841UHD, and X981UHD models only) and restart SpectraView.
Mac OS:
• See the README le included with the software for further information about any specic incompatibilities
or issues. Note that some Macs require at least OS 10.5.2 in order support the functionality necessary with
SpectraView.
Windows:
• Some video graphics adapter cards may not support the necessary functions for SpectraView to
communicate with the display monitor. For Windows systems, verify that the video graphics adapter is supported
by SpectraView by checking the Windows Graphics Chipset Compatibility Information. See the README le
included with the software for further information.
• Install the latest video drivers for the video graphics adapter card.
• Communications with the display monitor requires a special driver to be installed. This is installed and
congured when SpectraView is installed, however any of the following changes may necessitate that
SpectraView be re-installed to re-congure the driver:
• Updating the video graphics adapter card driver.
• Changing the monitor model
• Changing the video port that the monitor is connected to.
• Check the display conguration by clicking the Display Conguration button. In the Display Conguration
dialog, conrm that your model of display monitor is listed. If it is not listed, then there is a problem
communicating with and detecting the display monitor. If it is listed, conrm that the monitor is associated with the
correct Windows desktop display.
Page 53

52 | NEC SPECTRAVIEW II - USER’S GUIDE
Problem: No supported calibration sensor was detected.
Solution:
• Try reconnecting the calibration sensor and click the Auto Detect button in the Preferences dialog to re-
detect the sensor.
• It may be necessary to close and re-launch the SpectraView application.
• (Windows) It may be necessary to install the drivers for the color sensor device. Note that only the drivers
for the X-Rite iOne devices are installed by the SpectraView setup application. Drivers for other devices must be
installed manually.
Problem: Severe color banding appears after calibrating on images and when the test pattern is shown.
Solution:
• Always use a DVI or other digital video signal if possible.
• If an analog video signal must be used perform the following steps once prior to calibration:
1. Display something on the screen that has both full black and full white, such as the Test Pattern in
SpectraView.
2. On the monitor’s On Screen Display, select and operate the AUTO CONTRAST control.
3. Proceed with the calibration.
Problem (Windows): The ICC prole generated by SpectraView does not appear to be correctly installed and recog-
nized in Windows.
Solution:
• This problem may occur especially when using a multi-monitor conguration. In some cases updating the
video driver may x this issue.
• The prole can be manually assigned if necessary as follows:
1. In the Windows Display Properties control panel, select the Settings tab and click Advanced.
2. Select the Color Management tab on the Display Properties dialog.
3. Find the color prole generated by SpectraView and use Set As Default.
• A more advanced control panel is available from Microsoft for Windows XP which is much more reliable
for checking the assigned monitor prole. On the www.microsoft.com website, search for “Color Control Panel
Applet”.
Problem (Windows): SpectraView is unable to save the generated ICC prole.
Solution: If SpectraView is unable to save the ICC prole for this reason it will prompt you with the name and location
of the le that needs to be manually deleted in order to replace it with a new prole.
• This issue may occur if there are multiple users assigned to the machine. An ICC prole created by a user
can normally only be updated and replaced by that user, or an administrator. Starting with Windows Vista, even if
you are currently an Administrator, applications do not normally allow full administrative privileges by default.
You can either delete the current ICC prole manually (in which case Windows will ask for administrative level
credentials or permissions), or you can re-run SpectraView “as Administrator” by right-clicking the application
icon and selecting “Run as administrator”. This process needs to be done once each time the user who created
Page 54

53 | NEC SPECTRAVIEW II - USER’S GUIDE
the last ICC prole for the display is changed.
• This issue may also occur if another application is currently using the ICC prole. For example if the
Windows Advanced Display Settings control panel is open, the ICC prole may be locked. Be sure to close any
applications that may be using the prole.
Page 55

54 | NEC SPECTRAVIEW II - USER’S GUIDE
Chapter
Test Pattern Guide
8
The SpectraView II software includes several test patterns that are useful in evaluating the monitor calibration. It is also
good practice to use the Test Patterns to quickly visually verify the integrity of the calibration.
A pattern based on the DICOM TG18-GC test pattern has a number of useful features that allow very detailed analysis
of the monitor grayscale performance in one pattern. The main features of this pattern are described below.
Line-pair patterns for
resolution evaluation,
having pixel values of
0-255 and 128-130.
Sixteen luminance patches with pixel values
varying from 8 to 248 for luminance response
evaluation. Each patch contains four small 10x10
pixel corner patches at ±4 of pixel value difference
from the background, +4 in upper-left and lowerright, -4 in lower-left and upper-right. The small
patches are used for visual assessment of
luminance response.
“QUALITY CONTROL” characters
with decreasing contrasts at minimum,
mid-point, and maximum pixel values
for simple low-contrast evaluation at
three luminance levels.
256 level grayscale with
2 lines per level.
Grey background of
pixel value 128.
Two patches of minimum and
maximum pixel value with 13, and
242 pixel value internal patches,
similar to 5% and 95% areas in the
SMPTE test pattern.
Several other patterns are available in SpectraView and can be selected
using the buttons at the top left of the screen, or using the [ and ] keys.
Page 56

55 | NEC SPECTRAVIEW II - USER’S GUIDE
Chapter
SpectraView Engine Information
9
The MultiSync P232W, P241W, P242W, PA231W, PA241W, PA242W, PA271W, PA272W, PA301W, PA302W,
PA322UHD, X651UHD, X841UHD, and X981UHD monitor models feature a custom-designed color processor called the
SpectraView Engine. This sophisticated processor, combined with internal luminance, temperature and time monitoring
of the monitor, and individual characterization and calibration of each unit during production, results in an unparalleled
level of color control, accuracy and stability.
When SpectraView II is used to calibrate these models:
• The 5th of the 5 selectable Picture Modes is always automatically selected and used to store the calibration
made by SpectraView II.
• The Custom 3 memory location is always used to store the calibration. This location will be automatically
named SpectraViewII.
• The Color Gamut of the display can be adjusted by conguring the Target and re-calibrating.
• The SpectraView II software can be used together with the NEC MultiProler software. When MultiProler
is used with SpectraView II, the ICC/ColorSync prole generated by SpectraView will always be activated by
MultiProler when the Picture Mode calibrated by SpectraView II is selected. For all other Picture Modes, the
ICC/ColorSync proles generated by MultiProler will be used.
• The number of Calibration and Prole steps (set in the Preferences) does not increase or decrease the
accuracy of the grayscale calibration or ICC/ColorSync prole when calibrating the display. This is because the
monitor’s internal calibration is used.
• Communications with the display can be via either DDC/CI or USB. To use USB, connect a USB cable
between the host PC and one of the USB inputs on the display. Make sure the correct USB input is selected on
the OSD, or using the MultiProler application. On the Mac OS version of SpectraView II the USB connection will
automatically be used when detected. On the Windows and Linux versions the USB connection can be manually
selected using the Display Conguration dialog.
• The PA242W, PA272W, PA302W, PA322UHD, X651UHD, X841UHD, and X981UHD models support the
Update Internal Calibration function described on page 37.
• See the “Features by Model” on page 57 for all model specic functionality.
The MultiProler software is available for free from NEC at www.necdisplay.com/multiproler.
Page 57

56 | NEC SPECTRAVIEW II - USER’S GUIDE
Chapter
Using 6 Axis Color Trim
10
The 6 Axis Color Trim is an advanced feature that allows screen colors to be adjusted after the display has been
calibrated. The color adjustments only impact a specic range of colors, and each range can be adjusted in Hue,
Saturation, and Offset (Brightness). The color ranges that can be adjusted are the primary colors (red, green, and blue),
and the secondary colors (yellow, cyan, and magenta).
This feature is intended as an expert level control and can be useful in
situations when certain ranges of colors do not match exactly as
expected. For example if the hue of yellows appear slightly off when
evaluating a test print, the yellow hue can be adjusted slightly to improve
the matching.
Notes
1: Adjustments only impact saturated colors, and not the white point of the display, or any neutral colors.
2: Adjustments are intentionally applied after the display has been calibrated and the ICC/ColorSync prole has been
generated, so any adjustments made using the 6 Axis Color Trim are not reected in the ICC/ColorSync prole.
3: This feature is only available with the MultiSync PA series models, P232W, P241W, and P242W models. See the “Features by
Model” on page 57 for all model specic functionality.
4: This feature is not intended as a substitute for accurate output device ICC/ColorSync proles. It should be used only to
make minor adjustments when necessary.
The recommended workow for using this feature is as follows:
1. First calibrate with no 6 Axis Color Trim applied.
2. Visually evaluate the screen image with whatever test image is being used. Be sure to use the Proof Colors or
Softproof feature in the image editing application if available. Using a test image with a broad range of colors
and saturations is recommended.
3. If necessary make any necessary adjustments in the 6 Axis Color Trim dialog.
4. Save the modied Target le.
5. Use this Target the next time the display is recalibrated. The same trim adjustments will automatically be applied.
Page 58

57 | NEC SPECTRAVIEW II - USER’S GUIDE
Appendix
Features by Model
A
Desktop
Models
LCD1980SXi Yes Yes
LCD1980FXi Ye s Ye s
LCD1990SX Yes Ye s
LCD1990SXi Yes Yes
LCD1990SXp Yes Yes
LCD2090UXi Yes Ye s
LCD2180UX Yes Yes
LCD2180WG-LED Yes Yes Yes
LCD2190UXi Yes Ye s
LCD2190UXp Yes Ye s
LCD2490WUXi Yes Yes Yes
LCD2490WUXi2 Yes Yes Yes
LCD2690WUXi Yes Yes Yes
LCD2690WUXi2 Yes Yes Yes
LCD3090WQXi Yes Ye s Yes
P221W Yes Yes
P232W Yes Yes Auto Yes Yes
P241W Yes Yes Auto Yes Yes
P242W Yes Yes Auto Yes Yes
PA231W Yes Yes Auto Yes Yes
PA241W Yes Yes Yes 2Auto Yes Yes Yes
PA242W Yes Yes Yes 2Auto Yes Yes Yes Yes
PA271W Yes Yes Yes 2Auto Yes Yes Yes
PA272W Yes Yes Yes 2Auto Yes Yes Yes Yes
PA301W Yes Yes Yes 2Auto Yes Yes Yes
PA302W Yes Yes Yes 2Auto Yes Yes Yes Yes
PA322UHD Yes Yes Yes 2Auto Yes Yes Yes Yes
EA244UHD Yes Yes Yes Yes
EA304WMi Yes Yes Yes Yes
1
Fixed sRGB factory preset only
2
Luminance Stabilization is always on
USB control
SpectraView Engine
Luminance Stabilization
Calibration Priority
Wide Color Gamut
Custom Color Gamut
1
1
1
1
6 Axis Color Trim
Shows Uncalibrated
Correction Curves
Update Internal
Calibration
Yes
Yes
Yes
Yes
Page 59

58 | NEC SPECTRAVIEW II - USER’S GUIDE
Large-Screen
Models
LCD4020 Yes Yes
LCD4620 Yes Yes
LCD5220 Yes Yes
LCD6520 Yes Yes
M40, M40B, and M40-2 Yes Yes
M46, M46B, and M46-2 Yes Yes
X431BT Yes Yes
X461UN Yes Yes
X462UN Yes Yes
X461HB Ye s Ye s
X651UHD Yes Yes Auto Yes Yes
X841UHD Yes Yes Auto Yes Yes
X981UHD Yes Yes Auto Yes Yes
P401 Yes Yes
P461 Yes Yes
P521 Yes Yes
P551 Yes Yes
P701 Yes Yes
USB control
SpectraView Engine
Luminance Stabilization
Calibration Priority
Wide Color Gamut
Custom Color Gamut
6 Axis Color Trim
Shows Uncalibrated
Correction Curves
Update Internal
Calibration
Page 60

59 | NEC SPECTRAVIEW II - USER’S GUIDE
Appendix
Glossary
B
Achromatic – Neutral in color (having no hue).
Additive Primaries – Red, green, and blue light that when combined in different relative intensi-
ties produces different colors. (See also Subtractive Primaries)
Backlight – the internal light source for a Liquid Crystal Display, such as uorescent lamps or ar-
ray of LEDs (Light Emitting Diodes).
Black body – A hypothetical object that absorbs all incident radiation, thus any radiation (e.g. light)
coming from a blackbody must be emitted from it and not reected.
Blackbody Radiator Locus – The curved formed when the color of light radiated from a black-
body is plotted at different temperatures on a color space such as CIE xy.
Black Level – The luminance or “brightness” of black when displayed on the screen.
Calibration – The process of bringing a device such as a display monitor to an absolute standard
to ensure consistency over time and with other similarly calibrated devices.
Candelas (cd) – An international unit of light intensity. Luminance can be described in units of
Candelas per meter squared (cd/m²) but is often referred to as just Candelas or Nits for sake of
brevity.
CIE – The Commission Internationale d’Eclairage (International Commission on Illumination). An
organization that sets many of the standards used in color and color measurement.
CIE Lab – A color space that is relative to a reference white point. The L value represents lightness, a represents Red/Green and b represents Yellow/Blue. Lab is almost perceptually uniform in
that differences between colors expressed in Lab correlate to equally perceived color differences.
CIE uv chromaticity coordinates – Coordinates in the CIE uv color space which are derived
directly from CIE xyY color space. CIE uv is more perceptually uniform than CIE xy.
CIE xy chromaticity coordinates – Coordinates in the CIE xyY color space representing color
independent of luminance.
CIE xyY – A standard color space in which the Y component represents luminance. The x and y
components represent color.
Color Gamut – (See Gamut)
Colorimeter – An optical measurement device used to measure color that responds to light by
separating it into red, green, and blue components.
Color Management System (CMS) – Software used to control the handling of color between
scanner, monitor, and printer. ColorSync is an example of a CMS used on the Macintosh. Microsoft Image Color Management (ICM) is an example of a CMS used on Windows systems.
Page 61

60 | NEC SPECTRAVIEW II - USER’S GUIDE
Color Separation – The separating of a color image into the cyan, magenta, yellow, and black
color layers used for printing.
Color Separation Tables – A set of conversion tables used to calculate the separating of RGB images into the CMYK layers necessary for printing.
Color Space – A three dimensional representation of colors. Examples are RGB, CIE xyY, and
CIE Lab.
ColorSync – The Color Management System built into the Macintosh Operating System (Mac
OS).
Color Temperature – The color of light given off by an object, known as a blackbody, as it is
heated to a given temperature in degrees Kelvin. Low color temperatures such as 5000K are red-
dish, whilst higher color temperatures such as 9300K are bluish. A color temperature of 6500K is
considered to be “neutral” white.
Contrast Ratio – The ratio of the white luminance (Intensity) and black luminance (Black Level) of
the display.
Correlated Color Temperature – The closest matching color, expressed in Kelvin, of a white
point that does not lie exactly on the blackbody locus.
CMYK – The subtractive colors used in printing: Cyan, Magenta, Yellow, and Black. Note that
Black is referred to using “K” to avoid confusion with “blue”.
D Illuminants – CIE Daylight Standard Illuminants based on approximating daylight. The sub-
script denotes the correlated color temperature of the illuminant. For example, D50 has a correlated color temperature of 5000K.
Delta-E (Δ-E) – A measurement of how different two colors are to each other. In SpectraView, Delta-E values are derived by calculating the distance between two colors in Lab color space using
the CIE 94 formula. A Delta-E value of 1 indicates a just perceptual difference between two colors.
Delta-uv (Δ-uv) – A measure of how different two colors are, irrespective of luminance. In SpectraView Delta-uv values are used to indicate how far a white point is from the blackbody locus. CIE
uv color space is used instead of CIE xy because it is more perceptually uniform or linear.
Device Dependent Color – A color space that is tied to the color rendering capabilities of a spe-
cic device. Examples are RGB color spaces that depend on the phosphor or lter colors used on
the display. Another example is CMYK color spaces that are dependent on the types of inks and
paper used.
Device Gamut – The range of colors that a device can produce.
Device Independent Color – A color space that can describe color independently of the capabili-
ties of a specic device. An example is the CIE xy color space.
DDC/CI – Display Data Channel Command Interface is a two-way communications link between
the video graphics adapter and display monitor using the video signal cable.
DICOM – Digital Imaging and Communications in Medicine.
Foot Lamberts (fL) – A unit of luminance. One foot Lambert is equal to 1 Candela per meter
squared divided by 10.76/π (approximately 3.43) .
Page 62

61 | NEC SPECTRAVIEW II - USER’S GUIDE
Gamma – The relationship between the input video signal to a display monitor and the screen output luminance. Typically the screen luminance follows a mathematical power function of the input
video signal, the exponent of which is called the gamma.
Gamut – The range of colors that can be reproduced on a particular device such as a monitor or
printer, or that can be distinguished by a sensing device such as a scanner or the human eye.
Hue – The basic attribute of color such as red, green, yellow, blue or purple.
ICC – International Color Consortium, a color industry group working on standards for color man-
agement technology.
ICC Prole – A le conforming to the standards set by the ICC that contains a description of the
color characteristics of a device such as a monitor, printer, or scanner. In Windows, ICC proles
typically have the le extension “.icm”.
Image Color Management (ICM) – The Color Management System built into the Microsoft Windows operating systems.
Intensity – Intensity species the luminance or brightness of white when displayed on the screen.
Kelvin – An absolute temperature scale denoted by K. Zero Kelvin (0K) is equivalent to –273°
Celsius.
Lab – (See CIE Lab)
LED – Light Emitting Diode.
LCD – Liquid Crystal Display.
Lightbox – An enclosure with controlled lighting conditions used to evaluate proofs, transparen-
cies and other printed materials. Typically a lightbox is illuminated to approximate a standard
illuminant such as D50 or D65.
Luminance – A measure of the brightness or intensity of light, usually expressed in units of Candelas per meter squared (cd/m²) or foot Lamberts.
Look Up Table (LUT) – A table used to translate input values to output values. SpectraView displays use 10 or 12 bit internal LUTs to apply Gamma corrections and Tone Response Curves.
MCS (Monitor Calibration Settings) le – A le used by SpectraView II to store the results of the
calibration, including the monitor settings and measurements.
Metamerism – A phenomenon in which two color samples appear to match in color under certain
lighting conditions but not in others.
MPCD (Minimum Perceptible Color Difference) – A unit of measure, developed by the CIE, to
dene the change in light and color required to be just noticeable to the human eye.
Nit – A unit of luminance equal to Candelas per meter squared (cd/m²).
NTSC – National Television Standards Committee. A standard for encoding video signals used
widely in North America and Japan.
PAL – Phase Alternation by Line. A standard for encoding video signals used in Western Europe
and parts of Asia.
Phosphors – Materials that emit light when struck by radiation of certain wavelengths. CRT dis-
plays use phosphors that give off red, green, and blue light to display an image on the screen.
Page 63

62 | NEC SPECTRAVIEW II - USER’S GUIDE
Prole – A le containing a description of the color characteristics of a device such as a monitor,
printer, or scanner.
Refresh Rate – The number of times the display screen is electronically scanned or “painted”
each second. Expressed in Hertz (Hz).
Saturation – An expression of the amount a color deviates from being achromatic (neutral in color,
such as gray). For example, red is a saturated color, while pink is less saturated, and white has no
saturation.
SECAM – Sequentiel Couleur Avec Mémoire (Sequential Color with Memory). A standard for en-
coding video signals used mainly in France and Eastern Europe.
Soft Proof – Previewing on a display monitor what an image will actually look like when printed on
a particular printer.
Subtractive Primaries – Cyan, magenta, and yellow colors, such as dyes or inks that subtract
light reecting off objects giving the appearance of color. For example magenta ink subtracts
green light. When combined together, cyan, magenta, and yellow produce black.
Tone Response Curve – A graph representing the relationship between the input and output of a
system or device. In SpectraView, Tone Response Curves represent the relationship between the
intensity of a color within an application and the light intensity displayed on the monitor.
USB – Universal Serial Bus. A communication bus used to connect up to 127 devices such as
keyboards, mice, scanners, color sensors, etc.
Viewing Booth – (See Lightbox)
White point – Species the color of pure “white” on a display, usually as a Color Temperature ex-
pressed in Kelvin or as CIE xy chromaticity coordinates.
Page 64

Copyright © 2003-15 NEC Display Solutions, Ltd. All rights reserved.
USA and Canada: www.necdisplay.com
Europe: www.nec-display-solutions.com
Australia: www.spectraview.nec.com.au
Page 65

Version
1.1.20
Guide de l'utilisateur
Français
Page 66

2 | NEC SPECTRAVIEW II - GUIDE DE L'UTILISATEUR
Mises à jour logicielles et avis
Des mises à jour et améliorations pour le logiciel SpectraView pourront être publiées de façon ponctuelle. Rendez-vous
dans la section SpectraView II du site Internet de NEC DISPLAY SOLUTIONS pour vérier leur disponibilité.
NEC DISPLAY SOLUTIONS est à l'écoute de vos avis et suggestions pour améliorer nos produits. Merci d'utiliser le
formulaire d'avis dans la section SpectraView du site Internet de NEC DISPLAY SOLUTIONS.
Si vous êtes en Europe, merci de vous rendre sur le site Internet de NEC Display Solutions Europe,
www.nec-display-solutions.com.
Si vous êtes en Australie ou en Nouvelle-Zélande, merci de vous rendre sur le site Internet de NEC Australia,
www.spectraview.nec.com.au.
Assistance technique
Pour recevoir de l'aide technique pour le produit SpectraView II, merci de vous rendre dans la section SpectraView II du
site Internet de NEC DISPLAY SOLUTIONS et de vérier si une foire aux questions peut vous aider à résoudre votre
problème. Un formulaire d'avis en ligne est à votre disposition pour envoyer des questions et avis.
Pour recevoir de l'aide technique en Europe, merci de vous rendre sur le site Internet de NEC Display Solutions Europe,
www.nec-display-solutions.com, ou d'envoyer un e-mail à l'adresse spectraview@nec-displays.com.
Pour recevoir de l'aide technique en Australie ou en Nouvelle-Zélande, merci de vous rendre sur le site Internet de NEC
Australia, www.spectraview.nec.com.au, ou d'envoyer un e-mail à l'adresse spectraview.support@nec.com.au. Numéro
de téléphone du service après-vente : 131 632.
Marques de commerce et copyright
SpectraView est une marque déposée de NEC Display Solutions of America, Inc.
Adobe, le logo Adobe, Acrobat et Photoshop sont des marques déposées ou des marques de commerce d'Adobe
Systems Incorporated aux États-Unis et/ou dans d'autres pays.
Apple, Macintosh, ColorSync, Mac et le logo Mac sont des marques de commerce d'Apple Computer, Inc. enregistrées
aux États-Unis et dans d'autres pays.
Microsoft, Excel et Windows sont des marques déposées ou des marques de commerce de Microsoft Corporation aux
États-Unis et/ou dans d'autres pays.
Copyright © 2003-15 NEC Display Solutions, Ltd.
Les informations dans ce guide sont données à titre de renseignement uniquement, sont modiables sans préavis et ne
doivent pas être considérées comme un engagement de la part de NEC Display Solutions, Ltd. NEC Display Solutions,
Ltd. n'assume aucune responsabilité en cas d'erreurs ou d'imprécisions pouvant apparaître dans ce guide.
Tous droits réservés. Vos droits de propriété sont sujets aux limites et restrictions imposées par les lois sur le copyright,
comme dénies ci-dessous.
Il est illégal de copier, de reproduire ou de transmettre, y compris mais sans s'y limiter de transmettre par voie électronique
sur un réseau, l'ensemble ou une partie de ce guide, sauf si la loi américaine sur le copyright, Titre 17 du Code des
États-Unis, l'autorise. Dans le cadre de cette loi, la copie inclut la traduction vers une autre langue ou l'adaptation vers
un autre format.
Le paragraphe ci-dessus ne constitue pas une liste exhaustive des restrictions qui s'imposent à vous dans le cadre de
la loi américaine sur le copyright.
Pour connaître l'ensemble des restrictions qui s'imposent à vous dans le cadre de la législation des États-Unis
d'Amérique sur le copyright, consultez le Titre 17 du Code des États-Unis.
États-Unis et Canada : www.necdisplay.com
Australie : www.spectraview.nec.com.au
Europe www.nec-display-solutions.com
Révision 150210
Page 67

3 | NEC SPECTRAVIEW II - GUIDE DE L'UTILISATEUR
Federal Communications Commission (FCC) Notice (U.S.A. Only)
WARNING: This equipment has been tested and found to comply with the limits for a Class B digital device, pursuant to
Part 15 of the FCC Rules. These limits are designed to provide reasonable protection against harmful interference in a
residential installation. This equipment generates, uses, and can radiate radio frequency energy and, if not installed and
used in accordance with the instructions, may cause harmful interference to radio communications. However, there is no
guarantee that interference will not occur in a particular installation. If this equipment does cause harmful interference
to radio or television reception, which can be determined by turning the equipment off and on, the user is encouraged
to try to correct the interference by one or more of the following measures:
• Reorient or relocate receiving antenna.
• Increase the separation between the equipment and receiver.
• Connect the equipment into an outlet on a circuit different from that to which the receiver is connected.
• Consult the dealer or an experienced radio/TV technician for help.
This device complies with Part 15 of the FCC rules. Operation is subject to the following two conditions:
• This device may not cause harmful interference.
• This device must accept any interference received including interference that may cause undesired operation.
Page 68

4 | Sommaire
Sommaire
Précautions : . . . . . . . . . . . . . . . . 6
Écrans pris en charge . . . . . . . . . . . . . 7
Conguration système requise. . . . . . . . . . 8
Présentation de SpectraView II 9
Présentation . . . . . . . . . . . . . . . . 9
Fonctionnalités et avantages principaux . . . . . 9
Fenêtres, paramètres et menus 11
Fenêtre principale de SpectraView II . . . . . . . 11
Paramètres de cible . . . . . . . . . . . . .12
Calibrage . . . . . . . . . . . . . . . . .12
Boîte de dialogue Conguration d'afchage
(versions Windows et Linux uniquement) . . . . . 13
Boîte de dialogue Modier la cible de calibrage . . . 14
Boîte de dialogue Gamut de couleurs personnalisé . . 17
Boîte de dialogue Courbe gamma personnalisée . . 19
Boîte de dialogue Point blanc personnalisé . . . . 20
Boîte de dialogue Préférences . . . . . . . . . 21
Fenêtre Informations . . . . . . . . . . . . . 27
Fenêtre Colorimètre . . . . . . . . . . . . .34
Fenêtre Mesure de la lumière ambiante. . . . . . 35
Fenêtre Réglages d'écran . . . . . . . . . . . 36
Fenêtre Mise à jour du calibrage interne . . . . .37
Menus . . . . . . . . . . . . . . . . . . . 38
Menu Fichier . . . . . . . . . . . . . . . . 38
Menu Édition . . . . . . . . . . . . . . . . 38
Menu Outils . . . . . . . . . . . . . . . .38
Menu Aide . . . . . . . . . . . . . . . . . 39
Présentation du calibrage 40
Introduction au calibrage d'un écran . . . . . . .40
À propos des cibles . . . . . . . . . . . . . . 42
Gamma et courbes de réponse tonale (CRT) . . .42
Point blanc . . . . . . . . . . . . . . . . . 42
Intensité . . . . . . . . . . . . . . . . . . 43
Rapport de contraste . . . . . . . . . . . . . 43
Gamut de couleurs . . . . . . . . . . . . . . 43
Contrôle des couleurs sur 6 axes . . . . . . . . 44
Utilisation de SpectraView 45
Démarrage . . . . . . . . . . . . . . . . . 45
Sélectionner une cible de calibrage . . . . . . . . 45
Modier une cible . . . . . . . . . . . . . . . 45
Calibrer et proler l'afchage . . . . . . . . . .46
Proler l'afchage . . . . . . . . . . . . . . . 46
Valider le calibrage actuel . . . . . . . . . . .46
En dehors de SpectraView 47
Utiliser des prols d'écran ICC / ColorSync . . . . . 47
Présentation d'Adobe Photoshop . . . . . . . . . 47
Page 69

5 | Sommaire
Foire aux questions 48
Calibrage . . . . . . . . . . . . . . . . . . 48
Dépannage 51
Installation et conguration . . . . . . . . . . . 51
Utilisation des mires d'essai 54
Informations sur le moteur SpectraView 55
Utilisation du contrôle des couleurs sur 6 axes 56
Fonctionnalités par modèle 57
Glossaire 59
Page 70

6 | NEC SPECTRAVIEW II - GUIDE DE L'UTILISATEUR
Précautions:
• Les écrans LCD sont fragiles et peuvent être facilement endommagés en appliquant une force
dessus. N'utilisez jamais de ventouses pour attacher une sonde de couleur sur l'écran. Utilisez toujours
le câble ou l'élingue et le contrepoids fournis pour poser délicatement la sonde de couleur sur la surface
de l'afchage.
• Pendant la procédure de calibrage de l'afchage, des mesures de luminosité extrêmement sensibles sont
faites sur l'écran à l'aide de la sonde de couleur. Les niveaux de lumière ambiante élevés, comme la lumière
directe du soleil sur l'écran, peuvent affecter les mesures et entraîner un calibrage imprécis de l'afchage.
Les changements de lumière ambiante peuvent modier votre perception des images à l'écran. Si possible,
placez votre afchage à l'abri de toute source directe de lumière forte, et maintenez un niveau de lumière
ambiante stable.
• Conservez toujours la sonde de couleur dans son support quand vous ne l'utilisez pas.
• Ne touchez jamais la fenêtre de mesure de la sonde de couleur.
• Ne débranchez jamais la sonde de couleur pendant le fonctionnement du logiciel SpectraView.
• Laissez toujours l'afchage s'échauffer pendant au moins 30 minutes avant le calibrage.
• N'ajustez pas les contrôles de couleur, de luminosité ou de contraste de l'écran une fois ce dernier
calibré, sous peine d'invalider le calibrage des couleurs de l'écran.
• (Mac OS uniquement) N'utilisez pas le panneau de contrôle ColorSync pour alterner entre différents
calibrages d'écran en sélectionnant différents prols de couleur pour l'écran. Utilisez toujours
l'application SpectraView pour charger un calibrage d'écran précédent. En effet, tous les ajustements de
couleur nécessaires, y compris les tables de correspondance, sont conservés dans l'écran et doivent
être paramétrés par SpectraView. Les prols ColorSync générés par SpectraView contiennent des tables
de correspondance linéaires pour la carte graphique.
Remarque: Ce document s'applique aux versions Mac OS, Windows et Linux du logiciel SpectraView II. Les fonctionnalités
et fonctions de toutes les versions sont identiques, sauf indication contraire. La majorité des illustrations de
l'interface utilisateur utilisées dans ce document présentent la version Mac OS. Toutefois, les versions Windows
et Linux ont une disposition identique, sauf indication contraire.
Page 71

7 | NEC SPECTRAVIEW II - GUIDE DE L'UTILISATEUR
Écrans pris en charge
SpectraView II prend en charge les modèles d'écran NEC suivants :
• LCD1980SXi – Écran LCD 19"
• LCD1980FXi – Écran LCD 19"
• LCD1990SX – Écran LCD 19"
• LCD1990SXi – Écran LCD 19"
• LCD1990SXp – Écran LCD 19"
• LCD2090UXi – Écran LCD 20"
• LCD2180UX – Écran LCD 21"
• LCD2180WG-LED – Écran LCD LED 21" à gamut de couleurs étendu
• LCD2190UXi – Écran LCD 21"
• LCD2190UXp – Écran LCD 21"
• LCD2490WUXi – Écran LCD 24"
• LCD2490WUXi2 – Écran LCD 24"
• LCD2690WUXi – Écran LCD 26" à gamut de couleurs étendu
• LCD2690WUXi2 – Écran LCD 26" à gamut de couleurs étendu
• LCD3090WQXi – Écran LCD 30" à gamut de couleurs étendu
• LCD4020 – Écran LCD 40"
• LCD4620 – Écran LCD 46"
• LCD5220 – Écran LCD 52"
• LCD6520 – Écran LCD 65"
• M40, M40B et M40-2 – Écrans LCD 40"
• M46, M46B et M46-2 – Écrans LCD 46"
• X431BT – Écran LCD 43"
• X461UN – Écran LCD 46"
• X462UN – Écran LCD 46"
• X461HB – Écran LCD 46"
• X651UHD – Écran LCD 65" ultra-haute dénition
• X841UHD – Écran LCD 84" ultra-haute dénition
• X981UHD – Écran LCD 98" ultra-haute dénition
• P401 – Écran LCD 40"
• P461 – Écran LCD 46"
• P521 – Écran LCD 52"
• P551 – Écran LCD 55"
• P701 – Écran LCD 70"
• P221W – Écran LCD 22" à gamut de couleurs étendu
• P232W – Écran LCD 23"
• P241W – Écran LCD 24"
• P242W – Écran LCD 24"
• PA231W – Écran LCD 23"
• PA241W – Écran LCD 24" à gamut de couleurs étendu
• PA242W – Écran LCD 24" à gamut de couleurs étendu
• PA271W – Écran LCD 27" à gamut de couleurs étendu
• PA272W – Écran LCD 27" à gamut de couleurs étendu
• PA301W – Écran LCD 30" à gamut de couleurs étendu
• PA302W – Écran LCD 30" à gamut de couleurs étendu
• PA322UHD – Écran LCD 32" ultra-haute dénition à gamut de couleurs étendu
• EA244UHD – Écran LCD 24" ultra-haute dénition à gamut de couleurs étendu
• EA304WMi – Écran LCD 30" à gamut de couleurs étendu
Page 72

8 | NEC SPECTRAVIEW II - GUIDE DE L'UTILISATEUR
Conguration système requise
SpectraView nécessite la conguration système suivante :
Mac OS
Système
d'exploitation
Carte
graphique
Profondeur
de couleurs
vidéo
Résolution
vidéo
Sondes de
calibrage
prises en
charge
Mac Apple à base de processeur Intel,
avec OS X version 10.5 ou plus récent.
Reportez-vous au chier LISEZ-MOI
pour plus d'informations. Les Mac
à base de PPC ne sont plus pris en
charge depuis la version 1.1.11.
Toutes les cartes graphiques Apple
courantes, y compris celles de la plupart
des PowerBooks les plus récents. Une
sortie numérique (DVI ou DisplayPort)
est fortement recommandée.
Reportez-vous au chier LISEZ-MOI et
au site Internet de NEC pour accéder
aux dernières informations sur les Mac
avec une sortie vidéo DisplayPort.
Au moins 24 bits de couleurs (millions de couleurs).
Résolution native de l'écran fortement recommandée (1280x1024, 1600x1200, 1680x1050, 1920x1080, 1920x1200,
2560x1440, 2560x1600 ou 3840x2160 selon l'écran)
• GretagMacbeth Eye-One Display V1
• X-Rite/GretagMacbeth Eye-One
Display V2
• X-Rite/GretagMacbeth Eye-One
Monitor, Eye-One Pro
• X-Rite iOne Pro2
• X-Rite ColorMunki
• X-Rite iOneDisplay Pro
• NEC SpectraSensor Pro
Microsoft Windows XP, XP x64,
Server 2003, Vista et Vista x64,
Windows 7, Windows 7 x64,
Windows 8 et Windows 8 x64.
La plupart des cartes graphiques
ATI, Nvidia, Matrox, S3 Graphics et
Intel récentes. Une sortie numérique
(DVI ou DisplayPort) est fortement
recommandée. Reportez-vous au chier
LISEZ-MOI pour plus d'informations.
• GretagMacbeth Eye-One Display V1
• X-Rite/GretagMacbeth Eye-One
Display V2
• X-Rite/GretagMacbeth Eye-One
Monitor, Eye-One Pro
• X-Rite iOne Pro2
• X-Rite ColorMunki
• X-Rite iOneDisplay Pro
• NEC SpectraSensor Pro
ÿ
Microsoft Windows Linux
Versions 64 bits d'Ubuntu Linux,
version 10.04 ou plus récent et
ses variantes. Reportez-vous
aux Instructions d'installation
pour plus d'informations.
La plupart des cartes
graphiques ATI, Nvidia et
Intel récentes. Une sortie
numérique (DVI ou DisplayPort)
est fortement recommandée.
Reportez-vous aux Instructions
d'installation pour plus
d'informations.
• X-Rite/GretagMacbeth
Eye-One Display V2
• X-Rite iOneDisplay Pro
• NEC SpectraSensor Pro
• NEC MDSVSensor
• NEC MDSVSENSOR3
• Spectroradiomètres Photo
Research PR-655, 670, 680,
730 et 740
• NEC MDSVSensor
• NEC MDSVSENSOR3
• ColorVision/Datacolor Spyder2
• Datacolor Spyder3 et Spyder4
• BasICColor Discus
• Spectroradiomètres Photo Research
PR-655, 670, 680, 730 et 740
USB Au moins un port USB disponible pour la sonde de couleur, ou connexion USB de l'écran (série MultiSync PA et
modèles P232W, P241W, P242W, EA244UHD et EA304WMi uniquement).
• NEC MDSVSensor
• NEC MDSVSENSOR3
• Monaco OptixXR (X-Rite DTP 94)
• ColorVision/Datacolor Spyder2
• Datacolor Spyder3 et Spyder4
• basICColor Discus
• Spectroradiomètres Photo Research
PR-655, 670, 680, 730 et 740
Page 73

9 | NEC SPECTRAVIEW II - GUIDE DE L'UTILISATEUR
Chapitre
Présentation de SpectraView II
1
Présentation
Conçu pour les professionnels et les applications où la couleur est essentielle, SpectraView II combine la technologie
d'écran primée de NEC avec une sonde de mesure de couleur et un logiciel sophistiqué. Il s'agit d'une solution de
calibrage et de prolage d'afchage extrêmement précise, able, réutilisable et complète.
Le système SpectraView utilise une sonde de couleur pour mesurer les couleurs de l'écran pendant le calibrage. Le
logiciel analyse ces mesures, et envoie directement des commandes d'ajustement de couleur à l'écran. Cela signie
que les ajustements de couleur sont réalisés au niveau de l'écran plutôt que de la carte graphique. Les couleurs
disponibles sur la carte graphique sont pleinement exploitées, et vous obtenez une image bien plus claire et le gamut
de couleurs le plus étendu possible. Avec SpectraView, la carte graphique n'est pas du tout utilisée pour corriger les
gamma ou la courbe de réponse tonale de l'afchage, la résolution complète des couleurs et la délité du système sont
donc conservées.
Fonctionnalités et avantages principaux
SpectraView apporte les fonctionnalités et avantages suivants :
• Calibrage automatique - SpectraView communique avec les écrans à partir du protocole Display Data
Channel - Command Interface (DDC/CI), un canal de communication bidirectionnel entre la carte graphique
et l'écran à travers un câble de signal vidéo standard. Aucun câble supplémentaire n'est nécessaire. Tous les
ajustements des réglages de l'écran sont effectués automatiquement à travers ce canal de communication. Une
connexion USB entre le PC hôte et l'écran peut également être utilisée si cette fonction est prise en charge (tous
les modèles de la série MultiSync PA, modèles P232W, P241W, P242W, EA244UHD, EA304WMi, X651UHD,
X841UHD et X981UHD. Consultez la section « Fonctionnalités par modèle » page 57 pour connaître toutes les
fonctionnalités spéciques aux différents modèles.). Vous n'avez pas à congurer manuellement l'écran, car tous
les réglages nécessaires sont effectués par le logiciel.
• Tables de correspondance (LUT) internes à profondeur de bit élevée - Chaque écran LCD pris en charge
par SpectraView II comprend trois LUT internes 10, 12, ou 14 bits (selon le modèle). Ces tables permettent
d'ajuster avec beaucoup de précision la courbe de réponse tonale de l'écran, sans réduire le nombre de couleurs
afchables ou introduire d'artefacts de postérisation.
• Plusieurs jeux de calibrage - Différents calibrages d'écran peuvent être chargés instantanément, an
d'alterner facilement et rapidement entre différents paramètres de calibrage sans avoir à recalibrer l'afchage.
Chaque fois qu'un jeu de calibrage est chargé, les réglages d'écran et prols ICC / ColorSync nécessaires sont
automatiquement mis à jour.
• Informations - À la n de chaque calibrage d'écran, une fenêtre d'informations s'ouvre et présente les résultats
du calibrage. Elle inclut également toute une série d'informations sur l'écran, comme le gamut de couleurs mesuré, le
suivi des couleurs en échelle de gris, la valeur Delta E et la luminance. Des informations supplémentaires sur l'écran,
comme le nom du modèle, le numéro de série et le nombre total d'heures d'utilisation sont également afchées.
• Validation de l'état de calibrage - SpectraView vérie chaque écran calibré pour voir si des contrôles ont
été modiés depuis le dernier calibrage. En cas de changement, l'état de calibrage précédent peut être restauré
automatiquement.
• Polyvalence - SpectraView propose de nombreuses fonctionnalités et options qui le rendent sufsamment
polyvalent pour être utilisé dans toute une série d'applications, y compris la prise en charge complète de la norme
DICOM pour l'imagerie médicale. La luminance de l'afchage peut être ajustée à une valeur spécique ou au
niveau le plus élevé possible pour l'afchage.
• Verrouillage de l'écran - Une fois l'écran calibré, les commandes d'afchage à l'écran peuvent être verrouillées
pour empêcher tout ajustement accidentel ou non autorisé pouvant affecter l'état calibré de l'écran.
Page 74

10 | NEC SPECTRAVIEW II - GUIDE DE L'UTILISATEUR
• Prols d'écran - Après le calibrage, l'afchage est automatiquement prolé, et des prols de couleur
ICC / ColorSync extrêmement précis sont générés et enregistrés automatiquement auprès du Système de gestion
de couleurs. Ces prols utilisent la matrice d'adaptation chromatique Bradford.
• Colorimètre - Le logiciel comprend un colorimètre permettant à la sonde de couleur de prendre directement
des mesures et d'afcher les résultats dans différents formats.
• Fonction de mesure de la lumière ambiante - Permet de prendre des mesures de la lumière ambiante
de l'environnement de visionnage autour de l'écran. Cette fonction est utile pour déterminer les conditions de
visionnage optimales pour l'écran, an que le niveau de lumière ambiante et sa couleur n'affectent pas le visionnage
d'images à l'écran.
Page 75

11 | NEC SPECTRAVIEW II - GUIDE DE L'UTILISATEUR
Chapitre
Fenêtres, paramètres et menus
2
Fenêtre principale de SpectraView II
La fenêtre SpectraView II afche les paramètres actuels et l'état de calibrage de l'écran. Toutes les fonctionnalités de
SpectraView sont accessibles depuis cette fenêtre et les menus.
Modier la cible
Ouvre la boîte de dialogue Modier
la cible de calibrage an de modier
les paramètres de la cible.
Ouvrir une cible
Ouvre un chier Cible de
calibrage.
Liste déroulante
de cibles
Sélectionne des
paramètres de
cible existants. Les
cibles calibrées sont
cochées en vert.
Enregistrer la cible
Enregistre les paramètres de
cible actuels dans un chier
Cible de calibrage.
Calibrage activé
Active ou désactive
le calibrage de
l'afchage.
Calibrer
Calibre l'afchage
sélectionné sur les
paramètres de cible choisis.
Liste déroulante
d'afchages
Sélectionne l'afchage
à calibrer si plusieurs
afchages sont présents.
Ouvrir un calibrage
d'écran précédent
Les calibrages précédents
peuvent être chargés et
visualisés. Les paramètres
d'afchage et les prols
ICC / ColorSync pour
l'afchage seront réglés
automatiquement.
Page 76

12 | NEC SPECTRAVIEW II - GUIDE DE L'UTILISATEUR
Paramètres de cible
Le groupe Paramètres de cible présente les paramètres de cible de calibrage actuels pour l'écran sélectionné. Les
paramètres de cible peuvent être modiés, enregistrés et chargés à partir des boutons Modier, Enregistrer et Ouvrir.
La liste déroulante de cibles contient toutes les cibles disponibles. Quand l'afchage a été calibré sur une cible spécique,
une coche verte apparaît à côté du nom de la cible an d'indiquer que cette cible est utilisable. Différents calibrages
peuvent être restaurés automatiquement en sélectionnant différentes cibles calibrées. Cela vous permet d'alterner
rapidement entre différents paramètres de cible calibrés. La coche verte passera au jaune une fois que le calibrage de
cette cible aura dépassé le délai de recalibrage recommandé, an d'indiquer qu'il est temps de recalibrer cette cible.
Point blanc indique le point blanc de la cible.
Gamma indique le gamma ou le type de courbe de réponse tonale de la cible.
Intensité indique l'intensité d'afchage de la cible.
Rapport de contraste indique le rapport de contraste de la cible.
Gamut de couleurs indique le gamut de couleurs de la cible pour les modèles d'afchage prenant en charge l'ajustement
du gamut. Cette ligne sera grisée si l'afchage actuellement sélectionné ne prend pas en charge l'ajustement du gamut
de couleurs.
Calibrage
Le groupe Calibrage afche l'état de calibrage actuel pour l'écran sélectionné. C'est ici que le processus de calibrage
de l'écran est lancé.
L'écran peut être calibré sur les Paramètres de cible actuels en cliquant sur le bouton Calibrer.
Remarque: Le bouton Calibrer est désactivé si aucune sonde de couleur ou aucun écran pris en charge n'ont été détectés.
Consultez le chapitre «Dépannage» page 51 pour plus d'informations.
État indique l'état de calibrage actuel de l'écran. Les différents états sont Calibré, Non calibré et Calibrage désactivé.
Dernier indique la date et l'heure du dernier calibrage de l'écran.
Prochain indique le nombre de jours avant le prochain recalibrage prévu de l'afchage, ou le nombre de jours qui se
sont écoulés depuis la date de recalibrage prévue. La valeur de ce champ est basée sur la date du dernier calibrage et
sur l'option Délai de rappel de recalibrage dans la boîte de dialogue Préférences.
Si l'écran ne se trouve pas dans un état calibré, la case Calibrage activé est décochée. Si les commandes d'afchage
à l'écran sont verrouillées à l'aide de l'option Verrouiller les commandes d'afchage à l'écran dans la boîte de
dialogue Préférences, les commandes d'afchage à l'écran seront automatiquement déverrouillées une fois la case
Calibrage activé décochée. Cochez la case pour recongurer automatiquement l'écran et le ramener à son état calibré
précédent.
Le bouton Ouvrir ouvre la boîte de dialogue Calibrage d'écran précédent, qui contient tous les calibrages
précédemment réalisés. Vous pouvez afcher les résultats détaillés de chaque calibrage et sélectionner un calibrage
précédent pour le charger. Le chargement d'un calibrage d'écran précédent congure automatiquement l'afchage et
regénère le prol ICC / ColorSync si l'un d'eux a été généré lors du calibrage. Cette fonctionnalité peut être utilisée
pour alterner manuellement entre différents calibrages d'écran avec différents paramètres de cible, ou pour restaurer
un calibrage en particulier.
Remarque: Les calibrages d'écran sont spéciques à chaque écran et ne peuvent pas être utilisés pour charger les
paramètres calibrés d'un écran sur un autre écran, même s'il s'agit du même modèle. Chaque écran présente ses
propres tolérances et caractéristiques.
Page 77

13 | NEC SPECTRAVIEW II - GUIDE DE L'UTILISATEUR
Achage
Le groupe Afchage permet de sélectionner l'écran à calibrer si plus d'un écran est présent sur le système. Les
afchages peuvent être sélectionnés à partir de la liste déroulante. Les Paramètres de cible et l'état de Calibrage
seront automatiquement mis à jour. Notez que les Paramètres de cible sont exclusifs à chaque écran si plusieurs
écrans sont utilisés, chaque écran peut donc être calibré sur des paramètres de cible différents si nécessaire.
Le bouton Conguration d'afchage (versions Windows et Linux
uniquement) ouvre la boîte de dialogue Conguration d'afchage.
Cette dernière permet de congurer SpectraView II si plusieurs
écrans sont utilisés sur le système. Reportez-vous à la section
suivante.
Boîte de dialogue Conguration d'achage (versions Windows et Linux uniquement)
La boîte de dialogue Conguration d'afchage est accessible
soit depuis le menu Édition, soit en cliquant sur le bouton
Afchage : Modier dans la fenêtre principale de SpectraView.
Vous devrez peut-être congurer manuellement la relation entre
la disposition d'afchage sur le bureau et les écrans connectés
au système. La bonne conguration de cette relation est
nécessaire pour que les ajustements de l'écran soient envoyés
au bon écran et pour que le calibrage soit effectué sur la bonne
partie du bureau.
Un diagramme présentant la disposition du bureau est afché,
et les écrans associés à chaque partie du bureau sont indiqués.
L'écran associé à chaque afchage peut être sélectionné à
l'aide des listes déroulantes.
Vous pouvez également cliquer sur les différents rectangles
d'afchage pour sélectionner les afchages du bureau du
système.
Si une connexion USB est établie avec l'écran (tous les modèles
de la série MultiSync PA et modèles P232W, P241W, P242W,
EA244UHD, EA304WMi, X651UHD, X841UHD et X981UHD
uniquement), la connexion USB sera afchée et devra être
sélectionnée au lieu de la connexion DDC/CI. Consultez la
section « Fonctionnalités par modèle » page 57 pour connaître
toutes les fonctionnalités spéciques aux différents modèles.
Remarque: Certaines cartes graphiques peuvent présenter des achages doublons, en raison de problèmes au niveau des
pilotes de la carte. Dans ce cas, vous pouvez régler les achages doublons sur «Aucun».
Autocong. - Tente de détecter et de congurer automatiquement les écrans sur la disposition d'afchage du bureau
du système. Dans la plupart des cas, la bonne relation sera automatiquement congurée, mais il est possible que vous
deviez la congurer manuellement.
Test de LUT - Vérie si les LUT (Tables de correspondance) de la carte graphique peuvent être correctement paramétrés.
Cliquez sur ce bouton pour faire clignoter la luminosité de l'écran en paramétrant la LUT de la carte graphique pour
l'écran sélectionné. Assurez-vous que le bon écran clignote quand vous cliquez sur ce bouton.
Page 78

14 | NEC SPECTRAVIEW II - GUIDE DE L'UTILISATEUR
Remarque: Étant donné que SpectraView applique toutes les courbes de correction à la LUT 10, 12 ou 14bits intégrée
àl'écran, la LUT de la carte graphique sera toujours linéaire.
Test d'écran - Teste la communication avec l'écran sélectionné. Cliquez sur ce bouton pour envoyer un ordre de
clignotement de la couleur ou de la luminosité du voyant d'alimentation de l'écran ou de la luminosité de l'écran (selon le
modèle d'afchage). Si le mauvais écran clignote, modiez l'écran associé à chaque afchage à l'aide des listes
déroulantes.
Boîte de dialogue Modier la cible de calibrage
La boîte de dialogue Modier la cible de calibrage est accessible en cliquant sur le bouton Modier la cible sur
la fenêtre principale de SpectraView II ou en sélectionnant Cible dans le menu Édition. Des cibles personnalisées
peuvent être créées à partir de cette boîte de dialogue. Après la création d'une nouvelle cible, l'afchage doit être calibré
sur celle-ci. Vous pouvez partager des chiers de cible avec d'autres utilisateurs de SpectraView sur Windows, Linux
et Mac OS.
Point blanc
Point blanc sélectionne le point blanc cible du calibrage. Plusieurs
valeurs de point blanc courantes dans le milieu, comme D50 et
D65, sont proposées.
L'option Natif est disponible et peut être utilisée pour laisser
la valeur de point blanc sur le point blanc natif de l'afchage.
Cette fonction est utile quand la luminance maximale possible
est souhaitée mais que le point blanc n'est pas un paramètre
essentiel.
Vous pouvez spécier un point blanc personnalisé en cliquant sur
le bouton Modier... pour ouvrir la boîte de dialogue Température
de couleur personnalisée.
Page 79

15 | NEC SPECTRAVIEW II - GUIDE DE L'UTILISATEUR
Courbe de gamma
Courbe de gamma sélectionne la courbe de réponse tonale souhaitée pour l'afchage calibré. Les différentes options sont :
• Gamma natif de l'écran - Aucune correction n'est appliquée, et les tables de correspondance de l'afchage
sont établies en linéaire.
• Valeur de courbe de gamma - La courbe de réponse suit une simple courbe de gamma. Vous pouvez
saisir des valeurs situées entre 1,0 et 3,0. La valeur de gamma 2,2 est la plus courante pour la plupart des
applications.
• Courbe DICOM - La courbe de réponse suit la norme DICOM (Digital Imaging and Communications in
Medicine - Imagerie numérique et communications médicales). Cette courbe de réponse est destinée à un usage
médical, mais elle peut également être utilisée pour d'autres applications. L'objectif de la courbe de réponse
DICOM est de produire une réponse d'afchage visuellement linéaire.
Utiliser un facteur d'échelle - La forme de la courbe de réponse DICOM est basée sur le niveau de noir et
l'intensité mesurés. Si le niveau de noir ou l'intensité de l'afchage change, la forme de la courbe de réponse
DICOM sera également modiée. Si un afchage ne sera pas recalibré avant plusieurs mois, cette fonction
peut être utilisée pour allonger la durée de vie du calibrage DICOM en prenant en compte le fait que la
luminosité de l'afchage diminuera sensiblement à mesure que le temps passe. En mettant à l'échelle les
valeurs de niveau de noir et d'intensité utilisées pour calculer la courbe de réponse DICOM à partir de la valeur
de l'option Utiliser un facteur d'échelle, il est possible de baser la courbe de réponse sur le niveau de noir et
l'intensité futurs plus faibles. La valeur utilisée dépend de l'afchage, de son utilisation et de l'intervalle avant
son prochain recalibrage.
• BT.1886 - Une courbe de réponse recommandée pour les afchages à écran plat utilisés dans la production
en studio de matériaux prévus pour une télévision haute dénition. Elle reproduit un gamma proche de 2,4, mais
cette valeur est automatiquement ajustée pour améliorer la visibilité des détails en fonction du niveau de noir.
• Courbe personnalisée - Des courbes de réponse avancées et personnalisées peuvent être sélectionnées à
partir de préréglages ou créées en important une table de valeurs. Cliquez sur le bouton Modier... pour ouvrir la
boîte de dialogue Courbe gamma personnalisée.
Intensité
L'intensité détermine la luminance ou « luminosité » du blanc pour le calibrage. Les différentes options sont :
• Maximum possible - Calibre l'afchage sur la luminance la plus haute possible. La valeur atteinte dépend
du type d'afchage, de son âge et du point blanc utilisé. Cette option est déconseillée quand vous essayez de
faire correspondre deux afchages ou plus, car il peut y avoir une différence au niveau de l'intensité que chaque
afchage peut atteindre.
• Niveau spécique - Calibre l'intensité de l'écran sur une valeur cible spéciée. Si l'afchage ne peut
atteindre la valeur spéciée, il sera calibré sur l'intensité la plus proche possible, et un message sera afché à la
n du calibrage.
Remarque: En cas d'incertitude sur le niveau à utiliser pour le Niveau spécique d'une application en particulier, vous
pouvez ajuster de façon interactive le point blanc et l'intensité à l'aide de la fonction Correspondance visuelle dans
la boîte de dialogue Point blanc personnalisé.
Page 80

16 | NEC SPECTRAVIEW II - GUIDE DE L'UTILISATEUR
Rapport de contraste
Rapport de contraste permet d'utiliser un rapport de contraste en
particulier si nécessaire. Le rapport de contraste est le rapport entre la
luminance du blanc et celle du noir.
Sélectionnez Réglage par défaut de l'écran pour calibrer l'afchage sur
le rapport le contraste le plus élevé possible. Cette valeur est limitée par la
technologie de l'afchage, le point blanc sélectionné, la valeur d'intensité
et d'autres facteurs.
Dans certaines applications, comme la simulation d'images à contraste
faible pour du papier journal, il peut être utile d'utiliser un rapport de
contraste plus faible que la valeur native de l'afchage. Des rapports de
contraste allant de 50:1 à 500:1 peuvent être sélectionnés.
Remarque: Si le rapport de contraste sélectionné est plus élevé que ce
dont l'achage est capable, l'achage sera calibré sur le rapport de contraste
le plus élevé possible. Si un rapport de contraste spécique est choisi, nous vous
recommandons de paramétrer au moins 32étapes de calibrage et de mesure
dans laboîte de dialogue Préférences.
Gamut de couleurs
Gamut de couleurs permet de sélectionner un gamut de
couleurs en particulier, si l'afchage prend en charge les
ajustements de gamut de couleurs. Le gamut de couleurs est
la gamme de couleurs pouvant être afchées par l'écran. Il est
déni par et lié aux couleurs primaires rouge, vert et bleu, dont
la combinaison permet de créer toutes les autres couleurs.
Remarque: Selon le modèle d'achage, ce contrôle peut être
désactivé ou limité à Natif et sRGB.
Pour les modèles avancés, comme ceux de la série MultiSync PA,
le gamut de couleurs peut être entièrement contrôlé et
personnalisé, et le moteur interne de SpectraView manipulera les
couleurs primaires an d'afcher différents espaces de couleur.
Plusieurs gamuts de couleurs préréglés sont disponibles dans la liste, et vous pouvez également créer un gamut
personnalisé. Cliquez sur le bouton Modier... pour ouvrir la boîte de dialogue Gamut de couleurs personnalisé.
Avec le paramètre Natif (plein), le gamut de couleurs sera celui de l'écran LCD. Cela permet d'obtenir le gamut de
couleurs le plus large possible. Utilisez ce paramètre si vous travaillez avec des applications à gestion de couleurs
comme Adobe Photoshop, qui ont recours à un Système de gestion de couleurs pour convertir correctement les
couleurs à afcher.
Voici quelques exemples de situations typiques dans lesquelles il peut être avantageux d'utiliser un autre gamut de
couleurs que le gamut natif :
Montage vidéo : Si vous faites du montage de vidéos dans une application sans gestion de couleurs. Dans ce
cas, la vidéo est généralement encodée et pensée pour être visualisée sur un afchage avec des couleurs primaires
SMPTE-C ou ITU-R BT.709. Étant donné que l'application de montage vidéo ne prend pas en charge la gestion
des couleurs, aucune conversion de couleur n'est faite entre l'espace de couleur de la vidéo encodée et celui de
l'afchage. Si l'afchage est réglé sur le gamut de couleurs natif, l'image de la vidéo paraîtra trop saturée car elle est
afchée directement sur le gamut de couleurs étendu de l'afchage, sans aucune compensation. En réglant le gamut
de couleurs de la cible de calibrage sur celui de la vidéo encodée, l'afchage prend en charge la conversion de
couleurs qui aurait normalement eu lieu si la vidéo présentait une fonction de gestion des couleurs, et sera afchée
correctement sans paraître trop saturée.
Page 81

17 | NEC SPECTRAVIEW II - GUIDE DE L'UTILISATEUR
Afchage de pages web : Si vous visualisez des pages web à l'aide d'un navigateur Internet et d'un système
sans gestion des couleurs, les images et graphiques vous paraîtront trop saturés, car ils ont probablement été
conçus pour être afchés sur un afchage à gamut sRGB typique. Dans cette situation, l'utilisation du gamut de
couleurs sRGB comme cible attribuera à l'afchage la tâche de convertir les couleurs pour reproduire l'espace de
couleur sRGB, même s'il s'agit d'un écran LCD à gamut de couleurs large.
Contrôle des couleurs sur 6axes
La fonction Contrôle des couleurs sur 6 axes permet
d'ajuster les couleurs de l'écran après le calibrage. Les
ajustements sont réalisés dans la boîte de dialogue
Contrôle des couleurs sur 6 axes, accessible depuis le
menu Outils. Les ajustements des réglages pour la cible
actuelle peuvent être réinitialisés en cliquant sur le bouton
Réinitialiser. Consultez « Utilisation du contrôle des
couleurs sur 6 axes » page 56 pour plus d'informations
sur comment utiliser cette fonctionnalité.
Boîte de dialogue Gamut de couleurs personnalisé
La boîte de dialogue Gamut de couleurs personnalisé est accessible en cliquant sur le bouton Modier... dans la
section Gamut de couleurs de la boîte de dialogue Modier la cible de calibrage.
Remarque: Cette fonctionnalité n'est disponible que sur l'ensemble des modèles de la gamme MultiSync PA et sur les
modèles P232W, P241W, P242W, X651UHD, X841UHD et X981UHD. Consultez la section «Fonctionnalités par
modèle» page 57 pour connaître toutes les fonctionnalités spéciques aux diérents modèles.
Le gamut de couleurs de l'écran peut être modié en changeant les positions des couleurs primaires rouge, vert et bleu.
Cela peut être fait en faisant un glisser-déposer sur les contrôles de position du diagramme CIE xy ou en modiant les
valeurs CIE xy pour chaque couleur primaire.
Le gamut de couleurs natif de l'écran est afché sous la forme d'un triangle jaune sur le diagramme de chromaticité de
la boîte de dialogue. Ce triangle représente les limites des couleurs afchables. Les couleurs en dehors du triangle ne
peuvent pas être correctement représentées par l'afchage.
Les écrans LCD utilisés dans la série NEC MultiSync PA (à l'exception des modèles PA231W, P232W, P241W et
P242W) sont des écrans à gamut de couleurs étendu, ce qui signie qu'ils peuvent afcher une gamme de couleurs
bien plus large que les écrans habituels.
Page 82

18 | NEC SPECTRAVIEW II - GUIDE DE L'UTILISATEUR
Cependant, pour certaines applications, il est préférable de ne pas utiliser un gamut de couleurs étendu. Dans ce cas,
le contrôle de gamut de couleurs peut être utilisé pour manipuler la taille et la forme du gamut de couleurs.
Il existe également des situations dans lesquelles l'écran doit se comporter comme s'il disposait d'un gamut de couleurs
plus étendu qu'en réalité. Dans ce cas, les couleurs en dehors de la gamme afchable de l'écran LCD seront converties
automatiquement vers la couleur afchable la plus proche. L'espace de couleur DCI utilisé pour les applications Digital
Cinema est un bon exemple. Certaines parties de cet espace de couleur se situent en dehors de la gamme des couleurs
afchables, mais il est tout de même préférable que l'afchage reproduise le gamut de couleurs DCI pour toutes les
parties de l'espace de couleur qui se situent dans la gamme des couleurs afchables.
Remarque: Quand le réglage de gamut de couleurs est autre que Natif, les prols ICC/ ColorSync générés par SpectraView
utiliseront automatiquement les valeurs de chromaticité de couleurs primaires calculées par le moteur interne
de SpectraView pour l'achage, au lieu des mesures prises par la sonde de couleur si le réglage Source des
coordonnées chromatiques des couleurs primaires pour le prol ICC dans la boîte de dialogue Préférences
est sur Automatique (par défaut). Cette fonctionnalité permet d'utiliser des gamuts de couleurs plus étendus que
celui dont dispose l'écran, et encode les valeurs de chromaticité correctes des couleurs primaires dans le prol ICC/
ColorSync, même si elles ne sont pas toutes réellement achables et mesurables.
Ce comportement peut être modié si nécessaire en sélectionnant Sonde de calibrage dans la boîte de dialogue
Préférences, mais notez que si un gamut de couleurs plus étendu que celui de l'achage est utilisé, les valeurs de
chromaticité des couleurs primaires dans le prol ICC/ ColorSync ne représenteront pas correctement le gamut de
couleurs cible.
Page 83

19 | NEC SPECTRAVIEW II - GUIDE DE L'UTILISATEUR
Boîte de dialogue Courbe gamma personnalisée
La boîte de dialogue Courbe gamma personnalisée est accessible en cliquant sur le bouton Modier... dans la
section Courbe de gamma de la boîte de dialogue Modier la cible de calibrage.
Des courbes de réponse avancées peuvent être sélectionnées à partir de préréglages, et des courbes personnalisées
peuvent être créées en important une table de valeurs.
Les courbes préréglées suivantes sont disponibles :
• sRGB - Une courbe basée sur la spécication sRGB qui inclut le décalage, la transition et la pente.
• L* - Une courbe basée sur la valeur L* des spécications Lab. La courbe L* est pensée pour être plus
homogène qu'une simple courbe de gamma.
• Vidéo NTSC - Une courbe basée sur la spécication SMPTE-170M pour NTSC qui inclut le décalage, la
transition et la pente.
• SMPTE-240M - Une courbe basée sur la spécication SMTPE-240M pour la vidéo HD à 1 125 lignes qui
inclut le décalage, la transition et la pente.
Des courbes personnalisées peuvent être créées et importées dans SpectraView en créant un chier texte avec une
liste de valeurs numériques. Le chier texte doit être conforme aux spécications suivantes :
• Il doit contenir entre 3 et 256 valeurs.
• Chaque valeur doit être sur une ligne séparée.
• La première valeur doit être 0.
• Les valeurs doivent présenter une augmentation monotone.
Quand elles sont importées, les valeurs sont automatiquement mises à l'échelle et interpolées pour créer une courbe
cible.
Page 84

20 | NEC SPECTRAVIEW II - GUIDE DE L'UTILISATEUR
Boîte de dialogue Point blanc personnalisé
La boîte de dialogue Point blanc personnalisé est accessible en cliquant sur le bouton Modier... dans la section
Point blanc de la boîte de dialogue Modier la cible de calibrage.
Un point blanc personnalisé peut être créé en le spéciant comme une température de radiateur de corps noir en Kelvin,
comme des coordonnées CIE (chromaticité xy) ou en ajustant et en mesurant de façon visuelle et interactive.
Des valeurs situées entre 2 500 K et 10 000 K peuvent être saisies dans le champ Corps noir. Les coordonnées CIE xy
correspondantes sont automatiquement calculées et afchées à titre de référence.
Les coordonnées chromatiques CIE xy peuvent être saisies en sélectionnant le bouton Coordonnées CIE et en entrant les
valeurs x et y. Les valeurs corrélées correspondantes de température de radiateur de corps noir et Δuv (Delta-uv) sont
automatiquement calculées et afchées à titre de référence. La valeur Delta-uv indique la distance entre les coordonnées
xy saisies par rapport au lieu du radiateur de corps noir.
Un point blanc personnalisé peut être mesuré avec la sonde de calibrage et automatiquement saisi dans le champ de
coordonnées chromatiques CIE xy en cliquant sur le bouton Mesurer. Cette fonction est utile pour « cloner » le point
blanc d'un autre écran.
La sonde de couleur peut être placée sur le cercle blanc à droite de la boîte de dialogue, an de prendre une mesure du
point blanc en cliquant sur le bouton Mesurer. Le cercle peut également servir à comparer visuellement le point blanc
par rapport à un autre point de référence, comme une table lumineuse. Si une zone de référence de blanc plus grande
est nécessaire, sélectionnez Arrière-plan blanc pour que tout l'arrière-plan devienne blanc.
La luminance et la couleur de l'afchage peuvent être ajustées de façon interactive pour créer une correspondance
visuelle avec un point de référence si nécessaire. Pour ajuster de façon interactive la couleur de l'afchage, faites un
glisser-déposer dans le cercle de couleur, ou utilisez les èches directionnelles. Utilisez le curseur vertical pour ajuster
l'intensité. Des valeurs de rouge, de vert et de bleu spéciques peuvent également être saisies.
Une fois une correspondance visuelle trouvée, le point blanc ajusté doit être mesuré en cliquant sur le bouton Mesurer
et en mesurant le cercle blanc avec la sonde de couleur. Cette opération mettra à jour les valeurs du point blanc cible
avec les nouvelles valeurs de point blanc.
Remarque: Pour certaines applications et en raison des limites techniques de la sonde de couleur par rapport à l'œil
humain, il est parfois préférable d'établir une correspondance visuelle avec un point blanc à l'aide de cette méthode
interactive, puis de mesurer ce point blanc avec la sonde de couleur.
Page 85

21 | NEC SPECTRAVIEW II - GUIDE DE L'UTILISATEUR
Boîte de dialogue Préférences
La boîte de dialogue Préférences est accessible depuis le menu Édition sur Windows et Linux, et dans le menu de
l'application SpectraView II sur Mac OS. Les préférences sont divisées en 5 onglets.
Les paramètres par défaut pour l'ensemble des préférences peuvent être restaurés en cliquant sur le bouton Valeurs
par défaut.
Boîte de dialogue Préférences- Onglet Sonde de calibrage
Type de sonde - Sélectionne le modèle de sonde de calibrage à utiliser, et afche le modèle actuellement utilisé.
Autodétection - Tente de détecter le modèle de sonde de calibrage utilisé. SpectraView détecte automatiquement la
sonde de calibrage au lancement de l'application. Toutefois, si la sonde n'était pas branchée à ce moment ou si elle était
utilisée par une autre application, il peut être nécessaire de la redétecter.
Remarque: Si la sonde n'était pas branchée lors du lancement de SpectraView, vous devrez peut-être quitter l'application
SpectraView et la relancer.
Port COM - Sélectionne le port utilisé pour communiquer avec la sonde (spectroradiomètres Photo Research uniquement).
Modèle et Numéro de série - Indiquent le modèle et le numéro de série de la sonde de calibrage sélectionnée.
Moyenne des mesures à luminance faible - Calcule la moyenne entre différentes mesures de la sonde de couleur
an d'améliorer les mesures à luminance faible (inférieure à 10 cd/m²). Si vous sélectionnez cette option, le calibrage
de l'écran prendra plus de temps.
Page 86

22 | NEC SPECTRAVIEW II - GUIDE DE L'UTILISATEUR
Boîte de dialogue Préférences- Onglet Calibrage
Étapes de calibrage et de prol - Sélectionne le nombre d'étapes de mesure réalisées lors du calibrage et du prolage de
l'afchage. Un nombre d'étapes élevé permet généralement d'obtenir un calibrage plus précis en échelle de gris, mais cela
augmentera également la durée du calibrage. Nous recommandons d'utiliser 32 étapes pour la plupart des applications.
Délai de rappel de recalibrage - Dénit l'intervalle après le calibrage de l'afchage avant l'apparition d'un rappel pour
recalibrer l'écran. La valeur par défaut est de 2 semaines. Sélectionnez Jamais si vous ne souhaitez pas recevoir de
rappel pour le recalibrage de l'afchage.
Priorité du calibrage - Sélectionne l'algorithme utilisé pour calculer la courbe de réponse de l'afchage. Les différentes
options sont :
• Augmenter le rapport de contraste - Cette option maximise le rapport de contraste de l'afchage en produisant
un noir aussi sombre que possible, au détriment du suivi des couleurs proches du noir en échelle de gris.
• Meilleur suivi des couleurs en échelle de gris - Génère le meilleur suivi des couleurs en échelle de gris
dans les zones noires, avec en contrepartie un rapport de contraste légèrement réduit. Cette option ne sera pas
utilisée si une cible de calibrage avec un rapport de contraste autre que Par défaut est utilisée.
Remarque: Ce réglage n'a pas d'impact sur le calibrage des modèles de la série MultiSync PA, ni sur les modèles P232W,
P241W, P242W, EA244UHD, EA304WMi, X651UHD, X841UHD et X981UHD. Il sera désactivé si aucun achage
adapté n'est sélectionné.
Délai de stabilisation de luminance étendu - Allonge le temps d'attente de stabilisation de l'afchage lors de
l'ajustement de la luminance. Cette option peut être utilisée si nécessaire pour augmenter la précision de l'ajustement
de la luminance quand la cible présente un niveau d'intensité spécique. La durée du calibrage sera considérablement
allongée, et cette option n'est généralement utile que lorsqu'une valeur d'intensité très faible est choisie. Essayez
Page 87

23 | NEC SPECTRAVIEW II - GUIDE DE L'UTILISATEUR
de sélectionner cette option si l'intensité calibrée est considérablement différente de la valeur cible en raison de la
stabilisation de l'afchage lors des étapes de calibrage et de prol.
Boîte de dialogue Préférences- Onglet Prol ICC
Générer un prol ICC après le calibrage - Sélectionnez cette option pour générer automatiquement un prol d'écran
ICC / ColorSync après le calibrage de l'écran. Nous recommandons de sélectionner cette option pour la plupart des
applications.
Utiliser comme prol d'écran du Système de gestion de couleurs Windows (version Windows uniquement) Sélectionnez cette option pour associer automatiquement le prol d'écran ICC avec le Système de gestion de couleurs
Windows. Nous recommandons de sélectionner cette option pour la plupart des applications.
Nom de chier du prol ICC - Sélectionnez la façon dont le chier de prol ICC est nommé lors de la génération d'un
prol CC, après un calibrage par exemple.
• Générer automatiquement - Un nom et une description seront automatiquement attribués au prol. Ce réglage
est sélectionné par défaut, car il n'est généralement pas nécessaire de nommer manuellement le chier de prol.
• Demander un nom de chier et une description - Une invite apparaîtra an de saisir manuellement le nom
du chier et sa description.
Emplacement (Mac OS 10.6 et versions précédentes uniquement. Cette option est désactivée dans OS 10.7 et les
versions suivantes, et les permissions de dossier du système font que Par utilisateur de cet ordinateur est sélectionné
par défaut.) - Spécie l'endroit où les prols ICC / ColorSync générés sont enregistrés.
Les différentes options sont :
• Par utilisateur de cet ordinateur - Le prol est enregistré dans le dossier du prol de l'utilisateur. Les prols
Page 88

24 | NEC SPECTRAVIEW II - GUIDE DE L'UTILISATEUR
dans ce dossier ne sont généralement pas accessibles aux autres comptes d'utilisateur.
• Partagé par tous les utilisateurs de cet ordinateur - Le prol est enregistré dans le dossier de prol
partagé, accessible par tous les comptes d'utilisateur.
Source des coordonnées chromatiques des couleurs primaires pour le prol ICC - Sélectionne les valeurs
utilisées pour les chromaticités de couleurs primaires encodées dans le prol d'écran ICC / ColorSync. Les valeurs
servent à décrire le gamut de couleurs de l'afchage.
Les différentes options sont :
• Automatique (recommandé) - Utilise automatiquement le réglage optimal en fonction du type d'écran et du
gamut de couleurs cible. L'utilisation de ce réglage est recommandée.
• Mesures de la sonde de calibrage - Utilise les valeurs mesurées par la sonde de calibrage. Pour les
afchages à gamut de couleurs normal, cette option est recommandée quand une cible à gamut de couleurs
natif est utilisée, car la sonde de calibrage peut mesurer de façon précise ces couleurs primaires. Pour les
afchages à gamut de couleurs étendu, certaines sondes de calibrage basées sur des colorimètres peuvent ne
pas être à même de mesurer avec précision les couleurs primaires. Dans ce cas, nous vous recommandons
d'utiliser l'option Mesures d'usine.
Si vous utilisez un gamut de couleurs cible autre que Natif, nous vous recommandons d'utiliser l'option Mesures
d'usine, car le moteur de SpectraView calculera les bonnes chromaticités de couleur primaire, même si elles se
situent en dehors du gamut de couleurs natif de l'afchage. Sinon, les valeurs mesurées seront utilisées, ce qui
risquerait de provoquer l'encodage d'un gamut de couleurs invalide dans le prol ICC, étant donné que le gamut
de couleurs effectif de l'afchage s'étend au-delà du gamut de couleurs mesurable.
• Mesures d'usine - Utilise les mesures prises pendant la fabrication de l'écran, ainsi que les données calculées
par le moteur interne de SpectraView de l'afchage pour encoder les informations du gamut de couleurs dans le
prol ICC généré. Ces mesures peuvent être plus précises que celles de certaines sondes de couleur pour des
afchages à gamut de couleurs étendu. Reportez-vous à « Écrans pris en charge » page 7 pour connaître la
liste des types de gamut des différents afchages. Ce réglage est recommandé pour l'utilisation d'un gamut de
couleurs cible autre que Natif.
Page 89

25 | NEC SPECTRAVIEW II - GUIDE DE L'UTILISATEUR
Boîte de dialogue Préférences- Onglet Interface
Unités de luminance - Sélectionne les unités utilisées pour afcher les valeurs de luminance. Les options sont :
• Candelas (cd/m²)
• Foot-lamberts (fL)
Charger automatiquement les paramètres lors d'un changement de cible - Charge automatiquement les paramètres
de calibrage d'écran les plus récents quand une cible différente est sélectionnée, et génère un nouveau prol ICC
correspondant. Utilisez cette option pour autoriser la sélection de différentes cibles. L'écran sera automatiquement
conguré.
Conrmer le calibrage de l'afchage à chaque lancement de l'application - Dénit si les réglages d'écran actuels
doivent être vériés et comparés aux réglages du dernier calibrage au lancement de SpectraView. Si les réglages d'écran
sont différents, un message d'avertissement apparaît, et les réglages du dernier calibrage peuvent être réinitialisés.
Cette vérication prendra quelques secondes à chaque lancement de SpectraView.
Retarder le chargement du Chargeur de gamma de SpectraView II au démarrage de Windows (version Windows
uniquement) - Sélectionnez cette option pour retarder de 60 secondes le chargement du Chargeur de gamma de
SpectraView II lors du démarrage de Windows, an de permettre aux autres applications et utilitaires de se lancer
en premier. Sélectionnez cette option si vous rencontrez des problèmes de détection d'écran quand le Chargeur de
gamma de SpectraView II est en route lors du démarrage de Windows.
Vérier automatiquement les mises à jour du logiciel - Quand cette option est sélectionnée, le logiciel vérie
automatiquement et une fois toutes les deux semaines si une mise à jour est disponible lors de son démarrage. Une
connexion à Internet est requise pour effectuer cette opération.
Langue de l’interface - sélectionne la langue de l’interface de l’application. Le logiciel devra être redémarré pour que
la nouvelle sélection soit appliquée.
Page 90

26 | NEC SPECTRAVIEW II - GUIDE DE L'UTILISATEUR
Boîte de dialogue Préférences- Onglet Achage
Verrouiller les commandes d'afchage à l'écran une fois l'afchage calibré - Spécie si les boutons de contrôle
d'afchage à l'écran de l'écran sont verrouillés une fois ce dernier calibré. Le verrouillage des contrôles peut être utile
pour éviter des ajustements accidentels ou non autorisés de l'écran calibré. Les différentes options sont :
• Ne pas verrouiller
• Tout verrouiller, sauf la luminosité et le contraste
• Tout verrouiller
Remarque: Les contrôles seront déverrouillés si le calibrage est désactivé dans la fenêtre principale.
Utiliser l'autoluminance (si cette fonction est prise en charge) - Active le circuit de détection d'autoluminance à
l'intérieur de l'écran pour améliorer la stabilité de l'intensité (luminosité) à mesure que l'afchage vieillit et s'échauffe.
Cette option ne sera pas utilisée pour les cibles dont l'option « Maximum possible » est sélectionnée pour l'intensité,
ou si l'intensité cible se situe en dehors de la gamme contrôlable du circuit d'autoluminance. Cette fonctionnalité est
uniquement disponible sur les modèles suivants : LCD2490WUXi, LCD2490WUXi2, LCD2690WUXi, LCD2690WUXi2
et LCD3090WQXi.
La série d'écrans MultiSync PA (à l'exception du PA231W) utilise automatiquement et de façon systématique
l'autoluminance pour maintenir la stabilité de l'écran. Le modèle PA231W ne prend pas en charge l'autoluminance.
Consultez la section « Fonctionnalités par modèle » page 57 pour connaître toutes les fonctionnalités spéciques
aux différents modèles.
Remarque: Ce réglage est désactivé si aucun achage adapté n'est connecté.
Page 91

27 | NEC SPECTRAVIEW II - GUIDE DE L'UTILISATEUR
Fenêtre Informations
La fenêtre Informations est accessible depuis le menu Outils. Elle est également afchée automatiquement à la n
d'un calibrage.
Remarque: Les graphiques présentés dans la fenêtre Informations peuvent être déplacés, zoomés et mis à l'échelle. Faites un
glisser-déposer pour sélectionner un endroit sur lequel zoomer. Utilisez les èches directionnelles pour déplacer la
vue. Redimensionnez la boîte de dialogue pour mettre les graphiques à l'échelle.
Les graphiques et informations peuvent également être copiés dans le
presse-papier et collés dans d'autres applications d'édition d'image et de
texte en faisant un clic droit et en sélectionnant Copier. Cette fonction
est utile pour partager et consigner différents résultats.
Fenêtre Informations- Onglet Résumé
Point blanc
Les valeurs de la ligne Cible correspondent au point blanc de la cible sélectionnée. Les valeurs de la ligne Calibrage
indiquent le point blanc mesuré après le calibrage de l'écran.
La valeur Delta E correspond à la différence de couleur calculée entre le point blanc de la Cible et le point blanc
du Calibrage, à partir de la couleur et de la luminance. Le calcul est réalisé à l'aide de la formule de couleur
Delta E CIE 94. Une valeur Delta E égale à 1 est considérée comme à peine perceptible pour 50 % des utilisateurs.
Les valeurs inférieures à 3 sont généralement considérées comme excellentes pour un calibrage d'afchage.
Page 92

28 | NEC SPECTRAVIEW II - GUIDE DE L'UTILISATEUR
Couleurs primaires
CIE x, y rouge, vert et bleu - Présente les coordonnées de couleur mesurées pour les couleurs primaires de
l'afchage. Ces valeurs représentent le gamut de couleurs de l'afchage. La Source des mesures de couleur
indique si les valeurs de rouge, de vert et de bleu proviennent de la sonde de calibrage ou des mesures d'usine, et
dépend du réglage Source des coordonnées chromatiques des couleurs primaires dans la boîte de dialogue
Préférences.
Luminance de l'afchage
Les valeurs de Cible présentent le niveau de noir et l'intensité de la cible actuellement sélectionnée.
Les valeurs de la ligne Calibrage indiquent le niveau de noir et l'intensité mesurés après le calibrage de l'écran.
Rapport de contraste
Le rapport de contraste est le rapport entre l'intensité et le niveau de noir. Les valeurs de la ligne Cible
correspondent au rapport de contraste de la cible sélectionnée. Pour les écrans LCD, « S.O. » s'afche en raison du
niveau de noir xe de ces écrans.
Les valeurs de la ligne Calibrage indiquent le rapport de contraste effectif, calculé à partir du niveau de noir et de
l'intensité mesurés après le calibrage de l'écran.
Courbe de gamma
Cible afche le type ou la valeur de gamma de la courbe de gamma cible.
Étapes de calibrage - Indique le nombre d'étapes de calibrage utilisées pour mesurer l'échelle de gris pendant le
calibrage.
Prol ICC
Nom de chier afche le nom du prol ICC / ColorSync, si un prol a été généré après le calibrage de l'afchage.
Description afche la description du prol ICC / ColorSync, si un prol a été généré après le calibrage de l'afchage.
Écran
Modèle afche le nom du modèle de l'afchage sélectionné.
Numéro de série - Afche le numéro de série de l'afchage sélectionné.
Microprogramme - Afche la version du microprogramme interne de l'afchage sélectionné.
Utilisation actuelle indique le nombre total d'heures d'utilisation de l'afchage sélectionné.
Dernier calibrage indique le nombre d'heures d'utilisation de l'afchage sélectionné depuis son dernier calibrage.
Date de calibrage indique la date et l'heure du dernier calibrage de l'écran sur la cible sélectionnée.
Contrôle des couleurs sur 6 axes
Afche les ajustements de contrôle des couleurs sur 6 axes appliqués sur la cible sélectionnée, s'il y en a. Consultez
« Utilisation du contrôle des couleurs sur 6 axes » page 56 pour plus d'informations sur l'utilisation de cette
fonctionnalité.
Sonde de calibrage
Modèle afche le nom du modèle de la sonde de calibrage utilisée au moment du calibrage.
Numéro de série - Afche le numéro de série de la sonde de calibrage utilisée au moment du calibrage.
Page 93

29 | NEC SPECTRAVIEW II - GUIDE DE L'UTILISATEUR
Fenêtre Informations- Onglet Gamut de couleurs
L'onglet Gamut de couleurs propose une illustration graphique du gamut de couleurs de l'afchage à des ns de
comparaison, sous la forme d'une représentation 2D du volume 3D du gamut de couleurs. Le gamut de couleurs de
l'afchage peut être comparé au gamut de couleurs de plusieurs espaces de couleur répandus.
La source des mesures de couleur pour le gamut de couleurs de l'afchage dépend du réglage de Source des
coordonnées chromatiques des couleurs primaires dans la boîte de dialogue Préférences.
Un gamut de couleurs cible autre que Natif est utilisé, sélectionnez Cible pour afcher le gamut de couleurs cible. Cette
option sera désactivée si le gamut de couleurs natif est utilisé, car ce dernier est spécique à chaque écran.
Sélectionnez un espace de couleur de référence pour afcher le gamut de couleurs en surimpression sur l'afchage.
Espace de couleur
• CIE xy - Afche le gamut projeté dans un espace de couleur CIE xy. La plupart des utilisateurs connaissent déjà
cette fonction. Toutefois, elle ne permet pas d'évaluer facilement les différences de couleur, car cette projection
accentue les différences sur les couleurs vertes, et atténue les différentes sur les couleurs bleues.
• CIE u'v' - Afche le gamut projeté dans un espace de couleur CIE u'v'. Cette projection est plus able que
CIE xy, car les différentes couleurs sont représentées de façon plus équitable sur l'échelle.
Afcher la courbe de corps noir - Afche le lieu de corps noir sous la forme d'une courbe jaune.
Afcher le point blanc cible - Afche le point blanc de la cible sélectionnée sous la forme d'une croix verte.
Page 94

30 | NEC SPECTRAVIEW II - GUIDE DE L'UTILISATEUR
Fenêtre Informations- Onglet Courbes
L'onglet Courbes illustre de façon graphique les différentes courbes de réponse tonale et de correction mesurées et
générées pendant le calibrage.
Afcher le type de courbe
Cible - Illustre la courbe de réponse tonale cible de la cible sélectionnée. L'afchage sera calibré pour correspondre
à cette courbe. Cette courbe sera désactivée et ne sera pas afchée si le gamma cible est réglé sur Gamma natif
de l'écran.
Calibrage - Illustre les courbes de réponse tonale mesurées sur l'afchage calibré. Ces courbes sont générées à
partir de mesures prises pendant la génération d'un prol d'écran ICC / ColorSync pour l'afchage. Si aucun prol
ICC / ColorSync n'a été généré après le calibrage de l'écran, cette case sera désactivée.
Courbes non calibrées - Illustre les courbes de réponse tonale mesurées sur l'afchage non calibré, sans correction
appliquée sur les tables de correspondance. Ces courbes sont générées à partir de mesures prises pendant le
calibrage.
Correction - Illustre la correction appliquée sur les tables de correspondance de l'afchage, an d'atteindre les
caractéristiques de courbe de réponse tonale voulues pour la cible.
Remarque: Les courbes non calibrées et les courbes de correction ne sont pas disponibles pour les écrans de la série
MultiSync PA et pour les modèles P232W, P241W, P242W, EA244UHD, EA304WMi, X651UHD, X841UHD et X981UHD,
car elles sont calculées automatiquement en interne. Consultez la section «Fonctionnalités par modèle» page 57
pour connaître toutes les fonctionnalités spéciques aux diérents modèles.
Afcher les couleurs de courbe
Les boutons Toutes, Rouge, Vert et Bleu sélectionne les courbes de couleur afchées sur le graphique.
Page 95

31 | NEC SPECTRAVIEW II - GUIDE DE L'UTILISATEUR
Fenêtre Informations- Onglet Suivi des couleurs
L'onglet Suivi des couleurs présente une illustration graphique de la conformité de l'échelle de gris (les couleurs allant du
noir au blanc) de l'afchage par rapport à la cible sélectionnée. Dans l'idéal, tous les points sur l'échelle de gris mesurée
sur l'écran doivent présenter le même point blanc (chromaticité) et doivent suivre la courbe de luminance de la cible.
Les déviations par rapport à cet idéal à atteindre peuvent provoquer des erreurs visibles de suivi de couleur dans l'échelle
de gris, par exemple des modications de chromaticité sur l'échelle de gris et/ou des modications de luminance. Les
valeurs Delta E sont une mesure mathématique de ces déviations. Une valeur Delta E égale à 1 est considérée comme
à peine perceptible pour 50 % des utilisateurs. Les valeurs inférieures à 3 sont généralement considérées comme
excellentes pour un calibrage d'afchage. Les valeurs supérieures à 3 seront surlignées en jaune ou en rouge, et
peuvent indiquer un problème au niveau du calibrage de l'afchage.
Le graphique présente le suivi des couleurs d'échelle de gris mesuré, à l'aide de mesures prises lors de la génération
d'un prol d'écran ICC / ColorSync.
L'axe horizontal afche les valeurs Delta E pour chaque point mesuré sur l'échelle de gris. L'axe vertical afche la
luminance pour chaque point mesuré sur l'échelle de gris.
Remarque: Comme les valeurs Delta E sont calculées à partir de la cible sélectionnée, si une cible utilisant Intensité: Niveau
spécique est sélectionnée et que l'achage n'a pas été à même d'atteindre la valeur d'intensité de la cible, des
valeurs Delta E importantes seront générées.
Delta E
Moyenne - Afche la moyenne de toutes les valeurs Delta E calculées.
Maximum - Afche la valeur maximale parmi toutes les valeurs Delta E calculées.
Inclure les valeurs sombres - Détermine si le graphique et le calcul de valeur moyenne de Delta E prennent en
compte les mesures prises près du noir absolu (avec une luminance inférieure à 5 cd/m²) sur l'afchage. En général,
ces valeurs ne sont pas incluses, car une luminance faible peut provoquer des erreurs de mesure pouvant entraîner
des valeurs Delta E anormalement élevées. Sélectionnez cette option pour inclure toutes les valeurs mesurées.
Page 96

32 | NEC SPECTRAVIEW II - GUIDE DE L'UTILISATEUR
Afcher la moyenne - Afche la valeur Delta E moyenne sous la forme d'une ligne verticale sur le graphique.
Fenêtre Informations- Onglet Conformité DICOM
L'onglet Conformité DICOM contient une représentation graphique et numérique d'à quel point l'afchage calibré
est conforme à la réponse DICOM (Digital Imaging and Communications in Medicine - Imagerie numérique et
communications médicales) quand une courbe de cible DICOM est utilisée.
L'objectif de la réponse DICOM est de produire une réponse de luminance visuellement linéaire. Chaque point sur
l'échelle de gris de l'afchage doit présenter une augmentation de luminance homogène. La forme réelle de la courbe
de réponse DICOM est basée sur l'intensité et le niveau de noir mesurés de l'afchage, car la réponse DICOM prend
en compte la réponse non linéaire de l'œil humain face à la lumière.
Dans la terminologie DICOM, le niveau d'échelle de gris est appelé Linéarisation numérique dynamique et représente
le niveau de sortie vidéo numérique, qui se situe entre 0 et 255. Chaque progression dans la Linéarisation numérique
dynamique doit correspondre à une progression similaire de la luminance perçue. Dans la terminologie DICOM, une
modication de luminance à peine perceptible est considérée comme étant de 1 JND (Just Noticeable Difference -
Seuil de discrimination). Dans l'idéal, chaque étape de Linéarisation numérique dynamique doit correspondre à une
augmentation similaire de la valeur JND. Les valeurs JND sont calculées avec une formule complexe, à partir de deux
valeurs de luminance mesurées.
Les résultats du calibrage de l'afchage peuvent être visualisés dans deux types de graphiques différents, JND par
DDL et Réponse de contraste, en sélectionnant le type de graphique correspondant.
JND par DDL (Seuil de discrimination par Linéarisation numérique dynamique)
Moyenne - Afche la valeur JND par DDL moyenne. La valeur réelle dépend du niveau de noir et de l'intensité de
l'afchage.
Écart std. - Afche la déviation standard de toutes les valeurs JND par DDL calculées.
Page 97

33 | NEC SPECTRAVIEW II - GUIDE DE L'UTILISATEUR
Afcher la moyenne - Afche la valeur JND par DDL moyenne sous la forme d'une ligne verticale sur le graphique.
Afcher l'ajustement linéaire - Afche la meilleure ligne d'ajustement entre toutes les valeurs JND par DDL sous
la forme d'une ligne sur le graphique. Idéalement, il s'agit d'une ligne horizontale représentant une progression
homogène des JND par DDL sur l'échelle de gris de l'afchage.
Réponse de contraste
Erreur max. - Afche l'écart de pourcentage d'erreur le plus important par rapport à la courbe du modèle de Barten,
ainsi qu'à l'indice JND du point d'erreur le plus élevé.
Afcher le modèle de Barten - Afche la courbe du modèle de Barten sur le graphique. La courbe du modèle de
Barten est calculée à partir des valeurs mesurées pour l'intensité (luminance de blanc) et le niveau de noir.
Afcher les limites de 10 % - Afche deux lignes représentant les écarts d'erreur de 10 % par rapport à la courbe
du modèle de Barten. Les afchages médicaux utilisés pour le visionnage d'images de classe primaire doivent se
situer à l'intérieur des courbes d'écart de 10 %.
Afcher les limites de 20 % - Afche deux lignes représentant les écarts d'erreur de 20 % par rapport à la courbe
du modèle de Barten. Les afchages médicaux utilisés pour le visionnage d'images de classe secondaire doivent se
situer à l'intérieur des courbes d'écart de 20 %.
Page 98

34 | NEC SPECTRAVIEW II - GUIDE DE L'UTILISATEUR
Fenêtre Colorimètre
L'outil Colorimètre permet de mesurer les couleurs afchées sur l'écran avec la sonde de calibrage. Il est accessible
depuis le menu Outils. Les résultats de la mesure sont afchés dans différents formats utiles.
Pour mesurer des couleurs à l'aide du Colorimètre, placez la sonde de calibrage sur l'écran de manière à ce qu'elle soit
centrée sur la grande zone blanche de la fenêtre du Colorimètre.
Mesure :
• Simple - Cliquez sur ce bouton pour prendre une mesure simple et afcher les résultats.
• Continue - Sélectionnez cette option pour prendre automatiquement des mesures répétées et afcher les
résultats.
Les champs CIE XYZ et xyY présentent les mesures de la sonde de calibrage dans chaque espace de couleur.
Ces espaces de couleur sont indépendants. Cela signie qu'ils ne sont pas associés à un appareil en particulier, par
opposition aux espaces de couleur dépendants, comme l'espace RVB qui est lié à l'appareil qui afche la couleur.
Le champ Temp. de couleur montre la température corrélée de radiateur du corps noir de la mesure en Kelvin.
La valeur Δuv (Delta-uv) indique l'écart entre la mesure et le lieu du radiateur du corps noir. La valeur en Kelvin est
uniquement utile pour les couleurs proches du lieu du radiateur du corps noir, comme la plupart des nuances de blanc.
Échantillon de couleur : Quand vous sélectionnez ce groupe, une couleur personnalisée peut être afchée dans la
zone de mesure. Pour ajuster la couleur de façon interactive, faites un glisser-déposer dans le cercle de couleur, ou
utilisez les èches directionnelles. Utilisez le curseur vertical pour ajuster l'intensité. Des valeurs de rouge, de vert et de
bleu spéciques peuvent également être saisies.
Page 99

35 | NEC SPECTRAVIEW II - GUIDE DE L'UTILISATEUR
Fenêtre Mesure de la lumière ambiante
L'outil Mesure de la lumière ambiante permet de prendre des mesures de la lumière ambiante de l'environnement de
visionnage autour de l'écran. Cette fonctionnalité n'est disponible qu'avec une sonde de couleur prise en charge.
Les sondes de couleur actuellement prises en charge sont :
• X-Rite/GretagMacbeth Eye-One Display V2
• X-Rite/GretagMacbeth Eye-One Pro
• X-Rite iOne Pro2
• X-Rite iOneDisplay Pro / NEC SpectraSensor Pro / NEC MDSVSENSOR3
• X-Rite ColorMunki
• Datacolor Spyder3 et Spyder4
• basICColor Discus
Ces mesures sont utiles pour identier les conditions de visionnage optimales pour l'environnement autour de l'écran.
Dans l'idéal, le niveau de lumière ambiante et la température de couleur ne doivent pas affecter le visionnage d'images
sur l'écran.
Suivez les instructions à l'écran pour congurer la sonde de couleur pour le mode Mesure de la lumière ambiante.
Les mesures sont prises à quelques secondes d'intervalle et mises à jour sur l'écran sous la forme d'une valeur de
luminance et d'une température de couleur approximative.
Remarque: Les sondes de lumière ambiante Datacolor Spyder3 et Spyder4 mesurent uniquement la luminance, pas la
température de couleur.
Page 100

36 | NEC SPECTRAVIEW II - GUIDE DE L'UTILISATEUR
Fenêtre Réglages d'écran
La fenêtre Réglages d'écran permet d'accéder facilement à certains contrôles de l'écran, si ce dernier prend cette
fonctionnalité en charge.
Les contrôles de LED d'allumage peuvent être utilisés pour modier la couleur de la LED, ainsi que pour ajuster sa
luminosité. La luminosité peut être réduite si nécessaire dans les environnements peu éclairés, si vous trouvez la LED
trop voyante.
Le contrôle ColorComp ajuste la correction d'uniformité d'écran appliquée sur l'afchage an d'en améliorer l'uniformité
de la couleur et de la luminance. Cette correction est appliquée au détriment de la luminosité de l'écran. Un niveau de
correction élevé permet d'obtenir un écran plus uniforme, mais l'intensité (luminosité) maximale pouvant être atteinte
sera réduite.
Nous vous conseillons de faire un nouveau calibrage si le paramètre ColorComp est modié.
 Loading...