

Page 1
Controller Editor Template Documentation
Page 2

The information in this document is subject to change without notice and does not represent a
commitment on the part of Native Instruments GmbH. The software described by this document is subject to a License Agreement and may not be copied to other media. No part of this
publication may be copied, reproduced or otherwise transmitted or recorded, for any purpose,
without prior written permission by Native Instruments GmbH, hereinafter referred to as Native
Instruments.
“Native Instruments”, “NI” and associated logos are (registered) trademarks of Native Instruments GmbH.
Mac, Mac OS, GarageBand, Logic, iTunes and iPod are registered trademarks of Apple Inc.,
registered in the U.S. and other countries.
Windows, Windows Vista and DirectSound are registered trademarks of Microsoft Corporation
in the United States and/or other countries.
Ableton Live™ is a Trademark of Ableton AG.
All other trade marks are the property of their respective owners and use of them does not imply any affiliation with or endorsement by them.
Document authored by: Native Instruments GmbH
Disclaimer
Software version: 1.6.3 (03/2014)
Special thanks to the Beta Test Team, who were invaluable not just in tracking down bugs, but
in making this a better product.
Page 3

Germany
Native Instruments GmbH
Schlesische Str. 29-30
D-10997 Berlin
Germany
www.native-instruments.de
USA
Native Instruments North America, Inc.
6725 Sunset Boulevard
5th Floor
Los Angeles, CA 90028
USA
www.native-instruments.com
Japan
Native Instruments KK
YO Building 3F
Jingumae 6-7-15, Shibuya-ku,
Tokyo 150-0001
Japan
www.native-instruments.co.jp
Contact
© Native Instruments GmbH, 2014. All rights reserved.
Page 4

Table of Contents
Table of Contents
1 About this Document ..................................................................................................
1.1 Document Conventions ............................................................................................................... 9
2 AUDIO KONTROL 1 .....................................................................................................
2.1 MIDI/CC ...................................................................................................................................... 11
2.2 Mackie Control Universal™ ....................................................................................................... 12
2.1.1 Installation ................................................................................................................ 11
2.1.2 Knob/Button Pages .................................................................................................... 11
2.2.1 Installation ................................................................................................................ 12
2.2.2 Knob/Button Pages .................................................................................................... 12
3 KORE Controller .........................................................................................................
3.1 Ableton Live™ ........................................................................................................................... 13
3.2 Mackie Control Universal™ ....................................................................................................... 16
3.3 MASSIVE ..................................................................................................................................... 17
3.4 PRO-53 ....................................................................................................................................... 20
3.1.1 Installation ................................................................................................................ 13
3.1.2 Knob Pages ................................................................................................................ 14
3.1.3 Transport Buttons ...................................................................................................... 15
3.1.4 Global Controls .......................................................................................................... 15
3.2.1 Installation ................................................................................................................ 16
3.2.2 Knob Pages ................................................................................................................ 16
3.2.3 Global Controls .......................................................................................................... 17
3.3.1 Installation ................................................................................................................ 17
3.3.2 Knob Pages ................................................................................................................ 18
3.3.3 Global Controls .......................................................................................................... 19
3.4.1 Installation ................................................................................................................ 20
3.4.2 Knob Pages ................................................................................................................ 20
9
11
13
- Controller Editor Template Documentation - 4
Page 5

Table of Contents
3.5 TRAKTOR PRO ............................................................................................................................. 21
3.4.3 Global Controls .......................................................................................................... 21
3.5.1 Installation ................................................................................................................ 21
3.5.2 Knob Pages ................................................................................................................ 22
3.5.3 Global Controls .......................................................................................................... 22
4 MASCHINE Controller ...............................................................................................
4.1 Ableton Live™ ........................................................................................................................... 23
4.2 BATTERY 3 .................................................................................................................................. 26
4.3 BATTERY 3 (Large) ......................................................................................................................27
4.4 FXpansion Guru™ ......................................................................................................................28
4.1.1 Installation ............................................................................................................... 23
4.1.2 Knob Pages ................................................................................................................ 24
4.1.3 Pad Buttons ............................................................................................................... 24
4.1.4 Transport Buttons ...................................................................................................... 25
4.1.5 Group Buttons ........................................................................................................... 25
4.1.6 Master Controls ......................................................................................................... 25
4.2.1 Installation ............................................................................................................... 26
4.2.2 Knob Pages ................................................................................................................ 26
4.2.3 Battery Pad Assignment ............................................................................................ 26
4.2.4 Master Controls ......................................................................................................... 27
4.3.1 Installation ............................................................................................................... 27
4.3.2 Knob Pages ................................................................................................................ 27
4.3.3 Battery Pad Assignment ............................................................................................ 28
4.3.4 Master Controls ......................................................................................................... 28
4.4.1 Knob Pages ................................................................................................................ 28
4.4.2 Pad Pages ................................................................................................................. 29
4.4.3 Transport Buttons ...................................................................................................... 29
4.4.4 Group Buttons ........................................................................................................... 30
23
- Controller Editor Template Documentation - 5
Page 6

Table of Contents
4.5 GM Drums (Channel 10) ............................................................................................................. 31
4.6 Mackie Control Universal™ ....................................................................................................... 32
4.7 MASSIVE ..................................................................................................................................... 34
4.8 PRO-53 ....................................................................................................................................... 37
4.9 REAKTOR Junatik ........................................................................................................................ 38
4.10 REAKTOR Scenario ...................................................................................................................... 39
4.4.5 Master Controls ......................................................................................................... 30
4.5.1 Knob Pages ................................................................................................................ 31
4.5.2 Pad Pages ................................................................................................................. 31
4.6.1 Installation ................................................................................................................ 32
4.6.2 Knob Pages ................................................................................................................ 32
4.6.3 Pad Pages ................................................................................................................. 33
4.6.4 Transport Buttons ...................................................................................................... 33
4.6.5 Group Buttons ........................................................................................................... 33
4.6.6 Master Controls ......................................................................................................... 34
4.7.1 Installation ................................................................................................................ 34
4.7.2 Knob Pages ................................................................................................................ 35
4.7.3 Pad Pages ................................................................................................................. 36
4.8.1 Installation ................................................................................................................ 37
4.8.2 Knob Pages ................................................................................................................ 37
4.9.1 Knob Pages ................................................................................................................ 38
4.9.2 Pad Pages ................................................................................................................. 38
4.9.3 Transport Buttons ...................................................................................................... 39
4.9.4 Group Buttons ........................................................................................................... 39
4.9.5 Master Controls ......................................................................................................... 39
4.10.1 Additional requirements ............................................................................................ 39
4.10.2 Knob Pages ................................................................................................................ 40
4.10.3 Pad Pages ................................................................................................................. 40
- Controller Editor Template Documentation - 6
Page 7

Table of Contents
4.11 Toontrack® EZDrummer® ......................................................................................................... 41
4.12 TRAKTOR PRO ............................................................................................................................. 42
4.13 XLN Audio Addictive Drums™ .................................................................................................... 44
4.10.4 Transport Buttons ...................................................................................................... 40
4.10.5 Group Buttons ........................................................................................................... 41
4.10.6 Master Controls ......................................................................................................... 41
4.11.1 Additional requirements ........................................................................................... 41
4.11.2 Knob Pages ................................................................................................................ 41
4.11.3 Pad Pages ................................................................................................................. 42
4.12.1 Installation ................................................................................................................ 42
4.12.2 Knob Pages ................................................................................................................ 42
4.12.3 Pad Pages ................................................................................................................. 43
4.12.4 Transport Buttons ...................................................................................................... 43
4.12.5 Group Buttons ........................................................................................................... 43
4.12.6 Master Controls ......................................................................................................... 43
4.13.1 Installation ............................................................................................................... 44
4.13.2 Knob Pages ................................................................................................................ 44
4.13.3 Pad Pages ................................................................................................................. 44
5 TRAKTOR KONTROL X1 ...............................................................................................
5.1 Serato Scratch Live™ ................................................................................................................ 45
5.2 Serato Scratch Live™ 2 ............................................................................................................. 47
5.1.1 Installation ................................................................................................................ 45
5.1.2 Additional requirements ........................................................................................... 45
5.1.3 5.1.3 Knob Page ........................................................................................................ 46
5.1.4 Button Page ............................................................................................................... 46
5.2.1 Installation ................................................................................................................ 47
5.2.2 Additional requirements ........................................................................................... 47
45
- Controller Editor Template Documentation - 7
Page 8

Table of Contents
5.2.3 Knob Page ................................................................................................................. 48
5.2.4 Button Page ............................................................................................................... 48
- Controller Editor Template Documentation - 8
Page 9
About this Document
Document Conventions
1 About this Document
This document explains how to use your Native Instruments (NI) hardware controller and its NI
Controller Templates to control several products from Native Instrument and other companies.
Before you start
In order to control a MIDI-enabled software with your NI hardware controller in MIDI mode,
make sure that this software is set up for receiving MIDI data from the hardware controller. If
the software you want to control is capable of sending MIDI data back to the hardware controller, select your NI hardware controller as a MIDI Out device.
Note that some programs require an assignment file to be loaded in order to be able to control
it with NI hardware controller. These files can be found in the Controller Editor application
folder’s sub folder named “Template Support Files”.
Installation instructions and additional requirements are provided at the beginning of each
chapter.
1.1 Document Conventions
This document uses particular formatting to point out special facts and to warn you of potential issues. The icons introducing the following notes let you see what kind of information can
be expected:
Whenever this exclamation mark icon appears, you should read the corresponding note
carefully and follow the instructions and hints given there if applicable.
This light bulb icon indicates that a note contains useful extra information. This information may often help you to solve a task more efficiently, but does not necessarily apply to
the setup or operating system you are using; however, it's always worth a look.
Furthermore, the following formatting is used:
▪ Text appearing in (drop-down) menus (such as Open…, Save as… etc.) and paths to loca-
tions on your hard drive or other storage devices is printed in italics.
- Controller Editor Template Documentation - 9
Page 10

About this Document
Document Conventions
▪ Text appearing elsewhere on the screen (labels of buttons, controls, text next to checkbox-
es etc.) is printed in light blue. Whenever you see this formatting applied, you will find
the same text appearing on the screen.
▪ Important names and concepts are printed in bold.
▪ References to keys on your computer’s keyboard you’ll find put in square brackets (e.g.,
“Press [Shift] + [Return]”).
1. Sequences of ordered instructions are introduced by numbers.
Single instructions are introduced by this play button type arrow.
►
Results of actions are introduced by this smaller arrow.
→
- Controller Editor Template Documentation - 10
Page 11
AUDIO KONTROL 1
2 AUDIO KONTROL 1
2.1 MIDI/CC
Use this Controller Editor template to control software via MIDI commands.
Note that the software needs to accept MIDI CC commands.
2.1.1 Installation
Select MIDI/CC as remote control surface in the software you want to control.
►
For detailed information please refer to your host software’s documentation. Furthermore, articles describing the setup procedure in several common host softwares are available in the NI
Knowledge Base: www.native-instruments.com/knowledge/
MIDI/CC
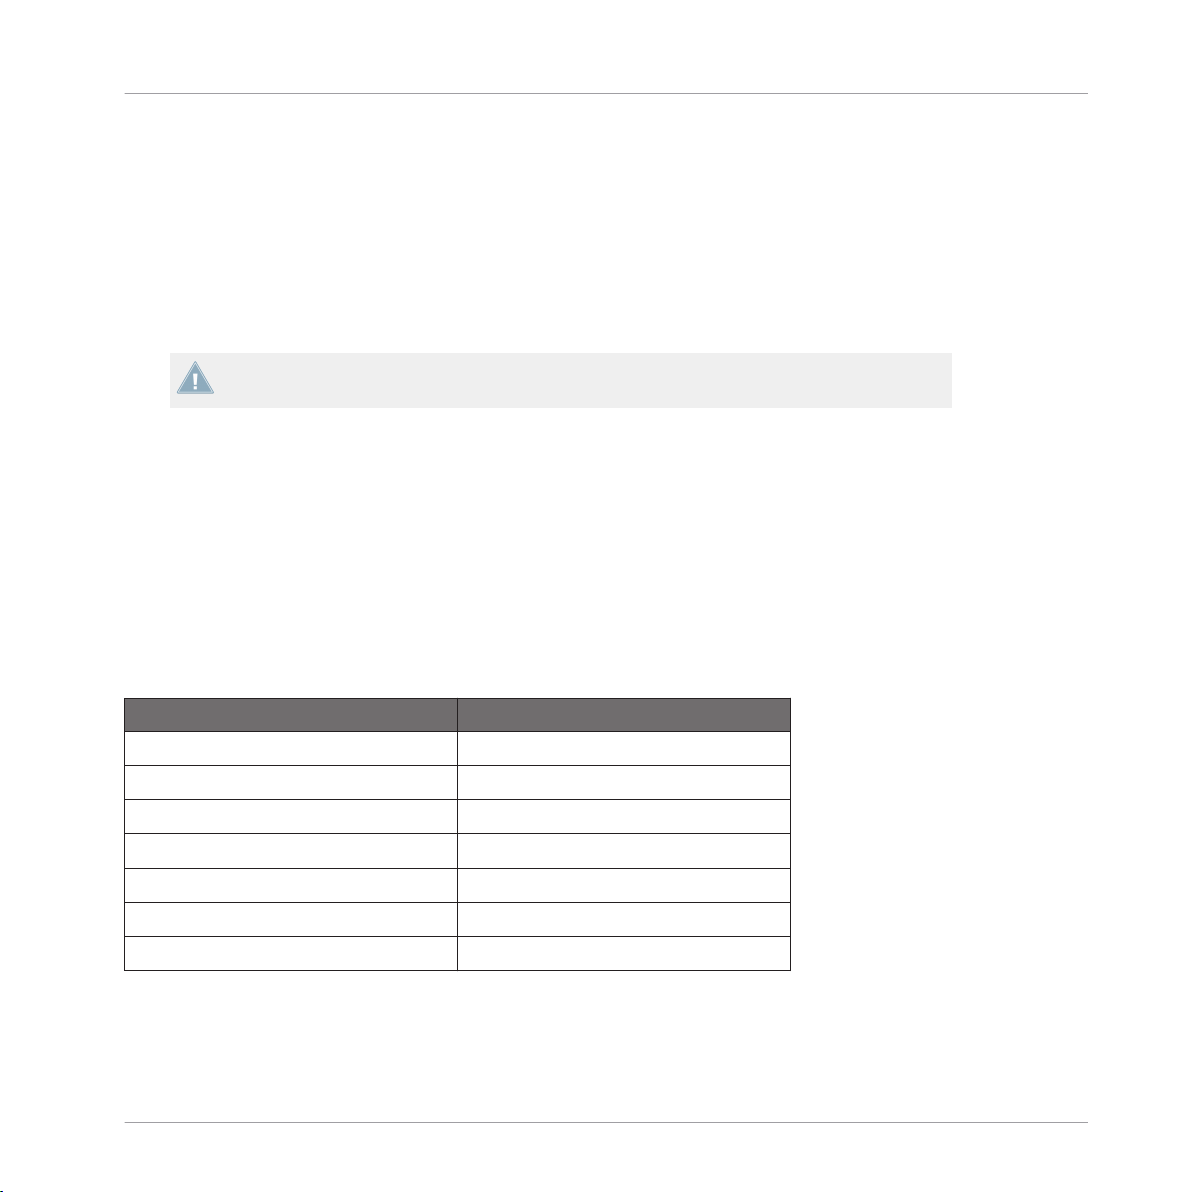
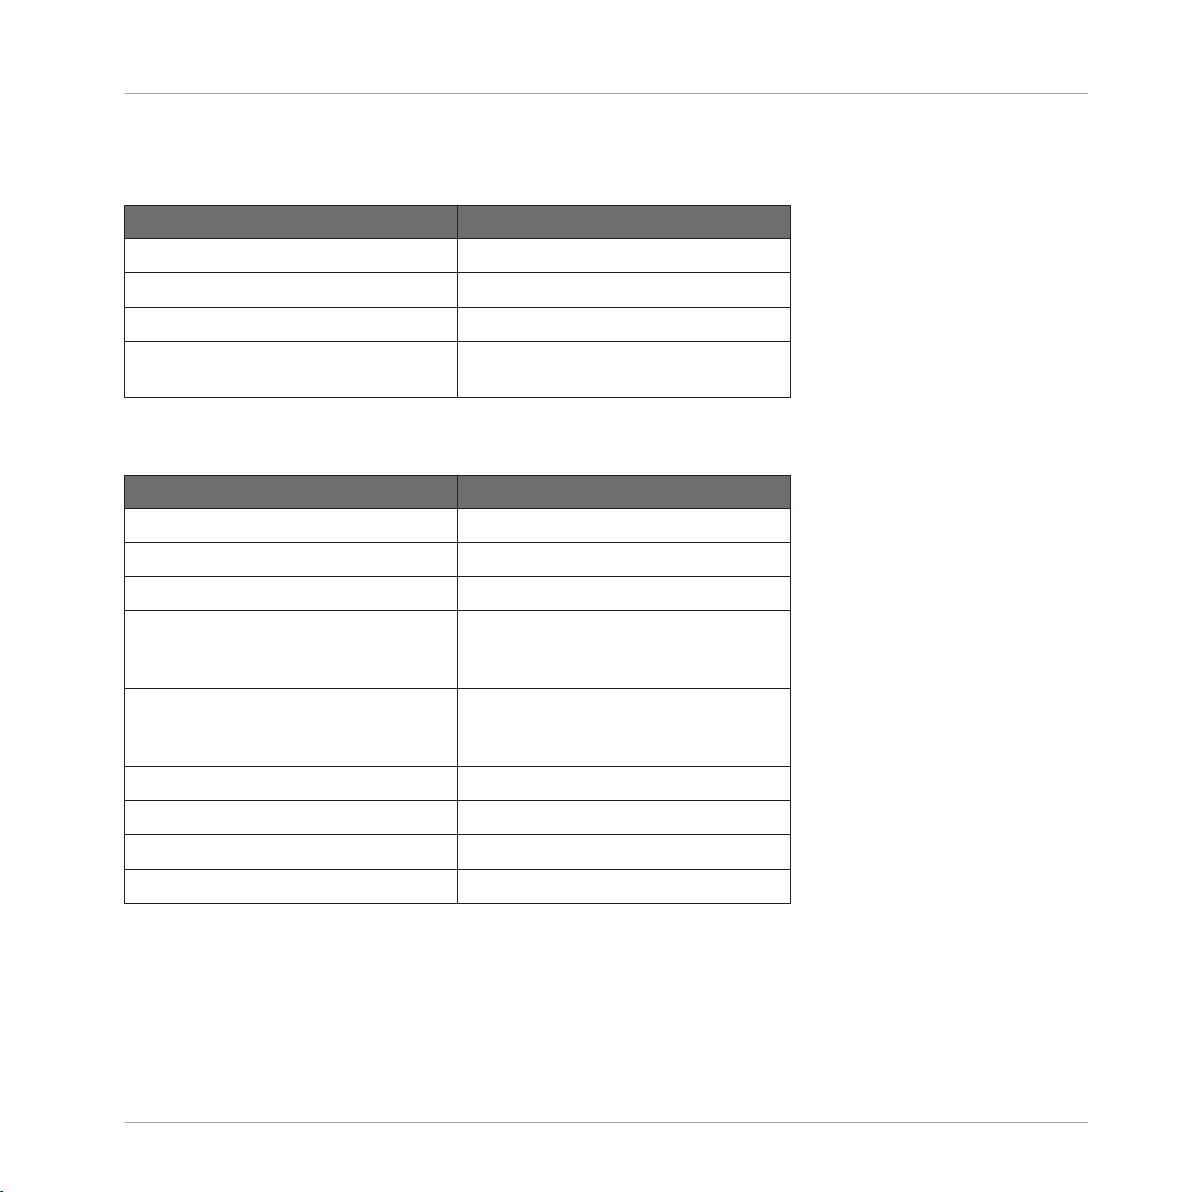
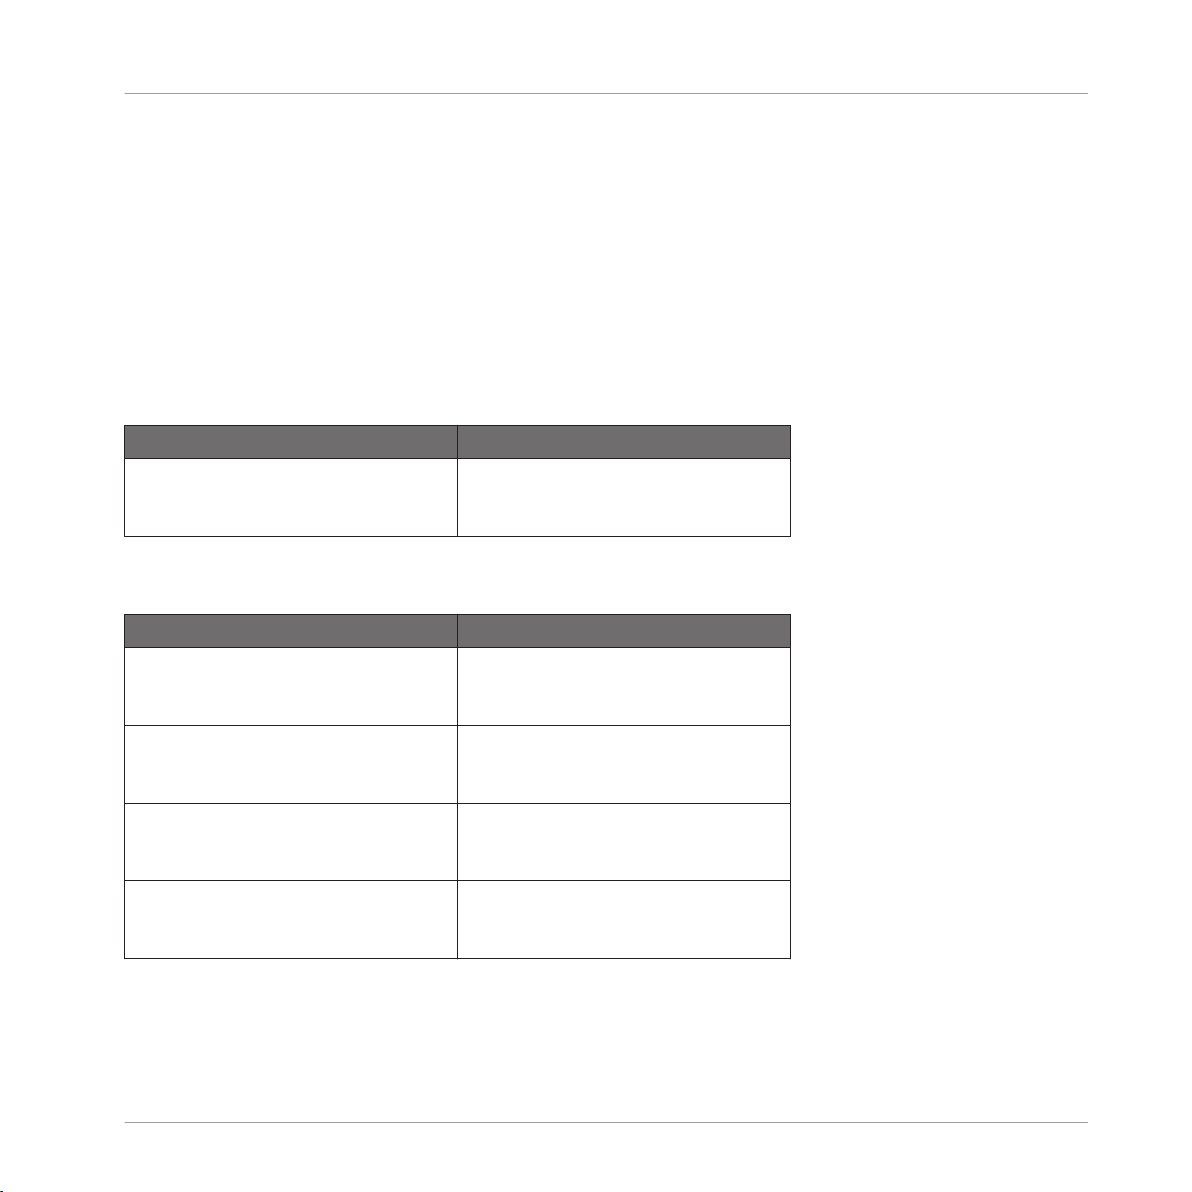
2.1.2 Knob/Button Pages
Control Name Description
Button 1 (left) Shift
Button 2 (center) MIDI CC 60
Button 3 (right) MIDI CC 61
Knob MIDI CC 7 (Channel Volume)
Button 2 + Shift (Button 1) MIDI CC 62
Button 3 + Shift (Button 1) MIDI CC 63
Knob + Shift MIDI CC 11 (Expression)
- Controller Editor Template Documentation - 11
Page 12
AUDIO KONTROL 1
Mackie Control Universal™
2.2 Mackie Control Universal™
In software supporting the MCU protocol, this Controller Editor template provides basic transport and master volume control.
2.2.1 Installation
Select Mackie Control as remote control surface in your host software that supports the
►
MCU (Mackie Control Universal™) protocol.
For detailed information please refer to your host software’s documentation. Furthermore, articles describing the setup procedure in several common host softwares are available in the NI
Knowledge Base: www.native-instruments.com/knowledge/
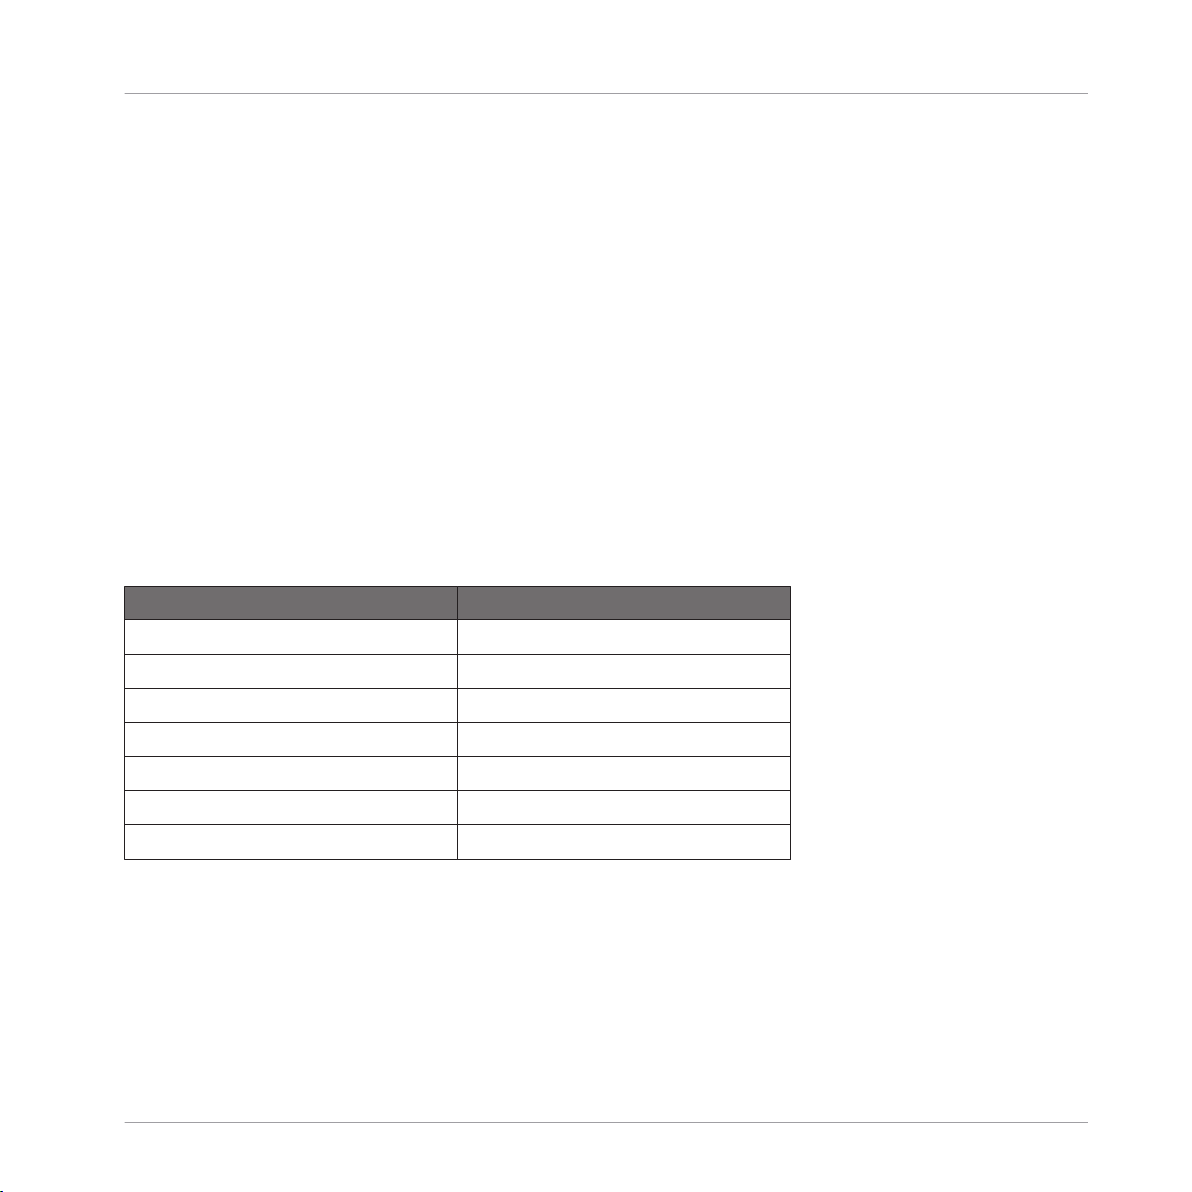
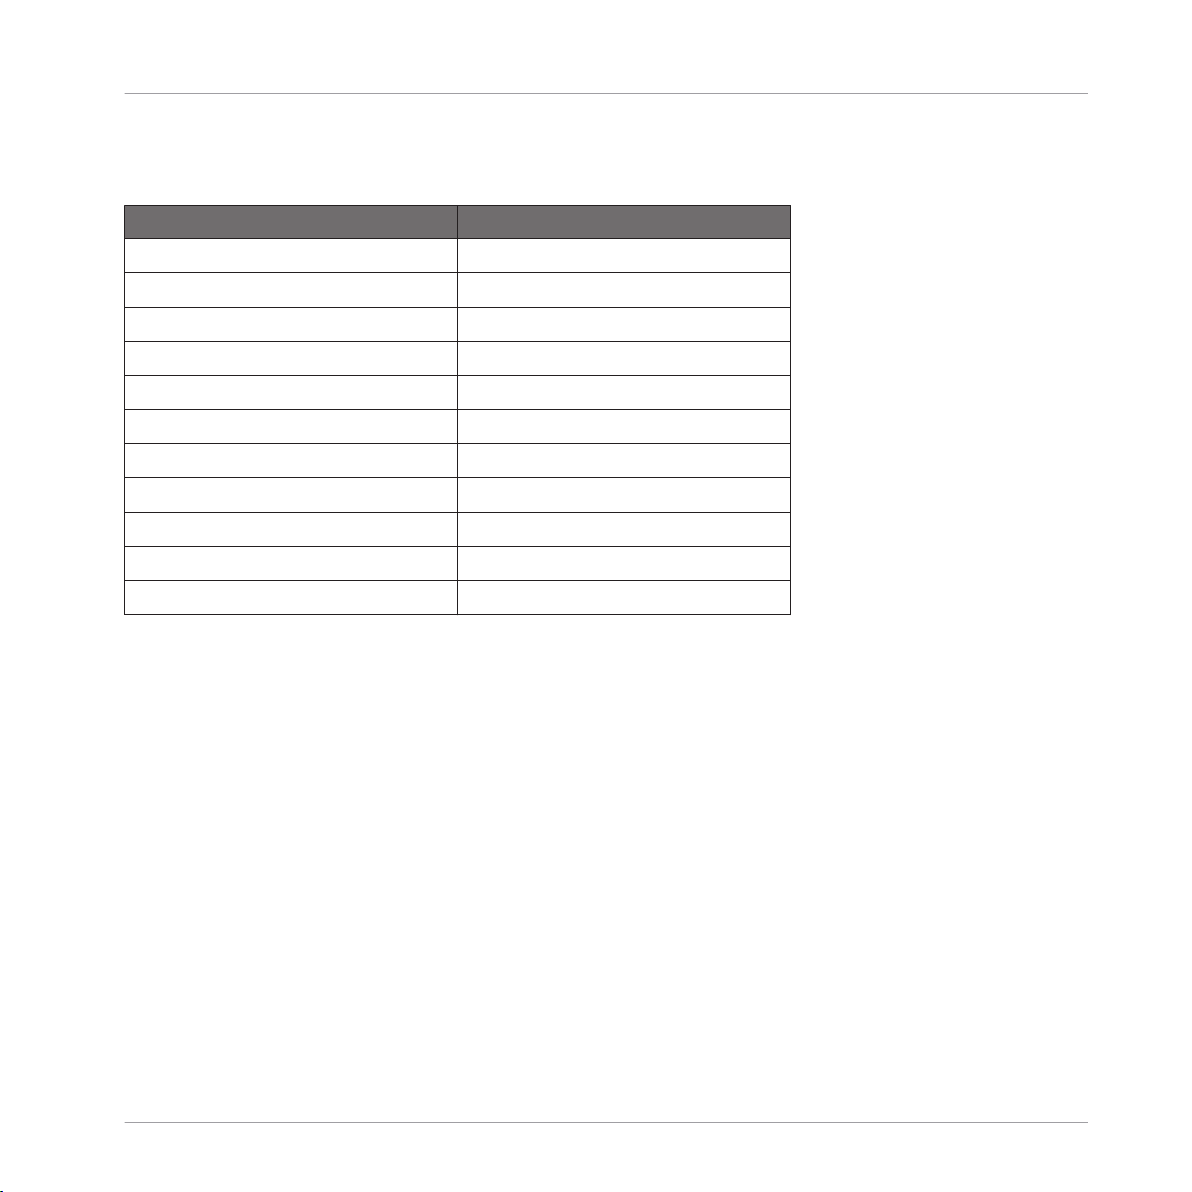
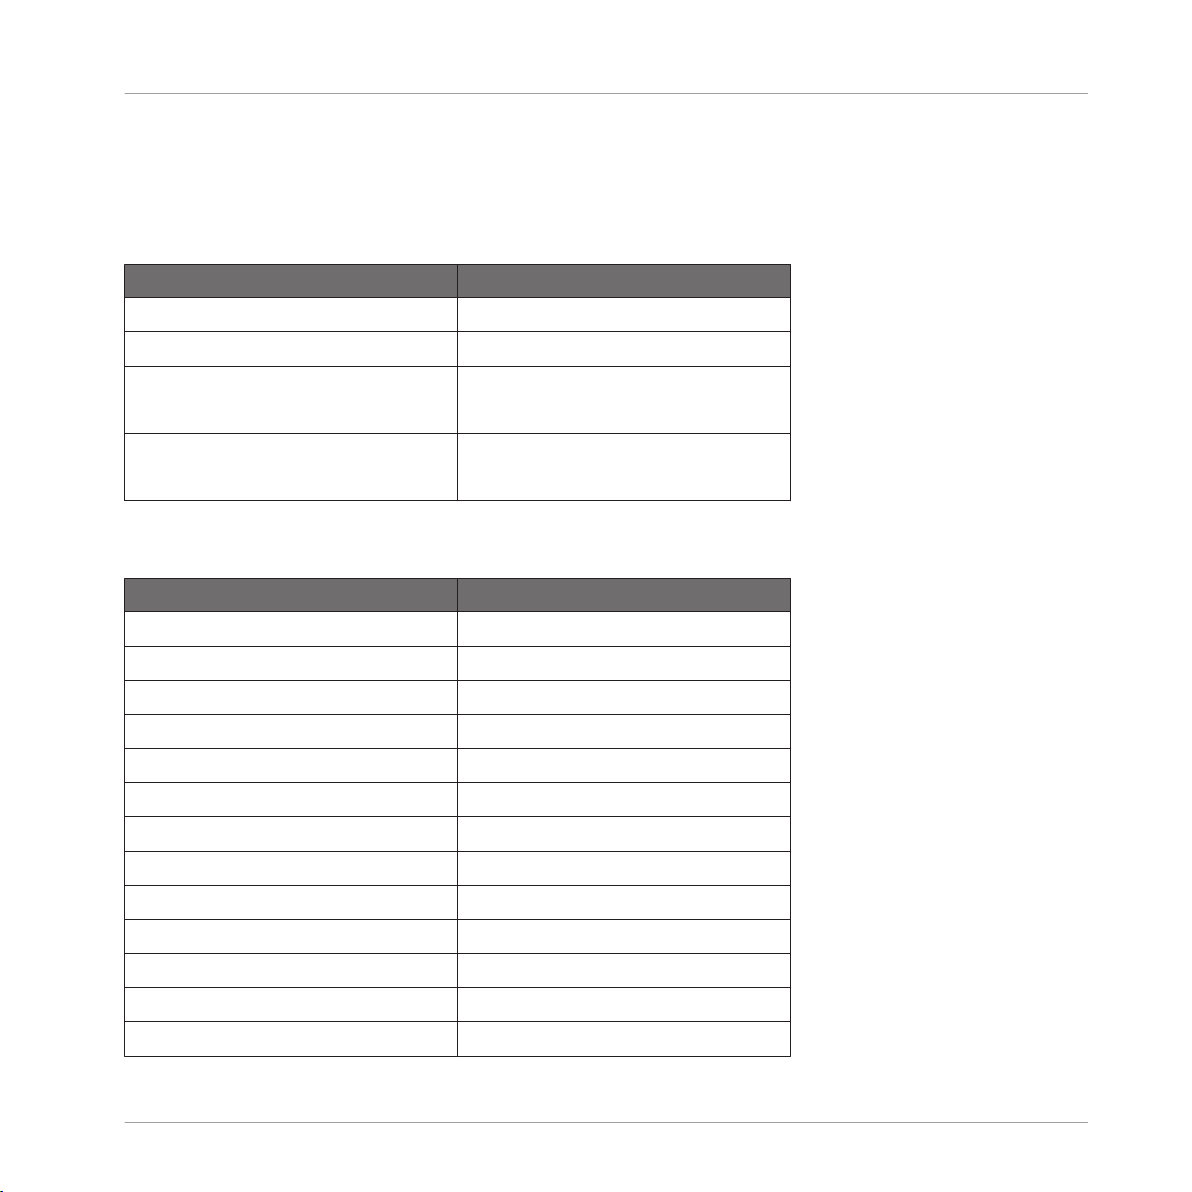
2.2.2 Knob/Button Pages
Control Name Description
Button 1 (left) Shift
Button 2 (center) MCU Button Stop
Button 3 (right) MCU Button Start
Knob Master Volume
Button 2 + Shift (Button 1) MCU Button Home
Button 3 + Shift (Button 1) MCU Button Record
Knob + Shift Master Volume
- Controller Editor Template Documentation - 12
Page 13

KORE Controller
3 KORE Controller
3.1 Ableton Live™
3.1.1 Installation
In the Controller Editor folder, sub folder Template Support Files/Ableton Live User Remote
Scripts, you will find the folder "Kore Controller 2" that contains a user configuration file for
Live™.
1. Copy the entire folder “Kore Controller 2“ to the following location:
On Mac OS X: /Users/<username>/Library/Preferences/Ableton/ Live <current version>/User
Remote Scripts/
On Windows: C:\Documents and Settings\<username>\Application Data\Ableton\Live <cur-
rent version>\Preferences\User Remote Scripts\
Ableton Live™
2. Load the Template “Ableton - Racks & Mixer” using Controller Editor.
3. In the MIDI sections of Live's preferences, select Kore Controller 2 from the control surface list (probably last entry).
4. Select NI Kore MIDI as “MIDI In & Out” interface.
- Controller Editor Template Documentation - 13
Page 14

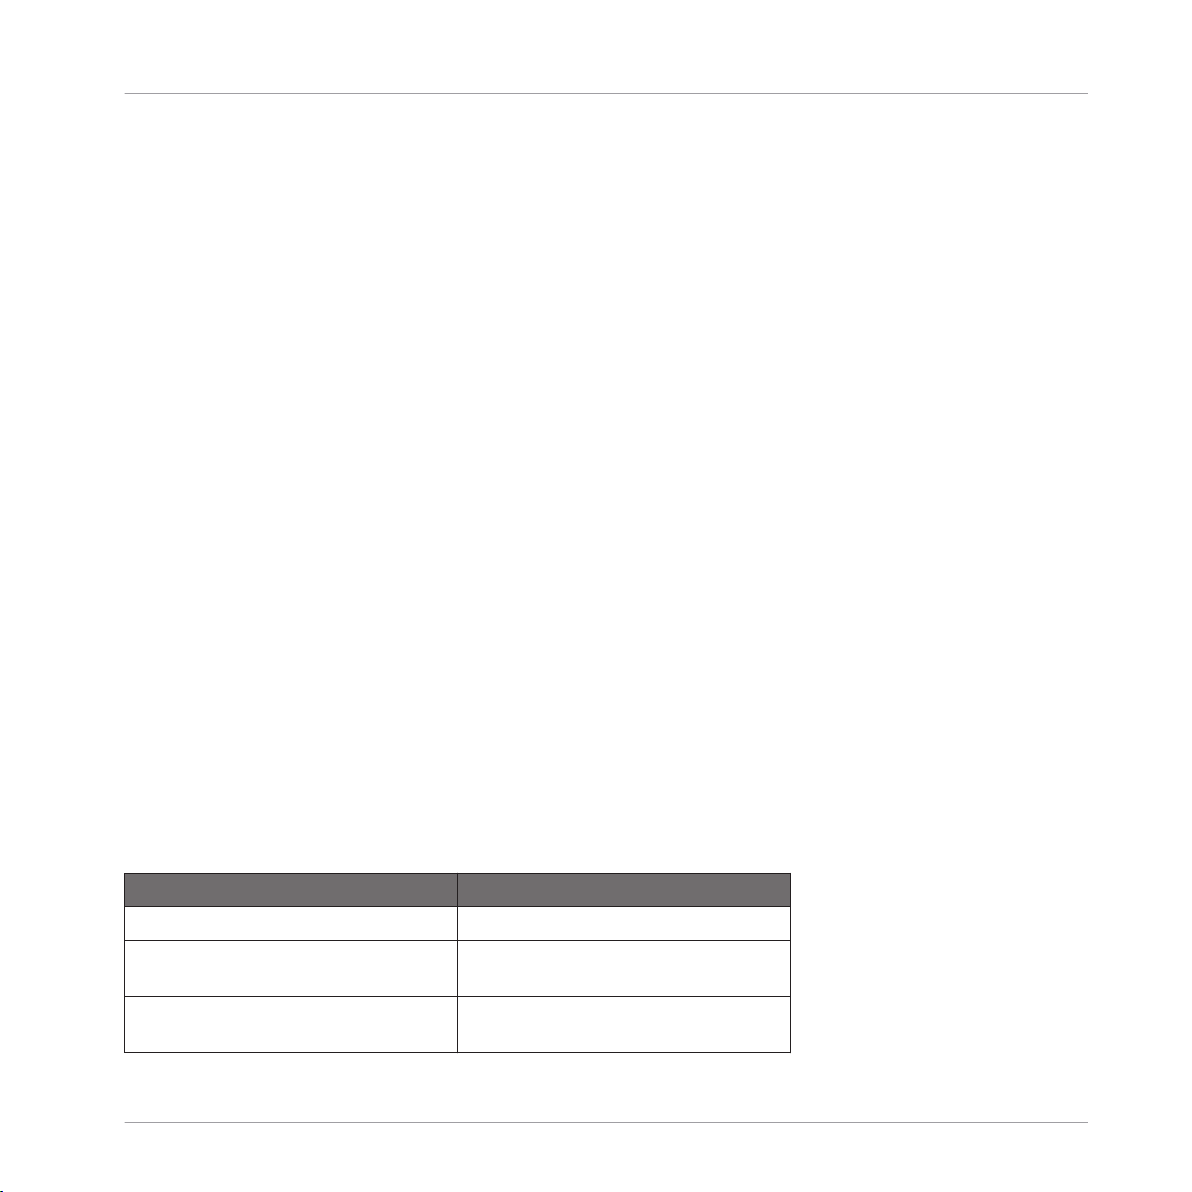
3.1.2 Knob Pages
Page Name Description
Current Rack / Device 8 knobs of whichever Live Rack or Drum
Rack is active or locked to hardware.
When a device other than a Rack is in focus, Device On/Off and the first 127 parameters of whichever live device/VST is
active or locked to hardware.
Sends Tracks 1-4 Sends 1 & 2 for tracks 1-4. The buttons
are for Record Arm for the 1st 8 tracks.
Sends Tracks 5-8 Sends 1 & 2 for tracks 5-8. The buttons
are still Record Arm for the 1st 8 tracks.
Track Volumes Volume for the 1st 8 tracks. The buttons
are still Record Arm for the 1st 8 tracks.
Drum Rack Direct mapping to the 16 drum pads
visible on an active or locked Drum
Rack. The top row of buttons = the top
row of pads; touching the top row of
knobs will trigger the second row of
pads, etc. Turning the 8 knobs each
send CC's 12 -18 on channel 2 for freely assigning to MIDI learnt functions. Try
mapping to effects or macros for that
drum.
KORE Controller
Ableton Live™
MIDI Learn 1 A group of 16 MIDI CC's on channel 3
for freely assigning to any parameter in
Live.
MIDI Learn 2 A second group of 16 MIDI CC's on
channel 4 for freely assigning to any parameter in Live.
- Controller Editor Template Documentation - 14
Page 15
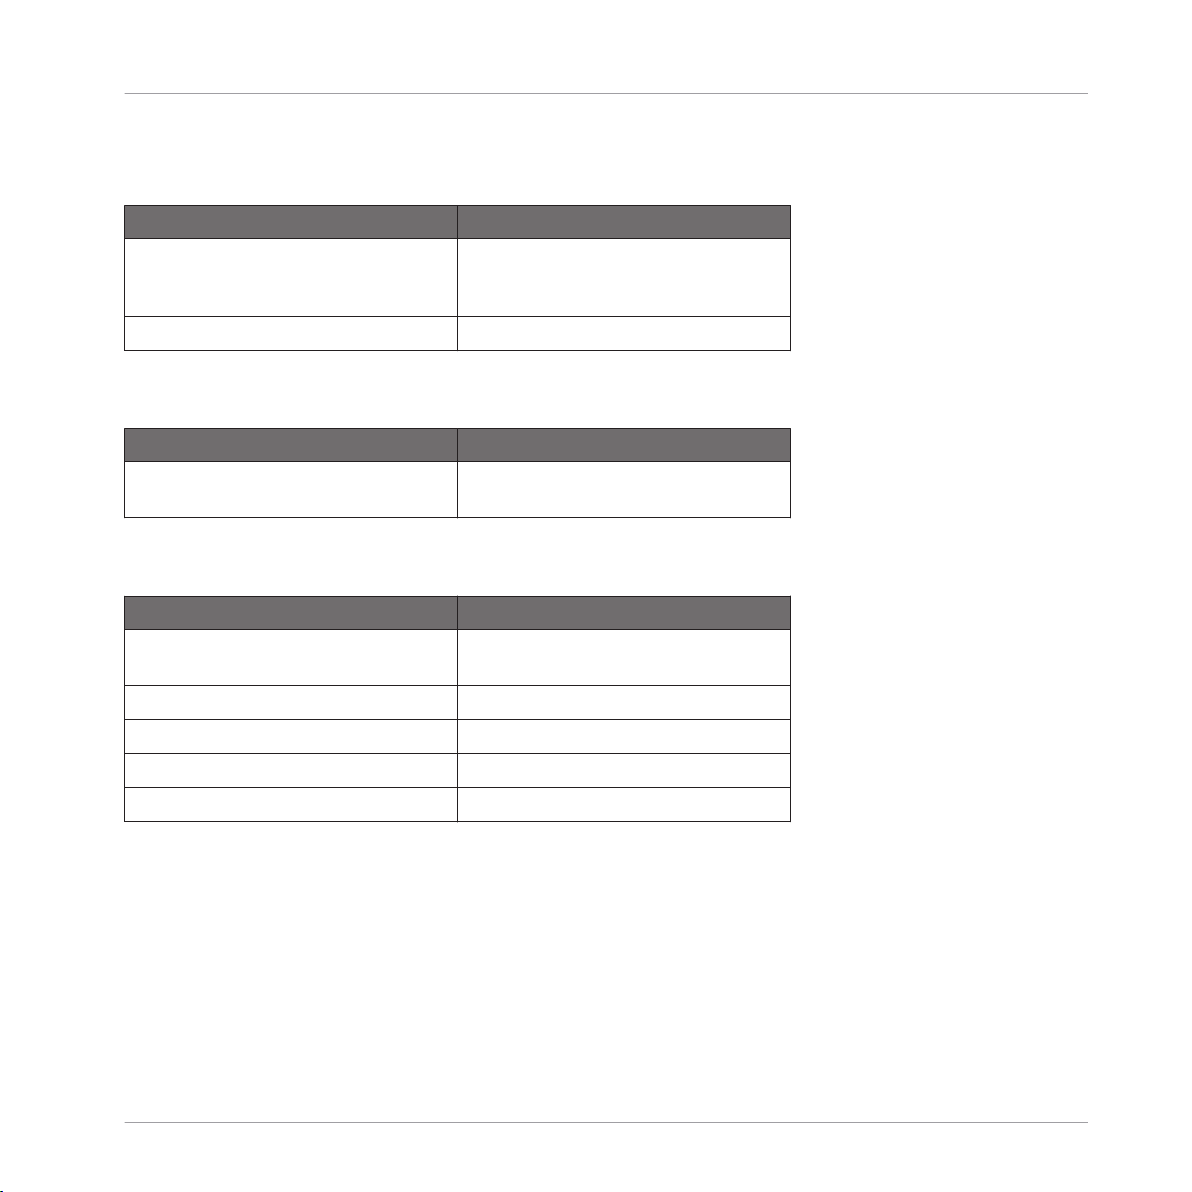
3.1.3 Transport Buttons
Page Name Description
Stop Stop
Play Play
Record Record
Audition Lock/unlock KORE Controller to active
device.
3.1.4 Global Controls
Page Name Description
Dial Program Change
Control Rewind
Sound Fast Forward
Enter Prior bank of parameters for an active
device when on “Current Rack / Device”
page.
KORE Controller
Ableton Live™
Esc Next bank of parameters for an active
device when on “Current Rack / Device”
page
Pedal 1 MIDI CC 74
Pedal 2 MIDI CC 75
FS 1 Play
FS 2 Record
- Controller Editor Template Documentation - 15
Page 16

KORE Controller
Mackie Control Universal™
3.2 Mackie Control Universal™
3.2.1 Installation
Select Mackie Control as remote control surface in your host software that supports the
►
MCU (Mackie Control Universal™) protocol.
For detailed information please refer to your host software’s documentation. Furthermore, articles describing the setup procedure in several common host softwares are available in the NI
Knowledge Base: www.native-instruments.com/knowledge/
3.2.2 Knob Pages
Page Name Description
Mute / Volume MCU Buttons Mute 1-8
MCU Fader 1-8
Solo / Volume MCU Buttons Solo 1-8
MCU Fader 1-8
Rec / Volume MCU Buttons Solo 1-8
MCU Fader 1-8
V-Pot push / V-Pots MCU V-Pot push
MCU V-Pot turn
Track Select / V-Pots MCU SELECT Ch. 1-8
MCU V-Pot turn
V-Pot Mode / V-Pots MCU Buttons
MCU V-Pot turn
- Controller Editor Template Documentation - 16
Page 17
3.2.3 Global Controls
Control Name Description
Stop MCU Button Stop
Play MCU Button Play
Record MCU Button Record
Pre-Listen MCU Button Scrub
Scroll Wheel MCU Jog Wheel
Control MCU Bank left (Fader groups)
Sound MCU Bank right (Fader groups)
Enter Rewind
ESC Fast Forward
Pedal MCU Pedal
Footswitch 1 / 2 MCU Foot Switches
KORE Controller
Mackie Control Universal™
3.3 MASSIVE
3.3.1 Installation
Installation for MASSIVE versions up to 1.1.3:
1. Copy the file “Massive - Kore Controller 2.mca” from the Controller Editor folder, sub
folder “Template Support Files” to the MASSIVE assignment folder:
On Mac OS X: place the file “Massive - Kore Controller 2.mca” in /Library/Application Sup-
port/Native Instruments/Massive/mca/
- Controller Editor Template Documentation - 17
Page 18
KORE Controller
On Windows : place the file “Massive - Kore Controller 2.mca” in the “mca” folder inside
the MASSIVE application folder.
2. Start MASSIVE and load the MIDI Setup “Kore Controller 2” by selecting Options > Midi
> Midi Setup.
3. Load the “Massive” Template in the Controller Editor.
Installation for MASSIVE version 1.1.4 and later:
1. Copy the file “Massive - Kore Controller 2.mca” from the Controller Editor folder, sub
folder “Template Support Files” to the MASSIVE assignment folder.
On Mac OS X, place the file “Massive - Kore Controller 2.mca” in ~/Library/Application
Support/Native Instruments/Massive/mca/
On Windows, place the file “Massive - Kore Controller 2.mca” in the “mca” folder inside
the MASSIVE application data folder.
On Windows Vista: C:\Users\<username>\AppData\Local\Native Instruments\Massive\mca
MASSIVE
On Windows XP: C:\Documents and Settings\<username>\Local Settings\Application Data
\Native Instruments\Massive\mca
2. Start MASSIVE and load the MIDI Setup “Kore Controller 2” by selecting Options > Midi
> Midi Setup.
3. Load the “Massive” Template in the Controller Editor.
3.3.2
Page Name Description
Macro Controls Controls the 8 macro parameters.
Osc 1, Osc 2 Controls Oscillator 1 and Oscillator 2
Osc 3, Noise Controls Oscillator 3 parameters and
Knob Pages
parameters.
Noise parameters.
- Controller Editor Template Documentation - 18
Page 19

Page Name Description
Mod Osc, (& Cutoff) Controls the Modulation Osc parameters
and cutoffs for Filter 1 and 2.
Filt 1, Filt 2 Controls parameters for Filter 1 and Fil-
ter 2.
Envelope 1 Controls parameters for Envelope 1.
Envelope 2 Controls parameters for Envelope 2.
Envelope 3 Controls parameters for Envelope 3.
Envelope 4 Controls parameters for Envelope 4.
FX1, FX2 Controls parameters for FX1 and FX2.
Eq, Pan Controls parameters for EQ and Pan.
Ins, FX Mix, Feedback Controls parameters for the Inserts, Ef-
fects Mix, and Feedback.
Amps, Filters Controls parameters for Amps and Fil-
ters.
KORE Controller
MASSIVE
3.3.3 Global Controls
Control Name Description
Stop MIDI Stop
Start MIDI Start
Record MIDI CC 62
Pre-Listen MIDI CC 63
Scroll wheel MIDI CC 7 (Volume)
Control MIDI CC 118
Sound MIDI CC 119
Enter MIDI CC 70
ESC MIDI CC 117
- Controller Editor Template Documentation - 19
Page 20

KORE Controller
Control Name Description
Pedal 1 / 2 MIDI CC 7 (Volume) / 11 (Expression)
Footswitch 1 / 2 MIDI CC 65 (Portamento) / 64 (Sustain)
3.4 PRO-53
3.4.1 Installation
1. Click on the NI logo within PRO-53 and select Load Controllermap from the drop-down
menu.
2. Load the file “Pro-53 Controller Map - Kore Controller 2.txt” from the “Controller Editor/
Template Support Files” folder as Controller Map for PRO-53.
3. From the same drop-down menu, select Enable Automatic CC Dump.
4. Load the “PRO-53” Template in the Controller Editor.
3.4.2 Knob Pages
Page Name Description
Oscillator A & B Control for all parameters for Osc A and
B.
PRO-53
Mixer & Amplifier Controls for the Mixer and Amplifier.
Filter Controls for the filter.
Delay FX Controls for Delay Effect.
Poly-Mod Controls for Poly-Mod.
LFO Controls for LFO.
Wheel-Mod Controls for Wheel-Mod and Pitchbend.
Global Controls global sound parameters.
- Controller Editor Template Documentation - 20
Page 21

3.4.3 Global Controls
Control Name Description
Stop MIDI Stop
Start MIDI Start
Record MIDI CC 68
Pre-Listen MIDI CC 69
Scroll wheel MIDI CC 7 (Volume)
Control MIDI CC 62
Sound MIDI CC 63
Enter MIDI CC 60
ESC MIDI CC 61
Pedal 1 / 2 MIDI CC 7 (Volume), 11 (Expression)
Footswitch 1 / 2 MIDI CC 65 (Portamento), 64 (Sustain)
KORE Controller
PRO-53
3.5 TRAKTOR PRO
3.5.1 Installation
1. Open the Preferences dialog in TRAKTOR PRO.
2. Load the settings file “Traktor Pro - Kore Controller 2.tsi” by clicking Import on the Preferences dialog. This file is located in the Controller Editor application folder, sub folder
“Template Support Files”.
3. In the next dialog named “Select Categories to import”, click OK.
4. Load the “Traktor Pro” Template in the Controller Editor.
- Controller Editor Template Documentation - 21
Page 22

3.5.2 Knob Pages
Page Name Description
Advanced FX Knob 1: FX Dry/wet
Knob 2-4: FX Parameters 1-3
Button 1: FX On
Button 2: FX Reset
Button 3 / 4: FX Button 1 / 2
Chained FX Knob 1: FX Dry/Wet
Knob 2-4: FX 1-3 Amount
Hold Button 1 + Knobs 1-3: FX Select
Button 2-4: FX 1-3 On
KORE Controller
TRAKTOR PRO
3.5.3
Global Controls
Control Name Description
Scroll wheel Browse: List Select Up/Down
Pre-Listen + Scroll wheel Master Volume (Soft Takeover)
Stop Snap Mode
Play Quantize Mode
Rec Audio Recorder On/Off
Enter Maximizes/Minimizes Full Browser View
ESC Tick On/Off
Control Loads Selected Track into Deck A
Sound Loads Selected Track into Deck B
- Controller Editor Template Documentation - 22
Page 23

MASCHINE Controller
4 MASCHINE Controller
4.1 Ableton Live™
4.1.1 Installation
In order to use the MASCHINE Controller for controlling Ableton Live™, you need to copy a
folder from the “Template Support Files” folder into the application folder of Ableton Live™.
If you are using Ableton Live™ 7, copy the folder “/Ableton Live 7/Maschine Controller”
►
to the Ableton Live™ application folder.
If you are using Ableton Live™ 8, copy the folder “/Ableton Live 8/Maschine Controller”
►
to the Ableton Live™ application folder.
Mac OS X
Ableton Live™
The target folder is located inside the Ableton Live™ application bundle. Right click on the
“Live.app” file and choose “Show Package Contents”. Copy ~/Ableton Live/Maschine folder to:
Contents/App-Resources/MIDI Remote Scripts.
Windows
The target folder is located inside the Ableton Live™ installation directory (usually C:\Program
Files\Ableton\). Copy “Maschine” to: \Resources\MIDI Remote Scripts.
Additional requirements
Activate MIDI Script in Ableton Live™:
1. From Live’s Options menu, select the Preferences entry.
2. In the Preferences dialog, click the MIDI Sync tab to access the MIDI controller settings.
3. From the Control Surface menu, select the Maschine Controller entry.
4. From the Input menu, select the Maschine Controller entry.
5. From the Output menu, select the Maschine Controller entry.
- Controller Editor Template Documentation - 23
Page 24

4.1.2 Knob Pages
Page Name Description
Track 1-8: Mute, Vol 8 Knobs control Track Volume.
Buttons control Track Mute.
Track 1-8: Solo, Pan 8 Knobs control Track Panning.
Buttons control Track Solo.
Track 1-8: Rec, Vol 8 Knobs control Track Volume.
Buttons control Track Arm (Record
Mode).
Sends 1 8 Knobs control Track Send 1.
Sends 2 8 Knobs control Track Send 2.
4.1.3 Pad Buttons
Button Name Description
Scene Enables Scene Trigger Mode (see: Transport Control Scene Off-
sets)
MASCHINE Controller
Ableton Live™
If Scene have Clips Pad on
If scene have no clips Pad off
If all Clips of a Scene are triggered Pad flashes
Pattern Enables Clip Trigger Mode
Available clips are active Pad on
Clips are playing or triggered Pad flashes
Mute Enables Clip Mute Mode
Available clips are active Pad on
Clips are muted Pad flashes
- Controller Editor Template Documentation - 24
Page 25

4.1.4 Transport Buttons
Button Name Description
Play Play Song
Rec Record Song
Erase Press Erase to stop all Clips
Loop [Restart] (holding down) Scene Offset (Scene Mode – scene
17-32) active
< (holding down) Scene Offset (Scene Mode – scene
33-48) active
> (holding down) Scene Offset (Scene Mode – scene
49-64) active
Grid (holding down) Scene Offset (Scene Mode – scene
65-80) active
4.1.5 Group Buttons
Button Name Description
E Left
MASCHINE Controller
Ableton Live™
B Up
F Down
G Right
4.1.6 Master Controls
Control Name Description
Volume Controls the Master Volume
Tempo Controls the Master Panning
Swing Controls the Master Crossfader
Note Repeat Displays BPM rate (flashing)
- Controller Editor Template Documentation - 25
Page 26

MASCHINE Controller
4.2 BATTERY 3
4.2.1 Installation
1. Start Battery 3.
2. Open “Battery 3 – Maschine Controller.kt3” from the Controller Editor folder, sub folder
“Template Support Files”.
3. Load the Battery 3 Template in the Controller Editor.
4.2.2 Knob Pages
Page Name Description
Cell 1 – Cell 16 These knob pages are specific to each of
the 16 cells in the “Battery 3” Template, controlling the cell volume, pan,
tune, and volume envelope parameters.
Global Effects This page adjusts several effect settings
for all 16-cells at once.
BATTERY 3
Delay & Reverb This page adjusts the Delay and Reverb
master effect settings.
4.2.3 Battery Pad Assignment
Pad Name Assignment
Battery C1-D#2 These pads are the 16 cells in Battery
which correspond to the standard MASCHINE kit layout.
- Controller Editor Template Documentation - 26
Page 27

MASCHINE Controller
4.2.4 Master Controls
Control Name Description
Volume This knob controls the master volume of
Battery 3.
4.3 BATTERY 3 (Large)
4.3.1 Installation
1. Start Battery 3.
2. Open “Battery 3 (Large)– Maschine Controller.kt3” from the Controller Editor folder, sub
folder “Template Support Files”.
3. Load the “Battery 3 (Large)” Template in the Controller Editor.
4.3.2 Knob Pages
Page Name Description
Global Effects This page adjusts several effect settings
for all 16-cells at once.
BATTERY 3
Delay & Reverb This page adjusts the Delay and Reverb
master effect settings.
- Controller Editor Template Documentation - 27
Page 28

4.3.3 Battery Pad Assignment
Pad Name Description
Battery C1-D#2 These pads are the 16 cells in Battery
which correspond to the standard MASCHINE kit layout.
Battery C2-D#3 These pads are the 16 cells in Battery
which correspond to the MIDI notes C2
(48) to D#2 (63)
(etc.) (etc.)
4.3.4 Master Controls
Control Name Description
Volume This knob controls the master volume of
Battery 3.
MASCHINE Controller
BATTERY 3 (Large)
4.4 FXpansion Guru™
4.4.1 Knob Pages
Page Name Description
Engines Mute + Vol Engine 1...8 mute (buttons) and volume
(knobs)
Engines Solo + Vol Engine 1...8 solo (buttons) and volume
(knobs)
Coloured Pad Groups 1..8 Automation of colored pad controls
Coloured FX Groups 1..8 Automation of colored FX controls
Master FX Controls 1..8 Master FX Controls 1..8
- Controller Editor Template Documentation - 28
Page 29

Page Name Description
Edit Scopes (basic) Edit basic pad controls in selectable
groups:
1 pad layer only / pad - all layers / all
colored pads / all pads in engine.
Edit Scopes Env’s Edit envelope controls in selectable
groups
Edit Scopes FX Edit pad FX and aux controls in selecta-
ble groups
Edit Scopes (extras) Edit more pad controls in selectable
groups
4.4.2 Pad Pages
Page Name Description
Pads 1-16 Trigger pads of selected engine
Pattern 1-16 Trigger pattern of selected engine
MASCHINE Controller
FXpansion Guru™
Scene 1-16 / 17-32 / 33 - 48 Recall scene (all engines pattern and
state).
Select Engines Select the engine.
4.4.3 Transport Buttons
Button Name Description
Play Play
Rec Record
Stop Stop
<..> Select Engines
- Controller Editor Template Documentation - 29
Page 30

4.4.4 Group Buttons
Button Name Description
A to H Select Pad Pages
4.4.5 Master Controls
Control Name Description
Volume Engine volume
Tempo Groove Velocity of selected engine
Swing Groove amount of selected engine
Note repeat Note repeat
F1 [Snap] Undo
F2 [Auto Write] Commit (Rec)
Control Panic
MASCHINE Controller
FXpansion Guru™
Pads modifier buttons Select Guru™ windows
Solo/Mute: solo/mute sel. Engine
- Controller Editor Template Documentation - 30
Page 31

4.5 GM Drums (Channel 10)
4.5.1 Knob Pages
Page Name Description
GM CC# 1-8 MIDI CC’s for controlling basic expres-
sion parameters and bank selection
It uses the MIDI controls stated in the
title of this page.
GM CC’ 71-77 Basic filter, Envelope, Vibrato control
This uses the MIDI controls stated in the
title of this page.
GM CC# 91-98 FX control
This uses the MIDI controls stated in the
title of this page.
MASCHINE Controller
GM Drums (Channel 10)
4.5.2 Pad Pages
Page Name Description
GM C-D#1 Standard GM mapping to the pads using
the controls stated in the page title.
GM Standard Kit This is a standard drum kit created
closely following the kit-pad layout for
Maschine kits.
GM Perc1 This is a kit using percussion sounds.
GM Perc2 This is a kit using percussion sounds.
- Controller Editor Template Documentation - 31
Page 32

MASCHINE Controller
Mackie Control Universal™
4.6 Mackie Control Universal™
4.6.1 Installation
Select Mackie Control as remote control surface in your host software that supports the
►
MCU (Mackie Control Universal™) protocol.
For detailed information please refer to your host software’s documentation. Furthermore, articles describing the setup procedure in several common host softwares are available in the NI
Knowledge Base: www.native-instruments.com/knowledge/
4.6.2 Knob Pages
Page Name Description
Vpot push / Vpots MCU V-Pot push
MCU V-Pot turn
Mute / Volume MCU Buttons Mute 1-8
MCU Fader 1-8
Solo / Volume MCU Buttons Solo 1-8
MCU Fader 1-8
Track Select / Vpots MCU SELECT Ch. 1-8
MCU V-Pot turn
VpotMode / Vpots MCU Buttons
MCU V-Pot turn
- Controller Editor Template Documentation - 32
Page 33

4.6.3 Pad Pages
Page Name Description
Select / VPot-assign 1-8: select track 1..8
9-16: Vpot function assignment.
Mute / VPot-assign 1-8: mute track 1..8
9-16: Vpot function assignment.
Solo / VPot-assign 1-8: solo track 1..8
9-16: Vpot function assignment.
Record / VPot-assign 1-8: track record READY 1..8
9-16: Vpot function assignment.
Navigation Easy to grasp navigation with scrub and
enter.
4.6.4 Transport Buttons
Button Name Description
Loop [Restart] MCU Loop button
MASCHINE Controller
Mackie Control Universal™
> FFW
< Rewind
Grid Read on/off
Play Play
Rec Record
Erase Stop
4.6.5 Group Buttons
Page Name Description
A to F Switch Pad Pages
- Controller Editor Template Documentation - 33
Page 34

MASCHINE Controller
Mackie Control Universal™
4.6.6 Master Controls
Control Name Description
Vol Master volume
Tempo CC 1 (regular MIDI)
Swing CC 11 (regular MIDI)
Note Repeat Scrub
4.7 MASSIVE
4.7.1 Installation
For MASSIVE versions up to 1.1.3
1. Copy the file “Massive - Maschine Controller.mca” from the Controller Editor folder, sub
folder “Template Support Files” to the MASSIVE assignment folder.
On Mac OS X, place the file “Massive - Maschine Controller.mca” in /Library/Application
Support/Native Instruments/Massive/mca/.
On Windows, place the file “Massive - Maschine Controller.mca” in the “mca” folder inside the MASSIVE application folder.
2. Start MASSIVE and load the MIDI Setup “Maschine Controller” by selecting Options >
Midi > Midi Setup.
3. Load the Massive Template in the Controller Editor.
For MASSIVE version 1.1.4 and later
1. Copy the file “Massive - Maschine Controller.mca” from the Controller Editor folder, sub
folder “Template Support Files” to the MASSIVE assignment folder.
- Controller Editor Template Documentation - 34
Page 35

MASCHINE Controller
On Mac OS X, place the file “Massive - Maschine Controller.mca” in ~/Library/Application
Support/Native Instruments/Massive/mca/.
On Windows, place the file “Massive - Maschine Controller.mca” in the “mca” folder inside the MASSIVE application data folder.
On Windows XP: C:\Documents and Settings\<username>\Local Settings\Application Data
\Native Instruments\Massive\mca.
On Windows Vista: C:\Users\<username>\AppData\Local\Native Instruments\Massive\mca.
2. Start MASSIVE and load the MIDI Setup “Maschine Controller” by selecting Options >
Midi > Midi Setup.
3. Load the "Massive" Template in the Controller Editor.
4.7.2 Knob Pages
Page Name Description
Macro Controls Controls the 8 macro parameters.
MASSIVE
Osc 1, Osc 2 Controls Oscillator 1 and Oscillator 2
parameters.
Oscillator 1 controls use the left-hand
side Maschine window and according
knobs.
Oscillator 2 uses the right-hand side
window and according knobs.
Osc 3, Noise Controls Oscillator 3 parameters and
Noise parameters.
Note: Same left and right divide as previous knob page.
Mod Osc, (& Cutoff) Control the Modulation Osc parameters
and cutoffs for Filter 1 and 2.
- Controller Editor Template Documentation - 35
Page 36

Page Name Description
Filt 1, Filt 2 Controls parameters for Filter 1 and Fil-
ter 2.
Filter 1 is controlled by the left-hand
side of the Maschine hardware and Filter 2 on the right-hand .
Envelope 1 Controls parameters for Envelope 1.
Envelope 2 Controls parameters for Envelope 2.
Envelope 3 Controls parameters for Envelope 3.
Envelope 4 Controls parameters for Envelope 4.
FX1, FX2 Controls parameters for FX1 and FX2.
Note: Same left and right-hand divide as
previous knob pages.
EQ, Pan Controls parameters for EQ and Pan
Ins, FX Mix, Feedback Controls parameters for the Inserts, Ef-
fects Mix, and Feedback.
Amps, Filters Controls parameters for Amps and Fil-
ters.
MASCHINE Controller
MASSIVE
Same left and right-hand divide as previous knob pages.
4.7.3 Pad Pages
Page Name Description
All pad pages are velocity sensitive.
Notes are mapped from C-1– D#7
across 8 pad pages named accordingly.
- Controller Editor Template Documentation - 36
Page 37

MASCHINE Controller
4.8 PRO-53
4.8.1 Installation
1. Click on the NI logo within PRO-53 and select Load Controllermap from the drop-down
menu.
2. Load the file “Pro-53 Controller Map - Maschine Controller.txt” from the “Controller Editor/Template Support Files” folder as Controller Map for PRO-53.
3. From the same drop-down menu, select Enable Automatic CC Dump.
4. Load the “PRO-53” Template in the Controller Editor.
4.8.2 Knob Pages
Page Name Description
Oscillator A & B Control for all parameters for Osc A and
B.
Note: Osc A uses the left-hand side MASCHINE Controller display and controls,
and Osc B uses the right-hand side display and controls. This is illustrated in
the page title. This applies to every page
in this Template (where control could be
mapped this way).
PRO-53
Mixer & Amplifier Controls for the Mixer and Amplifier
Filter Controls for the filter.
Delay FX Controls for Delay Effect.
Poly-Mod Controls for Poly-Mod.
LFO Controls for LFO.
Wheel-Mod Controls for Wheel-Mod and Pitchbend.
Global Controls global sound parameters.
- Controller Editor Template Documentation - 37
Page 38

4.9 REAKTOR Junatik
4.9.1 Knob Pages
Page Name Description
VCO section use Basics: Oscillator Amplitude related and
Filter Cutoff
VCO section all All possible controls in VCO section
Phils first page Basic Controls out of a musician's point
of view
Add. FX + LFO “Add. FX” Section and LFO
4.9.2 Pad Pages
Page Name Description
FX + EQ “Additional FX” Section including EQ.
MASCHINE Controller
REAKTOR Junatik
VCF + VCA Filter related and VCA Envelope con-
trols.
VCF + Mod Env Filter related and Mod Envelope con-
trols.
Miscellaneous Miscellaneous settings, resets and addi-
tional MIDI controls.
Stereo Delay Possible controls for trailed Stereo De-
lay.
- Controller Editor Template Documentation - 38
Page 39
4.9.3 Transport Buttons
Button Name Description
< / > Ensemble Snapshots (instrument are
available in Phils first page and FX
Snapshots in Stereo Delay).
Grid Velocity to VCA
4.9.4 Group Buttons
Button Name Description
Cn…D#n+1 Velocity sensitive notes without after-
touch in 8 octaves.
4.9.5 Master Controls
Control Name Description
Volume CC1 can be assigned to whatever you
like.
MASCHINE Controller
REAKTOR Junatik
Tempo LFO speed
Swing Octave control
Note repeat LFO Trigger
F1 [Snap] / F2 [Auto Write] Octave – and +
4.10 REAKTOR Scenario
4.10.1 Additional requirements
1. In REAKTOR’s Audio Setup dialog, activate the MASCHINE Controller’s MIDI In and MIDI
Out ports by clicking on their entries. This is required for incremental parameter updates.
- Controller Editor Template Documentation - 39
Page 40

MASCHINE Controller
REAKTOR Scenario
2. In order to use the Start/Stop commands, select the External Sync entry from REAKTOR‘s
Settings menu. Note that this function is available in Stand-alone mode only!
4.10.2 Knob Pages
Page Name Description
Filter + Gain 1…4 Recommended page for using Live.
Engine n Controls [1..4] All possible controls of Loop Engines
sections.
Loop, Slice, Gater, Lo/Hi Loop FX controls 1
Infinity FFB (+Loop+Slice) Mainly Loop FX – Infinity FFB controls
LoopFX Overview Loop FX controls 2
4.10.3 Pad Pages
Page Name Description
Off 1…4/5…8: Sample select down/up
9…12/13…16: Filter Cutoff down/up
Scene FX Infinity FFB enable on/off
4.10.4 Transport Buttons
Button Name Description
Start Start
Rec Continue
Erase Stop
Loop [Restart] enable Loop FX on/off
< / > Scene memory +/-
Grid enable FX Slicer on/off
- Controller Editor Template Documentation - 40
Page 41

4.10.5 Group Buttons
Button Name Description
A…D Loop Engines on/off
E…H E…H: Retrigger Engines 1-4 on/off
4.10.6 Master Controls
Control Name Description
Volume Gain = Master volume
Tempo LooP Lng = FX Loop – loop length
Swing Gate Speed
Note repeat Gate on/off
4.11 Toontrack® EZDrummer®
MASCHINE Controller
REAKTOR Scenario
4.11.1 Additional requirements
There are ‘Alias’ pads on the pad pages which are left this way as their assignment depends on
the expansion packs you have.
4.11.2 Knob Pages
Page Name Description
Empty This knob page is free for assignment
dependent on which host you are using
EZDrummer® within.
- Controller Editor Template Documentation - 41
Page 42

4.11.3 Pad Pages
Page Name Description
Standard Kit Standard drum kit created in accord-
ance with the MASCHINE kit pad set
up.
Pad Page C#1 – E2 The Pads are assigned in accordance to
the preceding 16 Key map MIDI controls used by EZDrummer®.
Pad Page F2-F3 The Pads are assigned in accordance to
the preceding 16 Key map MIDI controls used by EZDrummer®.
Pad Page A-1 – C1 The Pads are assigned in accordance to
the first 16 Key map MIDI controls used
by EZDrummer®.
4.12 TRAKTOR PRO
MASCHINE Controller
Toontrack® EZDrummer®
4.12.1 Installation
1. Open the Preferences dialog in TRAKTOR PRO.
2. Load the settings file “Traktor Pro - Maschine Controller.tsi” by clicking Import on the
Preferences dialog. This file is located in the Controller Editor application folder, sub folder “Template Support Files”.
3. In the next dialog named Select Categories to import, click OK.
4. Load the “Traktor Pro” Template in the Controller Editor.
4.12.2 Knob Pages
Page Name Description
TRAKTOR PRO FX FX control for Advanced & Chained FX
- Controller Editor Template Documentation - 42
Page 43

4.12.3 Pad Pages
Page Name Description
No pages used Pads control playback and loop func-
tions for Deck A and Deck B.
For a detailed description load the
“Traktor Pro” Template in the Controller
Editor and see the labels of the pads.
MASCHINE Controller
TRAKTOR PRO
4.12.4
Transport Buttons
Button Name Description
< and > Load to Decks
Play and Erase List browse
4.12.5 Group Buttons
Button Name Description
A and B FX assign for Deck A
C and D FX assign for Deck B
4.12.6 Master Controls
Control Name Description
Volume Loop length Deck A
Swing Loop length Deck B
F1 [Snap] Acts as a shift button for the Pads to
trigger advanced options.
F2 [Auto Write] Switches to Hotkeys mode: Pads can be
used to trigger Hotkeys.
- Controller Editor Template Documentation - 43
Page 44
MASCHINE Controller
XLN Audio Addictive Drums™
4.13 XLN Audio Addictive Drums™
4.13.1 Installation
Please see Addictive Drums™ manual for additional support regarding MIDI mapping and key
map assignments.
4.13.2 Knob Pages
Page Name Description
Empty This knob page is free for assignment
and depends on which host you are using Addictive Drums™ in.
4.13.3 Pad Pages
Page Name Description
Standard Kit Standard drum kit created in accord-
ance with the MASCHINE kit pad set
up.
Pad Page C1 – D#2 The Pads are assigned in accordance to
the preceding 16 Keymap MIDI control
used by Addictive Drums™.
Pad Page E2-G#3 The Pads are assigned in accordance to
the preceding 16 Keymap MIDI control
used by Addictive Drums™.
Pad Page A3– A#4 The Pads are assigned in accordance to
the first 16 Keymap MIDI control used
by Addictive Drums™
- Controller Editor Template Documentation - 44
Page 45

TRAKTOR KONTROL X1
Serato Scratch Live™
5 TRAKTOR KONTROL X1
5.1 Serato Scratch Live™
5.1.1 Installation
In order to use the TRAKTOR KONTROL X1 hardware controller for controlling Serato Scratch
Live™, you need to copy the file “SSL_X1.xml” from the Controller Editor folder’s sub folder
“Template Support Files” to the Serato Scratch Live™ “MIDI” folder.
Mac OS X
The target folder is located inside the Serato Scratch Live™ content directory (usually ~user/
music/ScratchLIVE/MIDI). Copy the SSL_X1.xml into the MIDI folder (if the MIDI folder does
not exist inside the Serato Scratch Live™ directory you have to manually create it).
Windows
The target folder is located inside the Serato Scratch Live™ content directory (usually ~ My
Documents\My Music\ScratchLIVE\MIDI). Copy the SSL_X1.xml into the MIDI folder (if the
MIDI folder does not exist inside the Serato Scratch Live™ directory you have to manually create it).
5.1.2 Additional requirements
Load MIDI mapping in Serato Scratch Live™:
1. Enter the Setup dialogue in Serato Scratch Live™.
2. Go to the MIDI tab.
3. Select the entry SSL_X1.
4. Confirm by clicking on Load.
- Controller Editor Template Documentation - 45
Page 46

5.1.3 5.1.3 Knob Page
Knob Name Description
DRY/WET Deck Gain
1-3 Sampler Slot Volume
BROWSE Turn: browse Playlist
Push: load selected track to deck
LOOP Turn: select Auto Loop size
Push: set Auto Loop
5.1.4 Button Page
Button Name Description
ON Key Lock On/Off
1-3 Play Sampler Slot
TRAKTOR KONTROL X1
Serato Scratch Live™
FX1 Loop Roll
FX2 Tempo Tap
IN Set Loop In Point
OUT Set Loop Out Point
< BEAT Cue 1
CUE/REL Cue 2
PLAY Cue 3
BEAT > Cue 4
CUP/ABS Cue 5
SYNC Censor
SHIFT Activates Shift layer
SHIFT + BROWSE (push) Instant double
SHIFT + LOOP (push) Loop active
- Controller Editor Template Documentation - 46
Page 47

TRAKTOR KONTROL X1
Serato Scratch Live™ 2
Button Name Description
SHIFT + < BEAT Sets/overwrites Cue 1
SHIFT + CUE/REL Sets/overwrites Cue 2
SHIFT + PLAY Sets/overwrites Cue 3
SHIFT + BEAT > Sets/overwrites Cue 4
SHIFT + CUP/ABS Sets/overwrites Cue 5
5.2 Serato Scratch Live™ 2
5.2.1 Installation
In order to use the TRAKTOR KONTROL X1 hardware controller for controlling Serato Scratch
Live™ 2, you need to copy the file “SSL2_X1.xml” from the Controller Editor folder’s sub folder “Template Support Files” to the Serato Scratch Live™ 2 “MIDI” folder.
Mac OS X
The target folder is located inside the Serato Scratch Live™ 2 content directory (usually ~user/
music/ScratchLIVE/MIDI). Copy the SSL2_X1.xml into the MIDI folder (if the MIDI folder does
not exist inside the Serato Scratch Live™ 2 directory you have to manually create it).
Windows
The target folder is located inside the Serato Scratch Live™ 2 content directory (usually
~\My Documents\My Music\ScratchLIVE\MIDI). Copy the SSL2_X1.xml into the MIDI folder (if
the MIDI folder does not exist inside the Serato Scratch Live™ 2 directory you have to manually create it).
5.2.2 Additional requirements
Load MIDI mapping in Serato Scratch Live™ 2:
1. Enter the Setup dialogue in Serato Scratch Live™ 2.
2. Go to the MIDI tab.
- Controller Editor Template Documentation - 47
Page 48
3. Select the entry SSL2_X1.
4. Confirm by clicking on Load.
5.2.3 Knob Page
Knob Name Description
DRY/WET Deck Gain
1-3 FX Parameter
BROWSE Turn: browse Playlist
Push: load selected track to deck
LOOP Turn: select Auto Loop size
Push: set Auto Loop
5.2.4 Button Page
Button Name Description
ON Key Lock On/Off
TRAKTOR KONTROL X1
Serato Scratch Live™ 2
1-3 FX on/off
FX1 Assign FX Unit 1
FX2 Assign FX Unit 2
IN Set Loop In Point
OUT Set Loop Out Point
< BEAT Cue 1
CUE/REL Cue 2
PLAY Cue 3
BEAT > Cue 4
CUP/ABS Cue 5
SYNC Censor
SHIFT Activates Shift layer
- Controller Editor Template Documentation - 48
Page 49

Button Name Description
SHIFT + 1-3 Play Sampler Slot
SHIFT + FX1 Loop Roll
SHIFT + FX2 Tempo Tap
SHIFT + BROWSE (push) Instant double
SHIFT + LOOP (push) Loop active
SHIFT + < BEAT Sets/overwrites Cue 1
SHIFT + CUE/REL Sets/overwrites Cue 2
SHIFT + PLAY Sets/overwrites Cue 3
SHIFT + BEAT > Sets/overwrites Cue 4
SHIFT + CUP/ABS Sets/overwrites Cue 5
TRAKTOR KONTROL X1
Serato Scratch Live™ 2
- Controller Editor Template Documentation - 49
 Loading...