

Page 1
Page 2

The information in this document is subject to change without notice and does not represent a
commitment on the part of Native Instruments GmbH. The software described by this document is subject to a License Agreement and may not be copied to other media. No part of this
publication may be copied, reproduced or otherwise transmitted or recorded, for any purpose,
without prior written permission by Native Instruments GmbH, hereinafter referred to as Native
Instruments.
“Native Instruments”, “NI” and associated logos are (registered) trademarks of Native Instruments GmbH.
Mac, Mac OS, GarageBand, Logic, iTunes and iPod are registered trademarks of Apple Inc.,
registered in the U.S. and other countries.
Windows, Windows Vista and DirectSound are registered trademarks of Microsoft Corporation
in the United States and/or other countries.
Ableton Live™ is a Trademark of Ableton AG.
All other trade marks are the property of their respective owners and use of them does not imply any affiliation with or endorsement by them.
Document authored by: Native Instruments GmbH
Disclaimer
Software version: 2.00 (10/2016)
Page 3
NATIVE INSTRUMENTS GmbH
Schlesische Str. 29-30
D-10997 Berlin
Germany
www.native-instruments.de
NATIVE INSTRUMENTS North America, Inc.
6725 Sunset Boulevard
5th Floor
Los Angeles, CA 90028
USA
www.native-instruments.com
NATIVE INSTRUMENTS K.K.
YO Building 3F
Jingumae 6-7-15, Shibuya-ku,
Tokyo 150-0001
Japan
www.native-instruments.co.jp
Contact
NATIVE INSTRUMENTS UK Limited
18 Phipp Street
London EC2A 4NU
UK
www.native-instruments.co.uk
© NATIVE INSTRUMENTS GmbH, 2016. All rights reserved.
Page 4

Table of Contents
Table of Contents
1 Welcome ..................................................................................................................
1.1 Document Conventions ............................................................................................................... 7
2 Installation ...............................................................................................................
2.1 Installing the Ableton Live Template on OS X ............................................................................. 9
2.2 Installing the Ableton Live Template on Windows ....................................................................... 9
2.3 Setup in Controller Editor ........................................................................................................... 10
2.4 Setup in Ableton Live .................................................................................................................. 11
3 MASCHINE including MIKRO and STUDIO ....................................................................
3.1 Layout and Basic Controls .......................................................................................................... 13
3.2 Global Controls and Navigation .................................................................................................. 31
3.3 Controller Modes ......................................................................................................................... 56
3.1.1 Basic Layout MASCHINE MK2 ..................................................................................... 13
3.1.2 Basic Layout MASCHINE ............................................................................................ 16
3.1.3 Basic Layout MASCHINE MIKRO MK2 ......................................................................... 19
3.1.4 Basic Layout MASCHINE STUDIO ................................................................................ 22
3.1.5 Transport Section with MASCHINE ............................................................................ 24
3.1.6 Navigation ................................................................................................................. 26
3.2.1 Controls and Navigation with MASCHINE STUDIO ...................................................... 31
3.2.2 Controls and Navigation with MASCHINE MK2 ........................................................... 40
3.2.3 Controls and Navigation with MASCHINE MIKRO MK1 & MIKRO MK2 ......................... 46
3.2.4 Controls and Navigation with MASCHINE .................................................................. 50
3.2.5 Edit Section ............................................................................................................... 53
3.3.1 Clip Mode .................................................................................................................. 56
3.3.2 Scene Mode ............................................................................................................... 64
3.3.3 Pad Mode ................................................................................................................... 66
6
9
13
Ableton Live 9.1 MASCHINE Template - Manual - 4
Page 5

Table of Contents
3.4 Controller Pages ......................................................................................................................... 90
3.3.4 Note Repeat ............................................................................................................... 74
3.3.5 Track Controls ........................................................................................................... 78
3.3.6 Control Mode (MIKRO MK1 and MIKRO MK2 only) ....................................................... 82
3.4.1 MASCHINE STUDIO Pages .......................................................................................... 91
3.4.2 MASCHINE MK2 Pages ............................................................................................... 96
3.4.3 MASCHINE MK1 Pages ............................................................................................... 100
3.4.4 MASCHINE MIKRO and MIKRO MK2 Pages .................................................................. 105
4 MASCHINE JAM .........................................................................................................
4.1 Transport and Global Functions .................................................................................................. 108
4.2 Matrix and Note Input ................................................................................................................. 110
4.3 Smart Strip and Mixing ...............................................................................................................113
108
Ableton Live 9.1 MASCHINE Template - Manual - 5
Page 6

1 Welcome
Welcome to the MASCHINE Controller Editor Ableton Live template. This document describes
how to install, setup and use the Ableton Live 9.1 template with the MASCHINE Controller Editor software and use a MASCHINE hardware controller to operate Ableton Live. This template
provides very detailed control over Ableton Live 9.1 and doubles the functionality of your MASCHINE hardware. Please carefully read the entire document and follow the instructions step
by step.
Included in this release are not only the remote script and template for MASCHINE STUDIO
but also new advanced templates and remote scripts for MASCHINE, MASCHINE MIKRO, MASCHINE MK2 and MASCHINE MIKRO MK2. Users of the previous template should note that
there have been a few changes and that some button assignments were changed to incorporate
various new functions like Note Repeat, Editing etc.
There are some notable changes for users of the previous version:
▪ NOTE REPEAT button now performs actual note repeat. The Stop All clips function has
been assigned to a different button depending on your version of MASCHINE.
Welcome
▪ CONTROL Mode is not available for MASCHINE MK2 anymore.
▪ Deactivating and activating devices in Control mode is done by pressing the Shift (ENTER)
button and the device assignment button (Pad 8).
▪ Pad Mode has been expanded to work with Drum Racks.
▪ Use Pad Mode to delete certain note values of a midi clip.
▪ Edit functions like deleting, duplicating or creating of tracks, scenes or clips has been add-
ed.
▪ Live 9’s new clip automation has been incorporated. You can also use the MASCHINE con-
troller knobs with the clear button to delete automation.
▪ Some functions on MASCHINE MIKRO like arm, stop track, cross fader assignment, and
control mode do not have dedicated buttons anymore but are activated by using the Shift
(ENTER) button and other mode buttons.
▪ You can edit the loop and start/end point of clips (not available for MIKRO).
Ableton Live 9.1 MASCHINE Template - Manual - 6
Page 7
Document Conventions
▪ Launch a scene in Clip Mode using the Shift button
It is necessary that you familiarize yourself with the new assignments and functions by studying this manual carefully.
On behalf of the entire NATIVE INSTRUMENTS team, we hope you find this template useful.
1.1 Document Conventions
This document uses particular formatting to point out special facts and to warn you of potential issues. The icons introducing the following notes let you see what kind of information can
be expected:
The speech bubble icon indicates a useful tip that may often help you to solve a task
more efficiently.
The exclamation mark icon highlights important information that is essential for the given context.
Welcome
The red cross icon warns you of serious issues and potential risks that require your full
attention.
Furthermore, the following formatting is used:
▪ Text appearing in (drop-down) menus (such as Open…, Save as… etc.) in the software and
paths to locations on your hard disk or other storage devices is printed in italics.
▪ Text appearing elsewhere (labels of buttons, controls, text next to checkboxes etc.) in the
software is printed in blue. Whenever you see this formatting applied, you will find the
same text appearing somewhere on the screen.
▪ Important names and concepts are printed in bold.
▪ References to keys on your computer’s keyboard you’ll find put in square brackets (e.g.,
“Press [Shift] + [Enter]”).
Single instructions are introduced by this play button type arrow.
►
Ableton Live 9.1 MASCHINE Template - Manual - 7
Page 8

Results of actions are introduced by this smaller arrow.
→
Welcome
Document Conventions
Ableton Live 9.1 MASCHINE Template - Manual - 8
Page 9
Installing the Ableton Live Template on OS X
2 Installation
The required files for installing the Ableton Live Template for your MASCHINE controller are
part of the Controller Editor installation.
Ensure that you have installed the latest version of Controller Editor before proceeding
with the installation. You can download the latest version with Native Access on your
computer.
2.1 Installing the Ableton Live Template on OS X
1. Ensure that Ableton Live is not running.
2. Navigate to the following folder: Macintosh HD/Applications/ Native Instruments/Control-
ler Editor/Template Support Files/Ableton Live 9
3. Locate the Template folder named according to your MASCHINE controller (for MASCHINE MIKRO Mk1, use the Maschine folder).
Installation
4. Copy this folder to your clipboard by right-clicking on it and choosing Copy.
5. Open your Applications folder and right-click the Live application symbol. In the context
menu, click on Show Package Contents.
6. In the Ableton Live package, navigate to Contents/App-Resources/MIDI Remote Scripts.
7. Delete any previously installed MASCHINE folders from MIDI Remote Scripts.
8. Paste the folder you have copied to your clipboard into the MIDI Remote Scripts folder.
You have now installed the required files for the MASCHINE Ableton Live Template.
→
2.2 Installing the Ableton Live Template on Windows
1. Ensure that Ableton Live is not running.
Ableton Live 9.1 MASCHINE Template - Manual - 9
Page 10
Setup in Controller Editor
2. Navigate to the following folder: C:\Program Files\Native Instruments\Controller Editor
\Template Support Files\Ableton Live 9
3. Locate the Template folder named according to your MASCHINE controller (for MASCHINE MIKRO Mk1, use the Maschine folder).
4. Copy this folder to your clipboard by right-clicking on it and choosing Copy.
5. Go to Ableton Live's installation directory. By default, it is located here: C:\Program Data
\Ableton\Live 9. The Program Data folder may be hidden. You can enable the option to
Show hidden files, folder and drives in the under Options in the View settings of the Win-
dows Explorer.
6. In the Ableton Live installation directory, navigate to ..\Resources\MIDI Remote Scripts.
7. Delete any previously installed MASCHINE folders from MIDI Remote Scripts.
8. Paste the folder you have copied to your clipboard into the MIDI Remote Scripts folder.
You have now installed the required files for the MASCHINE Ableton Live Template.
→
2.3 Setup in Controller Editor
1. Connect the MASCHINE controller to your computer.
Installation
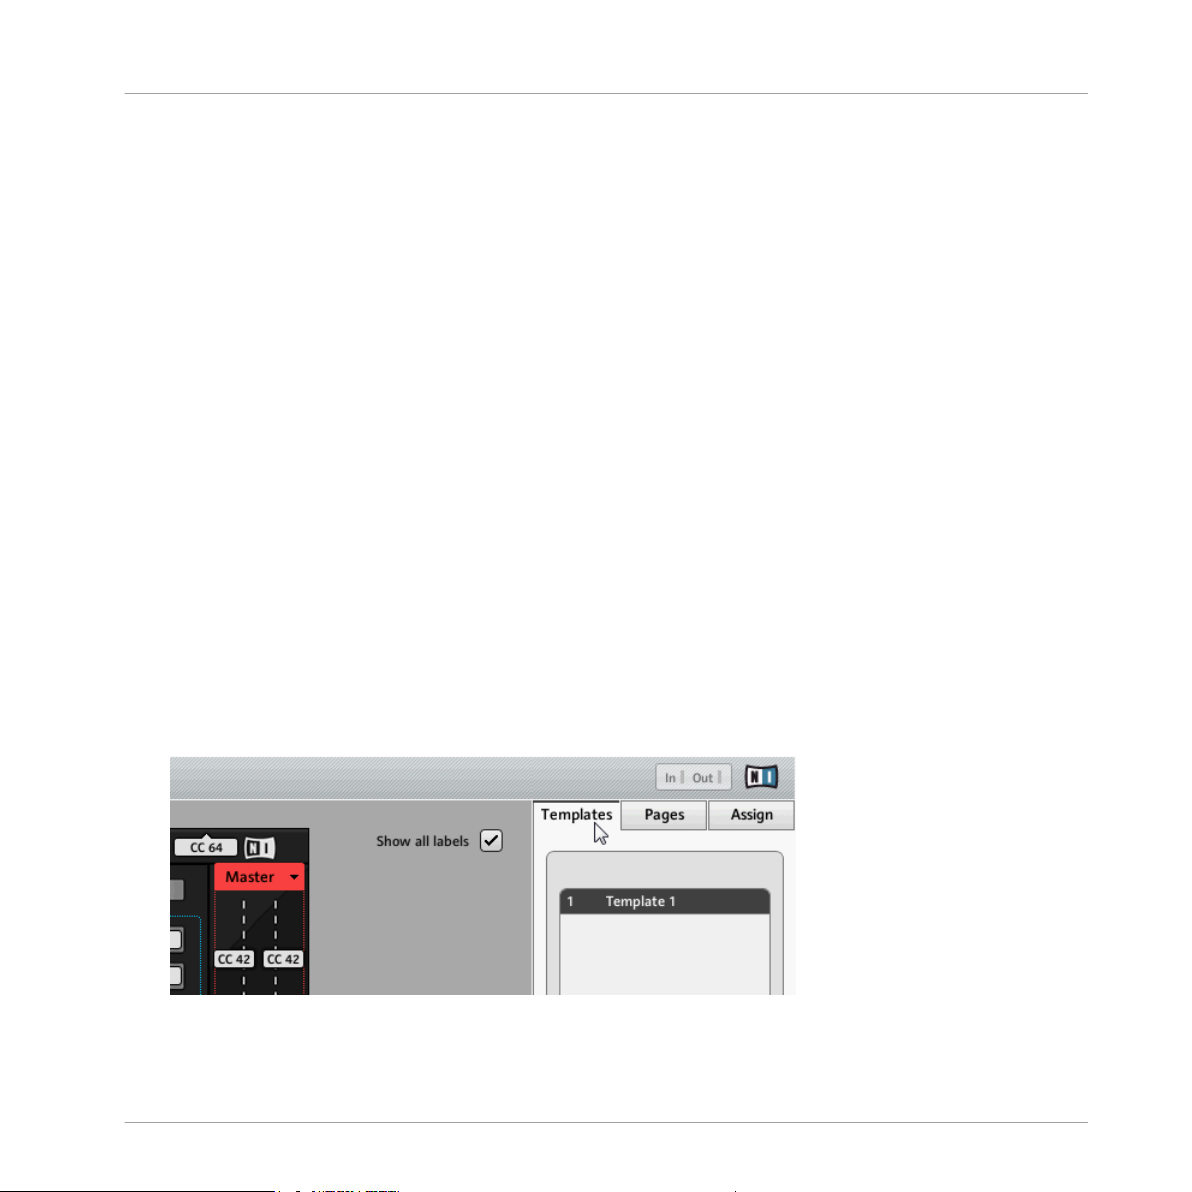
2. Start Controller Editor. It automatically recognizes your controller.
3. In Controller Editor, go to the Templates tab.
Ableton Live 9.1 MASCHINE Template - Manual - 10
Page 11
Setup in Ableton Live
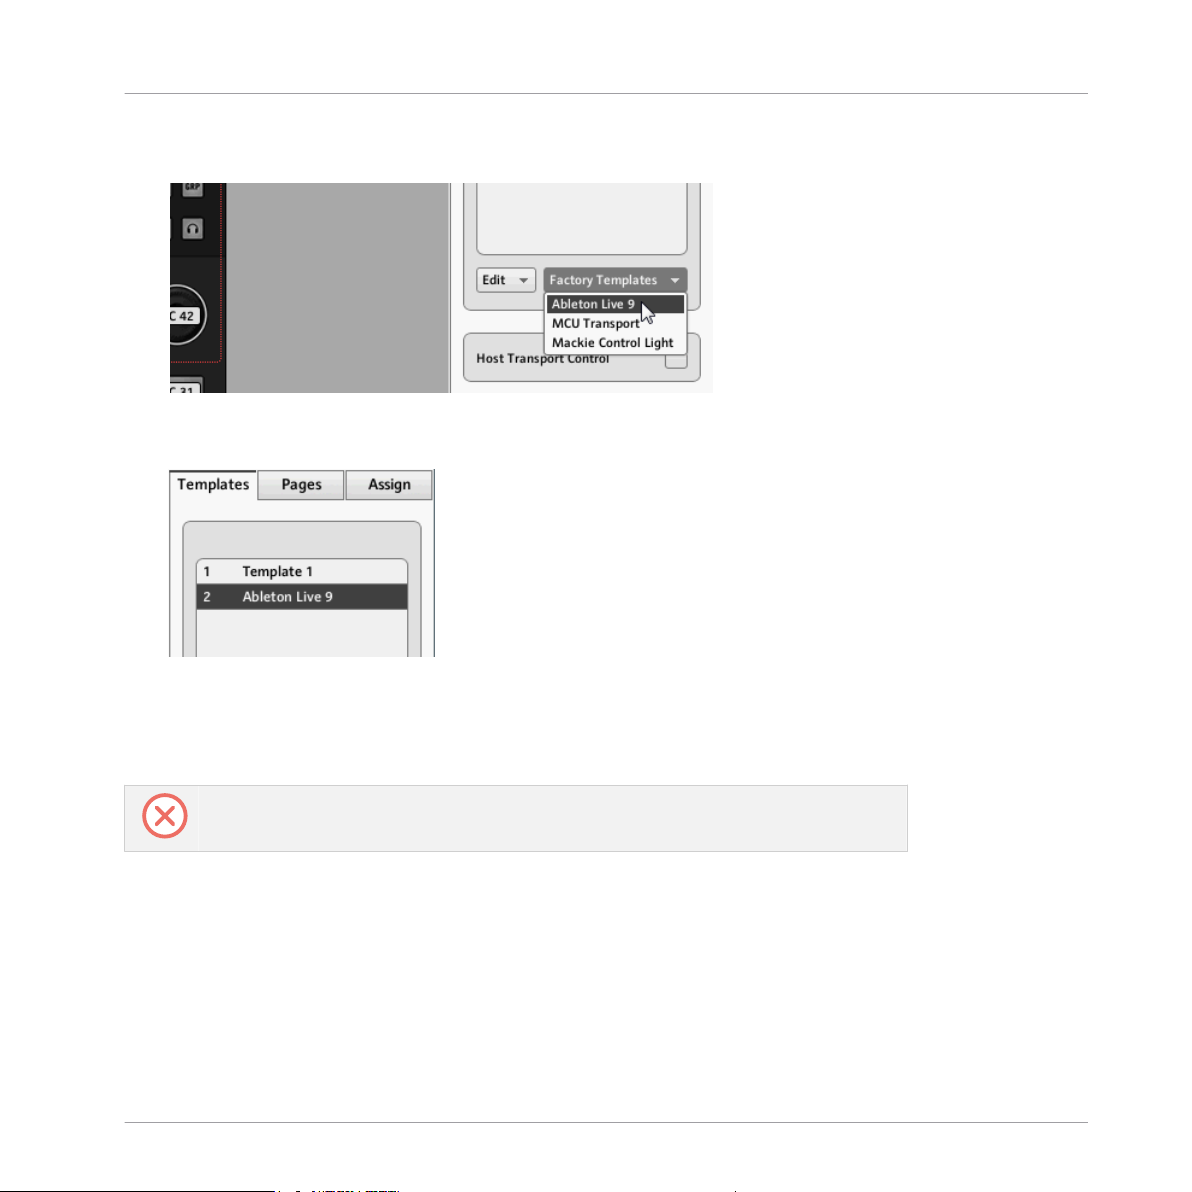
4. Click on the Factory Templates drop-down menu in the Templates tab and select Ableton
Live 9.
The Ableton Live 9 Template is added to the Templates list and selected as the currently
→
active Template. You can close Controller Editor.
Installation
2.4 Setup in Ableton Live
If Ableton Live was running during the installation process, you need to restart the application for the new settings to become available.
1. Start Ableton Live.
2. Open Ableton Live's Preferences and go to the MIDI / Sync tab.
3. Assign a free Control Surface slot to your MASCHINE controller by selecting it from the
drop-down list.
Ableton Live 9.1 MASCHINE Template - Manual - 11
Page 12

Setup in Ableton Live
4. If you are on OS X, select the Virtual Input entry corresponding to your MASCHINE controller as the Input. If you are on Windows, select here the In entry corresponding to your
controller.
5. If you are on OS X, select the Virtual Output entry corresponding to your MASCHINE controller as the Output. If you are on Windows, select the Out entry corresponding to your
controller.
The MASCHINE Ableton Live Template is now set up and ready to use.
→
Installation
Ableton Live 9.1 MASCHINE Template - Manual - 12
Page 13

MASCHINE including MIKRO and STUDIO
Layout and Basic Controls
3 MASCHINE including MIKRO and STUDIO
3.1 Layout and Basic Controls
The Controller Editor Ableton Live Template has three basic controller modes. The controller is
always in one of these modes and you can switch between them.
▪ Clip mode (PATTERN button) – for launching clips in Ableton Live's Session View, see
↑3.3.1, Clip Mode, ↑3.3.1, Clip Mode
▪ Scene mode (SCENE button) – for launching scenes in Ableton Live's Session View, see
5.2, Scene Mode
▪ Pad mode (PAD MODE button) – for playing notes with MASCHINE's pads, see 5.3, Pad
Mode
MASCHINE MIKRO has an additional Control Mode with which the pads are used to assign
Control encoder to volumes, pans, sends or device parameters in Ableton Live's GUI, see 5.5
Control Mode
Some Buttons have an extra function when selected while a Shift button is held down. The
Shift button is different for each controller. For every layout version the Shift button has been
highlighted with a blue box.
3.1.1 Basic Layout MASCHINE MK2
The Live Template assigns the controls of MASCHINE MK2 to the following tasks:
Ableton Live 9.1 MASCHINE Template - Manual - 13
Page 14

MASCHINE including MIKRO and STUDIO
Layout and Basic Controls
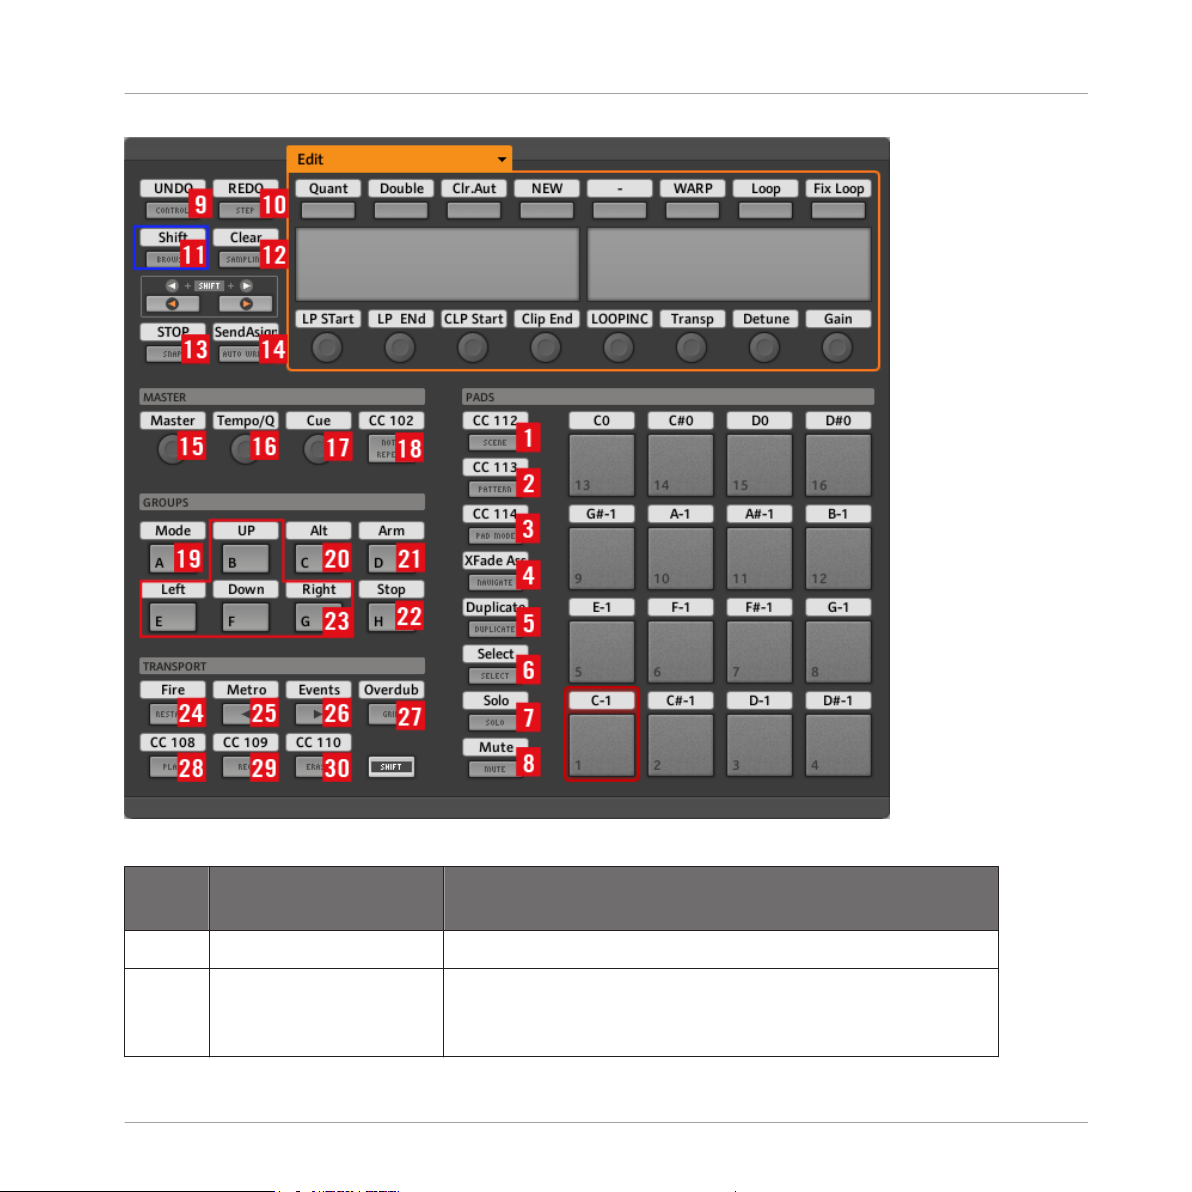
Overview of MASCHINE MK2 controller
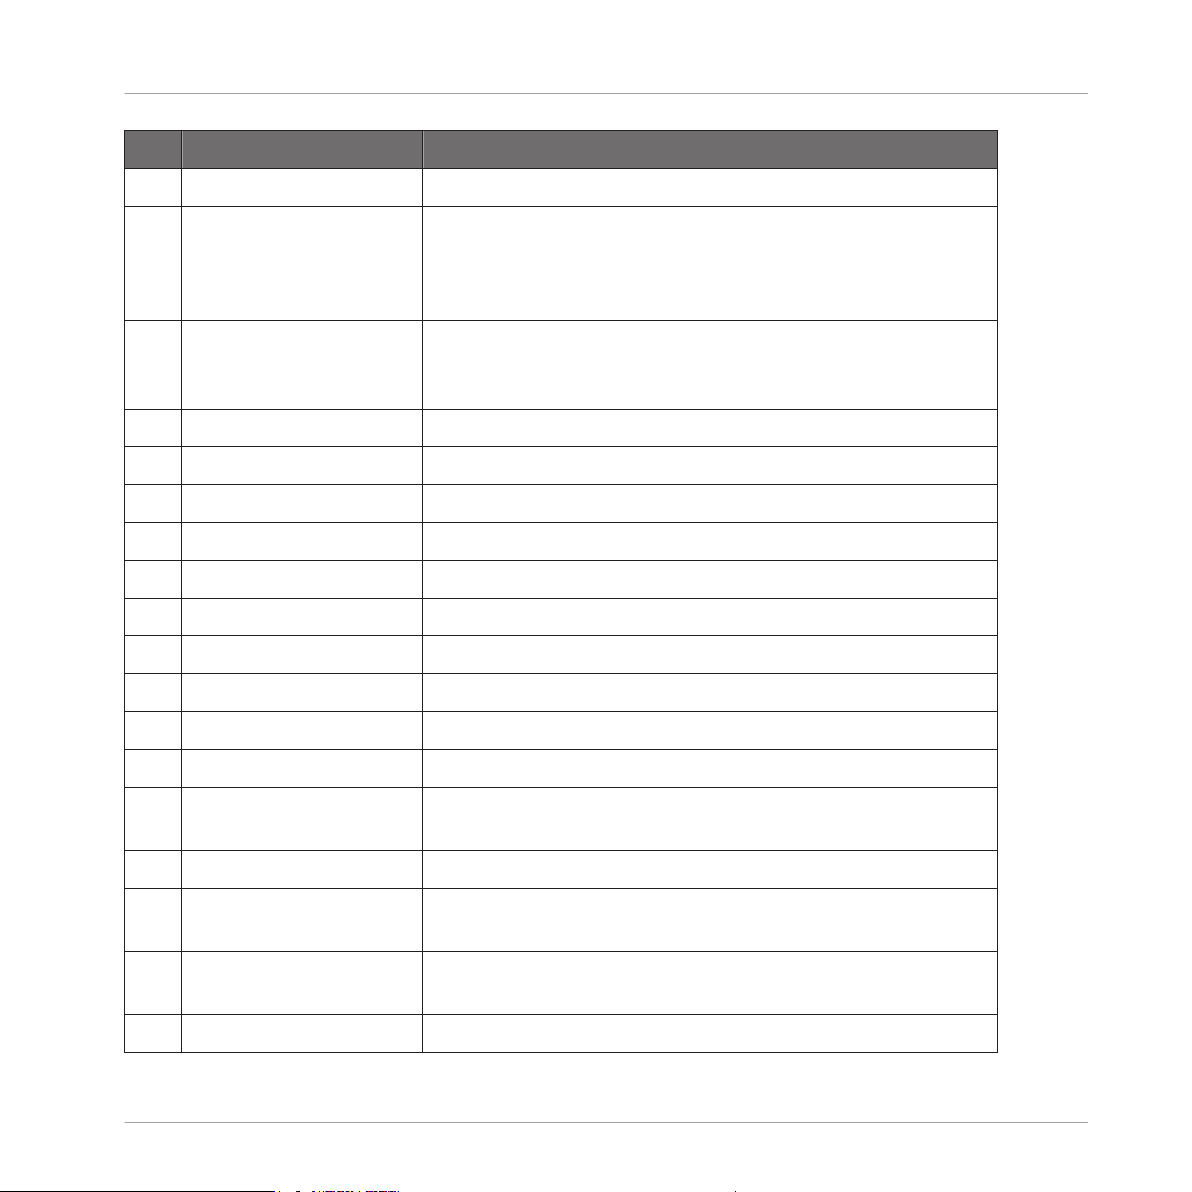
No Button Function
1 SCENE Switches to Scene mode
2 PATTERN switches to Clip/Session mode; with Shift button (ENTER
button) activates Color Editing see 5.1.2, Changing clip
colors
Ableton Live 9.1 MASCHINE Template - Manual - 14
Page 15
MASCHINE including MIKRO and STUDIO
Layout and Basic Controls
No Button Function
3 PAD switches to Note/Drum mode
4 NAVIGATE Enables Selection via the pads, basically this only works in
Clip mode. + Shift: changes Ableton Live's focus, stepping
through the Session View, Detail/Clip View, Detail/Device
Chain View, the browser and then to the Arranger View.
5 DUPLICATE Used to duplicate, for more details see ↑3.2.4, Controls and
Navigation with MASCHINE , ↑3.2.4, Controls and
Navigation with MASCHINE
6 SELECT Select Tracks
7 SOLO Solo Tracks
8 MUTE Mute Tracks
9 CONTROL UNDO, is lit up if there is something in the undo history
10 STEP REDO, is lit up if there is something in the redo history
11 BROWSE NEW function (see section on editing)
12 SAMPLING CLEAR/DELETE (see section on editing)
13 ALL Stop all Clips(quantized); + Shift: Stop all clips immediately
14 AUTO WR. Assign Sends; + Shift: Update display
15 VOLUME Assigns Control encoder to master volume/cue volume
16 SWING Assigns Control encoder to adjust record quantize/clip
quantize
17 TEMPO Assigns Control encoder to adjust tempo
18 Control encoder: Control encoder (assignable to various parameters depending on
controller mode)
19 Page buttons: (18) Page buttons ("◄" and "►"): Left/Right buttons (function
depends on current Mode)
20 NOTE REPEAT Note Repeat
Ableton Live 9.1 MASCHINE Template - Manual - 15
Page 16
MASCHINE including MIKRO and STUDIO
Layout and Basic Controls
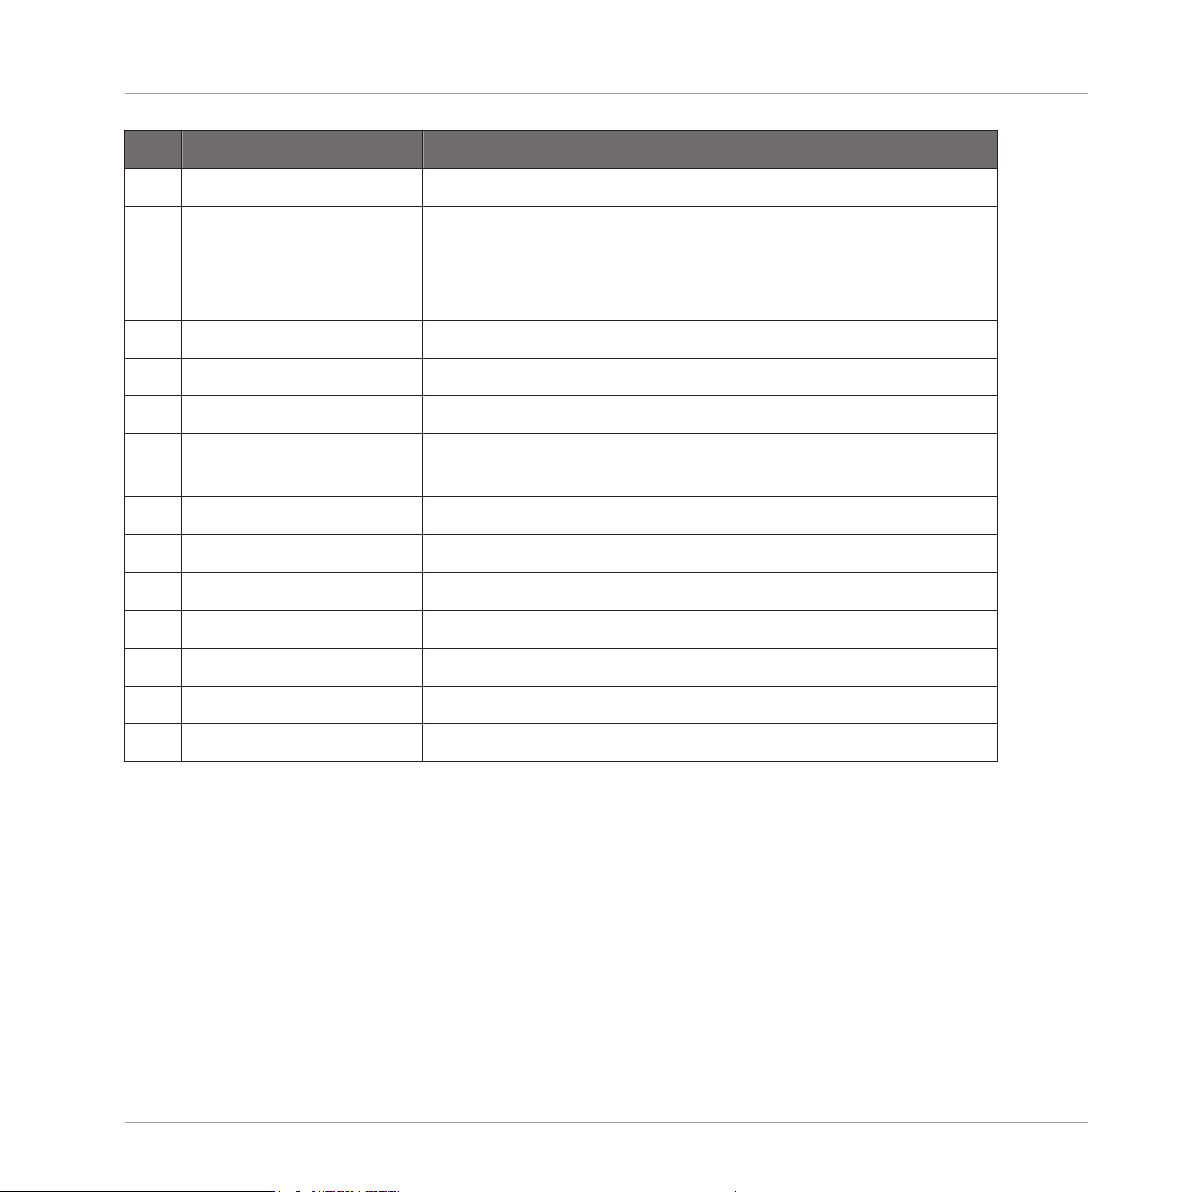
No Button Function
21 ENTER Shift button
22 GROUP A Navigation Mode assign, assigns control encoder to certain
navigation functions; +Shift switches navigation for the clip
view navigation [buttons (26)] between single step and 4
steps
23 GROUP C Track Crossfade Assign
24 GROUP D Track Arm
25 GROUP H Track Stop
26 GROUP B, E, F and G
Clip View Navigation
buttons
27 RESTART Fire; +Shift: tap tempo
28 Step Backward button: Metronome
29 Step Forward button: Session automation
30 GRID Session Overdub
31 PLAY Play
32 REC Record
33 ERASE Stop
3.1.2 Basic Layout MASCHINE
The Live Template assigns the controls of MASCHINE to the following tasks:
Ableton Live 9.1 MASCHINE Template - Manual - 16
Page 17
MASCHINE including MIKRO and STUDIO
Layout and Basic Controls
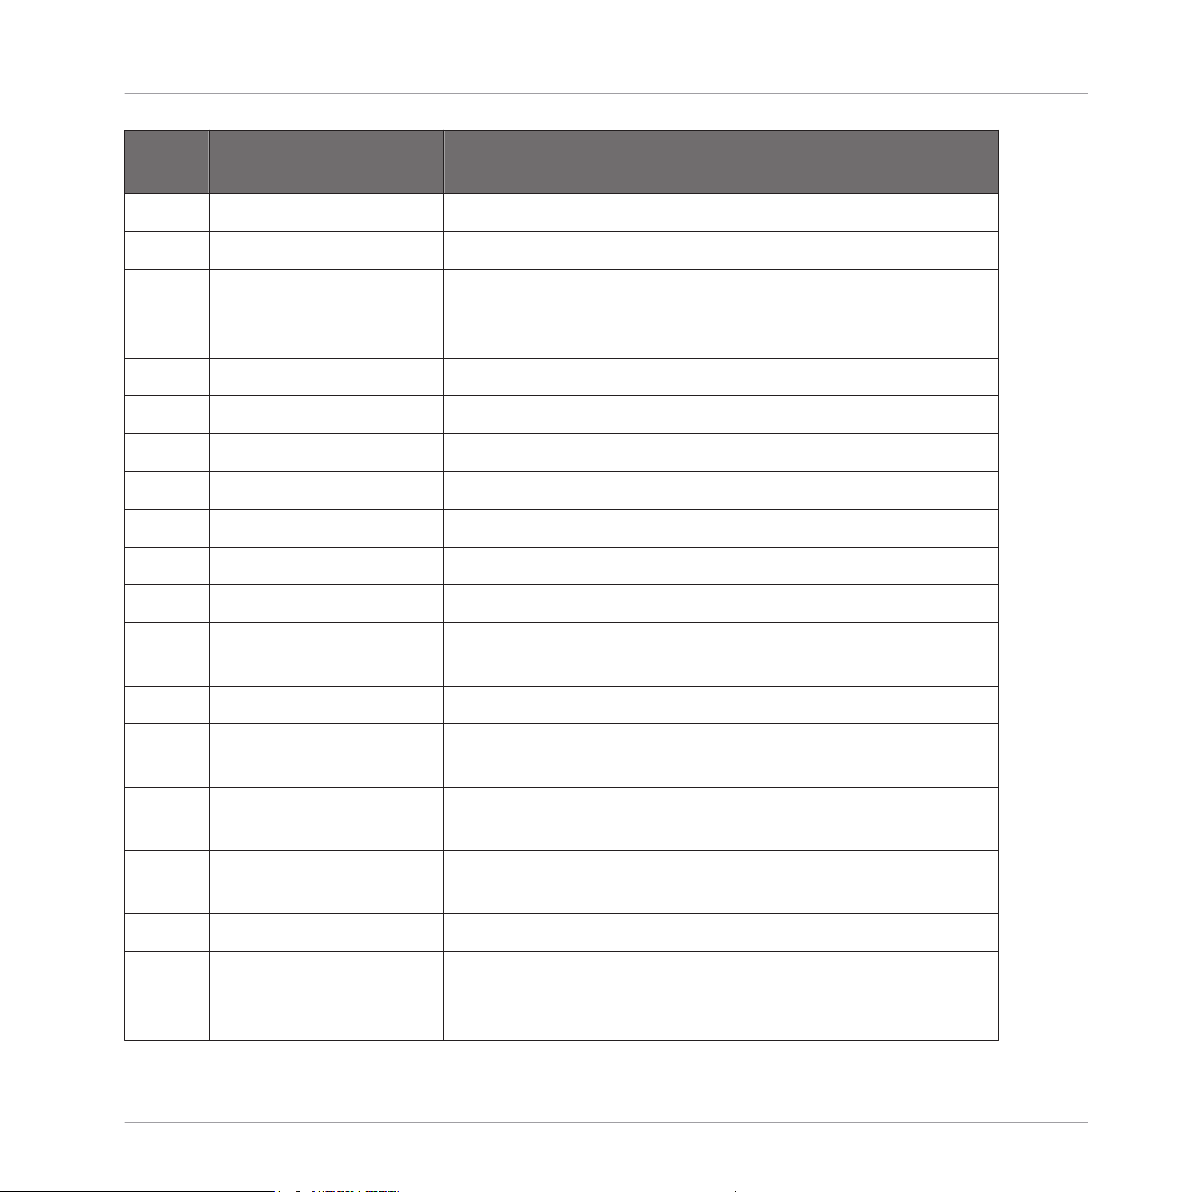
Overview of MASCHINE MK1 controller
Num-
Button Function
ber
1 SCENE switches to Scene mode
2 PATTERN switches to Clip/Session mode; with Shift button (BROWSE
button) activates Color Editing see 5.1.2, Changing clip
colors
Ableton Live 9.1 MASCHINE Template - Manual - 17
Page 18
MASCHINE including MIKRO and STUDIO
Layout and Basic Controls
Num-
Button Function
ber
3 PAD switches to Note/Drum mode
4 NAVIGATE Track crossfader assign
5 DUPLICATE Used to Duplicate, for more details see ↑3.2.4, Controls
and Navigation with MASCHINE , ↑3.2.4, Controls and
Navigation with MASCHINE
6 SELECT Select Tracks
7 SOLO Solo Tracks
8 MUTE Mute Tracks
9 CONTROL UNDO; is lit up if there is something in the undo history
10 STEP REDO; is lit up if there is something in the redo history
11 BROWSE Shift modifier button
12 SAMPLING Clear (function depends on Mode)
13 SNAP Stop all Clips(quantized); + Shift: Stop all clips
immediately
14 AUTO WRITE Assign Sends; + Shift: Update display
15 VOLUME encoder adjust master/cue volume; in Nav Mode ((11) active):
select tracks/scenes/devices
16 TEMPO encoder adjust song tempo; in Nav Mode ((11) active): Mode
dependent navigation
17 SWING encoder adjust record quantization/clip quantization; in Nav Mode
((11) active): Mode dependent navigation
18 NOTE REPEAT Note Repeat
19 GROUP A activates navigation with encoders (15),(16),(16); + Shift:
toggle between view navigation in steps of 4 and steps of
1; + ALT (20): switch focus in Live
Ableton Live 9.1 MASCHINE Template - Manual - 18
Page 19
MASCHINE including MIKRO and STUDIO
Layout and Basic Controls
Num-
Button Function
ber
20 GROUP C Alt modifier button
21 GROUP D Track Arm
22 GROUP H Track Stop
23 GROUP B, E, F and G
Clip View Navigation
buttons
24 RESTART Fire; +Shift: tap tempo
25 Step Backward button Metronome
26 Step Forward button Session automation
27 GRID Session Overdub
28 PLAY Play
29 REC Record
30 ERASE Stop
3.1.3 Basic Layout MASCHINE MIKRO MK2
The Live Template assigns the controls of the MASCHINE MIKRO MK2 to the following tasks:
Ableton Live 9.1 MASCHINE Template - Manual - 19
Page 20
Overview of MASCHINE MIKRO MK2 controller
MASCHINE including MIKRO and STUDIO
Layout and Basic Controls
Call-out Button Function
1 SCENE Switches to Scene mode; with Shift button (MAIN button)
switches to Control mode.
2 PATTERN Switches to Clip/Session mode; with Shift button (MAIN
button) activates Color Editing see 5.1.2, Changing clip
colors.
3 PAD Switches to Note/Drum mode.
4 VIEW Enables Selection via the pads, basically this only works in
Clip mode + Shift: changes Ableton Live's focus, stepping
through the Session View, Detail/Clip View, Detail/Device
Chain View, the browser and then to the Arranger View.
Ableton Live 9.1 MASCHINE Template - Manual - 20
Page 21

MASCHINE including MIKRO and STUDIO
Layout and Basic Controls
Call-out Button Function
5 DUPLICATE Used to Duplicate for more details see ↑3.2.4, Controls and
Navigation with MASCHINE , ↑3.2.4, Controls and
Navigation with MASCHINE
6 SELECT Select Tracks; with Shift button Crossfade Assign.
7 SOLO Solo Tracks; with Shift button Track Stop.
8 MUTE Mute Tracks; with Shift button Track Arm.
9 CONTROL Stop all Clips (quantized); + Shift: Stop all clips immediately.
10 Control encoder: Control encoder (assignable to various parameters depending
on controller mode).
11 MAIN General Shift button.
12 GROUP Rotary Assignment.
13 BROWSE Navigate left depending on current mode.
14 SAMPLING Navigate right depending on current mode.
15 NOTE REPEAT Note Repeat. Works only with Note/Drum Mode.
16 RESTART Fire; + Shift: tap tempo.
17 Step Backward
Metronome
button:
18 Step Forward
Session automation
button:
19 GRID Session Overdub
20 PLAY: Play
21 REC: Record
22 ERASE: Stop
Ableton Live 9.1 MASCHINE Template - Manual - 21
Page 22
MASCHINE including MIKRO and STUDIO
3.1.4 Basic Layout MASCHINE STUDIO
The Live Template assigns the controls of MASCHINE STUDIO to the following tasks:
Layout and Basic Controls
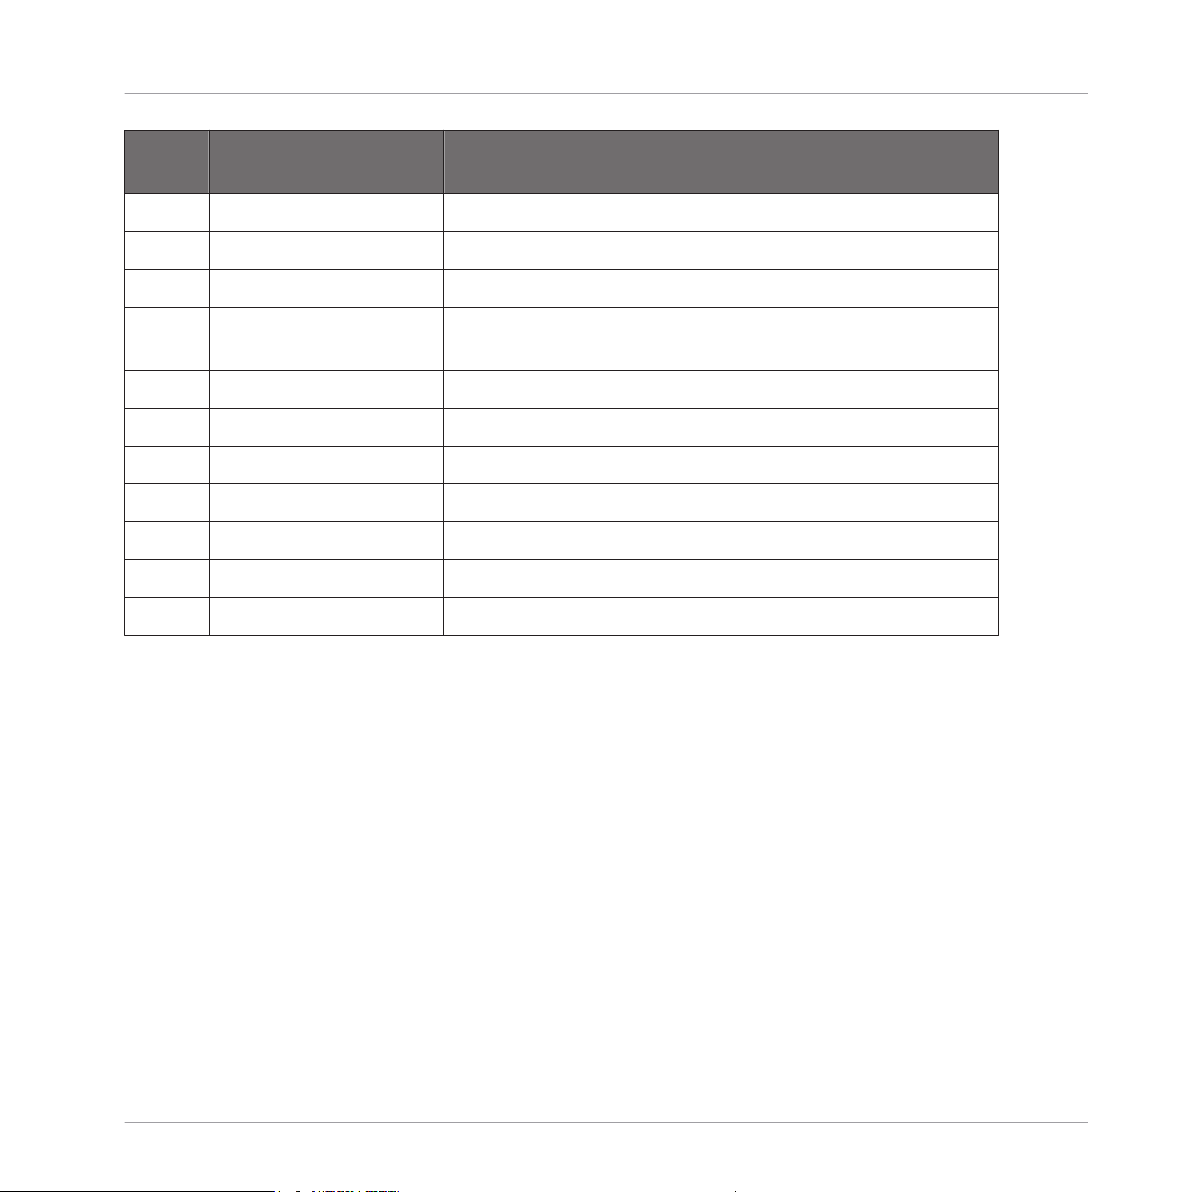
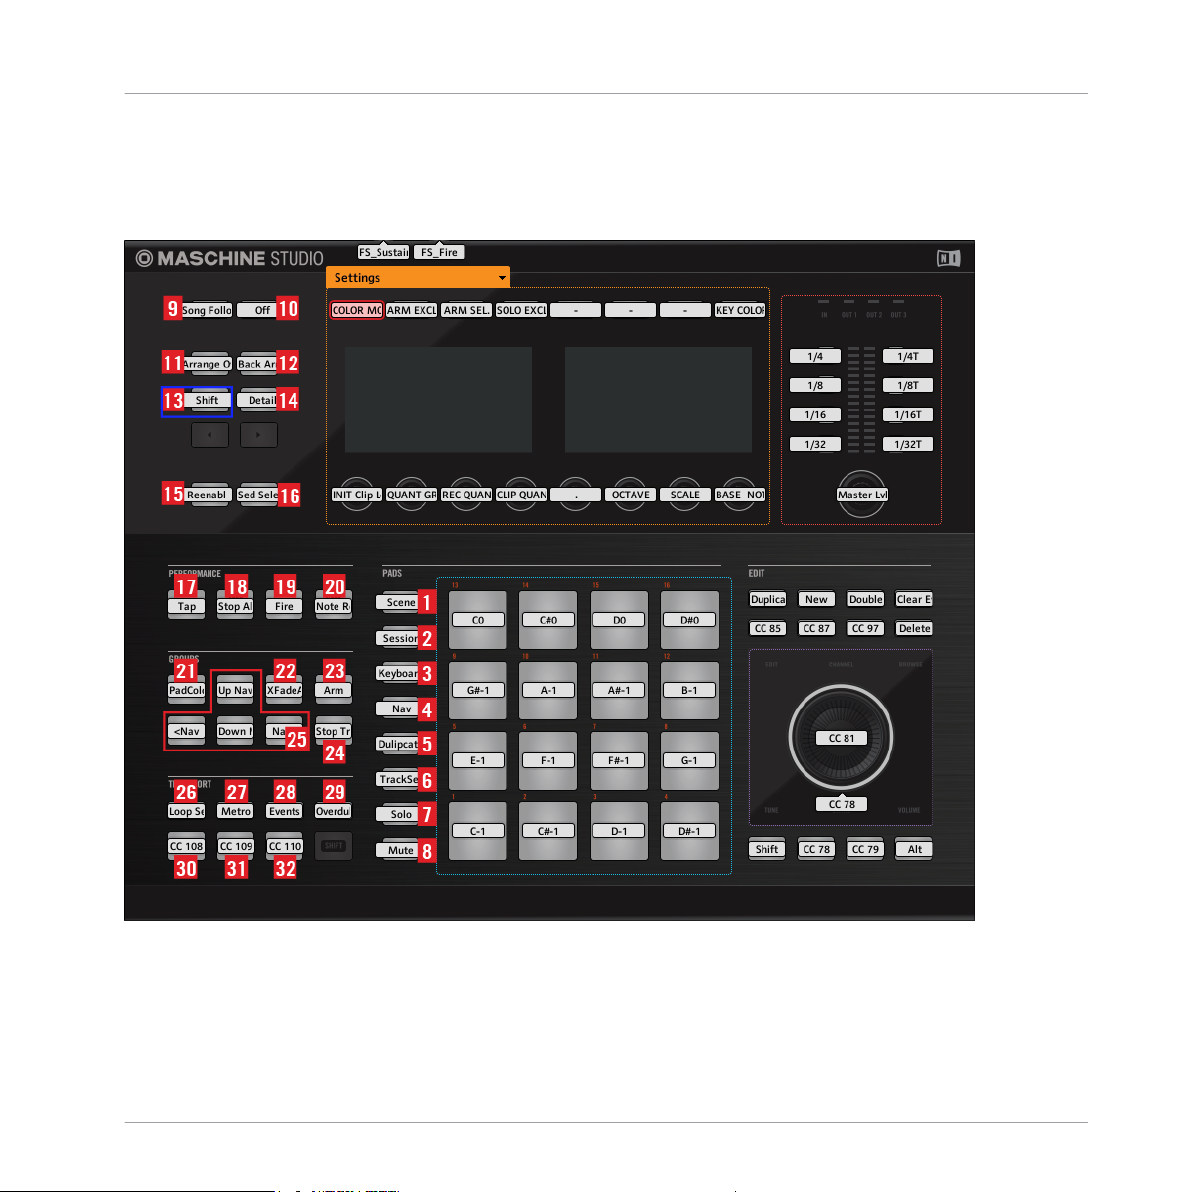
Overview of MASCHINE STUDIO controller
Ableton Live 9.1 MASCHINE Template - Manual - 22
Page 23

MASCHINE including MIKRO and STUDIO
Layout and Basic Controls
Call-out Button Function
1 SCENE Switches to Scene mode.
2 PATTERN Switches to Clip/Session mode; with Shift button (BROWSE
button) activates Color Editing see 5.1.2, Changing clip
colors.
3 PAD Switches to Note/Drum mode
4 NAVIGATE Enables Selection via the pads, basically this only works in
Clip mode +Shift: changes Ableton Live's focus, stepping
through the Session View, Detail/Clip View, Detail/Device
Chain View, the browser and then to the Arranger View.
5 DUPLICATE button: Used to Duplicate, for more details see ↑3.2.4, Controls and
Navigation with MASCHINE , ↑3.2.4, Controls and
Navigation with MASCHINE .
6 SELECT Select Tracks
7 SOLO Solo Tracks
8 MUTE Mute Tracks
9 CHANNEL
Song Follow
10 PLUGIN inactive
11 ARRANGE
Arrangement overdub ( button) in Live.
12 MIX Back to arrangement.
13 BROWSE Shift button.
14 SAMPLING Switch in Live between Detail/Clip and Detail/Device view. +
Shift switch between Session and Arrangement view in Live.
15 ALL
Re-Enable Automation function.
16 AUTO Assign sends
17 TAP Tap song temp
Ableton Live 9.1 MASCHINE Template - Manual - 23
Page 24
MASCHINE including MIKRO and STUDIO
Layout and Basic Controls
Call-out Button Function
18 STEP MODE Stop all Clips(quantized); + Shift: Stop all clips immediately
19 MACRO Fire currently selected slot
20 NOTE REPEAT Note Repeat
21 GROUP A Switch between navigation in the session in steps of four or
one.
22 GROUP C Track Crossfade Assign
23 GROUP D Track Arm
24 GROUP H Track Stop
25 GROUP B, E, F andGClip View Navigation
26 RESTART Adjust arrangement loop with jog wheel.
27 METRO Metronome
28 EVENTS Session automation
29 GRID Session Overdub
30 PLAY Play
3.1.5 Transport Section with MASCHINE
All MASCHINE Models have a Transport section MASCHINE, MASCHINE MK2, MASCHINE
MIKRO AND MIKRO MK2 all have the same assignment:
Ableton Live 9.1 MASCHINE Template - Manual - 24
Page 25
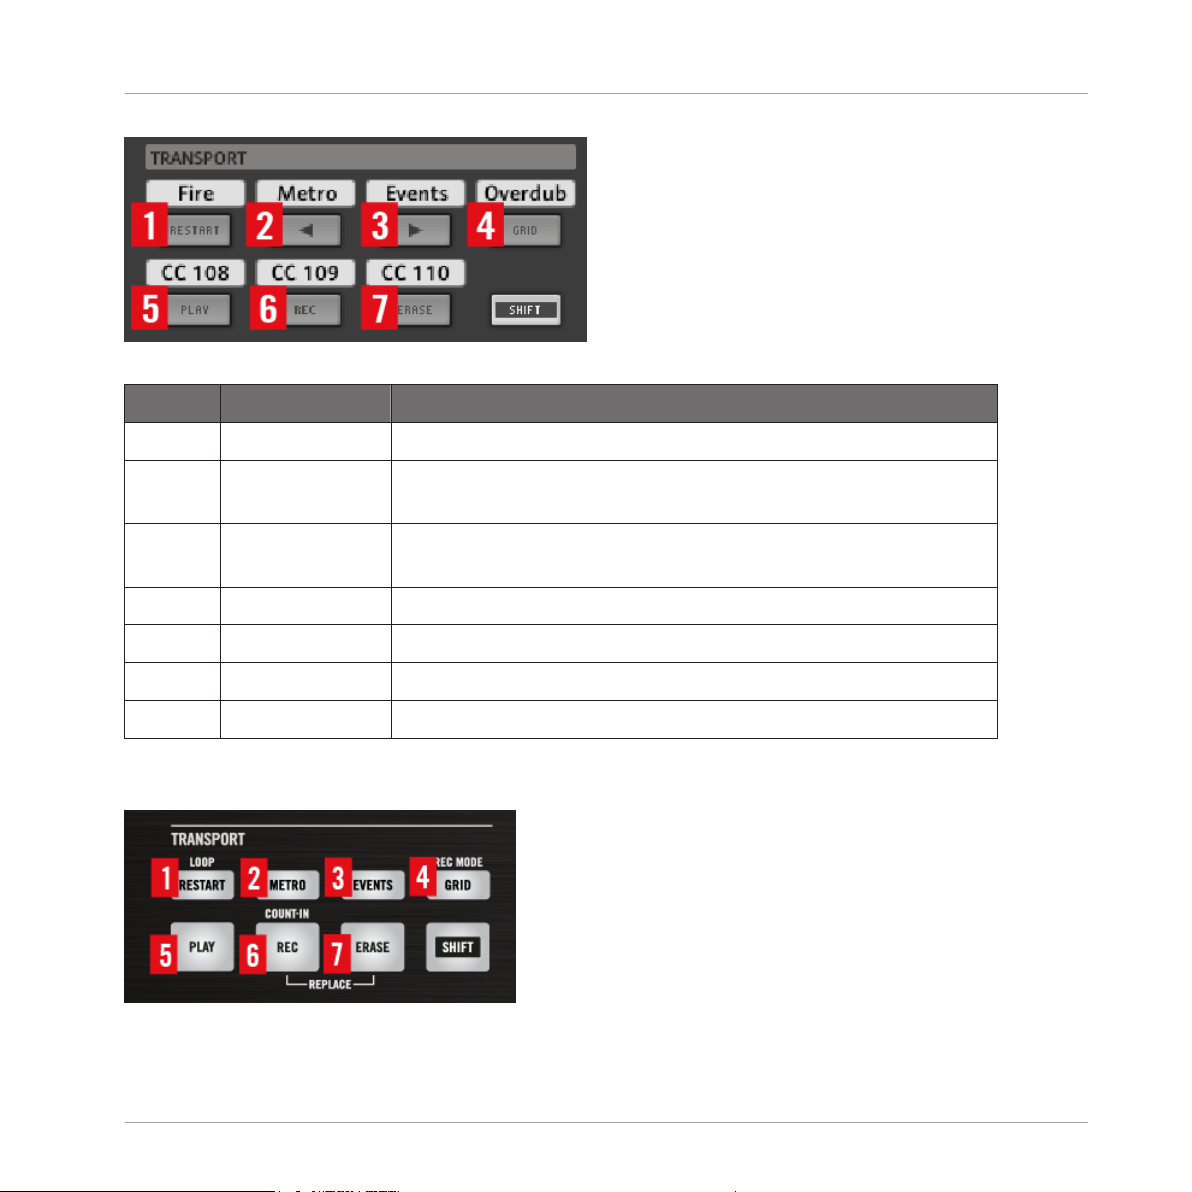
Transport section on MASCHINE controller
Call-out Button Function
1 RESTART Fire; + Shift: tap tempo.
MASCHINE including MIKRO and STUDIO
Layout and Basic Controls
2 Step Backward
Metronome
button:
3 Step Forward
Session automation
button:
4 GRID Session Overdub
5 PLAY Play
6 REC Record
7 ERASE Stop
MASCHINE STUDIO
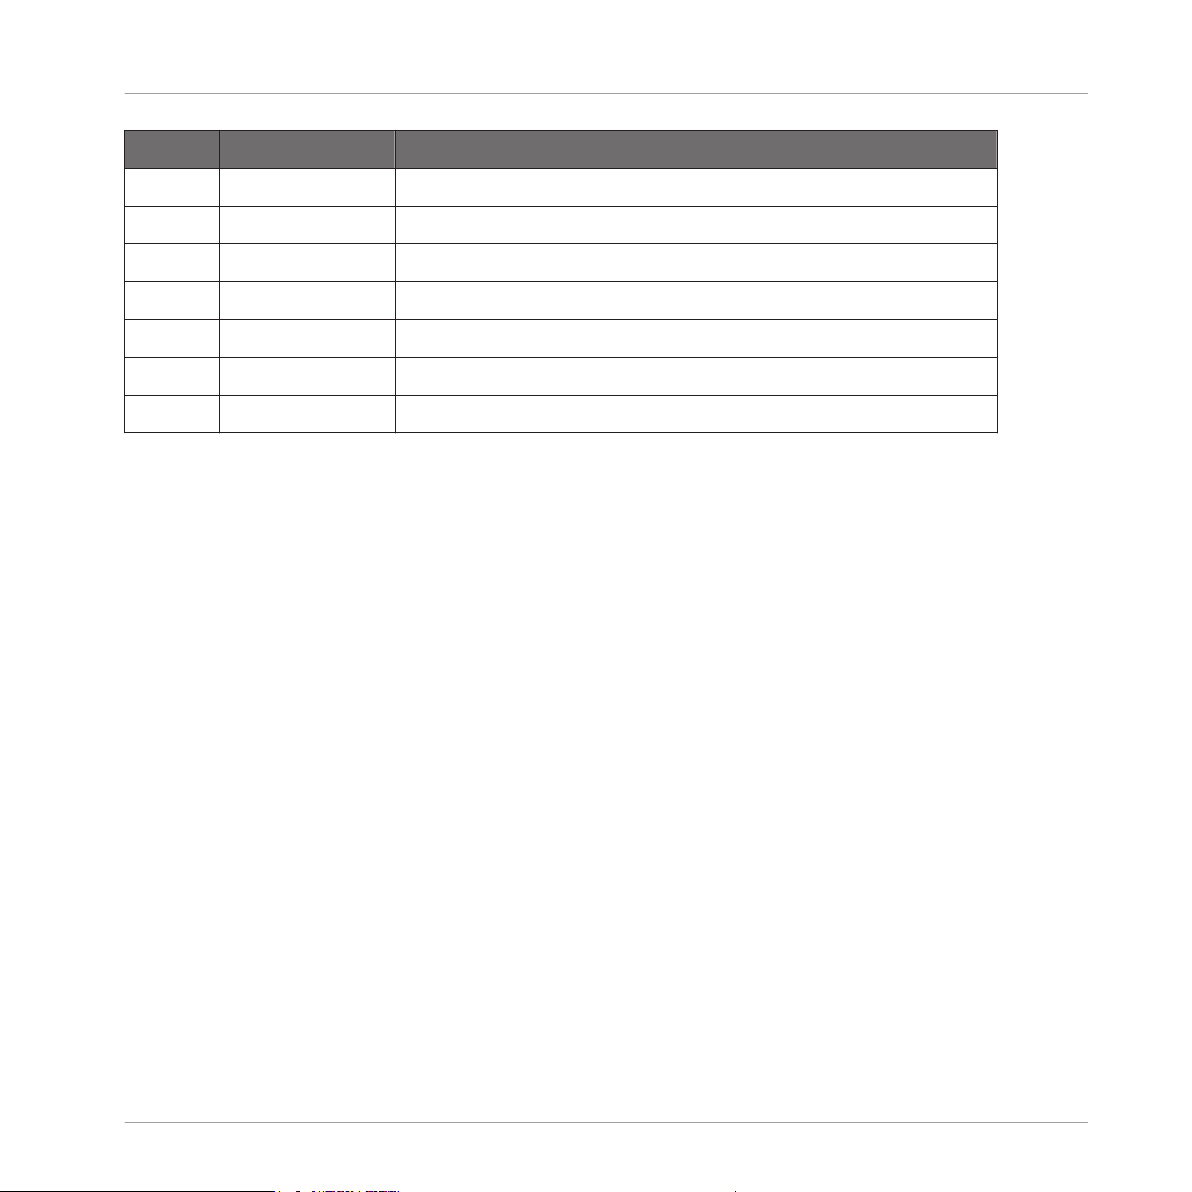
Transport section on MASCHINE STUDIO controller
Ableton Live 9.1 MASCHINE Template - Manual - 25
Page 26
MASCHINE including MIKRO and STUDIO
Layout and Basic Controls
Call-out Button Function
1 RESTART Fire; + Shift: tap tempo.
2 METRO Metronome
3 EVENTS Session automation
4 GRID Session Overdub
5 PLAY Play
6 REC Record
7 ERASE Stop
All buttons in the TRANSPORT section control their assigned functions in Live regardless of
which mode the controller is in. The only exception is the RESTART button in MASCHINE STUDIO Transport section. It is used in conjunction with MASCHINE Studios' jog
wheel.
Hold down the RESTART button in MASCHINE STUDIO and turn the jog wheel, this will move
the Arrangement loop start point. With the Shift button held down can modify the loop length.
If you press the jog wheel and turn it, the loop start/loop length will be modified in steps of
one beat otherwise one bar.
3.1.6 Navigation
In order to be able to move around among your tracks in Live, to select and play your clips, the
Live Template makes use of Navigation buttons. This come in the form of the GROUPS section
on the MASCHINE, MASCHINE MK2 and MASCHINE STUDIO controllers.
Ableton Live 9.1 MASCHINE Template - Manual - 26
Page 27
MASCHINE including MIKRO and STUDIO
Layout and Basic Controls
GROUPS section on MASCHINE STUDIO controller
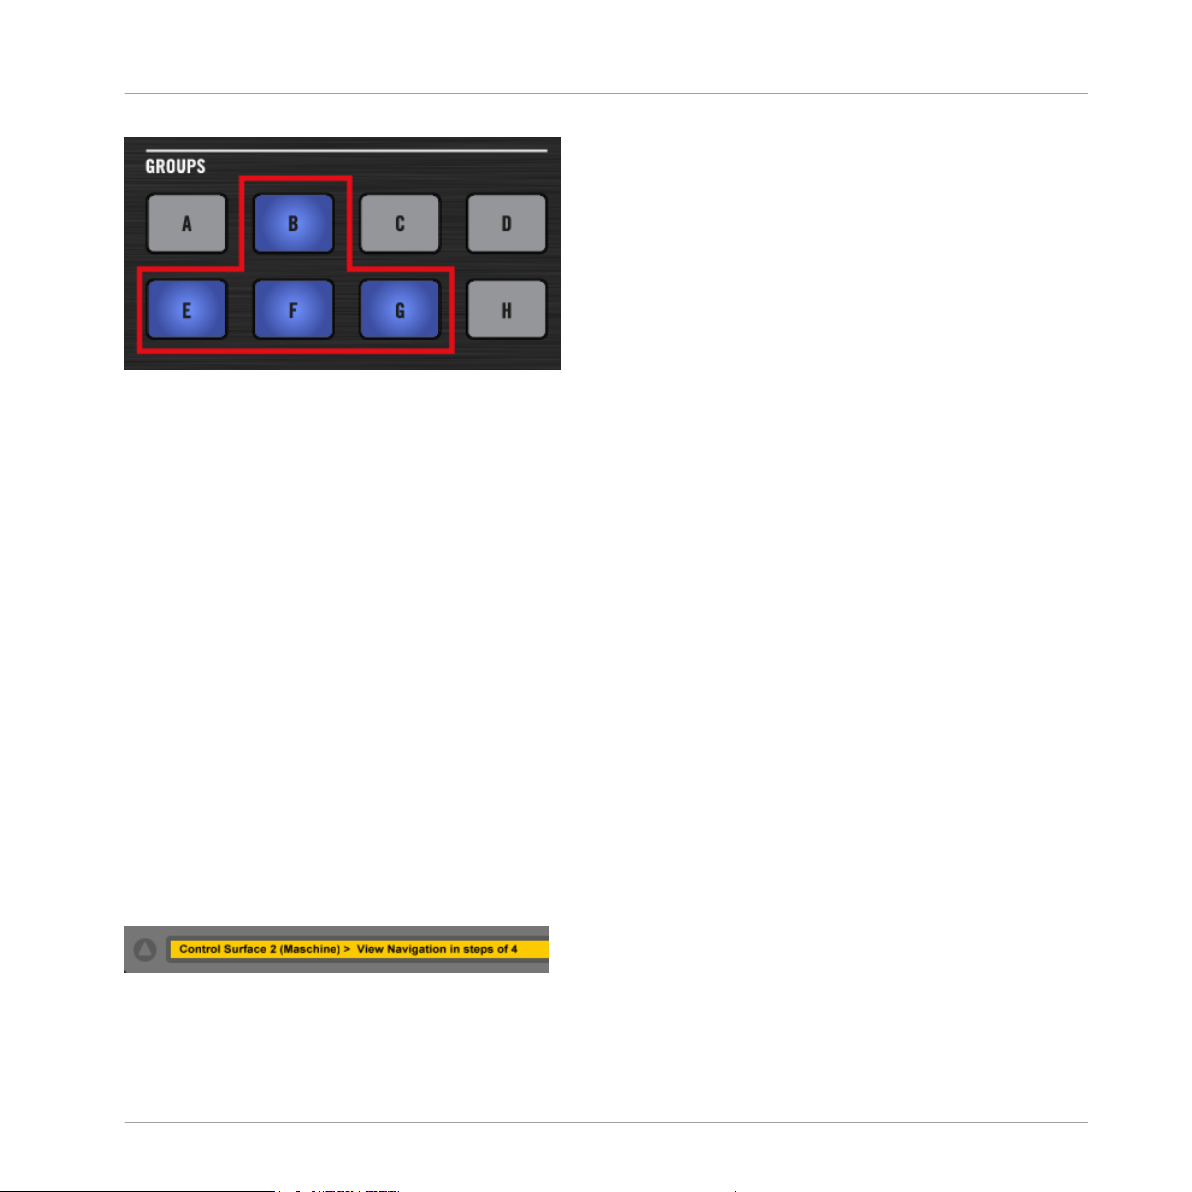
On both MASCHINE controller generations, the GROUPS buttons B, E, F and G are dedicated
to navigating within Ableton Live's Session View. The buttons of the GROUPS section retain
the same functionality, no matter which mode is active.
Press B and F to move the colored four x four focus rectangle up and down within the
►
Session View. The buttons E and G navigate left and right respectively.
By default the view is moved in steps of one cell. This can be modified in the following manner:
▪ For MASCHINE STUDIO the Group A button is assigned to turning the four step horizontal
navigation on or off. The Group B, E, F and G buttons will turn purple indicating that track
navigation is now possible in steps of four. Group A button will be lit up.
▪ For MASCHINE MK2 press Shift (ENTER) and the Group A button. The Group B, E, F and
G buttons will turn purple indicating that track navigation is now possible in steps of four.
To go back to one step just press the same combination again and the buttons will turn
blue again and navigation is done in steps of one.
▪ For MASCHINE MK1 press Shift (BROWSE) and the Group A button switch between hori-
zontal navigation in steps of one or four. The new mode is shown in Ableton Live's status
bar.
Ableton Live status bar reads View Navigation in steps of 4
Ableton Live 9.1 MASCHINE Template - Manual - 27
Page 28
By pressing and holding any of the Navigation buttons, you can move the focus rectangle in one direction until the button is released.
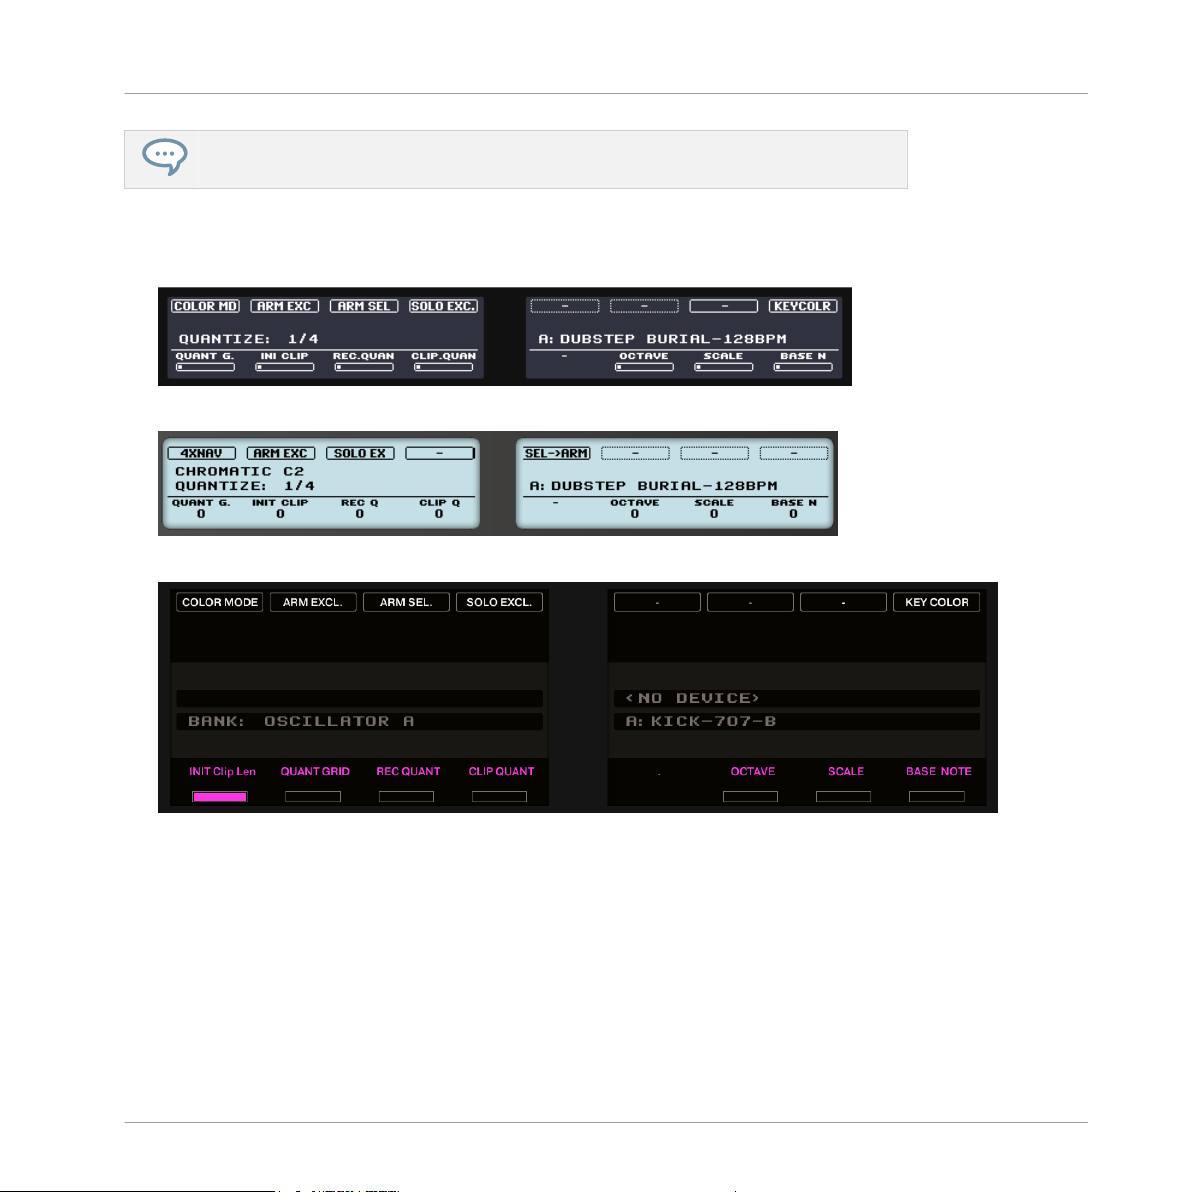
Settings Page
▪ MASCHINE MK2 controller Settings Page
▪ MASCHINE controller Settings Page
▪ MASCHINE STUDIO controller Settings Page
MASCHINE including MIKRO and STUDIO
Layout and Basic Controls
Ableton Live 9.1 MASCHINE Template - Manual - 28
Page 29
MASCHINE including MIKRO and STUDIO
Layout and Basic Controls
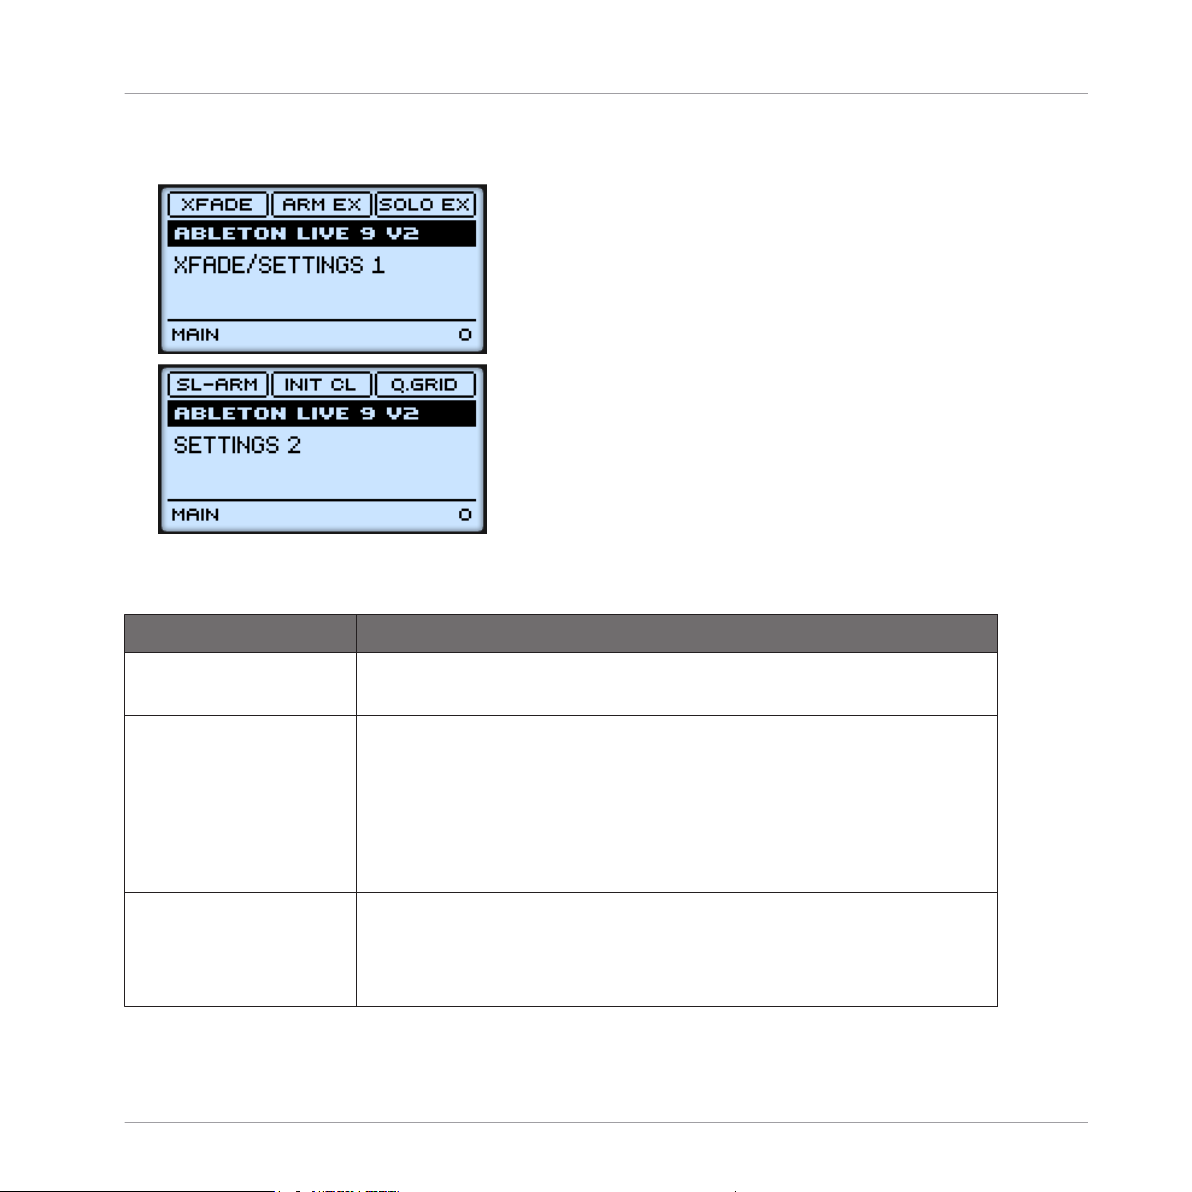
▪ On MASCHINE MIKRO these values are on Page 9: XFade/Settings 1 and Page 10: Settings
2:
On the Setting Page you can define certain basic behavior. These settings are recalled the next
time you load a new song or open Live again.
Mode
Description
Color Mode Switches between Standard Clip Color Mode (inactive) and Clip
Color Mode (active) (see 5.3.1, Note Mode)
Arm Exclusive This refers to the track arming behavior (for more details see 5.4
Track Controls)
If lit up, arming tracks with the pads in track arm mode will unarm
previously armed tracks. Otherwise, the previously armed tracks will
remain armed. This only refers to the behavior of arming tracks with
the controller and not in the software.
Arm Select This refers to general selection behavior of MASCHINE when
selecting tracks via the control encoder, jog wheel or the NAVIGATE/
VIEW button. If this is highlighted, then selecting tracks will also
automatically arm the selected track exclusively.
Ableton Live 9.1 MASCHINE Template - Manual - 29
Page 30
MASCHINE including MIKRO and STUDIO
Layout and Basic Controls
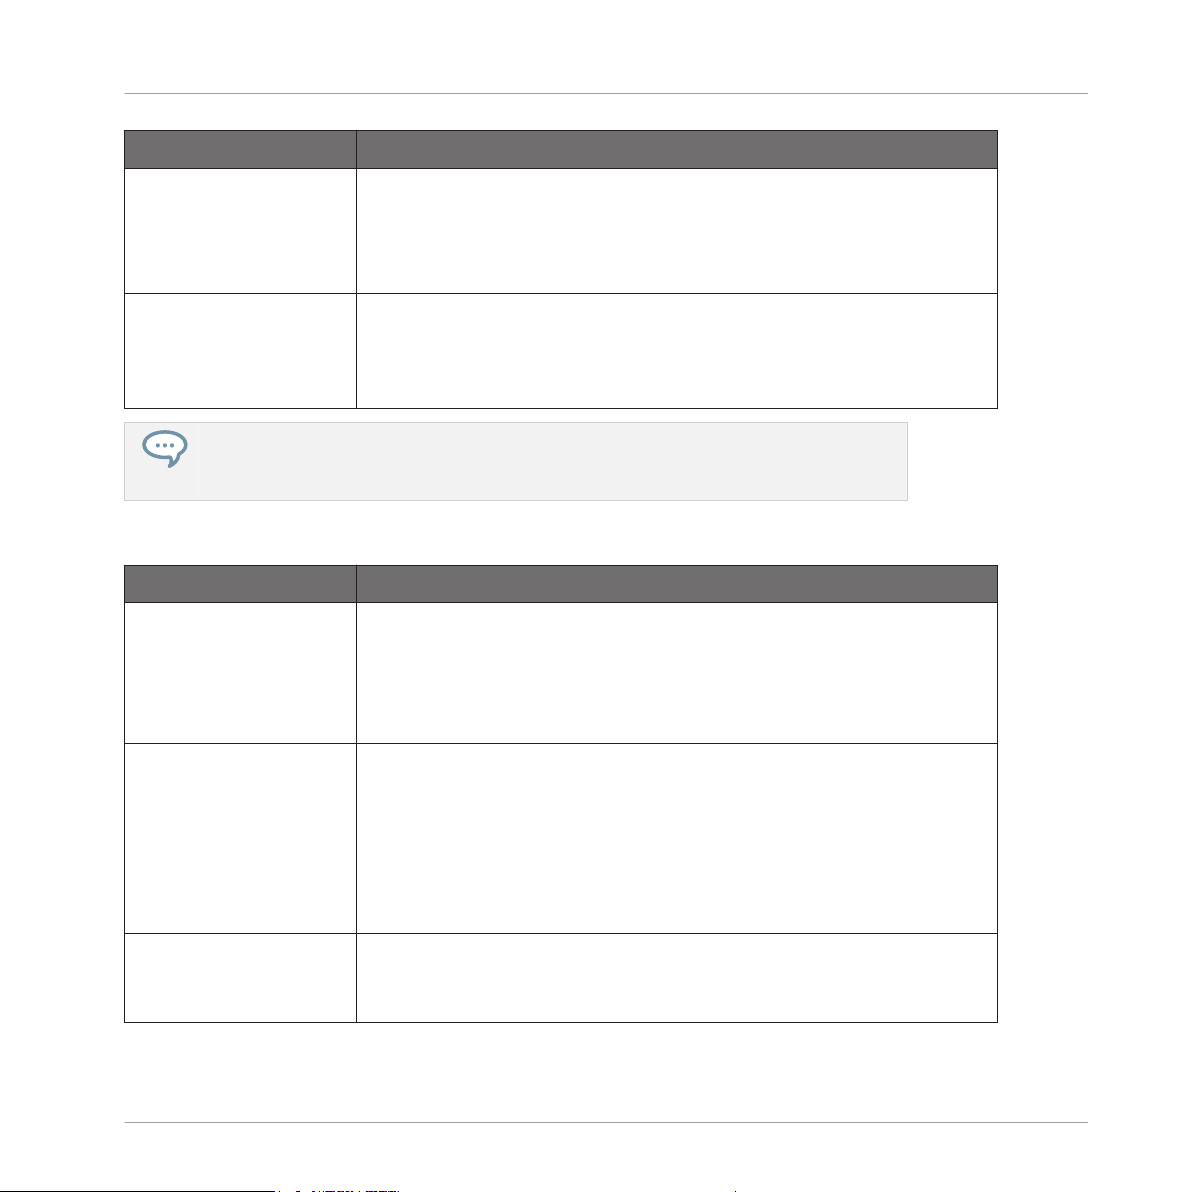
Mode Description
Solo Exclusive This refers to the track soloing behavior (for more details see 5.4
Track Controls)
If lit up, soloing tracks with the pads in tracks solo mode will un
solo tracks. Otherwise soloed tracks will remain solo.
KEY COLOR (Not MASCHINE) Refers to the coloring of notes in Pad Mode. If lit
up the notes are colored in Interval Color mode, otherwise in
Individual Color mode. Individual Color mode is the default. (For
more details see 5.3 Pad Mode)
It is important to note, that the Arm / Solo Exclusive settings are local to the MASCHINE
controller and not to be confused with the Arm / Solo Exclusive setting, which can be
set in Ableton Live's Preference Dialog > Record Warp Launch tab.
The knobs on the Settings page are responsible for setting certain values as follows:
Mode Description
QUANT GRID This refers to the edit function Quantize/Quantize 50%. The
quantization value applied when quantizing a clip can be set here.
The new value is displayed in Ableton Live's status bar.
MACHINE MK2 and MASCHINE STUDIO also display the value on
th
the left display. The default value is 1/16
.
INIT CLIP LENGTH This refers to the Edit function NEW clip. When creating a new
MIDI clip with the NEW the initial size of the new empty MIDI clip
is determined by the value you can set with this knob. The initial
value is 4 beat. The smallest value you can set is 1 beat and the
largest value is 64 beats = 16 bars. The new value is shown in Live’
status bar. MACHINE MK2 and MASCHINE STUDIO show the new
value on MASCHINE’s page display.
REC QUANTIZE Set the current recording quantization. This can also be set via the
control encoder or jog wheel. This value is not stored with Remote
Script but is linked with the current song.
Ableton Live 9.1 MASCHINE Template - Manual - 30
Page 31

MASCHINE including MIKRO and STUDIO
Global Controls and Navigation
Mode Description
CLIP QUANTIZE Set the current recording quantization. This can also be set via the
control encoder or jog wheel. This value is not stored with Remote
Script but is linked with the current song.
OCTAVE Refers to note mode and sets the current octave. See 5.3 Pad Mode
SCALE Refers to note mode and sets the current scale. See 5.3 Pad Mode
BASE NOTE Refers to note mode and sets the base note. See 5.3 Pad Mode
To set the initial Clip length and Quantization value to be applied when using Edit QUANTIZE
button on MACHINE MIKRO, go to Page 11: Settings 2 and hold down the corresponding buttons and turn the control encoder. The value will be changed and the new value will be displayed in Ableton Live's status bar.
Ableton Live's status bar reading MASCHINE MIKRO MK2 Quantize set to 1/16T
Ableton Live's status bar reading MASCHINE MIKRO MK2 Initial Clip Length: 4 Beats
The default value for initial clip length with the NEW function is 4 beats and the initial quantize value is 1/16 note. The initial clip length will be set in steps of 4 beats = 1 bar. If you
press the encoder while turning, the length will be set in steps of 1 beat.
3.2 Global Controls and Navigation
3.2.1 Controls and Navigation with MASCHINE STUDIO
Except for MASCHINE MK1, all models of MASCHINE have a main control encoder. MASCHINE STUDIO has a jog wheel. These have different functions depending on the current
Mode of the encoder.
Ableton Live 9.1 MASCHINE Template - Manual - 31
Page 32

When the encoder is assigned to a mixer parameter, turning the main encoder will modify the value in large steps. To modify the values in finer steps, press the encoder and
turn it while holding it down.
Global Section
MASCHINE including MIKRO and STUDIO
Global Controls and Navigation
Global section of MASCHINE STUDIO controller
Call-out
1 CHANNEL
2 ARRANGE
Button Function
Activate Song follow.
Arrangement overdub ( button) in Live
3 MIX Back to arrangement.
Ableton Live 9.1 MASCHINE Template - Manual - 32
Page 33

MASCHINE including MIKRO and STUDIO
Global Controls and Navigation
Call-out Button Function
4 BROWSE Shift button.
5 SAMPLING Switch in Live between the Detail/Clip and the Detail/Device view; +
Shift: switch in Live between Session and Arrangement view.
6 ALL
Re-Enable Automation function.
7 AUTO Assign Send Buttons; +Shift: synchronize the controllers display.
Performance Section
Performance section on MASCHINE STUDIO controller
Call-out Button Function
1 TAP Tap Tempo.
2 STEP MODE Stop all clips quantized; +Shift stops all clips immediately.
3 MACRO Fire Button fires the highlighted clip slot.
4 NOTE
REPEAT
Note Repeat (for more Details see 5.3.4 Note Repeat and 5.3.5
Note Repeat ).
Ableton Live 9.1 MASCHINE Template - Manual - 33
Page 34

Edit and Jog Wheel Section
MASCHINE including MIKRO and STUDIO
Global Controls and Navigation
Edit and jog wheel section on MASCHINE STUDIO controller
With the buttons (1)-(8) in the edit section, you can perform basic editing in Live, like deleting
clips, creating new midi clips, new tracks, new scenes etc. How the buttons work depends on
the current mode you are in.
Basic functions of the edit buttons:
Call-out
Button Function
1 COPY Creates a duplicate.
2 PASTE Corresponds to New.
3 NOTE Doubles length of MIDI loop.
4 NUDGE Clears Clip Envelops.
5 UNDO Undo last action in Live: is lit up if there is something in the undo
history.
Ableton Live 9.1 MASCHINE Template - Manual - 34
Page 35

MASCHINE including MIKRO and STUDIO
Global Controls and Navigation
Call-out Button Function
6 REDO Redo last undo: is lit up if there is something in the redo history.
7 QUANTIZE Quantize Clip.
8 CLEAR Clear/Delete.
For more details see the description of the edit section for each mode
Mode Description
Clip/Session mode see 5.1.3, Editing in Clip Mode
Scene mode see 5.2.1, Editing in Scene Mode
Note mode see 5.3.8, Edit in Pad Mode
Track modes see 5.4.2, Editing while in Track Control Mode
The function of the jog wheel depends on the selected jog wheel mode (13) – (18). Use the ◄
and ► buttons (11) to change the jog wheel mode.
Using the Jog Wheel
Turning the wheel is assigned to a certain function determined by the current mode. If you
press down the jog wheel and keep it down while turning it, an alternate function will be assigned. Holding the BACK or ENTER while will possibly give you other functions.
Ableton Live 9.1 MASCHINE Template - Manual - 35
Page 36

MASCHINE including MIKRO and STUDIO
No Page Function
13 EDIT In this mode the function is determined by the current mode:
Clip Mode
Move the clip view focus up/down or left/right
Scene Mode
Access to Scene beyond the scenes 1-16
Note Mode
Set Octave, Scale, Base Note
Drum Mode
Change drum pad scroll position
Global Controls and Navigation
Track Assign
Access to tracks beyond the tracks 1-16
14
CHANNEL The jog wheel is used to select tracks, scenes of devices in the selected
track. If SEL->ARM (see 3.6.2, Settings Page) is active a newly selected
track will be armed..
15 BROWSE The jog wheel is used to move the transport. Using the modifiers will
move the transport in greater or lesser step with every click.
16 TUNE Adjusts the Tempo of Live
17 SWING Adjusts Record Quantization/Clip Quantization
18 VOLUME Adjust the Master Volume or Cue Volume of Live
Jog wheel in EDIT Mode:
Ableton Live 9.1 MASCHINE Template - Manual - 36
Page 37

Mode Modifier Function
MASCHINE including MIKRO and STUDIO
Global Controls and Navigation
Clip Mode None
Push
Clip View Navigation left / right (tracks)
Clip View Navigation up / down (scenes)
Scene Mode Scene Navigation (only if song contains more than 16
scenes)
Note Mode None
Push
Shift
Octave up/down
Next/Previous scale in scale list
Next/Previous base note
Drum Rack Mode Scroll in Drum Pad up/down
Track Modes Track Navigation (only active if song contains more than 16
tracks)
All other jog wheel modes are independent from the current basic mode.
Ableton Live 9.1 MASCHINE Template - Manual - 37
Page 38

Wheel Mode Modifier Function
MASCHINE including MIKRO and STUDIO
Global Controls and Navigation
CHANNEL None
Push
Shift
Select Track (will automatically ARM the track if
SEL->ARM is active.
Select Scene.
Select Device.
BROWSE Jump by +/- 1 Beat.
Push Jump by +/- 1/4Beat.
Shift Jump by +/- 4 Beats.
TUNE Tempo Coarse.
Push Tempo Fine in steps of 0.01 BPM.
Shift Tempo Fine in steps of 0.1 BPM.
SWING Recording Quantize.
Push Clip Start Quantize.
Shift Swing amount +/- 0.01. Affects MIDI recording
and all direct quantize calls.
VOLUME Master Volume (coarse).
Push Master Volume (fine).
Shift Cue Volume (coarse).
Shift + Push Cue Volume (fine).
In conjunction with certain buttons the current assignment of the jog wheel via the jog wheel
mode is overwritten.
Ableton Live 9.1 MASCHINE Template - Manual - 38
Page 39

MASCHINE including MIKRO and STUDIO
Global Controls and Navigation
On MASCHINE STUDIO the RESTART button will overwrite this function as long as the RE-
START button is being held down. While holding down the RESTART button you can adjust the
position or length of the arrangement loop.
You can also overwrite the jog wheel when you enter Color Edit mode. As soon as you leave
Color Edit, the wheel is assigned to its previous function. For more details on color editing see
5.1.2, Changing clip colors
Footswitches
MASCHINE STUDIO also has 2 inputs for use with footswitches/sustain pedals.
Footswitch inputs of the MASCHINE STUDIO controller
Currently Footswitch 1 is assigned to MIDI CC 64, which is the standard sustain. Footswitch 2
is assigned to the FIRE function, which will trigger the currently selected slot.
You can also assign a footswitch to trigger other functions, like PLAY or NOTE REPEAT. To do
this, assign the same MIDI CC settings of a button to the footswitch using the Controller Editor. For example to assign the PLAY button to the footswitch select the footswitch (1 or 2) in
the controller editor and set the type to “Control Change”, the Channel to 1, the number to
108, the mode to “Gate”. The Off/On values should be set at 0/127.
Ableton Live 9.1 MASCHINE Template - Manual - 39
Page 40

3.2.2 Controls and Navigation with MASCHINE MK2
Global Controls
Global controls on MASCHINE MK2 controller
MASCHINE including MIKRO and STUDIO
Global Controls and Navigation
Call-out
Controller Ableton Live Function
1 CONTROL Undo Button is lit if there is something in the undo history.
2 STEP Redo Button is lit if there is something in the redo history.
3 BROWSE New New Button (see description of edit section).
4 SAMPLING Clear Clear/Delete (function depends on Mode).
5 ALL Stop All clips (quantized); +Shift: Stop all clips
immediately.
6 AUTO WR Snd Asn Assign Sends; + Shift: synchronizes the controllers
display.
The AUTO WR button is used in conjunction with Page 4 Sends & Solo. By default the Sends
are assigned to the Sends A of the respective tracks. By pressing the AUTO WR button you assign the send knobs to the next return track. If the knobs are assigned to the last return track,
the knobs will be assigned to the first return track again (A).
Ableton Live 9.1 MASCHINE Template - Manual - 40
Page 41

Master Section
Master section on MASCHINE MK2 controller
MASCHINE including MIKRO and STUDIO
Global Controls and Navigation
Call-out
Button Ableton Live Function
1 VOLUME Volume Assigns the control encoder to master
volume/cue volume.
2 SWING Quant Assigns the control encoder to
selecting record quantization/clip
launch quantization.
3 TEMPO Tempo Assigns the control encoder to
adjusting Ableton Live's tempo.
Ableton Live 9.1 MASCHINE Template - Manual - 41
Page 42

MASCHINE including MIKRO and STUDIO
Global Controls and Navigation
Call-out Button Ableton Live Function
4 Group A Nav Mode Assigns the control encoder to
adjusting a navigation function
depending on the color of the button.
When holding down Shift you turn
navigating horizontally in 4 steps on or
off. The clip view navigation buttons
(Group B/E/F/G) will be either blue (1
step) or purple (4 steps).
5 ENTER Shift Represents the remote scripts Shift
button.
6 ◄ and ► Page buttons are for navigation
depending on the active general mode
(see ↑3.3, Controller Modes, ↑3.3,
Controller Modes).
7 NOTE
REPEAT
Note Rpt For more Details see 5.3.4 Note
Repeat and 5.3.6, Note Repeat
MASCHINE and MASCHINE MK2.
Buttons (1)-(4) determine the function of the main control encoder.
Call-out NAME/COLOR Function
1 VOLUME Control encoder modifies the master volume in large steps.
Press and hold the main encoder while turning for finer
adjustment. Turning the encoder while holding Shift (ENTER)
button will adjust the current cue volume.
2 SWING Selects the current Record Quantization. The new value is
displayed in the Ableton Live status bar and MASCHINE
MK2s text display.
+ PUSH: Selects Ableton Live's Clip quantization. The new
value is displayed in the Ableton Live status bar and
MASCHINE MK2 text display.
Ableton Live 9.1 MASCHINE Template - Manual - 42
Page 43

MASCHINE including MIKRO and STUDIO
Global Controls and Navigation
Call-out NAME/COLOR Function
3 TEMPO Adjust Live’s tempo in 1 BPM steps:
+ PUSH: Adjust the Ableton Live tempo in 0.1 BPM steps.
+ Shift: Adjust the Albleton Live tempo in 0.01 BPM steps.
4 Group A (Green) Navigation depending on General mode (see Table below).
Ableton Live 9.1 MASCHINE Template - Manual - 43
Page 44

Call-out NAME/COLOR Function
4 Group A (Yellow) no modifier
Select tracks left/right.
+ Push
Select Scene left/right.
+ Shift
Select Device in selected track.
MASCHINE including MIKRO and STUDIO
Global Controls and Navigation
4
Group A (Pink) no modifier
Move general transport back/forward by 1 bar.
+ Push
Move general transport back/forward by 1 beat.
+ Shift
Move general transport back/forward by 1/2 beat.
+ Push + Shift
Move general transport back/forward by 1/4 beat.
Depending on the current general mode when the Group A button is lit green the following
functions are assigned:
Ableton Live 9.1 MASCHINE Template - Manual - 44
Page 45

Mode Modifier Function
MASCHINE including MIKRO and STUDIO
Global Controls and Navigation
Clip Mode None
Push
Clip View Navigation left / right (tracks).
Clip View Navigation up / down (scenes).
Scene Mode Move set of 16 scenes to be launched to the left or right. Let
us say your song has 20 scenes. By default only the first 16
scenes will be represented by the 16 pad. By turning the
control encoder by one click to the right the pads will be
assigned to scene 2-17 etc.
Note Mode None
Push
Shift
Octave up/down.
Next/Previous scale in scale list.
Next/Previous base note.
Drum Rack Mode Scroll in Drum Pad up/down.
Track Modes Track Navigation. By default only the first 16 tracks will be
represented by the 16 pad. By turning the control encoder by
one click to the right the pads will be assigned to tracks
2-17 etc.
The ◄ and ► buttons handle general navigation depending on the current mode:
Ableton Live 9.1 MASCHINE Template - Manual - 45
Page 46

Mode Modifier Function
MASCHINE including MIKRO and STUDIO
Global Controls and Navigation
Clip Mode None
Shift
Clip View Navigation left / right (tracks).
Clip View Navigation up / down (scenes).
Scene Mode Move set of 16 scenes to be launched to the left or right. Let
us say your song has 20 scenes. By default only the first 16
scenes will be represented by the 16 pad. By turning the
control encoder by one click to the right the pads will be
assigned to scene 2-17 etc.
Note Mode None
Shift
Octave up/down.
Next/Previous scale in scale list.
Drum Rack Mode Scroll in Drum Pad up/down.
Track Modes Track Navigation. By default only the first 16 tracks will be
represented by the 16 pad. By turning the control encoder by
one click to the right the pads will be assigned to tracks
2-17 etc.
3.2.3 Controls and Navigation with MASCHINE MIKRO MK1 & MIKRO MK2
With MASCHINE MIKRO the control encoder has even greater importance because the MASCHINE MIKRO doesn’t have the additional eight knobs.
Here are the assignments for MASCHINE MIKRO:
Ableton Live 9.1 MASCHINE Template - Manual - 46
Page 47

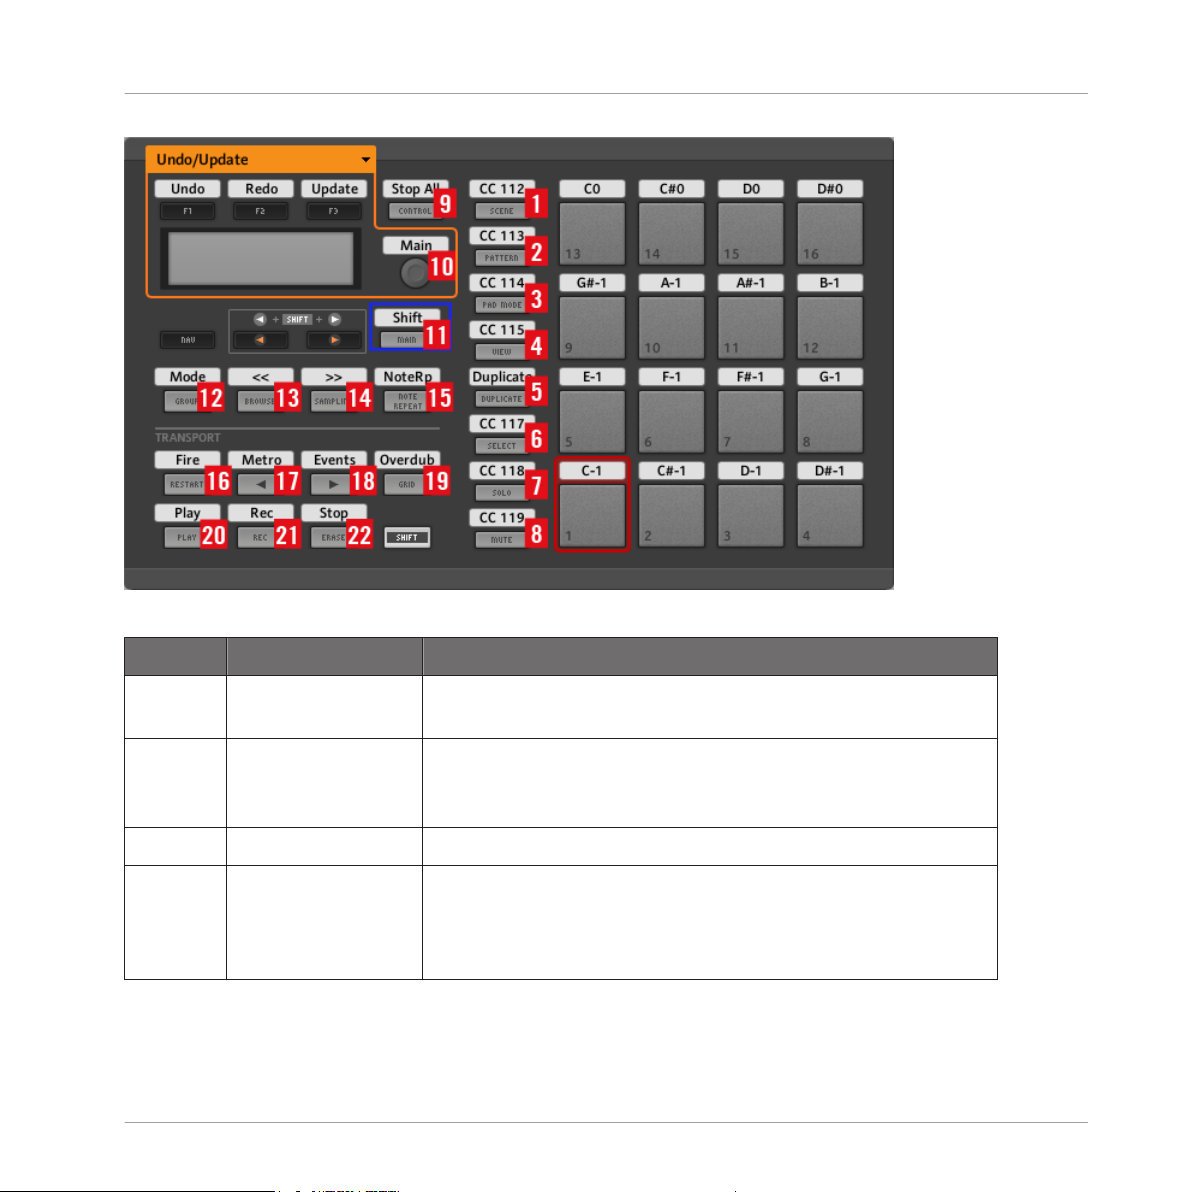
Controls and Navigation on MASCHINE MIKRO MK1 and MASCHINE MIKRO MK2 controller
Key
Controller Ableton Function
MASCHINE including MIKRO and STUDIO
Global Controls and Navigation
1 VOLUME Undo Assigns the control encoder to master volume/cue
volume.
2 QUANTIZE Redo Assigns the control encoder to record quantization/clip
launch quantization.
3 TEMPO Update Assigns the control encoder to Ableton Live's tempo.
4 GROUP Mode Assigns the control encoder to adjusting a navigation
function depending on the color of the button.
5 CONTROL
Main The central control encoder.
ENCODER
6 BROWSE,
SAMPLING
Navigation ◄ and ► buttons for navigation depending on currently
active general mode (see ↑3.3, Controller Modes, ↑3.3,
Controller Modes).
Ableton Live 9.1 MASCHINE Template - Manual - 47
Page 48

MASCHINE including MIKRO and STUDIO
Global Controls and Navigation
Key Controller Ableton Function
7 ENTER Shift Represents the remote scripts Shift button.
8 COTROL Stop All Stop all Clips (quantized); + Shift: Stop all clips
immediately.
9 NOTE REPEAT NoteRp (for more Details see 5.3.4 Note Repeat and 5.3.6,
Note Repeat MASCHINE and MASCHINE MK2).
Button (1)-(3) are located on Page 1 of the MACHINE MIKRO template.
The VOLUME, QUANTIZE, TEMPO and GROUP buttons work in the same way as for MASCHINE MK2, so for details see 4.2.2 MK2 Master Section.
On Page 10: Xfade/Settings 1 Button F1 assigns the control encoder to Ableton Live's crossfader.
Since MASCHINE MIKRO has no colored buttons, button (4) is lit if one of the navigation
functions is active. By repeatedly pressing button (4) you step through the modes. The new
state is displayed in Ableton Live's status bar.
Settings Page on the MASCHINE MIKRO MK2 controller
Undo, Redo and Display synchronization buttons are located on Page 2: Undo/Update of the
MASCHINE MIKRO controller.
Undo/Update Page on the MASCHINE MIKRO MK2 controller
Ableton Live 9.1 MASCHINE Template - Manual - 48
Page 49

MASCHINE including MIKRO and STUDIO
Global Controls and Navigation
On the transport page (Page 6) you access the Ableton Live Reverse and Fast Forward function. The F3 button is assigned to changing Ableton Live's focus.
Transport Page on the MASCHINE MIKRO MK2 controller
Ableton Live 9.1 MASCHINE Template - Manual - 49
Page 50

3.2.4 Controls and Navigation with MASCHINE
MASCHINE including MIKRO and STUDIO
Global Controls and Navigation
Controls and Navigation on MASCHINE controller
Call-out
Controller Ableton Function
1 CONTROL UNDO UNDO; with Shift button (MAIN
button) REDO
2 STEP REDO Refresh Display
Ableton Live 9.1 MASCHINE Template - Manual - 50
Page 51

MASCHINE including MIKRO and STUDIO
Global Controls and Navigation
Call-out Controller Ableton Function
3 BROWSE Shift Represents the remote scripts Shift
button
4 SAMPLING Clear Clear (function depends on Mode)
5 SNAP STOP Stop all clips (quantized); + Shift:
Stop all clips immediately.
6 AUTO WRITE SendAsign Assign Sends
7 MASTER
encoder
Master Sets Master Volume; + Shift: Sets
Cue Volume. If the Group A button
is lit: track/scene selection.
8 TEMPO
encoder
Tempo/Q Sets Ableton Live's tempo in 1 BPM
steps; + Shift: Sets Ableton Live's
tempo in 0.10 BPM steps. If Group
A button is lit: Mode dependent
navigation
9 SWING
encoder
Cue Sets Ableton Live's record
quantization; + Shift: Sets Ableton
Live's clip quantization. If Group A
button is lit: Mode dependent
navigation.
10 NOTE REPEAT Note Repeat For more Details see 5.3.4 Note
Repeat and 5.3.6, Note Repeat
MASCHINE and MASCHINE MK2.
11 Group A Mode Activates navigation with encoders
(7),(8),(9).
12 Group C Alt Represents a second modifier ALT
button used in conjunction with the
encoders (7),(8),(9).
If the group A button is not lit, the MASTER, TEMPO and SWING encoder control:
Ableton Live 9.1 MASCHINE Template - Manual - 51
Page 52

Mode Modifier Function
MASCHINE including MIKRO and STUDIO
Global Controls and Navigation
MASTER
encoder
TEMPO
encoder
SWING
encoder
None
+ Shift
None
+ Shift
None
+ Shift
Master Volume
Cue Volume
Tempo in 1 BPM steps
Tempo in 0.1 BPM steps
Record Quantization
Clip Quantization
If the group A button is active, the MASTER encoder handles track, scene or device selection.
Use the ALT button to modify the parameter for Master Volume and Cue Volume in smaller
steps.
Mode Modifier Function
MASTER None
Select tracks
+ Shift
+ ALT (Group C)
Select scenes
Select devices in selected track
The TEMPO and SWING button perform navigation actions depending on the current mode.
Ableton Live 9.1 MASCHINE Template - Manual - 52
Page 53

Mode Modifier Function
MASCHINE including MIKRO and STUDIO
Global Controls and Navigation
Clip Mode TEMPO
SWING
Clip View Navigation left / right (tracks)
Clip View Navigation up / down (scenes)
Scene Mode both Move set of 16 scenes to be launched to the left or right.
The new range is also displayed in Ableton Live's status bar.
Note Mode TEMPO
SWING
Octave up/down; +Shift base note up/down
Next/Previous scale in scale list
Drum Rack Mode both Scroll in Drum Pad up/down.
Track Modes Track Navigation. By default only the first 16 tracks will be
represented by the 16 pad. By turning the control encoder
by one click to the right the pads will be assigned to tracks
2-17 etc.
3.2.5 Edit Section
All MASCHINE models have an edit section. MASCHINE STUDIO is the only controller that has
a dedicated edit section:
Ableton Live 9.1 MASCHINE Template - Manual - 53
Page 54

MASCHINE including MIKRO and STUDIO
Global Controls and Navigation
Edit Section on MASCHINE STUDIO controller
Since no copy or paste function is available via the Live Remote scripts the basic meaning of
the buttons is assigned as follows.
MASCHINE STUDIO label Basic function
COPY DUPLICATE
PASTE NEW
NOTE DOUBLE LOOP (without modifiers)
NUDGE Clear Complete Automation
CLEAR Clear DELETE
On MASCHINE MK2 the Edit Page is located on Page 7:
Edit Page on MASCHINE MK2 controller
The other edit functions of MASCHINE MK2 are assigned as follows:
Function Button
New BROWSE button
Delete SAMPLING button
Duplicate DUPLICATE button
On MASCHINE MK1 the Edit PAGE is located on Page 9:
Ableton Live 9.1 MASCHINE Template - Manual - 54
Page 55

Edit Page on MASCHINE controller
The MASCHINE MIKRO models have 3 Edit Pages:
Edit Page 1 on MASCHINE MIKRO MK2 controller
MASCHINE including MIKRO and STUDIO
Global Controls and Navigation
Edit Page 2 on MASCHINE MIKRO MK2 controller
Edit Page 3 on MASCHINE MIKRO MK2 controller
For convenience the F1 button is assigned to Undo/Redo (use Shift for Redo) on all three Edit
Pages. The Duplicate function is assigned to the MASCHINE MIKRO DUPLICATE button.
Ableton Live 9.1 MASCHINE Template - Manual - 55
Page 56

MASCHINE including MIKRO and STUDIO
Controller Modes
The exact way the edit functions work depends on the current general mode you are in. These
are described in detail in the following chapter.
Clearing Parameter automation using the CLEAR button
This function always relates to the highlighted clip. If the selected clip slot doesn’t contain a
and content, this function will have no effect.
To clear the parameter automation for a single parameter, simply hold down the CLEAR/DELETE button and turn the corresponding encoder. While holding the CLEAR button, turning the
encoder will not change the assigned parameter but delete any automation that exists for the
currently highlighted clip and the assigned parameter of the knob. This only works when the
encoders are assigned either to device parameter or mixer parameters.
You can also clear mute automation in the same way, by holding down the CLEAR button and pressing the corresponding MUTE button. This works for the mute button on the
knob pages (for instance Page 3 of MASCHINE STUDIO) for the Track Mute Mode.
Clearing parameter automation always refers to clip automation introduced into Live 9
and not to automation in the arrangement view.
3.3 Controller Modes
3.3.1 Clip Mode
In this mode your clips are triggered by the pads. In Ableton Live's Session View, a four by four
rectangle is drawn around the clips the MASCHINE controller is focused on.
You can also launch scenes in this mode. Hold down the corresponding Shift button and
press a pad. The complete scene that belongs to clip slot of the triggered pad will be
launched.
Fold or un-fold group tracks by holding the PATTERN button and selecting a pad. If the
pad belongs to a group track, the track will fold if previously un-folded or un-fold if previously folded.
Ableton Live 9.1 MASCHINE Template - Manual - 56
Page 57

MASCHINE including MIKRO and STUDIO
Controller Modes
You can use the Clip Navigation buttons (Group B/F; E/G) to move around in the Session View.
Additionally in Clip mode, the Left/Right buttons allow you move the focus rectangle to the left
or right. Alternatively you can use the jog wheel, or control encoder depending on the MASCHINE model you are using. For details on using the jog wheel or control encoder, please refer to the previous section.
Clips on the Pads of MASCHINE controller
The pads on MASCHINE MK1 and MASCHINE MIKRO MK1 have two colored states: dimmed
or fully lit. Other states are displayed by letting the pads blink:
Ableton Live 9.1 MASCHINE Template - Manual - 57
Page 58

MASCHINE including MIKRO and STUDIO
Controller Modes
Pad State Clip State
Pad dimmed (off) No clip in slot
Pad bright (on) Clip in slot, but not launched or triggered
Pad blinking Clip launched
Pad blinking rapidly Clip triggered but not launched
The colored focus rectangle is also shown if you disconnect the controller from your
computer. The focus rectangle will be removed by deselecting the MASCHINE controller
in the MIDI/Sync tab of Ableton Live's preference dialog. Set the selected controller to
None.
The MASCHINE MK2 and MASCHINE STUDIO controllers make full use of the colored pads.
There are two Color Modes, Standard Color mode and Clip Color mode:
Standard Color Mode
In Standard Color Mode clips and their states are represented by fixed colors.
Pad State Clip State
Pad off No clip in slot
Yellow Clip in slot but not active
Green Clip launched
Red Clip recording
Green & blinking Clip triggered but not launched yet
Red & blinking Clip triggered but not recording yet
Group tracks have a slightly different coloring. The slots that are not launched are orange,
whereas the launched slots are represented by a slightly darker green.
Ableton Live 9.1 MASCHINE Template - Manual - 58
Page 59

MASCHINE including MIKRO and STUDIO
Controller Modes
Clips on the Pads of MASCHINE MK2 controller
Call-out Pad State
1 Pad 13 No Clip
2 Pad 2, 6,
Group Track
10 and 14
3 Pad 9 Launched Clip
4 Pad 11 Launched Clip
5 Pad 3 and 7 Clips in Slot
6 Pad 8 Clip Recording
Ableton Live 9.1 MASCHINE Template - Manual - 59
Page 60

MASCHINE including MIKRO and STUDIO
Controller Modes
Clip Color Mode
You can switch between Color Clip Mode and Standard Clip Color mode by pressing the following buttons:
Controller Button
MASCHINE MIKRO MK2 Button F1 on Page 9 Color Assign
MASCHINE MK2 Button 1 on Page 8: Settings
MASCHINE STUDIO Button 1 on Page 8: Settings
When the corresponding button is lit, Clip Color Mode is active otherwise Standard Clip Color
Mode.
In Clip Color Mode, clips are represented by the same colors as defined in Live, as follows:
Pad State Clip State
Pad off No clip in slot
Dimmed Clip Color Clip in slot but not active
Bright Clip Color Clip launched
Switching between Red and Clip
Clip recording
color
Blinking in Clip Color Clip triggered but not launched yet
Switching rapidly between Red and
Clip triggered but not recording yet
Clip color
The colors displayed on MASCHINE are approximates of the colors available in Live. Some colors will not be that easy to distinguish from one another. Very dark colors like black are displayed as dim grey, since black corresponds to an unlit pad and is therefore reserved to show
an empty clip slot. Group Clip Slots will be displayed as in the regular mode (darker green or
orange). This is due to certain technical limitations of Live.
This example shows a couple of clips and how the colors set in Live are represented on the
controller:
Ableton Live 9.1 MASCHINE Template - Manual - 60
Page 61

MASCHINE including MIKRO and STUDIO
Controller Modes
Clip colors on the Pads of MASCHINE MK2 controller
Changing Clip Colors
You can modify the clip color of each clip via the controller. To do this hold the designated
Shift button (BACK – STUDIO, MAIN – MIKRO MK2, ENTER – MK2) and the PATTERN but-
ton. When PATTERN Button starts to blink, pressing the pads will not launch the clips.
1. In Clip/Session mode hold Shift (ENTER-MK2, MAIN-MIKRO, BROWSE-STUDIO) + Clip
mode button (PATTERN).
The PATTERN buttons begins to blink. Now you are in Color Edit mode.
Ableton Live 9.1 MASCHINE Template - Manual - 61
Page 62

MASCHINE including MIKRO and STUDIO
2. Simply select a clip slot (can also be an empty one).
Instead of triggering the clip slot, you are presented with a color palette much in same
way this is done with the F1 in Traktor.
Controller Modes
3. Simply select a color from the palette and the clip is assigned the selected color and the
display returns to the session view. If the slot did not contain a clip, nothing is changed.
▪ If you hold the Shift button and select a color from the palette. All clips in the track of the
selected clip slot will be assigned the selected color.
▪ If you hold Shift while selecting a clip slot, selecting a color from the palette will color the
track in Live. This made visible by the fact that the PATTERN button will blink rapidly
while the color palette is being presented.
▪ If you hold Shift while selecting a clip slot (PATTERN button is flashing rapidly) and then
select a color from the palette while still (or again) holding the Shift button, the color of the
scene containing the selected clip slot will be changed accordingly.
Ableton Live 9.1 MASCHINE Template - Manual - 62
Page 63

MASCHINE including MIKRO and STUDIO
Controller Modes
▪ Since you can remove the color from a track or a scene, you can do this in track/scene col-
or edit mode (rapidly blinking PATTERN button) by pressing the main encoder. Hold Shift
and the main encoder to remove the coloring from the scene.
▪ When presented with the palette and you decide not to choose a color, simply press the
SESSION MODE button (PATTERN) again and you will jump back.
The script restricts the selection to sixteen distinguishable colors and does not offer the full
selection of Ableton Live's sixty colors. These are basically colors that correspond more or less
to the colors available in MASCHINE.
You can also change clip color while in Standard Clip Color Mode, but you will not see the
change on the controller.
Editing clip colors is not available for MASCHINE MK1 and MASCHINE MIKRO MK1
Editing in Clip Mode
Using the Edit section of the MASCHINE Controllers, you can delete, duplicate, create, quantize and remove automation from clips. You can also duplicate, delete and create tracks.
This is generally achieved by holding down one of the buttons from the edit section and then
pressing one of MASCHINE’s pads. The edit operation (if possible) will be performed on the
selected Clip Slot. In combination with the Shift button or the Alt button (on MASCHINE STUDIO only) alternate operation will be performed.
Button
Mod Action Destination
COPY (Duplicate) Duplicate clip of pad (if slot not empty)
Shift Duplicate Track track of column of pad
PASTE (New) New Clip clip slot of pad (if slot is empty and
MIDI track)
Shift New MIDI Track insert MIDI Track to right of column
NOTE (Double) Double Loop clip of pad (only if contains MIDI clip)
Shift New Audio Track insert to right of track of pressed pad
Ableton Live 9.1 MASCHINE Template - Manual - 63
Page 64

MASCHINE including MIKRO and STUDIO
Controller Modes
Button Mod Action Destination
NUDGE (Clear Env) Clear all automation clip of pad
Shift New Return Track
QUANTIZE Quantize clip of pad
Shift Quantize 50% clip of pad
CLEAR Delete Clip of Pad
ALT Delete all Notes in Clip (only
MASCHINE STUDIO)
Shift Track of Column of Pad
3.3.2 Scene Mode
In Scene mode the pads are used to launch scenes. On the MASCHINE MK1 controller, the
pads are only lit up if the scene contains a clip. Initially MASCHINE controls scenes 1-16. Pad
1 controls scene 1, pad 2 controls scene 2, etc.
On the MASCHINE MK1 controllers, the pads are lit up if the corresponding scene contains at
least one clip. The scenes that contain at least one launched clip are represented by blinking
pads.
Ableton Live 9.1 MASCHINE Template - Manual - 64
Page 65

MASCHINE including MIKRO and STUDIO
Controller Modes
Scene Mode on MASCHINE controller
Scenes without clips and non-existent scenes (only if you have less than 16 scenes in your
song) are represented by dimmed pads.
If you have more than 16 scenes, you can access these by pressing the Left/Right Buttons or
using the Controller Encoder/jog wheel as described in the previous section.
MASCHINE MK2 and MASCHINE MIKRO MK2 use colors to represent the state of scenes.
Green signifies that the scene contains at least one clip. Blue signifies that the scene has no
clips. A bright green pad represents a scene with at least one launched clip. If the scene does
not exist (you have less than 16 scenes) the pad is not lit at all.
Editing in Scene Mode
In Scene Mode you can you use the Edit Section together with the pads to create, delete, duplicate or capture scenes.
Ableton Live 9.1 MASCHINE Template - Manual - 65
Page 66

MASCHINE including MIKRO and STUDIO
Controller Modes
Button Mod Action Destination
COPY (Duplicate) Duplicate Scene Scene assigned to pad will be
duplicated
PASTE (New) New Scene New scene will be inserted after scene
of pad
Shift New Scene New scene will be inserted before
scene of pad
NOTE (Double) Capture and Insert Captured Scene will be insert at the
position of the selected pad
NUDGE (Clear Env) Clear all automation Removes all envelopes from all clips
of the selected scene
QUANTIZE ----- Nothing as quantizing a whole scene
would probably do more harm than
good
CLEAR Delete Delete scene of selected pad
3.3.3 Pad Mode
In Pad mode you use MASCHINE's pads to play MIDI notes on whatever instrument you are
controlling.
No visual feedback is given while playing the pads due to limitations of the template
and Ableton Live
Depending on the Instrument Device in the highlighted track, Pad Mode is either in Note Mode
or in Drum Rack Mode. If the selected track is not a MIDI track, Pad Mode will remain in its
previous mode. If the highlighted MIDI track contains an Ableton Drum Rack, the mode will
automatically switch to Drum Rack Mode.
Ableton Live 9.1 MASCHINE Template - Manual - 66
Page 67

MASCHINE including MIKRO and STUDIO
Controller Modes
Note Mode
The MK2 models make use of the colored LED by assigning colors to note values. There are
two coloring modes, Individual Color mode and Interval Color mode. In Individual Color mode
every note has its dedicated color. C is red, C# is dark pink, D is orange, D# is bright pink; E is
dark yellow, etc.
In Note mode you can set a scale, the octave range and the base note. The base note will always be on pad 1.
The following image shows the pads in Individual Color mode with a chromatic scale and base
note C:
Note Mode on MASCHINE MIKRO MK2 controller
Pad Mode: Individual Colors
You can switch between the color modes by pressing the KEY COLOR button which is located
on the Settings Page (Button 6).
Ableton Live 9.1 MASCHINE Template - Manual - 67
Page 68

MASCHINE including MIKRO and STUDIO
Controller Modes
The change is also displayed in Ableton Live's status bar and on MASCHINE MK2 and MASCHINE STUDIOs text display.
Ableton Live's status bar reading MASCHINE MK2 Note Mode Key Color: Individual colors
In Interval Colors mode, the keys are colored according to note interval based on the base note.
The pad representing the base note always has the color red.
You have different options to modify octave, scale and base note on the controllers.
Note Mode on MASCHINE MIKRO MK2 controller with options to modify octave, scale and base note
(1) Octave/Base note +12 semitones
(2) Minor sixth +8 semitones
(3) Major sixth +9 semitones
Ableton Live 9.1 MASCHINE Template - Manual - 68
Page 69

MASCHINE including MIKRO and STUDIO
Controller Modes
(4) Minor seventh +10 semitones
(5) Major seventh +11 semitones
(6) Major third +4 semitones
(7) Forth +5 semitones
(8) Diminished fifth +6 semitones
(9) Fifth +7 semitones
(10) Base note
(11) Minor second +1 semitone
(12) Major second +2 semitones
(13) Minor third +3 semitones
The original versions of MASCHINE do not have colored pads. As a result, visual feedback is
limited. In Note Mode the monochromatic MASCHINE model have unlit pads for the black
keys (C#/Db, D#/Eb, F#/Gb, G#/Ab, A#/Bb) and lit pads for the other key values. When holding
down the clear button, the view will change and only the pads that have notes in the current
clip will be lit.
Ableton Live 9.1 MASCHINE Template - Manual - 69
Page 70

MASCHINE including MIKRO and STUDIO
Controller Modes
MASCHINE MK1 Pad Mode Chromatic Scale
Drum Rack Mode
If the selected track contains an Ableton Drum Rack, the Pad Mode will automatically switch
to Drum Rack Mode. In this mode the pads are colored according to the drums in the drum
cells of the drum rack. The coloring is based on the name of the drum cell. For instance any
cell whose name contains the character sequences ‘kick’, ‘bd’ or ‘bassdrum’ will be colored
red. Cells whose name contains ‘snare’ or ‘sd’ will be colored dark blue, etc.
Ableton Live 9.1 MASCHINE Template - Manual - 70
Page 71

MASCHINE including MIKRO and STUDIO
Controller Modes
Ableton Live Drum Rack on the Pads of MASCHINE MK2 controller
The selected drum cell is lit up a little brighter than the other cells. Empty drum cells are unlit
and when select light up bright white.
Use the jog wheel/Control encoder when in Navigation Mode (MASCHINE STUDIO jog
►
wheel Page Edit, MASCHINE MIKRO MK2 Group button is green, MASCHINE MK2
Group A button is green) to scroll through the whole range of pads.
The MASCHINE MK1 models display cells containing an instrument as lit pad and empty cells as dimmed pad. When holding down the CLEAR button, the pads that have
notes in the current midi clip will light up, the others will be turned off.
For those who feel secure with editing Python Files and would like to customize the colors of
the drum pads, the Python source File MIDI_Map.py is included. Add or modify rules in the
AUTO_NAME list. Each list element contains a regular expression listing the word elements to
Ableton Live 9.1 MASCHINE Template - Manual - 71
Page 72

MASCHINE including MIKRO and STUDIO
Controller Modes
match. The second element is a pair of lists each containing 3 HSB value (0-127), the first
one determining the off color value and the second one the on color value. As an example,
here is the rule for kick drums:
(re.compile('kick|bd|bassdrum', re.IGNORECASE) , ((0, 127, 40), (0, 127, 127))
The rule for kick drum is set with off value Hue = 0 Saturation = 127 (full) and brightness =
40, which is a slightly dark red. When editing, make sure you saved the original. Let’s say you
want also want cells with names containing ‘kck’ to be colored red. Simply change the rule to:
(re.compile('kick|bd|bassdrum|kck', re.IGNORECASE) , ((0, 127, 40), (0, 127, 127))
You will have to restart Live for the change to take effect.
Edit in Pad Mode
In Pad Mode an edit action is always associated with the highlighted clip slot. Actions upon
clips like quantize clip, duplicate clip etc. will have no effect if the selected clip slot is empty.
The only edit function that works together with the pads in Note/Drum mode is the CLEAR function.
1. Hold down CLEAR button while in PAD Mode. All pads, which have corresponding note
events in the clip will light up.
2. Just press the pads to delete notes of the particular note value (while still holding the
CLEAR button). All notes of the note value of the pad will be removed from the clip (with-
in the start and end point of the clip).
Ableton Live 9.1 MASCHINE Template - Manual - 72
Page 73

Example of editing in Pad Mode on MASCHINE MK2 controller
MASCHINE including MIKRO and STUDIO
Controller Modes
This example shows a simple clip. The note vales in the clip are C3, F3 A#3 and B3. The picture of the MASCHINE controller shows PAD MODE with a chromatic scale and base note C3.
Pressing Pad 11 (Note A#3) will delete all notes in the clip with note value A#3. At the same
time the pad will be dimmed.
Pressing any Pad while also holding down the Shift button will remove all note events in the
MIDI clip.
The other edit functions are also always related to the highlighted clip slot in Live and work as
follows:
Button Mod Action Destination
COPY (Duplicate) Duplicate Selected clip slot (if slot not empty)
Shift Duplicate Track Selected track
PASTE (New) New Clip Selected clip slot (if slot is empty and
track is MIDI track)
Ableton Live 9.1 MASCHINE Template - Manual - 73
Page 74

MASCHINE including MIKRO and STUDIO
Button Mod Action Destination
Shift New MIDI Track Insert new empty MIDI Track to right
of selected track
NOTE (Double) Double Loop Selected clip slot (only if contains
MIDI clip)
Shift New Audio Track Insert new empty Audio Track to right
of selected track
NUDGE (Clear Env) Clear all automation Selected clip slot (if slot not empty)
Shift New Return Track Create a new empty Return Track to
QUANTIZE Quantize Selected clip slot (if slot not empty)
Shift Quantize 50% Selected clip slot (if slot not empty)
CLEAR + PAD Delete Delete all notes of with the note value
of selected pad in selected clip (clip
needs to contain a midi clip)
Controller Modes
Shift +
Delete all Notes in Clip
Pad
3.3.4 Note Repeat
Holding down the NOTE REPEAT button and playing a pad in Pad Mode will retrigger the note
in the set note repeat interval. The pads send poly aftertouch, so applying pressure to the held
pad will generate notes with higher or lesser velocity volumes.
If you are already holding down a note and then press NOTE REPEAT, note repeat will
not be activated for this particular note. It will only be triggered for note played after
note repeat was activated.
For all Versions of MASCHINE note repeat is deactivated as soon as your release the NOTE
REPEAT button again. If you hold the Shift button (ENTER-MK2, Group A-MK1, MAIN-MIKRO,
BACK or BROWSE STUDIO) and NOTE REPEAT, note repeat will lock. Unlock note repeat by
simply pressing NOTE REPEAT again without the Shift button.
Ableton Live 9.1 MASCHINE Template - Manual - 74
Page 75

MASCHINE including MIKRO and STUDIO
Controller Modes
The note repeat rate is modified by buttons in the note repeat section of the controller. Where
this section is depends on which MASCHINE model you are using.
When Note Repeat is locked, you can deactivate note repeat by pressing the currently active
note repeat rate button. It will come unlit and note repeat will stop. Press it again and note
repeat will continue.
Note Repeat on MASCHINE STUDIO
MASCHINE offers two ways to change the note repeat rate.
▪ I/O Volume Page located to top right on the controller
The rates are applied as displayed.
▪ Knob/Button Page 6: Note Repeat and Device
Ableton Live 9.1 MASCHINE Template - Manual - 75
Page 76

MASCHINE including MIKRO and STUDIO
Controller Modes
Button (1)-(4) are configurable buttons. Their values are set by the respective encoders below.
When activating one of the freely assignable note repeat buttons or changing the value with
knob, the current values of all buttons will be shown in the text display.
This page additionally has encoder 5-8 assigned to the current device.
Note Repeat on MASCHINE and MASCHINE MK2
MASCHINE and MASCHINE MK2 have a dedicate Note Repeat Page. On MASCHINE this is
Page 7 and on MASCHINE MK2 this Page 5.
Note Repeat Page on MASCHINE MK2 controller
Note Repeat Page on MASCHINE MK1 controller
Like with MASCHINE STUDIO buttons (1)-(4) are freely assignable to rates from ½ note to
1/64 note including triplets. When activating one of the freely assignable note repeat buttons
or changing the value, the current values of all buttons will be shown in MASCHINE MK2's text
display. MASCHINE MK1 will show the value of the currently selected or change note repeat
button in the status bar.
Note Repeat on MASCHINE MIKRO and MASCHINE MIKRO MK2
With MASCHINE MIKRO and MIKRO MK2 the Note Repeat Page is Page 5.
Ableton Live 9.1 MASCHINE Template - Manual - 76
Page 77

MASCHINE including MIKRO and STUDIO
Controller Modes
Note Repeat Page on MASCHINE MIKRO controllers
Only the F3 button has a fixed note repeat rate of 1/16 note. Buttons F1 and F2 have adjustable rates. You can adjust the repeat rates behind the NR-1 button or NR-2 button with the
control encoder.
This can be done either by
▪ holding down the corresponding NR button and turning the control encoder
▪ If the NR-1 or NR-2 button is currently active and NOTE REPEAT is also currently active,
being either held down or locked. Then the control encoder on this page is assigned to
changing the rate.
The new note repeat rate is displayed in Ableton Live's status bar:
Ableton Live's status bar reading MASCHINE MK2 Note Repeat Mode Button 1: 1/4 T
Otherwise the control encoder is assigned to its regular function. See 4.3 Controls and Navigation with MASCHINE MIKRO MK1 & MIKRO MK2
Ableton Live 9.1 MASCHINE Template - Manual - 77
Page 78

MASCHINE including MIKRO and STUDIO
Controller Modes
If the control encoder is assigned to changing the note repeat rate, pressing the encoder will
make live show the current rate in its status bar (without modifying it). If you turn the main
encoder while holding it down, you will stay within the current type of note repeat rate, being
triplets or non-triplets.
The rate is immediately applied, so this way you can use the encoder to perform note repeat
changes while playing the pads.
The configured note repeat values are stored, so when you load a new song or start up
Live again, the assignments will be recalled.
3.3.5 Track Controls
With the track control mode you can solo, mute, select, assign the cross-fader, arm or stop
tracks using the controllers pads. On the MASCHINE MK2 models, the pads are colored according to mode and state of the track.
To access each function, press and hold the corresponding button.
►
Only existing tracks are lit. By adding new tracks, more pads will light up.
With MASCHINE, MASCHINE MK2 and MACHINE STUDIO the SELECT, SOLO, MUTE, Group
C, Group D and Group H buttons.
Ableton Live 9.1 MASCHINE Template - Manual - 78
Page 79

Track Modes
Button Function Description
MASCHINE including MIKRO and STUDIO
Controller Modes
GROUP C Crossfade
Assign
SELECT
Select Track Selects one of the first sixteen
SOLO Solo/Un-Solo
Track
Assigns the crossfader of the
corresponding track to A, B or
both. For MK2 dim blue indicates
that the track has no assignment.
Orange corresponds to an
assignment to B and yellow an
assignment to A. On the
MASCHINE MK1 models, a
blinking pad displays an
assignment to B and a lit pad
displays an assignment to
A.
tracks in Live. The selected track
is highlighted. The
MASCHINE MK2 version uses
blue as the color for selection
mode. The MASCHINE MK1
models display the selected track
by highlighting it.
Solos or Un-Solos the
corresponding tracks. The tracks
that are soloed are highlighted. If
the Arm/Solo Exclusive mode
button (ALL) is active, soloing a
track will unsolo previously soloed
tracks or not.
Ableton Live 9.1 MASCHINE Template - Manual - 79
Page 80

Button Function Description
MASCHINE including MIKRO and STUDIO
Controller Modes
MUTE Mute/
Unmute
Track
Group D
(MASCHINE)
Arm/Unarm
Track
SAMPLING
(MIKRO)
GROUP H
Stop Track Selecting one of the pads in this
(MASCHINE)
BROWSE (MIKRO)
Mute or Unmutes a track. All
muted tracks are dimmed. The
MK2 version use yellow as color
to display muting.
Since Muting is automatable you
can also delete mute automation
for the highlighted track.
Arms or unarms the selected
track. Depending on if Arm
Exclusive mode (see 3.6.2
Settings Page) is active. Arming a
track will either automatically
unarm previously armed tracks or
not. Armed tracks are highlighted.
The MASCHINE MK2 versions
use red to symbolize arming.
Audio tracks are colored pink and
MIDI tracks red.
mode will stop the playing clip on
the corresponding track. Tracks
with active clips are colored
yellow and tracks without active
clips are blue. Tracks not
containing any clips are unlit.
On MASCHINE MK1 and
MIKRO MK1, tracks with active
clips blink, whereas tracks
containing inactive clips are lit
and all others are dimmed.
When changing in to any track related mode, the selected mode will be shown in the status
bar:
Ableton Live 9.1 MASCHINE Template - Manual - 80
Page 81

MASCHINE including MIKRO and STUDIO
Controller Modes
Ableton Live's status bar reading MASCHINESTUDIO Current Mode: Track Stop
If your song contains more than sixteen tracks, you access these by using the navigation methods (left/right buttons, jog wheel or control encoder) as described in ↑3.2, Global Controls and
Navigation, ↑3.2, Global Controls and Navigation.
Editing while in Track Control Mode
The edit buttons also work in any of the track control modes, although it might be less likely
that you would try to use the edit functions in this mode. The edit functions always work in
relation to the highlighted clip in Live
Button
Mod Action Destination
COPY (Duplicate) Duplicate Selected clip slot (if slot not empty)
Shift Duplicate Track Selected track
PASTE (New) New Clip Selected clip slot (if slot is empty and
track is MIDI track)
Shift New MIDI Track Insert new empty MIDI Track to right
of selected track
NOTE (Double) Double Loop Selected clip slot (only if contains
MIDI clip)
Shift New Audio Track Insert new empty Audio Track to right
of selected track
NUDGE (Clear Env) Clear all automation Selected clip slot (if slot not empty)
Shift New Return Track Create a new empty Return Track to
QUANTIZE Quantize Selected clip slot (if slot not empty)
Shift Quantize 50% Selected clip slot (if slot not empty)
CLEAR Delete Delete the clip in the clip slot
Shift Delete track Remove the currently selected track
Ableton Live 9.1 MASCHINE Template - Manual - 81
Page 82

MASCHINE including MIKRO and STUDIO
Controller Modes
3.3.6 Control Mode (MIKRO MK1 and MIKRO MK2 only)
Control mode is activated by selecting the SCENE button while holding down the Shift button
on MASCHINE MIKRO MK1 and MIKRO MK2. Control mode is only available for both MIKRO
models, since these controllers do not have 8 individual knobs.
In Control mode, you use the pads to assign the Control encoder to the mixer's output volumes,
pans, sends and device parameters.
By default the encoder modifies the parameters in larger steps for faster parameter changing.
By pressing down the encoder and turning it, the assigned parameter is modified in small
steps. The Live Template however detects so-called integer values, for instance, some quantization value or on/off values. In this case it makes no difference in which manner you turn the
knob.
When switching to Control mode, the pads on the MASCHINE MIKRO MK2 will look like this:
Control Mode on MASCHINE MIKRO MK2 controller
Ableton Live 9.1 MASCHINE Template - Manual - 82
Page 83

MASCHINE including MIKRO and STUDIO
Controller Modes
The buttons in the third row from above (pads 5-8) select volume (green), pan (red), send volume (blue) or device (purple) control.
Mixer Volume Control (Green)
The eight upper pads (13-16) are used to assign the Control encoder to one of eight tracks according to the position of the focus rectangle. The first pad in the row (13) assigns the Control
encoder to the volume of the first track of the current focus rectangle, the second pad (14) to
the volume of the second track, etc.
Ableton Live 9.1 MASCHINE Template - Manual - 83
Page 84

MASCHINE including MIKRO and STUDIO
Controller Modes
Mixer Volume control
In the image above, the focus rectangle starts at track 1. Pad 9, which is the fifth pad counting from the upper left corner of the pad matrix, is highlighted, so the Control encoder controls
the output volume of track 5.
Ableton Live 9.1 MASCHINE Template - Manual - 84
Page 85

MASCHINE including MIKRO and STUDIO
Pan Control (RED)
Select the second pad in the third row from above (pad 6) to set the Control mode to
►
panning.
Press the pad corresponding to the track you want to pan and turn the Control encoder
►
right or left in order to pan the track's output in the mix.
Controller Modes
Pan control
Ableton Live 9.1 MASCHINE Template - Manual - 85
Page 86

MASCHINE including MIKRO and STUDIO
Controller Modes
Send Volume Control (Blue)
Select the third pad in the third row from above (pad 7) to set the Control mode to ad-
►
justing send volumes of the tracks.
In this mode, the lower row of the pad matrix is lit. The number of lit pads corresponds to the
number of existing effect return tracks.
To assign a track to one of your effect return tracks:
1. Press the pad that corresponds to the track you wish to add the effect to.
2. Press the pad that corresponds to the desired return track (1 corresponds to A, 2 to B,
etc.).
3. Turn the Control encoder to adjust the volume of the effect return.
If you have more than four effect return tracks, press pad 4 repeatedly in order to reach
the fifth track, twice for the sixth track, etc.
The new assignment is shown in Ableton Live's status bar:
Ableton Live 9.1 MASCHINE Template - Manual - 86
Page 87

MASCHINE including MIKRO and STUDIO
Controller Modes
Send Volume control
The selection is shown in Ableton Live's status bar and the color of the forth pad changes as
well.
Ableton Live's status bar reads MASCHINE MIKRO MK2 Control Mode Focus: Send D
Basically any new assignment will be reflected in the status.
Ableton Live 9.1 MASCHINE Template - Manual - 87
Page 88

MASCHINE including MIKRO and STUDIO
Controller Modes
Controlling Devices in Control Mode (Purple)
The fourth button in the third row (pad 8) assigns the Control encoder to controlling devices in
Ableton Live's device chains. After selecting Device Control in Control mode, the four bottomrow pads will light up. Using the orange colored pads (pads 1 and 2); you can step through the
devices in the device chain of the selected track. The two darkest-purple colored pads (pads 3
and 4) select the parameter bank. The pads will be lit if it is possible to select a next or previous set of parameters. The new selection is also shown in the status bar.
Controlling devices in Control Mode in Ableton Live
The device can be turned on or off by selecting pad 8 while holding the Shift button (MAIN
button). If the device is turned off, the pads 9-16 will be white otherwise purple.
Ableton Live 9.1 MASCHINE Template - Manual - 88
Page 89

Controlling devices in Control Mode on MASCHINE MIKRO MK2 controller
(1) Pad 9, 10, 11, 12, 13, 14, 15, and 16: Parameter Controls
(2) Pad 1: Select Previous Device
(3) Pad 2: Select Next Device
MASCHINE including MIKRO and STUDIO
Controller Modes
(4) Pad 3: Previous Bank
(5) Pad 4: Next Bank
(6) Pads 9-16: Shows deactivated device
MASCHINE MIKRO MK1 works in the same way as described above, with the exception
that the pads only use one color and only the currently selected element are lit up.
Editing and Clearing Parameter Automation in Control Mode
As with the other MASCHINE models you can also clear any session automation for each parameter you can control via Control Mode. Simply hold the CLEAR button (Page 3: Edit 1 Button F3) and press the corresponding pad that is assigned to a parameter as described before. If
an envelope exists for the highlighted clip, the automation will be removed. This table provides
an overview of the way the edit buttons work in control mode:
Ableton Live 9.1 MASCHINE Template - Manual - 89
Page 90

MASCHINE including MIKRO and STUDIO
Button Mod Action Destination
COPY (Duplicate) Duplicate Selected clip slot (if slot not empty).
Shift Duplicate Track Selected track.
PASTE (New) New Clip Selected clip slot (if slot is empty and
track is MIDI track).
Shift New MIDI Track insert new empty MIDI Track to right
of selected track.
NOTE (Double) Double Loop Selected clip slot (only if contains
MIDI clip).
Shift New Audio Track Insert new empty Audio Track to right
of selected track.
NUDGE (Clear Env) Clear all automation Selected clip slot (if slot not empty).
Shift New Return Track Create a new empty Return Track.
QUANTIZE Quantize Selected clip slot (if slot not empty).
Shift Quantize 50% Selected clip slot (if slot not empty).
Controller Pages
CLEAR + PAD Delete Delete automation for parameter
assigned to the pad.
Shift +
Delete all Notes in Clip.
Pad
3.4 Controller Pages
MASCHINE, MASCHINE MK2 and MASCHINE STUDIO have eight knobs and buttons that can
be used to control the mixer or any device, such as a synthesizer or effect, in Live. These controls are split between the different pages of the Live Template.
Most pages are assigned to mixer or device control. The pages assigned to mixer controls always coincide with the position of the four x four focus rectangle.
Ableton Live 9.1 MASCHINE Template - Manual - 90
Page 91

MASCHINE including MIKRO and STUDIO
Controller Pages
You can control up to eight strips simultaneously. If your focus rectangle is focused on tracks
1-4, then the knobs and buttons on PAGE 02 - VOL & ARM control the output volume and
track arming of tracks 1-8.
Controlling volumes on MASCHINE MK2 controller
Some pages of the templates have already been explained. This section will shortly explain the
remaining pages.
3.4.1 MASCHINE STUDIO Pages
On PAGE: 01, Buttons 1-4 are assigned to the stop buttons of the four tracks inside your focus
rectangle. The buttons above the right display (5-8) are used for arming tracks. The knobs below the left display (1-4) let you control the output volume of each track and Knobs 5-8 are
assigned to the pan pots of the four tracks inside your focus rectangle.
Ableton Live 9.1 MASCHINE Template - Manual - 91
Page 92

MASCHINE including MIKRO and STUDIO
Controller Pages
Page 01 on MASCHINE STUDIO controller
On PAGE: 02 you can access controls for arming tracks (Buttons 1-8) and for track volumes
(Buttons 1-8)
Page 02 on MASCHINE STUDIO controller
PAGE 03 is dedicated to track muting (Buttons 1-8) and panning (Knobs 1-8).
Ableton Live 9.1 MASCHINE Template - Manual - 92
Page 93

MASCHINE including MIKRO and STUDIO
Controller Pages
Page 03 on MASCHINE STUDIO controller
On PAGE 04, all Buttons (1-8) are assigned to the solo function of each track in Live. Knobs
1-8 are dedicated to the send volumes of each track. By default the send volumes of return
track A are controlled.
Page 04 on MASCHINE STUDIO controller
To access other send tracks, press the AUTO button repeatedly
►
Ableton Live's status bar displays the selected send track.
►
PAGE: 05 is dedicated to controlling Ableton Live's devices.
Ableton Live 9.1 MASCHINE Template - Manual - 93
Page 94

MASCHINE including MIKRO and STUDIO
Controller Pages
Page 05 on MASCHINE STUDIO controller
Use Button 3 (<<Track) and Button 4 (Track>>) to select the previous or next track.
►
Use Button 5 (<<Device) and Button 6 (Device>>) to navigate between devices within
►
the chain.
The first time you select a device, Knobs 1-8 are assigned to the first eight parameters of the
device. If a device has more than eight controllable parameters, these are split into banks of
eight.
Use Button 8 (Bank>>) to move to the next bank.
►
In order to return to the previous bank, press Button 7 (<<Bank).
►
Ableton Live's status bar displays the change:
→
Additionally, the name of the selected bank is displayed in the lower left text display segment
of MASCHINE STUDIO.
PAGE 06 is the NOTE Repeat Page and has been described in 5.3.5, Note Repeat .
PAGE: 07 is assigned to editing the selected clip in Live.
Ableton Live 9.1 MASCHINE Template - Manual - 94
Page 95

MASCHINE including MIKRO and STUDIO
Controller Pages
Page 07 on MASCHINE STUDIO controller
The Clip/Loop Page is always associated with the highlighted clip slot. If the slot contains a
clip you can use the knobs Loop Start, Loop End, Clip Start, Clip End to adjust the Loop and
Start/End markers of the clip. The new position of the loop or start/end points are displayed in
the lower left segment of the controller text display.
If the clip is an audio clip, you can use the Transpose, Detune and Gain encoders to adjust the
corresponding values of the audio clip.
The Loop button activates/deactivates looping. The Warp button activates/deactivates warping.
This only works for audio clips.
With the Loop Inc. button you can set the division by which the Loop/Markers are modified by
the corresponding knobs. The new value is shown in the controller’s display.
If the Fixate Loop button is active, adjusting the start point of the loop will automatically move
the loop endpoint thus preserving the current loop length. It will also keep the start and end
markers set to the same position as the corresponding loop points.
PAGE 8 contains the Settings Page which has been discussed at length in 3.6.2, Settings Page
PAGE 9 controls the crossfader and some general transport controls in Live. Additionally, Knobs
5-8 are assigned to the volumes of the tracks the current focus rectangle.
Ableton Live 9.1 MASCHINE Template - Manual - 95
Page 96

Page 9 on MASCHINE STUDIO controller
PAGE 10 contains knobs and buttons with unassigned CCs.
MASCHINE including MIKRO and STUDIO
Controller Pages
Page 10 on MASCHINE STUDIO controller
Use these together with Ableton Live's MIDI learn function to freely assign the controls to
►
any parameter in Live.
3.4.2 MASCHINE MK2 Pages
On PAGE 01, Buttons 1-4 are assigned to the stop buttons of the four tracks currently inside
your focus rectangle. The buttons above the right display (5-8) are used for arming tracks. The
knobs below the left display (1-4) let you control each track's output volume and Knobs 5-8
are assigned to the pan pots of the four tracks inside your focus rectangle.
Ableton Live 9.1 MASCHINE Template - Manual - 96
Page 97

MASCHINE including MIKRO and STUDIO
Controller Pages
Page 01 on MASCHINE MK2 controller
On PAGE 02 all buttons are dedicated to arming tracks and all knobs to the tracks' output volumes.
Page 02 on MASCHINE MK2 controller
PAGE 03 is dedicated to track muting (Buttons 1-8) and panning (Knobs 1-8).
Page 03 on MASCHINE MK2 controller
On PAGE: 04, all Buttons (1-8) are assigned to the solo function of each track in Live. Knobs
1-8 are dedicated to the send volumes of each track. By default the send volumes of return
track A are controlled.
Page 04 on MASCHINE MK2 controller
To access other send tracks, press the AUTO WR. button repeatedly.
►
Page 05 gives you control over different and four configurable note repeat values.
Ableton Live 9.1 MASCHINE Template - Manual - 97
Page 98

MASCHINE including MIKRO and STUDIO
Page 05 on MASCHINE MK2 controller
For more details on note repeat, see 5.3.6, Note Repeat MASCHINE and MASCHINE MK2.
For convenience the four encoders are assigned to the current Live device.
PAGE 06 is dedicated to controlling Ableton Live's devices:
Page 06 on MASCHINE MK2 controller
Button 1(ON-OFF) activates or deactivates the currently selected device in the device chain.
Use Button 3 (<<TRCK) and Button 4 (TRCK>>) to select the previous or next track.
►
Controller Pages
The first time you select a device, Knobs 1-8 are assigned to the first eight parameters of the
device. If a device has more than eight controllable parameters, these are split into banks of
eight.
Use Button 7 (BNK>>) to move to the next bank.
►
In order to return to the previous bank, press Button 8 (<<BNK).
►
Ableton Live's status bar displays the change:
→
Additionally the name of the selected bank is displayed in the lower left text display segment
of MASCHINE MK2.
Page 07 contains basic editing function already discussed in ↑3.2.4, Controls and Navigation
with MASCHINE , ↑3.2.4, Controls and Navigation with MASCHINE .
Ableton Live 9.1 MASCHINE Template - Manual - 98
Page 99

MASCHINE including MIKRO and STUDIO
Controller Pages
Page 07 on MASCHINE MK2 controller
This Page has no Clear Button since the Clear function is assigned to the SAMPLING button.
Additionally this page contains eight encoders and two buttons dedicated to editing the selected clip in Live.
The Clip/Loop Page is always associated with the highlighted clip slot. If the slot contains a
clip you can use the knobs LP START, LP END, CLP START, CLP END to adjust the Loop and
Start/End markers of the clip. The new position of the loop or start/end points are displayed in
the lower left segment of the controller text display.
If the clip is an audio clip, you can use the TRANPO., DETUNE and GAIN knob to adjust the
corresponding values of the audio clip. The LOOP button activates/deactivates looping. The
WARP button activates/deactivates warping, which only works for audio clips.
With the LOOPINC button you can set the division by which the Loop/Markers are modified by
the corresponding knobs. The new value is shown in Ableton Live's status bar and in the left
lower section of MASCHINE MK2's text display area.
If the FIXLOOP button is active, adjusting the start point of the loop will automatically move
the loop endpoint thus preserving the current loop length. It will also keep the start and end
markers set to the same position as the corresponding loop points.
Page 08 :This page contains the Settings buttons which have been discussed at length in
3.6.2, Settings Page.
Page 08 on MASCHINE MK2 controller
PAGE 09 controls the crossfader and some general transport controls in Live. Additionally,
Knobs 5-8 are assigned to the volumes of the tracks the current focus rectangle.
Ableton Live 9.1 MASCHINE Template - Manual - 99
Page 100

MASCHINE including MIKRO and STUDIO
Controller Pages
Page 09 on MASCHINE MK2 controller
PAGE 10 contains a set of freely assignable MIDI CCs. Assign them as you like to any parameter
in Live. Knob 1 is however assigned to Program Change.
Page 10 on MASCHINE MK2 controller
Buttons (1) and (2) have been assigned to work as a sustain pedals. Otherwise feel free to customize this page, but make sure you don’t use MIDI channels below channel 5.
3.4.3 MASCHINE MK1 Pages
On PAGE 01, Buttons 1-4 are assigned to the stop buttons of the four tracks currently inside
your focus rectangle. The buttons above the right display (5-8) are used for arming tracks. The
knobs below the left display (1-4) let you control each track's output volume and Knobs 5-8
are assigned to the pan pots of the four tracks inside your focus rectangle.
Page 01 on MASCHINE controller
On PAGE 02, all buttons are assigned to selecting tracks. Knobs 1-4 are used to control the
output volume of each track currently inside the focus rectangle. Knobs 5-8 control the tracks
send volumes.
Ableton Live 9.1 MASCHINE Template - Manual - 100
 Loading...