

Page 1

BATTERY 3
Operation Manual
Page 2

The information in this document is subject to change without notice and does
not represent a commitment on the part of NATIVE INSTRUMENTS GmbH. The
software described by this document is subject to a License Agreement and may not
be copied to other media. No part of this publication may be copied, reproduced or
otherwise transmitted or recorded, for any purpose, without prior written permission
by NATIVE INSTRUMENTS GmbH, hereinafter referred to as NATIVE INSTRUMENTS.
All product and company names are trademarks of their respective owners.
Furthermore, the fact that you are reading this text means you are the owner of
legal version rather than an illegal, pirated copy. It is only through the loyalty and
honesty of people like yourself that NATIVE INSTRUMENTS GmbH can continue
to develop and create innovative audio software. On behalf of the entire company,
thank you very much.
Users Guide written by Craig Anderton, Cliff Douse
Special thanks to the Beta Test Team, who were invaluable not just in tracking down
bugs, but in making this a better product.
© NATIVE INSTRUMENTS GmbH, 2006. All rights reserved.
Germany USA
NATIVE INSTRUMENTS GmbH NATIVE INSTRUMENTS North America, Inc.
Schlesische Str. 28-30 5631 A Hollywood Boulevard
D-10997 Berlin Los Angeles, CA 90028
Germany USA
info@native-instruments.de info@native-instruments.com
www.native-instruments.de www.native-instruments.com
Page 3

Table Of Contents
The BATTERY 3 Interface ................................................................... 5
Master Section ................................................................................ 5
Drum/Sample Matrix ........................................................................ 5
The Edit Pane ................................................................................. 6
The Master Section ............................................................................ 7
File Menu: Loading Kits and Sounds .................................................. 7
Loading Dialogue ...........................................................................10
Options .........................................................................................11
Edit Menu: Modify the Cells ............................................................13
View Menu: Alter the Workspace ......................................................16
Automation Page ............................................................................17
Library “Fast Find” .........................................................................19
Master Volume Control ....................................................................19
Output Meter .................................................................................19
Panic! Button ................................................................................19
Data Fields ................................................................................... 20
The Drum/Sample Matrix ...................................................................21
Cell Contents .................................................................................21
Auditioning Cells ............................................................................21
Get Cell Info ................................................................................. 22
Copying and Moving Cells ............................................................... 22
Cell Solo and Mute ........................................................................ 23
Selecting and Editing Cells ............................................................. 23
Selecting Cells ...............................................................................24
Freeze and Padlock .......................................................................25
The Edit Pane.................................................................................. 26
Edit Pane Overview........................................................................ 26
Cell View Tab ................................................................................ 28
Setup Tab..................................................................................... 33
Mapping View Tab ......................................................................... 43
Wave Editor ...................................................................................49
Loop View Tab ...............................................................................51
Modulation View Tab ...................................................................... 53
Effects View Tab ............................................................................57
Browser View Tab ...........................................................................72
Tips and Techniques .........................................................................76
Drum Pitch Tuning .........................................................................76
Tweaking the Drum Mix .................................................................. 77
BATTERY 3 – 3
Page 4

Filter Modulation ............................................................................78
Multiple-Cycle Looping = Long Sustain .............................................78
Innite-Cycle Looping = Innite Sustain ............................................78
Click Layering ................................................................................79
MIDI Timing Tweaks .......................................................................79
Why Randomization is Not the Answer ............................................. 80
Why Quantization is Not the Answer either ........................................81
Tempo Track Timing Tweaks ............................................................81
Battery 3 Library.............................................................................. 82
Introduction .................................................................................. 82
Overview ...................................................................................... 83
Battery 3 Video Tutorials ................................................................... 85
Index .............................................................................................. 86
4 – BATTERY 3
Page 5
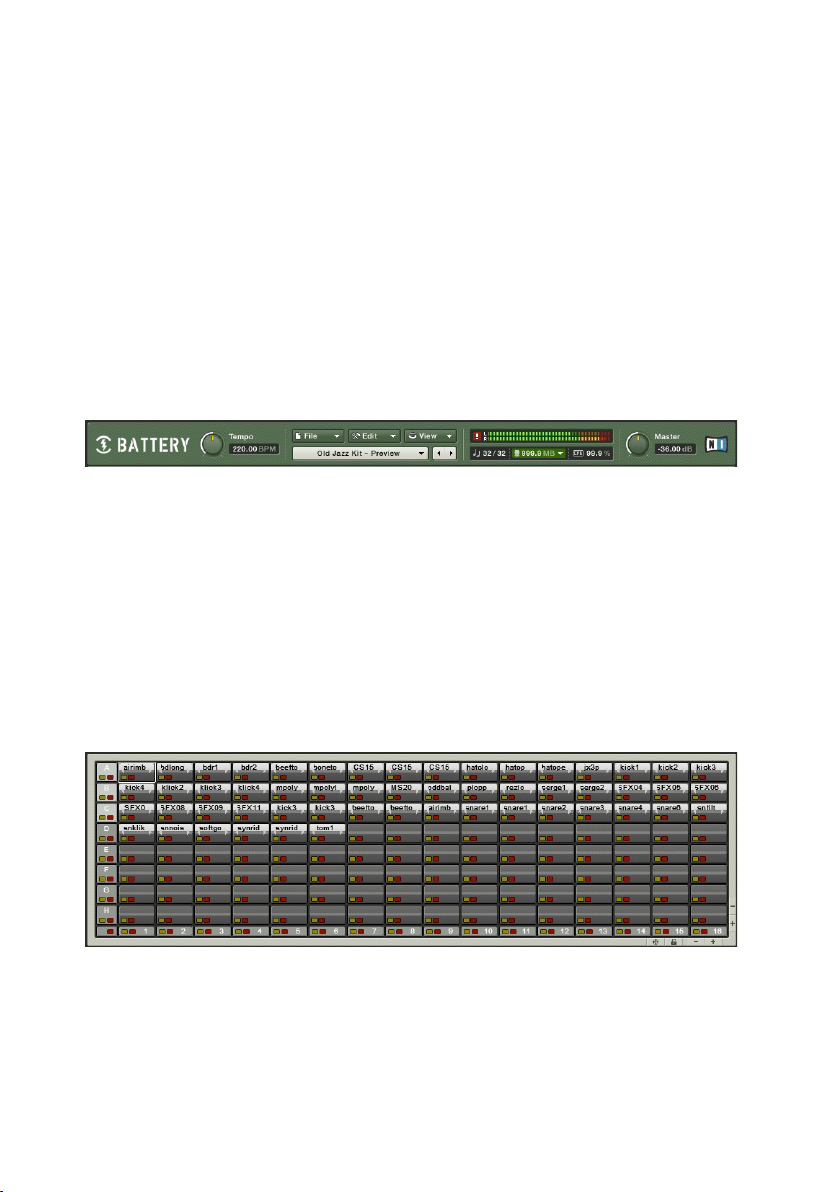
The BATTERY 3 Interface
BATTERY 3’s interface is intuitive and exible. You can view the entire interface
or hide areas that aren’t of interest to save screen space. BATTERY 3 also
lets you select different elements of the interface in different ways, so you
can use an approach that’s most comfortable for you.
Although it’s possible to use BATTERY 3’s interface entirely in its default
mode, you may want to acquaint yourself with the customizable options so
that you can optimize your workow based on your needs.
The interface is divided into three main sections:
Master Section
The Master Section has drop-down menus for File, Edit, and View functions, and another one
for selecting kits.
This is where you manage and import drum kits, perform basic editing
operations, check and adjust master levels, choose different interface views,
set the size of the drum/sample matrix, set the tempo for imported REX/
Apple/ACID loops (in stand-alone mode) and see information on polyphony, kit
size, and the master level setting. Think of it as BATTERY 3’s main “control
panel.”
Drum/Sample Matrix
This shows a 16x8 drum/sample matrix — the maximum number of cells possible in BATTERY 3.
The Drum/Sample Matrix consists of a number of rows and columns. At the
intersection of each row and column is a Cell, which represents a particular
“drum” (or other sound – some people use BATTERY 3 to play back sound
effects or even bass lines).
BATTERY 3 – 5
Page 6
Each Cell can contain up to 128 samples. If the Cell contains multiple samples,
they can be layered and/or velocity-switched (e.g., different velocity levels can
trigger different drum samples to give realistic dynamics or special effects).
The matrix can contain up to 128 Cells, viewable as 4-16 columns wide. You
can add or delete rows as desired so that the matrix doesn’t take up more
space than needed.
One reason for setting up Cells as rows and columns is that this allows for
powerful Mute, Solo, Copy, Paste and Delete options. For example, not only can
you mute and solo individual Cells, but also individual rows and/or columns.
You can organize 12 percussion instruments as one row in a matrix that’s 12
columns wide; to hear just that percussion, you would solo just that row. Or
you could mute just the percussion and listen to everything else, and so on.
The Edit Pane
Note the small triangle in the upper right corner. This is a shortcut to show/hide the Edit Pane.
The function key F2 will also perform the same action.
The Edit Pane works on the Cell level, just as the Master Section works on a
‘global’ level and the Drum Matrix works on a kit level. The Edit Pane is where
you can map samples within a cell, add expressive signal processing such
as modulation, ltering and dynamics, set up loop points for a sample, alter
pitch, assign outputs, and much more. It is your key to drum kit customization
and personalization.
The next few sections cover each element in detail.
6 – BATTERY 3
Page 7
The Master Section
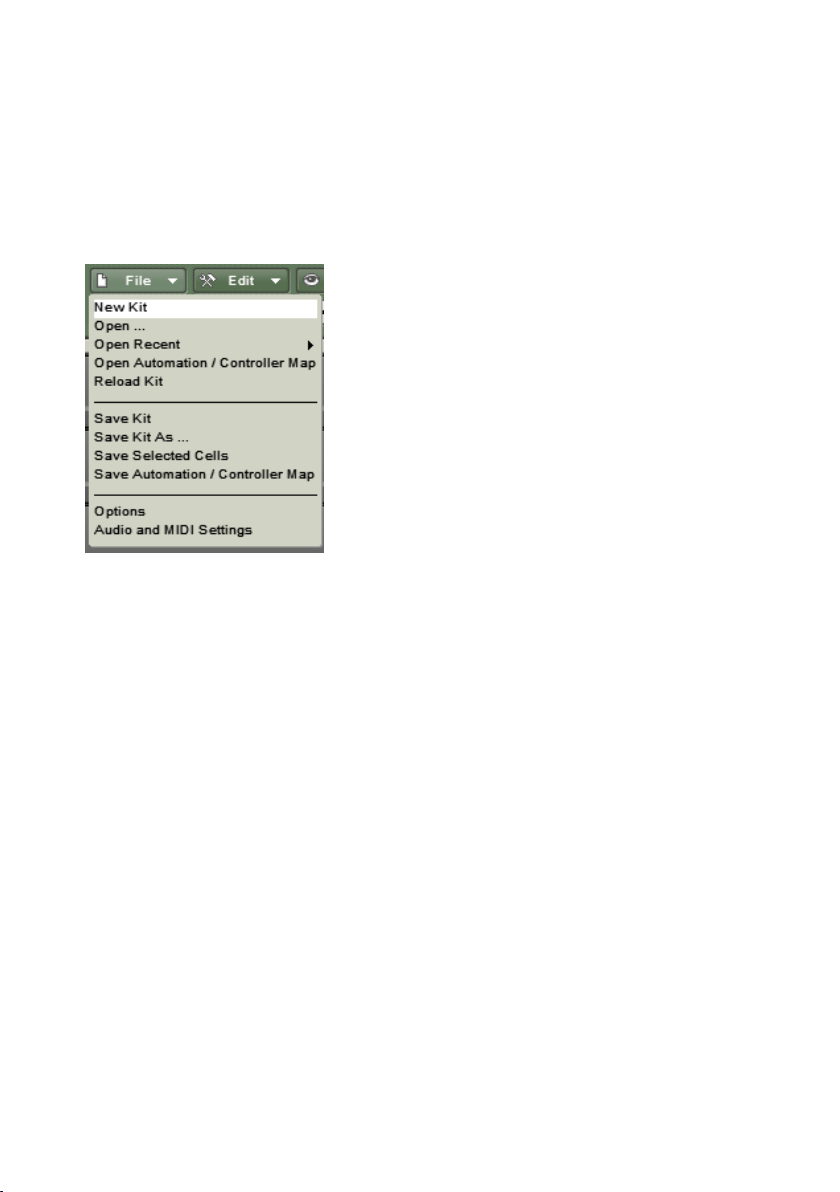
File Menu: Loading Kits and Sounds
There are several ways to load complete kits and individual sounds into
BATTERY 3. We’ll start with the File Menu.
There are two ways to call up the File Menu: From the Menu bar (stand-alone mode only) or from
the File button within the program itself.
Here are the functions available via the File menu. When you access them
from the Menu bar, you can also see the keyboard equivalents for calling up
some of the functions in stand-alone mode:
New Kit (PC: Ctrl+N/ MAC: Apple+N)
Open (PC: Ctrl+O / MAC: Apple+O)
Open Recent kits
Reload Kit
Save Kit (PC: Ctrl+S / MAC: Apple+S)
Save Kit As… (PC: Ctrl+Shift+S / MAC: Apple+Shift+S)
Save Selected Cells
Save Automation/Controller Map
Options
Audio and MIDI Settings
Exit
BATTERY 3 – 7
Page 8

New Kit
Use this when you want to create a new, blank kit. The Cells in the new
kit will have no contents and they will use BATTERY 3’s default parameter
settings.
Open
When selected, a le selection box appears that recognizes all le types
supported by BATTERY 3. This is a somewhat “intelligent” function. For
example, if you load a kit, it will replace the existing kit with a new kit (and
ask you rst if this is what you want to do).
If you load a Sound Font le (which will probably contain multiple samples),
your current kit will be replaced and the various samples will be mapped in
cells from left to right beginning with row A.
On the other hand if you have selected a single Cell and choose a WAV or AIF
le, it will load into only that Cell. If you Ctrl-click on several WAV or AIF les,
it will load all of them, starting at the currently selected Cell.
The bottom line is that BATTERY 3 makes it easy to load/import a variety of
sounds or kits in a very exible way. Supported le types are:
Kontakt Instruments (*.nki)
Cells (*.cel)
Battery 1 kits (*.kit)
Battery 2 kits (*.kt2)
Battery 3 kits (*.kt3)
Wave audio (*.wav)
AIF audio (*.aif, *.aiff)
MPC samples (*.snd)
MPC Program (*.pgm)
HALion (*.fxp).
Samplecell (*.bnk)
LM4 (*.txt)
SF2 (Sound Font) container (*.sf2)
Gigasampler container (*.gig)
REX les (*.rex)
REX2 les (*.rx2)
Sound Designer II (SD2) les (*.sd2)
8 – BATTERY 3
Page 9

ACID (*.wav)
Apple Loops
AKAI S1000/S3000/S5000/S6000
Beatcreator (*.zgr)
Reaktor (*.map)
EXS24 (*.exs)
Open Recent Kits
This displays a list of your most recently used kits. It’s like a “favorites”
function, as you can return quickly to a kit used in a recent project.
Open Automation/Controller Map
Use this to open Automation/Controller Map settings you have created for
BATTERY 3 kits.
Reload Kit
Allows you to reload an unedited version of your selected kit.
Save
This saves the current kit and overwrites the kit’s previously saved version. If
you Save a kit that has never been saved before, it will be treated the same
way as the “Save As…” option described next.
Save As…
This saves the kit, but presents the option to specify a different le name and
location. Furthermore, there are saving options:
Patch Only. This option saves Kit and Cell settings along with pointers to
where samples reside on your hard disk. It references samples, but does not
include them in the le, thus producing a smaller le size than if the samples
were included. Checking Absolute Sample Paths forces BATTERY 3 to look in
a specic path to nd the associated samples.
Patch and Samples. Here you can choose a directory into which the samples
will be saved. This is a good Save As… choice if you want a “transportable”
patch, for example, when collaborating with another musician. Send the
musician the patch and directory containing the samples, and it will be possible
to reproduce exactly the kit and sounds you used.
BATTERY 3 – 9
Page 10
The default Save As... option is Patch and Samples since this continues to be
the surest way that you will always be able to load your kits and as quickly as
possible, because they are saved all in one folder. If your kits are built with
samples from multiple folders, then it is best to use Absolute Sample Paths.
However, please be aware that renaming folders or moving them may result
in having to relocate the used samples. In this case, please nd them and
then resave your kit.
Save Selected Cells
You can save one or more Cells as a .cel le. This function allows you to name
the .cel le and choose its location. Hold down the shift or ctrl/ key and make
your selection. When nished, use this function to save them as a .cel le.
Revert to Saved
When creating kits, it’s a good idea to Save frequently (as described later) in
case you “over-edit” and wish you had stayed with a previous version. This
function returns the current kit to its last saved state.
Save Automation/Controller map
You can use this to save your Automation and Controller settings for a loaded
kit.
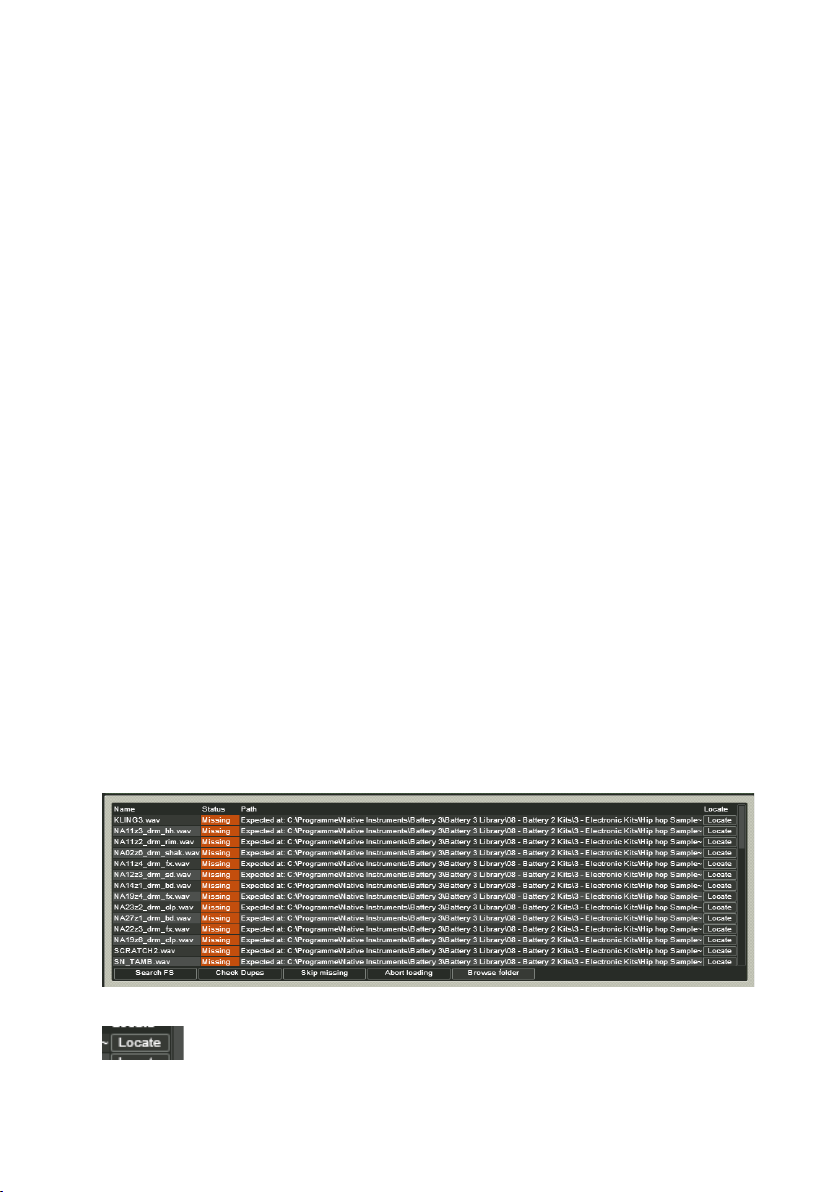
Loading Dialogue
The loading dialogue appears when you load kits in Battery 3. It shows the
le name and the le path (optional) within the loading window.
If samples are not found, you will see details about them in the following
window:
The following options are available:
10 – BATTERY 3
Page 11
Locate: Click on the Locate button next to a missing sample to locate the
sample.
Search File System (FS): Initiates an intelligent search process on your local
le system starting in your battery folder and continuing in a recursive way.
Check Dupes: Allows you to check for duplicates of a sample to ensure you
have the correct lepath.
Skip Missing: Skips the search and displays only the samples that have been
found when the dialogue appears.
Abort Loading: Stops the loading process and returns to the previous battery
status.
Browse Folder: Lets you select a folder to locate any missing samples.
Options
The Options menu lets you specify various essential default settings for
BATTERY 3:
Key follow: Selects the Cell(s) for editing when a key input is received from
your MIDI keyboard. Multiple held keys select multiple Cells. The selection is
renewed after all the keys are released and new notes are received.
Show Cell Info Window on Mouseover: Displays an Info message when you
move your mouse cursor over a Cell.
Warning on Delete Cells: Displays a warning message before you delete
Cells.
Warning on Delete Rows/Columns: Displays a warning message before you
delete a row or column.
Use Computer Keyboard for Playback: This lets you use your computer keyboard
to trigger BATTERY 3. You can also edit the velocity value that a key will
trigger.
BATTERY 3 – 11
Page 12

Trigger cell on Click: Plays samples when you click on a Cell.
Trigger cell on Cursor: Selecting a different Cell via cursor keys triggers the
Cell.
Click/Key Trigger Velocity: Plays the velocity layer’s audio when selecting it
in the Matrix.
Transpose MIDI In (Octave): Transposes the MIDI input in octaves. Use the ‘+’
button to transpose up and the ‘–‘ button to transpose down.
Transpose Comp. Keyboard (Octave): Transposes the computer keyboard input
in octaves. Use the ‘+’ button to transpose up and the ‘–‘ button to transpose
down.
Auto Refresh Browser: The Browser refreshes automatically so that new le
names and position alterations are clearly visible.
Hide Known File Extensions: File extensions of the letypes that are supported
by BATTERY 3 are hidden.
Show Full Filepath while Loading: Displays the full le path of a kit as it is
being loaded.
Load Multiple Samples into One Cell: Allows you to load multiple samples into
one Cell.
Load REX/ REX2 Without original Loop: Load slices only.
Convolution Reverb Sample Rate: Sets the sample rate of BATTERY 3’s
convolution reverb.
Convolution Reverb Latency: Sets the latency of BATTERY 3’s convolution
reverb in milliseconds.
RAM for DFD: Adjusts the amount of RAM to dedicate to the DFD process.
Although samples stream from disk, it is necessary to store attacks in RAM
so they are available instantly upon playback. If DFD isn’t working properly,
try allocating more RAM to this function.
Number of DFD Voices: Maximum number of stereo DFD voices the user will
be able to play.
Override Instruments Preload Size: Ratio of the samples that will be loaded
into RAM.
Total Stereo Outputs Count: Determines the number of Stereo Outputs to be
used by BATTERY 3.
Total Mono Outputs Count: Determines the number of Mono Outputs to be
used by BATTERY 3.
12 – BATTERY 3
Page 13

Default Kit Location: If you have a favorite kit and would like it to load
automatically every time you launch Battery 3, click the Set button and select
the path to your kit. Clicking the Clear button deletes this setting so Battery
can be launched later without loading your kits.
Factory Content Path: Setting this directory allows quick access to the BATTERY
3 library from the “fast nd” drop-down menu.
Audio and MIDI Settings
This brings up the dialog boxes for stand-alone mode where you can change
SoundCard drivers, Routing, and MIDI assignments, as described earlier.
Exit/Quit
This closes BATTERY 3, and asks if you want to save your work before
quitting.
Edit Menu: Modify the Cells
As with the File Menu, you can call up the Edit Menu from the menu bar (stand-alone mode only)
or from within the program itself.
When you access these functions from the menu bar’s Edit menu, you can
also see the keyboard equivalents for calling up the following functions:
Cut (PC: Ctrl+X / MAC: Apple+X)
Copy (PC: Ctrl+C / MAC: Apple+C)
BATTERY 3 – 13
Page 14

Paste (PC: Ctrl+V / MAC: Apple+V)
Delete (PC and MAC: Del)
Select All Cells (PC: Ctrl+A / MAC: Apple+A)
Exchange Cells (PC: Ctrl+E / MAC: Apple+E)
Randomize (PC: Ctrl+R / MAC: Apple+R)
Cut
Cuts the selected Cell(s).
Copy
Copies the selected Cell(s).
Paste
Pastes cell(s) into the drum / sample matrix. If multiple Cells were copied,
they will paste starting at the selected Cell.
Delete
Deletes all selected Cells. Note: In the section on the drum/sample matrix,
we will cover the various ways to select multiple Cells and groups of Cells for
Copy, Paste, and Delete operations.
Select All Cells
Selects all of Battery 3’s Cells.
Cell color
Can be used to set the color of selected Cells.
Exchange Cells
If two Cells are selected, this function switches them. For example, if the rst
Cell in Row A and the second Cell in Row B are selected, choosing Swap will
place the contents of the rst Cell in Row A into the second Cell in Row B,
and the contents of the second Cell in Row B into the rst Cell in Row A.
If multiple Cells are selected, then all will be swapped based on the number
of Cells selected and the order in which they were selected. For example, if
the rst ve cells of a row are called A, B, C, D, and E, you select them in
that order, and then choose Swap, the new order will be E, D, C, B, A.
14 – BATTERY 3
Page 15

Randomize Cells
This places Cells at random locations within the drum matrix. Try this if you’re
getting into a creative rut and want to shake things up a bit!
Important: Consider saving your kit before using Randomize so that you
can “Revert to Saved” if desired.
Lock All Cells
Locks all selected Cells so that their contents and parameter settings cannot
be changed.
Matrix Size
Sets the size of the Drum Matrix. You can customize the Matrix size to show
4 x 4, 8 x 4, 9 x 6, 12 x 6, 16 x 8 Cells. You can also adjust the number
of rows and columns by clicking the ‘+’ and ‘-‘ buttons at the bottom right
corner of the Matrix.
Add Row
Adds a horizontal Cell row to the Matrix.
Delete Row
Deletes a horizontal Cell row from the Matrix.
Add Column
Adds a vertical Cell column to the Matrix.
Delete Column
Deletes a vertical Cell column from the Matrix.
BATTERY 3 – 15
Page 16
View Menu: Alter the Workspace
You can use the View Menu shortcuts to make quick window selections in the Edit area:
The View Menu gives shortcuts to all of these Edit windows:
Browser (F1)
Cell Page (F2)
Setup Page (F3)
Mapping Page (F4)
Wave Page (F5)
Loop Page (F6)
Modulation (F7)
Cell Effects Page (F8)
Master Effects (F9)
Automation Page (F10)
Hide Edit area (Page Up)
Hide Drum Matrix (Page Up twice)
Show Matrix/Edit Page (Page Down once or twice)
16 – BATTERY 3
Page 17
Automation Page
Please note: In plugin mode you have one table for midi cc controllers
and one for host automation. You can change between them by clicking
on the Midi CC/ Host Tab.
Just drag and drop the Midi CC number to the knob you want to automate. You
can automate multiple parameters by dragging and dropping the same Midi
CC number to another parameter on the Battery interface. The automatable
parameters are marked with an hand-symbol during the dropping process.
The next controller appears then automatically in the list after a parameter
has been allocated.
Here is a detailed description of the visible columns:
Column CC
Displays the Midi CC number.
You can the change the midi controller itself by clicking and moving the mouse
on the number.
BATTERY 3 – 17
Page 18

Column Midi Label
Displays the name of the Midi controller
Column Cell
Displays the name of the affected cell
Column Parameter Name
Displays the allocated parameter.
Column From/ To
Here you can adjust the range of the knob you want to be affected by the
Midi controller.
Column Soft
Incoming MIDI data is “quantized” to 128 divisions. Sweeping some parameters
with this quantized signal produces a “stair-step” or “zipper” effect. The
Smoothing parameter smoothes the incoming MIDI data by creating a ramp
between values rather than a sudden jump. However, note that higher smoothing
values also make the control less responsive.
Column Learn
By pressing learn and moving a knob on your Midi-Keyboard you can allocate
the assigned
Midi controller in the list directly to this knob.
Column Reset
By pressing the „X“ sign in the appropriate list-entry the assigned parameters
are deleted beginning with the parameter you added lastly.
18 – BATTERY 3
Page 19
Library “Fast Find”
You can step through kits rapidly with the left and right arrows, as well as select kits from within
the BATTERY 3 Library folder.
The Library Fast Find section under the File, Edit, and View menus browses
the kits located in the BATTERY 3 Library folder. Click on the name for a
drop-down menu of kits within the Library. You can also load the next kit in
the Library by clicking on the (+) button, or the previous kit by clicking on
the (–) button.
Master Volume Control
The Master Volume control and associated display eld allow for precise level setting, whether
in stand-alone mode or used with a host.
The Master Section volume control sets the overall level for all outputs used by
the kit. The display eld to the left of the control provides a precise numeric
readout of the control’s setting. This is handy if, for example, the mixer in your
host shows that BATTERY 3 is overloading a mixer channel by 0.6dB, even
though BATTERY 3’s level is set to 0.0dB. You can then use this information
to reduce BATTERY 3’s level control to -0.7dB, thus insuring the host mixer
will not distort.
Output Meter
The output meter shows the total level of the signals being produced by
BATTERY 3. To avoid distortion, avoid having the meters go into the red.
Panic! Button
The red exclamation mark to the left of the output meters is there for those
moments when things get a bit hectic. This cuts off all playing notes.
BATTERY 3 – 19
Page 20

Data Fields
Use the data elds to check polyphony, the amount of memory required by the current kit, and
the master volume level.
The data eld to the right shows the CPU usage. The data eld to the left
indicates the amount of polyphony being used. For example, if it shows 4/32,
then four out of 32 voices are being used. The voice led is editable. Click
and enter the maximum polyphony by hand or drag the mouse up or down.
The middle eld shows how much memory the kit requires.
Purge
Purge analyzes which samples are being used in an arrangement, and removes
from RAM any samples that aren’t being used. Thus, BATTERY 3 can handle
huge amounts of samples while exhibiting very low RAM usage. Purge is
handy if you’ve nished a part; you can purge samples for that kit alone, thus
freeing up RAM for additional overdubs. If you click on the downward arrow
to the right of the kit memory size display you will be presented with access
to the following functions:
Reset Markers: Deletes all ’tags’ that mark samples as used.
Update Sample Pool: Unloads unused samples from RAM, and loads newly
marked samples in RAM.
Purge All Samples: Unloads all samples from RAM.
Reload All Samples: Reloads all samples used in a kit. A display for the
instrument shows Purge status.
20 – BATTERY 3
Page 21

The Drum/Sample Matrix
The Drum/Sample Matrix is where you assign samples to Cells, check info
about Cells, mute and solo layers (rows and columns) of Cells, and copy/paste/
delete individual Cells or groups of Cells. More detailed Cell editing occurs
in the section Edit Pane.
Loading a kit loads samples into the matrix’s Cells, and sets any Cell-related
parameters to the same values as when the kit was saved.
Various View commands let you modify the Drum/Sample Matrix by adding
or deleting rows, and changing the number of columns in the matrix. These
functions were described in the previous section, and can be accessed from
the View menu in the Master Section (as well as from the View menu option
on the menu bar when in stand-alone mode).
Cell Contents
Each Cell contains up to 128 samples (layered and/or velocity-split) and a
set of parameters that affect the sound. These include key range (the range
of notes to which the sound will respond), volume, pan, tuning, compression,
modulation, etc. Although BATTERY 3 is a drum sampler, you can of course
load any sample into a Cell – background vocals, sound effects, phrases,
scratches, notes, whatever.
Auditioning Cells
To hear what’s in a Cell, click on it with the mouse, or feed it a MIDI signal
that triggers the Cell (as specied in the Edit Pane). When BATTERY 3 receives
MIDI from a sequencer or other MIDI device, cells that are sounding have a
blue “backlight.”
BATTERY 3 – 21
Page 22

Get Cell Info
Holding your cursor over a Cell reveals info concerning several parameters.
To see several crucial Cell parameter values (Name, Key Range, Root Key,
Volume, Pan, and Tune) at a glance, hold your mouse’s cursor anywhere over
the Cell for about half a second. Active functions (i.e. loop, compressor,
lter) will also be shown in this list. This is for informational purposes only;
you cannot edit these parameters from this particular view. This hint can be
deactivated in Options.
Copying and Moving Cells
Cell contents are freely movable among Cells. For example, suppose you
have a great snare drum, but it sounds too mechanical when you trigger it
repeatedly. You can copy the Cell contents to another Cell, make a few small
changes to the copy (e.g., a slight pitch change), then alternate hits between
the two Cells. This gives a more “humanized” effect.
Following are the procedures for manipulating Cell contents.
If you move a source Cell to a non-empty destination Cell, then the destination
Cell’s contents will replace the source Cell’s contents – in other words, an
automatic swap function. If you move a source Cell to an empty destination
cell, then the source Cell becomes empty after the move is complete.
Move Cells (default): Click on the source Cell you want to move, and drag it
to the destination Cell. The destination cell’s key range will be used. Moving
a cell to an occupied cell will swap them.
Move a Cell with key range to another Cell: Alt+drag (PC); Apple+drag (Mac)
on the source Cell you want to move, and drag it to the destination Cell. This
moves the cell, the key range and root key.
Copy a Cell to another Cell: Ctrl+drag (PC); Alt+drag (Mac) on the source Cell
you want to copy, and drag it to the destination Cell. The destination cell’s
key range will be used.
22 – BATTERY 3
Page 23
Copy a Cell with key range to another Cell: Alt+Ctrl+drag (PC); Apple+Alt+drag
(Mac) on the source Cell you want to copy, and drag it to the destination Cell.
This copies the cell, the key range and root key.
You can access several more Cell-related functions by right-clicking (or Ctrlclicking for Mac) on the Cell. See the section “Right-Click Cell Edits”.
Cell Solo and Mute
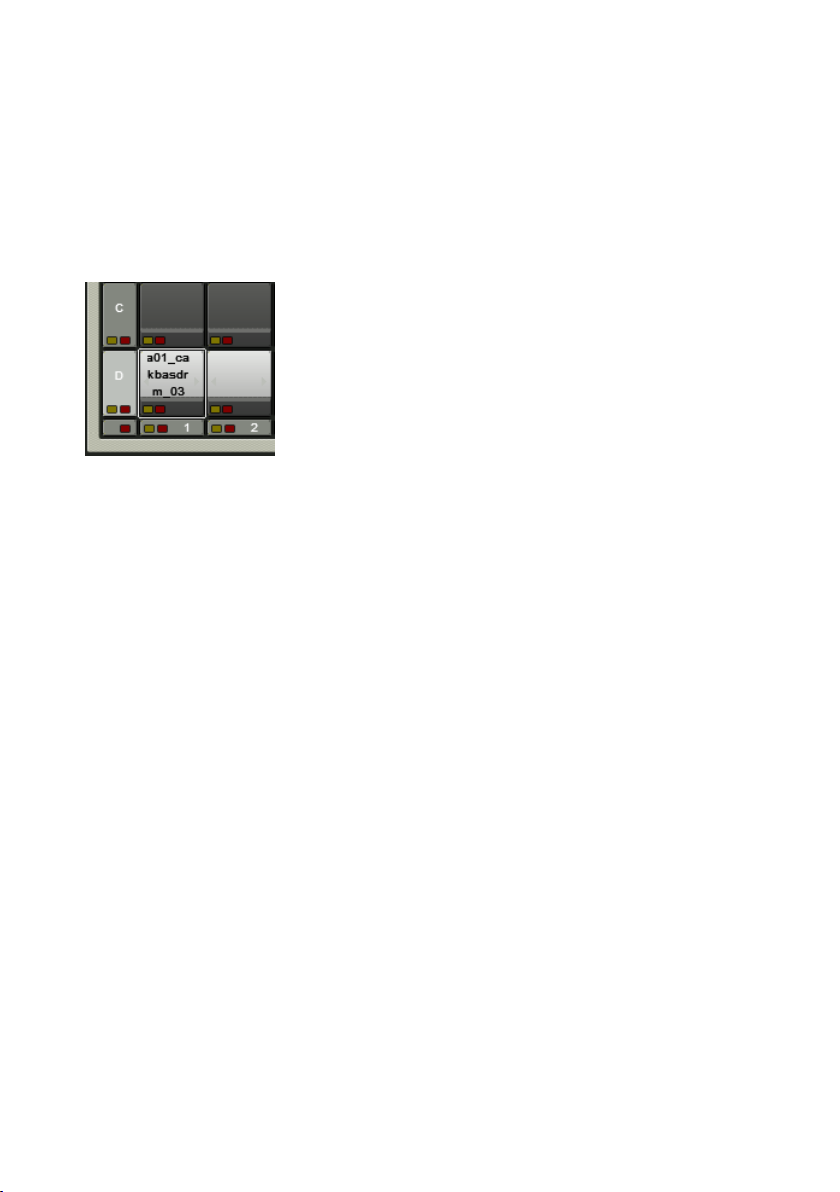
Each row, column, and Cell has a solo and mute button.
Each Cell, row, and column has two LEDs – yellow (solo) and red (mute).
• Click on the red LED to mute the Cell, row, or column. Click on it again
to unmute.
• Click on the yellow LED to solo the Cell, row, or column. Click on it
again to cancel.
The solo function is additive (not a “radio button”-type function): You can
solo multiple Cells, rows, and columns. Solos can also be combined; for
example, solo a row and a column. If all Cells in a row or column are muted
or soloed, the row’s or column’s mute or solo LED will be lit. If a column or
row contains a combination of soloed and muted Cells, then it will have no
lit row or column LEDs.
Selecting and Editing Cells
Parameter-related editing operations (modulation, pan, tuning, etc.) affect
ALL SELECTED Cells. For example, if you select an entire row of Cells and
change tuning, all Cells within that row will have their tuning changed. As a
result, BATTERY 3 includes exible ways to select anything from a single Cell
to various groups of Cells.
BATTERY 3 – 23
Page 24
Selecting Cells
Select any arbitrary collection of Cells by Shift-clicking on them:
Select an individual Cell: Click on it.
Select discontiguous Cells: Ctrl-click (PC) / Apple-click (Mac) on the Cells to
be selected.
Select continuous cells (not a row/column): Shift-click the rst and last cell
in the range.
Select a row of Cells: Click on one of the row letters to the left of the matrix
(A, B, C, etc.).
Select a column of Cells: Click on one of the column numbers on the bottom
on of the matrix (1, 2, 3, etc.).
Shift- or Ctrl-clicking applies to rows and columns as well as individual Cells.
For example, if you Shift-click on rows A and C, all the Cells in both rows will
be selected. If you Shift-click on row C and column 3, all the Cells in row C
and column 3 will be selected.
Context Menu - Right-click Cell Edits
Powerful Cell edit functions are only a click away.
Right-clicking (Mac: Ctrl-clicking) on a Cell offers several editing functions:
Load Previous Cell/Sample: With multi-sampled sounds, samples are often saved
in a folder and named so they can be differentiated easily (e.g., KickLowVel,
KickMedVel, KickHiVel). Selecting this option loads the previous sample in
the series compared to the existing sample within the Cell.
Load Next Cell/Sample: This is similar to Load Previous Sample, but loads the
next sample in the series compared to any existing sample within the Cell.
The same loading functions are available as + and - in the Cell tab view. There
it is called sample.
24 – BATTERY 3
Page 25

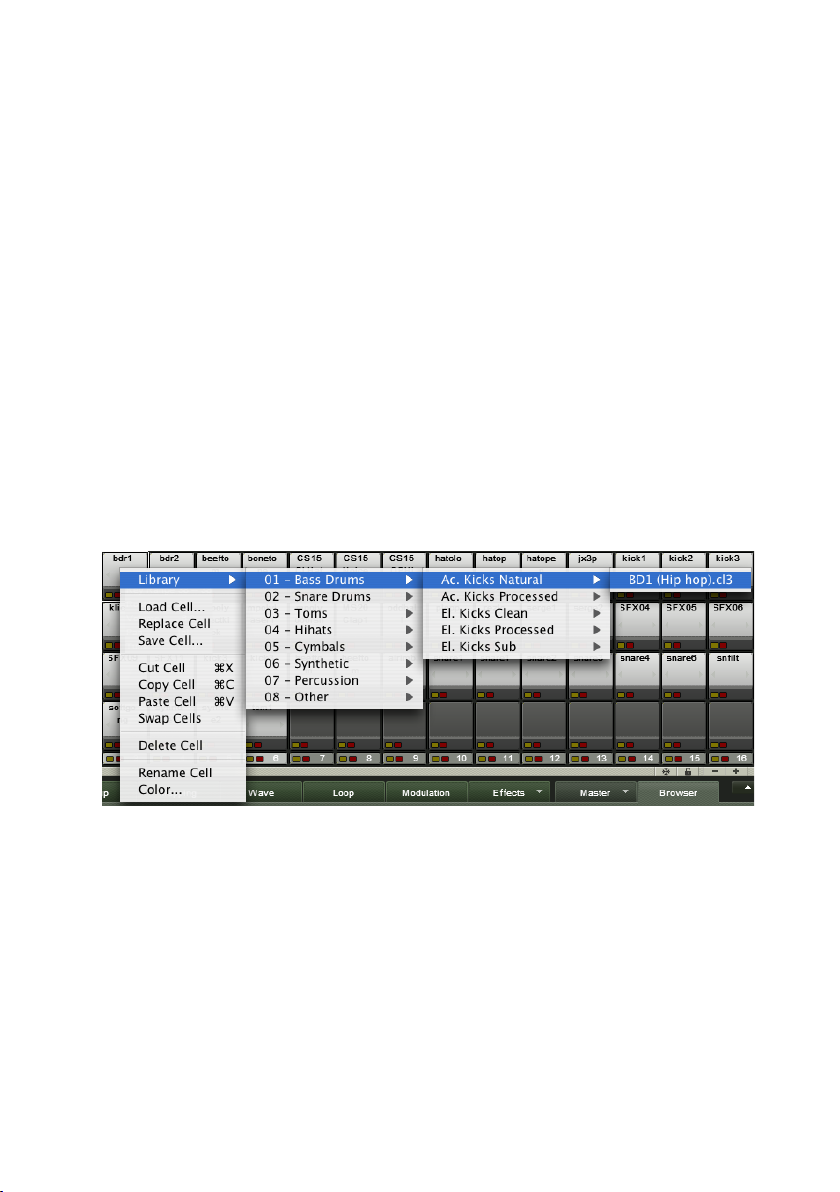
Library: Provides quick access to BATTERY 3’s extensive library for easy kit
editing. To make life even easier, drums are pre-arranged into different types
– Kicks, Snares, Toms, Hihats, Cymbals, Synthetic, Percussion and Other.
Add Sample: Opens a dialog box where you can navigate to a sample you want
to add to the Cell.
Note that if you open a kit, it will replace the existing kit.
Replace Sample: Opens a dialog box where you can navigate to a sample. If
you select this, it will replace the Cell’s current contents.
Save Cell: Opens up a “tree” view where you can choose a folder into which
the Cell will be saved under its current name.
Cut: Cuts the Cell your clipboard.
Copy: Copies the Cell.
Paste: Pastes the Cell into the currently selected Cell.
Swap Cells: For swapping the positions of two Cells.
Delete: Deletes the Cell.
Rename Cell: For renaming the Cell.
Color: For changing the color of the Cell.
Alt-Click Sample Selection
When you click the Alt button, arrows will appear on the left and right sides
of all selected Cells. You can use these arrows to ’step’ through other samples
or Cells.
Freeze and Padlock
The Freeze button at the bottom right of the Cell Matrix changes the edit status
of the values within the Matrix Cells. When it’s activated, the values within the
Cells do not change when you’re editing them within the cells directly.
The Padlock Button locks the cell to its last displayed value. When it’s activated
different value types to the one that was last displayed within the cell before
activating the function will not be displayed.
BATTERY 3 – 25
Page 26

The Edit Pane
This is where you can take your creativity to the max by manipulating drum
and other samples with anything from subtle to extreme processing. It’s also
a place where you can do Cell “housekeeping,” such as making MIDI trigger
and controller assignments.
Edit Pane Overview
The Edit Pane can display any one of nine different windows with which you
can organize samples within a Cell and process them in many different ways.
Each window is selectable by clicking on a tab:
Cell: The Cell section denes a selected Cell’s basic MIDI and sample
assignments, its pitch and its basic sonic characteristics.
Setup: This page provides powerful new tools specically designed for drum
playing and programming.
Mapping: The Mapping window is where you can set the minimum and maximum
velocities for each sample in a selected Cell. You can also adjust the tuning,
panning and root key for each sample.
Wave: This page is a convential wave editor with the functions available on
the screen. You can use it to edit drum samples within BATTERY 3 so you
don’t have to export them into a separate audio editor.
Loop: This window lets you loop (repeat indenitely) a section of a sample to
produce a sustained effect when you hold down a key. Such an effect can
even evolve over time.
Modulation: The Modulation window allows you to modulate your drum sound
with a variety of sources including LFOs (Low Frequency Oscillators), envelopes,
aftertouch, and external MIDI controllers.
Effects: The Effects page is where you can apply one or more effects to a Cell’s
audio output to enhance it’s sonic richness or make it blend within a mix.
Master: The Master section has a range of high quality effects that can
be applied to an entire drum mix: EQ/Filter, Compressor, Limiter, Delay,
Reverb.
Browser: This page allows you to quickly browse and select les from BATTERY
3’s library folder or anywhere else on your computer.
26 – BATTERY 3
Page 27

The button in the top right hand corner of the Edit Pane area can be clicked
to make the Edit Pane disappear or reappear.
Four Important Points!
• Remember that altering most of these parameters can affect everything
from a single Cell to all Cells in the matrix, depending on which Cells
you have selected.
• One extremely cool feature is that when you select a parameter for
editing, the Info Strip towards the bottom of each Cell shows the status
of that same parameter for each Cell. For example, if you tweak the Pan
parameter, you’ll see the current pan position for all Cells in their info
strips. This makes it easy to compare settings for the various Cells.
• Most numeric elds can be edited in two ways: Double-click on the
parameter value and type in a new number, or click on the eld and
drag up to increment the value, or down to decrement. For “ne tuning,”
hold Shift while dragging.
• Double-clicking on knobs resets them to default values.
Now let’s consider each section in detail.
BATTERY 3 – 27
Page 28

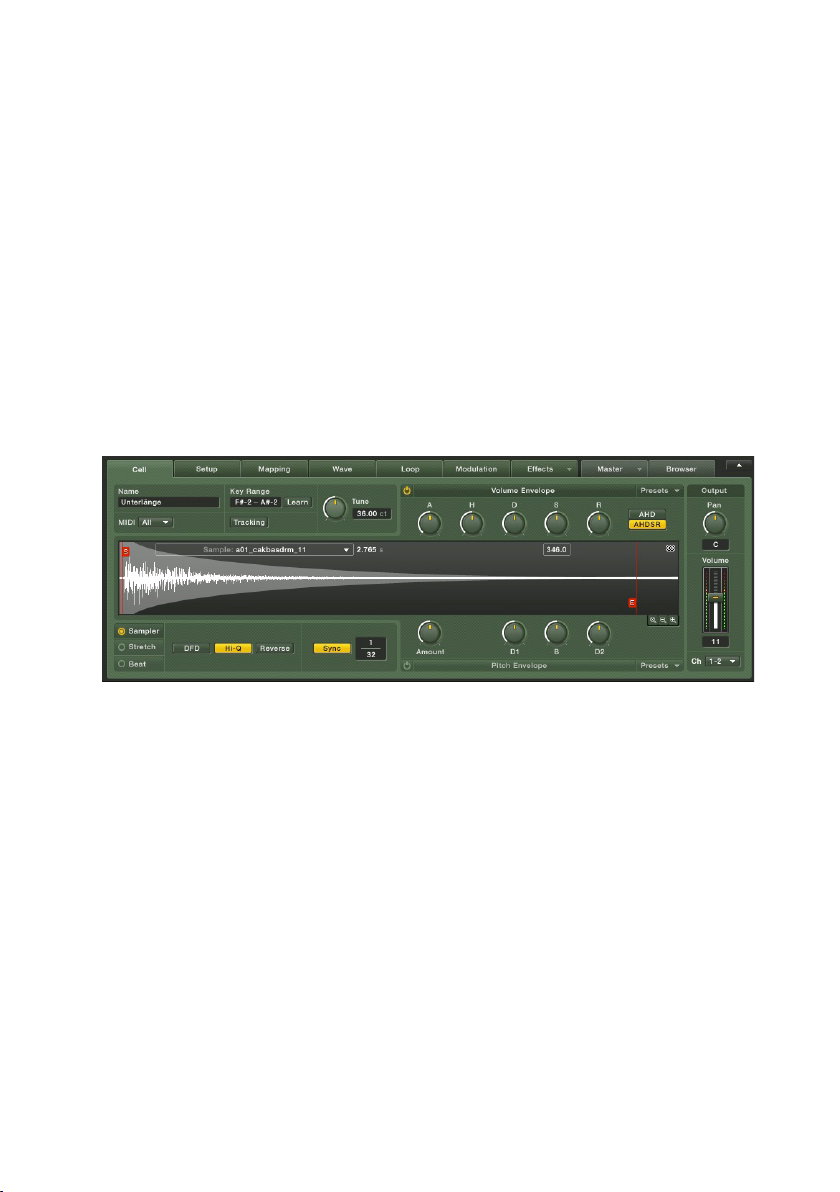
Cell View Tab
This window provides basic Cell management with respect to MIDI, voice groups, name, and
similar parameters. It also provides tuning, envelope shaping and advanced sample playback
capabilities.
The Cell section denes the current Cell’s basic MIDI and sample assignment
functions. It also has a Tune control, alternative sample modes, and Volume
and Pitch Envelope modiers.
Cell management controls
Cell Name: Shows the Cell’s currently selected name. This defaults to the
name of a sample within the Cell; to rename, double-click on the name, then
type in the new name.
Key Range: These two elds determine the MIDI note range that will trigger
the current Cell. For example, a key range of C2-C2 means that the Cell will
play only upon receiving MIDI note C2. If set to C1-E1, then C1, C#1, D1,
D#1, and E1 will all trigger the Cell.
There are two ways to set the Key Range:
• Double-click on the low range and type in a new note name or numeric
value. If you type in a numeric value, BATTERY 3 will automatically
convert it to a “musician-friendly” MIDI note name (for example, type
“60,” and the display will show C3). If necessary, do the same for the
high range. Using this method does not change the root key.
• Click on the Learn button. Use a keyboard or other MIDI note generator
to play rst the low range note, then the high range note. After playing
the second note, the display will update to show the new key range.
With this method the root key will be changed to the low note. You can
also use a computer’s QWERTY keyboard to do this.
28 – BATTERY 3
Page 29

MIDI: This species whether a cell should receive data from ALL MIDI channels,
or a specic MIDI channel from 1-16. Click on the down arrow and make the
desired assignment.
Tracking: When activated (lit) and the Key Range exceeds one note, all samples
in the current Cell will change pitch in response to the MIDI input. For
example, if the key range is C1-D1 and you play D1 with track On, the pitch
will be two semitones higher than if you had played C1. With Track disabled,
the sample’s pitch will be determined solely by its root key (as set in the Map
view) and the Tune knob.
Tune: Use this knob to change the pitch of all sample layers contained in a
Cell. The range is three octaves up or down, which allows for some serious
sound design effects. Try sweeping this at low Hertz settings (described later).
When used as a modulation destination the range is one octave up or down.
Sampler Mode
Battery uses three different modes to play back a sample. Each mode is
intended to do a different job.
Sampler: When this mode is activated, BATTERY 3 is in a “standard” digital
sampler mode that stores sample data in system memory, reads it out from
memory, and applies any needed pitch-shifting by resampling the audio data.
The Sampler module is very efcient and draws little power from the host
CPU.
Reverse: Reverses playback for all Samples contained in the selected Group.
It produces the well-known “backwards tape” effect.
DFD: When this button is activated, the sample is streamed Direct From
Disk instead of RAM. This is important if you have large samples but limited
RAM.
Hi-Q (Hi Quality): Improves the sample interpolation when playing back pitched
samples. The disadvantage of this feature is that it increases CPU load. Perfect
best preserves the sample‘s signal properties at slow or fast playback speeds.
Low is very CPU efcient and can be used on all drumsounds that are not
altered in pitch, as the loss in quality only is most true for pitched samples.
Standard is good for samples that are only pitched up or down a little.
BATTERY 3 – 29
Page 30

Stretch Mode
Stretch Button: When this button is activated, BATTERY 3 is in ’timestretching
mode’. It uses granular synthesis to alter sample speed while preserving the
original pitch information.
Smooth: Adjusts the amount of granular micro-envelopes to reduce unwanted
artifacts, thus altering the sonic character of the resynthesis process. Note
that small values generally cause a buzzier sound.
Length (Speed): Changes the playback rate independently of pitch. The Lenght
values are expressed as percentage: for example, 100% plays back the sound
at the original speed, 200% doubles the speed, 50% halves the speed, etc.
A value of 0 stops playback entirely and thus freezes the sound.
Grain: This control determines the size of the sound particles used for
resynthesis.
Beat Machine Mode
Beat: When this button is activated, BATTERY 3 is in Beat Mode – it displays
audio loops such as Apple Loops, REX2 les and ACID WAVE les as ’slices’
which are played back at rhythmically correct times. Playing these back at a
slower or faster rate slows down or speeds up the tempo respectively.
Length (Speed): The speed knob alters the sample’s playback speed without
altering the pitch. Clicking on the % symbol right next to the value opens
a pop-up menu where you can select an appropriate rhythmic value. Once
the rhythmic value is selected, the Speed control chooses a division of the
chosen note.
Smooth: Adjusts the Attack and Release of a selection.
Slice Attack: Slicing a le can produce clicks at the slice point. This Slice
Attack control adds an adjustable fade-in time for the slices that can minimize
any clicks. Generally, you want to use the lowest value consistent with minimal
clicking.
Slice Release: The Slice Release control adds an adjustable release time to
each slice. Adjust by ear for the best sounding results.
Sync: This control synchronizes the Beat Machine to BATTERY 3’s internal
tempo or that of a host sequencer. The fraction to the right shows the beat
to which the slices of the loop are synced: the enumerator can be edited by
value edits, while the denomiator values can be edited per drop down.
30 – BATTERY 3
Page 31

Volume Envelope
The following controls work in conjunction with the Volume envelope.
On/Off: Enables/disables the envelope. When enabled, you can see the envelope
shape against the waveform.
Presets: Click on this tab to access useful Volume Envelope presets.
AHD/AHDSR: These pushbuttons toggle between two envelope types: AHDSR
(Attack-Hold-Decay-Sustain-Release) and AHD (Attack-Hold-Decay) envelope.
Typically, the AHDSR envelope is for sustained samples, while the AHD
envelope is more for “one-shot” sample playback. AHD mode disables the
Sustain and Release controls.
Attack (A): The time it takes for the envelope to reach its maximum level.
Hold (H): Determines how long the envelope will hold at its maximum level.
Set this to 10-30 ms to add “punch” to a signal.
Decay (D): The time it takes for the envelope to fall from the held level to the
sustain level.
Sustain (S): The level that will be maintained as long as the incoming MIDI
note is held.
Release (R): The time for the sustain level to return to zero after receiving a
MIDI note-off (i.e., the MIDI trigger ends).
Pitch Envelope
The following controls work in conjunction with the Pitch envelope.
On/Off: Enables/disables the envelope.
Presets: Click on this tab to access useful Pitch Envelope presets.
Amount: Sets the degree to which the modulation envelope affects pitch.
D1: Edits the time for the envelope to go from its maximum level (as set by
the amount control) to the level set by…
BATTERY 3 – 31
Page 32
B: This is a “breakpoint” control that adjusts level. The value can be positive
or negative, so the pitch can be either higher or lower than normal pitch.
D2: This determines how long it takes for the level set by the Breakpoint
control to decay back to zero again.
Important: Please note that the Waveform view area in the middle of the
Cell View window displays Volume Envelope data (displayed as a shaded
area within the window) and Pitch Envelope data (displayed in the form
of red lines) as well as standard audio-visual data.
Start and End Point Adjust
The waveform view shows a start (S) and end (E) marker. You can move these
as desired to alter the Cell start point, length or both. One application is to
use the Start adjust to remove part or all of a drum’s attack. This can give a
very different, more muted type of drum sound. Another common usage is to
set the point 20ms or so into the sample. If you then apply negative velocity
modulation to the sample (do this in the Modulation View tab), harder hits will
play more of the attack, adding impact to the sound. This can make percussion
sounds far more realistic.
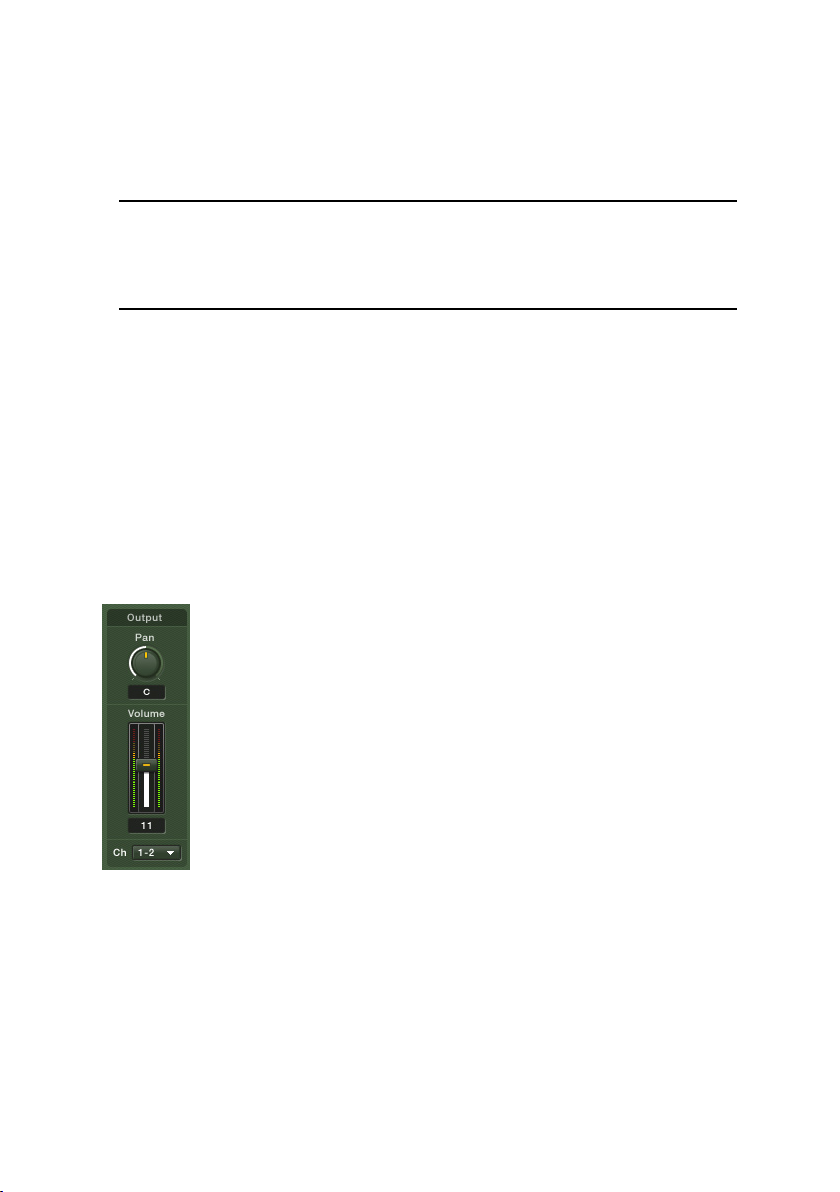
Output
The Output module can be regarded as the Cell’s “channel strip.”
This module is extremely straightforward: It simply sets the Cell’s pan, level,
and output assignment.
Pan: Places the Cell in the stereo eld, from full left (100 left) to center (c)
to full right (100 right).
Volume: Adjusts the Cell’s level in the overall mix, from +12dB to -8.
32 – BATTERY 3
Page 33
Channel: Chooses the output to which you want to assign the Cell. This eld
selects an audio interface’s physical output in stand-alone mode, or a “logical
output” when used as a plug-in.
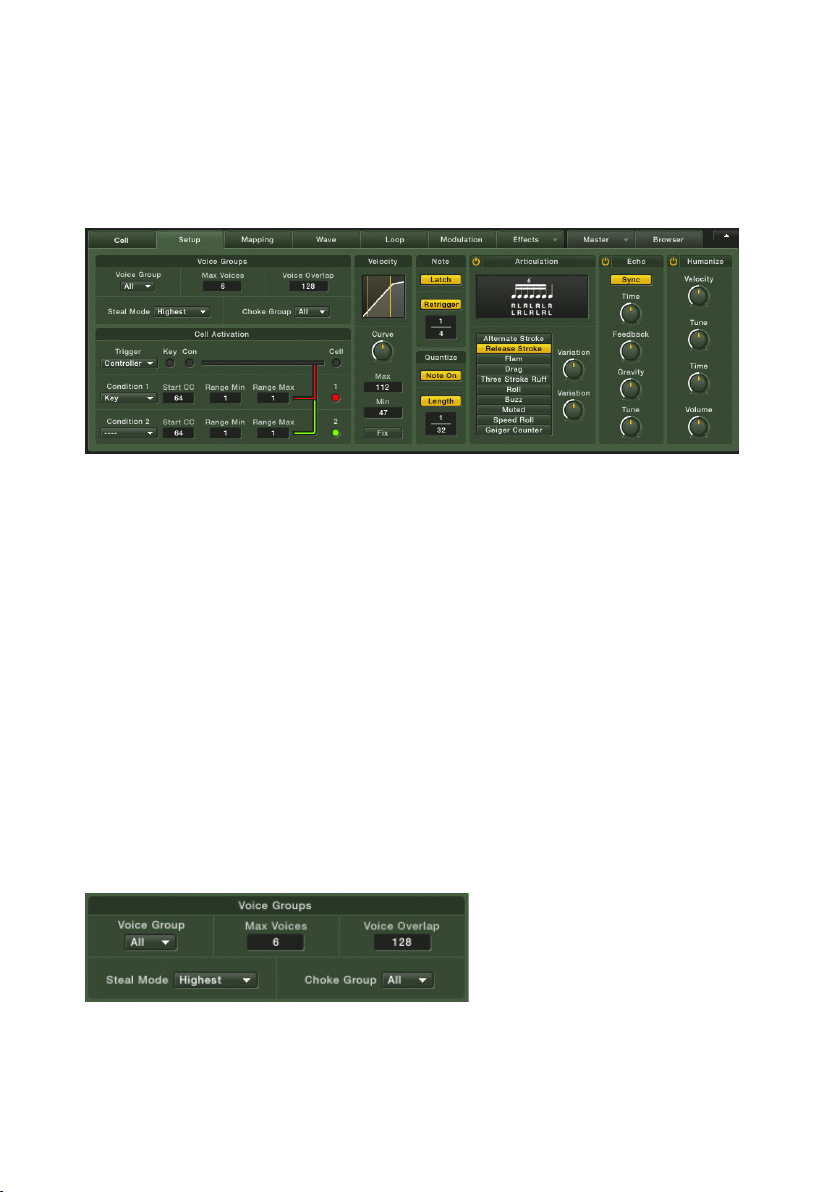
Setup Tab
The Setup page provides powerful tools specically designed for creative drum programming!
The Setup Page adds completely new features to BATTERY 3. It provides a
range of tools specically designed for drum playing and programming. You
can use it to ne-tune your favorite drum sounds and/or kit, or create totally
new drum sounds out of your existing library. This is a serious tool for the
creation of beats – but it’s also fun to play with and will often lead you to
intriguing results that you never expected from BATTERY 3.
Before we go on keep the following two characteristics of this page in
mind:
• The setup page is NOT just a basic MIDI processor. It can create things
that aren’t possible with other MIDI tools.
• All effects/parameters are Cell based, which means that each Cell can
have totally different settings!
Let’s take a closer look at each Setup tool:
Voice Groups
Use Voice Groups to make realistic hi-hats and complex percussion sounds.
BATTERY 3 – 33
Page 34

The Voice Group function allows linking the response of particular Cells to
note on-off commands so that the most recently-played Cell has priority over
other Cells in the group. Probably the easiest way to explain this is with some
typical applications.
• With “real” drums, you cannot have an open and closed hi-hat sound
at the same time. With BATTERY 3, assigning these two sounds to a
group, then setting the group polyphony to 1, means that triggering
the closed hi-hat will turn off the open hi-hat (and vice-versa). This
is because a polyphony setting of 1 allows only one voice to play at a
time, which will be the most recently-played note.
• If you have several tom sounds with long, “ringing” tails, the sound
may get muddy if several tom tails sustain at the same time. Assign
the toms to a group, and set polyphony to 2. Thus, only two tails can
ring at the same time – the most recently- triggered tom, and the tom
triggered just prior to it.
• Some musicians use BATTERY 3 to play back rhythmic loops or phrases
loaded into each Cell. Assigning these to a group means that triggering
a new loop will turn off any previously playing loop, which is often
desirable.
• Also when using loops, you could assign a “silent” sample (no sound) to
a group so that triggering this Cell turns off any loops that are playing,
and silences the output.
Here are the various voice group parameters:
Voice Group: Click on the down arrow to assign a Cell to no voice group, or
any of 128 voice groups. Remember that selecting this parameter will show
voice group assignments in each Cell’s info strip, making it very easy to check
on voice group assignments for an entire kit.
Max Voices: This sets the polyphony for each Voice Group, from 1 to 127
voices.
Voice Overlap Time: This allows a period of time where the voices overlap
(i.e., the previously-played voice sustains for a while even after a new voice
has been triggered). This prevents an overly abrupt transition between voices.
Overlap time is variable from 5 milliseconds to 2.5 seconds.
Steal Mode: Select a mode that decide which notes to ‘steal’ if you run out of
polyphony. You can choose from: Kill Any (any notes are removed), Kill Oldest
(the earliest notes played are removed), Kill Newest (the last notes played
are removed), Kill Highest (the highest notes are removed) or Kill Lowest (the
lowest notes are removed).
34 – BATTERY 3
Page 35
Choke Group: This is an advanced programming feature that allows for more
realistic mute groups to be set up. Choke groups allow you to turn off different
voice groups by setting them to the same Choke Group. The advantage here
is polyphonic mute grouping versus monophonic.
Let us expand on the previous voice group example. Take those same hi-hat
sounds and set them to exclusive voice groups. Such that the open hi-hat is
voice group 1 and the closed hi-hat is Voice Group 2. Now the open hi-hat
sound can be set to more voices, 5 for example. This allows some “trails” to
be heard. The second Voice Group can be set to 1 max voice. Both of these
groups should now be assigned a Choke Group of 1. With this setup you obtain
the desired effect of trailing drum sounds, while having a controlled polyphony
(Voice Group 1) and you can still choke that group with the closed hi-hat.
Cell Activation
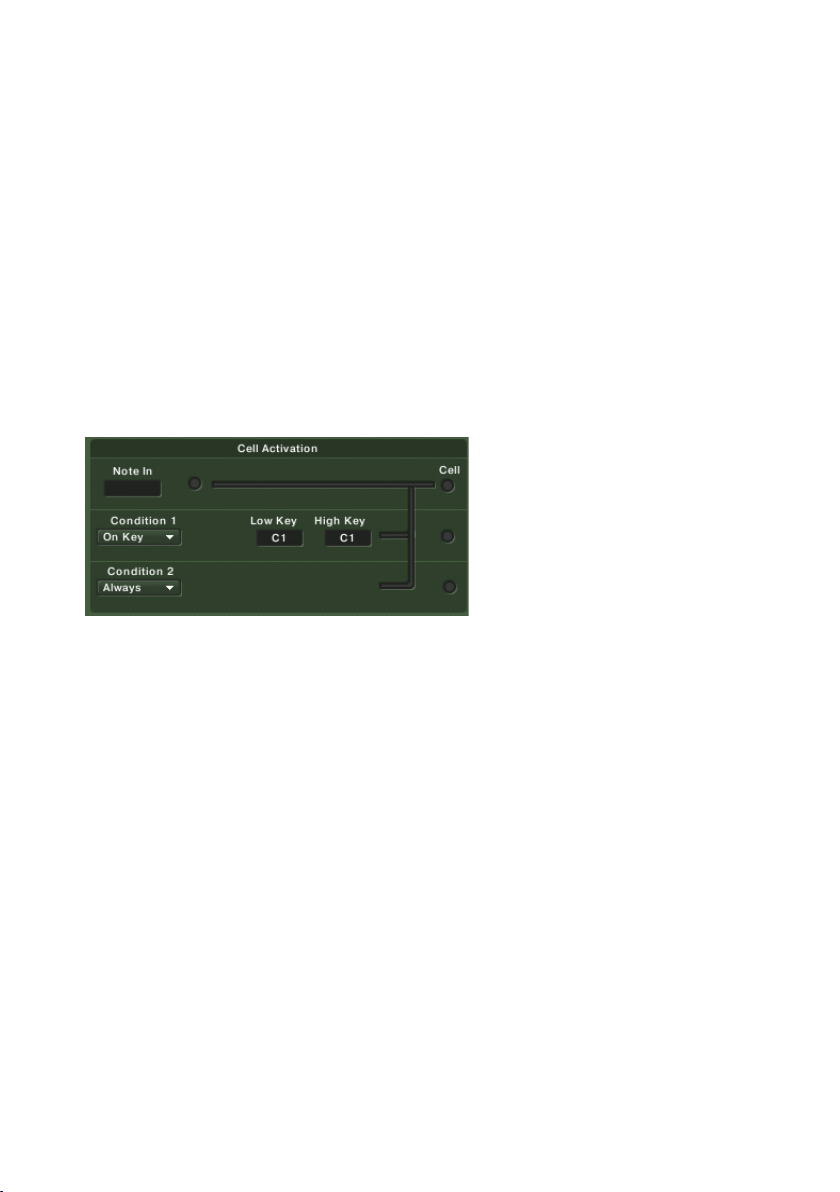
The Cell Activation module offers a number of useful ways to activate Cells.
This module consists of two parts. With the rst row you specify how a cell is
triggered. With the second and third row, you can specify certain conditions
which need to be fullled if the cell is to be triggered.
A cell can be triggered either with a Note On (default setting) or a Note Off
(a.k.a. release trigger). If you choose Note Off, the cell will be triggered when
you release the key. The velocity will be the same as the played velocity, and
the duration of the triggered note will be as long as you’ve held the note. This
is important when combining the Note Off trigger with articulations like Roll
or Geiger Counter.
Once a cell receives a trigger event (either from a Note On or Note Off), it
still has to pass a virtual semaphore: only if Condition 1 and Condition 2 are
fullled will the event be passed on and the cell triggered.
The following conditions can be dened:
Always: This is the default setting and simply means that this condition is
always true.
BATTERY 3 – 35
Page 36

On Key: With this function you can activate a cell with a specic key range of
the MIDI-Keyboard. Select “On Key” from the menu. Two key-number elds
will appear right next to the menu where you can set the specic key range
which will activate the cell for incoming MIDI notes.
Check out the Multi Stick Kit for a nice application of this technique: the
keys C3, D3, E3, F3, G3 and A3 activate the rows A to F. Each row refers to
a specic pair of sticks.
On Controller: This function activates cells by a MIDI controller instead of a
MIDI-key (as above). It allows you to activate different cells depending on
the position of the Mod wheel or any other controller. Select On Controller
from the menu and choose the controller number of the controller you want
to use for activating a cell (Start CC). Then set the lowest (Range Min) and
highest value (Range Max) in between which the cell will be activated when
the modwheel is set to this position.
Check out the Dub Remix Kit. Play the open Hi-Hat (Bb1) while moving the
mod wheel: when you move the mod wheel upwards (i.e. towards a controller
value of 127), the Hi-Hat is closed.
Cycle Round Robin: This function can be used to cycle through different
cells while hitting the same key again and again. It’s good to start with an
example.
Select multiple cells and press the Learn button in the Cell tab. Then press a
key twice on your MIDI keyboard. You have just assigned all these cells to one
key. Now select the Setup tab and set cell activation to round robin from the
drop-down menu. Each cell also gets a desired position in the cycle. Select
the individual cells in order to edit the position in the round robin cycle. You
can type the in number or drag the mouse upward to change it.
This is a nice technique that can result in humanized playing since you can
load similar sounding samples with subtle differences in each cell and cycle
through them.
Check out the Tight kit. Play E3 and watch the matrix. The twelve clap cells
get cycled through.
36 – BATTERY 3
Page 37
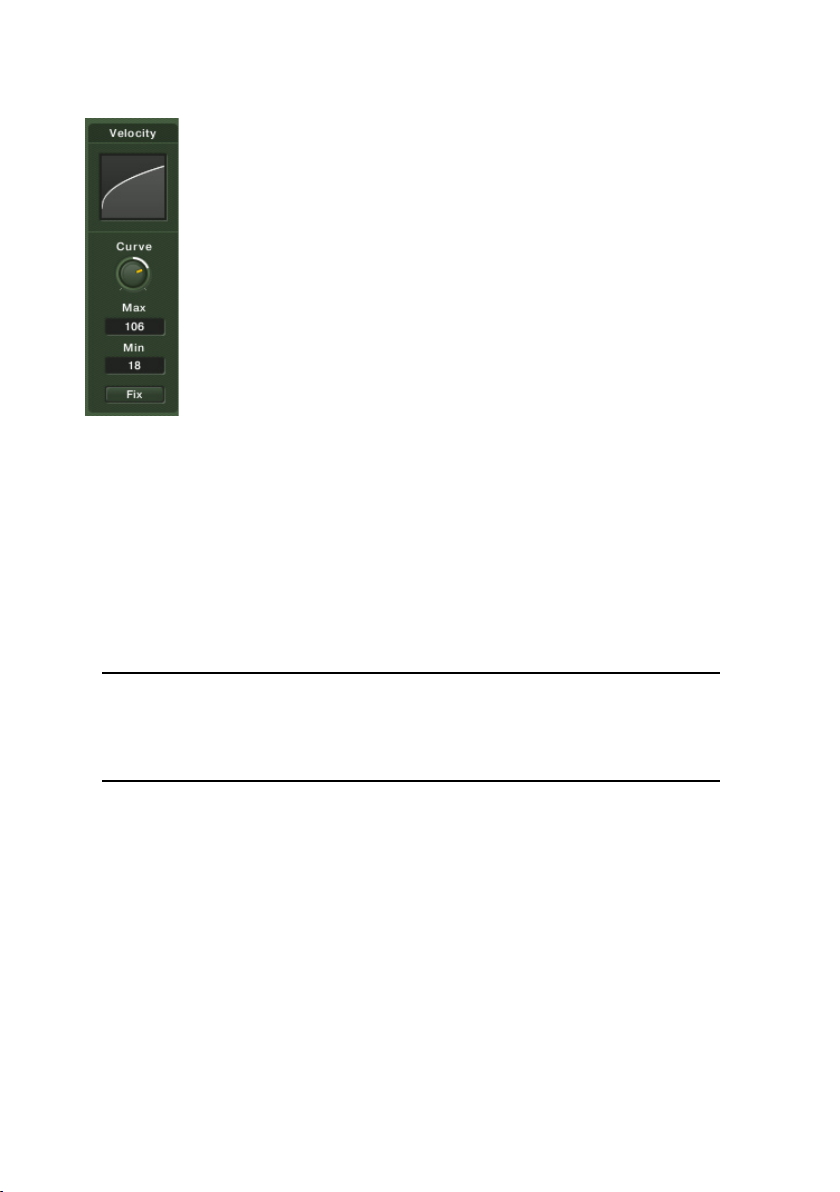
Velocity
Customize the velocity response of a cell with the Velocity module.
This module alters incoming velocities. Here are the controls:
Curve: Use this knob to adjust the velocity curve for a Cell.
Max: Specify your maximum velocity setting.
Min: Specify your minimum velocity setting.
Fix: Click on this to specify a xed velocity in the ‘Max’ eld.
Of course, you can also quickly select all Cells (click in the lower left corner)
to apply a velocity curve to the whole kit.
Note: Sometimes drum libraries have a “special” sample at velocity =
127 for certain drum instruments. If you don’t want this sample to be
triggered at all, set Max to 126. This will alter the velocity sensitivity
just a little, but will make sure the sample won’t be triggered.
BATTERY 3 – 37
Page 38
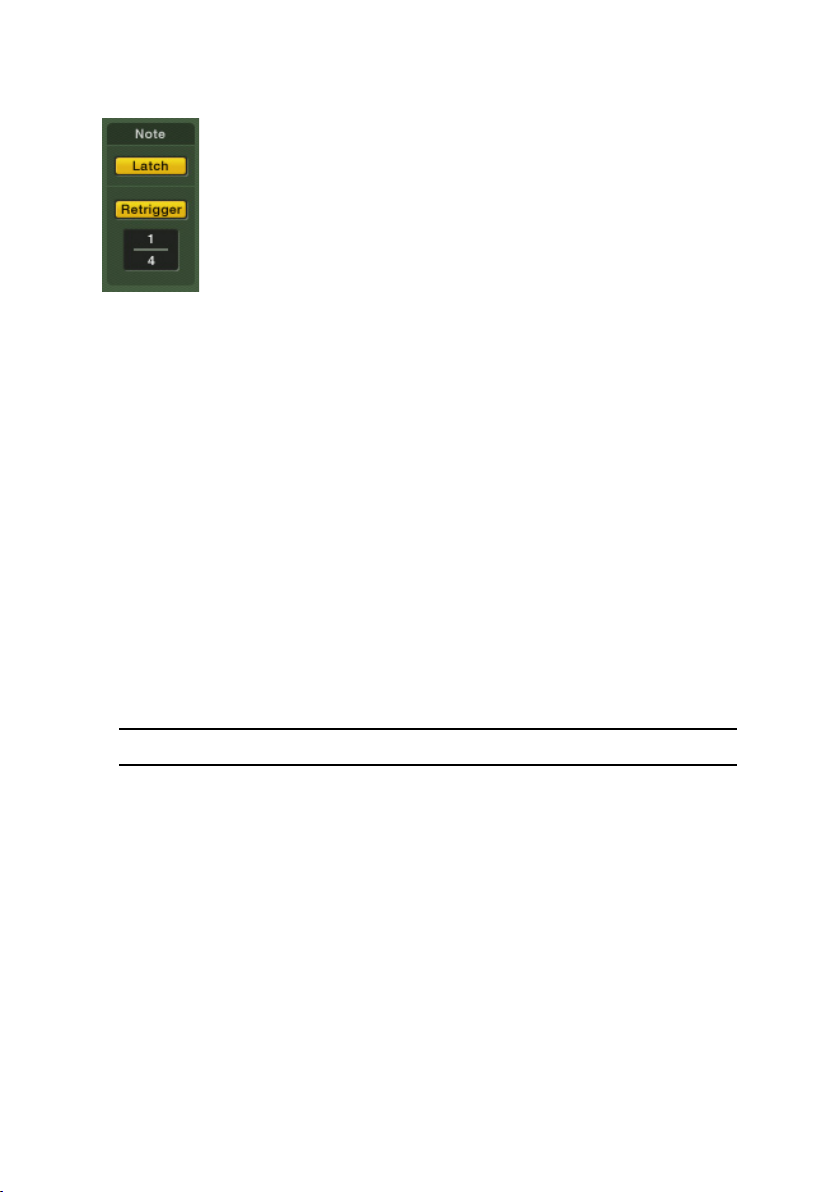
Note
Use this module to start and stop a sample with one key, plus more…
This module features two parameters – Latch and Retrigger:
Latch: Activate this button to “latch” incoming notes – i.e. play a note to trigger
the sample, play the note again to stop it. This is quite useful for loops. Or
you can take a crash cymbal and activate Latch. With the rst note, you can
trigger the cymbal and with the second note, you can “choke” it (you have to
set up the AHDSR in order to do this).
Retrigger: When activated, the notes retrigger as long as the key is held down.
The speed is determined by the numerator/denominator; if the denominator
is set to 1, this equals one bar.
Note: Don’t be afraid of other rhythmic values than sixteenth notes! Even if
you’ve never heard of it, a 1/17 note simply is a little bit faster than one 1/16
note. A 1/20 note is a quintuplet sixteenth, while a 1/3 note will play three
notes in the time of four quarter notes. This way of dealing with rhythms
gives you maximum exibility while still being able to adjust the tempo in an
intuitive way.
Latch and Retrigger are good friends, they work very well together!
38 – BATTERY 3
Page 39

Quantize
This section quantizes notes you play to an internal or external tempo clock.
This section has two buttons which share the same tempo. Here are the
Quantize controls:
Note On: Quantizes all incoming notes to the specied length. The length
species a rhythmic grid, to which note events are quantized. The origin for
this grid is always the beginning of a measure. That’s why it is not possible
here to have a larger numerator than the denominator, since this would exceed
one measure.
If you play a note and release it before the rhythmic grid, the note will be
triggered at the rhythmic grid, with a duration as long as you’ve held the note
(this is comes in handy for triggering loops).
If you play a note and release it after the rhythmic grid, the note on will be
quantized as well and the note stops when you release the key.
Length: Changes the length of all incoming notes to the specied duration (per
Cell). However, only the length of the note is quantized, not the length of the
triggered sample. This function is especially useful when used in combination
with articulations like Three Stroke Ruff (see Articulation section). If you
trigger a cell with a drum pad, the duration of your MIDI note will be rather
short. So how can you trigger a Three Stroke Ruff with the pad? Easy – just
set Length to around 1/4 and the complete articulation will be played, even
with small note durations.
BATTERY 3 – 39
Page 40
Articulation
Use Articulation to add special and authentic nuances to your drum parts.
Battery 3 has a variety of cool effects that can be automatically applied to
your drum sounds. It is important to note that each articulation can sound
different on different instruments. Also, since many of them alter velocity,
be sure to check the velocity to volume modulation (on the Modulation page)
of the selected cell.
The articulations are obtained by activating the module and clicking on any
one of the following buttons:
Alternate Stroke: Produces sounds that slightly vary character. Use this for
quickly creating Left/Right cells.
Release Stroke: Plays the original note and produces a second stroke when
you release your MIDI key. You can adjust the tone and velocity of the release
stroke. This is not the same as Note Off Trigger, since you trigger the note
both with a note on and a note off.
Flam: Plays two notes in rapid succession, the rst of which is a grace
note.
Drag: An exaggerated ‘am-like’ effect.
Three Stroke Ruff: A nice ‘military-style’ drum effect.
Roll: A continuous drum roll.
Buzz: A ‘buzz-like’ effect.
Muted: By quickly fading in and out, this produces a “muted” version of
your drum sound. Experiment with the Attack and Decay knobs to obtain the
desired results.
40 – BATTERY 3
Page 41
Speed Roll: A very fast drum roll. The duration of the triggered sample is
also shortened, so even though many notes are triggered, the voice count is
reasonable.
Geiger Counter: Produces a random ‘Geiger-like’ effect.
Echo
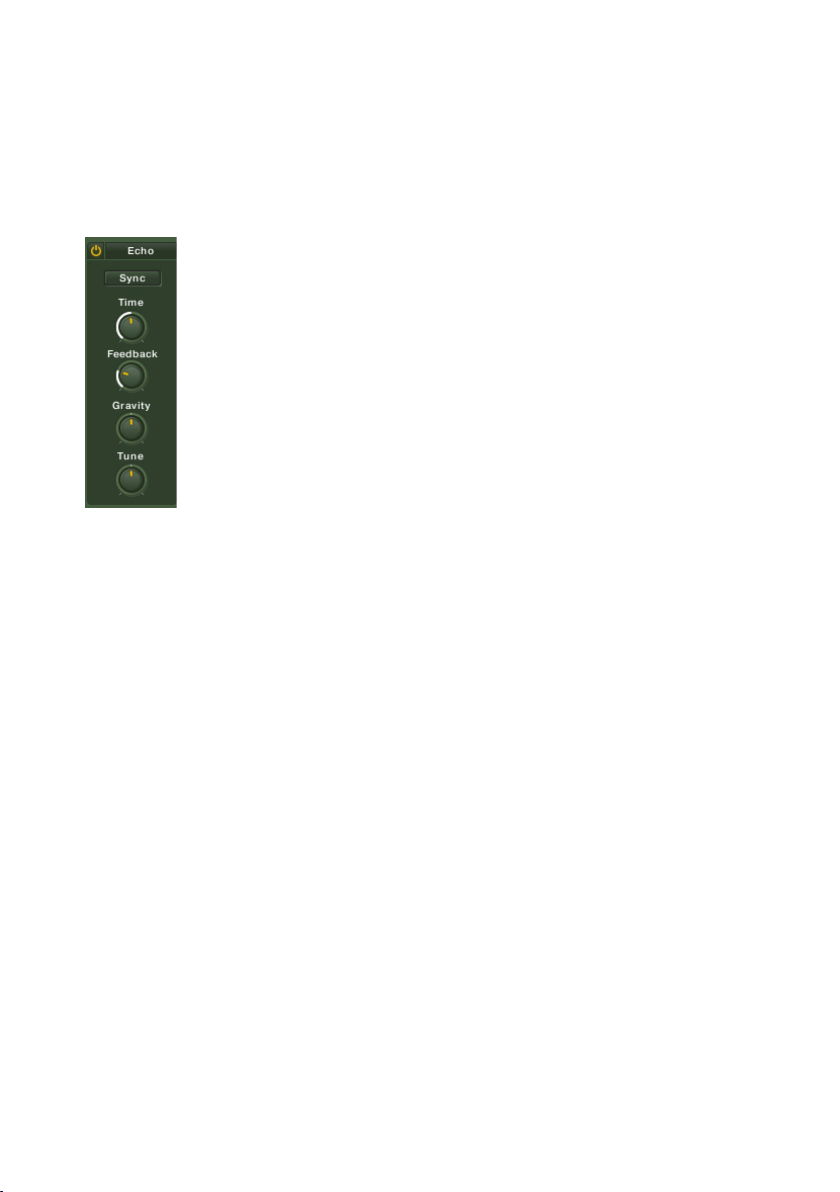
Add ‘Echo’ effects to individual Cells.
The Setup Page also features an Echo unit that can be used to create a variety
of useful and tempo-syncable echo effects. Here are the controls:
Sync/Time: Set the echo time to either a tempo-based value (which is
synchronized to BATTERY 3’s tempo control or your host’s tempo), or an
absolute time-based value, which is independent of the host tempo.
With Sync activated, a fraction appears where you can specify a tempo-based
value as a fraction. If the denominator is 1, this equals the duration of one
bar. So if you enter 4/1, and the meter in your host is 3/4, the delay time
will be 12 quarter notes. This is because a measure in 3/4 has three quarter
notes, so the numerator “4” is multiplied by three. The stand-alone version
of BATTERY 3 always defaults to a meter of 4/4.
With Sync deactivated, a knob appears where you can adjust the delay time
as an absolute value. The minimum is 10 milliseconds while the maximum
is one second.
Feedback: Set the number of echos from 1 to 100. If you feel that adjusting this
control has no effect, make sure to check the velocity to volume modulation.
With a high modulation amount (near 100), the last echoes might not be
audible.
BATTERY 3 – 41
Page 42

Gravity: Use this control to control the gravity of the echoes. When turned
clockwise, there’s less gravity and the echoes get slower. When turned counterclockwise, the echoes get faster.
Tune: Use this control to adjust the tuning of the echoes.
Humanize
The Humanize function can be used to add a slight randomization
(‘humanization’) to the velocity values, tuning, timing and loudness of the
triggered sample. This is achieved by tweaking the Velocity, Tune, Time and
Volume knobs, respectively.
When the knobs are turned to the left half, the changes are very subtle. Turned
all the way to the left, the specied function is bypassed. Turning them to the
right half however takes you to extreme settings.
Don’t be afraid to use this function. In fact, you might want to use it often.
Unless you’re into machine guns, you might get so used to this feature
that you will never want to do any drum programming without it.
42 – BATTERY 3
Page 43

Mapping View Tab
BATTERY 3 has sophisticated multi-sample mapping capabilities.
When you drag and drop a sample onto a Cell, a velocity zone is automatically
created for that sample. Mapping is the process of determining which samples
are layered or velocity-switched, and whether samples crossfade smoothly or
switch abruptly as they transition to other samples. You can also adjust several
important sample parameters from this view.
BATTERY 3 allows for extremely sophisticated mapping of multiple samples
within a Cell – in fact, far more sophisticated than many soft samplers.
Mapping sets several characteristics for any sample(s) within a Cell:
• The minimum velocity at which it will trigger (e.g., the sample triggers
only with velocities over 20).
• The maximum velocity at which it will trigger (e.g., the sample will not
trigger with velocities over 110).
• If the range over which a sample triggers overlaps with any other samples,
it’s possible to crossfade between them to provide a smoothed, rather
than stepped, transition from one sound to another.
• Independent control over Tune, Pan, Volume for each sample within a
Cell. Root key, on the other hand, is for the entire cell, not the samples
within it.
Map Layout
Upon selecting the Map tab, you’ll see the samples included in the Cell. They
show up as blocks, with the sample names toward the top of each block. You
can control auditioning the samples from within the Option menu. Clicking on
the zone plays back the original sample. Clicking on the velocity map’s y-axis
auditions the cell with its parameters. If there are more samples than can t
comfortably within the Map window, you’ll see a horizontal scroll bar to scroll
BATTERY 3 – 43
Page 44

past the window’s visible boundaries, as well as (-) and (+) buttons to zoom
in or out. A vertical scroll bar, again with (-) and (+) zoom buttons, may be
visible so that you can see more detail in the vertical axis (velocity).
Zones vs. Samples
In the Map View, samples acquire additional parameters involving how they
trigger and are crossfaded. Thus, the combination of the sample and the
parameters dening its response is called a Zone.
Selecting Zones
As with the Drum/Sample Matrix, editing operations within the Map View apply
to all selected Zones. To select multiple Zones, Shift-click on them. Selected
Zones are a darker shade than non-selected Zones.
Zone Cursors
When moving your mouse over a Zone, various cursors may appear:
• Four-way (cross) cursor. Use this to click on a Zone and move it left or
right or up and down.
• Two-way (up/down) arrow. This sets the lower or upper velocity limit
graphically as well as the velocity fade, depending on the position of
the arrow. There are other ways to set these limits, as described later.
The uses for these different cursors will become clear as we cover the
various mapping functions.
Edit Button
To access Zone edit operations, select the Zone(s) to be edited and click on
the Edit button to choose from the following:
Cut Zone(s): Removes the Zone(s) from the Map and stores the parameter
values for the Zone(s) parameter values.
Copy Zone(s): Stores the parameter values for the Zone(s).
Paste Zone(s): After a Cut or Copy operation, pastes contents into the Map.
Delete Zone(s): Removes the Zone(s) from the Map.
Replace Sample: Opens a dialog to locate the new sample.
Set Crossfade (Velocity): Draws lines that show the Crossfade velocity
boundaries, and enables using the arrow cursor to set these boundaries. We
will discuss crossfading in more detail shortly.
Remove Crossfade (Velocity): Removes any Crossfade velocity boundaries.
44 – BATTERY 3
Page 45

Stack Zones: Arranges Zones/Samples so that they cover the Cell’s entire
velocity range.
Reset Stack Zones: Undoes the Stack Zones command.
Setting Zone Upper/Lower Velocity Limits
The velocity range settings determine the minimum and maximum Zone
triggering ranges. For example, to have a Zone respond to all velocities, set
the lowest velocity value to 1 and the highest to 127.
However, you may want to use several samples to create more realistic drum
dynamics. Suppose you have three kick drum hits – one played softly, another
at medium volume and the third hit hard. You might want to set up the
velocities as follows:
Soft hit = 1-80
Medium hit = 81-110
Hard hit = 111-127
Three kick drum samples have been velocity-switched so that higher velocities trigger the
harder-hit samples.
As a result, different velocities play back different samples. There are three
ways to edit the velocity boundary values:
• Position the cursor over a Zone’s upper or lower boundary, either to the
left or right of center, until you see the up/down arrow cursor. Drag the
boundary to the desired velocity value. A small readout displays the
current velocity.
• Double-click on the lower or upper velocity value in the Velocity eld,
and enter the desired velocity value.
• Click and drag on the parameter.
BATTERY 3 – 45
Page 46

Velocity Crossfading
Sometimes, simply switching between samples provides too abrupt a transition.
In this case, you can crossfade between samples for a smoother transition.
You do this by adding crossfade information within the sample’s Zone.
To create a crossfade, rst set up the velocity switching boundaries so that the
sample Zones overlap. We will add crossfades where these overlaps occur.
The three velocity-switched kick drum samples shown previously have had their velocity boundaries
adjusted so that there is some overlap between the Zones.
We want the soft sample (on the left) to fade out as the middle sample fades
in. This occurs in the Zones’ overlapping range. Similarly, we want the middle
sample to fade out in the overlap range while the loud sample (on the right)
fades in.
To set up a velocity crossfade:
• Select the Zone where you want to add the crossfade.
• Click on the Edit down arrow and select Set Velocity Crossfades.
• There are upper and lower crossfade boundaries, as adjusted by the
arrow cursor. The sample fades in from the Zone’s lower velocity trigger
boundary up to the lower velocity crossfade boundary, and fades out
from the upper velocity crossfade boundary to the upper velocity trigger
boundary. The Zone uses shading to show where crossfading occurs
(i.e., the shade gets lighter as the signal fades).
46 – BATTERY 3
Page 47

Crossfades have been added in the places where the three kick drum Zones overlap. Note the
middle Zone, with two black lines toward the middle of the Zone. The upper line indicates where
the Zone’s fade-out begins; the lower line indicates where the fade-in ends. The right-most
sample has only a fade-in (it’s the loudest sample, so you don’t want it to fade out at the top of
its range), as indicated by the black line toward the middle of the Zone. Similarly, the left-most
sample only has a fade-out because it’s the softest sample, so it fades in naturally. Note the
line that indicates where the fade-out occurs, and how the Zone’s shading gets lighter as it
goes higher to indicate the fade.
Important: Please note that crossfading does not work well for all samples.
Fading samples can sometimes cause phase cancellation and thus a
loss of volume.
Moving Zones within a xed velocity range
When pressing the ALT-Key a zone can be moved while maintaining its velocity
range.
Other Map Edit Options
The following parameters affect any selected Zones.
Low Velocity: Sets the low velocity limit of a selected Zone.
High Velocity: Sets the high velocity limit of a selected Zone.
Tune: Changes tuning from –12 semitones up to +12 semitones.
Pan: Places the Zone from full left in the stereo eld (-100) to center (0) to
full right (+100)
Volume: Adds a volume offset from –36 to +36.
BATTERY 3 – 47
Page 48

Root Key: This eld sets the original pitch (note center), which usually equals
the pitch at which the sample was recorded. The root key also denes the
basis for pitch shifting; for each semitone (note) that you deviate from the
selected root key note, BATTERY 3 will pitch-shift the selected Zones by one
semitone. For example, if a Zone’s Root Key is set to C1 and you play a D1
note, the sample will be pitched 2 semitones higher. If on the other hand the
Root Key is set to D1 and you play a D1 note, it will sound at its normal pitch.
This eld’s range is the entire MIDI note range (C-2 through G8).
Select Zone via MIDI: When you play on a connected MIDI keyboard, the
appropriate zone is selected depending on the velocity you play.
Solo Zone: When this button is enabled, an incoming note will only play the
selected Zone. The rest of the kit will muted.
48 – BATTERY 3
Page 49
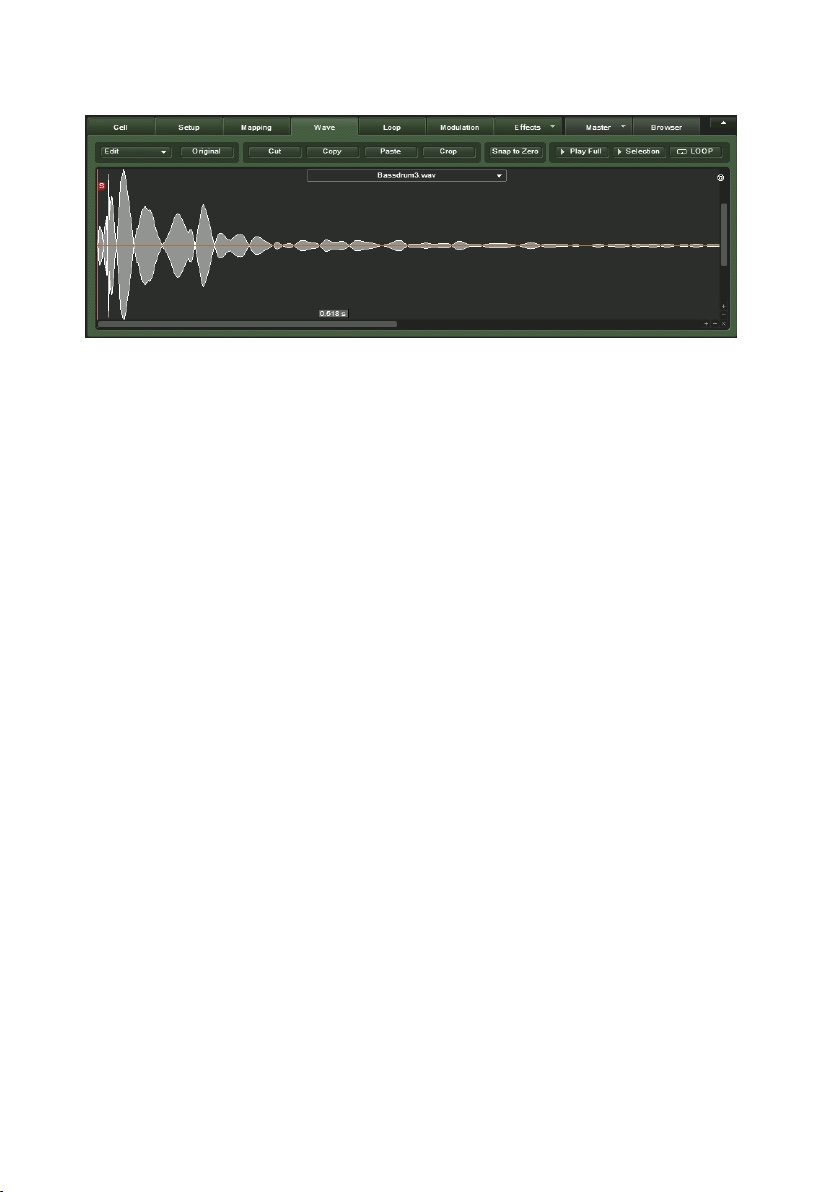
Wave Editor
Battery 3 comes with its own Wave Editor, which can be used to modify audio samples within
the drum module itself.
Battery 3 has a useful Wave Editor that can be used to edit audio samples.
It comes with a range of wave editing tools:
Edit
The Wave Editor has its own Edit menu which can be used to perform a
variety of tasks:
Fade in: Use this to fade your sample in over a selected region.
Fade out: Use this to fade the end of your sample out over a selected
region.
Silence: Removes audio information from a selected area to make it silent.
DC Removal: When this setting is activated, any DC drift present in your audio
sample as a result of analog-to-digital conversion will be removed.
Reverse: Reverses the sample so it plays backwards, from the end to the
beginning, when triggered.
Normalize: This adjusts the volumes of your audio les to a standard, optimum
level.
Original
Click this button to undo any edits you have made to revert back to the original
audio le.
Cut
Click this button to cut a selected region from the audio le.
BATTERY 3 – 49
Page 50

Copy
Click this button to copy a selected region from the audio le.
Paste
Click this button to paste a piece of audio into a specied part of the audio
le.
Crop
Use this tool to remove any unwanted audio before and after an audio
segment.
Snap to zero
This snaps the selection to the next location where the waveform crosses the
Zero line.
Play Full
Click this button to hear the whole audio le, from start to nish.
Selection
Click this button to hear playback of a selected area within the audio le.
Loop
Enabling this button will result in continuously looped playback when the Play
Full and Selection buttons are clicked.
You can use the + and – buttons in the bottom right corner of the wave display
to increase or decrease the amplitude or time resolution image.
50 – BATTERY 3
Page 51
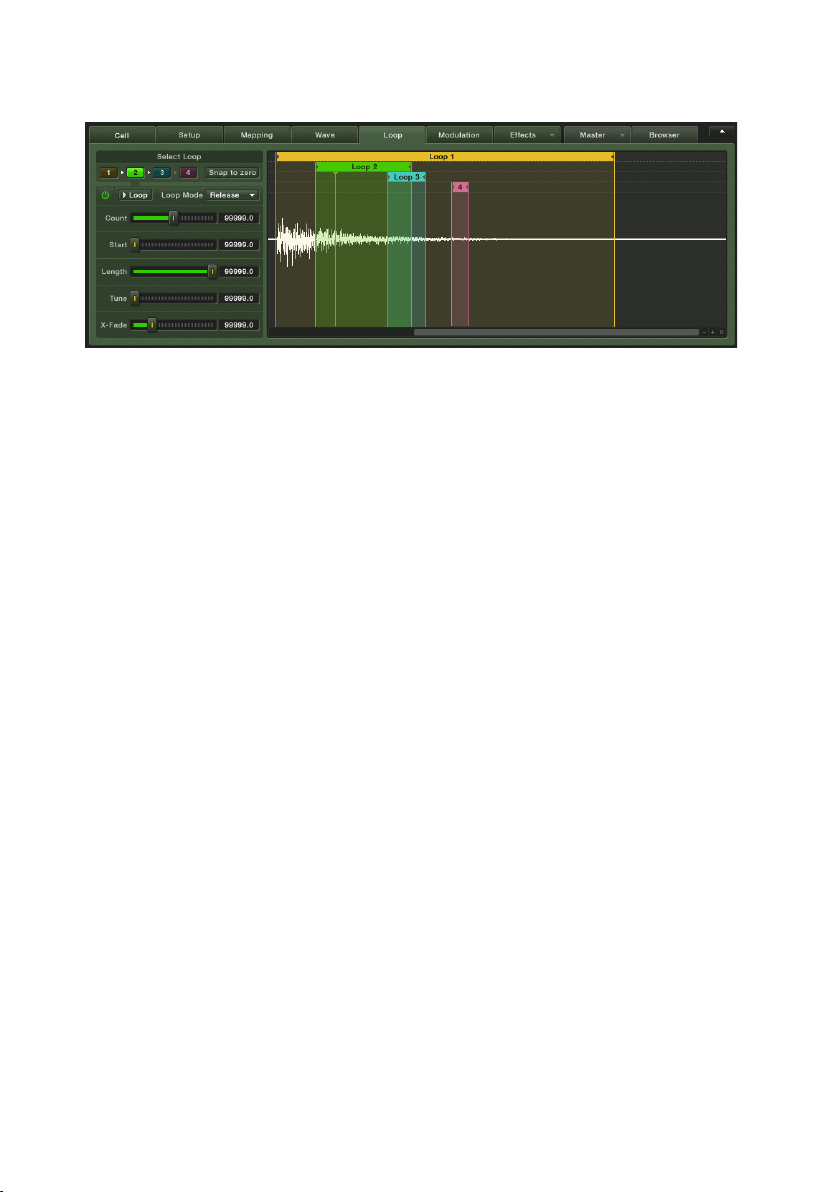
Loop View Tab
You can loop up to four sections of a sample simultaneously to produce an evolving sustain
effect.
The Loop View tab adds an important effect to your percussion samples: the
ability to loop (repeat as many times as you like) a section of the sample.
You can choose up to four sections to loop, and the number of times you
want each section to loop (from 0 to 127 times). This allows BATTERY 3 to
extend percussion sampling beyond mere “one-shot” sample playback into
sustained sounds that can evolve over time, and be modied by envelopes
to add dynamics.
Select Loop
Choose one of the four loops for editing. If a loop is on, its button will glow
yellow.
Snap to Zero
When enabled, loop start and end points will “snap” to the nearest audio
“zero-crossing” – the place where the audio amplitude is at zero (if the loop
start and end points have different amplitudes, there will likely be a click
every time the loop repeats). However, some sound designers loop at nonzero-amplitude points to create ‘buzzier’ (and therefore more jarring) loops.
Experiment with snap to see which works best for you. Enabling this feature
is for ALL loops.
On/Off
Enable or disable the loop with this button. Note that when the loop is enabled,
the waveform display toward the right shows the loop start and end points,
as well as its effect on the sample.
BATTERY 3 – 51
Page 52

Play Loop (>)
Click this button when the Loop Editor is enabled and you will hear the sample
looped.
Loop Mode
This button determines whether the loop is played until the volume envelope
has nished the release phase (Until End) or to the exact moment the key is
released (Until Release).
Count
This control determines the number of times the loop will repeat before
continuing to play through the rest of the sample, and can range from zero
to innity repeats. If you set it to zero the loop repeats indenitely as long as
the key is held/sustained. The display eld to the right of the control shows
the number of repeats.
Start
This slider sets where the loop begins. The display eld to the control’s right
shows the current value, expressed in samples. The control’s range equals
the number of samples in selected sound.
Length
This parameter determines the loop length, and therefore also sets the loop’s
end point. As you edit length, the waveform display will show the results of
your edits (if looping is enabled). The display eld to the right of the control
shows the current length in samples.
Tune
Each loop can be tuned independently, from an octave down to an octave
up.
X-Fade
The X-Fade function mixes some of the end of a loop in with its beginning to
create a more seamless loop. The display eld shows the length of the section
being mixed, in samples. While not a “foolproof” way to improve a loop, it’s
worth trying, particularly on sustained sounds.
Important: Please note that X-fade is not possible when the sample start
is 0 because a fade-in requires some sample material.
52 – BATTERY 3
Page 53

Modulation View Tab
Modulate various BATTERY 3 patch parameters with a variety of sources, such as LFOs, envelopes,
aftertouch and external MIDI controllers.
The Modulation View tab allows various controllers to change the values of
particular parameters within the BATTERY 3 patch. This can not only add
dynamics and color to a patch, but in conjunction with a software sequencer,
it can automate functions that add dramatic, real-time changes. As these
modulation sources can also be MIDI controllers, it’s possible to feed signals
from external hardware MIDI fader boxes and manipulate the sound as a realtime performance. If you record these signals in a sequencer, you can have
the best of both worlds: real-time improvisation and signal warping, recorded
as automation data for later playback.
LFO1 and LFO2
The LFOs provides a periodic modulation effect. Their controls are:
Frequency: Varies the LFO modulation rate.
Waveform: Choose from sine, triangle, square or random.
Trigger: When enabled, the LFO always starts from the same point when the
Cell using the LFO is triggered.
Sync: This syncs the frequency to the tempo of BATTERY 3 or your sequencer.
In this case, the Frequency control indicates note values rather than an
absolute rate.
Fade in: Sets the time over which the LFO signal fades in after triggering.
PW: The pulse width control changes the waveform’s duty cycle. For example,
it can continuously vary the square waveform’s width. This is only available
for the square wave.
BATTERY 3 – 53
Page 54

Modulation Envelope
The Envelope adds a modulation signal that varies over time in a non-periodic
way. The controls are:
AHD: This pushbutton selects a simple AHD (Attack-Hold-Decay) envelope.
This envelope is good for “one-shot” sample playback.
AHDSR: This pushbutton selects a AHDSR (Attack-Hold-Decay-Sustain-Release)
envelope. Typically, the AHDSR envelope is for samples with a signicant
sustain time (especially when played from a MIDI keyboard). AHD mode
disables the Sustain and Release controls.
Attack (A): The time it takes for the envelope to reach its maximum level.
Curve: Sets the shape of the envelope curves from concave, to linear (0), to
convex.
Hold (H): How long the envelope will hold at its maximum level. Set this to
10-30ms to add ‘punch’ to a signal.
Decay (D): The time it takes for the envelope to fall from the held level to the
sustain level.
Sustain (S): The level that will be maintained as long as the incoming MIDI
note is held.
Release (R): The time for the sustain level to return to zero after receiving a
MIDI note-off (i.e., the MIDI trigger ends).
Modulation Router
This section provides up to 8 modulation paths, each selected by a corresponding
button. An illuminated button indicates that the path has all the following
elements programmed:
• A modulation source (selected from a drop-down menu).
• Slider with display to determine the amount of modulation (this can be
positive or negative).
• A modulation destination that the signal will control (selected from a
drop-down menu).
If there is no modulation source or modulation destination, the button will
not be lit because the path does nothing.
Important: Please note that certain modulation sources cannot be routed
to certain targets. These targets will not be available as an option from
the drop-down menu.
54 – BATTERY 3
Page 55

Modulation Sources
Available modulation sources are:
None (no modulation)
Velocity
Modulation wheel
Pitchbend
Polyphonic Aftertouch
Mono (Channel) Aftertouch
Key Position
MIDI Controllers
Release Velocity
Release Trigger Counter
LFO1
LFO2
Modulation Envelope
Volume Envelope
Pitch Envelope
Modulation Amount Slider
This determines the “depth” of the effect on the Modulation Destination. The
range is from -100% to +100%, with 0% (no effect) at the fader’s center.
The display eld to the right of the fader displays the current setting value.
If any combination of modulations exceed an effect level of 100%, the value
will be “clipped,” or limited, to the maximum value.
Modulation Destination
The Modulation Destination is the BATTERY 3 parameter that will be controlled
by the Modulation Source. Available Destinations are:
None (no modulation)
Volume
Pan
Tune
Saturation
Bits
Hertz
BATTERY 3 – 55
Page 56

Filter Cutoff
Filter Resonance
EQ Frequency 1
EQ Bandwidth 1
EQ Gain 1
EQ Frequency 2
EQ Bandwidth 2
EQ Gain 2
EQ Frequency 3
EQ Bandwidth 3
EQ Gain 3
LFO 1Frequency
LFO 1 Intensity Multiply
LFO 1 Intensity Add
LFO 2Frequency
LFO 2 Intensity Multiply
LFO 2 Intensity Add
Modulation Envelope Attack
Modulation Envelope Hold
Modulation Envelope Decay
Modulation Envelope Sustain
Modulation Envelope Release
Modulation Envelope Intensity Add
Modulation Envelope Intensity Multiply
Loop Start
Loop Length
Sample Start
Pitch envelope
Volume envelope
If for some reason the modulation intensity is not sufcient, it is possible to
route several modulation strips to one destination.
56 – BATTERY 3
Page 57
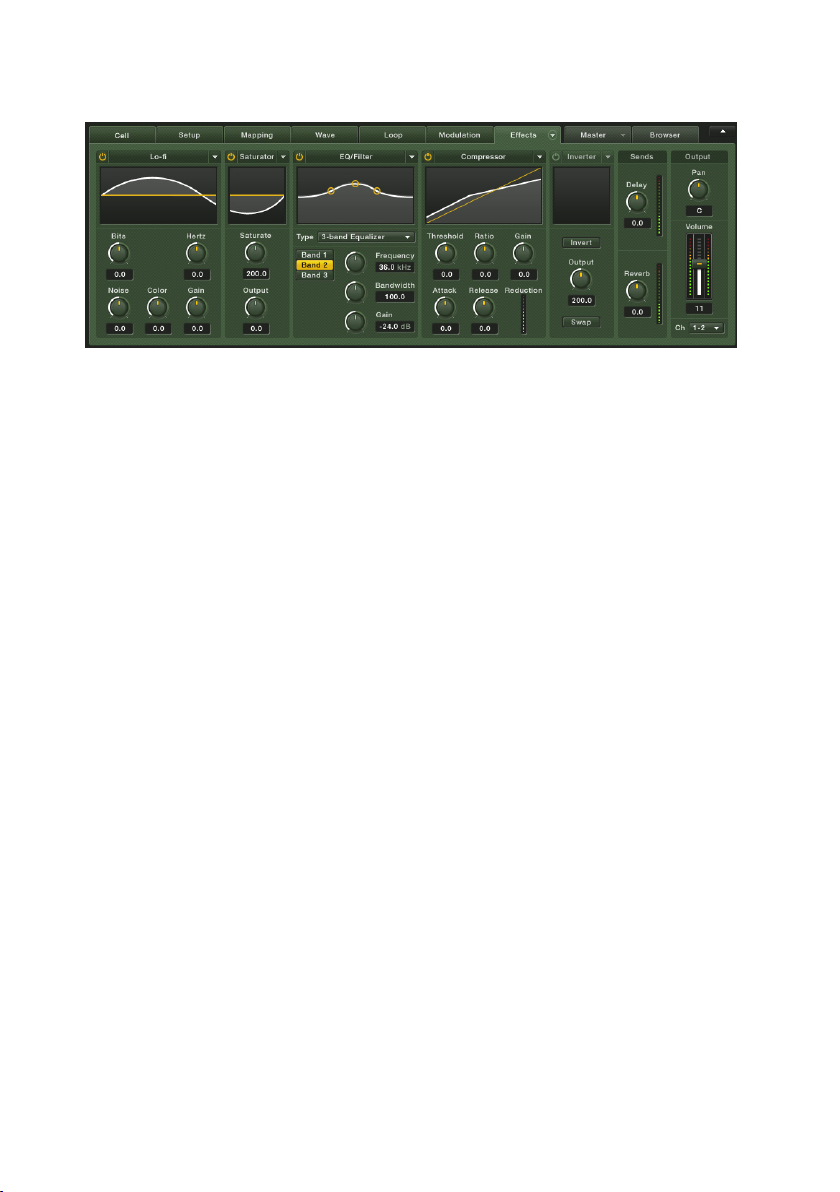
Effects View Tab
Change a Cell’s tonality or sonic characteristics with BATTERY 3’s wide range of effects.
BATTERY 3 has a selection of top quality effects that can be applied to change
the sonic characteristics of a Cell’s output. There is another set of effects in
the Master section that apply to the entire kit. Cell effects can be modulated
while Master effects cannot.
Lo-: Decreases the quality of your audio signal by lowering the resolution or
sample rate – great for producing ‘dirty’ sounds such as those produced by
old drum machines.
Saturator: Provides expansion/compression/saturation effects for the selected
Cell.
EQ/Filter: Changes the frequency characteristics of a Cell.
Compressor: Processes dynamics by reducing the difference in amplitude
between soft and loud signals. Gives drum sounds more presence and
‘punch’.
Inverter: Inverts the phase or pan position (reverse the left and right channels)
of a signal.
Sends: Two send knobs can be used to send the Cell’s output signal to BATTERY
3’s master Delay and Reverb effects. The further you turn the knobs to the
right, the ‘wetter’ the sound will be.
Each effect in the Effects section has an On/Off switch to activate and
deactivate it, and an excellent set of presets ready for a wide range of
applications.
BATTERY 3 – 57
Page 58

Lo-
Mess up your pristine signal in a variety of rude ways.
The Lo- module decreases the quality of your audio signal by lowering the
resolution or sample rate. Here are the controls:
Bits: This parameter dials in the bit resolution, from 16 bits down to 1 bit.
Along the way, you can emulate the 13-bit sound of the Ensoniq EPS, 12-bit
sound of the E-mu SP-12 and Akai S900, the 8-bit sound of the Ensoniq
Mirage, and even go for extreme lo- with 6 bits and under of resolution.
Hertz: Hertz changes the sample rate, from 15.8kHz down to 1kHz. Not only
can it give “clangy,” tonally metallic sounds, but when swept with modulation,
produces ring modulator-type effects.
Noise: Adds ‘hiss’ to the audio signal.
Color: Determines the noise’s tonality and works like a Lowpass lter. Higher
values reduce the high frequency noise.
Gain: Adjusts the module’s overall level.
58 – BATTERY 3
Page 59

Saturator
Use the saturator to greatly alter your drum sound.
Battery 3’s Saturation unit provides expansion/compression/saturation effects
for selected Cells. Unlike a standard audio compressor/expander, Saturation
works on individual sample bits, not the overall sound. Therefore it can greatly
alter the sound of even the shortest samples.
Saturate: A negative setting expands the sound, making quiet sounds quieter
and loud sounds louder, while a positive setting provides a compression-like
effect, where loud sounds become quieter and quiet sounds become louder.
Saturation increases as values become more positive or negative from the
default ‘0’ setting.
Output: Sets the module’s level.
EQ/Filter
Change a Cell’s tonality with a variety of lter types.
BATTERY 3 – 59
Page 60

The Filter section can change the frequency characteristics of a Cell in various
ways, from bassy and muddy, to bright and trebly, and anywhere in between. A
lter is basically a special kind of amplier that changes gain only at specic
frequencies, either boosting or cutting those frequencies. Filters require a fair
amount of CPU power, so leave them turned off when they’re not needed.
Different lter types affect the sound differently. Here are your options on
BATTERY 3:
Low-Pass lters: Passes frequencies below a certain cutoff point, and attenuates
signals above the cutoff point. The more poles, the steeper the cutoff, and the
more rapidly response falls past the cutoff point. (For the technically curious,
each pole increases the slope by about 6dB octave. For example, a 4-pole
low-pass lter has a 24dB/octave slope, which means that above the cutoff
frequency, the response drops by 24dB for each additional octave.)
High-Pass lters: This is the inverse of the Low-Pass response. It passes
frequencies above a certain cutoff point, while attenuating signals below the
cutoff point.
Band-Pass lters: This attenuates signals above and below the cutoff frequency
(or more correctly, the resonant frequency). Again, more poles create a steeper
cutoff.
Band EQ lters: Each band has three parameters, Boost/Cut (increases or
decreases response), Frequency (the center point where the boosting or cutting
occurs), and Bandwidth (the range of frequencies over which boosting or
cutting occurs, from narrow to broad). A 1-Band EQ has one such stage, a
2-band EQ has two such stages, etc.
Phase Filter: Provides the type of ltering associated with “phase shifter”
effects.
Vowel A and B Filters: These two lters model the response created by
the human mouth when pronouncing vowels (yes, your mouth is a type of
mechanical lter). Sweeping a vowel lter’s cutoff and resonance controls can
produce very “humanized” ltering sounds.
Band 1/Band 2/Band 3: These are buttons with which you can select and adjust
each of three lter bands.
Please note that the available complement of controls depends on what lter
type you’ve selected.
The EQ/Filter also has control knobs that vary depending on the type of
lter:
Cutoff: Sets the frequency above which signals are attenuated. (Approximate
range: 43.6Hz to 21.8Khz.)
60 – BATTERY 3
Page 61

Resonance: Emphasizes the frequencies just below the cutoff. Values range
from 0% (no emphasis) to 100% (maximum emphasis).
Frequency: Chooses the frequency at which boosting or cutting will occur.
Bandwidth: Sets the width (bandwidth) of the frequency band to be boosted
or cut.
Gain: Controls the amount of boost (positive values) or cut (negative values).
Compressor
Add punch and control dynamics with compression.
Compression is a signal processing technique that controls dynamics, and
is commonly used in recording. It reduces peaks and raises low-level signals
to produce a higher average signal level, thus creating a “hotter” sound. Use
caution, though; too much compression may sound impressive at rst (“Wow,
that sounds really loud! Cool!”) but it can also be fatiguing. Most people
feel that it’s important for music to have some degree of dynamics, and if
you want a loud sound, it’s better to turn up the volume than add excessive
compression.
On/Off Switch: As with lters, dynamics processors require some CPU power.
Only turn on a compressor when needed.
Threshold: This sets the level above which compression begins. For example,
with a threshold of –10dB, signals below that level will be relatively unaffected,
but signals above that level will be attenuated. The degree of attenuation is
set by the…
Ratio: This setting indicates the ratio of input signal to output signal once
a signal exceeds the threshold. For example, a ratio of 3:1 means that if a
signal is above the threshold, a 3dB increase in input level yields only a 1dB
increase in output level.
BATTERY 3 – 61
Page 62

Gain: Because the peak level has been reduced, use the gain to make up the
difference. However, be careful to avoid clipping. A good rule of thumb is to
set the Gain so that peaks with the compressor On reach the same level as
peaks with the compressor Off.
Attack: This determines how long it takes for the compression effect to kick
in once the input signal exceeds the threshold. The higher the value, the more
percussive the effect, with the tradeoff being higher peak levels. Lower values
give a more “squashed” sound, but keep peaks to a minimum.
Release: Sets how long it takes for the compressor gain to return to normal
after the input signal has gone below the threshold.
Compressor Tips
• Minimizing noise. Do not overcompress, as this makes for a thin, unnatural
sound. Use the bypass switch to compare the compressed and non-
compressed sounds; you may nd that just a little bit of compression
gives the desired effect.
• “Mystery” compression increases. If it seems like there’s been a sudden
increase in compression but you didn’t increase the compression amount,
then the input signal going to the compressor may have increased.
Inverter
Invert your signal’s phase and/or pan position.
This module allows you to invert the phase and/or the pan position (i.e.
reversing the left and right channels) of your audio. It allows you to react to
phase cancellation. Here are the controls:
62 – BATTERY 3
Page 63

Invert: Inverts the phase of your audio.
Swap: Reverses the left and right channels in stereo.
Output: Sets the module’s level.
Sends
The Effects section also has two Send controls for sending the Cell’s output
signal to BATTERY 3’s Delay and Reverb units respectively:
Delay: Determines the amount of signal to be sent to the Delay module.
Reverb: Determines the amount of signal to be sent to the Reverb module.
BATTERY 3 – 63
Page 64

Master View Tab
You can apply a range of top quality effects to a whole BATTERY 3 kit.
As well as the comprehensive Effects section that can be used to apply a range
of effects to each individual Cell, BATTERY 3 has an additional selection of
top quality processors that can be applied to an entire drum kit:
EQ/Filter: Changes the frequency characteristics in various ways.
Compressor: Processes dynamics by reducing the difference in amplitude
between soft and loud signals. Can give a mix more presence and punch.
Limiter: Commonly used for processing a stereo mix, a limiter is a compressor
with an extremely high compression ratio.
Delay: A delay unit with tempo sync capabilities.
Reverb: Choose between digital reverb (low CPU usage) and convolution reverb
(higher quality but more demanding on your processor).
Each effect in the Master section has an On/Off switch to activate and deactivate
it, and an excellent set of presets ready for a wide range of applications.
64 – BATTERY 3
Page 65
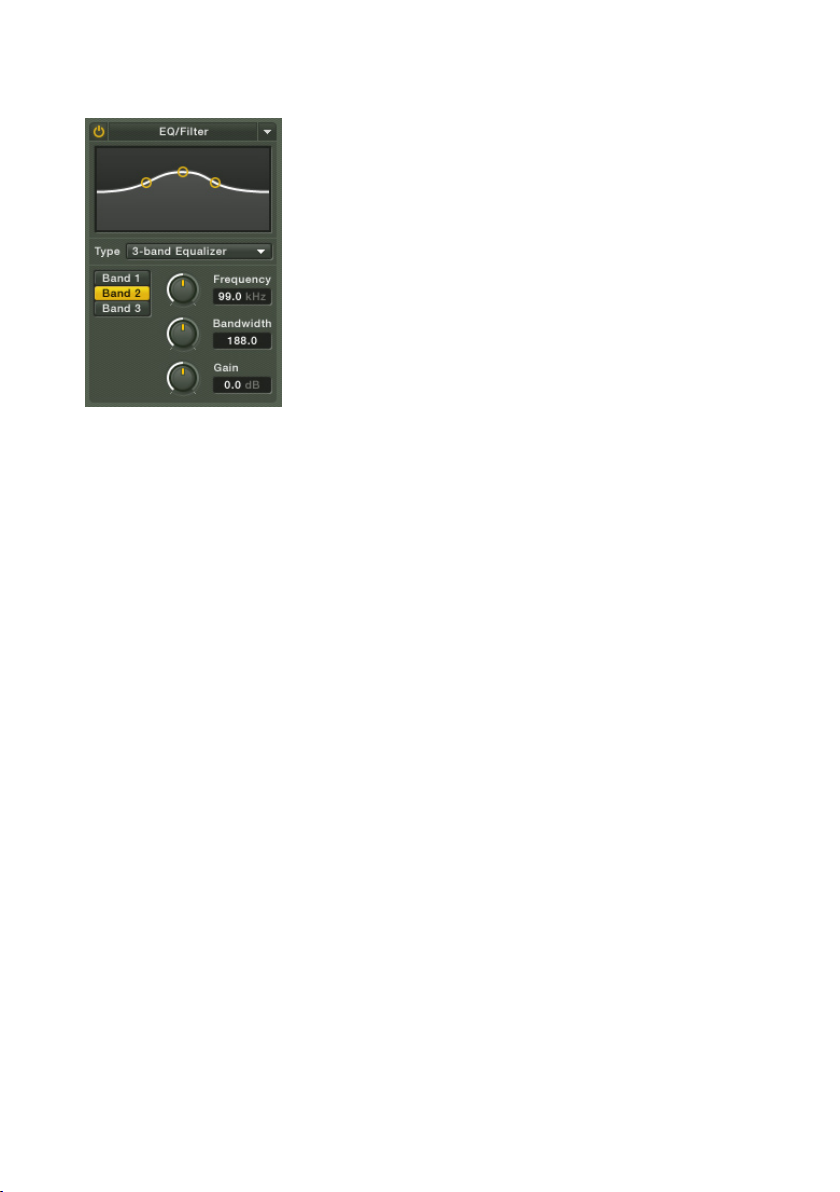
EQ/Filter
Adjust the frequency characteristics of your entire drum mix.
The Filter section can change the frequency characteristics of your mix in
various ways, from bassy and muddy, to bright and trebly, and anywhere in
between. A lter is basically a special kind of amplier that changes gain only
at specic frequencies, either boosting or cutting those frequencies. Filters
require a fair amount of CPU power, so leave them off unless needed.
Here are your Master options on BATTERY 3:
Low-Pass lters: Passes frequencies below a certain cutoff point, and attenuates
signals above the cutoff point. The more poles, the steeper the cutoff, and the
more rapidly response falls past the cutoff point. (For the technically curious,
each pole increases the slope by about 6dB octave. For example, a 4-pole
low-pass lter has a 24dB/octave slope, which means that above the cutoff
frequency, the response drops by 24dB for each additional octave.)
BATTERY 3 – 65
Page 66

High-Pass lters: This is the inverse of the Low-Pass response. It passes
frequencies above a certain cutoff point, while attenuating signals below the
cutoff point.
Band-Pass lters: This attenuates signals above and below the cutoff frequency
(or more correctly, the resonant frequency). Again, more poles create a steeper
cutoff.
Band EQ lters: Each band has three parameters, Boost/Cut (increases or
decreases response), Frequency (the center point where the boosting or cutting
occurs), and Bandwidth (the range of frequencies over which boosting or
cutting occurs, from narrow to broad). A 1-Band EQ has one such stage, a
2-band EQ has two such stages, etc.
Phase Filter : Provides the t ype of filtering ass ociated with “phase
shifter”effects.
Vowel A and B Filters: These two lters model the response created by
the human mouth when pronouncing vowels (yes, your mouth is a type of
mechanical lter). Sweeping a vowel lter’s cutoff and resonance controls can
produce very “humanized” ltering sounds.
Band 1/Band 2/Band 3: These are buttons with which you can select and adjust
each of three lter bands.
Please note that the available complement of controls depends on what lter
type you’ve selected.
The EQ/Filter also has control knobs that vary depending on the type of
lter:
Cutoff: Sets the frequency above which signals are attenuated. (Approximate
range: 43.6Hz to 21.8Khz.)
Resonance: Emphasizes the frequencies just below the cutoff. Values range
from 0% (no emphasis) to 100% (maximum emphasis).
Frequency: Chooses the frequency at which boosting or cutting will occur.
Bandwidth: Sets the width (bandwidth) of the frequency band to be boosted
or cut.
Gain: Controls the amount of boost (positive values) or cut (negative values).
66 – BATTERY 3
Page 67
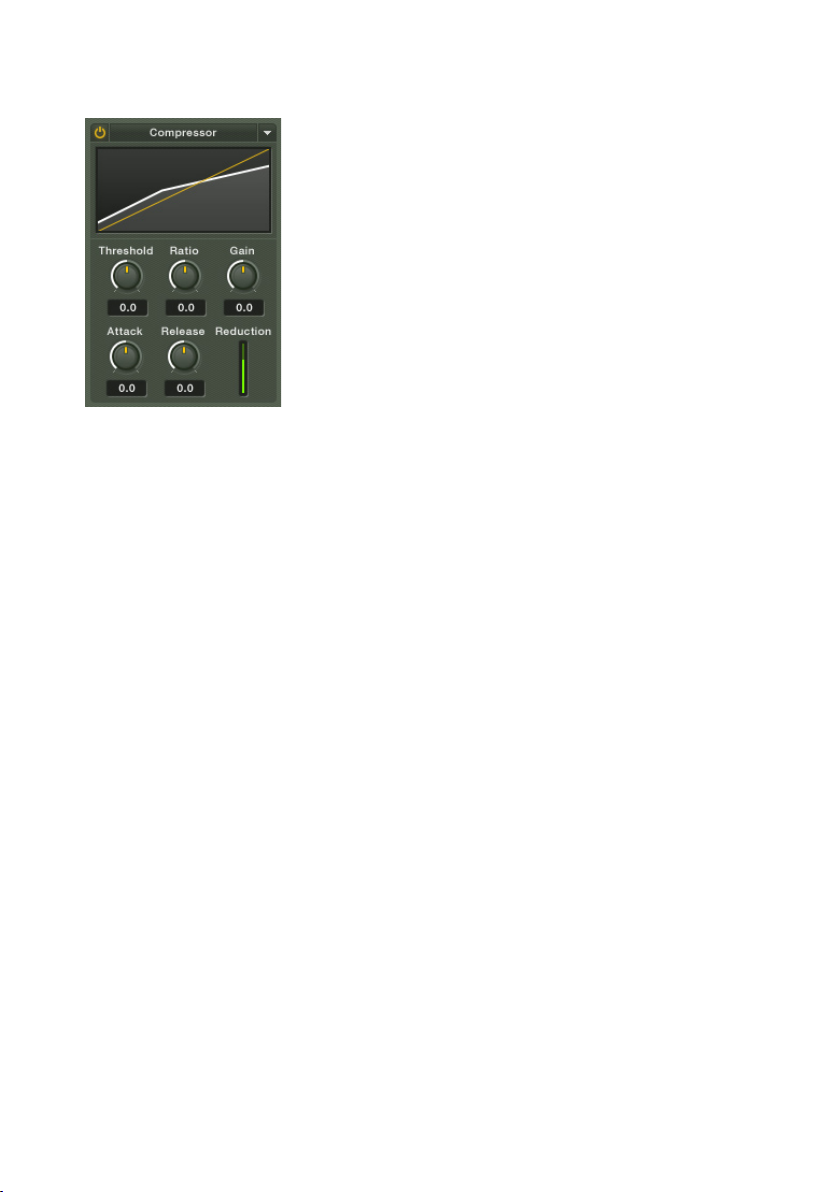
Compressor
Add ‘punch’ to your mix with compression.
Compression is a signal processing technique that controls dynamics, and
is commonly used in recording. It reduces peaks and raises low-level signals
to produce a higher average signal level, thus creating a “hotter” sound. Use
caution, though; too much compression may sound impressive at rst but it
can be fatiguing. Most people feel that it’s important for music to have some
degree of dynamics, and if you want a loud sound, it’s better to turn up the
volume than add excessive compression.
On/Off Switch: As with lters, dynamics processors require some CPU power.
Only turn on a compressor when needed.
Threshold: This sets the level above which compression begins. For example,
with a threshold of –10dB, signals below that level will be relatively unaffected,
but signals above that level will be attenuated. The degree of attenuation is
set by the…
Ratio: This setting indicates the ratio of input signal to output signal once
a signal exceeds the threshold. For example, a ratio of 3:1 means that if a
signal is above the threshold, a 3dB increase in input level yields only a 1dB
increase in output level.
Gain: Because the peak level has been reduced, use the gain to make up the
difference. However, be careful to avoid clipping. A good rule of thumb is to
set the Gain so that peaks with the compressor On reach the same level as
peaks with the compressor Off.
Attack: This determines how long it takes for the compression effect to kick
in once the input signal exceeds the threshold. The higher the value, the more
percussive the effect, with the tradeoff being higher peak levels. Lower values
give a more “squashed” sound, but keep peaks to a minimum.
BATTERY 3 – 67
Page 68
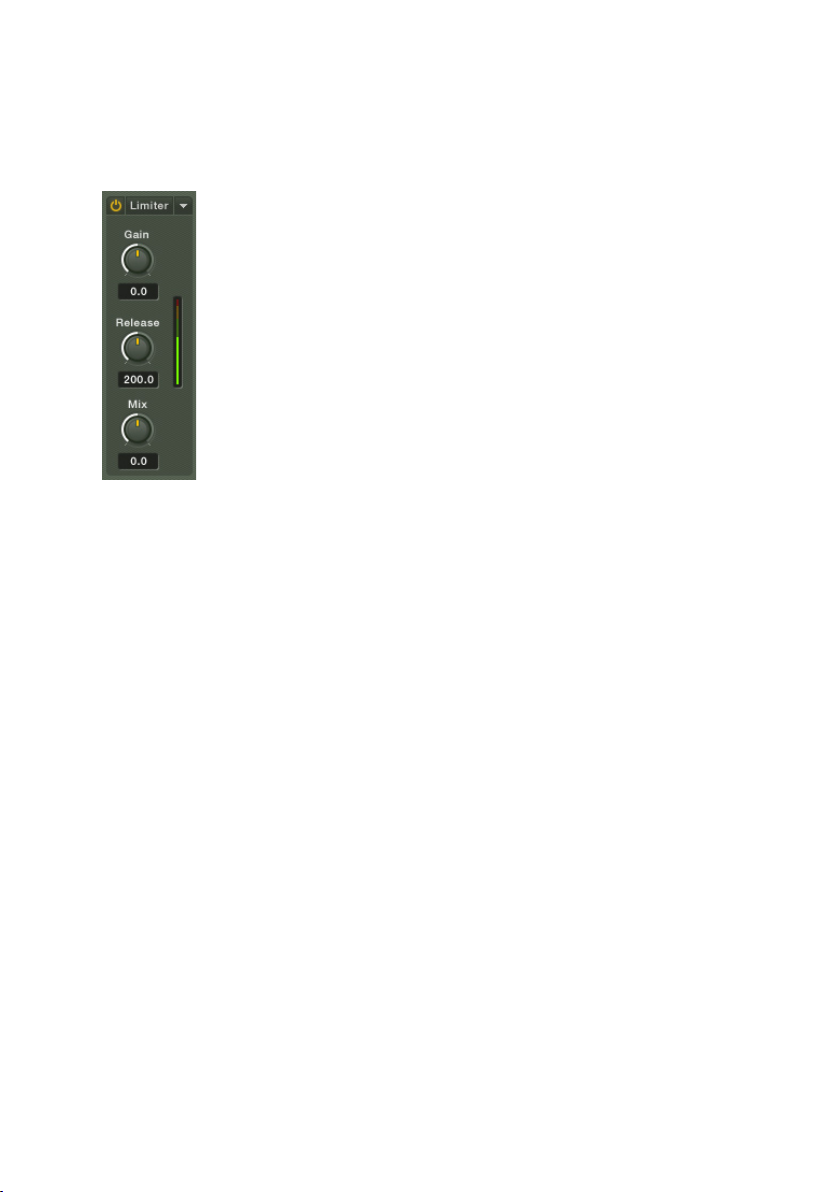
Release: Sets how long it takes for the compressor gain to return to normal
after the input signal has gone below the threshold.
Limiter
The Limiter is a compressor with a very high compression ratio.
A Limiter is a mastering tool that restricts dynamics to an absolute level. An
extreme form of compression, it is useful for making quiet components in
a mix louder, while restricting loud components to a optimum level. It can
change a relatively meek drum mix into a condent, polished sound!
The BATTERY 3 Limiter has 3 controls:
Gain: The input level of the Limiter.
Release: The time required by the Limiter to release the effect.
Mix: Choose a blend between ‘dry’ and limited signal.
68 – BATTERY 3
Page 69
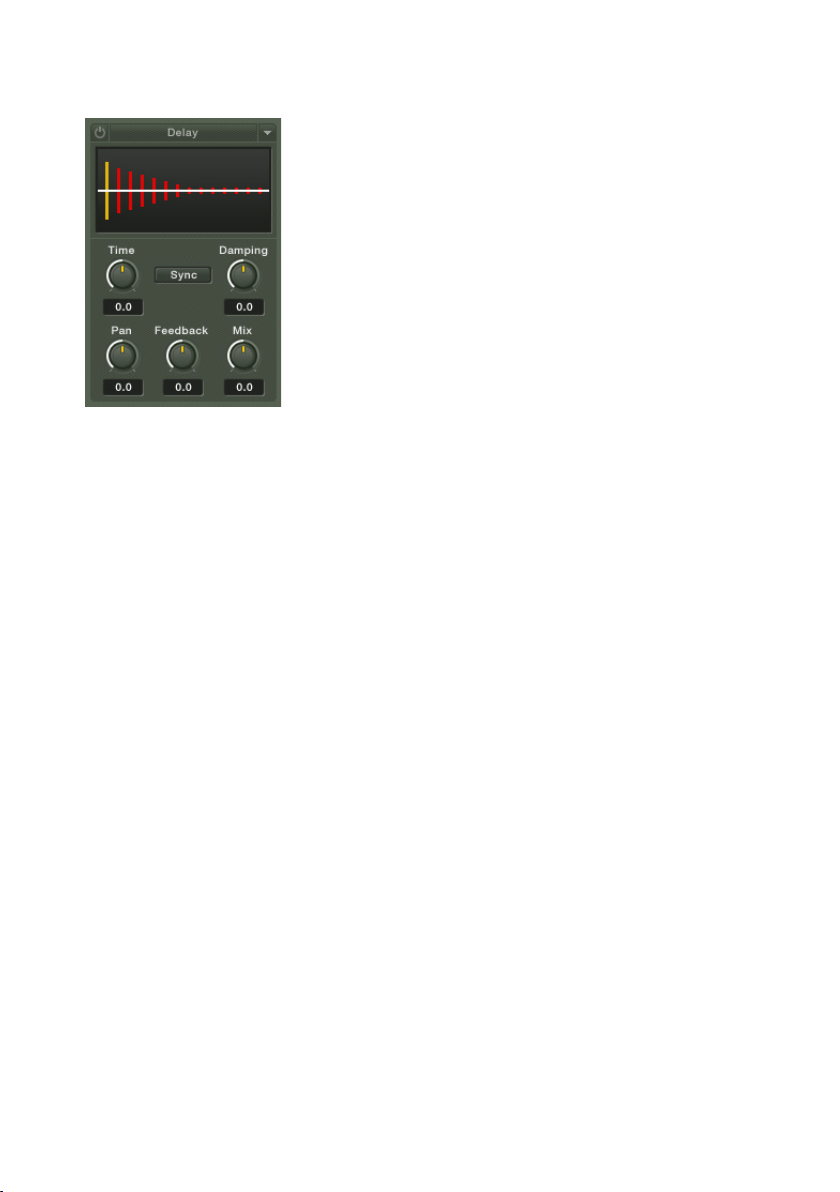
Delay
The Delay section to add extra depth and color to your drum sounds.
BATTERY 3’s Delay unit is simple and exible. It has 6 controls:
Time: The interval in milliseconds between hearing the clean signal and the
rst delay of the delayed signal.
Damping: Reduces (damps) high frequencies in the delayed signal. Higher
values reduce the highs further. With feedback applied (described below),
each successive echo has progressively lower high-frequency response.
Pan: Setting a value higher than 0 results in a panning effect where each
consecutive echo alternates between the left and right channel. The higher
the value, the greater the stereo spread; at 100, signals alternate between
the far left and far right channels.
Feedback: This sends a portion of the output back into the input of the delay
line, which creates repeating echoes. A value of 0 produces only one echo;
higher values give multiple echoes.
Mix: Varies the amount of the processed and straight signals.
Sync: Activate this button to synchronize the delay to your host sequencer.
BATTERY 3 – 69
Page 70
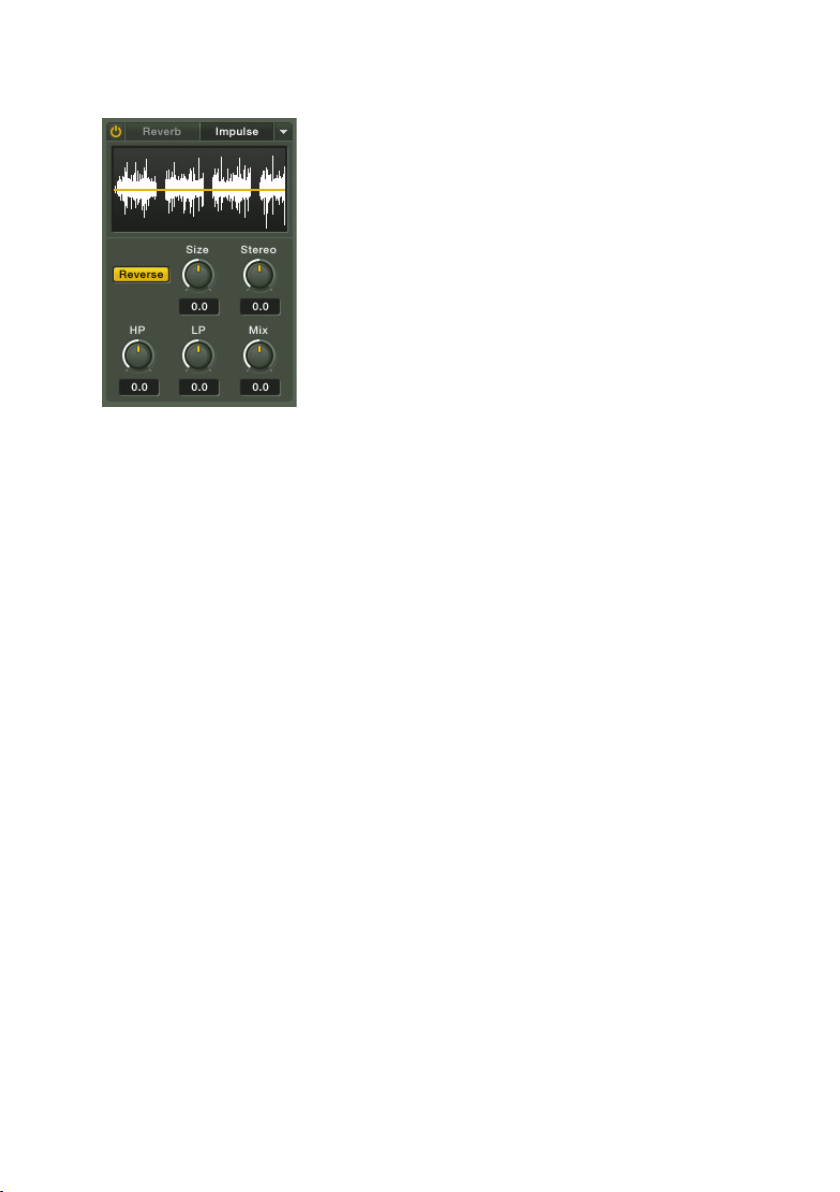
Reverb
The Reverb unit adds ‘acoustic space’ to your drum sound.
Digital reverb simulates the complex reections that occur when sounds play
in an acoustic space, thus adding spaciousness to the sound.
Battery 3’s Reverb section gives you two types of high quality reverb: Reverb
(’normal’ digital reverb) and Impulse (convolution reverb). These are selectable
by clicking on the two buttons at the top of the section.
The controls vary depending on the type of reverb selected. Here are all of
them:
Pre-Delay (PD): Introduces a short amount of delay (0-180ms) before the reverb
takes effect. This simulates the reverb response in large rooms, where a short
time elapses between the time a signal occurs and when it rst bounces off
of a room surface.
Size: Sets the room size, which affects how long the reverberation lasts. Higher
values are equivalent to larger rooms.
Stereo: Higher values increase the stereo effect. Use lower values to simulate
sitting closer to the stage, and higher values for sitting further back in the
hall.
Color: Determines the type of material used to construct the room. Lower
values are softer surfaces (e.g., wood), higher values are harder surfaces
(e.g., concrete).
Damping: Sets the amount of absorption in the room from drapes, people,
acoustic treatment, etc. Higher values simulate more absorption.
Mix: Varies the amount of the processed and straight signals.
70 – BATTERY 3
Page 71

Reverse: When this button is activated (yellow), the reverb is played in
reverse.
HP: High Pass Filter (a lter that lets high frequencies through but restricts
lower ones).
LP: Low Pass Filter (a lter that lets low frequencies through but restricts
higher ones).
Please note that any sample from a cell could be dropped to the convolution
display and used as a convolution sample.
BATTERY 3 – 71
Page 72

Browser View Tab
Battery 3’s new Browser makes it easy to handle samples and loops.
The Browser is where you can browse many things, including:
• Files anywhere on your computer
• A database of favorite samples and instruments
The Browser provides a handy source for drag-and-drop operations. Rather
than having to drag from the desktop, or folders nested within folders, you
can simply drag from the Browser into Battery 3.
The Files Browser displays your computer’s drives and les in a familiar “tree”
structure. It consists of three main panes and an Audition area.
Folder Pane
This shows a directory of your computer, including all hard drives, CD-ROM
drives, etc. – any objects that can “contain” other objects. Both Folders and
Files serve as containers.
A (+) sign next to a listed object indicates that it can be opened to reveal
additional objects. A (-) sign next to a folder indicates that it is already showing
its “child” objects. Click on the (-) to close the folder; any child objects will
no longer be shown.
72 – BATTERY 3
Page 73
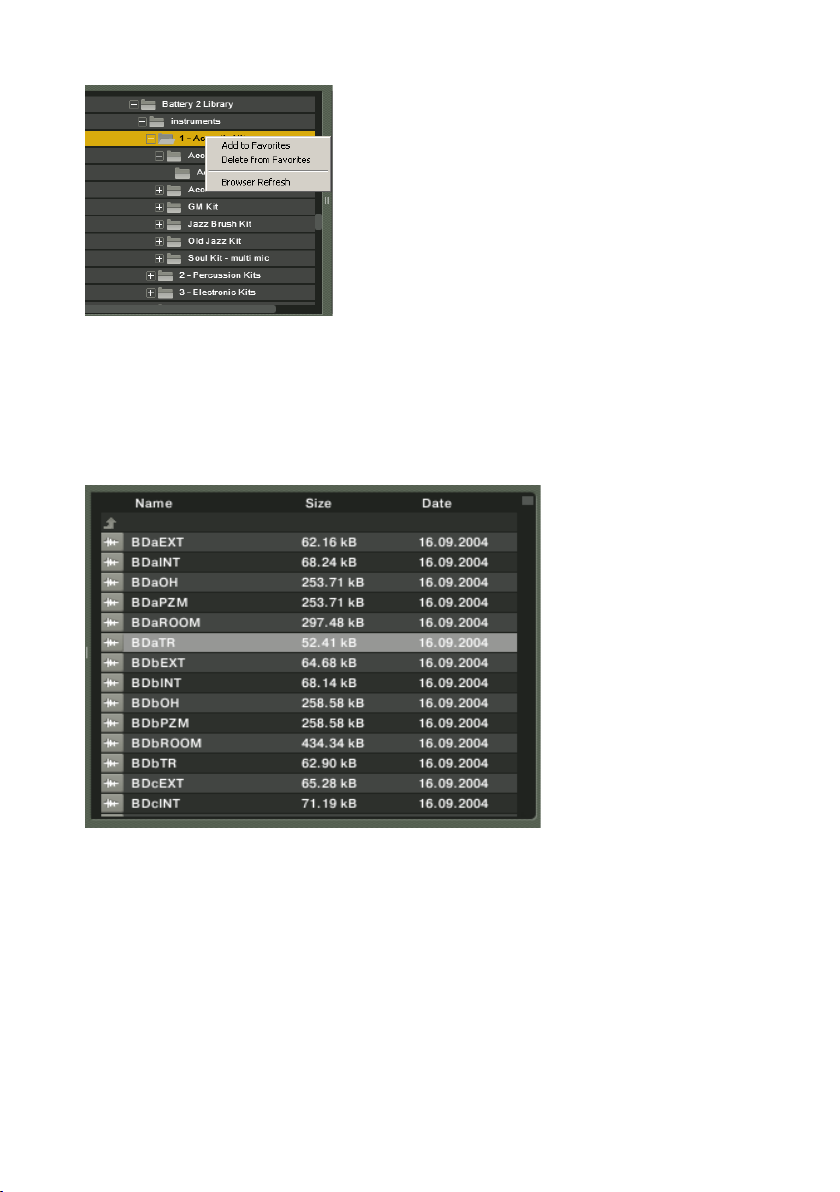
Context Menu: If you right-click (Mac: Ctrl-click) on the folder pane you’ll
get a menu. There you can add folders to Favorites or refresh the Browser to
update its directory listing. Incidently, Favorites show up in the browser in a
folder called „Favorites“.
Files Pane
This shows objects (usually les, but also objects within le containers such
as AKAI CDs or Monolithic Files) that are within a folder. When you click on a
container itself in the Left pane (rather than a “+” or “-” sign), any containers
or objects within the container that Battery 3 recognizes will show up in the
lower pane.
BATTERY 3 – 73
Page 74

A Splitter Bar between the Left and Middle panes can be moved sideways
to change the proportion each pane takes up within the Browser. To do this,
click on the Splitter Bar and drag left or right.
To load a sample into a Battery 3 Matrix Cell, locate the sample using the
Folder and File Panes, then drag it onto the Cell. In this way, you can easily
expand existing Battery 3 kits or build new ones from scratch.
Instrument Info Pane
This pane shows information about individual les:
• File name
• Number of channels
• Sample rate
• Bit resolution
• Length
• File size
74 – BATTERY 3
Page 75

There are buttons immediately below the Instrument Info area. They are as
follows:
Auto Preview: When this button is selected, audio les can be auditioned
automatically by selecting them in the Browser.
Sync: When a sliced loop is played back with this button selected, the playback
will be synced to the tempo set in BATTERY 3 or your host sequencer.
In Kit Preview: When a cell is selected with this button activated, you can
preview a new sample instead of the sample currently present in the selected
cell.
Loop: When this button is activated, your sample is played back as a repeating
loop – useful for REX les!
With Parameters: This is a sub-mode of In Kit Preview as it does not only play
the sample, but also uses the entire sound engine of the ’host’ cell.
Preview Area
The Preview Area at the far right end of the Browser window features some
simple controls:
Volume: For adjusting the volume of sounds previewed in the Browser.
Play: Click this to play a selected sound.
Stop: Click this to stop a previewed sound from being played.
BATTERY 3 – 75
Page 76

Tips and Techniques
As with any sample-based system, BATTERY 3 gives the best results if you
start with high-quality samples, then learn how to exploit its many soundshaping features. Here are some tips to get you started.
Drum Pitch Tuning
• The Root Key setting, in combination with the Key Range, determines
the sample’s “baseline” pitch. However, many modern drum sounds
(especially in dance and experimental music) use extreme pitch-shifting.
For example, downward pitch shifts are common in industrial music,
while upward shifts have found favor in drum and bass as well as
house music.
• You can use the Tune control in the Cell view tab to alter tuning of an
entire Cell, or the Tune control in the Mapping view tab if you want
to tune individual samples within a Cell. Also remember that you can
use key velocity or MIDI note number as modulation to alter the pitch,
and that adding a pitch envelope can create “movement” in the drum
sound.
• An important part of drum kit tuning is matching the tuning to your
song’s key. Although most percussion samples are unpitched, you will
nd that certain pitch adjustments allow your drum kits to “sit” better
in your mix. This is particularly true with hi-hats and cymbals. Once
you have completed a track, spend some time working with your kit’s
Tune settings to optimize the kit for a particular piece of music.
• Use tuning to create multiple drum sounds from one. Want to play a
two-hand shaker part, but have only one shaker sample? Copy it to
another Cell, then detune the copy to provide a slight sonic variation.
Detuning can also create a family of cymbals or toms out of one cymbal
or tom.
• Use radical transpositions to create new sounds. Most sample CDs
don’t seem to have a gong sound, but don’t let that stop you. Take your
longest cymbal sound, add it to a Cell, and in the Map view, detune
it by -12 semitones. Now, copy that Zone within the same Cell, and
detune it by about -3 semitones. When you trigger the two together,
the slightly detuned cymbal gives a convincing attack, while the highly
detuned one provides the necessary sustain.
76 – BATTERY 3
Page 77

• Although one of the above tips mentions using velocity, note number,
or an envelope to modulate pitch, one of the best applications of pitch
modulation is very subtle (almost unnoticeable) velocity control. A
small pitch increase with high velocities emulates a drum’s skin being
stretched, hence pitched higher, when it’s rst hit.
Tweaking the Drum Mix
Creating a great drum and percussion mix is as much art as science. Drum
mixes are the measure of greatness in engineers, and a poorly mixed percussion
mix can ruin an otherwise great song. While it would be impossible to list all
of the “great ideas” that have been written about creating drum mixes, here
are a few points worth noting. Luckily, when using the BATTERY 3 software,
we don’t have to worry about microphone location!
Try these tips on for size – but realize that in electronic music, there are no
rules.
• Use individual drum outputs. When using BATTERY 3 as a VST instrument,
you can have multiple outputs with unique EQ and effects settings.
A typical output setup would include a stereo output mix, individual
snare and hi-hat outputs, and a loop output. This lets you add a unique
reverb to the snare, EQ the hi-hats cleanly, and process sample loops
without affecting the “main” mix.
• Watch your hi-hat volume. Many beginning drum programmers create
kits with overly loud hi-hats. Make sure that the hi-hats slide into the
mix, and don’t dominate it.
• Use more than sub-bass tones for the kick. Using a sub-bass kick will
sound great on your studio monitors and in a big club system. However,
anyone listening to your mix with headphones or a boom box will probably
not hear the kick at all. Make sure your kick includes some high end,
perhaps by layering it with a second sample, or adding a bit of distortion
to increase high-frequency content.
• Use caution when combining sounds into a kit. You generally want to keep
each drum within a specic pitch/EQ range. If you nd that your basic
samples take up too much “sonic space,” you can route the samples
to individual outputs, and “thin” them with external EQs and effects.
• Check your mix in mono. While a wide stereo drum mix may sound great,
it may also keep you from creating a great mix. Try monitoring in mono
as you set up the mix; it’s often easier to get a good blend (even of a
stereo mix) when you do some of your mixing in mono.
BATTERY 3 – 77
Page 78

• Don’t forget processing during mixdown. For example, suppose you have
a good drum part but it seems to lack dynamics. While mixing down,
you can overdub a controller track using a mod wheel or fader to control
the sample start point. As mentioned previously in the manual, setting
the Start point a few milliseconds into the sample creates a more muted
drum sound. Adding negative modulation includes the entire attack,
giving a more dynamic sound. Or, use velocity to control saturation so
that high-velocity hits increase saturation.
Filter Modulation
For dynamic control beyond tying velocity to level and/or sample start point,
assign velocity to the Low-Pass lter cutoff so that hitting the drum harder
produces a slightly brighter sound. This gives extra emphasis to the hardest
hits, making the drums feel more “alive.”
If the drum sound isn’t too bright to begin with, using a low-pass response
might produce too “dull” a sound with soft hits. The solution here is to use
velocity to boost the lter’s treble, or resonance (assuming the cutoff is
somewhere in the treble range). This will again give the effect of creating a
brighter sound with harder hits.
Multiple-Cycle Looping = Long Sustain
This sampling-oriented trick can turn a quick hit into one with a super-long
decay, particularly with toms and kicks. This takes advantage of BATTERY
3’s Loop view, but we’ll be using only one loop.
The object is to loop a single cycle in the drum’s decay tail, and set Count
to a higher number of repeats. Then, turn on the Volume envelope and edit
the decay parameter for the desired length. Try different individual cycles for
looping; they may appear almost identical, but some will usually loop better
than others.
Innite-Cycle Looping = Innite Sustain
To turn a one-shot into a sustained sound - so long as you hold the key - activate
loop 1, set the loop count to innite, adjust the loop start and end points to a
desired location; turn on the volume envelope, activate mode and make sure
the sustain is turned up. Holding notes should result in sustained sounds.
78 – BATTERY 3
Page 79

Click Layering
Sometimes modulating an existing sample just isn’t enough to create serious
dynamics. This is where a “click sample” or sound can come in handy. To make
a click sample, you can simply draw some spikes in a digital audio editor (e.g.
Wavelab, Peak, Audition, Sound Forge, etc.) for about 35 ms, then save that
as a le. Map the click sample into the same Cell as the sample you want to
augment and reduce its volume so it blends in with the main sound, but set
the velocity triggering and crossfade so that the click sample responds only to
higher-velocity signals. In other words, the click’s entire dynamic range should
cover mostly the upper dynamic range of the sound with which it is layered.
Now with really hard hits, the click will come in and add some extra spice.
MIDI Timing Tweaks
BATTERY 3 is only half of the drum part equation: The part that makes sounds.
The other half is the sequence driving BATTERY 3. While it’s important to
tweak BATTERY 3 to deliver the best possible sounds, it’s equally important
to tweak the MIDI data that’s triggering those sounds if you want to produce
the best possible drum part.
There’s a saying that “timing is everything,” yet mathematically perfect timing
is most certainly not everything, otherwise drum machines would have replaced
drummers a long time ago. Good drummers enhance music by playing with
the time—subtly speeding up or slowing down to change a tune’s “feel,” and
leading or lagging specic beats to push a tune or make it lay back a bit
more in the groove.
Often, these time changes ahead of or behind the beat are very small; even a
few milliseconds (ms) can make a difference. This is surprising, since sound
itself moves at about 1/3 meter per second, so a 6ms change theoretically
affects a track about as much as moving an amplier 2 meters further behind
the drummer. Yet when you conduct timing shift experiments, it becomes
obvious that even very small timing differences can change a tune’s groove
when you hear these changes in comparison to a relatively steady beat.
Quantizing everything is the quickest way to suck the life out of a piece of
music. Fortunately, we can use other aspects of sequencers to put the feel
back in to sequenced music.
BATTERY 3 – 79
Page 80

Why Randomization is Not the Answer
Many sequencers provide timing randomization options to help give a more
human-sounding track. Randomization is great if you want to simulate the
effect of a drummer who’s had too many beers; however, for a great groove,
shift timings the way a drummer would. Human drummers add variations in a
mostly non-random way—often subconsciously, so these changes tap directly
into the source of the drummer’s “feel.”
Drummers often hit some drums slightly ahead of, or behind, the beat to
give certain effects. For example, jazz drummers tend to hit a ride cymbal’s
bell a bit ahead of the beat to “push” a song. Rock drummers frequently hit
the snare behind the beat (listen to any Led Zeppelin album) to give a “big”
sound. Of course, the sound isn’t really bigger; but our brain interprets slight
delays as indicating a big space, since we know that in a big space, sound
travels a while through the air before it reaches us.
A sequencer or drum machine’s track shift (or track offset) function, which
can move a track back and forth in increments of single clock pulses, is your
rst line of defense against mechanical grooves. Keep the kick drum on the
beat as a reference, and use track shifting to change the timing of the snare,
toms, and percussion by a few milliseconds. Here are some other track timing
tricks.
• For techno, dance, and acid jazz tunes try moving any double-time
percussion parts (shaker, tambourine, etc.) a little bit ahead of the
beat to give a “faster” feel.
• Sometimes it works well to shift individual notes rather than an entire
track. With tom lls, delay each subsequent note of the ll a bit
more (e.g., the rst note of the ll is on the beat, the second note
approximately 2ms after the beat, the third note 4-5ms after the beat,
the fourth note 6-8ms after the beat, and so on until the last note
ends up about 20ms behind the beat). This can make a tom ll sound
gigantic.
• If two percussion sounds often hit on the same beat in a rhythm pattern,
try sliding one part ahead or behind the beat by a small amount (a few
ms) to keep the parts from interfering with each other.
• If some drums ght with melodic parts (e.g., the kick drum and bass
mosh together), slightly advance the part you want to emphasize in
the mix. It will grab the ear’s attention just before the beat, therefore
bringing more attention to itself.
• Hitting a crash cymbal a bit ahead of the beat makes it really stand out.
Moving it behind the beat meshes it more with the track.
80 – BATTERY 3
Page 81

Why Quantization is Not the Answer either
Remember, machines don’t kill music, people do—and quantization is one of the
main weapons. Although quantization has its place, it’s a very articial process
because no drummer plays with crystal-controlled precision. Fortunately,
sequencers usually let you quantize by a certain percentage (usually called
“quantize strength” or “intensity”). In other words, 100% quantization moves
a note exactly to the nearest beat, but 50% quantization moves it halfway
closer to the beat. Try quantizing the kick to 100% and all other drum tracks
to somewhere between 50% and 80%. The result is a track that sounds
rhythmically correct, but retains most of a performance’s “feel.”
Tempo Track Timing Tweaks
People generally set the tempo in a sequencer to the desired beat, then just
lit it sit there. That’s not the way real music works; in a fascinating study,
Ray Williams and Ernest Cholakis (of DNA Groove Templates) compared the
tempo tracks of two classical pianists playing Moonlight Sonata, and plotted
out the tempo changes. The results were anything but a constant tempo—the
changes looked like a relief map of the Alps.
Even though pop music doesn’t change tempo as much as classical pieces, real
drummers insert subtle tempo changes, inserted over several measures or just in
selected parts of individual measures, to build anticipation and change moods.
Fortunately, most sequencers let you change the tempo track throughout a song;
once you start working with this technique, you’ll nd it an essential part of the
production process. Here are some examples of track shifting.
• To boost a song’s energy level, increase tempo slightly (by 1 or 2 beats
per minute). This is the timing equivalent of modulating pitch upward by a
semitone; both increase excitement. Decreasing tempo has the reverse effect.
Tempo shifts are useful when transitioning between song sections (verse to
chorus, chorus to instrumental, etc.) as well as within a particular section
(such as upping the tempo for the last two measures of a solo).
• Change tempo a little bit before the rst beat of the measure you want to
change. For example, if you’re going from verse to chorus, increase the tempo
halfway through the measure prior to the chorus. This creates a smoother
lead-in than having the tempo change coincide with a measure change.
• For really dramatic effects, ritard the tempo over the course of a measure (e.g.,
one BPM or less lower on each beat) then return to the original tempo. Having
a drum roll during the ritard creates a particularly effective transition.
Acknowledgement: Most of this section was written by author/musician (and
BATTERY user) Craig Anderton, and is used with his permission.
BATTERY 3 – 81
Page 82

Battery 3 Library
Introduction
Battery 3 is not a drum sampler bundled with a library. On the other hand,
the Battery 3 library is not a sample bank bundled with a sample player. The
library is an integral part of the complete product design of Battery. It is
extensive, comprehensive, thoughtfully programmed and well arranged. Here
are some insights to get you started, but extensive kit information can be
found in the “Battery 3 Library Manual.pdf” document.
For those of you who are interested in numbers, here are some impressive
facts:
• over 100 drum kits, specically programmed for Battery 3
• close to 12 GB of samples
• over 2000 individual cells
But numbers are one thing, music is something else. The Battery 3 Library
does not want to show off with quantity alone. It aims to provide you, the
musician, with a serious tool for music production. Regardless if you are a
drum’n’bass bedroom producer, a lm scoring guy, an orchestral composer
or a techno freak, you will nd the right sounds. And you will nd them fast.
You can even can tweak and customize your kit in such a quick and intuitive
way that will make your ears waggle.
Just load a kit and play through it. Unhappy with that snare sound? Right
click on that cell and choose another snare cell. Still unhappy? Use the arrow keys in the cells to step through all snare cells. With over 2000 cells
included, you should nd what you’re looking for. And just before you think
you’re feeling lucky, activate an Articulation from the cell setup page. And
then, make music!
It doesn’t matter what kind of music you make, the diversity of the library is
immense. Load the Multi Mic Rock Kit and you have over 1.5 GB of sample
data at your disposal. Or load the Simple Waveform Kit, with its 5 cute samples,
each being only 4 Kilobytes “large”. Check out the Beatbox Eliot Kit with some
cells containing 127 velocity layers. Or browse through the revised Battery 1
kits, many with just one velocity layer but loads of attitude! Fire up explosions
with the Armageddon Kit, march along with the Marching Band kit, create your
own drum mixes with the four Multi Mic Kits, be serious with the Orchestral
Percussion Kit and have a laugh at our Berlin Headquarters Kit.
82 – BATTERY 3
Page 83

The samples and drum kits of the Battery 3 Library are produced especially
for Battery 3. There is no demo content, no kits advertising for a sample producer, and no clown kits. There are kits like the Acoustic kits which feature
pure unprocessed samples, waiting for further processing in your host. But
there are also the Production kits with processed acoustic samples which
are ready to go.
The library is in no way an add-on to the application, it wasn’t designed to
simply get you started with Battery 3. It was designed to accompany you in
all of your musical projects. Therefore, the purpose of every kit in this library
is to make music without compromises, and that’s how we want you to treat
this library.
Overview
From ethnic to electronic, from high quality to vinyl-style, from GM to experimental, from orchestral drums to drum machines…everything is included at
your ngertips:
There are preview versions of all large kits, and every kit is accompanied by a
midi le which demonstrates the usage of the kit. Some kits like the Orchestral
Percussion Kit or the Timpani Kit come along with several subset kits, giving
you instant access to specic articulations and/or instruments without having
to load the entire kit.
There are also three additional folders labeled Battery 3 kits, Battery 2 kits
and Battery 1 kits. Here you will nd all original kit versions of the former
Battery versions as well as all new kits of Battery 3. These folders also contain
all sample folders.
Last but not least there is the cell library. If you want to start with an empty
kit and build your own kit, this is the way to go. There are over 2000 individual
cells, organized in subfolders making it easy for you to quickly nd what you‘re
looking for.
That‘s enough information for right now! It‘s time for you to re up some
beats and get acquainted with the library. For a detailed description of each
kit, please read the „Battery 3 Library Manual.pdf“ document.
BATTERY 3 – 83
Page 84

Soul* New York House* Robati Kit
Steveland´s Vinyl* Overtime DnX Kit Senv*
Studio Gong Kit R&B** Sintheti
See Our 7T8 Kit Vrtrel Kit
toksin_kit2** Wooden Clog
º denotes Multi Mic Kits
** denotes Battery 3 version of Battery 2 Kits
* denotes Battery 3 version of Battery 1 Kits
toksin_kit1** Wicked*
Rock* Nein Oh Nein Kit REAKTOR*
Vintage* Live Scrapyard Kit Hessy Eye Drum Trax MK2**
NuPop Kit Hip Hop** Off Topic*
Reggae* Lend Drum Kit Orgami Kit
1 - Acoustic 2 - Production 3 - Percussion 4 - Electronic 5 - Synthetic 6 - Special
Basic* 60´s Garrage* Afro Cuban Kit** Apparat** Alais* Armageddon Kit
Full Jazz Kit 70´s Funk* Bongo Kit** 80´s Electro* Alkaloid* Beatbox Eliot**
GM Kit** 70´s Reggae* Conga Kit** Argon* Arcocen** Berlin Headquarters
Heavy Rock Kitº Dragon Kit East Asian Kit Ate Oh Wait Kit Best of Absynth** CD KIT 1**
Jazz Brush** Dub* Marching Band Kit Big Beat* Best of FM7** CD KIT 2**
Multi Mic**º Dub Remix Kit Middle Eastern Kit Clik Dub Kit Best of Kr ypt** Factory Kit
Multi Stick** Elektro Akoustic North Indian Kit D´n´B* Best of Limelite** Microwave Kit
Old Jazz Kit** GVA Kit OrchestralPercussion** Dakeat Kit Dusty Circuit** Noise Kit
Pop Kit Hardkore Gothik Timbale Kit** Dance 1* Earth* Prepared Percussion
Rock Kitº Harsh* Timpani Kit** Dance 2* French* Simple Waveform**
Soul Kit**º Hip Hop* West African Kit Destinct* Glitch Kit Strom*
Tight Kit Jazz* World Music Kit Drum´n´Bass* Mega Synthetic
84 – BATTERY 3
Page 85
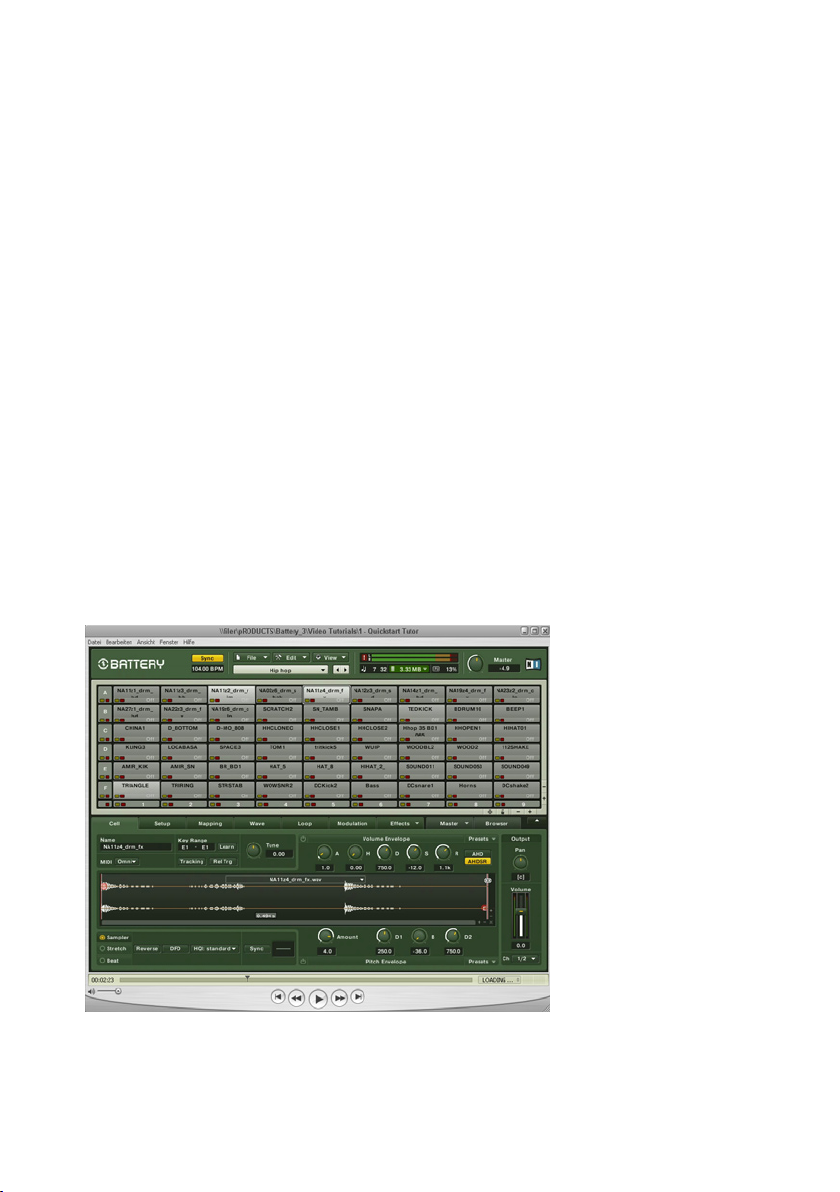
Battery 3 Video Tutorials
On your Battery 3 DVD you also nd 8 Video Tutorials that will help you
discover the Battery 3 functionalities. The tutorials have an approximate size
of 800 MB.
Many sound examples describing Battery in different application areas
demonstrate the exiblity and the power of the Battery 3’s functions and
the 12 GB Sound Library.
The Video Tutorials deal with the following issues:
1 - Battery 3 Quickstart (6:36 min.)(6:36 min.)
2 - What´s New (3:52 min.)
3 - Library (7:16 min.)
4 - Cell Matrix (5:53 min.)
5 - Drum Articulations (5:20 min.)
6 - Master Effects (7:37 min.)
7 - Loops (3:54 min.)
8 – Sound Design (6:29 min.)
Total Play Time: (46:57 min.)
BATTERY 3 – 85
Page 86

Index
A
Articulation .............................. 40
Auto Preview ............................ 75
B
Beat Machine ........................... 30
Browser ................................... 72
Browser View ............................ 72
C
Cell Activation .......................... 35
Cell Info ................................... 22
Cell View .................................. 28
Compressor .................. 61, 64, 67
convolution ............................... 70
Crossfade .................................44
Cycle Round Robin .................... 36
D
Delay ................................. 64, 69
DFD ........................................ 12
F
Filter ................................. 59, 64
Freeze ..................................... 25
H
Humanize ................................. 42
I
Impulse ................................... 70
In Kit Preview ........................... 75
Inverter ....................................62
L
LFO ......................................... 53
Library ..................................... 19
Limiter ............................... 64, 68
Lo- ........................................ 58
Loading Dialogue ...................... 10
Loop ........................................ 75
Loop View ................................ 51
E
Echo ........................................ 41
Edit Menu ................................ 13
Edit Pane ............................. 6, 26
Effects View ............................. 57
EQ ..........................................59
86 – BATTERY 3
M
Mapping View ........................... 43
Master Section ....................... 5, 7
Master View Tab ....................... 64
Master Volume .......................... 19
Matrix .................................. 5, 21
Modulation ............................... 54
Modulation Router ..................... 54
Modulation View .......................53
Mute ....................................... 23
Page 87

N
Normalize ................................ 49
T
Trigger ..................................... 12
O
Open ......................................... 8
Options .................................... 11
Output ............................... 19, 32
Outputs ................................... 12
P
Padlock ................................... 25
Panic ....................................... 19
Pitch Envelope .......................... 31
Q
Quantize .................................. 39
R
Reverb ............................... 64, 70
Reverse.................................... 49
S
Sampler Mode .......................... 29
Saturator .................................. 59
Save .......................................... 9
Sends ...................................... 63
Settings ................................... 13
Setup ...................................... 33
Snap to Zero ............................. 51
Solo ........................................23
Stack Zones ............................. 45
Stretch Mode ............................ 29
Sync ........................................ 75
V
Velocity .................................... 37
Video Tutorials .......................... 85
View Menu ............................... 16
Voice Groups ............................ 33
Volume Envelope ....................... 31
W
Wave Editor .............................. 49
With Parameters ....................... 75
Z
Zones ...................................... 44
BATTERY 3 – 87
 Loading...