

Page 1
®
C 390DD
Direct Digital Integrated Amplier
ENGLISHFRANÇAISESPAÑOLITALIANODEUTSCHNEDERLANDSSVENSKAРУССКИЙ
Owner’s Manual
Page 2

IMPORTANT SAFETY INSTRUCTIONS
ENGLISH FRANÇAIS ESPAÑOL ITALIANO DEUTSCH NEDERLANDS SVENSKA РУССКИЙ
SAVE THESE INSTRUCTIONS FOR LATER USE.
FOLLOW ALL WARNINGS AND INSTRUCTIONS MARKED ON THE AUDIO
EQUIPMENT.
1 Read instructions - All the safety and operating instructions should be read
before the product is operated.
2 Retain instructions - The safety and operating instructions should be retained
for future reference.
3 Heed Warnings - All warnings on the product and in the operating instructions
should be adhered to.
4 Follow Instructions - All operating and use instructions should be followed.
5 Cleaning - Unplug this product from the wall outlet before cleaning. Do not use
liquid cleaners or aerosol cleaners. Clean only with a dry cloth.
6 Attachments - Do not use attachments not recommended by the product
manufacturer as they may cause hazards.
7 Water and Moisture - Do not use this product near water-for example, near a
bath tub, wash bowl, kitchen sink, or laundry tub; in a wet basement; or near a
swimming pool; and the like.
8 Accessories - Do not place this product on an unstable cart, stand, tripod,
bracket, or table. The product may fall, causing serious injury to a child or adult,
and serious damage to the product. Use only with a cart, stand, tripod, bracket, or
table recommended by the manufacturer, or sold with the product. Any mounting
of the product should follow the manufacturer’s instructions, and should use a
mounting accessory recommended by the manufacturer.
9 A product and cart combination should be moved with care. Quick
stops, excessive force, and uneven surfaces may cause the product
and cart combination to overturn.
10 Ventilation - Slots and openings in the cabinet are provided for ventilation and
to ensure reliable operation of the product and to protect it from overheating, and
these openings must not be blocked or covered. The openings should never be
blocked by placing the product on a bed, sofa, rug, or other similar surface. This
product should not be placed in a built-in installation such as a bookcase or rack
unless proper ventilation is provided or the manufacturer’s instructions have been
adhered to.
11 Power Sources - This product should be operated only from the type of power
source indicated on the marking label. If you are not sure of the type of power
supply to your home, consult your product dealer or local power company. The
primary method of isolating the amplier from the mains supply is to disconnect
the mains plug. Ensure that the mains plug remains accessible at all times. Unplug
the AC power cord from the AC outlet if the unit will not be used for several
months or more.
12 Grounding or Polarization - This product may be equipped with a polarized
alternating current line plug (a plug having one blade wider than the other). This
plug will t into the power outlet only one way. This is a safety feature. If you are
unable to insert the plug fully into the outlet, try reversing the plug. If the plug
should still fail to t, contact your electrician to replace your obsolete outlet. Do
not defeat the safety purpose of the polarized plug.
13 Power Cord Protection - Power supply cords should be routed so that they
are not likely to be walked on or pinched by items placed upon or against them,
paying particular attention to cords at plugs, convenience receptacles, and the
point where they exit from the product.
14 Outdoor Antenna Grounding - If an outside antenna or cable system is
connected to the product, be sure the antenna or cable system is grounded so
as to provide some protection against voltage surges and built-up static charges.
Article 810 of the National Electrical Code, ANSI/NFPA 70, provides information
with regard to proper grounding of the mast and supporting structure, grounding
of the lead-in wire to an antenna discharge unit, size of grounding conductors,
location of antenna discharge unit, connection to grounding electrodes, and
requirements for the grounding electrode.
NOTE TO CATV SYSTEM INSTALLER
This reminder is provided to call the CATV system installer’s attention to Section 820-40 of
the NEC which provides guidelines for proper grounding and, in particular, species that
the cable ground shall be connected to the grounding system of the building, as close to
the point of cable entry as practical.
15 Lightning - For added protection for this product during a lightning storm, or
when it is left unattended and unused for long periods of time, unplug it from the
wall outlet and disconnect the antenna or cable system. This will prevent damage
to the product due to lightning and power line surges.
16 Power Lines - An outside antenna system should not be located in the vicinity
of overhead power lines or other electric light or power circuits, or where it can
fall into such power lines or circuits. When installing an outside antenna system,
extreme care should be taken to keep from touching such power lines or circuits
as contact with them might be fatal.
17 Overloading - Do not overload wall outlets, extension cords, or integral
convenience receptacles as this can result in a risk of re or electric shock.
18 Object and Liquid Entry - Never push objects of any kind into this product
through openings as they may touch dangerous voltage points or short-out parts
that could result in a re or electric shock. Never spill liquid of any kind on the
product.
WARNING: THE APPARATUS SHOULD NOT BE EXPOSED TO DRIPPING
OR SPLASHING, AND OBJECTS FILLED WITH LIQUIDS, SUCH AS VASES,
SHOULD NOT BE PLACED ON THE APPARATUS. AS WITH ANY ELECTRONIC
PRODUCTS, USE CARE NOT TO SPILL LIQUIDS INTO ANY PART OF THE
SYSTEM. LIQUIDS CAN CAUSE A FAILURE AND/OR A FIRE HAZARD.
19 Damage Requiring Service - Unplug this product from the wall outlet and refer
servicing to qualied service personnel under the following conditions:
a) When the power supply cord or plug is damaged.
b) If liquid has been spilled, or objects have fallen into the product.
c) If the product has been exposed to rain or water.
d) If the product does not operate normally by following the operating
instructions. Adjust only those controls that are covered by the operating
instructions as an improper adjustment of other controls may result in
damage and will often require extensive work by a qualied technician to
restore the product to its normal operation.
e) If the product has been dropped or damaged in any way.
f) when the product exhibits a distinct change in performance-this indicates a
need for service.
20 Replacement Parts - When replacement parts are required, be sure the
service technician has used replacement parts specified by the manufacturer
or have the same characteristics as the original part. Unauthorized
substitutions may result in fire, electric shock, or other hazards.
2
Page 3
IMPORTANT SAFETY INSTRUCTIONS
21 Safety Check - Upon completion of any service or repairs to this product, ask the
service technician to perform safety checks to determine that the product is in
proper operating condition.
22 Wall or Ceiling Mounting - The product should be mounted to a wall or ceiling
only as recommended by the manufacturer.
23 Heat - The product should be situated away from heat sources such as radiators,
heat registers, stoves or other products (including ampliers) that produce heat.
24 Headphones - Excessive sound pressure form earphones and headphones can
cause hearing loss.
25 Battery Disposal - When disposing of used batteries, please comply with
governmental regulations or environmental public instruction’s rules that apply
in your country or area. Batteries (battery pack or batteries installed) must not be
exposed to excessive heat such as sunshine, re or the like.
WARNING
TO REDUCE THE RISK OF FIRE OR ELECTRIC SHOCK, DO NOT EXPOSE THIS PRODUCT TO
RAIN OR MOISTURE.
CAUTION
TO PREVENT ELECTRIC SHOCK, MATCH WIDE BLADE OF PLUG TO WIDE SLOT, FULLY INSERT.
THE LIGHTNING FLASH WITH ARROWHEAD SYMBOL, WITHIN AN EQUILATERAL TRIANGLE,
IS INTENDED TO ALERT THE USER TO THE PRESENCE OF UNINSULATED
“DANGEROUS VOLTAGE” WITHIN THE PRODUCT ’S ENCLOSURE THAT MAYBE
OF SUFFICIENT MAGNITUDE TO CONSTITUTE A RISK OF ELECTRIC SHOCK
TO PERSONS.
THE EXCLAMATION POINT WITHIN AN EQUILATERAL TRIANGLE IS INTENDED
TO ALERT THE USER TO THE PRESENCE OF IMPORTANT OPERATING
AND MAINTENANCE (SERVICING) INSTRUCTIONS IN THE LITERATURE
ACCOMPANYING THE APPLIANCE.
NOTES ON ENVIRONMENTAL PROTECTION
At the end of its useful life, this product must not be disposed of with
regular household waste but must be returned to a collection point for
the recycling of electrical and electronic equipment. The symbol on the
product, user’s manual and packaging, point this out.
The materials can be reused in accordance with their markings. Through
re-use, recycling of raw materials or other forms of recycling of old
products, you are making an important contribution to the protection of our environment.
Your local administrative oce can advise you of the responsible waste disposal point.
INFORMATION ABOUT COLLECTION AND DISPOSAL OF WASTE BATTERIES
DIRECTIVE 2006/66/EC OF THE EUROPEAN PARLIAMENT AND THE COUNCIL
OF EUROPEAN UNION FOR EUROPEAN CUSTOMERS ONLY
Batteries bearing any of these symbols indicate that they
should be treated as “separate collection” and not as
municipal waste. It is encouraged that necessary measures
are implemented to maximize the separate collection of
waste batteries and to minimize the disposal of batteries as
mixed municipal waste.
End-users are exhorted not to dispose waste batteries as
unsorted municipal waste. In order to achieve a high level of
recycling waste batteries, discard waste batteries separately
and properly through an accessible collection point in your
vicinity. For more information about collection and recycling
of waste batteries, please contact your local municipality, your waste disposal service or the
point of sale where you purchased the items.
By ensuring compliance and conformance to proper disposal of waste batteries, potential
hazardous eects on human health is prevented and the negative impact of batteries and
waste batteries on the environment is minimized, thus contributing to the protection,
preservation and quality improvement of the environment.
ENGLISHFRANÇAISESPAÑOLITALIANODEUTSCHNEDERLANDSSVENSKAРУССКИЙ
CAUTION
Changes or modications to this equipment not expressly approved by NAD Electronics
for compliance could void the user’s authority to operate this equipment.
CAUTION REGARDING PLACEMENT
To maintain proper ventilation, be sure to leave a space around the unit (from the largest
outer dimensions including projections) that is equal to or greater than shown below.
Left and Right Panels: 10 cm
Rear Panel: 10 cm
Top Panel: 10 cm
RECORD YOUR MODEL NUMBER NOW, WHILE YOU CAN SEE IT
The model and serial number of your new C 390DD are located on the back of the cabinet.
For your future convenience, we suggest that you record these numbers here:
Model no: ...........................................
Serial no.: ..........................................
NAD is a trademark of NAD Electronics International, a division of Lenbrook Industries Limited
Copyright 2012, NAD Electronics International, a division of Lenbrook Industries Limited
3
Page 4

INTRODUCTION
TABLE OF CONTENTS
ENGLISH FRANÇAIS ESPAÑOL ITALIANO DEUTSCH NEDERLANDS SVENSKA РУССКИЙ
IMPORTANT SAFETY INSTRUCTIONS .........................2
INTRODUCTION
GETTING STARTED ...............................................5
WHAT’S IN THE BOX ..................................................5
CHOOSING A LOCATION .............................................5
IDENTIFICATION OF CONTROLS
FRONT PANEL ....................................................6
REAR PANEL .....................................................7
MDC CLASSIC UPGRADE SLOT .......................................9
DD HDM1 DIRECT DIGITAL HDMI ..................................9
DD AP1 DIRECT DIGITAL ANALOGPHONO .........................9
DD BluOS .............................................................9
AVR 4 REMOTE CONTROL ........................................11
USING THE AVR 4 REMOTE CONTROL ............................... 11
LIBRARY ............................................................ 14
OPERATION
USING THE C 390DD .............................................15
SELECTING SOURCES ............................................... 15
DISPLAY THE MAIN MENU .......................................... 15
MAIN MENU ........................................................ 15
BASS/TREBLE ....................................................... 15
BALANCE ........................................................... 15
SETUP MENU ....................................................... 16
EQUALIZATION/ROOM EQ .......................................... 16
POLARITY ..........................................................16
LISTENING MODE .................................................. 17
SPEAKER COMPENSATION .......................................... 17
PRE OUT/SUBWOOFER ............................................. 17
DIGITAL SOFT CLIPPING ............................................ 18
USING THE C 390DD .............................................19
IR CHANNEL ........................................................ 19
AUTO STANDBY .................................................... 19
SOURCE SETUP ..................................................... 19
SINGLEENDED/BALANCED ........................................ 20
PHONO ............................................................. 21
SPEAKERS ON/OFF HEADPHONE ..................................22
USB MODE ......................................................... 22
LISTENING TO USB DEVICE ......................................... 22
LISTENING TO A COMPUTER ........................................ 22
RENAMING A SOURCE INPUT ....................................... 22
THANK YOU FOR CHOOSING NAD.
The NAD C 390DD is a new concept in amplication exemplied by
leading edge audio system architecture. The C 390DD has no analog
stages in its signal path, keeping music in the digital domain right up to
the speaker output. All preamplier functions are executed in the digital
domain without the phase shift, noise and distortion that plague all
analog designs. The C 390DD has small footprint, large power, low energy
consumption, future-proof upgradability, software dened operation,
backward compatibility, easy integration and a new high denition system
architecture. The C 390DD’s 35 bit architecture and 108MHz master clock
make it as one of the most accurate DAC technologies available.
As with all our products, NAD’s “Music First” design philosophy guided the
C 390DD design that it can condently promise you both state-of-the-art
technology and audiophile-quality music listening for years to come.
We encourage you to take a few minutes now to read right through this
manual. Investing a little time here at the outset might save you a good
deal of time later, and is by far the best way to ensure that you make the
most of your investment in the C 390DD.
For warranty information contact your local distributor.
NAD SHALL NOT BE HELD LIABLE FOR ANY TECHNICAL OR USER
INTERFACE DISCREPANCIES IN THIS MANUAL.THE C 390DD
OWNER’S MANUAL MAY BE SUBJECT TO CHANGE WITHOUT PRIOR
NOTICE. CHECK OUT THE NAD WEBSITE FOR THE LATEST VERSION
OF THE C 390DD OWNER’S MANUAL.
REFERENCE
TROUBLESHOOTING ............................................23
RESTORING C 390DD TO ITS FACTORY DEFAULT SETTINGS ......... 23
SPECIFICATIONS ................................................24
4
Page 5

WHAT’S IN THE BOX
Packed with your C 390DD you will nd
• A detachable mains power cord
• The AVR 4 remote control with 2 AA batteries
• C 390DD Quick Start Guide
SAVE THE PACKAGING
Please save the box and all of the packaging in which your C 390DD arrived.
Should you move or otherwise need to transport your C 390DD, this is by
far the safest container in which to do so. We’ve seen too many otherwise
perfect components damaged in transit for lack of a proper shipping
carton, so please: Save that box!
CHOOSING A LOCATION
Choose a location that is well ventilated (with at least several inches to
both sides and behind), and that will provide a clear line of sight, within
25 feet/8 meters, between the C 390DD’s front panel and your primary
listening/viewing position - this will ensure reliable infrared remote control
communications. The C 390DD generates a modest amount of heat, but
nothing that should trouble adjacent components. It is especially important
that sucient ventilation be provided.
INTRODUCTION
GETTING STARTED
ENGLISHFRANÇAISESPAÑOLITALIANODEUTSCHNEDERLANDSSVENSKAРУССКИЙ
5
Page 6
ENGLISH FRANÇAIS ESPAÑOL ITALIANO DEUTSCH NEDERLANDS SVENSKA РУССКИЙ
IDENTIFICATION OF CONTROLS
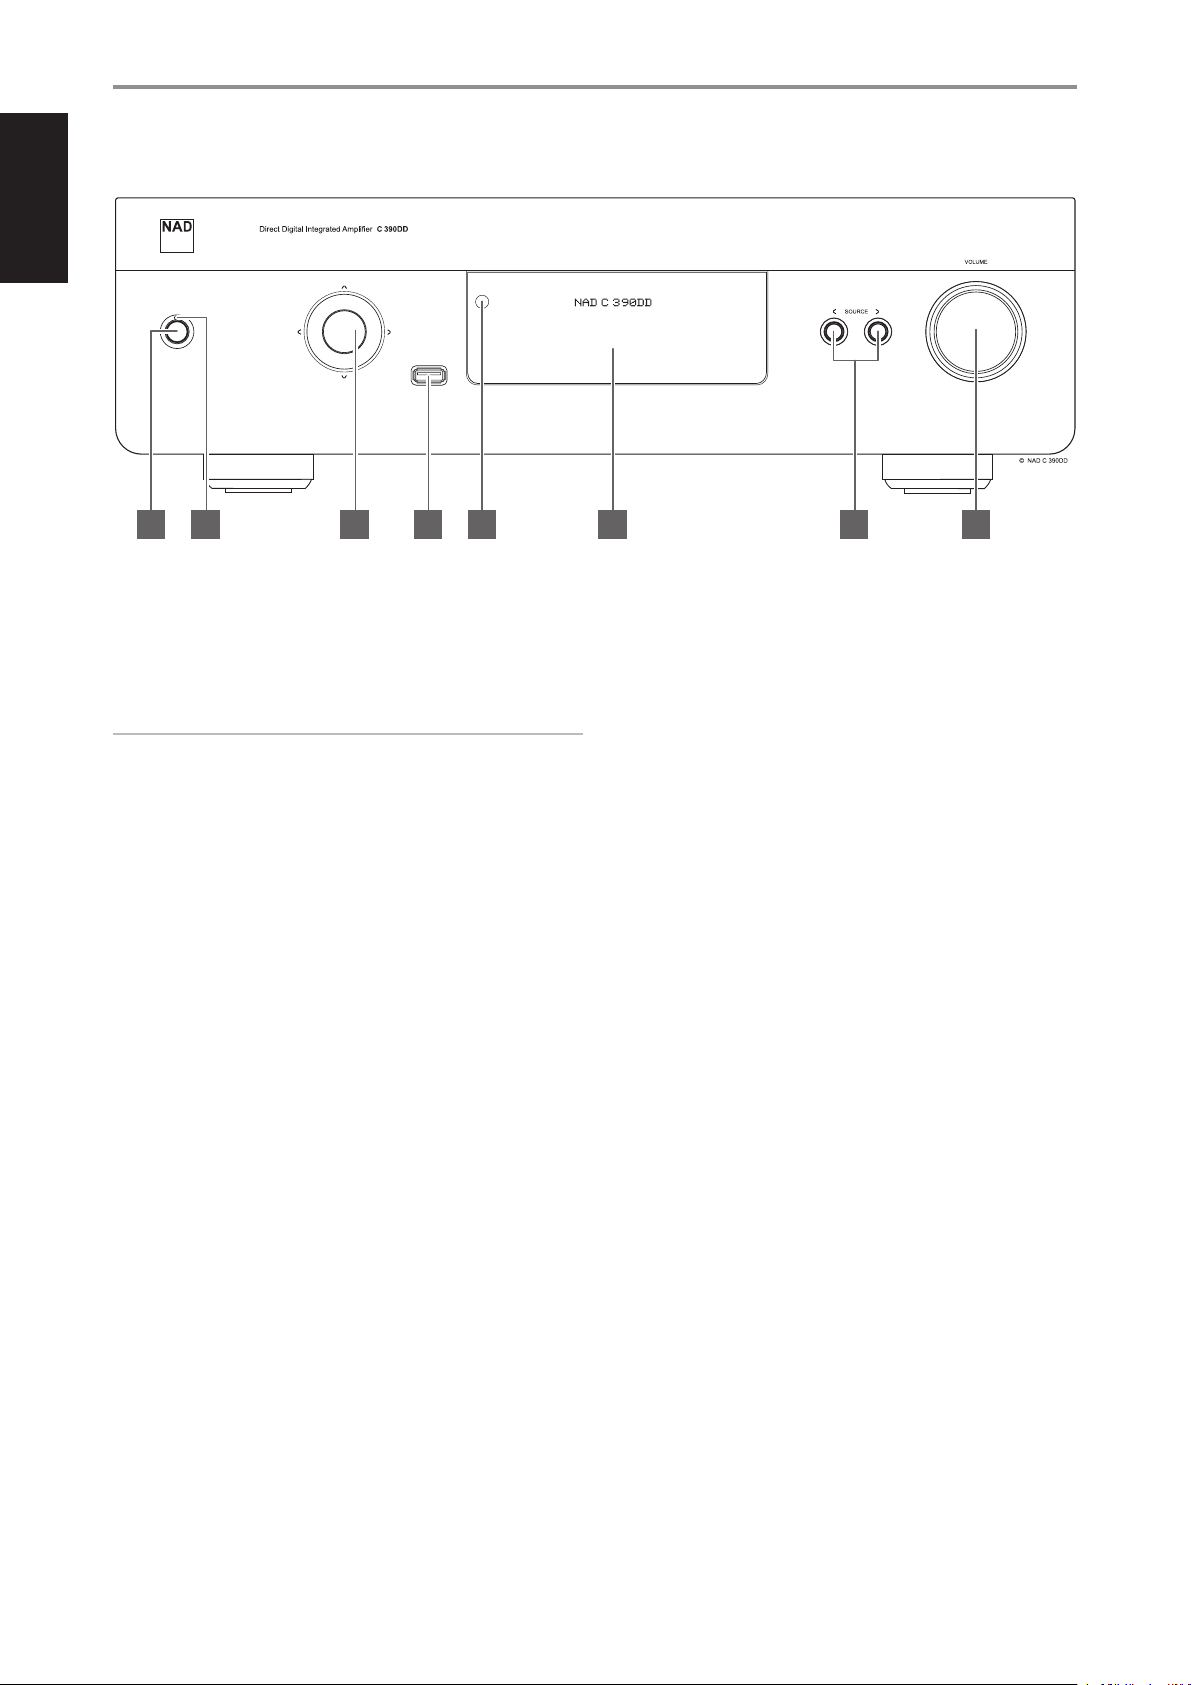
FRONT PANEL
4 5 6 7 81 2 3
1 STANDBY BUTTON
• Press this button to switch ON the C 390DD from standby mode.
The Standby LED indicator will turn from amber to blue and
illuminate the VFD. Pressing the STANDBY button again turns the
unit back to standby mode.
NOTE
In order to turn ON the C 390DD from standby mode or back to standby
mode, the rear panel POWER switch must be in the ON position.
2 STANDBY LED
• This indicator will light up amber when the C 390DD is at standby
mode.
• When the C 390DD is powered up from standby mode, this
indicator will illuminate blue.
3 NAVIGATION and ENTER BUTTONS
The navigation [d/f/a/s] and [ENTER] buttons have various
applications specic to given modes. The middle round button is
designated as [ENTER] button; this is normally pressed to complete a
selection, procedure, sequence or other applicable functions.
4 DIGITAL USB FRONT
• Connect a USB mass storage device to this input. Typical USB mass
storage devices compatible with C 390DD include portable ash
memory devices and external hard drives (FAT32 formatted).
• Refer also to the item about LISTENING TO USB DEVICE at the OTHER
FEATURES section of the OPERATION page.
6 REMOTE SENSOR
• Point the AVR 4 remote control at the remote sensor and press the
buttons.
• Do not expose the remote sensor of the C 390DD to a strong light
source such as direct sunlight or illumination. If you do so, you may
not be able to operate the C 390DD with the remote control.
Distance: About 23ft (7m) from the front of the remote sensor.
Angle: About 30o in each direction of the front of the remote sensor.
7 a SOURCE s
• Toggle through the input selections - Digital Coaxial 1, Digital
Coaxial 2, Digital Optical 1, Digital Optical 2, Digital AES/EBU,
Computer, Digital USB Back and Digital USB Front.
• If the optional modules like the DD HDM-1 (Direct Digital HDMI) and
the DD AP-1 (Direct Digital Analog/Phono) modules are installed,
the source selections will continue on with the corresponding
sources of said modules.
8 VOLUME
• The VOLUME control adjusts the overall loudness of the signal being
fed to the loudspeakers. Volume control is characterized by perfect
signal tracking and channel balance. It gives a highly linear and low
noise operation.
• Turn clockwise to increase the volume level; counter clockwise to
lower it.
5 VACUUM FLUORESCENT DISPLAY (VFD)
• Display visual information about the current Source. Information
supplied is generated by the Source.
• Show menu options and other related functions.
6
Page 7
IDENTIFICATION OF CONTROLS
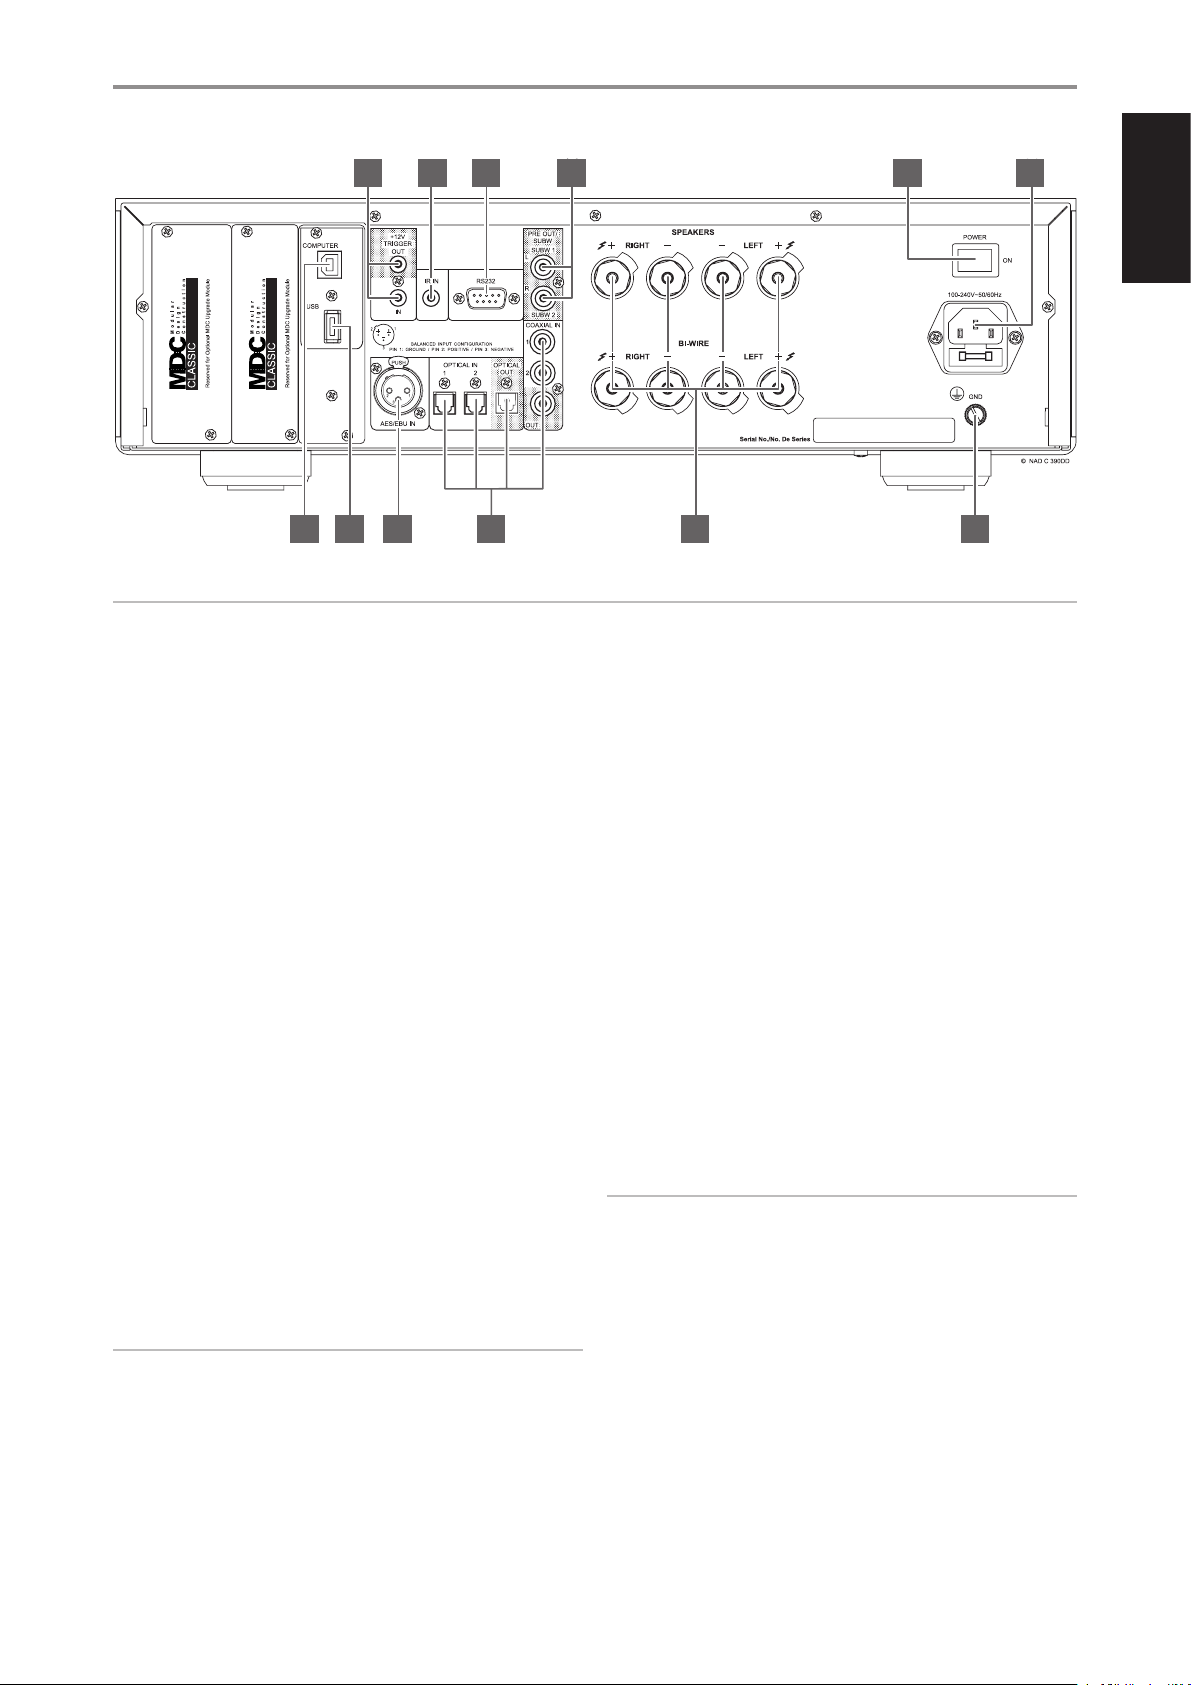
REAR PANEL
87 9 10
4 6
ATTENTION!
Please make sure that the C 390DD is powered o or unplugged from the mains power source before making any connections. It is also advisable to power
down or unplug all associated components while making or breaking any signal or AC power connections.
1 COMPUTER
• Using Type A to Type B cable connector (not supplied), interface
computer audio to this asynchronous Type B USB input to directly
stream 24/96 PCM content from your PC or MAC.
• Refer also to the item about LISTENING TO COMPUTER at the OTHER
FEATURES section of the OPERATION page.
2 DIGITAL USB BACK
• Connect a USB mass storage device to this input. Typical USB mass
storage devices compatible with C 390DD include portable ash
memory devices and external hard drives (FAT32 formatted).
3 DIGITAL AES/EBU
• Digital audio stream from professional audio sources like SACD/CD
Players or processors can be connected to this XLR connector.
• For high-end sources with higher sampling rates like 176kHz and
192kHz, it is highly recommended that such sources be interfaced
with the AES/EBU IN connector. The AES/EBU IN is well suited to
handle such sources with high sampling rate.
4 COAXIAL IN 1-2, OPTICAL IN 1-2
• Connect to the corresponding optical or coaxial digital output of
sources such as CD or BD/DVD players, digital cable box, digital
tuners and other applicable components.
COAXIAL OUT, OPTICAL OUT
• Connect the optical or coaxial DIGITAL OUT to the corresponding
digital audio input of compatible devices such as receivers,
computer soundcard or other digital processors.
NOTE
Only digital sources are available at COAXIAL OUT/OPTICAL OUT.
All other sources including the digital sources can be heard through
SPEAKERS terminal and also streamed via PRE-OUT/SUBW terminals.
5 SPEAKERS
NOTE
Use stranded wire of at least 16 gauge (AWG). Connections to the
51 2 3
Connect the right speaker to the terminals marked “R +” and “R-”
ensuring that the “R+” is connected to the “+” terminal on your
loudspeaker and the “R-” is connected to the loudspeaker’s “-” terminal.
Connect the left speaker to the terminals marked “L +” and “L-” ensuring
that the “L+” is connected to the “+” terminal on your loudspeaker and
the “L-” is connected to the loudspeaker’s “-” terminal.
There are two sets of SPEAKER output and these are identical in
function (parallel connection) and are provided for ease of Bi-wiring
with heavy audiophile cables. Double check your speaker connections
before powering up the C 390DD.
BI-WIRING
Most modern high quality loudspeakers oer the option of Biwiring. This separates the HF crossover from the LF crossover and
oers enhanced performance by preventing LF returned currents
from aecting the HF performance. If you decide to bi-wire, be sure
to remove the “links” at the loudspeaker that connect the LF and
HF sections (these are provided for convenience when single wire
connection is used). Your loudspeaker instruction manual should cover
this subject as well.
C 390DD can be made with banana-type plugs. Bare wire or pins can
also be used by loosening the terminal’s plastic nut, making a clean,
neat connection, and re-tightening carefully. To minimize the danger
of short circuit, ensure that only 1/2-inch of exposed wire or pin is
employed when connecting.
11 12
ENGLISHFRANÇAISESPAÑOLITALIANODEUTSCHNEDERLANDSSVENSKAРУССКИЙ
7
Page 8
ENGLISH FRANÇAIS ESPAÑOL ITALIANO DEUTSCH NEDERLANDS SVENSKA РУССКИЙ
IDENTIFICATION OF CONTROLS
REAR PANEL
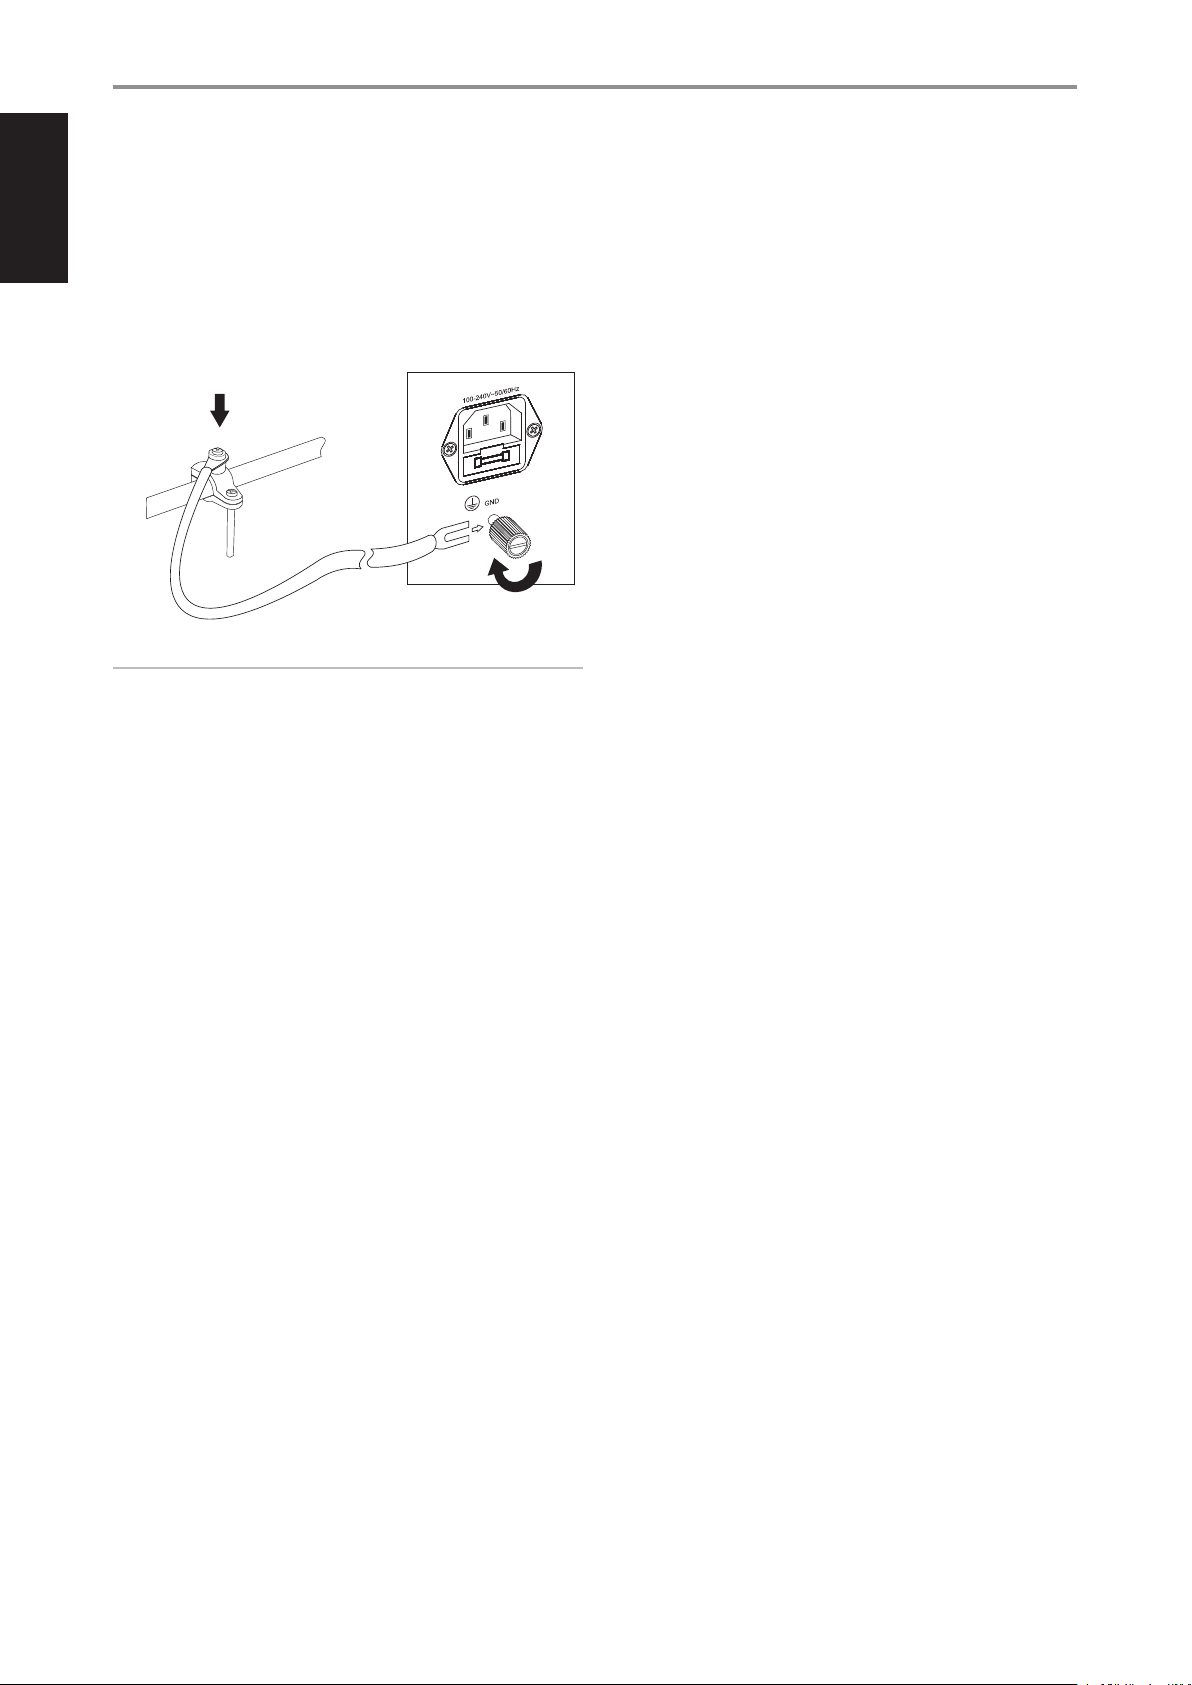
6 GROUND TERMINAL
The C 390DD requires a grounded AC receptacle or a separate earth
ground. Use this terminal to properly ground your C 390DD. The
C 390DD can be connected to ground by connecting a ground lead
wire or similar to this ground terminal. After insertion, tighten the
terminal to secure the lead.
EXAMPLE ILLUSTRATION OF GROUNDING THE C 390DD VIA THE
REAR PANEL GROUND TERMINAL
NOTES
• The above illustration shows the C 390DD being connected to ground
via a metal water pipe. There maybe other grounding conductor points
in your home. Consult with a licensed electrician to properly locate
or correctly install a grounding conductor in your home. NAD is not
responsible for any malfunction, damage or costs associated with the
installation, connection or grounding of your C 390DD.
• The grounding wire is not supplied with your C 390DD.
7 +12V TRIGGER OUT
The +12V TRIGGER OUT is used for controlling external equipment that
is equipped with a +12V trigger input.
• Connect this +12V TRIGGER OUT to the other equipment’s
corresponding +12V DC input jack using a mono cable with 3.5mm
male plug.
• This output will be 12V when the C 390DD is ON and 0V when the
unit is either OFF or in standby mode.
9 RS 232
NAD is a certied partner of AMX and Crestron and fully supports
these external devices. Check out the NAD website for information
about AMX and Crestron compatibility with NAD. See your NAD audio
specialist for more information.
• Connect this interface using RS-232 serial cable (not supplied)
to any Windows compatible PC to allow remote control of the
C 390DD via compatible external controllers.
• Refer to the NAD website for information about RS232 Protocol
documents and PC interface program.
10 PRE OUT/SUBW (1,2)
• These output terminals have dual function. They are used either as
PRE OUT or SUBWOOFER terminals.
• These terminals are enabled or disabled via the Pre Out/Subwoofer
sub-menu of the SETUP menu.
• Refer also to the item about PRE OUT/SUBWOOFER at the USING
THE C 390DD section of the OPERATION page.
11 AC MAINS INPUT
The C 390DD comes supplied with a separate detachable mains power
cord. Before connecting the plug to the mains power source, ensure
that it is rmly connected to the C 390DD’s AC Mains input socket rst.
• Always disconnect the mains power plug from the mains power
source rst, before disconnecting the cable from the C 390DD’s AC
Mains input socket.
12 POWER
• Supply the AC mains power to the C 390DD.
• When the POWER switch is set to ON position, the C 390DD goes
to standby mode as shown by the amber status condition of the
Standby LED. Press the front panel Standby button or AVR 4 remote
control’s [ON] button to switch ON the C 390DD from standby
mode.
• If you intend not to use the C 390DD for long periods of time (such
as when on vacation), switch o the POWER switch.
• With POWER switched o, neither the front panel Standby button
nor AVR 4 remote control’s [ON] button can activate the C 390DD.
+12V TRIGGER IN
With this input triggered by a 12V DC supply, the C 390DD can be
switched ON remotely from standby mode by compatible devices such
as ampliers, preampliers, receivers, etc. If the 12V DC supply is cut o,
the C 390DD will return to standby mode.
• Connect this +12V Trigger input to the remote device’s
corresponding +12V DC output jack using a mono cable with
3.5mm male plug. The controlling device must be equipped with a
+12V trigger output to use this feature.
8 IR IN
This input is connected to the output of an IR (infrared) repeater
(Xantech or similar) or the IR output of another component to allow
control of the C 390DD from a remote location.
8
Page 9

IDENTIFICATION OF CONTROLS
REAR PANEL
MDC CLASSIC UPGRADE SLOT
The delivery format of digital content is constantly changing in pure
digital systems like the C 390DD. Each of these formats typically requires
specialized hardware and software, often with licensed IP and content copy
protection.
In order to address such continuous technological evolution, NAD’s
design team placed all digital interface circuitry of the C 390DD on easily
upgradable modules. NAD calls this the Modular Design Construction
(MDC). The C 390DD includes one MDC module already – the DD USB 1
(Direct Digital USB) which has Type A and Type B USB input terminals.
There are other optional Modular Design Construction (MDC) modules that
can be integrated with the C 390DD by installing them on the vacant slots
in the rear panel. The following are the optional MDC modules
• DD HDMI-1 (HDMI) with 3 HDMI inputs (stereo only, no surround
decoding) and one 1 HDMI Output (Video pass through).
• DD AP-1 (Direct Digital Analog Phono) with SINGLE-ENDED stereo,
BALANCED stereo and PHONO inputs.
• DD BluOS featuring BluOS, a complete digital music solution that allows
the integration of Hi-Res audio, network streaming and music control
using the BluOS app.
DD HDM‑1 (DIRECT DIGITAL HDMI)
The DD HDM-1 oers three HDMI input terminals and one HDMI output
with video pass through. With DD HDM-1 installed, the C 390DD can be
the heart of a “Video 2.0” system using the mandatory 2 channel linear
PCM soundtrack from Blu-ray or DVD to make a compelling high denition
theater presentation. DD HDM-1 is fully 3D video compatible but without
surround sound decoding or video processing.
A HDMI OUT: Connect the HDMI Monitor OUT
to a HDTV or projector with HDMI input.
B HDMI 1 -3: Connect the sets of HDMI input
to the HDMI OUT connectors of source
components such as DVD player, BD player or
HDTV satellite/cable box.
WARNING
Before connecting and disconnecting any HDMI cables, both the
C 390DD and the ancillary source must be powered OFF and unplugged
from the AC outlet. Failure to observe this practice may cause permanent
damage to all equipment connected via HDMI sockets.
A
B
DD AP‑1 (DIRECT DIGITAL ANALOG‑PHONO)
DD AP-1 uses high quality Analog-to-Digital conversion to make analog
sources compatible with C 390DD’s pure digital circuitry. The PHONO circuit
has impedance settings for MM and MC with gain automatically set.
The DD AP-1 consists of the line level input terminals – PHONO, SINGLEENDED (ANALOG) and BALANCED.
A PHONO: Input for either a Moving Coil
or Moving Magnet phono cartridge.
Connect the twin RCA lead from your
turntable to this input.
B SE IN (SINGLE-ENDED): Use a twin
RCA-to-RCA lead to connect these
sockets to the left and right analog
output of a CD player, preamplier or
processor.
C PHONO GROUND CONNECTOR:
Turntables normally includes a single
wire earth lead. Use the C 390DD
phono ground connector to connect this lead. Unscrew the
terminal to expose the hole that will accept the lead. After insertion,
tighten the terminal to secure the lead.
D BALANCED: Connect XLR audio source to these connectors. Ensure
that proper pin congurations are followed – Pin 1: Ground, Pin 2:
Positive (signal live) and Pin 3: Negative (signal return).
A
B
DD BluOS
BluOS is a music management software developed by NAD’s sister brand,
Bluesound. Integrating DD BluOS will add BluOS network and internet
music streaming with advanced music management to your NAD C 390DD.
Refer to the MDC DD BluOS Mounting Instructions and Conguring
DDBluOS on how to install and integrate the DD BluOS with the C 390DD.
IMPORTANT NOTE
BluOS audio cannot be streamed through digital output terminals.
BluOS PLAYBACK CONTROLS
Using the AVR 4 remote control, the following control buttons are
applicable for BluOS playback. Set DEVICE SELECTOR to MP for BluOS
playback control.
4 : Resume playback from pause mode.
j : Pause current playback.
9 : Skip back to the beginning of current song.
0 : Skip forward to the next song.
RPT: Repeat track (song), playlist or repeat o.
DISP: Toggle to display applicable information about current song,
broadcast or media.
ENGLISHFRANÇAISESPAÑOLITALIANODEUTSCHNEDERLANDSSVENSKAРУССКИЙ
C
D
BluOS SETUP MENU
The BluOS Setup menu has to be enabled after integration of the DD BluOS
module. There are two ways to enable the BluOS Setup menu.
Using the front panel buttons
• Press and hold together front panel buttons [SOURCE s] and [ENTER]
Using the AVR remote control
• Press and hold [DISP] button
9
Page 10

ENGLISH FRANÇAIS ESPAÑOL ITALIANO DEUTSCH NEDERLANDS SVENSKA РУССКИЙ
IDENTIFICATION OF CONTROLS
REAR PANEL
Alternatively use either of the above procedure to enable or disable the
“BluOS Setup” item (“BluOS Setup ON” or “BluOS Setup OFF” is displayed in
the front panel display) in the Setup menu.
Source Setup
}BluOS Setup
There are three options under BluOS Setup menu -
BluOS Setup
}Upgrade Mode
BluOS Factory Reset
Service Mode
UPGRADE MODE
• Initiate BluOS upgrade mode. There are two ways how to implement
upgrade mode via this BluOS setup menu - internet connection or USB.
Internet connection: Ensure that the DD BluOS is connected wired or
wirelessly.
USB: Download the DD BluOS software upgrade le from the C390DD
webpage and install it via USB Front or USB Back port.
• Follow the display screen prompt to complete the upgrade procedure.
IMPORTANT NOTE
If the display remains at “Checking for upgrade” , “BluOS Upgrade” or
similar, this indicates that DD BluOS has no internet connection or no
USB (containing the software upgrade le) connected to USB Front or
USB Back port. Any of these two options must be available for BluOS
upgrade to proceed.
BluOS FACTORY RESET
• Initiate the restoring of the DD BluOS to its factory default settings.
• Select “Yes” to initiate factory reset or “No” to maintain current settings.
SERVICE MODE
• Use for servicing purposes only.
• This is a feature normally associated and coordinated with authorized
service personnel.
10
Page 11

IDENTIFICATION OF CONTROLS
USING THE AVR 4 REMOTE CONTROL
The AVR 4 remote control handset handles the key functions of the C 390DD. The AVR 4 can also be
used to directly command other NAD products that respond to applicable common remote control
codes. This includes other NAD Stereo Receiver, Integrated Amplier and Preamplier models. It has
additional controls to remotely operate NAD CD Players, AM/FM Tuners and dedicated AM/FM/DB
Tuners. It will operate up to a distance of 23ft (7m). Alkaline batteries are recommended for maximum
operating life. Two AA batteries should be tted in the battery compartment at the rear of the Remote
Control handset. When replacing batteries, check that they have been put in the right way round, as
indicated on the base of the battery compartment.
NOTE
The remote control handset supplied with the C 390DD is of a universal NAD type, designed to
operate several NAD models. Some buttons are applicable only to specic NAD models. Contact
your dealer or NAD audio specialist for assistance.
1 ON, OFF
The AVR 4 remote has a separate ON and OFF button.
ON: Switch C 390DD from Standby mode to operating mode.
OFF: Switch C 390DD to Standby mode.
NOTE
In order to turn ON the C 390DD from standby mode or back to standby mode, the rear panel
POWER switch must be in the ON position.
2 DEVICE SELECTOR
A Device Selector button determines only what component the AVR 4 will command; it does not
perform any function on the C 390DD.
• Press desired Device Selector button for the applicable buttons to be directed to a “page” of
commands relevant to the selected device. Upon selecting a Device, you can now press the
corresponding AVR 4 control buttons applicable for the selected Device.
AVR 4 REMOTE CONTROL
1
3
5
6
9
10
11
ENGLISHFRANÇAISESPAÑOLITALIANODEUTSCHNEDERLANDSSVENSKAРУССКИЙ
2
4
7
8
3 INPUT SELECTORS
Refer to the corresponding labels printed in the remote control faceplate and their respective
assigned buttons to make use of these functions.
• Set the DEVICE SELECTOR to “AMP” in order to gain access to these buttons.
The following table illustrates the corresponding C390DD source input when one presses the
specied AVR 4 button.
AVR 4 BUTTON C390DD SOURCE INPUT
INPUT 1 Digital Coaxial 1
INPUT 2 Digital Coaxial 2
INPUT 3 Digital Optical 1
INPUT 4 Digital Optical 2
INPUT 5 Digital AES EBU
INPUT 6 Computer
INPUT 7 Digital USB Back
FRONT Digital USB Front
SOURCE 5/6
4 DIMMER
Reduce or restore front panel display brightness.
5 MUTE
• Temporarily mute audio output or restore audio from mute mode.
• MUTE mode is indicated by “MUTE” shown in the front panel display.
• Adjusting the volume level via the AVR 4 or the front panel volume knob will automatically
release the mute function.
• Alternately press and hold [MUTE] button to enable or disable speakers (“Speakers ON” or
“Speakers OFF” is shown at the front panel display).
Toggle through the input sources including those from DD HDM-1, DD AP-1 and DDBluOS
modules when installed.
11
Page 12

ENGLISH FRANÇAIS ESPAÑOL ITALIANO DEUTSCH NEDERLANDS SVENSKA РУССКИЙ
IDENTIFICATION OF CONTROLS
AVR 4 REMOTE CONTROL
6 SOURCE p/q
• Toggle through the input selections - Digital Coaxial 1, Digital Coaxial 2, Digital Optical 1, Digital
Optical 2, Digital AES/EBU, Computer, Digital USB Back and Digital USB Front. If the optional
MDC modules are installed, the source selections will include the sources incorporated in the
applicable modules.
7 p VOL q
• Increase or decrease loudness level. Release the button when desired level is reached.
• The front panel display will indicate the volume level as in “Vol: -/+ _ _._ dB”
(“-/+_ _._ ” indicates the numerical dB level).
8 D/F/A/S, ENTER
D/F/A/S : Navigate through the menu options.
D/F : Adjust applicable control levels.
ENTER/S: Display menu options. Select an item in a menu.
A : Return to previous display.
9 DISP
With the optional MDC DD BluOS installed and DEVICE SELECTOR set to AMP, press and hold [DISP]
to turn ON or OFF BluOS Setup menu (“BluOS Setup ON” or “BluOS Setup OFF” is displayed at the
front panel display).
10 TONE
Toggle to select between “Tone Defeat” and “Tone Active” as indicated in the front panel display.
• Tone Defeat: Tone control circuits are bypassed and eectively defeated.
• Tone Active: Tone control circuits are active. At Tone Active mode, toggle [TONE] button to
select “Treble” or “Bass” and then use the [D/F] to adjust their respective levels.
11 EQ
Bring up the adjustable Equalization parameters - Frequency, Level and EQ levels.
AV SURROUND SOUND RECEIVER CONTROL (use with compatible NAD AV Surround Sound
Receiver or Preamplier models)
Set the DEVICE SELECTOR to “AMP” in order to gain access to these buttons. Refer to the corresponding
labels printed in the remote control faceplate and their respective assigned buttons to make use of
these functions. Some of the control buttons below are applicable only to specic NAD AV Surround
Sound Receiver or Preamplier models; check the owner’s manual of your NAD AV Surround Sound
Receiver or Preamplier for control button compatibility.
A/V PSET: In combination with the numeric keys, press a Preset number from 1 to 5 as referenced
to A/V Presets settings. Note that the Preset settings can be congured via the A/V Presets menu.
DIMMER: Reduce or restore front panel display brightness.
TEST: Initiate speaker TEST mode while at the Speaker Levels section of the Speaker Setup menu.
MUTE: Temporarily mute audio output or restore audio from mute mode.
SOURCE [5/6]: Toggle to select through the input sources.
SURR: Select desired listening or surround mode.
D/F/A/S, ENTER: Navigate through the menu options. Adjust applicable control levels.
ENTER/S: Display on-screen Main Menu options.
SLEEP: Switch o unit after a preset number of minutes.
EQ: Display on-screen DSP options.
TONE: Show tone control options on front panel display. Use [D/F] to adjust applicable levels.
L.NITE: Set Dynamic Range Control (DRC) level. Toggle [L.NITE] to select either DTS or Dolby DRC
setting and then use [D/F] buttons to set up DRC level.
12
Page 13

IDENTIFICATION OF CONTROLS
BD PLAYER CONTROL (use with compatible NAD Blu-ray Disc Player models)
Set the DEVICE SELECTOR to “BD” in order to gain access to these buttons. Some of the control buttons
below are applicable only to specic NAD Blu-ray Disc Players; check the owner’s manual of your NAD
model for control button compatibility. You can also load the applicable NAD code library to this
device so that it can be made compatible with your other NAD equipment. Refer to the section below
about “LIBRARY” on how to load a NAD code library.
HOME: Display or exit HOME menu.
PICTURE: Display or exit the Picture Mode menu.
SCAN [5/6]: Fast reverse/forward search.
RES: Set output resolution of HDMI and Component Video output.
TITLE/POP-UP: Display DVD title menu or BD-ROM pop-up menu, if available.
MENU: Access disc menu, if available.
D/F/A/S: Select an item in a menu. Select desired track, chapter, le or folder. In some
applications, one has to press [ENTER] to complete the selection.
ENTER: Conrm selected option, item or menu.
DISP: Show playback time and other display information.
RTN: Exit from a menu window.
[k]: Open or close disc tray.
[g]: Stop playback.
[;]: Pause playback temporarily.
[9]: Go to the beginning of current or previous track, chapter or le.
[4]: Start playback.
[0]: Go to next track, chapter or le.
RAND: Play tracks/les in random order.
RPT: Repeat track, chapter, le or whole disc.
PROG: Enter or exit program mode.
CLEAR: Delete programmed track/le.
A,B,C,D: Navigate or select BD-ROM menu, if applicable.
AVR 4 REMOTE CONTROL
ENGLISHFRANÇAISESPAÑOLITALIANODEUTSCHNEDERLANDSSVENSKAРУССКИЙ
TUNER CONTROL (use with compatible NAD Receiver, AM/FM/DAB Tuner models)
Set the DEVICE SELECTOR to “TUN” in order to gain access to these buttons. Refer to the corresponding
labels printed in the remote control faceplate and their respective assigned buttons to make use
of these functions. Some of the control buttons below are applicable only to specic NAD Receiver
or Tuner models; check the owner’s manual of your NAD Receiver or Tuner for control button
compatibility. You can also load the applicable NAD code library to this device so that it can be made
compatible with your other NAD equipment. Refer to the section below about “LIBRARY” on how to
load a NAD code library.
[SCAN 5/6] or [A/S]: Tune forward or backwards.
[A/S]: In combination with [TUNER MODE] or other compatible buttons, select through applicable
DAB menu options.
[A/S/D/F]: In XM mode and in combination with [TUNER MODE] or other compatible buttons,
select through applicable XM menu options.
ENTER: Select Preset or Tune mode at AM/FM band. Display signal strength at DAB mode.
INFO: Repeatedly pressing this button will show information as supplied by the current radio
station. The applicable display contents include related DAB display information and RDS broadcast
data.
PRESET [9/0] or [D/F]: Step up or down Preset numbers.
AM/FM/DB: Select DAB, XM, FM or AM band, as applicable.
TUNER MODE: In FM mode, toggle between “FM Mute On” and “FM Mute O”. At XM or DAB
mode, use the [TUNER MODE] button in combination with [D/F/A/S] and [ENTER] buttons to
activate XM or DAB menu options.
BLEND: Engage or disengage BLEND feature.
MEMORY: Save current station to a Preset number.
DELETE: Delete selected Preset number.
13
Page 14

ENGLISH FRANÇAIS ESPAÑOL ITALIANO DEUTSCH NEDERLANDS SVENSKA РУССКИЙ
IDENTIFICATION OF CONTROLS
AVR 4 REMOTE CONTROL
LIBRARY
The AVR 4 can store a dierent library of default NAD codes for each of its
DEVICE SELECTOR “pages.” If the original default library does not control
your NAD Blu-ray disc player or other components, follow the procedure
below to change the library code. Refer as well to the table below for a list
of applicable NAD Library Codes with their corresponding NAD models.
LOAD ANOTHER LIBRARY CODE
Example: Load NAD DVD Player T 517 library code to AVR 4’s “BD” device.
1 Press and hold [BD] in the DEVICE SELECTOR section of AVR 4.
2 While holding down the device button [BD], press “2” and “2” using AVR
4’s numeric buttons. “22” is the corresponding library code for T 517.
3 Press [ENTER] while still holding down the device button [BD]. The
BD device selector will ash once to indicate that the library input is
successful. Both the device selector button [BD] and [ENTER] can now
be released.
RESET THE AVR 4 TO ITS DEFAULT SETTINGS
The AVR 4 can be restored to its factory settings, including default libraries,
via the following procedures
1 Press and hold [ON] and [DELETE] buttons for about 10 seconds until
the AMP device button lights up.
2 Within two seconds of the AMP device button lighting up, release both
buttons. If the reset mode is successful, the [BD] device button will ash
twice.
TABLE OF LIBRARY CODES APPLICABLE TO AVR 4 REMOTE
CONTROL
LIBRARY CODE NAD PRODUCT DESCRIPTION
10 Default library for “AMP ” page
11 Zone 2
20 C 515BEE, C 545BEE, C 565BEE
21 T 535, T 585, M55; DVD section of L 54, VISO T WO, VISO FIVE
22 Default library for “BD” page; T 513, T 514, T 515, T 517
23 T 587, T 557, T 577, M56
30 IPD 1
31 IPD 2
40
41 C 422, C 425, C 426
42 C 445
NOTE
The AVR 4 may not necessarily contain all the control buttons applicable
for the above-mentioned NAD products. Use the prescribed remote
control of the specic NAD product for a full compliment of the
applicable remote control buttons.
Default library for “TUN” page; Tuner section of C 725BEE, T 175,
T737, T 747, T 755, T 765, T 775, T 785
14
Page 15

OPERATION
USING THE C 390DD
SELECTING SOURCES
Toggle AVR 4 [5 SOURCE 6] or front panel’s [a SOURCE s] buttons to step
through the following Source modes. Stop (release button) when desired
Source comes up.
Digital Coaxial 1 $ Digital Coaxial 2 $ Digital Optical 1 $ Digital Optical2
$ Digital AES EBU $ Computer $ Digital USB Back $ Digital USB Front
$ then back to Digital Coaxial 1
If the optional DD AP-1 (Analog/Phono) and DD HDM-1 (HDMI) upgrade
modules are installed, the source sequence would be
Digital Coaxial 1 $ Digital Coaxial 2 $ Digital Optical 1 $ Digital Optical2
$ Digital AES EBU $ Computer $ Digital USB Back $ Digital USB Front
$ Single-ended $ Balanced $ Phono $ Digital HDMI 1 $ Digital
HDMI2 $ Digital HDMI 3 $ then back to Digital Coaxial 1
DISPLAY THE MAIN MENU
Press [s], [S] or [ENTER] buttons of the AVR 4 remote control or front panel
to display in the VFD the C 390DD’s Main Menu.
NAVIGATING THE MENU AND MAKING CHANGES
To navigate through the menu options, undertake the following steps using
the AVR 4 or corresponding front panel buttons:
1 Press [S] or [ENTER] to select a menu item. Use [D/F] to move up
or down the Menu selections. Repeatedly press [S] to advance or go
further into the sub-menu of desired menu item.
2 Use [D/F] to set or change the parameter value (setting) of a menu
item.
3 Press [S] or [ENTER] to save the settings or changes done on the current
menu or sub-menu. Pressing [A] will return the user to the previous
menu or exit from a particular menu.
BASS/TREBLE
Bass
-10dB +10dB
0
Treble
-10dB +10dB
0
Bass and Treble controls only aect the low bass and high treble leaving the
critical midrange frequencies free of coloration.
• Use [D/F] to boost or cut Bass or Treble levels within ±10 dB range.
• Pressing AVR 4’s [TONE] button will also bring up Bass and Treble
modes. Toggle [ TONE] button to select “ Treble” or “Bass” and then use
the [D/F] to adjust their respective levels. Press TONE again to save the
settings and at the same time move on to the next parameter or exit
the parameter setting altogether.
BALANCE
Balance
L R
0 0
ENGLISHFRANÇAISESPAÑOLITALIANODEUTSCHNEDERLANDSSVENSKAРУССКИЙ
MAIN MENU
}Bass
Treble
Balance
Setup
The Main Menu contains the menu options for “Bass”, “Treble”, “Balance” and
access to “Setup” menu.
Follow the guidelines about “DISPLAY THE MAIN MENU” and “NAVIGATING
THE MENU AND MAKING CHANGES” to navigate through the menu options
and their sub-menu selections.
The BALANCE control adjusts the relative levels of the left and right
speakers.
• Press [D] to shift the balance to the right or [F] to shift the balance to
the left. Use [D/F] also to recover or even out the balance levels.
• “0” level setting for both “L” and “R” provides equal level to the left and
right channels.
15
Page 16

ENGLISH FRANÇAIS ESPAÑOL ITALIANO DEUTSCH NEDERLANDS SVENSKA РУССКИЙ
OPERATION
USING THE C 390DD
SETUP MENU
Bass
Treble
Balance
}Setup
}Equalization
Polarity
Listening Mode
Speaker Compensation
Pre Out/Subwoofer
Soft Clipping
IR Channel
}Source Setup
At higher frequencies these reections can be absorbed and scattered
randomly by the surface textures of wall coverings, drapes and furniture in
the room. But at the lower frequencies, the wave lengths are very large and
they interact with the room boundaries to create “standing waves” that can
alter the sound of music.
ROOM EQ TEST SEQUENCE
Our simple solution to this “standing waves” is the Room EQ. We have
devised a very simple test sequence to make the adjustments by ear (or
using an SPL meter). It uses the same concept musicians use to tune a
stringed instrument, with a slight twist: instead of matching frequency or
pitch, we are matching loudness levels.
Playing back the ROOM EQ TEST SEQUENCE allows this problem to be easily
tamed using your ears and the C 390DD Room EQ lters. The following are
the adjustable parameters.
}Freq Level EQ
40Hz 0dB Narrow
The Setup menu consists of the following selectable and adjustable
parameters – Equalization, Polarity, Listening Mode, Speaker Compensation,
Pre Out/Subwoofer, Soft Clipping, IR Channel and Source Setup.
EQUALIZATION/ROOM EQ
Equalization
}~Room EQ On
`Room EQ Off
ROOM EQ ON
• Bring up Room EQ setup parameters. Calibrate Room EQ parameters by
following the procedure demonstrated in the “C 390DD Software and
Room EQ Feature Video” downloadable from the C 390DD web page
http://nadelectronics.com/products/hifi-amplifiers/C-390DD-DirectDigital-Powered-DAC-Amplifier.
• Enable congured Room EQ settings.
ROOM EQ OFF
• Defeat or disable Room EQ settings.
The ROOM EQ feature of the C 390DD is a simple and eective way to tame
standing waves without altering the upper frequency balance of your
loudspeakers.
Frequency: There are six lters available in the frequency range where
standing waves typically are a problematical: 40Hz, 60Hz, 90Hz, 120Hz,
180Hz and 240Hz.
Level: The 6 frequency centers in the low bass region can be cut or
slightly boosted to remove the “boom” without reducing the low bass
response. Each lter can be boosted by up to 4dB or cut by up to 12dB in
2dB increments. The reason there is a smaller amount of boost than cut is
because boosting a null frequency actually increases the null making the
problem worse. Fortunately, the ear is less sensitive to sound missing than it
is to sound added. The objective is to tame the “boom” in the bass, resulting
to a much more incisive and realistic sound.
EQ: The width or “Q” of the lter can also be adjusted to be wide or narrow
to address a number of dierent room congurations.
IMPORTANT NOTE
The Room EQ Setup les along with corresponding setup instructions
can be downloaded from the “Software” section under “Manuals
and Downloads” of the C 390DD web page – http://nadelectronics.
com/products/hifi-amplifiers/C-390DD-Direct-Digital-Powered-DACAmplifier.
POLARITY
Polarity
Imagine a stone dropped into a small pool of water: waves ripple along
the surface in concentric circles until they reach the boundary of the pool,
at which time they are reected back toward the point where the stone
entered the water. As the reected wave travels back, it interacts with
the primary waves, causing a pattern of interference. Depending on the
spacing (frequency) of the waves, some will be nulled and some will be
reinforced or doubled in size. In the listening room, a similar pattern of
sound wave nulling or cancellation and sound wave reinforcement also
takes place.
The proximity of stereo loudspeakers to the listening room boundaries
creates “sound reections” that almost always result in uneven frequency
response at the listening position.
16
}~Positive
`Reversed
Allow compensation for recordings that have reversed polarity.
Positive: A positive sine wave at the input remains positive at the
output. Polarity is defaulted to “Positive” setting.
Reversed: A positive sine wave at the input is negative (inverted) or
reversed at the output.
Page 17

OPERATION
USING THE C 390DD
LISTENING MODE
Listening Mode
}~Stereo
`Mono
`Reversed
The C 390DD oers distinct listening modes, tailored for dierent types
of recording or program material. The following listening modes can be
selected.
STEREO
• Select “Stereo” when you wish to listen to a stereo production, such as
music CD or FM broadcast.
• Stereo recordings whether in PCM/digital or analog form and whether
surround-encoded or not encoded, are reproduced as recorded.
• Multi-channel digital recordings (Dolby Digital and DTS) are reproduced
in “Stereo Downmix” mode via the left and right speakers only.
MONO
• Use “Mono” listening mode when the audio source format is mono. The
mono information is replicated on both left and right channels.
• Mono” listening mode is recommended when watching old movies
with mono soundtrack, listening to recorded monaural sound sources
such as AM radio broadcasts or with the foreign language soundtracks
recorded in the left and right channels of some movies.
• Mono is also very helpful when setting up a stereo system to check that
both speakers are connected with correct polarity. Correctly connected
speakers will have a solid center image and strong bass response. If one
speaker has the input connections (+ and -) reversed, the image will be
indistinct and the bass will be reduced and uneven sounding.
SPEAKER COMPENSATION
Speaker Compensation
`2 ohms
}~4 ohms
`5 ohms
Speaker Compensation
}`6 ohms
`7 ohms
`8 ohms
Speaker Compensation
}`>8 ohms
Digital impedance compensation lter allows ne tuning of the top
octave to match the speaker impedance. This will result in perfectly at
frequency response at 20 kHz. The eect of this lter may not be audible*
but it is measurable, and it compensates for the small eect of the digital
reconstruction lter that eliminates the 844 kHz sampling frequency of the
amplier.
*The exception may be some electrostatic speakers that have very low
impedance at high frequency. The lower the HF impedance, the greater the
deviation from at response.
ENGLISHFRANÇAISESPAÑOLITALIANODEUTSCHNEDERLANDSSVENSKAРУССКИЙ
REVERSED
• Sends the right channel to the left speaker and the left channel to the
right speaker. This can easily correct a reversed input connection or
incorrectly recorded music source.
PRE OUT/SUBWOOFER
}Pre Out
Subwoofer
Pre Out
}~Enable
`Disable
Subwoofer
`Enable
}~Disable
Set the assignment of the rear panel output port PRE OUT/SUBW to either
PRE OUT or SUBWOOFER. If PRE OUT is selected and enabled, SUBWOOFER
is automatically disabled and vice-versa.
IMPORTANT NOTE
Subwoofer cannot be enabled if the speakers are set to “Speakers OFF”.
17
Page 18

ENGLISH FRANÇAIS ESPAÑOL ITALIANO DEUTSCH NEDERLANDS SVENSKA РУССКИЙ
OPERATION
USING THE C 390DD
There are two options when Subwoofer is enabled - Mode and Crossover.
Subwoofer
LEVEL TRIM
Level trim allows exact volume matching of the subwoofer level to the
main speaker level.
}Mode
Crossover
MODE
Set the subwoofer mode to either mono or stereo setting.
Mode
}~Mono
`Stereo
MONO
Select this setting when using one subwoofer. At mono mode, the left and
right channels are summed in the low pass subwoofer output to drive a
single subwoofer.
STEREO
Select this setting when using two subwoofers, one for the left channel and
one for the right channel.
CROSSOVER
Crossover allows easy bi-amplication or subwoofer integration by adding
the required lters to redirect bass frequencies to the subwoofer.
Crossover
Frequency
}High Pass Trim
Low Pass Trim
High Pass/Level Trim
Attenuate amplitude level of high pass lter up to -12dB (range: 0dB to
-12dB).
High Pass
Level Trim 0dB
Low Pass/Level Trim
Attenuate amplitude level of low pass lter up to -12dB (range: 0dB to
-12dB).
Low Pass
Level Trim 0dB
Crossover
}Frequency
High Pass Trim
Low Pass Trim
Crossover Frequency
}~40Hz
`50Hz
`60Hz
Frequencies from 40Hz to 200Hz can be selected, with the high pass signal
sent to the C 390DD amplier section and the low pass signal sent to the
Subwoofer Out.
CROSSOVER FREQUENCY (40Hz, 50Hz, 60Hz ...180Hz, 190Hz, 200Hz, Full)
Frequencies from the selected frequency and below will be directed to
subwoofer output.
NOTE
Since the low pass lter is already implemented in the C 390DD, the
subwoofer should be set to the highest frequency crossover setting
available or bypassed if it also includes a crossover function.
DIGITAL SOFT CLIPPING
Soft Clipping
`On
}~Off
Enables NAD’s proprietary Soft Clipping circuitry on all channels. Soft
Clipping allows a graceful overload without the usual generation of high
order harmonic distortion that normally occurs as the sine wave gets
squared o. Now digitally controlled, it can be carefully modeled for ideal
results.
At “On” setting, Digital Soft Clipping gently limits the output of the C 390DD
to minimize audible distortion should the amplier be overdriven. Soft
Clipping may simply be left “On” at all times to reduce the likelihood of
audible distortion from excessive volume settings. Set to “O” for critical
listening and to preserve optimum dynamics.
18
Page 19

OPERATION
USING THE C 390DD
IR CHANNEL
IR Channel
}~CH0
`CH1
`CH2
The C 390DD has the capability to operate over four IR channel settings.
This is practically useful if you have several NAD products that can be
operated by similar remote control commands. With varying IR Channel
settings, dierent NAD products can be controlled independently in the
same zone by setting each one to a dierent IR channel.
IR CHANNEL ASSIGNMENT
The C 390DD and the AVR 4 remote control must be set to the same
channel.
To change the IR Channel on the C 390DD
• While at “IR Channel” menu, use the [D/F] to select through CH 0
to CH 3. Press [S] to select preferred IR Channel setting. C 390DD IR
Channel is defaulted to CH0.
To change the IR Channel on the AVR 4 remote control
• Include a channel number before the library code. For AVR 4, library
code “10” is the default library table for “AMP” device. To select this “AMP”
library table for IR Channel 0 (CH0), retain the library code “10” (or “010”).
• If you want to load the “AMP” library table on ”IR Channel 1” (CH1) prex
the library code with “1” to indicate association with “IR Channel 1” (CH1).
Load then the “AMP” library table using the code “110”. Repeat the same
for MP (130) and TUNER (140).
SAMPLE SETUP OF TWO NAD PRODUCTS ON THE SAME ZONE
NAD C 390DD and NAD C 326BEE are both defaulted to IR Channel 0. If
[OFF] button is pressed on the AVR 4 remote control (or SR 8 remote control
for the C 326BEE), both products will go to standby mode. Press [ON] and
both products will power up from standby mode.
To prevent both products from simultaneously going in and out of standby
mode along with other common commands, set each one to a dierent
IR channel. In this setup, we will keep C 326BEE and SR 8 remote control
defaulted to “IR Channel 0” (CH0). As for C 390DD, we will assign it to
“IRChannel 1” (CH1); the same applies to AVR 4.
AVR 4
• Press and hold [AMP] in the DEVICE SELECTOR section of the AVR 4.
• While holding down the device button [AMP], press “1”, “1” and “0” using
AVR 4’s numeric buttons.
• Press [ENTER] while still holding down the device button [AMP]. The
AMP device selector will ash once to indicate that the library input is
successful.
With both C 390DD and AVR 4 set to “CH1”, the C 326BEE can now be
remotely controlled independent of the C 390DD.
NOTE
Performing a Factory Reset for C 390DD or AVR 4 will result to a return to
the factory default “IR Channel 0” setting.
AUTO STANDBY
The C 390DD can be setup to automatically go to standby mode if there is
no active input in the current source for 30 minutes.
Auto Standby
}~On
`Off
On: C 390DD will automatically go to standby mode if there is no active
input in the current source for 30 minutes.
O: C 390DD will remain at operating mode even if there is no active input
in the current source for 30 minutes.
IMPORTANT NOTICE
Auto Standby mode is not applicable if the current source is Digital USB
Front, Digital USB Back or the optional DD BluOS. At these sources, the
C390DD will not go to standby mode even if there is no active input for
more than 30 minutes.
SOURCE SETUP
Source Setup
}Digital Coaxial 1
Digital Coaxial 2
Digital Optical 1
ENGLISHFRANÇAISESPAÑOLITALIANODEUTSCHNEDERLANDSSVENSKAРУССКИЙ
Set C 390DD and AVR 4 to “CH1” via the following procedure.
C 390DD
• While at “IR Channel” menu, use the [D/F] to go to “CH1” setting. Press
[S] or [ENTER] to select “CH1”. Press [A] to exit IR Channel selection.
Source Setup makes it possible to select a Source and enable or disable it as
desired. The optional NAD DD AP-1 (Direct Digital Analog Phono) module
must be installed for “Single-ended” and “Balanced” sources to be functional.
The same applies for “Digital HDMI 1”, “Digital HDMI 2” and “Digital HDMI 3”
- the optional NAD DD HDM-1 (HDMI) module must also be installed. If the
applicable module is not installed, the corresponding sources will not be
available from the Source Setup menu selection.
19
Page 20

ENGLISH FRANÇAIS ESPAÑOL ITALIANO DEUTSCH NEDERLANDS SVENSKA РУССКИЙ
OPERATION
USING THE C 390DD
SINGLE‑ENDED/BALANCED
Single-ended
}~Enable
`Disable
Balanced
-9dB to 0dB: Increase or decrease the input signal level from -9dB
to 0dB. This attenuates the signal before the Analog-to-Digital (A/D)
Converter. If the analog input signal sounds “congested” or distorted,
the input should be attenuated.
Fixed: This setting should be selected when the C 390DD is connected
to the output of a preamplier and is used primarily as a power
amplier. Output level is xed and the C 390DD’s Volume Control is
bypassed. This feature is sometimes referred to as “Cinema Bypass”
because it allows the C 390DD to be used for the front channels of a
surround sound system by relegating the volume control function to
the surround processor.
}~Enable
`Disable
There are two options when Single-ended or Balanced input is enabled Level Trim and Sample Rate.
NOTE
The optional NAD DD AP-1 (Direct Digital Analog Phono) module must
be installed for “Single-ended” and “Balanced” sources to be functional.
Otherwise, aforementioned sources will not be available from the
Source Setup menu selection.
LEVEL TRIM
Adjust the input signal level from -9dB to 0dB or Fixed.
Single-ended
}Level Trim
Sample Rate
Single-ended
Level Trim 0dB
IMPORTANT NOTICE
If LEVEL TRIM will be set to FIXED level, adjust rst to MINIMUM level the
volume control of the amplier where the C390DD is connected. This
will prevent the amplier from starting at a high volume level when the
amplier is set to the Source input where the C390DD is connected.
SAMPLE RATE 48 KHZ, 96 KHZ, 192 KHZ
Select the user’s preference for sample rate of the A/D Converter. Higher
sampling rates allow for anti-aliasing lters to take eect further outside
the audible frequency range and are generally considered to sound better,
especially in the high frequencies.
Single-ended
Level Trim
}Sample Rate
Single-ended
Sample rate 48Hz
Balanced
Balanced
}Level Trim
Sample Rate
Balanced
Level Trim 0dB
20
Level Trim
}Sample Rate
Balanced
Sample rate 48Hz
Page 21

OPERATION
USING THE C 390DD
PHONO
Phono
}~Enable
`Disable
There are three options when Phono input is enabled – Level trim, Type and
Infrasonic Filter.
NOTE
The optional NAD DD AP-1 (Direct Digital Analog Phono) module must
be installed for “Phono” source to be functional. Otherwise, “Phono”
source will not be available from the Source Setup menu selection.
LEVEL TRIM
Adjust the input signal level from -20dB to 0dB to accommodate a wide
range of cartridge brands and models. Adjust the loudness of the Phono
input to the same level as the other inputs.
Phono
}Level Trim
Type
Infrasonic Filter
INFRASONIC FILTER
The output from a record player contains strong but inaudible signals at
infrasonic frequencies (below 10Hz) caused by disc warps, stylus/tone
arm resonance and vibrations reaching the turntable. If these non-musical
signals are amplied at full strength, they may waste amplier power
and produce excessive woofer cone motion, muddying the sound. The
infrasonic lter attenuates this unwanted contamination.
Infrasonic Filter
}~On
`Off
On: Select if your loudspeaker is of the type with “vented” cabinets (i.e.
bass reex, ported and auxiliary bass radiator designs). These types are
especially susceptible to being overdriven by infrasonic signals.
O: Select to bypass infrasonic lter.
ENGLISHFRANÇAISESPAÑOLITALIANODEUTSCHNEDERLANDSSVENSKAРУССКИЙ
Phono
Level Trim 0dB
IMPORTANT NOTICE
If LEVEL TRIM will be set to FIXED level, adjust rst to MINIMUM level the
volume control of the amplier where the C390DD is connected. This
will prevent the amplier from starting at a high volume level when the
amplier is set to the Source input where the C390DD is connected.
TYPE
Select MM (Moving Magnet) or MC (Moving Coil) depending upon the
Phono cartridge type being used. This feature matches the impedance of
the Phono input to the cartridge type.
Type
}~MM
`MC
MC: Select for Moving Coil Phono cartridge.
MM: Select for Moving Magnet Phono cartridge.
21
Page 22

ENGLISH FRANÇAIS ESPAÑOL ITALIANO DEUTSCH NEDERLANDS SVENSKA РУССКИЙ
OPERATION
OTHER FEATURES
SPEAKERS ON/OFF ‑ HEADPHONE
There are times when you may want the speakers to be silent but with
Preamp Output remaining active. An example would be driving an external
Headphone Amplier or Powered Speaker.
The HEADPHONE feature is premised upon having the SPEAKERS turned
ON or OFF. The speakers can be turned ON or OFF via the following
method.
• Alternately press and hold AVR 4’s MUTE button to enable or disable the
speakers (“Speakers ON” or “Speakers OFF” is shown at the front panel
display).
LISTENING TO USB DEVICE
1 Toggle [a SOURCE s] button to select “USB Front” or “USB Back” source
mode. If no USB mass storage device is connected to USB Front or
USB Back input, “Please Insert Device” will be displayed in the VFD. If
there are no applicable MP3/WMA/FLAC les available in the USB mass
storage device, the VFD will show “No les found”.
2 Plug-in the USB mass storage device to the USB input – MP3, WMA or
FLAC les or folders will be displayed in the VFD.
3 Use [d/f/a/s] to select through the les or folder. Press [s], [S] or
[ENTER] to start playback of particular le.
4 Toggle AVR 4’s [DISP] button to show information about the current le.
SPEAKERS ON
• SPEAKERS terminal is enabled or turned ON.
SPEAKERS OFF
• SPEAKERS terminal is disabled or turned OFF.
• “Headphone ON” is shown on the lower portion of the current Source.
• With SPEAKERS turned OFF, one can hear the current source as
streamed through PRE-OUT/SUBW or COAXIAL OUT/OPTICAL OUT
terminals via the amplier, receiver or other applicable media they are
connected to.
IMPORTANT NOTES
• Only digital sources are available at COAXIAL OUT/OPTICAL OUT.
All other sources including the digital sources can be heard through
SPEAKERS terminal and also streamed via PRE-OUT/SUBW terminals.
• Subwoofer cannot be enabled if the speakers are set to “Speakers OFF”.
USB MODE
The C 390DD is equipped with three USB input terminals – USB Front, USB
Back and Computer. Using either “USB Front” or “USB Back”, the C 390DD
can play back MP3/WMA/FLAC les stored in external USB (Universal Serial
Bus) mass storage devices. Use “Computer” to interface computer audio
and directly stream 24/96 PCM content from your PC or MAC.
DIGITAL USB FRONT/DIGITAL USB BACK USB TYPE A
• Supports playback of MP3, WMA and FLAC les
MP3/WMA: 48 kHz
FLAC: 24 bit/48 kHz
• FAT12/16 root directory up to 256 les (short names)
• FAT12/16/32 up to 65535 les (short names) per directory
• FAT le system limited to 2TB
• File and directory names limited to 64 characters
• Up to 16 maximum level of directories
• Supports USB version 1.1
COMPUTER USB TYPE B
• Supports 24 bit/96 kHz PCM content from PC or MAC
NOTE
Typical USB mass storage devices compatible with C 390DD include
portable ash memory devices and external hard drives (FAT32
formatted).
IMPORTANT NOTE ABOUT CONTROL BUTTONS
The control buttons mentioned in this manual may refer to either front
panel or remote control buttons. Check out the buttons shown with
respect to the actual front panel or remote control. There are front panel
and remote control buttons that may not exactly look alike but have
the same function – example: front panel’s [d/f/a/s] and remote
control’s [D/F/A/S]; front panel’s [a SOURCE s] and remote control’s
[SOURCE5/6].
USB PLAYBACK CONTROLS
Using the AVR 4 remote control, the following playback control buttons are
applicable for USB playback. Set DEVICE SELECTOR to MP for USB playback
control.
ENTER/S : Select USB le and at the same time start playback.
A : Return to previous display.
4 : Resume playback from pause mode.
j : Pause current playback.
9 : Skip back to the preceding song.
0 : Skip forward to the next song.
RPT: Repeat track (le), folder, all or repeat o.
DISP: Toggle to display applicable information about the le currently
playing.
IMPORTANT NOTICE
Do not disconnect the USB mass storage device during playback as it
may damage the C 390DD.
LISTENING TO A COMPUTER
Use Type A to Type B cable connector to directly stream 24/96 PCM
content from your PC or MAC to the C 390DD. Ensure that the Sound or
Audio device setting of your computer is set to “NAD USB Audio”.
MINIMUM PC SYSTEM REQUIREMENT
Microsoft Windows XP Service Pack 2 or higher, Microsoft Windows 7
FOR MAC USERS
Minimum Mac OS X Snow Leopard (version 10.6) and later versions.
RENAMING A SOURCE INPUT
A particular source input can be renamed according to your preference.
You can use up to 20 characters in renaming a source input. Below is the
procedure on how to rename a source input.
Example: Rename “Digital Coaxial 1” to “BD Player”.
1 Toggle [a SOURCE s] button until “Digital Coaxial 1”.
2 Then, press and hold front panel’s [a SOURCE] button until “Digital
Coaxial 1” is shown in the lower section of the VFD and with “D” ashing.
Note that “Digital Coaxial 1” is also shown at upper section of the VFD.
3 Within 5 seconds, toggle the [d/f] buttons to select the rst character
(“B” from the alphabetical list). The ranges of characters available are
A-Z, a-z, _ (space) and 0-9.
4 Press [s] to select the character and at the same time move on to the
next character. Repeat steps 3 and 4 for each character in sequence.
5 Complete the renaming process by pressing the [ENTER] button again
to save the new source input name.
NOTE
The renaming process will be automatically terminated if no button
is pressed within 5 seconds. Any renamed characters at the time of
termination will not be saved.
22
Page 23

REFERENCE
TROUBLESHOOTING
CONDITION POSSIBLE CAUSES POSSIBLE SOLUTIONS
No “Computer” audio. • Sound or Audio device setting of your PC or Mac
Cannot power ON the C 390DD. • Rear panel POWER switched o. • Set to “ON” the rear panel POWER switch and
VFD is dim. • Low brightness level of VFD is selected. • Toggle [DIMMER] button until desired
VFD show “No les found” even if a
USB device with les is connected.
is not set to “NAD USB Audio”.
• No music les being played back from your PC
or Mac.
• There are no applicable MP3/WMA/FLAC les
available in the USB device.
• Set your PC or Mac Audio or Sound device
setting to “NAD USB Audio”.
• Playback a music le from your computer.
then press front panel Standby button.
brightness level.
• Load MP3/WMA/FLAC les in the USB device for
playback.
ENGLISHFRANÇAISESPAÑOLITALIANODEUTSCHNEDERLANDSSVENSKAРУССКИЙ
C 390DD does not respond to remote
control commands.
• Batteries are at or incorrectly inserted. • Check batteries.
• Infrared receiver (IR) window of C 390DD or IR
transmitter of the remote control is obstructed.
• C 390DD front panel is in very bright sunlight or
ambient light.
• IR Channel setting of C 390DD is dierent with
the IR Channel setting of the remote control.
• Check IR windows and ensure clear line-of-sight
from remote to C 390DD.
• Reduce sunlight/room lighting.
• Ensure that both C 390DD and the remote
control are set to the IR Channel setting.
RESTORING C 390DD TO ITS FACTORY DEFAULT SETTINGS
Press and hold together front panel buttons [a SOURCE] and [SOURCE s] until the VFD shows “Factory Reset”. The C 390DD is now restored to its factory
default settings.
23
Page 24

ENGLISH FRANÇAIS ESPAÑOL ITALIANO DEUTSCH NEDERLANDS SVENSKA РУССКИЙ
REFERENCE
SPECIFICATIONS
OVERALL SPECIFICATIONS
Continuous output power (ref. 20Hz – 20kHz, rated THD) - 8 ohms ≥150W
Continuous output power (ref. 20Hz – 20kHz, rated THD) - 4 ohms ≥150W
Rated distortion (THD, with AES17 and AP passive 20kHz LP lters) <0.005% (ref. 20Hz – 20kHz, 500mW – rated power)
Clipping power >165W (ref. 1kHz 8 ohms 0.1% THD)
IHF Dynamic power - 8 ohms ≥160W
IHF Dynamic power - 4 ohms ≥350W
IHF Dynamic power - 2 ohms ≥350W
Maximum output current >18A
Signal-to-noise ratio > 95dB (ref. 1W, A-weighted)
>124dB (ref. 150W, A-weighted)
Damping factor >800 (ref. 20Hz- 200Hz)
USB INPUT
Digital USB Front/Digital USB Back (USB Type A) MP3/WMA: 48 kHz
FLAC: 24 bit/48 kHz
Computer (USB Type B) 24 bit/96 kHz PCM content from PC or MAC
DIGITAL INPUT (COAXIAL, OPTICAL, AES/EBU)
Input impedance - Coaxial 75 ohms
Input impedance - AES/EBU 110 ohms
Sample rate 32kHz to 192kHz
Frequency response ±0.5dB (ref. 20Hz – 96kHz @192kHz )
Channel separation >75dB (ref. 1/3 rated power, 10kHz 4 ohms)
POWER CONSUMPTION
Normal operation 500W (ref. 100 - 240V AC 50/60 Hz)
Standby power <0.5W
Idle power 100W
PHYSICAL SPECIFICATIONS
Unit Dimensions (W x H x D) 435 x 131 x 388 mm (Gross)
17 ¹/₈ x 5 ³/₁₆ x 15 ⁵/₁₆ inches
Net Weight 7.7 kg (17.0 lbs)
Shipping Weight 9.8kg (21.6 lbs)
* - Gross dimensions include feet, volume knob and speaker terminals.
Specications are subject to change without notice. For updated documentation and features, please log onto www.NADelectronics.com for the latest
information about C 390DD.
24
Page 25

ENGLISHFRANÇAISESPAÑOLITALIANODEUTSCHNEDERLANDSSVENSKAРУССКИЙ
25
Page 26

www.NADelectronics.com
©2015 NAD ELECTRONICS INTERNATIONAL
A DIVISION OF LENBROOK INDUSTRIES LIMITED
All rights reserved. NAD and the NAD logo are trademarks of NAD Electronics International, a division of Lenbrook Industries Limited.
No part of this publication may be reproduced, stored or transmitted in any form without the written permission of NAD Electronics International.
While every effort has been made to ensure the contents are accurate at the time of publication, features and specifications may be subject to change without prior notice.
C390DD_ENG_OM_V21 SEP 2015
 Loading...