


|
Table of Contents |
|
1 |
Brief Description................................................................................................................. |
2 |
|
Package Contents.......................................................................................................... |
2 |
2 Before Using Your Camera ................................................................................................ |
2 |
|
|
Digital Still Camera Specification ................................................................................ |
2 |
|
Memory Capacity Chart................................................................................................ |
3 |
|
Capturing good pictures................................................................................................ |
3 |
|
Identifying the parts ...................................................................................................... |
4 |
3 Using Your Digital Camera ................................................................................................ |
5 |
|
|
Charging the battery...................................................................................................... |
5 |
|
Lithium-polymer battery tips:....................................................................................... |
5 |
|
Turning on the camera .................................................................................................. |
6 |
|
Turning on the LCD...................................................................................................... |
6 |
|
Understanding LCD icons............................................................................................. |
6 |
|
Mode selection .............................................................................................................. |
6 |
|
Capture mode ................................................................................................................ |
7 |
|
Capture mode menus..................................................................................................... |
7 |
|
Capture mode with timer on ......................................................................................... |
9 |
|
Playback mode ............................................................................................................ |
10 |
|
Playback mode menu .................................................................................................. |
10 |
|
USB mode................................................................................................................... |
10 |
|
USB mode activity...................................................................................................... |
10 |
|
Using Secure Digital (SD) memory cards .................................................................. |
11 |
|
Changing resolution .................................................................................................... |
11 |
|
Turning sound on/off .................................................................................................. |
12 |
|
Taking pictures............................................................................................................ |
12 |
|
About Autobrite® technology .................................................................................... |
12 |
|
Low light lock-out....................................................................................................... |
12 |
|
Deleting an image/images........................................................................................... |
13 |
|
Formatting internal flash memory or SD card ............................................................ |
13 |
4 |
Installing the Software ...................................................................................................... |
14 |
|
System requirements................................................................................................... |
14 |
|
PhotoImpression 5.0 Installation ................................................................................ |
15 |
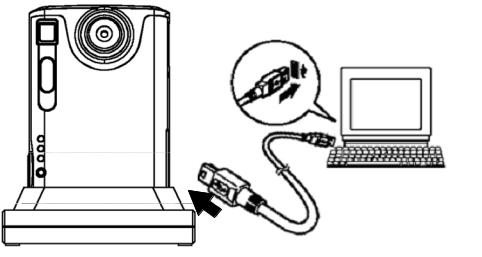
5 Connecting the Digital Camera to Your PC ..................................................................... |
16 |
|
6 |
Troubleshooting ................................................................................................................ |
19 |
7 |
Safety Notes...................................................................................................................... |
21 |
1
1 Brief Description
Your digital camera with color LCD display is similar to the size of a credit card - only 13 mm thick. The camera’s portability and convenience are enabled by its “worry free” rechargeable battery, simple user interface, and easy image download when you connect the camera to a PC with the supplied USB Docking Station.
Package Contents
The package contains all the items listed below:
Camera |
USB cable |
User Manual |
CD-ROM |
Carry Bag |
|
Neck Strap |
Docking Station |
|
2 Before Using Your Camera
Before using your camera, please read the Safety Notes in section 7 and the rest of this User Manual carefully.
Digital Still Camera Specification
Function |
Digital Still Camera |
Image Sensor |
3.1 MP CMOS |
Display |
1.5” Color TFT LCD |
Exposure Mode |
Auto |
Shutter Speed |
1/15 second to 1/1,000 second |
Lens |
Glass, F.L. = 8.2mm, F/3.0 (equivalent to 42mm lens on a |
|
35mm camera) |
Focus Range |
Fixed, 1.5m (4.9ft) to infinity |
Controls |
Power on-off, mode selection, shutter button, LCD on-off, |
|
menu, select, arrow up, arrow down |
Flash Distance |
Approx. 0.8m ~ 2m |
Image Resolution Settings |
Large: 2592 x 1944 Pixels (5 MP, Hardware interpolated) |
|
Medium: 2000 x 1500 Pixels |
|
Small: 1000 x 750 Pixels |
White Balance |
Autobrite* |
Built-in Storage |
Large resolution: 17 images |
(32 MB Flash memory ) |
Medium: 17 images |
|
Small: 34 images |
Memory Card Slot |
SD card ONLY |
USB Interface |
USB 1.1 |
System Requirements |
233 MHz Pentium 2 or greater with MS Windows ME, |
|
2000, or XP |
Dimensions |
3.5” x 2.4” x 0.6” (L x W x H) |
Weight |
0.14 lbs |
Battery Type |
Built-in Lithium-polymer battery (rechargeable) |
*Autobrite is a registered trademark of SMaL Camera Technologies, Inc. of Cambridge, MA, USA.
2

Memory Capacity Chart
|
|
|
32MB |
|
|
|
SD Memory Card |
|
|
||
|
|
|
|
|
|
|
|
||||
Camer |
|
Size |
Internal |
|
|
|
|
|
|
|
|
|
|
|
|
|
|
256M |
512M |
|
|||
a Mode |
|
Memor |
8MB |
16MB |
32MB |
64MB |
128MB |
1GM |
|||
|
|
B |
B |
||||||||
|
|
|
y |
|
|
|
|
|
|
||
|
|
|
|
|
|
|
|
|
|
|
|
|
Larg |
2592x19 |
17 |
2 |
7 |
17 |
36 |
75 |
150 |
304 |
600 |
|
e |
44 |
|
|
|
|
|
|
|
|
|
|
|
|
|
|
|
|
|
|
|
|
|
Still |
Med. |
2000x15 |
17 |
2 |
7 |
17 |
36 |
75 |
150 |
304 |
600 |
Image |
00 |
||||||||||
|
|
|
|
|
|
|
|
|
|
|
|
|
Sma |
1000x75 |
34 |
6 |
15 |
34 |
71 |
146 |
292 |
591 |
1167 |
|
ll |
0 |
|
|
|
|
|
|
|
|
|
|
|
|
|
|
|
|
|
|
|
|
|
Capturing good pictures
•Hold the camera steadily.
•Under dimmer environment, the camera needs longer time to capture a picture.
•Make sure your fingers will not block the lens and flash.
3
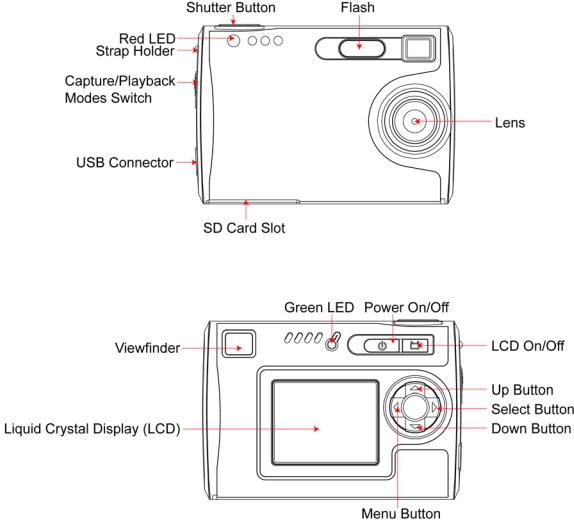
Identifying the parts
Front View
Back View
4
3 Using Your Digital Camera
Charging the battery
Long battery life is one of the key benefits of this camera compared to other digital cameras. On a full charge, the camera will take hundreds of images. Your camera battery has already been charged prior to shipment. So, you should be able to take pictures without recharging it. However, just to be safe, you may want to follow the instructions below to make sure that your camera is fully charged.
Note: Install the provided software before initial charging of the camera.
The Lithium-polymer battery used in the camera recharges automatically when the camera is plugged into a PC via the USB cable. When the battery is charging, the green LED will blink. After fully charged, the green LED remains ON.
Lithium-polymer battery tips:
•Safety note: Always observe the precautions described in Section 7.
•It takes approximately 3 hours to fully charge a battery.
•The battery can be charged at any time.
•If power is low, the red LED blinks 5 times and then the camera turns off.
•Recharge the battery immediately.
•A fully charged battery allows the camera to take about 90 pictures with Flash and 440 pictures without Flash.
•To ensure that your battery lasts as long as possible, switch the camera off when you are not using it.
5

Turning on the camera
Press the Power button once to turn on the camera. Press it again to turn the camera off.
Note:
•The camera has an automatic time-out feature to conserve battery life. After one minute (or 2 minutes) the camera will time-out (turn off). When timed out, the camera will not take a photo when you push the shutter button. Press the Power button once to turn on the camera again.
•If power is low, the red LED blinks 5 times and then the camera turns off. Recharge the battery immediately.
Turning on the LCD
The LCD screen comes on automatically in preview mode when the power is turned on. Press the LCD button to switch to preview mode. Press the LCD button again to turn off the LCD.
Understanding LCD icons
LCD |
Description |
|
Picture Counter: Shows remaining number of shots. |
|
Resolutions: |
|
|
|
: SMALL 1000 x 750 pixels |
|
: MED 2000 x 1500 pixels |
|
. |
|
: LARGE 2592 x 1944 pixels |
|
Indicates Battery Charge State |
|
: The battery is fully charged |
|
: The battery is about half-charged |
|
: Out of battery: need to recharge immediately |
|
Secure Digital card indicator |
|
|
|
Flash indicator: Flash icon blinks while charging. Steady on when flash is set to |
|
|
|
Automatic. |
Mode selection
Your camera has three modes of operation:
•Capture mode (for capturing images)
•Playback mode (for reviewing and deleting images)
•USB mode (for downloading images to a computer and charging the battery)
6
 Loading...