


Digital Video
User Guide
Cover page to be revised

Copyright Information
All rights reserved. No part of this publication may be reproduced, transmitted, stored in a retrieval system, or translated into any language in any form by any means, optical, electronic, recording, or otherwise, without the written consent of our company.
We reserved the right to revise this manual and to make changes to any or all parts at any time, without obligation to notify any person or entity of such revisions and changes.

Reminders
CAUTION
Keep product out of direct sunlight. Exposure to direct sunlight or extreme heat may cause damage or malfunction. To prevent fire or shock hazard, do not expose to rain or moisture.
BACK UP YOUR DATA
As with any device that has flash memory, you should back up the drive regularly.
IMPORTANT BATTERY INFORMATION
The battery used in this device may present a risk of fire or chemical burn if mistreated. Do not separately recharge, disassemble, heat above 60º C
(140º F), or incinerate.
Do not attempt to open the unit. No user serviceable parts inside.
Keep the unit away from children. Do not disassemble or dispose product in fire.
Use only the specified chargers which were packaged with the product. Use of another charger may present a risk of fire or explosion.
Keep charger plugged in to device for at least 3 hours before attempting to operate device if battery is completely run down and is insufficient to power up device.
|
|
|
|
|
|
|
|
Specifications |
|
Function |
|
|
Digital Camcorder, Digital Still Camera, Digital Voice |
|
|
|
|
Recorder, MP3 Player, Video Camera, SD/MMC |
|
|
|
|
Card Reader, PC Cam |
|
Image Sensor |
|
3.1 Mega CCD |
||
Lens |
Focal Length |
f = 6.7 mm |
||
|
Aperture Ratio |
F = 3.5/8.0 |
||
Digital Zoom |
|
4X |
||
Display |
|
|
2.5” TFT LCD |
|
Shutter Speed |
|
1/10 sec. ~ 1/1000 sec. |
||
Flashlight |
|
|
Built-in / IGBT Type |
|
External Memory |
SD/MMC |
|||
Interface |
|
|
USB 2.0 / AV Out / Earphone |
|
Television System |
NTSC/PAL |
|||
Battery Type |
|
Rechargeable Li-ion Battery x 1 (1500 mAh) |
||
Power Source |
|
DC-in (Charger inside/ Power Adapter (5V/ 1A) or |
||
|
|
|
Docking Station) |
|
Dimension |
|
84 x 55 x 95 mm (L x W x H) |
||
Weight |
|
|
220g (Without Battery) |
|
|
|
|
Digital Camcorder |
|
Resolution |
Fine |
VGA - 640 x 480 (12 fps) |
||
|
|
Normal |
400X304 (25 fps) |
|
|
|
Economic |
352X288 (30 fps) |
|
|
|
|
|
|
Quality |
|
Fine |
Low compression rate |
|
|
|
Normal |
High compression rate |
|
File Format (Video) ASF file (MPEG 4 compatible)
|
Digital Still Camera |
|
Resolution |
Fine |
2624 x 1968 (H/W enhancement) |
|
Normal |
2048 x 1536 |
|
Economic |
640 x 480 |
Quality |
|
Fine |
|
|
High |
|
|
Normal |
Self-Timer |
|
10 Seconds Delay |
File Format (Image) |
JPEG Compatible |
|
Scene Mode |
|
Auto / Portrait / Landscape / Sport / Night Portrait |
Digital Voice Recorder
File Format |
WAV |
|
MP3 Player |
File Format |
MP3 |
|
PC Camera |
Video Frame Rate (PC Cam) |
20 ~ 30 fps (320 x 240) |
System Requirements |
Pentium 266 MHz processor or higher |
|
Microsoft Windows 98se / Me / 2000 / XP |
|
Available USB port |
|
Super VGA card and color monitor |
|
CD-ROM or DVD-ROM drive |
|
At least 128 MB of RAM |
|
200 MB of available HD space |
|
|
Video Capture Driver (PC Cam) Win 98SE / Me / 2000 / XP |
|
Mass Storage Support |
Win 98SE, Me, 2000, XP / MAC OS 9.X and |
|
OS 10.1 or above |

USB Device Unplugging Notice:
If you want to unplug the device from your computer, be sure to stop the device before hand. To stop the device, follow the steps below:
Remove from PC: (For Windows ME/2000/XP)
1.Click on the device icon  located on the taskbar. Select the device you want to stop (e.g. Stop USB Mass Storage Device Drive(E:)).
2.Follow the on-screen instructions to safely remove the device.
Remove from Mac: (For Mac OS 9.X and 10.1 above)
1.Select the device icon (Shown as ‘NO_NAME’ or ‘untitled’ drive) on the desktop.
2.Drag and drop the drive to the Trash.

Table of Contents
Getting to know your device
Identifying the Operation Panel
Loading Battery/Memory Card
Attaching the Wrist Strap
Charging the Device
Installing Software CD
Transferring Files
Direct printing
PC Cam
Mass Storage
Connecting to TV
Recording voices
Taking still image
Using AE Lock
Back Light compensation
Using Self-timer
Using Flash Strobe
LCD Display
Applying Memory Mix
User Guide 7

Recording moving images
Using Operation Panel and Direction Control
Applying Fader Effect
Playing back recorded files
Playing back still images
Playing back voice recordings and moving images
Playing MP3
Using the Direction Control and Operation Panel
Deleting files
Setting Menu
Manual Set
Still Set
Movie Set
Audio Set
Playback Set
System Set
Various Settings
Adjusting White Balance
Adding P. Effect
Setting Macro
Setting Image Quality
Setting Image Size
Applying Scene
User Guide 8

Interval Shutter/Record
Attaching voice to still image
Protecting file from deletion
Formatting the memory card
Understanding LCD screen indicators
Voice Recording
Still Image Recording
Moving Images Recording
MP3 Playing
Playback
User Guide 9

Getting to know your device
1
2
3
4
5 |
7 |
|
|
6 |
8 |
|
9
10
11
12
1Built-in Microphone
Do not touch while recording.
2Power button
3AE-Lock button
4Shutter
5Speaker
6Zoom
7Lens
8Flash strobe
9Earphone jack
10USB port
11A/V OUT jack
12DC IN jack
14
15
13

 16
16
13SD/MMC Card Slot
14Hook for Wrist Strap
15Battery Slot
16Hook for Wrist Strap
User Guide 10
Getting to know your device - continued
|
17 |
|
|
18 |
|
|
19 |
|
|
20 |
|
|
21 |
|
|
22 |
|
17 LCD Screen |
20 Direction Control button |
|
18 Mode Dial |
Back Light [On/Off]/Playback Zoom/ Stop |
|
Voice Record |
Self-Timer [On/Off]/F.Bwd/Previous |
|
Image Record |
||
Flash [Off/On/Auto/Red Eye]/F.Fwd/Next |
||
Playback |
||
|
||
MP3 |
Display |
|
Menu |
Record: [OSD off/ LCD off/ LCD on & |
|
19 Record button |
OSD on] |
|
Playback: [Single/ OSD off/ LCD |
||
For video and audio recordings. |
||
off/LCD on & Multi] |
||
|
||
|
OK/Play/Pause/Playback Zoom Exit |
21Battery/SD/MMC Cover
22Operation Panel
User Guide 11
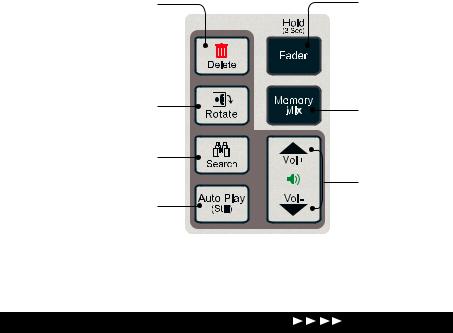
Identifying the Operation Panel
Delete 1/Delete All |
Fader/Hold |
Rotate Image |
Memory |
|
|
|
Mix |
Search |
|
|
Volume |
|
up/down |
Auto Play (Still) |
|
User Guide 12
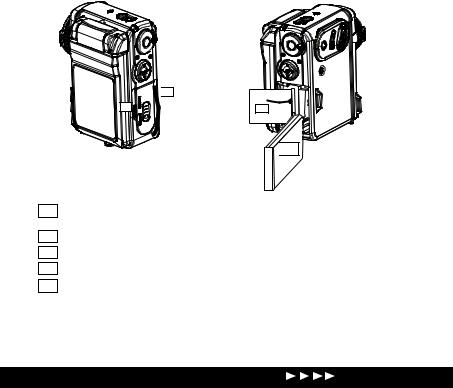
Loading Battery/Memory Card
To be revised
 B
B
A |
D |

 C
C
ASlide the Battery/SD/MMC cover lever in the direction of the arrow (down).
BFlip the Battery/SD/MMC Cover in the direction of the arrow (up).
CInsert the battery into the battery slot.
DInsert the SD memory card into the SD/MMC slot.
EClose the Battery/SD/MMC cover.
User Guide 13

Attaching the Wrist Strap |
|
1 |
2 |
B
A
B |
C |
|
3
A
C
D
B


 A
A


 User Guide 14
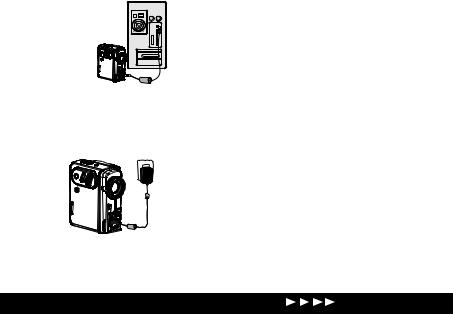
Charging the Device
There are three ways to charge this device. First, charge it via USB cable second, charge it via AC adapter and third, via the Dock Station (optional).
Charging the device via USB cable
1.Connect the device to a computer with the USB cable provided in the package.
2.The charge indicator illuminates in red and starts charging. If the battery is fully charged, the charge indicator will be turned off automatically.
Charging the device via AC Adapter
1.Connect the AC adapter to the DC IN jack on the device and the power plug to a power outlet.
2.The Charge indicator illuminates in red and starts charging. Turning on the device during the charging stage will lengthen the charge time.
Charging the device via Dock Station (Optional)
Please refer to the Dock Station guide for more detail.
User Guide 15
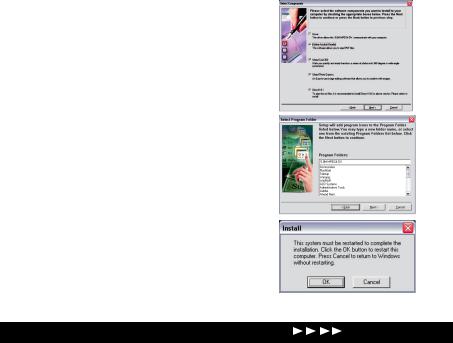
Installing Software CD
The installation CD bundled with the device contains all the necessary software and information for you to operate the device.
Please follow the instructions below to complete the software installation.
1.Insert the Software CD onto your CD-ROM drive or DVD-ROM drive. The
Select Language dialogue box appears.
2.Select your preferred language and press “OK” to continue.
3.A Welcome dialogue box appears, press
“Next”.
4.The Select Components dialogue box appears. Select the software you wish to install and press “Next”.
5.The Select Program Folder dialogue box appears telling you that setup program is about to add a program icon to your system, you can change the folder name listed in the text box, or simply press “Next” to continue.
6.The Start Copying Files dialogue box appears confirming that the listed software will be installed. Press “Next” to continue.
7.Follow the on-screen instructions to continue and complete the installation.
User Guide 16
Transferring Files
Before file transfer
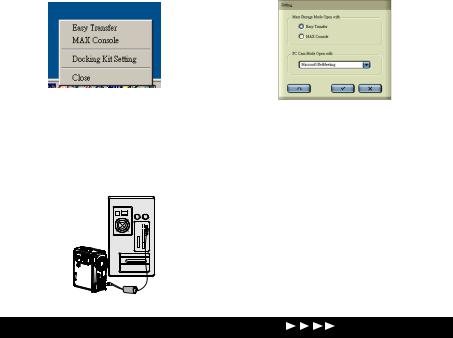
1.After successfully installing the driver a DV device icon will appear at your Windows OS taskbar. Right click on the icon to open the selection menu.
3.Press  confirm and exit.
Initiating file transfer
1.Connect the device to a computer with the USB cable provided in the package.
2.Select “Docking Kit Setting” from the menu and choose either “Easy Transfer or MAX Console as your default file transfer application.
2.Device enable icon will appear and Easy Transfer or MAX Console will launch automatically according to your prior setting.
User Guide 17
Transferring Files - continued
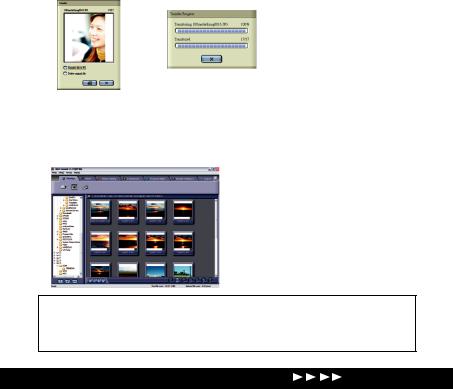
3. For Easy Transfer single file transfer dialogue or transfer all progress bar will appear depending on your setting.
or
4.For MAX Console select device’s drive and go to the DCIM/100MEDIA folder for audio clips and images, go to the MP3 folder for MP3 files
5.Use the Drag and Drop method to copy files to your computer or vice versa.
Important: In order for MP3 files to be playable on your device be sure to store those files in the MP3 folder. If the MP3 folder does not exist, turn on the device and switch the Mode dial to MP3 position. This will automatically create a MP3 folder on the device.
User Guide 18
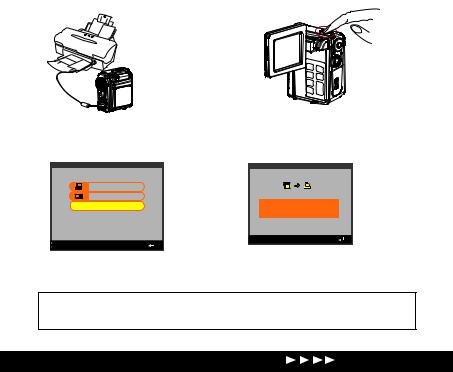
 Direct printing
Important: This function is only available to PictBridge™ compatible printers.
1.Connect the device to a printer via an USB cable.
2. Power ON the device.
3.Select “Direct Print” from the OSD menu of the device.
PC Cam
Mass Storage
 Direct Print
Select |
Ok |
|
|
4.Press OK button on the Direction
Control to confirm device is connected to a printer.
DON'T CONNECT TO PC !
DIRECT TO PRINTER !
Return |
Ok |
|
|
4.Select your preferred settings from the menus.
5.Select “Print” from the menu to print the selected images.
Note: When the device is connected to a computer under “Direct Print” mode,
Windows OS will ask for a device driver. We do not provide such driver.
User Guide 19
 Loading...