

Page 1
V3
GSM
Page 2

Page 3
Welcome
Welcome to the world of Motorola digital wireless
communications! We are pleased that you have chosen the
Motorola V3 GSM wireless phone.
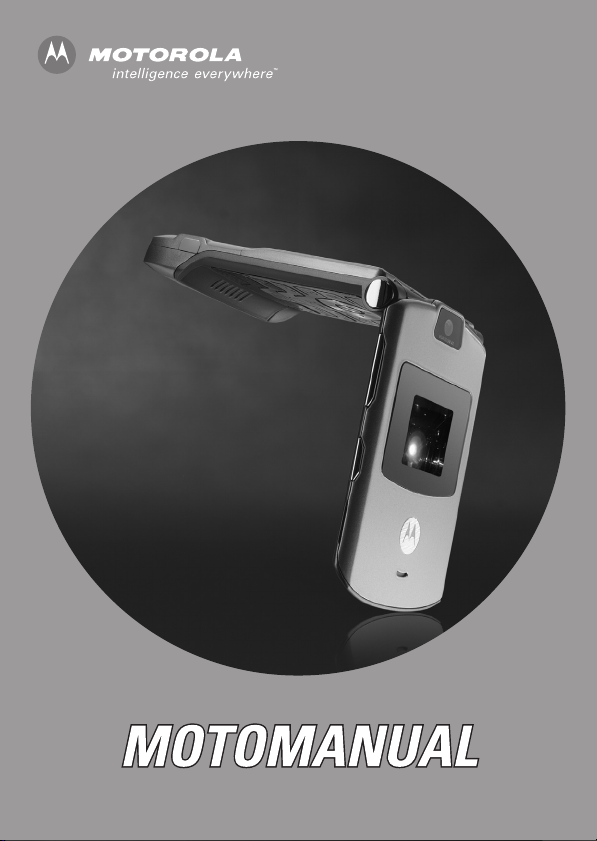
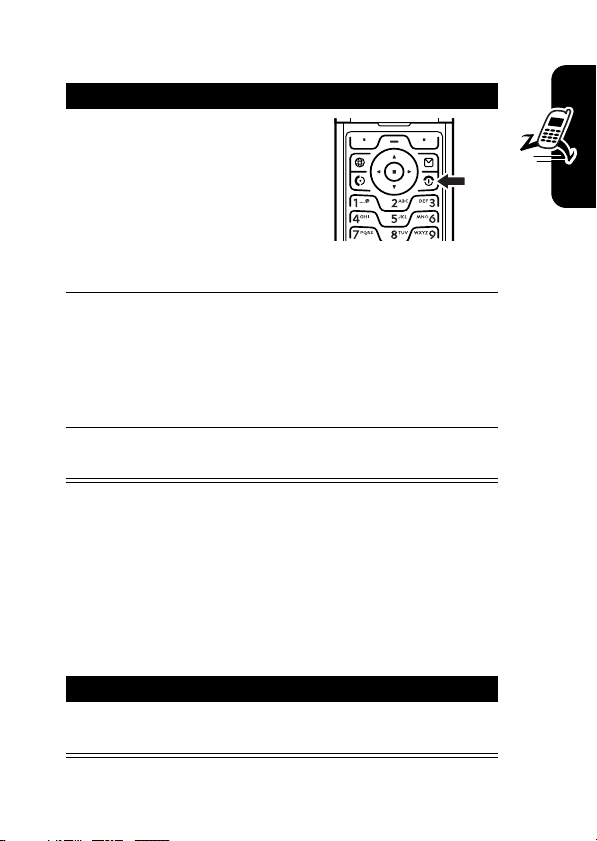
Smart Key
Volume Keys
Left Soft Key
Perform function
in lower left
display.
Operator Key
Send Key
Make & answer
calls.
Accessory
Connector Port
Insert charger &
phone
accessories.
040128o
4-Way
Navigation Key
with Center
Select
Voice Key
Create voice
records & voice
dial names.
Menu Key
Right Soft Key
Perform function
in lower right
display.
Message Key
Power & End Key
Turn phone
on/off, end calls,
exit menu
system.
1
Page 4
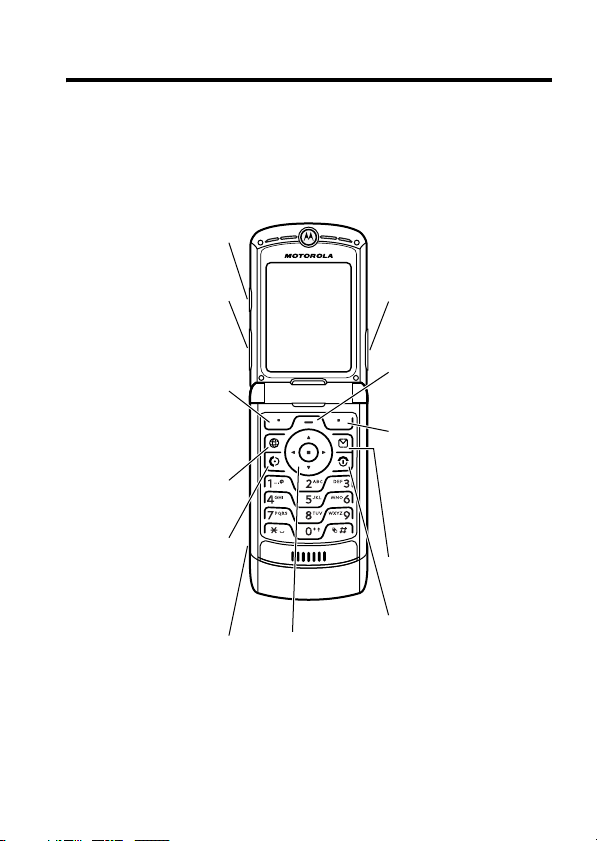
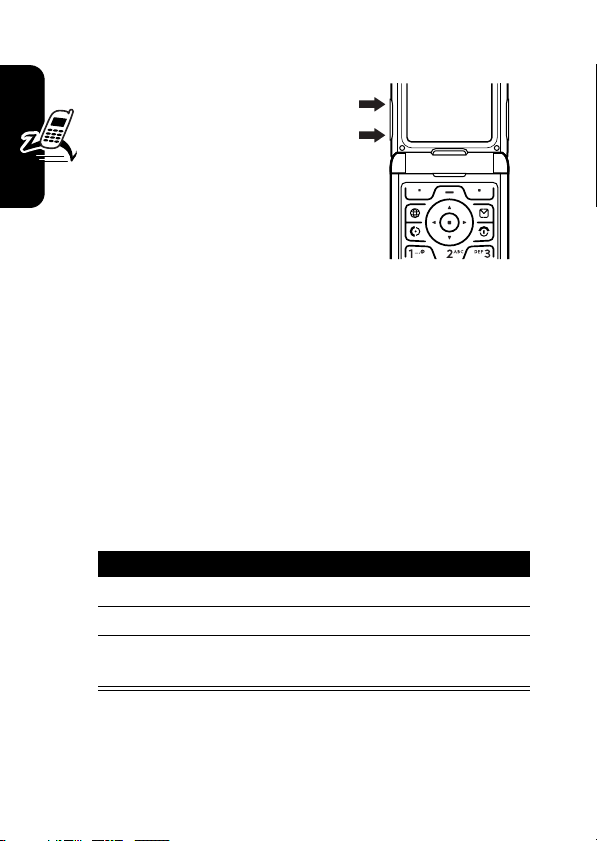
Check It Out!
Camera Lens Bluetooth
Smart Key
Take self-portrait
photo with
camera when flip
is closed.
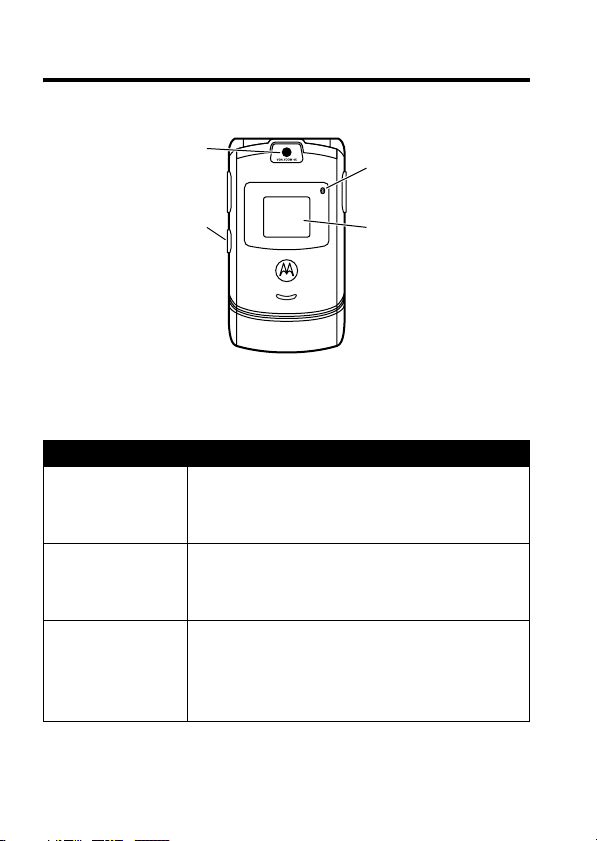
Feature Description
Take Photo
Take
Self-Portrait
(flip closed)
Send Photo
Press
Send a photo to a phone number or
CAMERA(-
camera, point lens at subject, press
CAPTURE(+
Activate the camera, close the flip, use
viewfinder to aim lens, press smart key to
take a photo.
email address:
Take photo, then press
>
Send
) to take a photo.
.
®
LED Indicator
External Display
View incoming
call information,
use as camera
viewfinder when
flip is closed.
) to activate the
STORE(+
)
2
Page 5
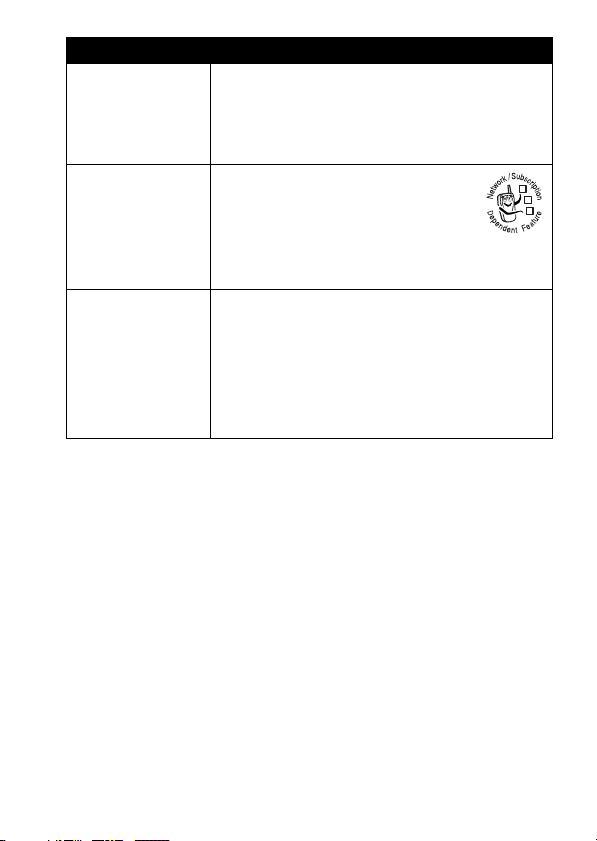
Feature Description
Set Photo as
Picture ID
Send
Multimedia
Message
Wireless
Connection
Assign a photo to a phonebook entry to
allow picture caller ID:
Take photo, then press
>
Apply as Phonebook Entry
Send a multimedia message
with pictures, animations,
sounds, and videos:
E >Create Message
>
New Multimedia Msg
Set up a Bluetooth
to a headset accessory, car kit, or
external device:
M >Settings >Connection >Bluetooth Link
>
Setup >Power >On
press >
Handsfree >[Look For Devices]
STORE(+
.
®
wireless connection
, press
BACK(-
)
032380o
),
3
Page 6

Motorola, Inc.
Consumer Advocacy Office
1307 East Algonquin Road
Schaumburg, IL 60196
www.motorola.com
1-800-331-6456 (United States)
1-888-390-6456 (TTY/TDD United States for hearing impaired)
1-800-461-4575 (Canada)
MOTOROLA and the Stylized M Logo are registered in the US Patent &
Trademark Office. America Online, AOL, the America Online & Design
logo, the AOL & Design logo, AIM, and the Triangle Logo, are registered
trademarks of America Online, Inc. in the United States and/or other
countries. Instant Messenger is a trademark of America Online, Inc. The
Bluetooth trademarks are owned by their proprietor and used by Motorola,
Inc. under license. Java and all other Java-based marks are trademarks
or registered trademarks of Sun Microsystems, Inc. in the U.S. and other
countries. All other product or service names are the property of their
respective owners.
©
Motorola, Inc. 2004.
The information contained in Motorola’s user’s guides is believed to be
correct at the time of printing. Motorola reserves the right to change or
modify any information or specifications without notice. The contents of
Motorola’s user’s guides are provided “as is.” Except as required by
applicable law, no warranties of any kind, either express or implied,
including, but not limited to, the implied warranties of merchantability and
fitness for a particular purpose, are made in relation to the accuracy,
reliability, or contents of this guide.
Caution:
expressly approved by Motorola, will void the user’s authority to operate
the equipment.
Manual number: 6809491A59-O
Changes or modifications made in the radio phone, not
4
Page 7

Contents
Getting Started
About This Guide . . . . . . . . . . . . . . . . . . . . . . . . . . . . . . . 8
Installing the SIM Card . . . . . . . . . . . . . . . . . . . . . . . . . . . 9
Battery Tips . . . . . . . . . . . . . . . . . . . . . . . . . . . . . . . . . . 10
Installing the Battery . . . . . . . . . . . . . . . . . . . . . . . . . . . . 11
Charging the Battery. . . . . . . . . . . . . . . . . . . . . . . . . . . . 11
Turning Your Phone On. . . . . . . . . . . . . . . . . . . . . . . . . . 13
Turning Your Phone Off. . . . . . . . . . . . . . . . . . . . . . . . . . 13
Adjusting Volume . . . . . . . . . . . . . . . . . . . . . . . . . . . . . . 14
Making a Call . . . . . . . . . . . . . . . . . . . . . . . . . . . . . . . . . 14
Answering a Call. . . . . . . . . . . . . . . . . . . . . . . . . . . . . . . 15
Viewing Your Phone Number . . . . . . . . . . . . . . . . . . . . . 15
Highlight Features
Taking and Sending a Photo . . . . . . . . . . . . . . . . . . . . . . 16
Sending a Multimedia Message . . . . . . . . . . . . . . . . . . . 19
Using a Bluetooth® Wireless Connection. . . . . . . . . . . . 23
Learning to Use Your Phone
Using the Display . . . . . . . . . . . . . . . . . . . . . . . . . . . . . . 26
Using the 4-Way Navigation Key. . . . . . . . . . . . . . . . . . . 30
Using the Operator Key . . . . . . . . . . . . . . . . . . . . . . . . . 31
Using the Message Key . . . . . . . . . . . . . . . . . . . . . . . . . 31
Using Menus. . . . . . . . . . . . . . . . . . . . . . . . . . . . . . . . . . 32
Entering Text . . . . . . . . . . . . . . . . . . . . . . . . . . . . . . . . . . 34
Using the Smart Key. . . . . . . . . . . . . . . . . . . . . . . . . . . . 46
Using the External Display . . . . . . . . . . . . . . . . . . . . . . . 46
Using the Handsfree Speaker. . . . . . . . . . . . . . . . . . . . . 48
Changing a Code, PIN, or Password . . . . . . . . . . . . . . . 48
Locking and Unlocking Your Phone . . . . . . . . . . . . . . . . 49
. . . . . . . . . . . . . . . . . . . . . . . . . . . . . . . . . . 8
. . . . . . . . . . . . . . . . . . . . . . . . . . . . . . 16
. . . . . . . . . . . . . . . . . . . . . . 26
5
Page 8

If You Forget a Code, PIN, or Password . . . . . . . . . . . . 50
Using the Phonebook . . . . . . . . . . . . . . . . . . . . . . . . . . 51
Setting Up Your Phone
Setting a Ring Style. . . . . . . . . . . . . . . . . . . . . . . . . . . . 54
Changing the Call Alert . . . . . . . . . . . . . . . . . . . . . . . . . 55
Setting the Time and Date . . . . . . . . . . . . . . . . . . . . . . 55
Setting a Wallpaper Image . . . . . . . . . . . . . . . . . . . . . . 56
Setting a Screen Saver Image . . . . . . . . . . . . . . . . . . . 57
Changing Phone Skin . . . . . . . . . . . . . . . . . . . . . . . . . . 58
Setting a Phone Theme . . . . . . . . . . . . . . . . . . . . . . . . 58
Setting Answer Options. . . . . . . . . . . . . . . . . . . . . . . . . 59
Setting Display Brightness . . . . . . . . . . . . . . . . . . . . . . 60
Adjusting the Backlight . . . . . . . . . . . . . . . . . . . . . . . . . 60
Setting Display Timeout . . . . . . . . . . . . . . . . . . . . . . . . 61
Storing Your Name and Phone Number . . . . . . . . . . . . 61
Calling Features
Turning Off a Call Alert . . . . . . . . . . . . . . . . . . . . . . . . . 62
Viewing Recent Calls . . . . . . . . . . . . . . . . . . . . . . . . . . 62
Redialing a Number . . . . . . . . . . . . . . . . . . . . . . . . . . . 64
Using Automatic Redial. . . . . . . . . . . . . . . . . . . . . . . . . 64
Returning an Unanswered Call . . . . . . . . . . . . . . . . . . . 65
Using the Notepad . . . . . . . . . . . . . . . . . . . . . . . . . . . . 65
Putting a Call On Hold or Mute . . . . . . . . . . . . . . . . . . . 66
Using Call Waiting. . . . . . . . . . . . . . . . . . . . . . . . . . . . . 66
Using Caller ID (Incoming Calls) . . . . . . . . . . . . . . . . . . 67
Calling an Emergency Number . . . . . . . . . . . . . . . . . . . 68
Dialing International Numbers. . . . . . . . . . . . . . . . . . . . 68
Calling With 1-Touch Dial . . . . . . . . . . . . . . . . . . . . . . . 68
Using Voicemail. . . . . . . . . . . . . . . . . . . . . . . . . . . . . . . 69
. . . . . . . . . . . . . . . . . . . . . . . . . . 54
. . . . . . . . . . . . . . . . . . . . . . . . . . . . . . . 62
6
Page 9

Phone Features
Main Menu . . . . . . . . . . . . . . . . . . . . . . . . . . . . . . . . . . . 71
Settings Menu. . . . . . . . . . . . . . . . . . . . . . . . . . . . . . . . . 72
Feature Quick Reference . . . . . . . . . . . . . . . . . . . . . . . . 73
Calling Features . . . . . . . . . . . . . . . . . . . . . . . . . . . . . . . 73
Messages . . . . . . . . . . . . . . . . . . . . . . . . . . . . . . . . . . . . 74
Phonebook . . . . . . . . . . . . . . . . . . . . . . . . . . . . . . . . . . . 75
Personalizing Features . . . . . . . . . . . . . . . . . . . . . . . . . . 79
AOL® Instant Messenger™ . . . . . . . . . . . . . . . . . . . . . . 80
Email. . . . . . . . . . . . . . . . . . . . . . . . . . . . . . . . . . . . . . . . 81
Menu Features . . . . . . . . . . . . . . . . . . . . . . . . . . . . . . . . 82
Special Dialing Features. . . . . . . . . . . . . . . . . . . . . . . . . 83
Call Monitoring . . . . . . . . . . . . . . . . . . . . . . . . . . . . . . . . 84
Handsfree Features . . . . . . . . . . . . . . . . . . . . . . . . . . . . 84
Data and Fax Calls . . . . . . . . . . . . . . . . . . . . . . . . . . . . . 85
Bluetooth® Wireless Connections . . . . . . . . . . . . . . . . . 86
Network Features . . . . . . . . . . . . . . . . . . . . . . . . . . . . . . 88
Personal Organizer Features . . . . . . . . . . . . . . . . . . . . . 88
Security. . . . . . . . . . . . . . . . . . . . . . . . . . . . . . . . . . . . . . 90
News and Entertainment . . . . . . . . . . . . . . . . . . . . . . . . 90
Troubleshooting
Specific Absorption Rate Data
AOL® Instant Messenger™ License
European Union Directives Conformance Statement
Index
. . . . . . . . . . . . . . . . . . . . . . . . . . . . . . . . . . . . . . . . 101
. . . . . . . . . . . . . . . . . . . . . . . . . . . . . . . . 71
. . . . . . . . . . . . . . . . . . . . . . . . . . . . . . . . 93
. . . . . . . . . . . . . . . . . . . . 94
. . . . . . . . . . . . . . . . 96
. 100
7
Page 10
Getting Started
CAUTION:
first time, read the
Legal Information
gray-edged pages at the back of this guide.
Before using the phone for the
Important Safety and
included in the
032259o
About This Guide
This guide describes the basic features of your phone.
Getting Started
Selecting a Menu Feature
Use the menu system to access your phone’s features.
This guide shows you how to select a menu feature from
the home screen as follows:
Find the Feature
This example shows that, from the home screen, you must
press the menu key
select
s
Recent Calls
Press the 4-way navigation key
menu feature. Press
menu feature.
M>Recent Calls >Dialed Calls
M
to open the menu, scroll to and
, then scroll to and select
S
to scroll and highlight a
SELECT(+
) to select the highlighted
Dialed Calls
.
8
Page 11
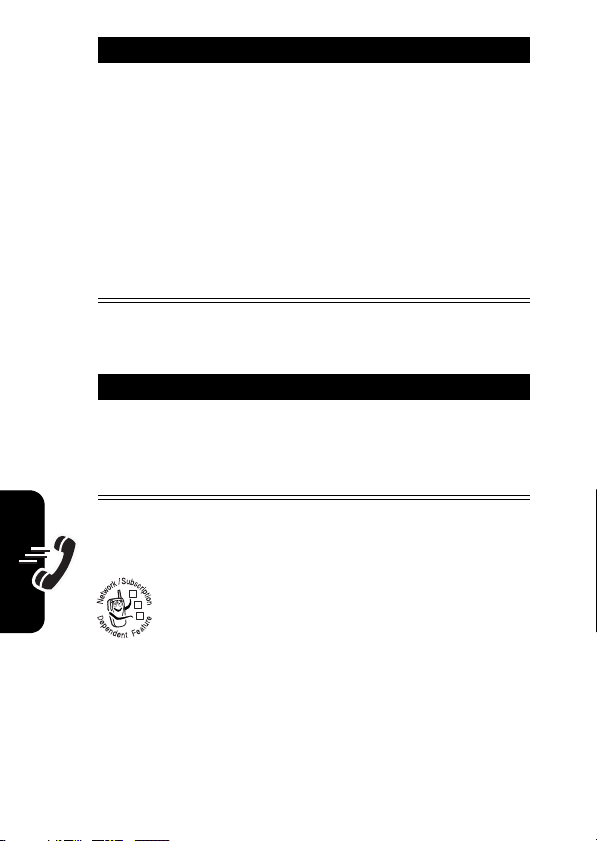
Optional Features
This label identifies an optional network, SIM
card, or subscription-dependent feature that
032380o
may not be offered by all service providers in
all geographical areas. Contact your service
provider for more information.
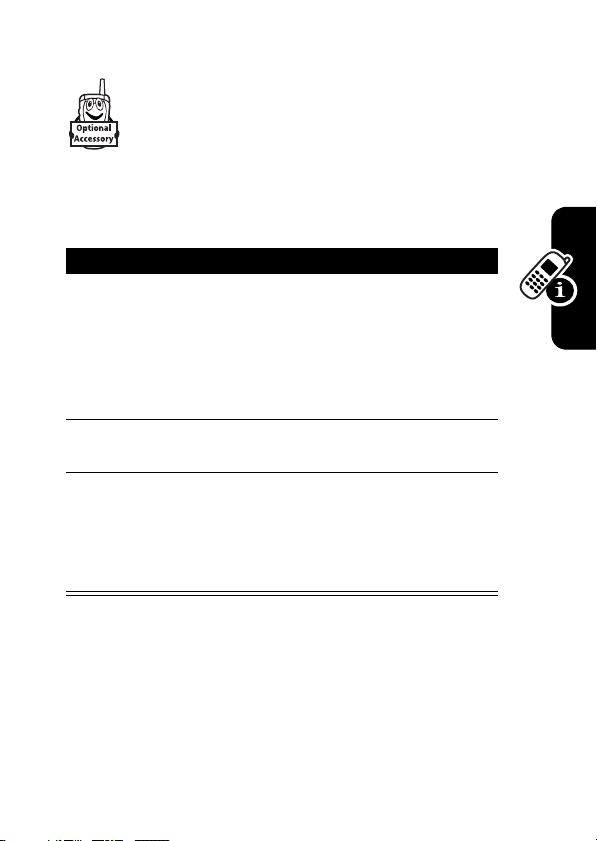
Optional Accessories
This label identifies a feature that requires an
optional Motorola Original™ accessory.
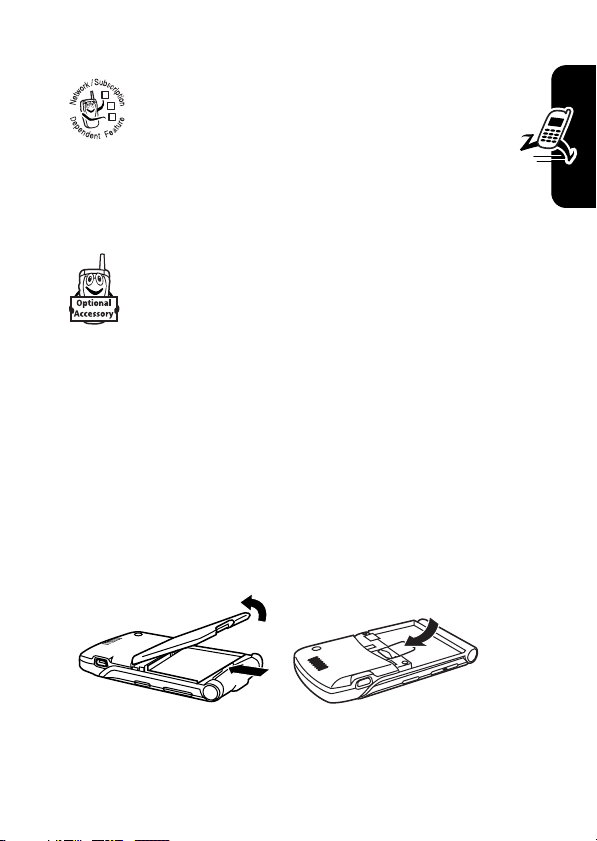
Installing the SIM Card
Yo u r Subscriber Identity Module (SIM) card contains your
phone number, service details, and phonebook/message
memory.
Caution:
exposing your SIM card to static electricity, water, or dirt.
Slide the SIM card under the retention strap to insert it into
the card slot as shown below:
1.
Do not bend or scratch your SIM card. Avoid
2.
Getting Started
9
Page 12

Battery Tips
Battery life depends on the network, signal strength,
temperature, features, and accessories you use.
•
Always use Motorola Original batteries
and chargers. The warranty does not
cover damage caused by using
non-Motorola batteries and/or chargers.
•
New batteries or batteries stored for a long time may
take more time to charge.
•
When charging your battery, keep it near room
Getting Started
temperature.
•
When storing your battery, keep it uncharged in a
cool, dark, dry place, such as a refrigerator.
•
Never expose batteries to temperatures below -10°C
(14°F) or above 45°C (113°F). Always take your
phone with you when you leave your vehicle.
•
It is normal for batteries to gradually wear down and
require longer charging times. If you notice a change
in your battery life, it is probably time to purchase a
new battery.
Contact your local recycling center for proper
battery disposal.
Warning:
may explode.
Before using your phone, read the battery safety
information in the “Safety and General Information” section
included in the gray-edged pages at the back of this guide.
10
Never dispose of batteries in a fire because they
Page 13
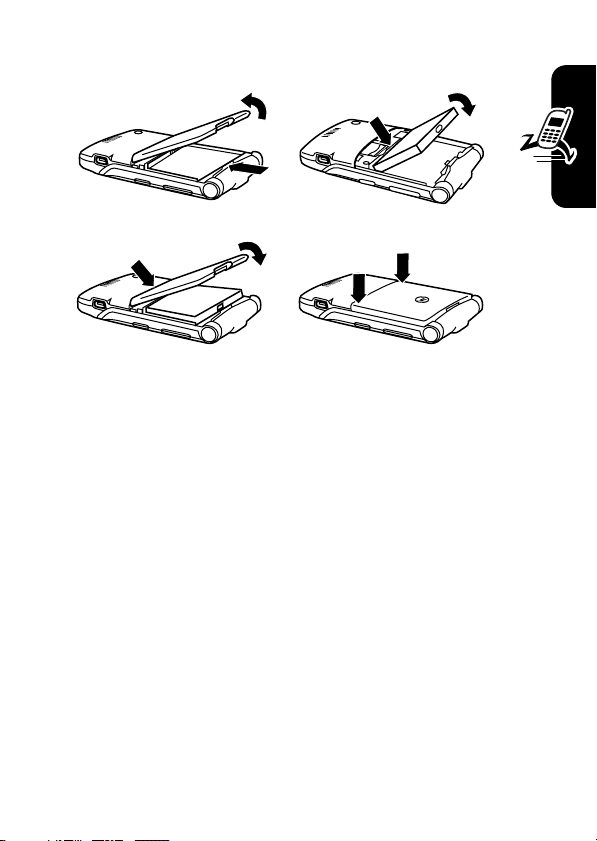
Installing the Battery
1.
3.
Charging the Battery
New batteries are shipped partially charged. Before you
can use your phone, you need to install and charge the
battery as described below. Some batteries perform best
after several full charge/discharge cycles.
2.
4.
Getting Started
11
Page 14
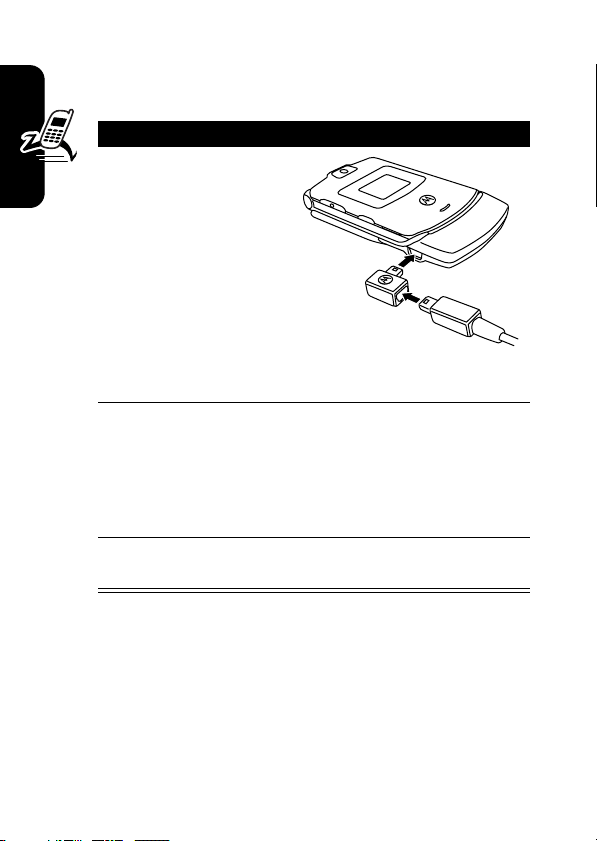
Tip:
The angle connector provided with your phone makes
it easier for you to use the phone with an attached battery
charger or phone accessory.
Action
1
Insert the travel
charger plug into
the detachable
angle connector as
shown.
2
Insert the angle
connector plug into
Getting Started
the USB connector
port on your
phone.
3
Plug the other end of the travel charger into the
appropriate electrical outlet.
Note:
It may take up to 10 seconds for your
phone to provide a visible or audible indication
that the battery is charging.
4
When your phone indicates
remove the travel charger and angle connector.
Charge Complete
,
Note:
You can safely leave the travel charger connected to
the phone after charging is complete. This will
the battery.
12
not
damage
Page 15
Turning Your Phone On
Action
1
Press and hold the
power key
2 seconds to turn the
phone on.
Note:
4 seconds for the
display to illuminate after you turn the phone on.
2
If necessary, enter your SIM card PIN code and
press
Caution:
3 times in a row, your SIM card is disabled and
your phone displays
3
If necessary, enter your 4-digit unlock code and
press
At startup, you may be prompted to personalize your
phone. Select
NO(+
about personalizing your phone, see page 79.
P
for
It may take up to
OK(+
) to unlock the SIM card.
If you enter an incorrect PIN code
SIM Blocked
.
OK(+
) to go to the home screen. For more information
) to unlock the phone.
YES(-
) to set personal phone options, or
Getting Started
Turning Your Phone Off
Action
Press and hold the power key P for 2 seconds to
turn the phone off.
13
Page 16
Adjusting Volume
Press the up or down volume
Getting Started
keys to:
•
silence an incoming call
alert
•
increase or decrease
earpiece volume during a
call
•
increase or decrease ringer volume when the home
screen is visible (flip must be open)
Tip:
At the lowest volume setting, press the down
volume key once to switch to vibrate alert. Press it
again to switch to silent alert. Press the up volume key
to switch back to vibrate alert, then ring alert.
040135o
Making a Call
You must be in the home screen to dial a phone number
(see page 26).
Press To
1
keypad keys dial the phone number
2N make the call
3O end the call and “hang up” the
phone when you are finished
14
Tip:
You can also close the phone flip to end the call.
Page 17

Answering a Call
When you receive a call, your phone rings and/or
vibrates and displays an incoming call message.
When the phone flip is active, open the phone to
answer the call. (To activate, press
>
In Call Setup >Answer Options >Open To Answer
If the phone flip is
Press To
1
N
or
ANSWER(-
2O end the call and “hang up” the
not
active:
answer the call
)
phone when you are finished
M>Settings
.)
Getting Started
Viewing Your Phone Number
To view your phone number from the home screen, press
M#
While you are on a call, press
Note:
card to use this feature. To store your phone number on
the SIM card, see page 61. If you do not know your phone
number, contact your service provider.
.
Your phone number must be stored on your SIM
M >My Tel. Numbers
.
15
Page 18
Highlight Features
You can do much more with your phone than make and
receive calls!
Taking and Sending a Photo
Shortcut:
activate the camera.
To activate your phone’s camera from the menu system:
The active viewfinder image appears on your display.
Highlight Features
Press
increase image
16
From the home screen, press
Find the Feature
S
up or
down to zoom
in or out.
S
Press
decrease or
Press
the camera application.
left
or right to
brightness.
BACK (-
IMAGE
AREA
Photo Viewfinder
Memory Used:72%
BACK CAPTURE
) to exit
CAMERA(-
M>Multimedia >Camera
Photo Storage
Space Used
Press
CAPTURE (+
to take a photo.
M
Press
My Pictures Menu
) to
)
to open
.
Page 19

Point the camera lens at the photo subject, then:
Press To
1
CAPTURE(+
2
STORE(+
or
DISCARD(-
3
S
scroll to
4
SELECT(+
) take a photo
)
view storage options
If you choose to store the
photo, continue to step 3.
delete the photo and return to
)
active viewfinder
Send, StoreinOnlineAlb
Store in Phone, Apply as Wallpaper
Apply as Screen Saver
Apply as Phonebook Entry
) perform the storage option
, or
Taking a Self-Portrait
Action
1
From the home screen, press
activate the camera, then close the flip.
or
Close the flip, then press and hold the smart key
to activate the camera and external display
viewfinder.
2
Use the external viewfinder to aim the camera
lens.
CAMERA(-
Highlight Features
,
,
) to
17
Page 20
Action
3
Press the smart key to take a photo.
4
Wait 5 seconds for your phone to save the photo
and reset the external viewfinder.
or
Open the flip to store or discard the photo.
Adjusting Camera Settings
Press
M
is active. The
options:
to open the
My Pictures Menu
My Pictures Menu
can include the following
when the camera
18
Highlight Features
Option Description
View Phone Album
Auto-Timed Capture
Pictures Setup
•
Lighting Conditions
Indoor (Home), Indoor (Office)
•
Exposure
Resolution
•
following resolutions:
(320x240 pixels, or
View pictures and photos
stored on your phone.
Set a timer for the camera to
take a photo.
Open the setup menu to
adjust the following settings:
: Set to
: Set to +2, +1, 0, -1, or -2.
: Set the camera to capture photos at the
Automatic, Sunny, Cloudy
, or
Night
.
MMS
(160x120 pixels),
High
(640x480 pixels)
,
Medium
Page 21
Option Description
•
Shutter Tone
take a photo. Can be set to
Boing
View Free Space
: Activate a tone that sounds when you
None, Chimp, Quack, Flix
, or
Click
.
See how much memory
remains for storing pictures.
,
Sending a Multimedia Message
A Multimedia Messaging Service (MMS)
multimedia message contains one or more pages
032380o
with text and embedded media objects (including
photos, pictures, animations, sounds, voice
records, and video clips). You can send a multimedia
message to other MMS-capable phones, and to email
addresses.
Tip:
The layout of all pages in a multimedia message is
defined by the layout of the first page. To display a media
object at the top of the page, insert it in the first half of the
message text. To display a media object at the bottom of
the page, insert it in the second half of the message text.
Find the Feature
Press To
1
keypad keys enter text on the page
2
M
open the
3
S
scroll to
4
SELECT(+
E>Create Message
>
New Multimedia Msg
MMS Menu
Add Media
) display a list of items you can
insert
Highlight Features
19
Page 22

Press To
5
S
scroll to
Record Voice, Sound, Video
New Page, Quick Note
Contact Info
6
SELECT(+
7
S
highlight the file you want
8
SELECT(+
9
M
Highlight Features
10S scroll to
11
SELECT(+
12S scroll to
13
SELECT(+
) select the file type
) insert the file
To add another page to the
message, continue to step 9.
open the
new page
) display a list of items you can
insert
) insert a new page after the
current page
Repeat steps 1 to 8 to enter
contents for the new page.
My Pictures
MMS Menu
Add Media
New Page
,
,
, or
to insert a
20
Page 23
When you finish composing the multimedia message:
Press To
1
2
OK(+
S
) store the message
scroll to a
option:
Mobile Number/Email
Highlight an existing
phonebook entry.
Or highlight
enter one or more phone
numbers or email addresses.
Or highlight
[New Phonebook Entry]
number/address and add it to
the phonebook.
3
ADD(+
SELECT(+
4
DONE(+
5
S
6
EDIT/ADD(-
)
or
) store the numbers/addresses
scroll to
add the phonebook entry to
the list of recipients
Repeat steps 2 and 3 to add
additional phonebook entries
to the list.
select
)
)select
[One Time Entry]
[New Phonebook Entry]
Subject
Subject
[One Time Entry]
to enter a
or
Highlight Features
to
032380o
21
Page 24

Press To
7
keypad keys enter the subject
8OK(+) store the subject
9
EDIT/ADD(-
10S scroll to
11
SELECT(+
12S highlight the file you want
13
SELECT(+
14
BACK(-
15S scroll to
Highlight Features
16
EDIT/ADD(-
17
ADD(+
REMOVE(+
18
DONE(-
19
SEND(+
or
M
)select
) select the file type
) attach the file
) return to the message editor
)select
) or
)
) return to the message editor
)
Attachments
file to the message, if desired
Picture, Sounds
Receipt
receipt, if desired
Receipt
activate/deactivate the
delivery report
send the message
view message details, save
the message in the drafts
folder, or cancel the message
to attach a
to request a
, or
Video
22
Page 25

Using a Bluetooth® Wireless Connection
Your phone supports Bluetooth wireless connections.
You can set up a wireless link with a Bluetooth headset
or handsfree car kit, or connect to a computer or
hand-held device to exchange and synchronize data.
Note: Your phone's Bluetooth features and Bluetooth
Class 1 power levels are not allowed for outdoor
operation in France. To avoid unlawful interference
with radio signals, do not use the Bluetooth features
in France unless you are indoors
Turning Bluetooth Power On or Off
The preferred method for connecting your phone to a
Bluetooth headset or handsfree car kit is to turn on
Bluetooth power on your phone, then connect your phone
to the headset or car kit.
To turn Bluetooth power on:
.
Highlight Features
Find the Feature
This procedure turns Bluetooth power on and leaves it on
until you turn it off. When your phone’s Bluetooth power is
on, your handsfree accessory can automatically reconnect
to the phone when you turn on the accessory or move it
within range of the phone.
Note:
To extend battery life, use the above procedure and
set Bluetooth power to
M>Settings >Connection
>
Bluetooth Link >Setup
>
Power >On
Off
when not in use.
23
Page 26

Searching for Other Devices
To connect your phone to a Bluetooth headset or
handsfree device:
Find the Feature
If Bluetooth power is turned off, your phone prompts you to
Temporarily Power On?
YES(Setup
Your phone scans for and displays a list of device(s)
located within range of the phone.
Highlight Features
Note:
must disconnect from it to search for other devices.
To connect to a device, highlight the device name and
press
The device may request permission to bond with your
phone. Select
create a secure connection with the device. When the
connection is made, the Bluetooth indicator
the home screen, and the external Bluetooth LED indicator
flashes.
) to proceed. Alternatively, set
menu to turn Bluetooth power on and leave it on.
If your phone is already connected to a device, you
SELECT(+
the Bluetooth power setting. Press
).
YES(-
M>Settings >Connection
>
Bluetooth Link
>
Handsfree
>
[Look For Devices]
Power
to On in the
) and enter the correct PIN code to
à
displays in
24
Page 27

Sending Objects to Another Device
You can use a Bluetooth wireless connection to send a
picture, sound, video, phonebook entry, datebook
event, or bookmark from your phone to another phone,
computer, or hand-held device.
Sending a Picture, Sound, or Video
Highlight the object on your phone that you want to send to
the other device, then press
M>Copy.
Highlight Features
Select a recognized device name listed in the
menu, or
you want to send the object.
Sending a Phonebook Entry, Datebook Event, or
Bookmark
Highlight the item on your phone that you want to send to
the other device, then press
Select a recognized device name listed in the
menu, or
you want to send the item.
[Look For Devices]
[Look For Devices]
to search for the device to which
M>Send.
to search for the device to which
Object Exchange
Object Exchange
25
Page 28
Learning to Use Your Phone
See page 1 for a basic phone diagram.
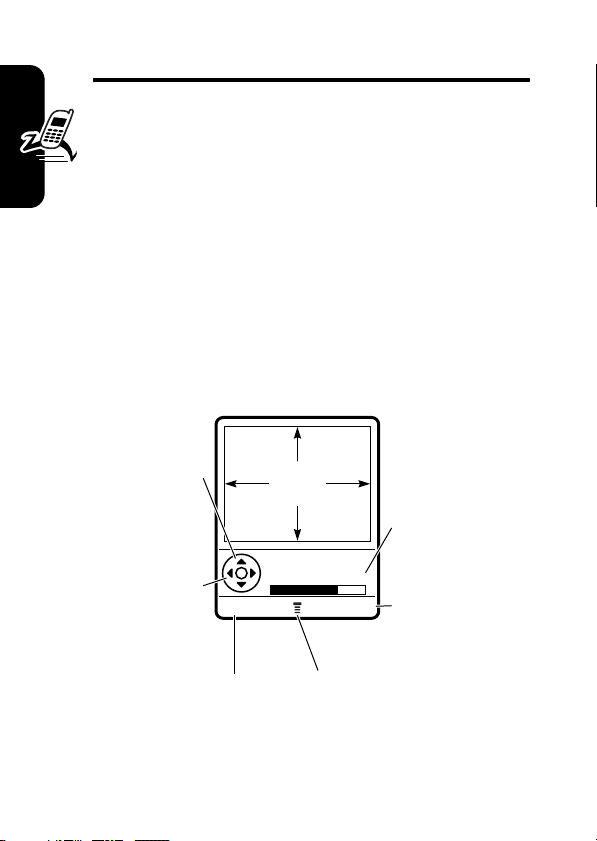
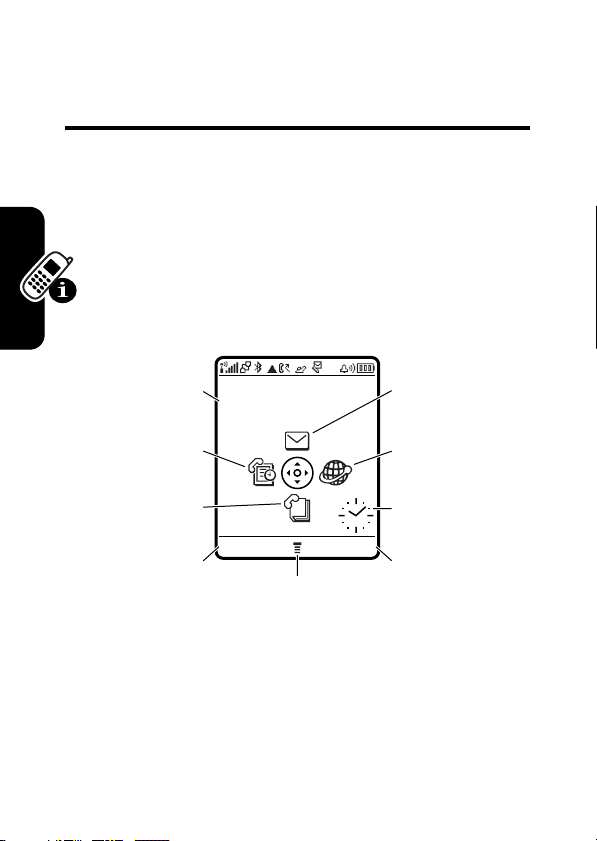
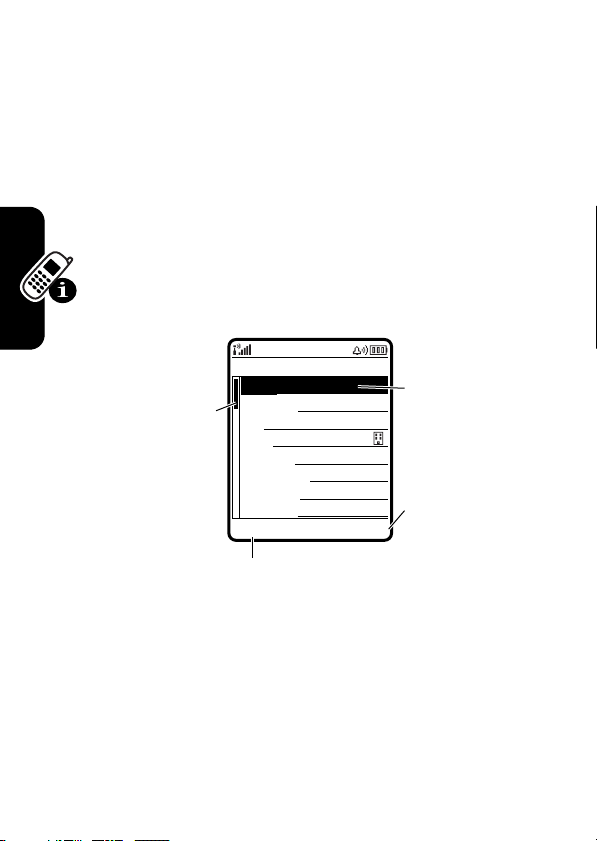
Using the Display
The home screen is displayed when you are
call or using the menu. You must be in the home screen
to dial a phone number.
Date
Service Provider
10/15/05
Messages
Recent Calls
Phonebook
CAMERA BROWSER
Left Soft Key
Learning to Use Your Phone
Press the 4-way navigation key
to select a menu feature icon. If you select a menu icon by
mistake, press
The menu indicator
key
M
26
Label
to enter the main menu.
Menu Indicator
S
O
to return to the home screen.
M
shows that you can press the menu
Browser
Clock
Right Soft Key
Label
up, down, left, or right
not
on a
Page 29

Labels at the bottom corners of the display show the
current soft key functions. Press the left soft key
right soft key
Notes:
•
Your home screen may appear different than shown.
For example, the menu feature icons normally are
hidden to allow a better view of the wallpaper image.
You can still select the menu icons when they are
hidden from view. To show or hide menu icons,
see page 80.
•
Your phone can display an analog or digital clock
in the home screen (see page 79).
•
Your phone’s display normally is visible only when the
display backlight is on, or when the display is viewed
in direct sunlight. To extend battery life, the backlight
turns off automatically when no activity is detected for
a specified time. The backlight turns back on when
you open the flip or press any key. To set the time that
the backlight stays on, see page 60.
•
To further extend battery life, you can set the display
to turn off (in addition to the backlight) when no
activity is detected for a specified time. The display
turns back on when you open the flip or press any key.
To set the time that the display stays on, see page 61.
+
to perform the indicated function.
-
or
Learning to Use Your Phone
27
Page 30
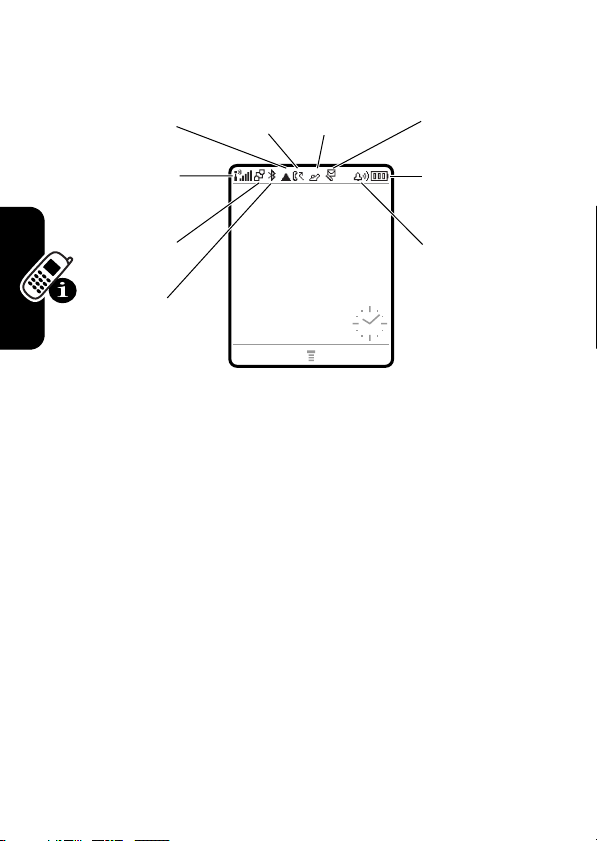
The following status indicators can display:
6.
Messaging
Presence
4.
Roam
3.
Signal
Strength
2.
GPRS
1.
Data
Transmission
5.
Call
Status
Service Provider
10/15/05
CAMERA BROWSER
7.
Message
8.
Battery
Level
9.
Ring Style
1. Data Transmission Indicator –
data transmission status. The Bluetooth
connection indicator
connection is active. Other indicators can include:
4
= secure packet
data transfer
3
= secure
Learning to Use Your Phone
28
application
connection
2
= secure Circuit
Switch Data
(CSD) call
à
shows when a Bluetooth
Show connection and
7
= unsecure packet
6
= unsecure
5
= unsecure CSD
®
wireless
data transfer
application
connection
call
Page 31

2. GPRS Indicator –
using a high-speed General Packet Radio
032380o
Service (GPRS) network connection. GPRS
allows faster data transfer speeds. Other
indicators can include:
*
= GPRS PDP
context active
Shows that your phone is
,
= GPRS packet
data available
3. Signal Strength Indicator –
strength of the network connection. You cannot make
or receive calls when the no signal indicator
transmit indicator
4. Roam Indicator –
shows when your phone is seeking or using
032380o
another network outside your home network.
5. Call Status Indicator –
of your phone. Indicators can include:
032380o
6. Messaging Presence Indicator –
when
032380o
can include:
G=AIM
When a Java™ application is active, the Java midlet
indicator
`
)
is displayed.
?
= phone in call
AIM® instant messaging is active. Indicators
active
displays in this location.
Vertical bars show the
!
or no
The roam indicator ã
Shows the call status
>
= call forward on
Shows
F
=away from
AIM
Learning to Use Your Phone
29
Page 32

7. Message Indicator –
receive a new message. Indicators can include:
032380o
r
= text message
s
= voicemail and
text message
Displays when you
t
= voicemail
message
c=AIM
message
8. Battery Level Indicator –
battery charge level. Recharge the battery when
Low Battery
9. Ring Style Indicator –
y
|
displays and the battery alert sounds.
= loud ring
=vibrate
=vibrate & ring
Vertical bars show the
Shows the ring style setting.
z
=soft ring
}
= vibrate then ring
{
= silent
Using the 4-Way Navigation Key
Press the 4-way navigation key
S
up, down, left, or right to scroll
through the menu system,
Learning to Use Your Phone
highlight menu items, change
feature settings, and play games.
Press the center select key
the center of the 4-way navigation key to select a
highlighted menu item. The center select key usually
performs the same function as the right soft key
30
C
in
+
.
Page 33

Using the Operator Key
From the home screen, press the
operator key
service provider’s portal site to
access customized content and
services.
If a portal site is not available,
press the operator key to start the micro-browser.
L
to go to your
Using the Message Key
From the home screen, press the
message key
message or read messages you
have received.
E
to send a
Learning to Use Your Phone
31
Page 34

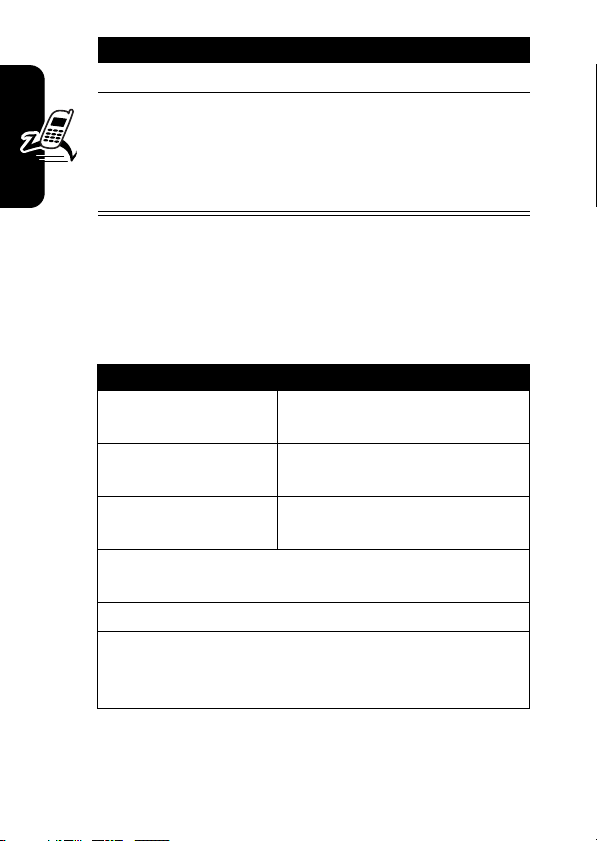
Using Menus
From the home screen, press
menu.
Highlighted
Menu Feature
Icon
Left Soft Key
Perform left
function.
4-Way Navigation
Key with Center
Select
Scroll up, down,
left, or right.
Press C to select
menu feature.
Learning to Use Your Phone
S
Press
the main menu. Press
highlighted menu feature.
to scroll to and highlight a menu feature icon in
M
Phonebook
040149o
EXIT SELECT
SELECT(+
to enter the main
Right Soft Key
Perform right
function.
Menu Key
Enter menu
system, or open
a sub-menu.
End Key
Exit menu without
making changes.
) or C to select the
32
Page 35

The following icons represent features that may display in
the main menu, depending on your service provider and
service subscription options.
Menu
Icon
Some features require you to select an option from a list.
•
•
Feature
Phonebook
n
Messages
e
Games & Apps
Q
Multimedia
h
Settings
w
BACK (-
go back to
previous
screen.
Press
M
Press S to scroll up or down to highlight the option
you want.
In a numbered list, press a number key to highlight the
option.
Press
) to
BACK VIEW
to open sub-menu.
Menu
Icon
s
É
á
B
Dialed Calls
10) John Smith
9)
Lisa Owens
8)
Adda Thomas
7)
Jack Bradshaw
6)
Dave Thompson
5)
Mary Smith
4)
Carlo Emrys
3)
Bob Adams
Feature
Recent Calls
Office Tools
Web Access
AIM
Highlighted
Option
Press
VIEW (+
view details of
highlighted
option.
) to
Learning to Use Your Phone
33
Page 36
•
In an alphabetized list, press a key repeatedly to cycle
through the letters on the key and highlight the closest
matching list option.
•
When an option has a list of possible values, press S
left or right to scroll through and select a value.
•
When an option has a list of possible numeric values,
press a number key to set the value.
Entering Text
Some features require you to enter information.
34
Entry Details
Name: John Smith
Scroll down to
bottom of list to
view more
options.
Press
CANCEL (-
Learning to Use Your Phone
making changes.
when you enter or edit information.
Category: General
No.: 212-555-1212
Type: Work
Store To: Phone
Voice Name:
Speed No.: 2
Ringer ID: Continental
CANCEL EDIT/ADD
DONE (-
#
(P)
) to exit without
) displays
Highlighted
option. Press
S
to scroll to
other options.
Press
EDIT/ADD (+
to set or edit
highlighted
option.
)
Page 37
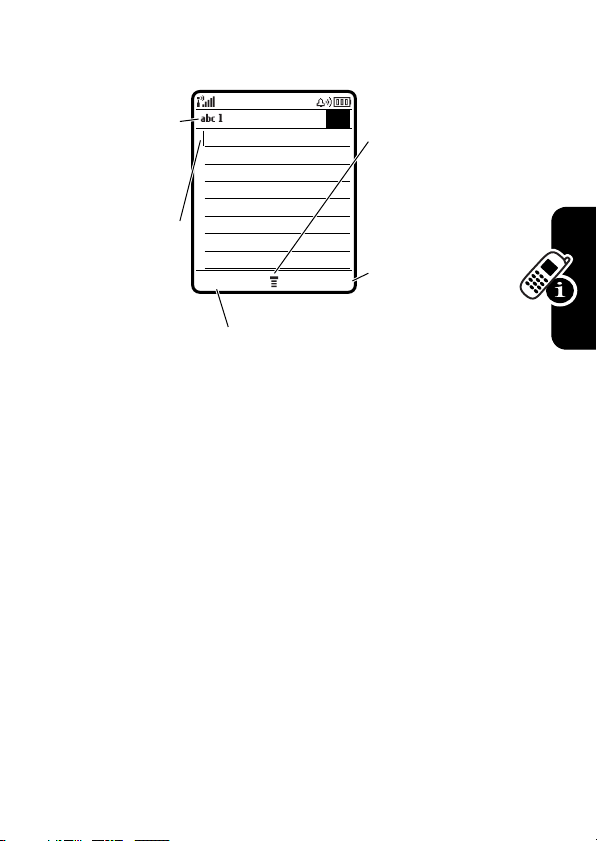
Some features let you enter text.
For indicator
descriptions,
see following
section.
Flashing
cursor
indicates
insertion
point.
Selecting a Text Entry Mode
Multiple text entry modes make it easy for you to enter
names, numbers, and messages. The mode you select
remains active until you select another mode.
Press
#
in a text entry screen to select one of the
following entry modes:
Primary
Your primary text entry mode (see
Numeric
Enter numbers only (see page 44).
Symbol
Enter symbols only (see page 44).
Secondary
Your secondary text entry mode
Msg 450
CANCEL ADD MEDIA
Press
CANCEL (-
without making changes.
below to set).
(see below to set).
Press
M
to
open
sub-menu.
Press
ADD MEDIA (+
to insert a quick
note, picture, or
sound.
) to exit
)
Learning to Use Your Phone
35
Page 38

Alternatively, you can select a text entry mode in any text
entry screen by pressing
Setting Primary and Secondary Text Entry Modes
You can set different primary and secondary text entry
modes, and easily switch between modes as needed when
you enter data or compose a message.
Press
M>Entry Setup
Primary Setup
iTAP
Tap
Tap Extended
None
Using Capitalization
Learning to Use Your Phone
Press
0
Indicators at the top of the display show the capitalization
setting:
or
iTAP® software predicts each word as
Enter individual letters and numbers by
Enter individual letters, numbers, and
Hide the
in a text entry screen to change text case.
M>Entry Mode
in a text entry screen. Select
Secondary Setup
you enter it, to simplify and speed up
text entry.
pressing a key one or more times.
symbols by pressing a key one or
more times.
not to set a secondary text entry mode
(only available for
, and choose:
Secondary
.
setting if you prefer
Secondary Setup
).
36
U
= no capital letters
T
= all capital letters
V
= capitalize next
letter only
Page 39

Text Entry Mode Indicators
In
Primary
or
Secondary
of the display show the text entry setting:
Primary
g
h
f
j
k
i
The following indicators identify
mode:
W
= numeric mode
text entry mode, indicators at the top
Secondary
m
Tap, no capital letters
q
Tap, capitalize next letter
only
l
Tap, all capital letters
p
iTAP, no capital letters
n
iTAP, capitalize next
letter only
o
iTAP, all capital letters
Numeric
or
Symbol
entry
[
= symbol mode
Using iTAP® Mode
iTAP mode lets you enter words using one keypress per
letter. The iTAP software combines your keypresses into
common words, and predicts each word as you enter it.
Learning to Use Your Phone
For example, to type “
843
most common word formed by this keypress combination
is “
the
,” and predicts that “
Other common words or word fragments that can be
spelled by the same keypress combination are presented
as alternate choices at the bottom of the display.
the
,” you would press
. The iTAP software recognizes that the
the
” is the word you are spelling.
37
Page 40

If necessary, press # in a text entry screen to switch to
iTAP
mode. An indicator tells you which mode is active (see
page 37). If
entry mode, see page 36.
Entering Words in iTAP Mode
Learning to Use Your Phone
iTAP
mode is not set as the
Press To
1
keypad keys
(one press per
letter)
2
S
left or right highlight the combination you
3
S
up
or
*
or
SELECT(+
show possible letter
combinations at the bottom of
the display
want
accept the predicted word
completion, followed by a
space
enter the highlighted
combination, followed by a
space
select the highlighted
)
combination, with no space
Primary
or
Secondary
38
You can press keypad keys to
add more letters at the end of
the combination.
Page 41

For example, if you press
phone displays:
*
Press
enter
DELETE (-
to delete last
to
Prog
and
a space.
Press
)
letter.
Msg 442
Prog ram
Prog Proh Spoi Proi
DELETE SELECT
7764
Press
S
accept
Press
S
to highlight
another
combination.
, your
up to
Program
right
.
Press
SELECT (+
highlighted combination with no space.
If you want a different word (such as
pressing keypad keys to enter the remaining characters.
Entering Novel Words in iTAP Mode
You may enter a word that the iTAP software does not
recognize. If your word is not shown as a letter
combination choice at the bottom of the display:
Action
1
Press
DELETE(-
letters, until you see a letter combination at the
bottom of the display that matches the start of
the word you want to enter.
2
Press S left or right to highlight the letter
combination.
) one or more times to delete
) to select
Progress
), continue
Learning to Use Your Phone
39
Page 42

Action
3
Press
SELECT(-
combination.
4
Continue to enter letters and select letter
combinations to spell the word.
Your phone automatically stores the novel word and
displays it as an option the next time you enter its letter
combination. When the memory space for storing novel
words is filled, your phone deletes the oldest words to
add new words.
Entering Numbers and Punctuation in iTAP Mode
To enter numbers quickly, press and hold a number key to
temporarily switch to numeric mode. Press the number
keys to enter the numbers you want. Enter a space to
revert to
Press
shown in the “Character Chart” on page 43.
iTAP
mode.
1
to enter punctuation or other characters as
) to select the letter
Using Tap Mode
This is the basic text entry mode on your phone.
Learning to Use Your Phone
Tap
mode cycles through the letters and number of the key
you press.
symbols as shown in the “Character Chart” on page 43.
If necessary, press
Tap
mode. An indicator shows which mode is active (see
page 37). If
Secondary
Tap Extended
Tap
entry mode, see page 36.
mode also cycles through additional
#
in a text entry screen to switch to
or
Tap Extended
is not set as the
Primary
or
40
Page 43

Tap Mode Text Entry Rules
•
Press a keypad key repeatedly to cycle through its
characters. For example, you would press
time to enter “
enter “
c
•
After 2 seconds,
the cursor moves to the next position.
•
The first character of every sentence is capitalized.
If necessary, press
character to lowercase before the cursor moves to
the next position.
•
Press S to move the flashing cursor to enter or edit
message text.
•
If you do not want to save your text or text edits, press
O
to exit without saving.
Entering Words in Tap Mode
Press To
1
a keypad key
one or more
times
2
keypad keys enter remaining characters
a
,” two times to enter “b,” three times to
,” or four times to enter “2.”
Tap
mode accepts the character, and
S
down to change the
enter a letter, number, or
symbol
2
one
Learning to Use Your Phone
Tip:
Press S right to accept
a word completion, or
insert a space.
3OK(+) store the text
*
to
41
Page 44

For example, if you press
displays:
8
one time, your phone
Character
displays at
insertion point.
Press
DELETE (-
to delete last
character
When you enter 3 or more characters in a row, your phone
may guess the rest of the word. For example, if you enter
prog
your phone might display:
Press S right
to accept
program
*
Learning to Use Your Phone
to reject it
and enter a
space after
entered.
. Press
prog
.
)
Msg 449
T
DELETE OK
Press
and store text.
Msg 432
This is a prog ram
After
2 seconds,
character is
accepted and
cursor moves
to next
position.
OK (+
) to accept
To enter a
different word
(such as
progress
keys to enter
remaining
characters.
), press
42
DELETE OK
Page 45

Character Chart
Use this chart as a guide for entering characters with
Tap Extended
1
2
3
4
5
6
7
8
9
0
*
#
Note:
available on your phone. In an email or Web address
editor,
mode.
. 1 ? ! , @ _ & ~ : ; " - ( ) '
¿ ¡ % £ $ ¥ + x * / \ [ ]
= > < # §
a b c 2 ä å á à â ã α β ç
d e f 3 δ ë é è ê
g h i 4 ï í î
j k l 5
m n o 6 ñ ö ø ó ò ô õ
p q r s 7 π ß
t u v 8 θ ü ú ù û
w x y z 9
change text case, for capital letters
enter a space (hold to enter a return)
change text entry mode (hold for default)
This chart may not reflect the exact character set
1
first shows common characters for that editor.
λ
ξ ψ
φ
γ
ω
σ
Learning to Use Your Phone
43
Page 46

Using Numeric Mode
In a text entry screen, press # to switch entry modes
until the numeric indicator
Press the number keys to enter the numbers you want.
When you finish entering numbers, press
another entry mode.
W
displays.
#
Using Symbol Mode
In a text entry screen, press # to switch entry
modes until the symbol indicator
Press To
1
keypad keys
(one press per
symbol)
2
S
left or right highlight the combination you
3
SELECT(+
Learning to Use Your Phone
or
*
show possible symbol
combinations at the bottom of
the display
want
)
select the highlighted
combination
You can press keypad keys to
add more symbols to the end
of the combination.
enter the highlighted
combination
[
displays.
to switch to
44
Page 47

Symbol Chart
Use this chart as a guide for entering characters with
symbol mode.
1
. ? ! , @ _ & ~ : ; " - ( ) ' ¿
¡ % £ $ ¥
2
@ _ \
3
/ : ;
4
" & '
5
( ) [ ] { }
6
¿ ¡ ~
7
< > =
8
$ £ ¥
9
# % *
0
+ - x * / = > < # §
*
enter a space (hold to enter a return)
#
change text entry mode (hold for default)
Note:
This chart may not reflect the exact character set
available on your phone. In an email or Web address
editor,
1
first shows common characters for that editor.
Learning to Use Your Phone
Deleting Letters and Words
Place the cursor to the right of the text you want to delete,
and then:
Action
Press
Hold
DELETE(-
DELETE(-
) to delete one letter at a time.
) to delete all entered text.
45
Page 48

Using the Smart Key
The smart key gives you another
way to perform many basic
phone functions. It anticipates
the next action you are likely to
perform. For example, when you
highlight a menu item, you can
press the smart key to select
it. You can use the smart key
to make and end calls, turn
features on and off, and open your phonebook. The
smart key usually performs the same function as the right
soft key
+
.
040159o
Using the External Display
When the flip is closed, the external display shows time
and phone status information. It also displays messages to
notify you of incoming calls and other events. You can
perform the following functions in the external display.
Setting Phone Ring Style
46
Learning to Use Your Phone
Press To
1
volume keys select
2
smart key set a ring style
3
volume keys return to the home screen
Ring Styles
Page 49
Returning an Unanswered Call
Your phone keeps a record of your unanswered
calls and displays
display.
Note:
Because the microphone and earpiece are
unavailable when the phone is closed, you must use a
headset or other handsfree device with this feature.
Action
1
Press the smart key to display the received calls
list.
or
Press the volume keys to dismiss the
message.
2
If necessary, press the volume keys to scroll
through the list and highlight an unanswered call.
3
If a headset is connected to your phone, press
and hold the smart key to call the number.
or
Press the smart key to exit without calling.
X Missed Calls
in the external
Missed Calls
Learning to Use Your Phone
47
Page 50

Using the Handsfree Speaker
When you activate your phone’s integrated handsfree
speaker, you can talk to the other party without holding the
phone to your ear.
Press
SPEAKER(+
off during a call.
Your phone displays
The handsfree speaker remains on until you press
SPEAKER(+
Note:
The handsfree speaker is disabled when you
connect your phone to a handsfree car kit or headset
accessory.
) to turn the handsfree speaker on or
Spkrphone On
) again or end the call.
in the home screen.
Changing a Code, PIN, or Password
Your phone’s 4-digit unlock code is originally set to 1234,
and the 6-digit security code is originally set to 000000.
Your service provider may reset these codes before you
receive your phone.
If your service provider has
Learning to Use Your Phone
recommend that you change them to prevent others from
accessing your personal information. The unlock code
must contain 4 digits, and the security code must contain 6
digits.
You can also reset your SIM card PIN code, PIN2 code,
and/or call barring password if necessary.
48
not
reset these codes, we
Page 51
To change a code or password:
Find the Feature
M>Settings >Security
>
New Passwords
Locking and Unlocking Your Phone
You can lock your phone manually or set the phone to
lock automatically whenever you turn it off.
To use a locked phone, you must enter the unlock
code. A locked phone still rings or vibrates for incoming
calls or messages,
You can make emergency calls on your phone even when
it is locked (see page 68).
Locking Your Phone Manually
Find the Feature
Press To
1
keypad keys enter your unlock code
2OK(+) lock the phone
Unlocking Your Phone
but you must unlock it to answer
M>Settings >Security
>
Phone Lock >Lock Now
.
Learning to Use Your Phone
Tip:
Your phone’s unlock code is originally set to 1234.
Your service provider may reset the unlock code to the last
4 digits of your phone number.
49
Page 52

At the
Enter Unlock Code
Press To
1
keypad keys enter your unlock code
2OK(+) unlock your phone
prompt:
Setting Your Phone to Lock Automatically
You can set your phone to lock every time you turn it
off:
Find the Feature
Press To
1
keypad keys enter your unlock code
2OK(+) activate automatic lock
M>Settings >Security
>
Phone Lock
>
Automatic Lock >On
If You Forget a Code, PIN, or Password
Note:
Your phone’s 4-digit unlock code is originally set to
1234, and the 6-digit security code is originally set to
Learning to Use Your Phone
000000. Your service provider may reset the unlock code
to the last 4 digits of your phone number before you
receive your phone.
50
Page 53

If you forget your unlock code, try entering 1234 or the last
4 digits of your phone number. If that does not work, do the
following at the
Press To
1
M
2
keypad keys enter your security code
3OK(+) submit your security code
If you forget your security code, SIM card PIN code,
PIN2 code, or call barring password, contact your
service provider.
Enter Unlock Code
display the unlock code
prompt:
bypass screen
Using the Phonebook
Learning to Use Your Phone
This section describes basic phonebook operations. For
more information about using the phonebook, see
page 75.
Storing a Phone Number
Enter a phone number in the home screen, then press
STORE(+
Press
other fields as necessary to complete the entry.
If you assign a
MORE
for the same
) to create a phonebook entry with that number.
DONE(-
to store another number (for example, a work number)
) to store the number by itself, or fill in the
Name
to the phonebook entry, you can select
Name
.
51
Page 54

Recording a Voice Name
When creating a phonebook entry, scroll to
press
RECORD(+
say the entry’s name (within 2 seconds). When prompted,
press and release the voice key and repeat the name.
Note:
This option is not available for entries stored on the
SIM card.
). Press and release the voice key and
Voice Name
Setting a Picture ID for a Phonebook
Entry
Press
M>Phonebook
>
Picture
> picture name.
Also see pages 2 and 16.
Dialing a Number
Press
M >Phonebook
press
N
to call.
Shortcut:
more times to jump to entries that begin with the key’s
letters.
Learning to Use Your Phone
Voice Dialing a Number
Press and release the voice key, and say the entry’s name
(within 2 seconds).
In the phonebook, press a keypad key one or
> entry, press
M>Edit
, highlight the phonebook entry,
and
52
Page 55

Sorting Phonebook Entries
Press
M>Phonebook
select whether you want to sort the phonebook list by
Speed No., Voice Name
When sorting by name, you can view
the
Primary
number for each name. To set the primary
number for a name, see page 78.
Tip:
In
Primary
number view mode, highlight a name
and press
associated with the name.
S
left or right to view other numbers
, or
, press
Email
M>Setup >Sort by
.
All
, then
Name
numbers or just
Viewing Entries By Category
Press
M>Phonebook
select whether you want to view
predefined category (
entries in a category you created.
To set the category for a phonebook entry, see page 77.
, press
Business, Personal, General, VIPs
M>Categories
All
entries, entries in a
, then
), or
,
Learning to Use Your Phone
53
Page 56

Setting Up Your Phone
Setting a Ring Style
You can set the following ring style profiles on your phone:
•
Loud
•
Soft
•
Vibrate
•
Vibe then Ring
•
Vibe & Ring
•
Silent
Each profile uses a different set of ring tone alerts or
vibration alerts to notify you of incoming calls, text
messages, and other events. The
your phone until you set another ring style.
To set a ring style:
Silent
setting silences
Find the Feature
The ring style indicator shows the current ring style setting
(see page 30).
Setting Up Your Phone
54
M>Settings >Ring Styles
>
Style
> style name
Page 57
Changing the Call Alert
You can change the alert that a ring style uses to notify you
of incoming calls or other events. Any changes you make
are saved to the ring style profile.
Find the Feature
Note:
style represents the current ring style. You cannot
set an alert for the
Press To
1
S
scroll to
2
EDIT/ADD(+
3
S
scroll to the alert you want
4
SELECT(+
5
BACK(-
The ring style profile contains additional settings for other
events, and settings for ringer ID, ringer and keypad
volume. You can change ring style profile settings as
desired to personalize the ring style.
) select the alert
) save the alert setting
M>Settings >Ring Styles
> style
Detail
Silent
ring style setting.
Calls
) select the event
Setting the Time and Date
You must set the time and date to use the datebook.
Find the Feature
M>Settings >Initial Setup
>
Time and Date
Setting Up Your Phone
55
Page 58

Setting a Wallpaper Image
Set a photo, picture, or animation as a wallpaper
(background) image in your phone’s home screen. The
wallpaper image appears as a faint watermark in text and
menu displays.
Find the Feature
1
2
3
4
5
6
7
Setting Up Your Phone
8
9
M>Settings >Personalize
>
Wallpaper
Press To
S
scroll to
EDIT/ADD(+
S
up or down scroll to a picture/animation
SELECT(+
S
scroll to
EDIT/ADD(+
S
scroll to
SELECT(+
BACK(-
) open the picture viewer
Scroll to
wallpaper image.
) select the image
) adjust the image layout
Fit-to-screen
Center
center of the display.
Tile
adjacent copies of the image.
Fit-to-screen
if necessary, to fit the display.
) confirm the layout setting
) save wallpaper settings
Picture
(None)
to turn off the
Layout
Center, Tile
places the image in the
fills the display with
, or
resizes the image,
56
Page 59

Setting a Screen Saver Image
Set a photo, picture, or animation as a screen saver image.
The screen saver image displays when the flip is open and
no activity is detected for a specified time. If necessary, the
image shrinks to fill the display. An animation repeats for 1
minute, then the first frame of the animation displays.
Tip:
Turn off the screen saver to extend battery life.
Find the Feature
Press To
1
S
scroll to
2
EDIT/ADD(+
3
S
up or down scroll to a picture/animation
4
SELECT(+
5
S
scroll to
6
EDIT/ADD(+
7
S
scroll to the inactivity interval
8
SELECT(+
9
BACK(-
) select the image
) select the inactivity interval
) save screen saver settings
M>Settings >Personalize
>
Screen Saver
Picture
) open the picture viewer
Scroll to
screen saver image.
) set the delay interval
that starts the screen saver
(None)
to turn off the
Delay
Setting Up Your Phone
57
Page 60

Changing Phone Skin
Change the look and feel of your phone’s user interface by
selecting a different skin setting.
Find the Feature
Your phone displays the new skin.
M>Settings >Personalize
Skin
> skin
>
Setting a Phone Theme
A phone theme is of a grouped set of image and
sound files with a specific theme (such as a
032380o
special event or cartoon character) that you can
apply collectively to your phone. Phone themes
typically include a wallpaper image, screen saver
image, and ring tone. Your phone includes several
preloaded themes. You can download and install
additional themes on your phone.
Downloading a Theme
To download a theme from a Web page with the
micro-browser, see page 91. When you install the theme,
you can instantly apply its screen saver, wallpaper, and
ring tone when your phone prompts you to
Selecting a Theme
You can apply any of the themes installed on your phone.
Setting Up Your Phone
Apply Theme Now?
58
Page 61

Note:
If one of a theme’s components is not available, then
a default setting is applied.
Find the Feature
M>Multimedia >Themes
> theme
Deleting a Theme
You cannot delete the preloaded themes on your phone.
To delete one or all of the themes that you have
downloaded and installed:
Find the Feature
Press To
1
M
open the
2
S
scroll to
3
SELECT(+
) select the option
M>Multimedia >Themes
> theme
Theme
menu
Delete
or
Delete All
Setting Answer Options
You can use additional, alternative methods to answer an
incoming call.
Multi-Key
answer by pressing any key
Open to Answer
To activate or deactivate an answer option:
answer by opening the flip
Setting Up Your Phone
Find the Feature
M>Settings >In-Call Setup
>
Answer Options
59
Page 62

Press To
1
S
scroll to
Open to Answer
2
EDIT/ADD(+
3
S
scroll to
4
SELECT(+
) select the option
) confirm the setting
Multi-Key
On
or
Off
or
Setting Display Brightness
Find the Feature
M>Settings >Initial Setup
>
Brightness
Adjusting the Backlight
Set the amount of time that the display backlight
remains on.
Find the Feature
Your phone’s display normally is visible only when the
display backlight is on, or when the display is viewed in
direct sunlight. To extend battery life, the backlight turns off
automatically when no activity is detected for a specified
time. The backlight turns back on when you open the flip or
press any key.
Setting Up Your Phone
60
M>Settings >Initial Setup
>
Backlight
Page 63

Setting Display Timeout
To further extend battery life, you can set the display to
turn off (in addition to the backlight) when no activity is
detected for a specified time.
Find the Feature
You can set the display to stay on for 1 or 2 minutes, or set
Off
to disable display timeout.
The display turns back on when you open the flip or press
any key.
M>Settings >Initial Setup
>
Display Timeout
Storing Your Name and Phone Number
To store or edit your name and phone number
information on your SIM card:
032380o
Find the Feature
Shortcut:
and edit your name and phone number(s).
If you do not know your phone number, contact your
service provider.
Press
M>Settings >Phone Status
>
My Tel. Numbers
M#
from the home screen to view
Setting Up Your Phone
61
Page 64

Calling Features
For basic instructions on how to make and answer calls,
see page 14.
Turning Off a Call Alert
You can turn off your phone’s incoming call alert before
answering the call.
Action
1
Press the volume keys to turn off the alert.
2
Open the flip (or press the button on a handsfree
headset) to answer the call.
Viewing Recent Calls
Calling Features
Your phone keeps lists of incoming and outgoing calls,
even for calls that did not connect. The most recent calls
are listed first. The oldest calls are deleted as new calls
are added.
Shortcut:
dialed calls list.
Find the Feature
1
2
62
Press N from the home screen to view the
M>Recent Calls
Press To
S
scroll to
Dialed Calls
SELECT(+
) select the list
Received Calls
or
Page 65
Press To
3
S
scroll to an entry
Note: < means the call
connected.
4N
or
VIEW(+
or
M
The
Last Calls Menu
Option Description
Store
Create a phonebook entry with
Delete
Delete All
Hide ID/Show ID
Send Message
Add Digits
Attach Number
)
Hide or show your caller ID for the
Open a new text message with the
Add digits after the number.
Attach a number from the
call the entry’s number
view entry details (such as
time and date of call)
open the
perform other procedures
can include the following options:
Last Calls Menu
the number in the
Delete the entry.
Delete all entries in the list.
next call.
number in the
phonebook or recent calls lists.
To
No.
field.
field.
to
Calling Features
63
Page 66

Option Description
Send Tones
Talk then Fax
Send the number to the network
as DTMF tones.
Note:
This option displays only
during a call.
Talk and then send a fax
in the same call (see
page 86).
Redialing a Number
Press To
1
N
view the dialed calls list
2
S
scroll to the entry you want to call
3N redial the number
Calling Features
Using Automatic Redial
When you receive a busy signal, your phone
displays
032380o
Press To
N
or
RETRY(+
Call Failed, Number Busy
) redial the number
032380o
.
When the call goes through, your phone rings or vibrates
one time, displays
64
Redial Successful
, and connects the call.
Page 67

Returning an Unanswered Call
Your phone keeps a record of your unanswered calls, and
displays:
•
the missed call indicator
•
XMissedCalls
Press To
1
VIEW(+
2
S
select a call to return
3N make the call
, where X is the number of missed calls
) display the received calls list
û
Using the Notepad
The most recent set of digits entered on the keypad are
stored in your phone’s notepad memory. This can be a
phone number that you called, or a number that you jot
down during a call, for later use. To retrieve the number
stored in the notepad:
Calling Features
Find the Feature
M>Recent Calls >Notepad
65
Page 68
Press To
N
or
STORE(+
or
M
)
call the number
create a phonebook entry
with the number in the
open the
a number or insert a special
character
Dialing Menu
Putting a Call On Hold or Mute
Press To
M>Hold
put all active calls on hold
Calling Features
or
M>Mute
mute all active calls
Using Call Waiting
When you are on a call, an alert tone sounds
to indicate that you have received a second
032380o
call.
No.
field
to attach
66
Page 69

Press To
1
N
answer the new call
2
SWITCH(+
or
)
switch between calls
LINK(-
M >EndCallOnHold
If necessary, you must turn on call waiting to use the
feature. To turn call waiting on or off:
Find the Feature
Using Caller ID (Incoming
or
)
connect the 2 calls
end the call on hold
M>Settings >In-Call Setup
>
Call Waiting
Calls)
Calling line identification (caller ID) displays the
phone number for incoming calls in your
032380o
phone’s external and internal displays.
The phone displays the caller’s name (and picture ID, if
available) when the name is stored in your phonebook, or
Incoming Call
You can also set your phone to play a distinctive ringer ID
for specific entries stored in your phonebook. For more
information, see page 75.
when caller ID information is not available.
Calling Features
67
Page 70

Calling an Emergency Number
Your service provider programs one or more emergency
phone numbers, such as 911 or 112, that you can call
under any circumstances, even when your phone is locked
or the SIM card is not inserted.
Note:
Emergency numbers vary by country. Your phone’s
preprogrammed emergency number(s) may not work in all
locations, and sometimes an emergency call cannot be
placed due to network, environmental, or interference
issues.
Press To
1
keypad keys dial the emergency number
2N call the emergency number
Dialing International Numbers
Calling Features
(Inserting
international call.) Then press the keypad keys as
usual to dial the country code and phone number.
Calling With 1-Touch Dial
To call phonebook entries 1 through 9, press and hold the
single-digit speed dial number for one second.
68
If your phone service includes international
dialing, press and hold
032380o
local international access code (
country from which you are calling.
+
enables your phone to make an
0
to insert the
+
) for the
Page 71

You can set 1-touch dial to call the entries in your phone
memory phonebook or the SIM card phonebook:
Find the Feature
Press To
1
S
scroll to the location you want
2
SELECT(+
) select the location
M>Settings >Initial Setup
>
1-Touch Dial
Using Voicemail
Voicemail messages that you receive are stored
on the network. To listen to your messages, you
032380o
must call your voicemail phone number.
Note:
Your service provider may include additional
information about using this feature.
Listening to Voicemail Messages
Find the Feature
The phone calls your voicemail phone number. If no
voicemail number is stored, your phone prompts you to
store a number.
E>Voicemail
Calling Features
69
Page 72

Receiving a Voicemail Message
When you receive a voicemail message, your phone
displays the voicemail message indicator
New Voicemail
The phone calls your voicemail phone number. If no
voicemail number is stored, your phone prompts you to
store a number.
notification.
Press To
CALL(+
) listen to the message
t
and the
Storing Your Voicemail Number
If necessary, use the following procedure to store your
voicemail phone number on your phone. Usually, your
service provider has already done this for you.
Calling Features
70
Find the Feature
Press To
1
keypad keys enter your voicemail number
2OK(+) store the number
Note:
You cannot store a p (pause), w (wait), or n (number)
character in this number. If you want to store a voicemail
number with these characters, create a phonebook entry
for it. Then, you can use the entry to call your voicemail.
For more information about these characters, see the
More Here guide.
EM >Voicemail Setup
Page 73

Phone Features
Main Menu
This is the standard main menu layout.
Menu
organization and feature names may vary on your
phone.
Not all features may be available on your phone.
n
Phonebook
s
Recent Calls
• Received Calls
• Dialed Calls
• Notepad
• Call Times
• Call Cost
•Data Times
•Data Volumes
e
Messages
• Create Message
• Message Inbox
• Media Templates
•Quick Notes
•Voicemail
• Email Msgs
•Outbox
É
Office Tools
• SIM Apps
•Calculator
• Datebook
• Shortcuts
•Voice Records
•Alarm Clock
• Dialing Services
•Fixed Dial
• Service Dial
•Quick Dial
Q
Games & Apps
á
Web Access
•Browser
• Browser Setup
• Web Sessions
h
Multimedia
• Themes
•Camera
• My Pictures
• Sounds
• MotoMixer
•Videos
®
B
AIM
w
Settings
(see next page)
Phone Features
71
Page 74

Settings Menu
l
Personalize
• Home Screen
• Main Menu
•Skin
•Greeting
• Wallpaper
• Screen Saver
•Quick Dial
t
Ring Styles
•Style
• Style Detail
L
Connection
• Bluetooth Link
•Sync
H
Call Forward
•Voice Calls
•Fax Calls
•Data Calls
•Cancel All
• Forward Status
U
In-Call Setup
• In-Call Timer
• Call Cost Setup
• My Caller ID
• Talk and Fax
• Answer Options
• Call Waiting
Z
Initial Setup
• Time and Date
•1-Touch Dial
• Display Timeout
• Backlight
• TTY Setup
Phone Features
•Scroll
• Language
• Brightness
•DTMF
•Master Reset
• Master Clear
m
Phone Status
• My Mobile Numbers
• Battery Meter
• Other Information
S
Headset
• Auto Answer
•Voice Dial
J
Car Settings
• Auto Answer
• Auto Handsfree
j
Network
• New Network
• Network Setup
• Available Networks
• My Network List
• Service Tone
• Call Drop Tone
u
Security
• Phone Lock
• Lock Application
•Fixed Dial
• Call Barring
• SIM PIN
•New Passwords
• Certificate Mgmt
c
Java Settings
•Java System
• Delete All Apps
• App Vibration
• App Volume
• App Priority
• App Backlight
• Set Standby App
• DNS IP
72
Page 75

Feature Quick Reference
This section helps you locate and use additional phone
features that are not described in detail in this guide.
Calling Features
Feature Description
Conference
Call
Transfer a
Call
Caller ID
(Outgoing)
Attach a
Number
Speed Dial
During a call:
Dial next number, press N,
press
LINK(-
During a call:
M >Transfer
transfer number, press
Hide or show your caller ID
phone number for the next
outgoing call:
M >Settings >In-Call Setup
>
My Caller ID
>
Hide IDorShow ID
Dial an area code or prefix
for a phonebook number,
then:
M >Attach Number
Speed dial and call a
phonebook entry:
Enter speed dial number,
press
#
. >
Next Call Only
, press N.
)
, dial
N
032380o
032380o
.
032380o
032380o
032380o
Phone Features
73
Page 76

Feature Description
Call
Forwarding
Call Barring
TTY Calls
Set up or cancel call
forwarding:
M >Settings >Call Forward
Restrict outgoing or
incoming calls:
M >Settings >Security
>
Call Barring
Set up your phone
for use with an
optional TTY
device:
M >Settings >Initial Setup
>
TTY Setup
032380o
032380o
032380o
Messages
Feature Description
Send Text
Message
Send
Phone Features
74
Multimedia
Message
Send Email
Message
Send a text message:
E >Create Message
>
New Text Msg
Send a multimedia
message:
E >Create Message
>
New Multimedia Msg
Send an email message:
E >Create Message
>
New Email
032380o
032380o
032380o
Page 77

Feature Description
Use
Multimedia
Temp late
Read New
Message
Read Old
Messages
Store
Message
Objects
Open a multimedia
template with preloaded
media:
E >Media Templates
Read a new text or
multimedia message that
you have received:
Press
READ(+
New Message
Read received messages:
E >Message Inbox
Tip:
Press
perform various operations on the
message.
Go to a multimedia
message page, then:
M >Store
Phonebook
Feature Description
Add New
Entry
Add a new entry to the phonebook:
M >Phonebook
M >New
Email Address
) when the
notification is displayed.
M
to
>
Phone Number
or
032380o
032380o
032380o
032380o
Phone Features
75
Page 78

Feature Description
Dial Number
Voice Dial
Number
Set Ringer
ID for Entry
Set Picture
ID for Entry
Phone Features
Call a number stored in the
phonebook:
M >Phonebook
phonebook entry, press
Voice dial a number stored in the
phonebook:
Press and release the voice key, and
say the entry’s name (within
2 seconds).
Assign a distinctive ringer alert to an
entry:
M >Phonebook
M >Edit >Ringer ID
Note:
The
available for entries stored on the
SIM card.
To activate ringer IDs, see page 79.
Assign a photo or picture to display
when you receive a call from an
entry:
M >Phonebook
M >Edit >Picture
Note:
The
available for entries stored on the
SIM card.
, highlight the
> entry
Ringer ID
> entry
Picture
option is not
option is not
> picture name
N
to call
> ringer name
76
Page 79

Feature Description
Set Picture
ID View
Set
Category for
Entry
Set
Category
View
Set
Category
Ringer ID
View phonebook entries as a text list,
or with picture caller ID photos:
M >Phonebook
M >Setup >View by
Set the category for an entry:
M >Phonebook
M >Edit >Category
> category name
Note:
The
Category
available for entries stored on the
SIM card.
Set a category view:
M >Phonebook
M >Categories
Set a distinctive ring alert (ringer ID)
to sound when you receive calls from
entries in a specific category:
M >Phonebook
M >Categories
category, press
>
Ringer ID
.
Note:
The
Ringer ID
available for entries stored on the
SIM card.
To activate ringer IDs, see page 79.
> view name
> entry
option is not
> category view
, highlight the
M >Edit
option is not
Phone Features
77
Page 80
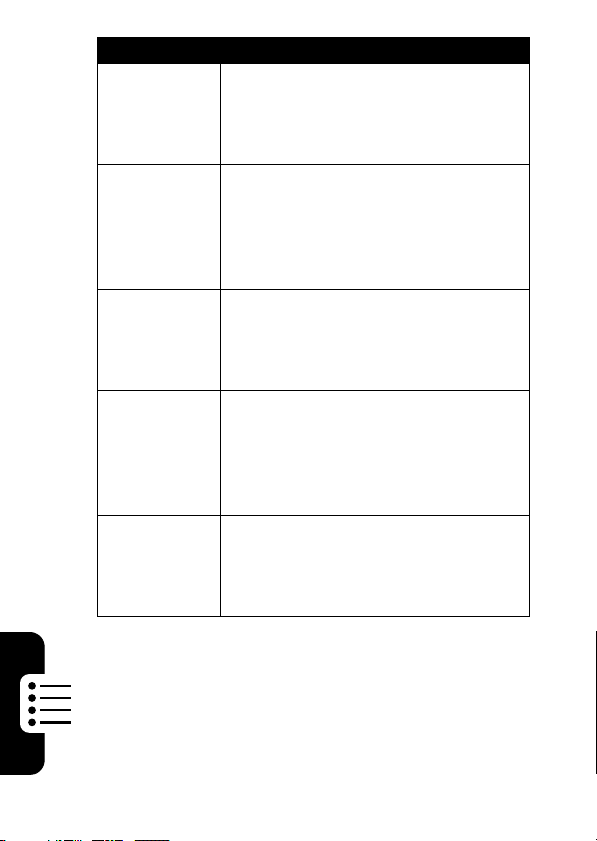
Feature Description
Sort
Phonebook
List
Set Primary
Number or
Address
Copy
Phonebook
Entry
Send
Phonebook
Entry to
Another
Device
Create
Group
Mailing List
Phone Features
Set the order in which entries are
listed:
M >Phonebook
M >Setup >Sort by
Set the primary number for an entry
with multiple numbers:
M >Phonebook
press
M >Set Primary
address.
Copy an entry between the phone
and SIM card:
M >Phonebook
press
M >Copy >Entries >To
Send a phonebook entry to another
phone, computer, or device:
M >Phonebook
press
M >Send
Create a group mailing list as a
phonebook entry:
M >Phonebook
M >New >Mailing List
> sort order
, highlight the entry,
, highlight the entry,
, highlight the entry,
> number or
78
Page 81

Personalizing Features
Feature Description
Activate
Ringer IDs
Ring
Volu me
Keypad
Volu me
Reminders
Clock View
Menu View
Main Menu
Activate distinctive ring alerts
assigned to phonebook entries:
M >Settings >Ring Styles
> style
Detail >Ringer IDs
Set ringer volume:
M >Settings >Ring Styles
> style
Detail >Ring Volume
Set keypad keypress volume:
M >Settings >Ring Styles
> style
Detail >Key Volume
Set reminder alerts for messages
that you receive:
M >Settings >Ring Styles
> style
Detail >Reminders
Display an analog clock or digital
time readout in the home screen:
M >Settings >Personalize
>
Home Screen >Clock
Display the main menu as graphic
icons or as a text-based list:
M >Settings >Personalize
>
Main Menu >View
Reorder your phone’s main menu:
M >Settings >Personalize
>
Main Menu >Reorder
Phone Features
79
Page 82
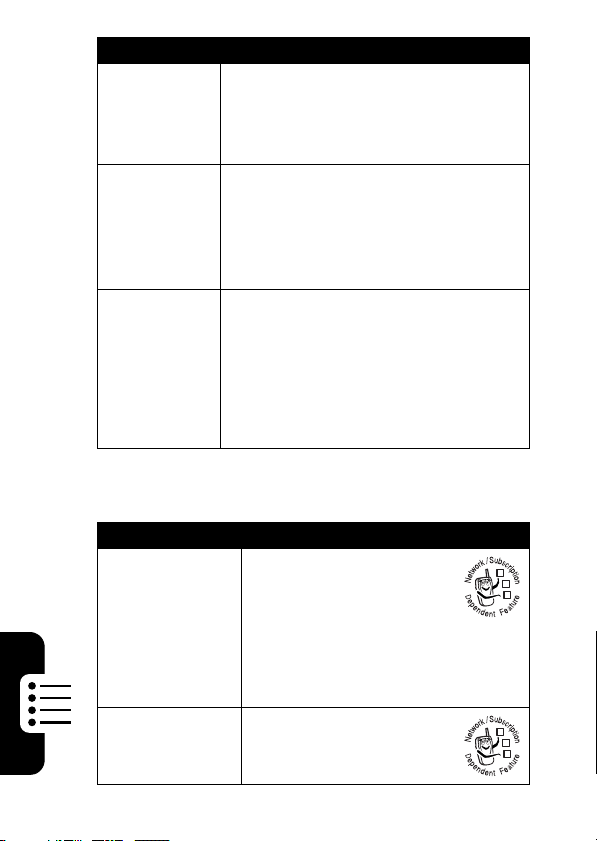
Feature Description
Show or
Hide Menu
Icons
Change
Menu Icons
& Home
Keys
Shortcuts
Show or hide menu feature icons in
the home screen:
M >Settings >Personalize
>
Home Screen >Home Keys >Icons
Change menu feature icons, soft key
labels, and smart key function in the
home screen:
M >Settings >Personalize
>
Home Screen >Home Keys
Create a shortcut to a menu item:
Highlight the menu item, then press
and hold
Use a shortcut:
Press
number.
M
M
.
, then press the shortcut
AOL® Instant Messenger™
Feature Description
Sign On
Phone Features
Find Others
Online
Sign on to AOL Instant
Messenger (
M >AIM >Sign On
You need a screen name to sign
on to
name, see
After you sign on:
Select
list of other users.
AIM
®):
AIM
. To set up a screen
http://www.aim.com
Buddy List
to see a
032380o
.
032380o
80
Page 83

Feature Description
Start
Conversation
Open Active
Conversation
End
Conversation
Sign Off
Sign off of
Start a conversation:
From your
highlight a name in
Online Buddies
SEND IM(+
Open a conversation in
progress:
From your
highlight a name in
Conversations
press
WRITE(+
message.
From the conversation
display:
M >End Conversation
Select
Sign Off
AIM Online
menu.
Feature Description
Send
Email
Message
Read
Email
Message
Send an email message:
E >Create Message >New Email
Read a new email message
that you have received:
Press
READ(+
Buddy List
, press
).
Buddy List
, press
AIM
:
from the
).
,
,
VIEW(+
) to send a
),
032380o
032380o
032380o
032380o
032380o
032380o
Phone Features
81
Page 84

Menu Features
Feature Description
Language
Master
Reset
Master
Clear
Phone Features
Set menu language:
M >Settings >Initial Setup >Language
except
Reset all options
security code, and lifetime timer:
M >Settings >Initial Setup
>
Master Reset
Clear all user settings and entries
except
SIM card information, erase all
downloaded pictures and sound files,
reset all options
security code, and lifetime timer:
M >Settings >Initial Setup
>
Master Clear
Caution:
user-entered information
phonebook and datebook entries)
user-downloaded content
photos and sounds) stored in your
phone’s memory. After you erase the
information, you cannot recover it.
except
Master clear
unlock code,
unlock code,
erases all
(including
and
(including
82
Page 85

Special Dialing Features
Feature Description
Fixed Dial
Service
Dial
Quick Dial
DTMF
Tones
Turn fixed dialing on or off:
M >Settings >Security
>
Fixed Dial
Use the fixed dial list:
M >Office Tools >Dialing Services
>
Fixed Dial
Dial service phone numbers:
M >Office Tools
>
Dialing Services >Service Dial
Dial preprogrammed phone
numbers:
M >Office Tools
>
Activate DTMF tones:
M >Settings >Initial Setup >DTMF
Send DTMF tones during a call:
Press number keys.
Send stored numbers as DTMF tones
during a call:
Highlight a number in the phonebook
or recent calls lists, then press
M>Send Tones
Dialing Services >Quick Dial
.
032380o
032380o
032380o
Phone Features
83
Page 86

Call Monitoring
Network connection time
moment you connect to your service provider's network to
the moment you end the call by pressing
includes busy signals and ringing.
The amount of network connection time you track on
your resettable timer may not equal the amount of time
for which you are billed by your service provider. For
billing information, please contact your service
provider directly.
Feature Description
Call Times
In-Call
Timer
Call Cost
Phone Features
View call timers:
M >Recent Calls >Call Times
Display time or cost
information during a call:
M >Settings >In-Call Setup
>
View call cost trackers:
M >Recent Calls >Call Cost
is the elapsed time from the
O
In-Call Timer
. This time
Handsfree Features
032380o
032380o
032380o
84
Note:
The use of wireless devices and their
accessories may be prohibited or restricted in certain
Page 87
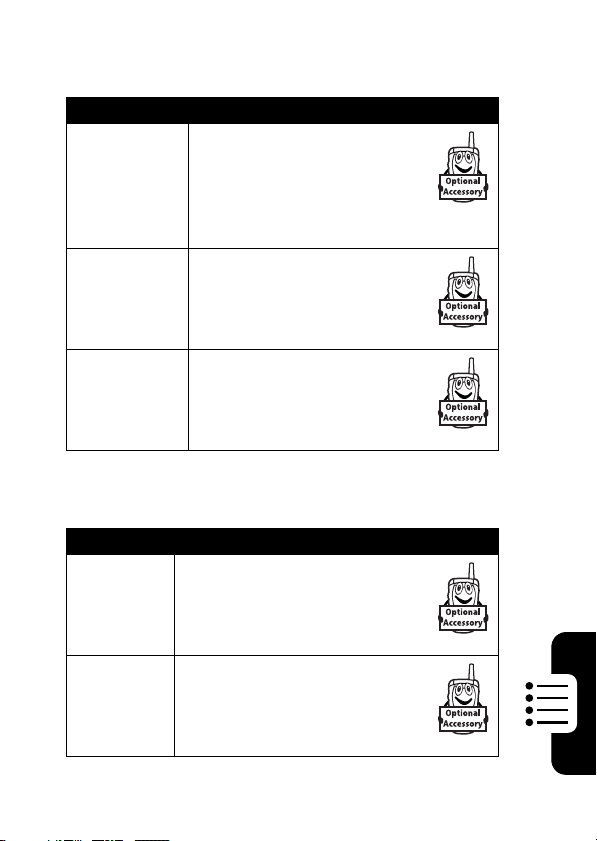
areas. Always obey the laws and regulations on the use of
these products.
Feature Description
Auto
Answer
(car kit or
headset)
Voic e Di a l
(headset)
Auto
Handsfree
(car kit)
Automatically answer calls
when connected to a car kit
or headset:
M >Settings >Car Settings
or
Headset >Auto Answer
Enable voice dial with
headset send/end key:
M >Settings >Headset
>
Voice Dial
Automatically route calls to a
car kit when connected:
M >Settings >Car Settings
>
Auto Handsfree
Data and Fax Calls
Feature Description
Send Data
or Fax
Receive
Data or
Fax
Connect your phone to the
device, then place the call
through the device
application.
Connect your phone to the
device, then answer the call
through the device
application.
Phone Features
85
Page 88
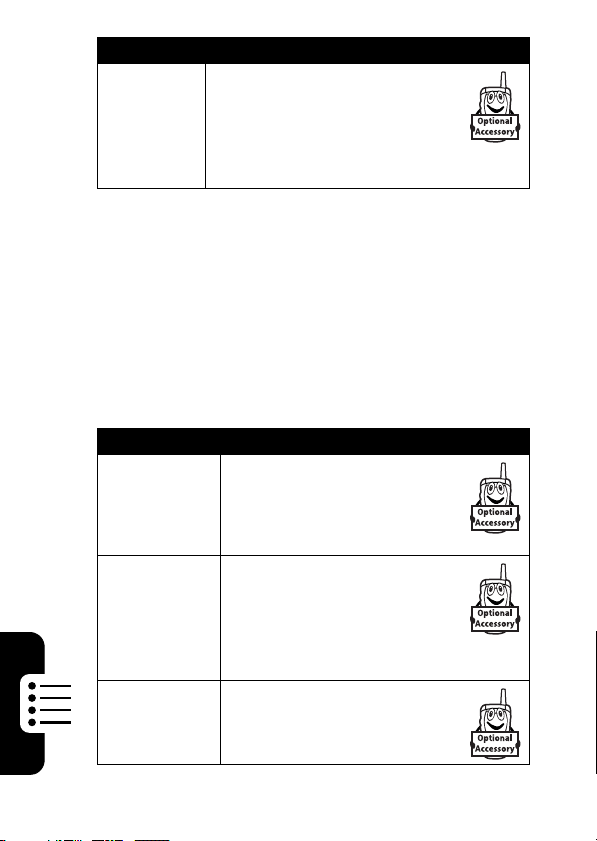
Feature Description
Talk Then
Fax
Connect your phone to the
device, enter the number,
press
M >Dialing Menu
>
Talk Then Fax
make the call.
, then press N to
Bluetooth® Wireless Connections
Note: Your phone's Bluetooth features and Bluetooth
Class 1 power levels are not allowed for outdoor
operation in France. To avoid unlawful interference
with radio signals, do not use the Bluetooth features
in France unless you are indoors
Feature Description
Make Phone
Visible to
Other
Device
Connect to
Phone Features
Recognized
Device
Disconnect
From
Device
Allow a Bluetooth device to
discover your phone:
M >Settings >Connection
>
Bluetooth Link >Setup >Find Me
Connect to a recognized
handsfree device:
M >Settings >Connection
>
Bluetooth Link >Handsfree
> device name
Disconnect from a device:
Highlight the device name
and press
.
DROP(+
).
86
Page 89

Feature Description
Switch to
Device
During Call
Switch to a headset or car
kit during a call:
M>Use Bluetooth
Send
Multimedia
Object to
Device
Move
Multimedia
Object to
Device
Send Data
to Another
Device
Edit Device
Properties
Set
Bluetooth
Options
Send a multimedia object to
another device:
Highlight the object, press
M>Copy
device name.
Move a multimedia object to
another device:
Highlight the object, press
M>Move
device name.
Caution:
the original object from your phone.
Copy a phonebook entry,
datebook event, or
bookmark to another device:
Highlight the item, press
M>Send
Edit the properties of a
recognized device:
Highlight the device name
and press
Set your phone’s Bluetooth
options:
M >Settings >Connection
>
Bluetooth Link >Setup
, select the
, select the
Moving an object
.
M>Edit
deletes
.
Phone Features
87
Page 90

Network Features
Feature Description
Network
Settings
View network information and
adjust network settings:
M >Settings >Network
Personal Organizer Features
Feature Description
Set Alarm
Turn Off
Alarm
Add New
Datebook
Event
View
Datebook
Phone Features
Event
Event
Reminder
Set an alarm:
M >Office Tools >Alarm Clock
Turn off alarm:
Press
Set 8-minute delay:
Press
Add a new event to the datebook:
M >Office Tools >Datebook
the day, press
View or edit event details:
M >Office Tools >Datebook
the day, press
press
View a datebook event reminder:
VIEW(+
DISABLE(-
SNOOZE(+
VIEW(+
)
) or O.
).
C
, press
C
, highlight the event,
)
032380o
, highlight
M >New
, highlight
88
Dismiss an event reminder:
EXIT(-
)
Page 91

Feature Description
Send
Datebook
Event to
Another
Device
Create
Voic e
Record
Play Voice
Record
Calculator
Currency
Converter
Send a datebook event to another
phone, computer, or device:
M >Office Tools >Datebook
the day, press
press
Calculate numbers:
M >Send
Create a voice record:
Press and hold voice key, speak into
the phone, release voice key
Note:
Recording phone calls is subject
to varying state and federal laws
regarding privacy and recording of
conversations.
Play back a voice record:
M >Office Tools >Voice Records
> voice record
M >Office Tools >Calculator
Convert currency:
M >Office Tools >Calculator
M >Exchange Rate
Enter exchange rate, press OK(+),
enter amount, press
M>Convert Currency
, highlight
C
, highlight the event,
.
Phone Features
89
Page 92

Security
Feature Description
SIM PIN
Lock
Application
Certificate
Management
Lock or unlock the SIM card:
M >Settings >Security >SIM PIN
Caution:
PIN code 3 times in a row, your
SIM card is disabled and your
phone displays
Lock phone applications:
M >Settings >Security
>
Lock Application
Enable or disable security
certificates stored on your phone:
M >Settings >Security
>
Certificate Mgmt
If you enter an incorrect
News and Entertainment
Feature Description
Manage
Phone Features
Pictures
Manage
Sounds
Manage
Video Clips
Manage pictures and
animations:
M >Multimedia
>
My Pictures
Manage ring tones and music that
you have downloaded or composed:
M >Multimedia >Sounds
Manage video clips:
M >Multimedia >Videos
SIM Blocked
.
032380o
90
Page 93

Feature Description
Edit Sounds
With
MotoMixer
Start MicroBrowser
Download
Objects from
Web Page
Web
Sessions
Download
Game or
Application
Start Game
or
Application
Edit MIDI-based songs that you can
use with your phone:
M >Multimedia >MotoMixer
>
[New Mix]
Start a micro-browser
session:
Press
Download a picture,
sound, or phone theme
from a Web page:
Highlight the file, press
SELECT(+
Select or create a Web
session:
M >Web Access
>
Web Sessions
Download a Java™ game
or application with the
micro-browser:
M >Web Access
>
Browser
press
DWNLOAD(+
Start a Java game or
application:
M >Games & Apps
highlight the application,
press
or mix file name
L
, highlight the application,
SELECT(+
SELECT(+
), press
), press
)
)
STORE(+
,
032380o
032380o
).
032380o
Phone Features
032380o
032380o
91
Page 94

Feature Description
Play Music
Create
Playlist
Create Ring
Tones
Play a song on your phone:
M >Multimedia >Sounds
> song name
Create a playlist of songs to play on
your phone:
M >Multimedia >Sounds
>
[New Playlist]
Create iMelody ring tones that you
can use with your phone:
M >Multimedia >Sounds
>
[New iMelody]
Phone Features
92
Page 95

Troubleshooting
If you have questions or need help, we’re here to help.
Go to
www.motorola.com/consumer/support
you can select from a number of customer care options.
You can also contact the Motorola Customer Support
Center at 1-800-331-6456 (United States),
1-888-390-6456 (TTY/TDD United States for hearing
impaired), or 1-800-461-4575 (Canada).
, where
Troubleshooting
93
Page 96

Specific Absorption Rate Data
The model wireless phone meets the government’s requirements for
exposure to radio waves.
Your wireless phone is a radio transmitter and receiver. It is designed and
manufactured not to exceed limits for exposure to radio frequency (RF)
energy set by the Federal Communications Commission (FCC) of the U.S.
Government and by the Canadian regulatory authorities. These limits are
part of comprehensive guidelines and establish permitted levels of RF
energy for the general population. The guidelines are based on standards
that were developed by independent scientific organizations through
periodic and thorough evaluation of scientific studies. The standards
include a substantial safety margin designed to assure the safety of all
persons, regardless of age or health.
The exposure standard for wireless mobile phones employs a unit of
measurement known as the Specific Absorption Rate, or SAR. The SAR
limit set by the FCC and by the Canadian regulatory authorities is
1.6 W/kg.
positions accepted by the FCC and by Industry Canada with the phone
transmitting at its highest certified power level in all tested frequency
bands. Although the SAR is determined at the highest certified power
level, the actual SAR level of the phone while operating can be well below
the maximum value. This is because the phone is designed to operate at
multiple power levels so as to use only the power required to reach the
network. In general, the closer you are to a wireless base station, the
lower the power output.
Before a phone model is available for sale to the public in the U.S. and
Canada, it must be tested and certified to the FCC and Industry Canada
that it does not exceed the limit established by each government for safe
exposure. The tests are performed in positions and locations (e.g., at the
ear and worn on the body) reported to the FCC and available for review by
Industry Canada. The highest SAR value for this model phone when
1
Tests for SAR are conducted using standard operating
94
Page 97

tested for use at the ear is 0.89 W/kg, and when worn on the body, as
described in this user guide, is 0.58 W/kg. The SAR value for this product
in its data transmission mode (body-worn use) is 1.24 W/kg. (Body-worn
measurements differ among phone models, depending upon available
accessories and regulatory requirements).
While there may be differences between the SAR levels of various phones
and at various positions, they all meet the governmental requirements for
safe exposure. Please note that improvements to this product model
could cause differences in the SAR value for later products; in all cases,
products are designed to be within the guidelines.
Additional information on Specific Absorption Rates (SAR) can be found
on the Cellular Telecommunications & Internet Association (CTIA) Web
site:
http://www.phonefacts.net
or the Canadian Wireless Telecommunications Association (CWTA) Web
site:
http://www.cwta.ca
1. In the United States and Canada, the SAR limit for mobile phones used by
the public is 1.6 watts/kg (W/kg) averaged over one gram of tissue. The
standard incorporates a substantial margin of safety to give additional
protection for the public and to account for any variations in measurements.
2. The SAR information includes the Motorola testing protocol, assessment
procedure, and measurement uncertainty range for this product.
2
95
Page 98

License Agreement for AOL®
Instant Messenger™ Service
AOL® Instant Messenger™ License
The AOL Instant Messenger service (the “Service”) is provided to you by
AOL, “AS IS,” subject to the terms and conditions of this License
Agreement (the “Agreement”). Please read this Agreement in full before
using the Service. ONLY INDIVIDUALS WHO HAVE AGREED TO THE
TERMS AND CONDITIONS OF THIS AGREEMENT MAY ACCESS THE
AOL INSTANT MESSENGER SERVICE.
BY YOUR USE OF THE AOL INSTANT MESSENGER SERVICE, YOU
AGREE TO USE THE AOL INSTANT MESSENGER SOFTWARE (THE
“SOFTWARE”) AND SERVICE AS PROVIDED IN THIS AGREEMENT.
1. Limited License
the Software solely for the specified platform to access the Service.
2. Restrictions on Use
the Software provided by AOL to access the Service, without the express
written authorization of AOL. You may not modify, reverse engineer,
decompile or disassemble the Software or in any way ascertain, decipher,
or obtain the communications protocol for accessing the Service. You may
not adapt, alter, modify, translate, or create derivative works of the
Software without the express written authorization of AOL. You may not
block, disable or otherwise affect any advertising, advertisement banner
window, links to other sites and services, or other features that constitute
an integral part of the Software and Service. You may not incorporate,
integrate or otherwise include the Software or any portion thereof into any
software, program or product that communicates, access, or otherwise
connects with any other instant messaging, Internet service, or online
service. Finally, you may not authorize or assist any third party to do any
of the things described in this paragraph.
3. Your Representations
Software and Service only for lawful purposes and in accordance with this
. AOL grants you a limited, non-exclusive license to use
. You may not create or use any software other than
. You represent and warrant that you will use the
96
Page 99

Agreement, and that you will not use the Software or the Service to violate
any law, regulation or ordinance or any right of AOL or any third party,
including, without limitation, any right of privacy, publicity, copyright or
trademark.
4. Charges
service provider to determine if the Service is included in your rate plan,
or if other charges may apply.
5. Termination
Software and the Service shall terminate immediately and without notice.
You may also terminate this Agreement by simply discontinuing use of the
Software and the Service. In the event of any termination of this
Agreement, the restrictions on your use of the Software and Service as
set forth in Paragraph 2 (“Restrictions on Use”) shall survive such
termination, and you agree to be bound by those terms.
6. No Support by AOL
Service at your own risk and provides no assistance or support for your
use of the Software or the Service.
7. Disclaimer of Warranty
PROVIDED “AS IS,” WITHOUT WARRANTIES OF ANY KIND, EITHER
EXPRESS OR IMPLIED, INCLUDING WITHOUT LIMITATION
WARRANTIES THAT THE SOFTWARE AND THE SERVICE ARE (A)
FREE OF DEFECTS OR ERRORS, (B) VIRUS FREE, (C) ABLE TO
MEET ANY REQUIREMENTS OF YOU OR ANYONE ELSE, (D) ABLE
TO OPERATE ON AN UNINTERRUPTED BASIS, (E) MERCHANTABLE,
(F) FIT FOR A PARTICULAR PURPOSE OR (G) NON-INFRINGING,
UNLESS SUCH WARRANTIES ARE LEGALLY INCAPABLE OF
EXCLUSION. AOL SHALL HAVE NO LIABILITY WITH RESPECT TO
USE OF THE SOFTWARE OR THE SERVICE.
8. Limitation of Liability
DISTRIBUTORS, SUPPLIERS, DIRECTORS, NOR AGENTS SHALL BE
LIABLE FOR ANY INDIRECT, INCIDENTAL, CONSEQUENTIAL,
SPECIAL, OR EXEMPLARY DAMAGES, INCLUDING BUT NOT
LIMITED TO LOST PROFITS AND LOST DATA, IN ANY WAY ARISING
. Please consult your rate plan and agreement with your
. Should you breach this Agreement, your right to use the
. You understand that you use the Software and the
. THE SOFTWARE AND THE SERVICE ARE
. NEITHER AOL, ITS EMPLOYEES,
97
Page 100

OUT OF OR RELATING TO THIS AGREEMENT, EVEN IN THE EVENT
SUCH PARTY HAS BEEN ADVISED AS TO THE POSSIBILITY OF
SUCH DAMAGES. BECAUSE SOME STATES OR JURISDICTIONS DO
NOT ALLOW THE EXCLUSION OR THE LIMITATION OF LIABILITY
FOR CONSEQUENTIAL OR INCIDENTAL DAMAGES, IN SUCH STATES
OR JURISDICTIONS, AOL'S LIABILITY SHALL BE LIMITED TO THE
EXTENT PERMITTED BY LAW.
9. No Trademark License
either expressly or implicitly, to use any trademark, service mark, names,
or logos of AOL, including America Online, AOL, AOL Instant Messenger,
Instant Messenger, AIM and the Running Man logo. AOL owns all
intellectual property in the Software, the Service and the proprietary AOL
name space database, including but not limited to AOL components and
algorithms and access to the Service server complex. AOL and/or its
suppliers or service providers own all customer data collected through the
Service registration process.
10. Injunctive Relief
proprietary and confidential information, and that disclosure of such
information or misuse of the Software will give rise to irreparable injury to
AOL, inadequately compensable in damages. Accordingly, AOL may seek
and obtain injunctive relief against the breach or threatened breach of the
foregoing undertakings, in addition to any other legal remedies that may
be available.
11. Construction
unenforceable, that portion shall be construed to reflect the parties'
original intent, and the remaining portions remain in full force and effect.
The laws of the Commonwealth of Virginia, excluding its conflicts-of-law
rules, govern this Agreement, and you expressly agree that jurisdiction for
any claim or dispute arising from the use of the Protocols resides in the
federal and state courts of the Commonwealth of Virginia.
12. Safety
this device to access the Service while engaging in any activity that
requires your full attention.
. Please obey all local laws and keep safety in mind when using
. No license is granted to you in this Agreement,
. You acknowledge that the Software contains AOL's
. If any part of the Agreement is held invalid or
98
 Loading...