

Page 1
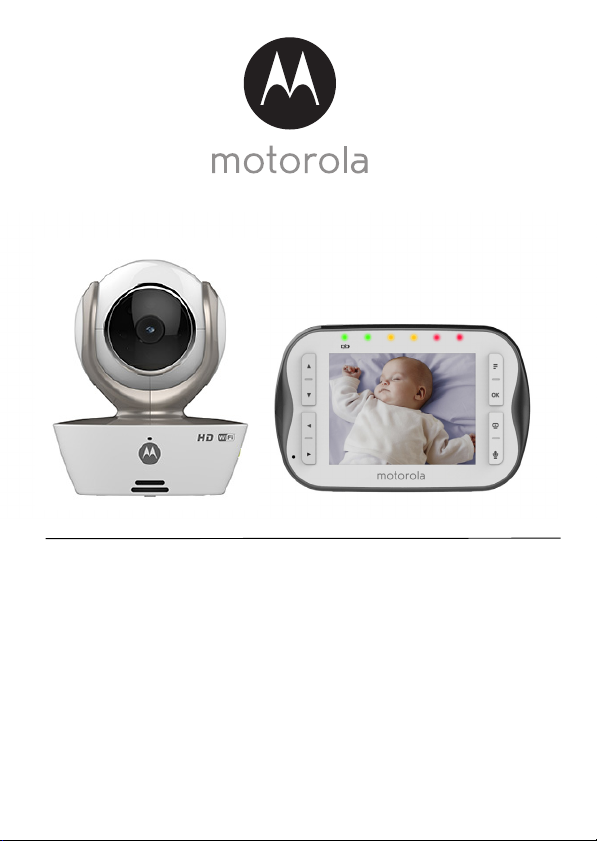
User’s Guide
Wi-Fi® Video Baby Monitor
Models: MBP843CONNECT, MBP843CONNECT-2, MBP843CONNECT-3,
MBP843CONNECT-4
The features described in this User’s Guide are subject to modifications without prior notice.
Page 2

Welcome...
to your new Motorola Wi-Fi® Video Baby Monitor!
Thank you for purchasing the Wi-Fi® Video Baby Monitor. Now you can view
and hear your baby sleeping in another room or you can monitor your older
children in their play room.
Please retain your original dated sales receipt for your records. For
warranty service of your Motorola product, you will need to provide a copy
of your dated sales receipt to confirm warranty status. Registration is not
required for warranty coverage.
For product-related questions, please call:
US and Canada 1-888-331-3383
Email: support@motorolamonitors.com
On the Web: www.motorolamonitors.com
This User's Guide provides you with all the information you need to get the
most from your product.
®
Before you use the Wi-Fi
insert and fully charge the battery in the Parent Unit, so that it continues to
work if you disconnect it from the electrical outlet to carry it to another
location. Please read the Safety Instructions on pages 6 - 8 before you
install the units.
Got everything?
• 1 x Parent Unit
• 1 x Baby Unit (Camera)
• 1 x Rechargeable Ni-MH battery pack for the Parent Unit
• 1 x Power adapter for the Parent Unit
• 1 x Power adapter for the Baby Unit
In packs with multi Baby Units, you will find one or more additional Baby
Units with power adapters.
Video Baby Monitor, we recommend that you
Page 3
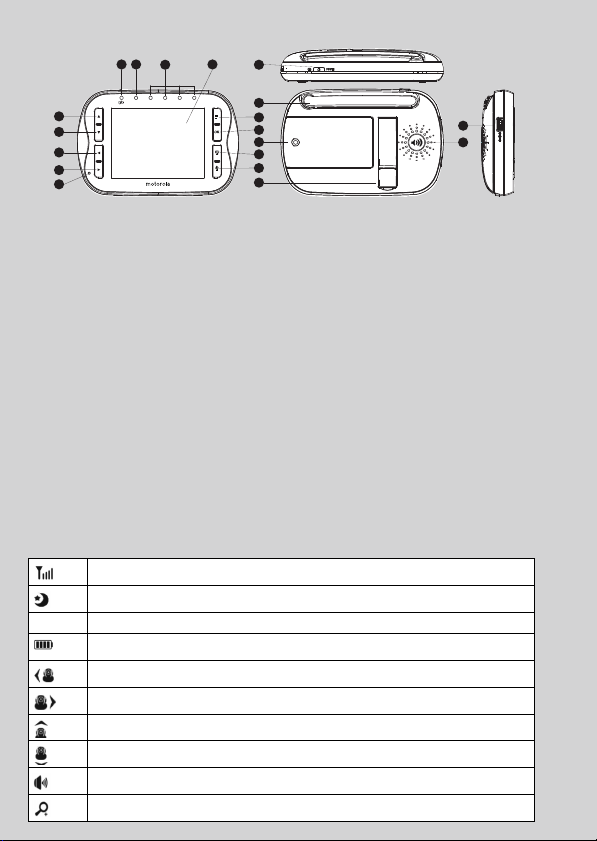
Overview of the Parent Unit
110 11
12 14
2
3
4
5
13
1. LCD displ ay
2. Up Key +
Normal Mode: Tilt Up
Menu Mode: Up
3. Down Key -
Normal Mode: Tilt Down
Menu Mode: Down
4. Left Key <
Normal Mode: Pan Left
Menu Mode: Left
5. Right Key >
Normal Mode: Pan Right
Menu Mode: Right
6. Menu Key
M
Press to open the Menu options.
7. OK Key
8. Video ON/OFF Key V
O
Press to turn OFF the LCD display.
Press again to turn ON the LCD display.
Parent unit menu icons
Signal Level (4 Levels)
Night Vision Mode (Screen changes to Black/White)
Talk Mo de
T
Battery Level Control (4 Levels)
Pan Left
Pan Right
Til t Up
Til t Dow n
Volume Level Control (8 Levels + OFF)
Zoom Level Control (1X, 2X)
15
6
7
16
8
9
17
9. Tal k K ey T
Press and hold to speak to your baby.
10. Power Adapter / Battery LED
BLUE when the adapter is powered on.
RED when battery low.
11. Unit ON/OFF LED (Green)
12. Audio Level LED (Green, Orange, Red,
Red)
13. Microphone
14. Power Key P
Press and Hold to switch the unit ON/
OFF.
15. Antenna
Lift up the antenna for optimal reception.
16. Battery cover
17. Stand
18. Speaker
19. USB power adapter socket
19
18
Page 4
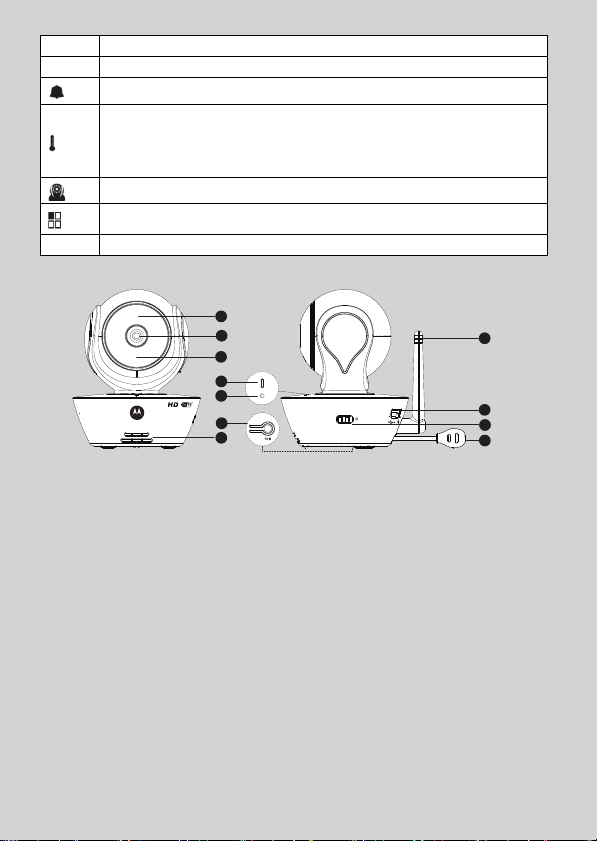
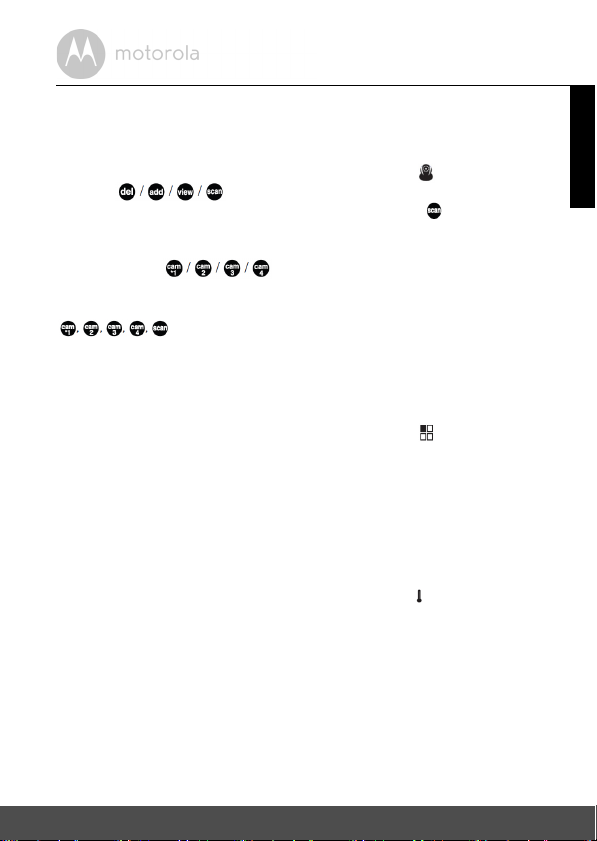
Parent unit menu icons (cont’d)
1
9
11
10
8
2
3
6
5
4
7
1. Light Sensor (for night mode
detection)
2. Camera Lens
3. Infrared LEDs (for night vision)
4. Power / Sta tus indicato r
5. Microphone
6. PAIR Button
7. Speaker
8. Antenna
9. Micro USB socket
10. ON/OFF Switch
11. Tem pe rat ur e S en sor
Brightness Level Control (8 Levels)
&
Lullaby Control (5 Song Selections)
m
Alarm Setting (6h, 4h, 2h, Off)
Temperature scale selection (ºC / ºF).
Readings display in BLUE, but turn RED if > 29 ºC / 84 ºF or
< 14 ºC / 57 ºF.
Displays HH ºC / ºF if > 36 ºC / 97 ºF.
Displays LL ºC / ºF if < 1 ºC / 34 ºF.
Cam Control (scan, view, add, delete)
View multiple cameras on screen (Picture in Picture). Available when
you have more than 1 Baby Unit (Camera).
Set Video On Timer (5min, 30min, 60min)
V
Overview of the Camera Unit
Important guidelines for installing your Wi-Fi® Video Baby Monitor
• To use your B aby Unit and Pare nt Unit together, you must be able to establish a radio link
between them, and the range will be affected by environmental conditions.
• Any large metal object, like a refrigerator, a mirror, a filing cabinet, a metallic door or
reinforced concrete, between the Baby Unit and Parent Unit may block the radio signal.
• The signal strength may also be reduced by other solid structures, like walls, or by radio
or electrical equipment, such as TVs, computers, cordless or mobile phones,
fluorescent lights or dimmer switches.
• Other 2.4GHz products, such as wireless networks (Wi-Fi
systems, microwave ovens or other Baby Monitors, may cause interference with this
product, so keep the Baby Monitor at least 5ft (1.5m) away from these types of product,
or turn them off if they appear to be causing interference.
• If the signal is weak, try moving the Parent and/or the Baby Unit to different positions in
the rooms.
• Always ensure that you have a good Wi-Fi
®
connection available.
®
routers), Bluetooth™
Page 5

Table of contents
1. Safety Instructions..................................................................................... 6
2. Getting Started..........................................................................................9
2.1 Camera Unit Power Supply.........................................................................9
2.2 Parent Unit Battery Installation....................................................................9
2.3 Parent Unit Power Supply .........................................................................10
2.4 Registration (Pairing).................................................................................11
3. Using the Wi-Fi® Video Baby Monitor.................................................... 12
3.1 Setting up...................................................................................................12
3.2 Pan and Tilt ................................................................................................12
3.3 Night Vision Mode.....................................................................................12
3.4 Talk Mode..................................................................................................12
3.5 Video ON/OFF..........................................................................................12
3.6 Temperature Display (HH °C / °F or LL °C / °F)......................................12
4. Parent Unit Menu Options.......................................................................13
4.1 Volume.......................................................................................................13
4.2 Brightness ..................................................................................................13
4.3 Lullaby........................................................................................................13
4.4 Zoom..........................................................................................................13
4.5 Alarm..........................................................................................................13
4.6 Camera Control ........................................................................................14
4.7 Temperature..............................................................................................15
4.8 Power Saving Mode..................................................................................15
5. System Requirements ............................................................................. 16
6. Getting started - Connecting Devices....................................................17
6.1 Setup..........................................................................................................17
6.2 User Account and Camera Setup on Android™ Devices .......................18
6.3 User Account and Camera Setup on iPhone®/iPad®.............................22
6.4 Camera Functions:....................................................................................28
6.5 Working with PC/Notebook.....................................................................31
6.6 Procedure for Resetting the Camera.......................................................31
7. Disposal of the Device (environment)....................................................32
8. Cleaning ..................................................................................................33
9. Troubleshooting ......................................................................................34
10. General Information ................................................................................42
11. Technical Specifications .........................................................................48
ENGLISH
Table of contents 5
Page 6
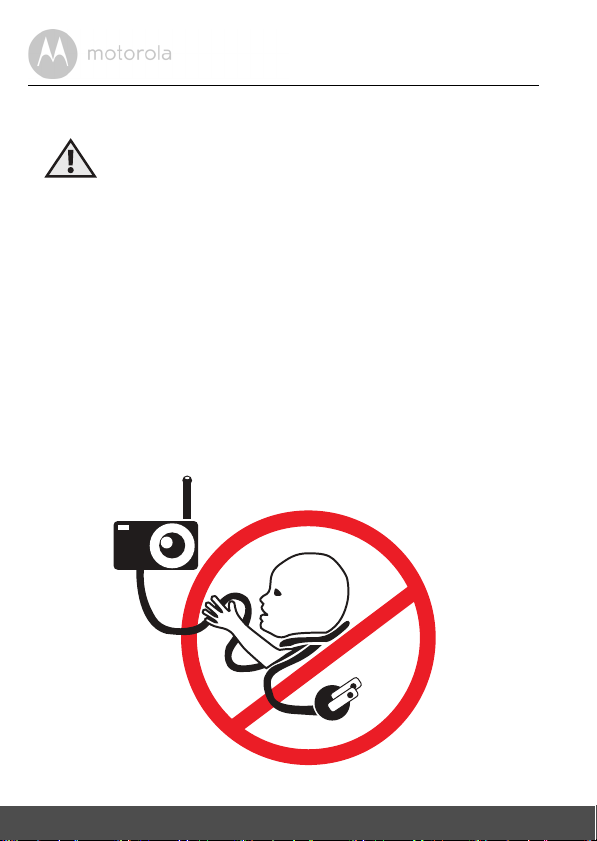
1. Safety Instructions
WARNING:
Strangulation Hazard. Children
have STRANGLED in cords.
Keep this cord out of the reach
of children (more than 3ft (1m)
away). Never use extension
cords with AC Adapters. Only
use the AC Adapters provided.
6 Safety Instructions
Page 7

Wi-Fi® CAMERA UNIT SET UP & USE:
• Choose a location for the Wi-Fi® Camera Unit that will provide the best
view of your baby in his/her crib.
• Place the Wi-Fi
bureau or shelf, or mount the Unit on a wall securely using the keyhole
slots under the stand.
• NEVER place the Wi-Fi
• Do not place the Wi-Fi
of the baby (the unit and cords should be more than 3 feet away).
®
Camera Unit on a flat surface, such as a dresser,
®
Camera Unit or cords within the crib.
®
Camera Unit or cords in the crib or within reach
ENGLISH
WARNING
This Wi-Fi
®
Video Baby Monitor is compliant with all relevant standards
regarding electromagnetic fields and is, when handled as described in the
User's Guide, safe to use. Therefore, always read the instructions in this User's
Guide carefully before using the device.
• Adult assembly is required. Keep small parts away from children when
assembling.
• This product is not a toy. Do not allow children to play with it.
• This Wi-Fi
supervision.
®
Video Baby Monitor is not a substitute for responsible adult
• Keep this user's guide for future reference.
• Keep the cords out of reach of children.
• Do not cover the Wi-Fi
• Test this monitor and all its functions so that you are familiar with it prior to
actual use.
• Do not use the Wi-Fi
• Do not install the Wi-Fi
®
Video Baby Monitor with a towel or blanket.
®
Video Baby Monitor in damp areas or close to water.
®
Video Baby Monitor in extreme cold or heat, direct
sunlight, or close to a heat source.
• Only use the chargers and power adapters provided. Do not use other
chargers or power adapters as this may damage the device and battery
pack.
• Only insert a battery pack of the same type.
• Do not touch the plug contacts with sharp or metal objects.
• Connect the power adapters to easily accessible electrical outlets.
Safety Instructions 7
Page 8

CAUTION
There is a risk of explosion if the battery is replaced by an incorrect type.
Only use a Ni-MH rechargeable battery pack with rating: 3.6V, 900mAh.
Dispose of used batteries according to the instructions.
8 Safety Instructions
Page 9
2. Getting Started
Power adapter plug
Switch to turn ON the camera
Red
Black
2.1 Camera Unit Power Supply
1. Insert the Power Adapter plug into the micro USB socket at the back of the
Camera Unit.
2. Connect the other end of the Power Adapter into a suitable electrical
outlet.
3. Switch the ON/OFF button to the ON position.
The colored LED will now start flashing slowly.
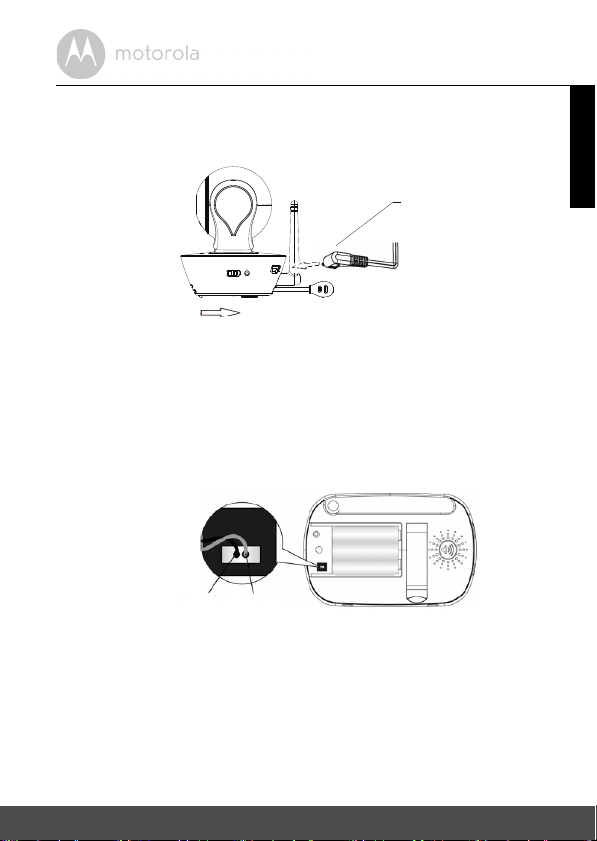
2.2 Parent Unit Battery Installation
1. Insert the wire tabs of the rechargeable battery pack into the contact slots
as shown above and fit the battery pack into the compartment.
2. Place the battery compartment cover over the battery, making sure that
the battery wires are carefully pushed down and the cover fits properly.
ENGLISH
Getting Started 9
Page 10

3. Gently tighten the screw in a clockwise direction using a small cross head
Small cross head or flat
end screwdriver
Micro USB Plug
Micro USB Socket
or flat end screwdriver.
2.3 Parent Unit Power Supply
IMPORTANT
Installing the rechargeable battery pack and charging it fully before use is
recommended. This will allow the unit to operate on battery in the event of a
power failure.
1. Connect the small plug of the power adapter to the Parent Unit and the
other end to the electrical outlet. Only use the supplied power adapter (5V
DC / 600mA) with the Micro USB plug.
2. Press and hold the
ON the Parent Unit.
3. Once the Camera and Parent Units are switched on, the display on the
Parent Unit will show the video captured by the Camera Unit.
4. If there is no connection or you are out of range, the video display will be
replaced by a symbol and the unit will beep every 5 seconds. Move the
Parent Unit closer to the Camera Unit until the link is re-established.
P POWER ON/OFF button for 1 second to switch
10 Getting Started
Page 11
5. To turn off the Parent Unit, press and hold the P POWER ON/OFF
0
button until the progress bar finishes scrolling.
NOTE
The battery icon turns RED and the unit emits a beep every 16 seconds to
indicate that the battery is low and needs to be recharged. The battery pack
takes about 16 hours to charge fully.
When charging
1. During charging, the battery icon at the top right of the screen indicates that it is
charging. If the Parent Unit is powered off while charging, a power plug icon is
displayed for 5 seconds, followed by a battery icon for 45 seconds. The Blue LED
at the top left corner lights up to indicate that the power adapter is plugged in.
2.4 Registration (Pairing)
The Camera Unit is pre-registered to your Parent Unit. You do not need to
register it again unless the Camera Unit loses its link with the Parent Unit.
To re-register your Camera Unit, or register a new Camera Unit, follow the
procedure below:
1. Press the
2. Press the
The
3. Press the
O button to confirm.
4. Press the
and press the O button to start searching for a camera unit. The green
audio level LED will flash rapidly while searching.
5. Press the O button to confirm.
6. Press and hold the PAI R button underneath the Camera Unit until the
Parent Unit finds the camera, beeps and the video from the camera
appears.
NOTE
If a particular Camera Unit was registered previously, registering this current
Camera Unit again will overwrite the old registration.
M button of the Parent Unit and the menu bar will pop up.
< LEFT button or > RIGHT button until is highlighted.
menu will pop up.
+ UP button or - DOWN button to select , and press the
will pop up.
+ UP button or - DOWN button to select the desired Camera
ENGLISH
Getting Started 11
Page 12

3. Using the Wi-Fi® Video Baby Monitor
3.1 Setting up
• Place the Camera Unit in a convenient location (e.g. on a table) and point the
camera lens towards the area you want to monitor.
• Adjust the Camera Unit's camera angle by rotating the camera up, down, left
and right until you are satisfied with the image in the Parent Unit.
NOTE
Do not place the Camera Unit within baby's reach! If there is interference with
the picture or sound, try moving the units to different locations, and ensure that
they are not close to other electrical equipment.
3.2 Pan and Tilt
The camera can be remotely controlled from the Parent Unit.
1. Press the + UP button or - DOWN button to tilt upward or downward.
2. Press the < LEFT button or > RIGHT button to pan left or right.
3.3 Night Vision Mode
The Camera Unit has 8 high-intensity infrared LEDs for picking up clear images
in the dark. When the built-in photo sensor detects a low level of ambient light,
the LEDs will automatically activate and the screen on the Parent Uni t will display
in black and white. The icon will be displayed at the top of the LCD screen.
3.4 Talk Mode
Press and hold the T TA LK b utt on o n th e Pa ren t Un it t o ta lk t o yo ur b aby thr oug h
the Camera Unit's loudspeaker. The
LCD screen.
3.5 Video ON/OFF
Press the V VIDEO ON/OFF button to turn the LCD display on or off. The
audio monitor will remain On.
3.6 Temperature Display (HH °C / °F or LL °C / °F)
The temperature reading from the temperature sensor at the back of the
Camera Unit will be displayed at the top of the LCD screen. The readings will
turn RED if the temperature goes above 29ºC / 84ºF or below 14ºC / 57ºF.
The reading will change to HH °C / °F if the temperature goes above 36ºC
/ 97ºF. The reading will change to LL °C / °F and icon flashes in red if the
temperature goes below 1ºC / 34ºF.
T icon will be displayed at the top of the
12 Using the Wi-Fi® Video Baby Monitor
Page 13
4. Parent Unit Menu Options
4.1 Volume
1. Press the M button.
The menu bar will pop up and is highlighted.
2. Press the
level from Level
4.2 Brightness
1. Press the M button and the menu bar will pop up.
2. Press the
3. Press the
level from Level
4.3 Lullaby
1. Press the M button and the menu bar will pop up.
2. Press the
3. Press the
the 5 lullabies available, or the cycle option to play all 5 songs in turn. If an
individual song is selected it will only play once. (The default setting is
OFF.)
4. Press
DOWN button to select the desired volume level.
4.4 Zoom
1. Press the M button and the menu bar will pop up.
2. Press the
3. Press the
default setting is 1X.)
4.5 Alarm
1. Press the M button and the menu bar will pop up.
2. Press the
3. Press the
2h). (The default setting is OFF.)
If an alarm time is selected, the Parent Unit will beep for about 45 seconds
after every 6, 4 or 2 hour period.
+ UP button or - DOWN button to select the desired volume
0~8
. (The default Volume level setting is Level 4.)
< LEFT button or > RIGHT button until & is highlighted.
+ UP button or - DOWN button to select the desired brightness
1
~ 8.(The default brightness level setting is Level 5.)
< LEFT button or > RIGHT button until m is highlighted.
+ UP button or - DOWN butto n to select the de sired song from
O on the selected lullaby, and then press the + UP button or -
< LEFT button or > RIGHT button until is highlighted.
+ UP button or - DOWN button to select 1X or 2X zoom. (The
< LEFT button or > RIGHT button until is highlighted.
+ UP button or - DOWN button to select the alarm time (6h, 4h,
ENGLISH
Parent Unit Menu Options 13
Page 14
4.6 Camera Control
4.6.1 Add (pair) a camera
1. Press the M button and the menu bar will pop up.
2. Press the
The
3. Press the
button to confirm. will pop up.
4. Press the
and press the
audio level LED will flash rapidly while searching.
5. Press and hold the PA IR button underneath the Camera Unit until the
Parent Unit finds the camera, beeps and the picture from the camera
appears.
NOTE
A camera can only be registered to one Parent Unit at any one time.
4.6.2 View a camera
1. Press the M button and the menu bar will pop up.
2. Press the
The menu will pop up.
3. Press the
button to confirm. will pop up.
4. Press the
press the O button to view the picture from that camera.
TIP
Quick Method to View Cameras.
4.6.3 Delete a camera
1. Press the M button and the menu bar will pop up.
2. Press the
The
3. Press the
O button to confirm. will pop up.
4. Press the
and press the
< LEFT button or > RIGHT button until is highlighted.
menu will pop up.
+ UP button or - DOWN button to select , and press the O
+ UP button or - DOWN button to select the desired Camera,
O button to start searching for a camera unit. The green
< LEFT button or > RIGHT button until is highlighted.
+ UP button or - DOWN button to select , and press the O
+ UP button or - DOWN button to select desired Camera, and
instead of entering the menu bar
Directly press O
repeatedly to select
.
< LEFT button or > RIGHT button until is highlighted.
menu will pop up.
+ UP button or - DOWN button to select , and press the
+ UP button or - DOWN button to select the desired Camera,
O button to delete that registration.
14 Parent Unit Menu Options
Page 15
4.6.4 Scan camera
This function is only available when you have more than 1 Camera Unit (Camera).
1. Press the M button and the menu bar will pop up.
2. Press the
The
3. Press the
< LEFT button or > RIGHT button until is highlighted.
menu will pop up.
+ UP button or - DOWN button to select , and press the
O button to confirm.
4. The screen will then display images from the different registered cameras
in a loop of , changing about every 12 seconds.
TIP
Quick Method to View Cameras.
instead of entering the menu bar
Directly press O
.
repeatedly to select
4.6.5 View multiple cameras on screen (Picture in Picture)
This function is only available when you have more than 1 Camera Unit. When the
Picture in Picture
1. Press the M button and the menu bar will pop up.
2. Press the
3. Press the
Off.
4. When the Picture in Picture function is On, you can press the
button/
between cameras.
function is On, you can view multiple cameras on the screen.
< LEFT button or > RIGHT button until is highlighted.
+ UP button or - DOWN button to select Picture in Picture On/
< LEFT
> RIGHT button/+ UP button /- DOWN button to switch
4.7 Temperature
1. Press the M button and the menu bar will pop up.
2. Press the
3. Press the
< LEFT button or > RIGHT button until is highlighted.
+ UP button or - DOWN button to select ºC or ºF.
4.8 Power Saving Mode
1. Press the M button and the menu bar will pop up.
2. Press the
3. Press the
30 or 60 mins if it is not charging.
< LEFT button or > RIGHT button until V is highlighted.
+ UP button or - DOWN button to select auto video off after 5,
ENGLISH
Parent Unit Menu Options 15
Page 16

5. System Requirements
Web Portal
• Windows® 7
• Mac OS
• Chrome™ 24
• Internet Explorer
• Safari
• Java™ 7
• Firefox
• Adobe
Android™ System
• Version 4.2 or above
iPhone®/iPad® iOS
• Version 7.0 or above
High Speed (Wi-Fi®) Internet
• At least 0.6 Mbps upload bandwidth per Camera (you can test your internet
®
10.7
®
®
6
®
18.0
®
Flash® Player 15.0
speed on this site: http://www.speedtest.net
9
)
16 System Requirements
Page 17

6. Getting started - Connecting Devices
View your Camera from any
compatible device remotely
MBP843
CONNECT
Wi-Fi® Router
Hubble
Service
How does it work?
When a user tries to access the Camera, our secure server authenticates the
user’s identity and permits access to the Camera.
6.1 Setup
Connect the Camera to the Power Adapter, then plug into an electrical outlet
and make sure the ON/OFF Switch is in the ON position. The Camera must be
within range of the Wi-Fi
®
ro ute r wi th w hic h yo u wa nt t o co nne ct. Mak e su re t he
password of the router is available for entering during the in-app setup process.
Status of LED Indication:
• Pairing and setting up Flashes slowly in red and blue
• Unconnected Flashes slowly in red
• Connected Lights up in blue
• Ready for connection Flashes slowly in blue
Note:
You can only setup via a compatible smartphone or tablet and not via a PC.
ENGLISH
Getting started - Connecting Devices 17
Page 18

6.2 User Account and Camera Setup on Android™ Devices
A1
What you need
• MBP843CONNECT Camera
• Power adapter for the Camera
• Device with Android
6.2.1 Power ON and Connect the Camera
• Connect the power adapter to an electrical outlet and insert the plug into the
micro USB socket on the back of the Camera Unit.
• Make sure that the ON/OFF switch is in the ON position.
• The Camera’s Red LED flashes after the Camera has finished booting. When
you hear one beep, this means that the Camera is ready for setup.
6.2.2 Download Hubble for Motorola Monitors App
• Go to Google Play™ Store to search for "Hubble for Motorola Monitors".
• Download "Hubble for Motorola Monitors" App from Google Play™ Store
and install it on your Android™ device
6.2.3 Run Hubble for Motorola Monitors App on Android™ device
• Ensure that your Android™ device is connected to your Wi-Fi® router.
• Run "Hubble for Motorola Monitors" App, enter your account information,
read through the Terms of Service, then select "I agree to the Terms of Use"
before you tap
Note
If you already have a Hubble App account, please select Already have an
Account? to go to the next step.
TM
system version 4.2 and above
Create
. (Picture A1)
18 Getting started - Connecting Devices
Page 19

6.2.4 Add the Camera to your account
A2
A3
• Tap on the top right corner of the screen to add camera. (Picture A2)
• The following setup instructions will appear on the screen. (Picture A3)
• Plug in and switch on the camera, and wait for a couple of minutes for it to
warm up.
Continue
• Tap
when the Camera LED starts to blink.
ENGLISH
Android™
Getting started - Connecting Devices 19
Page 20

• The following setup instructions will appear on the screen. (Picture A4)
A4
A5
A6
PAIR
• Press and hold the
for 3 seconds. You will then hear a beep tone, followed by a voice prompt
indicating that the Camera is ready for pairing.
• Tap
Continue
.
button on the bottom left edge of the Camera Unit
• The App will automatically search for and connect to your Camera as shown
in the pictures below. (Pictures A5, A6)
• The blue/red color LED on the Camera Unit will flash.
20 Getting started - Connecting Devices
Page 21

• Select your Wi-Fi® Network, enter your password and then tap
A7
A8
A9
A10
(Pictures A7, A8)
Connect
.
ENGLISH
Android™
• It will take a few minutes for the Camera to connect to the Wi-Fi
®
network
before showing the connection status. (Pictures A9, A10)
• If connection fails, please tap
• Tap
View Camera
indicator LED on the Camera Unit will flash in red/blue.
Getting started - Connecting Devices 21
to view the video captured by the Camera Unit. The status
Retry
and repeat the steps starting from 6.2.4.
Page 22

6.3 User Account and Camera Setup on iPhone®/iPad
i1
®
What you need
• MBP843CONNECT Camera
• Power adapter for the Camera
• iPhone
®
/ iPad® with iOS version 7.0 and above
6.3.1 Power ON and Connect the Camera
• Connect the power adapter to an electrical outlet and insert the plug into the
micro USB socket at the back of the Camera.
• Make sure that the ON/OFF switch is in the ON position.
• The Camera's red LED flashes after the Camera has finished booting. When
you hear one beep, this means that the Camera is ready for setup.
6.3.2 Download Hubble for Motorola Monitors App
• Go to App Store to search for "Hubble for Motorola Monitors".
• Download "Hubble for Motorola Monitors" App and install it on your
6.3.3 Run Hubble for Motorola Monitors App on iPhone®/iPad
• Ensure that your iPhone®/iPad® is connected to your Wi-Fi® Router.
• Run the "Hubble for Motorola Monitors" App, enter your account
Note:
If you already have a Hubble App account, please select Already have an
Account? to go to the next step (Picture i1).
®
iPhone
/iPad®.
information, read through the Terms of Service, and then select "I agree to
the Terms of Service" before you tap
Create
. (Picture i1)
®
22 Getting started - Connecting Devices
Page 23

6.3.4 Add the Camera to your account
i2
i3
• Tap on the top right corner of the screen to add camera. (Picture i2)
• The following Bluetooth setup instructions will appear on the screen. (Picture
i3)
ENGLISH
®
iOS
Getting started - Connecting Devices 23
Page 24

• Tap
i4
i5
i6
Settings
and activate Bluetooth on your iPhone®/iPad®. (Pictures i4, i5)
HOME
• Press the
key to return to the home screen, then tap on "Hubble for
Motorola Monitors" App to resume setup.
• The following setup instructions will appear on the screen. (Picture i6)
Note that if Bluetooth is on, you will be brought to this step directly.
• Wait for a couple of minutes for the Camera Unit to warm up and tap
Continue
when the Camera LED indicator starts to blink.
24 Getting started - Connecting Devices
Page 25

• The following will appear on the screen. (Pictures i7, i8)
i7
i8
i9
i10
ENGLISH
®
iOS
• Name the location of your Camera Unit and tap
Getting started - Connecting Devices 25
Continue
. (Pictures i9, i10)
Page 26

• The Camera Unit will search for the Wi-Fi® network (Picture i11) and display
i11
i12
i13
i14
a list of available networks. (Picture i12)
• Select your Wi-Fi
• Enter your Wi-Fi
• It will take a few minutes for the Camera Unit to connect to the Wi-Fi
®
network and tap
®
password and tap
Continue.
Next.
(Picture i14)
(Picture i13)
®
network before showing the connection status. (Pictures i15, i16)
26 Getting started - Connecting Devices
Page 27

• If connection fails, tap
i15
i16
Retry
and repeat the steps starting from 6.3.4.
ENGLISH
®
iOS
View Live Camera
• Tap
LED indicator on the Camera Unit will light up in blue.
Getting started - Connecting Devices 27
to view the video captured by the Camera Unit. The
Page 28

6.4 Camera Functions:
6.4.1 Connecting the Camera Unit to power
• Connect the power adapter to an electrical o utlet a nd inse rt the p lug into the
micro USB socket on the back of the Camera Unit.
• Slide the ON/OFF switch to the ON position. The power indicator LED will
light up in green. (Note: To switch off the device, slide the ON/OFF switch to
OFF.)
• Run the Hubble App on your smart device.
6.4.2 Overview of the Features on Hubble App
Menu • Tap
Photo/Video • Take a photo or record a video from your
Cameras
to access the camera list.
Event Log
• Tap
list that is triggered by Motion or Sound
detection.
• Tap
Account
subscription
Connection Setting
Camera.
• Tap the Video icon
function. Tap and hold the red button
start recording and release to stop.
• Tap the Camera icon
mode. You can capture photos from Camera
view.
Note:
Photos and videos will be stored in the internal
flash memory of your smart device, and can be
accessed via the Gallery or Media Player (Android
Device). To play videos, please use the Hubble
App.
to access the video record
to access user
Plan, Notifications
and
Profile
setting,
About Hubble
,
Remote
to activate Video
to switch to Camera
to
28 Getting started - Connecting Devices
Page 29

Lullaby Tap to access the
the 5 pre-set melodies you wish to play on your
Camera Unit.
Te m p e r a t u r e
Measure
The temperature reading from the temperature
sensor at the back of the Camera Unit will display
on the screen of your Android™ device. The
readings will turn RED if the temperature goes
beyond the High/Low temperature that was set in
your Account.
Melody
menu and select one of
ENGLISH
Two - w a y
communication
Tap to activate the function. Press the round
button
once to speak through the Camera
Unit. Toggle the button again to listen to the audio
feedback from the Camera Unit.
Speaker Tap to toggle speaker on or off.
Pan and Tilt Tap to pan right and left, tilt up and down.
Zoom Slide the scroll bar on the right hand side of the
screen to zoom in or zoom out.
You can also use the pinch-in and pinch-out
gestures to zoom out or zoom in a picture.
To use pinch-to-zoom gesture, your device must
support multi-touch technology.
Getting started - Connecting Devices 29
Page 30

Camera Setting You can change the Camera settings by tapping
on the
• Tap
Settings
Details
icon.
to review Camera Name, Cloud
Subscription, Change Image, Timezone,
Camera Model, Firmware Version and Delete
All Events.
• Tap
Notifications
Detection, Motion Detection and to set Alerts
for High temperature (Up to 33
Low temperature (down to 10
• Tap
Settings
to set the sensitivity of Sound
o
C or 91 oF) /
o
C or 50 oF).
to set Ceiling mount, Brightness
and Volume.
Add Camera Enter Add Camera procedures.
Delete All Events Tap to delete all events.
Select Events Check the box to select recorded event(s).
Edit Events Tap to select and delete event(s).
Delete Events
30 Getting started - Connecting Devices
Tap to delete selected event(s).
Page 31

6.5 Working with PC/Notebook
• Go to https://app.hubbleconnected.com/#login
Enter your
User Name
and
Password
, and then click
Login
if you have already
created an account.
• Click on the Camera list paired in your account via Android™ device or
®
iPhone
/iPad®, and the Camera view will appear on screen. You can easily
stay connected with your favorite people, places and pets with live video
streaming.
• On the website, you can change the
Settings
by following the menu
instructions.
6.6 Procedure for Resetting the Camera
Note: If your Camera is moved from one router (e.g. home) to another (e.g.
office) or you have Camera setup issues, then the Camera must be reset. Please
reset the Camera with the following procedures:
1. Slide the ON/OFF switch to OFF.
2. Press and hold the PAIR button, then slide the ON/OFF switch to ON.
3. Release the PAIR button when you hear a confirmation beep and wait for
the Camera Unit to compete an internal reset procedure. The LED
indicator will turn red and flash slowly when the Camera Unit is reset
successfully.
4. You can add your Camera again by following the steps in section 6.2.4 for
Android
TM
devices or in section 6.3.4 for iOS devices.
ENGLISH
Getting started - Connecting Devices 31
Page 32

7. Disposal of the Device (environment)
At the end of the product life cycle, you should not dispose of
this product with normal household waste. Take this product to
a collection point for the recycling of electrical and electronic
equipment. The symbol on the product, user's guide and/or
box indicates this.
Some of the product materials can be re-used if you take them
to a recycling point. By reusing some parts or raw materials from used products
you make an important contribution to the protection of the environment.
Please contact your local authorities in case you need more information on the
collection points in your area.
Dispose of the battery pack in an environmentally-friendly manner according to
your local regulations.
32 Disposal of the Device (environment)
Page 33

8. Cleaning
Clean your Wi-Fi® Vid eo Ba by Mon itor w ith a sligh tly d amp cl oth or with an ant istatic cloth. Never use cleaning agents or abrasive solvents.
Cleaning and care
• Do not clean any part of the Wi-Fi® Video Baby Monitor with thinners or
other solvents and chemicals - this may cause permanent damage to the
product which is not covered by the warranty.
• Keep your Wi-Fi
sunlight, and do not let it get wet.
• Every effort has been made to ensure high standards of reliability of your Wi-
®
Fi
Video Baby Monitor. However, if something does go wrong, please do
not try to repair it yourself - contact Customer Service for assistance.
IMPORTANT
Always power off and disconnect the power adapter before cleaning your
®
Wi-Fi
Video Baby Monitor.
®
Video Baby Monitor away from hot, humid areas or strong
ENGLISH
Cleaning 33
Page 34

9. Troubleshooting
Display
No display
• Try recharging or replacing the battery pack.
• Reset the units. Disconnect the battery pack of the Parent Unit and unplug
the power supply of both the units, then plug them back in.
• Is the unit turned on?
Press and hold the POWER ON/OFF button
it ON.
• Is the correct camera selected?
Change the camera number, if necessary. See 4.6.2 View a camera.
• Is the video display turned on?
Press the VIDEO ON/OFF button
• When operating using batteries only, the display will go blank after 5, 30 or
60 minutes to save power (depending on the Video On/Off setting. See 3.5
Video ON/OFF). The unit will remain active and emit audio alerts. You can
reactivate the screen by pressing any button.
V to turn it on.
Registration
If the Camera Unit has lost its link with the Parent Unit
• Try recharging or replacing the battery pack.
• The Camera Unit may go out of range if it is too far away. Move the Camera
Unit closer to the Parent Unit.
• Reset the units by disconnecting them from the battery and power supply.
Wait for about 15 seconds before reconnecting. Allow up to one minute for
the Camera Unit and the Parent Unit to synchronize.
• See 2.4 Registration (Pairing), if there is a need to re-register the units.
P on the Parent Unit to turn
34 Troubleshooting
Page 35

Interference
Noise interference on your Parent Unit
• Your Camera and Parent Units may be too close to each other. Move them
farther apart.
• Make sure that there is at least 3 to 6 feet between the 2 units to avoid audio
feedback.
• The Camera Unit may go out of range if it is too far away. Move the Camera
Unit closer to the Parent Unit.
• Make sure that the Camera and Parent Units are not near other electrical
equipment, such as a television, computer or cordless/mobile telephone.
• Use of other 2.4 GHz products, such as wireless networks (Wi-Fi
Bluetooth
product, so keep the Wi-Fi
®
systems, or microwave ovens, may cause interference with this
®
Video Baby Monitor at least 5ft (1.5m) away
from these types of products, or turn them off if they appear to be causing
interference.
• If the signal is weak, try moving the Parent and/or Camera Unit to different
positions in the rooms.
Noise interference on your device
• To avoid background noise or echoes, ensure that there is enough distance
between your device and the Wi-Fi
• Use of other 2.4 GHz products, such as Bluetooth
ovens, may cause interference with this product. Keep the Wi-Fi
Unit at least 5ft (1.5m) away from these types of products, or turn them off if
they appear to be causing interference.
®
Camera Unit.
™
systems or microwave
Lost connection
• Check your Wi-Fi® settings. If necessary, reconnect your Wi-Fi®. Ensure that
®
the Wi-Fi
Camera Unit is switched ON. Wait a few minutes to make the
connection with the Wi-Fi
®
system.
If you forgot your password
• If you do not remember your password, tap
e-mail address. A new password will be sent to your e-mail address
immediately.
Forgot Password
®
routers),
®
Camera
and submit your
ENGLISH
Troubleshooting 35
Page 36

Troubleshooting for Wi-Fi® Internet Viewing
Category Problem
Description / Error
Account I am unable to login
even after registration.
Account I receive an error
message saying: "Email
ID is not registered".
Account What do I do if I forget
my password?
Please check your user name and
password.
Please ensure that you have
registered with us. Tap Create
Account to create an account.
Click on the "Forgot Password" link on
https://app.hubbleconnected.com/
#lostpassword OR on your Android™
or iOS application. An email will be sent
to your registered email address.
Account I am unable to receive a
1. The e-mail might have been sent
new password although
I have used the "Forgot
2. There might be a delay in getting
1. Please try again in a few minutes.
Connectivity
Issues
password" option.
I get a message: We
are having problems
accessing your
Camera. This could be
due to the lack of an
2. If the problem remains, please
internet connection.
Please wait and try
again later.
3. Please restart your Wireless
Solution
to your Junk Mail Folder. Please
check your Junk Mail Folder.
your e-mail. Please wait a few
minutes and refresh your email
account.
This could be because of any
issue with your internet
connection.
restart your Camera to check if
this fixes the problem.
Rout er.
36 Troubleshooting
Page 37

Viewing
Camera
When I am in "remote
mode", the video stops
after 5 minutes. How
do I view for longer?
Features The sound alert setting
threshold is not right.
Setting Up While I am adding a
new Camera to my
account, I am not able
to find any Cameras to
add.
General What are the
supported browsers for
accessing from my PC/
Mac?
When you are accessing your Camera
via a network different from your
home network (over the internet) your
video times out after 5 minutes.
You can click on the Camera again
from the Android™/iOS application
to start streaming again.
If you are accessing from your webbrowser, then you can press on the
Reloa d button to start viewing your
Camera video stream again.
You can Adjust Sound Sensitivity to
trigger notifications under Camera
Setting menu.
If you are trying to add a Camera
which has previously been added into
your account or another account, you
will first have to reset the Camera. This
can be done by pressing and holding
the PAIR button at the bottom of the
Camera for 5 seconds.
We recommend using Google
Chrome 24 or above. However the
following browsers are also supported:
Internet Explorer 9.0 or above (for PC),
Safari 6.0 or above (for Mac) or Firefox
18.0 or above (both PC or Mac).
ENGLISH
Troubleshooting 37
Page 38

General What is the
significance of LED
flashing?
Connectivity
Issues
I am not able to access
my Camera.
Setting Up During setup on
devices for Android™
and iOS, I am not able
to find my Camera
during the last step and
the setup fails.
A flashing LED indicates the following
status:
Slow flashing: 1. Your Camera is in
setup mode. You can add the Camera
to your account in this mode. Out of the
box, the Camera is in Setup mode. To
reset to Setup mode, press and hold the
PAIR button on the bottom of the
Camera untill you hear a beep.
Slow flashing: 2. The Camera is either
connecting to the router or has lost the
link to the router. Please ensure that the
Camera is in the Wi-Fi
LED is stable:
connected to the Wi-Fi
Please check if the Camera is within
®
Wi-Fi
ra nge . If the LED on y our Cam era
®
signal range.
The Camera is
®
network.
is flashing slowly, please try to move the
Camera closer to the router for better
®
Wi-Fi
connectivity and try again.
Please reset the Camera to setup
mode and try again. Press and hold
the PAIR button on the bottom of the
Camera untill you hear a beep. Wait
for a minute for the Camera to restart.
When the Camera LED is flashing, this
indicates that it is in setup mode. Now
restart the setup from your smartphone
again.
38 Troubleshooting
Page 39

Connectivity
Issues
Even though I am
accessing my Camera
from the same Wi-Fi
®
network, I still find my
Camera is shown as
remote. I can only
access it for 5 minutes
at a time.
Camera When I try to view the
Camera, I get a prompt
for Camera firmware
upgrade. What should I
do?
General Which platforms are
supported for
accessing my Camera?
General I do not hear any sound
when I am accessing a
remote Camera.
Please check your wireless router
settings. For example, for Buffalo
brand routers there is an option called
Wireless Isolation. Please disable this
option.
Please upgrade your firmware. This
takes around 5 minutes. We push
upgrades from time to time to
improve Camera features.
Minimum requirement:
Windows 7*
*Java browser plug-in needed
®
Mac OS
Chrome™ version 24
Internet Explorer
Safari
Java™ version 7
Firefox
Adobe
Android™ 4.2
iPhone
version 10.7
®
®
version 6
®
version 18.0
®
Flash® Player 15.0
®
/iPad® iOS version 7.0
version 9
You can tap on the speaker icon in the
video stream screen to hear audio. By
default the audio is not ON when you
are accessing a remote Camera.
ENGLISH
Troubleshooting 39
Page 40

General What is the meaning of
"Local Camera" and
"Remote Camera"?
General How do I download the
App for Android™ and
iOS devices?
Setting up When the video is cut
off, the application
attempts to reconnect
and this results in lost
sound and choppy
video.
When you are accessing your Camera
from the same wireless network (Home)
in which it is configured,
it is a Local Camera. When you are
accessing your Camera away from your
home it is a Remote Camera. You may
be using 3G, 4G or 4G LTE or a Wi-Fi
connection outside of your home.
Android™:
- Open the Google Play Store on
your Android™ device.
- Select Search
- Type in "Hubble for Motorola
Monitors"
- The results will show the Hubble
App
- Select to install it
iOS Device:
- Open the App Store
SM
- Select Search
- Type in "Hubble for Motorola
Monitors"
- The results will show the Hubble
App
- Select to install it
You will need to turn off the Auto Lock
function of your device to ensure
continuous video/audio streaming.
40 Troubleshooting
Page 41

Features How many users can
access the Camera at
one time?
Connectivity
issues
I found interference
caused by my other
webcam devices.
If you are accessing in Local Mode,
two users are supported, after two
users all streaming will go through the
remote server. This allows for
unlimited user access to a single
Camera at one time.
Video streaming performance is
related to internet bandwidth,
especially if you have 2 or more video
streaming devices that are working
through the same router.
ENGLISH
Troubleshooting 41
Page 42

10. General Information
If your product is not working properly...
1. Read this User's Guide or the Quick Start Guide.
2. Visit our website: www.motorolamonitors.com
3. Contact Customer Service at
US and Canada 1-888-331-3383
Email: support@motorolamonitors.com
To order a replacement battery pack for parent Unit, contact customer service.
Consumer Products and Accessories Limited Warranty
("Warranty")
Thank you for purchasing this Motorola branded product manufactured under
license by Binatone Electronics International LTD ("BINATONE")
What Does this Warranty Cover?
Subject to the exclusions contained below, BINATONE warrants that this
Motorola branded product ("Product") or certified accessory ("Accessory") sold
for use with this product that it manufactu red to be free from defects in materials
and workmanship under normal consumer usage for the period outlined below.
This Warranty is your exclusive warranty and is not transferable.
Who is covered?
This Warranty extends only to the first consumer purchaser, and is not
transferable.
What will BINATONE do?
BINATONE or its authorized distributor at its option and within a commercially
reasonable time, will at no charge repair or replace any Products or Accessories
that do not conform to this Warranty. We may use functionally equivalent
reconditioned/ refurbished/ pre-owned or new Products, Accessories or parts.
42 General Information
Page 43

What Other Limitations Are There?
ANY IMPLIED WARRANTIES, INCLUDING WITHOUT LIMITATION THE
IMPLIED WARRANTIES OF MERCHANTABILITY AND FITNESS FOR A
PARTICULAR PURPOSE, SHALL BE LIMITED TO THE DURATION OF THIS
LIMITED WARRANTY, OTHERWISE THE REPAIR OR REPLACEMENT
PROVIDED UNDER THIS EXPRESS LIMITED WARRANTY IS THE EXCLUSIVE
REMEDY OF THE CONSUMER, AND IS PROVIDED IN LIEU OF ALL OTHER
WARRANTIES, EXPRESS OR IMPLIED. IN NO EVENT SHALL MOTOROLA OR
BINATONE BE LIABLE, WHETHER IN CONTRACT OR TORT (INCLUDING
NEGLIGENCE) FOR DAMAGES IN EXCESS OF THE PURCHASE PRICE OF
THE PRODUCT OR ACCESSORY, OR FOR ANY INDIRECT, INCIDENTAL,
SPECIAL OR CONSEQUENTIAL DAMAGES OF ANY KIND, OR LOSS OF
REVENUE OR PROFITS, LOSS OF BUSINESS, LOSS OF INFORMATION OR
OTHER FINANCIAL LOSS ARISING OUT OF OR IN CONNECTION WITH THE
ABILITY OR INABILITY TO USE THE PRODUCTS OR ACCESSORIES TO THE
FULL EXTENT THESE DAMAGES MAY BE DISCLAIMED BY LAW.
Some jurisdictions do not allow the limitation or exclusion of incidental or
consequential damages, or limitation on the length of an implied warranty, so
the above limitations or exclusions may not apply to you. This Warranty gives
you specific legal rights, and you may also have other rights that vary from one
jurisdiction to another.
ENGLISH
General Information 43
Page 44

Products Covered Length of Coverage
Consumer Products One (1) year from the date of the
products original purchase by the first
consumer purchaser of the product.
Consumer Accessories Ninety (90) days from the date of the
accessories original purchase by the first
consumer purchaser of the product.
Consumer Products and Accessories
that are Repaired or Replaced
The balance of the original warranty or
for ninety (90) days from the date
returned to the consumer, whichever is
longer.
Exclusions
Normal Wear and Tear. Periodic maintenance, repair and replacement of parts
due to normal wear and tear are excluded from coverage.
Batteries. Only batteries whose fully charged capacity falls below 80% of their
rated capacity and/or batteries that leak are covered by this Warranty.
Abuse & Misuse. Defects or damage that result from: (a) improper operation,
st orag e, mi suse or a buse , acc ide nt or negl ect, suc h as p hysi cal dama ge (c rack s,
scratches, etc.) to the surface of the product resulting from misuse; (b) contact
with liquid, water, rain, extreme humidity or heavy perspiration, sand, dirt or the
like, extreme heat, or food; (c) use of the Products or Accessories for
commercial purposes or subjecting the Product or Accessory to abnormal
usage or conditions; or (d) other acts which are not the fault of MOTOROLA or
BINATONE, are excluded from coverage.
Use of Non-Motorola branded Products and Accessories. Defects or damage
that result from the use of Non-Motorola branded or certified Products or
Accessories or other peripheral equipment are excluded from coverage.
44 General Information
Page 45

Unauthorized Service or Modification. Defects or damages resulting from
service, testing, adjustment, installation, maintenance, alteration, or
modification in any way by someone other than MOTOROLA, BINATONE or its
authorized service centers, are excluded from coverage.
Altered Products. Products or Accessories with (a) serial numbers or date tags
that have been removed, altered or obliterated; (b) broken seals or that show
evidence of tampering; (c) mismatched board serial numbers; or (d)
nonconforming or non-Motorola branded housings, or parts, are excluded from
coverage.
Communication Services. Defects, damages, or the failure of Products or
Accessories due to any communication service or signal you may subscribe to
or use with the Products or Accessories is excluded from coverage.
How to Obtain Warranty Service or Other Information?
To obtain service or information, please call:
US and Canada 1-888-331-3383
Email: support@motorolamonitors.com
You will receive instructions on how to ship the Products or Accessories at your
expense and risk, to a BINATONE Authorized Repair Center.
To obtain service, you must include: (a) the Product or Accessory; (b) the
original proof of purchase (receipt) which includes the date, place and seller of
the Product; (c) if a Warranty card was included in your box, a completed
Warranty card showing the serial number of the Product; (d) a written
description of the problem; and, most importantly; (e) your address and
telephone number.
These terms and conditions constitute the complete warranty agreement
between you and BINATONE regarding the Products or Accessories purchased
by you, and supersede any prior agreement or representations, including
representations made in any literature publications or promotional materials
issued by BINATONE or representations made by any agent, employee or staff
of BINATONE, that may have been made in connection with the said purchase.
ENGLISH
General Information 45
Page 46

FCC and IC regulations
FCC Part l5
NOTE: This equipment has been tested and found to comply with the limits for
a Class B digital device, pursuant to Part 15 of the Federal Communications
Commission (FCC) rules. These limits are designed to provide reasonable
protection against harmful interference in a residential installation. This
equipment generates, uses and can radiate radio frequency energy and, if not
installed and used in accordance with the instructions, may cause harmful
interference to radio communications. However, there is no guarantee that
interference will not occur in a particular installation. If this equipment does
cause harmful interference to radio or television reception, which can be
determined by turning the equipment off and on, the user is encouraged to try
to correct the interference by one or more of the following measures:
• Reorient or relocate the receiving antenna.
• Increase the separation between the equipment and receiver.
• Connect the equipment into an outlet on a circuit different from that to
which the receiver is connected.
• Consult the dealer or an experienced radio/TV technician for help.
Changes or modifications to this equipment not expressly approved by the
party responsible for compliance could void the user’s authority to operate the
equipment.
This device complies with Part 15 of the FCC rules. Operation is subject to the
following two conditions: (1) this device may not cause harmful interference,
and (2) this device must accept any interference received, including
interference that may cause undesired operation. Privacy of communications
may not be ensured when using this device.
To ensure the safety of users, the FCC has established criteria for the amount of
radio frequency energy that can be safely absorbed by a user or bystander
according to the intended usage of the product. This product has been tested
and found to comply with the FCC criteria. The Camera Unit shall be installed
and used such that parts of the user’s body other than the hands are maintained
at a distance of approximately 8 inches (20 cm) or more.
46 General Information
Page 47

This Class B digital apparatus complies with Canadian ICES-003.
CAN ICES-3(B)/NMB-3(B).
WARNING
Changes or modifications to this equipment not expressively approved by the
party responsible for compliance could void the user’s authority to operate the
equipment.
The socket-outlet shall be installed near the equipment and shall be easily
accessible.
Industry Canada
This device complies with Industry Canada licence-exempt RSS standard(s):
Operation is subject to the following Two conditions:(1) this device may not
cause interference, and (2) this device must accept any interference, including
interference that may cause undesired operation of the device.
The term "IC: " before the certification/registration number only signifies that
the Industry Canada technical specifications were met. This product meets the
applicable Industry Canada technical specifications.
Le présent appareil est conforme aux CNR d’Industrie Canada applicables aux
appareils radio exempts de licence. L’exploitation est autorisée aux deux
conditions suivantes : (1) l’appareil ne doit pas produire de brouillage, et (2)
l’utilisateur de l’appareil doit accepter tout brouillage radioélectrique subi,
même si le brouillage est susceptible d’en compromettre le fonctionnement.
ENGLISH
General Information 47
Page 48

11. Technical Specifications
Camera Unit
®
Wi-Fi
Image sensor Color CMOS 1M Pixels
Lens f = 2.3 mm, F = 2.4
IR LED 8 pcs
Power Adapter: Ten Pao International Ltd.
802.11 b/g/n
S009GU0500150
Input: 100-240V AC, 50/60Hz, 300mA
Output: 5V DC, 1500mA
48 Technical Specifications
Page 49

Parent Unit
Frequency 2.4 GHz to 2.48 GHz
Display 3.5" diagonal TFT LCD
Display color 16.7M color LCD
Brightness control 8 steps
Volume control 8 steps
Power Adapter: Ten Pao International Ltd.
S003IU0500060; Input: AC100-240V,
50/60Hz 150mA; Output: DC5V, 600mA
WARNING
Use only the supplied power adapter.
Battery: GPI GPRHCH93C021 Ni-MH AAA 3.6V
900mAh rechargeable battery pack
Do not use non-rechargeable batteries for the Parent
Unit. Risk of explosion if battery is replaced by an
incorrect type. Dispose of used batteries according to
the instructions.
Specifications are subject to change without prior notice.
ENGLISH
Technical Specifications 49
Page 50

Manufactured, distributed or sold by Binatone Electronics International
LTD., official licensee for this product. MOTOROLA and the S tylized M logo
are trademarks or registered trademarks of Motorola Trademark Holdings,
LLC. and are used under license. Apple logo and Safari are trademarks of
Apple Inc., registered in the U.S. and other co untries. App Store is a service
mark of Apple Inc. Google Play, Android, and Chrome are trademarks of
Google Inc. Wi-Fi is a trademark of the Wi-Fi Alliance. Internet Explorer and
Windows are trademarks of the Microsoft group of companies. Firefox is a
registered trademark of the Mozilla Foundation. Adobe and Flash are either
registered trademarks or trademarks of Adobe Systems Incorporated. Java
is a registered trademark of Oracle and/or its affiliates. All other trademarks
are the property of their respective owners. © 2015 Motorola Mobility LLC.
All rights reserved.
US_EN Version 3.0
Printed in China
 Loading...